creative stonesetting - tim mccreight, brynmorgen press€¦ · · 2012-09-25creative...
TRANSCRIPT

CreativeStonesetting
John Cogswell
brynmorgen pressportland, maine

All rights reserved. No part of this publication may be reproduced or transmitted in any form or by any means, electronic or mechanical, including photocopying, recording, or any storage and retrieval system except by a reviewer who wishes to quote brief passages in connection with a review written for inclusion in a magazine, newspaper, web posting, or broadcast.
ISBN 978-1-929565–22–1
Printed in Hong Kong
Third printing
Copyright 2008Brynmorgen Press
Drawings John CogswellBook design Tim McCreightEditing Tim McCreight Abby JohnstonProofreading Lois K. EdwardsIndex Jamie Kingman-Rice
Designs of all the jewelry shown in this book belong to the artists.
Preceding pageWilliam Richey, RingPlatinum, gold, diamonds, topaz
EndpapersSelection of settings made by the author.
For ordering and permissions, visit www. brynmorgen.com

Introduction
1 Getting Ready 9
2 Tools, Supplies, and Equipment 15
3 Bezel Settings 35
4 Prong Settings 87
5 Graver Settings 117
6 Gypsy Settings and Flush-Mount Settings 151
7 Beads, Pearls, and Gem Balls 173
8 Tension Settings 187
Appendix 196
Index 205
CREATIVE STONESETTING
Ronna Lugosch | Ring Yellow and white diamonds, 18k yellow gold, platinum. Photo: Ronn Orenstein

6 | creative stonesetting
Acknowledgements
I wish to thank my incredible wife, Barbara, for her unwavering support and assistance with this project (as well as a much-needed kick in the butt on more than one occasion). I cannot even begin to thank Tim McCreight enough for his oft-tested patience, understanding, and en-couragement. Thanks to Barbara Kuhlman (now deceased, but always in my heart) for helping me to start down the path of this life I so love, to my wonderful teacher, mentor, and friend, Kurt Matzdorf, for
believing in me, inspiring me and sharing all he knew with me. Thanks to Bob Eb-endorf for his inspiration and support, and for introducing me to the workshop circuit. Finally, thank you, thank you, thank you to all of the incredible stu-dents, both college and workshop, with whom I have trial-tested all of this mate-rial over the past three decades. We have all worked hard and played hard. This is for you all, with much love.
Susan Jo Klein | Munsteiner Necklace photo: Peter Groesbeck 18k gold, carved amethyst, brown diamond. Center link, 4"

introduction | 7
Introduction
In the competitive and highly specialized world of commercial jewelry, technical in-formation is as valued a commodity as pre-cious metals and stones—and is as closely guarded, too. Within this community, there is a widely held (mis)belief that divulging trade secrets is on a par with the illicit traf-ficking of documents relating to national security. The sadly mistaken notion that mere possession of technical information somehow confers an advantage has bred an atmosphere of silence and secrecy. Each fellow practitioner is viewed suspiciously as a competitor, which stifles discussion and sharing of mutual professional con-cerns and aesthetic issues. The attitude literally slows the wheels of progress. Each individual is left to reinvent the wheel, so to speak. We all use the same tools and techniques; it is what we do with them that establishes our individuality. Sharing information is a good thing. When you know how to do something, you often just do it automatically, without much thought. When you have to explain to someone else
what, how, and why you do what you do, it forces you to think about your work, and the more you think about your work, the better it gets. It is in the spirit of sharing that I offer this material on stonesetting, my way. I decided to write this book for two main reasons. The first involves an issue of social responsibility; I am one link in a social order, a metalsmithing tradition, that stretches back to the dawn of human civilization, and which will, I hope, stretch even further into the future. As workers in precious metal, we are—every one of us—stewards of our profession, privileged with the gift of information handed down to us (traditionally, mostly by word of mouth), perhaps adding a little something to it, and then passing it on. With privilege comes responsibility, and this gift of knowledge is actually less a gift than a loan. Though it’s ours to use for the brief time allotted to us, it is incumbent on each of us to pass what we know along to others. I take this responsibility seriously.

I was fortunate to have had excellent teachers and instruction as a student. Now I teach, and try to pass along the lore and wisdom that was entrusted to me. However, there is a severe limitation on the number of people I can reach directly, in person. Dimming eyesight, graying hair and a gradually increasing assortment of minor aches and pains leads me to suspect that I won’t be able to teach one on one forever. So here I sit, hunting and pecking, a one-fingered keyboard wonder. It is my hope that this book will reach a larger au-dience, and for longer than I can. My second reason for writing this book is simple: perceived need. I have long noted, with some degree of surprise and chagrin, that there seems to be a dearth of written information that deals specifically, in any depth, with creative stonesetting. By creative stonesettings, I mean unique, orig-inal settings designed and fabricated from scratch. There are many jewelry books that describe simple settings like the basic bezel, but they seldom explore the range of possibilities. Most leave the topic of ston-esetting at that plain thin band of metal, and for too many people that’s where the lesson ends. There are also a number of technical manuals that describe step-by-step techniques for mounting stones in commercial settings. These are well suited for trade jewelers, but they are of limited use to most studio craftspeople. When commercially manufactured settings are well-made and properly used, they do what settings are supposed to do: hold stones. Because they are churned out by the thousands, they have a built-in anonymity that stems from their mass-produced ‘look-alike-ness.’ More often than not, when we use them in original, handcrafted work, they look like tacked-on afterthoughts—functional, perhaps,
but bland and featureless. They lack any correlation to the design of the piece on which they are mounted. Your commer-cial settings look just like everyone else’s, and this lessens the visual impact of your work. Anyone with competent soldering and fabrication skills can make the settings described in this book. Having the ability to create unique settings that are integral to a design greatly expands options and possibilities. You won’t be restricted to the standard range of sizes and shapes com-mercially available. You can create settings for stones of any shape or size. And, there are other ancillary benefits, as well. As I say to my students: “More different is often more better.” Creative, innovative settings invite second looks. They add interest and freshness to your work. Also, in the process of learning how to assemble the settings described in these pages, I guaran-tee that your manual, technical, and design skills will improve. When you can solder the ten solder joints of a basic four-prong basket setting—all with hard solder and all within a space no larger than a pea—all of your other soldering jobs will be a breeze. Although the focus of this book is on stonesetting, it necessarily involves some practical information about gemstones. I do not plan to delve into gemology, miner-alogy, or lapidary beyond a brief discussion of pertinent issues. Though these three areas of study are related to stonesetting, they require more attention than I can give them here. Fortunately, each area is well covered in its own literature. I encourage you to acquaint yourself with the various gemstones and their properties. You’ll find that a basic knowledge of gem materials will come in handy in both the market-place and the studio. Now it’s time to get started. Let’s set stones!
8 | introduction

getting ready | 9
As mentioned earlier, a full description of lapidary or mineralogy is beyond the scope of this book, but it is important for jewelers to have a practical understanding of char-acteristics pertinent to stonesetting. It will be useful to establish a common vocabulary of terms that will be used throughout the book. Let’s start with some basic nomen-clature and practical considerations specif-ic to stonesetting. For example, stones that do not depend on the introduction of light are customarily set in solid bezels, while those that benefit from light are usually set in more open structures like prong settings. However, this “white wine with poultry, red wine with meat” approach has more to do with convention than practicality or ne-cessity. Since virtually all light that enters any stone does so from the top, any cut of stone can be set in any kind of setting that will hold it securely and attractively. That’s useful to know. It is also important to know the parts of a stone, and some characteris-tics that may help you in the design of an appropriate setting.
Alan Perry | Commitment Ring 18k gold, amethyst, tourmaline, boulder opalphoto: Robert Diamante
Chapter One
Getting Ready

base meet, is called the girdle. Most cabo-chons are opaque (impenetrable to light), or translucent (allowing some light to pass through). Transparent stones are rarely cut as cabochons and are more likely to be cut as faceted stones to take advantage of the illumination and reflection that results from penetration of, and interaction with, light.
Gemstone TerminologyCabochons Cabochons are polished gemstones with smooth, rounded tops (the crown, or dome) and flat bases. Some cabochons may be flat on both top and bottom sur-faces (called buff-top) and some may have two rounded surfaces (called double, or double-domed cabochons). The outer pe-rimeter of the cabochon, where crown and
Cabochons are available in a variety of profiles.
Parts of a faceted stone.
10 | getting ready
Hughes-Bosca | Citrine Earrings with Citrine Drops18k gold, citrines, diamonds. 2" tall. photo: Dean Powell
crown or dome
girdle
base
standard high dome low dome buff-top double bullet tongue

The proper names for parts of a faceted gem.
Standard shapes of faceted stones.
getting ready | 11
Faceted Faceted stones have reflective planes arranged in specific configurations to enhance the brilliance of a gemstone. The flat facet at the top of the stone, parallel to the plane of the girdle, is called the table. The faceted tip at the base of the pavilion is called the culet. Far and away the gems most often cut as faceted stones are trans-parent, but occasionally translucent and opaque stones are faceted.
Stuart Cathey | LV Ring18k gold, quartzphoto: Robert Diamante
girdle
table
facet
girdle
pavilion
crown
culet
crown pavilion
round oval baguette cushion marquise octagon pear triangular (emerald)

MOHS SCALEof Hardness
Any given gem can be described in terms of its physical properties. Over the millennia, specific terminology and standards have been developed for these descriptions.Hardness refers to a gemstone’s resistance to abrasion. The comparative hardness of gem materials is measured on a scale that rates materials from 1 to 10, on which diamonds (10) are hardest and talc (1) is softest. The scale bears the name of its inventor, the 19th century geologist, Frederick Mohs. Most familiar gems have a hardness of 6 or greater, allowing them to take, and maintain, a polished surface. However, some softer organic materials like amber, coral, jet, and pearls are used as gemstones because of their unique color, luster, or rarity, or because they can be carved into ornamental gems. Examples of these gem materials include shell cameos and carved ivory.
Luster describes the visual quality of pol-ished surfaces. The harder the stone, the higher the polish it will accept. The polish of soft gem materials are described as waxy, or greasy. Harder gems are described as vit-reous (i.e., glass-like), and the hardest gems are called adamantine (diamond-like).
Cut refers to three separate issues: • style (e.g., cabochon, faceted)• silhouette shape (e.g., round, oval, pear, marquise, etc.)• the quality of the workmanship
Is the stone lopsided? Is the girdle uneven? Too thick? Too thin? Are the facets dis-tributed unevenly? Is the surface poorly polished?). The third consideration is ob-viously open to subjective analysis, and it has a lot to do with a stone’s value, both market and aesthetic. Relevant to our con-cerns here, the quality of workmanship can also create problems when it comes time to set a gemstone. Uneven, asymmet-rical, and otherwise poorly cut stones are more difficult to set than precisely geomet-
mineral common gem materials
10 diamond diamond9 corundum ruby, sapphire8 topaz emerald, aquamarine topaz, spinel7 quartz amethyst, citrine, tourmaline6 orthoclase jade, opal, moonstone, turquoise5 apatite malachite4 fluorite jet 3 calcite pearl, coral2 gypsum amber, ivory1 talc
ric stones. An experienced setter knows to examine a gem carefully for cutting quality before beginning any job.
Color describes the hue of a stone—whether it is red or green or blue—but there is more to it than that. Color also includes these factors:
• depth or intensity (e.g., pale blue, dark red, deep purple, etc.)
• quality and distribution (e.g., uniform, zoned, cloudy, etc.)
• tone or shade (e.g., grass green, blood-red, etc.)
There is a tremendous range of variation in color, and subtle differences can greatly affect the value of a stone. A grass-green beryl of reasonable clarity is a very valuable emerald; a pale green or bluish-green beryl of comparable quality is a significantly less expensive aquamarine. To further confuse the unwary, many stones are routinely enhanced by being dyed, heat-treated, ir-radiated, or altered with lasers to improve
12 | getting ready
Durability and Stability are characteristics that define a gem’s ability to withstand stress (like the force on a stone when it is being set). This is different from hardness. The presence of flaws or inclusions and inherent characteristic tendencies play a role here. Opals are reasonably hard, but they are quite fragile because of the mil-lions of internal cracks and crevices. By contrast, jade has equal hardness but it is very tough because of its fibrous structure. Emeralds, though quite hard, are as brittle as they are beautiful. Some stones are dyed, heat-treated or irradiated to change or clarify their color, and if subjected to heat again, they may shift in color. Other gems are unaffected by high temperatures and can be soldered or cast in place. A little homework comes in handy here. Conduct a bit of research on each variety of stone
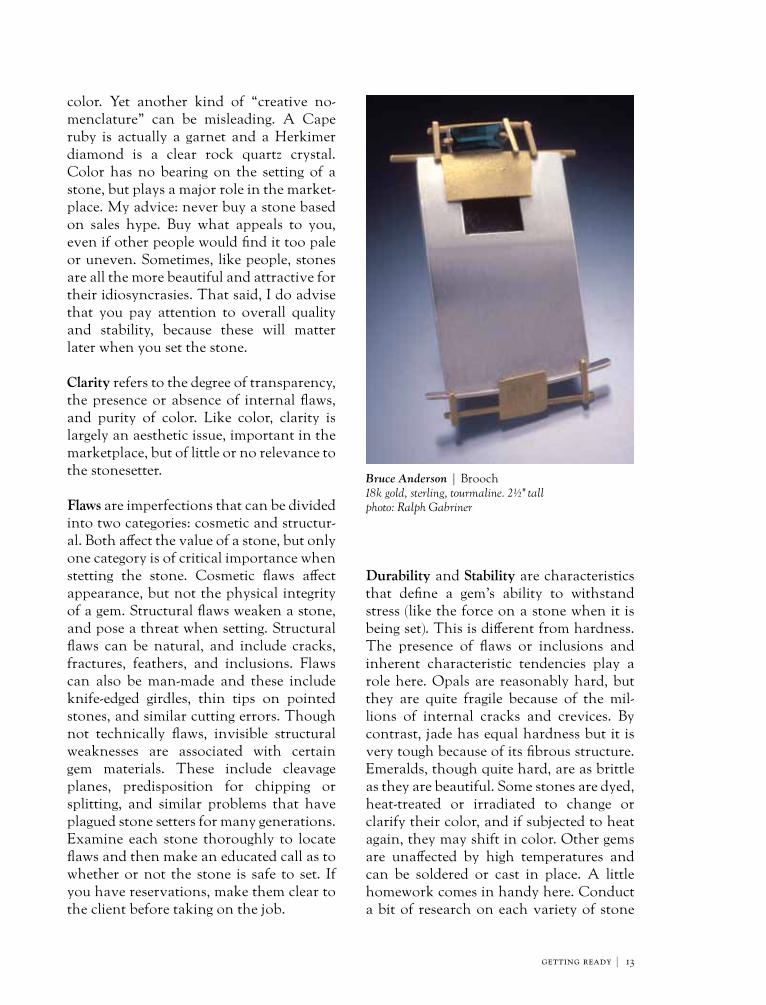
Bruce Anderson | Brooch18k gold, sterling, tourmaline. 2½" tall photo: Ralph Gabriner
color. Yet another kind of “creative no-menclature” can be misleading. A Cape ruby is actually a garnet and a Herkimer diamond is a clear rock quartz crystal. Color has no bearing on the setting of a stone, but plays a major role in the market-place. My advice: never buy a stone based on sales hype. Buy what appeals to you, even if other people would find it too pale or uneven. Sometimes, like people, stones are all the more beautiful and attractive for their idiosyncrasies. That said, I do advise that you pay attention to overall quality and stability, because these will matter later when you set the stone.
Clarity refers to the degree of transparency, the presence or absence of internal flaws, and purity of color. Like color, clarity is largely an aesthetic issue, important in the marketplace, but of little or no relevance to the stonesetter.
Flaws are imperfections that can be divided into two categories: cosmetic and structur-al. Both affect the value of a stone, but only one category is of critical importance when stetting the stone. Cosmetic flaws affect appearance, but not the physical integrity of a gem. Structural flaws weaken a stone, and pose a threat when setting. Structural flaws can be natural, and include cracks, fractures, feathers, and inclusions. Flaws can also be man-made and these include knife-edged girdles, thin tips on pointed stones, and similar cutting errors. Though not technically flaws, invisible structural weaknesses are associated with certain gem materials. These include cleavage planes, predisposition for chipping or splitting, and similar problems that have plagued stone setters for many generations. Examine each stone thoroughly to locate flaws and then make an educated call as to whether or not the stone is safe to set. If you have reservations, make them clear to the client before taking on the job.
getting ready | 13

as you buy it. Over time, you will compile a working knowledge of stone lore. You’ll learn what to look for as well as what to look out for.
Design ConsiderationsWhen you set out to design and fabricate a setting, there are functional and aesthetic factors to consider. The primary function of a good setting is to securely hold and to protect a stone in the environment for which it is designed. For example, a setting for a pendant is not subjected to the same rigorous wear as a setting on a ring, so the pendant might be designed with a more del-icate structure. On the other hand, burying a stone in a massive setting, though secure, would overwhelm the stone. The second design imperative is to display the stone
to advantage, enhancing its beauty. The third element is the design integration of the setting and the piece on which it will be set. These three considerations go hand in hand and should be addressed simultane-ously. It is never, “First, I’ll make the piece of jewelry. Next, I’ll design a beautiful setting. Then, I’ll figure out how to make it secure. And finally, I’ll figure out how to put the two together.” Always strive to design a secure, attractive setting that will integrate with, and be an essential element of, the overall design of the piece. The visual appearance of a setting will be determined by its safety, security, display, and location. I personally find it useful to make a mental checklist of the things I need to consider within each of the three categories.
14 | getting ready
Functional/Physical Considerations•What is the specific environment of the setting—ring, pin, pendant, etc.?•Is the setting appropriate for this environment and will it stand normal wear?•Does the stone require special safety or setting consideration? Is it brittle or
fragile?•Does the stone have flaws, inclusions, or fractures?•Is the stone hard and durable enough for the intended application?•Does the cut of the stone necessitate special design consideration? Is it deep, or
is the girdle liable to chip because it is too sharp?•Will the setting snag? Poke? Be uncomfortable to wear?•Will the physical design of the setting, or its final location, cause problems
when it is time to set the stone?
Aesthetic Considerations•What type of setting will it be? Prong? Bezel? Graver set?•What will it look like?•Can the setting be decorated or stylized? Can I add appliqués or embellish-
ments? Can I cut away selected areas to visually lighten the setting?•Will the design of the setting enhance the stone and display it to advantage?•Is the setting interesting? Unique?
Overall Design Integration•Will the setting fit in with the design of the rest of the piece, or will it look like
a tacked on afterthought?•Is the choice of stone, or its color, pattern, shape, or size significant to the design
of the overall piece, or is this stone an arbitrary addition? Will a different stone, size, cut, color be better?

If you have reached the point where you are ready to consider adding stonesettings to your jewelry pieces, you probably have already accumulated many of the tools and supplies needed for fabrication and setting. The incorporation of stones is as old as the history of jewelry itself, and until the advent of machine technology, all settings were completely constructed and set with only a few simple hand tools. In many places around the world this is still the case, and it remains a viable option for us, too. However, the widespread avail-ability of specialized tools and accessories (i.e., stonesetting burs, flexible shafts, and optical magnifiers) makes our work faster and easier. I am not suggesting that you run out and purchase everything on the following list of items, though the suppli-ers would certainly love it, and I know that most of us are avid tool collectors. Instead, I suggest that you add items to your collec-tion as needed. When you know you need a specific tool or accessory, buy it.
One additional bit of advice: many of these tools are available in varying quali-ties and prices. Always shop carefully, and look for the best quality and best value. Get your money’s worth. Especially in the case of the essential triumvirate of every jeweler’s tool kit: saw, file, and pliers, these should be the very best you can afford. They will render superior service, outlast cheaper look-alikes many times over, and they will just plain feel good in your hand. And, hey, don’t you really deserve the best? The items on the following list reflect my personal preferences and recommenda-tions. Some of these items require modifi-cation or special preparation before they’re ready to use. In most cases, I will explain how to make these alterations, in detail, in the chapters where their usage is discussed. I have also separated these items into two categories: Essential and Optional.
Chapter 2
Tools, Supplies, and Equipment
tools, supplies & equipment | 15

Essential ToolsBezel Pusher This tool is simply a flat-ended metal rod mounted in a wooden handle. It is used to compress a bezel against a stone. Because the same tool is used to push prong tips over the girdle of a faceted stone, it is synonymously called a prong pusher. For the sake of clarity, I will simply stick with “bezel pusher.” Though this tool can be used as purchased, I find that a simple modification increases its efficiency. This modification is described in Chapter 3, Bezels.
BurnisherBurnishers are used most often for rubbing out marks left on bezels from setting (i.e., pusher marks, filing and sanding scratches, etc.), and, to a lesser degree, for burnishing a rim of metal over the girdles of flush-mounted stones. Standard commercial burnishers (straight or curved) are used for the former, and homemade burnishers are used for the latter. The procedure for making these special homemade burnishers is described in Chapter 6, Flush Mounts.
BursBurs for stonesetting come in many silhou-ette shapes (bearing, Hart, ball, etc.) and qualities (i.e., carbon steel, vanadium steel, high speed steel). Though generally offered in (rather expensive) sets of graduated sizes, burs of virtually any size and style can be purchased individually. This allows you to buy only the burs you need, assembling an assortment gradually. Different types of burs and their specific usage are discussed throughout the book. Before you rush out and buy a set of burs, make sure you know exactly what you need. Read first, buy later. One other consideration: burs are of use only when you have some means of rotating them to realize their cutting poten-
Hughes-Bosca | Rings18k gold, agate, fire agate, emerald, mandarin garnet, tsavorite garnet, mexican opal, yellow sapphires, tourmalated quartz. photo: Dean Powell
A bezel pusher is nothing more than a short metal rod in a bulbous handle.
An assortment of burnishers.
16 | tools, supplies & equipment

Files Along with pliers and the ubiquitous jew-elers saw, files are among the most basic and essential tools in any jewelers kit. Files for jewelry use generally come in about a dozen different styles (flat, square, trian-gular, half-round, etc.), in three different size ranges. Files also come in a range of cuts, or coarsenesses (#0, #2, #4 and #6 are the most common cuts). Jewelry-quality files are often described as Swiss pattern or Swiss cut, which simply means that the teeth are created by the intersection of two rows of cuts that run lengthwise down the working face of the file. This produces a finer, smoother surface than the common hardware store variety of file that is often referred to as American bastard cut, or, simply, bastard cut. Larger files, usually ranging from 6" (15 cm) to 12" (30.5 cm) in length (the numeric length designation refers to the length of the working portion of the file, not its overall length) are called hand files. All hand files require the addition of a handle to prevent injury to the hand from the tapered, blunt-pointed tang. These larger files are designed for rapid removal of material, and are used for leveling, truing, and preliminary clean-up of broad surfaces. Intermediate-size files, known as needle files, mostly range from 4½" (11.5 cm) to 6½" (16.5 cm) in length, and are usually sold in
tial. Though you can secure a bur in a pin vise and cut a seat by hand, it is faster and easier to accomplish this operation with a flexible shaft machine.
Burs come in a dazzling range of styles and grades. Here are a few of the most commone.
Two hand files: American Bastard cut on the left, and Swiss-cut on the right.
an assortment of 10 or 12 standard styles (also available individually). Jewelers use these files extensively; their various cross sections allow access to small, restricted spaces. They are particularly useful for re-fining and detailing. Needle files have cylin-drical, partially knurled tangs with rounded ends, which eliminate the need for separate handles. The smallest files were originally de-signed for watchmakers (escapement files), or tool and die makers (machinist files). These tiny files have working surfaces ranging from about 1½" (4 cm) to about 2½" (6 cm) in length. Escapement files usually have long, square handles with an overall length of about 5½" (14 cm), and machinist files are shorter, typically 3½" (9 cm) with cy-lindrical, knurled handles. These miniature files are ideal for getting into tiny recesses, and for shaping, detailing and refining prong tips I find two specific files, one, a hand file and the other, a needle file, particularly
tools, supplies & equipment | 17

Susan Jo Klein | Strange Fruit: Ginko in Winter (Brooch) photo: Peter GroesbeckMorrison Ranch jasper, sterling, 18k gold. 22¼" wide.
useful for stonesetting. A 6" (15 cm) or 8" (20 cm) flat hand file (with handle), #0 or #2 cut, is extremely useful for quick, efficient leveling and truing, and a smaller, finer, barrette needle file, #4 or #6 cut, is handy for trimming prongs and fine detailing. I refine both of the barrette file edges on fine abrasive paper to smooth and polish away any roughness prior to use to prevent pos-sible damage to stones. Remember, it pays to buy the best quality files you can afford.
Needle files are available in three sizes: Standard (4½"–6½"), Escapement (around 5½"), and Machinists (3½").
Common cross sections of needle files.
18 | tools, supplies & equipment
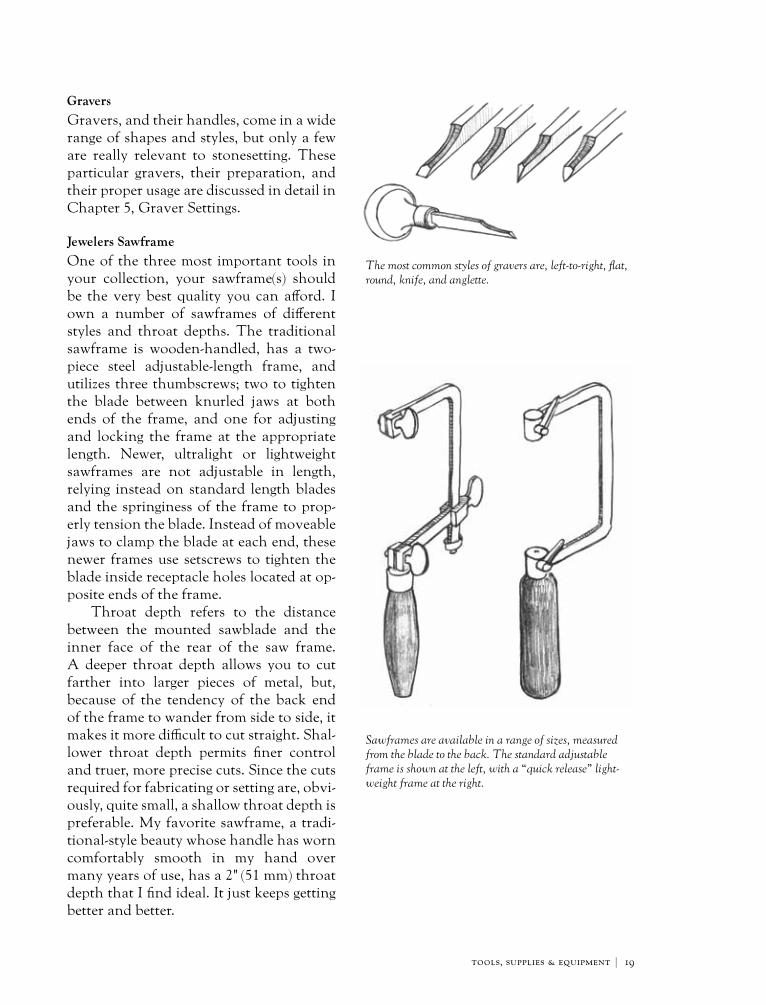
GraversGravers, and their handles, come in a wide range of shapes and styles, but only a few are really relevant to stonesetting. These particular gravers, their preparation, and their proper usage are discussed in detail in Chapter 5, Graver Settings.
Jewelers SawframeOne of the three most important tools in your collection, your sawframe(s) should be the very best quality you can afford. I own a number of sawframes of different styles and throat depths. The traditional sawframe is wooden-handled, has a two-piece steel adjustable-length frame, and utilizes three thumbscrews; two to tighten the blade between knurled jaws at both ends of the frame, and one for adjusting and locking the frame at the appropriate length. Newer, ultralight or lightweight sawframes are not adjustable in length, relying instead on standard length blades and the springiness of the frame to prop-erly tension the blade. Instead of moveable jaws to clamp the blade at each end, these newer frames use setscrews to tighten the blade inside receptacle holes located at op-posite ends of the frame. Throat depth refers to the distance between the mounted sawblade and the inner face of the rear of the saw frame. A deeper throat depth allows you to cut farther into larger pieces of metal, but, because of the tendency of the back end of the frame to wander from side to side, it makes it more difficult to cut straight. Shal-lower throat depth permits finer control and truer, more precise cuts. Since the cuts required for fabricating or setting are, obvi-ously, quite small, a shallow throat depth is preferable. My favorite sawframe, a tradi-tional-style beauty whose handle has worn comfortably smooth in my hand over many years of use, has a 2" (51 mm) throat depth that I find ideal. It just keeps getting better and better.
The most common styles of gravers are, left-to-right, flat, round, knife, and anglette.
Sawframes are available in a range of sizes, measured from the blade to the back. The standard adjustable frame is shown at the left, with a “quick release” light-weight frame at the right.
tools, supplies & equipment | 19

PliersLike files, pliers come in many styles, sizes, and qualities. All jewelry-grade pliers have smooth, untoothed jaws, preferably pol-ished, and the best quality are assembled with a box joint construction. Cheaper pliers often employ a weaker lap joint construction. Some pliers have springs to facilitate opening and closing, and some are fitted with plastic handle covers for comfort. Always buy the very best quality pliers you can afford. You can skimp on some tools, but buying cheap pliers is false economy. In addition to my standard pliers (i.e., flat-nose, chain-nose, etc.), there are three specific pairs of pliers that I find absolutely indispensable for stonesetting: parallel-jaw pliers, round/flat-jaw forming pliers, and half-round/flat-jaw forming pliers. Paral-lel-jaw pliers are very useful for holding small parts securely, particularly flat or uniformly thick items, while filing or refin-ing. The two forming pliers are essential for shaping and forming curved parts, and also for adjusting the length of bezels. I describe in detail the proper usage of these pliers in Chapter 3, Bezel Settings.
Pliers are available in dozens of styles, many designed for very specific uses. These are the most common, most versatile shapes. 1. Parallel Jaw, 2. Flat, 3. Chain-nose, 4. Round/Flat, 5. Half-Round/Flat
Pliers are constructed with lap joints (left), or the more rigid, more dependable box joint (right).
34
5
1
2
20 | tools, supplies & equipment

Ring Clamp Ring clamps, as the name implies, are simple, double-ended devices for holding small items, like rings, while working. Ring clamps are most commonly fashioned of wood, but some are made of plastic or aluminum. Generally, ring clamps are rounded at one end to follow the contour of a ring, and flat at the other. The inner faces are usually lined with leather, rubber, or plastic to provide a sturdy grip and to prevent marring. Items are usually secured in position at one end of wooden ring clamps by driving a wedge between the halves at the other end. Some plastic and metal clamp styles use a wing nut or thumbscrew to tighten the jaws instead of a wedge. I prefer the wooden clamps because they don’t flex (I have had small items snap out of the far more flexible plastic clamps and go sailing across my studio), and I find them more comfortable and easier to handle than metal ring clamps (the wing nut on most metal ring clamps is awk-wardly located on the side of the clamp). Also, I modify my stonesetting ring clamp by filing ¼" (6 mm) deep notches around the outer perimeter of the clamp, about an inch in from each end, that fit into a corre-spondingly shaped notch in my bench pin. This makes it easier for me to anchor and steady the ring clamp when I am filing or setting. Ring clamps and bench pins are so inexpensive and useful that I always keep extras on hand, modifying them to fit my needs.
ScriberA fine-pointed, straight-tapered scriber is essential. Make sure it does not have an angular, beveled point. They are widely available from any jewelry supplier, or you can make your own. A sewing needle with its eye end driven into a short length of dowel makes a respectable scriber. My scribers are fashioned from old dental tools. I simply snapped off the worn-out
Ring clamps are used to hold onto small pieces when cutting, filing, setting, and finishing. In addition to making the work easier, using them will avoid unhealthy stresses to your hand and arm muscles.
File notches into the ring clamp to nest into a prepared bench pin. This holds the tool secure while allowing it to be rotated in use.
Assorted scribers.
tools, supplies & equipment | 21

For simple measuring tasks, it is hard to beat a stainless ruler with inch and millimeter markings.
working end, and file a straight-tapered point. This same fine-tipped tool also serves as a miniature burnisher, allowing me to get into the tiniest of spaces to rub out file marks, brighten hard-to-polish areas, and to tighten stitch prongs against small stones, described in Chapter 5, Graver Settings.
Spring DividersAt first glance, spring dividers resemble a small compass. Upon closer inspection, however, you’ll note that instead of one leg ending with a graphite point, both legs of the spring dividers terminate with sharp metal points. Spring dividers are used ex-tensively for stonesetting (and for many other metalworking activities, as well). They are used for taking, and transfer-ring accurate measurements, for describ-ing arcs and circles, and for many other layouts requiring great precision (which is frequently, in the case of stonesetting). The numeric designation (2", 3", etc.) that de-scribes the size of a pair of spring dividers refers to the distance to which the legs will open, which in turn defines the maximum radius of a circle that it will describe. For example, a 3" (76 mm) spring dividers will describe a 6" circle. A silversmith might use a 12" (30.5 cm) spring dividers to describe a 24" (61 cm) circle on a sheet of metal, while, conversely, a stonesetter might use 1½" (38 mm) to 3" (76 mm) spring divid-ers when laying out the dimensions for a stonesetting. Size really does matter. If your dividers are too large and ungainly, they will be awkward and clumsy, and will not satisfy your needs. An occasional rub on a sharpening stone helps to maintain sharp points.
Mary Anna Petrick | PendantSterling, bi-colored tourmaline.
4½" tall. photo: Larry Sanders
A spring dividers is an essential tool for finding and holding small dimensions.
22 | tools, supplies & equipment

Stone GaugeMeasuring cabochons is pretty simple because most cabochons are flat-backed and can be measured with a simple 6" stain-less steel ruler that is marked off in millime-ters. In fact, because bezels are fitted to the stone, and because they are relatively easy to adjust, you really don’t even have to measure the stone. Unfortunately, however, such is not the case with faceted stones that will be set in prongs or, even more impor-tantly, into bur-cut seats in solid metal such as graver settings and channel settings. When cutting seats for faceted stones with burs, it is critical that you select a bur exactly the same size as your stone. A fraction of a millimeter means the differ-ence between a seat that will fit the stone properly, and one that won’t. With prongs, you may be able to adjust the prongs in or out a bit to improve the fit, but solid metal is not so accommodating. Either your stone fits, or it doesn’t. Because of the complex, multi-angular form of a faceted stone (and the matching bur, too), it is impossible to measure it precisely with a ruler. You will need a more accurate way of doing this. There are three basic types of measur-ing devices for measuring faceted stones with the degree of accuracy you will need. The least expensive, but also least precise, is called a sliding gauge. Usually made of brass, it measures in 1.0 millimeter increments. For intermediate fractional millimeter readings, you simply measure the stone and then, while maintaining the spacing between the two jaws, do a trial and error fit to select a bur of the same size. Not too sophisticated, but it works if you are careful. The other two measuring devices, a spring gauge and a vernier caliper, cost a little more, but both measure in tenths of a millimeter, making them more accurate and dependable than a sliding gauge. The degree gauge has two spring-tensioned legs joined with a single rivet, that allows the legs to pivot opened and closed. At one end, the legs terminate in pincer-like jaws. At the far end, a millimeter scale is affixed to one leg
A sliding gauge, also called a sliding caliper, is a handy and economical choice.
A vernier caliper provides much greater accuracy, espe-cially when measuring small gems. In addition to the me-chanical version shown, you will find models that display the measurement on a gauge or a digital read-out.
The time-honored spring gauge transfers an opening at one end into numerical readings on the other end.
tools, supplies & equipment | 23