crestron mps-300 multimedia presentation system 300
TRANSCRIPT

Crestron MPS-300 Multimedia Presentation System 300 Operations Guide

This document was prepared and written by the Technical Documentation department at:
Crestron Electronics, Inc.
15 Volvo Drive Rockleigh, NJ 07647
1-888-CRESTRON
Important Safety Instructions • Read these instructions.
• Keep these instructions.
• Heed all warnings.
• Follow all instructions.
• Do not use this apparatus near water.
• Clean only with dry cloth.
• Do not block any ventilation openings. Install in accordance with the manufacturer’s instructions.
• Do not install near any heat sources such as radiators, heat registers, stoves, or other apparatus (including amplifiers) that produce heat.
• Do not defeat the safety purpose of the polarized or grounding-type plug. A polarized plug has two blades with one wider than the other. A grounding-type plug has two blades and a third grounding prong. The wide blade or the third prong are provided for your safety. If the provided plug does not fit into your outlet, consult an electrician for replacement of the obsolete outlet.
• Protect the power cord from being walked on or pinched particularly at plugs, convenience receptacles, and the point where they exit from the apparatus.
• Only use attachments/accessories specified by the manufacturer.
• Unplug this apparatus during lightning storms or when unused for long periods of time.
• Refer all servicing to qualified service personnel. Servicing is required when the apparatus has been damaged in any way, such as power-supply cord or plug is damaged, liquid has been spilled or objects have fallen into the apparatus, the apparatus has been exposed to rain or moisture, does not operate normally, or has been dropped.
• Disconnect power prior to connecting or disconnecting equipment.
• Do not install in direct sunlight.
• The apparatus must be installed in a way that the power cord can be removed either from the wall outlet or from the device itself in order to disconnect the mains power.
• Prevent foreign objects from entering the device.
WARNING:
TO REDUCE THE RISK OF FIRE OR ELECTRIC SHOCK, DO NOT EXPOSE THIS APPARATUS TO RAIN OR MOISTURE. THE APPARATUS SHALL NOT BE EXPOSED TO DRIPPING OR SPLASHING. OBJECTS FILLED WITH LIQUIDS, SUCH AS VASES, SHOULD NOT BE PLACED ON THE APPARATUS.
WARNING:
TO PREVENT ELECTRIC SHOCK, DO NOT REMOVE COVER. THERE ARE NO USER SERVICEABLE PARTS INSIDE. ONLY QUALIFIED SERVICE PERSONNEL SHOULD PERFORM SERVICE.
The lightning flash with arrowhead symbol, within an equilateral triangle, is intended to alert the user to the presence of uninsulated “dangerous voltage” within the product’s enclosure that may be of sufficient magnitude to constitute a risk of electric shock to persons.
The exclamation point within an equilateral triangle is intended to alert the user to the presence of important operating and maintenance (servicing) instructions in the literature accompanying the appliance.
WARNING:
THIS IS AN APPARATUS WITH CLASS I CONSTRUCTION. IT SHALL BE CONNECTED TO AN ELECTRICAL OUTLET WITH AN EARTHING GROUND TERMINAL.
IMPORTANT:
The MPS-300 can be used with Class 2 output wiring.
All brand names, product names and trademarks are the property of their respective owners. ©2008 Crestron Electronics, Inc.

Crestron MPS-300 Multimedia Presentation System 300
Operations Guide – DOC. 6529B Contents • i
Contents
Multimedia Presentation System 300: MPS-300 1 Introduction ...............................................................................................................................1
Features and Functions ................................................................................................1 Applications.................................................................................................................4 Internal Block Diagram ...............................................................................................5 Specifications ..............................................................................................................6 Physical Description..................................................................................................10 Industry Compliance .................................................................................................21
Setup ........................................................................................................................................22 Network Wiring.........................................................................................................22 CAT5 Wiring.............................................................................................................22 QuickMedia Wiring...................................................................................................23 Installation.................................................................................................................24 Hardware Hookup .....................................................................................................25 Configure the RGB Input Ports .................................................................................28
Programming Software............................................................................................................31 Earliest Version Software Requirements for the PC .................................................31 Programming with Crestron SystemBuilder..............................................................31 Programming with SIMPL Windows ........................................................................31 Switching Programs...................................................................................................32 Saving Settings ..........................................................................................................32
Uploading and Upgrading........................................................................................................34 Establishing Communication.....................................................................................34 Programs and Firmware ............................................................................................35
Configuration & Operation......................................................................................................36 Configuration.............................................................................................................36 Operation...................................................................................................................76
Problem Solving ......................................................................................................................84 Troubleshooting.........................................................................................................84 Check Network Wiring..............................................................................................86 Reference Documents................................................................................................87 Further Inquiries ........................................................................................................88 Future Updates ..........................................................................................................88
Software License Agreement...................................................................................................89 Return and Warranty Policies ..................................................................................................91
Merchandise Returns / Repair Service ......................................................................91 CRESTRON Limited Warranty.................................................................................91


Crestron MPS-300 Multimedia Presentation System 300
Multimedia Presentation System 300: MPS-300 Multimedia Presentation System 300: MPS-300
Introduction Introduction
Features and Functions • System switcher, audio processor, and control system • Out-of-the-box switching and audio control • Two video/HDTV and three RGB/computer inputs • Three QuickMedia inputs with delay skew compensation • Built-in input signal sensing | auto-switching capable • Discrete composite, S-video, component, and RGB outputs • Three QuickMedia™ and one Crestron Home® CAT5 AV outputs • Five balanced stereo audio inputs • Two gated mic inputs with compressor & limiter • Eight-channel mic mixing w/4-band EQ per channel • Discrete program, speech, and record outputs • Graphic and parametric equalization | 40ms audio delay • Built-in 40 watt amplifier — stereo (20 Watt x2), 70V, or 100V models • 2-Series control engine | e-Control® 2 Web server • 10/100 Ethernet | RoomView and SNMP support • Two RS-232, four IR, four digital in, & four relay control ports • Front panel setup and control | Backlit LCD display • Keypad, touchpanel, and wireless control options • Internal power supply | 2-space rack-mountable
The MPS-300 is a complete presentation control and signal routing solution for boardrooms and classrooms. Integrating the control system, multimedia matrix switcher, mic mixer, audio processor, amplifier, and QuickMedia distribution center all into a single 2-space rackmount package, the MPS-300 affords considerable signal routing versatility and high-performance signal processing without the need for separate components.
System Switcher Right out of the box, the MPS-300 provides high-performance switching of two video and three RGB computer sources to a single projector or plasma display.
Operations Guide – DOC. 6529B Multimedia Presentation System 300: MPS-300 • 1

Multimedia Presentation System 300 Crestron MPS-300
Composite, S-video, component and RGBHV signals can be routed to the appropriate inputs on the display device, with control of the display provided via Ethernet, RS-232 or IR. Input signal sensing is provided on every video and RGB input to enable auto-switching functionality and provide device power status information to the control system. Selectable sync impedance on the RGB inputs helps accommodate cable runs of varying lengths.
Versatile matrix switching inside the MPS-300 actually affords some additional hidden flexibility, providing discrete outputs for RGB, composite, S-video, and component signals. For instance, Outputs 1 and 2 can function as separate composite and S-video outputs, or as a single component output; Output 3 can be used for component, S-video, or composite signals; and Output 4 can be used for either RGB or component. Each output is fed by a separate matrix crosspoint, so they all can be active simultaneously and assigned any relevant input source.
QuickMedia™ Matrix In addition to its conventional type video inputs and outputs, the MPS-300 accommodates additional sources and display devices via Crestron's exclusive QuickMedia (QM) transport. Three QM inputs accept connections from QM Wall Plates, FlipTop Boxes, and Distribution Centers, providing an abundance of additional inputs for AV, computer, and microphone sources. Three QM outputs are also provided, each independently controllable to feed multiple displays and other devices.
QuickMedia provides a very streamlined, low-cost, long-distance wiring solution. The QuickMedia transport transmits high-resolution RGB, HD video, stereo program and microphone audio signals up to 450 feet over a single inexpensive CAT5e type cable*. Just one CresCAT-QM cable and a QM receiver are all that is required for complete signal routing and device control, eliminating all the bulky, expensive cabling that would otherwise be needed. A full range of QM transmitters, receivers, and other products is offered by Crestron® to suit any application. * For QuickMedia wiring use CresCAT-QM-P, CresCAT-QM-NP, CresCAT-IM-P, or quality
CAT5e/CAT6 cable with a delay skew of ≤15ns per 100m; the maximum aggregate cable length and delay skew between any QM transmitter (origination point) and QM receiver (endpoint) is 450 ft (137 m) and 22 ns; a maximum of two QM midpoint devices may be inserted in a given QM signal path; exceptions apply, refer to each respective product manual for full detail.
Touchpanel Output Any of the QM outputs may be utilized to feed a preview signal to the system touchpanel. Additionally, one Crestron Home® (CH) CAT5 Balanced Video output is included, its signal corresponding with the first QM output, providing for simplified wiring to a complete range of Crestron touchpanels. Each QM output supports high-resolution RGB and HDTV plus audio, while the CH output is limited to standard video and HDTV only (dependent upon the capabilities of the touchpanel).
8-Channel Microphone Matrix Mixing Two gated microphone/line inputs are included on the MPS-300 complete with software-switchable 48V phantom power and independently adjustable compression and limiting. Up to six additional microphone signals can be brought in through the three QM inputs, with 4-band speech-optimized equalization provided on all eight mic channels. Sophisticated matrix mixing allows for six completely different mixes of all eight microphones—three mixes feeding discrete “local” outputs, and three additional mixes feeding the three QM outputs.
2 • Multimedia Presentation System 300: MPS-300 Operations Guide – DOC. 6529B

Crestron MPS-300 Multimedia Presentation System 300
Professional Audio Features Five stereo audio inputs on the rear panel accept balanced or unbalanced line-level signals from computers and other program audio sources. Additional audio sources can be brought in through the three QM inputs. To accommodate a wide range of signals, adjustable input compensation is employed to help maintain consistent volume levels when switching between sources. Versatile matrix mixing allows the selected program signal and the eight microphone signals to be separated or mixed in any combination to feed three “local” outputs, each with its own unique mix.
Three discrete balanced line level outputs are provided, each with independent adjustments for volume, bass, treble, and mute. The stereo (PROG OUT) and mono (SPEECH) outputs are normally intended for driving external amplification, with relay muting on each output to prevent “thumping” on power up. The record (REC OUT) output allows for a completely separate stereo mix to feed a codec, recording device, or assistive listening system. Ten-band graphic equalization plus 2-band parametric equalization on each output eliminates the need for expensive outboard audio processors, and up to 40ms delay adjustment is available on the SPEECH output for proper loudspeaker alignment.
The three QM outputs are controlled separately from the other audio outputs, allowing three different program sources and three different microphone mixes to be monitored on touchpanels and output to additional audio equipment by way of an appropriate QM receiver or other QuickMedia device(s).
Built-in Amplifier A 40-watt amplifier is built into the MPS-300, with three models available offering the choice of 8-ohm stereo, 70V mono, or 100V mono outputs. For large rooms requiring more power, the MPS-300 supports plug-and-play compatibility with Crestron's QM-Series 3-channel amplifiers, providing a complete solution for driving a professional loudspeaker system with discrete program and speech channels.
Front Panel Control Out of the box, the MPS-300 front panel supports easy pushbutton routing of input sources to each of the outputs, and audio volume adjustment using the volume control knob. Dedicated buttons and indicators are also provided for separate control of system power and projector power. In addition, five preset buttons are included for custom functions such as lowering a projection screen, closing blinds, or selecting a lighting preset.
The front panel label strips are easily customized using Crestron Engraver software or standard 3/8” tape labels, allowing for the clear designation of each input, output, and preset button. When selected, these functions will also appear on the LCD display as generic names (Input 1, 2…), or as custom names (DVD, Podium PC, Screen Up, etc.) which are easily entered using the out-of-the-box functionality, SIMPL™ Windows® software, or SystemBuilder software.
Easy setup of the MPS-300 is facilitated through the LCD display without necessitating a computer. Together with four softkey buttons, four menu navigation buttons and the volume knob, the LCD enables configuration of IP network, audio, and other system settings. For security, the front panel controls can be password protected or locked out.
2-Series Control System Integrated into the MPS-300 is a Crestron 2-Series Ethernet control system complete with e-Control®2 Web server and a host of RS-232, IR, digital input and relay control ports for integration with third-party equipment. Anything from a basic AV
Operations Guide – DOC. 6529B Multimedia Presentation System 300: MPS-300 • 3

Multimedia Presentation System 300 Crestron MPS-300
presentation room with a single projector, screen, and keypad controller, to a fully custom touchpanel based system with multiple controlled sources and display devices, can be programmed easily using Crestron SystemBuilder™ software. And, the MPS-300 works with Crestron's RoomView® Help Desk software, the industry's most comprehensive facility-wide asset management solution.
Room Control Options Without requiring any programming, the MPS-300 can be controlled simply using Crestron's APAD LCD Controller or a selection of keypads. With custom programming, Crestron's complete line of Isys® touchpanels and MediaManager FlipTops is supported. Equipped with an optional CNXRMIRD IR receiver, the MPS-300 allows any Crestron IR wireless touchpanel or handheld remote to be used for a low-cost wireless control solution. Or, adding an RF wireless gateway or WiFi access point enables use of a wide range of 1-way and 2-way RF wireless handheld remotes and touchpanels.
Applications The following diagram shows an MPS-300 in a lecture hall application.
MPS-300 in a Lecture Hall Application
4 • Multimedia Presentation System 300: MPS-300 Operations Guide – DOC. 6529B

Crestron MPS-300 Multimedia Presentation System 300
For more information on this and other QM applications, refer to the latest revision of the Crestron MediaManager Applications Guide (Doc. 6244), which is available from the Crestron website (http://www.crestron.com/manuals).
Internal Block Diagram The following diagrams represent the video and audio switching abilities of the MPS-300.
Video Block Diagram of the MPS-300
8x7MatrixSwitch
Composite
VIDEO INPUTS
S-Video
Component
RGBHV
QM INPUTS
QM OUT 6
VIDEO OUTPUTS
RGBHV
RGBHV
RGBHV
1
2
3
4
5
QM toAnalog
RGBHV
Analogto QM
QM OUT 7
6
7
CHBalanced
Video OUT
RGBHV
QM OUT
TOUCHPANELPORT
(Composite/S-Video/
Component)
8
LOCAL OUT 1
5
LOCAL OUT 2
LOCAL OUT 3
LOCAL OUT 4
RGB Signal Detection
RGB Signal Detection
RGB Signal Detection
Composite/S-Video/YPbPr
Composite/S-Video/YPbPr
Composite/S-Video/YPbPr Signal Detection
Composite/S-Video/YPbPr Signal Detection
Analogto QM
Analogto QM
QM toAnalog
QM toAnalog
RGBDelay
LPFilter
RGBHV
RGBHV
6x6QM Matrix
LOCAL OUT 1 and LOCAL OUT 2 can be combined to one component output. LOCAL OUT 3 can be used for composite, S-video, or component video. The MPS-300 does not convert input signal formats.
Operations Guide – DOC. 6529B Multimedia Presentation System 300: MPS-300 • 5
Multimedia Presentation System 300 Crestron MPS-300
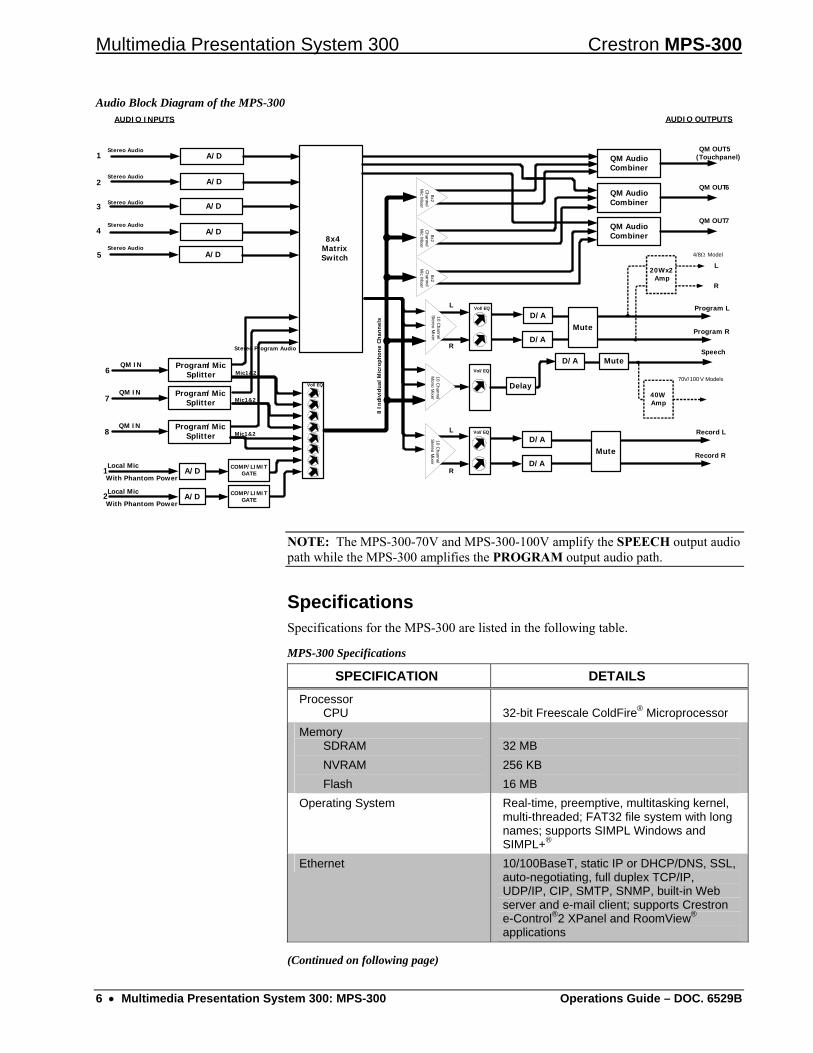
Audio Block Diagram of the MPS-300
8x4MatrixSwitch
AUDIO INPUTS
QM OUT5(Touchpanel)
Stereo Audio1
2
3
4
5
QM OUT6
6
A/D
A/D
A/D
A/D
A/D
7
QM AudioCombiner
QM AudioCombiner
QM IN
QM IN
Stereo Audio
Stereo Audio
Stereo Audio
Stereo Audio
Local Mic
Local Mic
1
2
Mic1&2
Vol/EQ
10C
hannelStereo
Mixer
L
R
Vol/EQ
Mute
Mute
Speech
Program L
Program R
With Phantom Power
With Phantom Power
8QM IN
Mic1&2
QM OUT7QM AudioCombiner
Vol/EQ
Mic1&2
Stereo Program Audio
Vol/EQ
Mute
Record L
Record R
8In
divi
dua
lM
icro
phon
eC
han
nel
s10
Channel
Mono
Mixer
10C
hannelStereo
Mixer
L
R
4/8Ω Model
L
R
70V/100 V ModelsDelay
8x2C
hannelM
icM
ixer
8x2C
hannelM
icM
ixer
8x2C
hannelM
icM
ixer
COMP/LIMITGATE
COMP/LIMITGATE
AUDIO OUTPUTS
AD/
D/A
D/A
D/A
D/A
40WAmp
20Wx2Amp
A/D
A/D
Program/MicSplitter
Program/MicSplitter
Program/MicSplitter
NOTE: The MPS-300-70V and MPS-300-100V amplify the SPEECH output audio path while the MPS-300 amplifies the PROGRAM output audio path.
Specifications Specifications for the MPS-300 are listed in the following table.
MPS-300 Specifications
SPECIFICATION DETAILS Processor
CPU 32-bit Freescale ColdFire® Microprocessor
Memory SDRAM
NVRAM Flash
32 MB 256 KB 16 MB
Operating System Real-time, preemptive, multitasking kernel, multi-threaded; FAT32 file system with long names; supports SIMPL Windows and SIMPL+®
Ethernet 10/100BaseT, static IP or DHCP/DNS, SSL, auto-negotiating, full duplex TCP/IP, UDP/IP, CIP, SMTP, SNMP, built-in Web server and e-mail client; supports Crestron e-Control®2 XPanel and RoomView® applications
(Continued on following page)
6 • Multimedia Presentation System 300: MPS-300 Operations Guide – DOC. 6529B

Crestron MPS-300 Multimedia Presentation System 300
MPS-300 Specifications (Continued)
SPECIFICATION DETAILS Video/RGB Switcher
Signal Types
Video/HDTV Formats RGB Formats Maximum Resolution
Blanking Time Sync Rise/Fall Time Sync Latency Gain QM Cable Compensation
8x7 crosspoint matrix including 3x3 QM signal routing, QM delay skew compensation RGB and composite, S-video, or component video (does not transcode) NTSC or PAL, HDTV up to 1080i/1080p RGBHV or RGBS QXGA 2048 x 1536 @ 60Hz (WUXGA 1920 x 1200 @ 60Hz via QM) < 0.1 second 3.5 ns maximum < 30 ns 0dB (75 ohms terminated) 10-bit digitally controlled PEAK (bandwidth) and BOOST (frequency); 4-bit digitally controlled SKEW delay, 0 to 22 ns (independent for R, G, and B)
Audio Switcher/Preamp
A-D/D-A Conversion Output Volume Range Mixer Volume Range Mute Input Compensation Mic Input Gain Gate Level (Threshold) Gate Attack Time Gate Decay (Release) Time Gating Depth Compressor Curve Compressor Threshold Level Compressor Attack Time Compressor Release Time Compression Ratio
8x4 stereo crosspoint matrix including 3x3 QM signal routing, 2-channel gated mic preamp with compressor and limiter, 8-channels mic EQ, 10x5 mic/program matrix mixer, 8x2 mic matrix mixer per each of 3 QM outputs, stereo volume/tone control and EQ per each of PROGRAM and RECORD outputs, mono volume/tone control and EQ/delay on SPEECH output, integrated power amplifier, QM auto-compensation with self-peaking 24-bit, 48 kHz -80dB to +20dB, 0.1dB steps -80dB to 0dB, 0.1dB steps -100dB (electronic), -120dB (relay) ±10dB, 0.1dB steps 0 to 100% (40dB range) plus mute 0 to 100% 0 to 100 ms 0 to 5000 ms -80dB to 0dB, 0.1dB steps Selectable hard or soft knee -80dB to 20dB, 0.1dB steps 0.1 to 300 ms 1 to 500 ms 1:1 (no compression) to 10:1 (maximum compression)
(Continued on following page)
Operations Guide – DOC. 6529B Multimedia Presentation System 300: MPS-300 • 7

Multimedia Presentation System 300 Crestron MPS-300
MPS-300 Specifications (Continued)
SPECIFICATION DETAILS Audio (continued) Limiter Curve Limiter Threshold Level Limiter Attack Time Limiter Release Time Microphone EQ Filter Gain Mic EQ Filter Center
Frequencies Bass Gain Range Treble Gain Range Output Equalization PEQ Filter Gain PEQ Filter Bandwidth PEQ Filter Center Frequency PEQ Filter Types
GEQ Filter Gain GEQ Filter Center
Frequencies Speech Output Delay Frequency Response
PROG/REC OUT SPEECH OUT SPEAKER (8 ohms) SPEAKER (70V or 100V) S/N Ratio
PROG/REC OUT
SPEECH OUT
SPEAKER (8 ohms)
SPEAKER (70V or 100V)
THD+N PROG/REC OUT
SPEECH OUT SPEAKER (8 ohms) SPEAKER (70V or 100V)
Stereo Separation
PROG/REC OUT SPEAKER (8 ohms) Channel Crosstalk
Selectable hard or soft knee 0dB to 20dB, 0.1dB steps 0.1 to 300 ms 1 to 500 ms ±12dB, 0.1dB steps 160, 500, 1.2k, 3k Hz ±12dB @ 100Hz, 0.5dB steps ±12dB @ 10kHz, 0.5dB steps 10-band graphic + 2-band parametric ±12dB, 0.1 dB steps 0.1 to 3.0 octaves, 0.1 octave steps 25Hz to 20kHz, 0.5Hz steps Low Pass, High Pass, Peaking Eq, Notch, Treble Shelf, Bass Shelf ±12dB, 0.1dB steps 31.5, 63, 125, 250, 500, 1k, 2k, 4k, 8k, 16k Hz 0 to 40 ms, 1 ms steps 20Hz to 20kHz ±0.5dB 50Hz to 20kHz ±0.5dB 20Hz to 20kHz ±0.5dB 100Hz to 20kHz ±1.5dB 95dB (@ 10dBV, 20Hz to 20kHz A-weighted) 95dB (@ 10dBV, 50Hz to 20kHz A-weighted) 90dB (full output, 20Hz to 20kHz A-weighted) 90dB (full output, 20Hz to 20kHz A-weighted) 0.02% (@ 10dBV, 20Hz to 20kHz) 0.02% (@ 10dBV, 50Hz to 20kHz) 0.7% (full output, 20Hz to 20kHz) 0.7% (full output, 100Hz to 20kHz A-weighted) -80dB (@ 10dBV, 20Hz to 20kHz) -60dB (full output, 20Hz to 20kHz -80dB (AUD IN @ 10dBV, 20Hz to 20kHz)
(Continued on following page)
8 • Multimedia Presentation System 300: MPS-300 Operations Guide – DOC. 6529B

Crestron MPS-300 Multimedia Presentation System 300
MPS-300 Specifications (Continued)
SPECIFICATION DETAILS LCD Display Green LCD alphanumeric, adjustable
backlight. Two lines x 20 characters per line. Displays input/outputs by name, volume level bargraph, setup menus, time/date, and other system information
Power Requirements Main Power Available Cresnet® Power
2.5 Amps @ 100-240 Volts AC, 50/60 Hz 30 Watts
Environmental Temperature Humidity
41° to 104°F (5° to 40°C) 10% to 90% RH (non-condensing)
Enclosure Chassis
Faceplate
Mounting
Steel, black matte powder coat finish, convection-cooled, vented top and sides Extruded aluminum, black matte powder coat finish with polycarbonate label overlay Freestanding or 2U 19-inch rack-mountable (adhesive feet and rack ears included)
Dimensions Height Width
Depth
3.47 in (8.81 cm) without feet 17.03 in (43.24 cm); 19.00 in (48.26 cm) with ears 12.58 in (31.95 cm)
Weight: MPS-300 MPS-300-70V MPS-300-100V
10.1 lbs (4.6 kg) 11.9 lbs (5.4 kg) 11.3 lbs (5.4 kg)
Available Models: MPS-300
MPS-300-70V
MPS-300-100V
Multimedia Presentation System 300 w/Stereo Amplifier Multimedia Presentation System 300 with 70 Volt Amplifier Multimedia Presentation System 300 with 100 Volt Amplifier
(Continued on following page)
Operations Guide – DOC. 6529B Multimedia Presentation System 300: MPS-300 • 9

Multimedia Presentation System 300 Crestron MPS-300
MPS-300 Specifications (Continued)
SPECIFICATION DETAILS Available Accessories: APAD C2N-DB12 C2N-FTB C2N-MNETGW CLS-C6(M) CLW-DIM1RF and
CLW-SW1RF CNSP-XX CNX-B12 CNXRMIRD IRP2 QM-AMP3X80MM QM-AMP3X80SR
Wall Mount LCD Controller 12-Button Decorator Keypad FlipTop Control Center infiNET™ Gateway iLux™ Integrated Lighting System infiNET Dimmer and Switch Custom Serial Interface Cable 12-Button Designer Keypad IR Receiver IR Probe 3-Channel Multimedia Amplifier 3-Channel Sound Reinforcement Amplifier
Physical Description This section provides information on the connections, controls and indicators available on your MPS-300.
MPS-300 Physical View (Front)
MPS-300 Physical View (Rear)
10 • Multimedia Presentation System 300: MPS-300 Operations Guide – DOC. 6529B

Crestron MPS-300 Multimedia Presentation System 300
MPS-300 Overall Dimensions
17.03 in(43.24 cm)
3.47 in(8.81 cm)
11.85 in(30.08 cm)
12.58 in(31.95 cm)
Operations Guide – DOC. 6529B Multimedia Presentation System 300: MPS-300 • 11

Multimedia Presentation System 300 Crestron MPS-300
MPS-300 Buttons and Ports
1
2
3
4
5
6
8
9
10
11
12
14 16
17
19
20
30
18 21
23
24
22 2725 29
31
32
34
15 28
26
7
13 33
12 • Multimedia Presentation System 300: MPS-300 Operations Guide – DOC. 6529B

Crestron MPS-300 Multimedia Presentation System 300
Connectors, Controls & Indicators
# CONNECTORS1, CONTROLS & INDICATORS
DESCRIPTION
1 NET LED (1) yellow LED, indicates Cresnet bus activity. 2 MSG LED (1) yellow LED, illuminates when a message is
present in the message log. To view the contents of the message log, use the front panel buttons or Crestron Toolbox™.
3 & 4 RESET BUTTONS HW-R – Initiates system hardware reset. SW-R – Pressing this in combination with HW-R button performs a system restart without loading the program. Pressing it alone momentarily while the system is running restarts the program.
5 COMPUTER
Pin 1 Pin 2
Pin 4 Pin 3
(1) USB Type B female; USB 1.1 computer console port (cable included)
PIN DESCRIPTION
1 +5 VDC 2 Data - 3 Data + 4 Ground
6 PROGRAM OUT (L/R)
(1) 5-pin 3.5 mm detachable terminal block; Balanced/unbalanced stereo line-level output; Output Impedance: 200 ohms balanced, 100 ohms unbalanced; Maximum Output Level: 4 Vrms balanced, 2 Vrms unbalanced
7 AUDIO INPUTS 1-5
(5) 5-pin 3.5 mm detachable terminal blocks; Balanced/unbalanced stereo line-level inputs; Input Impedance: 24k ohms balanced/unbalanced; Balanced Input Level: -20 to +12 dBV; 4 Vrms maximum; Unbalanced Input Level: -20 to +6 dBV; 2 Vrms maximum
(Continued on following page)
Operations Guide – DOC. 6529B Multimedia Presentation System 300: MPS-300 • 13

Multimedia Presentation System 300 Crestron MPS-300
Connectors, Controls & Indicators (Continued)
# CONNECTORS1, CONTROLS & INDICATORS
DESCRIPTION
8 MC/LN 1 – 2
(2) 5-pin 3.5 mm detachable terminal blocks; Comprises (2) Balanced microphone/line inputs; Balanced Mic Input Level: -52 to -12 dBV, 240 mVrms maximum; Balanced Line Input Level: -28 to +11 dBV; 3.7 Vrms maximum; Unbalanced Line Input Level: -34 to +5 dBV; 1.85 Vrms maximum; Mic Input Impedance: 3.9k ohms, accepts 60 to 600 ohm source; Line Input Impedance: 19k ohms (balanced), 9.5k ohms (unbalanced); Phantom Power: 10 mA (total) @ 48 Volts DC, software enabled to both mic inputs
9 VIDEO INPUTS 1 - 2
RGBHV INPUTS 3 - 5
(2) sets of (3) BNC female video inputs, each set configurable as:
• Component/HDTV (YPbPr) video input, or
• S-video (Y/C) input, or • Composite input
Input Level: 1 Vp-p nominal; Input Impedance: 75 ohms nominal; DC Offset: Insensitive to DC offset (AC coupled); Video signal sensing on COMP/Pb or Y/Y
(3) DB15HD female, RGBHV (VGA) inputs; Format: RGBHV or RGBS; RGB Input Level: 1 Vp-p nominal; RGB Input Impedance: 75 ohms nominal; Sync Input Level: 2 to 5 Vp-p; Sync Input Impedance: 75, 500, or 1k ohms individually selectable for H and V via bottom panel DIP switch; Video signal sensing on “H-SYNC”; Defeatable DDC pull-up resistors
10 SYSTEM POWER
(1) pushbutton and green LED, controls system power
11 PROJECTOR POWER
(1) pushbutton and green LED, controls display device power
(Continued on following page)
14 • Multimedia Presentation System 300: MPS-300 Operations Guide – DOC. 6529B

Crestron MPS-300 Multimedia Presentation System 300
Connectors, Controls & Indicators (Continued)
# CONNECTORS1, CONTROLS & INDICATORS
DESCRIPTION
12 REC OUT
(1) 5-pin 3.5 mm detachable terminal block; Balanced/unbalanced, stereo line-level output; Output Impedance: 200 ohms balanced, 100 ohms unbalanced; Maximum Output Level: 4 Vrms balanced, 2 Vrms unbalanced
NOTE: Does not include relay mute.
13 SPEECH OUT
(1) 3-pin 3.5 mm detachable terminal block; Balanced/unbalanced mono line-level output; Output Impedance: 200 ohms balanced, 100 ohms unbalanced; Maximum Output Level: 4 Vrms balanced, 2 Vrms unbalanced
14 LCD DISPLAY AND SOFT BUTTONS
Green LCD alphanumeric, adjustable backlight; 2 lines x 20 characters per line; Displays input/outputs by name, volume level bargraph, setup menus, time/date, and other system information (4) pushbuttons for activation of LCD driven functions and passcode entry
15 SPEAKER OUTPUTS
(1 or 2) 2-pin 5 mm detachable terminal blocks; Speaker-level audio outputs (MPS-300); (1) 2-pin 5 mm detachable terminal blocks; Speaker-level audio outputs (MPS-300-70V and MPS-300-100V) Wire Size: Connector accepts 12 AWG maximum Output Power (MPS-300): 20W RMS per channel stereo into 8 ohms, 4 ohms tolerant; Output Power (MPS-300-70V): 40W RMS mono at 70 Volts; Output Power (MPS-300-100V): 40W RMS mono at 100 Volts
16 NAVIGATION BUTTONS
(4) Pushbuttons for navigating the configuration menus of the MPS-300
17 IR/SERIAL OUT
(4) 2-pin 3.5 mm detachable terminal blocks, IR/Serial output ports; IR output up to 1.2 MHz; One-way serial TTL/RS-232 (0-5 Volts)2 up to 9600 baud
(Continued on following page)
Operations Guide – DOC. 6529B Multimedia Presentation System 300: MPS-300 • 15

Multimedia Presentation System 300 Crestron MPS-300
Connectors, Controls & Indicators (Continued)
# CONNECTORS1, CONTROLS & INDICATORS
DESCRIPTION
18 IR IN
(1) 3-pin 3.5 mm detachable terminal block; For connection of the CNXRMIRD IR Receiver (sold separately); Allows IR wireless control from Crestron or third-party remotes using RC-5 IR commands.
19 VOLUME CONTROL
(1) Continuous turn rotary encoder, adjusts menu parameters, defaults to program audio volume
20 RGB DIP SWITCHES (3) Banks of DIP switches (one per RGB input) for configuring the horizontal and vertical sync impedances of each RGB input. Each bank of DIP switches can also be configured to simulate the presence of a monitor to RGB outputs that require a monitor to be connected. For more information, refer to “Configure the RGB Input Ports” on page 28.
21 INPUT
(1) 5-pin 3.5 mm detachable terminal block; Comprises (4) digital/contact closure inputs; Rated for 0-24 Volts DC, referenced to GND; Input Impedance: 2.2k ohms pulled up to 5 Volts DC; Logic Threshold: 2.5 Volts DC nominal with 1 Volt hysteresis band
22 RELAY
(1) 8-pin 3.5 mm detachable terminal block; Comprises (4) normally open, isolated relays; Rated 1 Amp, 30 Volts AC/DC; MOV arc suppression across contacts
23 FUNCTION BUTTONS
(5) pushbuttons and red LEDs, programmable for any control system function. When using the out-of-the-box functionality, the buttons control the projector screen and lighting (if connected).
24 INPUT BUTTONS (8) pushbuttons and red LEDs, select input to be routed.
(Continued on following page)
16 • Multimedia Presentation System 300: MPS-300 Operations Guide – DOC. 6529B

Crestron MPS-300 Multimedia Presentation System 300
Connectors, Controls & Indicators (Continued)
# CONNECTORS1, CONTROLS & INDICATORS
DESCRIPTION
25 TOUCH PANEL OUT
Contains one CH port and one QM port. CH Port: 8-wire RJ-45 female; CAT5 balanced video output port; Signal Types: Dynamically configurable for component (Y/Pb/Pr), S-video (Y/C), or composite video; Video/HDTV Formats: NTSC or PAL, HDTV up to 1080i; Output Impedance: 100 ohms balanced; Connects to CH CAT5 balanced video input port of a compatible touchpanel or other device via CresCAT™ cable.3
QM Port: 8-wire RJ-45 female; QuickMedia output port; Signal Types: Dynamically configurable for RGBHV, component (YPbPr), S-video (Y/C), or composite video with stereo program and 2-channels microphone audio; RGB Format: RGBHV or RGBS; RGB Output Resolution, Non-interlaced: 1920 x 1200 maximum (60 Hz limit at 1600 x 1200 or higher); Video/HDTV Formats: NTSC or PAL, HDTV up to 1080i/1080p; Connects to QM input port of a compatible touchpanel or other QuickMedia device via CresCAT-QM or CresCAT-IM cable.4
26 QM INPUTS 6-8
(3) 8-wire RJ-45 female, QuickMedia input ports; Signal Types: Dynamically configurable for RGBHV, component (YPbPr), S-video (Y/C), or composite video with stereo program and 2-channels microphone audio; RGB Format: RGBHV or RGBS; RGB Input Resolution, Non-interlaced: 1920 x 1200 maximum (60 Hz limit at 1600 x 1200 or higher); Video/HDTV Formats: NTSC or PAL, HDTV up to 1080i/1080p; Delay Skew Compensation: 0 to 22 ns; Connect to QM output ports of any QuickMedia devices via CRESCAT-QM or CRESCAT-IM cable4; Maximum Cable Length: 450 ft (aggregate distance from QM origination)
(Continued on following page)
Operations Guide – DOC. 6529B Multimedia Presentation System 300: MPS-300 • 17

Multimedia Presentation System 300 Crestron MPS-300
Connectors, Controls & Indicators (Continued)
# CONNECTORS1, CONTROLS & INDICATORS
DESCRIPTION
27 COM A & B
(2) DB9 male, bidirectional RS-232 ports; Up to 115.2k baud, hardware and software handshaking support for communication with serial devices. Can also be used for modem communications. The following table lists the pin assignments of the serial ports.
PIN DIRECTION DESCRIPTION
1 To MPS-300
(DCD) Data Carrier Detect
2 To MPS-300
(RXD) Receive Data
3 From MPS-300
(TXD) Transmit Data
4 From MPS-300
(DTR) Data Terminal Ready
5 Common (GND) Ground 6 To
MPS-300 (DSR) Data Set Ready
7 From MPS-300
(RTS) Request To Send
8 To MPS-300
(CTS) Clear To Send
9 To MPS-300
(RI) Ring Indicator
28 QM OUTPUTS 6-7
(2) 8-wire RJ-45 female, QuickMedia output ports; Signal Types: Dynamically configurable for RGBHV, component (YPbPr), S-video (Y/C), or composite video with stereo program and 2-channels microphone audio; RGB Format: RGBHV or RGBS; RGB Output Resolution, Non-interlaced: 1920 x 1200 maximum (60 Hz limit at 1600 x 1200 or higher); Video/HDTV Formats: NTSC or PAL, HDTV up to 1080i/1080p; Connects to QM input port of any QuickMedia device via CRESCAT-QM or CRESCAT-IM cable4
Maximum Cable Length: 450 ft (aggregate distance from QM origination)
29 LAN
(1) 8-wire RJ-45 with two LED indicators; 10/100BaseT Ethernet port; Green LED indicates link status; Yellow LED indicates Ethernet activity
(Continued on following page)
18 • Multimedia Presentation System 300: MPS-300 Operations Guide – DOC. 6529B

Crestron MPS-300 Multimedia Presentation System 300
Connectors, Controls & Indicators (Continued)
# CONNECTORS1, CONTROLS & INDICATORS
DESCRIPTION
30 OUTPUT 1-4
Contains composite, S-video (Y/C), component (Y, Pb, Pr) and RGBHV outputs on six BNC connectors and one DB15HD connector. Composite/Pb Output 1: (1) BNC female, composite video output, or Pb of secondary component/HDTV video output; Output Level: 1.0 to 1.1 Vp-p (terminated, with 1 Vp-p input) Output Impedance: 75 ohms nominal Y/Y, C/Pr OUTPUT 2: (2) BNC female, S-video (Y/C) video output, or Y and Pr of secondary component/HDTV video output; Output Level: 1.0 to 1.1 Vp-p (terminated, with 1 Vp-p input); Output Impedance: 75 ohms nominal COMP/Pb, Y/Y, C/Pr OUTPUT 3: (3) BNC female, configurable as: (1) Component/HDTV (YPbPr) video output, or (1) S-video (Y/C) output, or (1) Composite output; Output Level: 1.0 to 1.1 Vp-p (terminated, with 1 Vp-p input); Output Impedance: 75 ohms nominal RGBHV OUTPUT 4: (1) DB15HD female, RGBHV (VGA) output; Format: RGBHV, RGBS, or YPbPr; RGB Output Level: 0.7 to 0.75 Vp-p (terminated, with 0.7 Vp-p input, unity gain); RGB Output Impedance: 75 ohms nominal; Sync Output Level: 4 to 5 Vp-p; Sync Output Impedance: 55 ohms; Sync Polarity: Follows input
31 OUTPUT SELECTION
(7) pushbuttons and red LEDs, select output destination
(Continued on following page)
Operations Guide – DOC. 6529B Multimedia Presentation System 300: MPS-300 • 19

Multimedia Presentation System 300 Crestron MPS-300
Connectors, Controls & Indicators (Continued)
# CONNECTORS1, CONTROLS & INDICATORS
DESCRIPTION
32 NET
(4) 4-pin 3.5 mm detachable terminal blocks; Cresnet Master ports, paralleled; Available Cresnet Power: 30 Watts 24: Power (24 Volts DC) Y: Data Z: Data G: Ground
33 GROUND (1) 6-32 screw, chassis ground lug 34 100 – 240V ~2.5A
50/60 Hz (POWER SUPPLY)
(1) IEC Socket, mates with removable power cord (included).
1. Interface connectors for NET, INFRARED-SERIAL, IR IN, INPUT, RELAY OUTPUT, and AUDIO ports are provided with the unit.
2. Transmission levels on the infrared – serial output connectors are in the 0 to +5 VDC range, which may not be compatible with all RS-232 devices.
3. This eight-pin RJ-45 port provides connectivity to a touchpanel with a CH input port or a Crestron device with a CAT5 video input. This port provides component, composite or S-video balanced output over CAT5 wiring. Refer to the following table for connector pinouts.
RJ-45 PIN NUMBER WIRE COLORS (568B) COMPOSITE S-VIDEO COMPONENT
1 WHITE/ORANGE + Composite + Luminance + Y
2 ORANGE - Composite - Luminance - Y
3 WHITE/GREEN N/A + Chrominance + Pb
4 BLUE N/A N/A + Pr
5 WHITE/BLUE N/A N/A - Pr
6 GREEN N/A - Chrominance - Pb
7 WHITE/BROWN N/A N/A N/A
8 BROWN N/A N/A N/A 4. The eight-pin RJ-45 QuickMedia transport port accepts CAT5E/CAT6 carrying RGB, audio, video
and microphone signals. The QM port conforms to the 568B wiring standard. Refer to the following table for connector pinouts.
RJ-45 PIN NUMBER
WIRE COLORS (EIA 568B)
QM ASSIGNMENT
RGB
QM ASSIGNMENT COMPOSITE, S-VIDEO,
COMPONENT AND AUDIO
1 WHITE/ORANGE - RGB Red - CHROMINANCE (- Pr)
2 ORANGE + RGB Red + CHROMINANCE (+ Pr)
3 WHITE/GREEN - RGB Green - LUMINANCE (- Y)
4 BLUE + Digital Audio + AUDIO
5 WHITE/BLUE - Digital Audio - AUDIO
6 GREEN + RGB Green + LUMINANCE (+ Y)
7 WHITE/BROWN - RGB Blue - COMPOSITE (- Pb)
8 BROWN + RGB Blue + COMPOSITE (+ Pb)
20 • Multimedia Presentation System 300: MPS-300 Operations Guide – DOC. 6529B

Crestron MPS-300 Multimedia Presentation System 300
Industry Compliance This product is Listed to applicable UL Standards and requirements by Underwriters Laboratories Inc.
(E302724)
As of the date of manufacture the MPS-300 has been tested and found to comply with specifications for CE marking and standards per EMC and Radiocommunications Compliance Labelling.
NOTE: This device complies with part 15 of the FCC rules. Operation is subject to the following two conditions: (1) this device may not cause harmful interference and (2) this device must accept any interference received, including interference that may cause undesired operation.
This equipment has been tested and found to comply with the limits for a Class B digital device, pursuant to part 15 of the FCC Rules. These limits are designed to provide reasonable protection against harmful interference in a residential installation. This equipment generates, uses and can radiate radio frequency energy and if not installed and used in accordance with the instructions, may cause harmful interference to radio communications. However, there is no guarantee that interference will not occur in a particular installation. If this equipment does cause harmful interference to radio or television reception, which can be determined by turning the equipment off and on, the user is encouraged to try to correct the interference by one or more of the following measures:
Reorient or relocate the receiving antenna.
Increase the separation between the equipment and receiver.
Connect the equipment into an outlet on a circuit different from that to which the receiver is connected.
Consult the dealer or an experienced radio/TV technician for help.
Operations Guide – DOC. 6529B Multimedia Presentation System 300: MPS-300 • 21

Multimedia Presentation System 300 Crestron MPS-300
Setup
Network Wiring When wiring the network, consider the following:
• Use Crestron Certified Wire.
• Provide sufficient power to the system.
CAUTION: Insufficient power can lead to unpredictable results or damage to the equipment. Please use the Crestron Power Calculator to help calculate how much power is needed for the system (http://www.crestron.com/calculators).
Cresnet For networks with 20 or more devices, use a Cresnet Hub/Repeater (CNXHUB) to maintain signal quality.
For more details, refer to “Check Network Wiring” on page 86.
Ethernet The MPS-300 can also use high-speed Ethernet for communications between the device and a control system, computer, digital media server and other IP-based devices.
For information on connecting Ethernet devices in a Crestron system, refer to the latest version of the Crestron e-Control® Reference Guide (Doc. 6052), which is available for download from the Crestron website.
CAT5 Wiring Category 5 (CAT5) wiring is a twisted pair cable designed for Ethernet networks. These networks operate at speeds of up to 100 Megabits per second (Mbps) using the 100BaseT standard. Crestron takes advantage of this specification for a variety of video applications.
Crestron recommends using CresCAT, CresCAT-D or CresCAT-Q wiring solutions.
The following chart shows the maximum recommended cable lengths for various signal formats.
Recommended Maximum Cable Lengths for Video via Crestron Certified Wire
FORMAT MAXIMUM DISTANCE
Composite 500 feet S-video 500 feet
Component 500 feet
For more information, refer to the latest version of the Crestron CAT5 Wiring Reference Guide (Doc. 6137).
22 • Multimedia Presentation System 300: MPS-300 Operations Guide – DOC. 6529B

Crestron MPS-300 Multimedia Presentation System 300
QuickMedia Wiring The Crestron QuickMedia cable (sold under the name “CresCAT-QM”) contains one CAT5E cable and one Cresnet cable in Siamese jackets. Installation of any QM device is as simple as installing CresCAT-QM wires from the output of one device to the input of another. Installations are flexible, affordable and fast. For more information, refer to the latest revision of the Crestron MediaManager Applications Guide (Doc. 6244).
CresCAT-QM Cable
NOTE: Do not untwist the two wires in a single pair for more than 1/3-1/2” (0.84-1.27 cm) when making a connection. The twists are critical to canceling out interference between the wires.
The aggregate cable length of a signal path originating at the MPS-300 and terminating at a QM receiver must not exceed 450 feet (137 meters). Video signals may experience a loss of quality over very long lengths of cable. This phenomenon is due to the added resistance and capacitance of longer cable lengths and is not peculiar to either Crestron and/or QuickMedia systems. To ensure sufficient bandwidth, the maximum aggregate cable length should not exceed 450 feet. The use of lower-resolution signals may allow increased cable length but must be tested by the installer with the sources to be used. The QM pin assignment is based on the EIA/TIA 568B RJ-45 Jack standard.
NOTE: When transmitting S-video, luminance uses the green video pathway and chrominance uses the red video pathway. When transmitting composite video, the signal is carried on the blue video pathway.
NOTE: When using CresCAT-QM wiring, four additional wires are included for making Cresnet connections.
When connecting multiple QM devices, the route between a QM origination point (transmitter) and a QM endpoint (receiver) cannot have more than two midpoints (e.g. QM-MD7x2 or other QM switchers). Refer to the following diagram when configuring a QM network.
NOTE: Use CresCAT-QM to make QM connections. The cumulative skew over the entire length must be less than 22 ns.
Operations Guide – DOC. 6529B Multimedia Presentation System 300: MPS-300 • 23

Multimedia Presentation System 300 Crestron MPS-300
QM Network Topology
TPS-12G/15G-QM-LMPS-300 QM
QM QM
QM
QM
Origination Points Endpoints
QM
Midpoints
MPS-300
MPS-300QM-MD7x2
MPS-300
TPS-12G/15G-QM-L
Installation Ventilation The MPS-300 should be used in a well-ventilated area. The venting holes should not
be obstructed under any circumstances. If the MPS-300 is hot to the touch, consider using forced air ventilation and/or incrementing the spacing between units.
To prevent overheating, do not operate this product in an area that exceeds the environmental temperature range listed in the table of specifications. Consideration must be given if installed in a closed or multi-unit rack assembly since the operating ambient temperature of the rack environment may be greater than the room ambient temperature. Contact with thermal insulating materials should be avoided on all sides of the unit.
Rack Mounting The MPS-300 can be mounted in a rack or stacked with other equipment. Two “ears” are provided with the MPS-300 so that the unit can be rack mounted. These ears must be installed prior to mounting. Complete the following procedure to attach the ears to the unit. The only tool required is a #2 Phillips screwdriver.
WARNING: To prevent bodily injury when mounting or servicing this unit in a rack, take special precautions to ensure that the system remains stable. The following guidelines are provided to ensure your safety:
• When mounting this unit in a partially filled rack, load the rack from the bottom to the top with the heaviest component at the bottom of the rack.
• If the rack is provided with stabilizing devices, install the stabilizers before mounting or servicing the unit in the rack.
NOTE: Reliable earthing of rack-mounted equipment should be maintained. Particular attention should be given to supply connections other than direct connections to the branch circuit (e.g. use of power strips).
To install the ears:
1. There are screws that secure each side of the MPS-300 top cover. Using a #2 Phillips screwdriver, remove the three screws closest to the front panel from one side of the unit. Refer to the diagram following step 3 for a detailed view.
2. Position a rack ear so that its mounting holes align with the holes vacated by the screws in step 1.
3. Secure the ear to the unit with three screws from step 1, as shown in the following diagram.
24 • Multimedia Presentation System 300: MPS-300 Operations Guide – DOC. 6529B

Crestron MPS-300 Multimedia Presentation System 300
Ear Attachment for Rack Mounting
4. Repeat procedure (steps 1 through 3) to attach the remaining ear to the opposite side.
NOTE: The sync input impedance and DDC feature should be set prior to placingthe MPS ent rack. For more information, refer to “Configure the -300 in an equipmRGB Input Ports” on page 28.
Stacking Four “feet” are located on the bottom of the MPS-300 so that if the unit is not rack ounted, the rubber feet can provide stability when the unit is placed on a flat
okup s as called out in the illustrations that follows this
iring” on page 22 before applying power. Apply
Hardware Connections for the MPS-3
msurface or stacked.
Hardware HoMake the necessary connectionparagraph. Refer to “Network Wpower after all connections have been made.
00, Front
COMPUTER:TO USB PORT ON PC
Operations Guide – DOC. 6529B Multimedia Presentation System 300: MPS-300 • 25

Multimedia Presentation System 300 Crestron MPS-300
Hardware Connections for the MPS-300, Rear TO SPEAKERS:
8-OHM STEREO (MPS-300)70 VOLT MONO (MPS-300-70V)
100 VOLT MONO (MPS-300-100V)
AUDIO INPUTS:FROM VIDEO AND
RGB SOURCES
MICROPHONE/LINE INPUT:FROM MICROPHONE ORLINE-LEVEL SOURCES
PROGRAM AUDIO OUTPUT:TO AMPLIFIER OR
AMPLIFIED SPEAKERS
IR/SERIAL OUT:TO IRP2 IR EMITTER PROBE
or ONE-WAY SERIALCONTROLLED DEVICES
IR IN:FROM
CNXRMIRD IRRECEIVER
INPUT:FROM DEVICE OUTPUTS
CONTACT OR RELAYCLOSURES (24 VOLTS MAX)
RELAY OUTPUT:TO CONTROLLABLE
DEVICES
COM A & COM B:BI-DIRECTIONAL RS-232 WITH
HARDWARE & SOFTWAREHANDSHAKING AND MODEM CONTROL
LAN:10/100 BASE-T
ETHERNET TO LAN
CRESNET:TO ANY
CRESNETDEVICE
POWER:FROM LINE VOLTAGE
GROUND:TIE ALL SOURCE ANDDEVICE GROUNDS TOGROUND TERMINAL
OUTPUTS 1-4:TO COMPOSITE,
COMPONENT, S-VIDEO,AND RGB INPUTS OF
DISPLAY DEVICE
RECORD OUTPUT:TO CODEC, RECORDINGDEVICE, OR ASSISTIVE
LISTENING SYSTEM
SPEECH OUTPUT:TO AMPLIFIER OR
AMPLIFIED SPEAKERS
INPUTS 1 & 2:FROM COMPOSITE,COMPONENT, OR
S-VIDEO SOURCES
INPUTS 3-5:FROM RGBHV &RGBS SOURCES
OUTPUTS 6 & 7:QM OUTPUTS TO
QM DEVICES
INPUTS 6-8:FROM QMSOURCES
OUTPUT 5:TOUCHPANEL OUTPUTS
TO “QM” or “CH” TYPETOUCHPANELS
When running the out-of-the-box program, the MPS-300 can support the following Crestron devices:
• (2) APAD
• (2) C2N-FTB
• (2) CNX-B12
• (2) C2N-DB12
• (2) CLW-DIM1RF / CLW-DIMS1RF (requires Crestron Toolbox for implementation)
• (2) CLW-SW1RF / CLW-SWS1RF (requires Crestron Toolbox for implementation)
• (1) QM-AMP3x80MM/SR
• (1) C2N-MNETGW
• (1) CLS-C6
• (1) RoomView Express or RoomView Server Edition connection
CAUTION: Speakers must be rated to full available output.
CAUTION: Do not bridge speaker outputs
CAUTION: All source devices should be grounded to the MPS-300.
NOTE: The MPS-300 can only be powered by the included power cord. Power cannot be supplied from network devices that are connected to the mini-terminal block connectors.
NOTE: For Cresnet, CAT5, and QuickMedia connections, use Crestron Certified Wire.
NOTE: When running the out-of-the-box program, relays 1 and 2 are momentary.
26 • Multimedia Presentation System 300: MPS-300 Operations Guide – DOC. 6529B

Crestron MPS-300 Multimedia Presentation System 300
NOTE: When running the out-of-the-box program and connecting a projector screen, the “up” control lines should be connected to relay 1 and the “down” control lines should be connected to relay 2.
NOTE: This product does not support Cresnet Analyzer software. If Cresnet analysis is required, contact Crestron’s True Blue Support.
Balanced and unbalanced audio inputs/outputs are provided, utilizing five-pin terminal block connectors. For connection details, refer to the following table and diagrams.
Audio Connections
SIGNAL NAME
BALANCED AUDIO INPUT
BALANCED AUDIO
OUTPUT
UNBALANCED AUDIO INPUT
UNBALANCED AUDIO OUTPUT
+ 1 + 1 + 1 + In 1 + Out - 1 - 1 - 1 – signal return,
jumper to GND Open
G Shield/ground Shield/ground Ground Common ground
+ 2 + 2 + 2 + In 2 + Out - 2 - 2 - 2 – signal return
jumper to GND Open
Typical Balanced/Unbalanced Inputs
+ - G + -
+
+
Balanced Input
Shield
Left/Microphone
Right/Line
Jumpers
+ - G + -
+
+
Unbalanced Input
Left/Microphone
Right/Line
Shield
Shield
Typical Balanced/Unbalanced Outputs
Shield
AMPLeft
Right
+ - G + -Balanced Output
+
+ AMP
Left
Right
+ - G + -Unbalanced Output
+
+
Operations Guide – DOC. 6529B Multimedia Presentation System 300: MPS-300 • 27

Multimedia Presentation System 300 Crestron MPS-300
Configure the RGB Input Ports Each of the RGB input ports feature a set of six DIP switches located inside the MPS-300. These switches are used to set the sync input impedance of each port and simulate the presence of a monitor (DDC) for each RGB input.
The sync input impedance can be set to either 1k, 500, or 75 ohms. The setting from the factory is 1k ohms and should work with most RGB sources. If the signal quality is poor, lowering the input impedance to match the impedance of coax cable may alleviate sync signal problems that are associated with RGB cables greater than the typical VESA standard (typically six feet).
For laptops that require the presence of a monitor to enable its video output, the MPS-300 has a selectable feature (DDC) that simulates the presence of a monitor so RGB sources (such as a laptop computer) will transmit a signal even when an RGB device is not connected to the MPS-300 output. Changing the DIP switch setting can enable or disable this feature. The MPS-300 is shipped from the factory with the DDC feature disabled.
NOTE: The sync input impedance and DDC feature should be set prior to placing the MPS-300 in an equipment rack.
Find the DIP Switches The DIP switches that configure the RGB input ports are located on the bottom of the MPS-300. The only tools required are a #2 Phillips screwdriver and a grounding strap (or grounded workstation).
CAUTION: The MPS-300 contains ESD-sensitive devices. Perform the following procedure while wearing a grounding strap that is properly grounded or on a grounded workstation to avoid damaging the MPS-300.
1. Connect RGB sources and a monitor to the MPS-300 as described in “Hardware Hookup” on page 25.
2. Remove the DIP switch access panel by removing the two screws located on the bottom of the MPS-300. Use a #2 Phillips screwdriver to remove the screws.
3. Lift the access panel shown in the following diagram to expose the DIP switches. Each RGB input port has a corresponding bank of DIP switches.
28 • Multimedia Presentation System 300: MPS-300 Operations Guide – DOC. 6529B

Crestron MPS-300 Multimedia Presentation System 300
DIP Switch Location
DIP SWITCHES LOCATED UNDER ACCESS PANEL
Set the DIP Switches 1. Referring to the following table, set the DIP switches of each RGB input port to the required sync input impedance and DDC functionality.
DIP Switch Function Chart
DDC HORIZONTAL SYNC
VERTICAL SYNC
SWITCH 1 2 3 4 5 6 FUNCTION SETTING
OFF OFF OFF X X X X DDC
ON ON ON X X X X
1K X X OFF OFF OFF OFF
500 X X ON OFF ON OFF SYNC INPUT IMPEDANCE
75 X X ON ON ON ON
NOTE: The function table is also located on the bottom of the MPS-300.
NOTE: The factory setting for the DIP switches are DDC disabled (switches 1 & 2 in the OFF position) and 1k ohm impedance (switches 3 through 6 in the OFF position).
2. Replace the access panel and secure the screws using the #2 Phillips screwdriver.
Further Configuration If using the out-of-the-box functionality, the MPS-300 can be configured with the front panel. For information, refer to “Configuration” on page 36.
Operations Guide – DOC. 6529B Multimedia Presentation System 300: MPS-300 • 29

Multimedia Presentation System 300 Crestron MPS-300
Label the Buttons Use Crestron Engraver software to print custom labels for the MPS-300’s front panel buttons and LEDS. Crestron recommends printing on 100-pound paper. Paper weighing less than 100 pounds will tend to crumple while sliding in, while paper weighing more than 100 pounds may not fit.
30 • Multimedia Presentation System 300: MPS-300 Operations Guide – DOC. 6529B

Crestron MPS-300 Multimedia Presentation System 300
Programming Software Have a question or comment about Crestron software? Answers to frequently asked questions (FAQs) can be viewed in the Online Help section of the Crestron website. To post a question or view questions you have submitted to Crestron’s True Blue Support, log in at http://support.crestron.com. First-time users will need to establish a user account.
Earliest Version Software Requirements for the PC NOTE: Crestron recommends that you use the latest software to take advantage of the most recently released features. The latest software is available from the Crestron website.
NOTE: Crestron software and any files on the website are for authorized Crestron dealers and Crestron Authorized Independent Programmers (CAIP) only. New users may be required to register to obtain access to certain areas of the site (including the FTP site).
Crestron has developed an assortment of Windows®-based software tools to develop an MPS-300 system. For the minimum recommended software versions, visit the Version Tracker page of the Crestron website (www.crestron.com/versiontracker).
Programming with Crestron SystemBuilder Crestron SystemBuilder is the easiest method of programming but does not offer as much flexibility as SIMPL Windows. For additional details, download SystemBuilder from the Crestron website and examine the extensive help file.
Any program created for the MPS-300 with SystemBuilder will include the out-of-the-box functionality in addition to any additional programming created with SystemBuilder.
Programming with SIMPL Windows NOTE: While SIMPL Windows can be used to program the MPS-300, it is recommended to use SystemBuilder for configuring an MPS-300 system.
SIMPL Windows is Crestron’s premier software for programming Crestron control systems. It is organized into two separate but equally important “Managers”.
Any SIMPL Windows program written for an MPS-300 will contain all of the MPS-300’s out-of-the-box functions in a protected area of the program. The parts of the program that contain the out-of-the-box functions are locked and cannot be changed or deleted. When a program is compiled, the custom program plus the out-of-the-box front panel functionality, including setup menus, are loaded.
NOTE: Visit Crestron’s True Blue Support on the web for programming tips.
Operations Guide – DOC. 6529B Multimedia Presentation System 300: MPS-300 • 31

Multimedia Presentation System 300 Crestron MPS-300
Configuration Manager Configuration Manager is the view where programmers “build” a Crestron control system by selecting hardware from the Device Library.
• To incorporate the MPS-300 into the system, drag the MPS-300 from the Control Systems folder of the Device Library and drop it in the System Views.
Locating the MPS-300 in the Device Library
Program Manager Program Manager is the view where programmers “program” a Crestron control system by assigning signals to symbols.
Signals that are part of the MPS-300’s out-of-the-box functionality are locked and cannot be modified or deleted. Locked signals are grayed out in the MPS-300’s SIMPL Windows symbols. To prevent corruption of the out-of-the-box functionality, locked signal names should not be copied or driven to other destinations in the SIMPL Windows program.
NOTE: If using SIMPL Windows version 2.08.19 or later, signals that are part of the out-of-the-box functionality may be hidden from view. To view hidden signals in a program containing out-of-the-box functionality, select Display Out Of The Box Functionality (OOTBF) Programming in the “SIMPL Windows Preferences” window (Options | Preferences…).
The symbol can be viewed by double clicking on the icon or dragging it into Detail View. A description for each signal in the symbol is described in the SIMPL Windows help file (F1).
Switching Programs If a custom program is loaded into the MPS-300, the MPS-300 will run the custom program when it boots up. To switch to the out-of-the-box program:
1. Press and release HW-R.
2. Press and hold SW-R until “Bypassing Custom Program, Running OOTBF” is displayed on the LCD.
3. To return to the custom program simply press HW-R or cycle power.
Saving Settings Settings such as tone/volume levels (out-of-the-box and custom programs) and input/output names (out-of-the-box programs) are stored in an xml and text file that can be recalled should an MPS-300 program need to be updated.
32 • Multimedia Presentation System 300: MPS-300 Operations Guide – DOC. 6529B

Crestron MPS-300 Multimedia Presentation System 300
To save settings for later use, use Crestron Toolbox’ File Manager utility to retrieve the *.xml (where * can be “ootbf” for settings made when running the out-of-the-box functionality program or “custom” for settings made when running a custom program) and System Configuration.txt files from the NVRAM Disk directory. After the new out-of-the-box functionality program or custom program has been loaded, use Windows Explorer and Crestron Toolbox’ File Manager utility to place the appropriate *.xml and System Configuration.txt files in the NVRAM Disk directory and reboot the processor. For instructions on using Crestron Toolbox’ File Manager utility, refer to the Crestron Toolbox help file.
NOTE: If switching to a different type of program (i.e. from out-of-the-box functionality to custom or vice-versa), the retrieved xml file can be renamed (ootbf.xml becomes custom.xml and custom.xml becomes ootbf.xml). The running program will import any relevant settings. Verify that all of the required settings are correct.
Operations Guide – DOC. 6529B Multimedia Presentation System 300: MPS-300 • 33

Multimedia Presentation System 300 Crestron MPS-300
Uploading and Upgrading Crestron recommends using the latest programming software and that each device contains the latest firmware to take advantage of the most recently released features. However, before attempting to upload or upgrade it is necessary to establish communication. Once communication has been established, files (for example, programs or firmware) can be transferred to the control system. Finally, program checks can be performed (such as changing a device ID or creating an IP table) to ensure proper functioning.
While the next section provides an overview for communication, refer to “Establishing Communications with the Control System” in the Crestron 2-Series Control Systems Reference Guide (Doc. 6256) for connection details. If communications cannot be established, refer to “Troubleshooting Communications” in the same guide.
Establishing Communication Use Crestron Toolbox for communicating with the MPS-300; refer to the Crestron Toolbox help file for details. There are two methods of communication.
USB NOTE: Required for initial setup of Ethernet parameters.
USB Communication
PC RUNNINGCRESTRON TOOLBOX MPS-300USB COMMUNICATION
VIA USB CABLE
• The COMPUTER port on the MPS-300 connects to the USB port on the PC via the included Type A to Type B USB cable.
• Use the Address Book in Crestron Toolbox to create an entry using the expected communication protocol (USB). When multiple USB devices are connected, identify the MPS-300 by entering “MPS-300” in the Model textbox, the unit’s serial number in the Serial textbox or the unit’s hostname in the Hostname textbox. The hostname can be found in the “System Info” window in the section marked Ethernet however, communications must be established in order to see this information in the “System Info” window.
NOTE: The hostname can also be viewed using the front panel. Refer to page 63 for more information.
• Display the MPS-300’s “System Info” window (click the icon); communications are confirmed when the device information is displayed.
34 • Multimedia Presentation System 300: MPS-300 Operations Guide – DOC. 6529B

Crestron MPS-300 Multimedia Presentation System 300
TCP/IP Ethernet Communication
PC RUNNINGCRESTRON TOOLBOX MPS-300ETHERNET
• Establish USB communications between the MPS-300 and a PC.
• Enter the IP address, IP mask and default router of the MPS-300 via the Crestron Toolbox (Functions | Ethernet Addressing); otherwise enable DHCP.
• Confirm Ethernet connections between MPS-300 and PC. If connecting through a hub or router, use CAT5 straight through cables with 8-pin RJ-45 connectors. Alternatively, use a CAT5 crossover cable to connect the two LAN ports directly without using a hub or router.
• Use the Address Book in the Crestron Toolbox to create an entry for the MPS-300 with the MPS-300’s TCP/IP communication parameters.
• Display the “System Info” window (click the icon) and select the MPS-300 entry.
Programs and Firmware Program and firmware files may be distributed from programmers to installers or from Crestron to dealers. Firmware upgrades are available from the Crestron website as new features are developed after product releases. One has the option to upload programs via the programming software or to upload and upgrade via the Crestron Toolbox. For details on uploading and upgrading, refer to the SIMPL Windows help file or the Crestron Toolbox help file.
Program If a SIMPL Windows program is provided, it can be uploaded to the control system using SIMPL Windows or Crestron Toolbox. If an updated out-of-the-box-functionality program is provided, it can be uploaded to the control system using Crestron Toolbox.
Firmware Check the Crestron website to find the latest firmware. (New users may be required to register to obtain access to certain areas of the site, including the FTP site.)
• Upgrade MPS-300 firmware via Crestron Toolbox.
• Establish USB or TCP/IP communications with the MPS-300 and display the “System Info” window.
• Select Functions | Firmware… to upgrade the MPS-300 firmware.
Operations Guide – DOC. 6529B Multimedia Presentation System 300: MPS-300 • 35

Multimedia Presentation System 300 Crestron MPS-300
Configuration & Operation The MPS-300 can be used for audio and video switching without any programming required. This is ideal for those that need a basic audio-video switching system. Prior to operation, the MPS-300 must be configured for use.
Configuration The MPS-300 is configured using the built-in menu.
Access the Menu To access the menu:
• Press SYS PWR to turn on the system.
• Press the MENU button. Instructions for entering the password will be displayed followed by a blinking cursor that prompts you to enter the password.
Enter Password
Enter Password
_
• Enter the password with the volume control and the j and k buttons.
NOTE: Administrator and user passwords can be created in SystemBuilder when creating a custom program. Refer to the SystemBuilder help file for more information. Users who enter an administrator password can change any of the MPS-300 settings. Users who enter a user password can only view the MPS-300 settings. The MPS-300 can determine when an administrator or user password is entered.
NOTE: If running the out-of-the-box program, the default password (which has the same rights as an administrator password) is 12345. It can be changed within the Control Setup menu. Refer to page 69 for more information.
⇒ Turn the volume control until the correct digit is displayed.
⇒ Press the k button to move the cursor to the next digit and select the next digit in the password with the volume control. Press the j button to move to the previous digit.
⇒ Press ENTER once the password is displayed. If an incorrect password is entered, the display will show “Invalid Password” and return to the Enter Password screen.
36 • Multimedia Presentation System 300: MPS-300 Operations Guide – DOC. 6529B

Crestron MPS-300 Multimedia Presentation System 300
Exit the Menu To exit the menu:
• While in the main menu, press the MENU button to exit the menu.
Exit Menu Prompt
Exit Setup Menu?
Yes No
⇒ Press the soft button labeled Yes to exit the menu or press the soft button labeled No to return to the menu.
NOTE: The following sections describe configuration instructions when the MPS-300 is running the out-of-the-box program or if an administrator password was entered (while a custom program is running). If a user password was entered while a custom program is running, the user can view the settings but cannot make changes. For information on administrator and user passwords, refer to the SystemBuilder help file.
NOTE: When the system is being configured, system operation is suspended.
Menu Structure The following diagram displays the menu structure of the MPS-300.
MPS-300 Menu Structure
MAIN MENU
AUDIO SETUP
PROGRAM OUTPUT
SPEECH OUTPUT
RECORD OUTPUT
INPUTCOMPENSATION
VIDEO SETUP
INPUT NAMES
INPUT TYPE
OUTPUT NAMES
NETWORK SETUP
IP ADDRESS
SUBNET MASK
DEFAULT ROUTER
DHCP
WINS
HOSTNAME
DOMAIN NAME
ROOMVIEW
CONTROL SETUP
BACKLIGHT
FUNCTIONS
DEVICES
APAD UPGRADE
PASSWORD
INFO
MESSAGES
TIME/DATE
DEFAULTSMAC ADDRESS
MASTER STARTUPVOLUME
FRONT PANELLOCK
MICROPHONES
Operations Guide – DOC. 6529B Multimedia Presentation System 300: MPS-300 • 37

Multimedia Presentation System 300 Crestron MPS-300
The menu is separated into four sections.
• Audio Setup: Contains controls for PROGRAM, SPEECH, and RECORD output settings, source input compensation, master startup volume, and microphones.
• Video Setup: Contains controls for naming input sources, selecting input signal types (video inputs only), and naming output destinations.
• Network Setup: Contains controls for setting the IP address of the MPS-300, the IP address of the subnet mask used by the MPS-300, the IP address of the default router used by the MPS-300, the DHCP mode of the MPS-300, and the WINS mode of the MPS-300. The Network Setup section can also display the hostname and MAC address of the MPS-300 as well as the domain name used by the MPS-300. The MPS-300’s RoomView settings can also be adjusted.
• Control Setup: Contains controls for adjusting the LCD backlight, naming the function buttons, identifying network devices, updating connected APAD devices, setting the front panel password, displaying system information, displaying system messages, setting the time and date, and restoring default settings.
Audio Setup The audio characteristics of the MPS-300 can be configured from the front panel using the Audio Setup menu.
Access the Audio Setup Menu
To access the Audio Setup menu:
• Access the menu as described on page 36. The words “Audio Setup” will be displayed.
• Press ENTER to open the Audio Setup menu.
• To exit the Audio Setup menu, press MENU.
Program Output The Program Output section of the Audio Setup menu is used to set the PROGRAM output’s volume level, source mix, bass, treble, minimum volume, maximum volume, stereo/mono mode, and startup volume. The RECORD and SPEECH outputs are not affected by changes made from the program output menu.
Access the Program Output Menu
To access the Program Output menu:
• Access the Audio Setup menu as described above.
• Press ENTER to open the Program Output menu.
• To return to the Audio Setup menu, press MENU.
Set the Program Volume Level
To set the Program Volume level:
• Access the Program Output menu as described above.
• Adjust the Program Volume level by turning the volume control clockwise to raise the volume, or counterclockwise to lower the volume. When adjusting the volume, the display will change to indicate the volume level.
38 • Multimedia Presentation System 300: MPS-300 Operations Guide – DOC. 6529B

Crestron MPS-300 Multimedia Presentation System 300
Set the Program Source Mix To set the PROGRAM output’s source mix:
• Access the Program Output menu as described in “Access the Program Output Menu” on page 38.
• Press the k or j buttons until “Source Mix” is displayed on the LCD and press ENTER to open the Program Source Mix controls.
Program Source Mix Controls
Program Source Mix
Aud. Only
• Press the k or j buttons until the desired setting is displayed on the LCD. The current setting is indicated with an asterisk (*). The following settings are available:
⇒ Aud. Only: Sends the audio signal from the selected source to the PROGRAM output.
⇒ Mic. Only: Sends the microphone input signals to the PROGRAM output.
⇒ Mic + Aud: Sends a mix of the audio signal from the selected source and the microphone input signals to the PROGRAM output.
NOTE: While setting the program source mix, the Program Volume level can be adjusted by turning the volume control clockwise to raise the volume, or counterclockwise to lower the volume. When adjusting the volume, the display will change to indicate the volume level.
• Press ENTER to save changes and return to the previous screen. To cancel without saving changes, press MENU.
Set the Program Bass Level To set the Program Bass level:
• Access the Program Output menu as described on page 38.
• Press the k or j buttons until “Bass” is displayed on the LCD and press ENTER to open the Program Bass controls. The current bass level will be displayed.
Operations Guide – DOC. 6529B Multimedia Presentation System 300: MPS-300 • 39

Multimedia Presentation System 300 Crestron MPS-300
Program Bass Controls
Program Bass
0db
• Adjust the Program Bass level with the j and k buttons. Press the k button to increase the bass level. Press the j button to lower the bass level.
NOTE: While adjusting the Program Bass level, the Program Volume level can be adjusted by turning the volume control clockwise to raise the volume, or counterclockwise to lower the volume. When adjusting the volume, the display will change to indicate the volume level.
• Press MENU or ENTER to save changes and return to the previous screen.
Set the Program Treble Level To set the Program Treble level:
• Access the Program Output menu as described on page 38.
• Press the k or j buttons until “Treble” is displayed on the LCD and press ENTER to open the Program Treble controls. The current treble level will be displayed.
Program Treble Control
Program Treble
0db
• Adjust the Program Treble level with the j and k buttons. Press the k button to increase the treble level. Press the j button to lower the treble level.
NOTE: While adjusting the Program Treble level, the Program Volume level can be adjusted by turning the volume control clockwise to raise the volume, or counterclockwise to lower the volume. When adjusting the volume, the display will change to indicate the volume level.
• Press MENU or ENTER to save changes and return to the previous screen.
40 • Multimedia Presentation System 300: MPS-300 Operations Guide – DOC. 6529B

Crestron MPS-300 Multimedia Presentation System 300
Set the Program Minimum Volume
The Program Minimum Volume control is used to set the lowest volume setting of the PROGRAM output. The RECORD and SPEECH outputs are not affected by changes made to the Program Minimum Volume level.
To set the Program Minimum Volume level:
• Access the Program Output menu as described on page 38.
• Press the k or j buttons until “Min Volume” is displayed on the LCD and press ENTER to open the Program Minimum Volume controls.
Program Minimum Volume Control
Prog. Min Volume
30%
• Adjust the Program Minimum Volume level with the j and k buttons. Press the k button to increase the Program Minimum Volume level. Press the j button to lower the Program Minimum Volume level. The highest Program Minimum Volume setting is 30%.
NOTE: While adjusting the Program Minimum Volume level, the Program Volume level can be adjusted by turning the volume control clockwise to raise the volume, or counterclockwise to lower the volume. When adjusting the volume, the display will change to indicate the volume level.
• Press MENU or ENTER to save changes and return to the previous screen.
Set the Program Maximum Volume
The Program Maximum Volume control is used to set the highest volume setting of the PROGRAM output. The RECORD and SPEECH outputs are not affected by changes made to the Program Maximum Volume level.
To set the Program Maximum Volume level:
• Access the Program Output menu as described on page 38.
• Press the k or j buttons until “Max Volume” is displayed on the LCD and press ENTER to open the Program Maximum Volume controls.
Program Maximum Volume Control
Prog. Max Volume
75%
Operations Guide – DOC. 6529B Multimedia Presentation System 300: MPS-300 • 41

Multimedia Presentation System 300 Crestron MPS-300
• Adjust the Program Maximum Volume level with the j and k buttons. Press the k button to increase the Program Maximum Volume level. Press the j button to lower the Program Maximum Volume level. The lowest Program Maximum Volume setting is 50%.
NOTE: While adjusting the Program Maximum Volume level, the Program Volume level can be adjusted by turning the volume control clockwise to raise the volume, or counterclockwise to lower the volume. When adjusting the volume, the display will change to indicate the volume level.
• Press MENU or ENTER to save changes and return to the previous screen.
Set the Stereo / Mono Mode The Stereo / Mono controls are used to set the PROGRAM output mode. The audio sent to the speaker outputs can be set for either stereo or mono. When set to stereo, the audio signal is separated into left and right channels for distribution to left and right speakers or amplifier channels. When set to mono, the audio signal is combined into one signal and sent to both channels for use in larger rooms where stereo separation is not practical. The RECORD and SPEECH outputs are not affected by changes to the stereo/mono mode.
To set the Stereo / Mono mode:
• Access the Program Output menu as described on page 38.
• Press the k or j buttons until “Stereo/Mono” is displayed on the LCD and press ENTER to open the Stereo / Mono controls as shown in the following diagram.
Stereo / Mono Control
Select Stereo/Mono
*Stereo
• Press the k or j buttons until the desired mode is displayed on the LCD and press ENTER. The current setting is indicated with an asterisk (*).
NOTE: While adjusting the Stereo/Mono setting, the Program Volume level can be adjusted by turning the volume control clockwise to raise the volume, or counterclockwise to lower the volume. When adjusting the volume, the display will change to indicate the volume level.
• Press ENTER to save changes and return to the Program Output menu. To cancel without saving changes, press MENU.
Adjust the Program Startup Volume
The Program Startup Volume control is used to establish the PROGRAM output’s volume level setting when an input is selected. The RECORD and SPEECH outputs are not affected by changes made to the Program Startup Volume level.
42 • Multimedia Presentation System 300: MPS-300 Operations Guide – DOC. 6529B

Crestron MPS-300 Multimedia Presentation System 300
To adjust the Program Startup Volume level:
• Access the Program Output menu as described on page 38.
• Press the k or j buttons until “Startup Vol.” is displayed on the LCD and press ENTER to open the Program Startup Volume control.
Program Startup Volume Control
Prog. Startup Vol.
30%
• Adjust the Program Startup Volume level with the j and k buttons. Press the k button to increase the startup volume level. Press the j button to lower the startup volume level. The highest Program Startup Volume setting is 100%.
NOTE: While adjusting the Program Startup Volume level, the Program Volume level can be adjusted by turning the volume control clockwise to raise the volume, or counterclockwise to lower the volume. When adjusting the volume, the display will change to indicate the volume level.
• Press MENU or ENTER to save changes and return to the previous screen.
Speech Output The Speech Output section of the Audio Setup menu is used to set the SPEECH output’s volume level, source mix, bass, treble, speech delay, minimum volume, maximum volume, and startup volume. The PROGRAM and RECORD outputs are not affected by changes made from the Speech Output menu.
Access the Speech Output Menu
To access the Speech Output menu:
• Access the Audio Setup menu as described on page 38. The words “Audio Setup” will be displayed.
• Press the k or j buttons until “Speech Output” is displayed on the LCD and press ENTER to open the Speech Output menu.
• To return to the Audio Setup menu, press MENU.
Set the Speech Volume Level To set the Speech Volume level:
• Access the Speech Output menu as described above.
• Adjust the Speech Volume level by turning the volume control clockwise to raise the volume, or counterclockwise to lower the volume. When adjusting the volume, the display will change to indicate the volume level.
Operations Guide – DOC. 6529B Multimedia Presentation System 300: MPS-300 • 43

Multimedia Presentation System 300 Crestron MPS-300
Set the Speech Source Mix To set the SPEECH output’s source mix:
• Access the Speech Output menu as described in “Access the Speech Output Menu” on page 43.
• Press the k or j buttons until “Source Mix” is displayed on the LCD and press ENTER to open the Speech Source Mix controls.
Speech Source Mix Controls
Speech Source Mix
Aud. Only
• Press the k or j buttons until the desired setting is displayed on the LCD. The current setting is indicated with an asterisk (*). The following settings are available:
⇒ Aud. Only: Sends the audio signal from the selected source to the SPEECH output.
⇒ Mic. Only: Sends the microphone input signals to the SPEECH output.
⇒ Mic + Aud: Sends a mix of the audio signal from the selected source and the microphone input signals to the SPEECH output.
NOTE: While setting the Speech Source Mix, the Speech Volume level can be adjusted by turning the volume control clockwise to raise the volume, or counterclockwise to lower the volume. When adjusting the volume, the display will change to indicate the volume level.
• Press ENTER to save changes and return to the previous screen. To cancel without saving changes, press MENU.
Set the Speech Bass Level To set the Speech Bass level:
• Access the Speech Output menu as described on page 43.
• Press the k or j buttons until “Bass” is displayed on the LCD and press ENTER to open the Speech Bass controls. The current bass level will be displayed.
44 • Multimedia Presentation System 300: MPS-300 Operations Guide – DOC. 6529B

Crestron MPS-300 Multimedia Presentation System 300
Speech Bass Controls
Speech Bass
0db
• Adjust the Speech Bass level with the j and k buttons. Press the k button to increase the Speech Bass level. Press the j button to lower the Speech Bass level.
NOTE: While adjusting the Speech Bass level, the Speech Volume level can be adjusted by turning the volume control clockwise to raise the volume, or counterclockwise to lower the volume. When adjusting the volume, the display will change to indicate the volume level.
• Press MENU or ENTER to save changes and return to the previous screen.
Set the Speech Treble Level To set the Speech Treble level:
• Access the Speech Output menu as described on page 43.
• Press the k or j buttons until “Treble” is displayed on the LCD and press ENTER to open the Speech Treble controls. The current treble level will be displayed.
Speech Treble Control
Speech Treble
0db
• Adjust the Speech Treble level with the j and k buttons. Press the k button to increase the Speech Treble level. Press the j button to lower the Speech Treble level.
NOTE: While adjusting the Speech Treble level, the Speech Volume level can be adjusted by turning the volume control clockwise to raise the volume, or counterclockwise to lower the volume. When adjusting the volume, the display will change to indicate the volume level.
• Press MENU or ENTER to save changes and return to the previous screen.
Operations Guide – DOC. 6529B Multimedia Presentation System 300: MPS-300 • 45

Multimedia Presentation System 300 Crestron MPS-300
Set the Speech Delay To set the Speech Delay:
• Access the Speech Output menu as described on page 43.
• Press the k or j buttons until “Speech Delay” is displayed on the LCD and press ENTER to open the Speech Delay controls. The current speech delay will be displayed.
Speech Delay Control
Speech Delay
0ms
• Adjust the Speech Delay with the j and k buttons. Press the k button to increase the delay. Press the j button to lower the delay. The highest delay setting is 40 milliseconds.
NOTE: While adjusting the Speech Delay, the Speech Volume level can be adjusted by turning the volume control clockwise to raise the volume, or counterclockwise to lower the volume. When adjusting the volume, the display will change to indicate the volume level.
• Press MENU or ENTER to save changes and return to the previous screen.
Change the Volume Control Mode
The operating mode of the volume control knob can be set to adjust the program volume, the speech volume, user-selectable program/speech volume, or the master volume. To change the Volume Control Mode:
• Access the Speech Output menu as described on page 43.
• Press the k or j buttons until “Prog/Spch Vol.” is displayed on the LCD and press ENTER to open the Volume Control Mode controls.
Volume Control Mode Control
Prog/Spch Vol.
Program Only
46 • Multimedia Presentation System 300: MPS-300 Operations Guide – DOC. 6529B

Crestron MPS-300 Multimedia Presentation System 300
• Press the k or j buttons until the desired mode is displayed on the LCD and press ENTER. The current setting is indicated with an asterisk (*). The following settings are available:
⇒ Program Only: The front panel volume control will now only control the output volume for PROG OUT (and SPEAKER 40W 8Ω if the internal amplifier is used).
⇒ Speech Only: The front panel volume control will now only control the output volume for SPEECH OUT.
⇒ Pgm/Spch Sel.: The front panel volume control will allow the user to select during operation if the knob affects the volume of PROG OUT or SPEECH OUT.
⇒ Master Vol.: The front panel volume control will control the master volume level, raising both the PROG OUT and SPEECH OUT volumes simultaneously while retaining their current proportional levels.
NOTE: While setting the Volume Control Mode, the Speech Volume level can be adjusted by turning the volume control clockwise to raise the volume, or counterclockwise to lower the volume. When adjusting the volume, the display will change to indicate the volume level.
• Press ENTER to save changes and return to the Speech Output menu. To cancel without saving changes, press MENU.
The MPS-300 ships with the Volume Control Mode set to the Master Vol. setting. When switching the Volume Control Mode from the Master Vol. setting to either the Program Only setting, the Speech Only setting, or the user selectable Pgm/Spch Sel. setting, the Minimum and Maximum Volume levels for the SPEECH and PROGRAM outputs must be set to ensure proper operation.
• Set the Volume Control Mode to Program Only, Speech Only, or Pgm/Spch Sel. as described on page 46.
• Set the PROGRAM output’s Minimum and Maximum Volume levels to 30% and 70% (respectively) as described in the instructions on page 41.
• Set the SPEECH output’s Minimum and Maximum Volume levels to 30% and 70% (respectively) as described on page 48.
• Set the Startup Volume levels for the PROGRAM and SPEECH outputs to 30% as described on pages 42 and 49.
• Set the Master Startup Volume to 100% to obtain the maximum dynamic range for the installation. Refer to the instructions on page 53.
• Raise or lower the Startup Volume levels for the PROGRAM and SPEECH outputs as necessary. These levels will determine the volume level of the system each time it is turned on.
If the Volume Control Mode is to be returned to the Master Vol. setting from the Program Only setting, the Speech Only setting, or the user selectable Pgm/Spch Sel. setting, the Minimum and Maximum Volume levels for the SPEECH and PROGRAM outputs must be set to ensure proper operation.
• Set the Volume Control Mode to Master Vol. as described on page 46.
• Set the PROGRAM output’s Minimum and Maximum Volume levels to 30% and 70% (respectively) as described in the instructions on page 41.
Operations Guide – DOC. 6529B Multimedia Presentation System 300: MPS-300 • 47

Multimedia Presentation System 300 Crestron MPS-300
• Set the SPEECH output’s Minimum and Maximum Volume levels to 30% and 70% (respectively) as described below.
• Set the Startup Volume levels of the “loudest” outputs (PROGRAM or SPEECH) to 100% as described on pages 42 and 49 so maximum dynamic range is available.
• Set the Master Startup Volume to the desired level (will probably be less than 50%). Refer to the instructions on page 53.
Set the Speech Minimum Volume
The Speech Minimum Volume control is used to set the lowest volume setting of the SPEECH output. The RECORD and PROGRAM outputs are not affected by changes made to the Speech Minimum Volume level.
To set the Speech Minimum Volume level:
• Access the Speech Output menu as described on page 43.
• Press the k or j buttons until “Min Volume” is displayed on the LCD and press ENTER to open the Speech Minimum Volume controls.
Speech Minimum Volume Control
Spch. Min Volume
30%
• Adjust the Speech Minimum Volume level with the j and k buttons. Press the k button to increase the Speech Minimum Volume level. Press the j button to lower the Speech Minimum Volume level. The highest Speech Minimum Volume setting is 30%.
NOTE: While adjusting the Speech Minimum Volume level, the Speech Volume level can be adjusted by turning the volume control clockwise to raise the volume, or counterclockwise to lower the volume. When adjusting the volume, the display will change to indicate the volume level.
• Press MENU or ENTER to save changes and return to the previous screen.
Set the Speech Maximum Volume
The Speech Maximum Volume control is used to set the highest volume setting of the SPEECH output. The RECORD and PROGRAM outputs are not affected by changes made to the Speech Maximum Volume level.
To set the Speech Maximum Volume level:
• Access the Speech Output menu as described on page 43.
• Press the k or j buttons until “Max Volume” is displayed on the LCD and press ENTER to open the Speech Maximum Volume controls.
48 • Multimedia Presentation System 300: MPS-300 Operations Guide – DOC. 6529B

Crestron MPS-300 Multimedia Presentation System 300
Speech Maximum Volume Control
Spch. Max Volume
75%
• Adjust the Speech Maximum Volume level with the j and k buttons. Press the k button to increase the Speech Maximum Volume level. Press the j button to lower the Speech Maximum Volume level. The lowest Speech Maximum Volume setting is 50%.
NOTE: While adjusting the Speech Maximum Volume level, the Speech Volume level can be adjusted by turning the volume control clockwise to raise the volume, or counterclockwise to lower the volume. When adjusting the volume, the display will change to indicate the volume level.
• Press MENU or ENTER to save changes and return to the previous screen.
Adjust the Speech Startup Volume
The Speech Startup Volume control is used to establish the SPEECH output’s volume level setting when an input is selected. The RECORD and PROGRAM outputs are not affected by changes made to the Speech Startup Volume level.
To adjust the Speech Startup Volume level:
• Access the Speech Output menu as described on page 43.
• Press the k or j buttons until “Startup Vol.” is displayed on the LCD and press ENTER to open the Speech Startup Volume control.
Speech Startup Volume Control
Spch. Startup Vol.
30%
• Adjust the Speech Startup Volume level with the j and k buttons. Press the k button to increase the Speech Startup Volume level. Press the j button to lower the Speech Startup Volume level. The highest Speech Startup Volume setting is 100%.
Operations Guide – DOC. 6529B Multimedia Presentation System 300: MPS-300 • 49

Multimedia Presentation System 300 Crestron MPS-300
NOTE: While adjusting the Speech Startup Volume level, the Speech Volume level can be adjusted by turning the volume control clockwise to raise the volume, or counterclockwise to lower the volume. When adjusting the volume, the display will change to indicate the volume level.
• Press MENU or ENTER to save changes and return to the previous screen.
Record Output The Record Output section of the Audio Setup menu is used to set the RECORD output’s volume level, source mix, output mode, and startup volume. The PROGRAM and SPEECH outputs are not affected by changes made to the Record Output controls.
Access the Record Output Menu
To access the Record Output menu:
• Access the Audio Setup menu as described on page 38. The words “Audio Setup” will be displayed.
• Press the k or j buttons until “Record Output” is displayed on the LCD and press ENTER to open the Record Output menu.
• To return to the Audio Setup menu, press MENU.
Set the Record Volume Level To set the Record Volume level:
• Access the Record Output menu as described above.
• Adjust the Record Volume level by turning the volume control clockwise to raise the volume, or counterclockwise to lower the volume. When adjusting the Record Volume level, the display will change to indicate the volume level.
NOTE: The Record Volume can only be used if the Fixed/Variable Mode is set to “Variable”. For more information, refer to “Set Fixed/Variable Mode” on page 51.
Set the Record Source Mix To set the RECORD output’s source mix:
• Access the Record Output menu as described above.
• Press ENTER to open the Record Source Mix controls.
Record Source Mix Controls
Record Source Mix
Aud. Only
50 • Multimedia Presentation System 300: MPS-300 Operations Guide – DOC. 6529B

Crestron MPS-300 Multimedia Presentation System 300
• Press the k or j buttons until the desired setting is displayed on the LCD. The current setting is indicated with an asterisk (*). The following settings are available:
⇒ Aud. Only: Sends the audio signal from the selected source to the RECORD output.
⇒ Mic. Only: Sends the microphone input signals to the RECORD output.
⇒ Mic + Aud: Sends a mix of the audio signal from the selected source and the microphone input signals to the RECORD output.
NOTE: While setting the Record Source Mix, the Record Volume level can be adjusted by turning the volume control clockwise to raise the volume, or counterclockwise to lower the volume. When adjusting the volume, the display will change to indicate the volume level.
• Press ENTER to save changes and return to the previous screen. To cancel without saving changes, press MENU.
Set Fixed/Variable Mode The RECORD output can be set to operate at a fixed level or a variable level. The SPEECH and PROGRAM outputs are not affected by changes made to the Fixed/Variable mode.
To adjust the Fixed/Variable Mode:
• Access the Record Output menu as described on page 50.
• Press the k or j buttons until “Fixed/Variable” is displayed on the LCD and press ENTER to open the Fixed/Variable control.
Fixed/Variable Control
Rec. Fixed/Variable
Fixed
• Press the k or j buttons until the desired setting is displayed on the LCD. The current setting is indicated with an asterisk (*). The following settings are available:
⇒ Fixed: The RECORD output operates at a fixed level.
⇒ Variable: The RECORD output operates at a variable level.
• Press ENTER to save changes and return to the previous screen. To cancel without saving changes, press MENU.
Operations Guide – DOC. 6529B Multimedia Presentation System 300: MPS-300 • 51

Multimedia Presentation System 300 Crestron MPS-300
Adjust the Record Startup Volume
The Record Startup Volume control is used to establish the RECORD output’s volume level setting when an input is selected. The SPEECH and PROGRAM outputs are not affected by changes made to the Record Startup Volume level.
NOTE: The Record Volume can only be used if the Fixed/Variable Mode is set to “Variable”. For more information, refer to “Set Fixed/Variable Mode” on page 51.
To adjust the Record Startup Volume level:
• Access the Record Output menu as described on page 50.
• Press the k or j buttons until “Startup Vol.” is displayed on the LCD and press ENTER to open the Record Startup Volume control.
Record Startup Volume Control
Rec. Startup Vol.
30%
• Adjust the Record Startup Volume level with the j and k buttons. Press the k button to increase the Record Startup Volume level. Press the j button to lower the Record Startup Volume level. The highest Record Startup Volume setting is 100%.
NOTE: While adjusting the Record Startup Volume level, the Record Volume level can be adjusted by turning the volume control clockwise to raise the volume, or counterclockwise to lower the volume. When adjusting the volume, the display will change to indicate the volume level.
• Press MENU or ENTER to save changes and return to the previous screen.
Input Compensation The compensation level of each input can be set from the MPS-300’s front panel. The line outputs are not affected by changes made to the input compensation level.
Set the Compensation Level To set the compensation level for an input:
• Access the Audio Setup menu described on page 38.
• Press the k or j buttons until “Input Compensation” is displayed on the LCD and press ENTER to open the Select Input to Compensate controls as shown in the following diagram.
52 • Multimedia Presentation System 300: MPS-300 Operations Guide – DOC. 6529B

Crestron MPS-300 Multimedia Presentation System 300
Select Input to Compensate
Input Compensation
Input 1 Comp.
• To select the input to compensate, press the k or j buttons until the desired input is displayed and press ENTER.
Adjust Compensation Level
Input 1 Comp.
0db
• Adjust the compensation level with the j and k buttons. Press the k button to increase the compensation level. Press the j button to lower the compensation level. Compensation can range from -10db to 10db. A compensation level of 0db will provide neutral compensation.
NOTE: While adjusting the compensation level, the master volume level can be adjusted by turning the volume control clockwise to raise the volume, or counterclockwise to lower the volume. When adjusting the volume, the display will change to indicate the volume level.
• Press MENU or ENTER to save changes and return to the Select Input to Compensate controls.
• Repeat for each input to be adjusted.
• Press MENU to save changes and return to the Audio Setup menu.
Master Startup Volume Control The Master Startup Volume control is used to establish the volume level setting when an input is selected. The RECORD output is not affected by changes made to the Master Startup Volume level.
Adjust the Master Startup Volume
To adjust the Master Startup Volume control:
• Access the Audio Setup menu as described on page 38.
• Press the k or j buttons until “Master Startup Vol.” is displayed on the LCD and press ENTER to open the Master Startup Volume control.
Operations Guide – DOC. 6529B Multimedia Presentation System 300: MPS-300 • 53

Multimedia Presentation System 300 Crestron MPS-300
Master Startup Volume Control
Master Startup Vol.
30%
• Adjust the Master Startup Volume level with the j and k buttons. Press the k button to increase the Master Startup Volume level. Press the j button to lower the Master Startup Volume level. The highest Master Startup Volume setting is 100%.
NOTE: While adjusting the Master Startup Volume level, the Master Volume level can be adjusted by turning the volume control clockwise to raise the volume, or counterclockwise to lower the volume. When adjusting the volume, the display will change to indicate the volume level.
• Press MENU or ENTER to save changes and return to the previous screen.
Microphones The MPS-300 can be connected to two microphones that are channeled to the SPEECH outputs and can be incorporated into the RECORD and PROGRAM outputs. The microphone inputs feature switchable gating, compression, and limiters. They can also provide phantom power to microphones requiring phantom power.
Access the Microphone Menu To access the Microphone menu:
• Access the Audio Setup menu as described on page 38.
• Press the k or j buttons until “Microphones” is displayed on the LCD and press ENTER to open the Microphones menu.
• To return to the Audio Setup menu, press MENU.
Switch Microphone Gating Microphone gating can be individually set on each microphone input. To switch microphone gating on or off:
• Access the Microphone menu as described above.
• Press the k or j buttons until “Mic 1 Gating” or “Mic 2 Gating” is displayed on the LCD and press ENTER to open the Microphone Gating control.
54 • Multimedia Presentation System 300: MPS-300 Operations Guide – DOC. 6529B

Crestron MPS-300 Multimedia Presentation System 300
Microphone Gating Control (MIC 1 shown)
Mic 1 Gating
OFF
• Press the k or j buttons until the desired setting is displayed on the LCD and press ENTER to save the setting. The current setting is indicated with an asterisk (*). The following settings are available:
⇒ OFF: The gating function for the selected microphone input is disabled.
⇒ ON: The gating function for the selected microphone input is enabled.
• To exit the Microphone Gating control without saving changes, press MENU.
Switch Microphone Compression
Microphone compression can be individually set on each microphone input. To switch microphone compression on or off:
• Access the Microphone menu as described on page 54.
• Press the k or j buttons until “Mic 1 Compression” or “Mic 2 Compression” is displayed on the LCD and press ENTER to open the Microphone Compression control.
Microphone Compression Control (MIC 1 shown)
Mic 1 Compression
OFF
• Press the k or j buttons until the desired setting is displayed on the LCD and press ENTER to save the setting. The current setting is indicated with an asterisk (*). The following settings are available:
⇒ OFF: The compression function for the selected microphone input is disabled.
⇒ ON: The compression function for the selected microphone input is enabled.
• To exit the Microphone Compression control without saving changes, press MENU.
Operations Guide – DOC. 6529B Multimedia Presentation System 300: MPS-300 • 55

Multimedia Presentation System 300 Crestron MPS-300
Switch Microphone Limiter A microphone limiter can be individually set on each microphone input. To switch the microphone limiter on or off:
• Access the Microphone menu as described on page 54.
• Press the k or j buttons until “Mic 1 Limiter” or “Mic 2 Limiter” is displayed on the LCD and press ENTER to open the Microphone Limiter control.
Microphone Limiter Control (MIC 1 shown)
Mic 1 Limiter
OFF
• Press the k or j buttons until the desired setting is displayed on the LCD and press ENTER to save the setting. The current setting is indicated with an asterisk (*). The following settings are available:
⇒ OFF: The limiter function for the selected microphone input is disabled.
⇒ ON: The limiter function for the selected microphone input is enabled.
• To exit the Microphone Limiter control without saving changes, press MENU.
Switch Phantom Power Phantom power for both of the microphone inputs can be switched on or off. To switch phantom power on or off:
• Access the Microphone menu as described on page 54.
• Press the k or j buttons until “Phantom Power” is displayed on the LCD and press ENTER to open the Phantom Power control.
Phantom Power Control
Phantom Power
Off
• Press the k or j buttons until the desired setting is displayed on the LCD and press ENTER to save the setting. The current setting is indicated with an asterisk (*). The following settings are available:
⇒ OFF: Phantom power to both of the microphone inputs is disabled.
⇒ ON: Phantom power to both of the microphone inputs is enabled.
56 • Multimedia Presentation System 300: MPS-300 Operations Guide – DOC. 6529B

Crestron MPS-300 Multimedia Presentation System 300
• To exit the Phantom Power control without saving changes, press MENU.
Adjust Microphone Gain The gain for each microphone input can be individually set. To adjust the gain of a microphone input:
• Access the Microphone menu as described on page 54.
• Press the k or j buttons until “Mic 1 Gain” or “Mic 2 Gain” is displayed on the LCD and press ENTER to open the Microphone Gain control.
Microphone Gain Control (MIC 1 shown)
Mic 1 Gain
0%
• Press the k or j buttons until the desired setting is displayed on the LCD and press ENTER to save the setting.
• To exit the Microphone Gain control without saving changes, press MENU.
Video Setup The video characteristics of the MPS-300 can be configured from the front panel using the Video Setup menu.
Access the Video Setup Menu
To access the Video Setup menu:
• Access the menu as described on page 36. Press the k or j buttons until “Video Setup” is displayed on the LCD.
• Press ENTER to open the Video Setup menu.
• To exit the Video Setup menu, press MENU.
Name Video Inputs The MPS-300 ships with default names assigned to each of the inputs. Input 1 is called “BNC 1”. Input 2 is called “BNC 2”. Input 3 is called “RGBHV 3”. Input 4 is called “RGBHV 4”. Input 5 is called “RGBHV 5”. Input 6 is called “QM In 6”. Input 7 is called “QM In 7”. Input 8 is called “QM In 8”. To change the input names:
• Access the Video Setup menu as described above.
• Press the k or j buttons until “Input Names” is displayed on the LCD and press ENTER to open the Input Naming menu.
Operations Guide – DOC. 6529B Multimedia Presentation System 300: MPS-300 • 57

Multimedia Presentation System 300 Crestron MPS-300
Select Input to Name
Sel. Input To Name
1:BNC 1
• Press the k or j buttons until the input to be named is displayed on the LCD and press ENTER. The cursor is placed after the last character in the input name.
Name the Input
BNC 1_
DEL INS < >
• Turn the volume control clockwise or counterclockwise (or press the k or j buttons) to select a new letter (uppercase or lowercase) or number. Move the cursor by pressing the soft buttons labeled < or >. Each input name can be up to 14 characters in length. To delete a character, position the cursor under the character to be deleted and press the soft button labeled DEL. To insert a space, position the cursor where the space is to be inserted and press the soft button labeled INS.
• Press ENTER to save the new name and return to the Input Naming menu or press MENU to cancel the operation and return to the Input Naming menu.
• After all inputs have been named, press MENU to return to the Video Setup menu.
Select Input Type The BNC video inputs of the MPS-300 can accept composite, S-video, or component signals. The RGB inputs of the MPS-300 can accept component or RGBHV signals. The QM inputs of the MPS-300 can accept composite, S-video, component, or RGBHV signals. Specifying the input signal type determines which of the output connectors receives the selected input signal. To specify the signal types expected by each of the inputs:
• Access the Video Setup menu as described on page 57.
• Press the k or j buttons until “Input Types” is displayed on the LCD and press ENTER to open the Input Type menu.
58 • Multimedia Presentation System 300: MPS-300 Operations Guide – DOC. 6529B

Crestron MPS-300 Multimedia Presentation System 300
Select Input Type Menu
Sel. Input Type
1:BNC 1
• Press the k or j buttons to select the video input to be configured and press ENTER. The current setting is indicated with an asterisk (*).
• Press the k or j buttons until the desired input type is displayed.
Select Input Type
Select Input 1 Type
* Composite
• Press ENTER to save the input type and return to the Select Input Type menu or press MENU to cancel the operation and return to the Select Input Type menu.
• After all inputs have been configured, press MENU to return to the Video Setup menu.
Name Video Outputs The MPS-300 ships with default names assigned to each of the outputs. Output 1 is called “Output 1”. Output 2 is called “Output 2”. Output 3 is called “Output 3”. Output 4 is called “Output 4”. Output 5 is called “QM Output 5”. Output 6 is called “QM Output 6”. Output 7 is called “QM Output 7”. To change the output names:
• Access the Video Setup menu as described on page 57.
• Press the k or j buttons until “Output Names” is displayed on the LCD and Press ENTER to open the Output Naming menu.
Select Output to Name
Sel. Output To Name
1:OUTPUT 1
Operations Guide – DOC. 6529B Multimedia Presentation System 300: MPS-300 • 59

Multimedia Presentation System 300 Crestron MPS-300
• Press the k or j buttons until the output to be named is displayed on the LCD and press ENTER. The cursor is placed after the last character in the output name.
Name the Output
Output 1_
DEL INS < >
• Turn the volume control clockwise or counterclockwise (or press the k or j buttons) to select a new letter (uppercase or lowercase) or number. Move the cursor by pressing the soft buttons labeled < or >. Each output name can be up to 14 characters in length. To delete a character, position the cursor under the character to be deleted and press the soft button labeled DEL. To insert a space, position the cursor where the space is to be inserted and press the soft button labeled INS.
• Press ENTER to save the new name and return to the Output Naming menu or press MENU to cancel the operation and return to the Output Naming menu.
• After all outputs have been named, press MENU to return to the Video Setup menu.
Network Setup The network settings of the MPS-300 can be configured and reviewed from the front panel using the Network Setup menu.
NOTE: Some changes to network settings may require a reboot to take effect. The system will automatically reboot when necessary.
Access the Network Setup Menu
To access the Network Setup menu:
• Access the menu as described on page 36. Press the k or j buttons until “Network Setup” is displayed on the LCD.
• Press ENTER to open the Network Setup menu.
• To exit the Network Setup menu, press MENU.
Set the IP Address The MPS-300 uses TCP/IP communications for communications between network devices, a PC, and RoomView Help Desk software. The IP address can be manually set or obtained from a DHCP server. For information on using DHCP to obtain an IP address, refer to “Set the DHCP Mode” on page 62. To manually set an IP address:
• Access the Network Setup menu as described above.
• Press the k or j buttons until “IP Address” is displayed on the LCD and press ENTER to display the IP Address controls. The current IP address will be displayed.
60 • Multimedia Presentation System 300: MPS-300 Operations Guide – DOC. 6529B

Crestron MPS-300 Multimedia Presentation System 300
Display the IP Address
IP Address
[000] 000. 000. 000
• Turn the volume control clockwise or counterclockwise to select a number in the left-most section of the IP address. You can also press the k or j buttons to select a number.
• Press ENTER to move the cursor to the next section of the address. To change a different section, press the soft button under the section to be changed.
• Repeat the previous two steps until the entire IP address is set.
• To save the new address and return to the Network Setup menu, move the cursor to the right-most section and press ENTER. To cancel the operation and return to the Network Setup menu, press MENU.
Set the Subnet Mask The MPS-300 can be configured to use an IP Subnet Mask for TCP/IP communications. To set the address of the IP Subnet Mask:
• Access the Network Setup menu as described on page 60.
• Press the k or j buttons until “Subnet Mask” is displayed on the LCD and press ENTER to display the Subnet Mask controls. The current IP address of the Subnet Mask will be displayed.
Display the IP Subnet Mask Address
Subnet Mask
[000] 000. 000. 000
• Turn the volume control clockwise or counterclockwise to select a number. You can also press the k or j buttons to select a number.
• Press ENTER to move the cursor to the next section of the address. To change a different section, press the soft button under the section to be changed.
• Repeat the previous two steps until the entire Subnet Mask IP address is set.
• To save the new address and return to the Network Setup menu, move the cursor to the right-most section and press ENTER. To cancel the operation and return to the Network Setup menu, press MENU.
Operations Guide – DOC. 6529B Multimedia Presentation System 300: MPS-300 • 61

Multimedia Presentation System 300 Crestron MPS-300
Set the Default Router The MPS-300 can be configured to use a Default Router for TCP/IP communications. To set the IP address of the Default Router:
• Access the Network Setup menu as described on page 60.
• Press the k or j buttons until “Def. Router” is displayed on the LCD and press ENTER to display the Default Router controls. The current IP address of the Default Router will be displayed.
Display the Default Router Address
Def. Router
[000] 000. 000. 000
• Turn the volume control clockwise or counterclockwise to select a number. You can also press the k or j buttons to select a number.
• Press ENTER to move the cursor to the next section of the address. To change a different section, press the soft button under the section to be changed.
• Repeat the previous two steps until the entire Default Router IP address is set.
• To save the new address and return to the Network Setup menu, move the cursor to the right-most section and press ENTER. To cancel the operation and return to the Network Setup menu, press MENU.
Set the DHCP Mode The IP address can be obtained from a DHCP server or manually set. For information on manually setting the IP address, refer to “Set the IP Address” on page 60. To set the DHCP mode:
• Access the Network Setup menu as described on page 60.
• Press the k or j buttons until “DHCP” is displayed on the LCD and press ENTER to display the DHCP controls.
DHCP Settings
DHCP
*On
• Press k and j buttons to toggle between On and Off. The current setting is indicated with an asterisk (*).
62 • Multimedia Presentation System 300: MPS-300 Operations Guide – DOC. 6529B

Crestron MPS-300 Multimedia Presentation System 300
• To save the setting and return to the Network Setup menu, press ENTER. To cancel the operation and return to the Network Setup menu, press MENU.
Set the WINS Mode The MPS-300 can use a WINS server to obtain an IP address. To set the WINS mode:
• Access the Network Setup menu as described on page 60.
• Press the k or j buttons until “WINS” is displayed on the LCD and press ENTER button to display the WINS controls.
Display the WINS Mode
WINS
On
• Press the k and j buttons to toggle between On and Off. The current setting is indicated with an asterisk (*).
• To save the setting and return to the Network Setup menu, press ENTER. To cancel the operation and return to the Network Setup menu, press MENU.
View and Set the Hostname The MPS-300 can be recognized by its hostname in a networked environment. To view and set the hostname:
• Access the Network Setup menu as described on page 60.
• Press the k or j buttons until “HostName” is displayed on the LCD and press ENTER to display the Hostname controls. The current Hostname will be displayed.
Display the Hostname
HostName
MPS-300-00107EA01223
• Press ENTER to change the Hostname. A cursor is placed after the last character in the Hostname.
Operations Guide – DOC. 6529B Multimedia Presentation System 300: MPS-300 • 63

Multimedia Presentation System 300 Crestron MPS-300
Change the Hostname
MPS-300-00107EA0122_
DEL INS < >
• Turn the volume control clockwise or counterclockwise (or press the k or j buttons) to select a new letter (uppercase or lowercase) or number. Move the cursor by pressing the soft buttons labeled < or >. The Hostname can be up to 64 characters in length. To delete a character, position the cursor under the character to be deleted and press the soft button labeled DEL. To insert a space, position the cursor where the space is to be inserted and press the soft button labeled INS.
• To save the new name and return to the Network Setup menu, press ENTER. To cancel the operation and return to the Hostname display, press MENU.
View and Set the Domain Name
Some networks may require a Domain name to resolve the hostname. To view and set the Domain name:
• Access the Network Setup menu as described on page 60.
• Press the k or j buttons until “Domain Name” is displayed on the LCD and press ENTER to display the Domain name controls. The current Domain name (if entered) will be displayed.
Display the Domain Name
Domain Name
corporate.crestron.
• Press ENTER to change the Domain name. A cursor is placed after the last character in the Domain name.
64 • Multimedia Presentation System 300: MPS-300 Operations Guide – DOC. 6529B

Crestron MPS-300 Multimedia Presentation System 300
Change the Domain Name
corporate.company.c
DEL INS < >
• Turn the volume control clockwise or counterclockwise (or press the k or j buttons) to select a new letter (uppercase or lowercase) or number. Move the cursor by pressing the soft buttons labeled < or >. The Domain name can be up to 64 characters in length. To delete a character, position the cursor under the character to be deleted and press the soft button labeled DEL. To insert a space, position the cursor where the space is to be inserted and press the soft button labeled INS.
• To save the new name and return to the Network Setup menu, press ENTER. To cancel the operation and return to the Domain name display, press MENU.
Set the RoomView Mode The MPS-300 can be configured to report to RoomView Express (formerly known as RoomView 6.0) or RoomView Server Edition (formerly known as RoomView 7.0). To set the version of RoomView:
• Access the Network Setup menu as described on page 60.
• Press the k or j buttons until “RoomView” is displayed on the LCD and press ENTER to display the RoomView controls.
Display the RoomView Settings
RoomView
*RV None
• Press the k and j buttons to toggle between RV 6.0 (RoomView Express), RV 7.0 (RoomView Server Edition), or RV None. The current setting is indicated with an asterisk (*). When set to RoomView None, the MPS-300 will not report any status information.
• To save the setting and return to the Network Setup menu, press ENTER. To cancel the operation and return to the Network Setup menu, press MENU.
For more information on using RoomView, refer to the RoomView help file.
Operations Guide – DOC. 6529B Multimedia Presentation System 300: MPS-300 • 65

Multimedia Presentation System 300 Crestron MPS-300
Display the MAC Address The MPS-300 can display its MAC address. To view the MAC address:
• Access the Network Setup menu as described on page 60.
• Press the k or j buttons until “MAC Address” is displayed on the LCD and press ENTER to display the MAC address.
• Press MENU to return to the Network Setup menu.
Control Setup Basic control system operations can be performed from the MPS-300 front panel using the Control Setup menu.
Access the Control Setup Menu
To access the Control Setup menu:
• Access the menu as described on page 36. Press the k or j buttons until “Control Setup” is displayed on the LCD.
• Press ENTER to open the Control Setup menu.
• To exit the Control Setup menu, press MENU.
Change the Backlight Level The brightness of the LCD’s backlight can be adjusted for ease of viewing. To adjust the brightness level from the front panel:
• Access the Control Setup menu as described above.
• Press the k or j buttons until “Backlight” is displayed on the LCD and press ENTER to display the Select Brightness controls.
Display the Select Brightness Controls
Select Brightness
Bklt Low
• Press the j or k buttons to select a brightness level (low, medium, or high). The current level is indicated with an asterisk (*).
• To save the setting and return to the Control Setup menu, press ENTER. To cancel the operation and return to the Control Setup menu, press MENU.
Name the Function Buttons The MPS-300 ships with default names assigned to each of the five function buttons. Button 1 is called “MUTE”. Button 2 is called “SCREEN DOWN”. Button 3 is called “SCREEN UP”. Button 4 is called “LIGHTS PRESET 1”. Button 5 is called “LIGHTS PRESET 2”. Function names can be changed from the front panel.
To change the function names:
• Access the Control Setup menu as described above.
• Press the k or j buttons until “Functions” is displayed on the LCD and press ENTER to display the Function Naming menu.
66 • Multimedia Presentation System 300: MPS-300 Operations Guide – DOC. 6529B

Crestron MPS-300 Multimedia Presentation System 300
Select Function to Name
Select Fct. To Name
1:MUTE
• Press the k or j buttons until the function to be named is displayed on the LCD and press ENTER. The cursor is placed after the last character in the function name.
Name the Function
MUTE_
DEL INS < >
• Turn the volume control clockwise or counterclockwise (or press the k or j buttons) to select a new letter (uppercase or lowercase) or number. Move the cursor by pressing the soft buttons labeled < or >. Each function name can be up to 14 characters in length. To delete a character, position the cursor under the character to be deleted and press the soft button labeled DEL. To insert a space, position the cursor where the space is to be inserted and press the soft button labeled INS.
• Press ENTER to save the new name and return to the Function Naming menu or press MENU to cancel the operation and return to the Function Naming menu.
• After all functions have been named, press MENU to return to the Control Setup menu.
Identify Network Devices Use the front panel to identify the presence of Cresnet devices such as APAD, C2N-DB12, CNX-B12, and C2N-FTB keypads, C2N-MNETGW gateways, CLS-C6 lighting systems, and QM-AMP amplifiers:
• Access the Control Setup menu as described on page 66.
• Press the k or j buttons until “Devices” is displayed on the LCD and press ENTER.
• The MPS-300 will poll the Cresnet network to detect Cresnet devices. The display will prompt the user to press ENTER to ID all devices.
Operations Guide – DOC. 6529B Multimedia Presentation System 300: MPS-300 • 67

Multimedia Presentation System 300 Crestron MPS-300
ID Devices Prompt
Press ENTER to ID
all devices.
• Press ENTER to continue the identification process, the MPS-300 will clear all device settings and prompt the user to select the device type to be identified.
Select Device Type
Select device type
APAD
• Press the k or j buttons until the device type to be identified is displayed on the LCD and press ENTER. The buttons (or SETUP LEDs) of the selected device type will flash. Press a button (or the SETUP button) on the selected device type to identify the device.
• Repeat for all other device types that are connected to the MPS-300.
• Press the MENU button to return to the menu.
NOTE: For information on using the front panel and input devices with the MPS-300, refer to “Operation” on page 76.
NOTE: If a C2N-MNETGW has been identified, infiNET switches and dimmers must still be identified with Crestron Toolbox. Refer to the respective infiNET switch and dimmer manuals for more information.
Upgrade Connected APADs APAD devices may need to be programmed to work with the MPS-300. If a connected APAD does not display controls for the MPS-300, perform the following.
• Access the Control Setup menu as described on page 66.
• Press the k or j buttons until “APAD Upgrade” is displayed on the LCD and press ENTER to display the APAD Upgrade controls.
68 • Multimedia Presentation System 300: MPS-300 Operations Guide – DOC. 6529B

Crestron MPS-300 Multimedia Presentation System 300
Display the APAD Upgrade Controls
Upgrade APAD
Yes
• To upgrade the APAD, press the k or j buttons until “Yes” is displayed on the LCD and press ENTER. The MPS-300 will upgrade the APAD’s firmware (if necessary) and copy the required files to the APAD.
• To cancel the upgrade procedure without starting the upgrade process, press the k or j buttons until “No” is displayed on the LCD and press ENTER. Alternatively, you can press MENU to return to the Control Setup menu.
Change the Front Panel Password
The front panel password can be changed from the front panel:
• Access the Control Setup menu as described on page 66.
• Press the k or j buttons until “Password” is displayed on the LCD and press ENTER to display the Change Password controls.
Display the Change Password Controls
Change Passwd:
_
• Turn the volume control to select the first digit in the password.
• Press the k button to move the cursor to the next digit and select the next digit in the password with the volume control. The maximum password length is 20 digits. Press the j button to move to the previous digit.
• To save the new password and return to the Control Setup menu, press ENTER.
• To cancel the process without saving any changes, press MENU. The display will return to the Control Setup menu.
View System Information Use the front panel to view information about the MPS-300. Information that can be viewed includes program information, hardware information, network information, and operating system information.
Operations Guide – DOC. 6529B Multimedia Presentation System 300: MPS-300 • 69

Multimedia Presentation System 300 Crestron MPS-300
NOTE: This information can be viewed using Crestron Toolbox. For more information, refer to the Crestron Toolbox help file.
• Access the Control Setup menu as described on page 66.
• Press the k or j buttons until “Info” is displayed on the LCD and press ENTER to display the Info menu.
Display the Info Menu
Info
REMS HW NET OPS
• To view program information, press the soft button labeled REMS.
Display the Program Information
Program Boot Directo
<< >>
⇒ Press the k or j buttons to see other information. If partial information is displayed, press the soft buttons labeled << or >> to view the rest of the information.
⇒ Press the MENU button to return to the Info menu.
• To view hardware information, press the soft button labeled HW.
Display the Hardware Information
Current Hardware Con
<< >>
⇒ Press the k or j buttons to see other information. If partial information is displayed, press the soft buttons labeled << or >> to view the rest of the information.
70 • Multimedia Presentation System 300: MPS-300 Operations Guide – DOC. 6529B

Crestron MPS-300 Multimedia Presentation System 300
⇒ Press the MENU button to return to the Info menu.
• To view a list of connected network devices, press the soft button labeled NET.
Display Connected Network Devices
2E: APAD LCD 6-bu
<< >>
⇒ Press the k or j buttons to see other network devices. If the information for a network device is partially displayed, press the soft buttons labeled << or >> to view the rest of the information.
⇒ Press the MENU button to return to the Info menu.
• To view information on the MPS-300 operating system, press the soft button labeled OPS.
Display Operating System Information
MPS-300 Cntrl Eng [v
<< >>
⇒ Press the soft buttons labeled << or >> to view the information that cannot fit on the display.
⇒ Press the MENU button to return to the Info menu.
• To return to the Control Setup menu, press MENU.
Review System Messages The MPS-300 stores system messages in a message log. The presence of new messages in the log is indicated when the MSG LED is lit. To review system messages using the front panel:
• Access the Control Setup menu as described on page 66.
• Press the k or j buttons until “Messages” is displayed on the LCD and press ENTER to display the Message controls.
Operations Guide – DOC. 6529B Multimedia Presentation System 300: MPS-300 • 71

Multimedia Presentation System 300 Crestron MPS-300
Display the Message Controls
System log:
Top Clear << >>
• To scroll through messages in the log, press the k or j buttons.
• To jump to the beginning of the log, press the soft button labeled Top.
• To jump to the last message in the long, press the soft button labeled Btm (not shown).
• To view the contents of a message press the soft buttons labeled << or >>.
• To erase the contents of the log, press the soft button labeled Clear.
• Press MENU to return to the Control Setup menu.
NOTE: The contents of the message log can be read and saved using Crestron Toolbox. For more information, refer to the Crestron Toolbox help file.
Set the Date and Time Use the front panel to set the MPS-300’s date and time.
• Access the Control Setup menu as described on page 66.
• Press the k or j buttons until “Time/Date” is displayed on the LCD and press ENTER to display the Time/Date controls.
Display the Time/Date Controls
10/16/06 04:08:25PM
DATE TIME
• To set the date, press the soft button labeled DATE. The Date controls will be displayed.
72 • Multimedia Presentation System 300: MPS-300 Operations Guide – DOC. 6529B

Crestron MPS-300 Multimedia Presentation System 300
Display the Date Controls
DATE: 10/16/2006
MO DAY YR
⇒ To set the month, press the soft button labeled MO. To set the day, press the soft button labeled DAY. To set the year, press the soft button labeled YR. A pair of brackets will appear around the selected part of the date.
⇒ Press the k or j buttons to increase or decrease the value of the selected part of the date.
⇒ Repeat for each part of the date.
⇒ Press ENTER to store the new date and return to the Time/Date controls or press MENU to return to the Time/Date controls without saving any changes.
• To set the time, press the soft button labeled TIME.
Display the Time Controls
TIME: 05:02:32PM
HR MIN AM/PM
⇒ To set the hour, press the soft button labeled HR. To set the minute, press the soft button labeled MIN. To set AM or PM, press the soft button labeled AM/PM. A pair of brackets will appear around the selected part of the time.
⇒ Press the k or j buttons to increase or decrease the value of the selected part of the time.
⇒ Repeat for each part of the time.
⇒ Press ENTER to store the new time and return to the Time/Date controls or press MENU to return to the Time/Date controls without saving any changes.
• To return to the Control Setup menu, press MENU.
NOTE: The date and time can be set using Crestron Toolbox. For more information, refer to the Crestron Toolbox help file.
Operations Guide – DOC. 6529B Multimedia Presentation System 300: MPS-300 • 73

Multimedia Presentation System 300 Crestron MPS-300
Restore Default Settings The MPS-300 can be restored to its default factory settings from the front panel. Users can select to restore the audio settings or to restore the audio settings, source names, output names, and function names.
• To restore audio settings only:
⇒ Access the Control Setup menu as described on page 66.
⇒ Press the k or j buttons until “Defaults” is displayed on the LCD and press ENTER to display the Restore Defaults menu.
Restore Defaults Menu-Audio Settings Only
Restore Defaults
Aud. settings only
⇒ Press the k or j buttons until “Aud. settings only” is displayed on the LCD and press ENTER.
Confirm Restore Audio Default Settings Only
Reset all audio?
No
⇒ Press the k or j buttons until “Yes” is displayed on the LCD and press ENTER to restore the audio settings to the factory defaults. To cancel, press the k or j buttons until “No” is displayed on the LCD and press ENTER.
• To restore all factory default settings:
⇒ Access the Control Setup menu as described on page 66.
⇒ Press the k or j buttons until “Defaults” is displayed on the LCD and press ENTER to display the Restore Defaults menu.
74 • Multimedia Presentation System 300: MPS-300 Operations Guide – DOC. 6529B

Crestron MPS-300 Multimedia Presentation System 300
Restore Defaults Menu-All Settings
Restore Defaults
All settings
⇒ Press the k or j buttons until “All settings” is displayed on the LCD and press ENTER.
Confirm Restore All Default Settings Only
Reset all settings?
No
⇒ Press the k or j buttons until “Yes” is displayed on the LCD and press ENTER to restore the audio settings, source names, output names, and function names to the factory defaults. To cancel, press the k or j buttons until “No” is displayed on the LCD and press ENTER.
• To cancel:
⇒ Press the k or j buttons until “Abort” is displayed on the LCD and press ENTER. The restore operation will be cancelled.
Cancel Restore Operation
Restore Defaults
Abort
Front Panel Lock Control The MPS-300’s front panel controls can be locked to prevent operational changes from the buttons on the front of the MPS-300. While locked, the menu can be accessed by pressing the MENU button. To open the Front Panel Lock control:
• Access the Control Setup menu as described on page 66.
Operations Guide – DOC. 6529B Multimedia Presentation System 300: MPS-300 • 75

Multimedia Presentation System 300 Crestron MPS-300
• Press the k or j buttons until “Front Panel” is displayed on the LCD and press ENTER to display the Front Panel control.
Front Panel Lock Controls
Front Panel Lock:
On
• Press the k or j buttons to toggle between On and Off. The current setting is indicated with an asterisk (*).
• Press ENTER to save the new setting and return to the Control Setup menu.
Operation Using the out-of-the-box functionality, the MPS-300 can be operated from the front panel, an APAD, a 12-button keypad such as the CNX-B12 or the C2N-DB12, or the C2N-FTB FlipTop Control Center.
Control from the Front Panel The following describes operation of a system when using the out-of-the-box functionality and the front panel. If a custom program has been created, the system may function differently.
Turn On the System To turn on the system:
1. Select an output by pressing any of the output buttons:
• VIDEO for composite output on OUTPUT 1.
• S-VIDEO for S-video output on OUTPUT 2.
• YPrPb for component output on OUTPUT 3.
• RGBHV for RGB video on OUTPUT 4.
• TOUCHPANEL for local touchpanel on OUTPUT 5 (CH or QM).
• QM OUT 6 for QM signal on OUTPUT 6.
• QM OUT 7 for QM signal on OUTPUT 7.
2. Select any of the source inputs by pressing an input button (BNC 1, BNC 2, RGBHV 3, BNC 4, RGBHV 5, QM IN 6, QM IN 7, or QM IN 8).
Turn Off the System To turn off the system, press the SYS PWR button twice.
NOTE: If the projector output was selected (output button 1), the display will prompt the user to turn off the projector.
76 • Multimedia Presentation System 300: MPS-300 Operations Guide – DOC. 6529B

Crestron MPS-300 Multimedia Presentation System 300
Lower the Projection Screen Press the function button labeled SCREEN DOWN to lower the projector screen.
NOTE: This function will only work if a projection screen’s control lines have been connected to RELAY 1 (up control) and RELAY 2 (down control).
Raise the Projection Screen Press the button labeled SCREEN UP to raise the projector screen.
NOTE: This function will only work if a projection screen’s control lines have been connected to RELAY 1 (up control) and RELAY 2 (down control).
Adjust the Volume Level The volume control of the MPS-300 consists of three parts; a program volume control, a speech volume control, and a master volume control. The program and speech volumes can be controlled independently of each other or can be jointly controlled from the master volume control as shown in the following diagram.
MPS-300 Volume Control System
0%
100%
StartVol
MasterVol
MinVol
0% (-80dB)
80% (0dB)
100% (+20dB)
MaxVol
StartVol
SPEECHVol
MinMinMin
MaxMax
MinVol
0% (-80dB)
80% (0dB)
100% (+20dB)
MaxVol
StartVol
PROGRAMVol
MinMinMin
MaxMax
PROGRAM volume is set to Program Start volume whenSYS PWR is pressed.
SPEECH volume is set to Speech Start volume whenSYS PWR is pressed.
MASTER volume is set to Master Startvolume when SYS PWR is pressed.
The volume level of the MPS-300 is adjusted with the volume control knob. The volume control knob will only control the volume parameter that was selected when the Volume Control Mode was specified as described on 46.
NOTE: If the volume control mode is set to the user-selectable mode, press the soft button labeled “PGM VOL” to control the PROGRAM output volume or the soft button labeled “SPCH VOL” to control the SPEECH output volume.
• Raise the volume: Turn the volume control clockwise. The volume level will be displayed on the LCD.
Operations Guide – DOC. 6529B Multimedia Presentation System 300: MPS-300 • 77

Multimedia Presentation System 300 Crestron MPS-300
• Lower the volume: Turn the volume control counterclockwise. The volume level will be displayed on the LCD.
Mute Audio The audio output of the MPS-300 can be muted with the MUTE button.
• Mute the audio output: Press the button labeled MUTE.
• Unmute the audio output: Press the MUTE button again.
Adjust Lighting To set lighting to one of two preset lighting values, press either LIGHTS PRE 1 or LIGHTS PRE 2.
NOTE: This function will only work if a CLS-C6, infiNET switch, or infiNET dimmer was previously identified and connected to the MPS-300. The CLS-C6 can be identified as a Cresnet device in the MPS-300 setup screens as described on page 67. Crestron’s infiNET switches and dimmers require a C2N-MNETGW to be identified as described on page 67 in addition to identifying the individual switch and/or dimmer with a unique identity code (MNET ID) using Crestron Toolbox. CLW-DIM1RF and CLW-DIMS1RF dimmers use MNET IDs 03 and 04 while CLW-SW1RF and CLW-SWS1RF switches use MNET IDs 05 and 06. For information on identifying infiNET switches and dimmers, refer to the Crestron Toolbox help file.
Control from an APAD The following describes operation of the system when using the out-of-the-box functionality and an APAD Wall Mount LCD Controller. If a custom program has been created, the system may function differently.
The APAD has six buttons and a Nav Wheel as shown in the following diagram.
APAD Buttons
When switching sources from the APAD, the MPS-300 will route the signal to all of the outputs.
78 • Multimedia Presentation System 300: MPS-300 Operations Guide – DOC. 6529B

Crestron MPS-300 Multimedia Presentation System 300
Turn On the System To turn on the system:
1. Press the soft button labeled Source to display a list of available sources.
2. Turn the Nav Wheel to highlight the desired source (BNC 1, BNC 2, RGBHV 3, RGBHV 4, RGBHV 5, QM IN 6, QM IN 7, or QM IN 8).
NOTE: Typically, signal routing information is not displayed on the front panel of the MPS-300. However, if an output button on the MPS-300 was pressed at any point during operation, routing information will be displayed and updated should any changes to routing be made.
3. Press the soft button labeled Select to route the source to the projector and touchpanel output.
Turn Off the System To turn off the system:
1. Press the Power button.
2. Press the soft button labeled Sys. Off.
3. Press the soft button labeled Yes to confirm. The display will indicate that the system is turning off.
Raise or Lower the Projection Screen
To raise or lower the projection screen:
1. Press the soft button labeled Environ.
2. Press the soft button labeled Screen.
3. To raise the projection screen, press the soft button labeled Up. To lower the projection screen, press the soft button labeled Down. The display will indicate the status of the projection screen. The front panel of the MPS-300 will indicate the screen’s status.
NOTE: This function will only work if a projection screen’s control lines have been connected to RELAY 1 (up control) and RELAY 2 (down control).
Adjust the Volume Level The volume level of the MPS-300 is adjusted with the Nav wheel.
The volume controlled by the APAD is determined by the volume control mode setting. If the volume control mode was set to MASTER VOLUME, then the APAD will control the master volume. Otherwise, the APAD will control the program volume only. For more information on the volume control mode, refer to page 46.
• Raise the volume: Turn the Nav wheel clockwise. The volume level will be displayed on the LCD.
• Lower the volume: Turn the Nav wheel counterclockwise. The volume level will be displayed on the LCD.
Operations Guide – DOC. 6529B Multimedia Presentation System 300: MPS-300 • 79

Multimedia Presentation System 300 Crestron MPS-300
Mute Audio The audio output of the MPS-300 can be muted with the APAD.
• To Mute the audio output:
⇒ Press the power button
⇒ Press the soft button labeled Mute. The display will indicate that the audio output is muted. The front panel of the MPS-300 will indicate the status of the mute function.
• To Unmute the audio output:
⇒ Press the soft button labeled Unmute.
Adjust Lighting To set lighting to one of two preset lighting values:
1. Press the soft button labeled Environ.
2. Press the soft button labeled Lights.
3. Turn the Nav wheel to highlight the desired lighting preset and press the soft button labeled Select. The front panel of the MPS-300 will indicate the selected preset light setting.
4. Press the soft button labeled Back to return to the lighting controls.
NOTE: This function will only work if a CLS-C6, infiNET switch, or infiNET dimmer was previously identified and connected to the MPS-300. The CLS-C6 can be identified as a Cresnet device in the MPS-300 setup screens as described on page 67. Crestron’s infiNET switches and dimmers require a C2N-MNETGW to be identified as described on page 67 in addition to identifying the individual switch and/or dimmer with a unique identity code (MNET ID) using Crestron Toolbox. CLW-DIM1RF and CLW-DIMS1RF dimmers use MNET IDs 03 and 04 while CLW-SW1RF and CLW-SWS1RF switches use MNET IDs 05 and 06. For information on identifying infiNET switches and dimmers, refer to the Crestron Toolbox help file.
Raise or Lower Drapes To raise or lower the drapes:
1. Press the soft button labeled Environ.
2. Press the soft button labeled Drapes.
3. To raise the drapes, press the soft button labeled Up. To lower the drapes, press the soft button labeled Down. The display will indicate the status of the drapes.
NOTE: This function will only work if a drape controller has been configured in Crestron SystemBuilder or SIMPL Windows and connected to the MPS-300.
80 • Multimedia Presentation System 300: MPS-300 Operations Guide – DOC. 6529B

Crestron MPS-300 Multimedia Presentation System 300
Control from a Keypad The following describes operation of the system when using the out-of-the-box functionality and either a C2N-DB12 or CNX-B12 keypad. If a custom program has been created, the MPS-300 may function differently.
NOTE: Buttons for the keypad are custom engraved using Crestron SystemBuilder software. For instructions on installing the buttons on the keypad, refer to the keypad’s guide.
The keypad has twelve buttons as shown in the following diagram.
C2N-DB12 Buttons
BNC 1
BNC 2
RGBHV 4
QM IN 6
QM IN 7
QM IN 8
POWER
RGBHV 3
RGBHV 5
MUTE
VOL UP
VOL DOWN
NOTE: Custom buttons can be created using Crestron Engraver software. For instructions on installing the custom buttons, refer to the keypad guide.
When switching sources from the keypad, the MPS-300 will route the signal to the projector output and then route the signal to the touchpanel output.
Turn On the System To turn on the system, press any of the source buttons on the left-side of the button pad. The selected source will be routed to all of the outputs.
NOTE: Typically, signal routing information is not displayed on the front panel of the MPS-300. However, if an output button on the MPS-300 was pressed at any point during operation, routing information will be displayed and updated should any changes to routing be made.
Turn Off the System To turn off the system, press the POWER button.
Adjust the Volume Level To raise the volume level, press the VOL UP button. To lower the volume, press the VOL DOWN button. The volume buttons will only control the volume parameter that was selected when the Volume Control Mode was specified as described on page 46.
Mute Audio To mute the audio output, press the MUTE button. To unmute, press the MUTE button again. The front panel of the MPS-300 will indicate the status of the mute function.
Operations Guide – DOC. 6529B Multimedia Presentation System 300: MPS-300 • 81

Multimedia Presentation System 300 Crestron MPS-300
Control from a C2N-FTB The following describes operation of the system when using the out-of-the-box functionality and a C2N-FTB FlipTop Control Center. If a custom program has been created, the MPS-300 may function differently.
NOTE: Buttons for the keypad are custom engraved using Crestron SystemBuilder software. For instructions on installing the buttons on the control center, refer to the control center’s guide.
The control center has 10 buttons as shown in the following diagram.
C2N-FTB Buttons
Button 1: PowerButton 2: BNC 1Button 3: RGBHV 3Button 4: RGBHV 5Button 5: QM IN 7Button 6: BNC 2Button 7: RGBHV 4Button 8: QM IN 6Button 9: QM IN 8Button 10: Lights Pre 1Button 11: Lights Pre 2Button 12: ScreenButton 13: MuteButton 14: Volume UpButton 15: Volume Down
PWRNET
12 3 4 5
6 7 8 9
14
1510 11 12 13
NOTE: Custom buttons can be created using Crestron Engraver software. For instructions on installing the custom buttons, refer to the C2N-FTB guide.
When switching sources from the C2N-FTB, the MPS-300 will route the signal to the projector output and then route the signal to the touchpanel output.
Turn On the System To turn on the system, press any of the source buttons on the control center. The selected source will be routed to all of the outputs.
NOTE: Typically, signal routing information is not displayed on the front panel of the MPS-300. However, if an output button on the MPS-300 was pressed at any point during operation, routing information will be displayed and updated should any changes to routing be made.
Turn Off the MPS-300 To turn off the system, press the POWER button.
Raise or Lower the Projection Screen
To raise or lower the projection screen, press the SCREEN button. The front panel of the MPS-300 will also indicate the screen’s status.
NOTE: This function will only work if a projection screen’s control lines have been connected to RELAY 1 (up control) and RELAY 2 (down control).
82 • Multimedia Presentation System 300: MPS-300 Operations Guide – DOC. 6529B

Crestron MPS-300 Multimedia Presentation System 300
Adjust the Volume Level To raise the volume level, press the VOL UP button. To lower the volume, press the VOL DOWN button. The volume control buttons will only control the volume parameter that was selected when the Volume Control Mode was specified as described on page 46.
Mute Audio To mute the audio output, press the MUTE button. To unmute, press the MUTE button again. The front panel of the MPS-300 will indicate the status of the mute function.
Adjust Lighting To toggle between preset light settings, press either of the LIGHTS buttons. The front panel of the MPS-300 will indicate the selected preset light setting.
NOTE: This function will only work if a CLS-C6, infiNET switch, or infiNET dimmer was previously identified and connected to the MPS-300. The CLS-C6 can be identified as a Cresnet device in the MPS-300 setup screens as described on page 67. Crestron’s infiNET switches and dimmers require a C2N-MNETGW to be identified as described on page 67 in addition to identifying the individual switch and/or dimmer with a unique identity code (MNET ID) using Crestron Toolbox. CLW-DIM1RF and CLW-DIMS1RF dimmers use MNET IDs 03 and 04 while CLW-SW1RF and CLW-SWS1RF switches use MNET IDs 05 and 06. For information on identifying infiNET switches and dimmers, refer to the Crestron Toolbox help file.
Operations Guide – DOC. 6529B Multimedia Presentation System 300: MPS-300 • 83

Multimedia Presentation System 300 Crestron MPS-300
Problem Solving
Troubleshooting The following table provides corrective action for possible trouble situations. If further assistance is required, please contact a Crestron customer service representative.
MPS-300 Troubleshooting
TROUBLE POSSIBLE CAUSE(S) CORRECTIVE ACTION Unexpected response from control system.
Network devices are not communicating with the control system.
Use Crestron Toolbox to poll the network. Verify network connection to the device.
PWR LED does not illuminate.
Control system is not receiving power.
Verify the power cord is properly attached to the control system and securely plugged into an outlet.
MSG LED illuminates.
Hardware or software failure, hardware incompatibility with software definitions or programming error.
Verify that hardware configuration matches software configuration. Use Crestron Toolbox to display the error log. Refer to “Error Message Definitions” in the latest version of the Crestron 2-Series Control Systems Reference Guide (Doc. 6256) for more details.
System locks up. Various. Press and release front panel HW-R button, then press and hold SW-R button to bypass program and communicate directly with the processor. (Refer to “Troubleshooting Communications” in the Crestron 2-Series Control Systems Reference Guide (Doc. 6256) for more details.
Cresnet device does not respond.
Device not wired correctly.
Verify Cresnet wiring.
Improper NET ID used. Verify that device ID matches NET ID in the program.
A/V system device does not respond.
Device is not receiving sufficient power.
User the Crestron Power Calculator to help calculate how much power is needed for the system.
Cables improperly connected.
Verify that all cables are secure.
Display device not configured properly.
Configure display device to match output frequency.
Poor picture quality (RGB).
Incorrect sync input impedance.
Set DIP switches to lower sync input impedance.
Poor picture quality (Video).
Cables improperly connected.
Verify that all cables are secure.
84 • Multimedia Presentation System 300: MPS-300 Operations Guide – DOC. 6529B

Crestron MPS-300 Multimedia Presentation System 300
NOTE: If communication cannot be established or the control system is locked-up, refer to “Troubleshooting Communications” in the Crestron 2-Series Control Systems Reference Guide (Doc. 6256).
NOTE: Passthrough Mode enables Viewport access to any serial controlled device on the network. This aids in troubleshooting by allowing direct communication between the PC and a network device (effectively “passing through” the MPS-300). For information pertaining to Passthrough Mode, refer to “Passthrough Mode” in the Crestron 2-Series Control Systems Reference Guide (Doc. 6256).
System Monitor The System Monitor allows you to reload firmware into the MPS-300 in the event that you cannot load the firmware in the normal mode.
If the system does not function, perform the following procedure:
1. Disconnect all Crestron USB devices from the PC.
2. On the MPS-300, press and release the HW-R button. The MSG LED will start blinking rapidly four times per second.
3. During the rapid blink of the MSG LED, press and release the SW-R button. This will put the MPS-300 into “Wait” mode for the next five seconds. During this mode the MSG LED will blink slowly, once per second.
4. During “Wait” mode, press and release the SW-R button again. The MPS-300 will now enter the “Wait Acknowledge” mode for the next five seconds. During this mode the MSG LED will blink rapidly four times per second.
5. During “Wait Acknowledge” mode, press and release the SW-R button a third time. The MPS-300 will enter “Monitor” mode. Once the MPS-300 is in “Monitor” mode, the MSG LED will flash to indicate “Monitor” mode. The display will also indicate the “Monitor” mode.
6. Once the MPS-300 is in “Monitor” mode, connect to the PC using a USB cable.
NOTE: If at any point in the above sequence, one of the timer periods expires without the SW-R button being pressed, the unit will boot normally, first running the firmware, then loading the application.
NOTE: If your PC does not have the USB driver installed, after connecting the MPS-300 to the PC using the USB cable, you will see a dialog box on your PC screen asking you to install the USB driver. For instructions on how to install the USB driver, refer to the Crestron Toolbox help file.
7. Open Toolbox and start the Text Console (click the icon). Then, click on the Address Book icon in the lower left corner of the window to open the “Address Book” window.
8. In the “Address Book” window, click the “Add Entry” button and give the new entry a name (e.g. “System Monitor”).
9. Click the arrow next to the “Device Type” drop down list. A “Warning” window will open to inform you that this is an advanced feature. Click OK, then select “2-Series Control System Monitor” from the drop down list.
Operations Guide – DOC. 6529B Multimedia Presentation System 300: MPS-300 • 85

Multimedia Presentation System 300 Crestron MPS-300
Make sure to choose USB as the “Connection Type”, then click OK. The following text will appear in the bottom right corner of the “Text Console” window:
usb;device 2SeriesCtrlSystemMonitor
The following text will appear in Toolbox:
MPSMNTR>
10. At the Toolbox prompt, type erase and press Enter. The following text will appear in Toolbox:
Erasing
->25%->50%->75%->100%
Done
11. Click the icon and select Firmware… to open the “Firmware” window, then click Browse.
12. Find and select the correct firmware file (.CUZ or .zip) and click Open.
13. In the “Firmware” window, click Send. You will see a “Confirmation” window asking if you’ve selected the right file. Click OK and you will see the “File Transfer” window.
14. When file transfer is completed, you will see a window asking you to re-connect. Click OK, then close the “Firmware” window and re-connect using the normal Address Book entry.
Network Analysis If Cresnet analysis is required, contact Crestron’s True Blue Support.
Battery Replacement A Lithium battery is used to power the system clock within the MPS-300. Under normal conditions, it will last for approximately 10 years. In the event that the clock fails, only an authorized technician should replace it. Refer to caution statement below.
CAUTION: Danger of explosion if battery is incorrectly replaced. Replace only with the same or equivalent type recommended by the manufacturer. Dispose of used batteries according to the manufacturer's instructions.
Check Network Wiring Use the Right Wire In order to ensure optimum performance over the full range of your installation
topology, Crestron Certified Wire and only Crestron Certified Wire may be used. Failure to do so may incur additional charges if support is required to identify performance deficiencies because of using improper wire.
86 • Multimedia Presentation System 300: MPS-300 Operations Guide – DOC. 6529B

Crestron MPS-300 Multimedia Presentation System 300
Calculate Power CAUTION: Use only Crestron power supplies for Crestron equipment. Failure to do so could cause equipment damage or void the Crestron warranty.
CAUTION: Provide sufficient power to the system. Insufficient power can lead to unpredictable results or damage to the equipment. Please use the Crestron Power Calculator to help calculate how much power is needed for the system (http://www.crestron.com/calculators).
When calculating the length of wire for a particular Cresnet run, the wire gauge and the Cresnet power usage of each network unit to be connected must be taken into consideration. Use Crestron Certified Wire only. If Cresnet units are to be daisy-chained on the run, the Cresnet power usage of each network unit to be daisy-chained must be added together to determine the Cresnet power usage of the entire chain. If the unit is home-run from a Crestron system power supply network port, the Cresnet power usage of that unit is the Cresnet power usage of the entire run. The wire gauge and the Cresnet power usage of the run should be used in the following equation to calculate the cable length value on the equation’s left side.
Cable Length Equation
L = Length of run (or chain) in feetR = 6 Ohms (Crestron Certified Wire: 18 AWG (0.75 MM ))
or 1.6 Ohms (Cresnet HP: 12 AWG (4 MM ))P = Cresnet power usage of entire run (or chain)
2
2L < 40,000R x P
Where:
Make sure the cable length value is less than the value calculated on the right side of the equation. For example, a Cresnet run using 18 AWG Crestron Certified Wire and drawing 20 watts should not have a length of run more than 333 feet. If Cresnet HP is used for the same run, its length could extend to 1250 feet.
NOTE: All Crestron certified Cresnet wiring must consist of two twisted pairs. One twisted pair is the +24V conductor and the GND conductor and the other twisted pair is the Y conductor and the Z conductor.
Strip and Tin Wire When daisy-chaining Cresnet units, strip the ends of the wires carefully to avoid nicking the conductors. Twist together the ends of the wires that share a pin on the network connector and tin the twisted connection. Apply solder only to the ends of the twisted wires. Avoid tinning too far up the wires or the end becomes brittle. Insert the tinned connection into the Cresnet connector and tighten the retaining screw. Repeat the procedure for the other three conductors.
Add Hubs Use of a Cresnet Hub/Repeater (CNXHUB) is advised whenever the number of Cresnet devices on a network exceeds 20 or when the combined total length of Cresnet cable exceeds 3000 feet (914 meters).
Reference Documents The latest version of all documents mentioned within the guide can be obtained from the Crestron website (http://www.crestron.com/manuals). This link will provide a list of product manuals arranged in alphabetical order by model number.
Operations Guide – DOC. 6529B Multimedia Presentation System 300: MPS-300 • 87

Multimedia Presentation System 300 Crestron MPS-300
List of Related Reference Documents
DOCUMENT TITLE 2-Series Control Systems Reference Guide APAD Wall Mount LCD Controller C2N-DB12 12-Button Decorator Function Keypads CNX-B12 12-Button Designer Keypads C2N-FTB FlipTop Control Center C2N-MNETGW infiNET Gateway/Transceiver CAT5 Wiring Reference Guide CLS-C6 iLux Integrated Lighting System Crestron e-Control Reference Guide QM-AMP Three Channel Amplifier MediaManager Applications Guide
Further Inquiries If you cannot locate specific information or have questions after reviewing this guide, please take advantage of Crestron's award winning customer service team by calling Crestron at 1-888-CRESTRON [1-888-273-7876].
You can also log onto the online help section of the Crestron website (www.crestron.com/onlinehelp) to ask questions about Crestron products. First-time users will need to establish a user account to fully benefit from all available features.
Future Updates As Crestron improves functions, adds new features and extends the capabilities of the MPS-300, additional information may be made available as manual updates. These updates are solely electronic and serve as intermediary supplements prior to the release of a complete technical documentation revision.
Check the Crestron website periodically for manual update availability and its relevance. Updates are identified as an “Addendum” in the Download column.
88 • Multimedia Presentation System 300: MPS-300 Operations Guide – DOC. 6529B

Crestron MPS-300 Multimedia Presentation System 300
Software License Agreement This License Agreement (“Agreement”) is a legal contract between you (either an individual or a single business entity) and
Crestron Electronics, Inc. (“Crestron”) for software referenced in this guide, which includes computer software and as applicable, associated media, printed materials and “online” or electronic documentation (the “Software”).
BY INSTALLING, COPYING OR OTHERWISE USING THE SOFTWARE, YOU REPRESENT THAT YOU ARE AN AUTHORIZED DEALER OF CRESTRON PRODUCTS OR A CRESTRON AUTHORIZED INDEPENDENT PROGRAMMER AND YOU AGREE TO BE BOUND BY THE TERMS OF THIS AGREEMENT. IF YOU DO NOT AGREE TO THE TERMS OF THIS AGREEMENT, DO NOT INSTALL OR USE THE SOFTWARE.
IF YOU HAVE PAID A FEE FOR THIS LICENSE AND DO NOT ACCEPT THE TERMS OF THIS AGREEMENT, CRESTRON WILL REFUND THE FEE TO YOU PROVIDED YOU (1) CLICK THE DO NOT ACCEPT BUTTON, (2) DO NOT INSTALL THE SOFTWARE AND (3) RETURN ALL SOFTWARE, MEDIA AND OTHER DOCUMENTATION AND MATERIALS PROVIDED WITH THE SOFTWARE TO CRESTRON AT: CRESTRON ELECTRONICS, INC., 15 VOLVO DRIVE, ROCKLEIGH, NEW JERSEY 07647, WITHIN 30 DAYS OF PAYMENT.
LICENSE TERMS
Crestron hereby grants You and You accept a nonexclusive, nontransferable license to use the Software (a) in machine readable object code together with the related explanatory written materials provided by Crestron (b) on a central processing unit (“CPU”) owned or leased or otherwise controlled exclusively by You and (c) only as authorized in this Agreement and the related explanatory files and written materials provided by Crestron.
If this software requires payment for a license, you may make one backup copy of the Software, provided Your backup copy is not installed or used on any CPU. You may not transfer the rights of this Agreement to a backup copy unless the installed copy of the Software is destroyed or otherwise inoperable and You transfer all rights in the Software.
You may not transfer the license granted pursuant to this Agreement or assign this Agreement without the express written consent of Crestron.
If this software requires payment for a license, the total number of CPUs on which all versions of the Software are installed may not exceed one per license fee (1) and no concurrent, server or network use of the Software (including any permitted back-up copies) is permitted, including but not limited to using the Software (a) either directly or through commands, data or instructions from or to another computer (b) for local, campus or wide area network, internet or web hosting services or (c) pursuant to any rental, sharing or “service bureau” arrangement.
The Software is designed as a software development and customization tool. As such Crestron cannot and does not guarantee any results of use of the Software or that the Software will operate error free and You acknowledge that any development that You perform using the Software or Host Application is done entirely at Your own risk.
The Software is licensed and not sold. Crestron retains ownership of the Software and all copies of the Software and reserves all rights not expressly granted in writing.
OTHER LIMITATIONS
You must be an Authorized Dealer of Crestron products or a Crestron Authorized Independent Programmer to install or use the Software. If Your status as a Crestron Authorized Dealer or Crestron Authorized Independent Programmer is terminated, Your license is also terminated.
You may not rent, lease, lend, sublicense, distribute or otherwise transfer or assign any interest in or to the Software. You may not reverse engineer, decompile or disassemble the Software. You agree that the Software will not be shipped, transferred or exported into any country or used in any manner prohibited
by the United States Export Administration Act or any other export laws, restrictions or regulations (“Export Laws”). By downloading or installing the Software You (a) are certifying that You are not a national of Cuba, Iran, Iraq, Libya, North Korea, Sudan, Syria or any country to which the United States embargoes goods (b) are certifying that You are not otherwise prohibited from receiving the Software and (c) You agree to comply with the Export Laws.
If any part of this Agreement is found void and unenforceable, it will not affect the validity of the balance of the Agreement, which shall remain valid and enforceable according to its terms. This Agreement may only be modified by a writing signed by an authorized officer of Crestron. Updates may be licensed to You by Crestron with additional or different terms. This is the entire agreement between Crestron and You relating to the Software and it supersedes any prior representations, discussions, undertakings, communications or advertising relating to the Software. The failure of either party to enforce any right or take any action in the event of a breach hereunder shall constitute a waiver unless expressly acknowledged and set forth in writing by the party alleged to have provided such waiver.
Operations Guide – DOC. 6529B Multimedia Presentation System 300: MPS-300 • 89

Multimedia Presentation System 300 Crestron MPS-300
If You are a business or organization, You agree that upon request from Crestron or its authorized agent, You will within thirty (30) days fully document and certify that use of any and all Software at the time of the request is in conformity with Your valid licenses from Crestron of its authorized agent.
Without prejudice to any other rights, Crestron may terminate this Agreement immediately upon notice if you fail to comply with the terms and conditions of this Agreement. In such event, you must destroy all copies of the Software and all of its component parts.
PROPRIETARY RIGHTS
Copyright. All title and copyrights in and to the Software (including, without limitation, any images, photographs, animations, video, audio, music, text and “applets” incorporated into the Software), the accompanying media and printed materials and any copies of the Software are owned by Crestron or its suppliers. The Software is protected by copyright laws and international treaty provisions. Therefore, you must treat the Software like any other copyrighted material, subject to the provisions of this Agreement.
Submissions. Should you decide to transmit to Crestron’s website by any means or by any media any materials or other information (including, without limitation, ideas, concepts or techniques for new or improved services and products), whether as information, feedback, data, questions, comments, suggestions or the like, you agree such submissions are unrestricted and shall be deemed non-confidential and you automatically grant Crestron and its assigns a non-exclusive, royalty-free, worldwide, perpetual, irrevocable license, with the right to sublicense, to use, copy, transmit, distribute, create derivative works of, display and perform the same.
Trademarks. CRESTRON and the Swirl Logo are registered trademarks of Crestron Electronics, Inc. You shall not remove or conceal any trademark or proprietary notice of Crestron from the Software including any back-up copy.
GOVERNING LAW
This Agreement shall be governed by the laws of the State of New Jersey, without regard to conflicts of laws principles. Any disputes between the parties to the Agreement shall be brought in the state courts in Bergen County, New Jersey or the federal courts located in the District of New Jersey. The United Nations Convention on Contracts for the International Sale of Goods shall not apply to this Agreement.
CRESTRON LIMITED WARRANTY
CRESTRON warrants that: (a) the Software will perform substantially in accordance with the published specifications for a period of ninety (90) days from the date of receipt and (b) that any hardware accompanying the Software will be subject to its own limited warranty as stated in its accompanying written material. Crestron shall, at its option, repair or replace or refund the license fee for any Software found defective by Crestron if notified by you within the warranty period. The foregoing remedy shall be your exclusive remedy for any claim or loss arising from the Software.
CRESTRON shall not be liable to honor warranty terms if the product has been used in any application other than that for which it was intended or if it as been subjected to misuse, accidental damage, modification or improper installation procedures. Furthermore, this warranty does not cover any product that has had the serial number or license code altered, defaced, improperly obtained or removed.
Notwithstanding any agreement to maintain or correct errors or defects, Crestron shall have no obligation to service or correct any error or defect that is not reproducible by Crestron or is deemed in Crestron’s reasonable discretion to have resulted from (1) accident; unusual stress; neglect; misuse; failure of electric power, operation of the Software with other media not meeting or not maintained in accordance with the manufacturer’s specifications or causes other than ordinary use; (2) improper installation by anyone other than Crestron or its authorized agents of the Software that deviates from any operating procedures established by Crestron in the material and files provided to You by Crestron or its authorized agent; (3) use of the Software on unauthorized hardware or (4) modification of, alteration of or additions to the Software undertaken by persons other than Crestron or Crestron’s authorized agents.
ANY LIABILITY OF CRESTRON FOR A DEFECTIVE COPY OF THE SOFTWARE WILL BE LIMITED EXCLUSIVELY TO REPAIR OR REPLACEMENT OF YOUR COPY OF THE SOFTWARE WITH ANOTHER COPY OR REFUND OF THE INITIAL LICENSE FEE CRESTRON RECEIVED FROM YOU FOR THE DEFECTIVE COPY OF THE PRODUCT. THIS WARRANTY SHALL BE THE SOLE AND EXCLUSIVE REMEDY TO YOU. IN NO EVENT SHALL CRESTRON BE LIABLE FOR INCIDENTAL, CONSEQUENTIAL, SPECIAL OR PUNITIVE DAMAGES OF ANY KIND (PROPERTY OR ECONOMIC DAMAGES INCLUSIVE), EVEN IF A CRESTRON REPRESENTATIVE HAS BEEN ADVISED OF THE POSSIBILITY OF SUCH DAMAGES OR OF ANY CLAIM BY ANY THIRD PARTY. CRESTRON MAKES NO WARRANTIES, EXPRESS OR IMPLIED, AS TO TITLE OR INFRINGEMENT OF THIRD-PARTY RIGHTS, MERCHANTABILITY OR FITNESS FOR ANY PARTICULAR PURPOSE, OR ANY OTHER WARRANTIES, NOR AUTHORIZES ANY OTHER PARTY TO OFFER ANY WARRANTIES, INCLUDING WARRANTIES OF MERCHANTABILITY FOR THIS PRODUCT. THIS WARRANTY STATEMENT SUPERSEDES ALL PREVIOUS WARRANTIES.
90 • Multimedia Presentation System 300: MPS-300 Operations Guide – DOC. 6529B

Crestron MPS-300 Multimedia Presentation System 300
Return and Warranty Policies
Merchandise Returns / Repair Service 1. No merchandise may be returned for credit, exchange or service without prior authorization
from CRESTRON. To obtain warranty service for CRESTRON products, contact an authorized CRESTRON dealer. Only authorized CRESTRON dealers may contact the factory and request an RMA (Return Merchandise Authorization) number. Enclose a note specifying the nature of the problem, name and phone number of contact person, RMA number and return address.
2. Products may be returned for credit, exchange or service with a CRESTRON Return Merchandise Authorization (RMA) number. Authorized returns must be shipped freight prepaid to CRESTRON, 6 Volvo Drive, Rockleigh, N.J. or its authorized subsidiaries, with RMA number clearly marked on the outside of all cartons. Shipments arriving freight collect or without an RMA number shall be subject to refusal. CRESTRON reserves the right in its sole and absolute discretion to charge a 15% restocking fee plus shipping costs on any products returned with an RMA.
3. Return freight charges following repair of items under warranty shall be paid by CRESTRON, shipping by standard ground carrier. In the event repairs are found to be non-warranty, return freight costs shall be paid by the purchaser.
CRESTRON Limited Warranty CRESTRON ELECTRONICS, Inc. warrants its products to be free from manufacturing defects in materials and workmanship under normal use for a period of three (3) years from the date of purchase from CRESTRON, with the following exceptions: disk drives and any other moving or rotating mechanical parts, pan/tilt heads and power supplies are covered for a period of one (1) year; touchscreen display and overlay components are covered for 90 days; batteries and incandescent lamps are not covered.
This warranty extends to products purchased directly from CRESTRON or an authorized CRESTRON dealer. Purchasers should inquire of the dealer regarding the nature and extent of the dealer's warranty, if any.
CRESTRON shall not be liable to honor the terms of this warranty if the product has been used in any application other than that for which it was intended or if it has been subjected to misuse, accidental damage, modification or improper installation procedures. Furthermore, this warranty does not cover any product that has had the serial number altered, defaced or removed.
This warranty shall be the sole and exclusive remedy to the original purchaser. In no event shall CRESTRON be liable for incidental or consequential damages of any kind (property or economic damages inclusive) arising from the sale or use of this equipment. CRESTRON is not liable for any claim made by a third party or made by the purchaser for a third party.
CRESTRON shall, at its option, repair or replace any product found defective, without charge for parts or labor. Repaired or replaced equipment and parts supplied under this warranty shall be covered only by the unexpired portion of the warranty.
Except as expressly set forth in this warranty, CRESTRON makes no other warranties, expressed or implied, nor authorizes any other party to offer any warranty, including any implied warranties of merchantability or fitness for a particular purpose. Any implied warranties that may be imposed by law are limited to the terms of this limited warranty. This warranty statement supersedes all previous warranties. Trademark Information All brand names, product names and trademarks are the sole property of their respective owners. Windows is a registered trademark of Microsoft Corporation. Windows95/98/Me/XP/Vista and WindowsNT/2000 are trademarks of Microsoft Corporation.
Operations Guide – DOC. 6529B Multimedia Presentation System 300: MPS-300 • 91

Crestron Electronics, Inc. Operations Guide – DOC. 6529B
15 Volvo Drive Rockleigh, NJ 07647 (2016141) Tel: 888.CRESTRON 10.08 Fax: 201.767.7576 Specifications subject to www.crestron.com change without notice.