crimson® cloud connectors: google® cloud connectors... · if you do not have a gcp account, visit...
TRANSCRIPT

Crimson® Cloud Connectors: Google
1
Industrial Automation Tech Note 52 Crimson® Cloud Connectors: Google
Abstract:
This document explains how to get Crimson 3.1 to talk to the Google Cloud Platform (GCP) using the MQTT Connector. It assumes a basic knowledge of Crimson and its operation, and the ability to read and manipulate JSON. For more details on the Crimson Cloud Connectors, please consult the Crimson User Manual.
Products:
CR3000 HMIs / Graphite® HMI / Graphite Controllers
Use Case: Google Connector
Transferring tag data to Google Cloud.
Required Software:
Crimson 3.1
Required Firmware: Build 3106.000 or higher

2 Crimson® Cloud Connectors: Google
Crimson® Cloud Connectors: Google TNIA52 REV A
Step 1 – Creating an Account If you do not have a GCP account, visit https://console.cloud.google.com to create a free trial account. This account should provide more than sufficient capacity for testing. Note that you will have to enter a credit card even to use the free account, but it will not be charged unless you exceed your allowance. Be careful not to leave test devices configured in a manner that will run up your bill.
Step 2 – Finding Your Project Information Logon to GCP by entering your Google credentials.
Figure 1.
The dashboard shown in Figure 1 will be displayed. Select the My First Project link to display your project information.
Figure 2.
You will notice that GCP has create an initial project called My First Project and that this project has been given an ID made up of two random words followed by a six-digit number. In this case, our project has been given the name reliable-plasma-217900. Make a note of your project name for future reference and then close the project window to return to the GCP console.

Crimson® Cloud Connectors: Google TNIA52 REV A
Crimson® Cloud Connectors: Google 3
Step 3 – Creating an IoT Registry GCP uses IoT Registries to hold information about the devices that feed it data. To create a registry, type the letters iot into the search bar and select IoT Registries when it appears. If you have not used the IoT functionality of GCP with this account, you will be prompted to enable the Cloud IoT API.
Figure 3.
Referring to Figure 3, press the Enable API button. Once you have enabled the Cloud IoT API, you will be prompted to create a registry.
Figure 4.
Referring to Figure 4, select Create a device registry to create the registry.

4 Crimson® Cloud Connectors: Google
Crimson® Cloud Connectors: Google TNIA52 REV A
Figure 5.
Referring to Figure 5, perform the following actions:
1. Set the registry name to registry. 2. Select an option for region and make a note of it. Here we are using us-central1. 3. Leave the Protocol settings at their defaults, checking that MQTT is enabled. 4. Under Default Telemetry Topic, select Create a Topic and enter the name telemetry. 5. Under Device State Topic, select Create a Topic and enter the name state. 6. Leave the CA Certificate options hidden and unchanged. 7. Press the Create button to commit the changes.
We will return to the registry later to add a device, but first we must begin our Crimson configuration.

Crimson® Cloud Connectors: Google TNIA52 REV A
Crimson® Cloud Connectors: Google 5
Step 4 – Creating an Outline Database You should now open Crimson 3.1 and create a new database for your device. Before we configure the Google Connector, we shall need to perform a few steps to create the infrastructure used for testing. Red Lion will soon be making these so-called outline databases available via its website and including them in the Crimson installation. In the meantime, to manually create an outline database, start by navigating to the Communications category and selecting the Ethernet 1 tab in the Network settings…
Figure 6.
Referring to Figure 6, if the device is connected to a network that automatically allocates IP addresses via a DHCP server, you may leave these settings unchanged. If you are manually specifying an IP address, you must also define a default gateway and manually provide DNS servers. The gateway is necessary for your device to push data to the Internet and the DNS servers are used to convert the cloud server name into an IP address. The default server addresses of 8.8.8.8 and 8.8.4.4 will be suitable for most applications, but the DNS Mode must be explicitly set to Manual if the Port Mode is set to Manual Configuration.

6 Crimson® Cloud Connectors: Google
Crimson® Cloud Connectors: Google TNIA52 REV A
Next select the Time Manager settings within the Services group.
Figure 7.
Referring to Figure 7, perform the following actions…
1. In the Control section, set the Enable Time Manager property to Yes.
2. In the Time Client section, set the Enable SNTP setting to Yes.
The other settings may be left at their default values. These settings enable time synchronization, allowing your device to set its real-time clock from the Internet. Having an accurate real-time clock is important not only for time-stamping data, but also for ensuring the correct operation of certain security algorithms. Once you have downloaded your outline database for the first time, select the Send Time option from the Link menu within Crimson to set the device’s time zone to that of your PC. If you need to set it to a different time zone, refer to the Crimson manuals for information on the time zone system variables.

Crimson® Cloud Connectors: Google TNIA52 REV A
Crimson® Cloud Connectors: Google 7
Next navigate to the Data Tags category and press the New button five times…
Figure 8.
Referring to Figure 8, select Tag5 in the Navigation pane and then rename it to Status.

8 Crimson® Cloud Connectors: Google
Crimson® Cloud Connectors: Google TNIA52 REV A
Next navigate to the Display Pages category…
Figure 9.
Referring to Figure 9, perform the following actions…
1. Select the Hello World text and press Delete to remove it from the screen. 2. In the Resource Pane, select the Data Tags category. 3. In the Resource Pane, click on Tag1 and, while holding down Shift + Ctrl, click on Status. 4. All five data tags should be selected. 5. Drag the resulting selection on to your display page. 6. Grab the bottom-right resizing handle and expand the data fields to a suitable size. 7. Click away from the data fields to deselect them. 8. Click on Tag1 and check the Data Entry box in the floating toolbar.
Alternatively, right-click and select Data followed by Data Entry. 9. Repeat this operation for Tag2.

Crimson® Cloud Connectors: Google TNIA52 REV A
Crimson® Cloud Connectors: Google 9
Your display page should now look like Figure 10.
Figure 10.
Next right-click on the page and select Properties…
Figure 11.
Referring to Figure 11, perform the following actions…
1. Select the Actions tab. 2. Enter Tag3++,Tag4++ in the On Update box. 3. Press OK to save the changes.

10 Crimson® Cloud Connectors: Google
Crimson® Cloud Connectors: Google TNIA52 REV A
Next navigate to the Web Server category…
Figure 12.
Referring to Figure 12, perform the following actions…
1. Select the Features tab. 2. In the Remove View section, set the Remote Control property to enabled.
You have now created an outline database. Press F9 to download this to your device, and if this is the first time you are doing so, select the Send Time option from the Link menu to set the device’s time and time zone. If the device has a display, you should be able to see the five tags. You will be able to edit the first two tags using the touchscreen, and the next two will be incrementing steadily as the display updates. If your device does not have a display, open your web browser. In the address bar, enter the http:// followed by the IP address that you have allocated to your device to access the Crimson web server. Within the Crimson web server, select Remote View to view the device’s virtual display and again note the behavior of the tags.

Crimson® Cloud Connectors: Google TNIA52 REV A
Crimson® Cloud Connectors: Google 11
Step 5 – Configuring the Google Connector We are now in a position to configure and test the Google Connector. We shall be configuring it to talk a device that we shall soon create and to push four of the data tags that we have created. The fifth tag will be used to display the connection status. Start by returning to the Communications category and select the Google MQTT settings in the Connectors section…
Figure 13.
Referring to Figure 13, perform the following actions:
1. In the Control section, set the Enable Agent property to Yes. 2. In the MQTT Server section, check that the Host Name 1 property is set to mqtt.googleapis.com 3. In the Identification section, set the Project Name property to the project name from Step 2. 4. In the Identification section, set the Region Name property to the region selected in Step 3. 5. In the Identification section, set the Registry Name property to the registry name used in Step 3. 6. In the Identification section, set the Device Name property to device-01 7. In the Authentication section, select Copy Public Key to place the device’s key on the clipboard. 8. In the Diagnostics section, set the Status property to Status
In our example, the project name is reliable-plasma-217900, the region name is us-central1 and the registry name is registry. Your project name will of course be different, but your region and registry names will most likely be the same. If you accidentally overwrite the clipboard contents, you may return to this page at any point to put them on the clipboard once more.

12 Crimson® Cloud Connectors: Google
Crimson® Cloud Connectors: Google TNIA52 REV A
Next select the Tag Data 1 tab.
Figure 14.
Referring to Figure 14, perform the following actions:
1. In the Control section, set the Tag Writes property to Enabled. 2. Select the Data Tags category of the Resource Pane. 3. Drag Tag1 through Tag4 into the Contents field in the editing pane.
You have now configured Crimson to push Tag1 through Tag4 to the cloud once per second. Do not yet download this database to your device, as we must first return to the GCP console to perform further configuration using the device’s name and public key.

Crimson® Cloud Connectors: Google TNIA52 REV A
Crimson® Cloud Connectors: Google 13
Step 6 – Create the Device Your Google cloud console should still be displaying the registry that we created earlier, complete with an empty list of devices. If you have navigated away, enter iot reg in the search bar, select Registries from the search results and then select the registry option from the presented list. Once you are back to your registry, select the Create Device button.
Figure 15.
Referring to Figure 15, perform the following actions:
1. In the Device ID field, enter device-01 to specify the device name. 2. Leave the Device Communications field set to Allow. 3. Under Authentication, set the Input Method field to Enter Manually. 4. Under Authentication, set the Public Key Format field to RS256. 5. Under Authentication, paste the public key from Crimson into the Public Key Value field. 6. Leave the other settings unchanged and press Create to create the device.
You may now return to Crimson and press F9 to download the database to your device. Check the Status tag on your display or via the web browser. A value of 4 should be displayed, indicating that the cloud connection has been established and that data is being pushed. A value of 0 typically indicates an issue with network connectivity or with DNS, while a value of 1 indicates that the server name was resolved but that the connection could not be established. A value of 3 indicates that the connection has been made, but that data has not been transferred. If you do not see a value of 4, check each item in this note carefully and ensure your Crimson configuration matches your GCP settings.

14 Crimson® Cloud Connectors: Google
Crimson® Cloud Connectors: Google TNIA52 REV A
Step 7 – Handling the Data We must now create code within GCP to handle the messages being published by our device. To do this, we create what is known as a cloud function that for demonstration purposes will simply send the messages to a log. In a real application, this code may write the data to a database or perhaps update a webpage. Start by entering func in the search bar and selecting Cloud Functions from the search results. If you have not used cloud functions before, you will be prompted to enable the API. You will then be prompted to create a function.
Figure 16.
Referring to Figure 16, press the Create Function button to create a cloud function.
Figure 17.
Referring to Figure 17, perform the following actions:
1. Set the Trigger type to Cloud Pub/Sub. 2. Set the Topic to telemetry. 3. Leave the other settings unchanged and press Create to create the function.
Crimson® Cloud Connectors: Google TNIA52 REV A
Crimson® Cloud Connectors: Google 15
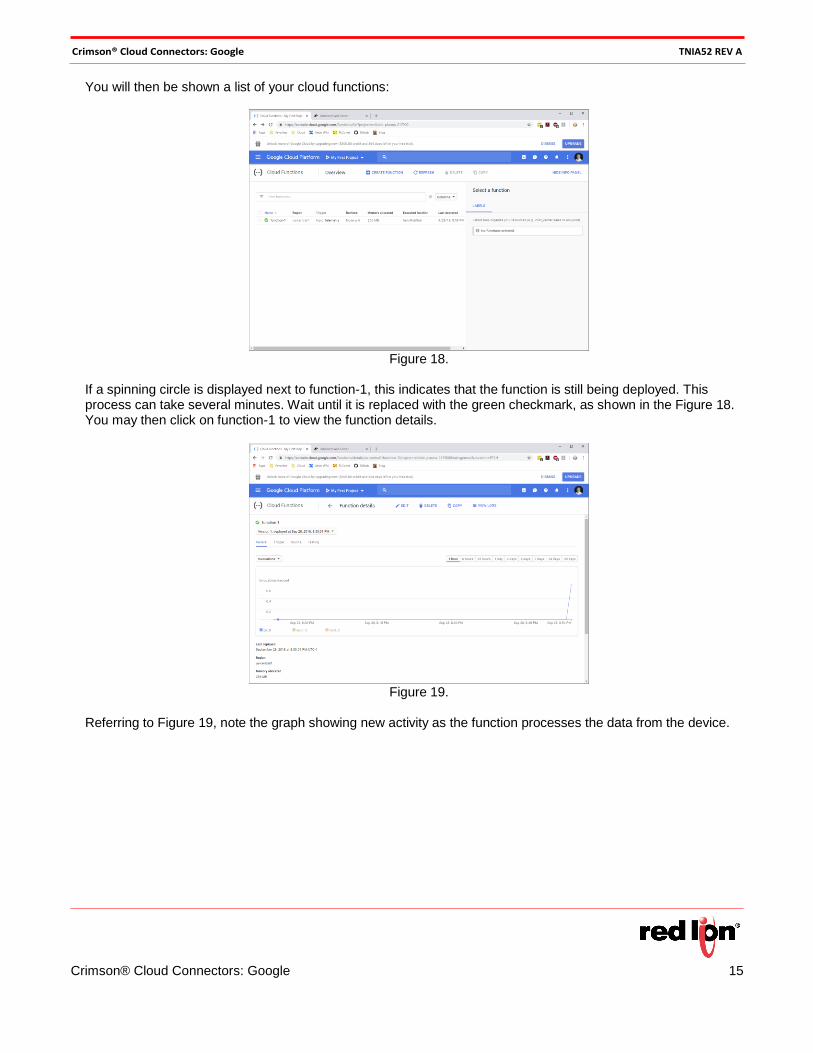
You will then be shown a list of your cloud functions:
Figure 18.
If a spinning circle is displayed next to function-1, this indicates that the function is still being deployed. This process can take several minutes. Wait until it is replaced with the green checkmark, as shown in the Figure 18. You may then click on function-1 to view the function details.
Figure 19.
Referring to Figure 19, note the graph showing new activity as the function processes the data from the device.

16 Crimson® Cloud Connectors: Google
Crimson® Cloud Connectors: Google TNIA52 REV A
Click on the View Logs link to display the log entries generated by the function.
Figure 20. Examine Figure 20 and note batches of three entries that mark the start of the function execution, the contents of the message that it is handling and the completion of the function execution. Expand one of the log entries that relate to message contents and you will note that the textPayload member contains the JSON submitted by Crimson.
{ insertId: "000000-375e78b3-83fa-4db1-aaed-36a661832c1e"
labels: {…}
logName: "projects/reliable-plasma-217900/logs/cloudfunctions.googleapis.com%2Fcloud-functions"
receiveTimestamp: "2018-09-29T00:55:04.527234795Z"
resource: {…}
severity: "INFO"
textPayload: "{"adhoc":"false","connected":"true","historic":"false","tags":{"Tag3":6146,"Tag4":6146},"timestamp"
:"2018-09-29T00:54:59.000Z"}"
timestamp: "2018-09-29T00:54:58.044Z"
}
In the example shown above, the values of Tag3 and Tag4 are being updated, since these are the only tags that have changed since the last update was transmitted. Note that the top-level JSON object contains an object called tags contains the data tags being pushed by Crimson, and an object called device acts as a placeholder for yet-to-be-supported device status information. Refer to the Crimson User Manual for details on how the format of this JSON fragment can be adjusted to suit your application.
For more information: http://www.redlion.net/support/policies-statements/warranty-statement