crochet giraffe - home – look at what i made gendry the crochet giraffe – a little zoo animal 3...
TRANSCRIPT

www.lookatwhatimade.net Gendry the Crochet Giraffe – A Little Zoo Animal
1
Crochet Giraffe
{A Little Zoo Animal}
©Anette Bak and Dedri Uys 2015. All Rights Reserved.
Size
10 cm high x 13 cm long (4” x 5”)
Difficulty
Intermediate to Advanced
www.lookatwhatimade.net Gendry the Crochet Giraffe – A Little Zoo Animal
2
Materials
Worsted weight yarn (#4) in 2 colours – 40 meters in total. I have used Deborah Norville Everyday Worsted
Weight Yarn in Baby Yellow and Terracotta - available from Annie's.
A scrap of black worsted weight yarn to embroider eyes with
4 mm Clover Amour Crochet hook (US G/6 UK 8)
Yarn Needle
Stuffing
Abbreviations
US Terminology Used. (US/UK Comparison Chart HERE)
CC – Contrasting colour
Ch – Chain
Dc – Double crochet
Hdc – Half-double crochet
MC – Main colour
Sc – Single crochet
Sc2tog – Single crochet 2 together (single crochet decrease)
Sc inc – Single crochet increase (make 2 sc’s in the same stitch)
Sl st – Slip stitch
St/st’s – Stitch/stitches
* - Repeat all instructions between asterisks the amount of times specified.
Special Instructions
Changing Colours: When changing colours, do so on the last
yarn-over of the last stitch before the colour-change. All Main
Colour instructions will be in standard font. All Contrasting
Colour instructions will be bold.
Carrying Your Yarn: To make the “carried” yarn less visible
Anette suggests that you only “catch” it with every third or
fourth stitch while working. You are welcome to work over
your “carried” yarn with every stitch, but it is not as neat as
only catching it occasionally.
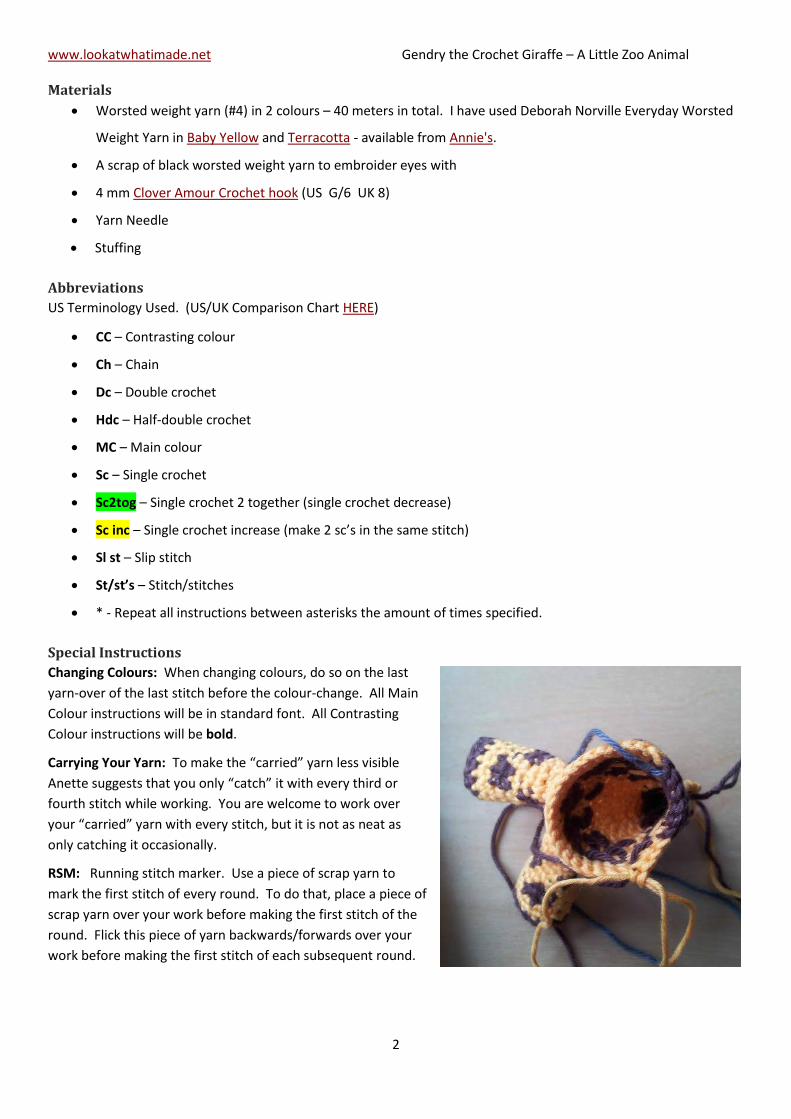
RSM: Running stitch marker. Use a piece of scrap yarn to
mark the first stitch of every round. To do that, place a piece of
scrap yarn over your work before making the first stitch of the
round. Flick this piece of yarn backwards/forwards over your
work before making the first stitch of each subsequent round.

www.lookatwhatimade.net Gendry the Crochet Giraffe – A Little Zoo Animal
3
Instructions
Legs
{Make 4}
1. Starting with MC yarn, ch 8. Join into a circle by making
a sc in the first chain (in other words, the chain farthest
away from your hook). Sc in the remaining 7 st’s. (8)
2. Sc in each of the 8 st’s around. Change to CC on the last
yarn-over of the last stitch (Photo 1). (8)
3. Sc inc in the next st. Sc in the next st. Change to MC
(Photo 2). Sc in the next 2 st’s. Change to CC. Sc inc in
the next st. Sc in the next st. Change to MC. Sc in the
next 2 st’s. Change to CC. (10)
4. Sc in the next 3 st’s. Change to MC (Photo 3). Sc in the next 2 st’s. Change to CC. Sc in the next 3 st’s.
Change to MC. Sc in the next 2 st’s (Photo 4). (10)
5. Sc in each of the first 9 st’s around. Change to CC. Note that this round ends 1 stitch before the actual end of
the round. This is to make the colour change instructions in the next 2 rounds easier (Photo 5). (9)
6. Sc in the next 2 st’s. Change to MC. Sc in the next 3 st’s. Change to CC. Sc in the next 2 st’s. Change to
MC. Sc in the last 3 st’s. Change to CC (Photo 6). (10)
7. Sc inc in the first st. Sc in the next st. Change to MC (Photo 7). Sc in the next 3 st’s. Change to CC. Sc inc in
the first st. Sc in the next st. Change to MC. Sc in the last 3 st’s (Photo 8). (12)
8. Sc in each of the 12 st’s around. (12)
9. Sc in each of the 12 st’s around. Sl st in the next st. Ch 1 and bind off. (12)

www.lookatwhatimade.net Gendry the Crochet Giraffe – A Little Zoo Animal
4
Feet
{Make 4}
1. Using CC and working into a magic ring: Ch 1. Make 6 sc’s. Don’t
turn, just continue around, making the first stitch of the next
round in the first stitch of this round. (6)
2. Sc inc in each of the 6 st’s around. (12)
Place the foot over the opening at the bottom of the leg with the right side
of the foot facing you. Insert your hook into the next st of the
foot AND from the inside to the outside into any stitch in the last round of
the leg. Make a sc through both layers. Continue making 11 more sc’s
through both layers. Sl st to the top of the first st. Ch 1 and bind off.
Work away your end tail of yarn. Here’s the lazy-girl guide to doing
it: using a yarn needle, sew around the last stitch 2 times and then pull the
yarn into the leg.
Use all your tails of yarn to stuff your legs with and then add enough
stuffing to fill the leg 3/4 of the way. I just jab the stuffing in there with the
back of a bigger crochet hook. Don’t fill the leg all the way, as you will
need to be able to flatten the top of the leg during attachment.
If you find stuffing the leg like this too fiddly, consider placing some
stuffing into your leg before closing the foot completely.
Make sure that you push the stuffing all the way down into the foot, otherwise your foot won’t be flat.

www.lookatwhatimade.net Gendry the Crochet Giraffe – A Little Zoo Animal
5
Ears
{Make 2}
The ears are shaped like leaves.
With CC: Ch 5 (Photo 1). Sc in the second ch from the hook. Hdc in the
next st. Dc in the next st (Photo 2). Sc inc in the last st. Working down the
other side of the initial ch-5, and OVER the initial tail of yarn, sc inc in the
other side of the same (last) chain (Photo 3). Dc in the next st. Hdc in the
next st. Sc in the last st (Photo 4). Join to the first sc with a sl st. Ch 1 and
bind off (Photo 5).
Rim
Using MC, join your yarn by making a standing single crochet in the sl st join (yes, in the actual sl st). Sc in the same
stitch (Photo 6). Sc in the next 5 st’s. The last sc should fall in the second sc made into the last chain (Photo 7). Ch 2
(Photo 8). Sc in the next 5 st’s (Photo 9). Sc inc in the sl st, which will already contain 2 sc’s (Photo 10). Ch 1 and
bind off (Photo 11). Knot the tails of yarn (Photo 12).

www.lookatwhatimade.net Gendry the Crochet Giraffe – A Little Zoo Animal
6
Horns
{Make 2}
With CC: Ch 5. Sl st in the second chain from the hook and each of the remaining 3 chains. Ch 1 and bind off.
When you crochet the horns on the head, use the second to last stitch to make them more securely fastened.
Note
Before starting on the head, make sure you have horns, ears, legs and feet all done.

www.lookatwhatimade.net Gendry the Crochet Giraffe – A Little Zoo Animal
7
Head
{Make 1}
1. With MC: Ch 3. Sc in the second chain from the hook. Sc in the next chain. Working into the other side of
the foundation chain, sc in the same chain. Sc in the next ch. Each of the 2 ch st’s should now contain 2 sc’s
– one on each side of chain. (4)
2. Sc inc in each of the 4 st’s around. RSM. (8)
3. Sc in each of the 8 st’s around. RSM. (8)
4. Sc in the first 7 st’s. Sc inc in the last st. RSM. (9)
5. Sc in the next 3 st’s. Sc inc in the next st. Sc in the last 5 st’s. RSM. (10)
6. Sc in each of the 10 st’s around. RSM. (10)
7. (Sc inc in the next st. Sc in the next st) 5 times. RSM. (15)
8. Sc inc in the first st. Sc in the next 6 st’s. Sc inc in the next st. Sc in the next 7 st’s. RSM. (17)
9. Short Row (Outside): Sc in the first 8 st’s. Sl st in the next st and turn, leaving the remaining st’s of Round 8
unworked. (8)
10. Short Row (Inside): Skip the sl st. Sc in the next 2 st’s. Sc inc in each of the next 2 st’s. Sc in the next 2 st’s.
Sl st in the next st and turn, leaving the remaining st of Short Row 9 unworked. (8)
11. Short Row (Outside): Skip the sl st. Sc inc in the next st. Sc in the next 6 st’s. Sc inc in the next st, which will
be the last st before the “step”. Skip the st at the base of the “step”, which already contains a sl st. Sc in the
next 8 st’s of Round 8. This will bring you to the RSM. (18)
12. Sc in the next st of Short Row 9 (in other words, the stitch after the RSM and before the “step”). Sc in the
next 9 st’s of Short Row 11 (after the “step”). Skip the next st. Sc in the last 8 st’s before the RSM. RSM.
(18)
13. You will be attaching the ears and horns in this round. Sc in the next 2 st’s. Attach the ear with the next 2
st’s (see Attaching the Ears below). Sc in the next st. Attach the first horn with the next sc (see Attaching the
Horns below). Attach the second horn with the next sc. Sc in the next st. Attach the second ear with the
next 2 sc’s (as before). Sc in the next st. Sc2tog. Sc in the next 3 st’s. Sc2tog. RSM. (16)
14. Sc in the next 11 st’s. Sc2tog twice. Sc in the next 2 st’s, changing to CC on the last yarn-over of the last st.
Please note that the last stitch should fall in the stitch AFTER the RSM. RSM. (15)
Attaching the Ears
When you attach the ears, you will only be working through 2 st’s of each ear:
the second sc of the rim, and the second to last sc of the rim (see adjacent
photo, which shows the hook inserted into those 2 st’s to make it easier for you
to see them).
Hold the ear against the head with the right side facing you and the top of the
ear pointing towards the giraffe’s nose.

www.lookatwhatimade.net Gendry the Crochet Giraffe – A Little Zoo Animal
8
Insert your hook into the second to last sc on the rim of the ear, and through the next st of the head, and complete a
sc through both layers (Photo 1).
Insert your hook into the second sc on the other side of the ear and through the next st of the head (Photo 2).
Complete a sc through both layers.
Attaching the Horns
The horns are attached with only 1 sc each – through the sl st next to the last st of the horn AND the next st of the
head (Photo 3).
As the horns are a bit curvy, it looks best to turn one of them so that the wrong side faces the front (Photo 4).
Neck
The neck is worked in rows until the neck meets the body. The neck opening will be used to make a mane later and
to stuff the head. Forget about the running stitch marker for now.
15. Short Row (Outside): With CC, Sc2tog. Sc in the next 3 st’s. Change to MC. Sc in the next st. Ch 1 and
turn. (5)
16. Short Row (Inside): Sc in the next (MC) sc. Change to CC and don’t carry the MC yarn. Sc in the next 3 st’s.
Sl st in the next (CC) st. Turn. (4)
17. Short Row (Outside): Skip the sl st. Sc in the next 3 st’s. Change to MC and bind off CC. Sc in the next st.
Ch 1 and turn. (4)
First Spot Finished – Top Left on Neck (Right if you are left-handed)
18. (Inside): Sc in the next 4 st’s. This will bring you to the “step”. Skip the CC stitch at the base of the step
(which already contains a sl st). Sc inc in each of the next 3 st’s. Change to CC. Sc2tog. Sc in the next 3 st’s.

www.lookatwhatimade.net Gendry the Crochet Giraffe – A Little Zoo Animal
9
Change to MC. Sc in the next st. Ch 1 and turn. The last sc will fall in the stitch between the horns that
already contains a sc from the other side of the neck. (15)
19. Short Row (Outside): Sc in the next sc. Change to CC and don’t carry the MC yarn. Sc in the next 3 st’s. Sl
st in the next st, which will be the last CC stitch. Turn. (4)
20. Short Row (Inside): Skip the sl st. Sc in the next 3 st’s. Change to MC and bind off CC. Sc in the next st. Ch
1 and turn. (4)
Second Spot Finished – Top Right on Neck (Left if you are left-handed)
21. Sc in the next 4 st’s. This will bring you to the “step”. Skip the CC stitch at the base of the “step”, which
already contains a sl st. Sc in the next (MC) st. Sc inc in the next 3 st’s. Sc in the next 4 st’s. Sc2tog. Ch 1
and turn. (16)
22. Short Row (Inside): Sc in the first st. Change to CC and don’t carry MC yarn. Sc in the next 4 st’s. Sl st in
the next st and turn. (5)
23. Short Row (Outside): Skip the sl st. Sc in the next 3 st’s. Change to MC. Sc2tog. Ch 1 and turn. (4)
24. (Inside): Sc in the next st. Change to CC. Sc in the next 3 st’s. Change to MC and fasten off CC. This will
bring you to the “step”. Skip the stitch at the base of the “step” that already contains a sl st. Sc inc in each
of the next 3 st’s. Sc in the next 5 st’s. Sc2tog. Ch 1 and turn. (16)
Third Spot Finished – Lower Left Side of Neck (Right if you are left-handed)

www.lookatwhatimade.net Gendry the Crochet Giraffe – A Little Zoo Animal
10
25. Short Row (Outside): Sc in the first st. Change to CC and don’t carry MC yarn. Sc in the next 4 st’s. Sl st in
the next st and turn. (5)
26. Short Row (Inside): Skip the sl st. Sc in the next 3 st’s. Change to MC. Sc2tog. Ch 1 and turn. (4)
27. Short Row(Outside): Sc in the next st. Change to CC. Sc in the next 3 st’s. Change to MC and fasten off CC.
This will bring you to the “step”. Skip the stitch at the base of the “step” that already contains a sl st. Sc in
the next 2 st’s. Sc inc in each of the next 2 st’s. Sl st in the next st, which should be the second-last MC st
(Photo 1 below). Turn, leaving the remaining stitches unworked. (10)
Fourth Spot Finished – Lower Right Side of Neck (Left if you are left-handed)
28. Short Row (Inside): Skip the sl st. Sc in the next st. Sc inc in the next st. Sc in the next st. Sl st in the next st
and turn (Photo 2 below), leaving the remaining stitches unworked. There should be 2 unworked MC st’s left
before the CC spot. (4)
29. Short Row (Outside): Skip the sl st. Sc inc in the next st. Sc in the next 2 st’s. Sc inc in the next st. This will
bring you to the “step”. Sc in the next 5 st’s, which will be MC, 3 CC, MC. Ch 1 (Photo 3 below) and turn.
(11)
30. (Inside): Sc in the first 6 st’s. Sc inc in the next st. Sc in the next 3 st’s. Sc inc in the next st. This will bring
you to the “step”. Skip the stitch at the base of the “step”, which already contains a sl st. Sc in the next 6
st’s (which will be 2 MC, 3 CC, 1 MC). Ch 1 and turn (Photo 4 below). (19)
31. Sc in the first 9 st’s. Sc inc in the next st. Sc in the next 4 st’s. Change to CC. Sc in the next 3 st’s. Change to
MC. Sc in the next 2 st’s. DO NOT TURN! (20)

www.lookatwhatimade.net Gendry the Crochet Giraffe – A Little Zoo Animal
11
Body
The body is worked in a spiral. Start using your RSM again.
32. Join to the opposite side of the neck by making a sc in the first st of the opposite side (see photo below). Sc
in the next st. Change to CC. Make 3 sc’s. Change to MC. Sc inc in each of the next 9 st’s. Change to CC. Sc
inc in the next st, which will be the last MC st. Sc in the next 3 st’s. Change to MC. Sc in the last 2 st’s.
RSM. (30)
33. Sc in the next 2 st’s. Change to CC. Sc in the next 5 st’s. Change to MC. Sc in the next 15 st’s. Change to
CC. Sc in the next 7 st’s. Change to MC. Sc in the last st, which will be MC. RSM. (30)
34. You will be attaching the front legs in this round. Sc in the next 2 st’s. Change to CC. Sc in the next 7 st’s.
Change to MC. Make 3 sc’s. Attach the first leg with the next 3 sc’s. To do this, place the leg on top of the
body with the foot pointing towards the head and the flattened “opening” of the leg lined up with the last
round of the body. Insert your hook through both layers of the first st of the leg, AND into the next st of the
body, and make a sc through all 3 layers. Sc through both layers of the leg and the next st of the body two
more times. Sc in the next 2 st’s of the body only (between the legs). Attach the second leg with the next 3
sc’s (as before). Sc in the next 4 st’s. Change to CC. Sc in the next 4 st’s. Change to MC. Sc in the last 2 st’s.
RSM. (30)
If you need visual help attaching the legs, see THIS TUTORIAL.
www.lookatwhatimade.net Gendry the Crochet Giraffe – A Little Zoo Animal
12
35. Sc in the next 4 st’s. Change to CC. Sc in the next 4 st’s. Change to MC. Sc in the next 22 st’s. RSM. (30)
36. Sc in the next 29 st’s. Change to CC. Sc in the last st. RSM. (30)
37. Sc in the next 5 st’s. Change to MC. Sc in the next 16 st’s. Change to CC. Sc in the next 4 st’s. Change to
MC. Sc in the next 3 st’s. Change to CC. Sc in the last 2 st’s. RSM. (30)
38. Sc in the next 6 st’s. Change to MC. Sc in the next 2 st’s. Change to CC. Sc in the next 4 st’s. Change to
MC. Sc in the next 10 st’s. Change to CC. Sc in the next 4 st’s. Change to MC. Sc in the next 2 st’s. Change
to CC. Sc in the last 2 st’s. RSM. (30)
39. You will be attaching the back legs in this round. Sc in the next 6 st’s. Change to MC. Sc in the next 2 st’s.
Change to CC. Sc in the next 4 st’s. Change to MC. Sc in the next st. Attach the third leg with the next 3 sc’s
(as before). Sc in the next 2 st’s. Attach the last leg with the next 3 sc’s (as before). Sc in the next st.
Change to CC. Sc in the next 4 st’s. Change to MC. Sc in the next 2 st’s. Change to CC. Sc in the last 2 st’s.
RSM. (30)
40. Sc2tog. Sc in the next 3 st’s. Change to MC. Sc2tog. Sc in the next st. Change to CC. Sc in the next 2 st’s.
Sc2tog. Change to MC. (Sc in the next 3 st’s, sc2tog) twice. Sc in the next st. Change to CC. Sc in the next 2
st’s. Sc2tog. Change to MC. Sc in the next 2 st’s. Change to CC. Sc in the last st. RSM. (24)
41. Sc2tog. Sc in the next 2 st’s. Change to MC. Sc2tog. Sc in the next st. Change to CC. Sc in the next st.
Sc2tog. Change to MC. (Sc in the next 2 st’s, sc2tog) three times. Sc in the last 2 st’s. Change to CC. RSM.
(18)
42. Sc2tog. Sc in the next st. Change to MC and bind off CC. (Sc2tog, sc in the next st) five times. RSM. (12)
43. Sc2tog six times. Sl st in the next st and bind off, leaving a 50 cm (20”) tail of yarn. (6)
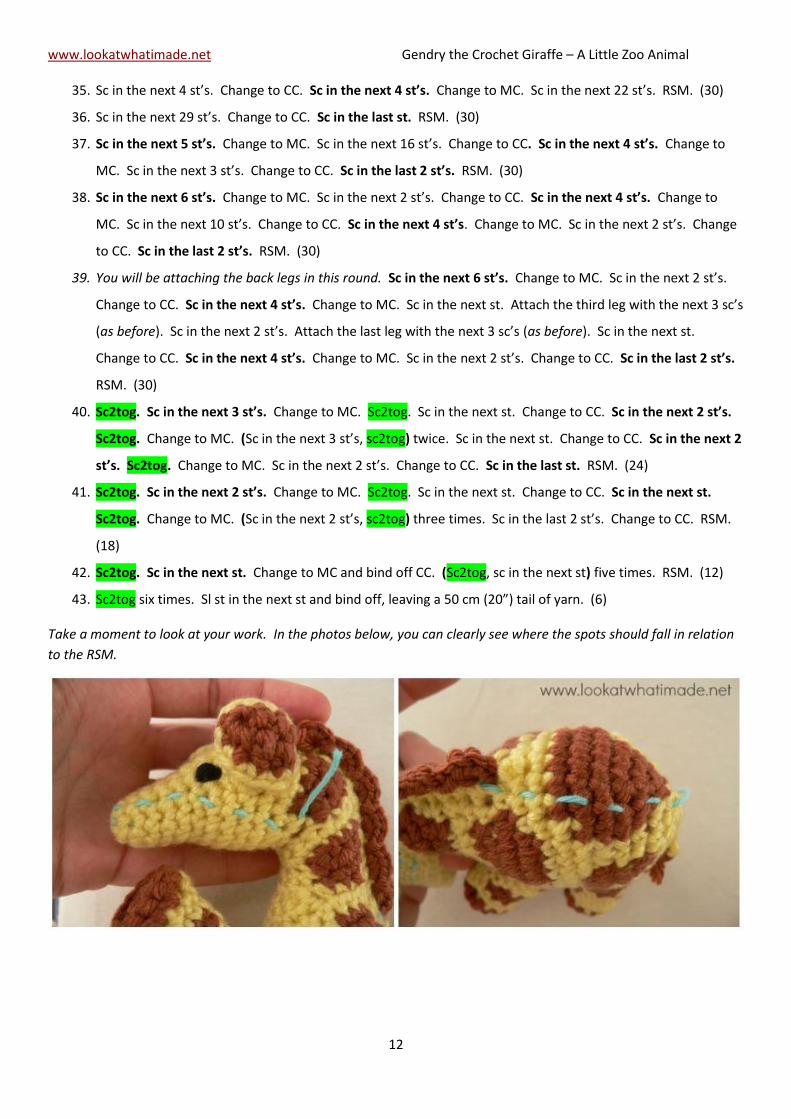
Take a moment to look at your work. In the photos below, you can clearly see where the spots should fall in relation
to the RSM.

www.lookatwhatimade.net Gendry the Crochet Giraffe – A Little Zoo Animal
13
Stuffing the Giraffe
Stuff the giraffe through the opening in the neck, making sure that you have enough stuffing to fill out the neck once
closed.
Close the Neck
With MC: Make a standing single crochet around the post of the stitch 2 rows below the opening of the neck and in
line with it (Photos 1 and 2 below). Sc2tog, inserting your hook around the post of the stitch in the last row before
the opening, and into the first row of the opening (through both sides). Sc2tog, working into the next 2 rows of the
neck (through both sides). Sc the next 7 rows (through both layers). Make a sc around the post of the stitch right
above the opening of the neck (between the horns). Ch 1 and bind off (Photo 3 below). Work away your tails of
yarn. (11)
Adding the Mane
Join your CC yarn by making a standing single crochet in the standing single crochet that you used to close the neck
(at the lower end of the neck). Make 3 sc’s in the same stitch. (Sl st in the next st, make 4 sc’s in the next st) five
times. Ch 1 and bind off. Work away your tails of yarn. (24)

www.lookatwhatimade.net Gendry the Crochet Giraffe – A Little Zoo Animal
14
Adding the Eyes
Use black yarn to embroider the eyes. Choose a pleasing spot. Anette likes them like this (in Round 8):
Tail
If you need some visual help making the Tail and Tassel, please see THIS TUTORIAL.
Take the 50 cm/20” tail of yarn from the end of Round 43 and weave it through the last 6 stitches. Pull them tight to
close the hole.
Insert your hook around the “hole” by poking it into the giraffe on one side of the closed hole and out the other
side. Yarn over with the long tail of yarn and pull up a loop.
Ch 8. Working into the back bump of the chain stitches: sl st in the second ch from the hook and the remaining 6 ch
st’s. Bind off and work away your tail of yarn by sewing around the base of the tail. This will make the tail a little bit
more secure.
Tassel
Cut 3 or 4 pieces of CC yarn, roughly 15 cm (6”) long. Why so long for such a tiny
tassel? Because it is easier to work with.
Jab your hook through the end of the tail. Fold the pieces of yarn in half and grab
them with your hook. Pull up a loop with all the pieces of yarn. Yarn over again
(with ALL the pieces of yarn), and pull them all the way through the loop. Trim
your tassel.
“Thank You” to our Brilliant Testers
Lesley Lord
Tess McDonald
Jill Delorey Constantine
Brittany Umbaugh
Shireen Ng (from Buddy Companions)
Kiley Jones
Pam Perkins
Liked this pattern? You can find the rest of the Little Zoo Animals HERE.
Remember to subscribe to my Weekly Newsletter if you would like to be kept in the loop. You can also like
my Facebook page or follow me on Bloglovin, Google+, Pinterest, Twitter, or Instagram.