crosswrap by b d ehler
TRANSCRIPT

8/10/2019 CrossWrap by B D Ehler
http://slidepdf.com/reader/full/crosswrap-by-b-d-ehler 1/62
Introduction to Cross Wrap Designs
By BD Ehler
Cross Wrap 1
Decorating fishing rods with thread designs has been around for many years. To the new rod builder and some of the experienced rod builders the process of placing a cross wrap design on the butt
section of a rod can be intimidating. The goal of this series of articles is to help remove the confusion
from doing cross wraps by explaining how these designs are created. Our hope is to stimulate builders totry this form of decoration.
This series of articles will include definitions of thread art terms (with pictures as examples), the
types of processes that can be used in wrapping, the layout methods of starting the cross wrap, andeventually the process of creating cross wrap designs using charting tape.
These articles will be posted on the main forum for all builders to copy/print for future use. Anyquestions about an article are invited to be posted on the main forum in hopes that various rod builders
can give their answers, which will provide a variety of methods from which the builder can choose. Due
to my phone modem connection and limits on our forum page, these articles will be short (one page).
There will be many articles, so print them, save them and you should have a good resource for yourattempts at rod thread art.
This is an example of a chevron cross wrap shaded from right to left by using three shades of green
regular A thread and three shades of green metallic A thread finished with 2 threads of metallic silver. Notice on the right side of this photo two vertical cracks in the finish. This was caused by breaking the
rod blank by high sticking the rod on a crappie, which is embarrassing with Don Morton in the boat with
you. Fortunately, the rod was repaired (stronger) and the cross wrap

8/10/2019 CrossWrap by B D Ehler
http://slidepdf.com/reader/full/crosswrap-by-b-d-ehler 2/62
Cross Wrap 2
What do you need to begin a cross wrap? For starters, pick a piece of a rod blank, an old blank or
even a wooden dowel available from the hardware store. Some rod builders put five or six designs on a
three foot dowel and have them to show the potential rod purchaser. The diameter of the piece chosen towork on can be any size because you will soon learn to size your design to fit the rod. The best design
size is one that shows the whole design when viewed from above. This photo shows different size
diameters and designs. Notice the top design is a six point star which is too large for the rod because thedesign wraps around the rod and cannot be seen without turning the rod.
Take home lesson: Choose design that fits the rod

8/10/2019 CrossWrap by B D Ehler
http://slidepdf.com/reader/full/crosswrap-by-b-d-ehler 3/62
Introduction to Cross Wrap Designs
Cross Wrap 3
Do you need a rod lathe to do cross wraps? The answer is no! After doing cross wraps by hand
holding the rod for 25 years, a rod lathe was finally added to my tools. If you hold the rod by hand thenyou need to provide tension on the thread while spiraling the thread up and down the rod. For regular
thread you may use a tension device that the thread is pulled through. Or you may use a large book to
give the tension you desire. Need more tension? Move the thread down more pages in the book. Both of
these methods require something to hold the spool of thread while wrapping. A cup, bowl or the center ofa spool of masking tape can corral the spool while turning. A small dowel mounted vertically that fits
into the center hole of the spool will hold the spool adequately. If you are using metallic thread the tension
needs to be applied to the spool instead of the thread so the metallic thread does not come apart. Athreaded bolt with spring and wing nut will hold the spool with variable tension available.
If you wrap holding the rod by hand you will also need room for the tip section especially on 7
foot, one piece rods. When spirally the thread up the rod the tip of the rod is pointed forward (in front ofyou) and when spirally the thread back down the rod, the tip of the rod is pointed rear-ward (behind you).
You need enough space for this type of wrapping. Here is an example of hand held wrapping –
Take home lesson: cross wraps can be down without expensive tools.

8/10/2019 CrossWrap by B D Ehler
http://slidepdf.com/reader/full/crosswrap-by-b-d-ehler 4/62
Cross Wrap 4
Another method of doing cross wraps without a rod lathe is to use rod supports to hold the rod. Rodsupports can be as simple as notches on both sides of a cardboard box or a couple caster wheels mounted
back to back on wooden blocks. More elaborate types of rod supports can be made from wood, metal or
plastic. Or they can be purchased ready-made from many sources.
This method of cross wrapping entails holding the spool of thread in one hand while the other hand turns
the rod being held level in the supports. The thread is spiraled up the rod (toward the tip) by one hand and
then switching hands when spiraling the thread back down the rod (toward the butt).
The hand holding the spool of thread supplies the tension on the thread. Experience will teach you how
much tension is correct. Too much or too little thread tension will lead to problems in packing threadslater in the wrapping. Clean hands are also important so you do not transfer dirt or oil from your hands to
the thread. The following is a photo of this technique of cross wrapping
Take home lesson: use rod supports when working space is small.

8/10/2019 CrossWrap by B D Ehler
http://slidepdf.com/reader/full/crosswrap-by-b-d-ehler 5/62
Cross Wrap 5
For those of you who do own a rod lathe, one of the many uses of the lathe is to hold the rod while
doing a cross wrap. A scrap piece of rod can be inserted into the butt end of the rod and then the chuck isclosed on the scrap piece so the chuck does not damage the rod being wrapped. Using three or more lathe
rod supports to support the rod is ideal to keep the rod steady and under tension while turning.
The spool of thread is hand held while spiraling it up and down the rod to create the design. The
hand holding the spool of thread controls the thread tension. My preference is to leave the belt from the
lathe motor connected to the chuck as it provides resistance and better tension control on the thread. The
following photo shows a rod chucked into a lathe while cross wrap is applied –
Take home lesson: Notice the masking tape reversed on itself with sticky side up to hold threads from
moving while reversing direction during wrapping. Some prefer double stick tape for this purpose

8/10/2019 CrossWrap by B D Ehler
http://slidepdf.com/reader/full/crosswrap-by-b-d-ehler 6/62
Cross Wraps 6
For those of you who may not be familiar with some of the thread terms here are some examples.
Open wrap -- open spaces between designs which allows the rod or underwrap to show.
Closed wrap -- the threadwork of the design keeps going until the designs touch eachother with no rod showing under the wrapping.
Underwrap -- thread that is wound around the rod blank completely covering the area for the butt wrap.
The design of the butt wrap is place over this underwrap.
In the above picture the tan is the underwrap while the brown and gold make the chevron design calledthe optical chevron. It is supposed to create a 3-D effect like looking into a box. In this design the
underwrap should be the lightest color to help the 3-D effect.
Take home lesson: learn the definitions used in rod decorations.

8/10/2019 CrossWrap by B D Ehler
http://slidepdf.com/reader/full/crosswrap-by-b-d-ehler 7/62
Cross Wrap 7
Are you still with me? Don’t panic yet as we will be getting to the good stuff soon! Just a few
more definitions, layout and information on tape replicas. I am trying to build a good foundation for you
on which to build your future knowledge of thread art.
Next we need to differentiate between single wrap patterns and double wrap patterns. The single
wrap pattern means that you will have a row of patterns on two opposite sides of the rod. The preferableareas for single patterns are top and bottom. The owner of the rod will enjoy being able to see the full
pattern on the top of the rod while they are holding it. Since the rod is round (usually) think of the cross
section of the rod as a circle with 0 degrees at the top and 180 degrees is at the bottom. The single wrap
pattern should be lined up straight down the rod at 0 and 180 degrees. Here is an example of a single pattern wrap but also is an open wrap because you can see the rod through parts of the design.
The double pattern wrap has the design on the 0 and 180 degree marks (top & bottom) plus it also
appears on each side of the rod at the 90 and 270-degree marks. Duplicating your thread wraps on the top
pattern, then on the side patterns makes this type pattern. Here is an example of a double pattern wrap,called fish scale, showing the pattern on the top and one side. It is also a closed wrap because the two
patterns come together with no rod showing through the pattern.
Take home lesson: single pattern wraps fit better on small diameter rods while larger rods give moreroom for the double pattern wrap.

8/10/2019 CrossWrap by B D Ehler
http://slidepdf.com/reader/full/crosswrap-by-b-d-ehler 8/62
Cross Wraps 8
In the early “cross wrap” years, most of the designs were found by experimentation or by accident andshared between rod builders. Some builders would create designs by pencil and paper while some would
use graph paper for that purpose. All these techniques were pretty slow and the final test was to wrap it ona rod. The wrapping was time consuming and many design failures ended by being cut off the rod.
Then someone found charting tape or graphic arts tape, which comes in many colors and widths. The1/16th inch wide tape worked best for me and the many colors allowed designs to be made quickly. Theonly equipment needed is a piece of paper, pen, ruler, single-edge razor blade and the tape. All the designs
shown in Custom Rod Thread Art were made in this manner.
To create a design first make an X on the paper. This X represents the thread going up the rod and the
returning thread coming back down the rod. Label each leg of the X with A, B or 1,2, show the color oftape to be used and place arrows on the legs of the X to show the direction of the wrap. Then start the
design by laying the tape along the / (up) part of the X and then on the \ (down) leg. By laying the next
tapes in the direction of the arrows the design is created. One should usually make the length of the tape just shorter that the initial X (which is called the layout thread). Start by placing the tape on the X,
positioning it properly, and using the SE razor blade to cut the tape at the proper length.

8/10/2019 CrossWrap by B D Ehler
http://slidepdf.com/reader/full/crosswrap-by-b-d-ehler 9/62
Cross Wrap 9
Now it is time to discuss the layout threads, which are the first threads spiraled up and down therod, on which the design is built. The equipment needs are:
Layout tool – two boards connected at 90 degrees to each other. The bottom board has a V grooverouted into it parallel to the back board. A plastic or metal rectangle piece reaches from the back to the
center of the groove. This tool is used to draw a straight line down the rod. (see photo)
A circle template – used to slide over the rod to mark top and bottom (and sides if double patternis used). The circle template can be used as a ruler with both standard and metric measurements on it.
A metal, pointed tool for scratching marks on the rod.
Compass or calipers for measuring the spacing between design centers.
layout tool

8/10/2019 CrossWrap by B D Ehler
http://slidepdf.com/reader/full/crosswrap-by-b-d-ehler 10/62

8/10/2019 CrossWrap by B D Ehler
http://slidepdf.com/reader/full/crosswrap-by-b-d-ehler 11/62
Cross Wrap 10
If the rod has the guides on it, then the circle template cannot be used. So the 0 and 180 degree
axis can be found with tape or a piece of paper. Wrap the tape around the rod and make a mark on the
tape where it passes over itself. This is the circumference of the rod. Remove the tape and fold the end ofthe tape back on itself to the mark made above. The crease at the fold is the halfway distance around the
rod. Rewrap the tape around the rod with the starting end on the spine of the rod and mark the rod at the
beginning and the halfway mark. This gives you the 0 and 180 degree locations on the rod.
Place the rod in the layout tool and use the plastic/metal guide to draw or scratch a line down the
rod at 0 and180 degrees. The crossover points where the threads will cross each other on the lines can
now be determined.
The spacing between these crossovers can be square, compressed or elongated. Once the spacing
is determined then use your compass or calipers to measure the spacing of the crossovers at 0 degrees. Onthe back (180 degree) side the marks will be equal distance between the marks on the top side. Make the
first mark on the back side ½ the distance between crossovers on the top, then the other marks will be the
full distance from that first mark.
Space the layout points to give a pleasing design. Some designs, like the box wrap, require a
square spacing, which can be obtained by using the circumference measurement for your spacing. If you
are just starting cross wraps, you would be wise to use a wooden dowel which is level. Also use a largerdiameter thread, like C, D or E until you gain more experience. Remember to consider the size or
diameter of the rod when choosing the type of design being wrapped.
This photo shows the 0 degree line with the spacing marks scratched lightly on it.
For more information on layout techniques and spacing see:Custom Rod Thread Art, by Dale P. Clemens
Decorative Butt Wraps, by Billy Vivona in the Guild library on this website
RodCrafters Journal, Vol 21, J-A, 1995 Taper Offset SpacingRodCrafters Journal, Vol 24, A-J, 1998 Taper Offset Spacing
RodCrafters Journal, Vol 29, A-J, 2003 Turbo Taper Offsett Spacing by Clay Johnson
VisualWrap Software, by David Boyle
Take home lesson: For starters, do not worry about Taper Offset Spacing (TOS) right now. First learn
how to do the designs on flat rods or dowels, later when proficient enough then you can learn TOS and
how to use it on closed design wraps on rod blanks with tapers.

8/10/2019 CrossWrap by B D Ehler
http://slidepdf.com/reader/full/crosswrap-by-b-d-ehler 12/62
Cross Wraps 11
Now the fun stuff is going to start! In the last article we described marking the rod with the axis and thespaces between patterns. When you spiral the thread up and down the rod making the crossover points
(Xs) lined up on the axis, the Xs may be compressed, square or elongated. Here is an example of the typesof crossovers:
If you are using a tapered blank the angle of the Xs will always be different, similar to the above example.
Actually when you do a closed wrap on a tapered blank you will have an initial layout, which looks like
the above example.So, go ahead and wrap that initial layout thread up and down the rod forming that series of Xs from which
you will build your design.
From this point on you are going to learn how these designs are created. Finally, bet you thought that we
would ever get here!
Once the initial layout and the first threads have been placed what are our choices placing the next
threads? They are (1) the direction of successive threads from X. (2) The color choices for up and downthe rod and (3) the sequences that the threads are placed. All three of these choices are important in the
formation of the design. Here is a very important thing to remember: whenever two threads cross, there
will be one thread on top and one on the bottom. THE TOP THREAD IS THE ONE THAT ALWAYS
SHOWS IN THE DESIGN.
The basic design in cross wraps is the chevron. Every design is built from chevrons and how they are
combined together. Every chevron starts with the standard X and every design is built from a series of Xs.The explanation of the designs that we cover will be from the basic X showing directions, colors and
sequences of the threads. All of our designs will start from an X diagram.
Take home lesson: The top thread is always the one that shows!

8/10/2019 CrossWrap by B D Ehler
http://slidepdf.com/reader/full/crosswrap-by-b-d-ehler 13/62
Cross Wraps 12
Now you have your layout threads spiraled up & down the rod, so it is time to start laying the otherthreads next to your starting point. Remember there are three choices now for placing the remaining
threads. Direction, color and sequence! Starting with the basic crossover:
Laying the threads to the RIGHT of A & B (direction), and using the same color on A & B (color) and
using equal thread numbers on A & B (sequence), you will get a chevron pointing to the RIGHT.
Notice where the thread/tape intersect in the center and see the horizontal line that is created from left to
right. (The picture is skewed slightly) Later we will change the sequence and that center line will change.
If you reverse these directions and place every thread to the LEFT you will get a chevron pointing to the
LEFT.
Take home lesson: The threads either go right or left only from the starting point to form a chevron.

8/10/2019 CrossWrap by B D Ehler
http://slidepdf.com/reader/full/crosswrap-by-b-d-ehler 14/62
Cross Wrap 13
In this chevron we used different colors on A & B, then part of the way through the design we
alternated the two colors. This is called a split chevron. It is split straight across the middle. Using onethread of each color on each pass up & down the rod will create the horizontal line. Using 2 or 3 threads
at a time going up & down will give you a more jagged line across the center. This effect is used to create
the feathered look on the wings and tail of the Thunderbird design
Other color choices on these chevron designs are:
Alternate colors on A or B while using a solid color on the opposite leg.
Shading or change to a new color on A & B.Shading or change to a new color on A or B, with solid color on the other leg.
Shading light to dark on A, shading dark to light on B.
Even though most of these example designs are made with two colors, keep in mind that changing
colors, shading and using metallics can be substituted on many segments of the design. Do not be afraid
to experiment and try new color ideas.

8/10/2019 CrossWrap by B D Ehler
http://slidepdf.com/reader/full/crosswrap-by-b-d-ehler 15/62
Cross Wraps 14
In the previous articles we have discussed direction and color alternatives, but now we are going toexamine sequence possibilities. In the photo above two colors are used to show the changes in the centerof the chevron design. One thread is spiraled up the rod with color 1. Coming back down the rod with two
threads of color 2. This is called a 1:2 ratio. By changing the sequence in the number of threads used on
each pass one can see the line through the center of the design is no longer horizontal. The line rises
higher and higher the further you wrap.
Take home lesson: Changing the sequence and numbers of threads will alter the original Chevron design.

8/10/2019 CrossWrap by B D Ehler
http://slidepdf.com/reader/full/crosswrap-by-b-d-ehler 16/62
Cross Wraps 15

8/10/2019 CrossWrap by B D Ehler
http://slidepdf.com/reader/full/crosswrap-by-b-d-ehler 17/62
Cross Wraps 16
Here we have changed the ratio (sequence) to a 1:4. As you can see the angle of the rise of the center of
the design is much more drastic. Ratios of 1:3 and 1:4 can be used in the fish patterns to depict the tail orfins in the design.
You will also note that the numbers of threads on leg #1 is smaller than the number of threads on leg #2.In larger designs the #1 leg usually is the design pattern and leg #2 (with more threads) is used as the
background. The background color on leg #2 can be changed, for example shaded from light to darkwhich will still highlight the primary design.You will notice on 1 : 1, 2, 3 and 4 ratio designs the line where the two colors meet is a straight line. Only
the elevation of the line occurs as the ratio increases.
Next we will show you how to make the intersection line CURVE!

8/10/2019 CrossWrap by B D Ehler
http://slidepdf.com/reader/full/crosswrap-by-b-d-ehler 18/62
Cross Wraps 17
This is called a Plus-1 ratio. 1 thread up – 1 thread down, 1 thread up – 2 threads down, 1 thread up – 3threads down, 1 thread up – 4 threads down, etc. Get the idea? One-leg gets 1 thread each pass while the
other leg gets increased by 1 thread each pass. This Plus-1 ratio gives the intersection line a curved look.
In this example the background color has been changed from red to orange to yellow to how it can bevaried.
This is another example of sequencing the numbers of threads to change the look of the chevron design.
Learning how to change directions, change colors and change sequences of the threads will give you
many possibilities to change the look of the design. By using different combinations of direction, color
and sequence there are more than 30 possible designs that can be created on just the chevron alone.
Take home lesson: Using ratios to change the intersection line on chevrons will change the shape of the
chevron.

8/10/2019 CrossWrap by B D Ehler
http://slidepdf.com/reader/full/crosswrap-by-b-d-ehler 19/62
Cross Wraps 18
Now we are going to put direction, change of color and sequence altogether and make a pretty nice
chevron design called the American Flag. The black lines are the original X and the threads will wrap to
the right. Start by making the X a square pattern (or 90 degrees between threads). The flag size is varied by the number of threads used in each of the red and white stripes. Small pattern will take 2 or 3 threads
per stripe and larger patterns 4 or 5 threads per stripe. Start by laying the top red stripe up the rod,
followed by a white stripe, and then repeat this pattern until you have three stripes of each color for a total
of six stripes. Then coming back down the rod with blue/silver thread (blue with silver band in it) to form
the blue/star field. After it is proportioned to fit the size of flag then go back to making the remainingstripes. Start with red, again alternating with the white, then finish with red making a total of 7 stripes.This makes the 13 stripes of the flag. You can then isolate the flag with a thread or two of gold or yellow
around each border. A flagpole can be added by going left down the rod with brown or gray next to the
gold or yellow band on the left edge of the flag. The wrap should be closed to cover the blue between patterns. Other alternatives to close the wrap would be to do a double pattern or add a completely
different pattern between the flag patterns to close the pattern.
Take home lesson: When you carefully use the principles of direction, color change and sequence you end
up with a great looking decoration.
Photo below

8/10/2019 CrossWrap by B D Ehler
http://slidepdf.com/reader/full/crosswrap-by-b-d-ehler 20/62

8/10/2019 CrossWrap by B D Ehler
http://slidepdf.com/reader/full/crosswrap-by-b-d-ehler 21/62
Cross Wraps 19
Here are a couple more examples of chevrons in combination. This one is back to back chevrons. Made
by building one complete pattern to the right, then coming back with another complete pattern to the left.
Another variation is doing a double pattern of chevrons in a very compressed pattern so that the points aresteep and narrow. When done in a shaded manner with yellow, orange and red it looks like flames of a
fire, thus the name Flames.
Here is another chevron pattern called a 4-way chevron. The first chevron is pointing right, second to theleft, third upwards and the fourth downward. There are four steps to make this design.
Take home lesson: When looking at an pattern and trying to figure out the sequence of thread placement,look for the shortest threads because that is where the pattern was started. In the pattern below you can see
the short threads right, next left, etc.

8/10/2019 CrossWrap by B D Ehler
http://slidepdf.com/reader/full/crosswrap-by-b-d-ehler 22/62
Cross Wraps 20
Diamonds
Using the basic X with the A thread going up the rod and the B thread coming down the rod, we learnedthat there are two components to making the chevron design. Up and down the rod only on one side of the
layout thread. The diamond design also starts from the single X, but is wrapped on BOTH sides of thelayout thread. The diamond wrap is made by wrapping up right, down right, up left and down left. Thesefour steps are called a pass, meaning one pass around the design.
When doing cross wraps it is important to develop habits that will allow you to use the same technique
throughout all future designs. In doing the four steps to make a diamond there are a couple ways to do thewrap. Some wrap to the left first then right second, while others prefer wrapping right first then left
second. Either way is fine, but if you settle into a routine for all wraps it will benefit you in the future.
Remember when it was explained that all designs were made from the chevron building block? Well,when a diamond is made, the first pass up and down the rod is a chevron and the second pass on the
opposite side is also a chevron. Both chevrons, when wrapped at the same time, will create the diamond
look. Here is an example of a concentric ring diamond with color changes after each four- step pass:
If all threads used in this design were the same color the diamond shape would be the same, but it would
be a solid color diamond.
Take home lesson: diamonds are made by going both directions from the layout thread

8/10/2019 CrossWrap by B D Ehler
http://slidepdf.com/reader/full/crosswrap-by-b-d-ehler 23/62
Cross Wraps 21
A is going up the rod, B is coming down the rod. This is an example of color choices and this is called a
horizontal split center diamond. To build this design, use color 1 going up to the right and coming downto the left. Color 2 goes up the rod to the left and comes down to the right.
This is called a vertical split diamond. Color 1 goes up and down the rod to the right and color 2 goes up
and down the rod to the left. The vertical and horizontal splits will be used many times when we get intothe larger designs.
Take home lesson: many designs can be created by changing the position of the colors.

8/10/2019 CrossWrap by B D Ehler
http://slidepdf.com/reader/full/crosswrap-by-b-d-ehler 24/62
Cross Wraps 22
This is called an opposite split diamond. From the photo you can see that the light green only goes up therod on both sides while the dark green only goes down the rod on both sides. (a little light reflection in
this photo). This photo also shows the four sections in the design of a diamond. Notice the square shape of
this split center diamond. This pattern is used in making the Malteze Cross, using two vertical and two
horizontal split diamonds.The next photo shows the four-way split diamond with each of the four sections a different color and a
compressed layout for the diamond. One color goes up on A right, second color comes down on B right,
third color goes up on A left and the fourth color comes down on B left.Other color choices can be one-half the diamond can be one color while the other half can be two colors.
Or, three of the sections can be one color while the fourth is another color.
Some sections can be solid colors while other sections can be shaded. Two opposite sections can beshaded from dark out to light colors while the other opposite sections are shaded light out to dark. Later
on in some of the more complex designs the background colors are really diamonds and can be shaded tohelp emphasize the center design.

8/10/2019 CrossWrap by B D Ehler
http://slidepdf.com/reader/full/crosswrap-by-b-d-ehler 25/62
Cross Wraps 23
Now we can talk about sequence choices on diamonds. As we have shown before using the same colorthread in all four sections while changing colors on during the design give a concentric ring diamond.
While using different colors in 2, 3 or 4 sections and laying the threads one at a time gives a straight line
between sections, while using bands of 2, 3 or 4 threads gives a feathered look between sections. Nextchanging the ratios of colors can provide the following examples:
Using the Plus-1 ratio method of one thread at a time on the left side up & down, while increasing thethreads by one on each pass to the right gives this curved split center diamond. This can form the tail in a
fish pattern.
Using a 1 to 2 ration in the same manner will give a different look because of the angle of a constant ratiorather that the increasing ration in the above pattern.

8/10/2019 CrossWrap by B D Ehler
http://slidepdf.com/reader/full/crosswrap-by-b-d-ehler 26/62
Cross Wraps 24
This is the layout and sequence for a 1:3 ratio split center diamond. Below is the same for the 1:4 ratiosplit center diamond. From these examples the narrowing of the “fish tail” can be seen clearly. This
should help in choosing the shape of the design to be used.
Question for you mathematicians: if you have 2 directions, 8 color choices and 6 sequence choices on
thread to use, how many design possibilities are there for this simple X layout??

8/10/2019 CrossWrap by B D Ehler
http://slidepdf.com/reader/full/crosswrap-by-b-d-ehler 27/62
Cross Wrap 25
Here is a diamond pattern, which shows the use of the chevron in building this design. To begin thedesign the same dark color was used all four ways to make the solid diamond center. The next ring was
made by using yellow and orange at the same time to create the chevron look. Then simple diamond
borders with yellow and dark green were used to frame the design. The outer orange and yellow chevronswere made just opposite of the first combination. Then dark green was used to finish the design.
This is another example showing the use of a two color split center diamond plus two shades of green
chevrons framing them. A simple single pattern left open for the rod blank to show.Once you have become used to the principles of using the chevrons and diamonds, let your imagination
take over and apply the many possibilities and combinations to your patterns.

8/10/2019 CrossWrap by B D Ehler
http://slidepdf.com/reader/full/crosswrap-by-b-d-ehler 28/62

8/10/2019 CrossWrap by B D Ehler
http://slidepdf.com/reader/full/crosswrap-by-b-d-ehler 29/62
Multiple Thread Wraps 1
The designs that have been discussed previously were all built from the basic X formed by the singlecrossover point of the layout thread going up and down the rod. Now, our crossover point(s) in the initial
layout will have more than two threads. In the example below we have two threads going up the rod and
only one thread coming down the rod. With these three layout threads we now have six DIRECTIONSthat we can go with the threads. The choices for COLOR on A, B and C are numerous. The SEQUENCES
that are possible are also numerous. In this example there are only sixteen listed, but several hundred possibilities exist if you want to take the time to try them all. Of the 16 that are listed only two of them aredesigns worth doing, as the others only turn out to be designs that have no impact or are mirror images of
each other. By using your knowledge of the principles of building thread designs you should be able to
pick out the most usable designs.
Can you tell which of the 16 sequences will produce a useful design?
Did you give up? The hint is the two asterisks to the left of the sequence number. Here is #7:

8/10/2019 CrossWrap by B D Ehler
http://slidepdf.com/reader/full/crosswrap-by-b-d-ehler 30/62
This gives you a square, single box. The arrows point the direction to wrap.
Now take it one step further and add another thread so there are 3 threads going one way and still onethread going the opposite direction. In this example we still wrap inward on the two outer threads and on
the middle thread we go both directions. Here is what happens then:
This method gives you double boxes.

8/10/2019 CrossWrap by B D Ehler
http://slidepdf.com/reader/full/crosswrap-by-b-d-ehler 31/62
Multiple Thread Wraps 2
From the previous three-thread layout and the sequences that were listed, #16 on the list is shown below.
The wrap direction is both ways on all three layout threads.
The center design is two split center diamonds. They are 4-way split center, but only two colors are used.
Using the same layout as the previous double box design, #7 from the original list, which was 3 threads
one way and a single thread the opposite direction, by using two threads in the opposite direction gives
this design:

8/10/2019 CrossWrap by B D Ehler
http://slidepdf.com/reader/full/crosswrap-by-b-d-ehler 32/62
This produces a 4 box or straight cross design.
Be sure to follow the direction arrows in making the design. In multiple thread designs threads must be placed and spaced properly and in a sequence that allows the pattern to develop. A good routine for
wrapping these designs would be to place thread #1 up the rod, then #2 up, then #3 up, then #4 down and
last #5 down the rod. These steps are called a pass, meaning a complete pass through all layout threads.The second pass would be 1 thread to the right of #1, left and right from #2 and left from #3 going up the
rod. Then to finish this pass, one thread is placed right and left of #4 & #5 going down the rod. This
second pass is repeated until the pattern closes.

8/10/2019 CrossWrap by B D Ehler
http://slidepdf.com/reader/full/crosswrap-by-b-d-ehler 33/62
Multiple Thread Wraps 3
For the next several articles we will be looking at the various design possibilities made from this initial
layout. Most of the patterns derived from this beginning are better if the layout threads are placed in a
square alignment. From the previous discussions about designs starting from the basic X, in the box wrap
layout there are four of the Xs, at the top, bottom, left and right. All of the previous principles ofdirection, colors and sequence can be applied to this box wrap layout. The first example is what is called a
reverse diamond. Where a diamond is wrapped from inside out, the reverse diamond is wrapped from theoutside in.

8/10/2019 CrossWrap by B D Ehler
http://slidepdf.com/reader/full/crosswrap-by-b-d-ehler 34/62
Close examination of this pattern reveals four chevrons pointing at each other. If you leave this pattern
open the rod blank color shows through the gaps in the design. This pattern has been used on the chrome
shafts of golf clubs. If this sequence is continued until the threads all come together in the center, then youhave a straight cross pattern as below.
Take home lesson: as these multiple thread designs are being wrapped, keep your eye open to a pleasing
design that may appear during the wrapping process. If it is appropriate, stop the design right there or
proceed further to see what it turns into eventually.

8/10/2019 CrossWrap by B D Ehler
http://slidepdf.com/reader/full/crosswrap-by-b-d-ehler 35/62
Multiple Thread Wraps 4This pattern is called the Maltese or Iron Cross. It is made by wrapping out from the box with color #1
and in from the box with color #2. If you want the center of the pattern closed then start by wrapping a
small diamond of color #2 in the center of the box, then begin the wrapping sequence above. Look at the pattern closely and see that it is made up of four diamonds, one on each corner. The top and bottom
diamonds are split horizontally and the two side diamonds are split vertically. This is a good example of
building a pattern from four simultaneously wrapped diamonds. This pattern is wrapped both ways fromall four of the layout threads.
Other choices in wrapping this pattern are to use variable colors in the background color #1. Once the
center design is completed, the background threads continue on in a diamond manner. Shading color #1
can produce a nice variable background for the Cross.If color #2 is not stopped (at the Cross stage), but continued on to close the center of the wrap a square is
obtained.

8/10/2019 CrossWrap by B D Ehler
http://slidepdf.com/reader/full/crosswrap-by-b-d-ehler 36/62

8/10/2019 CrossWrap by B D Ehler
http://slidepdf.com/reader/full/crosswrap-by-b-d-ehler 37/62
Multiple Thread Wraps 6
This pattern is called Jets. This box wrap layout and directions are the same as the Maltese Cross and the
Boxed Patch Wrap. The difference from the others is the positioning of the colors and the sequence.
Wrapping color #1 to the left of threads 1, 2, 3 and 4 makes the Jets. At the same time, color #2 iswrapped to the right of threads 1, 2, 3 and 4. Close observation will show that the Jets are made of four
vertical split center diamonds. When the split center diamonds are built to the desired size, fill in around
them with color #2 with an even border. A chevron highlight can be added with color #1 and another
border around the whole design with color #2 will finish off the pattern. Other accents or embellishmentscan be added as desired.

8/10/2019 CrossWrap by B D Ehler
http://slidepdf.com/reader/full/crosswrap-by-b-d-ehler 38/62
Multiple Thread Wraps 7
This pattern is called St. John’s Cross. It is made from the same layout and directions as the Maltese
Cross. The only difference in this pattern is in the sequence of thread used to create the design. The centercan be left open as shown or filled in by starting a small diamond in the center of the box, then proceeding
with the rest of the pattern. In this pattern a plus-1 sequence is used to create the curved portions of thecross. To make this pattern wrap each layout thread IN one thread at a time with Color
#1, then wrap each layout thread OUT with a plus-1 sequence of color #2. The plus-1 sequence adds one
more thread after each full pass around the pattern. The threads wrapped IN are stopped to leave the pattern open to make the cross. If the center threads were used to close the pattern a four-pointed star
would be created.
This pattern and be varied by changing the background thread color (color #2). A shaded backgroundlooks good with this pattern. Since the background is one large diamond, four different colors can be used
to build a 4-color background for the cross. I made this design once using white for the cross and red,
yellow, green and blue for the background.

8/10/2019 CrossWrap by B D Ehler
http://slidepdf.com/reader/full/crosswrap-by-b-d-ehler 39/62
Multiple Thread Wraps 8
This pattern is a circle and is made from the box wrap layout using a plus-1 sequence. If the layout box is
square a circle is made, but if the box is rectangular an oval is the resulting pattern. The sequence for this pattern is one thread wrapped OUT from the box and plus-1 thread sequence wrapped IN from the box. If
different colors are used inside the box this is the result.

8/10/2019 CrossWrap by B D Ehler
http://slidepdf.com/reader/full/crosswrap-by-b-d-ehler 40/62
Multiple Thread Wraps 9
This is a design that was started like a circle, but instead of finishing the circle, it was left open and acouple trim bands were added for emphasis. Many of the patterns have interesting and completely
different looking designs when they are only partially completed.
This pattern is created by starting with a box wrap layout, wrapping IN from all four threads with color

8/10/2019 CrossWrap by B D Ehler
http://slidepdf.com/reader/full/crosswrap-by-b-d-ehler 41/62
#1, then wrapping OUT from all four threads with FOUR threads of color #2. This is a 4:1 ratio pattern.
Interestingly enough, this is very similar to the Maltese Cross design except the Maltese Cross is wrappedwith equal numbers IN and OUT of the box layout, while this 4:1 ratio design gives the 4-point star look.
This is a good example of a SEQUENCE change to get another design. This is another pattern that gives a
completely different, but nice pattern when the wrapping process is only one-half finished.

8/10/2019 CrossWrap by B D Ehler
http://slidepdf.com/reader/full/crosswrap-by-b-d-ehler 42/62
Multiple Thread Wraps 10
This single arrow pattern starts from the box wrap layout and is made by wrapping IN and OUT from the
top X with the color wanted for the arrow. The background color wraps OUT only from the bottom X inthe layout. The sequence for wrapping this pattern is up and down the rod left and right for the green
color, then up and down the rod to the outside with the yellow background color.

8/10/2019 CrossWrap by B D Ehler
http://slidepdf.com/reader/full/crosswrap-by-b-d-ehler 43/62
This point-to-point 4 arrowhead pattern also starts from the basic box wrap layout. The initial layout
threads are numbered 1 thru 4. The pattern is wrapped IN and OUT from all 4 layout threads one thread at
a time. Looking at the pattern one can see that the dark green is wrapped to the outside going up the rod, but wrapped to the inside coming back down the rod. The light green is just the opposite, going inside up
the rod and the outside coming back down the rod.
While this sequence may seem quite simple (and it really is), I have to admit that after spending 2.5 years
with pencil and paper trying to get the sequence right for this design in my head, I failed to figure it out.Then one day while using charting tape and trying for another pattern, I inadvertently switched these two
colors coming back down the rod on the initial layout. Rather than take the tape off and redo the wrap
intended, I decided to finish this sequence to see what happens. What happened was that I got the abovedesign that I had been working on for years by accident. I think you can read between the lines to get the
take home lesson from my experience.

8/10/2019 CrossWrap by B D Ehler
http://slidepdf.com/reader/full/crosswrap-by-b-d-ehler 44/62
Multiple Thread Wraps 11
Taper Offset Spacing (TOS)
Taper offset spacing is the process of placing your layout threads on the axis of the blank in such amanner that when the subsequent pattern is wrapped and closed there are no gaps or overlays between the
patterns. This process is particularly needed when the cross wrap is placed on an area of the blank with ataper. There are several methods to obtain the TOS, which have been referenced in the previous article,
Cross Wraps 10. Billy Vivona very well covers these methods in his article, Decorative Butt Wraps,which is available in the Guild’s Library. Other methods have been regular topics in past RodCrafterJournals.
Most of the methods require measurements and some use of mathematics. Some builders have asked for
simpler terms and techniques in order to do a taper offset layout. The following is a method learned from
RodCrafters many years ago, which seems to work quite well.After finding and marking the axis of the blank to be wrapped, the next step is to mark the blank where
the cross wrap is to begin and end. Leave enough space in front of the handle for the tie off wraps when
the cross wrap is finished.In the following example the area for the cross wrap is marked at both ends. Find the center of the cross
wrap area and wrap a slip of paper or piece of tape around the rod and mark it where the overlap occurs.
This gives you the circumference of the rod in the center of the future wrap. Then place calipers orcompass on the slip of paper from the edge to the overlap mark. Using that setting on the calipers start at
the butt end mark on the rod and by rotating the calipers down the axis, this will give you an estimate of
the number of cross over points there will be in your cross wrap. In this example there were five cross
over points along the axis. There may be some space left over on the axis, but don’t worry about that because you will most likely cover it with the tie off wrap.
Knowing that there will be five cross over points in the cross wrap, the next step is to find the
circumference of the rod at the butt end of the wrap and the tip end of the wrap. Using a slip of paperagain wrap it around the point where the design will start at the butt of the rod and mark the point where
the paper overlaps. Do the same for the point where the design ends towards the tip of the rod. The same
slip of paper can be used for both measurements, but be sure to label the marks.
Using a ruled piece of paper with a vertical margin line at the left side and the slip of paper marked withthe circumferences, the TOS can be laid out graphically on the ruled paper. Transfer the circumference of
the butt to the top line of the paper beginning at the left vertical margin. Since there will be five cross over points in the wrap, count down the first five lines on the paper and transfer the tip end circumference to
the fifth line. Using a ruler connect the two circumference markings with a straight line. You now have
the distances figured out for the tapered offset layout. They are the distance between the left hand margin
line and the right hand line.However, when you layout these distances on the axis, start with the TIP end measurement and place that
distance beginning from the BUTT end marking. The next distance going toward the tip will be the next
line above the tip distance on your chart. Continue working up each line and transferring that distance tothe rod blank until the last line (the butt circumference) is transferred to the tip end of the axis. The
distances on your chart are reversed during the layout on the rod blank, so the smallest distance is closestto the butt end and the longest distance is closest to the tip of the rod. These variable distances between
the cross over points will allow for the taper of the rod in a closed wrap.

8/10/2019 CrossWrap by B D Ehler
http://slidepdf.com/reader/full/crosswrap-by-b-d-ehler 45/62
This photo shows the axis on the rod, the butt end mark, the tip mark and the dot in the center. The slip of paper with ½ on it is the circumference at the halfway point. The other slip of paper shows the
circumference of the butt and tip. The distance is measured from the left hand edge of the paper to the
marks. Using those distances the chart below them was made. The five lines represent the five distances
between cross over centers. For the opposite side of the rod (180 degrees) the cross over points will becentered between the top cross over points. Start with one-half the tip circumference for the first cross
over point on the back side of the rod, then the full length of the remaining distances on your paper graph
will complete the layout.

8/10/2019 CrossWrap by B D Ehler
http://slidepdf.com/reader/full/crosswrap-by-b-d-ehler 46/62
This photo shows the calipers used to transfer the measurements from the chart to the rod blank. Notice
the shortest distance is next to the butt end (left) and the cross over point distances increase as they gotoward the tip. This tapered offset layout process is simple, quick and effective. Good luck!

8/10/2019 CrossWrap by B D Ehler
http://slidepdf.com/reader/full/crosswrap-by-b-d-ehler 47/62
Multiple Thread Wraps 12
So far we have talked about cross wrap designs built from a single cross or X, which is one thread up anddown the rod. From there we have added another thread or two to the initial layout and have seen some
designs develop from these. The last few designs were created from what we call the box wrap layout,
which were two threads up and down the rod forming a square or box on the axis of the rod blank. Thenext design is formed from an initial layout of a box wrap, but we are adding a fifth thread in the center of
the two threads going up the rod.
The white wraps OUT from the center thread going up the rod.
The blue wraps IN coming back down the rod.The orange wraps OUT from all four threads of the box.A single thread of black was added around the pattern to frame it.
A variation on this pattern would be to use a plus-1 sequence in the white and blue threads giving curved
lines in the pattern and a circle in the center instead of a square.

8/10/2019 CrossWrap by B D Ehler
http://slidepdf.com/reader/full/crosswrap-by-b-d-ehler 48/62
Multiple Thread Wraps 13
The next step in multiple thread patterns is a six thread layout, with three threads going up the rod andthree coming back down. Another way to look at them is a simple box wrap with a simple cross thread
through the center of the box. With six threads in the layout and two directions to go from each thread it is
possible now to have 12 thread sequences in each single pass around the pattern. The following exampleshows the 6 layout threads with 3 colors and going both directions from each of the 6 threads. A pass
would be up the rod on each side of all three threads and the same sequence coming back down the rod,with the only difference being one color in the center going up the rod and a second color coming backdown the center.
This can be called a Patterned Cross or Boxed Patch Cross.
White wraps up the rod IN from 1 & 3White wraps up the rod both ways OUT from 2Green wraps down the rod IN from 4 & 6
Green wraps down the rod both ways OUT from 5
Orange wraps out from 1,3,4 & 5A variation is to do four of these simultaneously in a diamond formation using five different colors and
the results looks like a multi-color quilt. Are we having fun yet??

8/10/2019 CrossWrap by B D Ehler
http://slidepdf.com/reader/full/crosswrap-by-b-d-ehler 49/62
Multiple Thread Wraps 14
This pattern also starts from a box wrap with center thread layout. It is a very nice, simple wrap thatwould be useful on a small diameter rod. The pattern does not expand beyond the initial box wrap layout
so the pattern is small. When the wrap is left open there is a nice diamond shaped opening for the rod or
underwrap to show through.
The blue center line wraps OUT both ways while the orange wraps IN only. There are eight wrappingsteps in each pass (count the arrows). The pattern closes into the center quickly and makes a nice designthat is quick and easy. This pattern is similar to the Reverse Diamond and Straight Cross seen in MTW 3,
with the difference being the addition of the center line wrapping.

8/10/2019 CrossWrap by B D Ehler
http://slidepdf.com/reader/full/crosswrap-by-b-d-ehler 50/62
Multiple Thread Wraps 15
This is the same pattern as MTW 14 except the addition of blue outside the box.
To build this pattern it requires a 12 step wrapping sequence for each pass.The blue wraps OUT from the center line on each side.
The orange wraps IN from the outer box.The blue wraps OUT from the outer box.
The straight lines are achieved by wrapping one thread at a time in each sequence during a pass around
the pattern. Notice the four diamonds at the corners of this pattern, 2 split vertical and 2 split horizontal.

8/10/2019 CrossWrap by B D Ehler
http://slidepdf.com/reader/full/crosswrap-by-b-d-ehler 51/62
Multiple Thread Wraps 16
Another example of patterns from the single box with center cross thread layout is the eight- point starand variations of it.
The black starts at the center line and wraps OUT both ways..
The green starts on the outside of the box wraps and wraps OUT only.There are eight sequence steps in each pass around the pattern.
Wrapping one thread at a time will give the straight lines, but using different ratios or plus-1 sequenceswill give a variety of variations.

8/10/2019 CrossWrap by B D Ehler
http://slidepdf.com/reader/full/crosswrap-by-b-d-ehler 52/62
Multiple Thread Wraps 17
This is also a two-color, eight-point star but the wrap sequence is changed in one area. It can be called aSpaced Star.
This pattern is made by:
The center thread is wrapped OUT both ways in red.
The outer box is wrapped both IN and OUT in yellow.When the pattern closes inside the box, then frame it with red or another color.

8/10/2019 CrossWrap by B D Ehler
http://slidepdf.com/reader/full/crosswrap-by-b-d-ehler 53/62
Multiple Thread Wraps 18
This pattern is also a variation of the 8-point star, with the main difference being the use of three different
colors.
This pattern is made with a 12 sequence pass including:Wrap the centerline thread OUT both ways with red.
Wrap the outer box threads IN with yellow and OUT with green.Wrap with single threads for the straight lines inside the pattern box.
Black was added for frame effect and can be varied within the design.
Note the 8-points of the star in red, but also the cross, formed by the yellow. Note the black separated the whole pattern into 9 diamonds. A solid red in the center, 4-way split
diamonds of red, green & yellow and 2-way split diamonds of yellow and green (both vertical and
horizontal split). This shows how this pattern is built from the simultaneous wrapping of these nine
diamonds. This is a good example of building patterns from the basic chevrons & diamonds.

8/10/2019 CrossWrap by B D Ehler
http://slidepdf.com/reader/full/crosswrap-by-b-d-ehler 54/62
Multiple Thread Wraps 19
Here is another variation of the 8-point star, called the Spider.
This pattern is formed by:
Wrap the center thread OUT both ways with one thread of the dark color.Wrap the outer box OUT only with the background color using the plus-1 method.
Using a shaded technique for the background color is a popular procedure.
8/10/2019 CrossWrap by B D Ehler
http://slidepdf.com/reader/full/crosswrap-by-b-d-ehler 55/62
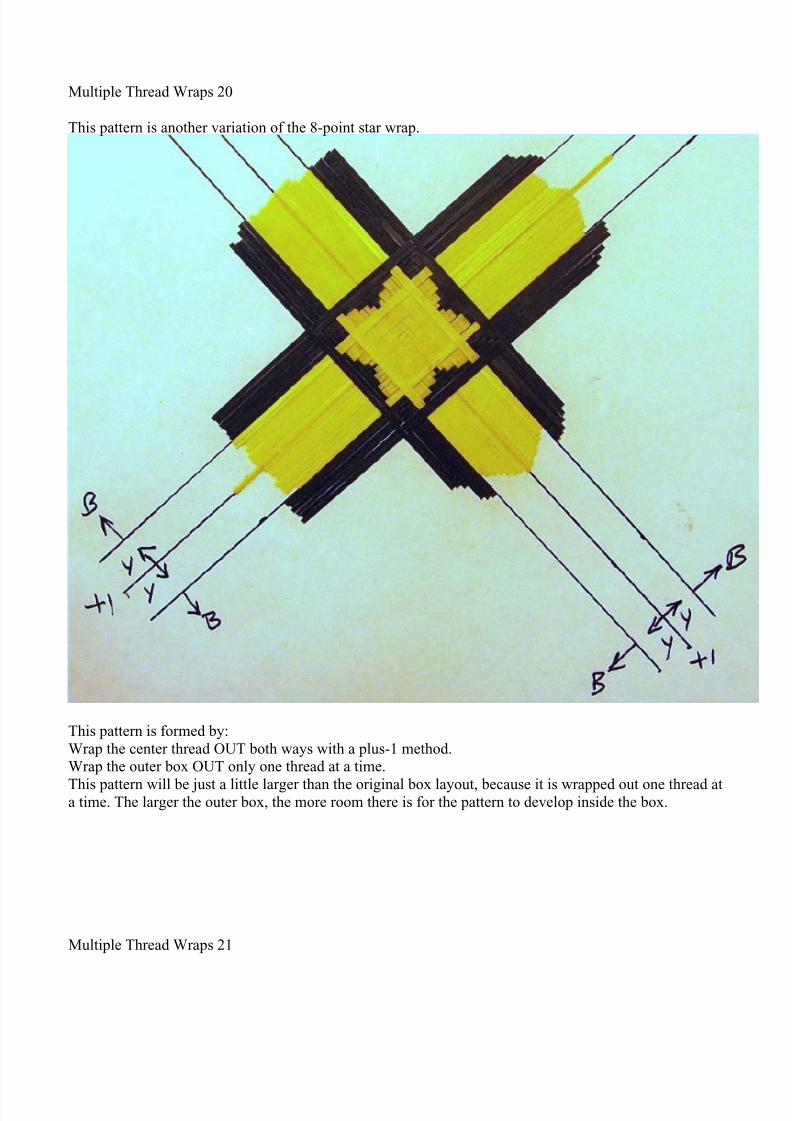
Multiple Thread Wraps 20
This pattern is another variation of the 8-point star wrap.
This pattern is formed by:
Wrap the center thread OUT both ways with a plus-1 method.Wrap the outer box OUT only one thread at a time.
This pattern will be just a little larger than the original box layout, because it is wrapped out one thread ata time. The larger the outer box, the more room there is for the pattern to develop inside the box.
Multiple Thread Wraps 21

8/10/2019 CrossWrap by B D Ehler
http://slidepdf.com/reader/full/crosswrap-by-b-d-ehler 56/62
The next step in designs is to use a double box layout. This means a box layout with another box outside
of it. Now you will have four threads going up the rod and four threads coming back down the rod. Hereis an example:
The white wraps IN one thread at a time from the center box.The green wraps OUT one thread at a time from the center box.
The orange wraps OUT --TWO threads at a time from the outer box.
A variation would be to use a plus-1 method with the white, which gives a center circle, or use a plus-1
method with the orange to give a more pointed 4-point white star.

8/10/2019 CrossWrap by B D Ehler
http://slidepdf.com/reader/full/crosswrap-by-b-d-ehler 57/62
Multiple Thread Wraps 22
This is another example of a double box layout pattern.
The dark blue wraps IN with a plus-1 method from both side of the inner box.
The green wraps OUT from the inner box and IN from the outer box one thread at a time.
The dark blue wraps OUT from the outer box in a plus-1 method.
In this example there are numbers on each side of the layout threads. This is to help identify the order of
the steps to be done on each pass.
Since there are 16 wrapping steps on each pass around this pattern it is really helpful to list the steps and
check them off as they are completed. Also keep in mind that you will be increasing 8 of these steps by
one thread each pass. Keeping track of the steps and the passes you are working on will be beneficial to
you if the phone rings or you need a nature break.
Multiple Thread Wraps 23

8/10/2019 CrossWrap by B D Ehler
http://slidepdf.com/reader/full/crosswrap-by-b-d-ehler 58/62

8/10/2019 CrossWrap by B D Ehler
http://slidepdf.com/reader/full/crosswrap-by-b-d-ehler 59/62
Thunderbird
Build the head and body on threads 1 & 2 as a horizontal split center diamond and wrapping one thread ata time. May use red under-wrap for body fill if needed. Once the head and body are the appropriate size, build the tail and wings at the same time using 3 threads each pass for the feathered look. The tail is
formed on threads 3 & 4 with red wrapping OUT and black wrapping IN. The wings are finished off on
threads 5 & 6 by black wrapping OUT, 3 threads at a time. After the bird is completed frame with achevron or diamond wrap. Other variations can be metallic thread highlights, shaded backgrounds or
different bird effects.

8/10/2019 CrossWrap by B D Ehler
http://slidepdf.com/reader/full/crosswrap-by-b-d-ehler 60/62

8/10/2019 CrossWrap by B D Ehler
http://slidepdf.com/reader/full/crosswrap-by-b-d-ehler 61/62
Multiple Thread Wraps 25
Four-Corner ThunderbirdOnce you have mastered the single thunderbird, then try this one.
The layout is side by side thunderbird layouts, which allows you to build all four at the same time.
Step one is to for the split center head by green wrapped OUT and yellow wrapped IN. Step two is
forming the tail and wings by yellow wrapped OUT for the tail & wings, red wrapped IN to outline the
tail and red wrapped OUT (later changed to black) to outline the wings and make the center black cross.
Well, now is probably the best time to end this project on Cross Wraps! The goal was to help the builder
obtain a better knowledge of how these patterns are created and to stimulate the desire to try doing thistype of decoration. Good luck with your endeavors and remember that if you come up with some new
patterns be sure to share them with others, especially me!! B.D.Ehler 2006

8/10/2019 CrossWrap by B D Ehler
http://slidepdf.com/reader/full/crosswrap-by-b-d-ehler 62/62
Do you think that you have enough information on cross wraps to keep you busy for a while? Hope youhave downloaded them for future use! Please start from the very beginning and read through them in
order. This is a very easy process if you approach it from the start and expand from there. Remember to
pack and re-pack your threads about every 3 or 4 passes. Try to keep the crossover points in the designlined up on the top and bottom axis. You can scoot these threads around pretty good with a strong
fingernail. If you are doing a closed wrap, then besides packing in some places, you may have to spread
the threads a little in others. When the pattern is closed and finished being packed, then use a burnishingtool to go over the entire wrap to even and smooth out threads. Using a large diameter piece of bare rod
blank to ROLL over the threads can mash them down to spread them out in areas that need filling. Also,
don't forget about the use of the invisible thread to hold your open designs from thread slippage. Use
quilters invisible thread to wrap over the completed design leaving about a 1/16th inch space betweeneach revolution. Then go between these threads to do the last push on design threads that need it. Then
saturated the wrap with CP or finish and after it has soaked in good remove excess with coffee filter. Let
dry for 24 hours and then remove the invisible thread and complete the finish process. Here is what theinvisible thread looks like on a finished wrap.
If any of you have questions about cross wrapss or need assistance, just contact me. Good luck! B.D.