ct133 - mini milling machine - busy bee tools · 2015-02-25 · offer the ct133 mini milling...
TRANSCRIPT
OWNER’S MANUAL
CT133 - MINI MILLING MACHINE

2
CT133 MINI MILLING MACHINE
INDEX
GENERAL SAFETY INSTRUCTIONS PAGE 3 SPECIFIC SAFETY INSTRUCTIONS PAGE 4 FEATURES ILLUSTRATED FEATURES PAGE 5 MACHINE SPECIFICATIONS PAGE 6 LIST OF ACCESSORIES PAGE 7 POWER SAFETY PAGE 8 MAHCINE INSTALLATION PAGE 9 – 10 MECHANSIM ADJUSTMENT PAGE 11 –16 OPERATION & TECHNIQUES PAGE 17 – 18 ELECTIRICAL CIRCUIT DIAGRAM PAGE 19 MAINTENANCE PAGE 20 –21 PARTS DIAGRAM PAGE 22 – 24 PARTS LISTING PAGE 25 – 26 WARRANTY PAGE 27

3
GENERAL SAFETY INSTRUCTIONS EXTREME CAUTION SHOULD BE USED IN OPERATING ALL POWER TOOLS. KNOW YOUR POWER TOOL, BE FAMILIAR WITH ITS OPERATION. READ THE OWNER’S MANUAL AND PRACTICE SAFE USAGE PROCEDURES AT ALL TIMES.
CONNECT your machine ONLY to the matched and specified power
source.
WEAR SAFETY GLASSES, RESPIRATORS, HEARING PROTECTION and SAFETY SHOES when operating heavy machinery.
DO NOT wear loose clothing or jewellery when operating machinery.
Always wear safety glasses.
A Safe Environment is important. Keep the area free of dust, dirt and
other debris in the immediate vicinity of the machine.
BE ALERT! Do Not Use prescription or other drugs that may affect your
ability or judgement to safely use this machine.
DISCONNECT the power source when changing drill bits or making other
adjustments or repairs.
NEVER leave an operating tool unattended.
NEVER reach over the table when the tool is in operation.
ALWAYS keep bits sharp and properly aligned.
ALWAYS keep all safety guards in place and ensure their proper function.
ALWAYS make sure that any tools used for adjustments are removed
before operating the machine.
ALWAYS secure your work with the appropriate clamps or vises.
ALWAYS keep bystanders safely away while operating machinery.
THINK SAFETY. WORK SAFELY. Never attempt a procedure if it does
not feel safe or comfortable.

4
SPECIFIC SAFETY INSTRUCTIONS This machine is designed for drilling, deep milling and face milling of small pieces with a limit size of approx. 12” x 8” x 8”. It is highly recommended that you read this manual carefully before operating this machine. • Always use the chip guard along with safety glasses to ensure proper safety
when milling. • Before starting any work, make sure the work piece has been properly
clamped to the table. DO NOT ever hold a work piece in your hand when milling or drilling.
• When selecting an appropriate speed for your work piece, allow the mill to
gain full speed before starting. • NEVER reverse the motor direction while the mill is in motion. • DO NOT clear debris & chips by hand. ALWAYS use a brush & DO NOT
clear the table while the mill is running. • Operating this machine beyond the design purpose and limit of this machine
without sufficient consultation or proper training is not recommended. • The noise level during operation if 70 – 75db. Hearing protection may not be
necessary but is recommended. • In case of power failure, the machine may start up again once power is
restored, be sure to pay close attention in this case and turn the power switch to off as soon as there is a machine interruption.
• Handling – The net weight of this machine is approx. 50kg. When lifting or
moving this machine, be sure to get assistance from another person. It is best to use common sense and practice safety at all times when using this machine and other power tools.

5
CT133 - FEATURES
A – MOTOR B – FINE FEEDING WHEEL C – HEADSTOCK & SPINDLE D – LOGINTUDINAL FEED HAND WHEEL E – WORKING TABLE F – SADDLE G – CROSS FEED WHEEL H – BASE I – CONNECTING STRUT J – LIMIT BLOCK K – EMERGENCY STOP SWITCH L – BALANCE MECHANISM M – COLUMN N – ELECTRICAL BOX

6
CT133 - MACHINE SPECIFICATIONS As part of the growing line of Craftex metalworking equipment, we are proud to offer the CT133 Mini Milling Machine. The Craftex name guarantees Craft Excellence. By following the instructions and procedures laid out in this owner’s manual, you will receive years of excellent service and satisfaction. The CT133 is a professional tool and like all power tools, proper care and safety procedures should be adhered to. The CT133 Mini Milling Machine has multiple functions on either face milling or drilling and there are various sizes and kinds or cutters that can be used with this machine. Table Size ………………………………………………………………….16” x 4” T-Slot Size …………………………………………………………………. M10 Maximum Table Travel …………………………………………………... 8 ½” Maximum Cross Slide …………………………………………………..…4” Maximum Spindle Travel …………………………………………………..7” Head Tilt……………….……………………………………………( -45° ~ +45°) Spindle Speed ..……………………………………………Low: 0 ~ 1100 RPM
High: 0 ~ 2500 RPM Spindle Taper ……………………………………………………………. MT3 Drilling Capacity ……………………………………………………………1/2” End Milling Capacity ……………………………………………………….5/8” Face Milling Capacity ……………………………………………………..1 1/8” Machine Weight …………………………………………Gross Weight – 68 kg Net Weight – 50 kg Motor……………………………………………………………………… 350 Watts Voltage……………………………………………………………………. 110V AMP…………………………………………………………………………4.5 Cycle/RPM………………………………………………………………… 6000RPM Switch Type ……………………………………………Variable Speed Reversible Power Transfer…………………………………………………………… Gears FEATURES Dial Graduation are in Metric Fine Feed Head Control Two Speed ranges Spring Head Return Zero Setting Dials Cast Iron Construction

7
CT113 – STANDARD ACCESSORIES
T-SLOT SPECIFICATION (mm)
Description QTY Large Wrench S: 36 1 Drill Chuck & Taper Shank 1 Oil Can 1 Fixing Pin 1 L Hex. Wrench S: 3, 4, 5, 4 Socket Head Wrench D: 45 – 52 1 Double End Wrench 8-10, 14-17, 17-19 3 Drill Chuck Holder 1 Handle 2 T-Nut 2 Fuse 4.5A(110V) 1 Draw Bar 1

8
CT133 - POWER CONNECTION/DISCONNECT & OPEARTION
The connection, disconnection and grounding is carried out through the plug on the machine. For safety reasons do not change this plug in any situation. For the protection control device, we recommend that the operator should supply a fuse with current ratings and the total length between the fuse and connection terminal should coincide with the following “ Extension lead Chart” The power source for this machine is 110V. Make sure that the Emergency stop switch is in the off position before plugging the cord in. Disconnect the machine from the power source with the plug before servicing and when changing accessories.
Amperage Rating
7.5m
15m
22.5m
30m
45.5m
Extension Cable Length
3A
0.75
0.75
0.75
0.75
0.75
6A
0.75
0.75
0.75
0.75
1.25
10A
1.0
1.0
1.0
1.0
1.5
13A
1.25
1.5
1.5
1.5
2.5
Wire Size mm 2

9
CT133 – MACHINE INSTALLATION MACHINE LOCATION & SET UP The machine should be fixed on the working table with four hexagon holts. Please install it to an appropriate location in order to meet with the precision requirements of the machine. Before setting your machine up, clean off any anti-rust protector and grease that was used for shipping purposes. You can use a clean cloth and appropriate solvents. (1) When selecting a location make sure that your worktable has a flat surface. (2) Avoid placing in a location with exposure to direct sunlight, heavy moisture
and excessive dust. (3) When you have found your desired location, drill 4 locating holes on the
worktable, the dimensions should be the same as the machine base. (4) Pay close attention when selecting your spot to ensure that there is enough
room around the machine for the cross feed & longitudinal hand wheel can be extended during future use.
(5) Adjust the machine accordingly and affix to the worktable with 4 M10 bolts & nuts.

10
CT133 – MACHINE INSTALLATION CHECK THE FOLLOWING BEFORE SWITCHING YOUR MACHINE ON (1) Remove all fixtures that were used while initial set up of your machine took
place. (2) Check whether the power voltage is suited for your machine (3) Remove all obstacles which are around your machine and might come in the
way (4) Check the angle of the pillar and adjust the bolts to see if they are tight
enough. (5) Check the chuck, chuck holder and fixing pin on the spindle to make sure that
they are unloaded. (6) Check the high-low speed o n the spindle to see if it is set on the right speed.

11
CT133 – MECHANISM ADJUSTMENT INSTALATION OF THE TAPER SHANK (1) Turn the main power off before replacing the cutter. (2) Pull out the protective cover (a) (3) Wipe the spindle sleeve and the taper shank from any debris or dirt. (4) Put the taper shank (g) into the spindle sleeve. The cutter should be matted
with an oilcloth to keep your fingers safe. (5) Insert the fixing pin (d) right on the spindle (6) Use a #14 open end wrench ( c) to tighten(clockwise) the spindle draw bar (b) (7) Pull out the fixing pin (8) Install the protective cover
REMOVAL OF THE TAPER SHANK (1) Turn off the main power before you replace the cutter (2) Pull out the protective cover (a) (3) Insert the fixing pin (d) right on the spindle sleeve (4) Use a #14 open end wrench (c ) to loosen (counter clockwise) the spindle
draw bar (b) (5) Knock the taper shank (g) gently with a plastic or deadblow hammer to loosen
it into the spindle sleeve. Then take off the taper shank (g) (6) The cutter should be again handles with an oilcloth to protect your fingers. (7) Install the protective cover (a)
* When installing or removing the taper shank, make sure that the machine is unplugged.
12
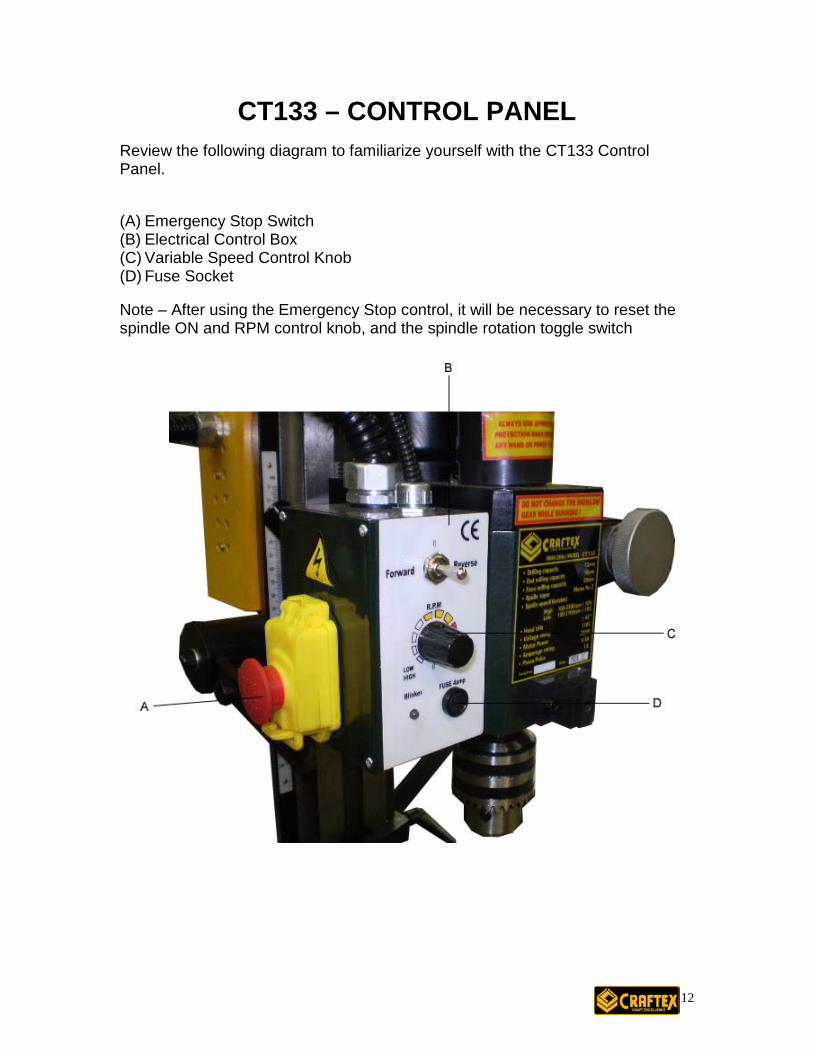
CT133 – CONTROL PANEL Review the following diagram to familiarize yourself with the CT133 Control Panel. (A) Emergency Stop Switch (B) Electrical Control Box (C) Variable Speed Control Knob (D) Fuse Socket Note – After using the Emergency Stop control, it will be necessary to reset the spindle ON and RPM control knob, and the spindle rotation toggle switch

13
CT133 – MECHANISM ADJUSTMENT TEST RUN & SPINDLE BREAK IN The CT133 has two spindle speeds: Low – 0 ~ 1100 & High – 0 ~ 2500 RPM. It is important to break the machine in properly before consistently using your machine. This will ensure better overall performance. Once you have read this entire manual and have familiarized yourself with the machine, you can begin the process. To begin, take the following steps (1) Make sure the machine is properly lubricated (see page20) (2) Make sure the machine is free from obstruction or debris. Remove the
drawbar if there is no arbor or collet in the spindle. (3) With the spindle at a complete stop, change the speed range lever into the
low range. (If the lever will not change at first, rotate the spindle by hand while holding light pressure on the lever. When the gear engages, the lever will fall into place)
(4) Turn the machine ON and let the machine run for at least 10 minutes on low speed. The machine should run smooth with minimal vibration and minimal noise. If the mill is not running smoothly, turn the machine OFF right away before proceeding.
DO NOT change speed ranges with the machine is ON. This may damage your machine. (5) Slowly increase the RPM to a medium range and allow the machine to run
another 10 minutes in this range. (6) Slowly increase the RPM to the highest range and allow the machine to run
another 10 minutes in this range. (7) Turn the machine OFF and change to HIGH speed. Repeat steps 4 – 6.
14
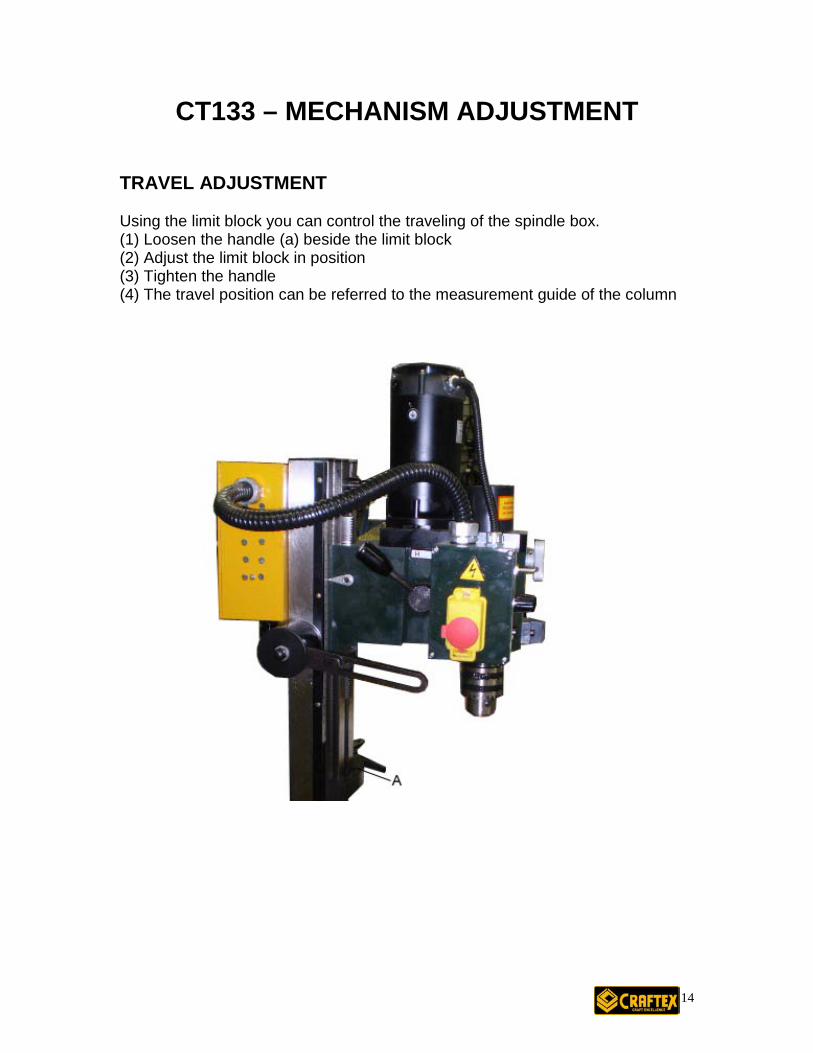
CT133 – MECHANISM ADJUSTMENT TRAVEL ADJUSTMENT Using the limit block you can control the traveling of the spindle box. (1) Loosen the handle (a) beside the limit block (2) Adjust the limit block in position (3) Tighten the handle (4) The travel position can be referred to the measurement guide of the column

15
ADJUST THE ANGLE OF THE COLUMN (1) Turn the main power off before making this adjustment (2) Hold the column with your hands in order to prevent the column from free fall
once it is loose. (3) Loosen the locked nut (a) with a large wrench (b) (4) Adjust the column angle as desired. (45° is the Max. for both left & right) (5) Tighten.

16
MITER WEDGE ADJUSTMENT
After long term use & contact motion to the machine function, errors may occur due to relative surface motion. The miter wedge acts as an interface on each slide face. In order to eliminate this error, make use of the adjusting screw by keeping pressure between two machine parts (example – Spindle box & column) Adjust and keep the contact pressure to maintain its mechanical precision.
In order to maintain precision, the pressure between the two elements needs to be adjusted appropriately because of the abrasion that is produced from the contact motion (This adjustment can be made once a year if necessary) In order to make this adjustment take the following steps. (1) Loosen the locked nuts (2) Adjust the foremost pressure of the miter wedge by the locked nut. If
necessary, loosen all the adjusting screws (3) Tighten and loosen the adjusting screws and keep in mind that the pressure
of each adjusting screw should be the same. (4) Tighten the lock nuts uniformly (5) Use a #3 hexagonal wrench to fix the adjusting screws from rotating to cause
the unbalanced pressure (6) Adjust the middle portion first and then go towards the interior from two sides
uniformly while you are adjusting the screw in order to ensure a uniform pressure.

17
CT133 – OPERATIONS & TECHNIQUES METHOD OF OPERATION – DRILLING & DEEP MILLING (1) Install the appropriate tool and tighten & make sure your adjustments are firm.
(Make sure the power is turned to OFF at this time) (2) Select an appropriate speed level.
WHEN THE SPINDLE IS RUNNING, DO NOT CHANGE THE SPEED BETWEEN HIGH & LOW
(3) Set your work piece on the worktable & secure it. (4) Adjust the working table (Longitudinal Axis Y) and saddle seat (Cross Axis X)
in position. (5) Loosen the limit block handle and adjust the blocks in position. At this point
do not let the tool meet the work piece. (6) Remove all obstacles and unnecessary items from around the machine. (7) Turn on the main power. (8) Refer to the measurement ruler on the column to obtain your desired drilling
or milling depth. (9) After you have finished your work, turn the power off and take the spindle
back to its original position. (10) Clean the machine of debris or dirt. FACE MILLING (1) Install the appropriate tool and tighten & make sure your adjustments are firm.
(Make sure the power is turned to OFF at this time) (2) Select an appropriate speed level.
WHEN THE SPINDLE IS RUNNING, DO NOT CHANGE THE SPEED BETWEEN HIGH & LOW
(3) Set your work piece on the worktable & secure it. (4) Adjust the working table (Longitudinal Axis Y) and the saddle seat (Cross Axis
X) in position. (5) Release the limit block on the column and adjust the depth of cut. (6) Turn the hand wheel of the working table (Y-axis) and the saddle seat (X- axis) to perform face milling. (7) After you have finished your work, turn the power off and take the spindle
back to its original position. (8) Clean the machine of debris or dirt.

18
CT133 – OPERATIONS & TECHNIQUES INSPECTION DURING OPERATION During operation it is important to be aware at all times not only of your work piece and machine but of your surroundings. The machine will not perform to the best of its abilities under the following conditions. (1) The depth of cut is too deep (2) The feeding speed is too fast for the material being worked on (3) The rotation speed is too fast (4) The machine is not fixed properly to the bench or worktable. (5) The vise and work piece is not properly and firmly fixed. PROPER RPM SETTINGS It is important the follow correct RPM settings when working with different materials. Before you start any work, you should determine the best RPM setting for your work piece. Failure to select the correct RPM may result in the operator’s bodily harm as the machine may eject certain materials or work piece if the incorrect RPM is selected. Failure to choose the correct RPM will also put excess strain on the machine and shorten the tool life. The following formula may also be helpful in determining the correct RPM.
(Cutting Speed x 4) / Diameter of cutting tool = RPM
Refer to the following table below before you begin milling/drilling.
CUTTING SPEEDS FOR HSS CUTTING TOOLS
STAINLESS STEEL TOOL STEEL CAST STEEL CAST IRON, HARD CAST IRON, SOFT COPPER ALLOY STEEL, HARD TITANIUM ALUMINUM & ALLOYS BRASS & BRONZE WOOD PLASTICS
60 50 80
50 80 100 40 50 300 150 300-500 300-800
MATERIAL CUTTING SPEED (SFM)

19
CT133 – ELECTRICAL CIRCUIT DIAGRAM
20
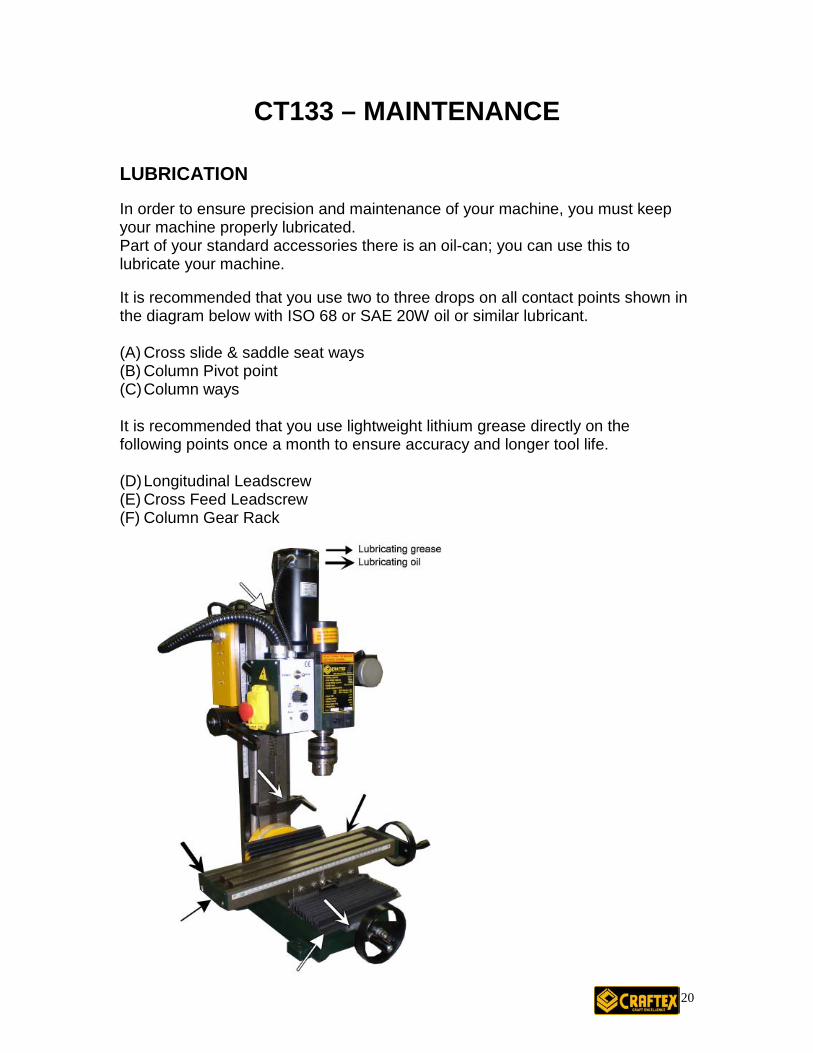
CT133 – MAINTENANCE LUBRICATION In order to ensure precision and maintenance of your machine, you must keep your machine properly lubricated. Part of your standard accessories there is an oil-can; you can use this to lubricate your machine. It is recommended that you use two to three drops on all contact points shown in the diagram below with ISO 68 or SAE 20W oil or similar lubricant. (A) Cross slide & saddle seat ways (B) Column Pivot point (C) Column ways It is recommended that you use lightweight lithium grease directly on the following points once a month to ensure accuracy and longer tool life. (D) Longitudinal Leadscrew (E) Cross Feed Leadscrew (F) Column Gear Rack

21
CT133 – MAINTENANCE To get the most out of your machine, it is imperative that you maintain it. Daily, weekly, monthly and yearly maintenance is highly recommended and keeping a log of your maintenance is also recommended. DAILY MAINTENANCE (1) Inspect each operation part to ensure the condition of lubrication. (2) Ensure that the mounting bolts are secure. (3) Double check that all wires are not worn or damaged. (4) Clean any debris or dirt from in and around the machine. (5) Ensure that the mill is completely powered down at the end of each use. If
The machine is left on, the cooling fan will continue to run and could cause excess wear.
WEEKLY MAINTENANCE (1) Clean and grease down the shaft. (2) Check all nuts & bolts to ensure they are tight and in place. (3) Check your lubrication levels and ensure your machine is properly lubricated. (4) Examine the overall circuit, contact point conductor, plugs and switches to
ensure everything is normal. MONTHLY MAINTENANCE (1) Check all plugs and switches are in working order. (2) Check the cooling fan to ensure everything is in order. (3) Check lubrication levels. SEASONAL MAINTENANCE (1) Go over your maintenance logs to ensure that you have not come across any
problems. (2) Check that all parts are in working order (3) Check that electrical components are OK and do not need replacement.

22
CT133 ASSEMBLY DIAGRAM

23
CT133 ASSEMBLY DIAGRAM

24
CT133 ASSEMBLY DIAGRAM

25
CT133 PARTS LISTING

26
CT133 PARTS LISTING
27
WARRANTY Craftex warrants every product to be free from defects in materials and agrees to correct such defects where applicable. This warranty covers two years
Proof of purchase is necessary.
for parts and 90 days for labour (unless specified otherwise), to the original purchaser from the date of purchase but does not apply to malfunctions arising directly or indirectly from misuse, abuse, improper installation or assembly, negligence, accidents, repairs or alterations or lack of maintenance.
All warranty claims are subject to inspection of such products or part thereof and Craftex reserves the right to inspect any returned item before a refund or replacement may be issued. This warranty shall not apply to consumable products such as blades, bits, belts, cutters, chisels, punches etceteras. Craftex shall in no event be liable for injuries, accidental or otherwise, death to persons or damage to property or for incidental contingent, special or consequential damages arising from the use of our products.
RETURNS, REPAIRS AND REPLACEMENTS
To return, repair, or replace a Craftex product, you must visit the appropriate Busy Bee Tools showroom or call 1-800-461-BUSY. Craftex is a brand of equipment that is exclusive to Busy Bee Tools. For replacement parts directly from Busy Bee Tools, for this machine, please call 1-800-461-BUSY (2879), and have your credit card and part number handy. • All returned merchandise will be subject to a minimum charge of 15% for re-stocking and
handling with the following qualifications. • Returns must be pre-authorized by us in writing. • We do not accept collect shipments. • Items returned for warranty purposes must be insured and shipped pre-paid to the nearest
warehouse • Returns must be accompanied with a copy of your original invoice as proof of purchase.
Returns must be in an un-used condition and shipped in their original packaging a letter explaining your reason for the return. Incurred shipping and handling charges are not refundable.
• Busy Bee will repair or replace the item at our discretion and subject to our inspection. • Repaired or replaced items will be returned to you pre-paid by our choice of carriers. • Busy Bee reserves the right to refuse reimbursement or repairs or replacement if a third party
without our prior authorization has carried out repairs to the item. • Repairs made by Busy Bee are warranted for 30 days on parts and labour. • Any unforeseen repair charges will be reported to you for acceptance prior to making the
repairs. • The Busy Bee Parts & Service Departments are fully equipped to do repairs on all products
purchased from us with the exception of some products that require the return to their authorized repair depots. A Busy Bee representative will provide you with the necessary information to have this done.
• For faster service it is advisable to contact the nearest Busy Bee location for parts availability prior to bringing your product in for repairs.
CRAFTEX 2 YEAR LIMITED WARRANTY