ctos data systems sdn bhd de - cm4. · pdf filebangsar south, no 8, jalan kerinchi ... 1, 2016...
TRANSCRIPT

Credit Manager System UserGuide for CTOS Subscribers October 1, 2016 1
Cre
dit M
an
ag
er
Syst
em
Use
r G
uid
e CTOS DATA SYSTEMS SDN BHD
Unit 1-12, Level 8, Tower A, Vertical Business Suite, Avenue 3, Bangsar South, No 8, Jalan Kerinchi, 59200 Kuala Lumpur
Credit Manager User Guide to CTOS Subscribers
Date By: For:
October 1, 2016 CTOS DATA SYSTEMS SDN BHD
Unit 1-12, Level 8, Tower A, Vertical Business Suite, Avenue 3, Bangsar South, No 8, Jalan Kerinchi, 59200 Kuala Lumpur
CTOS Subscribers
This Credit Manager System User Guide is solely built for CTOS’s subscribers and the content shall be
used only for the employee of the organization. The materials may not be distributed to any other
parties except for company’s internal usage.

Credit Manager System UserGuide for CTOS Subscribers October 1, 2016 2
Content 1.0 Introduction .................................................................................................................................................................. 3
1.1 Login ............................................................................................................................................................................... 3
1.2 Home Page .................................................................................................................................................................... 4
2.0 Create Profile and Purchase Report .......................................................................................................................... 5
2.1 Create Profile for Company ........................................................................................................................................ 5
2.2 Create Profile for Business/Others ........................................................................................................................... 6
2.3 Create Profile for Individual ....................................................................................................................................... 7
2.4 Purchase Reports .......................................................................................................................................................... 8
2.5 View Customer’s Profile ............................................................................................................................................ 11
3.0 Monitor Customer ...................................................................................................................................................... 15
4.0 Submit Trade References (eTR) ............................................................................................................................... 17
5.0 Delete Trade References (eTR) ................................................................................................................................ 25
6.0 Other Features in Home Page .................................................................................................................................. 27
7.0 User Admin Accessibility .......................................................................................................................................... 31

Credit Manager System UserGuide for CTOS Subscribers October 1, 2016 3
1.0 Introduction
CTOS Credit Manager System is here to help you make better credit decision.
It allows you to have access to a variety of reports to better evaluate risks. The enhancement will allows you to
obtain Bank Negara Information, also known as Banking Payment History (B.P.H) through the new system.
Hence, you will now be able to obtain CTOS and CCRIS information in one single report under one click.
Monitoring services gives you a piece of mind as we make sure that when we know there is a change in company
statuses (eg: change of director, financials, etc), you will be the first to know.
You may also reinforcing better payment behaviour by sharing both good and bad experiences on your existing
customer through our electronic Trade Reference platform.
This userguide will shows you step-by-step on how to perform the functions in the system.
1.1 Login
This is the login page of CTOS Credit Manager system.
Key in your User ID, Password and click “Sign In”.
If you are a first time user, you will be prompt to reset
your password after sign in.

Credit Manager System UserGuide for CTOS Subscribers October 1, 2016 4
1.2 Home Page
The home page of new credit manager system:
Live Chat Existing Customer List External Report
Status
Global
Menu
Start new search Unviewed Monitoring Hits
1 Start New Search
This is where you search for a new
customers/ prospect that you have not
entered in the Credit Manager System
2 Existing Customer List
This is where you search for an existing
customer file which you have created in
the Credit Manager System
Unviewed Monitoring Hits
This orange box on the top right
corner indicates that you have an
unviewed monitoring report. If there is
not any monitoring hit or updates on
your customers, this box will appear
grey in colour
4 Report Status
This section displays the report status of
the external searches you have
conducted. Applicable for: [CCM(SSM) ,
MDI (JIM), NRD (JPN), International
Reports or IDAMAN Reports]
3

Credit Manager System UserGuide for CTOS Subscribers October 1, 2016 5
2.0 Create Profile and Purchase Report
Note: Before you can purchase report, you need to first create a profile for the customer in the Credit Manager
System.
2.1 Create Profile for Company
Step 1: Click on the ‘Company/Business/Others’ tab
Step 2: Type the customer name and click on the ‘Search’ icon, like below:
Step 3: Immediately, you will be directed to this page to purchase reports. Tick the checkbox
accordingly for the reports you want to purchase
*Note: For CTOS Report/CTOS Score Report, you need to declare the purpose of checking for every name.
1
2

Credit Manager System UserGuide for CTOS Subscribers October 1, 2016 6
2.2 Create Profile for Business/Others
Follow the steps below to create profile for sole proprietor or partnership:
Step 1: Click on the ‘Company/Business/Others’ tab
Step 2: Type the customer name and click on the ‘Search’ icon, like below:
Step 3: Select the constitution (Business/Others), the region, type the Registration number
and click “Confirm”.
Note: Please be informed that a CCM purchase is required for the subject as it is not available in the CTOS Database. The
turnaround time for the information will take about an hour.
1
2

Credit Manager System UserGuide for CTOS Subscribers October 1, 2016 7
2.3 Create Profile for Individual
Follow the steps below to create profile for individual:
Step 1: Click on the ‘Individual’ tab
Step 2: Type the individual name and click on the ‘New’ icon, like below:
Step 3: Fill in the ID of the individual and click ‘Confirm’
1

Credit Manager System UserGuide for CTOS Subscribers October 1, 2016 8
2.4 Purchase Reports
There are various reports you can obtain through our system, tick the checkbox besides the report
that you want to purchase.
*Note: For CTOS Report/CTOS Score Report, you need to declare the purpose of checking for every name.
Credit Manager System UserGuide for CTOS Subscribers October 1, 2016 9
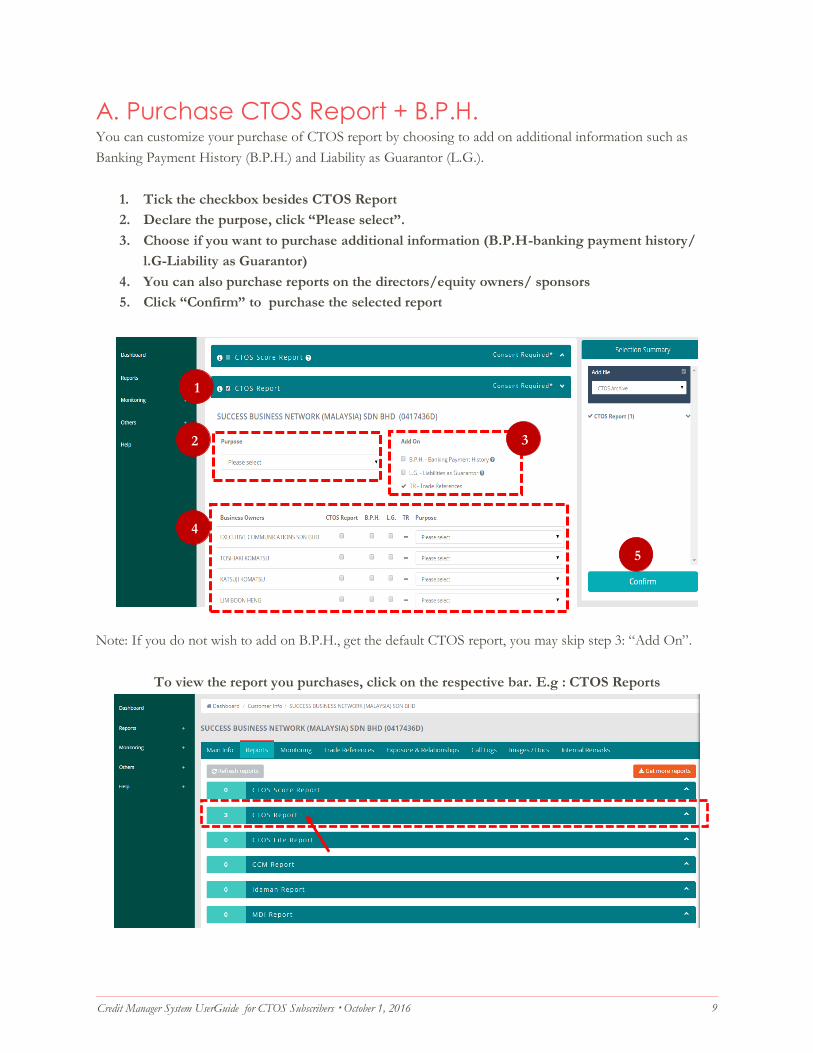
A. Purchase CTOS Report + B.P.H. You can customize your purchase of CTOS report by choosing to add on additional information such as
Banking Payment History (B.P.H.) and Liability as Guarantor (L.G.).
1. Tick the checkbox besides CTOS Report
2. Declare the purpose, click “Please select”.
3. Choose if you want to purchase additional information (B.P.H-banking payment history/
l.G-Liability as Guarantor)
4. You can also purchase reports on the directors/equity owners/ sponsors
5. Click “Confirm” to purchase the selected report
Note: If you do not wish to add on B.P.H., get the default CTOS report, you may skip step 3: “Add On”.
To view the report you purchases, click on the respective bar. E.g : CTOS Reports
1
2 3
4
5

Credit Manager System UserGuide for CTOS Subscribers October 1, 2016 10
If you have purchased CTOS + B.P.H. (CCRIS) report, click on tab “CTOS Report” and you will see
your report there.
This is a 2 in 1 report. The information of B.P.H. is at Section C: Banking Payment History. (Refer
to the sample image below.)

Credit Manager System UserGuide for CTOS Subscribers October 1, 2016 11
2.5 View Customer’s Profile
To view the customer’s profile, click on the ‘Main Info’ tab.
This is your Customer’s profile. SSM/CCM information is populated in this customer’s profile.
A. Create Sponsors in Customer File Step 1: Upon creating the file, go to the “Accounts & Aging” bar in the customer profile, like
below:

Credit Manager System UserGuide for CTOS Subscribers October 1, 2016 12
Step 2: Put in the account number (Customer code) for this customer
You will then see this:
Fill in accordingly and click ‘Save’.

Credit Manager System UserGuide for CTOS Subscribers October 1, 2016 13
Step 3: Click on ‘Add’ as shown below:
Step 4: Fill in the information on the sponsors and click ‘Save’

Credit Manager System UserGuide for CTOS Subscribers October 1, 2016 14
Step 5: Once you have added, you can go to the Report tab, and proceed with the purchase
of reports for this sponsor:
Credit Manager System UserGuide for CTOS Subscribers October 1, 2016 15
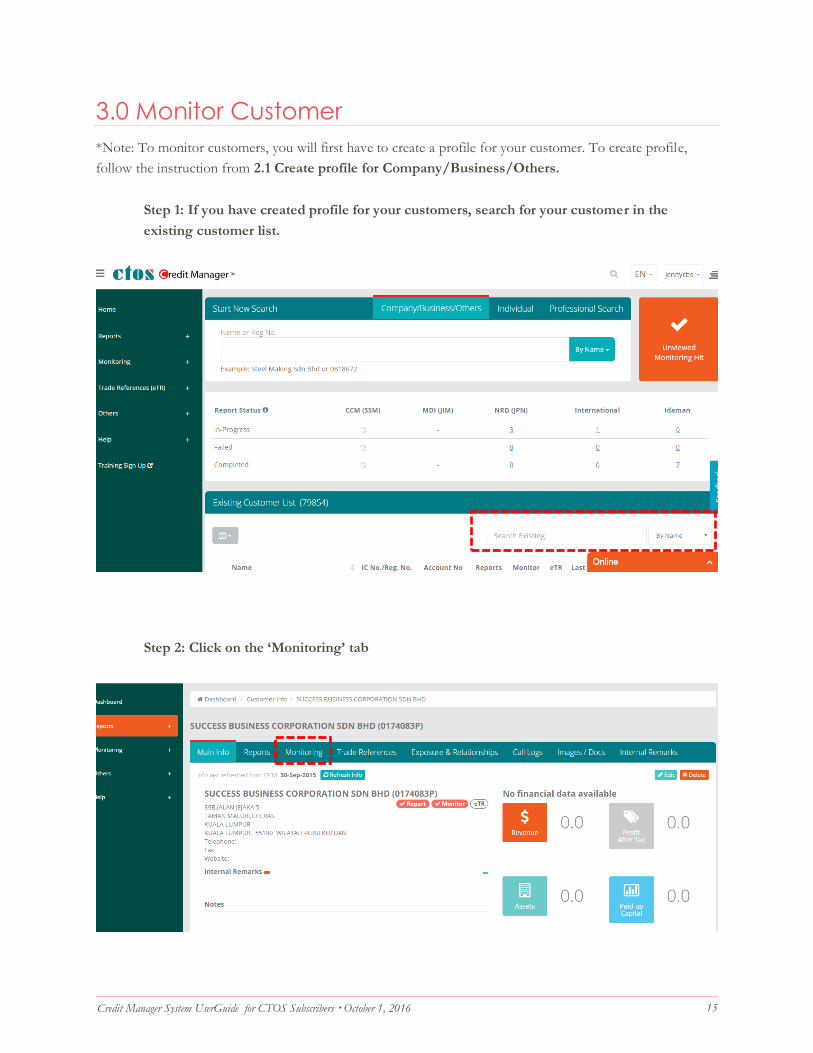
3.0 Monitor Customer
*Note: To monitor customers, you will first have to create a profile for your customer. To create profile,
follow the instruction from 2.1 Create profile for Company/Business/Others.
Step 1: If you have created profile for your customers, search for your customer in the
existing customer list.
Step 2: Click on the ‘Monitoring’ tab

Credit Manager System UserGuide for CTOS Subscribers October 1, 2016 16
Step 3: Tick on the checkbox to monitor the name(s), then click ‘Save’
*To edit the monitoring setup, just follow the same procedure and untick the checkbox, like below:
Credit Manager System UserGuide for CTOS Subscribers October 1, 2016 17
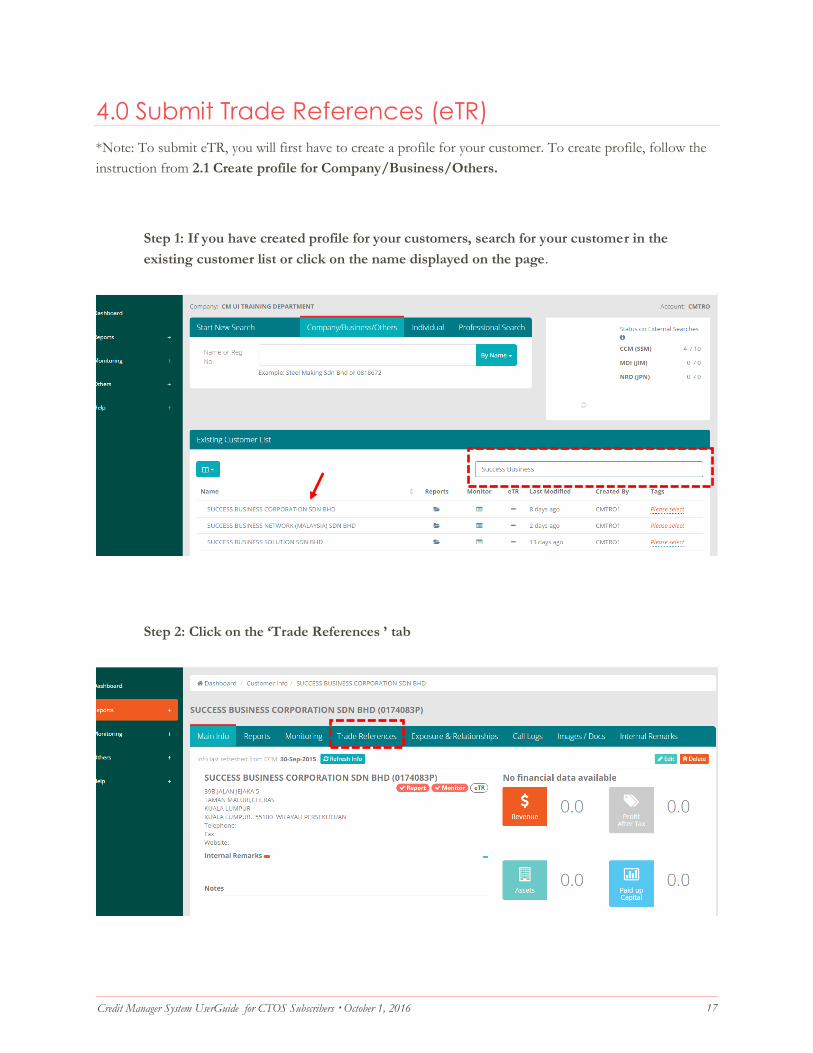
4.0 Submit Trade References (eTR)
*Note: To submit eTR, you will first have to create a profile for your customer. To create profile, follow the
instruction from 2.1 Create profile for Company/Business/Others.
Step 1: If you have created profile for your customers, search for your customer in the
existing customer list or click on the name displayed on the page.
Step 2: Click on the ‘Trade References ’ tab
Credit Manager System UserGuide for CTOS Subscribers October 1, 2016 18
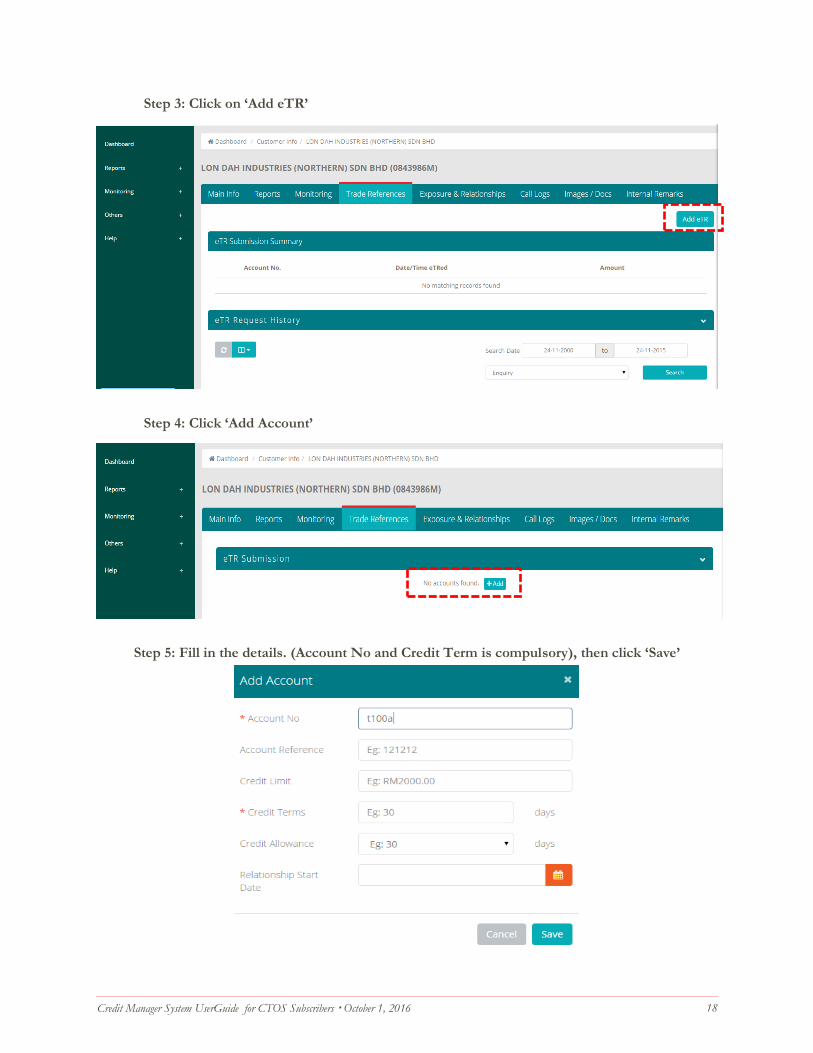
Step 3: Click on ‘Add eTR’
Step 4: Click ‘Add Account’
Step 5: Fill in the details. (Account No and Credit Term is compulsory), then click ‘Save’

Credit Manager System UserGuide for CTOS Subscribers October 1, 2016 19
Step 6: Fill in the relationship type and the Debt type
Step 7: Click on ‘Subject is a customer’.

Credit Manager System UserGuide for CTOS Subscribers October 1, 2016 20
Step 8: Tick the checkbox if you want to list the directors/equity owners
Step 9: Click on ‘Aging Information as of Statement Dated’
Step 10: Click on the edit button

Credit Manager System UserGuide for CTOS Subscribers October 1, 2016 21
Step 11: Fill in the aging information (Statement date and the amount owed). Click ‘Save’
Step 12: Remember to list this information

Credit Manager System UserGuide for CTOS Subscribers October 1, 2016 22
Step 13: If your debtor issued you bounced cheque, you can also share this experience. Click
on the ‘Add‘ in the ‘Returned Cheque Experience’ bar
Step 14: Fill in details of the bounced cheque and click ‘Save’
Step 15: Remember to list the information

Credit Manager System UserGuide for CTOS Subscribers October 1, 2016 23
Step 16: If you have send out reminder letters or letter of demand to the debtor, you can also
share this out. Click on ‘Reminder and Letter of Demand’
Step 17: Click on the ‘edit’ button
Step 18: Fill in the information of reminder letters and click ‘Save’

Credit Manager System UserGuide for CTOS Subscribers October 1, 2016 24
Step 19: List the information
Step 20: Click ‘Preview’ button to make sure information shared is accurate. Upon
confirmation, click ‘Submit’
Credit Manager System UserGuide for CTOS Subscribers October 1, 2016 25
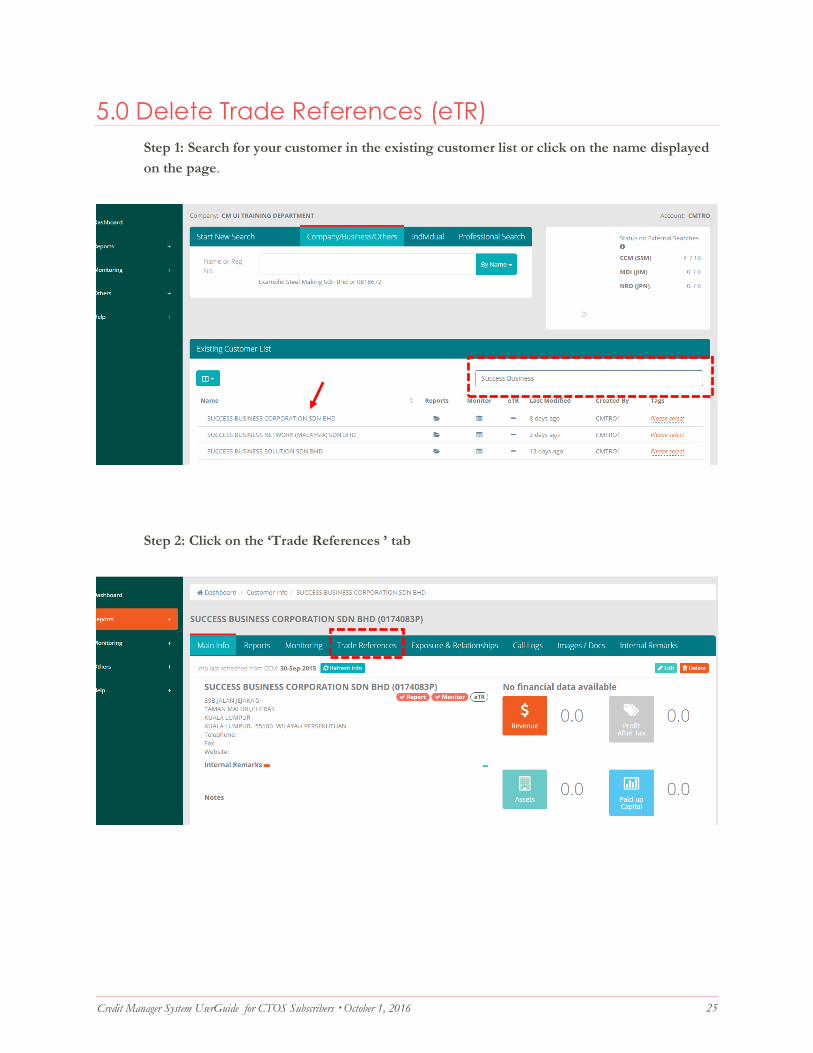
5.0 Delete Trade References (eTR)
Step 1: Search for your customer in the existing customer list or click on the name displayed
on the page.
Step 2: Click on the ‘Trade References ’ tab

Credit Manager System UserGuide for CTOS Subscribers October 1, 2016 26
Step 3: Click on the trade references and delist every information that you have listed before.
(Example: Aging information below)
Step 4: Preview and make sure information is all delisted. Then, click ‘Submit’

Credit Manager System UserGuide for CTOS Subscribers October 1, 2016 27
6.0 Other Features in Home Page
Other Features in the Home Page:
1. Menu bar
2. Reports: You can view the list of reports your company has purchased through Credit
Manager System
Under the Reports tab, you will see the total number reports
conducted via Credit Manager, categorized according to different
type
You can also purchase International reports here

Credit Manager System UserGuide for CTOS Subscribers October 1, 2016 28
3. Monitoring
Monitoring Hits: This is where you view the monitoring report. You can
see the list of monitoring reports by clicking this and you can view the
monitoring reports too.
Monitoring statistics: This tells you the total number of names you are
currently monitoring:
Mass Monitoring Setup: You can edit your monitoring setup here [Tick
to monitor, untick to not monitor the names]. Make sure to click ‘Save’

Credit Manager System UserGuide for CTOS Subscribers October 1, 2016 29
4. Trade References
eTR Statistics: This will help in generating the list of names that you have
submitted / have not submitted eTR:
Mass eTR upload: If you want to submit eTR for a large number of
customers, you can upload the information here.
You will need to prepare a CSV file with necessary information and upload it
here:[ please check with customer service on the format of csv file]

Credit Manager System UserGuide for CTOS Subscribers October 1, 2016 30
5. Others
6. Help
This is to search for information that you have keyed in the Credit Manager
System: Internal Remarks, contacts, call logs etc
You can also do ‘Advance Customer Setup’ to key in account number or
credit terms for your customers in the system.
This system also allows you to send SMS or email to your clients. You may
click ‘Communications’ to do so [Contact details have to be keyed in the
system prior to sending message/email]
This is where you can download forms and templates, read- ups on our
reports provided under ‘Guides’, watch our video tutorial or our contacts
If you would like to attend our training program, just click on ‘training sign
up’ to check on the types of training we offered. You can register a slot for
yourself through here too.

Credit Manager System UserGuide for CTOS Subscribers October 1, 2016 31
7.0 User Admin Accessibility
*If you are a user admin, you are able to reset password and assign role for other users
A. Reset Password Step 1: Go to the top right corner of the page and click on your username, select “Settings”
Step 2: Click on the ‘Reset Password’ tab to help other users reset password. You may also
change your own password in this page

Credit Manager System UserGuide for CTOS Subscribers October 1, 2016 32
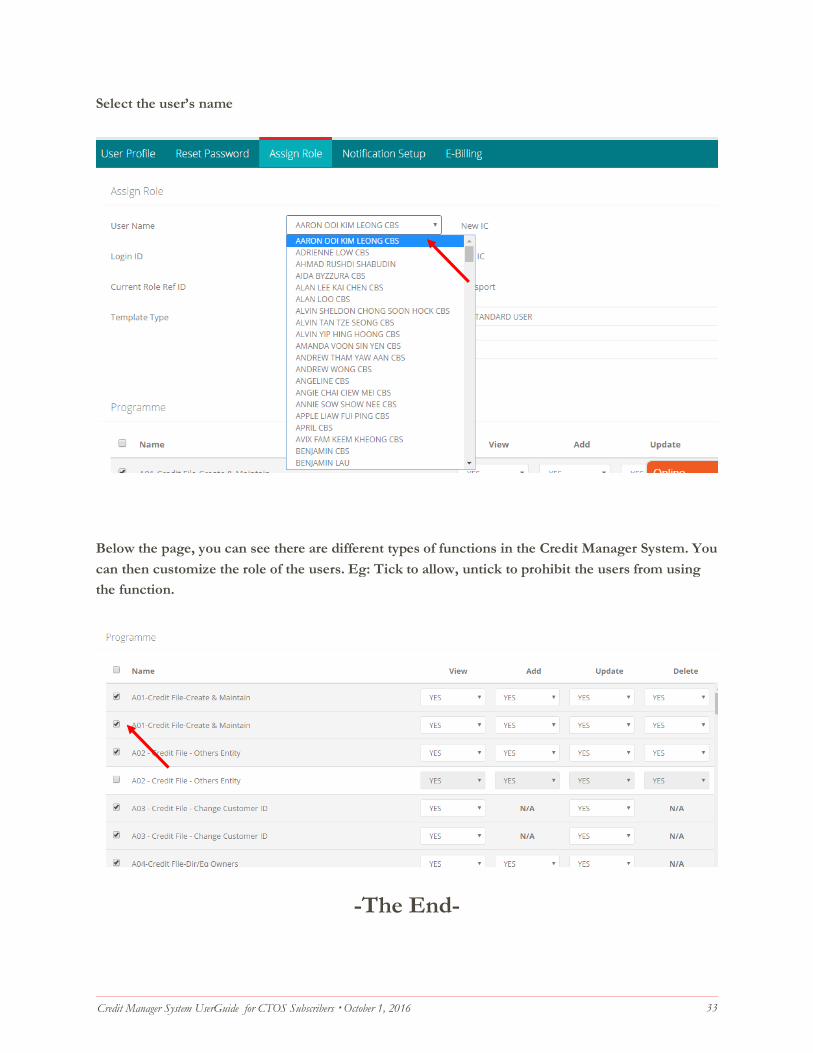
Step 3: Select the user’s name and proceed with resetting the password
B. Assign Role In the same page, you will also see another tab called “Assign Role”. Click on this tab to help other customize
role for different users
Credit Manager System UserGuide for CTOS Subscribers October 1, 2016 33
Select the user’s name
Below the page, you can see there are different types of functions in the Credit Manager System. You
can then customize the role of the users. Eg: Tick to allow, untick to prohibit the users from using
the function.
-The End-