cubicle curtain track fitting instructions
TRANSCRIPT

fitting instructions no.963
100S
/W
Cu
bic
le C
urta
in T
rack
100S/W Cubicle Track
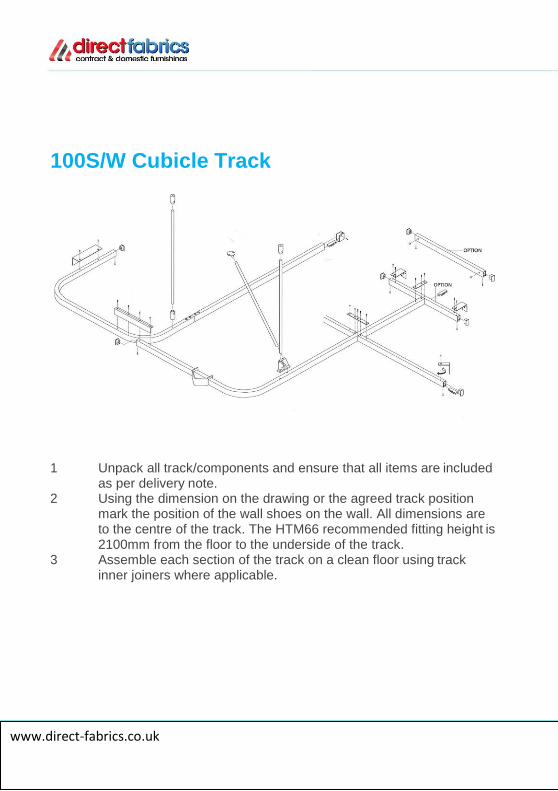
1 Unpack all track/components and ensure that all items are included as per delivery note.
2 Using the dimension on the drawing or the agreed track position mark the position of the wall shoes on the wall. All dimensions are to the centre of the track. The HTM66 recommended fitting height is 2100mm from the floor to the underside of the track.
3 Assemble each section of the track on a clean floor using track inner joiners where applicable.
www.direct-fabrics.co.uk

ww
Tip: When fitting the inner track joiners; tighten outside screws first and then the inner screws last for the perfect join
4 Lift first section of track up into wall shoes 5 Support the track at bend with a suitable temporary support
ensuring that track is level. 6 Using the screws provided, secure the track into the wall shoe.
100S/W fitting instructions

7 Depending on layout of track – join each section together with overlaps taking care that all fixings holes are used and screws tightened securely for maximum stability.
8 For suspension rods refer to Fig 1. Each bend must be supported by a 313 hanger assembly no further that 350mm from either leg of the bend.
Fig 1.
www.direct-fabrics.co.uk

9 At no point should the track span more than 3000mm without support. If the track has a join ensure the track is suspended within 150mm from join. If the track has no lateral support and spans more than 3000mm please ensure a V-Hanger is used. Using a plumb line mark where hanger assembly will fix to ceiling and track. Refer to Fig 2.
Fig 2
10 For V- suspension refer to fig 2. When assembling the 313 hanger assembly ensure that the K113 V-hanger is located on the suspension tube and is resting on the lower 113 hanger which is fixed to the track.
11 Once installation is complete, ensure that gliders run smoothly across and joins etc and adjust any misalignments accordingly. Track can be ‘tweaked’ with a large flat headed screwdriver to correct any misalignment on joins if required.
100S/W
fitting instructions
