cuemix fx touchosc for ipad
DESCRIPTION
CueMix FX Touch OSC iPadTRANSCRIPT

CHAPTER
1
Controlling CueMix from an iPad using TouchOSC
The CueMix mixer in your MOTU audio interface can be controlled from an iPad using an iPad app called TouchOSC. From your iPad, you can perform all CueMix mixing functions using the on-screen faders, knobs, and buttons in TouchOSC.
This document explains how to set up and use TouchOSC to control CueMix.
Compatible MOTU interfaces . . . . . . . . . . . . . . . . . . . . . . . . . .1
How it works. . . . . . . . . . . . . . . . . . . . . . . . . . . . . . . . . . . . . . . . . . . 1
About TouchOSC . . . . . . . . . . . . . . . . . . . . . . . . . . . . . . . . . . . . . .2
Installing TouchOSC . . . . . . . . . . . . . . . . . . . . . . . . . . . . . . . . . . .2
Downloading the TouchOSC Editor. . . . . . . . . . . . . . . . . . . .2
Obtaining the CueMix FX TouchOSC layout. . . . . . . . . . . .3
Loading the CueMix FX layout into TouchOSC . . . . . . . . .3
Configuring the TouchOSC client . . . . . . . . . . . . . . . . . . . . . .3
Configuring the CueMix FX host . . . . . . . . . . . . . . . . . . . . . . .4
Using TouchOSC . . . . . . . . . . . . . . . . . . . . . . . . . . . . . . . . . . . . . . . 4
COMPATIBLE MOTU INTERFACES
The following MOTU interfaces are compatible with TouchOSC:
■
Any “mk3” MOTU audio interface
■
Any “mkII” MOTU audio interface (including the 896HD, UltraLite, and Traveler)
■
Track16
■
Audio Express and 4pre
■
MicroBook and MicroBook II
■
PCI-424 core systems
HOW IT WORKS
The CueMix FX (or CueMix DSP) mixer in your MOTU audio interface hardware is controlled by the CueMix FX software running on your computer. The CueMix FX software is, in turn,
controlled by TouchOSC running on your iPad, which is wirelessly communicating with your computer. Therefore, the following conditions are required:
■
Your MOTU interface must be connected to (and working successfully with) your computer.
■
The latest version of the CueMix FX software must be running on the computer.
■
The TouchOSC app (with CueMix FX layout) must be installed and running on your iPad.
■
Your iPad must be successfully communicating wirelessly with your computer.
Figure 1: Use an iPad to control the CueMix FX software running onyour computer, which controls the CueMix FX mixer in the MOTUaudio interface.
iPad running TouchOSC app
Computer running CueMix FX software
Wireless connection from iPad to computer
USB2, FireWire or PCI connection to MOTU interface
MOTU audio interface with CueMix FX or CueMix DSP
CueMix FX TouchOSC for iPad Page 1 Thursday, August 23, 2012 4:29 PM

C O N T R O L L I N G C U E M I X F R O M A N I P A D U S I N G T O U C H O S C
2
Support for both Mac and Windows
iPad control of CueMix FX is supported on both Mac and Windows. The instructions in this guide apply to both computer platforms.
ABOUT TouchOSC
Open Sound Control
(OSC) is a protocol for communication among computers, sound synthesizers, and other multimedia devices that is optimized for modern networking technology.
TouchOSC
is a customizable OSC and MIDI control surface app for iPhone / iPod Touch / iPad and Android. It is available through the Apple App Store and Google Play. It allows you to control applications on your Mac or PC over Wi-Fi.
MOTU has created a custom TouchOSC iPad
layout
for controlling CueMix FX (Figure 2). When you load it into TouchOSC, your iPad becomes a customized Wi-Fi control surface for CueMix FX.
INSTALLING TouchOSC
From your iPad, visit the Apple App store to install TouchOSC and get it running on your iPad.
DOWNLOADING THE TouchOSC EDITOR
From your computer, visit the Hexler Software web site to download the TouchOSC Editor application for your Mac or PC, which allows you to upload MOTU’s custom CueMix FX layout from your computer to your iPad. You can find it here:
http://hexler.net/software/touchosc
Figure 2: The CueMix FX layout for TouchOSC.
CueMix FX TouchOSC for iPad Page 2 Thursday, August 23, 2012 4:29 PM
C O N T R O L L I N G C U E M I X F R O M A N I P A D U S I N G T O U C H O S C
3
You can also use the editor to modify the CueMix FX layout to your liking. You can change colors, controls, and arrangement as desired.
OBTAINING THE CUEMIX FX TouchOSC LAYOUT
From your computer
, obtain the CueMix FX TouchOSC layout from the motu web site by downloading and running the latest MOTU Universal Audio Installer found here:
http://www.motu.com/downloads
LOADING THE CUEMIX FX LAYOUT INTO TouchOSC
Now you are ready to load the CueMix FX TouchOSC layout into the TouchOSC app on your iPad. To do so:
1
On your computer, launch the TouchOSC Editor.
2
Open the CueMix FX TouchOSC layout file on your hard drive that applies to your MOTU audio interface.
You can find the layout files in a folder called
CueMix FX TouchOSC Layouts
, which is included with the Audio Installer download.
3
Optional: change the colors of the controls and make other changes, as desired. If this is your first time using TouchOSC, it might be prudent to leave the layout as is, until you get it working successfully.
4
Click the Sync button at the top of the TouchOSC Editor window.
5
On your iPad, launch the TouchOSC app.
6
Go to the Setup screen (the
i
button in the top right-hand corner).
7
Tap the current layout.
8
Tap
Add
.
The name of your computer should appear as a host.
9
Tap the name of the host.
Doing so loads the CueMix FX layout into TouchOSC.
10
Choose the CueMix FX layout that applies to your MOTU audio interface and return to the main setup screen.
CONFIGURING THE TouchOSC CLIENT
Now you need to link TouchOSC to your host computer, as follows:
1
On your computer, launch CueMix FX.
2
On your iPad, launch TouchOSC, go to the setup screen, and under
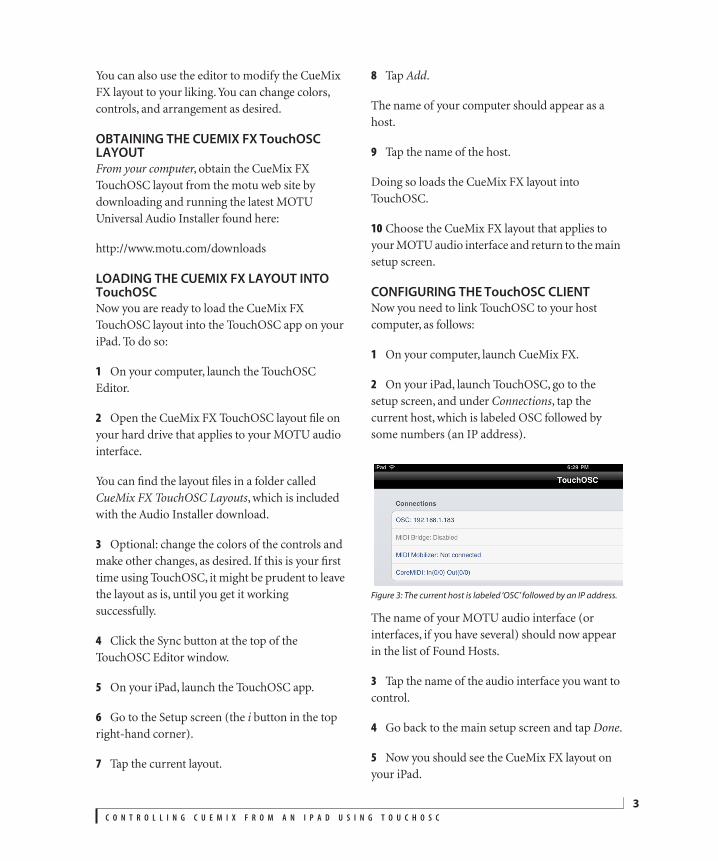
Connections
, tap the current host, which is labeled OSC followed by some numbers (an IP address).
Figure 3: The current host is labeled ‘OSC’ followed by an IP address.
The name of your MOTU audio interface (or interfaces, if you have several) should now appear in the list of Found Hosts.
3
Tap the name of the audio interface you want to control.
4
Go back to the main setup screen and tap
Done
.
5
Now you should see the CueMix FX layout on your iPad.
CueMix FX TouchOSC for iPad Page 3 Thursday, August 23, 2012 4:29 PM

C O N T R O L L I N G C U E M I X F R O M A N I P A D U S I N G T O U C H O S C
4
CONFIGURING THE CUEMIX FX HOST
Now you need to link the CueMix FX software (running on your computer) to your client iPad, as follows:
1
On your iPad, launch TouchOSC and make sure the CueMix FX layout is loaded, as explained earlier.
2
On your computer, launch the CueMix FX software.
3
In the Control Surfaces menu, go to the TouchOSC sub-menu and choose the client iPad from which you want to control CueMix FX.
You can now control CueMix FX from your iPad. In addition, you can make changes in CueMix FX on your computer, and those changes will be reflected on your iPad as well. In other words, you now have two-way, wireless communication between your iPad and computer, both of which control the CueMix FX mixer in your MOTU audio interface.
USING TouchOSC
The TouchOSC CueMix FX template operates almost identically to the CueMix FX software. The following sections discuss navigation features and other elements that are unique to the TouchOSC interface.
Bi-directional communication
Communication is bi-directional. For example, if you move a fader on your computer, it will move on your iPad, and vice versa. Changing tabs (Mixes, Inputs, Outputs, etc.) is an exception to this rule.
The Mixes tab
In the TouchOSC Mixes tab, use the
bus
buttons (Figure 4) to change which mix bus you are viewing. Use the
input
buttons to scroll the channel strips left or right (to view inputs that are currently not displayed). Press the
METERS
button to toggle the meters (above each channel strip) on or off.
Figure 4: Navigating in the Mixes tab.
The Inputs and Outputs tabs
In the TouchOSC Inputs and Outputs tabs, use the
bank
buttons (Figure 5) to scroll the input channel display left or right by one screenful. Use the arrow buttons below the bank buttons to scroll one channel at a time.
Figure 5: Navigating in the Inputs and Outputs tabs.
In the Inputs tab, the
PRE and POST
buttons (Figure 5) enable the pre- and post-effects meters, which can be enabled simultaneously.
Pre-effects meters
Post-effects meters
CueMix FX TouchOSC for iPad Page 4 Thursday, August 23, 2012 4:29 PM
C O N T R O L L I N G C U E M I X F R O M A N I P A D U S I N G T O U C H O S C
5
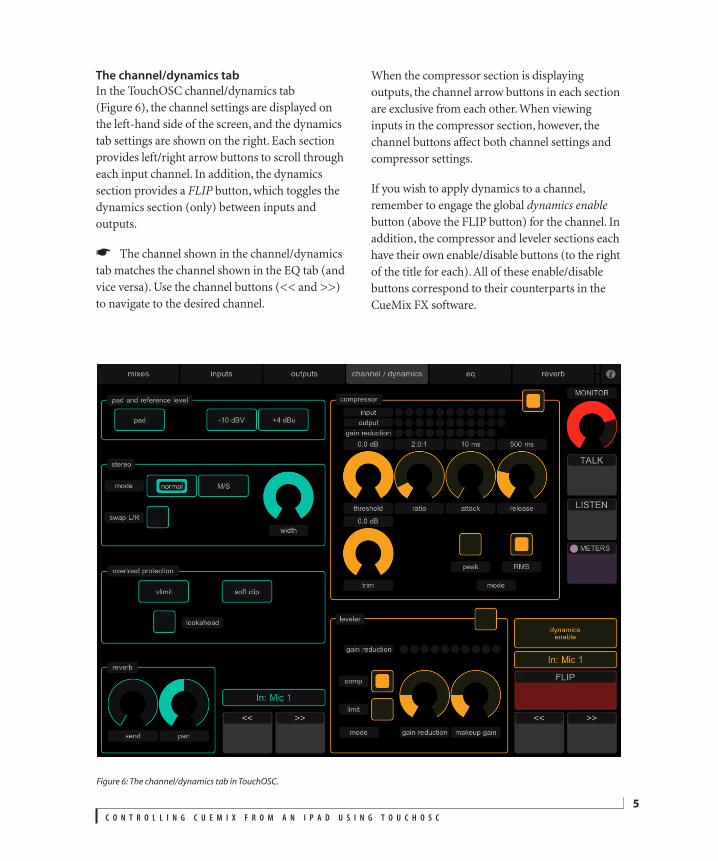
The channel/dynamics tab
In the TouchOSC channel/dynamics tab (Figure 6), the channel settings are displayed on the left-hand side of the screen, and the dynamics tab settings are shown on the right. Each section provides left/right arrow buttons to scroll through each input channel. In addition, the dynamics section provides a
FLIP
button, which toggles the dynamics section (only) between inputs and outputs.
☛
The channel shown in the channel/dynamics tab matches the channel shown in the EQ tab (and vice versa). Use the channel buttons (<< and >>) to navigate to the desired channel.
When the compressor section is displaying outputs, the channel arrow buttons in each section are exclusive from each other. When viewing inputs in the compressor section, however, the channel buttons affect both channel settings and compressor settings.
If you wish to apply dynamics to a channel, remember to engage the global
dynamics enable
button (above the FLIP button) for the channel. In addition, the compressor and leveler sections each have their own enable/disable buttons (to the right of the title for each). All of these enable/disable buttons correspond to their counterparts in the CueMix FX software.
Figure 6: The channel/dynamics tab in TouchOSC.
CueMix FX TouchOSC for iPad Page 5 Thursday, August 23, 2012 4:29 PM
C O N T R O L L I N G C U E M I X F R O M A N I P A D U S I N G T O U C H O S C
6
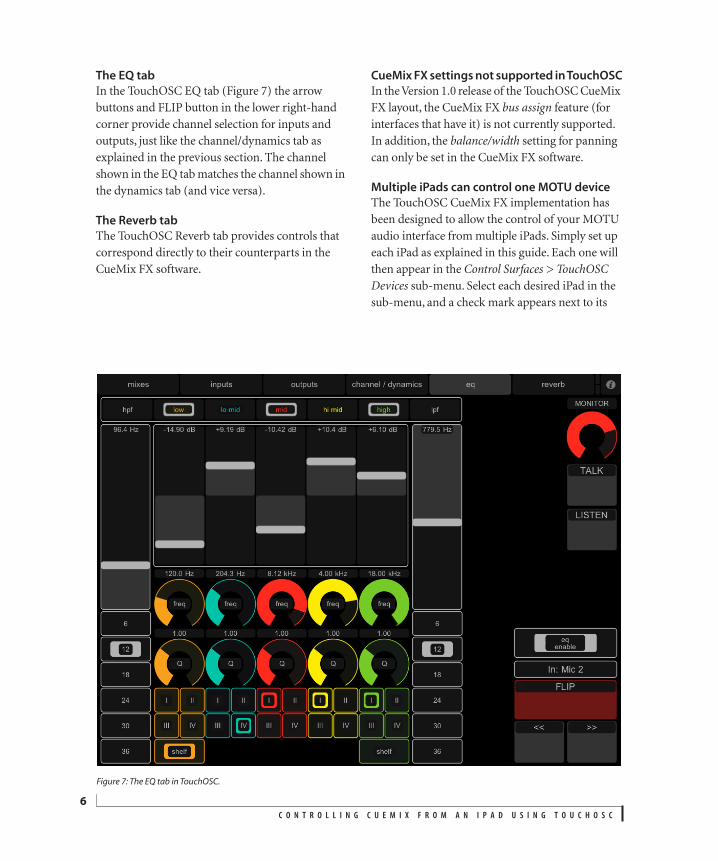
The EQ tab
In the TouchOSC EQ tab (Figure 7) the arrow buttons and FLIP button in the lower right-hand corner provide channel selection for inputs and outputs, just like the channel/dynamics tab as explained in the previous section. The channel shown in the EQ tab matches the channel shown in the dynamics tab (and vice versa).
The Reverb tab
The TouchOSC Reverb tab provides controls that correspond directly to their counterparts in the CueMix FX software.
CueMix FX settings not supported in TouchOSC
In the Version 1.0 release of the TouchOSC CueMix FX layout, the CueMix FX
bus assign
feature (for interfaces that have it) is not currently supported. In addition, the
balance/width
setting for panning can only be set in the CueMix FX software.
Multiple iPads can control one MOTU device
The TouchOSC CueMix FX implementation has been designed to allow the control of your MOTU audio interface from multiple iPads. Simply set up each iPad as explained in this guide. Each one will then appear in the
Control Surfaces > TouchOSC Devices
sub-menu. Select each desired iPad in the sub-menu, and a check mark appears next to its
Figure 7: The EQ tab in TouchOSC.
CueMix FX TouchOSC for iPad Page 6 Thursday, August 23, 2012 4:29 PM
C O N T R O L L I N G C U E M I X F R O M A N I P A D U S I N G T O U C H O S C
7
name. Check marks are “sticky”, so they remain enabled until you uncheck them, even when multiple ipads are selected.
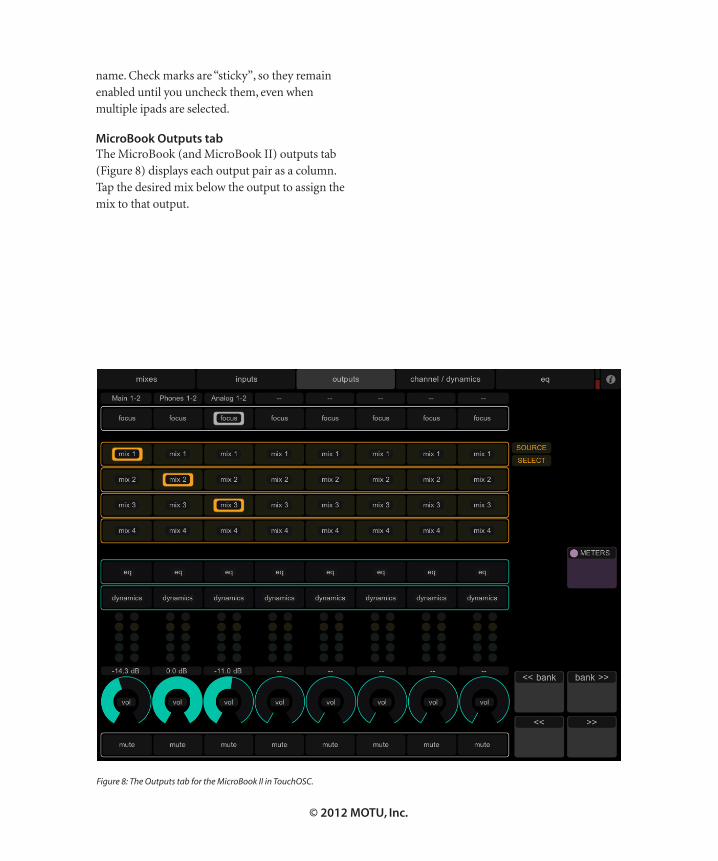
MicroBook Outputs tab
The MicroBook (and MicroBook II) outputs tab (Figure 8) displays each output pair as a column. Tap the desired mix below the output to assign the mix to that output.
Figure 8: The Outputs tab for the MicroBook II in TouchOSC.
© 2012 MOTU, Inc.
CueMix FX TouchOSC for iPad Page 7 Thursday, August 23, 2012 4:29 PM