curriculum for investigative scienceo closing 1. observation of fingerprint cards. challenge lab...
TRANSCRIPT

Curriculum for
Investigative Science
Created/Compiled by:
Merle Hunsaker
Renee Wootten Tecumseh High School
Tecumseh, Oklahoma
Research Experience for Teachers 2005
Department of Physics & Astronomy
University of Oklahoma
Norman, Oklahoma

Collaborations
Special collaborators:
! Dr. David Von Minden, Forensics Chair, University of Central Oklahoma
! Frank Pasierb, Norman Police Department, Oklahoma
! Braden Parmer, student, Tecumseh High School, Oklahoma
! Aaron Hennen, student, Tecumseh High School, Oklahoma
! Greg Schader, student, Norman High School, Oklahoma
University of Oklahoma collaborators:
! Caroline Hall, Project Manager
! Mark Curtis, Graduate Assistant
! Tuan Nguyen, Student Technician
! Kieran Mullen, Associate Professor of Physics
! Eric Abraham, Assistant Professor of Physics
! Matt Johnson, Associate Professor of Physics
! Lloyd Bumm, Assistant Professor of Physics
RET Program University of Arkansas Department of Physics•Fayetteville, Arkansas

Dates ____________________________ Class ____________________
OU RET 2005 Fingerprint Module teacher materials
Day Students will: Duration
O
n
e
1) discuss how TV crime shows differ from real life crime
investigation 2)
explore the history of fingerprinting and biology of friction
skin 3)
investigate collecting inked fingerprints (lab)
1) 15 minutes
2) 15 minutes
3) 45-60 minutes
T
w
o
1) classify fingerprint patterns 2)
identify ridge characteristics 3)
understand fingerprint terminology
1) 20-30 minutes 2)
20-30 minutes 3) 15-
20 minutes
T
h
r
e
e
1) explore dusting powders/techniques and lifting
techniques (lab) 1) 60-85 minutes
F
o
u
r
1) learn proper dusting/lifting procedures
2) investigate chemical techniques (lab)
1) 20 minutes
2) 45-60 minutes
F
i
v
e
1) investigate and solve a hypothetical crime scenario1) 60 minutes (crime #1) or
85 minutes (crime #2)

_______ ____, 20____
Dear Parent/Guardian,
Beginning _______________ our class will be working on a Forensic Science
unit. This unit will last approximately _____ days. We will be studying fingerprint
analysis. The students will be required to provide their fingerprints. However,
these will not be kept or filed. The students will retain them. The students will
also participate in a “mock” crime scene in which they will solve a case using
fingerprint evidence.
If you have any questions, feel free to contact me at _______________
during my planning period __________ to __________. If you have any objection
to your child participating in this forensic science unit, please contact me and/or
complete the information below. If such is the case, your child will complete an
alternative study in the library.
Sincerely,
_ _ _ _ _ _ _ _ _ _ _ _ _ _ _ _ _ _ _ _ _ _ _ _ _ _ _ _ _ _ _ _ _ _ _ _ _ _ _ _ _ _
I would prefer that my child ______________________________ not be
involved in this forensics unit. I understand that an alternative unit will be
presented in the library.
______________________________ _______________ Signature Date

- 1 -
OU RET 2005 Fingerprint Module
Forensics Science Unit
Fingerprinting Module Lesson Plans
I. Rationale
Fingerprint evidence is among the most valuable data found at a crime scene.
Fingerprints directly indicate an individual’s presence at a certain location. Although
DNA is usually viewed as a crucial piece of evidence for a crime, fingerprints are easier
to obtain, more cost effective, less fallible, and better for identification. Fingerprints are
more unique to the individual than DNA. Crime scene investigators use print data more
often to identify people.
Within this lesson, students will investigate the fundamental concepts behind
fingerprint analysis. Students will identify characteristics in a given set of data, construct
qualitative observations, and place information into a classification system. Students will
experience using tools and apparatuses to collect evidence and practice safety
procedures in all activities. In addition, students will utilize the scientific method to
interpret data, recognize variables, derive a hypothesis, and arrive at a conclusion using
fingerprint identification.
We have designed these lesson plans to be easily modified as needed by the
teacher. It is our goal that teachers can decide to present all the material in one
comprehensive package or just pull out specific activities/topics to use as mini-lessons.
In all of the activities, additional suggestions and time saving tips are included at the
end.
II. Objectives
A. Cognitive objectives:
Upon completion of this module, the student will be able to:
• Understand terminology associated with fingerprints.
• Explain the importance and historical relevance of fingerprint identification in
criminal investigation.
• Recognize the fundamental biology of a skin section.
• Distinguish among the basic fingerprint patterns.
• Recognize ridge characteristics (bifurcations, islands, dots, etc.)
• Identify the types of fingerprints that may be found at a crime scene.
• Describe the various methods for developing latent fingerprints.
B. Skills and Performance objectives:
Upon completion of this module, the student will be able to:
o Identify the basic fingerprint patterns given a set of fingerprints.
o Indicate and compare the ridge characteristics of a given fingerprint.
o Demonstrate the correct procedure for collecting inked fingerprints.
o Exhibit the proper techniques (dusting, chemical development, etc.) to collect
latent (visible and invisible) prints.
o Report data in an appropriate manner.
o Deduce a criminal suspect based on the identification of latent fingerprints, given
a scenario and exclusionary prints.
III. Materials—see lab handouts and crime scenarios for detailed descriptions

- 2 -
OU RET 2005 Fingerprint Module
IV. Instructional Procedure—based on 85 minute class periods
A. Lesson One
o Opening
1. Place a piece of glossy photo paper at each lab station, on which you have
written “Do Not Touch!”
2. After taking roll, announcements or bell work, retrieve the glossy paper and
use magnetic powder to dust for prints.
3. Begin discussion of CSI—fact vs. fiction (see lecture materials)
o Middle
1. Presentation of abbreviated history of fingerprinting. (see lecture materials)
2. Presentation of biology of friction skin. (lecture materials, transparency 1)
3. Demonstrate correct procedure for collecting inked prints (ten print cards,
transparency 2).
4. Activity: Collecting inked fingerprints
5. Looking ahead: Teacher will collect inked thumbprints from each student for
analysis of ridge characteristics. Need to make enlarged copy for each
student or pairs of students. (lesson two)
o Closing
1. Observation of fingerprint cards. Challenge lab groups to classify prints.
B. Lesson Two
o Opening
1. Students present created classification systems.
2. Summarize similarities in the different systems.
o Middle
1. Presentation of fingerprint patterns. (transparency 3, handout)
2. Students will classify own individual prints based on standard patterns
system.
3. Presentation of ridge characteristics. (transparency 4, 5, and 6)
4. Demonstrate/students model identification of ridge characteristics in
unlabeled prints (transparency 7, handout)
5. Students identify 10 ridge characteristics in an enlarged thumbprint.
(individually or pairs)
o Closing
1. Distribute terminology (handout) and crossword puzzle (handout).
C. Lesson Three
o Opening
1. Review terminology and characteristics.
o Middle
1. Activity: Lifting latent prints using powder techniques and various
surfaces.
o Closing
1. Students present, discuss, and defend results from activity.
D. Lesson Four
• Opening
1. Review dusting results.
2. Presentation of lifting techniques (powder)

- 3 -
OU RET 2005 Fingerprint Module
• Middle
1. Demonstration of chemical techniques (Ninhydrin fuming)
2. Activity: Chemical Development of Latent Prints
• Closing
1. Discuss results of activities
E. Lesson Five
o Opening
1. Review patterns, characteristics, and lifting techniques.
o Middle
1. Present crime scene scenario(see cumulating experience); *the
scenarios were designed for the teacher to select one crime
depending on resources and time
o Closing
1. Discuss, defend, and evaluate results
V. Activities—brief descriptions (see lab handouts for detailed descriptions)
A. Obtaining Inked Fingerprints
o Demonstrate proper procedure to take fingerprints (see lab handout)
o Students will need to practice procedure before committing to the ten-print card.
o In pairs, students will use proper technique to take fingerprints using ten-print
cards and a black ink pad.
o Carefully monitor student progress. Have isopropyl (rubbing) alcohol, water &
soap, and paper towels on hand.
B. Lifting Prints Using Dusting Techniques
o Provide lab groups (2-4 students) with a variety of surfaces, dusting powders, and
enough brushes for each powder (see materials). Also provide lifting tape and
fingerprint cards.
o Instruct the students to lay fingerprints on each of the surfaces.
o Have the students experiment with the different surfaces and powders. The
students will also need to try to lift the latent prints with the tape and transfer to
the fingerprint card.
o Students will need to analyze the results and conclude which powders work best
on the different surfaces.
C. Developing Prints Using Chemical Methods
i. Ninhydrin Fuming Demonstration (no lab handout—see enclosed information
from “Processing Guide…” to prepare 0.5% solution)
o Materials: ninhydrin solution (0.5%), porous surface (paper, cloth,
cardboard, etc.), iron (on steam setting), latex gloves
o Place several fingerprints on the porous surface.
o Spray the porous surface with a 0.5% solution of ninhydrin in a fume hood
or well ventilated area until saturated.
o Lay the porous surface on a countertop and without touching, use the
steam from the iron to develop the invisible latent prints.
o The prints have a limited life span; you will need to photograph or scan to
preserve.
o See included MSDS information for hazardous material concerns

- 4 -
OU RET 2005 Fingerprint Module
ii. Chemical Development Lab (see lab handout for detailed description)
o Students will use iodine crystals and superglue (cyanoacrylate) to develop
invisible latent prints
o You will need to exercise caution when dealing with potentially hazardous
materials
o See included MSDS information for hazardous material concerns
VI. Culminating Experience—Crime Scenarios
• Crime # 1: “Paper” crime—students will use their skills at fingerprint pattern
classification and identification to solve a crime on paper (no processing evidence)
o Resources (e.g. handouts) are included in the module
o Scenario: Dr. Gadget’s silver Porsche 911 was stolen Friday night from the
Bricktown parking lot. Dr. Gadget’s car was found the next morning
wrecked at Lake Thunderbird.
o Observations: The driver’s side window had been knocked out. A tire iron
was found on the passenger side floor board. The glove box appeared to
have been pried open. Approximately twelve feet from the car were two
sleeping men with an empty liquor bottle between them.
o Evidence: Officers collected latent fingerprints from the exterior door handle
(fingerprints 1 and 2), steering wheel (3 and 4), tire iron (5), dashboard (6),
glove box (7), bottle (8 and 9), and interior door handle (10 and 11).
o Interview: The men found at the scene were identified as Bubba Jones and
Redd Nekk. They were taken into custody for questioning. Both men vowed
that the other had stolen the car and had pulled the lodged criminal from
the wrecked car. Afterwards, they celebrated the rescue by drinking the
liquor.
+++++++++++++++++++++++++++++++++++++++++++++++++++++++++++++++++++++++++++++++
• Crime #2: “Evidence” crime—students will use processing techniques and fingerprint
pattern classification and identification to solve a crime with physical evidence
o Some resources (e.g. handouts) included, others will need to be supplied
(see evidence list)
o Have enough materials for each crime team/lab group. *Suggestion:
number the evidence according to the crime team/lab groups. Place the
evidence in various locations about the room so that the teams must locate
their materials.
o Other materials: gloves, materials for processing evidence (dusting powders,
Superglue, iodine, etc.), scanner/digital camera
o Allow the students to decide how to process the evidence; guide as
necessary
o You will need to supply the TEACHER print (your left thumb print) and the
PERPETRATOR print (your right thumb print)
o To set up the crime scene again, wipe nonporous material with glass
cleaner, replace the envelope, and lay your thumb prints (left & right) on the
evidence.
o Scenario: The teacher (you) had several after school parent-teacher
conferences one afternoon. Some conferences the teacher initiated and
the other conferences parents requested. The next morning, the teacher
arrives to find a manila envelope that was sitting in a paper tray has been

- 5 -
OU RET 2005 Fingerprint Module
unsealed. The content of the envelope, a data CD in a CD case, is missing!
The CD contained several important chapter tests and the final exam.
o Observations: The students will make several observations and indicate
them on the crime report.
o Evidence: Metal/plastic letter tray, plastic CD case, manila envelope; the
students will examine the evidence for prints.
o Interview: The teacher produces the list of parent-teacher conferences from
the previous afternoon. The teacher states that (s)he left the room in
between each conference for breaks, to greet the parents upon arrival, and
to escort the parents out upon departure. The teacher indicates that (s)he
left the room at 5:30 in the evening in which the door was locked and (s)he
did not notice if the envelope was tampered with or missing.
o AFIS results: After students have processed the fingerprint evidence,
hypothetically run the prints in a fictitious AFIS. Give each crime investigator
(student) the results of the AFIS (5 prints). Students will use their obtained skills
regarding ridge characteristics to deduce the criminal.

- 1 -
OU RET 2005 Fingerprint Module teacher materials
Forensic Science
Fingerprint Lecture Materials
I. Misconceptions: CSI vs. Real Life
• Suggestion is to make a table on the board and have the students discuss what
they have seen on CSI. The following are some “real world” points to mention.
(Note: these points may not apply to all crime labs in the US)
A. Time—tests and results take days or weeks (sometimes months!) to perform
B. Money—law enforcement is a public service; no police budget in this
country could afford the cost of the tests conducted on every piece of
evidence
C. Evidence
o DNA is not always conclusive (identical twins have the same DNA…but
not the same fingerprints)
o The National Institute of Justice estimates a back log of 200,000 to
300,000 DNA samples awaiting analysis.
o Fingerprints can easily be destroyed or damaged, especially on firearms
D. Equipment—again, no police crime lab would have all possible laboratory
equipment needed to conduct all tests (this goes back to time and
money!). Most evidence will be sent off to another lab for testing.
E. Staffing/careers/positions
o Most crime labs have a smaller number of staff than what is shown on TV
(example: Norman, OK police department has a staff of 2 with no blonds
in high heels!).
o Most crime labs do not allow an agent to collect evidence, test
evidence, AND interrogate the suspect. Duties are delegated to the
proper people.
o Most agents working in a crime lab do not have a degree in Forensic
Science. They typically are police officers that have an interest, possible
a background in forensics, that work their way to the position.
o Forensic Science degree programs are becoming very popular.
However, the market is becoming flooded with graduates with not
enough positions.
• In 1999, 4 students graduated with degrees in forensics from West
Virginia. In 2005, more than 400 people are enrolled!
• It’s the most popular degree program on the 25,000 student
campus.
o The starting pay for a crime lab technician is not six figures!
II. History—Timeline
• Ancient times—Chinese used fingerprints to sign legal documents
• 1684—Nehemiah Grew—English physician who first called attention to the
system of pores and ridges in hands and feet
• 1858—William Herschel—British administrator in India who was the first
government official to use prints for identification
• Required them to sign contracts with imprint of their right hand

- 2 -
OU RET 2005 Fingerprint Module teacher materials
• 1880—Henry Faulds—Scottish physician in Japan who first developed a method
for lifting prints and who concluded that fingerprint patterns remain unchanged
throughout one’s life
• 1883—Alphonse Bertillon—French police officer who first developed and
introduced a systematic attempt at personal identification
o Bertillon system relied on a detailed description of the subject, combined
with full-length and profile photographs and a system of precise body
measurements
o Skeleton sizes were thought to be so extremely diverse that no two
individuals could have exactly the same measurements
o Bertillon system recommended the routine taking of 11 anatomical
measurements (e.g. height, reach, width of head, and length of left
foot)
o 1903—system began to fall into disfavor
! convict Will West arrived at Fort Leavenworth prison to find that
William West, already in the prison, could not be distinguished
from the other
! body measurements were practically the same and the two men
appeared like twins
! fingerprints distinguished the two men apart
• 1892—Francis Galton—British anthropologist who presented statistical proof of
the uniqueness of fingerprints and outlined principles of fingerprint
identification; wrote Finger Prints
• 1897—Edward Henry—British police officer in India who developed a method of
fingerprint classification that is widely used (called Henry system)
• 1901—New York City Civil Service Commission—adopted the first systematic
and official use of fingerprints for personal identification
III. Biology of skin (transparency)
• Friction skin—found on fingertips, palms, and soles of feet; designed by nature
to provide firmer grasp and resistance to slippage
• Skin is composed of layers of cells
o Outer portion of skin—epidermis
o Separating boundary—dermal papillae
! Determines the form and pattern of ridges on friction skin
! Develops during fetal growth at about 12 weeks
! Damage done to this layer will become permanent; such a
wound must penetrate 1 to 2 millimeters beneath the skin’s
surface; however, impossible to obliterate all ridge characteristics
on the hand and presences of scars merely provides new
characteristics for identification
o Inner skin—dermis
• Each skin ridge is composed of a single row of pores that are openings for
ducts leading from the sweat glands
o Through pores perspiration is discharged and deposited on skin
o Oils may be picked up by touching hairy portions of the body

- 3 -
OU RET 2005 Fingerprint Module teacher materials
• Once a finger/palm/sole touches as surface, perspiration and oils are
transferred onto the surface, thereby leaving an impression of the print’s ridge
pattern
IV. Fundamental Principles of Fingerprints
A. Why fingerprints?
o Fingerprint evidence is among the most valuable data found at a crime
scene.
o Fingerprints directly indicate an individual’s presence at a certain location.
o Although DNA is usually viewed as a crucial piece of evidence for a crime,
fingerprints are easier to obtain, more cost effective, less fallible, and better
for identification.
o Fingerprints are more unique to the individual than DNA.
o Crime scene investigators use print data more often to identify people.
B. First fundamental principle:
o A fingerprint is an individual characteristic
o No two fingers have yet been found to possess identical ridge
characteristics
C. Second fundamental principle:
o A fingerprint will remain unchanged during an individual’s lifetime
o Skin conditions such as wart’s, wounds, blisters, or temporary damage
(caused by abrasives, sandpaper, or chemicals) have no permanent
effect on the pattern; once the condition changes or skin heals, the
original patterns return (see info. on dermal papillae)
D. Third fundamental principle:
o Fingerprints have general ridge patterns that permit them to be
systematically classified
o All fingerprints are divided into three classes on the basis of their general
pattern:
! Loops—65% of population
o Types: ulnar, radial (transparency/handout)
! Whorls—30-35% of population
o Types: plain, central pocket loop, double, accidental
(transparency/handout)
! Arches—5% of population
o Types: plain, tented (transparency/handout)
E. Ridge Characteristics (transparencies)—also called minutiae—ridge endings,
bifurcations, enclosures, and other ridge details, which must match in two
fingerprints in order for their common origin to be established
o Examples:
! Core—approximate center of the bulb
! Delta—a triangular area on the bulb
! Dot—ridge characteristic in which the ridge appears as a single point
! Islands (Eye, Enclosure)—ridge characteristic in which a ridge divides
into two the converges back into one
! Ridge endings—ridge characteristic in which the ridge blatantly stops
! Bifurcations (forks)—ridge characteristic in which ridges diverge into
two ridges

- 4 -
OU RET 2005 Fingerprint Module teacher materials
o In modern forensics, identification of a fingerprint is no longer based on
arbitrary point system (e.g. finding 8 or 10 similar points); today,
fingerprints are identified and individualized based upon “finding
agreement of individual characteristics—with no unexplainable
dissimilarities”
o Dactylography—the scientific study of fingerprints as a means of
identification
o AFIS (Automated fingerprint identification system)—a computerized
system for scanning, mapping, storing, searching, and retrieving
fingerprints
! Uses automatic scanning devices that convert the image of a
fingerprint into digital minutiae that contain data showing ridges at
their points of termination (ridge endings) and the branching of
ridges into two ridges (bifurcations)
! Set of 10 fingerprints can be searched against a file of 500,000 10-
finger prints in about eight-tenths of a second
! FBI has the largest catalog of fingerprints
F. Types of Prints
o Latent print (common usage) refers to any fingerprint discovered at a
crime scene
o Three kinds of crime scene prints:
! Visible prints (patent prints)—made by fingers touching a surface
after the ridges have been in contact with a colored material (e.g.
blood, paint, grease, or ink)
! Plastic prints—ridge impressions left on a soft material (e.g. putty, wax,
soap, or dust)
! Invisible prints—impressions caused by the transfer of body
perspiration or oils present on finger ridges to the surface of an object
o Processing surfaces:
! Hard, nonabsorbent (e.g. glass, mirror, tile, painted wood)—powder
or cyanoacrylate techniques
! Soft, porous (e.g. papers, cardboard, cloth)—chemical techniques
V. Activities—Procedure for Collecting Inked Prints (also see lab handout)
1) Always stand at the subject’s left, regardless of which hand you are using.
2) Have the subject stand about forearm’s length from the work area and slightly
behind you. Tell the subject to relax his/her hand and let you do all the work.
3) In rolling the fingers of the right hand, the right thumb should be rolled inward,
from right to left, and the other four fingers rolled outward, from left to right. This
procedure is reversed for the left hand.
4) Hold the subject’s hand in your left hand, with all of the subjects fingers curled
except the one you are inking and recording on the card. Grasp the extended
finger of the subject with your right thumb and index finger. Roll the subject’s
fingers on the ink pad, from nail to nail, keeping the finger flat on the pad from
the first joint to the tip.
*MORE PRINTS ARE RUINED FROM TOO MUCH INK RATHER THAN TOO LITTLE.*

- 5 -
OU RET 2005 Fingerprint Module teacher materials
5) Roll the inked finger on the ten-print card as previously instructed. Use gentle
pressure in rolling the finger, to avoid smearing the ink. At the end of the roll, lift
the finger upward to prevent smudging of the edge of the print.
6) Repeat the procedure for all fingers on both hands.
7) When all the impressions have been taken, the subject should wipe his/her
fingertips with isopropyl alcohol and then wash with soap and water.
8) Fill in all pertinent information on the ten-print card.
VI. Activities—Dusting & Chemical Techniques (also see lab handout)
A. Suggested processing procedure for DUSTING:
o Nonmagnetic powders—brush in the direction of any ridges that begin
to appear
o Magnetic powders—drop a pile of dust onto supposed location of print,
pick up excess, and apply in a circular motion
o Porous surfaces (i.e. cardboard, paper) usually do not produce latent
prints using powder techniques (see chemical techniques)
o Nonporous surfaces—the color of the background on which the print is
made determines the color of the powder to use to provide a good
contrast (e.g. light-colored powder help prints stand out on a dark
background; dark powders are more useful on a light background)
o Glossy paper (semiporous) will work best with magnetic powders.
B. Ninhydrin fuming (chemical reagent used to develop latent fingerprints on
porous materials by reacting with amino acids in perspiration) demonstration
procedure (no lab handout—see “Processing Guide…” to prepare 0.5% solution)
o Materials: ninhydrin solution (0.5%), porous surface (paper, cloth,
cardboard, etc.), iron (on steam setting)
o Place several fingerprints on the porous surface.
o Spray the porous surface with a 0.5% solution of ninhydrin in a fume hood
or well ventilated area until saturated.
o Lay the porous surface on a countertop and without touching, use the
steam from the iron to develop the invisible latent prints.
o The prints have a limited life span; you will need to photograph or scan
to preserve.
o See included MSDS information for hazardous material concerns
C. Cyanoacrylate fuming (technique for visualizing latent fingerprints on
nonporous surfaces by exposing them to cyanoacrylate vapors) procedure:
1) Label the Petri dish with your name, date, and time.
2) Run a finger alongside your nose or run your fingers through your hand to
pick up oils. Lay several, non-overlapping fingerprints on the INSIDE of the
Petri dish LID.
3) In the base (i.e. bottom) of the Petri dish, place a small dampen piece of
paper towel toward the side.
4) Also in the base, place two drops of superglue in the center.
5) Quickly, yet carefully, place the lid on the base with the fingerprints towards
the superglue.
6) Place the Petri dish in a sunny window or outside. If neither is available,
place directly under a lamp. (Other accelerants: moving air, chemicals—
NaOH)

- 6 -
OU RET 2005 Fingerprint Module teacher materials
7) Observe the Petri dish for development of latent prints.
8) Extension: Either dust & lift the print or photograph/scan.
*See included MSDS information for hazardous material concerns
D. Iodine fuming (technique for visualizing latent fingerprints by exposing them to
iodine vapors) procedure:
1) Using the scissors, cut approximately ! of the bulb off of the plastic pipette
(leave " of the bulb attached).
2) Using a portion of the cotton, pack the bottom of the pipette bulb.
3) Place several iodine crystals (< 0.25g) on top of the cotton packing.
4) Using a second portion of the cotton square, pack cotton on top of the
iodine crystals.
5) Have your instructor check your mini-iodine fuming chamber.
6) Place several, non-overlapping fingerprints onto the porous surface.
7) IMPORTANT!!! Carefully breathe into the end of the pipette bulb. Do not
inhale! Direct the open end of the pipette toward the porous surface to
develop latent fingerprints.
8) Use a camera (or scanner) and ruler to record the developed print.
*See included MSDS information for hazardous material concerns
VII. Crime Scenarios (see lesson plans and handouts for more details)
Crime # 1: “Paper” crime
Scenario: Dr. Gadget’s silver Porsche 911 was stolen Friday night from the Bricktown parking
lot. Dr. Gadget’s car was found the next morning wrecked at Lake Thunderbird.
! Observations: The driver’s side window had been knocked out. A tire iron was found
on the passenger side floor board. The glove box appeared to have been pried
open. Approximately twelve feet from the car were two sleeping men with an empty
liquor bottle between them.
! Evidence: Officers collected latent fingerprints from the exterior door handle
(fingerprints 1 and 2), steering wheel (3 and 4), tire iron (5), dashboard (6), glove box
(7), bottle (8 and 9), and interior door handle (10 and 11).
! Interview: The men found at the scene were identified as Bubba Jones and Redd
Nekk. They were taken into custody for questioning. Both men vowed that the other
had stolen the car and had pulled the lodged criminal from the wrecked car.
Afterwards, they celebrated the rescue by drinking the liquor.
++++++++++++++++++++++++++++++++++++++++++++++++++++++++++++++++++++++
Crime #2: “Evidence” crime
Scenario: The teacher (you) had several after school parent-teacher conferences one
afternoon. Some conferences the teacher initiated and the other conferences parents
requested. The next morning, the teacher arrives to find a manila envelope that was sitting in
a paper tray has been unsealed. The content of the envelope, a data CD in a CD case, is
missing! The CD contained several important chapter tests and the final exam.
! Observations: The students will make several observations and indicate them on the
crime report.
! Evidence: Metal/plastic letter tray, plastic CD case, manila envelope; the students will
examine the evidence for prints.

- 7 -
OU RET 2005 Fingerprint Module teacher materials
! Interview: The teacher produces the list of parent-teacher conferences from the
previous afternoon. The teacher states that they left the room in between each
conference for breaks, to greet the parents upon arrival, and to escort the parents out
upon departure. The teacher indicates that they left the room at 5:30 in the evening
in which the door was locked and did not notice if the envelope was tampered with
or missing.
! AFIS results: After students have processed the fingerprint evidence, hypothetically run
the prints in a fictitious AFIS. Give each crime investigator (student) the results of the
AFIS (5 prints). Students will use their obtained skills regarding ridge characteristics to
deduce the criminal.
Further information:
" Forensic Science. Stuart H. James and Jon J. Nordby. CRC Press. 2005
" Criminalistics. Richard Saferstein. Pearson/Prentice Hall. 2004
" Practical Crime Scene Processing and Investigation. Ross M. Gardner. CRC Press. 2005
" Criminal Investigation Third Edition. Bruce L. Berg and John J. Horgan. Glenco
McGraw-Hill. 1998
" Processing Guide for Developing Latent Prints. US Department of Justice, Federal
Bureau of Investigation, Laboratory Division. 2000
" www.onin.com Ed German
" http://www.ccs.neu.edu/home/feneric/cyanoacrylate.html Eric W. Brown
" “Case of the Solitary Fingerprint” kit. Teachers Discovery demonstration kit.


Name ________________________________________ Date ___________
OU RET 2005 - 1 – Fingerprint Module Activity
Obtaining Inked Fingerprints
Laboratory Activity Purpose/Objectives: Students will…
• Explore fingerprints patterns.
• Distinguish among the basic fingerprint patterns.
• Organize fingerprint patterns to create a classification system.
• Demonstrate the correct procedure for collecting inked fingerprints.
Hypothesis: Visually inspect your fingerprints. Do you notice any similarities? What are the
differences? How many different patterns are present? What would be your basis of
establishing a classification system for the different fingerprint patterns? Answer the previous
questions for your hypothesis.
__________________________________________________________________________________________
__________________________________________________________________________________________
__________________________________________________________________________________________
__________________________________________________________________________________________
__________________________________________________________________________________________
__________________________________________________________________________________________
__________________________________________________________________________________________
__________________________________________________________________________________________
Materials:
• Black ink pads
• Ten-print card or white card stock
• Magnifying glass
• White, unlined paper (for practice)
• Paper towels
• Isopropyl alcohol (rubbing alcohol)
Safety: Goggles and lab aprons are suggested to protect eyes and clothing. Isopropyl
alcohol is flammable.
Procedure:
1) The subject should wash and dry hands.
2) Always stand at the subject’s left, regardless of which hand you are using.
3) Have the subject stand about forearm’s length from the work area and slightly behind
you. Tell the subject to relax his/her hand and let you do all the work.
4) In rolling the fingers of the right hand, the right thumb should be rolled inward, from
right to left, and the other four fingers rolled outward, from left to right. This procedure
is reversed for the left hand.
5) Hold the subject’s hand in your left hand, with all of the subjects fingers curled except
the one you are inking and recording on the card. Grasp the extended finger of the
subject with your right thumb and index finger. Roll the subject’s fingers on the ink
pad, from nail to nail, keeping the finger flat on the pad from the first joint to the tip.
*MORE PRINTS ARE RUINED FROM TOO MUCH INK RATHER THAN TOO LITTLE.*
6) Roll the inked finger on the ten-print card as previously instructed. Use gentle pressure
in rolling the finger, to avoid smearing the ink. At the end of the roll, lift the finger
upward to prevent smudging of the edge of the print.

Name ________________________________________ Date ___________
OU RET 2005 - 2 – Fingerprint Module Activity
7) Repeat the procedure for all fingers on both hands.
8) When all the impressions have been taken, the subject should wipe his/her fingertips
with isopropyl alcohol and then wash with soap and water.
9) Fill in all pertinent information on the ten-print card.
Data & Observations:
o Attach your ten-print card.
o Describe the difficulty in taking ink prints.
_______________________________________________________________________________________
_______________________________________________________________________________________
o Describe the difficulty in having your prints taken.
_______________________________________________________________________________________
_______________________________________________________________________________________
o Describe the appearance (clarity) of the prints.
_______________________________________________________________________________________
_______________________________________________________________________________________
Analysis & Conclusion:
1) Is there fingerprint symmetry between your two hands? Explain.
_______________________________________________________________________________________
_______________________________________________________________________________________
_______________________________________________________________________________________
2) Observe your lab group’s prints. What are the similarities? Differences?
_______________________________________________________________________________________
_______________________________________________________________________________________
_______________________________________________________________________________________
3) In your lab groups, establish a classification system for fingerprints. Explain your
reasoning for the system your group creates.
_______________________________________________________________________________________
_______________________________________________________________________________________
_______________________________________________________________________________________
_______________________________________________________________________________________
_______________________________________________________________________________________
_______________________________________________________________________________________
_______________________________________________________________________________________
_______________________________________________________________________________________
_______________________________________________________________________________________

Name ________________________________________ Date ___________
OU RET 2005 - 3 – Fingerprint Module Activity
Teacher Suggestions and Expected Results:
Prep time: 5-10 minutes to set-up materials
Lab time: 45-60 minutes
o You will need to have the students practice the rolling technique before they commit
to placing ink fingerprints on the cards. (The FBI would reject ten print cards with
messy prints or too many mistakes!) This will eliminate waste of the cards. Just use
regular unlined white paper for practice.
o Avoid using the “correct” terminology until the students have devised their own
classification system. However some groups may require more guidance than others.
o Alternative materials:
! If you would prefer to not use ink pads, you can use graphite (pencil lead).
“Scribble” a dark square of the graphite on a piece of paper and rub the finger on
the square.
! Better prints will result from using “Perfect Print” ink (www.indenticatorinc.com), a
flat glass plate, and a roller. If you have the monetary means, you might
investigate using a fingerprint station. (www.armorforensics.com)
o Make sure to monitor student progress to avoid mess or horseplay.

Name __________________________________________ Date __________
OU RET 2005 - 1 – Fingerprint Module Activity
Lifting Prints Using Dusting Techniques
Laboratory Activity
Purpose/Objectives: Students will…
• Explore dusting techniques using a variety of surfaces and dusting powders to
formulate a conclusion on which powders are best to use in different places.
• Practice lifting fingerprints using tape and transferring the prints to cards.
• Reinforce previous knowledge of fingerprint patterns and identification.
Hypothesis: Observe the various surfaces and dusting powders. Formulate a hypothesis
on which powders will work best on each of the surfaces. Support your hypothesis
based on previous knowledge.
_____________________________________________________________________________________
_____________________________________________________________________________________
_____________________________________________________________________________________
_____________________________________________________________________________________
_____________________________________________________________________________________
_____________________________________________________________________________________
Materials:
Synthetic fiber brushes
Lifting or transparent bookbinding tape
Fingerprint cards or 3x5 index cards
Black dusting powder
White dusting powder
Dual-color dusting powder
Magnetic dusting powder and brush
Various surfaces: lab table counter top,
glossy photo paper, white unlined
paper, glass slides or beaker, plastic
transparency, Formica samples
For extension: student inked fingerprint
cards, magnifying glass
Safety: Wear goggles and laboratory apron. Wash hands after completion.
Procedure:
1) Place several fingerprints on each of the surfaces. Try not to overlap fingerprints. If your
finger is dry, rub it along side your nose or run your fingers through you hair to pick up
some oil.
2) Use each powder on the surfaces at different fingerprints. Do not overlap dusting
powders or interchange the brushes, as you will obtain poorly developed latent prints.
Label each powder.
3) Record your observations.
4) To lift prints, cut 6-7 cm of tape from the roll. Cover the print with the tape by smoothing
the tape over the print with your finger, beginning with one end and working slowly over
the print. Do not simply lay the tape over the print! Air bubbles will ruin the fingerprint.
5) Lift the tape with the developed print smoothly and slowly from the surface in one
continuous motion. This will prevent distortion. Repeat the laying-down, smoothing
operation to eliminate any air bubbles until the print is taped to a card.
6) Record the surface from which the print was taken, your initials, and the powder used to
develop the print.

Name __________________________________________ Date __________
OU RET 2005 - 2 – Fingerprint Module Activity
Data & Observations: Create a qualitative data table (surface, powder, and quality or clarity of
transferred print)
Analysis & Conclusion:
1) Based on your experimental results, determine which powder works best for each of the
surfaces. Elaborate with explanation.
____________________________________________________________________________________________
____________________________________________________________________________________________
____________________________________________________________________________________________
____________________________________________________________________________________________
____________________________________________________________________________________________
____________________________________________________________________________________________
____________________________________________________________________________________________
2) Did you encounter any problems? What were they? What could (or did) you do to solve
these problems?
____________________________________________________________________________________________
____________________________________________________________________________________________
____________________________________________________________________________________________
3) Why do you suppose that there are different types of dusting powders? Did all surfaces
provide a latent print? Why or why not?
____________________________________________________________________________________________
____________________________________________________________________________________________
____________________________________________________________________________________________
Extension & Application:
(1) For each of the lifted and transferred prints…
A) Determine the fingerprint pattern (arch, loop, whorl)
B) Using 8-10 points and the inked fingerprint cards, make an identification of each print.
(2) Research the use of nanoparticles in fingerprint identification.

Name __________________________________________ Date __________
OU RET 2005 - 3 – Fingerprint Module Activity
Teacher Suggestions & Expected Results:
Prep time: 10-15 minutes to set up materials
Lab time: 60-85 minutes, depending on extension/application
• Inquiry learning with fingerprint powders will be messy! ! Put paper towels underneath
the surfaces for easier clean up.
• Excess powder should be removed before trying to lift the print.
• www.armorforensics.com has an excellent selection of forensic tools
• Time saving suggestions:
o Have each lab group investigate only one powder. At the end of the experiment
the lab groups would report on their findings, produce a group data table and
make a collective conclusion.
o Limit the variety of powders.
o Have enough brushes for each student.
• We suggest providing lab groups with a small amount of each powder in a weigh dish or
other container. This will help to eliminate some mess and waste of powders.
• It is also suggested to have the students wear lab aprons and goggles for clothing and
eye protection.
• You should have enough brushes for each powder. It is not advised to interchange
brushes and powders because this will cause poorly developed latent prints. Label
brushes based on the powder used.
• If you absolutely must use the same brushes, wipe the tips on paper towels until clean.
• To make a pseudo-magnetic brush for the magnetic powder, glue a small magnet to the
end of a stick (pencil, skewer, Popsicle stick, etc.) and place inside a thin test tube.
Place this test tube into a larger one that has been fitted with a rubber washer at the
end. This makes a cheaper alternative to purchasing several magnetic brushes.
• Students will find that not all surfaces will produce a latent print. This will be the bridge to
discussion and demonstration of chemical techniques (e.g. ninhydrin, iodine fuming,
cyanoacrylate fuming, etc.)
• Suggested processing procedure:
o Nonmagnetic powders—brush in the direction of any ridges that begin to appear
o Magnetic powders—drop onto surface, remove excess in a circular motion
o Porous surfaces (i.e. cardboard, paper) usually do not produce latent prints using
powder techniques (see chemical techniques)
o Nonporous surfaces—the color of the background on which the print is made
determines the color of the powder to use to provide a good contrast (e.g. light-
colored powder help prints stand out on a dark background; dark powders are
more useful on a light background).
o Glossy photo-like paper (semiporous) will work best with magnetic powders.
• Nanotechnology websites:
o “Nanoparticles Clearly Finger the Culprit,” 08 Nov 2003, New Scientist
www.newscientist.com/article.ns?id=dn4348
o Nanotechnology in Crime Prevention and Detection, London
www.nano.org.uk/crime.htm
o Fred Rowell, University of Sunderland
http://orac.sunderland.ac.uk/~hs0bcl/fjr.htm
o Nanotechnology, New Scientist
www.newscientist.com/hottopics/tech/techindex.jsp?sub=Nanotechnology
o “Sweat Prints could Nail Criminals,” 10 Sept 2001, New Scientist
www.newscientist.com/article.ns?id=dn1242
o “Single cell DNA fingerprinting gathers speed,” 31 Oct 2002, New Scientist

Name __________________________________________ Date __________
OU RET 2005 - 4 – Fingerprint Module Activity
www.newscientist.com/article.ns?id=dn2995

Name ________________________________________________ Date ____________
OU RET 2005 - 1 - Fingerprint Module Activity
Chemical Development of Latent Prints
Laboratory Activity
Purpose/Objectives: The student will…
• Explore chemical techniques (cyanoacrylate fuming, iodine fuming) to develop latent
prints.
• Utilize technology (e.g. scanner, digital photography) to capture chemically
developed latent prints.
• Practice appropriate safety procedures in a chemical laboratory setting.
Hypothesis: Are all fingerprints visible? Can powder dusting techniques be used on any type
of surface? Why or why not? What are other methods of developing latent prints?
__________________________________________________________________________________________
__________________________________________________________________________________________
__________________________________________________________________________________________
__________________________________________________________________________________________
__________________________________________________________________________________________
(1) Cyanoacrylate Fuming Technique
Materials:
• Superglue (variation of cyanoacrylate)
• Plastic Petri dish
• Deionized water
• Paper towels
Safety: Goggles for eye protection. Use caution with the superglue; it can adhere to skin,
cause eye irritation, and produces mildly irritating fumes.
Procedure:
1) Label the Petri dish with your name, date, and time.
2) Run a finger alongside your nose or run your fingers through your hair to pick up oils.
Another good place for this is your forehead. Lay several, non-overlapping fingerprints
on the INSIDE of the Petri dish LID.
3) In the base (i.e. bottom) of the Petri dish, place a small dampened piece of paper
towel toward the side.
4) Also in the base, place two drops of superglue in the center
5) Quickly, yet carefully, place the lid on the base with the fingerprints towards the
superglue.
6) Place the Petri dish in a sunny window or outside. If neither is available, place directly
under a lamp.
7) Observe the Petri dish for development of latent prints.
8) Extension: Either dust & lift the print or photograph/scan.

Name ________________________________________________ Date ____________
OU RET 2005 - 2 - Fingerprint Module Activity
Observations: Make a data table for the time lapse and indicate qualitative observations.
(2) Iodine Fuming Technique:
Materials:
• Iodine crystals
• Cotton balls/squares
• Disposable pipette
• Scoopula
• Scissors
• Porous surface
• Camera
• Ruler
Safety: Goggles for eye protection. CAUTION!! Iodine crystals are highly toxic by ingestion
and inhalation. DO NOT INHALE! Iodine is irritating and corrosive to the skin. Avoid all body
contact.
Procedure:
1) Using the scissors, cut approximately ! of the bulb off of the plastic pipette (leave " of
the bulb attached).
2) Using a portion of the cotton, pack the bottom of the pipette bulb.
3) Place several iodine crystals (< 0.25g) on top of the cotton packing.
4) Using a second portion of the cotton square, pack cotton on top of the iodine crystals.
5) Have your instructor check your mini-iodine fuming chamber.
6) Place several, non-overlapping fingerprints onto the porous surface.
7) IMPORTANT!!! Carefully breathe into the end of the pipette bulb. Do not inhale! Direct
the open end of the pipette toward the porous surface to develop latent fingerprints.
8) Use a camera (or scanner) and ruler to record the developed print.
Observations: Make a sketch of the results. Using the camera or scanner, photograph/scan
the results. Record all observations.

Name ________________________________________________ Date ____________
OU RET 2005 - 3 - Fingerprint Module Activity
Analysis & Conclusion:
1) Make a generalized statement regarding the development of latent fingerprints on
different surfaces using chemical techniques versus dusting techniques.
_______________________________________________________________________________________
_______________________________________________________________________________________
_______________________________________________________________________________________
_______________________________________________________________________________________
2) Compare the prints developed from the two chemical techniques.
_______________________________________________________________________________________
_______________________________________________________________________________________
_______________________________________________________________________________________
_______________________________________________________________________________________
3) Why did you have to take a photograph or scan the prints developed with iodine?
Explain.
_______________________________________________________________________________________
_______________________________________________________________________________________
_______________________________________________________________________________________
4) Propose a hypothesis to explain why you used two different chemical development
techniques.
_______________________________________________________________________________________
_______________________________________________________________________________________
_______________________________________________________________________________________
5) Extension/Application: Using the ten-print cards and dusting/lifting techniques, identify a
print developed using the cyanoacrylate method. Use 8-10 points to justify identification.
_______________________________________________________________________________________
_______________________________________________________________________________________
_______________________________________________________________________________________

Name ________________________________________________ Date ____________
OU RET 2005 - 4 - Fingerprint Module Activity
Teacher Suggestions & Expected Results:
Prep time: 15-20 minutes
Lab time: 45-60 minutes
• MSDS information included.
• The humidity and sunlight will greatly accelerate the cyanoacrylate fuming technique.
The process will occur without the humidity and heat; however it does not produce
the same detailed fingerprints and takes a considerable amount of time.
• Do not use a “red” heat source (e.g. hot plate, Bunsen burner, etc.) to accelerate the
fuming process. The fumes can ignite and explode!
• Examples of porous surfaces: paper, cardboard, cloth, unfinished wood
• Iodine crystals are toxic by ingestion or inhalation. They react violently with reducers,
sulfur, iron, alkali metals, metal powders and phosphorous. They irritate the skin and
are corrosive to eyes and respiratory tract. Inhalation of vapors or ingestion of crystals
may be fatal! Use extreme caution when conducting this experiment.
Hazards aside, this activity is worth it!
• To dispose of small quantities of iodine: While working in a fume hood or well
ventilated room, place the iodine crystals in 50% aqueous solution of sodium
thiosulfate (e.g. 50 g Na2S2O3 in 100 mL H2O). Continuously stir. Check with pH paper.
Slowly add a small amount of sodium carbonate (1 g or less) and periodically check
with pH paper for neutralization. Stir until the iodine is consumed. Do a final check
with pH paper for neutralization. Flush down the drain with large quantities of water.
(based on the Flinn Chemical & Biological Catalog Reference Manual 2005)
• Dispose of the Petri dish in the waste container.


Name ______________________________________________________ Date ___________
OU RET 2005 Fingerprint Module Handout
Fingerprint Terminology
1. Accidental whorl—fingerprint pattern that is a combination of two or more types
of patterns, except for plain arch
2. AFIS (Automated fingerprint identification system)—a computerized system for
scanning, mapping, storing, searching, and retrieving fingerprints
3. Bifurcations (forks)—ridge characteristic in which ridges diverge into two ridges
4. Bulb—rounded area at the end joint of every finger and thumb
5. Central pocket whorl—fingerprint pattern in which most of the ridges form a loop,
with one or more ridges curving completely around the core to form a pocket
6. Classification—method of organizing fingerprints
7. Core—approximate center of the bulb
8. Dactylography—the scientific study of fingerprints as a means of identification
9. Delta—a triangular area on the bulb
10. Dot—ridge characteristic in which the ridge appears as a single point
11. Double loop—fingerprint pattern consisting of two loop formations, two separate
and distinct sets of deltas
12. Friction ridges—minute, raised lines on the surface of fingertips, palms, toes, and
heels
13. Fingerprint—an impression created by the friction ridges, pores, sweat, and oil on
a person’s hands and feet
14. Identification—the determination of an individual’s identity through physical
evidence, especially fingerprint evidence
15. Invisible print—a latent print not visible without some form of developing
16. Islands (Eye, Enclosure)—ridge characteristic in which a ridge divides into two
the converges back into one
17. Latent prints—an impression transferred to a surface by sweat, oil, dirt, blood, or
some other substance on the ridges of the fingers; may be visible or invisible
18. Loop pattern—fingerprint pattern in which one or more ridges enter from one
side, make a turn, and exit on the side from which they entered; has only one
delta
19. Plain arch—fingerprint pattern in which the ridges enter on one side of the
impression and flow, or tend to flow, out the other side with a wave in the center
20. Plain whorl—the simplest, most common whorl fingerprint pattern; has two deltas,
and at least one ridge that makes a complete circuit about the core
21. Plastic print—a form of a visible print that is created in a soft substance, such as
wax, soap, butter, putty, grease, or paint
22. Radial loop—a loop fingerprint pattern in which the ridges slant toward the
thumb, or the radial bone of the forearm
23. Ridge characteristics (minutiae)—ridge endings, bifurcations, enclosures, and
other ridge details, which must match in two fingerprints in order for their
common origin to be established
24. Ridge endings—ridge characteristic in which the ridge blatantly stops
25. Ten-print card—a card or form on which fingerprints are transferred along with
other personal data and then filed for future retrieval

Name ______________________________________________________ Date ___________
OU RET 2005 Fingerprint Module Handout
26. Tented arch—fingerprint pattern in which the ridges enter on one side and flow
out the other, as in the plain arch, however the ridge or ridges at the center
have a distinct upward thrust
27. Ulnar loop—a loop fingerprint pattern in which the ridges slant toward the little
finger, or the ulna bone of the forearm
28. Visible print—a latent print that is immediately visible to the naked eye
29. Whorl pattern—fingerprint pattern in which at least one ridge must pass
completely around the core of the finger; typically spiral, circular, oval, or an
variation of a circle; has at least two deltas


Name ________________________________________________ Date _______________
OU RET 2005 - 1 - Fingerprint Module Activity
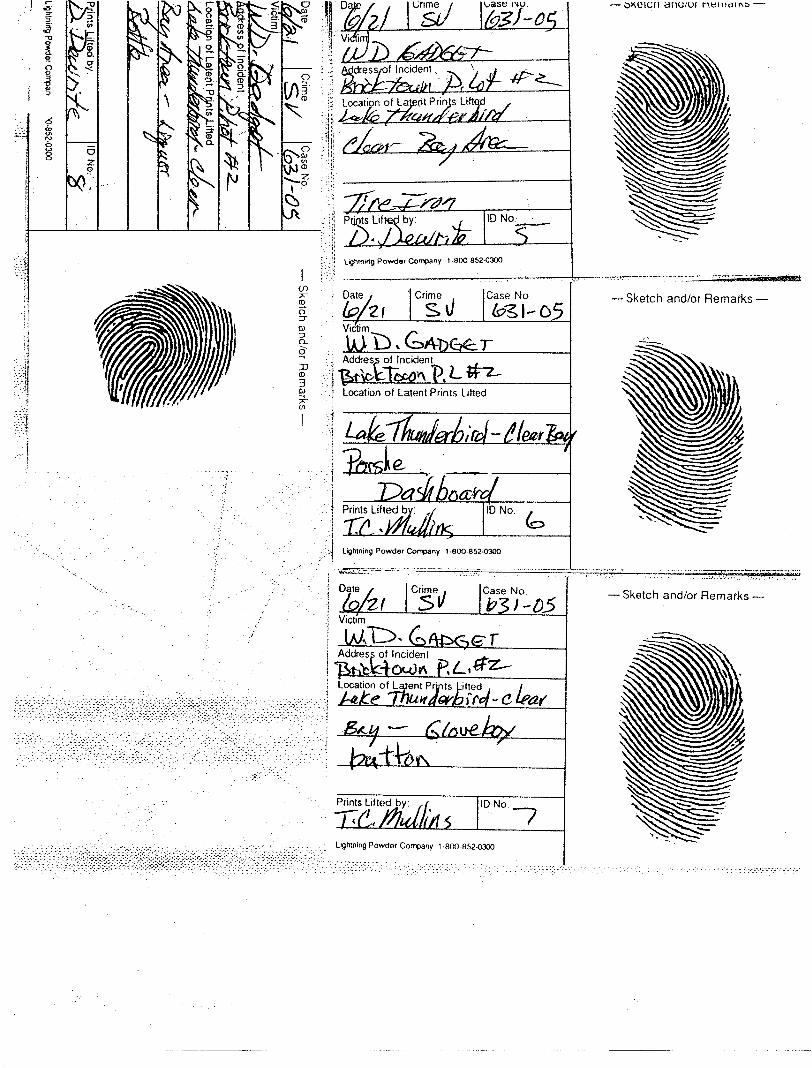
Crime Scenario #1
Dr. Gadget’s silver Porsche 911 was stolen Friday night from the Bricktown parking lot.
Dr. Gadget’s car was found the next morning wrecked at Lake Thunderbird.
! Observations: The driver’s side window had been knocked out. A tire iron was
found on the passenger side floor board. The glove box appeared to have
been pried open. Approximately twelve feet from the car were two sleeping
men with an empty liquor bottle between them.
! Evidence: Officers collected latent fingerprints from the exterior door handle
(fingerprints 1 and 2), steering wheel (3 and 4), tire iron (5), dashboard (6), glove
box (7), bottle (8 and 9), and interior door handle (10 and 11).
! Interview: The men found at the scene were identified as Bubba Jones and Redd
Nekk. They were taken into custody for questioning. Both men vowed that the
other had stolen the car and had pulled the lodged criminal from the wrecked
car. Afterwards, they celebrated the rescue by drinking the liquor.
! Materials:
ten print cards, 3
latent print cards, 11
magnifying glass (optional)
! Directions: Use the materials and information provided to answer the following
questions:
1) Which fingerprints belong to Dr. Gadget?
• How many?
• What evidence supports your decision?
2) Which fingerprints belong to Bubba Jones?
• How many?
• What evidence supports your decision?
3) Which fingerprints belong to Redd Nekk?
• How many?
• What evidence supports your decision?
4) Who stole the Porsche? Explain by citing the evidence.
5) Was the bottle already in the car when it was stolen? Explain by citing the
evidence.

Name ________________________________________________ Date _______________
OU RET 2005 - 2 - Fingerprint Module Activity
Teacher Suggestions
Crime # 1: “Paper” crime
• Students will use their skills at fingerprint pattern classification and identification to
solve a crime on paper
• No processing evidence
• Resources (e.g. handouts) are included in the module
Instructions:
• Pass out the crime scenario to each student and other materials to each crime
team/lab group.
• Instruct the students to work cooperatively to solve the case and support their
answers by utilizing the evidence.
Expected Results
• Fingerprints
o Dr. Gadget—1, 4, 6, 7, 10
o Bubba Jones—2, 9
o Redd Nekk—3, 5, 8, 11
• The car belongs to Dr. Gadget. His prints were all over the car. He enters and
exits using both handles. He opened the glove box by pushing the button.
• Redd is the thief. He never opened the car door from the outside. He broke the
window with the tire iron and reached inside. He then used the iron to pry open
the glove box. He drove the car and shared the liquor.
• Bubba’s prints were on the exterior handle only. He opened the door from the
outside to rescue Redd. He also shared the bottle of liquor.
• The bottle was not in the car when it was stolen. Dr. Gadget’s prints were not on
it.


Name __________________________________________________ Date __________
OU RET 2005 - 1 - Fingerprint Module Activity
Crime Scenario #2
The teacher had several after school parent-teacher conferences one afternoon.
Some conferences the teacher initiated and the other conferences parents requested.
The next morning, the teacher arrives to find a manila envelope sitting in a paper tray
that has been unsealed. The content of the envelope, a data CD in a CD case, is
missing! The CD contained several important chapter tests and the final exam.
! Observations: Use the crime scene form to record your observations.
! Evidence: Use the crime scene form to record information about the evidence.
! Interview: The teacher supplies the list of parent-teacher conferences from the
previous afternoon.
The teacher states that they left the room in between each conference for breaks,
to greet the parents upon arrival, and to escort the parents out upon departure.
The teacher indicates that they left for the evening at approximately 5:30, in which
the door was locked and they did not notice if the envelope was tampered with or
missing.
Parent(s) Name Reason for Conference Time
Wanna & Gunna Bee Son/step son—Hank
Crank—has not been
turning in homework;
teacher requested
conference
3:45—did not show
Susie Purrfect Daughter was caught
cheating on an exam;
teacher requested
conference
4:00-4:11
Nate Naval Son is failing class, must
pass to graduate; parent
requested conference
4:20-4:37
Marsha Mellow Daughter is having
behavioral issues in class
(i.e. anger management);
teacher requested
conference
4:45-5:02
Principal Ian Charge Several parents have
called to complain about
exams being “too
difficult”, has requested
copies of exams; principal
requested conference
5:25-5:30

Name __________________________________________________ Date __________
OU RET 2005 - 2 - Fingerprint Module Activity
Tecumseh Police Department
Crime Scene Investigation
Date of Report ____________ Crime Team ____________ Agent Reporting ______________
Description of Incident ___________________________________________________________________
Address of Incident ______________________________________________________________________
VICTIM
Name
Address
Phone
Race
Gender Age Date of Birth
Place of Employment
Work Phone
Work Address
EVIDENCE COLLECTED
Item #
Description, Location
Processing Technique Processing by
Item #
Description, Location
Processing Technique Processed by
Item #
Description, Location
Processing Technique Processed by
Item #
Description, Location
Processing Technique Processed by
Item #
Description, Location
Processing Technique Processed by

Name __________________________________________________ Date __________
OU RET 2005 - 3 - Fingerprint Module Activity
Observations of Scene ___________________________________________________________________
__________________________________________________________________________________________
__________________________________________________________________________________________
__________________________________________________________________________________________
Sketch of Scene
Details—Actions—Remarks
1. ______________________________________________________________________________________
2. ______________________________________________________________________________________
3. ______________________________________________________________________________________
4. ______________________________________________________________________________________
5. ______________________________________________________________________________________
6. ______________________________________________________________________________________
7. ______________________________________________________________________________________
8. ______________________________________________________________________________________
9. ______________________________________________________________________________________
10. ______________________________________________________________________________________

Name __________________________________________________ Date __________
OU RET 2005 - 4 - Fingerprint Module Activity
AFIS results: After running the prints your crime team lifted in the Automated
Fingerprint Identification System, the computer produced these results:
Name/Description Reason in AFIS Print
Principal Ian Charge
55, Male, Caucasian Educator
Nate Naval
43, Male, Caucasian Military
Officer Dudly Duwright
32, Male, African American Law enforcement
Teacher 29, Female, Native American
Educator
Hank Crank
16, Male, Caucasian Offender (drugs)

Name __________________________________________________ Date __________
OU RET 2005 - 5 - Fingerprint Module Activity
Analysis and Results Use complete sentences to answer the following. Attach additional paper as necessary.
1) Where did you look for prints? Why?
2) Where were prints found?
3) How many different prints were found? Specify their locations.
4) Whose prints were found on the evidence? Explain your reasoning using the
latent prints and the AFIS file.
5) Who committed the burglary? Explain your reasoning.
6) Hypothesize on a motive to commit the crime.

Name __________________________________________________ Date __________
OU RET 2005 - 6 - Fingerprint Module Activity
Teacher Suggestions
Crime #2: “Evidence” crime
• Students will use processing techniques and fingerprint pattern classification and
identification to solve a crime with physical evidence
• Some resources (e.g. handouts) included, others will need to be supplied (e.g.
metal or plastic letter tray, manila envelope, CD case)
• Have enough materials for each crime team/lab group.
• Other materials: goggles, aprons, gloves, materials for processing evidence
(dusting powders, Superglue, iodine, etc.), scanner/digital camera/Polaroid
camera
• Number the evidence according to the crime team/lab groups. Place the
evidence in various locations about the room so that the teams must locate their
materials.
Instructions
• Present each crime team/lab group with a numbered file folder that contains
the information/handouts (except for the AFIS results) and latent fingerprint cards
• There should be enough crime reports and AFIS results for each student.
• Instruct the students to make detailed observations of the crime scene and
evidence and also to include a brief sketch.
• Instruct students that on the crime report under the “Details—Actions—Remarks”,
they should indicate why they chose the processing technique for that specific
evidence (based on material).
• After the students have processed the prints, hand out the AFIS results and
analysis questions.
• Students should return the file folder with all the information/handouts, each
individual’s AFIS results and analysis questions, and completed latent fingerprint
cards or digital photos.
Expected Results
• Allow the students to decide how to process the evidence; guide as necessary
• You will need to supply the TEACHER print (your left thumb print) and the
PERPETRATOR—Nate Naval—print (your right thumb print). Record an enlarged
version of each on the AFIS results.
• Place right & left thumbprints on the tray, manila envelope, CD case, and
possible the counter.
• To set up the crime scene again, wipe nonporous material with glass cleaner,
replace the envelope, and lay your thumbprints on the evidence.


407.00
Section 1 — Chemical Product and Company Identification
Section 2 — Composition, Information on Ingredients
Iodine
Iodine
Section 3 — Hazards Identification
Call a physician, seek medical attention for further treatment, observation and support after first aid.Inhalation: Remove to fresh air at once. If breathing has stopped give artificial respiration immediately.Eye: Immediately flush with fresh water for 15 minutes.External: Wash continuously with fresh water for 15 minutes.Internal: Rinse out mouth, give 1 to 2 cups of water or milk, induce vomiting. Call a physician or poison control at once.
Section 4 — First Aid Measures
Section 7 — Handling and Storage
Avoid contact with eyes, skin and clothing. Wear chemical splash goggles, chemical-resistant gloves and chemical-resistant apron.Use ventilation to keep airborne concentrations below exposure limits. Always wear a NIOSH-approved respirator with propercartridges or a positive pressure, air-supplied respirator when handling this material in emergency situations (spill or fire).Exposure guidelines: ceiling 0.1 ppm (OSHA)
Gray-black flakes, metallic luster, characteristic odor.Highly toxic by ingestion and inhalation.Irritating and corrosive to skin. Avoid all body contact.
Section 5 — Fire Fighting MeasuresNon-flammable, noncombustible solid.When heated to decomposition, emits toxic fumes of iodide and various iodine compounds.Fire Fighting Instructions: Use triclass, dry chemical fire extinguisher. Firefighters should wear PPEand SCBA with full facepiece operated in positive pressure mode.
Section 6 — Accidental Release MeasuresRestrict unprotected personnel from area. Sweep up, place in sealed bag or container and dispose. Ventilate area and wash spill siteafter material pickup is complete. See Sections 8 and 13 for further information.
Section 8 — Exposure Controls , Personal Protection
Flinn Suggested Chemical Storage Pattern: Inorganic #2. Store with acetates, halides, sulfates, sulfites, thiosulfates andphosphates. Store in a cool dry place. Store in a Flinn Chem-Saf bag; the substance sublimes. Frequently oxidizes metal shelves ormetal containers in proximity to the iodine. Use and dispense in a hood.
November 25, 2002Revision Date:MSDS #:
CHEMTREC Emergency Phone Number: (800) 424-9300Flinn Scientific, Inc. P.O. Box 219 Batavia, IL 60510 (800) 452-1261
Health-3Flammability-0Reactivity-2Exposure-3Storage-1
FLINN AT-A-GLANCE
PAGE 1 OF 2
NFPA CODENone Established
© 2002 Flinn Scientific, Inc. All Rights Reserved.
0 is low hazard, 3 is high hazard
7553-56-2CAS#:
Material Safety Data Sheet (MSDS)
FLINN SCIENTIFIC INC."Your Safer Source for Science Supplies"

Section 14 — Transport Information
Section 10 — Stability and Reactivity
Shipping Name: Toxic solid, inorganic, n.o.s.Hazard Class: 6.1 Keep away from foodUN Number: UN3288
Avoid contact with magnesium, zinc, ammonia, aluminum, corrodes steel. Reacts violently with acetaldehyde.Shelf Life: Fair; the substance sublimes. Frequently oxidizes metal shelves or metal containers in proximity to the iodine.
Section 9 — Physical and Chemical Properties
Section 12 — Ecological Information
Section 11 — Toxicological Information
Section 13 — Disposal ConsiderationsPlease consult with state and local regulations.Flinn Suggested Disposal Method #12a is one option.
Gray-black flakes, metallic luster, characteristic odor.Solubility: Soluble in alcohol and other organic solvents;not in water.Formula: I2Formula Weight: 253.80
Section 15 — Regulatory Information
Data not yet available.
ORL-HUM LD50: 2-4 gm for an adultIHL-RAT LC50: N.A.SKN-RBT LD50: N.A.
TSCA-listed, EINECS-listed (231-442-4), RCRA code D002.
© 2002 Flinn Scientific, Inc. All Rights Reserved.
Section 16 — Other Information
407.00MSDS #:November 25, 2002Revision Date:
Consult your copy of the Flinn Scientific Catalog/Reference Manual for additional information about laboratory chemicals.This Material Safety Data Sheet (MSDS) is for guidance and is based upon information and tests believed to be reliable. FlinnScientific Inc. makes no guarantee of the accuracy or completeness of the data and shall not be liable for any damages relatingthereto. The data is offered solely for your consideration, investigation, and verification. Flinn Scientific Inc. assumes no legalresponsibility for use or reliance upon this data.
Acute effects: Highly toxic, harmful vapor, corrosive, severelachrymatol, sensitizer, stomach pains, vomiting.Chronic effects: DermatitisTarget organs: Thyroid
Iodine
Boiling Point: 185.24 CSpecific gravity: 4.98Melting Point: 113.5 C
PAGE 2 OF 2
N.A. = Not available, not all health aspects of this substance have been fully investigated.
N/A = Not applicable
Material Safety Data Sheet (MSDS)
FLINN SCIENTIFIC INC."Your Safer Source for Science Supplies"
FLINN SCIENTIFIC INC."Your Safer Source for Science Supplies"
[email protected] www.flinnsci.comP.O. Box 219 Batavia IL 60510
(800) 452-1261 Fax (866) 452-1436
Flinn Is No. 1 in Safety

420.00
Section 1 — Chemical Product and Company Identification
Section 2 — Composition, Information on Ingredients
Isopropyl Alcohol
Isopropyl AlcoholSynonym: 2-propanol, rubbing alcohol
Section 3 — Hazards Identification
Call a physician, seek medical attention for further treatment, observation and support after first aid.Inhalation: Remove to fresh air at once. If breathing has stopped give artificial respiration immediately.Eye: Immediately flush with fresh water for 15 minutes.External: Wash continuously with fresh water for 15 minutes.Internal: Induce vomiting. Call a physician or poison control at once.
Section 4 — First Aid Measures
Section 7 — Handling and Storage
Avoid contact with eyes, skin and clothing. Wear chemical splash goggles, chemical-resistant gloves and chemical-resistant apron.Use ventilation to keep airborne concentrations below exposure limits. Always wear a NIOSH-approved respirator with propercartridges or a positive pressure, air-supplied respirator when handling this material in emergency situations (spill or fire).Exposure guidelines: TWA 400 ppm, STEL 500 ppm (OSHA, ACGIH)
Clear colorless liquid; distinctive odor; like rubbing alcohol.Irritant to body tissues. Slightly toxic by ingestion, inhalation, and skin absorption.The single lethal dose for a human adult is about 250 mL, although as little as 100 mL can be fatal.Class 1B flammable liquid.
Section 5 — Fire Fighting MeasuresClass 1B flammable liquid.Flash Point: 60 F Upper: 12% Lower: 2.5% Autoignition Temperature: 860 FWhen heated to decomposition, emits acrid smoke and fumes.Fire Fighting Instructions: Use triclass, dry chemical fire extinguisher. Firefighters should wear PPEand SCBA with full facepiece operated in positive pressure mode.
Section 6 — Accidental Release MeasuresRestrict unprotected personnel from area. Remove all ignition sources and ventilate area. Contain spill with sand and absorbentmaterial; deposit in sealed bag or container. See Sections 8 and 13 for further information.
Section 8 — Exposure Controls , Personal Protection
Flinn Suggested Chemical Storage Pattern: Organic #2. Store with alcohols, glycols, amines and amides.Store in a dedicated flammables cabinet. If a flammables cabinet is not available, store in Flinn Saf-Stor can.Store in a cool dry place. Use and dispense in a hood. Avoid prolonged storage (see section 10).
March 14, 2001Revision Date:MSDS #:
CHEMTREC Emergency Phone Number: (800) 424-9300Flinn Scientific, Inc. P.O. Box 219 Batavia, IL 60510 (800) 452-1261
Health-1Flammability-3Reactivity-1Exposure-1Storage-3
FLINN AT-A-GLANCE
PAGE 1 OF 2
NFPA CODEH-1F-3R-0
© 2002 Flinn Scientific, Inc. All Rights Reserved.
0 is low hazard, 3 is high hazard
67-63-0CAS#:
Material Safety Data Sheet (MSDS)
FLINN SCIENTIFIC INC."Your Safer Source for Science Supplies"

Section 14 — Transport Information
Section 10 — Stability and Reactivity
Shipping Name: Isopropyl alcoholHazard Class: 3, Flammable liquidUN Number: UN1219
Avoid contact with strong oxidizers, acetaldehyde, chlorine, ethylene oxide, acids, isocyanates.Shelf life: Poor, organic peroxide development is possible when exposed to light and air. Organic peroxides can result inexplosions, especially when distilled. Avoid prolonged storage.
Section 9 — Physical and Chemical Properties
Section 12 — Ecological Information
Section 11 — Toxicological Information
Section 13 — Disposal ConsiderationsPlease consult with state and local regulations.Flinn Suggested Disposal Method #18a is one option.
Clear colorless liquid.Solubility: Water soluble, soluble in alcohol and ether.Formula: C3H8OFormula Weight: 60.11
Section 15 — Regulatory Information
Data not yet available.
ORL-RAT LD50: 5045 mg/kgIHL-RAT LC50: N.A.SKN-RBT LD50: 12800 mg/kg
TSCA-listed, EINECS-listed (200-661-7), RCRA code D001.
© 2002 Flinn Scientific, Inc. All Rights Reserved.
Section 16 — Other Information
420.00MSDS #:March 14, 2001Revision Date:
Consult your copy of the Flinn Scientific Catalog/Reference Manual for additional information about laboratory chemicals.This Material Safety Data Sheet (MSDS) is for guidance and is based upon information and tests believed to be reliable. FlinnScientific Inc. makes no guarantee of the accuracy or completeness of the data and shall not be liable for any damages relatingthereto. The data is offered solely for your consideration, investigation, and verification. Flinn Scientific Inc. assumes no legalresponsibility for use or reliance upon this data.
Acute effects: Severe eye irritant, nausea, headache, vomitingChronic effects: N.A.Target organs: Nerves, kidneys
Isopropyl Alcohol
Specific Gravity: 0.7863Melting Point: -89 CBoiling Point: 82.4 CVapor Pressure: 33 mm (20C)Vapor Density: 2
PAGE 2 OF 2
N.A. = Not available, not all health aspects of this substance have been fully investigated.
N/A = Not applicable
Material Safety Data Sheet (MSDS)
FLINN SCIENTIFIC INC."Your Safer Source for Science Supplies"
FLINN SCIENTIFIC INC."Your Safer Source for Science Supplies"
[email protected] www.flinnsci.comP.O. Box 219 Batavia IL 60510
(800) 452-1261 Fax (866) 452-1436
Flinn Is No. 1 in Safety

509.00
Section 1 — Chemical Product and Company Identification
Section 2 — Composition, Information on Ingredients
Methyl Alcohol
Methyl AlcoholSynonyms: methanol, wood alcohol
Section 3 — Hazards Identification
Call a physician, seek medical attention for further treatment, observation and support after first aid.Inhalation: Remove to fresh air at once. If breathing has stopped give artificial respiration immediately.Eye: Immediately flush with fresh water for 15 minutes.External: Wash continuously with fresh water for 15 minutes.Internal: Induce vomiting. Call a physician or poison control at once.
Section 4 — First Aid Measures
Section 7 — Handling and Storage
Avoid contact with eyes, skin and clothing. Wear chemical splash goggles, chemical-resistant gloves and chemical-resistant apron.Use ventilation to keep airborne concentrations below exposure limits. Always wear a NIOSH-approved respirator with propercartridges or a positive pressure, air-supplied respirator when handling this material in emergency situations (spill or fire).Exposure guidelines: TWA 200 ppm, STEL 250 ppm (OSHA, NIOSH)
Clear, colorless liquid. Alcohol odor.Toxic by ingestion (may cause blindness), inhalation or absorption. Irritating to body tissues.Avoid body tissue contact.Flammable liquid.
Section 5 — Fire Fighting MeasuresFlammable liquid.Flash Point: 54 F Upper 36% Lower: 6% Autoignition Temperature: 725 FDangerous fire risk. When heated to decomposition, emits acrid smoke and irritating fumes.Fire Fighting Instructions: Use triclass, dry chemical fire extinguisher. Firefighters should wear PPEand SCBA with full facepiece operated in positive pressure mode.
Section 6 — Accidental Release MeasuresRestrict unprotected personnel from area. Remove all ignition sources and ventilate area. Contain spill with sand and absorbentmaterial; deposit in sealed bag or container. See Sections 8 and 13 for further information.
Section 8 — Exposure Controls , Personal Protection
Flinn Suggested Chemical Storage Pattern: Organic #2. Store with alcohols, glycols, amines and amides.Store in a dedicated flammables cabinet. If a flammables cabinet is not available, store in Flinn Saf-Stor can.
March 14, 2001Revision Date:MSDS #:
CHEMTREC Emergency Phone Number: (800) 424-9300Flinn Scientific, Inc. P.O. Box 219 Batavia, IL 60510 (800) 452-1261
Health-3Flammability-3Reactivity-1Exposure-1Storage-3
FLINN AT-A-GLANCE
PAGE 1 OF 2
NFPA CODEH-1F-3R-0
© 2002 Flinn Scientific, Inc. All Rights Reserved.
0 is low hazard, 3 is high hazard
67-56-1CAS#:
Material Safety Data Sheet (MSDS)
FLINN SCIENTIFIC INC."Your Safer Source for Science Supplies"

Section 14 — Transport Information
Section 10 — Stability and Reactivity
Shipping Name: Methyl AlcoholHazard Class: 3, Flammable liquidUN Number: UN1230
Avoid contact with acids, acid chlorides, acid anhydrates, oxidizers, reducers, alkali metals.Shelf life: Indefinite.
Section 9 — Physical and Chemical Properties
Section 12 — Ecological Information
Section 11 — Toxicological Information
Section 13 — Disposal ConsiderationsPlease consult with state and local regulations.Flinn Suggested Disposal Method 18a is one option.
Clear, colorless, mobile, highly polar liquid. Alcohol odor.Specific Gravity: 0.7924Miscible with water, alcohol and ether.Formula: CH3OHFormula Weight: 32.05
Section 15 — Regulatory Information
Data not yet available.
ORL-RAT LD50: 5628 mg/kgIHL-RAT LC50: 64000 ppm/4HSKN-RBT LD50: 15800 mg/kg
TSCA-listed, EINECS-listed (200-659-6), RCRA code U154.
© 2002 Flinn Scientific, Inc. All Rights Reserved.
Section 16 — Other Information
509.00MSDS #:March 14, 2001Revision Date:
Consult your copy of the Flinn Scientific Catalog/Reference Manual for additional information about laboratory chemicals.This Material Safety Data Sheet (MSDS) is for guidance and is based upon information and tests believed to be reliable. FlinnScientific Inc. makes no guarantee of the accuracy or completeness of the data and shall not be liable for any damages relatingthereto. The data is offered solely for your consideration, investigation, and verification. Flinn Scientific Inc. assumes no legalresponsibility for use or reliance upon this data.
Acute effects: Poison, irritant, GI disturbancesChronic effects: N.A.Target organs: Eyes, kidneys
Methyl Alcohol
Melting Point: -98 CBoiling Point: 64.6 CVapor Pressure: 410 mm (50 C)Vapor Density: 1.1
PAGE 2 OF 2
N.A. = Not available, not all health aspects of this substance have been fully investigated.
N/A = Not applicable
Material Safety Data Sheet (MSDS)
FLINN SCIENTIFIC INC."Your Safer Source for Science Supplies"
FLINN SCIENTIFIC INC."Your Safer Source for Science Supplies"
[email protected] www.flinnsci.comP.O. Box 219 Batavia IL 60510
(800) 452-1261 Fax (866) 452-1436
Flinn Chemicals--Your Best Choice

551.00
Section 1 — Chemical Product and Company Identification
Section 2 — Composition, Information on Ingredients
Ninhydrin Solution
Ninhydrin (485-47-2) .5%, Butanol (71-36-3) 99%Synonym: 0.5% solution in butanol
Section 3 — Hazards Identification
Call a physician, seek medical attention for further treatment, observation and support after first aid.Inhalation: Remove to fresh air at once. If breathing has stopped give artificial respiration immediately.Eye: Immediately flush with fresh water for 15 minutes.External: Wash continuously with fresh water for 15 minutes.Internal: Induce vomiting. Call a physician or poison control at once.
Section 4 — First Aid Measures
Section 7 — Handling and Storage
Avoid contact with eyes, skin and clothing. Wear chemical splash goggles, chemical-resistant gloves and chemical-resistant apron.Use ventilation to keep airborne concentrations below exposure limits. Always wear a NIOSH-approved respirator with propercartridges or a positive pressure, air-supplied respirator when handling this material in emergency situations (spill or fire).Exposure guidelines: TWA 100 ppm, as butanol (OSHA)
Amber colored liquid. Odor of butyl alcohol.Moderately toxic by ingestion and inhalation. Severe body tissue irritant. Avoid body tissue contact.Contains butanol, a flammable liquid.
Section 5 — Fire Fighting MeasuresClass IC flammable liquid.Flash Point: 95 F Upper: 11.2% Lower: 1.4% Autoignition Temperature: 649 FFire Fighting Instructions: Use triclass, dry chemical fire extinguisher. Firefighters should wear PPE andSCBA with full facepiece operated in positive pressure mode.
Section 6 — Accidental Release MeasuresRestrict unprotected personnel from area. Remove all ignition sources and ventilate area. Contain spill with sand and absorbentmaterial; deposit in sealed bag or container. See Sections 8 and 13 for further information.
Section 8 — Exposure Controls , Personal Protection
Flinn Suggested Chemical Storage Pattern: Organic #2. Store with alcohols, glycols, amines and amides.Store in a dedicated flammables cabinet. If a flammables cabinet is not available, store in Flinn Saf-Stor can.Use and dispense in a hood.
November 25, 2002Revision Date:MSDS #:
CHEMTREC Emergency Phone Number: (800) 424-9300Flinn Scientific, Inc. P.O. Box 219 Batavia, IL 60510 (800) 452-1261
Health-2Flammability-3Reactivity-1Exposure-2Storage-3
FLINN AT-A-GLANCE
PAGE 1 OF 2
NFPA CODENone Established
© 2002 Flinn Scientific, Inc. All Rights Reserved.
0 is low hazard, 3 is high hazard
None EstablishedCAS#:
Material Safety Data Sheet (MSDS)
FLINN SCIENTIFIC INC."Your Safer Source for Science Supplies"

Section 14 — Transport Information
Section 10 — Stability and Reactivity
Shipping Name: ButanolsHazard Class: 3, Flammable liquidUN Number: UN1120
Avoid contact with acid chlorides, acid anhydrides, oxidizing agents copper; sources of ignition; avoid body contact; avoidinhaling.Shelf life: Indefinite.
Section 9 — Physical and Chemical Properties
Section 12 — Ecological Information
Section 11 — Toxicological Information
Section 13 — Disposal ConsiderationsPlease consult with state and local regulations.Flinn Suggested Disposal Method 18b is one option.
Amber colored liquid. Odor of butyl alcohol.
Section 15 — Regulatory Information
Data not yet available.
ORL-RAT LD50:790 mg/kg as butanolIHL-RAT LC50: 8000 ppm/4H as butanolSKN-RBT LD50: 340 mg/kg as butanol
Not listed.
© 2002 Flinn Scientific, Inc. All Rights Reserved.
Section 16 — Other Information
551.00MSDS #:November 25, 2002Revision Date:
Consult your copy of the Flinn Scientific Catalog/Reference Manual for additional information about laboratory chemicals.This Material Safety Data Sheet (MSDS) is for guidance and is based upon information and tests believed to be reliable. FlinnScientific Inc. makes no guarantee of the accuracy or completeness of the data and shall not be liable for any damages relatingthereto. The data is offered solely for your consideration, investigation, and verification. Flinn Scientific Inc. assumes no legalresponsibility for use or reliance upon this data.
Acute effects: Severe irritant, GI disturbancesChronic effects: N.A.Target organs: Central nervous system, ears, liver, kidneys, blood
Ninhydrin Solution
PAGE 2 OF 2
N.A. = Not available, not all health aspects of this substance have been fully investigated.
N/A = Not applicable
Material Safety Data Sheet (MSDS)
FLINN SCIENTIFIC INC."Your Safer Source for Science Supplies"
FLINN SCIENTIFIC INC."Your Safer Source for Science Supplies"
[email protected] www.flinnsci.comP.O. Box 219 Batavia IL 60510
(800) 452-1261 Fax (866) 452-1436
Questions on Chemical Disposalor Storage?--Call Flinn

550.00
Section 1 — Chemical Product and Company Identification
Section 2 — Composition, Information on Ingredients
Ninhydrin
NinhydrinSynonyms: 1,2,3,-indantrione, monohydrate
Section 3 — Hazards Identification
Call a physician, seek medical attention for further treatment, observation and support after first aid.Inhalation: Remove to fresh air at once. If breathing has stopped give artificial respiration immediately.Eye: Immediately flush with fresh water for 15 minutes.External: Wash continuously with fresh water for 15 minutes.Internal: Give large quantities of water. Call a physician or poison control at once.
Section 4 — First Aid Measures
Section 7 — Handling and Storage
Avoid contact with eyes, skin and clothing. Wear chemical splash goggles, chemical-resistant gloves and chemical-resistant apron.Use exhaust ventilation to keep airborne concentrations low.
White to yellowish crystals or powder; characteristic odor of fresh paint. Turns red when heated above100C.Irritant to skin and mucous membranes. May cause redding and inflammation to the skin.Avoid all body tissue contact. Slightly toxic by ingestion.
Section 5 — Fire Fighting MeasuresNon combustible solid.
Section 6 — Accidental Release MeasuresRestrict unprotected personnel from area. Sweep up, place in sealed bag or container and dispose. Ventilate area and wash spill siteafter material pickup is complete. See Sections 8 and 13 for further information.
Section 8 — Exposure Controls , Personal Protection
Flinn Suggested Chemical Storage Pattern: Organic #2. Store with alcohols, glycols, amines and amides.Store in a cool dry place. Light sensitive, store in Flinn Chem-Saf bag. Use and dispense in a hood.
November 25, 2002Revision Date:MSDS #:
CHEMTREC Emergency Phone Number: (800) 424-9300Flinn Scientific, Inc. P.O. Box 219 Batavia, IL 60510 (800) 452-1261
Health-1Flammability-0Reactivity-1Exposure-1Storage-1
FLINN AT-A-GLANCE
PAGE 1 OF 2
NFPA CODENone Established
© 2002 Flinn Scientific, Inc. All Rights Reserved.
0 is low hazard, 3 is high hazard
485-47-2CAS#:
Material Safety Data Sheet (MSDS)
FLINN SCIENTIFIC INC."Your Safer Source for Science Supplies"

Section 14 — Transport Information
Section 10 — Stability and Reactivity
Shipping Name: Not regulatedHazard Class: N/AUN Number: N/A
Avoid strong bases and amines.Shelf life: Indefinite, but light sensitive.
Section 9 — Physical and Chemical Properties
Section 12 — Ecological Information
Section 11 — Toxicological Information
Section 13 — Disposal ConsiderationsPlease consult with state and local regulations.Flinn Suggested Disposal Method 18b is one option.
White to yellowish crystals or powder; characteristic odor offresh paint. Turns red when heated above 100 C.Solubility: Soluble in both water and alcohol.Formula: C6H4-1,2-(CO)2CO H2OFormula Weight: 195.15
Section 15 — Regulatory Information
Data not yet available.
ORL-RAT LD50: N.A.IHL-RAT LC50: N.A.SKN-RBT LD50: N.A.
TSCA-listed, EINECS-listed (207-618-1).
© 2002 Flinn Scientific, Inc. All Rights Reserved.
Section 16 — Other Information
550.00MSDS #:November 25, 2002Revision Date:
Consult your copy of the Flinn Scientific Catalog/Reference Manual for additional information about laboratory chemicals.This Material Safety Data Sheet (MSDS) is for guidance and is based upon information and tests believed to be reliable. FlinnScientific Inc. makes no guarantee of the accuracy or completeness of the data and shall not be liable for any damages relatingthereto. The data is offered solely for your consideration, investigation, and verification. Flinn Scientific Inc. assumes no legalresponsibility for use or reliance upon this data.
Acute effects: Irritant, reddening and inflammation of skin.Chronic effects: N.A.Target organs: N.A.
Ninhydrin
Melting Point: 240-245 C
PAGE 2 OF 2
N.A. = Not available, not all health aspects of this substance have been fully investigated.
N/A = Not applicable
Material Safety Data Sheet (MSDS)
FLINN SCIENTIFIC INC."Your Safer Source for Science Supplies"
FLINN SCIENTIFIC INC."Your Safer Source for Science Supplies"
[email protected] www.flinnsci.comP.O. Box 219 Batavia IL 60510
(800) 452-1261 Fax (866) 452-1436
Questions on Chemical Disposalor Storage?--Call Flinn

584.00
Section 1 — Chemical Product and Company Identification
Section 2 — Composition, Information on Ingredients
Petroleum Ether
Petroleum EtherSynonyms: ligroine, naphtha
Section 3 — Hazards Identification
Call a physician, seek medical attention for further treatment, observation and support after first aid.Inhalation: Remove to fresh air at once. If breathing has stopped give artificial respiration immediately.Eye: Immediately flush with fresh water for 15 minutes.External: Wash continuously with fresh water for 15 minutes.Internal: Give 1 to 2 cups of water or milk, followed by a gastric antacid, such as milk of magnesia. Do not induce vomiting. Call aphysician or poison control at once.
Section 4 — First Aid Measures
Section 7 — Handling and Storage
Avoid contact with eyes, skin and clothing. Wear chemical splash goggles, chemical-resistant gloves and chemical-resistant apron.Use exhaust ventilation to keep airborne concentrations low.
Water-white liquid. Natural gas-like odor.Irritating to body tissues. Avoid body tissue contact.Flammable liquid. Serious fire risk.
Section 5 — Fire Fighting MeasuresClass IA flammable liquid.Flash Point: -57 F Upper: 8% Lower: 1.1% Autoignition Temperature: 475 FFire Fighting Instructions: Use triclass, dry chemical fire extinguisher. Firefighters should wear PPEand SCBA with full facepiece operated in positive pressure mode.
Section 6 — Accidental Release MeasuresRestrict unprotected personnel from area. Remove all ignition sources and ventilate area. Contain spill with sand and absorbentmaterial; deposit in sealed bag or container. See Sections 8 and 13 for further information.
Section 8 — Exposure Controls , Personal Protection
Flinn Suggested Chemical Storage Pattern: Organic #3. Store with hydrocarbons, esters, aldehydes, and oils.Store in a dedicated flammables cabinet. If a flammables cabinet is not available, store in Flinn Saf-Stor Can.Use and dispense in a hood.
March 15, 2001Revision Date:MSDS #:
CHEMTREC Emergency Phone Number: (800) 424-9300Flinn Scientific, Inc. P.O. Box 219 Batavia, IL 60510 (800) 452-1261
Health-0Flammability-3Reactivity-0Exposure-1Storage-3
FLINN AT-A-GLANCE
PAGE 1 OF 2
NFPA CODEH-1F-4R-0
© 2002 Flinn Scientific, Inc. All Rights Reserved.
0 is low hazard, 3 is high hazard
8032-32-4CAS#:
Material Safety Data Sheet (MSDS)
FLINN SCIENTIFIC INC."Your Safer Source for Science Supplies"

Section 14 — Transport Information
Section 10 — Stability and Reactivity
Shipping Name: Petroleum Distillates, n.o.s.Hazard Class: 3, Flammable liquidUN Number: UN1268
Avoid contact with strong oxidizers.Shelf life: Indefinite, if stored safely.
Section 9 — Physical and Chemical Properties
Section 12 — Ecological Information
Section 11 — Toxicological Information
Section 13 — Disposal ConsiderationsPlease consult with state and local regulations.Flinn Suggested Disposal Method #18a is one option.
Water-white liquid. Natural gas-like odor.Solubility: Insoluble with water. Miscible with manyorganic solvents.Not an ether, a low boiling fraction of petroleum distillate.
Section 15 — Regulatory Information
Data not yet available.
ORL-RAT LD50: >5gm/kgIHL-RAT LC50: N.A.SKN-RBT LD50: >3gm/kg
TSCA-listed, EINECS-listed (232-453-7), RCRA code D001.
© 2002 Flinn Scientific, Inc. All Rights Reserved.
Section 16 — Other Information
584.00MSDS #:March 15, 2001Revision Date:
Consult your copy of the Flinn Scientific Catalog/Reference Manual for additional information about laboratory chemicals.This Material Safety Data Sheet (MSDS) is for guidance and is based upon information and tests believed to be reliable. FlinnScientific Inc. makes no guarantee of the accuracy or completeness of the data and shall not be liable for any damages relatingthereto. The data is offered solely for your consideration, investigation, and verification. Flinn Scientific Inc. assumes no legalresponsibility for use or reliance upon this data.
Acute effects: Toxic, irritantChronic effects: Possible mutagenTarget organs: Central nervous system
Petroleum Ether
Specific Gravity: 0.640Boiling Point: 36-60 CVapor Pressure: 400mm (20 C)Vapor Density: 2.5
PAGE 2 OF 2
N.A. = Not available, not all health aspects of this substance have been fully investigated.
N/A = Not applicable
Material Safety Data Sheet (MSDS)
FLINN SCIENTIFIC INC."Your Safer Source for Science Supplies"
FLINN SCIENTIFIC INC."Your Safer Source for Science Supplies"
[email protected] www.flinnsci.comP.O. Box 219 Batavia IL 60510
(800) 452-1261 Fax (866) 452-1436
Reduce Science Accidents--Use Flinn Chemicals

The forger who fooled the world
Last Updated: 12:01am BST 05/08/2006 Page 1 of 4
Frank Wynne tells the extraordinary story of Han van Meegeren, the Dutch artist whose
‘Vermeer' made him a folk hero
I've always loved a forger. It's difficult not to feel a surge of joy at the thought of an eminent critic waxing lyrical over the glories of a "17th-century masterpiece" on which the paint is barely dry. If the pinnacle of Western art is arguably Leonardo da Vinci, his shadow self in the pantheon of forgers is Han van Meegeren.
In May 1945, shortly after the liberation of Holland, two officers arrived at the studio of van Meegeren, then just a little-known Dutch painter and art dealer. The officers, from the Allied Art Commission, were responsible for repatriating works of art looted by the Nazis. They had come about a painting discovered among the collection of Hermann Göring: a hitherto unknown canvas by the great Johannes Vermeer, entitled The Supper at Emmaus.
Since the Nazis had kept detailed records, it had been easy to trace the sale of the painting back to van Meegeren. Now, they wanted only the
name of the original owner so that they might return his priceless masterpiece. When van Meegeren refused to name the owner, they arrested him and charged him with treason. If found guilty, he faced the death penalty.
The artist was entirely innocent of the charges against him, a fact he could easily have proved. But in doing so, he would have to confess to a series of crimes which he had plotted for decades and which, in five short years had earned him the equivalent of $60 million. Han van Meegeren was a forger.
He loathed modern art - he thought it childish and decadent, a passing fad for ugliness which would soon fade. For years he had eked out a living painting gloomy portraits of rich patrons in a faux-Rembrandt style and had winced as he heard his work ridiculed by his peers. A prominent critic reviewing van Meegeren's second solo exhibition wrote, "A gifted technician who has made a sort of composite facsimile of the Renaissance school, he has every virtue except originality."
Han van Meegeren's The last supper (1940-
1941)

The time had come, van Meegeren felt, to revenge himself on his critics. He devised a plan to paint a perfect Vermeer - neither a copy, nor a pastiche, but an original work - and, when it had been authenticated by leading art experts, acquired by a major museum, exhibited and acclaimed, he would announce his hoax to the world.
His first step was concocting an ingenious mixture of pigments that "would pass the five tests which any genuine 17th-century painting must pass". Now he had only to paint a masterpiece.
The Supper at Emmaus was unlike any acknowledged Vermeer. Van Meegeren, true to his perversely moral scheme, painted it in his own style, adding only subtle allusions to works by the Dutch master, before signing it with the requisite flourish. He had it submitted to Abraham Bredius, the most eminent authority on Dutch baroque art of his day, and the critic took the bait.
Writing in the Burlington magazine, Bredius opined: "It is a wonderful moment in the life of a lover of art when he finds himself suddenly confronted with a hitherto unknown painting by a great master… And what a picture! We have here a - I am inclined to say the - masterpiece of Johannes Vermeer of Delft."
Suddenly the world was at van Meegeren's feet. The Supper at Emmaus was bought by the prestigious Boijmans Gallery in Rotterdam for the equivalent of $6 million. More importantly for van Meegeren, it was advertised as the centrepiece, the crowning glory of the gallery's exhibition, 400 Years of European Art.
During the exhibition, van Meegeren would loudly proclaim the painting a forgery, a crude pastiche, and listen as the finest minds of his generation persuaded him that his painting was a genuine Vermeer. His triumph was now complete. He had only to do what he had promised himself: to stand up and claim the work for himself, thereby making fools of his critics. Instead, within a month, he was working on a new forgery.
In less than six years, van Meegeren would paint a further six "Vermeers", earning the equivalent of $60 million. With money, came vice - he revelled in fine champagne, became addicted to morphine and was compulsively unfaithful to his wife.
He bought dozens of houses and hotels, but even then he could not exhaust his wealth, so he hid hundreds of thousands of guilders in gardens, heating ducts and under the floorboards of his many properties. Often he would forget where he had hidden the money, and 30 years after his death, the Dutch were still turning up cashboxes stuffed with pre-war notes.
As van Meegeren's addictions to alcohol and morphine took hold, and the standard of his forgeries plummeted, still experts accepted them as genuine. He discovered that, regardless of how incompetent his painting, how crude his anatomy, how uncertain the provenance, the most erudite Vermeer critics were prepared to sanctify his work. His one mistake had been to allow one of his paintings to fall into enemy hands.

No expert eye discovered van Meegeren's forgery. He was unmasked only because, after six weeks in prison, he cracked: "‘Fools!" he roared at his jailers. "You think I sold a priceless Vermeer to Göring? There was no Vermeer - I painted it myself."
There was one thing van Meegeren had not counted on: no one believed his confession. It was one of the officers who naively suggested that if van Meegeren had painted Göring's Vermeer, he could paint a copy from memory. Van Meegeren arrogantly refused. "To paint a copy is no proof of artistic talent. In all my career I have never painted a copy! But I shall paint you a new Vermeer. I shall paint you a masterpiece."
And so, surrounded by reporters and court-appointed witnesses, and supplied with liberal quantities of alcohol and morphine, he worked for six weeks painting one final "Vermeer", in a desperate attempt to prove himself guilty.
Having been denounced by the press as a traitor, a "Dutch Nazi artist", van Meegeren was now a folk hero - the man who had swindled Göring. The Reichsmarschall was told that his beloved Vermeer was a forgery while awaiting execution in Nuremberg. According to a contemporary account: "[Göring] looked as if for the first time he had discovered there was evil in the world."In the wake of his confession and the scandal it caused, van Meegeren truly knew the fame he had craved. The trial, when it came, was a three-ring circus. Experts tripped over each other to exculpate themselves. Van Meegeren - more than the prosecuting counsel - was determined that he should be found guilty of committing these "masterpieces", but even now, experts conspired against him, arguing that at least one of his forgeries might be genuine.
In the end, however, van Meegeren got his wish: on November 12, 1947 he was found guilty of obtaining money by deception and sentenced to one year's imprisonment.But he would never serve a day of his sentence. While prosecution and defence wrangled to secure a full public pardon from the Queen, the forger - long a consummate hypochondriac - finally succumbed to angina. He was hospitalised on the day before he was scheduled to serve his sentence and died some weeks later.
Han van Meegeren's greatest gift to the art world is doubt. If forgers throughout the ages have taught us anything, it is to re-examine why we love what we love, to overcome our obsession with simple authenticity and appreciate the work for itself. Is a minor Rothko truly worth more than the finest Ellsworth Kelly? Are we captivated by the serenity and light of a Corot watercolour, or simply the signature?
"Perhaps," as the art critic Emily Genauer wrote, "we are almost at the point of sophistication where we are able to enjoy a work of art for what it is."
Perhaps. Then again, as Theodore Rousseau pointed out, "We should all realise that we can only talk about the bad forgeries, the ones that have been detected; the good ones are still hanging on the walls."
• Frank Wynne is the author of 'I Was Vermeer: The Legend of the Forger Who Swindled the
Nazis', published by Bloomsbury (£14.99) on Mon.


Latent Fingerprints Experiment
There are many ways of developing fingerprints, below is one experiment that uses iodine as a
method of developing fingerprints.
You will need: filter paper; a paper clip; iodine crystals; string; jar
1. Make a fingerprint on a small piece of filter paper by firmly pressing down.
2. Take a paper clip with a piece of string attached to it and clip this on to the filter paper. Place a
few iodine crystals on the bottom of a screw top jar.
3. Hang the paper clip and filter paper inside the jar and put the lid on tightly trapping the string
out the side of the jar and suspending the paperclip and filter paper.
3. After about ten minutes, the iodine will develop the print on the filter paper and the image
should be clear enough to photograph.
Alternately, fingerprints can also be easily revealed by brushing a fingerprinted surface with iron
filings or lifting it from a surface with adhesive tape - neither require 'developing'.