custom mapping of fields in dme - soliton systems · custom mapping of fields in dme . contacts,...
TRANSCRIPT

Document version: 1.4
Date: 2012-05-25
Author: Niels Fanøe
Circulation/Restrictions: Internal/Excitor partners
Applies to: DME Server 3.5 and above
Custom mapping of fields in DME Contacts, Global Address Book searches, and Rooms & Resources in DME Server 3.5 and above
Table of contents Page 2 of 20
Table of contents Disclaimer.................................................................................................................................... 2 Introduction to custom mapping ..................................................................................................... 3
Why change the default mapping? ............................................................................................... 3 How to change the default mapping ............................................................................................. 3 A word of warning! ..................................................................................................................... 4
Customizing field mapping ............................................................................................................. 5 The collaboration system fields .................................................................................................... 5
Domino – Lotus Notes .............................................................................................................. 5 Exchange 2003 – Outlook 2003 ................................................................................................ 8 Exchange 2007 – Outlook 2007 .............................................................................................. 11
Editing the XML ....................................................................................................................... 11 Extracting ............................................................................................................................ 11 Device-specific files ............................................................................................................... 12 Editing ................................................................................................................................. 12 Default phone number ........................................................................................................... 13 Deploying ............................................................................................................................. 13 Upgrading ............................................................................................................................ 14
Customizing fields other than contacts .......................................................................................... 15 Global address book searches .................................................................................................... 15 Rooms and resources ............................................................................................................... 16
Device-specific mapping .............................................................................................................. 18 Mapping file hierarchy .............................................................................................................. 18
Naming the files .................................................................................................................... 18 Enabling device-specific mapping ............................................................................................ 19
Disclaimer The procedures and descriptions given in the following are meant as a guideline only. Each customer’s setup may differ from the premises assumed when developing this documentation. Custom mapping should only be done by certified DME Partners. Excitor A/S cannot assume any liability or be held responsible for the effects of the changes made to a customer’s setup on the basis of this documentation, regardless whether the instructions set forth were followed or not.
Why change the default mapping? Page 3 of 20
Introduction to custom mapping When you synchronize contacts from a DME device, DME compares the contacts on the phone with your contacts on the collaboration system. Based on the comparison, a number of create, update, and delete actions are carried out, and your contacts on the phone and on the collaboration system are aligned and match. This comparison is very complex and dependent on two main parameters:
• Which collaboration system are you using? • Which address book fields does your phone support?
The collaboration system contact list (address book) supports a wide range of fields, many of which are not supported by any device, and many that are not supported by very many devices. Therefore DME selects a subsection of fields that are supported by many devices, and only those fields are synchronized with the device. If the individual device does not support a field, that field is simply ignored by the DME client. In short: DME decides which fields can be synchronized between the devices and the collaboration system. Using a similar technique, you can customize which fields should be available for searching through the clients’ Search Global Address Book feature. For more information about this, see the section “Global address book searches”. Finally, you can customize which fields are available for searching for and returning rooms and resources. For more information about this, see the section “Rooms and resources”. As of DME 3.5, it is possible to target the mapping of contacts and searches to specific device platforms and even specific device models. For more information about this, see the section “Device-specific mapping”.
Why change the default mapping? In most cases, this scheme – the default mapping – works very well. However, in some cases you may want to change the scheme in order to conform to company policies. An example: Say that every employee has a phone number, a mobile phone number, and a short number. The short number is assigned to each employee as part of a deal with the phone company. The cost of the call is much less if you dial the short number instead of the regular phone number. Also, if the call is not answered, it is automatically forwarded to the mobile phone. All in all, there are many good reasons to make the short number the default phone number for every employee. Therefore, the short number is entered into the collaboration system’s contact list as the Pager number. So to dial the short number, the user has to dial the number in the Pager field. However, the standard set of fields that are synchronized to the DME clients does not include the Pager number. In this case, a custom mapping of the Pager field in the collaboration system to another field in the phones’ Contacts application, for instance the Home Fax field, would be in order. As of DME 3.0 SP3, it is also possible to directly assign which of the contact fields should act as the default phone number of each contact. In this way you can specify which number should be the first choice when a user dials a contact. This is useful if the administrator for instance wants to specify that the users should always use a low-cost short number, and that the device should look for that number in the (say) Home Fax field. Note that not all devices support this feature.
How to change the default mapping The mapping schemes for contacts, searches, and rooms & resources are described in XML files located on the DME server. By altering these files, you can map a field from the collaboration system to a field in the phones’ Contacts application (in the case of contact mapping). In this way, the file defines which
A word of warning! Page 4 of 20
fields in the collaboration system are mapped to which fields in the phones’ Contacts application. When the file has been changed as specified in the following instructions, DME will start mapping the fields according to the changes immediately.
A word of warning! Great care must be taken before changing the mapping of contacts. It is vital that a thorough investigation of the real requirements is made, and that a risk assessment is carried out. Ideally, re-mapping should be done in connection with the introduction of a new DME system. For systems that are already in use, the recommended procedure is as follows:
1. Perform the new mapping on a test system. 2. Test the new mappings thoroughly. 3. When testing is complete, announce to all users that a major change to DME is to take place, and
schedule the change for outside regular business hours. Inform the users that they should NOT make any changes to their contacts after that time.
4. Deploy the edited mapping file, and test that the system is working as intended. 5. Announce to all users that the change has been made, and inform them about the implications of
the change. 6. Tell the users to run a contact synchronization before they modify or add any contacts.
Repeating the disclaimer from the title page of this document would be appropriate here: “The procedures and descriptions given in the following are meant as a guideline only. Each customer’s setup may differ from the premises assumed when developing this documentation. Custom mapping should only be done by certified DME Partners. Excitor A/S cannot assume any liability or be held responsible for the effects of the changes made to a customer’s setup on the basis of this documentation, regardless whether the instructions set forth were followed or not.”

The collaboration system fields Page 5 of 20
Customizing field mapping Customizing the mapping of fields is a three-step process:
1. Identify the field in the collaboration system that you want to map. 2. Identify the field in the phones’ Contacts application that you want to map to. 3. Alter the relevant XML files.
The collaboration system fields DME supports three collaboration systems: IBM Lotus Domino 6.x-8.x, Microsoft Exchange 2003, and Microsoft Exchange 2007. The following sections show the fields that are possible to map, and their names. The fields are shown in screenshots of the e-mail client native to the collaboration system in question.
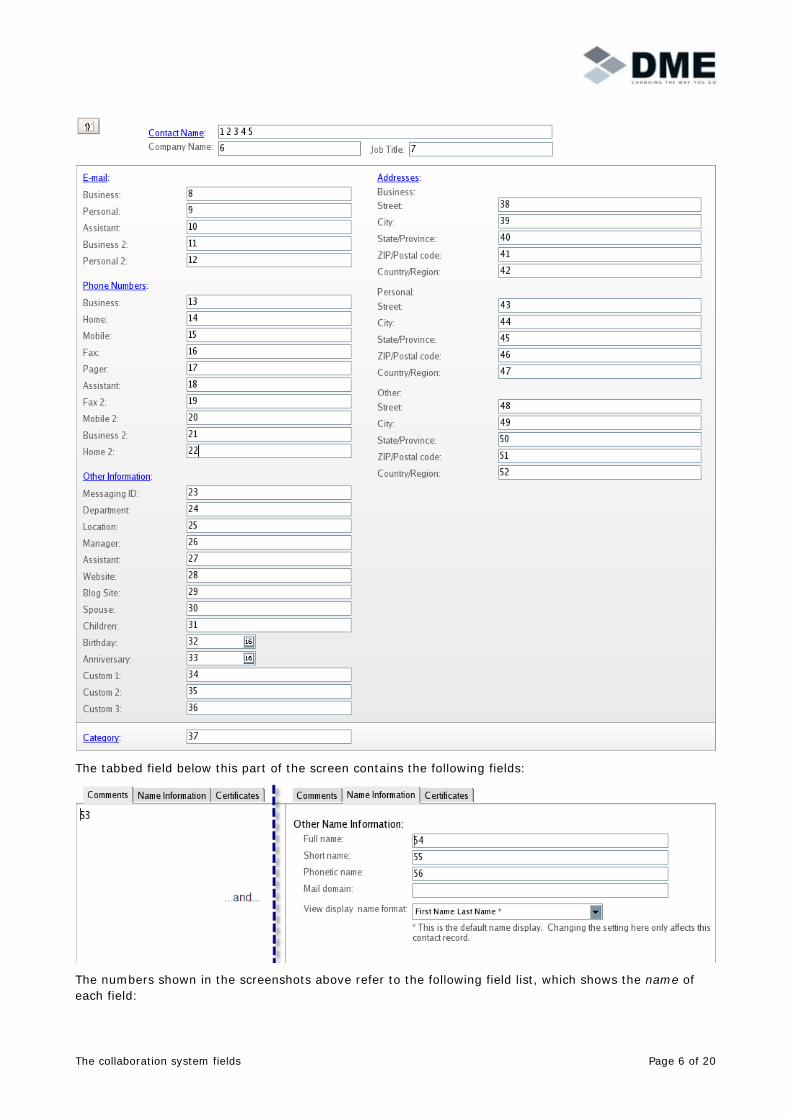
Domino – Lotus Notes We only show Lotus Notes version 8. To see the fields, open your Contacts, and select New contact. The following screen appears (note that all possible fields are enabled by making selections in the helper windows – click the underlined links in the New Contacts window to open the helper windows):
The collaboration system fields Page 6 of 20
The tabbed field below this part of the screen contains the following fields:
The numbers shown in the screenshots above refer to the following field list, which shows the name of each field:
The collaboration system fields Page 7 of 20
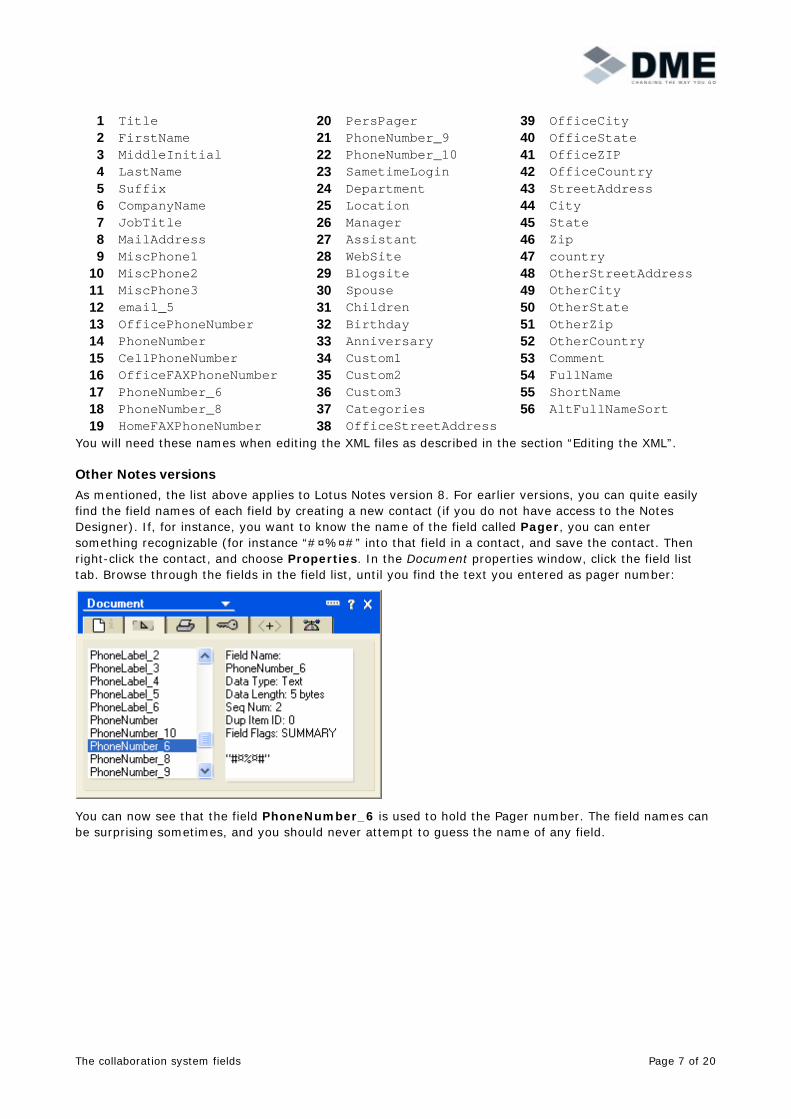
1 Title 20 PersPager 39 OfficeCity 2 FirstName 21 PhoneNumber_9 40 OfficeState 3 MiddleInitial 22 PhoneNumber_10 41 OfficeZIP 4 LastName 23 SametimeLogin 42 OfficeCountry 5 Suffix 24 Department 43 StreetAddress 6 CompanyName 25 Location 44 City 7 JobTitle 26 Manager 45 State 8 MailAddress 27 Assistant 46 Zip 9 MiscPhone1 28 WebSite 47 country
10 MiscPhone2 29 Blogsite 48 OtherStreetAddress 11 MiscPhone3 30 Spouse 49 OtherCity 12 email_5 31 Children 50 OtherState 13 OfficePhoneNumber 32 Birthday 51 OtherZip 14 PhoneNumber 33 Anniversary 52 OtherCountry 15 CellPhoneNumber 34 Custom1 53 Comment 16 OfficeFAXPhoneNumber 35 Custom2 54 FullName 17 PhoneNumber_6 36 Custom3 55 ShortName 18 PhoneNumber_8 37 Categories 56 AltFullNameSort 19 HomeFAXPhoneNumber 38 OfficeStreetAddress
You will need these names when editing the XML files as described in the section “Editing the XML”.
Other Notes versions As mentioned, the list above applies to Lotus Notes version 8. For earlier versions, you can quite easily find the field names of each field by creating a new contact (if you do not have access to the Notes Designer). If, for instance, you want to know the name of the field called Pager, you can enter something recognizable (for instance “#¤%¤#” into that field in a contact, and save the contact. Then right-click the contact, and choose Properties. In the Document properties window, click the field list tab. Browse through the fields in the field list, until you find the text you entered as pager number:
You can now see that the field PhoneNumber_6 is used to hold the Pager number. The field names can be surprising sometimes, and you should never attempt to guess the name of any field.
The collaboration system fields Page 8 of 20
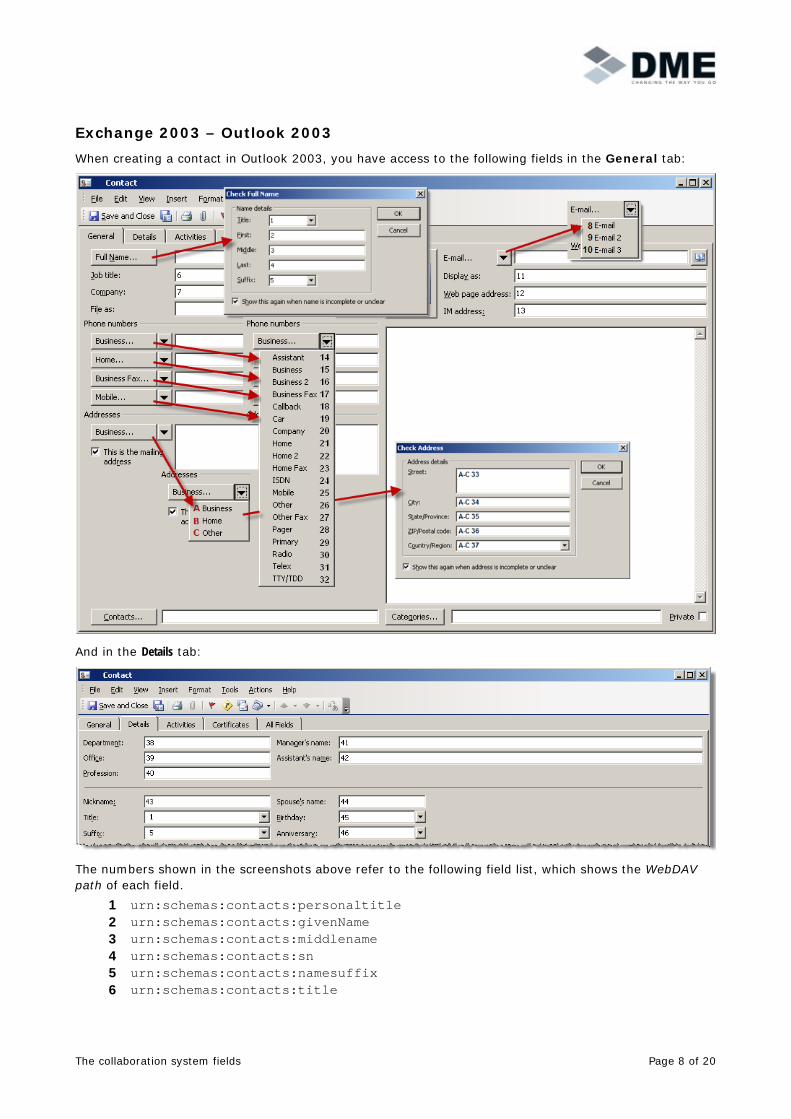
Exchange 2003 – Outlook 2003 When creating a contact in Outlook 2003, you have access to the following fields in the General tab:
And in the Details tab:
The numbers shown in the screenshots above refer to the following field list, which shows the WebDAV path of each field.
1 urn:schemas:contacts:personaltitle 2 urn:schemas:contacts:givenName 3 urn:schemas:contacts:middlename 4 urn:schemas:contacts:sn 5 urn:schemas:contacts:namesuffix 6 urn:schemas:contacts:title

The collaboration system fields Page 9 of 20
7 urn:schemas:contacts:o 8 urn:schemas:contacts:email1 9 urn:schemas:contacts:email2
10 urn:schemas:contacts:email3 11 “Display as” is not supported. 12 urn:schemas:contacts:businesshomepage 13 http://schemas.microsoft.com/mapi/InstMsg 14 urn:schemas:contacts:secretaryphone 15 urn:schemas:contacts:telephoneNumber 16 urn:schemas:contacts:telephoneNumber2 17 urn:schemas:contacts:facsimiletelephonenumber 18 urn:schemas:contacts:callbackphone 19 urn:schemas:contacts:othermobile 20 urn:schemas:contacts:organizationmainphone 21 urn:schemas:contacts:homePhone 22 urn:schemas:contacts:homePhone2 23 urn:schemas:contacts:homefax 24 urn:schemas:contacts:internationalisdnnumber 25 urn:schemas:contacts:mobile 26 urn:schemas:contacts:otherTelephone 27 urn:schemas:contacts:otherfax 28 urn:schemas:contacts:pager 29 http://schemas.microsoft.com/mapi/proptag/x3a1a001f 30 http://schemas.microsoft.com/mapi/proptag/x3a1d001f 31 urn:schemas:contacts:telexnumber 32 urn:schemas:contacts:ttyttdphone
A-33 urn:schemas:contacts:mailingstreet A-34 urn:schemas:contacts:mailingcity A-35 urn:schemas:contacts:mailingstate A-36 urn:schemas:contacts:mailingpostalcode A-37 urn:schemas:contacts:mailingcountry B-33 urn:schemas:contacts:homeStreet B-34 urn:schemas:contacts:homeCity B-35 urn:schemas:contacts:homeState B-36 urn:schemas:contacts:homePostalCode B-37 urn:schemas:contacts:homeCountry C-33 urn:schemas:contacts:otherstreet C-34 urn:schemas:contacts:othercity C-35 urn:schemas:contacts:otherstate C-36 urn:schemas:contacts:otherpostalcode C-37 urn:schemas:contacts:othercountry
38 urn:schemas:contacts:department 39 urn:schemas:contacts:roomnumber 40 urn:schemas:contacts:profession 41 urn:schemas:contacts:manager 42 urn:schemas:contacts:secretarycn 43 urn:schemas:contacts:nickname 44 urn:schemas:contacts:spousecn 45 urn:schemas:contacts:bday 46 urn:schemas:contacts:weddinganniversary
Microsoft supports many fields. You can download a field browser such as Mistaya (freeware; http://www.infinitec.de/post/2005/01/Mistaya.aspx), or Outlook Spy (shareware;
The collaboration system fields Page 10 of 20
http://www.dimastr.com/outspy/) to find the paths of each field. However, do note that you must try out the mappings in a test environment before deploying the changes in a production environment. Note especially that some fields have built-in logic, either in Outlook or in DME, and re-mapping such fields should generally be avoided – this in particular applies to e-mail fields. Furthermore, only the following namespaces are supported by DME:
urn:schemas:contacts: urn:schemas:httpmail: http://schemas.microsoft.com/mapi/ http://schemas.microsoft.com/mapi/proptag/
Fields in other namespaces will either be ignored, or the synchronization of contacts could fail or behave in unexpected ways. You will need these WebDAV paths when editing the XML files as described in the section “Editing the XML”.
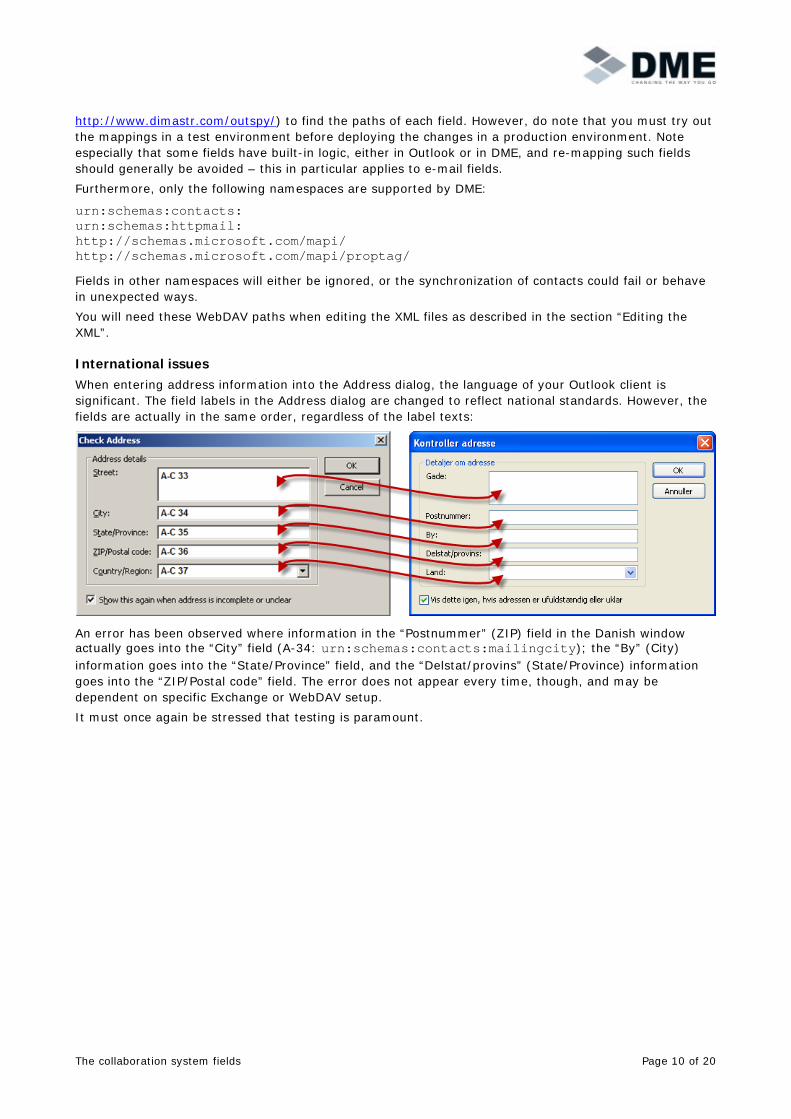
International issues When entering address information into the Address dialog, the language of your Outlook client is significant. The field labels in the Address dialog are changed to reflect national standards. However, the fields are actually in the same order, regardless of the label texts:
An error has been observed where information in the “Postnummer” (ZIP) field in the Danish window actually goes into the “City” field (A-34: urn:schemas:contacts:mailingcity); the “By” (City) information goes into the “State/Province” field, and the “Delstat/provins” (State/Province) information goes into the “ZIP/Postal code” field. The error does not appear every time, though, and may be dependent on specific Exchange or WebDAV setup. It must once again be stressed that testing is paramount.

Editing the XML Page 11 of 20
Exchange 2007 – Outlook 2007 The fields from Outlook 2003 illustrations also apply in Outlook 2007. However, the fields are not paths, but calls to methods. This is due to the change from the use of OWA (WebDAV) in Outlook 2003 to Web Services in Outlook 2007. The methods are the following (please refer to the numbers in the Outlook 2003 illustrations):
1 Prefix 20 CompanyPhone 38 Department
2 FirstName 21 HomePhone 39 OfficeLocation
3 MiddleName 22 Home2Phone 40 Profession
4 LastName 23 HomeFax 41 ManagerName
5 Suffix 24 ISDNPhone 42 AssistantName
6 JobTitle 25 MobilePhone 43 Nickname
7 CompanyName 26 OtherPhone 44 SpouseName
8 BusinessEmail 27 OtherFax 45 BirthDay
9 HomeEmail 28 PagerPhone 46 Anniversary
10 OtherEmail 29 PrimaryPhone
11 Not supported. 30 RadioPhone
12 BusinessHomePage 31 TelexPhone
13 ImAddress 32 TtytddPhone
14 AssistantPhone A-33 BusinessStreet B-33 HomeStreet C-33 OtherStreet
15 BusinessPhone A-34 BusinessCity B-34 HomeCity C-34 OtherCity
16 Business2Phone A-35 BusinessState B-35 HomeState C-35 OtherState
17 BusinessFax A-36 BusinessZip B-36 HomeZip C-36 OtherZip
18 CallbackPhone A-37 BusinessCountry B-37 HomeCountry C-37 OtherCountry
19 CarPhone You will need these names when editing the XML files as described in the section “Editing the XML” below.
Editing the XML To change the mapping between the collaboration system and the phone Contacts, you need to edit an XML file.
Extracting There is one XML file per supported collaboration system. Depending on your collaboration system, you need to edit one of the following files:
• contact-sync-domino-mapping.xml
• contact-sync-exchange2003-mapping.xml
• contact-sync-exchange2007-mapping.xml
The XML files are stored on the connector in the following directory: • On a DME 3.5 system, it is the dme-connector.jar file. • On a DME 3.6 system, the Exchange mapping files are in dme-exchange-collaborator.jar and
the Domino mapping files are in dme-domino-collaborator.jar
To extract the XML file: 1. Open the connector .jar file with your favorite ZIP archive utility. 2. Browse to /conf/
3. Extract the XML file for your collaboration system.

Editing the XML Page 12 of 20
Device-specific files (DME 3.5 or later) In addition to the general mappings outlined in the collaboration platform-specific files you have extracted, it is possible to create mappings that apply to specific device platforms or specific device models. You can do this by copying the extracted files as described in “Device-specific mapping”.
Editing Open the relevant file in a text editor. The file looks something like this (Domino):
<?xml version="1.0" ?> <mappings> <mapping> <id>firstname</id> <field>FirstName</field> </mapping> <mapping> <id>lastname</id> <field>LastName</field> </mapping> ... <mapping> <id>homefax</id> <field>PhoneNumber_6</field> <defaultphone>TRUE</defaultphone> </mapping> <mapping> <id>birthday</id> <field>Birthday</field> <type>DATE</type> </mapping> <mapping> <id>categories</id> <field>Categories</field> <type>STRINGLIST</type> </mapping> <mapping> <id>description</id> <field>Comment</field> </mapping> </mappings>
The XML <mappings> section is a series of <mapping> sections, each containing two XML fields: • <id>: This is the name used by the DME client in order to know in which field in the Contacts
application to find or place the synchronized information. This value must NEVER be changed. • <field>: A name used by the DME server in order to know in which field in the collaboration
system to find or place the synchronized information. This is where you may place one of the field names/paths/methods listed for your collaboration system above.
• <defaultphone>: The first field in the XML file that includes this tag with the value TRUE is marked as the default phone number on the device. Please see below for more information about this tag, which was introduced in DME 3.0 SP3.
• <type>: The data type in a field is STRING, if no other type is specified using the type tag. You can specify two other data types of the current field: DATE: DME attempts to convert data in a field in the client to a date. If unsuccessful, the data is discarded. STRINGLIST: DME treats data in a field of this type as a list of values. The client converts pipe-separated values from the server to a list in a platform-dependent format and vice versa. For

Editing the XML Page 13 of 20
instance, you can map names in the Children field of the contacts to entries on separate lines in the Description field. Note that on Domino, some fields are multi-value fields (stringlists) even where you do not expect it. You can for instance enter multiple phone numbers in the Telephone field, separated by comma, and map them to the businessphone field. On some platforms, including Symbian, this will result in the creation of multiple Phone (business) fields in the Contacts application. Please remember that it is important to test your mappings on all device platforms.
It is recommended to add XML comments describing the changes, who made them, and why. The syntax for writing comments in XML is similar to that of HTML:
<!-- This is an XML comment -->
Default phone number As mentioned above, you can add a <defaultphone> tag to the configuration file. The first tag of this type in the file is used to appoint a suitable field as default number. On all DME device platforms (except iPhone) this means that when the user places a phone call to a contact from within DME, this is the number that will be dialed. For instance, if the user presses the Call key with focus on an e-mail in the Inbox, DME will look up the default number of the sender of the highlighted e-mail by looking up the sender in the contact database, and dial it if found. This can for instance be useful if you want to ensure that users dial a certain cost-saving short number instead of, say, the mobile number.
Deploying When you are done editing the file as outlined below, place it in a directory on the connector server. Then open the file dme-config.xml on the connector server, and search for the <configuration> tag. Somewhere within the <configuration></configuration> tag, add the following tag: <mappingFilesLocation>[location of mapping file]</mappingFilesLocation>
Note that [location of mapping file] could be anywhere that can be accessed from the connector. Now save the file. When the files have been deployed, and dme-config.xml has been edited, restart the DME connector. DME will start mapping the fields according to the changes immediately. Monitor the server.log file, and look for messages such as the following, which will appear after the first contact sync from a device:
INFO [dme.nam.pim.mapping.ContactSyncMapping] Loading mapping scheme from : /var/dme/instances/base/etc/contact-sync-exchange2003-mapping.xml
This means that the mapping file mentioned was loaded correctly, and that the server is now mapping the fields as specified in the file. This is a good way to check that the server is loading the file you expected.
Problems parsing Integrator mapping file : /var/dme/instances/base/etc/contact-sync-exchange2003-mapping.xml The content of elements must consist of well-formed character data or markup.
A message such as this means that the XML mapping file is malformed. Perform a syntax check of the file, and redeploy. You can use log4j to add debugging to the class dme.nam.pim.mapping to log mapping messages in the server.log file, like this:
<!-- Custom mappings debug --> <logger name="dme.nam.pim.mapping" additivity="false"> <priority value="DEBUG"/> <appender-ref ref="FILE"/> </logger>
Editing the XML Page 14 of 20
For more information about changing the log4j configuration, see the Technote called “Changing log4j log level” at the Excitor Partner website.
Upgrading
Warning: When upgrading your DME server, either by applying an .ear file or by using the installer, the XML files from the upgrade will not overwrite your modified XML files.
This means that any changes or improvements in the new version of the XML files will not be applied to the upgraded server. It is your own responsibility to merge your changes with the new XML files supplied by DME. This must be done before the DME server is started after an upgrade.

Global address book searches Page 15 of 20
Customizing fields other than contacts Apart from contacts, you can modify the mapping of global address book searches and of rooms and resources in the client.
Global address book searches When a DME user chooses Search > Global Address Book in the DME client, the following screen is shown (screenshot taken from a Nokia S60 device):
When the user presses Search, the values entered in the fields are sent to the server. An XML file similar to the mapping files described above maps each field in the search screen to a field in the collaboration system’s underlying LDAP system. The XML files governing this mapping are called contact-search-ad-mapping.xml (for Active Directory systems) or contact-search-domino-mapping.xml (for Domino systems), and are located in the same place as the other mapping files. The reason that there are two files, even though there is only one LDAP standard, is that both Domino and AD extends the standard, and the fields returned by the search are different on the two systems. The default mapping is as follows:
When a user searches for a name, DME will search in the following LDAP name fields: cn (common name), sn (surname), givenname, and displayName (full name). When a user searches for contacts associated with a department, DME will search in both the department and ou (organizational unit) fields in LDAP.
Thus, you can change the functionality of the Title field so it searches in the LDAP Pager field by changing the mapping:
Rooms and resources Page 16 of 20
<mapping> <id>title</id> <field>title</field> </mapping>
to:
<mapping> <id>title</id> <field>Pager</field> </mapping>
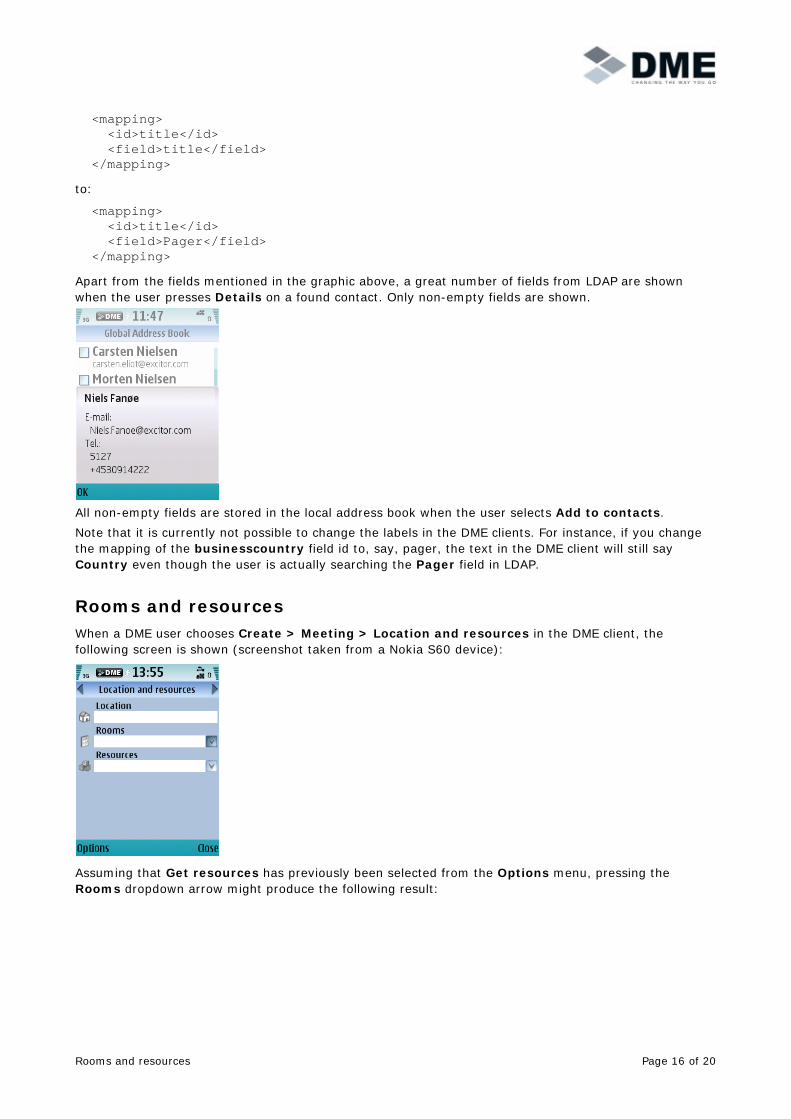
Apart from the fields mentioned in the graphic above, a great number of fields from LDAP are shown when the user presses Details on a found contact. Only non-empty fields are shown.
All non-empty fields are stored in the local address book when the user selects Add to contacts. Note that it is currently not possible to change the labels in the DME clients. For instance, if you change the mapping of the businesscountry field id to, say, pager, the text in the DME client will still say Country even though the user is actually searching the Pager field in LDAP.
Rooms and resources When a DME user chooses Create > Meeting > Location and resources in the DME client, the following screen is shown (screenshot taken from a Nokia S60 device):
Assuming that Get resources has previously been selected from the Options menu, pressing the Rooms dropdown arrow might produce the following result:

Rooms and resources Page 17 of 20
This screen shows the list of rooms in the Domino collaboration system, with the room capacity shown below each name. Using a technique similar to the re-mapping of contact fields, you can change the mapping of rooms and resources fields. Note that it does not make much sense to do this on Domino systems, as the rooms and resources are defined as such in Domino. On Exchange, however, where rooms and resources are defined as users, it might be relevant. Therefore, only Exchange (Active Directory) is described in the following. An XML file similar to the mapping files described above maps each available field in the rooms and resources display screen to a field in the underlying AD. The XML files governing this mapping are called rnr-ad-mapping.xml (for Active Directory systems) or rnr-domino-mapping.xml (for Domino systems), and are located in the same place as the other mapping files. The default mapping in AD is as follows:
<?xml version="1.0" ?> <mappings> <mapping> <id>displayname</id> <field>cn</field> </mapping> <mapping> <id>mail</id> <field>mail</field> </mapping> <mapping> <id>capacity</id> <field></field> </mapping> </mappings>
• displayname: This is the name shown in the list of rooms or resources on the client. This is by default the common name, but can in principle be any name field in AD.
• mail: This is the mail address of the room or resource user, and this cannot be changed. • capacity: The room capacity is not supported by default in Exchange, but some third-party
systems add a capacity indicator for each room. If you have such a system, you can map the capacity to the relevant field in AD, and the capacity will then be shown in the DME client also.
Mapping file hierarchy Page 18 of 20
Device-specific mapping (DME 3.5 or later) The instructions above all pertain to the default mapping files. However, as of DME 3.5, it is possible to create mappings for individual device models or platforms. For instance, if you run Exchange, you can use this feature to map the contact field Mobile on the devices to the field Carphone in Outlook, but only for Symbian S60. This feature applies to contact mapping and global address book search mapping.
Mapping file hierarchy As mentioned in “Editing the XML”, the connector looks for a mapping file whenever a contact sync or a global address book search is made. As of DME 3.5, the server looks for the XML mapping file in the following way:
1. Does an XML mapping file for the current collaboration platform exist with the device model name of the currently active device appended to it? If so, this is used.
2. Does a mapping file exist with the device platform name of the currently active device appended to it? If so, this is used.
3. Does the mapping file for the current collaboration platform exist? If so, this is used. Otherwise, the standard mapping file for the current collaboration platform (located in the DME-Connector.jar file) is used.
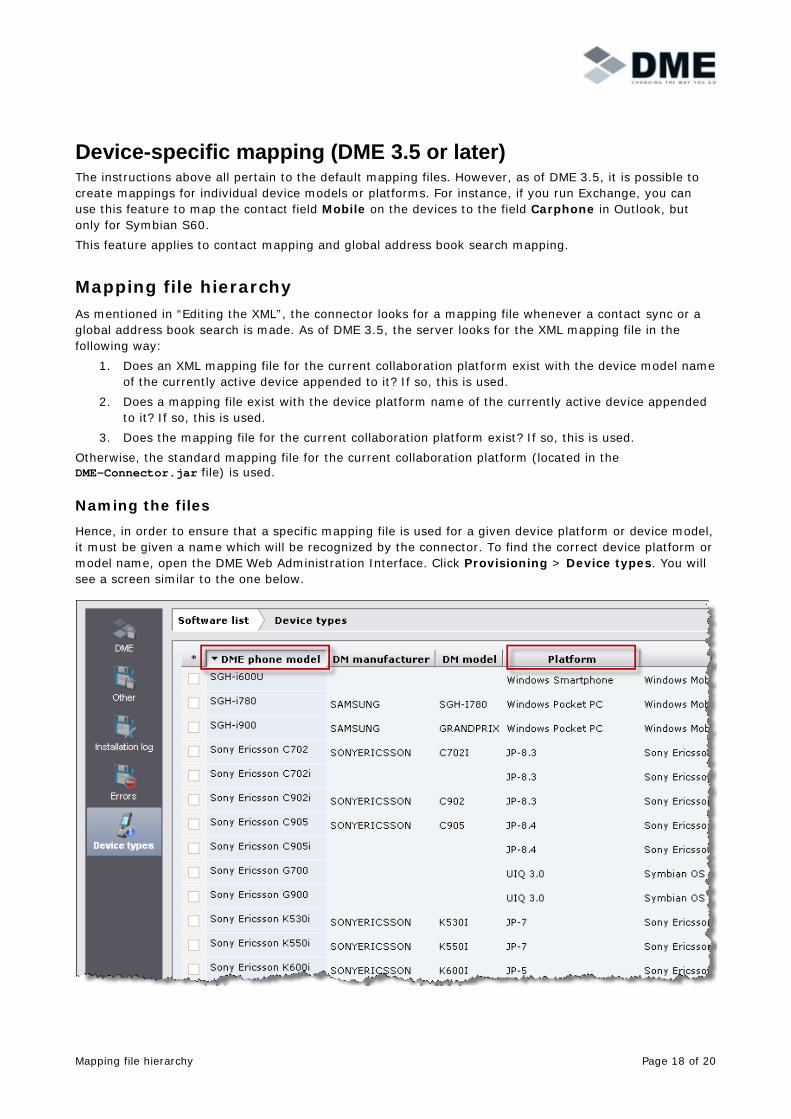
Naming the files Hence, in order to ensure that a specific mapping file is used for a given device platform or device model, it must be given a name which will be recognized by the connector. To find the correct device platform or model name, open the DME Web Administration Interface. Click Provisioning > Device types. You will see a screen similar to the one below.

Mapping file hierarchy Page 19 of 20
If you want to create a contact mapping for a specific device model, do the following: 1. In the DME phone model column, find the device model you need, for instance the SGH-i900. 2. Locate the file contact-sync-exchange2007-mapping.xml (assuming you are using Exchange
2007). 3. Copy the file, and name the copy contact-sync-exchange2007-mapping-SGH-i900.xml.
4. Edit the file to match your needs, and save it. Now, whenever SGH-i900 devices synchronize contacts, they will be using the new file for mapping contacts. Note the following about the name of mapping files for device models:
• Any spaces in the device model name must be replaced by a -. Thus, the same file for a “Sony Ericsson C702i” device should be called ...-Sony-Ericsson-C702i.xml.
• Otherwise, you must write it exactly as it is spelled in the DME web interface, including letter casing (very important on Linux, as file names are case sensitive).
If you want to create a contact mapping for a specific device platform, do the following: 1. In the Platform column, find the name of the platform for which you want to make specific
changes to the mapping file. You may use the name of specific devices to find the correct platform, for instance the JP-8.3.
2. Locate the file contact-sync-exchange2007-mapping.xml (assuming you are using Exchange 2007).
3. Copy the file, and name the copy contact-sync-exchange2007-mapping-JP-83.xml.
4. Edit the file to match your needs, and save it. Now, whenever devices running JP 8.3 synchronize contacts, they will be using the new file for mapping contacts. Note the following about the name of mapping files for device platforms:
• The device platform part of the mapping file must be written in CAPITALS. • Any spaces in the platform name must be replaced by a -. For instance, the file name for
Windows Pocket PC should be ...WINDOWS-POCKET-PC.xml.
• Any punctuation (such as “.”) must be omitted from the file name. • IMPORTANT: You can create one file that covers multiple platforms. When looking for the file,
the connector will start with the full name, then move back one letter at a time until a match is found. For instance, if you want one mapping file for all Java devices, you can simply name it contact-sync-exchange2007-mapping-JP.xml, and it will be used for all Java devices – whether they are JP-8.3, 8.4, 7 or any other version of the Java Platform. Or ...WINDOWS.xml to cover both the Windows Pocket PC and the Windows Smartphone platforms.
Enabling device-specific mapping To avoid processing overhead if you are not using this feature, you must enable the connectors that provide contact synchronization and search to look for device-specific mapping files.
1. In the DME Web Administration Interface, click the Connector tab. 2. Click the connector that provides contact synchronization. 3. Click Functions. 4. If this is a Domino connector:
a. In the Domino integration group of fields, go to the Contacts section, and enable the field Use device platform specific contact mappings.
5. If this is an Exchange connector: a. In the Exchange integration group of fields, go to the Advanced section, and enable the
field Use device platform specific contact mappings. 6. Click Save.

Mapping file hierarchy Page 20 of 20
7. Repeat for the connector that provides search, or if more connectors provide contact synchronization.