custom theme creation websphere portal 8
TRANSCRIPT

CUSTOM THEME CREATION WEBSPHERE
PORTAL 8.0.0.1 CF5 With CTC integration and social rendering
Michele Buccarello
5/3/2013
This document describe how to create a custom theme for portal 8.0.0.1 with CTC modules and Social Rending features.
CUSTOM THEME CREATION WEBSPHERE PORTAL 8.0.0.1 CF5
Custom Theme Portal 8.0.0.1 Author:Michele Buccarello Page 1
Table of Contents ENVIROMENT CHECK ......................................................................................................................................... 2
Install Portall 8.0.0.1 CF05 ............................................................................................................................. 2
Install CTC V4 ................................................................................................................................................. 2
Enable Inline editing and rendering features ................................................................................................ 2
EXTRACT THEME DYNAMIC AND STATIC PART.................................................................................................. 3
Extract Dynamic part ..................................................................................................................................... 3
Extract Static part .......................................................................................................................................... 4
Preparing RAD 8.5.1 for packaging the theme .................................................................................................. 7
Preparation for dynamic part ........................................................................................................................ 7
Preparation for static part ........................................................................................................................... 10
Create the war in project ......................................................................................................................... 10
Setting the access in web.xml.................................................................................................................. 12
Preparing the EAR for deployment.............................................................................................................. 13
CREATING DYNAMIC CONTENT SPOTS ............................................................................................................ 13
Manualy Creation ........................................................................................................................................ 13
Automatic Creation ..................................................................................................................................... 14
Install the Theme and Register in Websphere Portal ...................................................................................... 14
Install the ear in console.............................................................................................................................. 15
Register the theme in websphere portal..................................................................................................... 21
Creating the xmlaccess script .................................................................................................................. 21
Using My Custom Script .......................................................................................................................... 21
Testing the theme in a new page .................................................................................................................... 23

CUSTOM THEME CREATION WEBSPHERE PORTAL 8.0.0.1 CF5
Custom Theme Portal 8.0.0.1 Author:Michele Buccarello Page 2
ENVIROMENT CHECK
This guide coverage the creation of custom theme for websphere Portal 8 with CTC4 and social rendering
feature. For create correctly the theme you need:
1) Have a local or remote installation with portal 8.0.0.1 (I suggest to install CF05)
2) Install the CTC V4
3) Enable Inline Editing and Social Rending feature
Install Portall 8.0.0.1 CF05
For this part you must follow the documentation in the portal wiki at this link
Install CTC V4
For this part you must follow the documentation in the portal wiki at this link
Enable Inline editing and rendering features For this part you need run this two config engine:
For inline editing go to in wp_profile_root/ConfigEngine and enter the following command: Windows:
ConfigEngine enable-new-8001-features -DWasPassword=<password> -DPortalAdminPwd=<password>
Linux, Unix, IBM, i z/OS: ./ConfigEngine.sh enable-new-8001-features -DWasPassword=<password> -DPortalAdminPwd=<password>
For social rendering go to in wp_profile_root/ConfigEngine and enter the following command: Windows:
ConfigEngine.bat action-enable-social-rendering -DPortalAdminId=portal_user_id -DPortalAdminPwd=portal_user_password -DWasUserid=was_user_id -DWasPassword=was_user_password
Linux, Unix, IBM, i z/OS: ./ConfigEngine.sh action-enable-social-rendering -DPortalAdminId=portal_user_id -DPortalAdminPwd=portal_user_password -DWasUserid=was_user_id -DWasPassword=was_user_password

CUSTOM THEME CREATION WEBSPHERE PORTAL 8.0.0.1 CF5
Custom Theme Portal 8.0.0.1 Author:Michele Buccarello Page 3
EXTRACT THEME DYNAMIC AND STATIC PART
The Websphere Portal theme is divided in two part:
- Static Files located in webdav store
- Dynamic Files located in the Default80 theme
You need to copy this two type of files in two separated folders. For more organization I suggest to create a
folder named CUSTOM THEME 8.0.0.1 CF5 and in this folder you need to create two folder:
- custom theme dynamic
- custom theme static
Extract Dynamic part
The dynamic part in my case is located in:
C:\IBM8\WebSphere\PortalServer\theme\wp.theme.themes\default80\installedApps\DefaultTheme80.ear
\DefaultTheme80.war
In this folder you see:
You need to copy only the folders :
- skins
- themes
- WEB-INF
In the WEB-INF folder you need only the folder tld and the file decorations.xml, below the screenshoot of
my Dynamic folder files.

CUSTOM THEME CREATION WEBSPHERE PORTAL 8.0.0.1 CF5
Custom Theme Portal 8.0.0.1 Author:Michele Buccarello Page 4
Extract Static part
Download via webdav client or via url this folders:
- Themes
- Skins
- Common-resources
You can use these urls
http://localhost:10039/wps/mycontenthandler/dav/fs-type1/themes/?mime-type=application/zip
http://locahost:10039/wps/mycontenthandler/dav/skinlist/?mime-type=application/zip
http://localhost:10039/wps/mycontenthandler/dav/fs-type1/common-resources/?mime-
type=application/zip

CUSTOM THEME CREATION WEBSPHERE PORTAL 8.0.0.1 CF5
Custom Theme Portal 8.0.0.1 Author:Michele Buccarello Page 5
after you get the zip files you need to unzip in the static folder directory, see the images below.
Go in the skinlist folder rename all folders by removing the part ibm.portal.80 and for every folder you
need to delete :
- Metadata properties folder
- Metadata.properties file
See the image below for the folder Hidden after renaming
BEFORE

CUSTOM THEME CREATION WEBSPHERE PORTAL 8.0.0.1 CF5
Custom Theme Portal 8.0.0.1 Author:Michele Buccarello Page 6
AFTER

CUSTOM THEME CREATION WEBSPHERE PORTAL 8.0.0.1 CF5
Custom Theme Portal 8.0.0.1 Author:Michele Buccarello Page 7
Preparing RAD 8.5.1 for packaging the theme
In this part we make an EAR with two WAR, one for static part and one for dynamic part.
Preparation for dynamic part
1) Create new web project select simple and Java EE and then press next

CUSTOM THEME CREATION WEBSPHERE PORTAL 8.0.0.1 CF5
Custom Theme Portal 8.0.0.1 Author:Michele Buccarello Page 8
2) Select as target runtime WebSphere Portal v8.0, web module version 3.0 and click on Add project
to an EAR and write the name of the EAR, I use Custom8001ThemeCF5
3) Click on Web Module and click on Generate web.xml

CUSTOM THEME CREATION WEBSPHERE PORTAL 8.0.0.1 CF5
Custom Theme Portal 8.0.0.1 Author:Michele Buccarello Page 9
4) Now copy the resources located in the dynamic folder in the webcontent directory of the dynamic
war, below you see the screenshot and a map of the file location :
skins → WebContent/skins
themes → WebContent/themes
WEB-INF/decorations.xml → WebContent/WEB-INF/decorations.xml
WEB-INF/tld → WebContent/WEB-INF/tld

CUSTOM THEME CREATION WEBSPHERE PORTAL 8.0.0.1 CF5
Custom Theme Portal 8.0.0.1 Author:Michele Buccarello Page 10
Preparation for static part In this part you need to create the WAR and setting the access in the web.xml file for static resources.
Create the war in project
1) Create new web project select simple and Java EE and then press next

CUSTOM THEME CREATION WEBSPHERE PORTAL 8.0.0.1 CF5
Custom Theme Portal 8.0.0.1 Author:Michele Buccarello Page 11
2) Select as target runtime WebSphere Portal v8.0, web module version 3.0 and click on Add project
to an EAR and write the name of the EAR, I use Custom8001ThemeCF5
3) Click on Web Module and click on Generate web.xml
4) Now copy the resources located in the static folder in the webcontent directory of the dynamic
war, below you see the screenshot and a map of the file location :
skinlist/Hidden → WebContent/skinlist/Hidden

CUSTOM THEME CREATION WEBSPHERE PORTAL 8.0.0.1 CF5
Custom Theme Portal 8.0.0.1 Author:Michele Buccarello Page 12
skinlist/ NoSkin → WebContent/skinlist /NoSkin
skinlist/ Standard → WebContent skinlist /Standard
NOTE: in the skinlist folder and themes folder I have the folder mobile 80, I have it only for e future
expansion of this article.
Setting the access in web.xml
In this part you need to add the line highlighted for enable the access for anonymous user to the static
files.
<?xml version="1.0" encoding="UTF-8"?>
<web-app id="WebApp_ID" version="3.0" xmlns="http://java.sun.com/xml/ns/javaee"
xmlns:xsi="http://www.w3.org/2001/XMLSchema-instance"
xsi:schemaLocation="http://java.sun.com/xml/ns/javaee http://java.sun.com/xml/ns/javaee/web-
app_3_0.xsd">
<display-name>Custom8001ThemeStatic</display-name>
<welcome-file-list>
<welcome-file>index.html</welcome-file>
<welcome-file>index.htm</welcome-file>
<welcome-file>index.jsp</welcome-file>
<welcome-file>default.html</welcome-file>
<welcome-file>default.htm</welcome-file>
<welcome-file>default.jsp</welcome-file>
</welcome-file-list>
<context-param>
<description>A regular expression that defines which of the resources in the WAR file
can be served by the portal war datasource. </description>
<param-name>com.ibm.portal.whitelist</param-name>
<param-value>.*</param-value>
</context-param>
<context-param>

CUSTOM THEME CREATION WEBSPHERE PORTAL 8.0.0.1 CF5
Custom Theme Portal 8.0.0.1 Author:Michele Buccarello Page 13
<description>A regular expression that defines which of the resources in the WAR file
cannot be served by the portal war datasource.</description>
<param-name>com.ibm.portal.blacklist</param-name>
<param-value>WEB-INF/.*</param-value>
</context-param>
</web-app>
Preparing the EAR for deployment
Right-click on the EAR project (in my case is Custom8001ThemeCF5) and select Java EE -- Prepare for deployment.
1. Create a new Dynamic Content Spot as per the instructions given in the table below :
CREATING DYNAMIC CONTENT SPOTS
In this part I describe two mode to create the dynamic content spots and new mode based on a jython
script. I explain the Manualy creation for understand how the jython script work.
Manualy Creation Log on to the WebSphere Integrated Solutions Console and follow this steps:
- Go to Resources -> Resource Environment -> -> Resource environment providers -> WP
DynamicContentSpotMappings.
- Select Custom Properties.
- Select New
- Add the “custom properties” listed below to
Name=CustomTheme8001CF5_head
value=res:/CustomTheme8001Dynamic/themes/html/dynamicSpots/head.jsp
At the link below you find the official documentations for creating the dynamic content spots
http://www-
10.lotus.com/ldd/portalwiki.nsf/xpDocViewer.xsp?lookupName=V8+Update%3A+Supplemental+Document
ation#action=openDocument&res_title=Creating_a_dynamic_content_spot_wp8001&content=pdcontent
At the link below you find all properties you need to create manualy
http://www-
10.lotus.com/ldd/portalwiki.nsf/xpDocViewer.xsp?lookupName=V8+Update%3A+Supplemental+Document
ation#action=openDocument&res_title=Working_with_dynamic_content_spots_wp8001&content=pdcont
ent

CUSTOM THEME CREATION WEBSPHERE PORTAL 8.0.0.1 CF5
Custom Theme Portal 8.0.0.1 Author:Michele Buccarello Page 14
Automatic Creation
Edit the jython script attached with your own context root and your own name, for my understating I use
this naming conventions:
- CustomThemePortalVersionname_of_the_normal_spots , for example 80theme_head became
CustomTheme8001CF5_head
After you complete to edit the jython script you can simply run the script using the wsadmin console using
this command:
- Wsadmin.(sh|bat) –user adminuser –password passworduser -f path_to_jython_script
After complete registration of dynamic content spots you need to reboot the portal
Replace the new Dynamic Content Spots
Change the dynamic content spots for every theme_xx.html
The location of this files is “Custom8001ThemeStatic/WebContent/themes/Portal8.0/nls/theme_xx.html“
This change must be done for all theme_*.html files , for a fast replace I use notepad++ I open every
theme_xx.html and I do a find replace in all opened document, and in the find replace box I put:
- FIND: 80theme_
- REPLACE: CustomTheme8001CF5_
After this changes you need to change the bootstrap.jspf located in
Custom8001ThemeDynamic /WebContent/themes/html/bootstrap.jspf
And change
URI davURI = pocSvc.createURI("dav","fs-type1/common-resources/ibm/css/portal/ibmPortlets.css");
In
URI davURI = pocSvc.createURI("war"," Custom8001ThemeStatic /common-
resources/ibm/css/portal/ibmPortlets.css");

CUSTOM THEME CREATION WEBSPHERE PORTAL 8.0.0.1 CF5
Custom Theme Portal 8.0.0.1 Author:Michele Buccarello Page 15
Save all modification and export the EAR.
Install the Theme and Register in Websphere Portal In this part is described the installation process of the theme and the registration process in websphere
portal via xmlaccess.
Install the ear in console Follow the images below
Click on Install button

CUSTOM THEME CREATION WEBSPHERE PORTAL 8.0.0.1 CF5
Custom Theme Portal 8.0.0.1 Author:Michele Buccarello Page 16
Click on select file and press next (depend if your portal is local or remote)
Press next

CUSTOM THEME CREATION WEBSPHERE PORTAL 8.0.0.1 CF5
Custom Theme Portal 8.0.0.1 Author:Michele Buccarello Page 17
Press next
Map the Websphere_Portal server and the webserver if you install the webserver.

CUSTOM THEME CREATION WEBSPHERE PORTAL 8.0.0.1 CF5
Custom Theme Portal 8.0.0.1 Author:Michele Buccarello Page 18
Press next
Press finish

CUSTOM THEME CREATION WEBSPHERE PORTAL 8.0.0.1 CF5
Custom Theme Portal 8.0.0.1 Author:Michele Buccarello Page 19
Press save
Start the application

CUSTOM THEME CREATION WEBSPHERE PORTAL 8.0.0.1 CF5
Custom Theme Portal 8.0.0.1 Author:Michele Buccarello Page 20

CUSTOM THEME CREATION WEBSPHERE PORTAL 8.0.0.1 CF5
Custom Theme Portal 8.0.0.1 Author:Michele Buccarello Page 21
Register the theme in websphere portal In this part you register the theme via xmlaccess, you can create manualy the xmlaccess or use my custom
xmlaccess script.
Creating the xmlaccess script
For create the xmlacces script you can follow this article:
- http://www-
10.lotus.com/ldd/portalwiki.nsf/xpDocViewer.xsp?lookupName=IBM+WebSphere+Portal+Express+
8+Product+Documentation#action=openDocument&res_title=Bind_your_theme_to_the_context_r
oot_of_the_web_app_exp8&content=pdcontent
Using My Custom Script
For using mycustom xmlaccess script you need:
1) Modify all context-root= parameter with the correct context root of your ear
2) Modyfy the parameter name="com.ibm.portal.layout.template.href" for pointing to your layout
directory
3) Modyfy the parameter name=" com.ibm.portal.theme.template.ref" for pointing to your theme
directory
4) Run the script via command line or via graphic interface
RegisterTheme8001.xml
Command line:
Open the command line or the shell and go in portal_server_root/bin in my case I go in this folder
c:\IBM8\WebSphere\PortalServer\bin
and I run this command
xmlaccess.bat -user wpsadmin -password wpsadmin -url http://localhost:10039/wps/config -in
..\doc\xml-samples\RegisterTheme8001.xml –out result.xml
in the result.xml you need to see this line at the bottom of the file.
<status element="all" result="ok"/>

CUSTOM THEME CREATION WEBSPHERE PORTAL 8.0.0.1 CF5
Custom Theme Portal 8.0.0.1 Author:Michele Buccarello Page 22
Graphic Interface
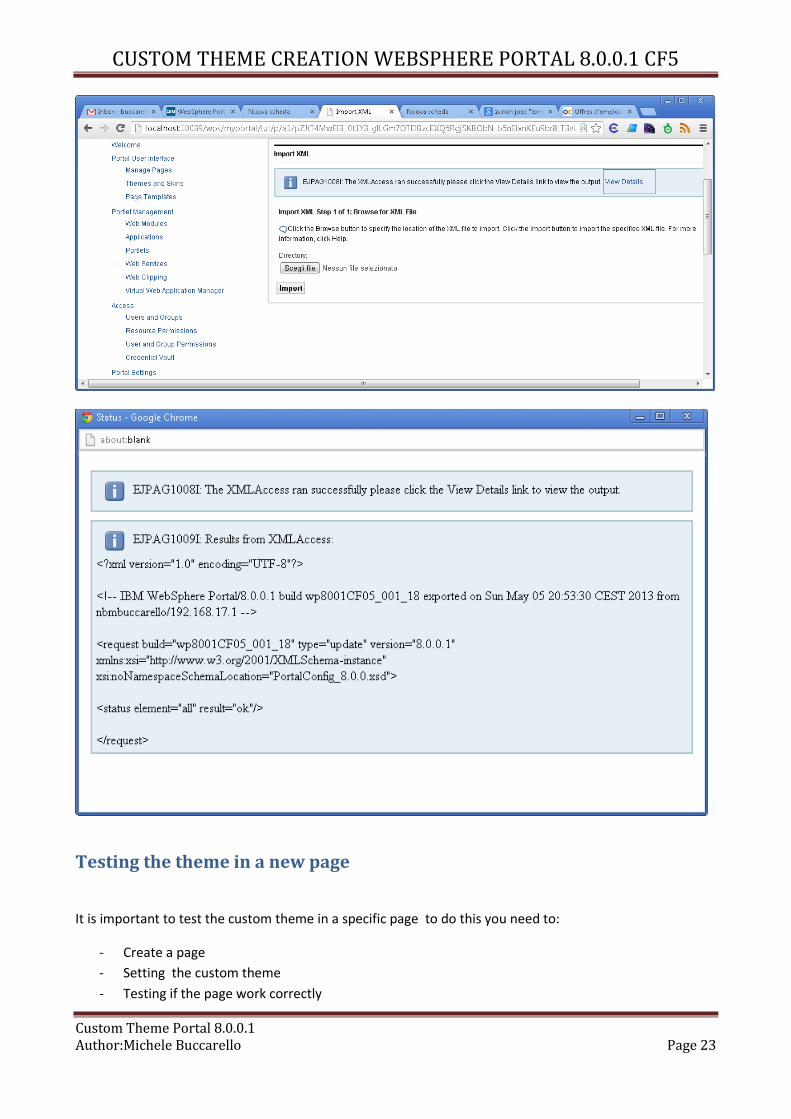
Login as portal administrator on websphere portal and go in the administration tab then click on Import
Xml link and click on Choose File.
After you choose the RegisterTheme8001.xml click on import and verify the output
CUSTOM THEME CREATION WEBSPHERE PORTAL 8.0.0.1 CF5
Custom Theme Portal 8.0.0.1 Author:Michele Buccarello Page 23
Testing the theme in a new page
It is important to test the custom theme in a specific page to do this you need to:
- Create a page
- Setting the custom theme
- Testing if the page work correctly

CUSTOM THEME CREATION WEBSPHERE PORTAL 8.0.0.1 CF5
Custom Theme Portal 8.0.0.1 Author:Michele Buccarello Page 24
See the screen below

CUSTOM THEME CREATION WEBSPHERE PORTAL 8.0.0.1 CF5
Custom Theme Portal 8.0.0.1 Author:Michele Buccarello Page 25
Verify the if the edit mode works and if you are able to see the ctc portlets section