customer support email setup guide - your website and...
TRANSCRIPT

Customer Support
Email Setup Guide
Mailbox Setup Guide
Page 1
Table of Contents Mailbox Setup Guide .................................................................................................................................. 2
Before you Start ....................................................................................................................................... 2
Desktop Mail Clients .................................................................................................................................. 3
Outlook 2016 setup .................................................................................................................................. 3
Outlook 2013 setup .................................................................................................................................. 7
Outlook 2010 setup ................................................................................................................................ 12
Windows 10 Mail Setup .......................................................................................................................... 17
Windows Live Mail setup ........................................................................................................................ 22
Thunderbird Setup ................................................................................................................................. 25
Apple Mac Mail Clients ............................................................................................................................. 27
Outlook 2011 for Mac Setup .................................................................................................................. 27
Mac Mail Setup ...................................................................................................................................... 30
Mobile Device Clients ............................................................................................................................... 33
iPhone and iPad setup ........................................................................................................................... 33
Android Setup ........................................................................................................................................ 40
Legacy Mail Clients .................................................................................................................................. 46
Outlook 2007 Setup ............................................................................................................................... 46
Outlook 2003 Setup ............................................................................................................................... 53
Outlook Express Setup .......................................................................................................................... 57

Advanced Mailbox Setup Guide
Page 2
Mailbox Setup Guide
Setting up an Advanced mailbox only takes a few minutes. You can set up any email software
to send and receive email from your mailbox.
You can connect to your mailbox using either the POP3 or IMAP protocols. As a rule of thumb
it is better to use POP3 if only one computer accesses your mailbox, while it is better to use
IMAP if you have a number of computers that will access your mailbox. This guide will show
you step by step how to set up the most common mail clients to work with your new mailbox,
using whichever protocol you prefer.
Before you Start
Before you set up your email software, there are certain things you will need. These are
• Email software
• Internet connection
• Incoming Server address (shown in your control panel)
• SMTP address (shown in your control panel)
• Username (This is the same as the email address for your new mailbox)
• Password (As specified when you created the mailbox)
Mailbox Setup Guide
Page 3
Desktop Mail Clients
Outlook 2016 setup
Step 1
Open Outlook 2016. If this is the first time you have opened Outlook you will be directed to the
new account wizard. If you already have an account set up, click File, then Add account and
skip to step 3.
Step 2
When the Welcome to Outlook 2016 box opens, click Next, then Next again.
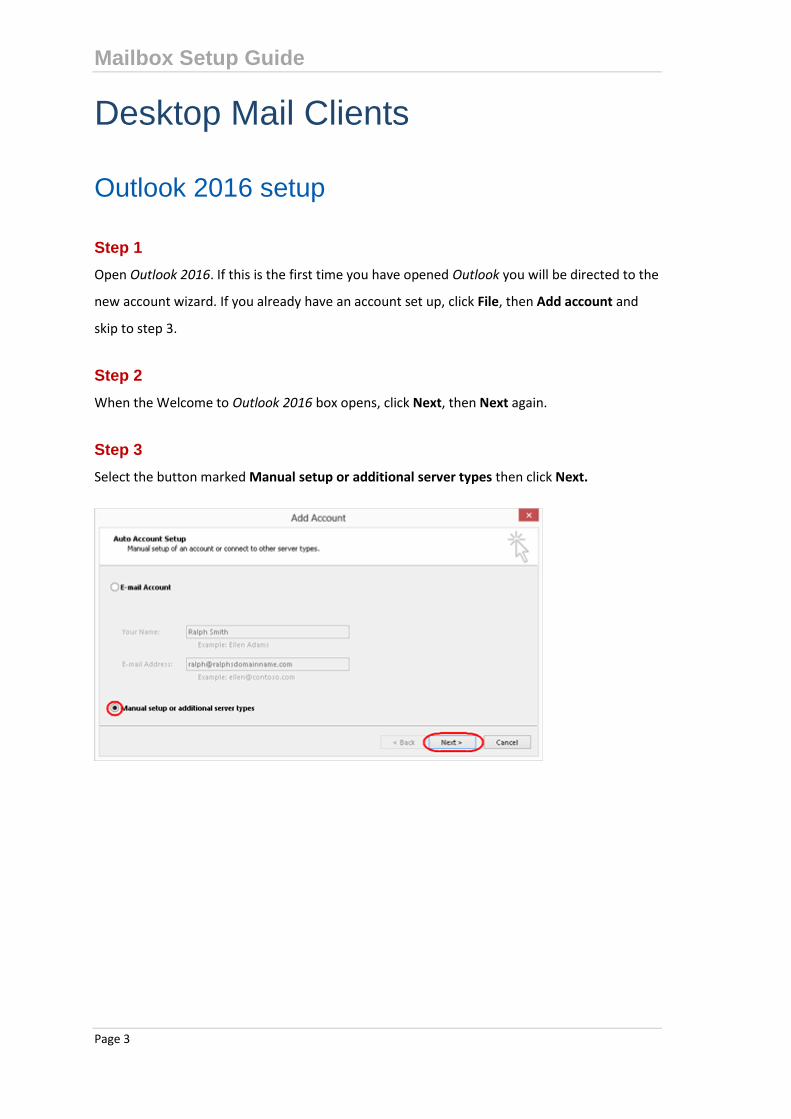
Step 3
Select the button marked Manual setup or additional server types then click Next.

Advanced Mailbox Setup Guide
Page 4
Step 4
Select POP or IMAP, then click Next.
Step 5
There is a lot of information to fill in on this next screen, let’s look at each section bit by bit.
User Information
Your name: This is what most email users will see in their inboxes instead of your
email address. Enter your name.
E-mail Address: Enter your full email address. This is made up of the mailbox name
you chose, an @ symbol and your domain name. [email protected] for example.
Server Information
Account type: Depending on your preferred type of connection,
select POP or IMAP from the drop down menu.
Incoming mail server: Enter mail.livemail.co.uk.
Outgoing mail server (SMTP): Enter smtp.livemail.co.uk.
Logon Information
User Name: Enter your full email address. This made up of the mailbox name you
chose, an @ symbol and your domain name.
Password: Enter the password you set up when you created the mailbox within your
control panel.
Remember password: Check this box.
Require logon using Secure Password Authentication (SPA): Leave unchecked.

Mailbox Setup Guide
Page 5
Once completed, the screen should look similar to the following:
Once you have entered all the information required, click More Settings.
Step 6
Select Use same settings as my incoming mail server.

Advanced Mailbox Setup Guide
Page 6
Step 7
Click the Advanced tab and enter the following settings:
Incoming Server: 993 for IMAP or 995 for POP.
Use the following type of encrypted connection: Set to SSL.
Outgoing server: Enter 465.
Use the following type of encrypted connection: Set to SSL.
Mailbox Setup Guide
Page 7
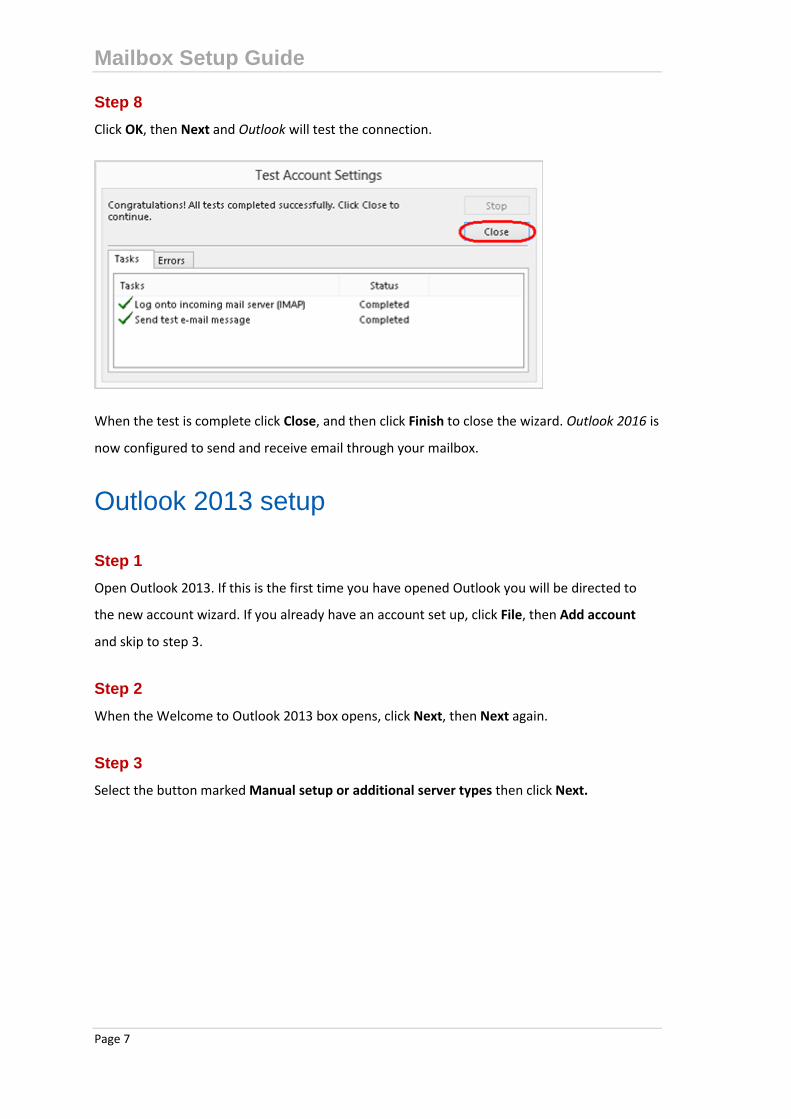
Step 8
Click OK, then Next and Outlook will test the connection.
When the test is complete click Close, and then click Finish to close the wizard. Outlook 2016 is
now configured to send and receive email through your mailbox.
Outlook 2013 setup
Step 1
Open Outlook 2013. If this is the first time you have opened Outlook you will be directed to
the new account wizard. If you already have an account set up, click File, then Add account
and skip to step 3.
Step 2
When the Welcome to Outlook 2013 box opens, click Next, then Next again.
Step 3
Select the button marked Manual setup or additional server types then click Next.

Advanced Mailbox Setup Guide
Page 8
Step 4
Select POP or IMAP, then click Next.
Step 5
There is a lot of information to fill in on this next screen, let’s look at each section bit by bit.
User Information
Your name: This is what most email users will see in their inboxes instead of your
email address. Enter your name.
E-mail Address: Enter your full email address. This is made up of the mailbox name
you chose, an @ symbol and your domain name. [email protected] for example.
Server Information
Account type: Depending on your preferred type of connection, select POP or IMAP
from the drop down menu.

Mailbox Setup Guide
Page 9
Incoming mail server: Enter mail.livemail.co.uk.
Outgoing mail server (SMTP): Enter smtp.livemail.co.uk.
Logon Information
User Name: Enter your full email address. This made up of the mailbox name you
chose, an @ symbol and your domain name.
Password: Enter the password you set up when you created the mailbox within your
control panel.
Remember password: Check this box.
Require logon using Secure Password Authentication (SPA): Leave unchecked.
Once completed, the screen should look similar to the following:

Advanced Mailbox Setup Guide
Page 10
Step 6
Make sure Use same settings as my incoming mail server is selected.
Step 7
Click the Advanced tab and enter the following settings:
Incoming Server: 993 for IMAP or 995 for POP.
Use the following type of encrypted connection: Set to SSL.
Outgoing server: Enter 465
Use the following type of encrypted connection: Set to SSL.

Mailbox Setup Guide
Page 11
Step 8
Click OK, then Next and Outlook will test the connection.
When the test is complete click Close, and then click Finish to close the wizard. Outlook 2013 is
now configured to send and receive email through your mailbox.

Advanced Mailbox Setup Guide
Page 12
Outlook 2010 setup
Step 1
Open Outlook 2010, click File and then click Account Settings.
Step 2
Select the E-mail tab and click New.

Mailbox Setup Guide
Page 13
Step 3
Select Manually configure server settings or additional server types and click Next.
Step 4
Select Internet E-mail and click Next.

Advanced Mailbox Setup Guide
Page 14
Step 5
There is a lot of information to fill in on this next screen, let’s look at each section bit by bit.
User Information
• Your name: This is what most email users will see in their inboxes instead of your
email address. Enter your name.
• E-mail Address: Enter your full email address. This is made up of the mailbox name
you chose, an @ symbol and your domain name. [email protected] for example.
Server Information
• Account type: Depending on your preferred type of connection, select POP or IMAP
from the drop down menu.
• Incoming mail server: Enter mail.livemail.co.uk
• Outgoing mail server (SMTP): Enter smtp.livemail.co.uk
Logon Information
• User Name: Enter your full email address. This made up of the mailbox name you
chose, an @ symbol and your domain name.
• Password: Enter the password you set up when you created the mailbox within your
control panel.
• Remember password: Check this box.
• Require logon using Secure Password Authentication (SPA): Leave unchecked.
Once completed, the screen should look similar to the following:
Mailbox Setup Guide
Page 15
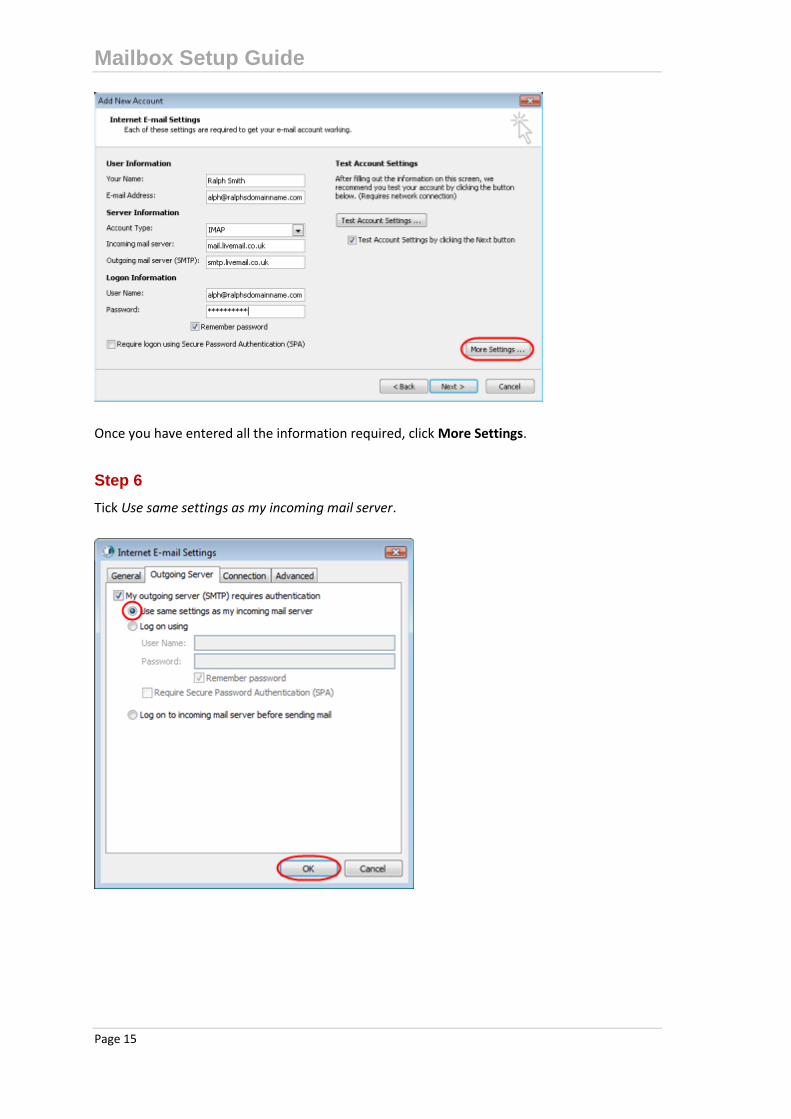
Once you have entered all the information required, click More Settings.
Step 6
Tick Use same settings as my incoming mail server.

Advanced Mailbox Setup Guide
Page 16
Step 7
Click the Advanced tab and enter the following settings:
• Incoming Server: 993 for IMAP or 995 for POP.
• Use the following type of encrypted connection: Set to SSL.
• Outgoing server: Enter 465.
• Use the following type of encrypted connection: Set to SSL.
Step 8
Click OK, then Next and Finish to close the wizard. Outlook 2010 is now configured to send and
receive email through your mailbox.

Mailbox Setup Guide
Page 17
Windows 10 Mail Setup
Step 1
Click the Start icon and select Mail from the menu.
Step 2
The first time you open Windows 10 Mail, you will be prompted to add an account. Click the
Add account button.
If you already have an email account set up click Settings, Accounts, Add an Account,
then Advanced Setup to start the wizard.

Advanced Mailbox Setup Guide
Page 18
Step 3
Click the Advanced Setup icon.

Mailbox Setup Guide
Page 19
Step 4
Click Internet email.
Step 5
Enter the following details:
Account name: A name to identify your account.
Your name: The name that will be displayed in your messages.
Incoming email server: Enter mail.livemail.co.uk.
Account type: Select IMAP4.

Advanced Mailbox Setup Guide
Page 20
Step 6
Scroll down to fill out the rest of the details as below:
Username: Enter your email address.
Password: Enter your mailbox password.
Outgoing (SMTP) email server: Enter smtp.livemail.co.uk.
Outgoing server requires authentication: Checked.
User the same user name and password for sending email: Checked.
Require SSL for incoming mail: Checked.
Require SSL for outgoing mail: Checked.
Once completed, the screen should look similar to the following:

Mailbox Setup Guide
Page 21
Step 7
Click Sign-in to set up your account and start using Windows 10 Mail. Windows 10 Mail is now
set up to send and receive emails from your mailbox

Advanced Mailbox Setup Guide
Page 22
Windows Live Mail setup
Step 1
Open Windows Live Mail. Click the Accounts tab and select Email in the New Account section.
Step 2
Enter your full email address and mailbox password in the text boxes provided.
In the Display Name text box, enter your name or company name. This is what most people will
see in their inbox when they receive an email from you.
Select the box marked Manually configure server settings for e-mail account and click Next.

Mailbox Setup Guide
Page 23
Step 3
Select IMAP or POP as your incoming mail server type from the drop down list and enter the
following details:
Incoming server information
Server address: Enter mail.livemail.co.uk
Port: 993 for IMAP, 995 for POP.
Requires a secure connection (SSL): Tick.
Authenticate using: Select Clear text from the drop down menu.
Logon user name: Enter the email address of your mailbox.
Outgoing server information
Server address: Enter smtp.livemail.co.uk.
Port: Change this from 25 to 465.
Requires a secure connection (SSL): Tick.
Requires authentication: Tick.

Advanced Mailbox Setup Guide
Page 24
Step 4
Check the details again. Click Next and Finish to set up your account and close the new
account wizard. Windows Live Mail is now configured to send and receive email through your
mailbox.

Mailbox Setup Guide
Page 25
Thunderbird Setup
Step 1
Open Thunderbird, open the menu, select New Message and then Existing Mail Account.
Step 2
Enter your mailbox details as below into the boxes provided and click Continue.
• Your name: Enter your name.
• Email address: Enter your email address.
• Password: Enter your mailbox password.
Advanced Mailbox Setup Guide
Page 26
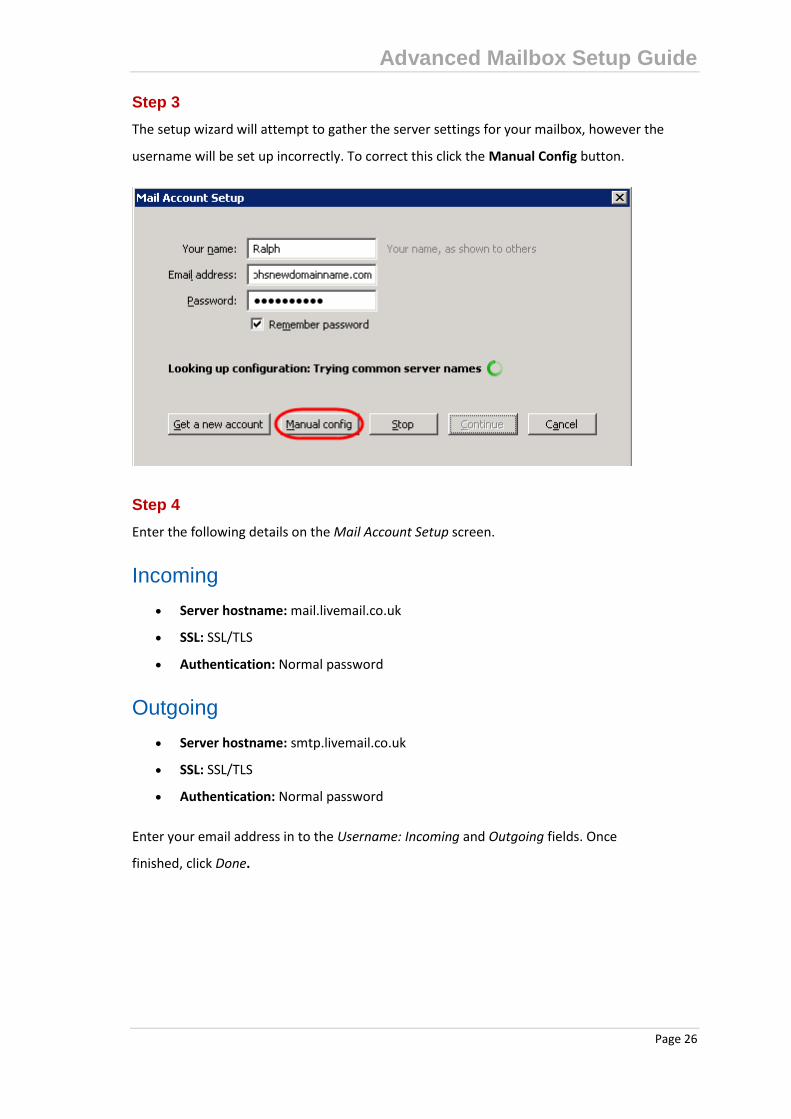
Step 3
The setup wizard will attempt to gather the server settings for your mailbox, however the
username will be set up incorrectly. To correct this click the Manual Config button.
Step 4
Enter the following details on the Mail Account Setup screen.
Incoming
Server hostname: mail.livemail.co.uk
SSL: SSL/TLS
Authentication: Normal password
Outgoing
Server hostname: smtp.livemail.co.uk
SSL: SSL/TLS
Authentication: Normal password
Enter your email address in to the Username: Incoming and Outgoing fields. Once
finished, click Done.

Mailbox Setup Guide
Page 27
Step 5
Thunderbird is now set up to send and receive emails.
Apple Mac Mail Clients
Outlook 2011 for Mac Setup
Step 1
Open Outlook 2011 and select Accounts from the Tools menu.
Advanced Mailbox Setup Guide
Page 28
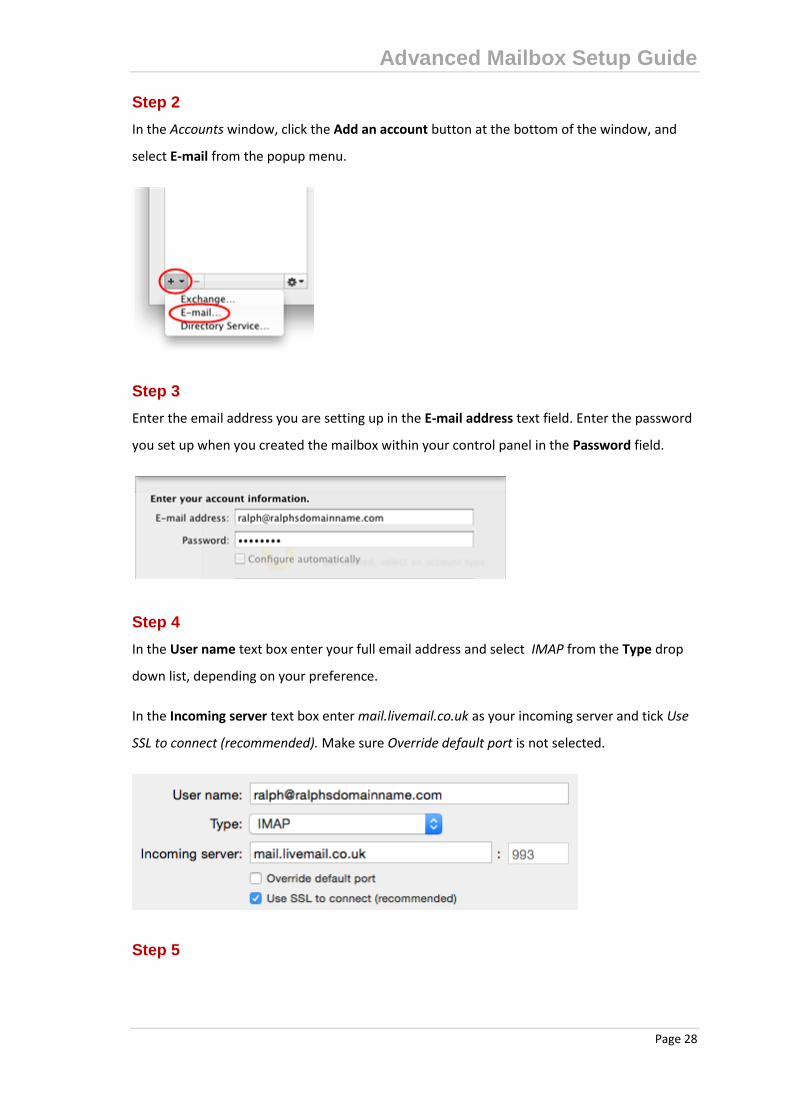
Step 2
In the Accounts window, click the Add an account button at the bottom of the window, and
select E-mail from the popup menu.
Step 3
Enter the email address you are setting up in the E-mail address text field. Enter the password
you set up when you created the mailbox within your control panel in the Password field.
Step 4
In the User name text box enter your full email address and select IMAP from the Type drop
down list, depending on your preference.
In the Incoming server text box enter mail.livemail.co.uk as your incoming server and tick Use
SSL to connect (recommended). Make sure Override default port is not selected.
Step 5

Mailbox Setup Guide
Page 29
Enter smtp.livemail.co.uk into the Outgoing server text box. Next, enter 465 in the port box to
the right of the Outgoing server, and make sure Use SSL to connect (recommended) is selected.
Click Add Account when you have entered the details.
Step 6
Close the Accounts window and click the Send messages in the Outbox and check for new
items button on the toolbar.
You should receive a test email to your Inbox folder.
Outlook 2011 is now configured to send and receive mail through your mailbox.

Advanced Mailbox Setup Guide
Page 30
Mac Mail Setup
Step 1
Open Mail.
If you have not already added an account to Mail you will directed to the New Account
Wizard.
If you have already created an account in Mail, click File, then Add account from the
drop down menu.
Step 2
When the New Account wizard opens, select Add Other Mail Account and click Continue.
Step 3
Enter the following in the text boxes provided:
Full Name: Enter your full name.
Email Address: Enter the full email address of the mailbox you want to create to.
Password: Enter the password for your mailbox.
Once done, click Create.

Mailbox Setup Guide
Page 31
You will receive a message stating Account must be configured manually, click Next.
Step 4
Select to setup your mailbox as IMAP. Enter mail.livemail.co.uk as the mail server to use a
secure SSL connection.
Your username is the same as your full email address. Enter this and your password in the text
boxes and click Next.

Advanced Mailbox Setup Guide
Page 32
Step 5
The Outgoing Mail Server page will appear. Enter the following information:
SMTP mail server: Enter smtp.livemail.co.uk as the SMTP server to use a secure SSL
connection.
Username: Enter your full email address.
Password: Enter your mailbox password. This is the password you chose when you
created your mailbox.
Once completed, the screen should look similar to the following:
Apple Mail will now configure your mailbox to use the best settings. If you need to edit these
settings, click Preferences in the Mail menu.

Mailbox Setup Guide
Page 33
Mobile Device Clients
iPhone and iPad setup
Step 1
Tap the Settings icon.
Step 2
Scroll down and press Mail, Contacts, Calendars.

Advanced Mailbox Setup Guide
Page 34
Step 3
Press Add Account.
Step 4
Select Other.

Mailbox Setup Guide
Page 35
Step 5
Press Add Mail Account.

Advanced Mailbox Setup Guide
Page 36
Step 6
Enter the following information and press Next:
Name: Enter your name. People will see this when you send them an email from your
device.
Email: Enter the full email address you are setting up. For
example [email protected].
Password: Enter your mailbox password.
Description: Enter an optional description to help you identify this mailbox.

Mailbox Setup Guide
Page 37
Step 7
When using a mobile device, we recommend using IMAP. This will give you greater flexibility
sharing information between your various devices. You should now be able to enter your
various email server settings, and the screen will look similar to this:
Incoming mail server
Let’s now enter the INCOMING MAIL SERVER settings. These settings control your ability to
receive email on your device.
Step 1
Change your Host Name to mail.livemail.co.uk.

Advanced Mailbox Setup Guide
Page 38
Step 2
Next, enter the email address, e.g. [email protected], for the Username.
Step 3
Finally, enter the Password will be the same you entered earlier.
Step 4
Your INCOMING MAIL SERVER settings will now look like this.

Mailbox Setup Guide
Page 39
Outgoing mail server
Step 1
Enter smtp.livemail.co.uk as your Host Name
Step 2
Next, enter the email address, e.g. [email protected], for the Username.
Step 3
Finally, the enter Password.
Step 4
Your OUTGOING MAIL SERVER settings will now look like this.

Advanced Mailbox Setup Guide
Page 40
Step 5
Press Next
Your device will then Verify the settings. This can take a couple of minutes.
Once everything has been verified, press the Save button to save your new account.
Android Setup
Step 1
Open the Email application on your device.

Mailbox Setup Guide
Page 41
Step 2
Enter your Email address and mailbox password in the text boxes provided and select Manual
Setup.
Step 3
Select IMAP as the account type.

Advanced Mailbox Setup Guide
Page 42
Step 4
For the Incoming settings, enter the following details in the text boxes provided:
Username: Enter your mailbox username, this will be the same as your Email address.
Password: Enter your mailbox password. This is the same password you chose when
you created your mailbox.
IMAP Server: Enter mail.livemail.co.uk.
Security type: Set to SSL.
Port: Leave this as 993.
IMAP path prefix: Leave this blank.
Once you have filled out all the details, click Next.

Mailbox Setup Guide
Page 43
Step 5
For the Outgoing settings, enter the following details in the text boxes provided:
SMTP server: Enter smtp.livemail.co.uk.
Security type: Set to SSL.
Port: Leave this as 465.
Require sign-in: Make sure this is checked.
Username: Enter your e-mail address.
Password: Enter your password.
Once you have filled out all the details, click Next.

Advanced Mailbox Setup Guide
Page 44
Step 6
You will be given options to select some custom settings.
Once you have chosen your custom settings, click Next.
Step 7
Enter an account name in the Set account name box and enter a display name in the Your
name box.
Quick tip: The account name will allow you to distinguish this account from any
other Email accounts you have set up on your Phone. The display name will be
shown on all outgoing messages.

Mailbox Setup Guide
Page 45
Click Done.
Your mailbox will now be ready to use.
Advanced Mailbox Setup Guide
Page 46
Legacy Mail Clients
Outlook 2007 Setup
Step 1
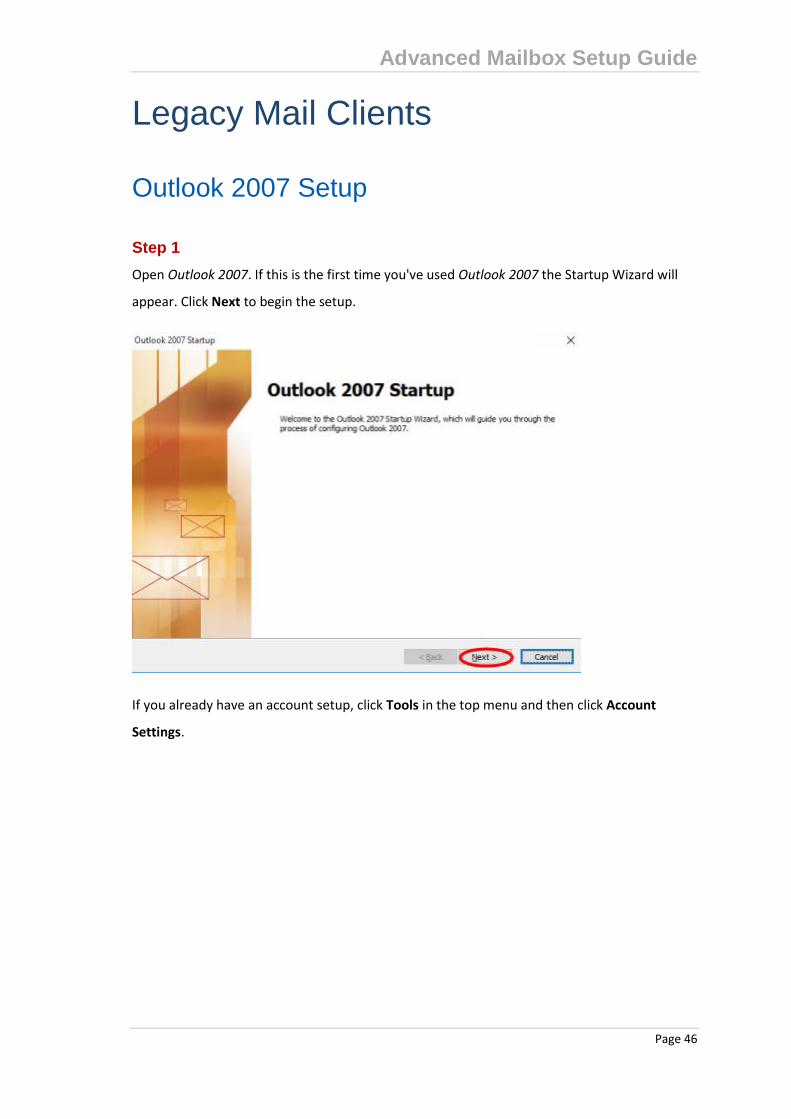
Open Outlook 2007. If this is the first time you've used Outlook 2007 the Startup Wizard will
appear. Click Next to begin the setup.
If you already have an account setup, click Tools in the top menu and then click Account
Settings.

Mailbox Setup Guide
Page 47
Step 2
To configure an email account select Yes and click Next.

Advanced Mailbox Setup Guide
Page 48
Step 3
Select Manually configure server settings of additional server types and click Next.

Mailbox Setup Guide
Page 49
Step 4
Select Internet E-mail and click Next.
Step 5
There is a lot of information to fill in on this next screen, let’s look at each section bit by bit.
User Information
• Your name: This is what most email users will see in their inboxes instead of your
email address. Enter your name
• E-mail Address: Enter your full email address. This is made up of the mailbox name
you chose, an @ symbol and your domain name. [email protected] for example.
Server Information
• Account type: Depending on your preferred type of connection, select POP or IMAP from
the drop down menu.
• Incoming mail server: Enter mail.livemail.co.uk.
• Outgoing mail server (SMTP): Enter smtp.livemail.co.uk

Advanced Mailbox Setup Guide
Page 50
Login Information
• User Name: Enter your full email address. This made up of the mailbox name you
chose, an @ symbol and your domain name.
• Password: Enter the password you set up when you created the mailbox within your
control panel.
• Remember password: Check this box.
• Require logon using Secure Password Authentication (SPA): Leave unchecked.
Once completed, the screen should look similar to the following:
Once you have entered all the information required, click More Settings.

Mailbox Setup Guide
Page 51
Step 6
Select Use same settings as my incoming mail server.
Step 7
Click the Advanced tab and enter the following settings:
• Incoming Server: 993 for IMAP or 995 for POP.
• Use the following type of encrypted connection: Set to SSL.
• Outgoing server: Enter 465.
• Use the following type of encrypted connection: Set to SSL.

Advanced Mailbox Setup Guide
Page 52
Step 8
Click OK, then Next and Finish to close the wizard. Outlook 2007 is now configured to send and
receive email through your mailbox.
Mailbox Setup Guide
Page 53
Outlook 2003 Setup
Step 1
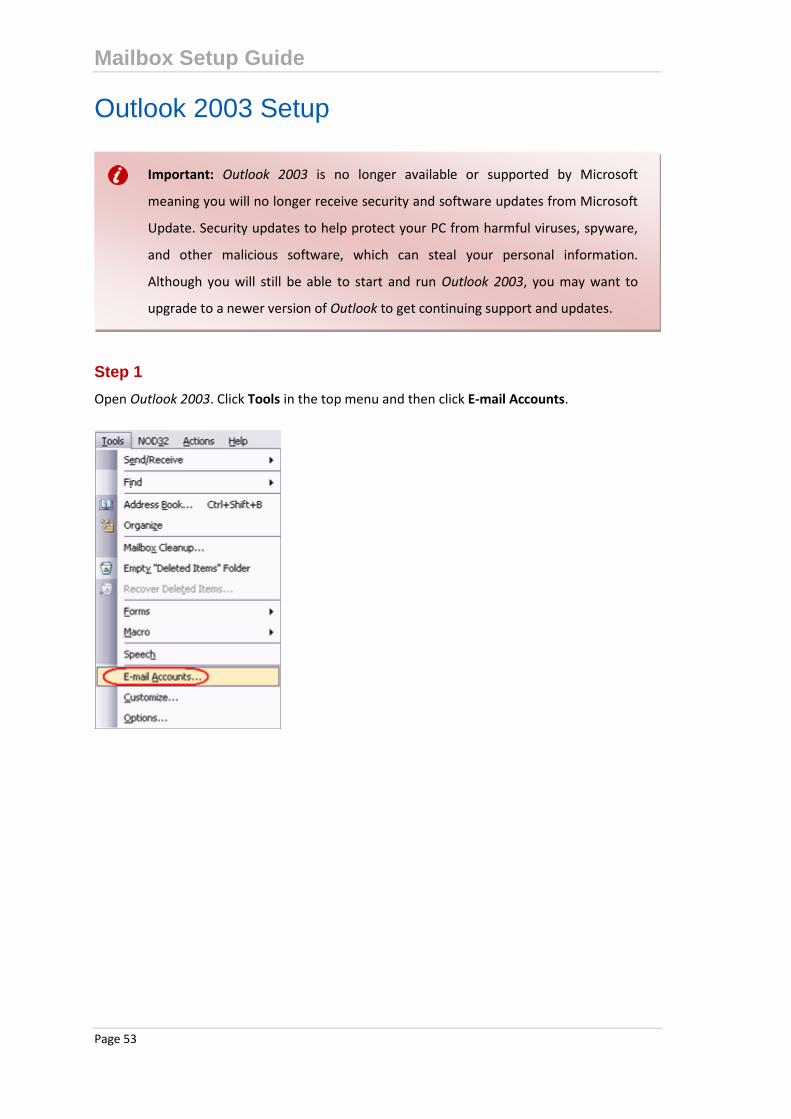
Open Outlook 2003. Click Tools in the top menu and then click E-mail Accounts.
Important: Outlook 2003 is no longer available or supported by Microsoft
meaning you will no longer receive security and software updates from Microsoft
Update. Security updates to help protect your PC from harmful viruses, spyware,
and other malicious software, which can steal your personal information.
Although you will still be able to start and run Outlook 2003, you may want to
upgrade to a newer version of Outlook to get continuing support and updates.

Advanced Mailbox Setup Guide
Page 54
Step 2
Select Add a new e-mail account and then click the Next button.
Step 3
Depending on your preferred connection select POP3 or IMAP from the list of available server
types. Click Next.

Mailbox Setup Guide
Page 55
Step 4
There is a lot of information to fill in on this next screen, let’s look at each section bit by bit.
User Information
Your name: This is what most email users will see in their inboxes instead of your
email address. Enter your name.
E-mail Address: Enter your full email address. This is made up of the mailbox name
you chose, an @ symbol and your domain name. [email protected] for example.
Server Information
Incoming mail server: Enter mail.livemail.co.uk
Outgoing mail server (SMTP): Enter smtp.livemail.co.uk
Login Information
User Name: Enter your full email address. This made up of the mailbox name you
chose, an @ symbol and your domain name.
Password: Enter the password you set up when you created the mailbox within your
control panel.
Remember password: Check this box.
Log on using secure password authentication (SPA): Leave unchecked.
Once completed, the screen should look similar to the following:
Advanced Mailbox Setup Guide
Page 56
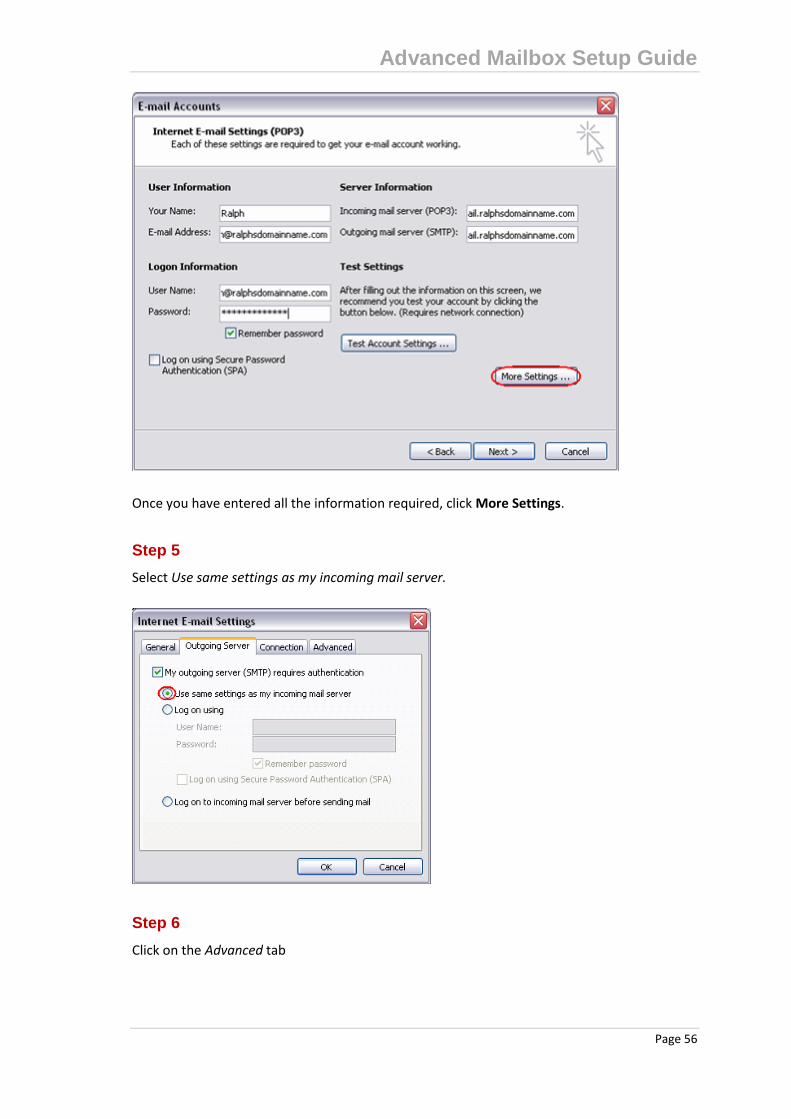
Once you have entered all the information required, click More Settings.
Step 5
Select Use same settings as my incoming mail server.
Step 6
Click on the Advanced tab

Mailbox Setup Guide
Page 57
Change the Incoming server port number to 993 if you are using IMAP or 995 for POP and
ensure you tick the This server requires an encrypted connection (SSL) box.
Change the Outgoing server port number to 465 and ensure you tick the This server requires
an encrypted connection (SSL) box.
Once finished click the OK button.
Step 7
Click the Next button, then click Finish. Outlook 2003 is now configured to send and receive
email through your mailbox.
Outlook Express Setup
Step 1
Open Outlook Express. Click the Tools menu and then click Accounts.
Step 2
The Internet Accounts window will open. Click Add in the top right corner. Click Mail in the
menu that appears. This will open the Internet Connection Wizard.

Advanced Mailbox Setup Guide
Page 58
Note: If it is the first time you have run Outlook Express on this computer, the
Internet Connection Setup wizard may start automatically.

Mailbox Setup Guide
Page 59
Step 3
On the first screen of the Internet Connection Wizard, you’ll be asked to enter a display name.
This is what most email users will see in their inboxes instead of your email address. Enter your
name and then click Next.
Step 4
Enter your full email address. This is made up of the mailbox name you chose, an “@” symbol
and your domain name. For example [email protected].
After you have entered your email address, click Next.

Advanced Mailbox Setup Guide
Page 60
Step 5
Depending on your preferred connection select POP3 or IMAP from the drop down menu.
Entermail.livemail.co.uk in the Incoming mail (POP3, IMAP or HTTP) server text box.
Enter smtp.livemail.co.uk into the Outgoing mail (SMTP) text box.
After you have entered your mail server names, click Next.
Step 6
On the Internet Mail Logon screen, enter your full email address in the Account name text box.
When you created the mailbox, you chose a password. Enter this in the Password text box.
After you have entered your mailbox name and password, click Next.
Important: The Log on using Secure Password Authentication (SPA) should not be
selected.
Mailbox Setup Guide
Page 61
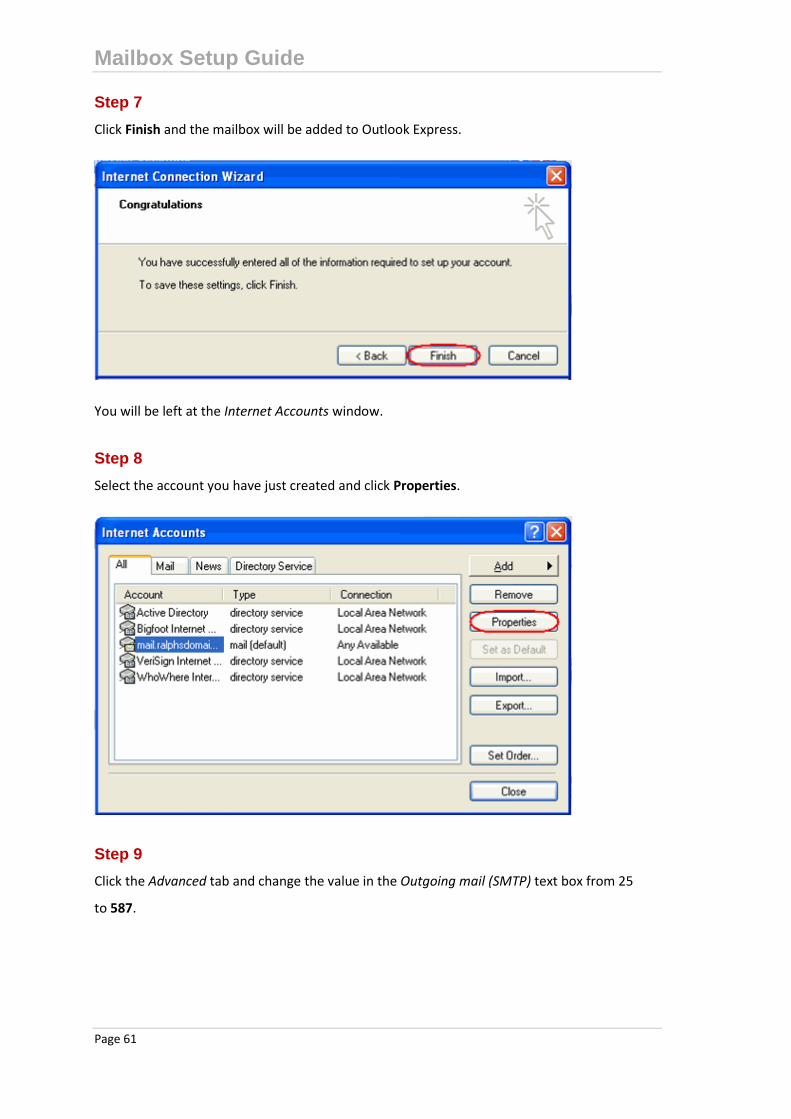
Step 7
Click Finish and the mailbox will be added to Outlook Express.
You will be left at the Internet Accounts window.
Step 8
Select the account you have just created and click Properties.
Step 9
Click the Advanced tab and change the value in the Outgoing mail (SMTP) text box from 25
to 587.

Advanced Mailbox Setup Guide
Page 62
Step 10
Click the Servers tab and ensure the My server requires authentication check box is selected,
then click Settings.
Step 11
Check Use same settings as my incoming mail server is selected.
Step 12
Finally, click OK and then Close to exit the window. Outlook Express is now configured to send
and receive email through your mailbox.