customer telephone support
TRANSCRIPT

Customer Telephone Support
To resolve problems with your printer use the suggestions provided in the
If You Have a Printing Problem
section in this user’s guide.
From a touch tone phone, you can reach our automated, 24-hour fax retrieval service that allows you to request information on HP Products by calling:
HP FIRST Fax...............................................(800) 333-1917
To reach 24-hour access to pre-recorded messages for common printer problems, call:
HP Audio Tips .............................................(800) 333-1917
If you continue to have problems call the HP Customer Support Center to speak with someone for technical assistance or for repair information. This service is free during the hardware warranty of your printer; however, you are charged a toll for the phone call. If your printer is out of warranty, see the
If You Have
a Printing Problem
section of this user’s guide.
HP Customer Support Center.................. (208) 323-2551
(Monday, Tuesday, Thursday, and Friday 7 am to 6 pm [MST]) (Wednesday 7 am to 4 pm [MST]; Saturday 9 am to 3 pm [MST])
N o te
Place any telephone call to the HP Customer Support Center from a telephonelocated near your printer and computer. This helps your support representativequickly diagnose any printer problems.
Before calling, fill in the following information so that you will have it ready to help your Customer Support Center representative:
What is the serial number of your printer?
(The serial number label is on the back of the printer.)
What model of printer do you have?
HP DeskWriter 600
What is the model of your Macintosh computer?
What is the version of software you are using, and what driver have you selected in the Chooser?

HP DeskWriter 600 Printer
••••••••••••••••••••••••••••••••••••••••••••••••••••••••••••••••••••••••••••
USER’S GUIDE
Manual Part NumberC2185-90200
®

••••••••••••••••••••••••••••••••••••••••••••••••••••••••••••••••••••••••••••••••••••••••••••••••••••••••••••••••••••••••••••••
ii
ACKNOWLEDGEMENTS
••••••••••••••••••••••••••••••••••••••••••••••••••••••••••••••••••••••••••••••••••••••••••••••••••••••••••••••••••••••••••••••
Apple, the Apple logo, AppleTalk, ImageWriter, LaserWriter, and Macintosh are registered trademarks of Apple Computer, Inc.
Apple Desktop Bus, TrueType, Finder, LocalTalk, MultiFinder, and QuickDraw are trademarks of Apple Computer, Inc.
Adobe and Adobe Type Manager are trademarks of Adobe Systems Incorporated.
Monotype
®
is a U.S. registered trademark of The Monotype Typography Ltd.
Times® is under license from The Monotype Typography Ltd.
Milestones™ is a trademark of The Monotype Corporation.
Lucida® is a U.S. registered trademark of Bigelow & Holmes Inc.
PL is a trademark of Photoletting Inc.
Graphite is a trademark of David Siegel.
ITC Avant Garde Gothic, ITC Bookman, ITC Zapf Chancery Medium Italic and ITC Zapf Dingbats are under license from and registered trademarks of International Typeface Corporation.
Scalable type outlines are licensed from Agfa Division of Miles Inc.
Helvetica™ is a trademark of Linotype-Hell AG and/or its subsidiaries.
Apple Computer, Inc. makes no warranties, either express or implied, regarding the enclosed computer software package, its merchantability or its fitness for any particular purpose. The exclusion of implied warranties is not permitted by some states. The above exclusion may not apply to you. This warranty provides you with specific legal rights. There may be other rights that you may have which vary from state to state.
Apple software shall not be copied onto another diskette (except for archival purposes) or into memory unless as part of the execution of HP DeskWriter 600 printer installation software. When the HP DeskWriter 600 printer installation software has completed execution, Apple software shall not be used by any other program.
The HP DeskWriter 600 printer driver was developed by Hewlett-Packard Company using the Palomar Imaging Kernel developed by Palomar Software, Inc. The HP Background Startup, HP Background, and HP PrintMonitor are copyrighted programs of Palomar Software, Inc. They are licensed to Hewlett-Packard Company to distribute for use in combination with the HP DeskWriter 600 printer.
NOTICE
••••••••••••••••••••••••••••••••••••••••••••••••••••••••••••••••••••••••••••••••••••••••••••••••••••••••••••••••••••••••••••••
The information contained in this document is subject to change without notice.
Hewlett-Packard makes no warranty of any kind with regard to this material, including, but
not limited to, the implied warranties of merchantability and fitness for a particular purpose.
Hewlett-Packard shall not be liable for errors contained herein or for incidental or consequential damages in connection with the furnishing, performance, or use of this material.
No part of this document may be photocopied, reproduced, or translated to another language without the prior written consent of Hewlett-Packard Company.
PRINTING HISTORY
••••••••••••••••••••••••••••••••••••••••••••••••••••••••••••••••••••••••••••••••••••••••••••••••••••••••••••••••••••••••••••••
Edition 1, March 1995
© Copyright 1995 by Hewlett-Packard Company

••••••••••••••••••••••••••••••••••••••••••••••••••••••••••••••••••••••••••••••••••••••••••••••••••••••••••••••••••••••••••••••
iii
T A B L E O F C O N T E N T S
SECTION 1
FIRST TIME SETUP
Unpacking Your Printer............................................ 2Identifying the Parts of Your Printer ...................... 4What the Buttons and Lights Do ............................. 5Connecting the Printer Cable .................................. 6Connecting the Power Module ................................ 8Loading Standard Size Paper .................................. 9Installing the Print Cartridge ................................ 11Verifying the Printer is Working ........................... 13Installing the Printer Software .............................. 14
SECTION 2
USING THE PRINTER SOFTWARE
The Software Provided for Your Printer ............... 19Printing Features ................................................... 20Other Printing Options .......................................... 21Using the HP PrintMonitor .................................... 22Using the Online Help ............................................ 23Updating the Printer Software .............................. 23
SECTION 3
USING PAPER, CARDS, ENVELOPES, LABELS, AND TRANSPARENCIES
Determining the Print Side of Paper .................... 25Guidelines for Using Paper .................................... 26Selecting and Storing Paper, Envelopes, Cards, Labels, and Transparencies ....................... 27Using Standard Size Paper .................................... 29Using Index Cards and Postcards ......................... 31Using Envelopes ..................................................... 33Using Avery Paper Labels ...................................... 37Tip: Using Non-Standard Size Paper .................... 39Adding Paper, Envelopes, Cards, or Transparencies ....................................................... 42Removing Paper, Envelopes, Cards, or Transparencies ....................................................... 42
SECTION 4
USING PRINT CARTRIDGES
Storing and Using Print Cartridges ....................... 43Removing the Print Cartridge ............................... 44Cleaning the Print Cartridge ................................. 45

••••••••••••••••••••••••••••••••••••••••••••••••••••••••••••••••••••••••••••••••••••••••••••••••••••••••••••••••••••••••••••••
iv
T A B L E O F C O N T E N T S
SECTION 5
IF YOU HAVE A PRINTING PROBLEM
How You Can Find the Solution .............................47If Nothing Prints .....................................................48If Paper, Envelopes, Cards, Labels, or Transparencies Don’t Pass Through the Printer .............................52If You Get a Message at the Computer ..................55Printing the Self-Test Pattern ................................57If Print Quality is Poor ............................................58If Margins are Printed Wrong .................................60If Text or Pictures are Printed Wrong ...................63Contacting Customer Support ...............................65
SECTION 6
REFERENCE, SPECIFICATIONS, AND ORDERING INFORMATION
Maintaining Your Printer ........................................67Increasing Printer Performance .............................68Ink Drying Times ....................................................70The Printable Area ..................................................71Specifications ..........................................................73Regulatory Notices .................................................75Available Supplies and Accessories .......................77Ordering Information ..............................................79
SECTION 7
USING THE HP COLOR KIT
How to Print in Color ..............................................81How to Resume Printing in Black ..........................81About Composite Black ..........................................82About ColorSmart ...................................................82Using Grayscale for Draft Copies ...........................82Storing the Unused Print Cartridge .......................83If Colors are Printed Wrong ...................................84
SECTION 8
INDEX
................................................................. 87
••••••••••••••••••••••••••••••••••••••••••••••••••••••••••••••••••••••••••••••••••••••••••••••••••••••••••••••••••••••••••••••
1
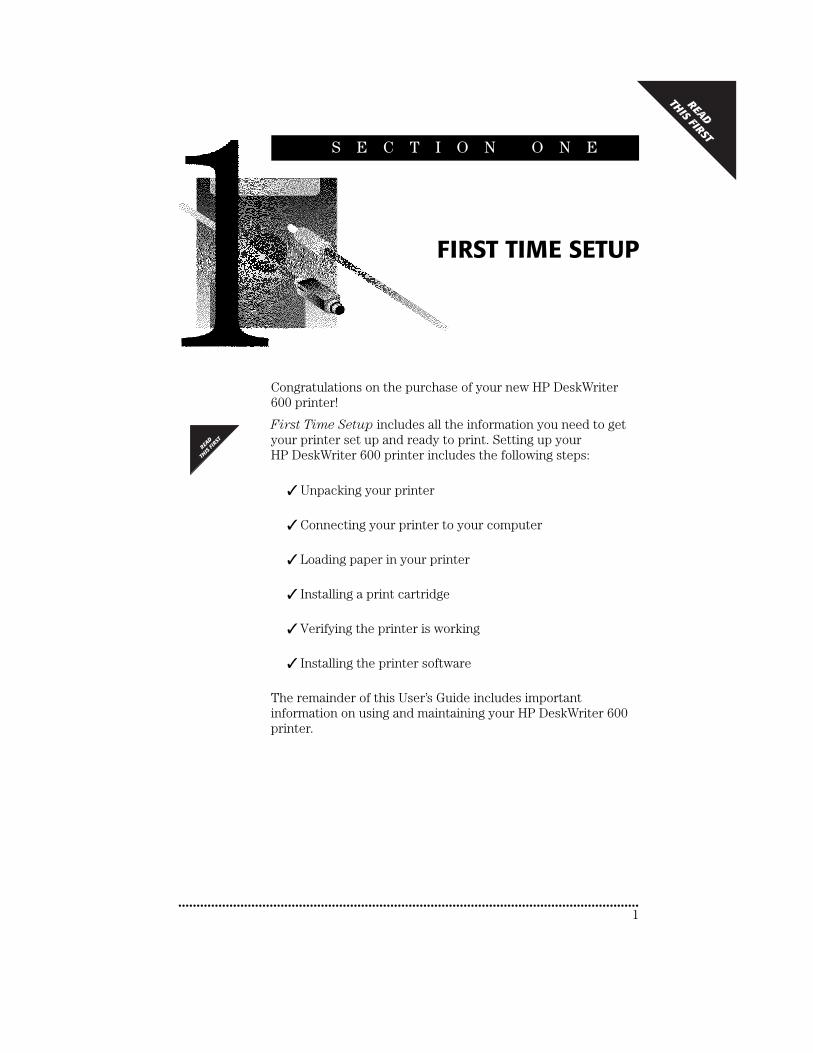
Congratulations on the purchase of your new HP DeskWriter 600 printer!
First Time Setup
includes all the information you need to get your printer set up and ready to print. Setting up your HP DeskWriter 600 printer includes the following steps:
✓
Unpacking your printer
✓
Connecting your printer to your computer
✓
Loading paper in your printer
✓
Installing a print cartridge
✓
Verifying the printer is working
✓
Installing the printer software
The remainder of this User’s Guide includes important information on using and maintaining your HP DeskWriter 600 printer.
FIRST TIME SETUP
S E C T I O N O N E

••••••••••••••••••••••••••••••••••••••••••••••••••••••••••••••••••••••••••••••••••••••••••••••••••••••••••••••••••••••••••••••
2
SECTION ONE
•••••••••••••••••••••••••••••••••••••••••••••••••••••••••••••••••••••••••••••••••••••••••••••••••••
Unpacking Your Printer
1.
Unpack the accessories, packing material, and printer from the carton. Set the printer on a flat, stable surface.
2.
Make sure the following items were shipped with your printer. If any of these items are missing or damaged, contact the dealer from whom you purchased your printer.
Save the carton and packing material so you can use it to move or ship your printer later.
2184046
Printer
Power Module
User’s Guide
BlackPrint Cartridge
Printer Software

••••••••••••••••••••••••••••••••••••••••••••••••••••••••••••••••••••••••••••••••••••••••••••••••••••••••••••••••••••••••••••••
3
FIRST TIME SETUP
••••••••••••••••••••••••••••••••••••••••••••••••••••••••••••••••••••••••••••••••••••••••••••••••••••••••••••••••••••••••••••••
3.
Remove the packing tape securing the left side of the top cover, securing both sides of the OUT tray packing material, and securing the paper length adjuster to the printer.
4.
Remove the packing material.
5.
Open the top cover and remove the tape securing the packing material inside the printer.
.
6.
Lift the packing material up and out of the printer.
2184047
Packing Material
2162049
Tape andPacking Material

••••••••••••••••••••••••••••••••••••••••••••••••••••••••••••••••••••••••••••••••••••••••••••••••••••••••••••••••••••••••••••••
4
SECTION ONE
•••••••••••••••••••••••••••••••••••••••••••••••••••••••••••••••••••••••••••••••••••••••••••••••••••
Identifying the Parts of Your Printer
2184001B
Top Cover
Print CartridgeCradle
Power Buttonand Light
Paper WidthAdjuster
IN Tray
OUT Tray
Card Guide
Resume Buttonand Light
Paper LengthAdjuster
Single EnvelopeSlot

••••••••••••••••••••••••••••••••••••••••••••••••••••••••••••••••••••••••••••••••••••••••••••••••••••••••••••••••••••••••••••••
5
FIRST TIME SETUP
••••••••••••••••••••••••••••••••••••••••••••••••••••••••••••••••••••••••••••••••••••••••••••••••••••••••••••••••••••••••••••••
What the Buttons and Lights Do
The resume and power buttons and lights are on the front of the printer. In general, the lights indicate when the printer is operating correctly and when it needs attention from you; the buttons are used to control the printer.
This table summarizes what the lights indicate:
When the Lights are... You Need to...
Turned off and Turned off
Press the power button to turn on the printer.
Steadily lit and Turned off
Send a document to the printer. The printer is in the ready-to-print state.
Steadily lit and Blinking
If you just installed a print cartridge, make sure the print cartridge is securely snapped into the printer with the arrow aligned with the dot on the top of the print cartridge cradle.
Close the top cover of the printer if it is open.
Check the IN tray to be sure it contains paper and that the paper is correctly loaded in the tray.
Press the resume button to clear the error condition. Then check your computer screen for any reported error message and corrective action instructions.
Blinking and
Turned off
No action required. This indicates that either the computer is sending a document to the printer or that the printer is currently busy printing a document.
Blinking and
Blinking
Press the power button to turn off the printer. At the computer, cancel any documents awaiting printing. Then press the power button again to turn the printer back on. If the lights continue to blink alternately, see the troubleshooting information in
Section 5
of this User’s Guide.
Steadily lit and
Steadily lit
See the troubleshooting information in
Section 5
of this User’s Guide.
Power Lightand Button
Resume Lightand Button

••••••••••••••••••••••••••••••••••••••••••••••••••••••••••••••••••••••••••••••••••••••••••••••••••••••••••••••••••••••••••••••
6
SECTION ONE
•••••••••••••••••••••••••••••••••••••••••••••••••••••••••••••••••••••••••••••••••••••••••••••••••••
Connecting the Printer Cable
A shielded network connector kit or a shielded serial printer cable are not supplied with your printer, allowing you to purchase the kit or cable of your choice. If you use PhoneNET connectors in your network, you’ll need to purchase an AppleTalk Connector kit; if you use LocalTalk connectors in your network, you’ll need to purchase an Apple LocalTalk Locking Connector kit. If you connect your printer directly to your Macintosh computer, you’ll need to purchase a serial printer cable. See your local computer dealer or
Available
Supplies and Accessories
on page 77 for details.
1.
Position the printer with the back toward you.
2.
Perform the steps in either the procedure
Connecting
Directly to a Macintosh Computer
(below) or in the procedure
Connecting to an AppleTalk Network
(on page 7).
Connecting Directly to a Macintosh Computer
1.
Connect one end of the serial printer cable firmly to the printer’s interface port.
N OT E
A serial printer cable resembles a “switch box” extension cable; however, do notuse a switch box extension cable because it will not work properly.
2.
Connect the other end of the printer cable to either the modem port or printer port (whichever is available) on the back of the computer.
2162006
Printer’s InterfacePort

••••••••••••••••••••••••••••••••••••••••••••••••••••••••••••••••••••••••••••••••••••••••••••••••••••••••••••••••••••••••••••••
7
FIRST TIME SETUP
••••••••••••••••••••••••••••••••••••••••••••••••••••••••••••••••••••••••••••••••••••••••••••••••••••••••••••••••••••••••••••••
Connecting to an AppleTalk Network
Use the following steps to connect your printer to the computer using an AppleTalk network. (If your computer is already connected to a network, refer to the documentation provided with your network for appropriate connection procedures.)
1.
Connect a connector box firmly to the printer’s interface port.
2.
Connect a second connector box to the
printer port
on the back of the computer. Do not connect to the modem (phone) port.
3.
Connect the two connector boxes with a network interface cable. You may use either connector on the connector box.
4.
If necessary, terminate the AppleTalk network as described in the documentation provided with the connector boxes.
2162006
Printer’s InterfacePort

••••••••••••••••••••••••••••••••••••••••••••••••••••••••••••••••••••••••••••••••••••••••••••••••••••••••••••••••••••••••••••••
8
SECTION ONE
•••••••••••••••••••••••••••••••••••••••••••••••••••••••••••••••••••••••••••••••••••••••••••••••••••
Connecting the Power Module
Be sure the electrical outlet you intend to use to power your printer is located near the equipment and is easily accessible.
1.
Plug the power module connector firmly into the printer’s power socket
2.
Plug the other end of the power module cord into an electrical outlet.
N OT E
Place the power module at least 1 inch (approximately 3 cm) away from yourcomputer, disk drive, or hard disk to avoid magnetic interference.
2164003
Power Socket onBack of Printer

••••••••••••••••••••••••••••••••••••••••••••••••••••••••••••••••••••••••••••••••••••••••••••••••••••••••••••••••••••••••••••••
9
FIRST TIME SETUP
••••••••••••••••••••••••••••••••••••••••••••••••••••••••••••••••••••••••••••••••••••••••••••••••••••••••••••••••••••••••••••••
Loading Standard Size Paper
The HP DeskWriter 600 printer prints on plain, premium, and glossy paper; envelopes; cards; transparencies; and Avery paper labels. Most bond paper yields good results. Use this procedure to load standard size paper into the printer. See
Section 3
for more information on using paper, envelopes, cards, transparencies, and Avery paper labels.
1.
Slide the paper width adjuster to its leftmost position.
2.
Pull out the paper length adjuster.
3.
Remove up to a
1
/
2
inch (approximately 1 cm) stack of paper from the packaging. Fan the edges of the paper stack to separate the pages. Then tap the short edge of the stack on a flat surface to even the stack.
2184037
Paper WidthAdjuster
Paper LengthAdjuster
2162040

••••••••••••••••••••••••••••••••••••••••••••••••••••••••••••••••••••••••••••••••••••••••••••••••••••••••••••••••••••••••••••••
10
SECTION ONE
•••••••••••••••••••••••••••••••••••••••••••••••••••••••••••••••••••••••••••••••••••••••••••••••••••
4.
Insert the paper evenly into the IN tray, print side down, until it stops. (For plain paper, the print side is identified by a word or symbol on the paper’s packaging. See
Determining the Print
Side
of Paper
on page 25 for more details.) Align the right edge of the stack with the right edge of the IN tray.
5.
Push the paper length adjuster in toward the paper until it stops.
Make sure the paper does not bend in the IN tray.
2184021
2184022
Paper LengthAdjuster

••••••••••••••••••••••••••••••••••••••••••••••••••••••••••••••••••••••••••••••••••••••••••••••••••••••••••••••••••••••••••••••
11
FIRST TIME SETUP
••••••••••••••••••••••••••••••••••••••••••••••••••••••••••••••••••••••••••••••••••••••••••••••••••••••••••••••••••••••••••••••
Installing the Print Cartridge
1.
Turn on the computer, then turn on the printer by pressing and releasing the power button.
The very first time you turn on the printer,
the printer performs a startup procedure.
2.
Open the top cover of the printer. In a few moments the empty print cartridge cradle automatically moves to the center of the printer and the resume light flashes.
3.
Open the print cartridge packaging. Grasp the print cartridge by the top and remove the cartridge from the package.
N OT E
Be careful not to touch the ink nozzles or the copper contacts.
4.
Remove
both pieces
of tape covering the ink nozzles and the vent hole on the print cartridge.
2184013
Top Cover
2162041
Tape

••••••••••••••••••••••••••••••••••••••••••••••••••••••••••••••••••••••••••••••••••••••••••••••••••••••••••••••••••••••••••••••
12
SECTION ONE
•••••••••••••••••••••••••••••••••••••••••••••••••••••••••••••••••••••••••••••••••••••••••••••••••••
5.
Drop the print cartridge into the cradle, making sure that the print cartridge is in front of the movable cartridge guide. Align the arrow on the cartridge top with the dot on top of the cradle.
6. Push the arrow toward the dot until the cartridge snaps into place. (Rocking of the cradle is normal.) When using the black print cartridge, be sure that the movable cartridge guide is behind the print cartridge.
7. Close the printer’s top cover. The print cradle returns to its “home” position on the right side of the printer and the resume light turns off.
N OT E If the resume light continues to blink and if the cradle does not move back tothe right side of the printer, remove and reinstall the print cartridge. Make sure theprint cartridge is pressed down into the cradle before you snap it forward intoposition. Also be sure the cartridge guide is behind the black print cartridge.
A color kit is available for use with your HP DeskWriter 600 printer. See Using the HP Color Kit on page 81 for more information.
FOR COLOR KIT USERS
218401Print Cartridge
Movable CartridgeGuide
2184015
Print Cartridge

••••••••••••••••••••••••••••••••••••••••••••••••••••••••••••••••••••••••••••••••••••••••••••••••••••••••••••••••••••••••••••••
13
FIRST TIME SETUP••••••••••••••••••••••••••••••••••••••••••••••••••••••••••••••••••••••••••••••••••••••••••••••••••••••••••••••••••••••••••••••
Verifying the Printer is Working
Before installing the printer software, make sure your printer is set up and working properly by performing a printer self-test.
1. To print a one-page self-test pattern, with the computer turned on and printer’s power light lit, press and hold down the resume button for a few seconds.
2. When the printer begins to print, release the resume button.
N OT E The self-test pattern may vary slightly from the example shown. If you cannot printa self-test pattern, see the troubleshooting information in Section 5.
To fully use all the features of your HP DeskWriter 600 printer, install the printer software supplied with the printer by following the instructions given next.
2185100

••••••••••••••••••••••••••••••••••••••••••••••••••••••••••••••••••••••••••••••••••••••••••••••••••••••••••••••••••••••••••••••
14
SECTION ONE•••••••••••••••••••••••••••••••••••••••••••••••••••••••••••••••••••••••••••••••••••••••••••••••••••
Installing the Printer Software
Unless you install the software supplied with your printer, you will not be able to print to your new HP DeskWriter 600 printer. For more information about the software provided with your printer, see Section 2.
System Requirements
To install your HP DeskWriter Series printer software, you need:
• A computer with a 68020 (or faster) processor with a hard disk drive with at least 7.5 MB of free disk space (1.5 MB for the printer drivers and 6.0 MB for the fonts). If you have less than 7.5 MB of free disk space, your software may not install properly.
• Macintosh system software version 7 or later.
• At least 4 MB of system memory.
N OT E The standard printer software supplied with the HP DeskWriter 600 printer is
QuickDraw compatible, but not compatible with QuickDraw GX. However, insome countries, HP provides additional printer software for use with QuickDrawGX. Check the software diskettes shipped with your printer to see if the Quick-Draw GX printer software is provided. If the QuickDraw GX printer software is notprovided with your printer, see the information card enclosed with your printer forinstructions on how to obtain printer software for use with QuickDraw GX.
Before you install the printer software:
1. Make a copy of the Installation Disks. Use the copy for installation and keep the original disks in a safe place.
2. Turn off any virus protection applications.
3. Quit any open applications.
N OT E If the printer software is damaged or missing from the package, contact yourauthorized Hewlett-Packard dealer as described under Contacting Customer Support on page 65.

••••••••••••••••••••••••••••••••••••••••••••••••••••••••••••••••••••••••••••••••••••••••••••••••••••••••••••••••••••••••••••••
15
FIRST TIME SETUP••••••••••••••••••••••••••••••••••••••••••••••••••••••••••••••••••••••••••••••••••••••••••••••••••••••••••••••••••••••••••••••
Installing the printer software:
The driver installer provides two options: Easy Install and Customize. Use the Easy Install option to install all of the printer software in the correct locations on your hard disk. Use the Customize option to install only selected portions of the printer software as described in the ReadMe file on the Driver Installation disk.
1. Make sure your computer is turned on.
2. Insert the Driver Installation disk and double-click the Installer icon.
3. Follow the instructions on the screen.
N OT E If the Installer finds a file that has the same name as one it is installing, it replacesthat file with the most current version.
4. Optionally, perform the steps in the procedure Installing the
TrueType fonts (given below) if you want to use the TrueType fonts in your printed documents.
5. You must select your printer in the Chooser as described in the procedure Choosing Your Printer (on page 16) before you can start printing.
Installing the TrueType fonts:
Perform this optional procedure only if you want to use the TrueType fonts provided with your printer in your printed documents. To install all of the TrueType fonts in the correct locations on your hard disk:
1. Insert the Fonts Installation disk and double-click the Installer icon.
2. Follow the instructions on the screen.
N OT E If you need more detailed instructions for installing fonts on your system, see theReadMe file on the Fonts Installation disk.

••••••••••••••••••••••••••••••••••••••••••••••••••••••••••••••••••••••••••••••••••••••••••••••••••••••••••••••••••••••••••••••
16
SECTION ONE•••••••••••••••••••••••••••••••••••••••••••••••••••••••••••••••••••••••••••••••••••••••••••••••••••
Setting the Disk Cache
To enhance the performance of your printer, you need to set the disk cache of the computer.
1. From the Finder’s Control Panels, double-click to open the Memory control panel.
2. Set the size of the Disk Cache to at least 256K by clicking on the up-arrow of the Disk Size box.
3. Close the Memory control panel by clicking on the close box in the upper left corner.
Choosing your printer:
Use the Chooser to select the printer driver, printer, and port.
When your printer is connected directly to your
computer with a serial printer cable, follow these steps to choose a printer:
1. Select the Chooser from the Apple menu.
2. Select the DW 600 Series icon (on the left side of the Chooser).
3. Then select either the printer or modem port on the right side of the Chooser. If you select the printer port and if your computer is also connected to an EtherTalk network, make AppleTalk inactive by clicking the Inactive button.
The driver automatically selects the model of printer you are using. However, to verify that the correct printer has been selected, click the Setup button and check that DeskWriter 600 is highlighted in the pop-up menu.
4. If you want to print in background mode, select Background Printing by clicking the On button.
N OT E If the Background Printing buttons are grayed out, background printing is unavail-able. See If You Get a Message at the Computer on page 55.
5. Close the Chooser by clicking the close box in the upper left corner. You are alerted that you have changed printers.
Printer
Modem

••••••••••••••••••••••••••••••••••••••••••••••••••••••••••••••••••••••••••••••••••••••••••••••••••••••••••••••••••••••••••••••
17
FIRST TIME SETUP••••••••••••••••••••••••••••••••••••••••••••••••••••••••••••••••••••••••••••••••••••••••••••••••••••••••••••••••••••••••••••••
When your printer is connected to an AppleTalk network, follow these steps to choose a printer:
1. Select the Chooser from the Apple menu.
2. Make AppleTalk active by clicking the Active button.
3. Select Restart from the Finder’s Special menu to activate AppleTalk. Then reselect the Chooser from the Apple menu.
4. Select the DW 600 Series (AT) icon (on the left of the Chooser).
5. If you are on a large network, select your AppleTalk zone from the window in the lower left corner.
6. Select your printer from the window on the right.
The driver automatically selects the model of printer you are using. However, to verify that the correct printer has been selected, click the Setup button and check that DeskWriter 600 is highlighted in the pop-up menu.
7. If you want to print in background mode, select Background Printing by clicking the On button.
N OT E If the Background Printing buttons are grayed out, background printing is unavail-able. See If You Get a Message at the Computer on page 55.
8. Close the Chooser by clicking the close box in the upper left corner. You are alerted that you have changed printers.

••••••••••••••••••••••••••••••••••••••••••••••••••••••••••••••••••••••••••••••••••••••••••••••••••••••••••••••••••••••••••••••
18
SECTION ONE•••••••••••••••••••••••••••••••••••••••••••••••••••••••••••••••••••••••••••••••••••••••••••••••••••
Naming Your Printer
If your DeskWriter Series printer is connected to an AppleTalk network that has multiple HP DeskWriter series printers connected to it, you may want to name your printer to distinguish it from other printers listed in the Chooser. This ensures that you can select the desired printer on the network.
Before you name your printer, make sure the printer is turned on and connected to the network. Then follow these steps:
1. Select the Chooser from the Apple menu.
2. Select the DW 600 Series (AT) icon (on the left of the Chooser).
3. If you are on a large network, select your AppleTalk zone from the window in the lower left corner.
4. Select your printer from the window on the right, then click Setup. (By default, the unnamed printer is named DeskWriter 600 in the list of printers.)
5. Type in a new name for your printer. Click Rename, then click OK.
6. Close the Chooser by clicking the close box in the upper left corner. You are alerted that you have changed printers.

••••••••••••••••••••••••••••••••••••••••••••••••••••••••••••••••••••••••••••••••••••••••••••••••••••••••••••••••••••••••••••••
19
USING THE PRINTERSOFTWARE
S E C T I O N T W O
The Software Provided for Your Printer
The features provided with your printer software include:
• Laser-quality text and graphics printing in portrait and landscape orientations
• A printer driver for the HP DeskWriter 600 printer
• TrueType and Adobe Type Manager scalable typeface support
• Many
TrueType fonts
• ColorSmart technology

••••••••••••••••••••••••••••••••••••••••••••••••••••••••••••••••••••••••••••••••••••••••••••••••••••••••••••••••••••••••••••••
20
SECTION TWO
•••••••••••••••••••••••••••••••••••••••••••••••••••••••••••••••••••••••••••••••••••••••••••••••••••
Printing Features
After installing the printer software and choosing the HP DeskWriter 600 printer as described in
Section 1
, you are ready to start printing from your software applications.
You select general print settings, such as the paper size and type, the page orientation, and so forth, from within the software application by choosing
Page Setup
from the File menu to display the Page Setup dialog box.
You select specific print settings, such as intensity, halftoning patterns, and color matching, from within the software application by choosing
Options
from either the Page Setup or the Print dialog box to display the Options dialog box. Typically, you will want to leave these Options settings at
Auto
, allowing ColorSmart to provide the best printing of your files.
You can print documents in either of the following two ways:
•
From within a software application
— Choose
from the File menu.
•
From the Finder
— Select the document(s) you want to print by clicking on the document icon(s) and choosing
from the File menu.
You can select multiple documents for printing in succession. These documents need not have the same specifications nor do they need to have been created with the same software application. The printing specifications for each document are used when that document is printed. However, the printer does not notify you if the documents require different sizes or types of paper.

••••••••••••••••••••••••••••••••••••••••••••••••••••••••••••••••••••••••••••••••••••••••••••••••••••••••••••••••••••••••••••••
21
USING THE PRINTER SOFTWARE
••••••••••••••••••••••••••••••••••••••••••••••••••••••••••••••••••••••••••••••••••••••••••••••••••••••••••••••••••••••••••••••
Other Printing Options
Printing in the Background
Background Printing allows you to work on other documents while printing. When Background Printing is on, the information needed to print the document is saved in the PrintMonitor Documents folder, a temporary folder in the System Folder on your hard disk. This copy of the document is then sent to the printer. Because processing a document to disk takes significantly less time than printing a document, you regain control of your computer sooner. However, the actual printing of the document is slower.
If you send several documents to the printer, the spooled copies are placed in the PrintMonitor Documents folder. Each document is printed in the order in which it was received.
To use Background Printing, select the Chooser from the Apple menu, select the DeskWriter 600 printer, and click the
On
button under Background Printing.
Printing Back to Front
Click the
Print Back to Front
box in the Print dialog box to print your document in reverse order so that the document is in the correct order in the printer’s OUT tray when printing is complete.
If your software application offers the option of printing back to front and you select both back to front options, the document prints from front to back.
Previewing a Document
Click the
Preview
button in the Print dialog box to see how your document will be positioned on the page when printed.

••••••••••••••••••••••••••••••••••••••••••••••••••••••••••••••••••••••••••••••••••••••••••••••••••••••••••••••••••••••••••••••
22
SECTION TWO
•••••••••••••••••••••••••••••••••••••••••••••••••••••••••••••••••••••••••••••••••••••••••••••••••••
Using the HP PrintMonitor
You can use the HP PrintMonitor during Background Printing to:
• See which file is currently printing
• View and re-arrange the order of files waiting to be printed
• Cancel a file from printing
• Remove a file from the print queue
• Establish preferences for the level of notification used when the printer needs attention
However, you cannot directly print a file from the HP PrintMonitor. The HP PrintMonitor prints in the background until the PrintMonitor Documents folder is empty.
To open the HP PrintMonitor during Background
Printing,
select HP PrintMonitor from the Application menu in the upper-right corner of the menu bar.
To open the HP PrintMonitor when the printer is
inactive,
double-click on the HP PrintMonitor icon in the Extensions folder.
N OT E
By default, the HP PrintMonitor is not displayed during printing. To automaticallydisplay the HP PrintMonitor during printing, change the setting in the Preferencesdialog box.
To change your preferences settings for the
HP PrintMonitor:
Once the HP PrintMonitor is displayed, choose
Preferences
from the File menu. Make the desired changes in the Preferences dialog box.

••••••••••••••••••••••••••••••••••••••••••••••••••••••••••••••••••••••••••••••••••••••••••••••••••••••••••••••••••••••••••••••
23
USING THE PRINTER SOFTWARE
••••••••••••••••••••••••••••••••••••••••••••••••••••••••••••••••••••••••••••••••••••••••••••••••••••••••••••••••••••••••••••••
Using the Online Help
The HP DeskWriter Series printer software offers online Balloon help. Use the Balloon Help to get information about options in the dialog boxes.
Choose
Show Balloons
from the Help menu in the upper right corner of the menu bar. If
Show Balloons
is not an option in the menu, Balloon Help is already on. Balloon Help provides pop-up help when you move the mouse cursor over certain parts of the screen. To turn off Balloon Help, choose
Hide Balloons
from the Help menu.
Using the ReadMe Files
There are two ReadMe files that came with your printer software: one on the Driver Installation disk, and one on the Fonts Installation disk. See these files to get late breaking information on your printer software and for more detailed information that is not included in this booklet. These files can be printed.
Updating the Printer Software
HP periodically provides updates of the printer software. These updates may include enhancements that improve the performance of your printer. See
Contacting Customer
Support
on page 65 for detailed instructions on obtaining updated printer software.

••••••••••••••••••••••••••••••••••••••••••••••••••••••••••••••••••••••••••••••••••••••••••••••••••••••••••••••••••••••••••••••
25
USING PAPER,CARDS, ENVELOPES,
LABELS, ANDTRANSPARENCIES
S E C T I O N T H R E E
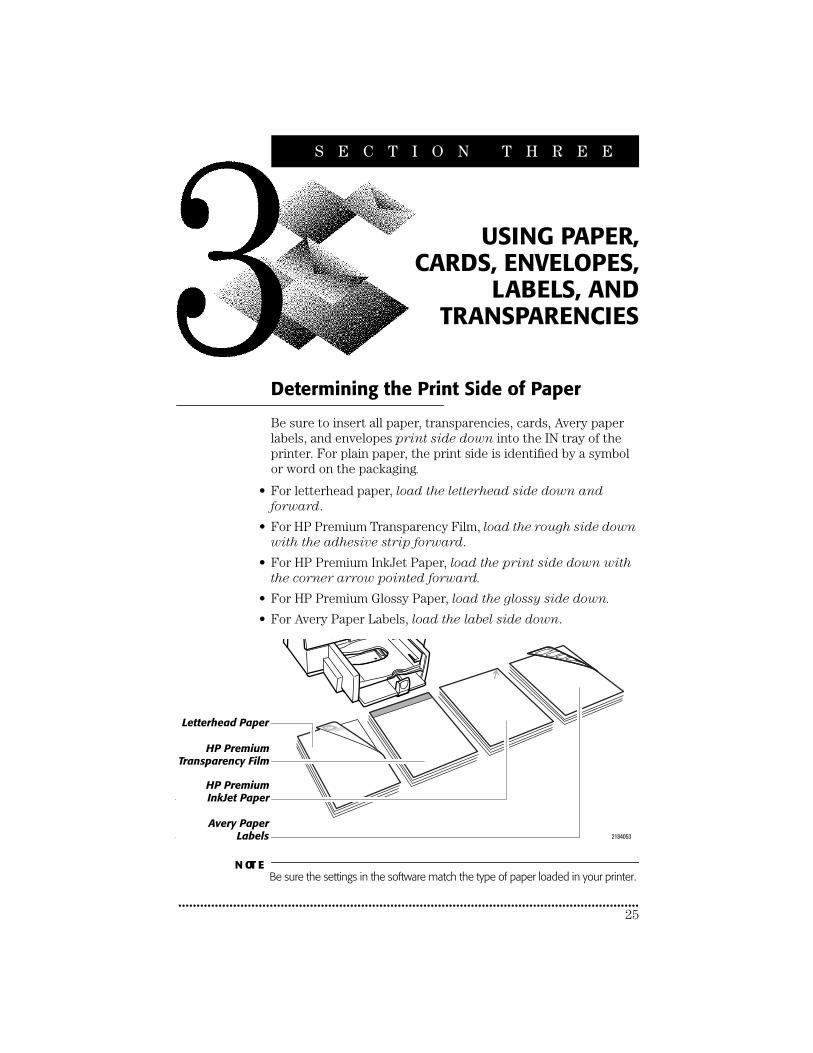
Determining the Print Side of Paper
Be sure to insert all paper, transparencies, cards, Avery paper labels, and envelopes
print side down
into the IN tray of the printer. For plain paper, the print side is identified by a symbol or word on the packaging
.
• For letterhead paper,
load the
letterhead side down and
forward
.
• For HP Premium Transparency Film,
load the
rough side down
with the adhesive strip forward
.
• For HP Premium InkJet Paper,
load the print side down with
the corner arrow pointed forward.
• For HP Premium Glossy Paper,
load the glossy side down.
• For Avery Paper Labels,
load the label side down
.
N OT E
Be sure the settings in the software match the type of paper loaded in your printer.
2184053
Letterhead Paper
HP PremiumTransparency Film
HP PremiumInkJet Paper
Avery PaperLabels

••••••••••••••••••••••••••••••••••••••••••••••••••••••••••••••••••••••••••••••••••••••••••••••••••••••••••••••••••••••••••••••
26
SECTION THREE
•••••••••••••••••••••••••••••••••••••••••••••••••••••••••••••••••••••••••••••••••••••••••••••••••••
Guidelines for Using Paper
• To obtain the best print quality and to avoid getting paper jammed in the paper feed rollers of the printer, always use paper, envelopes, index cards, postcards, Avery paper labels, and transparency films that conform in weight, type, and size with those listed in the
Specifications
on page 73.
• Load only one type of paper, envelope, or transparency at a time in the IN tray, making sure the right edge of the stack is aligned with the right edge of the IN tray.
• When using index cards or postcards, make sure the right edge of the card stack is aligned with the left side of the raised card guide.
• Never load more than
1
/
2
inch (1 cm) of paper or transparencies,
1
/
4
inch (
1
/
2
cm) of cards or Avery paper labels, or 20 envelopes into the IN tray at one time.
• Always load index cards and postcards where the paper is longer than wide when placed in the IN tray.
• When using the single envelope slot, always lower the card guide in the IN tray, be sure that paper is loaded in the IN tray, and be sure to push the envelope all the way into the slot.
• Only use Avery paper labels that are specifically designed for use with HP InkJet printers. Do not use plastic or clear labels.
• Always use software settings that match the type and size of the paper, envelopes, transparencies, or cards in the printer.
• Some types of paper, such as transparencies, glossy paper, and coated cards, need longer drying times. The printer software automatically provides the appropriate drying time for each printed page based on the paper type, print quality, and inks printed.
Steve: I think we need to

••••••••••••••••••••••••••••••••••••••••••••••••••••••••••••••••••••••••••••••••••••••••••••••••••••••••••••••••••••••••••••••
27
USING PAPER, CARDS, ENVELOPES, LABELS, AND TRANSPARENCIES
••••••••••••••••••••••••••••••••••••••••••••••••••••••••••••••••••••••••••••••••••••••••••••••••••••••••••••••••••••••••••••••
Selecting and Storing Paper, Envelopes,
Cards, Labels, and Transparencies
N OT E
Always use paper, envelopes, index cards, post cards, and other paper stock thatconforms in weight, type, and size with that listed in the
Specifications
on page73.
Selecting Paper
The HP DeskWriter 600 printer prints on plain paper, HP Premium Glossy Paper, HP Premium InkJet Paper, and HP Premium Transparency Film. Most bond paper yields excellent printing results and is appropriate for your letterhead stationery.
Use these guidelines to select paper:
• Most papers have a side conditioned for printing and a side not conditioned for printing. Before you purchase large quantities of a paper, print on both sides of a few sheets of the paper to determine if it produces acceptable quality printing on its “print” side.
• Be sure that your paper does not have tears, dust, wrinkles, or curled or bent edges.
• Only load one type, size, and weight of paper in the printer at one time.
• For color printing, most bond paper produces good results. However, choose HP Premium InkJet Paper or HP Premium Glossy Paper to produce intense, high quality color results.
Selecting Envelopes
• Print on a few envelopes before you purchase large quantities.
• Use high-quality envelopes that are thin and sharply creased.
• Do not use envelopes with thick or crooked edges, or envelopes that are damaged, curled, wrinkled, or irregularly shaped.
• Do not use envelopes that are shiny or embossed, or envelopes with clasps or windows.

••••••••••••••••••••••••••••••••••••••••••••••••••••••••••••••••••••••••••••••••••••••••••••••••••••••••••••••••••••••••••••••
28
SECTION THREE
•••••••••••••••••••••••••••••••••••••••••••••••••••••••••••••••••••••••••••••••••••••••••••••••••••
Selecting Transparencies, Labels, and Other Paper
• To achieve best color print quality, use only the recommended HP Premium Transparency film for printing transparency slides. This transparency film was designed specifically for use with your printer.
• Only use Avery paper labels that are specifically designed for use with HP InkJet printers.
• Do not use plastic or clear labels. The ink formulated for use with this printer does not dry when used with plastic or clear labels.
• Do not use paper or Avery paper labels that are damaged, folded, curled, or wrinkled.
• Do not use Avery paper labels that are over two years old.
• Do not print on partially used sheets of Avery paper labels.
• Do not use paper with cutouts or perforations, except HP approved Avery paper labels.
• Do not use multiple-part forms.
• Do not use paper that is heavily textured or embossed.
Storing Paper, Envelopes, Cards, Labels, and Transparencies
Store your paper in its packaging until you use it. Protect the paper from temperature and humidity extremes by wrapping it tightly in plastic.
Always store Avery paper labels flat in the original package to avoid wrinkling or bending.

••••••••••••••••••••••••••••••••••••••••••••••••••••••••••••••••••••••••••••••••••••••••••••••••••••••••••••••••••••••••••••••
29
USING PAPER, CARDS, ENVELOPES, LABELS, AND TRANSPARENCIES
••••••••••••••••••••••••••••••••••••••••••••••••••••••••••••••••••••••••••••••••••••••••••••••••••••••••••••••••••••••••••••••
Using Standard Size Paper
Use this procedure to print on standard size paper or transparencies with your HP DeskWriter 600 printer. Paper and transparency sizes that are considered
standard
are: U.S. Letter (8.5 x 11 inches) and U.S. Legal (8.5 x 14 inches).
1.
Slide the paper width adjuster to its leftmost position.
2.
Pull out the paper length adjuster.
N OT E
Make sure the card guide (used when printing on index cards and postcards) is inthe down position. (See the drawing on page 31 in the procedure
Using IndexCards and Postcards
for the location of the card guide.)
3.
Remove up to a
1
/
2
inch (approximately 1 cm) stack of paper from the packaging. Fan the edges of the paper stack to separate the pages. Then tap the short edge of the stack on a flat surface to even the stack.
2184037
Paper WidthAdjuster
Paper LengthAdjuster
2162040

••••••••••••••••••••••••••••••••••••••••••••••••••••••••••••••••••••••••••••••••••••••••••••••••••••••••••••••••••••••••••••••
30
SECTION THREE
•••••••••••••••••••••••••••••••••••••••••••••••••••••••••••••••••••••••••••••••••••••••••••••••••••
4.
Insert the paper evenly into the IN tray, print side down, until it stops. Align the right edge of the stack with the right edge of the IN tray.
5.
Push the paper length adjuster in toward the paper until it stops.
Make sure the paper does not bend in the IN tray.
6.
Set the software to print on the size and type of paper now in the printer.
2184021
2184022
Paper LengthAdjuster

••••••••••••••••••••••••••••••••••••••••••••••••••••••••••••••••••••••••••••••••••••••••••••••••••••••••••••••••••••••••••••••
31
USING PAPER, CARDS, ENVELOPES, LABELS, AND TRANSPARENCIES
••••••••••••••••••••••••••••••••••••••••••••••••••••••••••••••••••••••••••••••••••••••••••••••••••••••••••••••••••••••••••••••
Using Index Cards and Postcards
Use this procedure to print on index cards or postcards with your HP DeskWriter 600 printer. Make sure the index cards or postcards that you use with your printer conform in size and weight to those listed in the
Specifications
on page 73.
1.
Remove the OUT tray.
2.
Raise the card guide.
3.
Remove up to a
1
/
4
inch (
1
/
2
cm) stack of cards from their packaging and tap the short edge of the stack on a flat surface to even the stack.
2184008
OUT Tray
2162009
Card Guide

••••••••••••••••••••••••••••••••••••••••••••••••••••••••••••••••••••••••••••••••••••••••••••••••••••••••••••••••••••••••••••••
32
SECTION THREE
•••••••••••••••••••••••••••••••••••••••••••••••••••••••••••••••••••••••••••••••••••••••••••••••••••
4.
Insert the cards into the IN tray. Align the right edge of the card stack with the card guide.
5.
Slide the paper width adjuster to the right until it aligns with the left edge of the card stack.
6.
Press the inside of the paper length adjuster handle to release and lower it.
2162026
Card Stack
2162038
Paper WidthAdjuster
Paper LengthAdjuster Handle

••••••••••••••••••••••••••••••••••••••••••••••••••••••••••••••••••••••••••••••••••••••••••••••••••••••••••••••••••••••••••••••
33
USING PAPER, CARDS, ENVELOPES, LABELS, AND TRANSPARENCIES
••••••••••••••••••••••••••••••••••••••••••••••••••••••••••••••••••••••••••••••••••••••••••••••••••••••••••••••••••••••••••••••
7.
Push the paper length adjuster in toward the card stack until it stops.
8.
Replace the OUT tray. If you encounter difficulty replacing the OUT tray, lift the top cover, wait a few moments for the print cartridge cradle to move to its center position, replace the OUT tray, then lower the top cover.
Make sure the cards do not bend in the IN tray.
9.
Set the software to print on the size and type of cards now in the printer.
Using Envelopes
The HP DeskWriter 600 printer allows you to load up to 20 envelopes at a time in the IN tray or to feed a single envelope through the printer (without first removing the paper from the IN tray) by using the single envelope slot.
N OT E
Using loosely creased or thick envelopes reduces the capacity of the IN tray.Because of these variations in envelope styles, the IN tray might accommodateless than 20 envelopes.
Always use envelopes that conform in weight, type, and size with those listed in the
Specifications
on page 73.
N OT E
For more information about using envelopes, see the ReadMe file.
2162028
Paper LengthAdjuster with
Handle Released

••••••••••••••••••••••••••••••••••••••••••••••••••••••••••••••••••••••••••••••••••••••••••••••••••••••••••••••••••••••••••••••
34
SECTION THREE
•••••••••••••••••••••••••••••••••••••••••••••••••••••••••••••••••••••••••••••••••••••••••••••••••••
Using the Single Envelope Slot
The single envelope slot allows you to print on either a No. 10 or a DL size envelope. Other envelope sizes are not supported with the single envelope slot.
N OT E
Do not remove the paper from the IN tray, and be sure the card guide is in thedown position, before using the single envelope slot.
1.
Remove a No. 10 or a DL size envelope from its packaging.
2.
Slide the envelope evenly into the single envelope slot, address side down (flap side up).
3.
Make sure the creased flap edge of the envelope aligns with the right side of the single envelope slot.
4.
Slide the envelope through the slot until it stops.
Make sure the envelope is inserted all the way into the slot and that it is not skewed or bent.
5.
Set the software to print on the size and type of envelope now in the printer.
6.
Be sure to reset the software for the paper in the IN tray after printing on the envelope is completed.
2184005

••••••••••••••••••••••••••••••••••••••••••••••••••••••••••••••••••••••••••••••••••••••••••••••••••••••••••••••••••••••••••••••
35
USING PAPER, CARDS, ENVELOPES, LABELS, AND TRANSPARENCIES
••••••••••••••••••••••••••••••••••••••••••••••••••••••••••••••••••••••••••••••••••••••••••••••••••••••••••••••••••••••••••••••
Loading Envelopes in the IN Tray
1.
Slide the paper width adjuster to its leftmost position.
2.
Pull out the paper length adjuster and remove any paper from the IN tray.
N OT E
Make sure the card guide (used when printing on index cards and postcards) is inthe down position. (See the drawing on page 31 in the procedure
Using IndexCards and Postcards
for the location of the card guide.)
3.
Remove a stack of up to 20 envelopes from their packaging and tap the short edge of the envelopes on a flat surface to even the stack.
4.
Slide the envelopes evenly into the IN tray, address side down (flap side up).
2184037
Paper LengthAdjuster
Paper WidthAdjuster
2184030

••••••••••••••••••••••••••••••••••••••••••••••••••••••••••••••••••••••••••••••••••••••••••••••••••••••••••••••••••••••••••••••
36
SECTION THREE
•••••••••••••••••••••••••••••••••••••••••••••••••••••••••••••••••••••••••••••••••••••••••••••••••••
5.
Make sure the creased flap edge of the stack aligns with the right side of the IN tray.
6.
Slide the paper width adjuster to the right until it aligns with the left edge of the envelope stack.
7.
For size Invitation A2 and C6 envelopes,
press the inside of the paper length adjuster handle to release and lower it. Lowering the paper length adjuster handle reduces the capacity of the IN tray to no more than 10 envelopes.
8.
For all sizes of envelopes,
push the paper length adjuster in toward the envelopes until it stops.
Make sure the envelopes do not bend in the IN tray.
9.
Set the software to print on the size and type of envelopes now in the printer.
2184031
2184032
Paper LengthAdjuster
••••••••••••••••••••••••••••••••••••••••••••••••••••••••••••••••••••••••••••••••••••••••••••••••••••••••••••••••••••••••••••••
37
USING PAPER, CARDS, ENVELOPES, LABELS, AND TRANSPARENCIES••••••••••••••••••••••••••••••••••••••••••••••••••••••••••••••••••••••••••••••••••••••••••••••••••••••••••••••••••••••••••••••
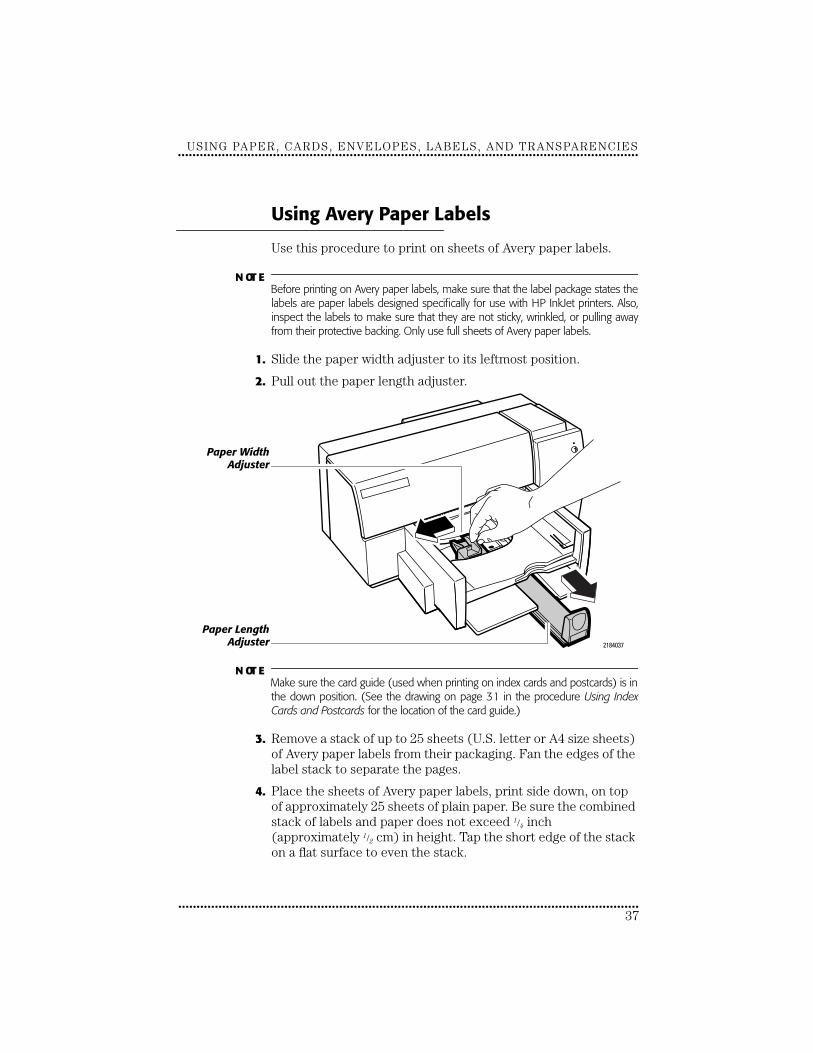
Using Avery Paper Labels
Use this procedure to print on sheets of Avery paper labels.
N OT E Before printing on Avery paper labels, make sure that the label package states thelabels are paper labels designed specifically for use with HP InkJet printers. Also,inspect the labels to make sure that they are not sticky, wrinkled, or pulling awayfrom their protective backing. Only use full sheets of Avery paper labels.
1. Slide the paper width adjuster to its leftmost position.
2. Pull out the paper length adjuster.
N OT E Make sure the card guide (used when printing on index cards and postcards) is inthe down position. (See the drawing on page 31 in the procedure Using IndexCards and Postcards for the location of the card guide.)
3. Remove a stack of up to 25 sheets (U.S. letter or A4 size sheets) of Avery paper labels from their packaging. Fan the edges of the label stack to separate the pages.
4. Place the sheets of Avery paper labels, print side down, on top of approximately 25 sheets of plain paper. Be sure the combined stack of labels and paper does not exceed 1/4 inch (approximately 1/2 cm) in height. Tap the short edge of the stack on a flat surface to even the stack.
2184037
Paper WidthAdjuster
Paper LengthAdjuster

••••••••••••••••••••••••••••••••••••••••••••••••••••••••••••••••••••••••••••••••••••••••••••••••••••••••••••••••••••••••••••••
38
SECTION THREE•••••••••••••••••••••••••••••••••••••••••••••••••••••••••••••••••••••••••••••••••••••••••••••••••••
5. Insert the combined stack of Avery paper labels and paper evenly into the IN tray, print side down, until it stops. Align the right edge of the stack with the right edge of the IN tray.
6. Push the paper length adjuster in toward the printer until it stops.
If you are using A4 size sheets of Avery paper labels, slide the paper width adjuster to the right until it aligns with the left edge of the label stack.
Make sure the sheets do not bend in the IN tray.
7. Set the software to print on the size, type, and orientation of labels now in the printer. Typically, use the Normal print mode and a plain paper type when printing on Avery paper labels.
2184021
2184022
Paper LengthAdjuster

••••••••••••••••••••••••••••••••••••••••••••••••••••••••••••••••••••••••••••••••••••••••••••••••••••••••••••••••••••••••••••••
39
USING PAPER, CARDS, ENVELOPES, LABELS, AND TRANSPARENCIES••••••••••••••••••••••••••••••••••••••••••••••••••••••••••••••••••••••••••••••••••••••••••••••••••••••••••••••••••••••••••••••
Tip: Using Non-Standard Size Paper
The printer driver provided with the HP DeskWriter 600 printer does not provide settings for non-standard paper sizes. Paper sizes that are considered non-standard are those with a width between 5 and 8.5 inches (127 and 215 mm) and a length between 5.83 and 14 inches (148 and 356 mm).
In general, to use non-standard paper sizes, first set up your software application for a page size that is the same as or smaller than the paper now in the printer. Then, in Page Setup, select the paper size that is one size larger in both directions than the paper now in the printer. For more precise control of printing on non-standard size papers, use the following steps.
1. Slide the paper width adjuster to its leftmost position.
2. Pull out the paper length adjuster and remove any paper from the IN tray.
N OT E Make sure the card guide (used when printing on index cards and postcards) is inthe down position. (See the drawing on page 31 in the procedure Using IndexCards and Postcards for the location of the card guide.)
3. Remove up to a 1/2 inch (1 cm) stack of paper from its package and tap the short edge of the stack on a flat surface to even the stack.
2184037
Paper LengthAdjuster
Paper WidthAdjuster

••••••••••••••••••••••••••••••••••••••••••••••••••••••••••••••••••••••••••••••••••••••••••••••••••••••••••••••••••••••••••••••
40
SECTION THREE•••••••••••••••••••••••••••••••••••••••••••••••••••••••••••••••••••••••••••••••••••••••••••••••••••
Be sure the width of the paper is between 5.0 and 8.5 inches (127 and 216 mm) and be sure the length of the paper is between 5.83 and 14 inches (148 and 356 mm).
4. Note the width and length dimensions of the non-standard size paper. (These measurements are used later in the procedure to determine the correct paper size settings for the non-standard size paper).
Width (X) = Length (Y) =
5. Insert the non-standard size paper evenly into the IN tray, print side down, until it stops.
6. Align the right edge of the paper stack with the right side of the IN tray.
7. Slide the paper width adjuster to the right until it aligns with the left edge of the paper stack.
Make sure the paper does not bend in the IN tray.
2184023
Paper WidthAdjuster

••••••••••••••••••••••••••••••••••••••••••••••••••••••••••••••••••••••••••••••••••••••••••••••••••••••••••••••••••••••••••••••
41
USING PAPER, CARDS, ENVELOPES, LABELS, AND TRANSPARENCIES••••••••••••••••••••••••••••••••••••••••••••••••••••••••••••••••••••••••••••••••••••••••••••••••••••••••••••••••••••••••••••••
N OT E When the paper is shorter in length than 8 2/3 inches (approximately 22 cm),release the handle of the paper length adjuster as shown on page 33 before youpush in the paper length adjuster. Lowering the paper length adjuster handlereduces the paper capacity of the IN tray to a maximum stack height of 5/16 inch(0.8 cm).
8. Push the paper length adjuster in toward the paper until it stops.
Make sure the paper does not bend in the IN tray.
9. Determine the sizes of your document’s margins. Record them using the following identifiers:
Left (L) = Right (R) = Top (T) = Bottom (B) =
10. In the Page Setup dialog box, select a paper size that is larger in both the width (M) and the length (N) than the paper now in the printer.
11. Within your software application, account for the differences by setting the printing margins as follows:
Left = (L) Right = (M - X + R)Top = (T) Bottom = (N - Y + B)
2184025Paper Length
Adjuster

••••••••••••••••••••••••••••••••••••••••••••••••••••••••••••••••••••••••••••••••••••••••••••••••••••••••••••••••••••••••••••••
42
SECTION THREE•••••••••••••••••••••••••••••••••••••••••••••••••••••••••••••••••••••••••••••••••••••••••••••••••••
Adding Paper, Envelopes, Cards, or Transparencies
If the printer runs out of paper, envelopes, cards, or transparencies while it is printing, the resume light flashes and an alert box appears on your computer screen prompting you to add in more paper. To add items to the IN tray, remove all remaining paper from the IN tray and combine it with a new stack of the same paper. Tap the stack on a flat surface to even the stack. The stack should not exceed 1/2 inch (1 cm) for paper, envelopes, or transparencies and should not exceed 1/4 inch (1/2 cm) for cards or Avery paper labels. Push the resume button to continue printing.
Removing Paper, Envelopes, Cards, or Transparencies
1. Remove the OUT tray.
2. Remove the paper, envelopes, cards, or transparencies.
3. Replace the OUT tray. If you encounter difficulty replacing the OUT tray, lift the top cover, wait a few moments for the print cartridge cradle to move to its center position, replace the OUT tray, then lower the top cover.
N OT E Except when printing on index cards and postcards, make sure the card guide is inthe down position. (See the drawing on page 31 in the procedure Using IndexCards and Postcards for the location of the card guide.)
If you have any problems while loading or removing items from the IN tray, see the troubleshooting information in Section 5.
2184029

••••••••••••••••••••••••••••••••••••••••••••••••••••••••••••••••••••••••••••••••••••••••••••••••••••••••••••••••••••••••••••••
43
USINGPRINT CARTRIDGES
S E C T I O N F O U R
Storing and Using Print Cartridges
To maintain excellent print quality from your print cartridges:
• Keep print cartridges in their sealed packages, at room temperature (60°- 78°F or 15.6°- 26.6°C), until you are ready to use them.
• Turn off the printer and allow the print cartridge to return to the right side of the printer for proper capping of the nozzles before unplugging the power module or turning off any attached power strip.
See
Storing the Unused Print Cartridge
on page 83 for information on storing the print cartridges when the HP Color Kit is being used.
C A U T IO N
The ink in the cartridges has been carefully formulated by Hewlett-Packard toensure superior print quality and compatibility with the printer. Do not attempt torefill the print cartridge; damage to the printer or print cartridge resulting frommodifying or refilling a print cartridge is not the responsibility of Hewlett-Packard.
To install the print cartridges in your printer, follow the procedure
Installing the Print Cartridge
on page 11.
N OT E
Be careful not to touch the ink nozzles or the copper contacts.
FOR COLOR KIT USERS

••••••••••••••••••••••••••••••••••••••••••••••••••••••••••••••••••••••••••••••••••••••••••••••••••••••••••••••••••••••••••••••
44
SECTION FOUR
•••••••••••••••••••••••••••••••••••••••••••••••••••••••••••••••••••••••••••••••••••••••••••••••••••
Removing the Print Cartridge
1.
With the printer turned on, open the top cover.
In a few moments the print cartridge cradle automatically moves to the center of the printer and the resume light flashes.
2.
Grasp the top of the print cartridge and pull it toward you until the cartridge pops loose.
3.
Lift the print cartridge out of the cradle.
4.
Discard the cartridge if it is empty.
See
Storing the Unused Print Cartridge
on page 83 for information on storing the print cartridges when the HP Color Kit is being used.
C A U T IO N
Keep new and used cartridges out of the reach of children.
FOR COLOR KIT USERS
2184042
Top Cover
Print CartridgeCradle
2184016
Print Cartridge

••••••••••••••••••••••••••••••••••••••••••••••••••••••••••••••••••••••••••••••••••••••••••••••••••••••••••••••••••••••••••••••
45
USING PRINT CARTRIDGES
••••••••••••••••••••••••••••••••••••••••••••••••••••••••••••••••••••••••••••••••••••••••••••••••••••••••••••••••••••••••••••••
Cleaning the Print Cartridge
Clean the print cartridge when you notice that lines or dots are missing from your printed text and graphics, as shown to the left. The print cartridge can be cleaned from the Service dialog box or from the buttons on the front of the printer.
N OT E
Do not clean the print cartridges unnecessarily, as this wastes ink and shortens theprint cartridge life. If you suspect that dried ink is clogging a print cartridge, refer topage 64
.
From the Service dialog box:
1.
From within your software application, choose
Page Setup...
from the File menu to display the Page Setup dialog box.
2.
Choose
Service
to display the Service dialog box.
3.
Click the
Start
button next to
Clean Print Cartridges,
then choose
Clean
.
From the printer buttons:
1.
With the printer turned on, press and hold down the power button.
2.
While still holding down the power button, press and release the resume button seven times.
3.
Release the power button.

••••••••••••••••••••••••••••••••••••••••••••••••••••••••••••••••••••••••••••••••••••••••••••••••••••••••••••••••••••••••••••••
47
IF YOU HAVE APRINTING PROBLEM
S E C T I O N F I V E
How You Can Find the Solution
When printing from software applications,
many printer problems and the corrective actions you should take are reported in dialog boxes on your computer screen. When you receive such a message, follow the instructions given. If you don’t receive an error message, but you suspect a problem with the printer, find the problem in this section and try the given solution(s).
If your printer does not print,
go directly to
If Nothing
Prints
on
page 48. Otherwise, find the symptom that most closely matches your printer’s problem in the troubleshooting tables in this section. For each listed symptom, more than one solution is usually possible. The first solution given is the most probable corrective action for the symptom. However, if that solution does not solve the problem, perform the other solutions in the order they appear until the problem is solved.
If you are unable to solve a problem using the
troubleshooting tables in this section,
refer to
Contacting
Customer Support
on page 65 for a listing of resources available to you for the support and maintenance of your printer.

••••••••••••••••••••••••••••••••••••••••••••••••••••••••••••••••••••••••••••••••••••••••••••••••••••••••••••••••••••••••••••••
48
SECTION FIVE
•••••••••••••••••••••••••••••••••••••••••••••••••••••••••••••••••••••••••••••••••••••••••••••••••••
If Nothing Prints
When the printer is in the ready-to-print state, the power
light is lit and the resume
light is off. When the computer is sending a file to the printer, and when the printer is printing a file, the power
light blinks and the resume
light is off. When the printer needs attention or when a printer error occurs, either the resume
light blinks or both lights blink alternately.
If paper, envelopes, cards, or transparencies are loaded in the printer, and if the printer does not print, observe the state of the printer’s power and resume lights, and then find the symptom in the following table that best matches the observed condition of your printer.
For each listed symptom, more than one solution is usually possible. The first solution given is the most probable corrective action for the symptom. However, if that solution does not solve the problem, perform the other solutions in the order they appear until the problem is solved.
Symptom Solution
Both lights on the front of the printer are off, and nothing prints.
The printer is not turned on or is improperly connected to the power source. Make sure the power module plug is firmly inserted in the printer’s power socket and the other end of the cord is plugged into an outlet. Make sure any attached power strip is turned on and plugged into an outlet. If possible, try using a different power outlet. Then turn on the printer by pressing the power
button.
The printer is in an undefined state. If open, close the top cover on the printer. Cycle the power to the printer by pressing the power
button. You may need to press the power
button a second time.
The printer failed or the computer-to-printer connection failed. Turn off the printer, disconnect the printer cable from the back of the printer, and turn the printer on again. If the lights stay off, the printer failed: see
Contacting Customer Support
on page 65.

••••••••••••••••••••••••••••••••••••••••••••••••••••••••••••••••••••••••••••••••••••••••••••••••••••••••••••••••••••••••••••••
49
IF YOU HAVE A PRINTING PROBLEM
••••••••••••••••••••••••••••••••••••••••••••••••••••••••••••••••••••••••••••••••••••••••••••••••••••••••••••••••••••••••••••••
The power light is on, but nothing prints.
The printer driver is still preparing the data to send to your printer. Wait a few more minutes for the printer to respond. Some computers take several minutes of processing time before sending any data to the printer.
The printer is not in the ready-to-print state. Press the resume button on the front of the printer. If the resume light is blinking, check the error message displayed on your computer screen for additional instructions. Resend the document. If the document still doesn’t print, cycle the power to the printer off and back on by pressing the power
button twice. Then resend the document.
The printer is improperly connected to the computer. Make sure the printer cable is firmly connected to the printer and the computer.
Your software is not properly set up for the printer. Follow the instructions in your software application’s manual for setting up the software to work with the printer.
The printer is not selected in the Chooser. Select the printer in the Chooser as described on page 16.
Tape is covering the ink nozzles or vent hole of the print cartridge. Remove the print cartridge and remove any pieces of tape. Reinstall the print cartridge.
The print cartridge is improperly installed in the printer. Make sure the print cartridge snaps into place with the arrow aligned with the dot on the cradle top.
The print cartridge is clogged. Print a self-test as described on page 57. If this does not clear the ink nozzles, clean the print cartridge as described on page 58.
The print cartridge is out of ink. Install a new print cartridge.
Both lights are on, and nothing prints.
The printer failed. Turn off the printer and turn it on again. If the lights stay on, see
Contacting Customer Support
on page 65.
Symptom Solution

••••••••••••••••••••••••••••••••••••••••••••••••••••••••••••••••••••••••••••••••••••••••••••••••••••••••••••••••••••••••••••••
50
SECTION FIVE
•••••••••••••••••••••••••••••••••••••••••••••••••••••••••••••••••••••••••••••••••••••••••••••••••••
The resume and power lights blink alternately, and nothing prints.
The print cartridge is missing. Install a print cartridge.
The printer is in an unknown state. Turn the printer off by pressing the power
button. Cancel the print job at the computer and turn the printer back on. Resend the document to the printer.
The paper is jammed in the printer. Clear the paper jam as described for the symptom “Paper does not fully eject from the printer and the resume and power lights blink alternately” on page 53.
Something is blocking the movement of the print cartridge cradle. Open the top cover and allow the print cartridge to move to the center position. Then pull the power module connector from the power socket on the back of the printer. Remove any object blocking the print cartridge cradle. Move the print cartridge cradle to the left and right with your hand. Close the top cover, reconnect the power module connector to the printer’s power socket, and cycle power to the printer by pressing the power
button twice.
The printer failed or the computer-to-printer connection failed. Turn off the printer, disconnect the printer cable from the back of the printer, and turn the printer on again. If the lights continue to blink, the printer failed: see
Contacting Customer Support
on page 65. If the printer is not the problem, reconnect the printer cable. If the lights continue to blink, the problem may be with the printer cable, the cable connections, or the computer port.
The printer appears to be printing, but the paper is blank when ejected.
Tape is covering the ink nozzles or vent hole of the print cartridge. Remove the print cartridge and remove any pieces of tape. Reinstall the print cartridge.
The print cartridge is improperly installed in the printer. Make sure the print cartridge snaps into place with the arrow aligned with the dot on the cradle top.
The print cartridge is clogged. Print a self-test as described on page 57. If this does not clear the ink nozzles, clean the print cartridge as described on page 58.
The print cartridge is out of ink. Install a new print cartridge.
Symptom Solution
••••••••••••••••••••••••••••••••••••••••••••••••••••••••••••••••••••••••••••••••••••••••••••••••••••••••••••••••••••••••••••••
51
IF YOU HAVE A PRINTING PROBLEM
••••••••••••••••••••••••••••••••••••••••••••••••••••••••••••••••••••••••••••••••••••••••••••••••••••••••••••••••••••••••••••••
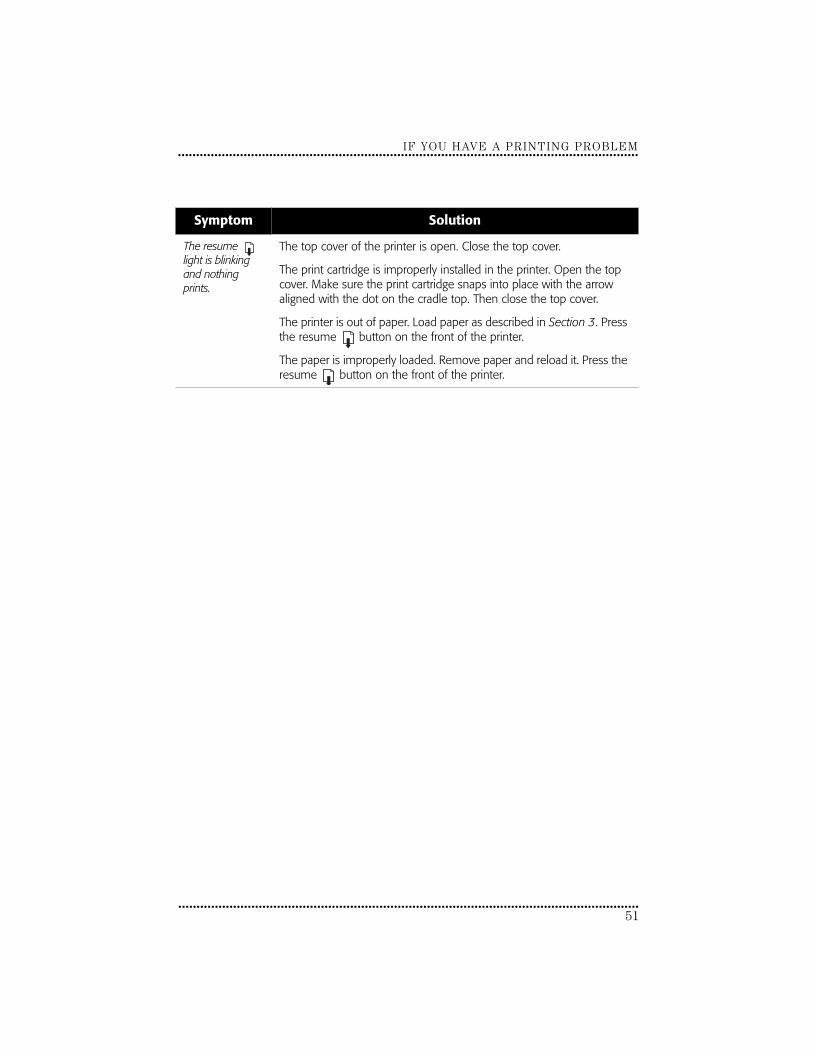
The resume
light is blinking and nothing prints.
The top cover of the printer is open. Close the top cover.
The print cartridge is improperly installed in the printer. Open the top cover. Make sure the print cartridge snaps into place with the arrow aligned with the dot on the cradle top. Then close the top cover.
The printer is out of paper. Load paper as described in
Section 3
. Press the resume button on the front of the printer.
The paper is improperly loaded. Remove paper and reload it. Press the resume button on the front of the printer.
Symptom Solution

••••••••••••••••••••••••••••••••••••••••••••••••••••••••••••••••••••••••••••••••••••••••••••••••••••••••••••••••••••••••••••••
52
SECTION FIVE
•••••••••••••••••••••••••••••••••••••••••••••••••••••••••••••••••••••••••••••••••••••••••••••••••••
If Paper, Envelopes, Cards, Labels, or Transparencies Don’t Pass Through
the Printer
During normal printing, the printer picks up the top sheet, envelope, card, or transparency from the stack in the IN tray, prints on it, passes it to the OUT tray, and picks up the next top sheet from the stack in the IN tray. The exception to this process is when you use the single envelope slot. If the printer is not printing a single sheet at a time, or if the paper does not pass into or through the printer as expected, find the symptom in the following table that best matches the observed condition of your printer.
For each listed symptom, more than one solution is usually possible. The first solution given is the most probable corrective action for the symptom. However, if that solution does not solve the problem, perform the other solutions in the order they appear until the problem is solved.
N OT E
For more information about using envelopes, see the ReadMe file.
Symptom Solution
Paper does not get picked up from the IN tray.
The paper in the IN tray is not pressed against the paper feeder of the printer. Move the paper stack toward the printer until it presses against the paper feeder.
The paper path in the printer is blocked. Remove the OUT tray, remove any paper from the IN tray, and lower the card guide if it is in the up position. Make sure the paper width adjuster is not preventing paper from loading. Reinstall the OUT tray and load paper.
Too much paper is in the IN tray at one time. Remove a few sheets of paper.

••••••••••••••••••••••••••••••••••••••••••••••••••••••••••••••••••••••••••••••••••••••••••••••••••••••••••••••••••••••••••••••
53
IF YOU HAVE A PRINTING PROBLEM
••••••••••••••••••••••••••••••••••••••••••••••••••••••••••••••••••••••••••••••••••••••••••••••••••••••••••••••••••••••••••••••
Paper does not advance into the printer.
You are printing on a transparency or special paper and the automatic dry timer is operating correctly. Wait for the page to drop into the OUT tray.
Paper is improperly loaded. Remove the paper stack from the IN tray. Make sure the stack is even and does not contain curled or damaged paper. Reload the stack evenly in the IN tray so the stack’s right side aligns with the printer’s right side. If the paper is less than 8
2
/
3
inches (22 cm) in length, release the handle of the paper length adjuster. (This reduces the paper capacity of the IN tray to a maximum stack height of
5
/
16
inch (0.8 cm).) Push the paper length adjuster toward the printer until it stops. Do not bend the paper.
The OUT tray is improperly installed in the printer. Make sure the OUT tray is fully installed into the printer and rests evenly on the IN tray. If necessary, lift the top cover, insert the OUT tray, and lower the top cover.
Different paper types, sizes, or weights are loaded in the IN tray at the same time. Remove the stack and reload paper of only one type, size, and weight. The exception to this is when you are printing on Avery paper labels: be sure the stack of Avery paper labels is placed print side down on top of 25 sheets of paper before the combined stack is inserted into the IN tray.
The paper in the printer is damaged, wrinkled, or curled. Remove damaged paper from the IN tray. Always store paper in its packaging.
Paper does not eject from the printer.
You are printing on a transparency or special paper and the automatic dry timer is operating correctly. Wait for the page to drop into the OUT tray.
The computer was turned off while the printer was printing. Turn off the printer. Turn on the computer and printer in the sequence described in your computer manual.
Paper does not fully eject from the printer and the resume
and power lights blink alternately.
The paper is jammed in the printer. Turn off the printer, open the top cover, and remove the OUT tray. Pull the jammed paper out of the printer. Remove all torn pieces of paper from the printer. Small scraps of paper left within the printer can cause further paper jams. Remove wrinkled or torn paper from the IN tray. Reload the paper stack. Replace the OUT tray and close the top cover. Turn on the printer.
Symptom Solution

••••••••••••••••••••••••••••••••••••••••••••••••••••••••••••••••••••••••••••••••••••••••••••••••••••••••••••••••••••••••••••••
54
SECTION FIVE
•••••••••••••••••••••••••••••••••••••••••••••••••••••••••••••••••••••••••••••••••••••••••••••••••••
Printer advances multiple sheets of paper.
The paper is stuck together. Remove the paper, separate stuck paper, and reload it. Make sure the paper is appropriate for use with the printer. See
Section 6
.
Too much paper is in the IN tray at one time. Remove a few sheets of paper.
Different paper types, sizes, or weights are loaded in the IN tray at the same time. Remove the stack and reload paper of only one type, size, and weight. The exception to this is when you are printing on Avery paper labels: be sure the stack of Avery paper labels is placed print side down on top of 25 sheets of paper before the combined stack is inserted into the IN tray.
Paper was incorrectly added to the stack. To add paper, remove any paper from the IN tray and combine it with a new stack of the same type, size, and weight of paper. Make sure the stack is at least
1
/
8
inch (3 mm) thick; not more than
1
/
2
inch (1 cm) thick for paper, envelopes, and transparencies; and not more than
1
/
4
inch (0.5 cm) thick for cards and Avery paper labels. Tap the stack on a table to make it even. Align the stack against the right side of the printer and reload the paper.
The paper in the IN tray is bent. Remove the paper and reload it. Push the paper length adjuster toward the paper until it stops. Do not bend the paper.
Envelopes do not advance into the printer from the IN tray or the single envelope slot.
The envelopes are improperly loaded. Slide the paper width adjuster to the appropriate envelope setting. For size A2 and C6 envelopes, release and lower the paper length adjuster handle. Push the paper length adjuster toward the envelopes until it stops. Do not bend the envelopes.
The envelopes in the IN tray are bent or damaged. Do not use envelopes with bent or curled corners.
Too many or too few envelopes are loaded in the IN tray. Adjust the number of envelopes in the IN tray.
Too many envelopes are loaded in the single envelope slot. Only load one envelope at a time in the single envelope slot.
The envelope was not fully inserted into the single envelope slot. Be sure the envelope is inserted fully in the slot.
Paper is improperly loaded in the IN tray when trying to use the single envelope slot. Be sure the IN tray is properly loaded with paper and that the card guide is in the lowered position.
Symptom Solution

••••••••••••••••••••••••••••••••••••••••••••••••••••••••••••••••••••••••••••••••••••••••••••••••••••••••••••••••••••••••••••••
55
IF YOU HAVE A PRINTING PROBLEM
••••••••••••••••••••••••••••••••••••••••••••••••••••••••••••••••••••••••••••••••••••••••••••••••••••••••••••••••••••••••••••••
If You Get a Message at the Computer
When printing from software applications,
most printing problems are explained with messages on your computer screen. Follow the on-screen instructions or see the on-line help (see
Section 2
). Also, be sure the print settings in your software are set as desired. For additional assistance see the ReadMe file and your software application’s manual. Also review the troubleshooting tables throughout this section.
The following table describes solutions to common problems you may encounter after the printer software installation process and the solutions to problems identified for you with error messages.
Cards do not advance into the printer.
The cards are incorrectly loaded in the IN tray. Remove the OUT tray, make sure the card guide is flipped up and the cards are aligned against the left side of the guide. Slide the paper width adjuster to the right until it presses against the left edge of the card stack. Release and lower the paper length adjuster handle. Push the paper length adjuster toward the cards until it stops. Do not bend the cards. Reinstall the OUT tray.
An unsupported type of card is loaded in the IN tray. Use cards that meet the recommendations in
Section 6
.
Symptom Solution
Background printing is not working.
Background printing is not activated. Turn on Background printing in the Chooser.
The printer software did not install correctly. Make sure the files HP Background and HP PrintMonitor are installed within the Extensions folder in the System Folder. Background printing must be selected from the Chooser. Make sure you restart your computer after installing the printer software.
A conflict has occurred with an extension or control panel. You may need to make sure that HP Background is turned on.
Symptom Solution

••••••••••••••••••••••••••••••••••••••••••••••••••••••••••••••••••••••••••••••••••••••••••••••••••••••••••••••••••••••••••••••
56
SECTION FIVE
•••••••••••••••••••••••••••••••••••••••••••••••••••••••••••••••••••••••••••••••••••••••••••••••••••
The printer name does not appear in the page setup dialog box.
The printer is not selected in the Chooser. Select the printer in the Chooser as described on page 16
.
The installation of the printer software was unsuccessful. Close any screen saver or other software applications that are open and running in the background. Restart the computer. Reinstall the printer software using the installation instructions in
Section 1
.
The printer icon does not appear in the Chooser.
The printer software did not install correctly. Make sure the printer driver is installed within the Extensions folder in the System Folder.
The network printer icon appears in the Chooser, but no names appear.
AppleTalk is inactive. Turn on AppleTalk by clicking the Active button in the Chooser.
The network is improperly connected. Make sure that you are using the proper network cables and that they are connected properly to each device. See the discussion
Connecting the Printer Cable
on page 6.
“Please bring HP PrintMonitor to the front.” is displayed in a dialog box.
The HP PrintMonitor is obscured. Select the HP PrintMonitor from the Application menu at the right side of the menu bar. When the HP PrintMonitor appears, another dialog box appears that describes the current printing problem and how to fix it. Follow the instructions given.
“The printer is not responding. Make sure it is properly connected and turned on. Click OK to continue or Cancel to terminate printing.” is displayed in a dialog box.
The printer is not communicating with the computer. Check that the printer is properly connected to the computer as described in
Section 1
. Also make sure the printer is turned on. Then click OK to continue with the prior printing instruction. If the problem persists, check that the printer is selected in the Chooser. Then check the cable between the printer and the computer. To cancel the prior printing instruction, click Cancel.
“The serial port is already open or in use.” is displayed in a dialog box. After about five seconds, this message disappears and an application-dependent message such as “TeachText is unable to print this document. Make sure you’ve selected a printer.” appears.
The port is currently being used by a device (such as a modem) other than the printer. Check that you have selected the correct port and that the printer is attached to the port selected in the Chooser. Restart the computer. Then resend the document.
Symptom Solution

••••••••••••••••••••••••••••••••••••••••••••••••••••••••••••••••••••••••••••••••••••••••••••••••••••••••••••••••••••••••••••••
57
IF YOU HAVE A PRINTING PROBLEM
••••••••••••••••••••••••••••••••••••••••••••••••••••••••••••••••••••••••••••••••••••••••••••••••••••••••••••••••••••••••••••••
Printing the Self-Test Pattern
To test the print cartridge operation, print a one-page
self-test pattern:
With the power light on, press and hold down the resume button. After the printer begins printing, release the button.
To print a diagnostic test of technical information about
your printer:
With the printer turned on, hold down the power button while you press and release the resume button five
times. Release the power button to print the test.
To print the pen cartridge cleaning test to check the
operation of the print cartridge nozzles:
With the printer turned on, hold down the power button while you press and release the resume button seven times. Release the power button to clean the print cartridge and print the test.
If any of these tests do not print, try the solution given next.
“Please make sure that a DeskWriter is connected to this port and powered on. After you have done this, you can either select the printer in the Chooser, or use the “Setup...” button to configure your DeskWriter.” is displayed in a dialog box.
The printer is not responding to the computer. Check that the printer is properly connected to the computer as described in
Section 1
. Make sure you are using the correct printer driver for the type of connection established between the printer and the computer. Also make sure the printer is turned on. Check that you have selected the correct port and that the printer is attached to the port selected in the Chooser. Then resend the document.
Symptom Solution
The printer self-test pattern will not print when initiated from the resume
and power buttons.
Tape is covering the ink nozzles or vent hole of the print cartridge. Remove the print cartridge and remove any pieces of tape as shown on page 11. Reinstall the print cartridge.
The print cartridge is improperly installed. Make sure the print cartridge snaps into place with the arrow aligned with the dot on the cradle top. Close the top cover, then press the resume button on the front of the printer.
Symptom Solution
2185100

••••••••••••••••••••••••••••••••••••••••••••••••••••••••••••••••••••••••••••••••••••••••••••••••••••••••••••••••••••••••••••••
58
SECTION FIVE
•••••••••••••••••••••••••••••••••••••••••••••••••••••••••••••••••••••••••••••••••••••••••••••••••••
If Print Quality is Poor
Use the printed self-test pattern to help you diagnose the quality of text and pictures being printed. Print quality problems are often indicated by broken or missing lines and dots in the printout. You can often solve print quality problems by using only the
print side
of the paper, envelopes, cards, or transparencies, or by loading a different paper type. (See
Section 3
for more details on using paper.)
If you observe a print quality problem, find the symptom in the following table that most closely matches your problem, then perform the possible solution(s). For each listed symptom, more than one solution is possible. The first solution given is the most probable corrective action for the symptom. However, if that solution does not solve the problem, perform the other solutions in the order they appear until the problem is solved.
Symptom Solution
Lines or dots are missing from the characters in the printout, making the ink coverage inconsistent. For example:
The connection between the print cartridge and cradle is intermittent. Remove the print cartridge and reinstall it.
The paper is inappropriate. Try another type of paper. See Section 6.
The copper contacts of the print cartridge may be dirty. If the problem persists after you cleaned the cartridge as described on page 45, remove the print cartridge. Use a lint-free water-damp cloth to gently clean the copper contacts on the print cartridge and the print cartridge cradle. Do not wipe the ink nozzles. Reinstall the print cartridge, close the top cover, and perform a self-test.
Do not clean the print cartridge unnecessarily, because this shortens the print cartridge life. If the print quality remains poor after cleaning, install a new print cartridge. If the problem persists, see Contacting Customer Support on page 65.
2162044

••••••••••••••••••••••••••••••••••••••••••••••••••••••••••••••••••••••••••••••••••••••••••••••••••••••••••••••••••••••••••••••
59
IF YOU HAVE A PRINTING PROBLEM••••••••••••••••••••••••••••••••••••••••••••••••••••••••••••••••••••••••••••••••••••••••••••••••••••••••••••••••••••••••••••••
Print is fuzzy. The paper is inappropriate. Try another type of paper. See Section 6.
The print side of the paper was not used. Turn over the paper in the IN tray.
The print settings are inappropriate. Make sure you select the appropriate paper type and intensity settings.
The print cartridge is drying out or clogging. Print a self-test as described on page 57. If this does not clear the ink nozzles, clean the print cartridge as described on page 58.
Ink is smearing or paper is wrinkling.
The paper was not dry before you handled it. Let the ink dry before you handle the printed pages.
The wrong paper type setting is selected. Make sure the paper type setting matches the type of paper, cards, envelopes, or transparency film in the printer.
Too much ink was used on the page. Darker intensity settings print more ink; lighter intensity settings print less ink. Reduce the amount of ink printed by manually reducing the intensity setting.
The paper is inappropriate. Try another type of paper. See Section 6.
The wrong type of labels were used or the Avery paper labels were loaded incorrectly in the IN tray. Use only Avery paper labels. The ink does not dry on plastic and clear labels. Be sure to load the Avery paper labels in the IN tray as described on page 37.
Print is faded. The print cartridge is drying out or clogging. Print a self-test as described on page 57. If this does not clear the ink nozzles, clean the print cartridge as described on page 58.
The print cartridge is running out of ink. Install a new print cartridge.
Symptom Solution

••••••••••••••••••••••••••••••••••••••••••••••••••••••••••••••••••••••••••••••••••••••••••••••••••••••••••••••••••••••••••••••
60
SECTION FIVE•••••••••••••••••••••••••••••••••••••••••••••••••••••••••••••••••••••••••••••••••••••••••••••••••••
If Margins are Printed Wrong
If you observe that the placement of text and pictures on your printed pages is not what you expected, first be sure that you have set your software to print within the printable area for the size and orientation of paper, envelopes, or cards loaded in the printer.
If your software is set correctly and you still experience problems in the placement of text and pictures, find the symptom in the following table that most closely matches your problem, then perform the possible solution(s). For each listed symptom, more than one solution is usually possible. The first solution given is the most probable corrective action for the symptom. However, if that solution does not solve the problem, perform the other solutions in the order they appear until the problem is solved.
Symptom Solution
Margins on paper are not printing as expected.
The margins are incorrectly set. Check your margin settings in the software application. Check that the margins are in accordance with those in Section 6.
The page orientation is incorrectly set. Check the page orientation in the software program. Make sure the paper is loaded in the correct orientation.
The paper was improperly loaded. Align the paper stack against the right side of the printer. Make sure no paper is over the paper width adjuster. Make sure the paper does not bend in the IN tray.
Margins on index cards and postcards are not printing as expected.
The margins are incorrectly set. Check that cards are selected as the media size in the page setup for your software application. Check the margin settings in the software application. Check that the margins are in accordance with those listed in Section 6.
The cards are incorrectly loaded into the printer. Make sure the card guide is raised and align the right edge of the card stack against the card guide.

••••••••••••••••••••••••••••••••••••••••••••••••••••••••••••••••••••••••••••••••••••••••••••••••••••••••••••••••••••••••••••••
61
IF YOU HAVE A PRINTING PROBLEM••••••••••••••••••••••••••••••••••••••••••••••••••••••••••••••••••••••••••••••••••••••••••••••••••••••••••••••••••••••••••••••
Margins on envelopes are not printing as expected.
The left margin of the envelope is always at least 0.84 inch (21 mm).
The margins are incorrectly set. Check that envelopes are selected as the media size in the page setup for your software application. Check the margin settings in the software application. Check that the margins are in accordance with those listed in Section 6.
The envelopes are incorrectly loaded into the printer. Align the envelope stack against the right side of the IN tray. Make sure the card guide is down.
When printing on an individual envelope inserted into the single envelope slot, make sure the right side of the envelope presses evenly against the right side of the single envelope slot.
Printing is slanted on paper.
The paper is improperly loaded. Remove and reload the paper as described in Section 3. Make sure to align the stack evenly against the right side of the printer. Slide the paper width adjuster to the right until it presses against the left edge of the stack.
Unsupported or different paper types, sizes, or weights are loaded in the printer. Remove the stack and reload paper of only one type, size, and weight. See Section 6. When using preprinted forms, make sure they were printed straight. When you are printing on Avery paper labels: be sure the stack of Avery paper labels is placed print side down on top of 25 sheets of paper before the combined stack is inserted into the IN tray.
Paper was incorrectly added to the stack. To add paper, remove the stack from the IN tray and combine it with a new stack of the same type, size, and weight of paper. Make sure the stack is at least 1/8 inch (3 mm) thick; not more than 1/2 inch (1 cm) thick for paper, envelopes, and transparencies; and not more than 1/4 inch (0.5 cm) thick for cards and Avery paper labels. Tap to even the stack, and reload the stack.
The OUT tray is improperly installed in the printer. Make sure the OUT tray is fully installed into the printer and rests evenly on the IN tray. If necessary, lift the top cover, let the print cartridge cradle move to the center position, insert the OUT tray, and lower the top cover.
Symptom Solution

••••••••••••••••••••••••••••••••••••••••••••••••••••••••••••••••••••••••••••••••••••••••••••••••••••••••••••••••••••••••••••••
62
SECTION FIVE•••••••••••••••••••••••••••••••••••••••••••••••••••••••••••••••••••••••••••••••••••••••••••••••••••
Printing is slanted on envelopes.
The envelopes are improperly loaded. Remove the OUT tray, make sure the stack of envelopes is at least 1/8 inch (3 mm) thick but not more than 1/2 inch (1 cm) thick. Tap the stack on a table to make it even. Align the stack against the right side of the printer. Make sure the paper width adjuster is in the correct position for the size of envelopes you are printing. Reinstall the OUT tray.
Unsupported or different envelope types, sizes, or weights are loaded into the printer ‘s IN tray at the same time. Remove the envelopes and reload envelopes of only one type, size, and weight. Use envelopes that meet the recommendations in Section 6.
Envelopes were incorrectly added to the stack in the IN tray. To add envelopes, remove any envelopes from the IN tray and combine them with a new stack of the same type, size, and weight. Make sure the stack of envelopes is at least 1/8 inch (3 mm) thick but not more than 1/2 inch (1 cm) thick. Tap the stack on a table to make it even and reload the envelopes.
When printing on an individual envelope inserted into the single envelope slot, make sure the right side of the envelope presses evenly against the right side of the single envelope slot.
The OUT tray is improperly installed in the printer. Make sure the OUT tray is fully installed into the printer and rests evenly on the IN tray. If necessary, lift the top cover, let the print cartridge cradle move to the center position, insert the OUT tray, and lower the top cover.
Printing is slanted on cards.
The cards are unevenly or incorrectly loaded in the printer. Remove and reload the cards as described in Section 3. Make sure the card guide is in the raised position and that the card stack presses against it. Slide the paper width adjuster to the right until it presses against the left edge of the cards.
Unsupported or different card types, sizes, or weights are in the printer at the same time. Remove the cards and reload cards of only one type, size, and weight. Use cards that meet the recommendations in Section 6.
Cards were incorrectly added to the stack. To add cards, remove any cards from the IN tray and combine them with a new stack of the same type, size, and weight of cards. Make sure the stack is at least 1/8 inch (3 mm) thick but not more than 1/4 inch (1/2 cm), tap to even the stack, and reload the cards.
Symptom Solution

••••••••••••••••••••••••••••••••••••••••••••••••••••••••••••••••••••••••••••••••••••••••••••••••••••••••••••••••••••••••••••••
63
IF YOU HAVE A PRINTING PROBLEM••••••••••••••••••••••••••••••••••••••••••••••••••••••••••••••••••••••••••••••••••••••••••••••••••••••••••••••••••••••••••••••
If Text or Pictures are Printed Wrong
If you observe that the text or pictures of your documents are printed incorrectly on the pages, first be sure that you have set your software to print within the printable area of the paper loaded in the printer. Then make sure that you have used the formatting features of your software to create the design or layout as you intended.
If you still experience problems with the printing of text or pictures, find the symptom in the following table that most closely matches your problem, then perform the possible solution(s). For each listed symptom, more than one solution is usually possible. The first solution given is the most probable corrective action for the symptom. However, if that solution does not solve the problem, perform the other solutions in the order they appear until the problem is solved.
Symptom Solution
First printout after turning on the printer contains garbled text.
The printer and the computer were turned on in the wrong sequence. Turn on the computer before turning on the printer.
Font selections are not printing.
The fonts are not installed or are selected improperly. See your software application manual for selecting fonts within the application. Also make sure that the selected fonts are installed on your computer.
The printer appears to be printing, but the paper is blank when ejected.
Tape is covering the ink nozzles or vent hole of the print cartridge. Remove the print cartridge and remove any pieces of tape. Reinstall the print cartridge.
The print cartridge is improperly installed in the printer. Make sure the print cartridge snaps into place with the arrow aligned with the dot on the cradle top.
The print cartridge is clogged. Print a self-test as described on page 57. If this does not clear the ink nozzles, clean the print cartridge as described on page 58.
The print cartridge is out of ink. Install a new print cartridge.

••••••••••••••••••••••••••••••••••••••••••••••••••••••••••••••••••••••••••••••••••••••••••••••••••••••••••••••••••••••••••••••
64
SECTION FIVE•••••••••••••••••••••••••••••••••••••••••••••••••••••••••••••••••••••••••••••••••••••••••••••••••••
Characters, dots, or lines are incomplete or missing.
See If Print Quality is Poor on page 58.
The printout is illegible.
The wrong printer driver is selected. Select the correct printer driver in the Chooser as described on page 16. If necessary, reinstall the printer driver using the installation instructions in Section 1.
The print settings in your software application are incorrect. Make sure the print settings in your software application are set as desired.
Printout contains garbled or strange text characters or contains distorted graphic images.
The printer failed or the computer-to-printer connection failed. Turn off the printer, disconnect the printer cable from the back of the printer, and turn the printer on again. Print a self-test as described on page 57. If the self-test doesn’t print, the printer failed: see Contacting Customer Support on page 65. If the printer is not the problem, reconnect the printer cable and resend the file to the printer. If the printout is still garbled, the problem may be with the printer cable, the cable connections, or the computer port. Try another printer cable. If the interface cable is not the problem, see Contacting Customer Support on page 65.
Black and white instead of color, or wrong colors are printed.
See If Colors are Printed Wrong on page 84.
Symptom Solution

••••••••••••••••••••••••••••••••••••••••••••••••••••••••••••••••••••••••••••••••••••••••••••••••••••••••••••••••••••••••••••••
65
IF YOU HAVE A PRINTING PROBLEM••••••••••••••••••••••••••••••••••••••••••••••••••••••••••••••••••••••••••••••••••••••••••••••••••••••••••••••••••••••••••••••
Contacting Customer Support
The information presented earlier in this section suggests solutions to common problems. If your printer is not operating properly and these suggestions do not solve your problem, try using the following support services to obtain assistance.
24 Hour Support Information
Phone (800) 333-1917 to access either HP Audio-Tips or HP FIRST Fax, our 24-hour automated support services. Audio-Tips provides pre-recorded help messages on common questions, as well as information on other resources within HP to get you the help you need. Selected messages can be faxed to you for future reference.
HP FIRST Fax will deliver detailed support information on common software applications, and troubleshooting tips for your HP product. You may access this service from any touch tone phone and request up to three documents per call. These documents will be sent to the fax of your choice within minutes.
Electronic Information Services
For 24-hour access to information over your modem:
• HP Download Service — Our electronic download service is available 7 days a week, 24 hours a day for your convenient access to HP printer drivers, product information, and troubleshooting hints. Call (208) 344-1691. Set your communications software to N,8,1.
• CompuServe — Printer drivers and interactive sharing of technical information are available on CompuServe’s HP Peripherals forum (GO HPPER). To subscribe, call CompuServe, Inc., (800) 524-3388 and ask for representative #51. (This is not operated by HP.)
• Internet — Printer drivers, product and support information can be obtained via HP’s anonymous FTP site at 192.6.71.2 or ftp-boi.external.hp.com which is available to anyone with FTP access to the Internet. Access through the World-Wide Web is at:
URL http://www.hp.com/home.html

••••••••••••••••••••••••••••••••••••••••••••••••••••••••••••••••••••••••••••••••••••••••••••••••••••••••••••••••••••••••••••••
66
SECTION FIVE•••••••••••••••••••••••••••••••••••••••••••••••••••••••••••••••••••••••••••••••••••••••••••••••••••
Printer Drivers by MailHP’s Distribution Center provides printer drivers and printer driver updates. You can order by calling (970) 339-7009, Monday through Saturday, 24 hours a day.
Telephone Assistance — In WarrantyOur highly responsive support staff is dedicated to helping you get your new product up and running. Our support staff is available Saturday 9 am to 3 pm MST and Monday-Friday 7 am to 6 pm MST (except Wednesday; 7 am to 4 pm MST). This service is free during the warranty of your product; however, you are charged a toll for the phone call. Please have your serial number ready when calling (208) 323-2551.
Telephone Assistance — Post WarrantyPost warranty telephone assistance is available to you to answer your product questions as well as to offer insight on how to use your product with the most common software applications. We want to help you get the right information the first time you call. Available Saturday 9 am to 3 pm MST and Monday-Friday 7 am to 6 pm MST (except Wednesday; 7 am to 4 pm MST). Call (900) 555-1500 ($2.50 per minute, U.S.A. only). Charges begin only when you connect with a support technician. Or call (800) 999-1148 ($25 per call VISA or Master Card, U.S. and Canada). Prices are subject to change without notice.
Hardware Repair ServicesTo speak with someone for technical assistance or repair information, call (208) 323-2551. This service is free during the warranty of your printer; however, you will be charged a toll for the phone call.
If a service contract would better meet your needs, HP offers a variety of service contract options to compliment the standard warranty. Call (800) 633-3600 (U.S.A.) or (800) 268-1221 (Canada).
HP’s SupportPackYour three year protection plan in a box is available on your local reseller’s shelves. Simply fill out the form included in the SupportPack box, mail it to HP, and your protection plan is in motion. HP helps you avoid down-time and lost productivity by providing fast and convenient next-day express exchange replacement for your HP DeskWriter 600 printer from our skilled service technicians. Purchase SupportPack from your local reseller.

••••••••••••••••••••••••••••••••••••••••••••••••••••••••••••••••••••••••••••••••••••••••••••••••••••••••••••••••••••••••••••••
67
REFERENCE,SPECIFICATIONS,AND ORDERING
INFORMATION
S E C T I O N S I X
Maintaining Your Printer
• Use a soft cloth moistened with water to wipe dust, smudges, and stains off.
• Keep print cartridges in their sealed containers, at room temperature, until you are ready to use them.
• Keep the print cartridge in the print cartridge cradle at all times to keep it from drying out or becoming clogged.
• Do not unplug the printer before printing is complete and the print cartridge cradle has returned to the “home” position on the right side of the printer; doing so can dry out the print cartridge.
• The interior of the printer does not require cleaning. Keep fluids away from the interior of the printer.

••••••••••••••••••••••••••••••••••••••••••••••••••••••••••••••••••••••••••••••••••••••••••••••••••••••••••••••••••••••••••••••
68
SECTION SIX
•••••••••••••••••••••••••••••••••••••••••••••••••••••••••••••••••••••••••••••••••••••••••••••••••••
Increasing Printer Performance
The printing speed of the HP DeskWriter 600 printer can
be affected by:
• Amount of system memory available in your computer, which depends on many factors:
– The number of extensions and control panels you are currently running.
– The amount of system memory reserved in the disk cache.
– The degree of system memory fragmentation.
• Amount of space available on your hard disk.
Most techniques for maximizing printer performance require freeing computer memory for the printer driver. See your computer documentation for information on memory management.

••••••••••••••••••••••••••••••••••••••••••••••••••••••••••••••••••••••••••••••••••••••••••••••••••••••••••••••••••••••••••••••
69
REFERENCE, SPECIFICATIONS, AND ORDERING INFORMATION
••••••••••••••••••••••••••••••••••••••••••••••••••••••••••••••••••••••••••••••••••••••••••••••••••••••••••••••••••••••••••••••
To enhance the printer’s performance:
• Increase the amount of RAM in your computer. If you typically work with more than one large application open at a time, more than 4 MB of RAM may be required to ensure satisfactory printer performance.
• Limit the number of applications or documents you open at one time.
You may receive a message indicating that not enough memory is available to print your document. If this occurs, try the following:
• If several applications are open, close some and try printing again.
• If you still cannot print, adjust the size of the application memory. See your Macintosh computer documentation for how to adjust application memory size.
• If you are trying to print several documents at once, reduce the number of documents and try printing again.
When you work on your computer for several hours, opening and closing several applications, your computer’s system memory becomes fragmented — broken into small blocks. To understand memory fragmentation, see the appropriate sections of your Macintosh computer documentation. To create an unfragmented block of memory, close all applications you are currently using, restart the computer, then restart the application you want to print from. This gathers fragmented system memory to make one large, contiguous block available for your printer driver.

••••••••••••••••••••••••••••••••••••••••••••••••••••••••••••••••••••••••••••••••••••••••••••••••••••••••••••••••••••••••••••••
70
SECTION SIX
•••••••••••••••••••••••••••••••••••••••••••••••••••••••••••••••••••••••••••••••••••••••••••••••••••
Ink Drying Times
The HP DeskWriter 600 printer automatically sets the drying time for each printed page (based on paper type, print quality, and inks printed) to ensure that the ink does not smear on the page before the page is ejected into the OUT tray. You can override the automatic timer and force the page to be ejected into the OUT tray by pressing the resume button. The standard times allotted for ink drying are listed in the following table.
Standard Drying Times
Paper Type EconoFastBlack Color
NormalBlack Color
BestBlack Color
Plain Paper
0 sec. 0 sec. 15 sec. 15 sec. 25 sec. 15 sec.
Special Paper
0 sec. 0 sec. 15 sec. 15 sec. 25 sec. 15 sec.
Transparency
60 sec. 120 sec. 180 sec. 360 sec. 240 sec. 360 sec.

••••••••••••••••••••••••••••••••••••••••••••••••••••••••••••••••••••••••••••••••••••••••••••••••••••••••••••••••••••••••••••••
71
REFERENCE, SPECIFICATIONS, AND ORDERING INFORMATION
••••••••••••••••••••••••••••••••••••••••••••••••••••••••••••••••••••••••••••••••••••••••••••••••••••••••••••••••••••••••••••••
The Printable Area
The HP DeskWriter 600 printer can print within the area shown below. Most software programs allow you to specify where print appears on the page with margin settings or column width settings. When you set margins or columns in your software, be sure to set them within the printer’s printable area.
Printable Area
A4 size paper
8.0 x 10.1 in. (203.2 x 257.8 mm)
8.0 x 13.1 in. (203.2 x 334 mm)
7.76 x 10.8 in. (197.2 x 275.5 mm)
U.S. legal size paper
U.S. letter size paper
Executive size paper
6.7 x 9.6 in. (171.5 x 245.1 mm)
Printable AreaU.S. No. 10 3.8 x 8.4 inch (98.4 x 213.4 mm)
DL 4 x 7.5 inch (103.6 x 191.1 mm)
Printable AreaFor Envelopes:
Printable AreaFor Sheet Paper:
A5 size paper
5.3 x 7.1 in. (135.2 x 182.1 mm)
B5 size paper
6.6 x 9.2 in. (169.2 x 235.5 mm)
C6 4.2 x 5.2 inch (107.6 x 134.1 mm)
Printable AreaFor Cards:
U.S. 4x6 Cards3.5 X 4.9 in.
(88.9 x 124.5 mm)
U.S. 5x8 Cards
4.5 x 6.9 in.
(114.3 x 175.3 mm)
A6 Cards
3.6 x 4.7 in.(92.2 x 120.1 mm)
Hagaki Postcards
3.4 x 4.7 in.(87.2 x 120.1 mm)
Printable Area
A2 4.37 x 5.75 inch (111 x 146 mm)

••••••••••••••••••••••••••••••••••••••••••••••••••••••••••••••••••••••••••••••••••••••••••••••••••••••••••••••••••••••••••••••
72
SECTION SIX
•••••••••••••••••••••••••••••••••••••••••••••••••••••••••••••••••••••••••••••••••••••••••••••••••••
Minimum Margins* for Paper and Cards in Portrait Orientation
Minimum Margins* for Envelopes
Paper Size Left and RightMargins Bottom Margin
U.S. letter
8.5 x 11 in. (216 x 279 mm) 0.25 in. (6.4 mm) 0.59 in. (14.9 mm)
U.S. legal
8.5 x 14 in. (216 x 356 mm) 0.25 in. (6.4 mm) 0.59 in. (14.9 mm)
A4
size
8.27 x 11.7 in. (210 x 297 mm) 0.25 in. (6.4 mm) 0.59 in. (14.9 mm)
A5 size
5.8 x 8.3 in. (148 x 210 mm) 0.25 in. (6.4 mm) 0.84 in. (21.3 mm)
B5 size
7.2 x 10.1 in. (182 x 257 mm) 0.25 in. (6.4 mm) 0.59 in. (14.9 mm)
Executive
7.25 x 10.5 in. (184 x 267 mm) 0.25 in. (6.4 mm) 0.59 in. (14.9 mm)
U.S. cards
4 x 6 in. (102 x 152 mm) 0.25 in. (6.4 mm) 0.84 in. (21.3 mm)
U.S. cards
5 x 8 in. (127 x 203 mm) 0.25 in. (6.4 mm) 0.84 in. (21.3 mm)
A6 cards
4.1 x 5.83 in. (105 x 148 mm) 0.25 in. (6.4 mm) 0.84 in. (21.3 mm)
Hagaki postcards
3.9 x 5.8 in. (100 x 148 mm) 0.25 in. (6.4 mm) 0.84 in. (21.3 mm)
*Note: The top margin is 0.26 inch (6.6 mm) for all paper sizes.
Envelope Size Left Margin Right Margin
U.S. No. 10
4.12 x 9.5 in. (105 x 241 mm) 0.84 in. (21 mm) 0.29 in. (6.6 mm)
DL
4.33 x 8.66 in. (110 x 220 mm) 0.84 in. (21 mm) 0.29 in. (6.6 mm)
C6
4.48 x 6.37 (114 x 162 mm) 0.84 in. (21 mm) 0.29 in. (6.6 mm)
I
nvitation A2
4.37 x 5.75 in. (111 x 146 mm) 0.84 in. (21 mm) 0.29 in. (6.6 mm)
*Note: The top and bottom margins are 0.125 inch (3.2 mm) for all envelope sizes.

••••••••••••••••••••••••••••••••••••••••••••••••••••••••••••••••••••••••••••••••••••v•••••••••••••••••••••••••••••••••••••••••
73
REFERENCE, SPECIFICATIONS, AND ORDERING INFORMATION
••••••••••••••••••••••••••••••••••••••••••••••••••••••••••••••••••••••••••••••••••••••••••••••••••••••••••••••••••••••••••••••
Print Method
Plain paper drop-on-demand thermal inkjet printing
Black Print Speed*
Best mode: 1 page per minuteNormal mode: 2.5 pages per minuteEconoFast: 4 pages per minute
Color Print Speed*
Best mode: 4 min. per pageNormal mode: 2 min. per pageEconoFast: 1 min. per page
Black Resolution
Best mode: 600 x 600 dpiNormal mode: 600 x 300 dpiEconoFast: 300 x 300 dpi
Color Resolution
300 x 300 dpi on plain and premium paper
Resolution on glossy paper and transparency film:
600 x 300 dpi black and color
Vertical Alignment
± 0.002 in.
Dimensions
436 mm (17.2 in.) W x 199 mm (7.9 in.) H x405 mm (16 in.) D
Weight
5.3 kg (11.6 lb)
Reliability
60,000 page life. 20,000 hours MTBF 2000 hours power-on and 12,000 printed pages per year 1000 total black pages per month max. 160 total color pages per month max.
TrueType Fonts
ITC Avant Garde Gothic Book, ITC Avant Garde Gothic Demi, ITC Bookman Light, ITC Bookman Light Italic, ITC Bookman Demi, ITC Bookman Demi Italic, Helvetica™ Narrow, Helvetica™ Narrow Bold, New Century Schoolbook, New Century Schoolbook Italic, New Century Schoolbook Bold, New Century Schoolbook Bold Italic, ITC Zapf Chancery Medium Italic, ITC Zapf Dingbats, Bernhard Modern, Cooper Black, Dom Casual, PL Torino Outline, CG Poster Bodoni, Graphite Light, Graphite Light Narrow, Lucida® Casual, Lucida® Casual Italic, PL Benguiat Frisky, Phyllis, Signet Roundhand, Milestones™.
Recommended Media Weight
Paper: 60 to 135 g/m
2
(16 to 36 lb)Envelopes: 75 to 90 g/m
2
(20 to 24 lb)Cards: 110 to 200 g/m2 (110 lb index max.; 8.5 pt max. thickness)
Media Size
US letter
216 x 279 mm (8.5 x 11 in.)
US legal
216 x 356 mm (8.5 x 14 in.)
Executive
184 x 267 mm (7.25 x 10.5 in.)
European A4
210 x 297 mm
European A5
148.5 x 210 mm
B5-JIS
182 x 257 mm
US No. 10 envelope
104.7 x 241.3 mm (4.12 x 9.5 in.)
European DL envelope
220 x 110 mm
European C6 envelope
114 x 162 mm
Invitation A2 envelope (5.5)
4
3
/
8
x 5
3
/
4
in.
Index card
101.6 x 152.4 mm (4 x 6 in.)
Index card
127 x 203.2 mm (5 x 8 in.)
European A6 card
105 x 148.5 mm
Japanese Hagaki Postcard
100 x 148 mm
US HP Premium Transparency Film
216 x 279 mm (8.5 x 11 in.)
European A4 HP Premium Transparency Film
210 x 297 mm
US HP Premium Glossy Paper
216 x 279 mm (8.5 x 11 in.)
European A4 HP Premium Glossy Paper
210 x 297 mm
US HP Premium InkJet Paper
216 x 279 mm (8.5 x 11 in.)
European A4
HP Premium InkJet Paper
210 x 297 mm
Media Handling (Built-In Feeders)
Sheets: up to 100 sheetsMultiple envelopes: up to 20 envelopesSingle envelope: only 1 envelopeCards: up to 30 cardsLabels: up to 25 sheets of Avery paper labels. Use only U.S. letter or A4 size sheets. Use only Avery paper labels specifically designed for use with HP InkJet printers.OUT tray capacity: up to 50 sheets
Buttons/Lights
Resume and power
I/O Interface
AppleTalkHigh-speed Serial (RS-422-A)
Specifications
*Approximate figures. Exact speed will vary depending on the system configuration, software program, and document complexity.

••••••••••••••••••••••••••••••••••••••••••••••••••••••••••••••••••••••••••••••••••••••••••••••••••••••••••••••••••••••••••••••
74
SECTION SIX
••••••••••••••••••••••••••••••••••••••••••••••••••••••••••••••••••••••••••••••••••••••••••••••••••••••••••••••••••••••••••••••
Product Certifications
Safety Certifications - Power Module: UL, CSA, TÜV SEMKO, NEMKO, SEV, SECV, FIMKO, DEMKO, NOMSafety Certifications - Printer with Power Module: UL, CSA, TUV, ETL. Others not requiredEMI Certifications - Printer with Power Module: FCC Class B when used with a Class B computing device (USA), EMC Directive 89/336/EEC (European Community), VCCI (Japan), SABS (South Africa)
Printer Memory
512 Kbyte built-in RAM32 Kbyte receive buffer
Power Requirements
Power modules:Input Voltage (depends on power module ordered): 100, 120, 127, 220, 230, or 240 VAC (+10%, -10%)
Frequency:
Power consumption:
2 watts maximum when off4.5 watts maximum non-printing12 watts maximum printing
100 VAC 50/60 Hz (+3 Hz, -3 Hz)120 VAC 60 Hz (+3 Hz, -3 Hz)127 VAC 60 Hz (+3 Hz, -3 Hz)220 VAC 50 Hz (+3Hz, -3 Hz)230 VAC 50 Hz (+3Hz, -3 Hz)240 VAC 50 Hz (+3 Hz, -3 Hz)
Operating Environment
Maximum operating temperature:5°C (41°F) to 40°C (104°F)Humidity: 10-80% RH non-condensingRecommended operating conditions for best print quality: 15°C (59°F) to 35°C (95°F), 20 to 80% RH non-condensingStorage temperature: -40°C (-40°F) to 60°C (140°F)Noise Levels per ISO 9296:
BestMode
NormalMode
Econo-Fast
ModeSound Power, L
wAd
: 6.0 B(A) 6.3 B (A) 6.5 B(A)
*
Sound Pressure, L
pAm
: 46 dB(A) 50 dB (A) 51 dB(A)
*
Bystander positions

••••••••••••••••••••••••••••••••••••••••••••••••••••••••••••••••••••••••••••••••••••••••••••••••••••••••••••••••••••••••••••••
75
REFERENCE, SPECIFICATIONS, AND ORDERING INFORMATION
••••••••••••••••••••••••••••••••••••••••••••••••••••••••••••••••••••••••••••••••••••••••••••••••••••••••••••••••••••••••••••••
Regulatory Notices
FCC Statement (USA)
The United States Federal Communications Commission (in 47 CFR 15.105) has specified that the following notice be brought to the attention of users of this product.
This equipment has been tested and found to comply with the limits for a Class B digital device, pursuant to part 15 of the FCC Rules. These limits are designed to provide reasonable protection against harmful interference in a residential installation. This equipment generates, uses and can radiate radio frequency energy and, if not installed and used in accordance with the instructions may cause harmful interference to radio communications. However, there is no guarantee that interference will not occur in a particular installation. If this equipment does cause harmful interference to radio or television reception, which can be determined by turning the equipment off and on, the user is encouraged to try to correct the interferences by one or more of the following measures:
•
reorient or relocate the receiving antenna
•
increase the separation between the equipment and the receiver
•
connect the equipment into an outlet on a circuit different from that to which the receiver is connected
•
consult the dealer or an experienced radio/TV technician for help
The user may find the following booklet, prepared by the Federal Communications Commission, helpful:
How to Identify and Resolve Radio/TV Interference Problems
. This booklet is available from the U.S. Government Printing Office, Washington, D.C. 20402, Stock No. 004-000-00345-4.
Use of a shielded cable is required to comply within Class B limits of Part 15 of FCC Rules.
Pursuant to Part 15.21 of the FCC Rules, any changes or modifications to this equipment not expressly approved by Hewlett-Packard Company may cause harmful interference and void the FCC authorization to operate this equipment.
Power Module StatementThe power module cannot be repaired. If it is defective it should be discarded or returned to the supplier.
SvenskaFår endast anslutas till jordat nätuttag.
Observera!Skadas sladden till denna nätadapter skall enheten kasseras. Sladden går ej att byta ut.

••••••••••••••••••••••••••••••••••••••••••••••••••••••••••••••••••••••••••••••••••••••••••••••••••••••••••••••••••••••••••••••
76
SECTION SIX
•••••••••••••••••••••••••••••••••••••••••••••••••••••••••••••••••••••••••••••••••••••••••••••••••••
DECLARATION OF CONFORMITYaccording to ISO/IEC Guide 22 and EN 45014
Manufacturer’s Name: Hewlett-Packard Company
Manufacturer’s Address:
Hewlett-Packard Co. Hewlett-Packard Singapore (PTE) Ltd.Vancouver Division Asia Peripherals Division18110 S.E. 34th Street 20 Gul WayCamas, WA 98607 Singapore 2262
Hewlett-Packard Espanola, S.A.Barcelona DivisionAvenida Graells, 50108190 Sant Cugat del VallesBarcelona, Spain
declares, that the product(s):
Product Name: DeskJet and DeskWriter Printers
Model Number(s): C2168A, C2169A, C2170A, C2171A,C2162A, C2163A, C2164A, C2165A,C2184A, and C2185A
Product Options: All
conforms to the following Product Specifications:
Safety: IEC 950 (1991) Second Edition without amendments/EN 60950 (1988)
EMC: EN55022 (1988) Class B/CISPR 22 (1985) Class BIEC 801-2 (1991) Second Edition/prEN 55204-2 (1992):4 kV CD, 8 kV ADIEC 801-3 (1984)/prEN 55024-3 (1992): 3 V/mIEC 801-4 (1988)/prEN 55024-4 (1992): 1 kV Power lines, 0.5kV Signal lines
Supplementary Information:
The products herewith comply with the requirements of the Low Voltage Directive 73/23/EEC and the EMC Directive 89/336/EEC. The products were tested in a typical configuration.
Camas, WA., March 3, 1995Kathy SmithCustomer Assurance Manager
European Contact: Your local Hewlett-Packard Sales and Service Office or Hewlett-Packard GmbH, Department ZQ/ Standards Europe, Herrenberger Straße 130,
D-71034 Böblingen FAX:+49-7031-143143

••••••••••••••••••••••••••••••••••••••••••••••••••••••••••••••••••••••••••••••••••••••••••••••••••••••••••••••••••••••••••••••
77
REFERENCE, SPECIFICATIONS, AND ORDERING INFORMATION••••••••••••••••••••••••••••••••••••••••••••••••••••••••••••••••••••••••••••••••••••••••••••••••••••••••••••••••••••••••••••••
Available Supplies and Accessories
Supply/Accessories HP Reorder NumberHP Serial Printer Cable 92215SHP AppleTalk Connector 92215NHP Color Kit
U.S.A. C4533AEurope, China C4534AAsia C4535AJapan, Latin America C4536A
Print CartridgeBlack Print Cartridge 51629AColor Print Cartridge 51649A
MediaHP Premium Transparency Film (U.S. letter, 50 sheets) C3834AHP Premium Transparency Film (U.S. letter, 20 sheets) C3828AHP Premium Transparency Film (European A4, 50 sheets) C3835AHP Premium Transparency Film (European A4, 20 sheets) C3832AHP Premium Glossy Paper (U.S. Letter, 50 sheets) C3836AHP Premium Glossy Paper (U.S. Letter, 10 sheets) C3833AHP Premium Glossy Paper (European A4, 50 sheets) C3837AHP Premium Glossy Paper (European A4, 10 sheets) C3831AHP Premium InkJet Paper (U.S. Letter, 200 sheets) 51634YHP Premium InkJet Paper (European A4, 200 sheets) 51634Z

••••••••••••••••••••••••••••••••••••••••••••••••••••••••••••••••••••••••••••••••••••••••••••••••••••••••••••••••••••••••••••••
78
SECTION SIX•••••••••••••••••••••••••••••••••••••••••••••••••••••••••••••••••••••••••••••••••••••••••••••••••••
Replaceable Parts HP Reorder NumberPower Module
U.S.A., Canada, Mexico 120V/60Hz 9100-5124 (C2175A)Europe (except U.K.), 230V/50Hz 9100-5132 (C2176A)Japan, 100V/50/60 Hz 9100-5130 (C2178A)U.K., 240V/50Hz 9100-5131 (C2177A)South Africa, 220V/50Hz 9100-5128 (C2180A)Australia, 240V/50Hz 9100-5127 (C2181A)China, Argentina, 220V/50Hz 9100-5129 (C2179A)Korea, 220V/60Hz 9100-5126 (C2182A)
HP DeskWriter 600 Printer User’s Guide KitsUS English User’s Guide Kit C2185-60200Asian English User’s Guide Kit C2185-60201Spanish User’s Guide Kit C2185-60218Korean User’s Guide Kit C2185-60214Japanese User’s Guide Kit C2185-60213
Access Door (Top Cover) Assembly C2164-67816Base Foot Assembly (4 ea.) C2162-60098Paper Tray Assembly C2164-67807

••••••••••••••••••••••••••••••••••••••••••••••••••••••••••••••••••••••••••••••••••••••••••••••••••••••••••••••••••••••••••••••
79
REFERENCE, SPECIFICATIONS, AND ORDERING INFORMATION••••••••••••••••••••••••••••••••••••••••••••••••••••••••••••••••••••••••••••••••••••••••••••••••••••••••••••••••••••••••••••••
Ordering Information
To order printer supplies or accessories, call your nearest HP dealer. If your dealer does not have the supplies, call HP DIRECT for fast shipping service:
• Within the U.S.: 1 (800) 538-8787
To order replaceable parts within the U.S.: 1 (800) 227-8164
For information on HP Service Agreements within the U.S.: 1 (800) 835-4747 (Monday-Friday: 7:30 am to 12 noon PST and 1:00 pm to 4:00 pm PST).
• Toronto: (416) 671-8383
• Other Canadian Provinces: 1 (800) 387-3154
• Australia/ New Zealand: (03) 895-2895, China Resources Bldg., 26 Harbour Road, Wanchai, Hong Kong
• Latin America: (525)326-40-00, Latin American Region Headquarters, Monte Pelvoux 111 Colonia Lomas de Chapultepec, Codigo Postal 11000, Mexico, D.F.
• Japan: (03) 331-6111, Yokogawa-Hewlett-Packard Ltd. 29-21, Takaido-Higashi 3-chome, Suginami-ku, Tokyo 168
• Elsewhere in the World: Hewlett-Packard Company, Intercontinental Headquarters, 3495 Deer Creek Road, Palo Alto, CA 94304, U.S.A.


•••••••••••••••••••••••••••••••••••••••••••••••••••••••••••••••••••••••••••••••••••••••••••••••••••••••••••••
81
7
••••••••••••••••••••••••••••••••••••••••••••••••••••••••••••••••••••••••••••••••••••••••••••••••••••••••••••••••••••••••••••••
How to Print in Color
Other than installing a color print cartridge, no physical modifications to the printer are necessary to print in color. Be sure you have created colored text or pictures within your document.
1.
Remove the black print cartridge from the printer as described in
Removing the Print Cartridge
on page 44 of the User’s Guide.
2.
Install the color print cartridge in the printer as described in
Installing the Print Cartridge
on page 11 of the User’s Guide. When you install the color print cartridge, the movable cartridge guide is pushed to the left of the color print cartridge; this is its proper position when using the color print cartridge.
3.
From your application, select
from the File menu to open the Print dialog box.
4.
If checked, click to uncheck the
Print in Grayscale
option.
5.
Print the document.
If the document contains intermixed pages of all black and others of all color, the color pages are printed first, followed by the black pages. You are prompted when it is appropriate to reinstall the black print cartridge.
N OT E
Always store the print cartridge that you are not currently using in the print car-tridge storage container. The print cartridge storage container is uniquely designedto protect the ink nozzles from damage and to prevent the ink from evaporatingand drying out while the print cartridge is not being used. This prolongs the life ofthe print cartridge, protecting your investment.
How to Resume Printing in Black
To resume printing in black, simply exchange the black and color print cartridges again, placing the color print cartridge back into the print cartridge storage container and re-installing the black print cartridge in the print cartridge cradle of the printer.
USING THE HP COLOR KIT
S E C T I O N S E V E N

••••••••••••••••••••••••••••••••••••••••••••••••••••••••••••••••••••••••••••••••••••••••••••••••••••••••••••••••••••••••••••••
82
SECTION SEVEN
•••••••••••••••••••••••••••••••••••••••••••••••••••••••••••••••••••••••••••••••••••••••••••••••••••
About Composite Black
When printing black with the color print cartridge, the black that is printed, called “composite black,” is a mixture of the cyan, yellow, and magenta inks. The darkness of the composite black depends on the intensity and print quality settings selected through your printer software, and on the quality of the paper used.
N OT E
Unless your document contains color, do not extensively use the color print cartridge to print. Because each “dot” of composite black is made from a dot eachof cyan, yellow, and magenta ink, using composite black in your output meansusing a large amount of color ink.
About ColorSmart
The quality of your color printing depends partly on how the three color inks — cyan, yellow, and magenta — are placed on the printed page. Your HP DeskWriter 600 printer uses HP’s ColorSmart technology to intelligently analyze your documents at the time of printing to provide the best color output. ColorSmart identifies each element on a page — text, simple graphics, or complex graphics such as photographic images — and automatically applies the appropriate color settings to each element as the page is printed.
Using Grayscale for Draft Copies
To economize on the use of the color print cartridge, print draft copies of your color documents in grayscale using the black print cartridge. Grayscale printing is significantly faster than color printing, and it gives you a good approximation of your final output. To print in grayscale, install the black print cartridge and select the
Print in Grayscale
setting in the Print dialog box.

••••••••••••••••••••••••••••••••••••••••••••••••••••••••••••••••••••••••••••••••••••••••••••••••••••••••••••••••••••••••••••••
83
USING THE HP COLOR KIT
••••••••••••••••••••••••••••••••••••••••••••••••••••••••••••••••••••••••••••••••••••••••••••••••••••••••••••••••••••••••••••••
Storing the Unused Print Cartridge
To avoid mixing black and color inks on the nozzles of the print cartridges during storage in the print cartridge storage container, always store the print cartridges as shown here:
To remove a print cartridge from the print cartridge storage container, lift the print cartridge up and out of the print cartridge storage container.
Point the arrow on the top of the colorprint cartridge toward the cartridge
clip at the back of the print cartridgestorage container.
Color Print Cartridge
Point the arrow on the top of the blackprint cartridge toward the cartridgeclip on the left of the print cartridge
storage container.
21840502184051
Black Print Cartridge

••••••••••••••••••••••••••••••••••••••••••••••••••••••••••••••••••••••••••••••••••••••••••••••••••••••••••••••••••••••••••••••
84
SECTION SEVEN
•••••••••••••••••••••••••••••••••••••••••••••••••••••••••••••••••••••••••••••••••••••••••••••••••••
If Colors are Printed Wrong
N OT E
See
Available Supplies and Accessories
on page 77 for the part number of the HP Color Kit.
If you observe that the colors in your documents are printed incorrectly on the pages, first be sure that you have set your software for color printing.
If you still experience problems with the printing of colors, find the symptom in the following table that most closely matches your problem, then perform the possible solution(s). For each listed symptom, more than one solution is usually possible. The first solution given is the most probable corrective action for the symptom. However, if that solution does not solve the problem, perform the other solutions in the order they appear until the problem is solved.
Symptom Solution
Missing colors.
Color printing is not selected in your software. Check your software application’s manual for how to select color.
The black print cartridge is installed in the printer. Remove the black print cartridge and install the color print cartridge. Store the black print cartridge in the print cartridge storage container.
Grayscale printing is selected in the Print dialog box. Turn off the
Print in Grayscale
setting.
The print cartridge is drying out or clogging. Print a self-test as described on page 57. If this does not clear the ink nozzles, clean the print cartridge as described on page 58.
The color print cartridge has run out of one or more inks. Install a new color print cartridge.
Your computer does not support color printing. Print from a color-capable computer.

••••••••••••••••••••••••••••••••••••••••••••••••••••••••••••••••••••••••••••••••••••••••••••••••••••••••••••••••••••••••••••••
85
USING THE HP COLOR KIT
••••••••••••••••••••••••••••••••••••••••••••••••••••••••••••••••••••••••••••••••••••••••••••••••••••••••••••••••••••••••••••••
Printed colors don’t match screen colors.
The print settings are inappropriate. Check your software application’s manual for information on selecting colors. Make sure the appropriate settings are made in the Options dialog box (of the Page Setup or Print dialog boxes).
The color print cartridge has run out of one or more inks. Install a new color print cartridge.
The paper is inappropriate. Try another type of paper. See
Section 6
. For high-quality color printing results, use HP Premium Glossy Paper.
Colors appear washed out.
The print cartridge is drying out or clogging. Print a self-test as described on page 57. If this does not clear the ink nozzles, clean the print cartridge as described on page 58.
The paper is inappropriate. Try another type of paper. See
Section 6
. For high-quality color printing results, use HP Premium Glossy Paper.
The intensity setting is set too low. Increase the Intensity setting in the Options dialog box (of the Page Setup or Print dialog boxes).
When using the color print cartridge, vertical lines of color are jagged.
The color print cartridge needs to be aligned. Click the Service button to open the Service dialog box from the Page Setup dialog box. Choose
Start
next to
Align Print Cartridge.
Click
Align
and follow the on-screen instructions.
Composite black is mixing with the colors along the print boundaries.
The transparency was moved or placed in a protective sleeve while still wet. Allow 10 to 15 minutes for the ink to dry before moving it or placing it in a protective sleeve.
The print settings are inappropriate. See your software application’s manual for the correct print settings. Try printing in Best mode.
The paper is inappropriate. Try another type of paper. See Section 6.
The color print cartridge is misaligned. Click the Service button to open the Service dialog box from the Page Setup dialog box. Choose
Start
next to
Align Print Cartridge.
Click
Align
and follow the on-screen instructions.
Symptom Solution

••••••••••••••••••••••••••••••••••••••••••••••••••••••••••••••••••••••••••••••••••••••••••••••••••••••••••••••••••••••••••••••
86
SECTION SEVEN
•••••••••••••••••••••••••••••••••••••••••••••••••••••••••••••••••••••••••••••••••••••••••••••••••••
Black and white output instead of color.
Grayscale printing is selected in the Print dialog box. Turn off the
Print in Grayscale
setting.
Color printing is not selected in your software. Check your software application’s manual for how to select color.
The black print cartridge is installed in the printer. Remove the black print cartridge and install the color print cartridge. Store the black print cartridge in the print cartridge storage container.
The color settings are inappropriate. Adjust the color settings in the software.
Your computer does not support color printing. Print from a color-capable computer.
Symptom Solution

••••••••••••••••••••••••••••••••••••••••••••••••••••••••••••••••••••••••••••••••••••v•••••••••••••••••••••••••••••••••••••••••
87
8
••••••••••••••••••••••••••••••••••••••••••••••••••••••••••••••••••••••••••••••••••••••••••••••••••••••••••••••••••••••••••••••
INDEX
A
A4/A5/A6 paper sizes 73access door
See
top coveraccessories 2, 77, 79adding media 42adhesive labels
See
labelsadvance/eject errors 52-55AppleTalk
choosing printer 17connecting to 7connector kit 7ordering 79
ATM fonts 19
B
B5-JIS paper sizes 73back-to-front printing 21background printing 16, 21, 22
problems 55Balloon Help 23Best print mode 73black (composite) 82black printing
print speed 73resolution 73
blank paper ejected 50, 63blinking lights 5, 50, 51, 53bold fonts 73bond paper 27buffer size 74buttons
See also
lightspower 4, 5, 48, 49resume 4, 5, 48, 49
C
C6 size envelopes 36, 75cables
connecting 6, 7ordering 77, 79
cancel printing 22card guide 4, 31cards
See
index cards or postcardscartridges
See
print cartridgeschanging print cartridges 44, 81characters
See also
fontsincomplete/missing 58print problems 63
Chooser 16-18, 56choosing printer 16-17
cleaningprint cartridges 45, 57printer 67
clearing paper jams 53color kit
See also
color printinginstalling 81Options dialog box 81ordering 77, 79printing problems 84-86storing cartridges 81using 81
color matching 82, 85color printing
cartridge 81installing 81missing colors 84paper selection 85procedure 81problems 84-86speed 73resolution 73using 81
ColorSmart 82composite black 82CompuServe 65connecting
cable 6, 7power module 8
connector box 7connectors 6context sensitive help 23Control Panel 16cotton bond paper 27customer support 65
D
diagnostic test 13, 57dimensions of printer 73direction of printing
See
page orientationdisk cache 16DL size envelopes 34, 73documents
previewing 21printing 20
downloading customer support 65
draft printing 82dried ink 59, 70driver installer 15drivers
See
printer drivers
E
EconoFast print mode 73ejection problems 53electronic information service 65envelopes
adding 42advance/eject errors 54loading 33-36margin problems 61margins 72printable area 71removing 42selecting 27single envelope slot 4, 34sizes 36storing 28
environmental specifications 74error messages 55-57European media sizes 73Executive size paper 73
F
faded print 59faxed customer support 65Finder 20fonts
See also
charactersATM 19installing 15printing problems 63TrueType 73
fuzzy print 59
G
garbled text 63-64glossy paper 25, 77graphics distorted 64grayscale printing 82
H
halftoning patterns 20hardware repair 66help
See also
customer supportonline 23
HP AppleTalk connector 77HP Audio Tips 65HP Color Kit
See also
color printinginstalling 81Options dialog box 81ordering 77, 79printing problems 84-86

••••••••••••••••••••••••••••••••••••••••••••••••••••••••••••••••••••••••••••••••••••••••••••••••••••••••••••••••••••••••••••••
88
INDEX
••••••••••••••••••••••••••••••••••••••••••••••••••••••••••••••••••••••••••••••••••••••••••••••••••••••••••••••••••••••••••••••
using 81HP ColorSmart 82HP Customer Support 65HP Download Service 65HP FIRSTFax 65HP PrintMonitor 22
error message 56HP SupportPack 66
I
I/O interface 73illegible printout 64IN tray
advance/eject errors 52-55identifying 4loading media 29-41
increasing speed 68, 69index cards
adding 42advance/eject errors 55loading 31-33margin problems 60margins 72printable area 71removing 42storing 28
inkdried 60drying times 70inconsistent 59nozzles 59
inkjet print method 73installing
cables 6, 7color kit 81power module 8print cartridge 11printer software 14-15TrueType fonts 15
intensity 20interface cables
connecting 6, 7ordering 77, 79
interface connector 6interface port 6, 7Internet 65italic fonts 73
JKL
jammed paper 53Japanese Hagaki postcard 73labels
adding 42advance/eject errors 53loading 37removing 42selecting 28storing 28
landscape orientation
See
page orientationlegal size paper 73length adjuster 4, 9, 30letter size paper 73lights
blinking 5, 50, 51off 5, 48power 4, 5resume 4, 5
lines missing from printout 58loading media
envelopes 33guidelines 26index cards 31non-standard size 39-41paper 9, 29postcards 31transparencies 29
LocalTalk connectors 6
M
maintenanceprint cartridge 67printer 67
manuals (ordering) 78-79margins 72
problems 60media
See
envelopes, index cards, postcards, paper, transparen-cies
memory 16, 68, 74messages 55-57missing
characters/dots/lines 58colors 84
modes of printing 73modem port 6monitoring status 22multiple documents 20
N
naming printer 18network
choosing printer 17connecting to 7connector kit 6interface cable 7naming printer 18
non-standard paper 39-41nothing prints 48, 63Normal print mode 73
O
online help 23
on-screen messages 55operating environment 74Options dialog box 20ordering
accessories 77, 79printer drivers 65supplies 77, 79
orientation
See
page orientationOUT tray
identifying 4paper problems 52-55removing 31replacing 33, 62
P
page orientation 20
See also
portrait orientationPage Setup dialog box 20, 41
printer name missing 56paper
adding 42advance/eject errors 52-54bond 25glossy 25, 77ink drying 70jammed 53legal/letter size 72, 73loading 9, 29margin problems 60margins 72non-standard 39print side 25printable area 71removing 42selecting 27standard size 29, 73storing 28trays 4, 9weight 73wrinkling 59
paper length adjuster 4, 9, 30paper width adjuster 4, 9, 29parts (ordering) 77-79pen cartridge cleaning 57PhoneNET connectors 6port (interface) 6, 16portrait orientation
See also
page orientationloading cards 26margins 72
postcardsadding 42advance/eject errors 55Japanese 73loading 31-33margin problems 60margins 72printable area 71removing 42size specifications 72, 73

••••••••••••••••••••••••••••••••••••••••••••••••••••••••••••••••••••••••••••••••••••••••••••••••••••••••••••••••••••••••••••••
89
INDEX
••••••••••••••••••••••••••••••••••••••••••••••••••••••••••••••••••••••••••••••••••••••••••••••••••••••••••••••••••••••••••••••
storing 28power
button 4, 5consumption 74module 2, 8, 78requirements 74socket 8
preference settings 22premium paper 25, 77previewing documents 21print
background 21cradle 12margins 72method 73problems 47queue 22resolution 73settings 20side of paper 25speed 68, 73
print cartridges 43cleaning 45, 59color 81cradle 4, 44installing 11ordering 77, 79printing problems 58-59removing 44storing 43, 67, 83testing 57
Print dialog box 21printable area 71printer
accessories 2, 77buttons 4, 5cable 6, 7choosing 16, 17color printing 81diagnostic test 13, 57dimensions 73does not print 55dried ink 59increasing speed 68I/O interface 73lights 4, 5maintenance 67memory 74naming 18network connection 7operating environment 74parts of 4printable area 71port 6, 7power
consumption 74requirements 74socket 8
problems 47, 65reliability 73resolution 73requirements 14self-test 13, 57
setting up 2-8settings 20size 73software 14-15, 19, 23specifications 73speed 68, 73supplies 77unpacking 2weight 73
printer driver
See also
softwarechoosing 16installing 15ordering 65
PrintMonitor 22PrintMonitor Documents folder
22printer icon
missing in Chooser 56printer interface port 7printing 20
back to front 21background 21, 55blank paper ejected 63canceling 22color 81error messages 55faded 59garbled 64grayscale 82illegible 64ink problems 59labels 25margin problems 60margins 72non-standard paper 39nothing prints 48, 63orientation 20poor quality 58preference settings 22printable area 71problems 47procedure 20settings 20slanted 61, 62speed 68, 69status
See
HP PrintMonitortests 13, 57
problems in printing 47
Q-R
quality print problems 58, 63queue 22 QuickDraw compatible 14RAM 69, 74ReadMe files 23regulatory notices 75reliability 73removing
media 42
print cartridge 44repair service 66replaceable parts 78requirements 14resolution 73resume button 4, 5resume light 4, 5, 48
S
selecting media 27-28self-test 13
does not print 57printing 57
serialcable 6, 77port 57
Service dialog boxcleaning print cartridge 45print self-test 57selecting 25
setting up printer 2-8sideways printing
See
page orientationsingle envelope slot 4, 34sizes of media 73slanted printing 61, 62smearing ink 59software 19
See also
printer driverserror messages 55installing 14-15online help 23printing problems 47returning 14updating 23
special paper (ordering) 77, 79specifications 73, 74speed
increasing 68specifications 73
spooling 21storing print cartridges 43, 83stuck (jammed) paper 53supplies 77, 79system requirements 14
T
technical support 65telephone support 65testing
print cartridge 57printer 13
thermal inkjet print method 73top cover 4transparencies
adding 42advance/eject errors 52-54ink drying 70

••••••••••••••••••••••••••••••••••••••••••••••••••••••••••••••••••••••••••••••••••••••••••••••••••••••••••••••••••••••••••••••
90
INDEX
••••••••••••••••••••••••••••••••••••••••••••••••••••••••••••••••••••••••••••••••••••••••••••••••••••••••••••••••••••••••••••••
loading 29margins 72print side 25printable area 71removing 42selecting 28storing 28
trays advance/eject errors 52-55identifying 4jammed paper 53loading paper 9, 29removing paper 42
troubleshooting 47advance/eject errors 52-55blank paper ejected 50, 63blinking lights 50, 51character problems 58Chooser problems 56color printing 84error messages 55-57fonts 63garbled text 63-64graphics distorted 64illegible printout 64ink problems 59jammed paper 53margin problems 60nothing prints 48poor quality 58self-test 57slanted printing 61-62slow printing 68software problems 47, 55-57
TrueType fonts 73installing 15
typeface
See
fonts
U
unpacking printer 2updating software 23US No. 10 envelopes 73US paper sizes 73User's Guides 78
V-W
vertical alignment 73weight
media 73printer 73
width adjuster 4, 9, 29wrinkling paper 59

Protecting the Environment
Hewlett-Packard continuously improves the design and production processes of HP DeskJet and DeskWriter printers to minimize the negative impact on the office environment; on the communities where they are manufactured, shipped, and used; and of the disposal at the end of printing life.
Elimination
Ozone:
All ozone-depleting chemicals (CFCs, for example) have been eliminated from Hewlett-Packard manufacturing processes.
Printer Packaging:
Boxes for shipping individual printers from the factory to the distribution centers have been eliminated, saving roughly 50% in fuel and, therefore, fuel emissions. Boxes used to ship printers from the distribution centers are whitened without using chlorine.
Recycling
Printer Packaging:
The boxes used to ship printers from the distribution centers, the expanded polystyrene packaging inserts, and the clear polyethylene bags containing the printer drivers are 100% recyclable.
Plastic Parts:
Major manufactured plastic parts are marked as to the plastic content to facilitate product recycling.
Print Cartridges:
Hewlett-Packard is conducting several pilot programs to take back print cartridges for material reclamation and environmentally-sound disposal. Call your Hewlett-Packard
representative for current status.
Printers:
Hewlett-Packard accepts used and obsolete printers for component recycling. Call your Hewlett-Packard sales office for instructions.
Manuals:
The manuals in this kit are printed on recycled paper.
Reduction and Reuse
Ink Packaging:
The print cartridge capability for color was significantly increased and the packaging for the ink cartridges was reduced.
Energy Consumption
HP DeskJet and DeskWriter printers use only 4.5 watts in stand-by mode, which easily qualifies them as energy-saving computer printers under the U.S. Environmental Protection Agency’s Energy Star Computers program. The EPA estimates that if all desktop PCs and peripherals in the U.S. were to qualify, the overall savings in electricity could amount to over $1 billion each year. It could also prevent the emission of 20 million tons of carbon dioxide per year (the equivalent output of 5 million cars). The Energy Star emblem does not represent EPA endorsement of any product or service.
Reduce, Reuse, Recycle