d link wireless manual
TRANSCRIPT

7/31/2019 d Link Wireless Manual
http://slidepdf.com/reader/full/d-link-wireless-manual 1/52

7/31/2019 d Link Wireless Manual
http://slidepdf.com/reader/full/d-link-wireless-manual 2/52
Contents
Package Contents ................................................................................ 3
Introduction ........................................................................................... 4
Features and Benets .......................................................................... 5
Wireless Basics .................................................................................... 6
Installation Considerations ................................................................... 7
Getting Started ..................................................................................... 8
Using the Conguration Utility ............................................................ 11
Networking Basics ..............................................................................
Troubleshooting .................................................................................. 41
Technical Specications ..................................................................... 46
Contacting Technical Support ............................................................ 48
Warranty ............................................................................................. 49
Registration ........................................................................................ 5

7/31/2019 d Link Wireless Manual
http://slidepdf.com/reader/full/d-link-wireless-manual 3/52
7/31/2019 d Link Wireless Manual
http://slidepdf.com/reader/full/d-link-wireless-manual 4/524
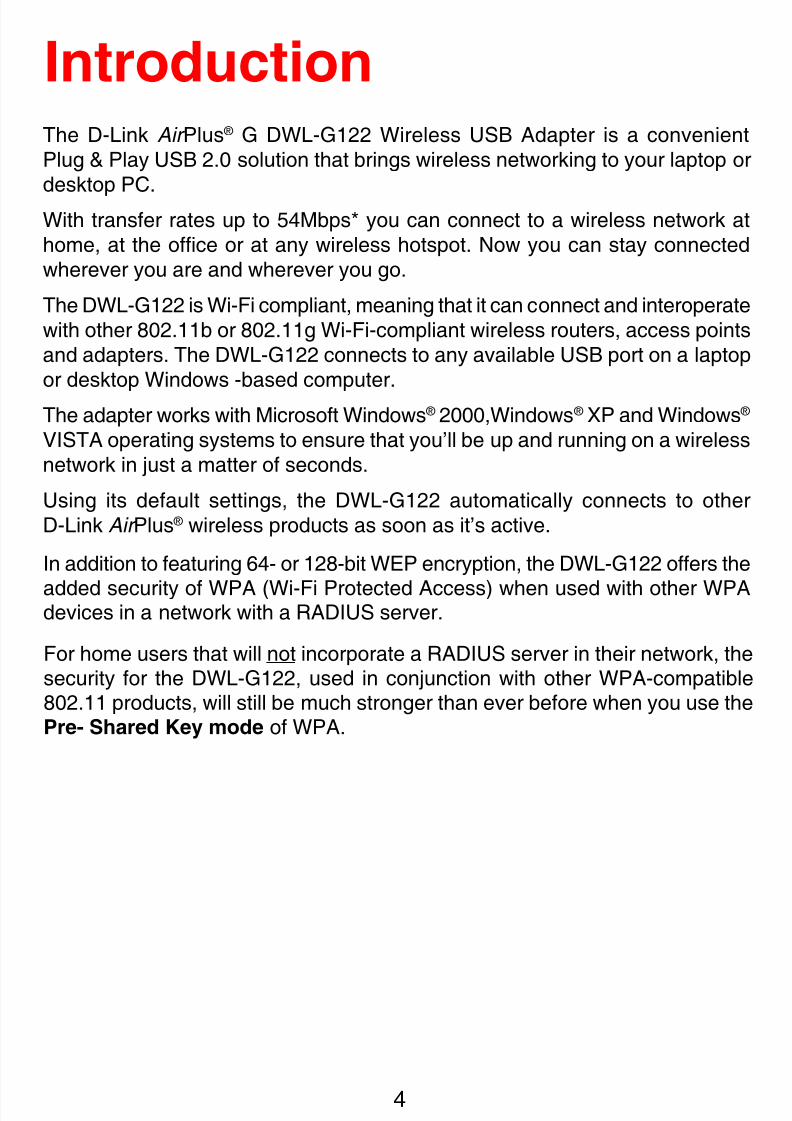
IntroductionThe D-Link Air Plus ® G DWL-G1 Wireless USB Adapter is a convenientPlug & Play USB 2.0 solution that brings wireless networking to your laptop ordesktop PC.
With transfer rates up to 54Mbps* you can connect to a wireless network athome, at the ofce or at any wireless hotspot. Now you can stay connectedwherever you are and wherever you go.
The DWL-G1 is Wi-Fi compliant, meaning that it can connect and interoperatewith other 80.11b or 80.11g Wi-Fi-compliant wireless routers, access pointsand adapters. The DWL-G122 connects to any available USB port on a laptopor desktop Windows -based computer.
The adapter works with Microsoft Windows ® 000,Windows ® XP and Windows ® VISTA operating systems to ensure that you’ll be up and running on a wirelessnetwork in just a matter of seconds.
Using its default settings, the DWL-G122 automatically connects to otherD-Link Air Plus ® wireless products as soon as it’s active.
In addition to featuring 64- or 128-bit WEP encryption, the DWL-G122 offers the
added security of WPA (Wi-Fi Protected Access) when used with other WPAdevices in a network with a RADIUS server.
For home users that will not incorporate a RADIUS server in their network, thesecurity for the DWL-G122, used in conjunction with other WPA-compatible802.11 products, will still be much stronger than ever before when you use thePre- Shared Key mode of WPA.

7/31/2019 d Link Wireless Manual
http://slidepdf.com/reader/full/d-link-wireless-manual 5/525
Features and Benets
Provides high-speed wireless connection at up to 54Mbps*
2 Environmental actors may adversely aect range
Better Security with WPA - In addition to 64-,128-bit WEP encryption,you can also securely connect to a wireless network using WPA (Wi-FiProtected Access) providing you a much higher level of security for yourdata and communication than has previously been available.
Convenience of Plug & Play installation
Compact size for placement anywhere
Fully 802.11b/802.11g compatible
USB 2.0 standard1
Powered by the USB port; no external power source is required
User-friendly conguration and diagnostic utilities
Supports Infrastructure networks via an access point and
Peer-to-Peer communication in Ad-Hoc mode
Connects at up to 328 feet indoors
1Using a USB 1.1 port will adversely aect throughput
7/31/2019 d Link Wireless Manual
http://slidepdf.com/reader/full/d-link-wireless-manual 6/526
Wireless Basics
Wireless users can use the same applications they use on a wired network.Wireless adapter cards used on laptop and desktop systems support the sameprotocols as Ethernet adapter cards.
D-Link wireless products are based on industry standards to provide easy-to-useand compatible high-speed wireless connectivity within your home, business or
public access wireless networks. D-Link wireless products will allow you accessto the data you want, when and where you want it. You will be able to enjoy thefreedom that wireless networking brings.
A wireless local area network (WLAN) is a computer network that transmits andreceives data with radio signals instead of wires. WLANs are used increasinglyin both home and ofce environments, and public areas such as airports, coffeeshops and universities. Innovative ways to utilize WLAN technology are helpingpeople to work and communicate more efciently. Increased mobility and theabsence of cabling and other xed infrastructure have proven to be benecialto many users.
People use WLAN technology or many dierent purposes:
Mobility - Productivity increases when people have access to data in anylocation within the operating range of the WLAN. Management decisions basedon real-time information can signicantly improve worker efciency.
Low Implementation Costs - WLANs are easy to set up, manage, changeand relocate. Networks that frequently change can benet from WLANs easeof implementation. WLANs can operate in locations where installation of wiringmay be impractical.
Installation and Network Expansion - Installing a WLAN system can be fast
and easy and can eliminate the need to pull cable through walls and ceilings.Wireless technology allows the network to go where wires cannot go - evenoutside the home or ofce.
Inexpensive Solution - Wireless network devices are as competitively pricedas conventional Ethernet network devices.
Scalability - WLANs can be congured in a variety of ways to meet the needsof specic applications and installations. Congurations are easily changedand range from Peer-to-Peer networks suitable for a small number of users tolarger Infrastructure networks to accommodate hundreds or thousands of users,depending on the number of wireless devices deployed.

7/31/2019 d Link Wireless Manual
http://slidepdf.com/reader/full/d-link-wireless-manual 7/527
Installation ConsiderationsThe DWL-G122 lets you access your network using a wireless connection
from virtually anywhere within its operating range. Keep in mind, however, thatthe number, thickness and location of walls, ceilings, or other objects that thewireless signals must pass through, may limit the range. Typical ranges varydepending on the types of materials and background RF (radio frequency) noisein your home or business. The key to maximizing wireless range is to followthese basic guidelines:
Keep your product away (at least 3-6 feet or 1-2 meters) from electricaldevices or appliances that generate RF noise.
4
Keep the number of walls and ceilings between the DWL-G122 and othernetwork devices to a minimum - each wall or ceiling can reduce yourDWL-G122’s range from 3-90 feet (1-30 meters.) Position your devicesso that the number of walls or ceilings is minimized.
1
Be aware of the direct line between network devices. A wall that is 1.5feet thick (.5 meters), at a 45-degree angle appears to be almost 3 feet(1 meter) thick. At a 2-degree angle it looks over 42 feet (14 meters)
thick! Position devices so that the signal will travel straight through awall or ceiling (instead of at an angle) for better reception.
2
Building materials can impede the wireless signal - a solid metal door oraluminum studs may have a negative effect on range. Try to positionwireless devices and computers with wireless adapters so that the signalpasses through drywall or open doorways and not other materials.
3
Wireless Basics (continued)

7/31/2019 d Link Wireless Manual
http://slidepdf.com/reader/full/d-link-wireless-manual 8/528
Getting Started
With its default settings, the DWL-G122 will connect with otherD-Link Air Plus® G products, right out of the box.
A wireless router - D-Link Air Plus ® G DI-524
A laptop computer with a D-Link Air Plus® G DWL-G122
A desktop computer with a D-Link Air Plus® G DWL-G122
A cable modem - D-Link DCM-201
There are basically two modes of networking:
Infrastructure – using an access point or router, such as the DI-64.
Ad-Hoc – directly connecting to another computer, for Peer-to-Peercommunication, using wireless network adapters on each computer, suchas two or more DWL-G1 Wireless Network USB adapters.
On the following pages we will show you an example of an Infrastructure
Network and an Ad-Hoc Network .
An Infrastructure network contains an access point or router. The Infrastructure
network example shown on the following page contains the following D-Linknetwork devices (your existing network may be comprised of other devices):
7/31/2019 d Link Wireless Manual
http://slidepdf.com/reader/full/d-link-wireless-manual 9/529
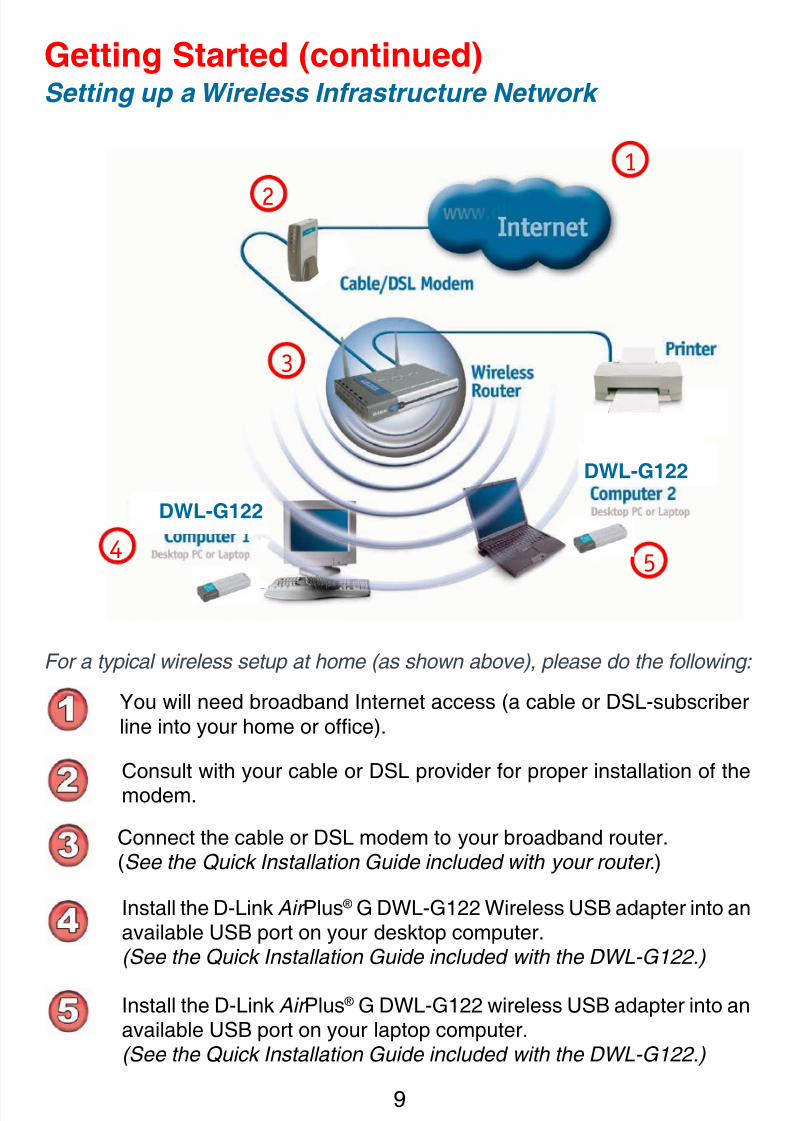
You will need broadband Internet access (a cable or DSL-subscriberline into your home or ofce).
Consult with your cable or DSL provider for proper installation of themodem.
Connect the cable or DSL modem to your broadband router.(See the Quick Installation Guide included with your router.)
Install the D-Link Air Plus ® G DWL-G1 Wireless USB adapter into anavailable USB port on your desktop computer.(See the Quick Installation Guide included with the DWL-G122.)
Getting Started (continued)
For a typical wireless setup at home (as shown above), please do the ollowing:
5
Setting up a Wireless Inrastructure Network
1
2
3
Install the D-Link Air Plus ® G DWL-G1 wireless USB adapter into anavailable USB port on your laptop computer.(See the Quick Installation Guide included with the DWL-G122.)
4
DWL-G122
DWL-G122

7/31/2019 d Link Wireless Manual
http://slidepdf.com/reader/full/d-link-wireless-manual 10/5210
Getting Started (continued)Setting up a Wireless Ad-Hoc Network
When assigning IP addresses to the computers on the network, pleaseremember that the IP address for each computer must be in the same
IP address range as all the computers in the network , and the subnetmask must be exactly the same for all the computers in the network.
For example: If the rst computer is assigned an IP address of 192.168.0.2with a subnet mask of 55.55.55.0, then the second computer can beassigned an IP address of 19.168.0.3 with a subnet mask of 55.55.55.0,etc.
IMPORTANT: If computers or other devices are assigned the same IPaddress, one or more of the devices may not be visible on the network.
IP Address
Install the D-Link Air Plus ® G DWL-G122 Wireless USB adapter intothe desktop computer. (See the Quick Installation Guide included with the product.)
Set the wireless conguration for the adapters to Ad-Hoc mode, setthe adapters to the same channel, and assign an IP address to eachcomputer on the Ad-Hoc network.
Install the D-Link Air Plus ® G DWL-G122 Wireless USB adapter into
the laptop computer. (See the Quick Installation Guide included with the product.)
DWL-G1Wireless USB Adapter

7/31/2019 d Link Wireless Manual
http://slidepdf.com/reader/full/d-link-wireless-manual 11/5211
The D-Link Air Plus ® G uses the Conguration Utility as the managementsoftware. The utility provides the user an easy interface to change any settingsrelated to the wireless adapter. After you have completed the installation of theDWL-G122 (refer to the Quick Installation Guide that came with your purchase)whenever you start the computer, the Conguration Utility starts automaticallyand the system tray icon is loaded in the toolbar (see illustration below.*) Clickingon the utility icon will start the Conguration Utility. Another way to start theConguration Utility is to click on Start>Programs>D-Link Air Plus ® G >D-Link
Air Plus ® G Utility.
Select the Wireless Networks tab.
Uncheck the box in the properties window
that enables windows conguration.
Using the Conguration Utility
If you are using Windows XP, you can use either the Zero Conguration Utilityor the D-Link Conguration Utility.
If the icon does not display in the taskbar, then click onthis icon on your desktop to open.
To use the D-Link Conguration Utility with XP, right-clickon the wireless network icon in the taskbar in the lower
right-hand corner of your computer screen.
In the window that appears, selectView Available Wireless Networks
and click the Advanced button. Thescreen at right will appear.
After you have done this, you can then use the D-LinkConguration Utility with XP by clicking on the D-LinkConguration Utility icon.
*Confguration Utility icon in the system tray

7/31/2019 d Link Wireless Manual
http://slidepdf.com/reader/full/d-link-wireless-manual 12/521
Using the Conguration Utility (continued)
Link Info
SSID:The Service Set Identier isthe name assigned to thewireless network. The facto-
ry SSID setting is default.
Tx Rate:The default setting is Auto; Tx Rate settings are automatically determined foran optimal speed up to a maximum of 54Mbps.
Status:Displays the MAC address
of the access point or routerto which the DWL-G1 isassociated.
Channel:The default setting is Auto. The channel selection is automatically detemined
by the DWL-G122.
Link Quality/Signal Strength:Displays the signal strength and the link quality of the DWL-G122’s wirelessconnection to the access point or router.
Data Rate:Displays the statistics of the data packets that are transmitted and received.
Rescan Button:Rescans for the strongest signal with the current SSID and associates with thataccess point or router.

7/31/2019 d Link Wireless Manual
http://slidepdf.com/reader/full/d-link-wireless-manual 13/5213
Conguration
Using the Conguration Utility (continued)
Wireless Mode:
SSID:Service Set Identier is a name that identies a wireless network. Access pointsand wireless devices attempting to connect to a specic WLAN (Wireless LocalArea Network) must use the same SSID. The default setting is default.
Click on the pull-down menu; select from the following options:
Infrastructure - connecting to the WLAN using an access point. (This isthe default setting).
Ad-Hoc – wireless mode used when connecting directly to a computerequipped with a wireless adapter in a Peer-to-Peer environment.
Tx Rate:The default setting is Auto; Tx Rate settings are automatically determined foran optimal speed up to a maximum of 54Mbps.
Channel:The default setting is Auto. The channel selection is automatically deteminedby the DWL-G122.
7/31/2019 d Link Wireless Manual
http://slidepdf.com/reader/full/d-link-wireless-manual 14/5214
Using the Conguration Utility (continued)
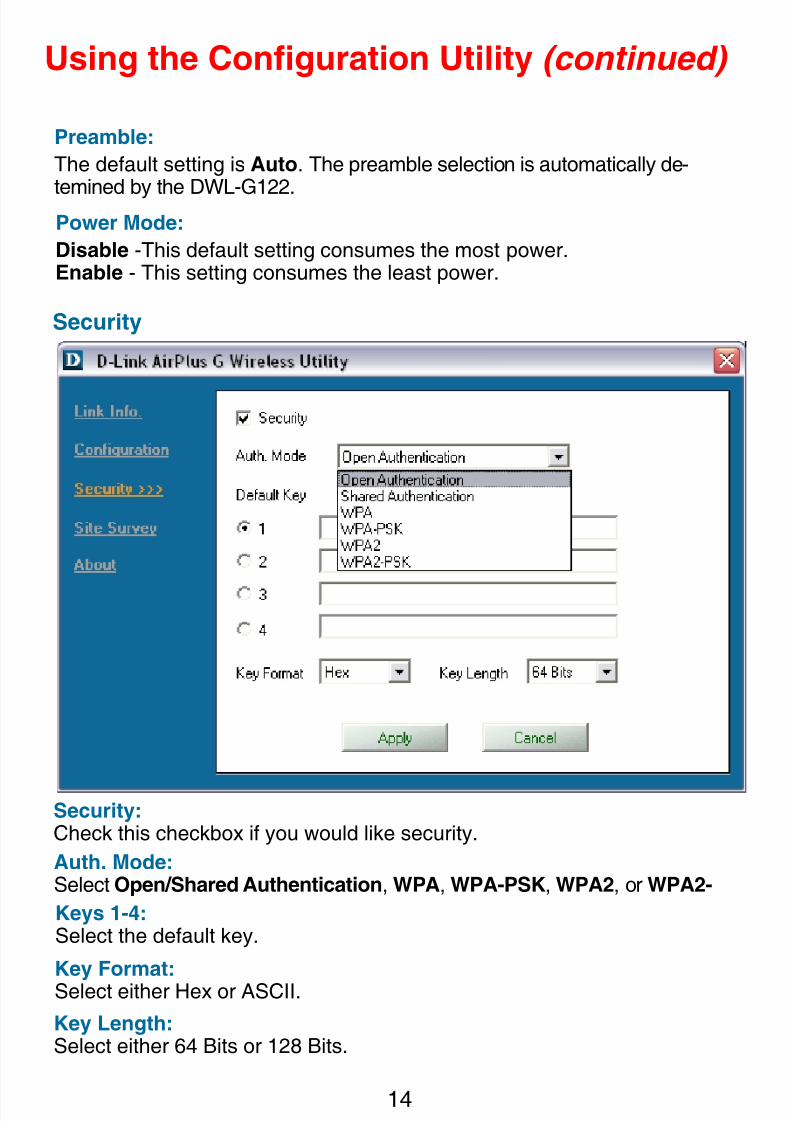
Power Mode:
Disable -This default setting consumes the most power.Enable - This setting consumes the least power.
Preamble:
The default setting is Auto. The preamble selection is automatically de-
temined by the DWL-G122.
Security
Keys 1-4:Select the default key.
Security:Check this checkbox if you would like security.
Auth. Mode:Select Open/Shared Authentication, WPA, WPA-PSK, WPA2, or WPA2-
Key Format:Select either Hex or ASCII.
Key Length:Select either 64 Bits or 18 Bits.

7/31/2019 d Link Wireless Manual
http://slidepdf.com/reader/full/d-link-wireless-manual 15/5215
Using the Conguration Utility (continued)
Hexadecimal digits consist o the numbers 0-9 and the letters A-F.
ASCII (American Standard Code or Inormation Interchange) is a code or representing English letters as numbers rom 0-127.
Site Survey
Available Network:The top section of the window displays the Available Networks. Scroll up anddown the list and highlight the network to which you wish to connect. Click onthe Connect button.
Prole:In the lower half of the screen, you can manage the proles that you havecreated for the wireless network at home, at the ofce and in public places.Scroll up and down and highlight the prole that you wish to congure. You canAdd or Remove a prole, or congure the Properties of the prole in order to
connect with an available network.
7/31/2019 d Link Wireless Manual
http://slidepdf.com/reader/full/d-link-wireless-manual 16/5216
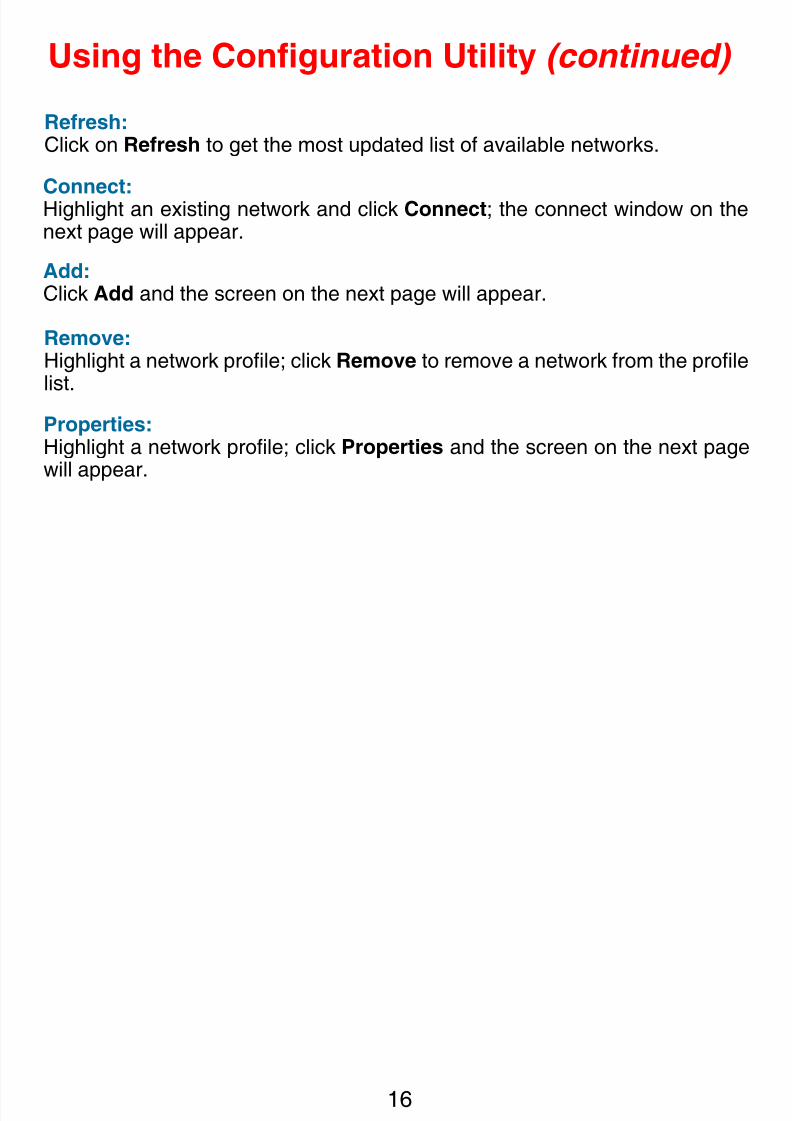
Refresh:Click on Refresh to get the most updated list of available networks.
Using the Conguration Utility (continued)
Connect:Highlight an existing network and click Connect; the connect window on thenext page will appear.
Add:Click Add and the screen on the next page will appear.
Remove:Highlight a network prole; click Remove to remove a network from the prole
list.Properties:Highlight a network prole; click Properties and the screen on the next pagewill appear.

7/31/2019 d Link Wireless Manual
http://slidepdf.com/reader/full/d-link-wireless-manual 17/5217
Using the Conguration Utility (continued) Authentication > WPA, WPA2
Select the availablenetwork to which youwant to connect.
Click Connect.
Click Apply.
Select WPA in theAuth. Mode eld.
7/31/2019 d Link Wireless Manual
http://slidepdf.com/reader/full/d-link-wireless-manual 18/5218
Using the Conguration Utility (continued)
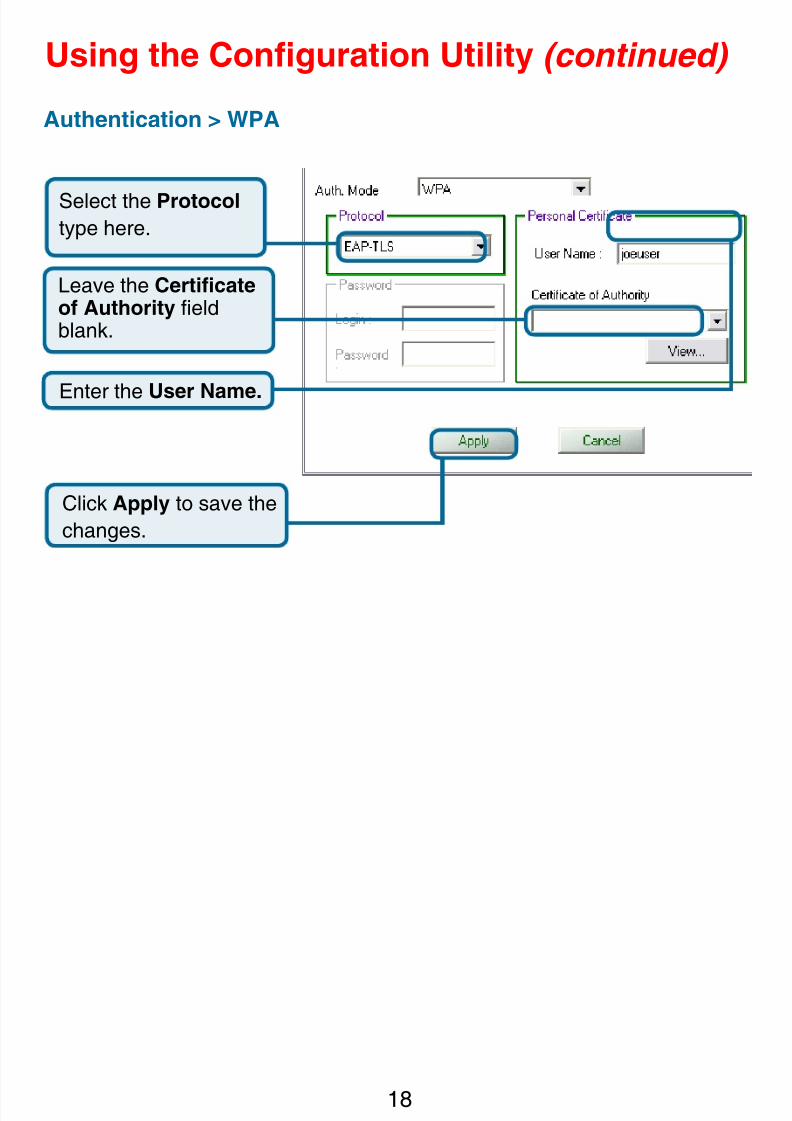
Authentication > WPA
Select the Protocol type here.
Enter the User Name.
Click Apply to save the
changes.
Leave the Certicateof Authority eldblank.

7/31/2019 d Link Wireless Manual
http://slidepdf.com/reader/full/d-link-wireless-manual 19/5219
Using the Conguration Utility (continued) Authentication > WPA-PSK, WPA2-PSK
Click Connect.
Select WPA-PSK inthe Auth. Mode eld.
Select the available
network to which youwant to connect.
WPA-PSK doesnot require aRADIUS Serverin the network.
Click Apply.

7/31/2019 d Link Wireless Manual
http://slidepdf.com/reader/full/d-link-wireless-manual 20/520
Using the Conguration Utility (continued) Authentication > WPA-PSK, WPA2-PSK (continued)
Enter the Passphrase.
Click Apply.The configurationis done.

7/31/2019 d Link Wireless Manual
http://slidepdf.com/reader/full/d-link-wireless-manual 21/521
Using the Conguration Utility (continued) Authentication > WEP
Enter theDefault Keyandselect the Key Formatand Key Length.
Click Apply.The conguration isdone.
About
TheAbout screen givesyou the MAC address,Utility Version and theDriver Version of theDWL-G1.

7/31/2019 d Link Wireless Manual
http://slidepdf.com/reader/full/d-link-wireless-manual 22/52
Using the Network Setup Wizard in Windows XP
In this section you will learn how to establish a network at home or work,using Microsoft Windows XP.
Note: Please reer to websites such as http://www.homenethelp.com and http://www.microsot.com/windows2000 or inormation about networking computers using Windows XP/2000.
Go to Start>Control Panel>Network Connections.
Select Set up a home or small ofce network.
Networking Basics
When this screen appears, click Next.

7/31/2019 d Link Wireless Manual
http://slidepdf.com/reader/full/d-link-wireless-manual 23/523
Please follow all the instructions in this window:
Networking Basics (continued)
Click Next.
In the following window, select the best description of your computer. If your
computer connects to the Internet through a router, select the second optionas shown.
Click Next.
7/31/2019 d Link Wireless Manual
http://slidepdf.com/reader/full/d-link-wireless-manual 24/524
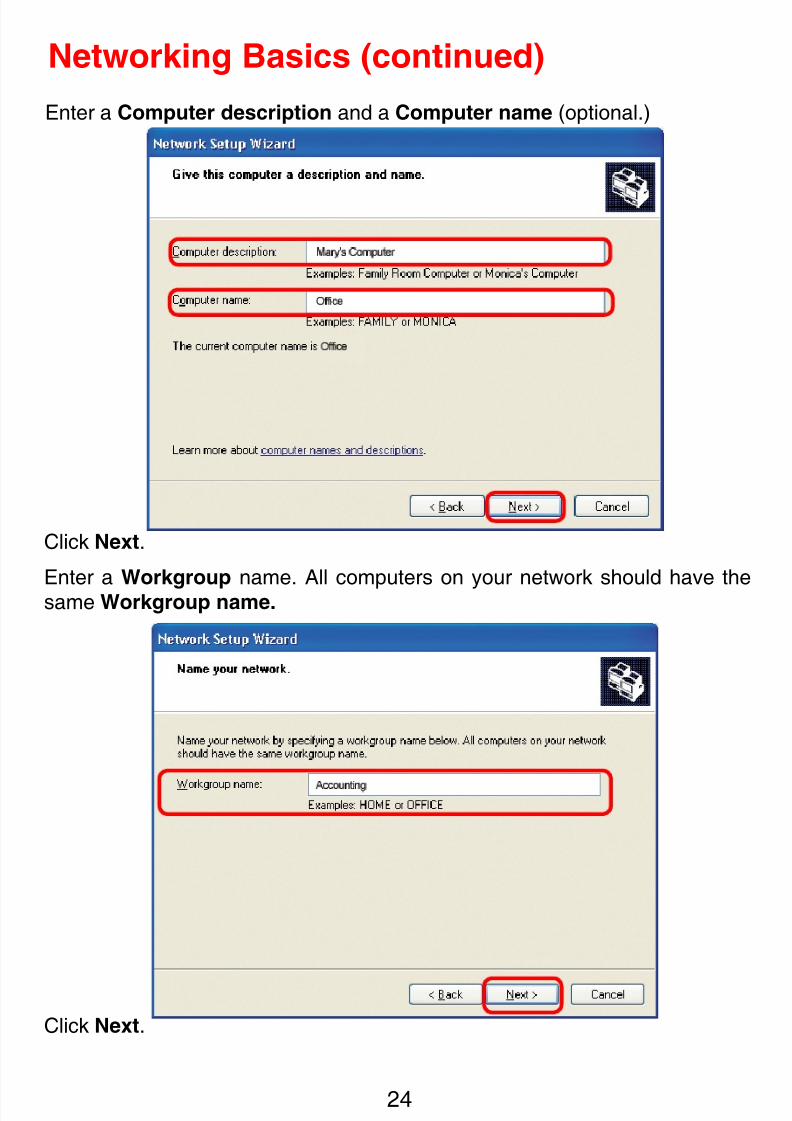
Enter a Computer description and a Computer name (optional.)
Networking Basics (continued)
Click Next.
Enter a Workgroup name. All computers on your network should have the
same Workgroup name.
Click Next.

7/31/2019 d Link Wireless Manual
http://slidepdf.com/reader/full/d-link-wireless-manual 25/525
Please wait while the Network Setup Wizard applies the changes.
Networking Basics (continued)
When the changes are complete, click Next.
Please wait while the Network Setup Wizard congures the computer.This may take a few minutes.

7/31/2019 d Link Wireless Manual
http://slidepdf.com/reader/full/d-link-wireless-manual 26/526
In the window below, select the option that ts your needs. In this example,Create a Network Setup Disk has been selected. You will run this disk oneach of the computers on your network. Click Next.
Insert a disk into the Floppy Disk Drive, in this case drive A.
Networking Basics (continued)

7/31/2019 d Link Wireless Manual
http://slidepdf.com/reader/full/d-link-wireless-manual 27/527
Please read the information under Here’s how in the screen below. After youcomplete the Network Setup Wizard you will use the Network Setup Disk torun the Network Setup Wizard once on each of the computers on your network.To continue click Next.
Networking Basics (continued)
7/31/2019 d Link Wireless Manual
http://slidepdf.com/reader/full/d-link-wireless-manual 28/528
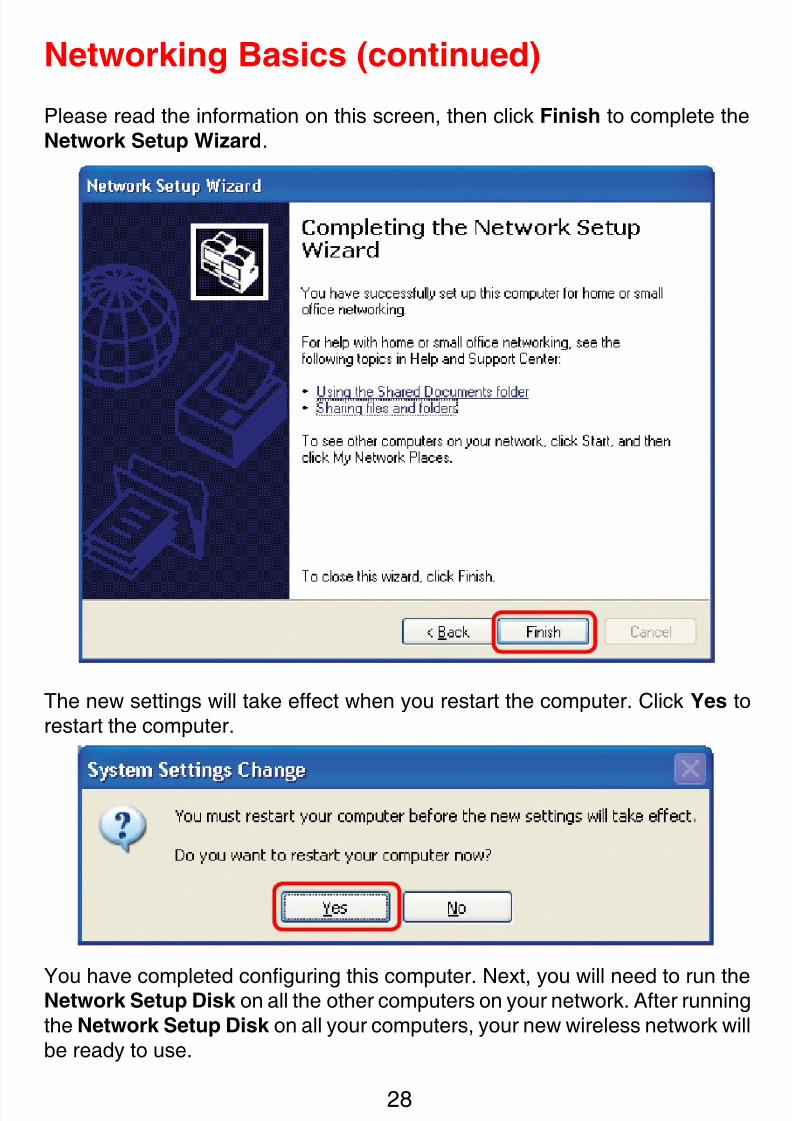
Please read the information on this screen, then click Finish to complete theNetwork Setup Wizard.
The new settings will take effect when you restart the computer. Click Yes torestart the computer.
You have completed conguring this computer. Next, you will need to run theNetwork Setup Disk on all the other computers on your network. After runningthe Network Setup Disk on all your computers, your new wireless network willbe ready to use.
Networking Basics (continued)
7/31/2019 d Link Wireless Manual
http://slidepdf.com/reader/full/d-link-wireless-manual 29/529
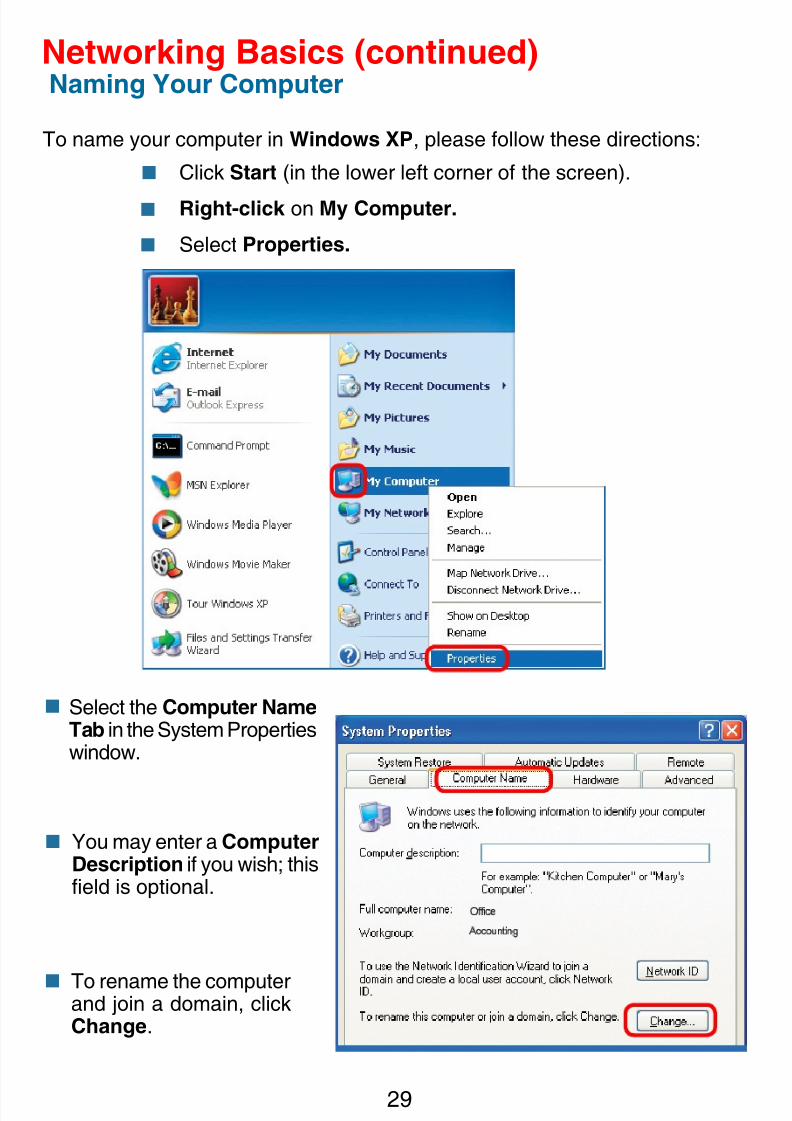
Click Start (in the lower left corner of the screen).
Right-click on My Computer.
Select Properties.
Select the Computer NameTab in the System Propertieswindow.
You may enter a ComputerDescription if you wish; thiseld is optional.
To rename the computerand join a domain, clickChange.
Networking Basics (continued)Naming Your Computer
To name your computer in Windows XP, please follow these directions:
7/31/2019 d Link Wireless Manual
http://slidepdf.com/reader/full/d-link-wireless-manual 30/5230
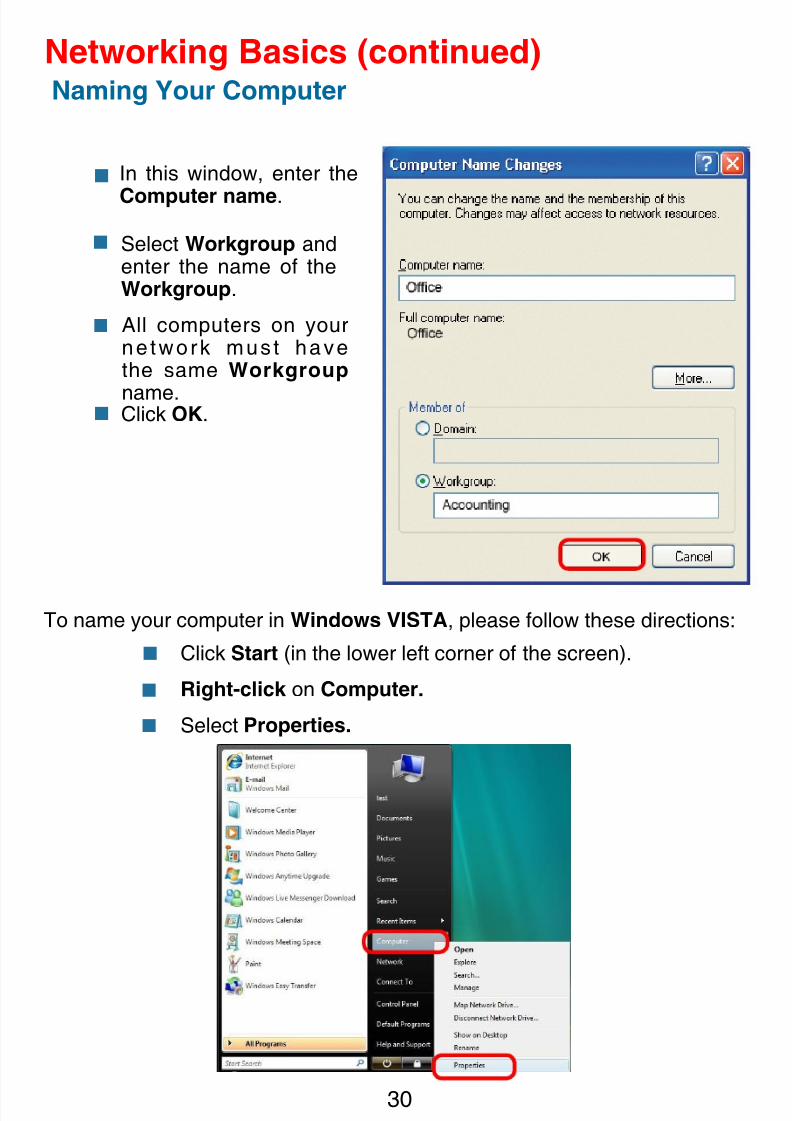
In this window, enter the
Computer name.
Select Workgroup andenter the name of theWorkgroup.
All computers on yourne twork must havethe same Workgroup
name.Click OK.
Networking Basics (continued)Naming Your Computer
Click Start (in the lower left corner of the screen).
Right-click on Computer.
Select Properties.
To name your computer in Windows VISTA, please follow these directions:

7/31/2019 d Link Wireless Manual
http://slidepdf.com/reader/full/d-link-wireless-manual 31/5231
Select the Computer NameTab in the System Propertieswindow.
You may enter a ComputerDescription if you wish; thiseld is optional.
To rename the computerand join a domain, clickChange.
Click the Advanced systemsetting

7/31/2019 d Link Wireless Manual
http://slidepdf.com/reader/full/d-link-wireless-manual 32/523
Checking the IP Address
In Windows XP
Right-click on
the Local AreaConnection icon inthe task bar.
Click on Status.
In this window, enter the
Computer name.
Enter the name of theWorkgroup.
All computers on yourne twork must havethe same Workgroup
name.
Click OK.
Networking Basics (continued)Naming Your Computer

7/31/2019 d Link Wireless Manual
http://slidepdf.com/reader/full/d-link-wireless-manual 33/5233
This window will appear.
Click the Supporttab.
Click Close.
Networking Basics (continued)Checking the IP Address in Windows XP
Checking the IP Address
In Windows VISTA
Right-click on the
Wireless Network Connection icon inthe task bar.
Click on Network and SharingCenter
.

7/31/2019 d Link Wireless Manual
http://slidepdf.com/reader/full/d-link-wireless-manual 34/5234
This window will appear.
Click the ViewStatus.
Click Close.
Networking Basics (continued)Checking the IP Address
Click on theDetail.

7/31/2019 d Link Wireless Manual
http://slidepdf.com/reader/full/d-link-wireless-manual 35/5235
Assigning a Static IP Address
Note: Many broadband routers will automatically assign IP addresses to the computers on the network, using DHCP (Dynamic Host Confguration Protocol) technology. I you are using a DHCP-capable router you will not need to assign static IP addresses.
If you are not using a DHCP capable router, or you need to assign a static IPaddress, please follow these instructions:
Go to Start.
Click onControl Panel.
In Windows XP/ 2000
Networking Basics (continued)
Double-click on Network Connections.

7/31/2019 d Link Wireless Manual
http://slidepdf.com/reader/full/d-link-wireless-manual 36/5236
Click on Properties.
Right-click on Local AreaConnections.
Networking Basics (continued)
D-Link Air Plus ® G DWL-G122 Wireless USB Adapter
Click on Internet
Protocol (TCP/IP).
Click Properties.
7/31/2019 d Link Wireless Manual
http://slidepdf.com/reader/full/d-link-wireless-manual 37/5237
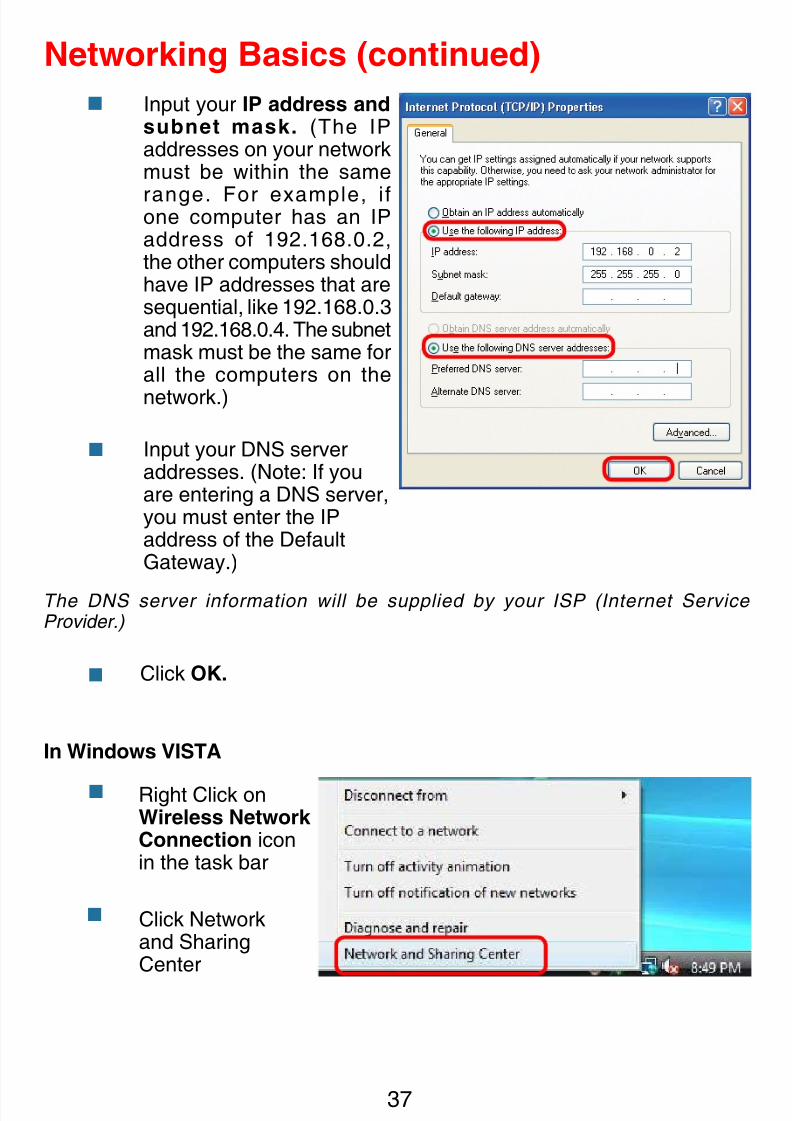
Input your DNS serveraddresses. (Note: If youare entering a DNS server,you must enter the IPaddress of the DefaultGateway.)
The DNS server inormation will be supplied by your ISP (Internet Service Provider.)
Click OK.
Networking Basics (continued)
Input your IP address andsubnet mask. (The IPaddresses on your networkmust be within the same
range. For example, ifone computer has an IPaddress of 19.168.0.,the other computers shouldhave IP addresses that aresequential, like 19.168.0.3and 19.168.0.4. The subnetmask must be the same forall the computers on the
network.)
Right Click onWireless Network Connection iconin the task bar
Click Networkand SharingCenter
In Windows VISTA
7/31/2019 d Link Wireless Manual
http://slidepdf.com/reader/full/d-link-wireless-manual 38/5238
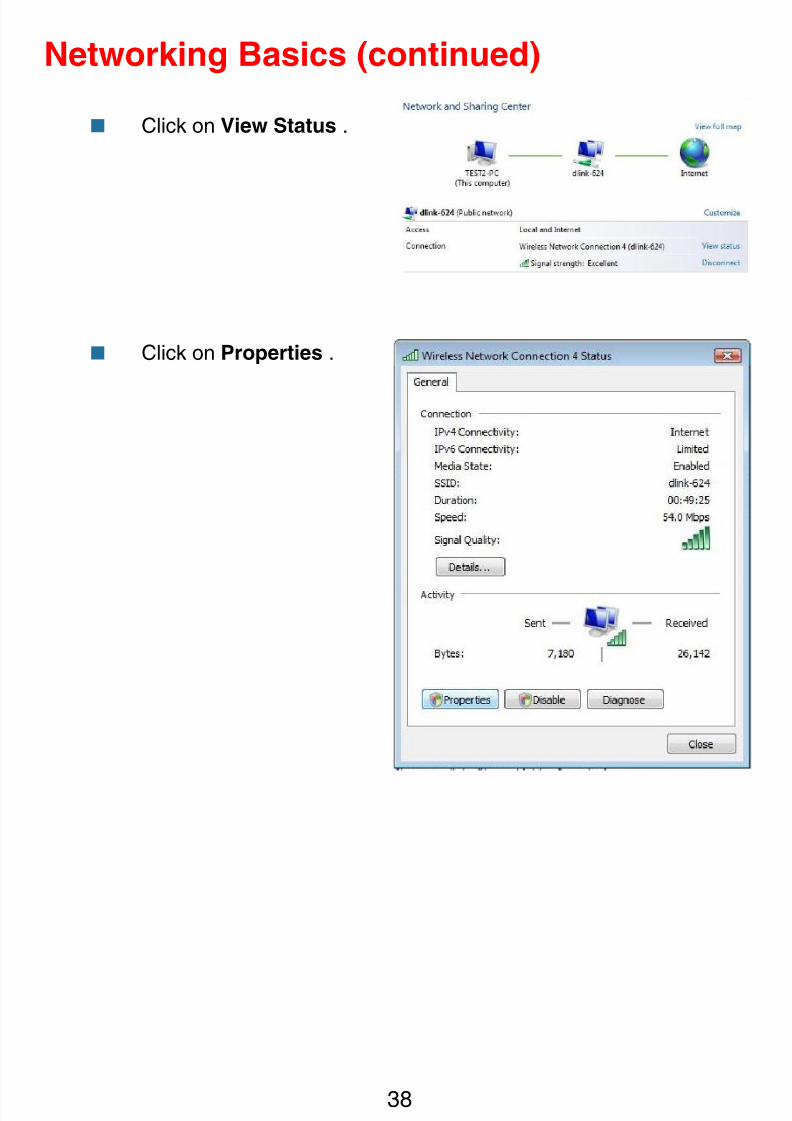
Click on View Status .
Networking Basics (continued)
Click on Properties .

7/31/2019 d Link Wireless Manual
http://slidepdf.com/reader/full/d-link-wireless-manual 39/5239
Assigning a Static IP Address
Networking Basics (continued)
D-Link Air Plus ® G DWL-G122 Wireless USB Adapter
Input your IP address andsubnet mask. (The IPaddresses on your networkmust be within the samerange. For example, ifone computer has an IPaddress of 19.168.0.,the other computers shouldhave IP addresses that aresequential, like 19.168.0.3and 19.168.0.4. Thesubnet mask must be thesame for all the computers
on the network.)
Click on Internet
Protocol (TCP/IPv4).
Click Properties.
Input your DNS serveraddresses. (Note: If you areentering a DNS server, youmust enter the IP address ofthe Default Gateway.)
The DNS server inormation will be supplied by your ISP (Internet Service Provider.)
Click OK.

7/31/2019 d Link Wireless Manual
http://slidepdf.com/reader/full/d-link-wireless-manual 40/5240
Checking the Wireless Connectionby Pinging in Windows XP and 2000
Go to Start > Run > type cmd. A window similar to this one will appear. Typeping xxx.xxx.xxx.xxx, where xxx is the IP address of the wireless router oraccess point. A good wireless connection will show four replies from thewireless router or access point, as shown.
Networking Basics (continued)
Checking the Wireless Connectionby Pinging in Windows VISTA
Go to Start > Start Search > type cmd. A window similar to this one will ap-pear. Type ping xxx.xxx.xxx.xxx, where xxx is the IP address of the wirelessrouter or access point. A good wireless connection will show four replies fromthe wireless router or access point, as shown.
7/31/2019 d Link Wireless Manual
http://slidepdf.com/reader/full/d-link-wireless-manual 41/5241
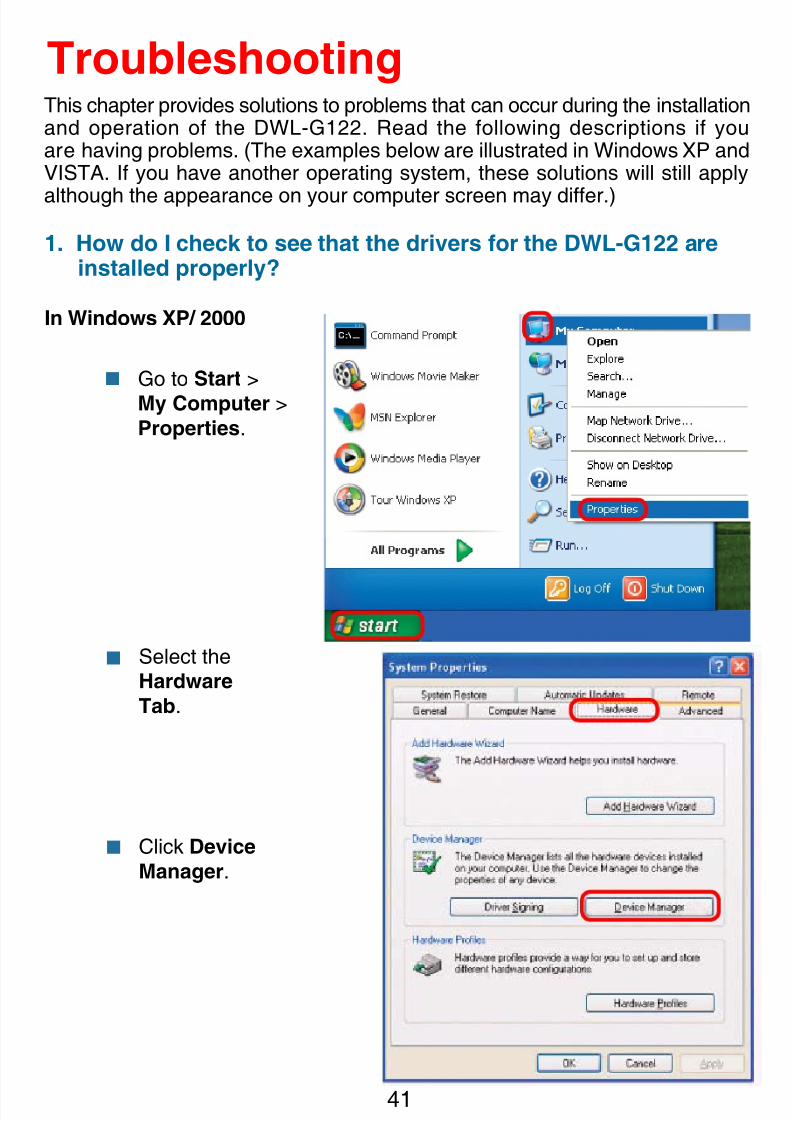
1. How do I check to see that the drivers for the DWL-G122 areinstalled properly?
In Windows XP/ 2000
Click Device
Manager.
Select theHardware
Tab.
Troubleshooting
Go to Start >My Computer >Properties.
This chapter provides solutions to problems that can occur during the installationand operation of the DWL-G122. Read the following descriptions if youare having problems. (The examples below are illustrated in Windows XP andVISTA. If you have another operating system, these solutions will still apply
although the appearance on your computer screen may differ.)

7/31/2019 d Link Wireless Manual
http://slidepdf.com/reader/full/d-link-wireless-manual 42/524
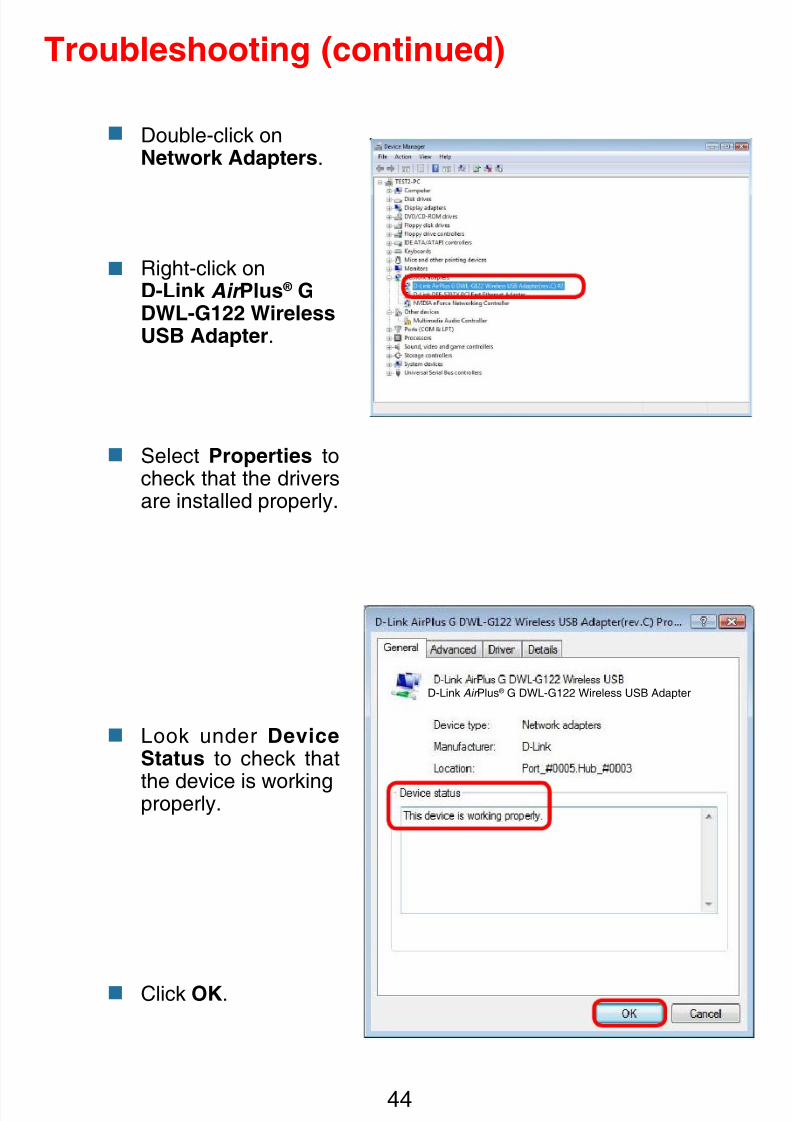
Troubleshooting (continued)
Double-click onNetwork Adapters.
Right-click onD-Link Air Plus ® GDWL-G122 WirelessUSB Adapter.
Select Properties tocheck that the driversare installed properly.
Look under DeviceStatus to check that
the device is workingproperly.
Click OK.
D-Link Air Plus ® G DWL-G122 Wireless USB Adapter
D-Link Air Plus ® G DWL-G1 Wireless USB Adapter
D-Link Air Plus ® G DWL-G122 Wireless USB Adapter

7/31/2019 d Link Wireless Manual
http://slidepdf.com/reader/full/d-link-wireless-manual 43/5243
In Windows VISTA
Click Device
Manager.
Go to Start >Computer >Properties.
Troubleshooting (continued)
7/31/2019 d Link Wireless Manual
http://slidepdf.com/reader/full/d-link-wireless-manual 44/5244
Troubleshooting (continued)
Double-click onNetwork Adapters.
Right-click onD-Link Air Plus ® GDWL-G122 WirelessUSB Adapter.
Select Properties tocheck that the driversare installed properly.
Look under DeviceStatus to check that
the device is workingproperly.
Click OK.
D-Link Air Plus ® G DWL-G1 Wireless USB Adapter

7/31/2019 d Link Wireless Manual
http://slidepdf.com/reader/full/d-link-wireless-manual 45/5245
Troubleshooting (continued)
2. What variables may cause my wireless products to lose reception?
D-Link products let you access your network from virtually anywhere you want.However, the positioning of the products within your environment will affect thewireless range. Please refer to Installation Considerations in the WirelessBasics section of this manual for further information about the mostadvantageous placement of your D-Link wireless products.
3. Why does my wireless connection keep dropping?
4. Why can’t I get a wireless connection?
If you have enabled encryption on the DWL-G122, you must also enable encryptionon all wireless devices in the network in order to establish a wireless connection.
If you are using 2.4GHz cordless phones, X-10 equipment or other home
security systems, ceiling fans, and lights, your wireless connection willdegrade dramatically or drop altogether. Try changing the channel onyour router, access point and wireless adapter to a different channel toavoid interference.
Keep your product away (at least 3-6 feet) from electrical devices thatgenerate RF noise, like microwaves, monitors, electric motors, etc.
The encryption settings are: 64- or 128-bit. Make sure that theencryption bit level is the same on the router and the DWL-G122.
Make sure that the SSID on the wireless router (if you have one in yournetwork) and the DWL-G122 are exactly the same. If they are not,wireless connection will not be established. The default SSID isdefault.
7/31/2019 d Link Wireless Manual
http://slidepdf.com/reader/full/d-link-wireless-manual 46/5246
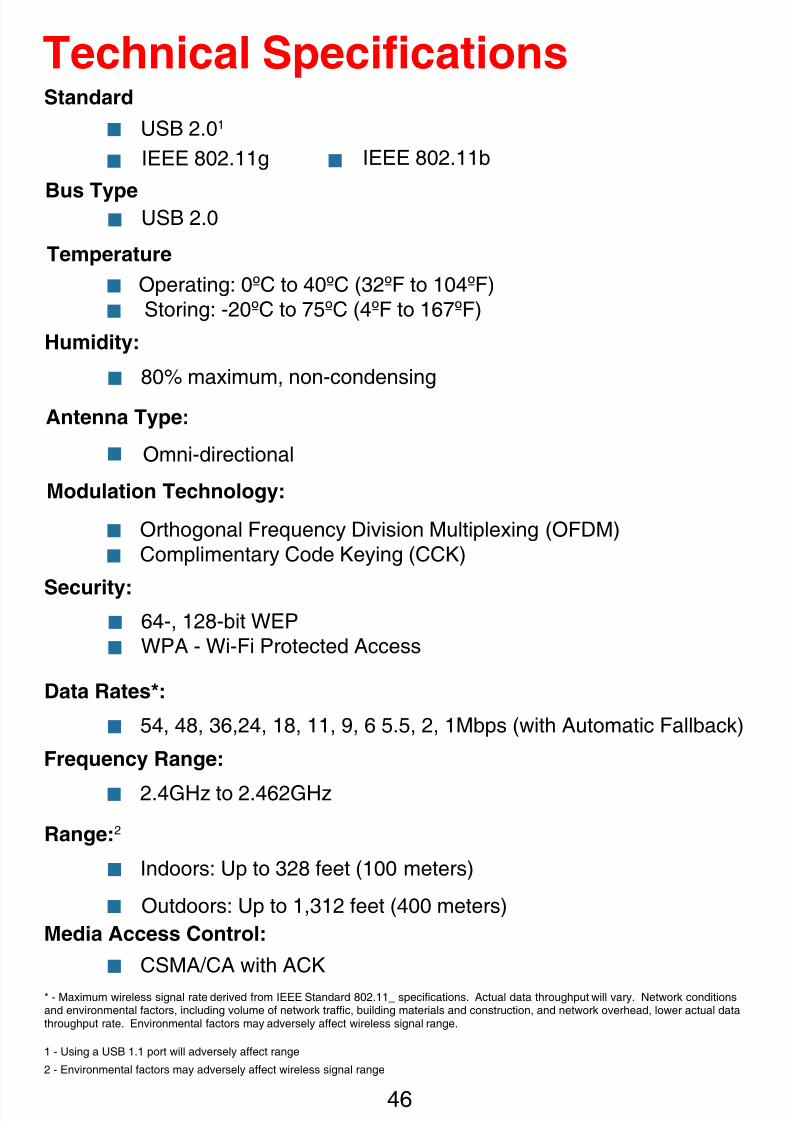
IEEE 80.11g
Technical Specications
USB .01
Standard
80% maximum, non-condensing
Humidity:
Antenna Type:
Omni-directional
Modulation Technology:
54, 48, 36,24, 18, 11, 9, 6 5.5, 2, 1Mbps (with Automatic Fallback)
Data Rates*:
.4GHz to .46GHz
Frequency Range:
Indoors: Up to 328 feet (100 meters)
Range:
IEEE 80.11b
USB .0Bus Type
Temperature
Operating: 0ºC to 40ºC (32ºF to 104ºF) Storing: -20ºC to 75ºC (4ºF to 167ºF)
Orthogonal Frequency Division Multiplexing (OFDM)Complimentary Code Keying (CCK)
64-, 18-bit WEPWPA - Wi-Fi Protected Access
Security:
CSMA/CA with ACK
Media Access Control:
Outdoors: Up to 1,312 feet (400 meters)
2 - Environmental factors may adversely affect wireless signal range
* - Maximum wireless signal rate derived from IEEE Standard 802.11_ specications. Actual data throughput will vary. Network conditionsand environmental factors, including volume of network trafc, building materials and construction, and network overhead, lower actual datathroughput rate. Environmental factors may adversely affect wireless signal range.
1 - Using a USB 1.1 port will adversely affect range

7/31/2019 d Link Wireless Manual
http://slidepdf.com/reader/full/d-link-wireless-manual 47/5247
Technical Specications (continued)
Receiver Sensitivity:
L = 3.3 inchesW = .1 inchesH = 0. inches
Physical Dimensions:
5.5Mbps CCK2Mbps QPSK1Mbps BPSK
11Mbps OFDM9Mbps OFDM6Mbps OFDM
4Mbps OFDM18Mbps OFDM1Mbps OFDM
54Mbps OFDM
48Mbps OFDM36Mbps OFDM
14Bm +/-dB
Transmitter Output Power:
0.021 lb. (4.4g)
Weight:
CE ,C-Tick, IC, FCC part 15bCertications:
D-Link AirPlus ® G products can transfer data up to 5 times faster than standard 802.11b networks. They are also interoperable with 802.11bcompliant wireless devices.
7/31/2019 d Link Wireless Manual
http://slidepdf.com/reader/full/d-link-wireless-manual 48/5248
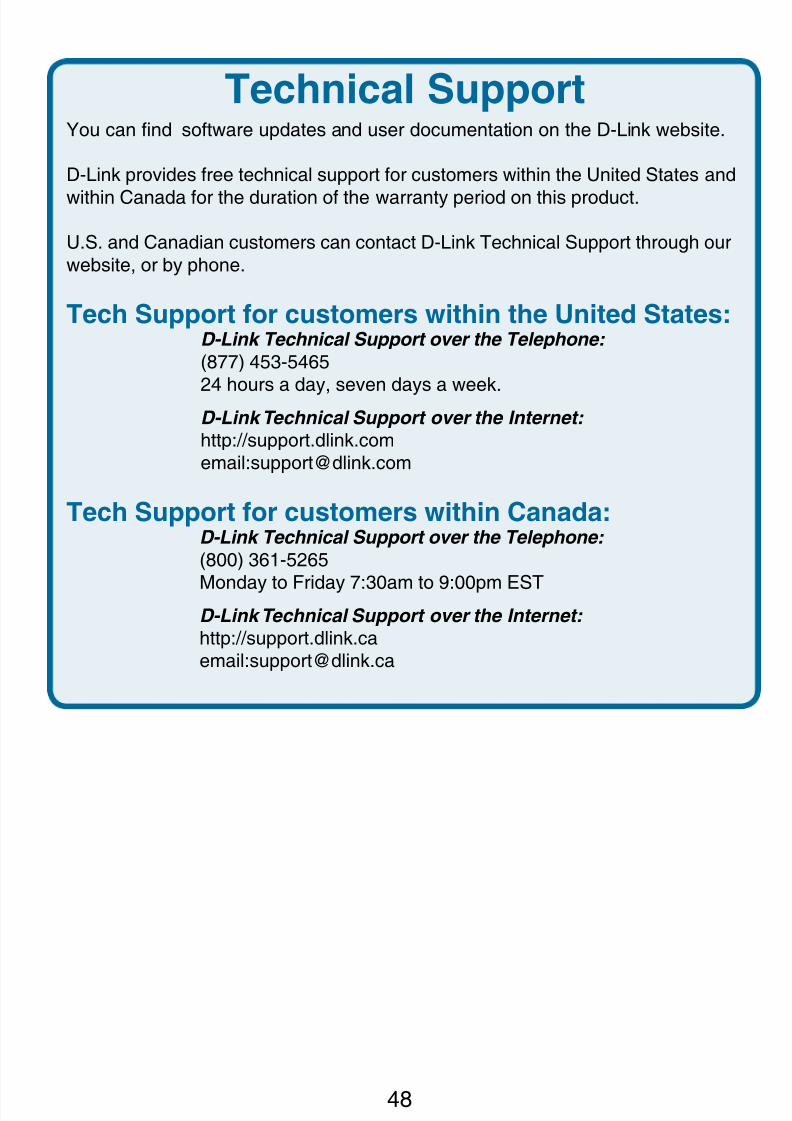
Technical SupportYou can nd software updates and user documentation on the D-Link website.
D-Link provides free technical support for customers within the United States and
within Canada for the duration of the warranty period on this product.
U.S. and Canadian customers can contact D-Link Technical Support through our
website, or by phone.
Tech Support for customers within the United States:D-Link Technical Support over the Telephone:
(877) 453-5465
24 hours a day, seven days a week.D-Link Technical Support over the Internet: http://support.dlink.com
email:[email protected]
Tech Support for customers within Canada:D-Link Technical Support over the Telephone:
(800) 361-5265
Monday to Friday 7:30am to 9:00pm ESTD-Link Technical Support over the Internet: http://support.dlink.ca
email:[email protected]

7/31/2019 d Link Wireless Manual
http://slidepdf.com/reader/full/d-link-wireless-manual 49/5249
Subject to the terms and conditions set forth herein, D-Link Systems, Inc. (“D-Link”) provides this LimitedWarranty:
• Only to the person or entity that originally purchased the product from D-Link or its authorized reseller or distributor, and
• Only for products purchased and delivered within the fty states of the United States, the District of Columbia, U.S. Possessions or Protectorates, U.S. Military Installations, or addresses with an APO or FPO.
Limited Warranty: D-Link warrants that the hardware portion of the D-Link product described below(“Hardware”) will be free from material defects in workmanship and materials under normal use from thedate of original retail purchase of the product, for the period set forth below (“Warranty Period”), except asotherwise stated herein.
• Hardware (excluding power supplies and fans): Three (3) years
•
Power supplies and fans: One (1) year • Spare parts and spare kits: Ninety (90) days
The customer's sole and exclusive remedy and the entire liability of D-Link and its suppliers under this LimitedWarranty will be, at D-Link’s option, to repair or replace the defective Hardware during the Warranty Periodat no charge to the original owner or to refund the actual purchase price paid. Any repair or replacement willbe rendered by D-Link at an Authorized D-Link Service Ofce. The replacement hardware need not be newor have an identical make, model or part. D-Link may, at its option, replace the defective Hardware or anypart thereof with any reconditioned product that D-Link reasonably determines is substantially equivalent(or superior) in all material respects to the defective Hardware. Repaired or replacement hardware will bewarranted for the remainder of the original Warranty Period or ninety (90) days, whichever is longer, and issubject to the same limitations and exclusions. If a material defect is incapable of correction, or if D-Linkdetermines that it is not practical to repair or replace the defective Hardware, the actual price paid by theoriginal purchaser for the defective Hardware will be refunded by D-Link upon return to D-Link of the defectiveHardware. All Hardware or part thereof that is replaced by D-Link, or for which the purchase price is refunded,shall become the property of D-Link upon replacement or refund.
Limited Software Warranty: D-Link warrants that the software portion of the product (“Software”) willsubstantially conform to D-Link’s then current functional specications for the Software, as set forth in theapplicable documentation, from the date of original retail purchase of the Software for a period of ninety (90)days (“Software Warranty Period”), provided that the Software is properly installed on approved hardware andoperated as contemplated in its documentation. D-Link further warrants that, during the Software WarrantyPeriod, the magnetic media on which D-Link delivers the Software will be free of physical defects. Thecustomer’s sole and exclusive remedy and the entire liability of D-Link and its suppliers under this LimitedWarranty will be, at D-Link’s option, to replace the non-conforming Software (or defective media) with softwarethat substantially conforms to D-Link’s functional specications for the Software or to refund the portion of the actual purchase price paid that is attributable to the Software. Except as otherwise agreed by D-Link
in writing, the replacement Software is provided only to the original licensee, and is subject to the termsand conditions of the license granted by D-Link for the Software. Replacement Software will be warrantedfor the remainder of the original Warranty Period and is subject to the same limitations and exclusions. If a material non-conformance is incapable of correction, or if D-Link determines in its sole discretion that itis not practical to replace the non-conforming Software, the price paid by the original licensee for the non-conforming Software will be refunded by D-Link; provided that the non-conforming Software (and all copiesthereof) is rst returned to D-Link. The license granted respecting any Software for which a refund is givenautomatically terminates.
Non-Applicability of Warranty: The Limited Warranty provided hereunder for Hardware and Softwareportions of D-Link’s products will not be applied to and does not cover any refurbished product and any productpurchased through the inventory clearance or liquidation sale or other sales in which D-Link, the sellers, or theliquidators expressly disclaim their warranty obligation pertaining to the product and in that case, the productis being sold “As-Is” without any warranty whatsoever including, without limitation, the Limited Warranty as
described herein, notwithstanding anything stated herein to the contrary.

7/31/2019 d Link Wireless Manual
http://slidepdf.com/reader/full/d-link-wireless-manual 50/5250
Submitting A Claim: The customer shall return the product to the original purchase point based on its returnpolicy. In case the return policy period has expired and the product is within warranty, the customer shallsubmit a claim to D-Link as outlined below:
• The customer must submit with the product as part of the claim a written description of the Hardware
defect or Software nonconformance in sufcient detail to allow D-Link to conrm the same, along withproof of purchase of the product (such as a copy of the dated purchase invoice for the product) if theproduct is not registered.
• The customer must obtain a Case ID Number from D-Link Technical Support at 1-877-453-5465, whowill attempt to assist the customer in resolving any suspected defects with the product. If the productis considered defective, the customer must obtain a Return Material Authorization (“RMA”) number bycompleting the RMA form and entering the assigned Case ID Number at https://rma.dlink.com/.
• After an RMA number is issued, the defective product must be packaged securely in the original or other suitable shipping package to ensure that it will not be damaged in transit, and the RMA number must beprominently marked on the outside of the package. Do not include any manuals or accessories in theshipping package. D-Link will only replace the defective portion of the product and will not ship backany accessories.
• The customer is responsible for all in-bound shipping charges to D-Link. No Cash on Delivery (“COD”) isallowed. Products sent COD will either be rejected by D-Link or become the property of D-Link. Products
shall be fully insured by the customer and shipped to D-Link Systems, Inc., 17595 Mt. Herrmann,Fountain Valley, CA 92708. D-Link will not be held responsible for any packages that are lost in transitto D-Link. The repaired or replaced packages will be shipped to the customer via UPS Ground or anycommon carrier selected by D-Link. Return shipping charges shall be prepaid by D-Link if you use anaddress in the United States, otherwise we will ship the product to you freight collect. Expedited shippingis available upon request and provided shipping charges are prepaid by the customer.
D-Link may reject or return any product that is not packaged and shipped in strict compliance with theforegoing requirements, or for which an RMA number is not visible from the outside of the package. Theproduct owner agrees to pay D-Link’s reasonable handling and return shipping charges for any product thatis not packaged and shipped in accordance with the foregoing requirements, or that is determined by D-Linknot to be defective or non-conforming.
What Is Not Covered: The Limited Warranty provided herein by D-Link does not cover: Products that, in
D-Link’s judgment, have been subjected to abuse, accident, alteration, modication, tampering, negligence,misuse, faulty installation, lack of reasonable care, repair or service in any way that is not contemplatedin the documentation for the product, or if the model or serial number has been altered, tampered with,defaced or removed; Initial installation, installation and removal of the product for repair, and shippingcosts; Operational adjustments covered in the operating manual for the product, and normal maintenance;Damage that occurs in shipment, due to act of God, failures due to power surge, and cosmetic damage;
Any hardware, software, rmware or other products or services provided by anyone other than D-Link; andProducts that have been purchased from inventory clearance or liquidation sales or other sales in whichD-Link, the sellers, or the liquidators expressly disclaim their warranty obligation pertaining to the product.While necessary maintenance or repairs on your Product can be performed by any company, we recommendthat you use only an Authorized D-Link Service Ofce. Improper or incorrectly performed maintenance or repair voids this Limited Warranty.
Disclaimer of Other Warranties: EXCEPT FOR THE LIMITED WARRANTY SPECIFIED HEREIN, THE
PRODUCT IS PROVIDED “AS-IS” WITHOUT ANY WARRANTY OF ANY KIND WHATSOEVER INCLUDING,WITHOUT LIMITATION, ANY WARRANTY OF MERCHANTABILITY, FITNESS FOR A PARTICULARPURPOSE AND NON-INFRINGEMENT. IF ANY IMPLIED WARRANTY CANNOT BE DISCLAIMED IN ANYTERRITORY WHERE A PRODUCT IS SOLD, THE DURATION OF SUCH IMPLIED WARRANTY SHALL BELIMITED TO THE DURATION OF THE APPLICABLE WARRANTY PERIOD SET FORTH ABOVE. EXCEPT
AS EXPRESSLY COVERED UNDER THE LIMITED WARRANTY PROVIDED HEREIN, THE ENTIRE RISK AS TO THE QUALITY, SELECTION AND PERFORMANCE OF THE PRODUCT IS WITH THE PURCHASEROF THE PRODUCT.

7/31/2019 d Link Wireless Manual
http://slidepdf.com/reader/full/d-link-wireless-manual 51/5251
Limitation of Liability: TO THE MAXIMUM EXTENT PERMITTED BY LAW, D-LINK IS NOT LIABLE UNDER ANY CONTRACT, NEGLIGENCE, STRICT LIABILITY OR OTHER LEGAL OR EQUITABLE THEORY FOR ANYLOSS OF USE OF THE PRODUCT, INCONVENIENCE OR DAMAGES OF ANY CHARACTER, WHETHERDIRECT, SPECIAL, INCIDENTAL OR CONSEQUENTIAL (INCLUDING, BUT NOT LIMITED TO, DAMAGESFOR LOSS OF GOODWILL, LOSS OF REVENUE OR PROFIT, WORK STOPPAGE, COMPUTER FAILUREOR MALFUNCTION, FAILURE OF OTHER EQUIPMENT OR COMPUTER PROGRAMS TO WHICH D-LINK’SPRODUCT IS CONNECTED WITH, LOSS OF INFORMATION OR DATA CONTAINED IN, STORED ON, ORINTEGRATED WITH ANY PRODUCT RETURNED TO D-LINK FOR WARRANTY SERVICE) RESULTING
FROM THE USE OF THE PRODUCT, RELATING TO WARRANTY SERVICE, OR ARISING OUT OF ANYBREACH OF THIS LIMITED WARRANTY, EVEN IF D-LINK HAS BEEN ADVISED OF THE POSSIBILITY OFSUCH DAMAGES. THE SOLE REMEDY FOR A BREACH OF THE FOREGOING LIMITED WARRANTY ISREPAIR, REPLACEMENT OR REFUND OF THE DEFECTIVE OR NON-CONFORMING PRODUCT. THEMAXIMUM LIABILITY OF D-LINK UNDER THIS WARRANTY IS LIMITED TO THE PURCHASE PRICE OFTHE PRODUCT COVERED BY THE WARRANTY. THE FOREGOING EXPRESS WRITTEN WARRANTIES
AND REMEDIES ARE EXCLUSIVE AND ARE IN LIEU OF ANY OTHER WARRANTIES OR REMEDIES,EXPRESS, IMPLIED OR STATUTORY.
Governing Law : This Limited Warranty shall be governed by the laws of the State of California. Somestates do not allow exclusion or limitation of incidental or consequential damages, or limitations on how longan implied warranty lasts, so the foregoing limitations and exclusions may not apply. This Limited Warrantyprovides specic legal rights and you may also have other rights which vary from state to state.
Trademarks: D-Link is a registered trademark of D-Link Systems, Inc. Other trademarks or registeredtrademarks are the property of their respective owners.
Copyright Statement: No part of this publication or documentation accompanying this product may bereproduced in any form or by any means or used to make any derivative such as translation, transformation,or adaptation without permission from D-Link Corporation/D-Link Systems, Inc., as stipulated by the UnitedStates Copyright Act of 1976 and any amendments thereto. Contents are subject to change without prior notice. Copyright 2005 by D-Link Corporation/D-Link Systems, Inc. All rights reserved.
CE Mark Warning: This is a Class B product. In a domestic environment, this product may cause radiointerference, in which case the user may be required to take adequate measures.
FCC Statement: This equipment has been tested and found to comply with the limits for a Class B digitaldevice, pursuant to part 15 of the FCC Rules. These limits are designed to provide reasonable protectionagainst harmful interference in a residential installation. This equipment generates, uses, and can radiateradio frequency energy and, if not installed and used in accordance with the instructions, may cause harmfulinterference to radio communication. However, there is no guarantee that interference will not occur in aparticular installation. If this equipment does cause harmful interference to radio or television reception,which can be determined by turning the equipment off and on, the user is encouraged to try to correct theinterference by one or more of the following measures:
• Reorient or relocate the receiving antenna.
• Increase the separation between the equipment and receiver.
• Connect the equipment into an outlet on a circuit different from that to which the receiver is
connected.
•
Consult the dealer or an experienced radio/TV technician for help.
For detailed warranty information applicable to products purchased outside the United
States, please contact the corresponding local D-Link ofce.

7/31/2019 d Link Wireless Manual
http://slidepdf.com/reader/full/d-link-wireless-manual 52/52
Registration
(03/27/2007)