dairybase user guide - dairy australia
TRANSCRIPT

For further assistance contact [email protected]
DairyBase
User guideThis user guide is designed as a reference point for dairy farmers and service providers to help with the use of DairyBase.
Introduction
DairyBase has been established to provide dairy farmers with a web based tool to help manage their farms, and service providers and the Australian industry with a national database of dairy farm performance information. This includes data from the Dairy Farm Monitor Project (DFMP) and other validated Datasets from consultants and service providers at a later date.
DairyBase has been developed by Dairy Australia, in collaboration with DairyNZ, to provide dairy farmers with a web based system to measure their business performance over time and undertake comparative analysis for their business.
If you require further assistance after reviewing this guide contact the DairyBase team at [email protected] or on 1800 548 073. If you need a more detailed explanation of DairyBase there is an Expert User Guide which can be downloaded at dairybase.com.au.
Getting Started
System requirements
DairyBase will perform optimally on Google Chrome, Safari, Mozilla Firefox and Internet Explorer v11. Any earlier versions of Internet Explorer may result in issues with the layout of DairyBase for the user.
Finding DairyBase
You can login via the DairyBase website dairybase.com.au
Look for the DairyBase Log in to the right of the home page.
Logging in for the first time
1. Click ‘Please register me as a new Dairy Australia user’
2. Fill in your details and tick the box to agree to Dairy Australia’s privacy policy. Click ‘Register’
3. Your new user application will take 24 hours to process. You will receive an email confirmation including your ‘user name’ and password. The user name provided will be your email
4. You can now go to ‘Log in’ at dairybase.com.au and use the user name and password provided to enter your farm’s physical and financial information.

Selecting and Creating Datasets
You can store multiple data sets in DairyBase, for example, one for each year. In order to start using DairyBase for your own business click on the ‘Create a Dataset’ button at the top right of the screen.
When you first login to DairyBase the home page will have a Default Farm Dataset which you can open and view but cannot edit. If someone has already created a Dataset for you and allocated the authority for this Dataset to you then this will be visible on your home page. You should have authority to edit such a Dataset.
Creating Datasets
To create a new Dataset you will need to name the Dataset and select the farm ID and financial year to which the Dataset relates. You can also include a description but these details will not appear on the home screen.
You can elect to prefill the new Dataset with the default Dataset or with a blank Dataset.
There is an option to use an excel upload file if you have a slow internet connection but access to this function has to be requested via [email protected].
You would need to save this file to your computer and enter the data prior to uploading it to DairyBase. Whilst the upload file has some calculations within it you cannot access a full set of reports in the excel file and some of the calculations vary to those within DairyBase. On this basis you will need to upload the excel file to DairyBase before you can access your reports.
When you create your new Dataset you will need to allocate the authority level for your Dataset as either private data, research or public access or industry comparison. Selecting Private means your Datasets are private and confidential unless you choose to share them with someone within DairyBase or print the reports and provide them to someone else. You might choose to share your Datasets with other people such as your consultant or accountant.
An explanation of the remaining three authority options in DairyBase are available by clicking on the help icon next to the selection box when you create a dataset.
Selecting Datasets
Once you have a number of Datasets within DairyBase you will then have the option to either, load, download, copy or archive them.
If you select load, the Dataset will open into the editor. If you select download, this will enable you to download the data in that particular Dataset into an excel spreadsheet which will include a tab for the input data and one for the output report data. Selecting copy will make an exact copy of the Dataset you have selected and DairyBase will then prompt you to enter a description and choose the access authority.
You will be able to allocate Datasets to groups and then search by group names. This may be particularly useful for service providers who have access to multiple Datasets and want to group Datasets for ease of location.
Please refer to the Expert User Guide for more information on creating groups.
Editing Data Sets
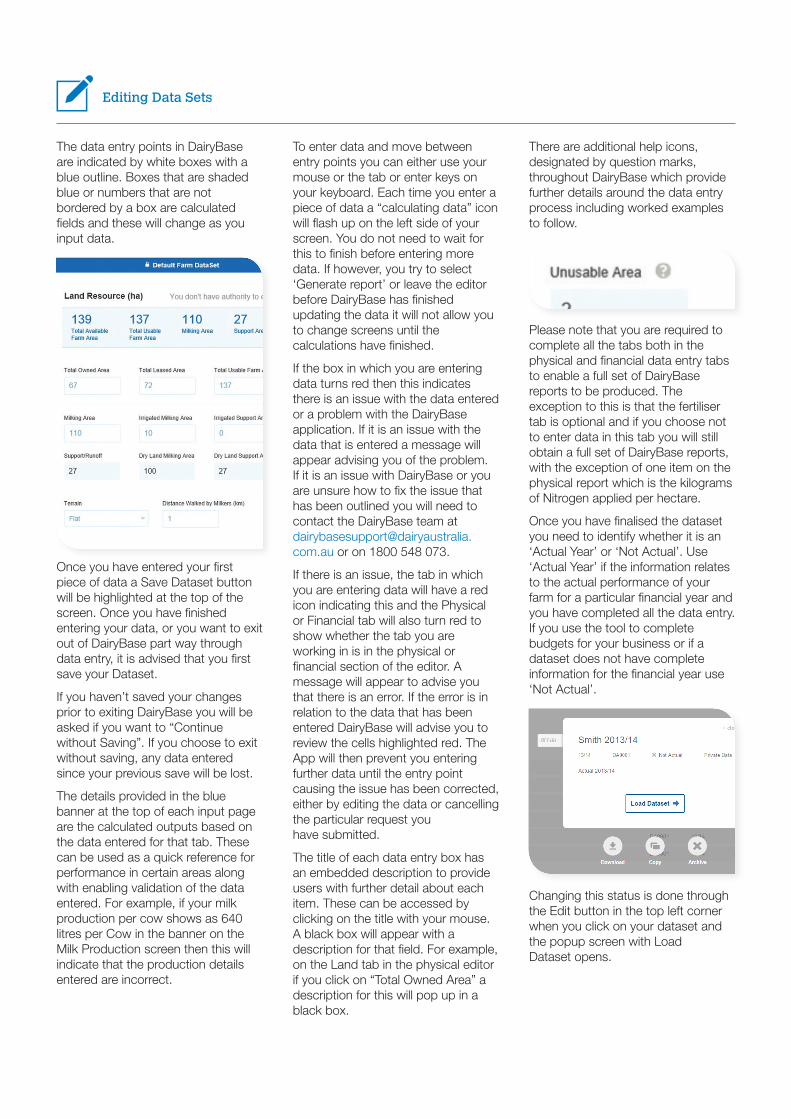
The data entry points in DairyBase are indicated by white boxes with a blue outline. Boxes that are shaded blue or numbers that are not bordered by a box are calculated fields and these will change as you input data.
Once you have entered your first piece of data a Save Dataset button will be highlighted at the top of the screen. Once you have finished entering your data, or you want to exit out of DairyBase part way through data entry, it is advised that you first save your Dataset.
If you haven’t saved your changes prior to exiting DairyBase you will be asked if you want to “Continue without Saving”. If you choose to exit without saving, any data entered since your previous save will be lost.
The details provided in the blue banner at the top of each input page are the calculated outputs based on the data entered for that tab. These can be used as a quick reference for performance in certain areas along with enabling validation of the data entered. For example, if your milk production per cow shows as 640 litres per Cow in the banner on the Milk Production screen then this will indicate that the production details entered are incorrect.
To enter data and move between entry points you can either use your mouse or the tab or enter keys on your keyboard. Each time you enter a piece of data a “calculating data” icon will flash up on the left side of your screen. You do not need to wait for this to finish before entering more data. If however, you try to select ‘Generate report’ or leave the editor before DairyBase has finished updating the data it will not allow you to change screens until the calculations have finished.
If the box in which you are entering data turns red then this indicates there is an issue with the data entered or a problem with the DairyBase application. If it is an issue with the data that is entered a message will appear advising you of the problem. If it is an issue with DairyBase or you are unsure how to fix the issue that has been outlined you will need to contact the DairyBase team at [email protected] or on 1800 548 073.
If there is an issue, the tab in which you are entering data will have a red icon indicating this and the Physical or Financial tab will also turn red to show whether the tab you are working in is in the physical or financial section of the editor. A message will appear to advise you that there is an error. If the error is in relation to the data that has been entered DairyBase will advise you to review the cells highlighted red. The App will then prevent you entering further data until the entry point causing the issue has been corrected, either by editing the data or cancelling the particular request you have submitted.
The title of each data entry box has an embedded description to provide users with further detail about each item. These can be accessed by clicking on the title with your mouse. A black box will appear with a description for that field. For example, on the Land tab in the physical editor if you click on “Total Owned Area” a description for this will pop up in a black box.
There are additional help icons, designated by question marks, throughout DairyBase which provide further details around the data entry process including worked examples to follow.
Please note that you are required to complete all the tabs both in the physical and financial data entry tabs to enable a full set of DairyBase reports to be produced. The exception to this is that the fertiliser tab is optional and if you choose not to enter data in this tab you will still obtain a full set of DairyBase reports, with the exception of one item on the physical report which is the kilograms of Nitrogen applied per hectare.
Once you have finalised the dataset you need to identify whether it is an ‘Actual Year’ or ‘Not Actual’. Use ‘Actual Year’ if the information relates to the actual performance of your farm for a particular financial year and you have completed all the data entry. If you use the tool to complete budgets for your business or if a dataset does not have complete information for the financial year use ‘Not Actual’.
Changing this status is done through the Edit button in the top left corner when you click on your dataset and the popup screen with Load Dataset opens.

Physical Data EntryThe physical data entry tabs collect information in relation to your land, livestock, milk production, feed, fertiliser, water and labour.
If you are unsure of the information required at each data entry point, click on the title for that field and a more detailed description will appear. You can also use the help icons throughout DairyBase to assist with data entry, including worked examples.
To enter data or edit the livestock groups on the livestock screen you can either click on the Livestock Group name, such as Milking Herd or Bulls. On the feed and fertiliser tabs to enter a new feed or fertiliser type click on the ‘Add a Feed’ or ‘Add a Fertiliser’ button which will then open up into another screen to enter your data.
The additional screens that pop-up throughout DairyBase for more detail around livestock, feed, fertiliser, monthly milk and monthly calving data, will only save data to the database if you select the submit or save button within the pop-up screen. If you enter the data and close the pop-up screen without saving or submitting your data will be lost.
Financial Data Entry
The financial data entry for DairyBase needs to be completed on a GST exclusive basis.
You can choose to use your financial statements to complete the financial tabs or you might prefer to use the accounting program you use at home. If you use your own accounting program you need to ensure the Profit and Loss Statement, which has your income and expenses, is GST exclusive.
The milk income needs to match the production for the financial year and it is unlikely this will be reflected accurately in your financial statements or your accounting program, given the step-ups received in most years. It is thus recommended that you obtain this from your milk processor to ensure the income matches the production in the financial year you are analysing.

Generating Reports
DairyBase provides you with four overall report types:
The Single Dataset Report is based on the performance of your business for the financial year being analysed.
The Comparison Report enables comparative analysis of the existing financial year with historical years for your business, and any budget years you may create to selected comparative Datasets. You can compare up to six of your own years plus two comparative Datasets in this report.
The Farm Size Analysis and Farm History Analysis show your selected Datasets overlaid on the comparative data with farm size and financial years respectively on the X axis. The Y axis is selectable from a range of physical and financial parameters.
Single Dataset Report
To create a single Dataset report click on the Reports button in the top right of the DairyBase screen.
Then select ‘Single Dataset Report’ and choose the Dataset you want to use by clicking on it in your list of Datasets and then click on ‘Set Report Filters’.
You will then be asked to select your Dataset filters. The KPI (Key Performance Indicators) filters at the top enable you to select your Milk Unit, Land and Financial KPI preferences. The Financial Ratio filters enable you to select five different columns that will be presented in your reports. Once you have selected your filters click on the Generate Report button.
Comparison Report
DairyBase allows you to compare your farms performance against others. You are able to filter the data available to allow comparison on farms with particular characteristics, and similar to your own if you would like. The only farms that you can compare against have been collected through the Dairy Farm Monitor Project or the Queensland Dairy Accounting Scheme and are high quality data that has been verified.
To create a comparison Dataset report click on the Reports button in the top right of the DairyBase screen and then select Comparison Report. You can then select up to six different Datasets from your list of Datasets and click on Set Report Filters.
The KPI filters on the left relate to your preference for the unit of measurement used. For example you can elect to view milk details on a per litre basis or per kilogram of milk solids.
The Chart filters enable you to select from five options. The Chart data filter will determine the grouping of the data in your comparison Datasets. There will be five different groups, each differentiated by a different colour in the charts, within each category. For example, if you select Pasture Grazed the comparison data will be separated into five groups.

For further assistance contact [email protected]
Published by Dairy Australia Limited.
Whilst all reasonable efforts have been taken to ensure the accuracy of the DairyBase User guide, use of the information contained herein is at one’s own risk. To the fullest extent permitted by Australian law, Dairy Australia disclaims all liability for any losses, costs, damages and the like sustained or incurred as a result of the use of or reliance upon the information contained herein, including, without limitation, liability stemming from reliance upon any part which may contain inadvertent errors, whether typographical or otherwise, or omissions of any kind.
© Dairy Australia Limited 2015. All rights reserved.
Dairy Australia Limited ABN 60 105 227 987
Level 5, IBM Centre60 City Road, Southbank VIC 3006 Australia
T + 61 3 9694 3777 F + 61 3 9694 3701
0239
| M
ay 2
015
In the comparison filters you will need to select a preference for each filter for both groups. You have the option to select all years and all farms for some of these filters or you can select a range within each filter. For example on Farm Size – Million Litres you can elect to use all farms in the comparison data or you might prefer to select a range such as 1.5 million litres to 2.5 million litres.
Once you have selected your filters click on the ‘generate report’ button.
If the filters you have selected result in a comparative Dataset with too few Datasets then DairyBase will advise you that the selection is too limited and you need to increase the ranges selected to obtain a comparative Dataset. For example, if you select farms producing more than 6 million litres for the 2013/14 financial year then there will be insufficient Datasets within that selection to produce a comparison so you would need to increase the range for milk production and financial years to enable the comparative Dataset to be created.
Downloading Your Data
Throughout DairyBase you have the option to download both your input data and the reports to an excel file by clicking on the ‘Download’ button visible at the top of all screens.
The filter process available in DairyBase for the single Dataset and comparison reports is not translated to the download file so the download file will have a different structure to DairyBase. The Summary and Physical reports in the excel file have a fixed layout for all users. This means your filter selections will not necessarily be represented in the excel download file.
For example, if you have selected per litre as your comparison the Summary and Physical report in the excel download file is set on a kilogram milk solids comparison so you will get a different report to the one presented in DairyBase. Similarly, for the download on the comparison report the filter selections do not transfer to the download, but the download will provide additional report sections to that seen in DairyBase in that the download file will have extra reports to counter this restriction. The comparison download will therefore have separate reports for per cow, per milking and per usable ha, $ / kg MS, cents / litre and % of income.