dart parking data collection task scope of work · pdf filefor dart parking data collection...
TRANSCRIPT

DART Parking Data Collection Task
Scope of Work
February 5, 2013

Scope of Work
For DART Parking Data collection Task
(In Support of the Integrated Corridor Management Demonstration ICM Project)
Project Description:
DART is leading the US 75 Integrated Corridor Management (ICM) Demonstration Project for the
Dallas region. Coordinated corridor operation and management is predicated on being able to share
transportation information on highways, arterials, transit, and incidents. To accomplish the ICM
Demonstration Project, DART has contracted with Telvent for the System Integration of new and
existing systems in the development of a data sharing network to facilitate the exchange of information
among the transportation agencies via a web based tool that works with the region’s center-to-center
standards and deploy a Regional 511 traveler information system.
Definition of Services:
Telvent as part of the DART ICM team is tasked to lead the Systems Integration effort needed to design,
build, operate and maintain an Integrated Corridor Management System. DART is requesting Telvent to
assist with DART parking demonstration and equipped 28 parking driveways with solar traffic detection
system to count the traffic in-and-out of parking and report parking availability for the ICM
demonstration.
Telvent’s proposed work breakdown structure is listed below. Each task is further defined below:
1. Loop location design at driveways
2. Supply hardware and software
3. Install all detection equipments
4. Commission and calibrate the system
5. Technical support
Task 1: Loop location design
This task defines the location of detector loops at each of the parking driveways. The loop location is
critical in the accuracy and performance of the system
Loop layout drawing: Telvent will provide a loop layout drawing for each driveway that will
specify the location of the loop to be installed.
Task 1 Deliverables
1. Design document to be approved by DART
Task 2: Supply Hardware :
This task will allow Telvent and its subcontractors to supply loop detection and controller hardware and
pole. Telvent will supply the power plant in the form of a solar system. The solar system will contain a
cabinet that will house the detection and controller system.
Task 2 Deliverables

1. Solar system
2. Loop detector
3. Loop (lane) controller
4. Pole
Task 3: Install detection and controller equipment in secured cabinets:
This task will allow Telvent to install loop detection system and controller in the solar cabinet.
Task 3 Deliverables
1. Completed detection cabinet
2. Installed loop detection system
3. Installed Loop (lane) controller
Task 4: Commission and calibrate the system:
This task will calibrate the loop detector system and set sensitivity levels based on the loop and ground
conditions. Commissioning of the system is done by connecting the controller to the loop detection
system, verifying proper function and then establishes external communication through controller.
Task 4 Deliverables
1. Completed detection system
2. External communication established
3. Traffic data relayed
Task 5: Technical support
This task will allow Telvent team to establish interface between Telvent servers, and the source data
from the field. The data shall be relayed directly from the field to the to the Telvent servers at DalTrans.
Task 5 Deliverables
1. Data relay to Telvent servers

Narrative – Driveways and Poles
Balancing functionality with effective use of existing structures, four of the five stations have light poles within reach
of the loop wiring. Parker Road Station is the one station that will require the installation of three more poles for
mounting the solar panels and controllers. Of the 10 sensor locations, five will have special poles, including the
two already installed, and five will use light poles as mounting platforms. We also do not recommend moving the
two poles that were installed at Parker Road for the test in September. The poles are not located where we would
have chosen now, but are close enough that it does not make sense to mess with them. The original test pulled
power from a light pole to power the controller which meant that it had overhead wiring running from pole to
pole. We don’t want to take that approach, but use the driveway poles installed for the test as solar and controller
mounts. The equipment will be mounted higher on the pole than the original box was placed to protect the
equipment from the vagrants that hang around across the street at the day labor center.
Arapaho, Spring Valley, and LBJ all have light poles and adequate access to sunlight to use solar panels mounted
on the light poles.
Bush Tolllway Station requires the use of the light poles for mounting as well as the source of power. The reason is
that the parking lots are under the tollway and as a result there is no consistent sunlight for five of the eight
driveways. At Bush Station, the electrical power from the light poles at night will be used to recharge the batteries
for day time power. Fortunately, these lights are 110 volt so no step down transformers are needed. The batteries
will be upgraded.
For consistency and aesthetics, when we analyzed the lots, we wanted to maintain a consistency in the look and
feel of the sites, site by site, in particular with respect to poles. At Bush, we could have used solar panels at the
three southern driveways, but opted to use the light poles so that all driveways look the same with minimal intrusive
hardware, especially extra poles. At one driveway at the far west and middle end, the light pole is located about 40
feet away and an electrical junction box is next to the driveway. A pole would be more convenient, but we believe it
would look out of place so have opted for the longer installation to the light pole.

The loops will be cut in varying rectangular sizes but always three feet wide. All but the handicapped parking at Parker Road has double loops, including LBJ driveway that is one way. The reason for double loops is to catch traffic going both directions conceivably at the same time. The one way driveways may experience traffic going the wrong direction, but rarely at the same time. Loop cutting can be done in two to four days. Laying and sealing the loops has to be tightly synchronized with the loop cuts. The cuts are cleaned and immediately need the loops laid and sealed to avoid contamination by rocks and dirt filling in the channel. The sequence of the cuts will require the team to close a driveway to traffic for couple hours between 9:30 a.m. and 3:30 p.m.
The sequence of pavement cuttin and loop placement (without specifying timelines) is the following:
• Identify the pivot point on the driveway for the loop junction and splice from where the line will thread from the driveway to the mounting pole
• Drill the one inch hole 12 inches deep • Lay the pre-fomed loops on the ground and then spray paint the layout so that the cutter has clear lines • Close the driveway access with cones
• Cut the pavement 1.5” deep to and thru the curb
• Clean the channel with high pressure water
• Lay the loops in the channel and secure at the junction splice point
• Run the dead wire from the junction to the curb and secure
• Seal the cut with EZ-7. EZ-7 sealant is the most commonly used sealant for pavement. It is black in color and completely covers and seals the crack such that no liquid water or ice can enter the channel.
• Either cover the sealant with duct tape or keep the driveway closed for a few hours to prevent tire tracks from vehicles passing over the sealant spreading the sealant.
We do not need to get the conduit to the light poles at any of the 26 driveways in the same timeframe, but we do need to complete all the work on the pavement as soon as the pavement is cut.
Narrative - Loops in Driveway
Loop size 5366 linear feet
loop cut on street 2794 linear feet

Loops in Driveway - 2 X’
X’
3’
3’
3’
3’
3’
curb
curb
The loops are laid out as rectangles perpendicular to the curbs, except in the case of the shared driveway at Arapaho where the loops are diagonal and more trapezoidal. The length varies based on length of the driveway, but width is consistently 3 feet. There is a 3 foot gap between the loops
pole
Loop 1
Loop 2

Narrative – Dig Test
We still need to get the Dig Test reports back, and submission for the Dig Test
from Texas811.org will be submitted as soon as DART approves the approach
outlined in this document. We also require schematics from DART on location
of irrigation systems and type of PVC or conduit used. The irrigation system
will likely be cut at times, and we will re-attach the cut PVC with a joint and
glue.
We have been advised by the electrician and loop cutter that the dig test data
base does not usually cover items like irrigation systems, but only major
underground lines. It will tell us where the electrical lines for the light poles are
running, and we should make sure that if they have a standard depth, that we
lay our conduit above that depth. The only place we will be cutting below the
cement line on the driveways (12 inches) is the core drill for slicing the
lines. This will require that we mark on the submitted information where the
one inch core will be dug, and the path the DLC will follow to its light pole.

EZ-7 Sealant Martin EZ-7® Cold-Applied Crack Sealant is a non-hazardous, cold-applied asphalt and concrete sealant used for sealing cracks in concrete and asphalt pavements. Martin EZ-7® prevents water and non-compressible materials from entering the crack and causing damage or failure to the pavement by settling into the crack and sealing both the bottom and the sides of the crack.
Preparation of Crack & Application •Apply Martin EZ-7® Crack Sealant to the surface of a cleaned crack. •Then using a “V” shaped squeegee, smooth the material across the length of the crack. This will allow for proper penetration and prevent build-up on the pavement’s surface. •To ensure optimum cure time, make sure the “Surface Membrane” is a very thin layer of sealant.
Clean Up and Usage Information •Because Martin EZ-7® is non-hazardous, you can simply clean up by washing away with water. •The sealant should not be applied in temperatures below freezing. •Martin EZ-7® should be stored at a temperature no less that 40°F. •Cure time is typically between 10 – 30 minutes depending on weather conditions
•Source (http://www.themartincompanies.com/martin-product-sales-everything-asphalt) manufacturer of EZ -7
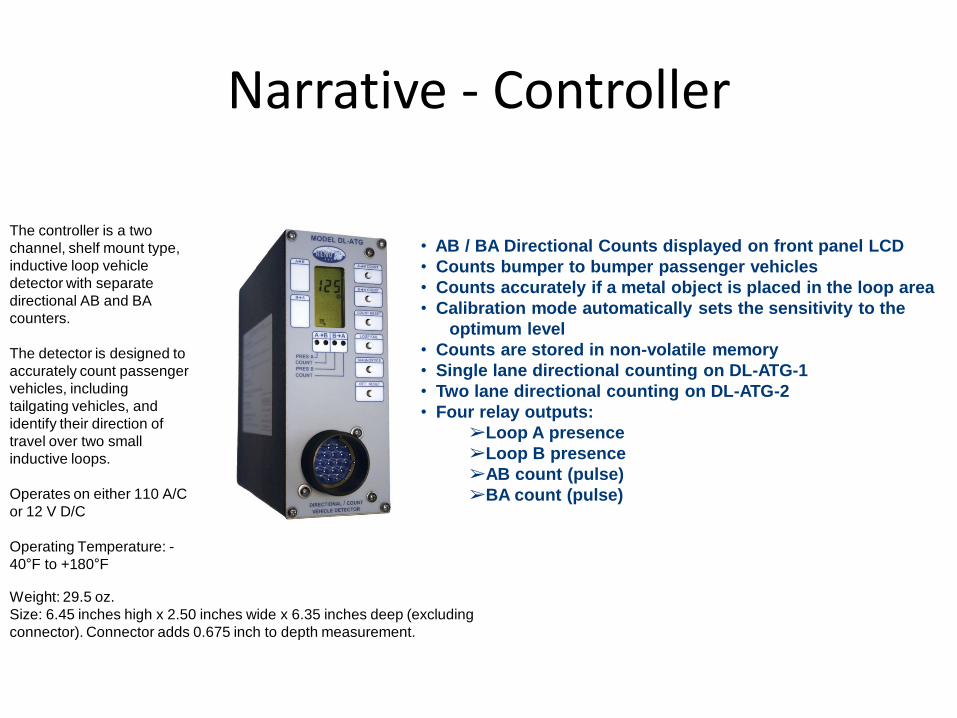
Narrative - Controller
• AB / BA Directional Counts displayed on front panel LCD
• Counts bumper to bumper passenger vehicles
• Counts accurately if a metal object is placed in the loop area
• Calibration mode automatically sets the sensitivity to the
optimum level
• Counts are stored in non-volatile memory
• Single lane directional counting on DL-ATG-1
• Two lane directional counting on DL-ATG-2
• Four relay outputs:
➢Loop A presence
➢Loop B presence
➢AB count (pulse)
➢BA count (pulse)
The controller is a two
channel, shelf mount type,
inductive loop vehicle
detector with separate
directional AB and BA
counters.
The detector is designed to
accurately count passenger
vehicles, including
tailgating vehicles, and
identify their direction of
travel over two small
inductive loops.
Operates on either 110 A/C
or 12 V D/C
Operating Temperature: -
40°F to +180°F
Weight: 29.5 oz.
Size: 6.45 inches high x 2.50 inches wide x 6.35 inches deep (excluding
connector). Connector adds 0.675 inch to depth measurement.

Narrative – Use of Poles
The light poles are used as mounting bases similar to the pole at the right where we mounted the solar panel, controllers, and camera on the pole. Only at Bush Turnpike will we be tapping into the power from the light pole at night to recharge the batteries. A battery charger interfaces with the 110 V current to charge the battery. The units are powered from the DC current from the battery. In the case of our customer in California, we tapped into the light power at night to recharge the batteries, and the solar panel during the day to trickle power to the controller, cameras, and network router.

Clamps and Mounts to Pole
Clamps are designed to be adjustable for solar panels and controller boxes. Battery boxes may be located at base of light poles. All boxes are NEMA standard for outdoor usage and electrical safety. The boxes will be locked with access controlled by Telvent once system is accepted

Narrative – Installation on Poles
The installation of the conduit from the curb to the respective poles can proceed on a different timeline, and probably
should to avoid teams colliding with each other. The trenching for the conduit across the grass (non pavement portion of
the line) will be 12 inches deep. We are expecting that the trenching will cut at least one place in the irrigation system.
Rather than taking extraordinary steps to avoid cutting the irrigation conduit, the conduit team will patch the system with
PVC.
The conduit will be flexible conduit in the trench rated to handle low voltage wiring. The wiring will be pushed thru the
conduit, and terminate near the spot on the pole where the controller will be hung. It will be tied off until the controller is
ready to be installed. During the same installation cycle, the solar panels and batteries will be installed. Each driveway
will take approximately four man hours to complete. The sequence of conduit from the poles to the curb can be
asynchronous from the sequence of pavement cutting and loop laying and sealing. However it appears most
efficient to lay the loops first and run them to the poles on a separate timeline.
The last phase in the field installation is the installation of the controller and connection with the power supply. All
components will be shipped to Apex Office in Nevada where they will be assembled and pre-tested. The controller
boxes will be shipped fully assembled to the electrician for installation. Each controller will take about 2 hours to instal l
and secure.

Narrative – Other Work
At the driveway at Parker Road with a left turn lane, the team will install lane buttons similar to what was installed at the test site; and also use a stencil to paint the direction signs.
The location of the arrows has specifications that the team is unfamiliar with. DART will outline the location of the arrows on the pavement ahead of time.
The buttons and arrows will be done after the sealant has cured.

Installation and Construction Summary
1. Install the three poles needed ahead of the loop installation. 2. Install the loops coordinating the work to be done in parallel with the cement cutter. This means that locating
and painting the cut lines with the preformed loops in hand will take place the week before the cutting figuring that we can lay out the dimensions for the loops – about 5 driveways per day. 6 – 9 am and 4 to 6:30 pm will be unavailable hours due to traffic. We can locate the splice junction, and build the rest of the layout from there.
3. A portion of the channel is dug on the lawn for placing the ends of the wires. The following week – Driveway engineering
4. Cutter cuts leaving one driveway open for traffic at each lot where available, 5. Cleaner cleans immediately afterwards, 6. Loops are laid immediately after being cleaned, 7. Cutter seals the cuts and cones are used to block the driveway for 3 hours. All driveways done in 5 days.
Installation of power systems, controllers, and connection to loops
8. Controllers and power systems have arrived and stored by electrician. 9. Loop wires are run to the poles, 10. Controllers and power systems are installed, 11. Wires are connected to the power supply, 12. Connection via GSM is tested and verified, 13. Data transmitted and received on test server.

Bu
sh Tu
rnp
ike Statio
n
Sprin
g Valley
Ro
ad Statio
n
Layouts of the Major Parking Stations
Parker Road Station
Par
ker
Ro
ad
Lin
gco
Ro
ad
Spring Valley Road
Note: Each Driveway is highlighted on the slides below with to identify the specific driveway with the picture

PAR
KER
4
PAR
KER
5
PAR
KER
6
PARKER 1 PAR
KER
9
PARKER 7
PAR
KER
8
PARKER 10
PAR
KER
2 ARCHERWOOD ST
OZA
RK

PARKER STATION 2600 ARCHERWOOD ST. PLANO TX.
N
E. PAR
K B
LVD
E. PAR
KER
RD
ARCHERWOOD ST.
PAR
KER
5
PAR
KER
4
PAR
KER
6
EXC
HA
NG
E DR
.
OZA
RK
PAR
KER
9
PAR
KER
7
PAR
KER
8
PAR
KER
10
PA
RK
ER 1
PAR
KER
2
PAR
KER
3
PARKER STATION BUILDING
To US 75
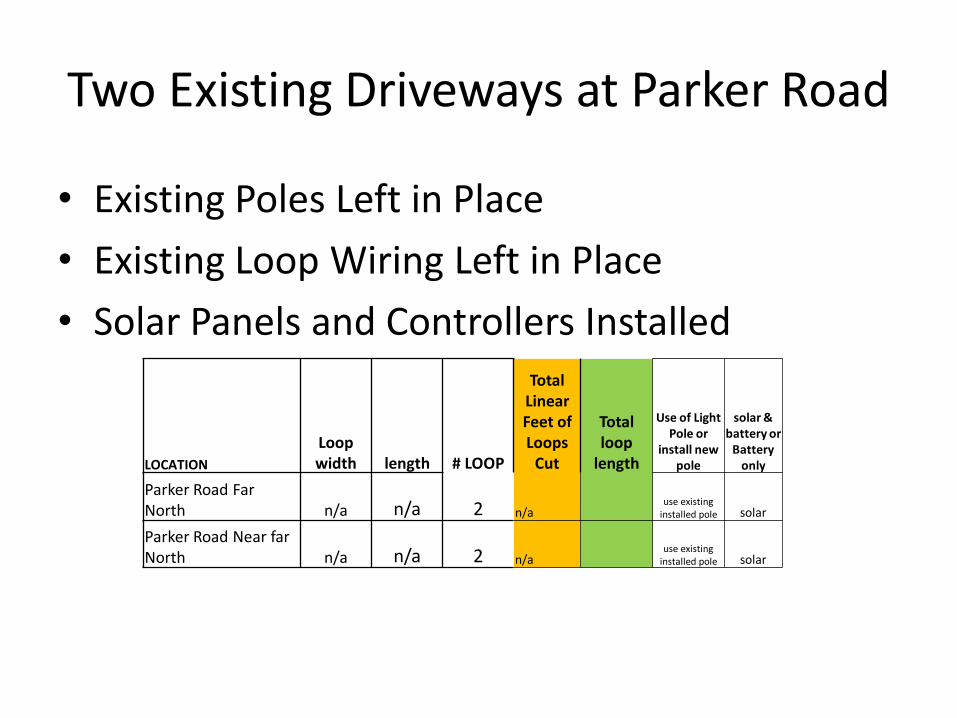
Two Existing Driveways at Parker Road
• Existing Poles Left in Place
• Existing Loop Wiring Left in Place
• Solar Panels and Controllers Installed
LOCATION
Loop width length # LOOP
Total Linear Feet of Loops
Cut
Total loop
length
Use of Light Pole or
install new pole
solar & battery or
Battery only
Parker Road Far North n/a n/a 2 n/a
use existing installed pole solar
Parker Road Near far North n/a n/a 2 n/a
use existing installed pole solar

PARKER OZARK (PARKER 9)
TO THE ELEC.POLE 4’ TO THE CURB
LOCATION
Loop width length # LOOP
Total Linear Feet of Loops
Cut
Total loop
length
Use of Light Pole or
install new pole
solar & battery or
Battery only
ozark 3 18 2 93 134 use light pole solar

PARKER TO STORE(PARKER 1)
POLE 8’ TO THE CURB
LOCATION
Loop width length # LOOP
Total Linear Feet of Loops
Cut
Total loop
length
Use of Light Pole or
install new pole
solar & battery or
Battery only
Parker to stores 3 23 2 113 167 install pole solar

PARKER EXCH. SHORT(PARKER 6)
NEW POLE BEHIND STOP SIGN 5’ TO CURB
LOCATION
Loop width length # LOOP
Total Linear Feet of Loops
Cut
Total loop
length
Use of Light Pole or
install new pole
solar & battery or
Battery only
parker exch short 3 18 2 93 184 use light pole solar

PARKER EXCH. WIDE(PARKER 4)
BUTTONS IN THE MIDDLE
LOOPS TO ELEC. POLE
LOCATION
Loop width length # LOOP
Total Linear Feet of Loops
Cut
Total loop
length
Use of Light Pole or
install new pole
solar & battery or
Battery only
parker exch wide 3 40 2 161 238 use light pole solar

PARKER PARK SW(PARKER 5)
NEW POLE 9’ TO THE CURB
LOCATION
Loop width length # LOOP
Total Linear Feet of Loops
Cut
Total loop
length
Use of Light Pole or
install new pole
solar & battery or
Battery only
parker park sw 3 21 2 105 140 install pole solar

PARKER HC NORTH (PARKER 10)
TO ELEC. POLE 8’ TO CURB
LOCATION
Loop width length # LOOP loops cut
Total loop length
Use of Light Pole or
install new pole
solar & battery or
Battery only
parker North near Park 3 23 2 113 189 use light pole solar

PARKER HC Entrance (PARKER 8)
Double Loop 30’ TO ELEC POLE
LOCATION
Loop width length # LOOP
loops cut
Total loop
length
Use of Light Pole or
install new pole
solar & battery or
Battery only
parker hc south 3 18 2 93 159 use light pole solar

Parker HC Exit
Double Loop 30’ TO ELEC POLE
LOCATION
Loop width length # LOOP
Total Linear Feet of Loops
Cut
Total loop
length
Use of Light Pole or
install new pole
solar & battery or
Battery only
Parker hc exit 3 18 1 93 141 use light pole solar

BUSH 2
BUSH 1 BUSH 3
BUSH 4 BUSH 5
BUSH 8
BUSH 6 BUSH 7

BUSH TURNPIKE STATION 1300 E. PRESIDENT BUSH HIGHWAY RICHARDSON, TX.
( PARKING LOT IS BETWEEN K AVE AND US 75)
PGBT
UNDER CROSSING PARKING LOTS
BUSH 6 BUSH 7
BUSH 4
K A
VE.
BUSH 5 BUSH 8
BUSH 2 BUSH 1 BUSH 3
N. PRESIDENT GEORGE BUSH HWY ONLY
ONLY N. PRESIDENT GEORGE BUSH HWY

BUSH NC (BUSH 1)
LOCATION
Loop width length # LOOP
Total Linear Feet of Loops
Cut
Total loop
length
Use of Light Pole or
install new pole
solar & battery or
Battery only
bust nc 3 24 2 117 145 mount and
power battery

BUSH 2 (BUSH NE)
LOCATION
Loop width length # LOOP
Total Linear Feet of Loops
Cut Total loop
length
Use of Light Pole or install
new pole
solar & battery or
Battery only
Bush NE 3 24 2 117 145 mount and
power battery

BUSH NW (BUSH 3)
LOCATION
Loop width length # LOOP
Total Linear Feet of Loops
Cut
Total loop
length
Use of Light Pole or
install new pole
solar & battery or
Battery only
bush nw 3 24 2 117 143 mount and
power battery

BUSH SE (BUSH 4)
LOCATION
Loop width length # LOOP
Total Linear Feet of Loops
Cut
Total loop
length
Use of Light Pole or
install new pole
solar & battery or
Battery only
bush se 3 25 2 121 143 mount and
power battery

BUSH SC (BUSH 5)
LOCATION
Loop width length # LOOP
Total Linear Feet of Loops
Cut
Total loop
length
Use of Light Pole or
install new pole
solar & battery or
Battery only
bush sc 3 24 2 117 173 mount and
power battery

BUSH SW(BUSH 8)
LOCATION
Loop width length # LOOP
Total Linear Feet of Loops
Cut
Total loop
length
Use of Light Pole or
install new pole
solar & battery or
Battery only
bush sw 3 24 2 117 158 mount and
power battery

BUSH MID EAST (BUSH 6)
LOCATION
Loop width length # LOOP
Total Linear Feet of Loops
Cut
Total loop
length
Use of Light Pole or
install new pole
solar & battery or
Battery only
bush mid east 3 18 2 93 134 mount and
power battery

BUSH MID WEST(BUSH 7)
light pole 35’ from curb (TBD)
LOCATION
Loop width length # LOOP
Total Linear Feet of Loops
Cut
Total loop
length
Use of Light Pole or
install new pole
solar & battery or
Battery only
bush mid west 3 25 2 121 147 mount and
power battery

ARAPAHO 1
ARAPAHO 2

ARAPAHO STATION 1051 N. GREENVILLE AVE. RICHARDSON, TX.
WOODALL DR.
ARAPAHO 1
ARAPAHO 2
Parking Lot

ARAPAHO 1
Light pole
LOCATION
Loop width length # LOOP loops cut
Total loop length
Use of Light Pole or install
new pole
solar & battery or
Battery only
Arapaho Center 1a 3 28 2 133 254 use light pole solar

ARAPAHO 2
TO ELEC. POLE
LOCATION
Loop width length # LOOP
Total Linear Feet of Loops
Cut
Total loop
length
Use of Light Pole or
install new pole
solar & battery or
Battery only
Arapaho Center 2 3 24 2 117 193 use light pole solar


SPRING VALLEY STATION 100 W. SPRING VALLEY RD. RICHARSON TX
LING
CO
DR
.
W. SPRING VALLEY RD
SPRING 5
SPRING 1
SPRING 2
SPRING 6
SPRING 3
SPRING 4

LINGCO ADJACENT TO STATION
LOCATION
Loop width length # LOOP
Total Linear Feet of Loops
Cut
Total loop
length
Use of Light Pole or
install new pole
solar & battery or
Battery only
spring near n near 3 18 2 93 130 use light pole solar

SPRING S.E
LOCATION
Loop width length # LOOP
Total Linear Feet of Loops
Cut
Total loop
length
Use of Light Pole or
install new pole
solar & battery or
Battery only
spring near n far 3 18 2 93 113 use light pole solar

SPRING FAR NORTH
LOCATION
Loop width length # LOOP
Total Linear Feet of Loops
Cut
Total loop
length
Use of Light Pole or
install new pole
solar & battery or
Battery only
spring far n near 3 18 2 93 118 use light pole solar

SPRING NORTH FAR
LOCATION
Loop width length # LOOP
Total Linear Feet of Loops
Cut
Total loop
length
Use of Light Pole or
install new pole
solar & battery or
Battery only
spring far north 3 18 2 93 114 use light pole solar
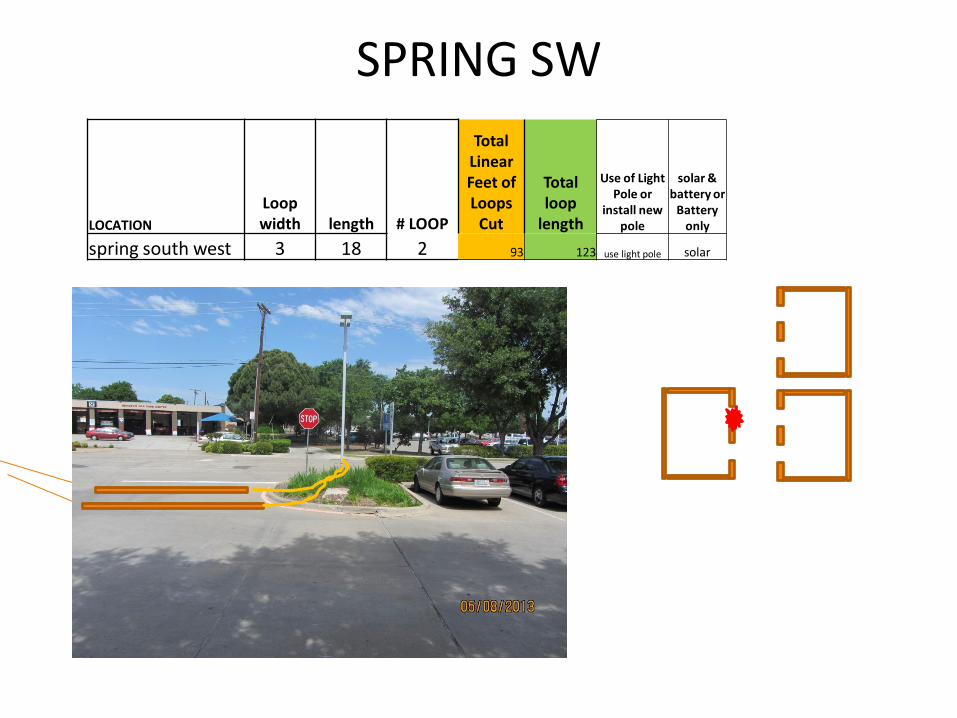
SPRING SW
LOCATION
Loop width length # LOOP
Total Linear Feet of Loops
Cut
Total loop
length
Use of Light Pole or
install new pole
solar & battery or
Battery only
spring south west 3 18 2 93 123 use light pole solar

SPRING VALLEY WEST Driveway
LOCATION
Loop width length # LOOP
Total Linear Feet of Loops
Cut
Total loop
length
Use of Light Pole or
install new pole
solar & battery or
Battery only
spring south east 3 18 2 93 117 use light pole solar

LBJ 1
LBJ 2

LBJ STATION
LBJ
2
LBJ 1
MARKVILLE DR.
8800 Markville Dr. Dallas, TX
Parking Lot

LBJ1
LOCATION
Loop width length # LOOP
Total Linear Feet of Loops
Cut
Total loop
length
Use of Light Pole or
install new pole
solar & battery or
Battery only
LBJ/Central 1 3 30 2 141 192 use light pole solar

LBJ 2
LOCATION
Loop width length # LOOP
Total Linear Feet of Loops
Cut
Total loop
length
Use of Light Pole or
install new pole
solar & battery or
Battery only
LBJ/Central 2 3 10 2 61 115 use light pole solar

step description resource(s) duration dependency Location notes Start Date End Date
in days by step no. TBD
1 Contract authorized by DART AL = Apex Logic
2 Mobilization Invoice Issued 0.5 1 BB = Bryan Baker
3 Project WBS draft completed BB, AL DART = DART
4 Project Kick off A, BB, DART, T 1 1 Dallas (D) T= Telvent
5Lot visit for planning of loops and
polesA, BB, ES, LS 3 1 D
ES = Electical Sub (Power Pro)
6 Reno M2M detector ordered AL 1 1 8 week lead time LS = Driveway Sub
7 Pole locations identified A, BB, ES 3 5 D
8 Loop location determined A, AL 2 5 D A = Apex Technician
9 Loops sizing completed AL, LS 1 5 D D = Dallas
10Draft of Project Specifications
Delivered to TelventAL, BB, T 10 5 C
C = Apex Offices
11 Project Specs approved by Telvent T, AL 2 6 D
12 Subcontractor Agreements AL, ES, LS 2 5 DElectrical and Driveway
Contractors
13 Project Plan submitted to T AL BB 3 11
14 Project Plan approved T 1 13
15 Preformed loops ordered AL 0.5 14 lead time 2 weeks
16
Loop drawings with xy reference
point relative to corner of
entry/exit
A 3 8,9,11 D
17AS BUILT diagrams Secured from
DARTT 2 11 D
Location of irrigation and
other items on to Light
Poles
18Loop and Pole Locations Submitted
to Dig TestAL 2
11 2 day turn around
19 Loop drawings reviewed by LS al 2 16
Planning Phase
Project Work Breakdown – Planning Phase

Project Work Breakdown - Execution step description resource(s) duration dependency Location notes Start Date End Date
in days by step no. TBD
20 Solar power plant ordered AL 1 11 4 weeks
21 Wizard 3 controllers ordered AL 0.5 11 5 week
22 SIM chips (GSM) ordered AL 0.5 11 2 day
23Account Set up Locally in Dallas for
SuppliesAL
11
24 Poles purchased AL 0.5 18,24 D three poles
25 Poles installed ES 3 24 D three poles
26 Controllers arrive at AL office AL, DART, T 35 21 al
27Reno M2M detectors arrive at AL
officeal 56 6 al
28 GSM SIM at AL office al 2 22 al
29
Controllers, Reno detectors, and
SIM staged at AL office (configured
and tested)
al 5 26,27,28 al
30 Preformed Loops arrive in Dallas AL, DART, T 0.5 15 D delivered to Power Pro
31Loop locations painted on
pavementA, LS 3 19 D
32Channel Cut in Driveway and Loops
installedLS 3 31 D steps 32, 33 at same time
33 Loops are tied off at edge of curb ES 3 32 D
34Configured controller system
delivered to DallasAL 3 29 D delivered to Power Pro
35 Solar power plant arrives in Dallas es 20 D delivered to Power Pro
36Solar power plant and controller
installedES 15 33,34,35 D
Steps 44,45,46, 47 run at
same time
37Wiring from curb edge to pole
CompletedES 13 33 D
38 Loops are connected to Controller ES 13 36,37 D
39Physical System powered up and
unit tested 38D
40 Cellular Communications verified AL, ES 2 36 D
41 Installation Invoice Issued AL 1 40 AL
Installation Execution
Installation Preparation

Project Work Breakdown – Acceptance Phase
step description resource(s) duration dependency Location notes Start Date End Date
in days by step no. TBD
42 System commissioned AL 1 39,40 D
43System accepted for testing by
DARTT, DART, AL 2 42 D
44System accepted for turnover to
DARTT, DART, AL 90 43 D
45 Final Invoice Approved by Telvent T 3 44
46 Comm redirected to DART URL AL, DART, T 1 45 Off site
47 Project Completed T, AL 1 46
Acceptance Phase

DART Parking Space Counting System Summary:
The DART Parking Space Counting System tracks the number of vehicles entering and exiting a
parking area, and sends the information to the Schneider-Electric servers for data management
and processing information and displaying the number of available spaces in each parking lot for
the public in real-time.
Concept of Operations
The DART parking system deployed is comprised of the following subsystems and components:
1. Inductive Loops
2. Solar Power system
3. Inductive loop vehicle detector with separate directional AB and BA counters.
4. Open Communications Gateways OCG-D with built-in M2M wizard software
1. Inductive Loops
At each gate inductive loops have been installed. At each entrance and exit at each gate there is
two inductive loops.
Figure 1 Inductive Loops at DART parking entrance

2. Solar Power System
Figure 22. 30 Watt Solar Power System, 12V 58 Amp-hr. Battery and pole mounted cabinet
3. inductive loop vehicle detector with separate directional AB and BA counters.
To avid missed vehicle counts, the “Anti Tailgating” advanced
Detector cards has been installed in the solar powered cabinets
supported by a 2-inch Diameter poles. The Anti tailgating
detectors are the latest technology developed for situation when
parkers are arriving or departing within a close time interval and
will travel very closely to each other. Most regular loop detection
systems fail to count the vehicles with high accuracy. In the case
of this advanced detector card, even The two channel, shelf
mount type, inductive loop vehicle detector with separate
directional AB and BA counters. The detector is designed to
accurately count passenger vehicles, and identify their direction
of travel over two small inductive loops. Standard loop detectors
stop counting vehicles when metal objects are placed in the loop
area.

4. Open Communications Gateways OCG-D with built-in M2M wizard software
The open communications gateways comprise an open Linux development environment and
a fully certified hardware offering that includes multiple interfaces and internal peripherals in
one application-ready end user solution. The M2M wizard controller Applications that
require device networking capability has been embedded directly onto the hardware. The
system provides the html data information and send it to the parking management servers for
further processing and for using the data on different applications such as SmartNet, Eco-
Traffix, 511 etc.
Figure 3 4. Open Communications Gateways OCG-D

Figure 4 Equipment cabinet at each parking entrance

M2M Simplified.™ Innovative Designs, Innovative Solutions.
Benefits• Linux-based open source
software
• Proven hardware for the development and deployment of custom applications
• Cost-effective alternative to custom manufacturing
• Comprehensive service and developer support
The MultiConnect® OCG-D open communications gateways with CoreCDP™ comprise an open Linux development environment and a fully certified hardware offering that includes multiple interfaces and internal peripherals in one application-ready end user solution. Applications that require device networking capability can now be embedded directly onto select Multi-Tech hardware, providing a flexible, quick and cost-effective way to bring your solution to market.
Development Hardware · Application-ready hardware platform
· Includes GPS and cellular modem
· Multiple interfaces available (serial, USB, Ethernet)
· 36-pin GPIO interface
· FCC, IC, UL, PTCRB and R&TTE certified
CoreCDP™ Software · Custom Linux distribution
· Provides complete Linux build environment
· Cross-compile thousands of open source software packages
· Create custom applications in a short period of time
Support · Advanced developer support available
· Established developer community available at www.multitech.net
· Two-year warranty
Deployment Models · Non-cellular, cellular-only and cellular/GPS models available
· Standard and customized deployment models available
· FCC, IC, UL, PTCRB and R&TTE certified
MultiConnect® OCG-DOpen Communications Gateways - Device

Specifications
Models MTCDP-H5 MTCDP-EV2 MTCDP-E1 MTCDP-G2
Environmental†
Physical Description
Certifications
CoreCDP Software Specifications(Version 2.1.0)Linux Kernel 2.6.35.14Utilizes OpenEmbedded frameworkTested with the following Linux OS: Ubuntu 9.10 to 11.04 (recommended), Debian 6 (recommended)
openSUSE 11.4, Fedora Core 12 – 15, CentOS 5.6 & 6Drivers to support all peripherals included on the platform hardware
Notable Software Versions: Python 2.6.6, JamVM 1.5.4 (Java), Perl 5.10.1. Ruby 1.8.7, PHP 5.3.6
A complete list of software versions is available at www.multitech.net
Networking: PPP, iptablesWeb Server: lighttpdRemote shell: SSHDatabase: sqlite3Network file system: sambaSecurity: OpenSSLSoftware Development Kit: MultiConnect SDK

Highlights Custom Application Development and DeploymentThe MultiConnect OCG-D offers customers the opportunity to develop and deploy custom applications on the same product platform. Developer kits include all the hardware, cables and accessories required to develop unique applications. Once complete, deployment models are available for the sale and distribution of the solution within a proven and approved hardware platform.
Linux-Based Open SourceThe MultiConnect OCG-D uses the OpenEmbedded framework as the base to provide a custom Linux distribution, known as CoreCDP. This allows developers to cross-compile thousands of open source software packages and to create custom applications in a very short period of time. In many cases, existing applications can easily be run with little or no modification.
Carrier ApprovedAll MultiConnect OCG-D developer kits and deployment models are PTCRB approved, relieving customers the burden and expense of obtaining these approvals independently. This also provides a faster time-to-market and improved return on investment.
Multiple Interface OptionsThe MultiConnect OCG-D provides the broadest range of interface options, including serial, USB host, and Ethernet, giving customers seamless connectivity to their applications.
GPIOThe 36-pin general purpose input/output connection, which includes SPI, I2C, serial, ADC, and GPS connections, provides multiple ways of interfacing with any application.
Proof of ConceptCustomers planning their own internal custom developments can use the MultiConnect OCG-D to create beta units and prototypes for use in voice of customer and proof of concept activities. These models can be generated quickly and with little additional expense. The input from these activities can improve the feature set of the customer’s final product.
Hardware SpecificationsProcessor & Memory400 MHz ARM9 CPU256MB NAND flash64MB SDRAM2GB industrial grade SD Flash Card (included)
Internal PeripheralsRTC (Real Time Clock)Dedicated GPS receiverCellular modem Debug 3 pin serial console portTemperature sensor
ConnectionsLAN: RJ-45, 10/100BaseTRS-232 Data: DB-9 female, 921.6K bps max serial speedGSM/GPS Antenna: 50 ohm SMA femalePower: 2.5mm miniature screwSIM: Standard 1.8V & 3V SIM receptacleUSB Host: USB 2.0 Full Speed (12 Mbps) Host connector USB Device: USB 2.0 Full Speed (12 Mbps) mini-B device connector
GPIO: 36-pin Molex connectionSD Memory Flash Card: SD memory card slot
GPIO Functions:*Pins 1-9: General Purpose Input
Pins 10-14: Analog InputPins 15-24: General Purpose Output
Pins 25-29: SPI
Pins 30-31: DebugPin 32: GPS PPSPins 33-34: I2CPin 35: No ConnectPin 36: Ground (SPI, I2C, Serial)
* For more specifications on GPIO functionality, visit www.multitech.net
InterfacesGeneral Purpose LEDs: Power, Cellular Link Status, Ethernet Link, & Speed
Programmable LEDs: 5 user-defined, application-specific LEDsShort Message Services - SMSText & PDUPoint-to-Point (MO/MT)
GPSPosition: 2.5 metersAcquisition: Hot start 1 second; cold start 29 seconds avg.Sensitivity: Tracking -161 dBmProtocol: NMEA-0183 V3.01, GGA, GLL, GSA, GSV, RMC, VTG
Power RequirementsInput Power: 9 to 32VDC

Services & WarrantyMulti-Tech’s comprehensive Support Services programs offer a full array of options to suit your specific needs. These services are aimed at protecting your investment, extending the life of your solution or product, and reducing total cost of ownership. Our seasoned technical experts, with an average tenure of more than 10 years, can walk you through smooth installations, troubleshoot issues and help you with configurations. Products include a 2-year warranty that can be extended up to 5 years via Multi-Tech’s Extended Warranty program, which offers the convenience of Overnight Service* for optimal uptime.
Extended Warranty & Overnight ServicesTo give you peace-of-mind and protect your investment, our Extended Warranty Service Plans ensure your Multi-Tech products are covered for 1, 2, or 3 years beyond the manufacturer’s warranty with an optional Overnight Service plan*.
Installation SupportMulti-Tech’s Installation Support Service delivers priority service with the ability to work one-on-one with an experienced Multi-Tech technical support engineer, to guide you through the installation process for our products.
Technical Support ServicesAt Multi-Tech, we’re committed to providing you personalized attention and quality service while providing you a quick response to your product support needs. We have several options of support for you to choose from.
For additional information on Support Services as well as other service offerings, please contact your Multi-Tech representative or visit www.multitech.com/support.go.
* Overnight replacement service is currently available for U.S. customers.
World HeadquartersMulti-Tech Systems, Inc. 2205 Woodale Drive Mounds View, MN 55112 U.S.A. Tel: 763-785-3500 Toll-Free: 800-328-9717 Email: [email protected] www.multitech.com
EMEA HeadquartersMulti-Tech Systems (EMEA) Unit 1, Thames Court 2 Richfield Avenue Reading, Berkshire RG1 8EQ United Kingdom Tel: +(44) 118 959 7774 Email: [email protected]
Ordering InformationDeveloper KitsDeveloper kits include: Modem with GPS receiver, universal power supply, GSM/GPS antenna, GPIO cable, serial debug cable, Ethernet cable, RS-232 cable, compact flash, USB cables, DVD, and screwdriver.Product Description RegionMTCDP-H5-GP-DK-1.0 3G, HSPA+ Developer Kit GlobalMTCDP-EV2-GP-N2-DK-1.0 3G, EV-DO (Sprint) Developer Kit USAMTCDP-EV2-GP-N3-DK-1.0 3G, EV-DO (Verizon Wireless) Developer Kit USAMTCDP-EV2-GP-N3-DK-1.0-NP‡ 3G, EV-DO (nPhase/Verizon Wireless) Developer Kit USAMTCDP-EV2-GP-N16-DK-1.0 3G, EV-DO (Aeris Communications) Developer Kit USAMTCDP-E1-GP-DK-1.0 2.5G, EDGE Developer Kit GlobalMTCDP-G2-GP-DK-1.0 2G, GPRS Developer Kit GlobalMTCDP-GP-DK-1.0 Non-Cellular Developer Kit Global
Deployment Models (includes GPS receiver)*Deployment models are modem only. All accessories are sold separately.Product Description RegionMTCDP-H5-GP-1.0 3G, HSPA+ Deployment Model GlobalMTCDP-EV2-GP-N2-1.0 3G, EV-DO (Sprint) Deployment Model USAMTCDP-EV2-GP-N3-1.0 3G, EV-DO (Verizon Wireless) Deployment Model USAMTCDP-EV2-GP-N3-1.0-NP‡ 3G, EV-DO (nPhase/Verizon Wireless) Deployment Model USAMTCDP-EV2-GP-N16-1.0 3G, EV-DO (Aeris Communications) Deployment Model USAMTCDP-E1-GP-1.0 2.5G, EDGE Deployment Model GlobalMTCDP-G2-GP-1.0 2G, GPRS Deployment Model GlobalMTCDP-GP-1.0 Non-Cellular Deployment Model Global
Deployment Models*Deployment models are modem only. All accessories are sold separately.Product Description RegionMTCDP-H5-1.0 3G, HSPA+ Deployment Model GlobalMTCDP-EV2-N2-1.0 3G, EV-DO (Sprint) Deployment Model USAMTCDP-EV2-N3-1.0 3G, EV-DO (Verizon Wireless) Deployment Model USAMTCDP-EV2-N3-1.0-NP‡ 3G, EV-DO (nPhase/Verizon Wireless) Deployment Model USAMTCDP-EV2-N16-1.0 3G, EV-DO (Aeris Communications) Deployment Model USAMTCDP-E1-1.0 2.5G, EDGE Deployment Model GlobalMTCDP-G2-1.0 2G, GPRS Deployment Model GlobalMTCDP-1.0 Non-Cellular Deployment Model Global
Developer SupportFor developers needing dedicated support, Multi-Tech offers a fee-based support option. Advanced Developer Support provides assistance with software issues, the porting of or cross-compiling of applications, use of peripherals, and much more.Product Description RegionCDPS-5 Developer Support - 5 hours GlobalCDPS-25 Developer Support - 25 hours Global
AccessoriesMTOCG-BOB-DK GPIO Cable and Break-out BoardCA-CDP-GPIO 36-pin, General Purpose Input/Output Cable (open ended)PS-9VCB-LBC-U-Global 100 - 240V 9V-1.7A changeable blade power supply with three interchangeable blades (U.S., Euro, UK)
ANGSM-GPS-1MM GSM/GPS Combination Antenna, 9.8 feet (3 meters)CA-CDP-DEBUG 3-Pin, Serial Debug Cable, 6 feet (1.8 meters)CA9-9-D RS-232 Cable, DB9F-DB9M, 6 feet (1.8 meters)CA-RJ-45 RJ45 (CAT5E, 10/100 Mbps) Cable, 6 feet (1.8 meters)CA-USB USB A/B Cable, 4.9 feet (1.5 meters)CA-USB-A-MINI-B USB A-to-Mini-B Cable, 3.9 feet (1.2 meters)
* Custom deployment options available. Contact your Multi-Tech Systems representative for details.
‡ Available through Authorized nPhase ONE Developers.

Model DL-ATG Op Instr 2009 09 21 P/N 551-4300-00
1
2
MODEL DL-ATG
TWO CHANNEL ANTI-TAILGATING LOOP DETECTOR
OPERATING INSTRUCTIONS
I General
The model designation indicates the number of lanes covered by each loop.
Model DL-ATG-x
1 = Single Lane
2 = Two Lane
The Model DL-ATG is a two channel detector designed to accurately count vehicles and identify their direction of travel over two
small inductive loops, even if they are tailgating. Please note that the Model DL-ATG has been specifically designed and tested to
count and/or identify passenger vehicles.
The Model DL-ATG accumulates directional vehicle counts that are displayed on the front panel Liquid Crystal Display (LCD). The
Model DL-ATG has 4 relay outputs; 2 for loop presence, 1 for counting in the AB direction, and 1 for counting in the BA direction.
Prior to initial operation, the Model DL-ATG detector must be calibrated. Connect the detector to an appropriately wired harness
and apply power. Follow the instructions outlined under Calibration on page 2 to calibrate the detector.
II Controls
i Push Buttons
A B Count
When pressed the LCD screen displays the number of vehicles that have traveled over the loops in the AB direction. This
accumulator is capable of accumulating up to 99,999 directional counts. The display will show the hundreds, tens, and ones digits
until the accumulated count exceeds 999. At this point the display will alternate between the ten thousands and thousands digits and
the remaining three digits for hundreds, tens, and ones. Loss of power will not reset this number. The AB accumulator is indicated
by the symbol on the bottom of the LCD screen.
B A Count
When pressed the LCD screen displays the number of vehicles that have traveled over the loops in the BA direction. This
accumulator is capable of accumulating up to 99,999 directional counts. The display will show the hundreds, tens, and ones digits
until the accumulated count exceeds 999. At this point the display will alternate between the ten thousands and thousands digits and
the remaining three digits for hundreds, tens, and ones. Loss of power will not reset this number. The BA accumulator is indicated
by the symbol on the bottom of the LCD screen.
Count Reset
When pressed, both AB and BA Count accumulators are reset to zero.
Loop Fail
When pressed, the LCD screen displays the count of past failures for each loop. The LCD will display the text “LOOP FAIL” and a
channel indicator icon for Channel A or for Channel B. These numbers reset to 0 for both channels on power down, or when
Detector Reset is pressed.
Diagnostics When pressed the LCD screen continuously displays the Loop Inductance value L= in microhenries (µH). When a vehicle is detected
the LCD displays the percentage of inductance change -ΔL/L= value. When this feature is activated a single audible beep sounds for
vehicles traveling in the AB direction. A double audible beep sounds for vehicles in the BA direction. Pressing the Diagnostics
button again while viewing Diagnostics will toggle between Channel A and Channel B. This Diagnostic display will turn OFF after
15 minutes and return to the AB Count display.
Detector Reset
When pressed both channels are reset. Detector Reset will clear the loop fail accumulators, and any prior loop fail indication.
Detector Reset does not reset the count accumulators.
2 1
Reno A&E 4655 Aircenter Circle
Reno, NV 89502-5948 USA
Telephone: (775) 826-2020
Fax: (775) 826-9191
Website: www.renoae.com
E-mail: [email protected]
1

Model DL-ATG Op Instr 2009 09 21 P/N 551-4300-00
III Loop Orientation
i DL-ATG-1
The DL-ATG-1 version of the detector accurately counts directional vehicles in a single lane of traffic with loop spacing of 8 feet from
leading edge to leading edge. Loop spacing may vary from a minimum of 2 feet from leading edge to leading edge (overlapping by
six inches) to a maximum of 12 feet from leading edge to leading edge. Count accuracy at high speed (30 mph) decreases as you
approach the minimum and maximum loop spacing. Vehicles must span both loops to be counted.
Typical loop size is 2.5 feet x 6 feet. The loop size can vary from 2 feet to 4 feet in the direction of travel and 5 feet to 7 feet across
the lane. The loop should have three (3), four (4), or five (5) turns of wire. The detector operates most effectively when each channel
is connected to a single loop. Connecting multiple loops to a single channel is not recommended.
ii DL-ATG-2
The DL-ATG-2 version of the detector accurately counts directional vehicles in two lanes of traffic with loop spacing of 8 feet from
leading edge to leading edge. Loop spacing may vary from a minimum of 2 feet from leading edge to leading edge (overlapping by
0.5 feet) to a maximum of 12 feet from leading edge to leading edge. Count accuracy at high speed (30 mph) decreases as you
approach the minimum and maximum loop spacing. Vehicles must span both loops to be counted.
Typical loop size is 2.5 feet x 18 feet. The loop size can vary from 2 feet to 4 feet in the direction of travel and 12 feet to 24 feet
across the lane. The loop should have two (2), three (3), or four (4) turns of wire. The detector operates most effectively when each channel is connected to a single loop. Connecting multiple loops to a single channel is not recommended.
IV Calibration
Calibrating the detector will automatically select the proper frequency and sensitivity for each channel. The detector ships from the
factory ready to be calibrated for first time use. Once power is applied and there are no loop failure indications, the LCD displays
CAL. To calibrate the detector, place the Reno A&E Calibration Loop (not included with the detector) on the ground at least two feet
away from the inductive loop. Slowly drag the calibration loop over the entire detection area of the inductive loops. The calibration is
finished when the calibration loop has been detected over both channels and there is no presence detected on the loops for
approximately five (5) seconds. Once the calibration process has successfully been completed, the display will revert from CAL to
Count AB. Please note that once the calibration process has been initiated there is no way to cancel the calibration procedure. To
enter into calibration mode after initial calibration, press and hold the Detector Reset button for 10 seconds until the LCD Display
reads CAL.
NOTE: Proper calibration is essential for accurate detection of tailgating vehicles. It is critical that vehicles do not pass over the
inductive loop while calibration is in progress.
V Loop Fail
Any time a channel failure occurs the LCD Display will indicate what type of failure has occurred on the channel. The LCD wil l
display L lo for low loop inductance and shorted loop situations or L hi for high loop inductance and open loop situations. When
there is a failure on both channels the display will toggle between the channels every 5 seconds displaying the fail status of each
channel. Upon failure, the presence Output Relay for that channel will enter into the Fail Safe Mode, indicating presence on that
channel. In addition to the LCD display indication, and the Presence Output Relay, the corresponding channel’s Presence LED will
flash three flashes per second. If the loop self-heals, the Presence Relay and LCD will resume normal operation while the LED will
continue to flash until the loop fail register is cleared by a Detector Reset or by cycling power.
VI Pin Connections
(Reno A&E Wiring Harness Model 804)
Pin Wire Color Function
A White Power, Neutral, 120 VAC
B Gray/Black BA Count, Relay Common
C Black Power, Line, 120 VAC
D Brown Channel A Loop Input
E White/Brown Channel A Loop Input
F Red Channel B Loop Input
G White/Red Channel B Loop Input
H Green Chassis Ground
J Orange No Connection
K White/Orange No Connection
L Yellow No Connection
M White/Yellow No Connection
N White/Blue Channel A Presence, Relay Normally Open
P Blue Channel A Presence, Relay Common
R Violet AB Count, Relay Common
S White/Violet AB Count, Relay Normally Open
T Gray Channel B Presence, Relay Common
U White/Gray Channel B Presence, Relay Normally Open
V White/Black BA Count, Relay Normally Open
NOTE: All pin connections listed above are with power applied, loop connected, and no vehicle detected.
To calibrate the detector, drag the calibration loop over the entire detection area of the inductive loops with CAL on.
Calibration Loop
Inductive Loops

SCALE:
1
E1.1NTS
NOTE: WIRING DIAGRAM IS SUGGESTED PRACTICE ONLY. REFER TO INSTALLATION MANUALS FOR PROPER INSTALLATION PROCEDURES AND WIRING FOR ALL COMPONENTS. IT IS RESPONSIBILITY OF INSTALLER TO MEET ALL CODES APPLICABLE TO THE INSTALLATION OF THIS SYSTEM.

SCALE:
1
E2.1NTS
NOTE: WIRING DIAGRAM IS SUGGESTED PRACTICE ONLY. REFER TO INSTALLATION MANUALS FOR PROPER INSTALLATION PROCEDURES AND WIRING FOR ALL COMPONENTS. IT IS RESPONSIBILITY OF INSTALLER TO MEET ALL CODES APPLICABLE TO THE INSTALLATION OF THIS SYSTEM.

SCALE:
1
S1.1NTS
NOTE: WIRING DIAGRAM IS SUGGESTED PRACTICE ONLY. REFER TO INSTALLATION MANUALS FOR PROPER INSTALLATION PROCEDURES AND WIRING FOR ALL COMPONENTS. IT IS RESPONSIBILITY OF INSTALLER TO MEET ALL CODES APPLICABLE TO THE INSTALLATION OF THIS SYSTEM.

Estimate
Date04/23/13
Estimate No.TV-001
Name/AddressTelvent USA, LLC1390 Piccard Drive,Suite 200Rockville, MD 20850
ProjectDART
Item Description Quantity Cost TotalWizard - SolarLoop ATG
GSM/Java 3G Controller, Detection Software, AntiTailgating Detection System, GSM/GPS Antenna, 50Watt Solar Power System, NEMA 4X, Battery,Charger.
28 4,500.00 126,000.00
Inductive Loop Inductive Loop 56 140.00 7,840.00Deployment Design and Commissioning 28 350.00 9,800.00Deployment Estimated Loop Installation 26 1,200.00 31,200.00Supplies Miscellaneous Parts and Supplies 26 400.00 10,400.00GSM DataService
Three (3) months of AT&T GSM Wireless Data Relayand Data Collection - Telvent Interface. Convert toTelvent after Three (3) months.
28 45.00 1,260.00
GSM DataService
Discount GSM Wireless Data 28 -45.00 -1,260.00
Deployment Estimated Shipping, Handling, and Out of PocketExpenses
14,260.00 14,260.00
Warranty -Contract
One year warranty on equipment and software percontract terms. Warranty covers repairs andreplacement of components unless damaged byvandalism, abuse, accidents, acts of God, or othercauses outside of normal use and operation.
0.00 0.00T
0.00 0.00
Total
P. O. Box 5673 • Incline Village, NV 89450-5673
301-657-4444 • Fax: 301-657-4454
$199,500.00