data acquisition over ethernet using serial device …dnoff/prltn/technical note t a rajesh...
TRANSCRIPT
Data Acquisition over
Ethernet using Serial Device
Server - NPort 5210
PRL-TN-2010-96

Data Acquisition over
Ethernet using Serial Device
Server - NPort 5210
PRL-TN-2010-96


Introduction 1
Serial Device Server - NPort 5210 1
Windows Socket API 2
Configuration of NPort 5210 3
Implementation and Layout 3
Application case study 3
Summary 5
Acknowledgement 5
Bibliography 5
Appendix-A: Flowchart 6
Appendix-B: Screen Shots 7
Appendix-C: VB6.0 Source Code 8

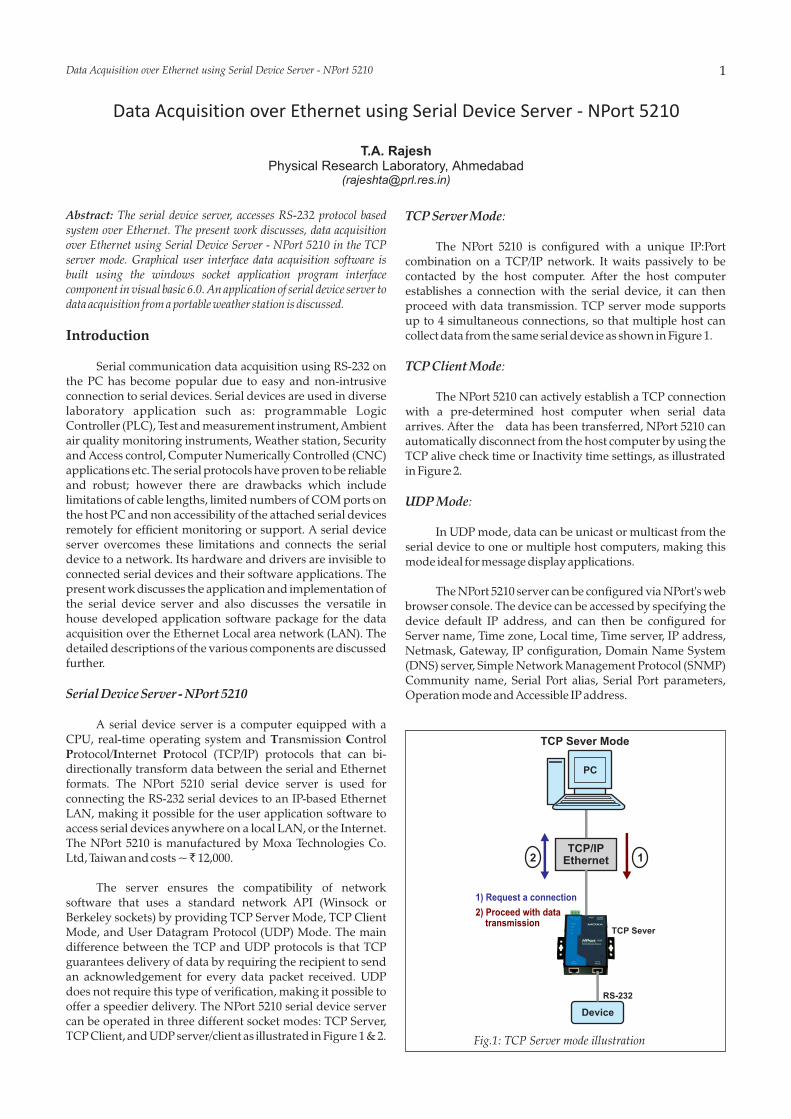
TCP Server Mode:
The NPort 5210 is configured with a unique IP:Port combination on a TCP/IP network. It waits passively to be contacted by the host computer. After the host computer establishes a connection with the serial device, it can then proceed with data transmission. TCP server mode supports up to 4 simultaneous connections, so that multiple host can collect data from the same serial device as shown in Figure 1.
TCP Client Mode:
The NPort 5210 can actively establish a TCP connection with a pre-determined host computer when serial data arrives. After the data has been transferred, NPort 5210 can automatically disconnect from the host computer by using the TCP alive check time or Inactivity time settings, as illustrated in Figure 2.
UDP Mode:
In UDP mode, data can be unicast or multicast from the serial device to one or multiple host computers, making this mode ideal for message display applications.
The NPort 5210 server can be configured via NPort's web browser console. The device can be accessed by specifying the device default IP address, and can then be configured for Server name, Time zone, Local time, Time server, IP address, Netmask, Gateway, IP configuration, Domain Name System (DNS) server, Simple Network Management Protocol (SNMP) Community name, Serial Port alias, Serial Port parameters, Operation mode and Accessible IP address.
Abstract: The serial device server, accesses RS-232 protocol based system over Ethernet. The present work discusses, data acquisition over Ethernet using Serial Device Server - NPort 5210 in the TCP server mode. Graphical user interface data acquisition software is built using the windows socket application program interface component in visual basic 6.0. An application of serial device server to data acquisition from a portable weather station is discussed.
Introduction
Serial communication data acquisition using RS-232 on the PC has become popular due to easy and non-intrusive connection to serial devices. Serial devices are used in diverse laboratory application such as: programmable Logic Controller (PLC), Test and measurement instrument, Ambient air quality monitoring instruments, Weather station, Security and Access control, Computer Numerically Controlled (CNC) applications etc. The serial protocols have proven to be reliable and robust; however there are drawbacks which include limitations of cable lengths, limited numbers of COM ports on the host PC and non accessibility of the attached serial devices remotely for efficient monitoring or support. A serial device server overcomes these limitations and connects the serial device to a network. Its hardware and drivers are invisible to connected serial devices and their software applications. The present work discusses the application and implementation of the serial device server and also discusses the versatile in house developed application software package for the data acquisition over the Ethernet Local area network (LAN). The detailed descriptions of the various components are discussed further.
Serial Device Server - NPort 5210
A serial device server is a computer equipped with a CPU, real-time operating system and Transmission Control Protocol/Internet Protocol (TCP/IP) protocols that can bi-directionally transform data between the serial and Ethernet formats. The NPort 5210 serial device server is used for connecting the RS-232 serial devices to an IP-based Ethernet LAN, making it possible for the user application software to access serial devices anywhere on a local LAN, or the Internet. The NPort 5210 is manufactured by Moxa Technologies Co. Ltd, Taiwan and costs ~ ̀ 12,000.
The server ensures the compatibility of network software that uses a standard network API (Winsock or Berkeley sockets) by providing TCP Server Mode, TCP Client Mode, and User Datagram Protocol (UDP) Mode. The main difference between the TCP and UDP protocols is that TCP guarantees delivery of data by requiring the recipient to send an acknowledgement for every data packet received. UDP does not require this type of verification, making it possible to offer a speedier delivery. The NPort 5210 serial device server can be operated in three different socket modes: TCP Server, TCP Client, and UDP server/client as illustrated in Figure 1 & 2.
Data Acquisition over Ethernet using Serial Device Server - NPort 5210
Data Acquisition over Ethernet using Serial Device Server - NPort 5210
Fig.1: TCP Server mode illustration
TCP Sever Mode
2
1) Request a connection
2) Proceed with data transmission
TCP Sever
RS-232
Device
TCP/IPEthernet 1
PC

Fig.2: TCP Client and UDP operating mode illustrations
TCP Sever Mode
2
1) Request a connection
2) Proceed with data transmission
TCP Sever
RS-232
Device
TCP/IPEthernet 1
PC
UDP Mode
Directly proceed with datatransmission
RS-232
Device
TCP/IPEthernet
PC
Data Acquisition over Ethernet using Serial Device Server - NPort 5210
Specifications of NPort 5210:
LANEthernet 10/100 Mbps, RJ45Serial InterfaceRS-232 port x 2 (RJ45 8-pin)RS-232 Signals TxD, RxD, RTS, CTS, DTR, DSR, DCD, GNDProtectionSerial Line 15 KV ESD for all signalsPower Line 4 KV Burst & 2 KV SurgeBuilt-in FeaturesBuzzer, Real Time Clock,Watch Dog TimerSerial Communication ParametersParity None, Even, Odd, Space, Mark Data Bits 5, 6, 7, 8Stop Bit 1, 1.5, 2Flow Control RTS/CTS, XON/XOFFSpeed 50 bps to 230.4 KbpsPower RequirementPower Input Unregulated 12 to 30 VDCEnvironmentalOperating Temperature 0 to 55°C, Humidity 5 to 95% RH
Windows Socket APIWindows Socket (WinSock), an Application Program Interface (API) defines how network software should access network services. It is a library of functions and routines that all Windows programs use when they want to access the TCP/IP protocol. These routines reside in a Dynamic Link Library (DLL) that runs under Windows. Windows operating system comes with WINSOCK.DLL and WSOCK32.DLL files for 16-bit and 32-bit applications, respectively. It is used for developing the programs that can communicate with other network devices via TCP/IP protocol. Winsock runs between an application program and the Internet program that uses TCP/IP protocol. A request flows in the following order:
Winsock enables to create clients and servers using the same
control. This dual functionality is specified through property
setting the type of application to be built. Some of the
important properties of the control are as follows:
1. BytesReceived Property This property returns the
number of bytes currently in the receive buffer. This is a read-
only property and the value returned is a long integer.
2. LocalHostName Property The LocalHostName
property returns the name of the local host system. This is a
read-only property and the value returned is a string.
3. LocalIP Property The LocalIP property returns the local
host system IP address in the form of a string, such as
172.16.6.166. This property is read-only.
4. LocalPort Property This property returns or sets the
local port number. This can be both "read from" and "written
to" and the value returned is a long integer.
5. Protocol Property Returns or sets the protocol, either
TCP or UDP, used by the Winsock control.
6. RemoteHost Property The RemoteHost property
returns or sets the remote host. This can be both "read from"
and "written to" and the value returned is a string and can be
specified either as an IP address or as a DNS name.
7. RemotePort Property This property returns or sets the remote port number.
8. State Property This returns the state of the control as expressed by an enumerated list. This is a read-only property.Some of the important methods of Winsock control are as follows:
1. Accept Method It accepts the request for connection from the client system. For this method to be used, the control must be in the listening state.
2. Close Method The Close method terminates a TCP
Application
Winsock.dll
TCP/IP layer
Network interface card
Destination

connection from either the client or server applications.
3. GetData Method GetData is the method that retrieves the current block of data from the buffer and then stores it in a variable of the variant type.
4. PeekData Method The PeekData method operates in a fashion similar to the GetData method. However, it does not remove data from the input queue.
5. Listen Method This is invoked on the server application to have the server application wait for a TCP request for connection from a client system.
6. SendData Method This method dispatches data to the remote computer. It is used for both the client and server systems.
7. Connect Method The Connect method requests a connection to a remote computer.
Configuration of Nport 5210
The device can be configured through NPort 5200 Administration Suite, ARP, Web Console, Telnet Console or Serial Console. In order to configure the device the computer and NPort 5210 must be connected to the same local area network. The NPort 5200 administration suite consists of useful utility programs that are used to configure and manage the NPort 5210 device server. The web console is the user-friendliest method to configure NPort 5210. The present NPort 5210 settings are listed belowServer name :NP5210_WSConfiguration Console :Web, TelnetIP address :172.16.6.166Netmask :255.255.255.0IP configuration :StaticPort #1 Interface :RS 232Port #1 Setting :9600, N, 8, 1, RTS/CTSPort #2 Interface :RS 232Port #2 Setting :9600, N, 8, 1, RTS/CTSPort 1 operating mode :TCP Server modePort 1 local TCP port : 4001Port 2 operating mode :TCP Server modePort 2 local TCP port : 4002
Implementation and Layout
The serial device server NPort 5210 with IP address '172.16.6.166' is connected to the PRL LAN through a 10/100M Ethernet port. The serial device to be remotely accessed is interfaced with the P1 or P2 RS-232 port of the server and the NPort 5210 is accessed through a PC from the LAN, as shown in Figure 3.
The graphical user interface (GUI) was designed and developed in Visual Basic (VB6.0), which is an event-driven Object-Oriented programming language. The serial device server NPort 5210 is interfaced to GUI over Ethernet using Winsock dynamic link library. The physical data acquisition from any device is implemented via 'timer' event of the Visual Basic programming language. The data acquisition setup data like NPort IP address, NPort RS232 port ID, Data request command, Data polling interval and the data log file prefix are accessed from an
ASCII file “NPort5210setup.txt” into the respective modules; this is done using the intrinsic file input-output features of the Visual basic.
The GUI software can be executed after the proper installation of the data acquisition hardware. When the software is executed for the first time, all the input fields are blank. The user has to enter or select the appropriate settings and then save the setting. This makes the GUI ready and loaded with the setup file parameters. The NPort 5210 device connection request is generated from the GUI. After successful connection, the data acquisition can be initiated. The flowchart is shown in appendix 'A'. The various screen shots are shown in appendix 'B'. The GUI software has six command button-based modules as described below;
Data Acquisition over Ethernet using Serial Device Server - NPort 5210
1. Edit Setup: The setup parameters like NPort 5210 IP address, NPort 5210 RS232 port ID, Data request command, Data polling interval and the data log file prefix can be set as per the user requirement through [Edit Setup] button as shown in appendix B Figure 6.
2. Save Setup: The setup parameters are stored to an ASCII file 'NPort5210setup.txt' and can be executed through the [Save Setup] button as shown in appendix B Figure7.
3. Connect: The serial device server NPort 5210 is virtually connected to the GUI software over the Ethernet. The RS232 port of the NPort 5210, which is interfaced to the data communication equipment, is virtually connected to the data terminating equipment. The GUI to device connection is activated through the [Connect] button as shown in appendix B Figure 8.
4. Start Acquisition: The data from the specific equipment can be polled and accessed after the request through the configured data request command. The data acquisition is started through [Start Acquisition] button as shown in appendix B figure 9. The screen shot of the GUI during real time data acquisition mode is shown in appendix B Figure 10.
5. Stop Acquisition: The data acquisition can be halted through [Stop Acquisition] button keeping the NPort 5210 connection alive as shown in appendix B Figure 10.
6. Exit: The application can be properly terminated through [Exit] button as shown in appendix B Figure 10.
Application – case study: Weather Station Interface
A Capricorn 2000 portable Weather Station has been installed over the PRL Purchase department building. The schematic of the weather station interface is shown in Figure 4. The weather station consists of sensors for temperature, relative humidity, barometric pressure, wind speed and wind direction. The details are given in table 1.
Fig.3: Serial device server implementation schematic
NPort 5210 PC
LAN
Serial Device

Data Acquisition over Ethernet using Serial Device Server - NPort 5210
Fig.4: Weather station data acquisition schematic
NPort-5210
Data acquisition
software running in
Aerosol monitoring Lab
(#670b)
Portable Capricorn
2000 Weather Station,
installed over the PRL
Purchase building
PRN LAN
Range
-67° to 257°F
0 to 100%RH
27 to 33.96 in. Hg
0 to 125 mph
360 degrees
Resolution
0.01°F
1%RH
0.01 in. Hg
1 mph
-
Sensor
Temperature
RH
Pressure
Wind Speed
Wind direction
Type
Digital semiconductor
Capacitance
Silicon shear stress gauge
Chopping disc anemometer
Wind vane
Table 1: Weather station sensors specifications
Fig.5: Weather station ASCII data file

Data Acquisition over Ethernet using Serial Device Server - NPort 5210
All these sensors data are interfaced to the weather station control module, which sends the multiplexed data in the RS 232 format. The weather station control module is interfaced to the NPort 5210 serial port. The NPort 5210 is configured to operate in the TCP server mode. The data acquisition software runs on a PC in the sixth floor Aerosol Monitoring Lab (#670b), which accesses the weather data over the Ethernet at the programmed polling interval. The software saves the acquired data in ASCII file format on a daily basis. Every 5s weather data, logged in the format “date, time, temperature, pressure, humidity, wind speed, wind direction” is shown in Figure 5.
Summary
The described utility software package along with NPort 5210 serial device server can be used for data acquisition of the desired instrument or the device connected to serial device server through RS 232 interface. The user can configure the device address and data polling command as per requirement. The data can be logged and saved for the instantaneous value, as programmed by the user. It is a user-friendly windows package to be used with NPort 5210 serial device server. The program checks for the hardware status. The program in the distribution form is available with the author for any user.
Acknowledgement
I am thankful to the members of the Space and Atmospheric Sciences Division of PRL who helped in this work.
Bibliography
1. Visual Basic 6 Programming Black Book, Steven Holzner
2. Visual Basic 6 Programming Bible, Eric A Smith and others
3. Mastering Visual Basic 6, Evangelos Petroutsos
4. Visual Basic 6 Desktop Applications, Michael Mckelvy
5. www.advantech.com/products
6. www.msdn.microsoft.com/vbasic
7. www.devarticles.com/c/b/Visual-Basic
8. www.fredshack.com/docs/inno.html
9. Visual Basic 6.0 Internet Programming, Carl Franklin
10. www.moxa.com

Data Acquisition over Ethernet using Serial Device Server - NPort 5210
Appendix: A – Flowchart
GUI form with user input paramenters
Exit
No CheckSetup file
YesEdit Setup(IP address, RS232port, Command,Polling Interval)
Acquire, Validate,Process & Long Data
CheckInstrument
Interface
CheckDevice
Connection
Load Setup file
No
No
Yes
Yes
Display Status

Data Acquisition over Ethernet using Serial Device Server - NPort 5210
Appendix: B – Screen Shots
Fig.6: Screen for setting device parameters in edit mode Fig.9: Screen for device connection mode
Fig.8: Screen with device parameters in ready mode
Fig.7: Screen with device parameters in save mode Fig.10: Screen during Real time acquisition mode
Data Acquisition over Ethernet using Serial Device Server - NPort 5210
Appendix: C – VB6.0 Source code
'//Private and public variable declaration//Private Declare Sub Sleep Lib "kernel32" (ByVal dwMilliseconds As Long)Public fnum As IntegerPrivate setup(0 To 5), retval, filename As StringPrivate i As Integer
'//Exit application//Private Sub Command1_Click()Winsock1.CloseEndEnd Sub
'// Connect GUI to NPort 5210 device//Private Sub Command2_Click() 'connectWinsock1.Protocol = sckTCPProtocol '//Set protocol//Winsock1.RemoteHost = Trim$(Text1.Text) '"172.16.6.166"Select Case Trim$(Combo1.Text)Case "P1"Winsock1.RemotePort = 4001Case "P2"Winsock1.RemotePort = 4002End SelectWinsock1.ConnectCommand5.Enabled = FalseEnd Sub
'//Enable data acquisition//Private Sub Command3_Click()Timer1.Interval = Val(Trim$(setup(3))) * 1000Timer1.Enabled = TrueCommand4.Enabled = TrueCommand3.Enabled = FalseCommand5.Enabled = FalseEnd Sub
'//Halt data acquisition//Private Sub Command4_Click()
Timer1.Enabled = FalseCommand3.Enabled = TrueCommand4.Enabled = FalseCommand5.Enabled = TrueLabel2(9).Visible = FalseLabel3.Caption = vbNullStringEnd Sub
'//Enable setup edit mode//Private Sub Command5_Click()Frame1.Enabled = TrueCommand6.Visible = TrueEnd Sub
'//Save setup in NPort5210setup.txt file//Private Sub Command6_Click()fnum = FreeFileOpen "C:\NPort5210setup.txt" For Output As fnumWrite #fnum, Text1.Text, Combo1.Text, Text2.Text, Combo2.Text, Text3.Text, Check1.ValueClose fnumCommand6.Visible = FalseFrame1.Enabled = FalseForm1.RefreshEnd Sub
'//Load form - initialise & load default setup//Private Sub Form_Load()
Command4.Enabled = FalseFrame1.Enabled = FalseCommand6.Visible = FalseLabel2(9).Visible = Falsei = 0Dim strData As StringDim rbuf As Stringfnum = FreeFileretval = Dir$("C:\NPort5210setup.txt")'//Check the existence of the file//If retval = "NPort5210setup.txt" ThenOpen "C:\NPort5210setup.txt" For Input As fnumDo Until EOF(fnum)Input #fnum, setup(i)i = i + 1LoopClose fnum
'//Load setup//Text1.Text = setup(0) ' IP AddressCombo1.Text = setup(1) ' RS232 PortText2.Text = setup(2) ' CommandCombo2.Text = setup(3) ' IntervalText3.Text = setup(4) ' file prefixCheck1.Value = setup(5) ' CREnd IfEnd Sub
'//Timer Interrupt - request for data//Private Sub Timer1_Timer()filename = setup(4) + Mid$(Date, 1, 2) + Mid$(Date, 4, 3) + Mid$(Date, 8, 4) + ".txt"Select Case setup(5)Case "1"Winsock1.SendData Trim$(Text2.Text) & Chr$(13)Case "0"Winsock1.SendData Trim$(Text2.Text)End SelectLabel1.Caption = DateLabel4.Caption = TimeLabel2(9).Visible = TrueEnd Sub
'//Display msg on successfull connection//Private Sub winsock1_connect()Label3.Caption = "Device 5210 is Connected"Command2.Enabled = FalseEnd Sub
'//Acquire data routine//Private Sub winsock1_DataArrival(ByVal bytesTotal As Long)Winsock1.GetData strData, vbStringrbuf = rbuf + strDataLabel3.Caption = rbufCall write_fileEnd Sub
'//enters here on successful data transmission//Private Sub Winsock1_SendComplete()Sleep 250End Sub
'//Write data into file routine//Private Sub write_file()fnum = FreeFileOpen "C:\" + filename For Append As fnumPrint #fnum, Date+”,”+Time+”,”+Label3Close fnumEnd Sub