data center solution configurator overview & beginners guide · • the data center solution...
TRANSCRIPT
2019 Lenovo. All rights reserved.
November 2019 | Version 1.03
Data Center Solution Configurator
Overview & Beginners Guide
Sent email to [email protected] for feedback on this document
2019 Lenovo. All rights reserved.
Topics [1/2]
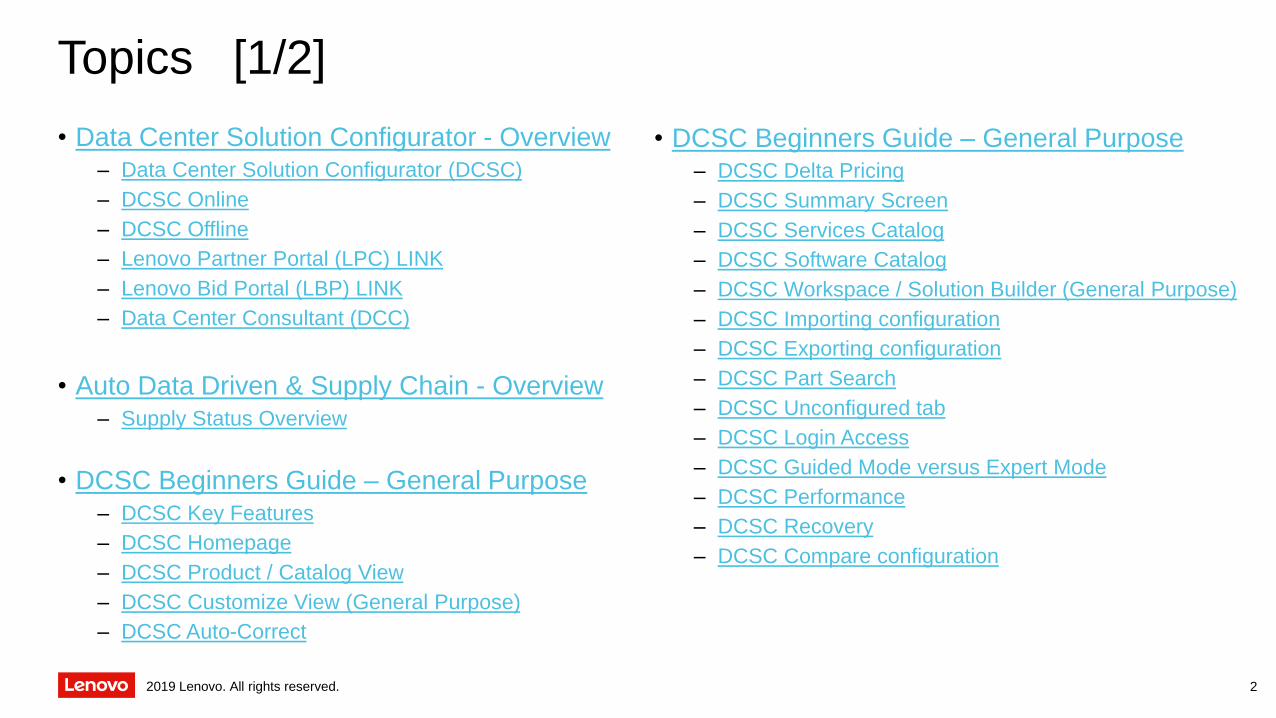
• Data Center Solution Configurator - Overview– Data Center Solution Configurator (DCSC)
– DCSC Online
– DCSC Offline
– Lenovo Partner Portal (LPC) LINK
– Lenovo Bid Portal (LBP) LINK
– Data Center Consultant (DCC)
• Auto Data Driven & Supply Chain - Overview– Supply Status Overview
• DCSC Beginners Guide – General Purpose– DCSC Key Features
– DCSC Homepage
– DCSC Product / Catalog View
– DCSC Customize View (General Purpose)
– DCSC Auto-Correct
• DCSC Beginners Guide – General Purpose– DCSC Delta Pricing
– DCSC Summary Screen
– DCSC Services Catalog
– DCSC Software Catalog
– DCSC Workspace / Solution Builder (General Purpose)
– DCSC Importing configuration
– DCSC Exporting configuration
– DCSC Part Search
– DCSC Unconfigured tab
– DCSC Login Access
– DCSC Guided Mode versus Expert Mode
– DCSC Performance
– DCSC Recovery
– DCSC Compare configuration
2
2019 Lenovo. All rights reserved.
Topics [2/2]
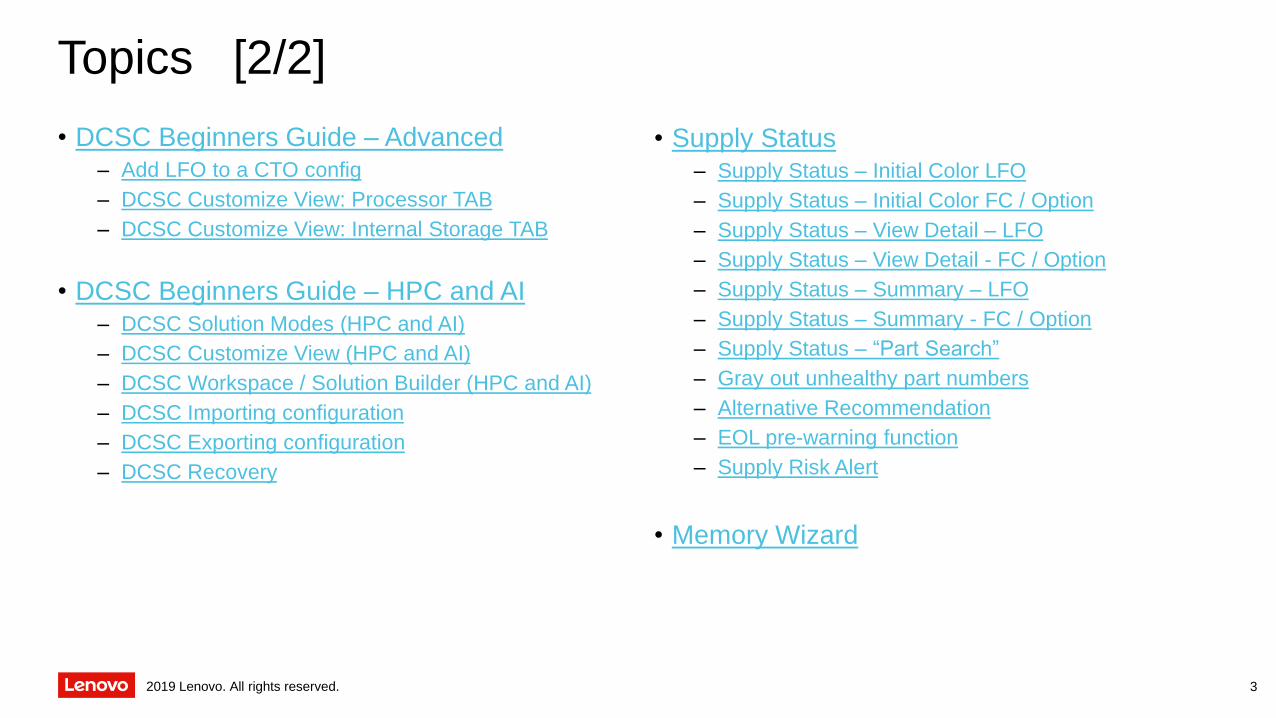
• DCSC Beginners Guide – Advanced– Add LFO to a CTO config
– DCSC Customize View: Processor TAB
– DCSC Customize View: Internal Storage TAB
• DCSC Beginners Guide – HPC and AI– DCSC Solution Modes (HPC and AI)
– DCSC Customize View (HPC and AI)
– DCSC Workspace / Solution Builder (HPC and AI)
– DCSC Importing configuration
– DCSC Exporting configuration
– DCSC Recovery
• Supply Status– Supply Status – Initial Color LFO
– Supply Status – Initial Color FC / Option
– Supply Status – View Detail – LFO
– Supply Status – View Detail - FC / Option
– Supply Status – Summary – LFO
– Supply Status – Summary - FC / Option
– Supply Status – “Part Search”
– Gray out unhealthy part numbers
– Alternative Recommendation
– EOL pre-warning function
– Supply Risk Alert
• Memory Wizard
3
2019 Lenovo. All rights reserved.
DCSC - Used acronyms
4
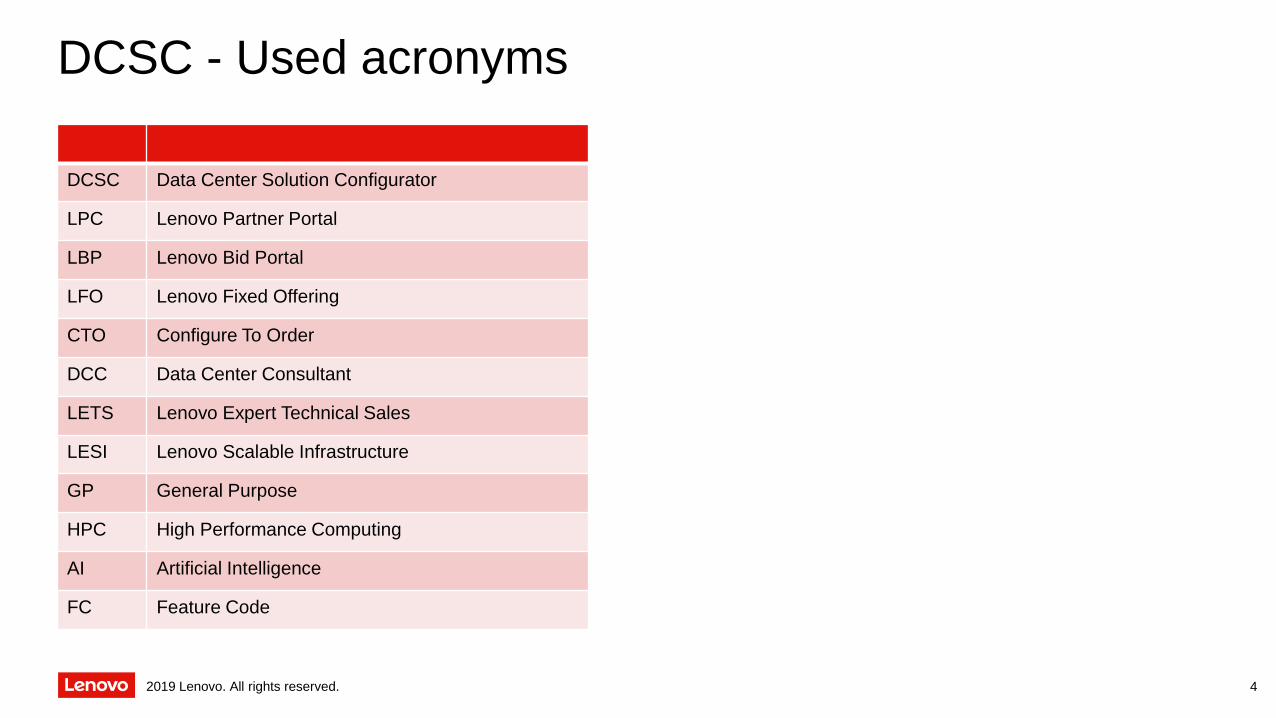
DCSC Data Center Solution Configurator
LPC Lenovo Partner Portal
LBP Lenovo Bid Portal
LFO Lenovo Fixed Offering
CTO Configure To Order
DCC Data Center Consultant
LETS Lenovo Expert Technical Sales
LESI Lenovo Scalable Infrastructure
GP General Purpose
HPC High Performance Computing
AI Artificial Intelligence
FC Feature Code
2019 Lenovo. All rights reserved.
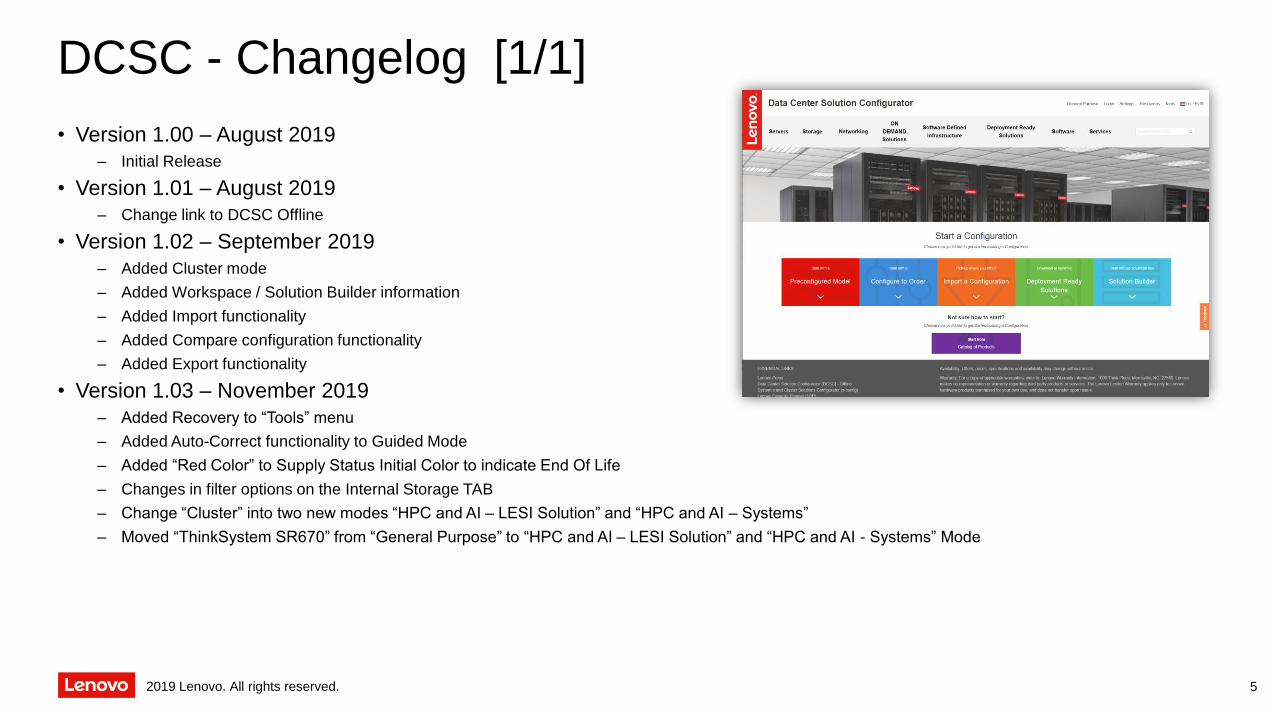
DCSC - Changelog [1/1]
• Version 1.00 – August 2019
– Initial Release
• Version 1.01 – August 2019
– Change link to DCSC Offline
• Version 1.02 – September 2019
– Added Cluster mode
– Added Workspace / Solution Builder information
– Added Import functionality
– Added Compare configuration functionality
– Added Export functionality
• Version 1.03 – November 2019
– Added Recovery to “Tools” menu
– Added Auto-Correct functionality to Guided Mode
– Added “Red Color” to Supply Status Initial Color to indicate End Of Life
– Changes in filter options on the Internal Storage TAB
– Change “Cluster” into two new modes “HPC and AI – LESI Solution” and “HPC and AI – Systems”
– Moved “ThinkSystem SR670” from “General Purpose” to “HPC and AI – LESI Solution” and “HPC and AI - Systems” Mode
5
2019 Lenovo. All rights reserved.
Data Center Solution Configurator -Overview
6
2019 Lenovo. All rights reserved.
Data Center Solution Configurator (DCSC)
• The Data Center Solution Configurator (DCSC) is the Lenovo Data Center Group configurator that allows you to create a configuration for ThinkSystem and ThinkAgile solutions either in “General Purpose”, “HPC and AI – LESI Solution” or “HPC and AI – Systems” Mode which includes:
– Servers
– Storage
– Networking
– Services
– Software
– Preconfigured Models (LFO)
– Configure To Order Models (CTO)
– ON DEMAND Solutions:
- Cobalt Iron, Pivot3, Scale Computing
– Software Defined Infrastructure:
- HyperConverged Infrastructure
- ThinkAgile HX, ThinkAgile VX, ThinkAgile MX
- Turnkey Cloud Platforms
- ThinkAgile SXM, ThinkAgile CP
– Deployment Ready SolutionsBig Data and Analysis, Networking, Client Virtualization, Software Defined Storage
7
• Exported file format for CTO is XLS, XML and ZIP. For LFO this is CSV, XLS, XML and ZIP.
• The exported XML file can be used to create a bid or quotation in our quoting tools LBP, LMS or CPQ (Lenovo Internal)
• DCSC has been updated in September 2019 to also include “HPC and AI” capabilities that before was only found in x-config like HPC-, Multi Rack Solutions and Customer-specific CTOs.
• x-config can be found @ https://lesc.lenovo.com/products/hardware/configurator/worldwide/bhui/asit/install.html
2019 Lenovo. All rights reserved.
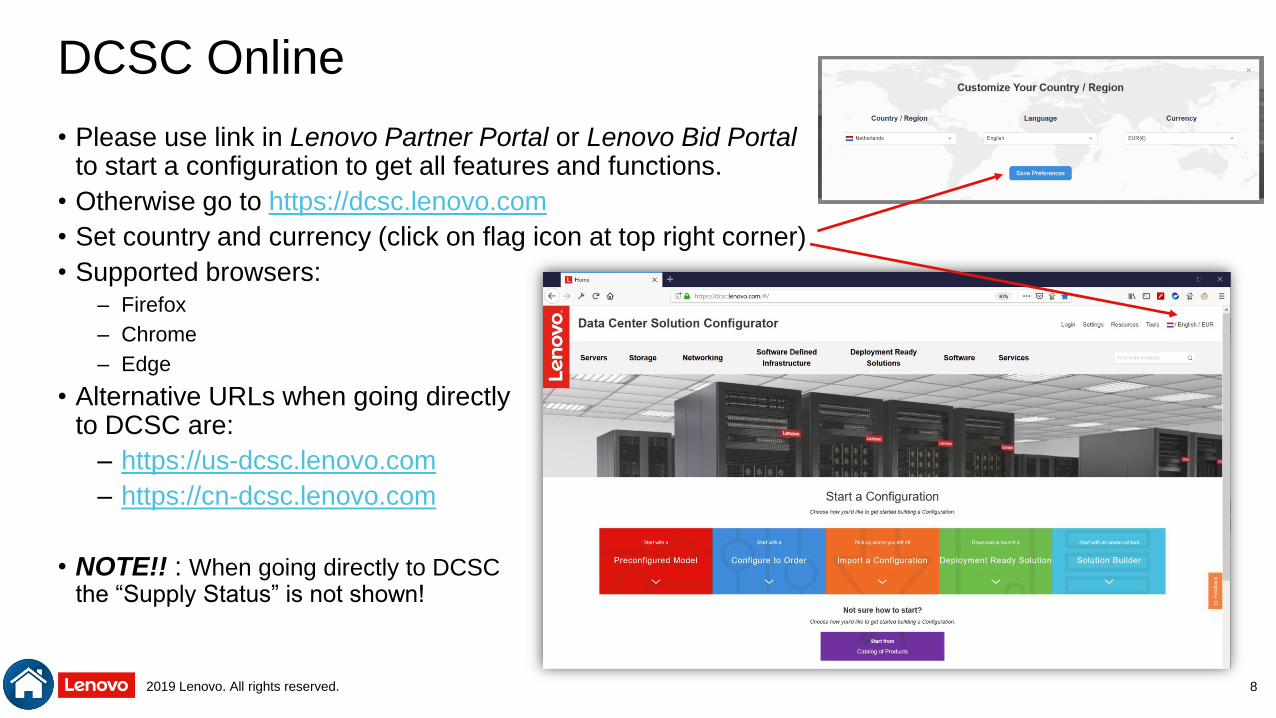
DCSC Online
• Please use link in Lenovo Partner Portal or Lenovo Bid Portalto start a configuration to get all features and functions.
• Otherwise go to https://dcsc.lenovo.com
• Set country and currency (click on flag icon at top right corner)
• Supported browsers:– Firefox
– Chrome
– Edge
• Alternative URLs when going directlyto DCSC are:
– https://us-dcsc.lenovo.com
– https://cn-dcsc.lenovo.com
• NOTE!! : When going directly to DCSCthe “Supply Status” is not shown!
8
2019 Lenovo. All rights reserved.
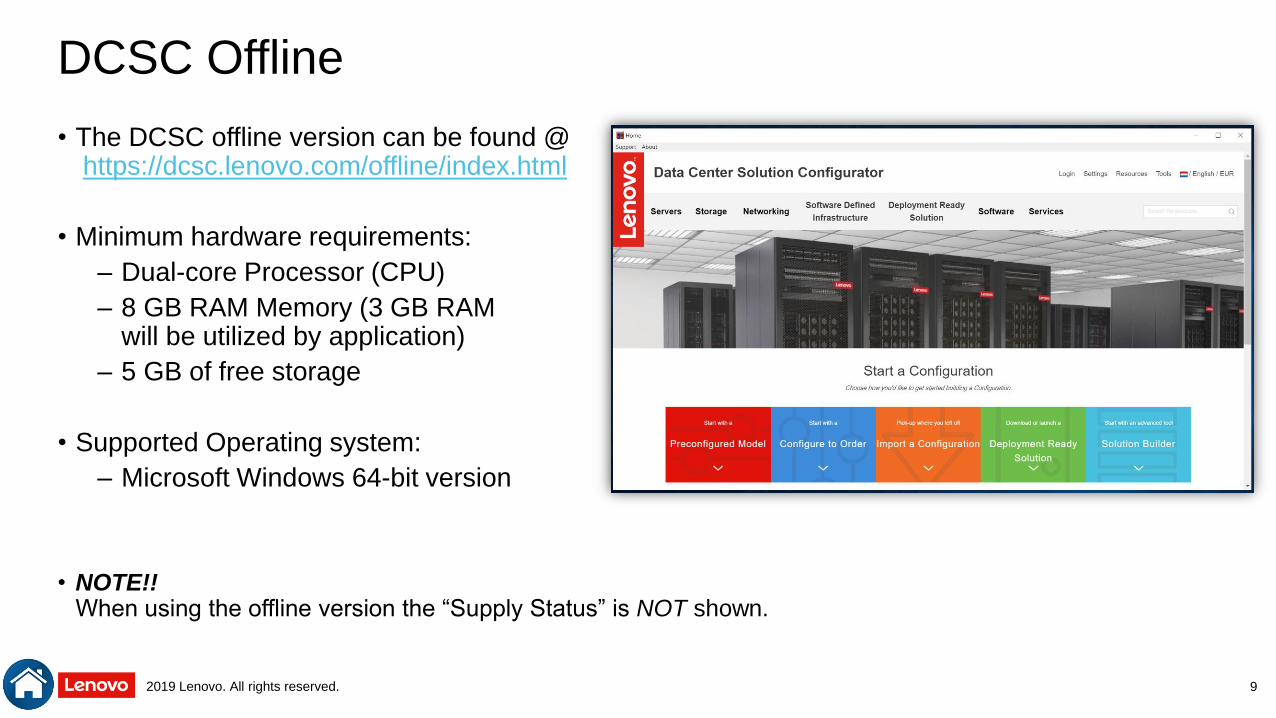
DCSC Offline
• The DCSC offline version can be found @https://dcsc.lenovo.com/offline/index.html
• Minimum hardware requirements:
– Dual-core Processor (CPU)
– 8 GB RAM Memory (3 GB RAM will be utilized by application)
– 5 GB of free storage
• Supported Operating system:
– Microsoft Windows 64-bit version
• NOTE!!When using the offline version the “Supply Status” is NOT shown.
9

2019 Lenovo. All rights reserved.
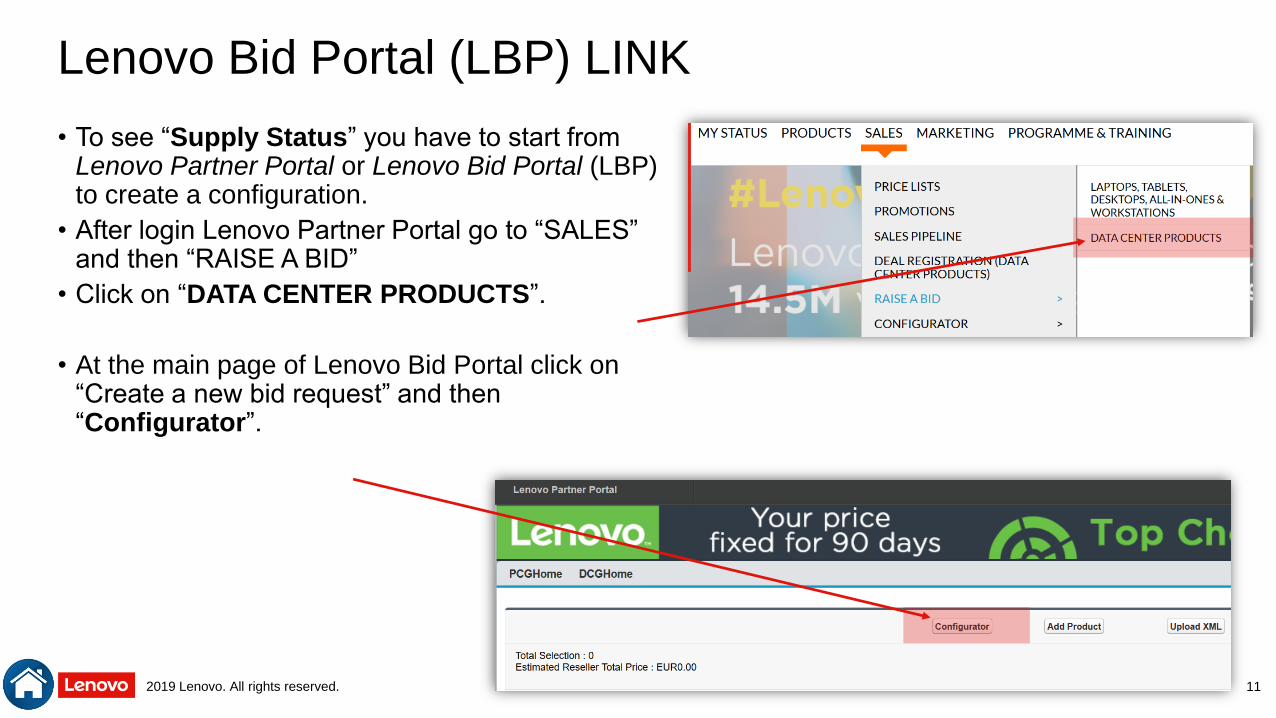
Lenovo Partner Portal (LPC) LINK
• To see “Supply Status” you have to start from Lenovo Partner Portal or Lenovo Bid Portal (LBP) to create a configuration.
• After login Lenovo Partner Portal go to “SALES” and then “CONFIGURATOR”
• Click on “DATA CENTER SOLUTION CONFIGURATOR (ONLINE)”.
• EMEA: https://www.lenovopartner.com/
• NA: https://www.lenovopartnernetwork.com
• LA: https://la.lenovopartner.com
• AP: https://ap.lenovopartner.com
10
2019 Lenovo. All rights reserved.
Lenovo Bid Portal (LBP) LINK
• To see “Supply Status” you have to start from Lenovo Partner Portal or Lenovo Bid Portal (LBP) to create a configuration.
• After login Lenovo Partner Portal go to “SALES” and then “RAISE A BID”
• Click on “DATA CENTER PRODUCTS”.
• At the main page of Lenovo Bid Portal click on “Create a new bid request” and then “Configurator”.
11
2019 Lenovo. All rights reserved.
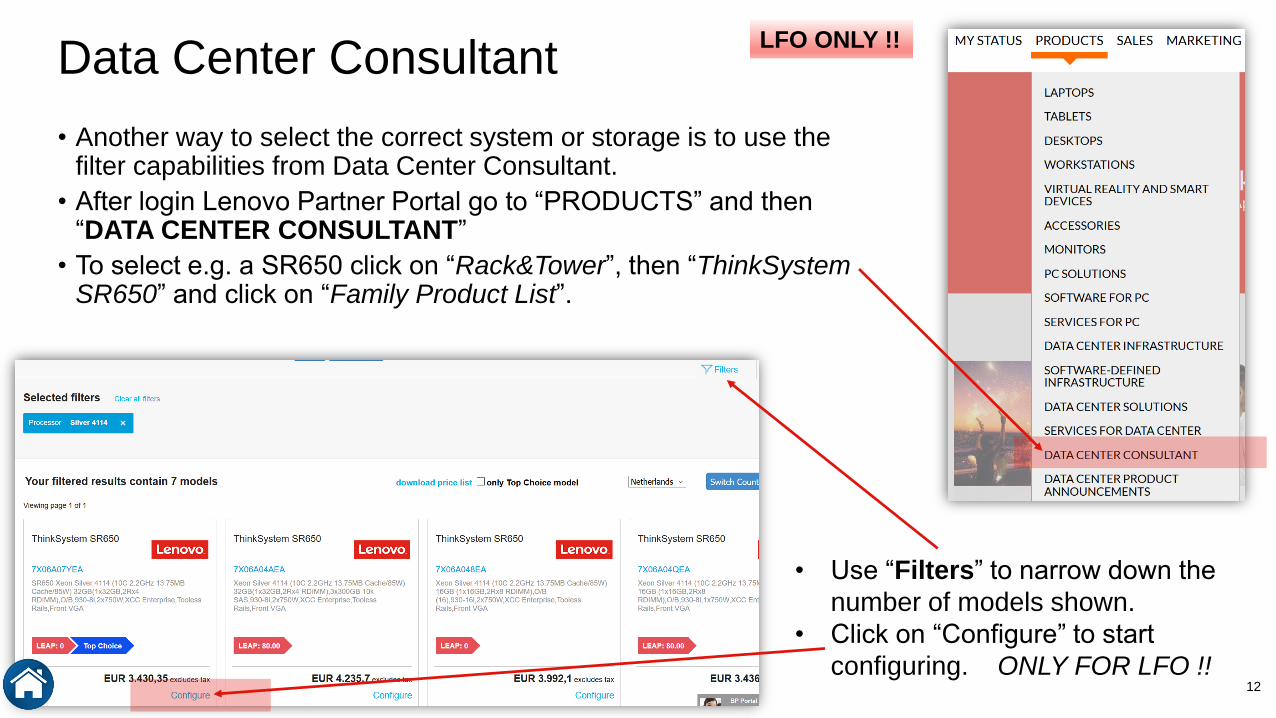
Data Center Consultant
• Another way to select the correct system or storage is to use the filter capabilities from Data Center Consultant.
• After login Lenovo Partner Portal go to “PRODUCTS” and then “DATA CENTER CONSULTANT”
• To select e.g. a SR650 click on “Rack&Tower”, then “ThinkSystem SR650” and click on “Family Product List”.
12
• Use “Filters” to narrow down the
number of models shown.
• Click on “Configure” to start
configuring. ONLY FOR LFO !!
LFO ONLY !!
2019 Lenovo. All rights reserved.
Auto Data Driven & Supply Chain -Overview
13
2019 Lenovo. All rights reserved.
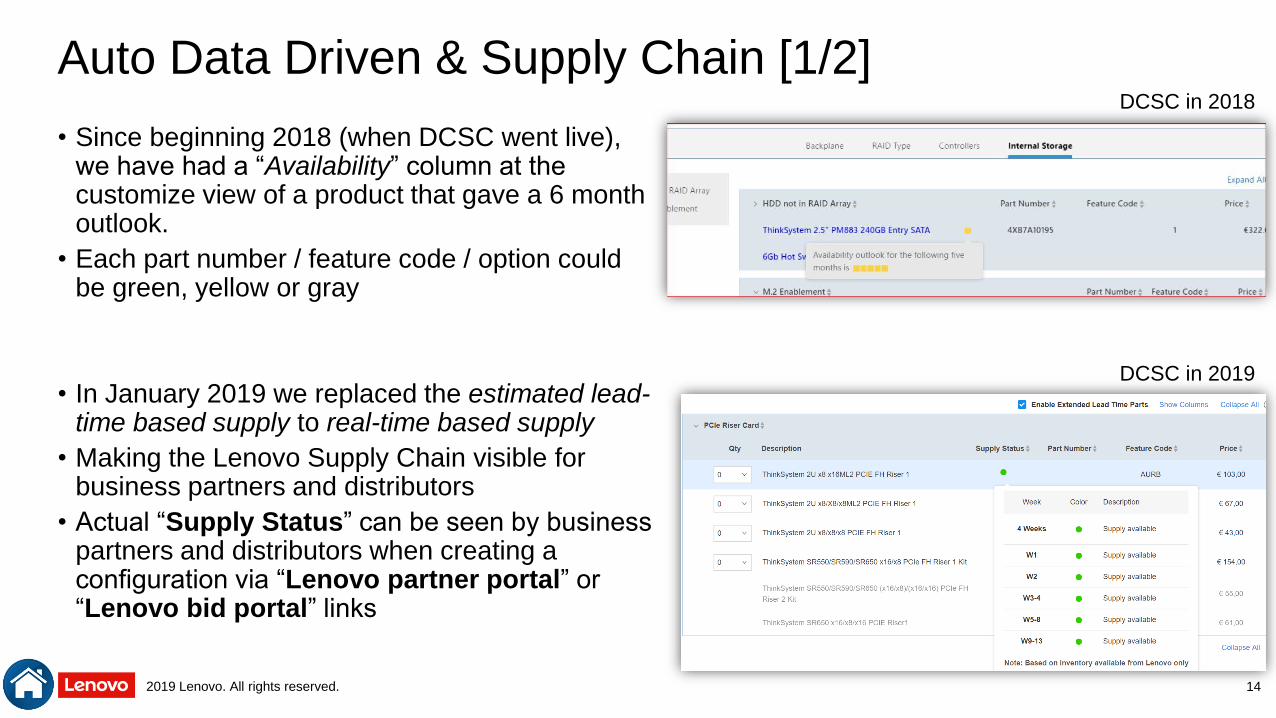
Auto Data Driven & Supply Chain [1/2]
• Since beginning 2018 (when DCSC went live), we have had a “Availability” column at the customize view of a product that gave a 6 month outlook.
• Each part number / feature code / option could be green, yellow or gray
• In January 2019 we replaced the estimated lead-time based supply to real-time based supply
• Making the Lenovo Supply Chain visible for business partners and distributors
• Actual “Supply Status” can be seen by business partners and distributors when creating a configuration via “Lenovo partner portal” or “Lenovo bid portal” links
14
DCSC in 2018
DCSC in 2019

2019 Lenovo. All rights reserved.
Auto Data Driven & Supply Chain [2/2]
• “Supply Status” given is based on inventory available from Lenovo only
• Each part number could be Blue, Green, Yellow or Gray
• A “Special Alert Message” is added to give additional (background) information
• Status is divided into 6 buckets.
• First bucket is the combined status of the first 4 weeks. The color in the “4 weeks” will be used as initial color.
• Other five buckets represents W1, W2, W3-4, W5-8 and W9-13.
• This gives a 90 days / 13 weeks real time supply status
15
Supply Status (Color + Description)
13 weeks Supply Status displayed in 6 buckets
2019 Lenovo. All rights reserved.
Data Center Solution Configurator -Beginners Guide
16
2019 Lenovo. All rights reserved.
DCSC - Key Features [1/4]
• The following features will be highlighted and explained further as you go through the guide:
– Home Page and Home Page features
- Configure To Order (CTO) vs Preconfigured (LFO)
- Links to valuable resources and tools
- Easy country, language and currency selection
- Hover-over product and solution catalogs
- Quick Launch and Look ahead search features
– Product Page and Product Page features
- Quick access to Product Guide, Data Sheets and 3D catalog
- Filtering, Sorting and Column Width features
– Customize Page and Customize Page features
- Find Part
- View Details
- Configuration Tree
- Resource Tracker
17
2019 Lenovo. All rights reserved.
DCSC - Key Features [2/4]
• The following features will be highlighted and explained further as you go through the guide:
– Summary Page and Summary Page features
- Recommendations On/Off
- Engineering Power Report
- Go to Workspace
- Show/Hide Product Catalog
- Restart, Save and Export
- Change Quantity & Contextual Catalog
18

2019 Lenovo. All rights reserved.
DCSC - Key Features [3/4]
• The following features will be highlighted and explained further as you go through the guide:
– Importing Configuration
– Compare Configuration
– Exporting Configuration
– Recovery
– Part Search
– Unconfigured Tab
– Supply Status (visible for Lenovo internal and Partner integrated version of DCSC)
– Login access
– Error Handling
– Guided mode vs Expert mode
– Output formats
– Services Catalog
– Software Catalog
– Workspace and Solution Builder
– General Purpose Mode
– HPC and AI – LESI Solution Mode
– HPC and AI – Systems Mode
19
2019 Lenovo. All rights reserved.
DCSC - Key Features [4/4]
• The following features will be highlighted and explained further as you go through the guide:
– Engineering Report
– Logical Grouping
– Error Messages and Error Handling
– Single & Multiple product configuration
20
2019 Lenovo. All rights reserved.
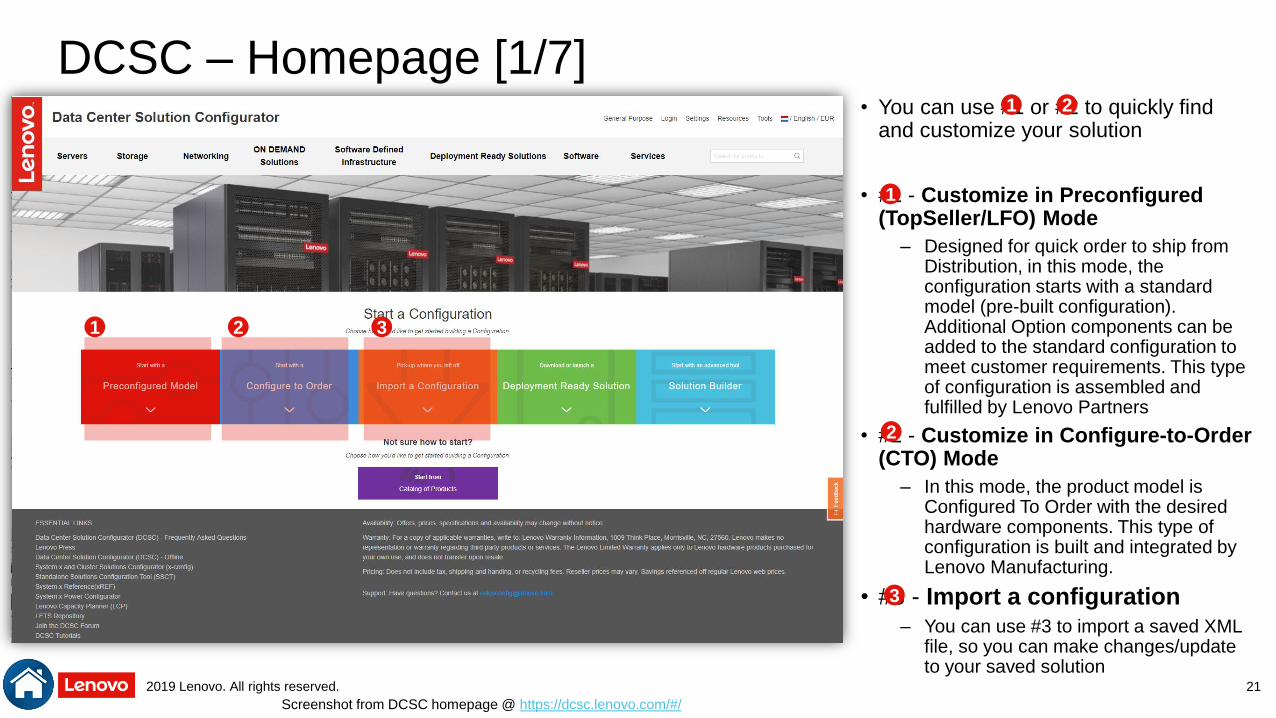
DCSC – Homepage [1/7] • You can use #1 or #2 to quickly find
and customize your solution
• #1 - Customize in Preconfigured (TopSeller/LFO) Mode
– Designed for quick order to ship from Distribution, in this mode, the configuration starts with a standard model (pre-built configuration). Additional Option components can be added to the standard configuration to meet customer requirements. This type of configuration is assembled and fulfilled by Lenovo Partners
• #2 - Customize in Configure-to-Order (CTO) Mode
– In this mode, the product model is Configured To Order with the desired hardware components. This type of configuration is built and integrated by Lenovo Manufacturing.
• #3 - Import a configuration– You can use #3 to import a saved XML
file, so you can make changes/update to your saved solution
21
Screenshot from DCSC homepage @ https://dcsc.lenovo.com/#/
1
1
2 3
2
3
1
2
2019 Lenovo. All rights reserved.
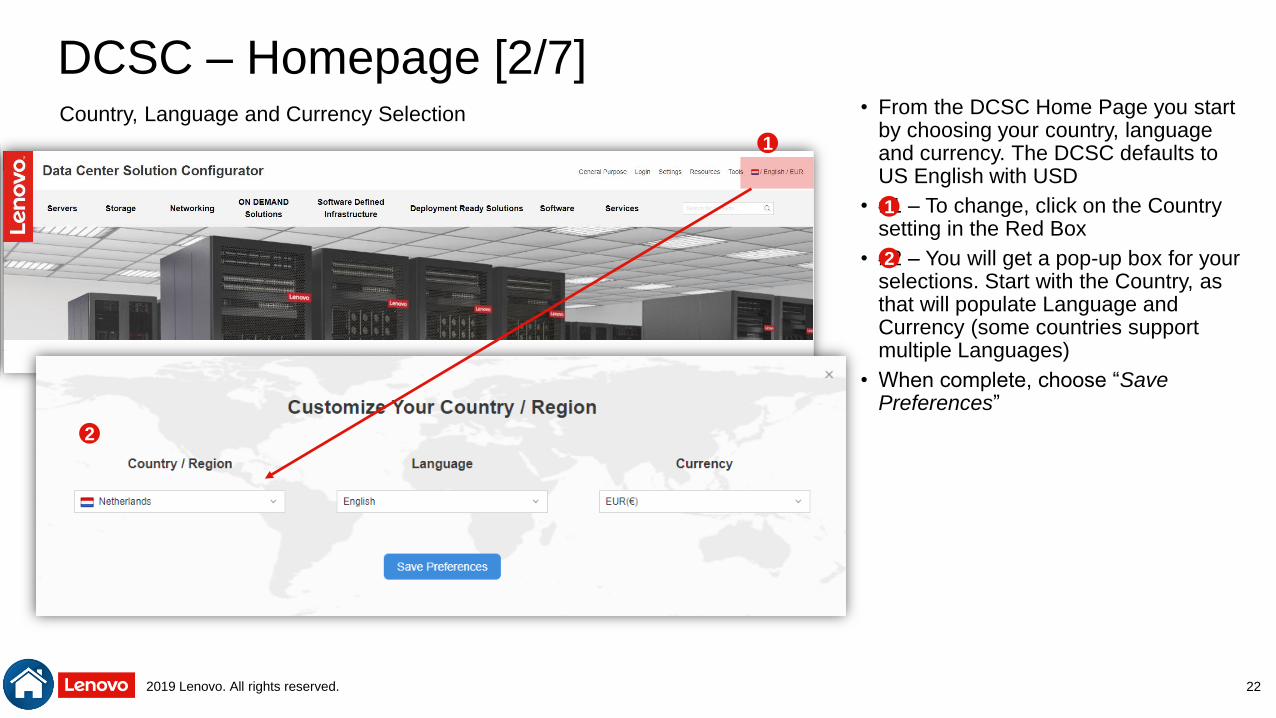
DCSC – Homepage [2/7] • From the DCSC Home Page you start
by choosing your country, language and currency. The DCSC defaults to US English with USD
• #1 – To change, click on the Country setting in the Red Box
• #2 – You will get a pop-up box for your selections. Start with the Country, as that will populate Language and Currency (some countries support multiple Languages)
• When complete, choose “Save Preferences”
22
1
Country, Language and Currency Selection
2
1
2
2

2019 Lenovo. All rights reserved.
DCSC – Homepage [3/7] • The DCSC Homepage menu has the options “General Purpose / HPC
and AI”, “Login” (internal only), “Settings”, “Resources” and “Tools”.
• Solution Mode As of November 2019 there are three Modes:
– “General Purpose”: Select this mode when you have an order that will not require manufacturing to connect network cables for products configured in a rack. This mode is for customers who intend or doing their own networking once the products are delivered. Used in the majority of configurations
– “HPC & AI - LESI Solution”: Select this mode if you are working on a configuration for High Performance Computing or Artificial Intelligence workload and you are looking for tighter manufacturing integration and solution level interoperability support through Lenovo Scalable Infrastructure (https://lenovopress.com/lp0900) best recipes. Besides LeSIqualified systems like ThinkSystem SD650 liquid cooled servers and defined solutions like Distributed Storage Server, this mode provides also access to all Lenovo datacenter systems not part of the LeSI tested material list, which will be marked -SB- (special bid) for reference. All configurations include LeSI racks or LeSIclient site integration kits.
– “HPC & AI - Systems”: Select this mode if you are working on a configuration for High Performance Computing or Artificial Intelligence workload without tight manufacturing integration or solution level interoperability support (sometimes called “roll your own” or “RYO”). This mode is for customers who are doing their own network configuration and manage the different firmware and software levels by themselves. Mostly used for standalone systems.
23
Links to valuable Resources and Tools
1
1
2
2
“HPC and AI” configuration details can be found @
DCSC Beginners Guide – HPC and AI Section
3
2019 Lenovo. All rights reserved.
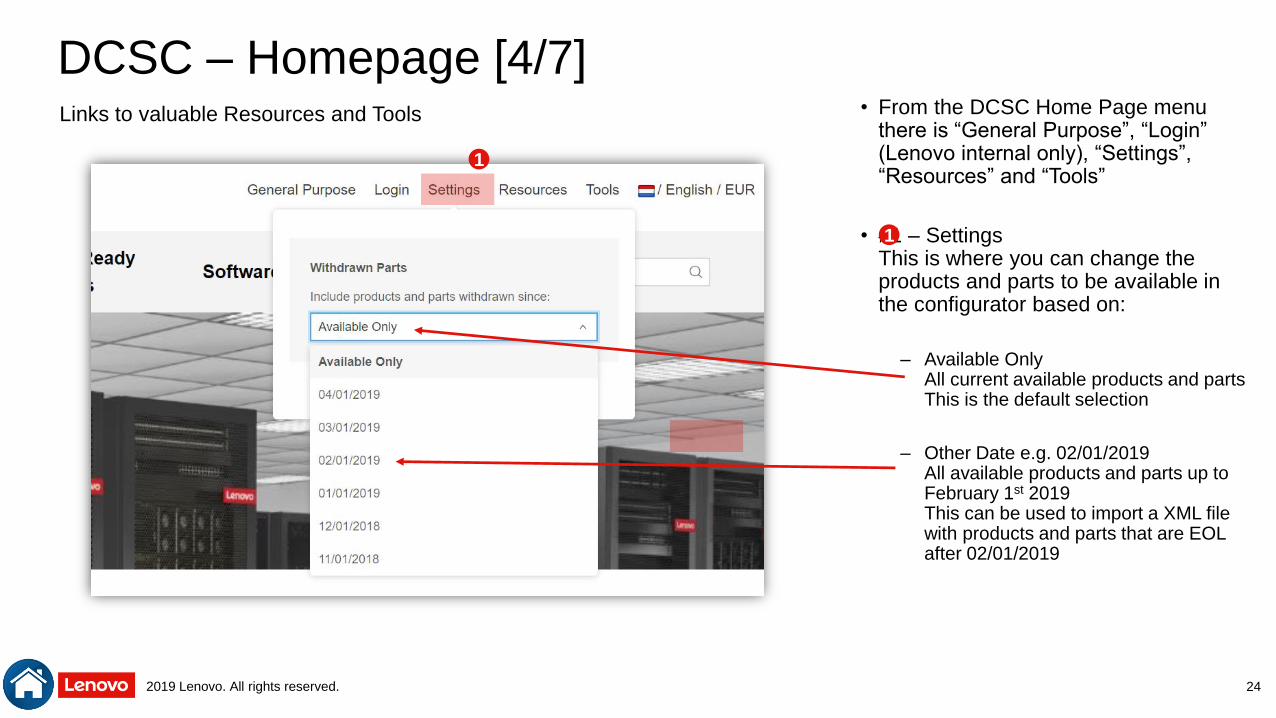
DCSC – Homepage [4/7] • From the DCSC Home Page menu
there is “General Purpose”, “Login” (Lenovo internal only), “Settings”, “Resources” and “Tools”
• #1 – SettingsThis is where you can change the products and parts to be available in the configurator based on:
– Available OnlyAll current available products and partsThis is the default selection
– Other Date e.g. 02/01/2019All available products and parts up to February 1st 2019This can be used to import a XML file with products and parts that are EOL after 02/01/2019
24
Links to valuable Resources and Tools
2
1
1
2019 Lenovo. All rights reserved.
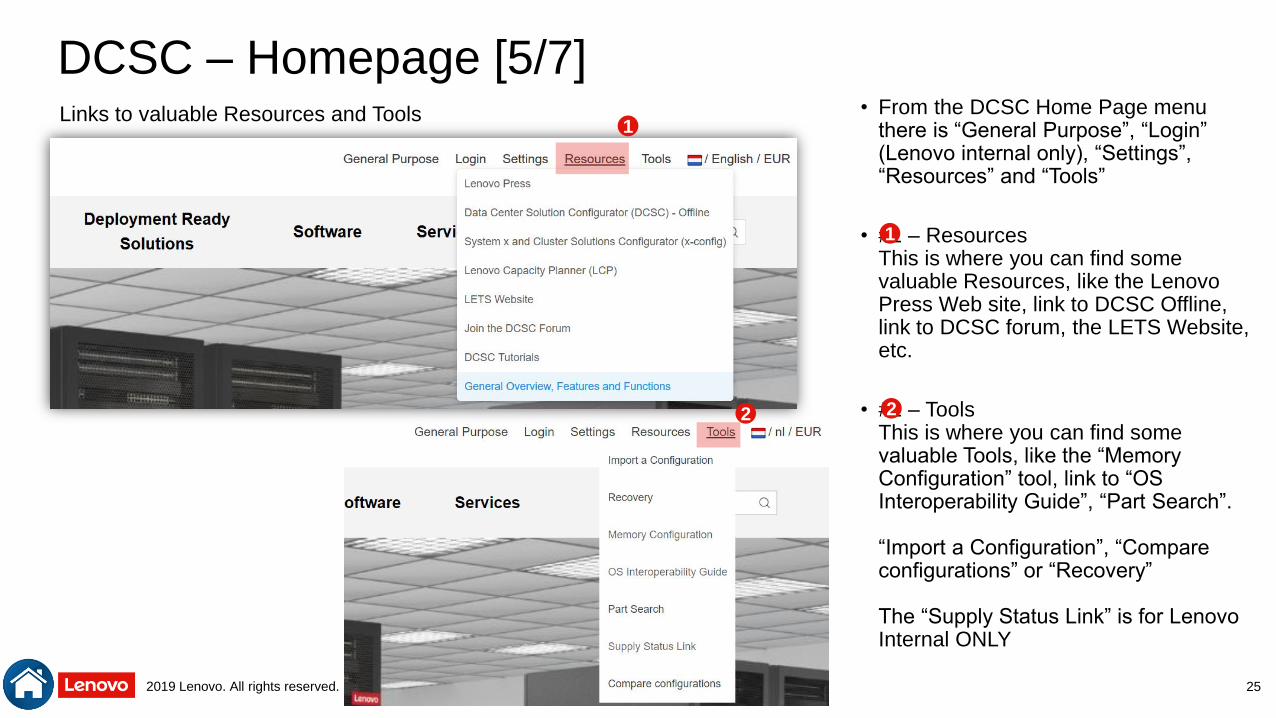
DCSC – Homepage [5/7] • From the DCSC Home Page menu
there is “General Purpose”, “Login” (Lenovo internal only), “Settings”, “Resources” and “Tools”
• #1 – ResourcesThis is where you can find some valuable Resources, like the Lenovo Press Web site, link to DCSC Offline, link to DCSC forum, the LETS Website, etc.
• #2 – ToolsThis is where you can find some valuable Tools, like the “Memory Configuration” tool, link to “OS Interoperability Guide”, “Part Search”.
“Import a Configuration”, “Compare configurations” or “Recovery”
The “Supply Status Link” is for Lenovo Internal ONLY
25
Links to valuable Resources and Tools
1
22
1
2019 Lenovo. All rights reserved.
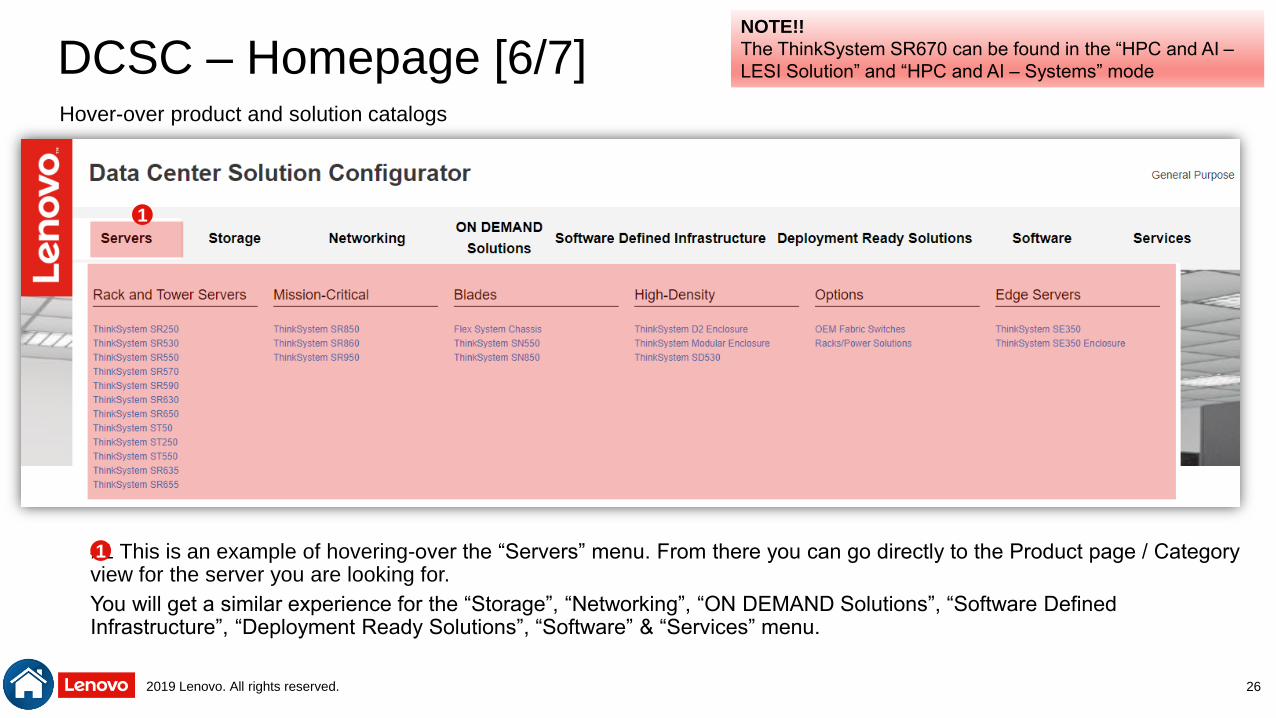
DCSC – Homepage [6/7]
#1 This is an example of hovering-over the “Servers” menu. From there you can go directly to the Product page / Category view for the server you are looking for.
You will get a similar experience for the “Storage”, “Networking”, “ON DEMAND Solutions”, “Software Defined Infrastructure”, “Deployment Ready Solutions”, “Software” & “Services” menu.
26
Hover-over product and solution catalogs
1
1
NOTE!!
The ThinkSystem SR670 can be found in the “HPC and AI –
LESI Solution” and “HPC and AI – Systems” mode
2019 Lenovo. All rights reserved.
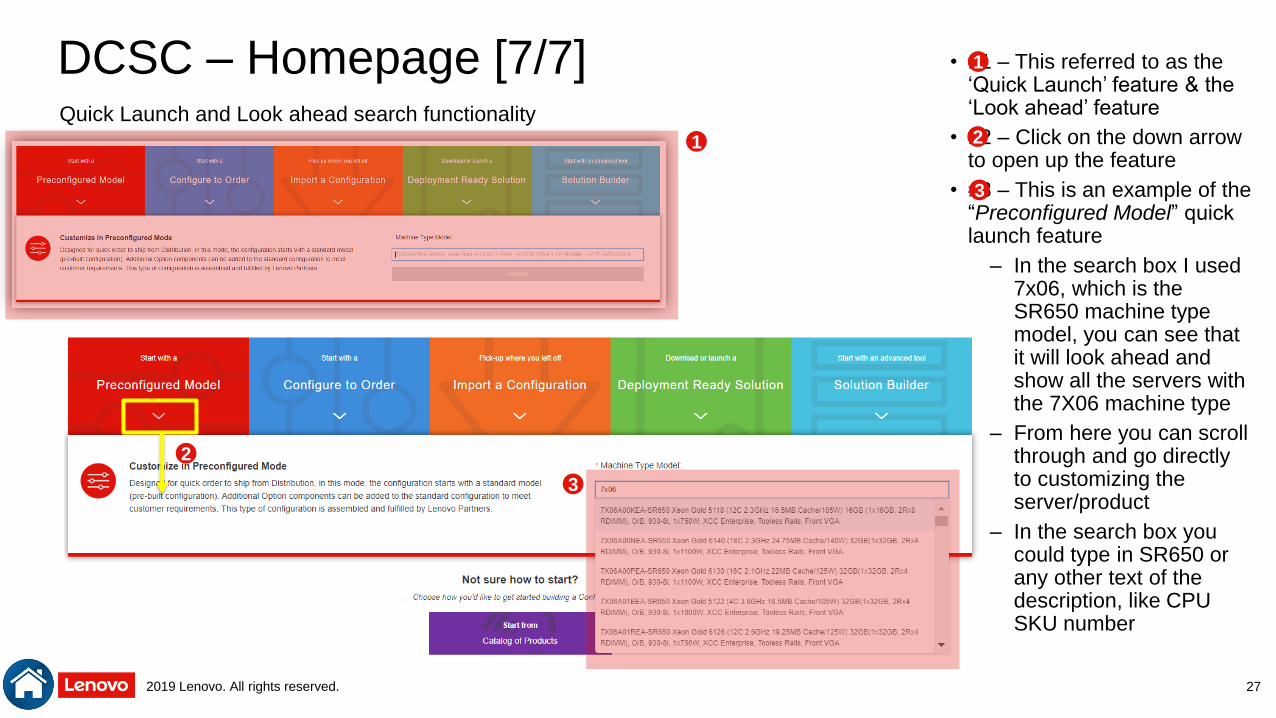
DCSC – Homepage [7/7] • #1 – This referred to as the ‘Quick Launch’ feature & the ‘Look ahead’ feature
• #2 – Click on the down arrow to open up the feature
• #3 – This is an example of the “Preconfigured Model” quick launch feature
– In the search box I used 7x06, which is the SR650 machine type model, you can see that it will look ahead and show all the servers with the 7X06 machine type
– From here you can scroll through and go directly to customizing the server/product
– In the search box you could type in SR650 or any other text of the description, like CPU SKU number
27
Quick Launch and Look ahead search functionality
1
1
2
2
3
3

2019 Lenovo. All rights reserved.
DCSC – Product / Catalog View • This is an example of the ST550 Product Page / Catalogus View
• On this page you will find key resources:
– Data Sheet, Product Guide, Product Video & 3D Product Catalog
• The landing page defaults to the “Preconfigured Mode” tab, to the right is the “Configure-To-Order Mode” tab
• Some key features on this page are:
– Search, Filter & Sort
– Show/Hide Columns & Adjust Column Size
• Once you find the model you want to configure, choose ‘Customize’
28
https://dcsc.lenovo.com/#/categories/STG%40Servers%40Rack%20and%20Tower%20Servers%40ThinkSystem%20ST550

2019 Lenovo. All rights reserved.
DCSC – Customize View (General Purpose) [1/7] • This is an example of the SR650
Customize Page (preconfigured model 7X06A04LEA)
• The default tab is usually the ‘Base’, for preconfigured models that is already chosen and locked
• Move from left to right, choosing the tab you want to chose and/or change options on (best practice is to move from left to right across the option tabs)
• Some key features on this page:
– Name Product (optional), Find Part, Voltage Selection, Power Policy, Summary Button, Resource Tracker Button, Guided Mode & Expert Mode Buttons, Configuration Price, & Configuration Tree
• Some other key features:
– Show/Hide Columns, Collapse/Expand All, Filtering & Sorting
• When customizing is complete, choose ‘Summary’ button to go to the Summary page 29
https://dcsc.lenovo.com/#/configuration/lfo/7X06A04LEA?mode=lfo
2019 Lenovo. All rights reserved.
DCSC – Customize View (General Purpose) [2/7]
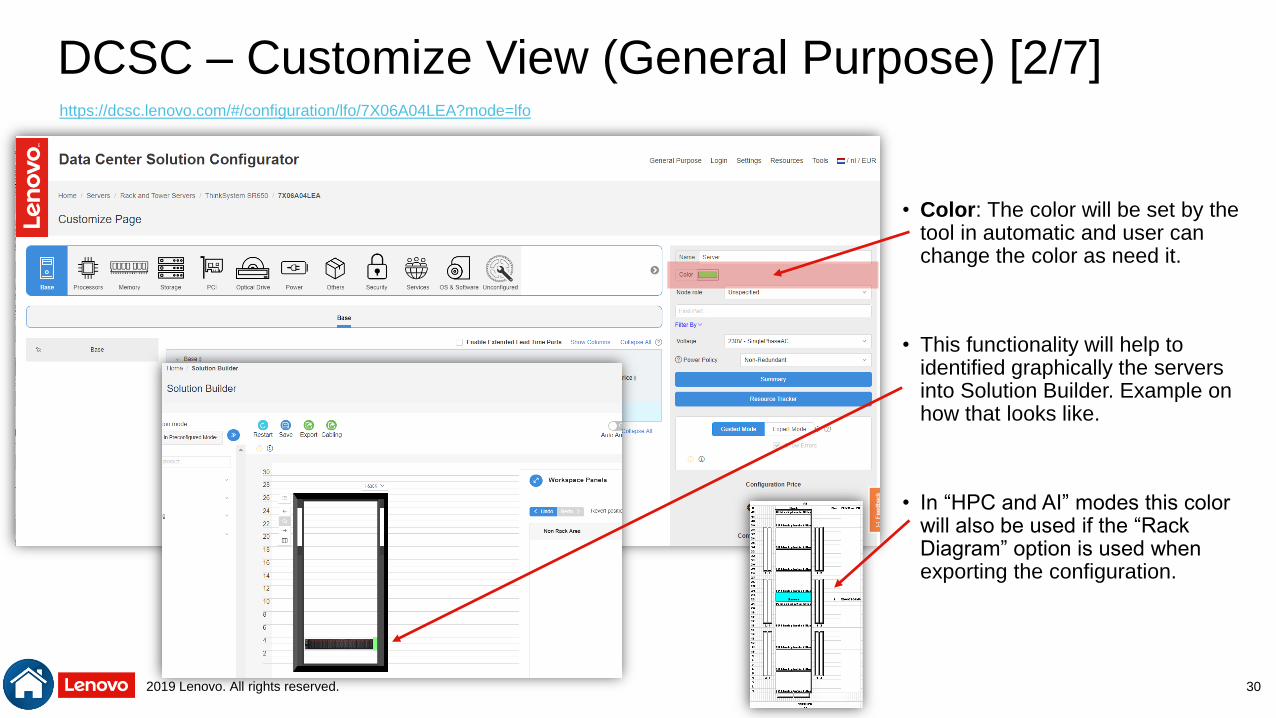
• Color: The color will be set by the tool in automatic and user can change the color as need it.
• This functionality will help to identified graphically the servers into Solution Builder. Example on how that looks like.
• In “HPC and AI” modes this color will also be used if the “Rack Diagram” option is used when exporting the configuration.
30
https://dcsc.lenovo.com/#/configuration/lfo/7X06A04LEA?mode=lfo

2019 Lenovo. All rights reserved.
DCSC – Customize View (General Purpose) [3/7]
• Node role: This is “unspecified” by default, but can be changed to “Storage”, “Compute” or “Management”.
• This functionality will help to identified graphically the servers into Solution Builder.
31
https://dcsc.lenovo.com/#/configuration/lfo/7X06A04LEA?mode=lfo
2019 Lenovo. All rights reserved.
DCSC – Customize View (General Purpose) [4/7]
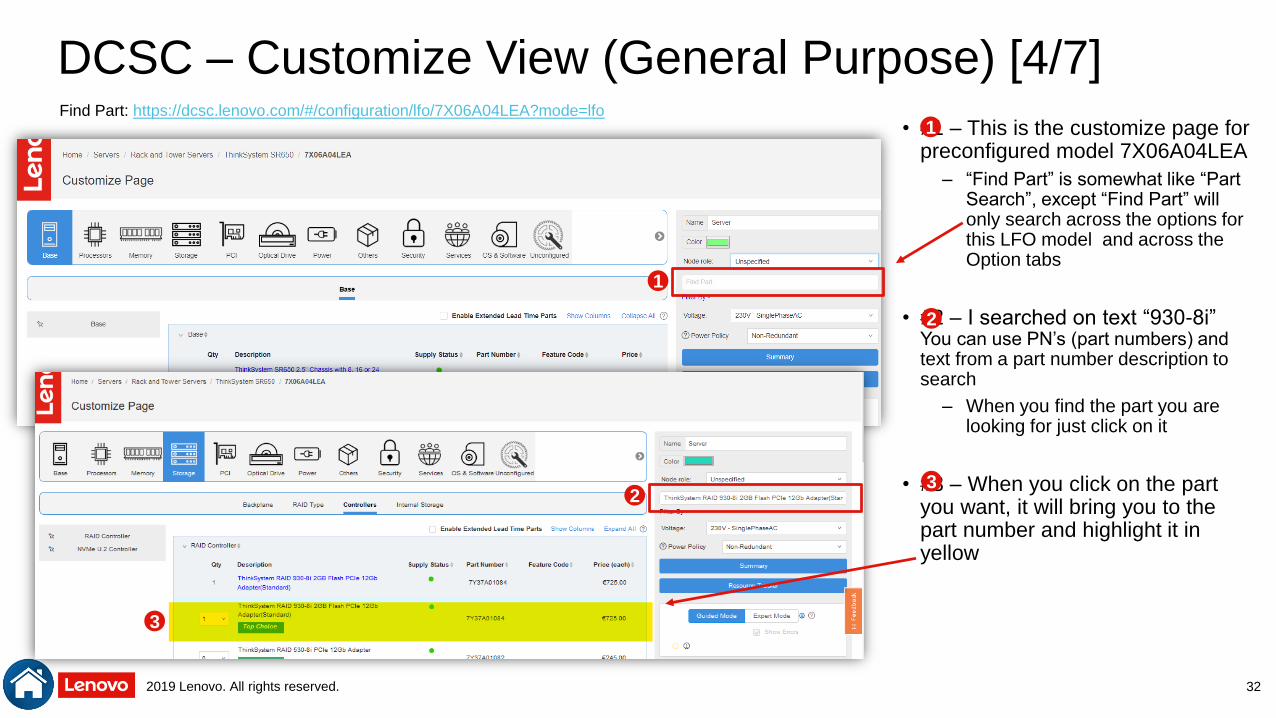
• #1 – This is the customize page for preconfigured model 7X06A04LEA
– “Find Part” is somewhat like “Part Search”, except “Find Part” will only search across the options for this LFO model and across the Option tabs
• #2 – I searched on text “930-8i” You can use PN’s (part numbers) and text from a part number description to search
– When you find the part you are looking for just click on it
• #3 – When you click on the part you want, it will bring you to the part number and highlight it in yellow
32
Find Part: https://dcsc.lenovo.com/#/configuration/lfo/7X06A04LEA?mode=lfo1
1
2
32
3
2019 Lenovo. All rights reserved.
DCSC – Customize View (General Purpose) [5/7]
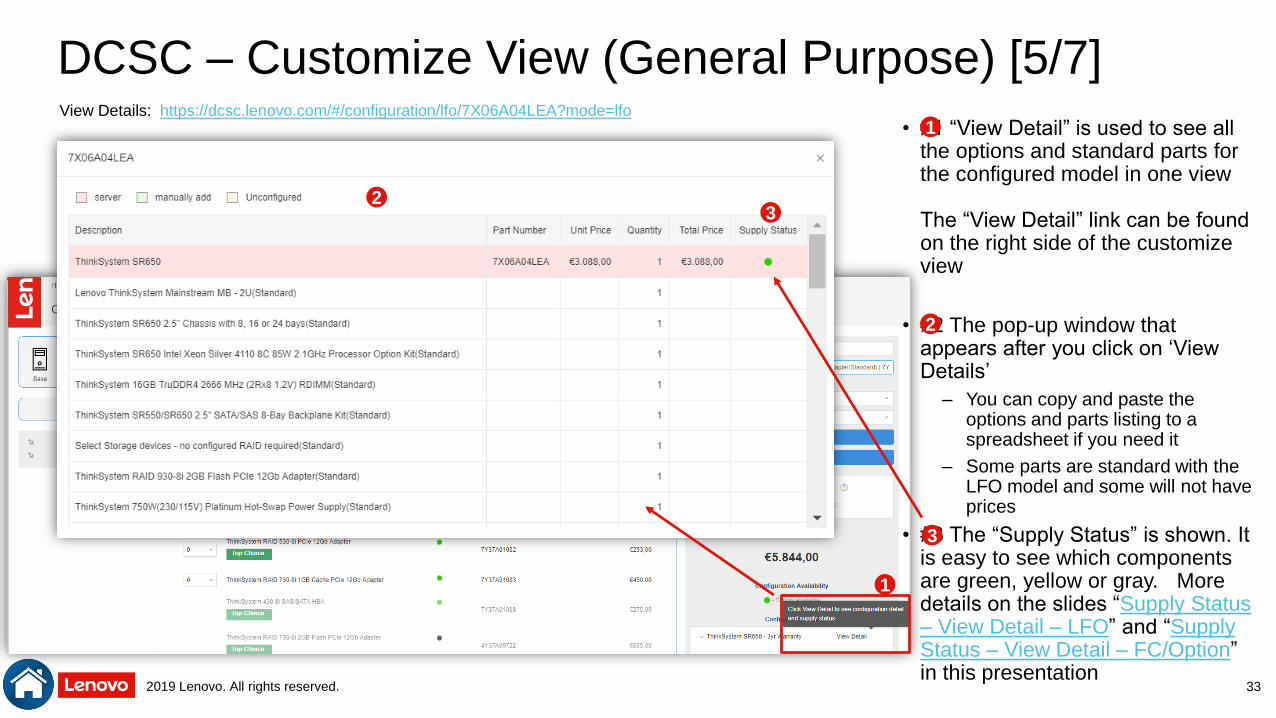
• #1 “View Detail” is used to see all the options and standard parts for the configured model in one view
The “View Detail” link can be found on the right side of the customize view
• #2 The pop-up window that appears after you click on ‘View Details’
– You can copy and paste the options and parts listing to a spreadsheet if you need it
– Some parts are standard with the LFO model and some will not have prices
• #3 The “Supply Status” is shown. It is easy to see which components are green, yellow or gray. More details on the slides “Supply Status – View Detail – LFO” and “Supply Status – View Detail – FC/Option” in this presentation
33
View Details: https://dcsc.lenovo.com/#/configuration/lfo/7X06A04LEA?mode=lfo1
2
1
2
3
3
2019 Lenovo. All rights reserved.
DCSC – Customize View (General Purpose) [6/7]
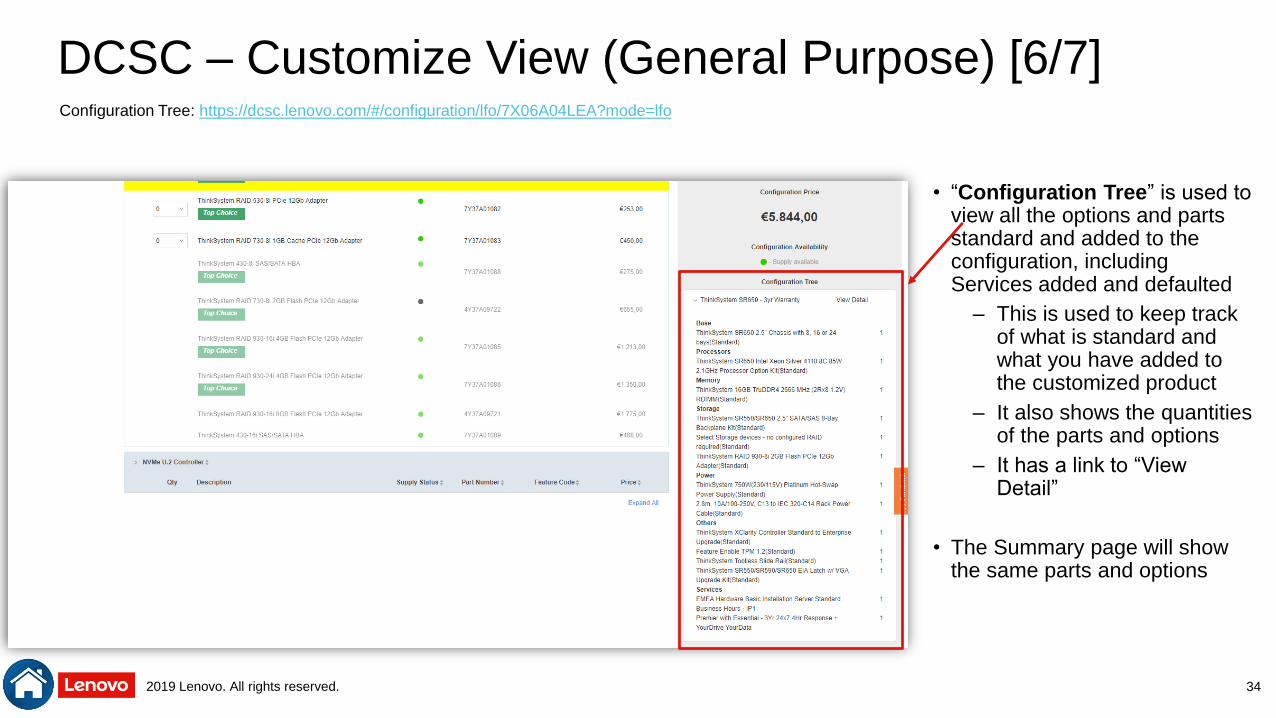
• “Configuration Tree” is used to view all the options and parts standard and added to the configuration, including Services added and defaulted
– This is used to keep track of what is standard and what you have added to the customized product
– It also shows the quantities of the parts and options
– It has a link to “View Detail”
• The Summary page will show the same parts and options
34
Configuration Tree: https://dcsc.lenovo.com/#/configuration/lfo/7X06A04LEA?mode=lfo
2019 Lenovo. All rights reserved.
DCSC – Customize View (General Purpose) [7/7]
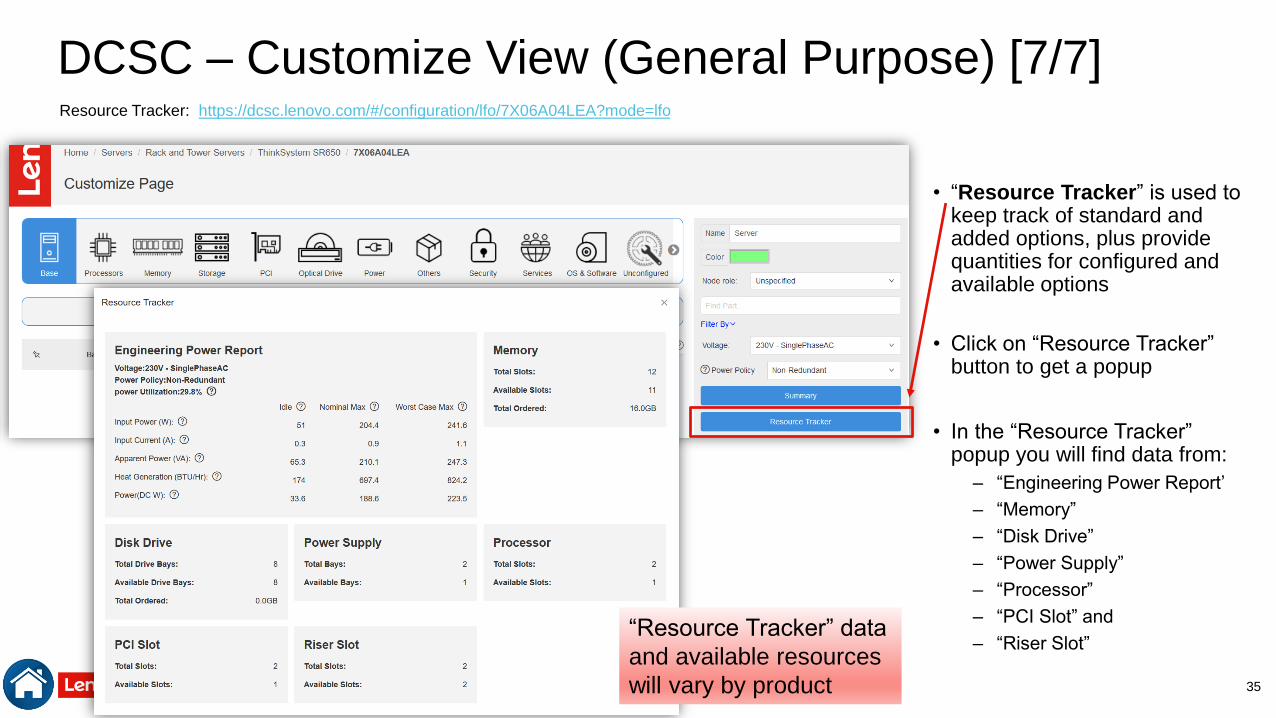
• “Resource Tracker” is used to keep track of standard and added options, plus provide quantities for configured and available options
• Click on “Resource Tracker” button to get a popup
• In the “Resource Tracker” popup you will find data from:
– “Engineering Power Report’
– “Memory”
– “Disk Drive”
– “Power Supply”
– “Processor”
– “PCI Slot” and
– “Riser Slot”
35
Resource Tracker: https://dcsc.lenovo.com/#/configuration/lfo/7X06A04LEA?mode=lfo
“Resource Tracker” data
and available resources
will vary by product
2019 Lenovo. All rights reserved.
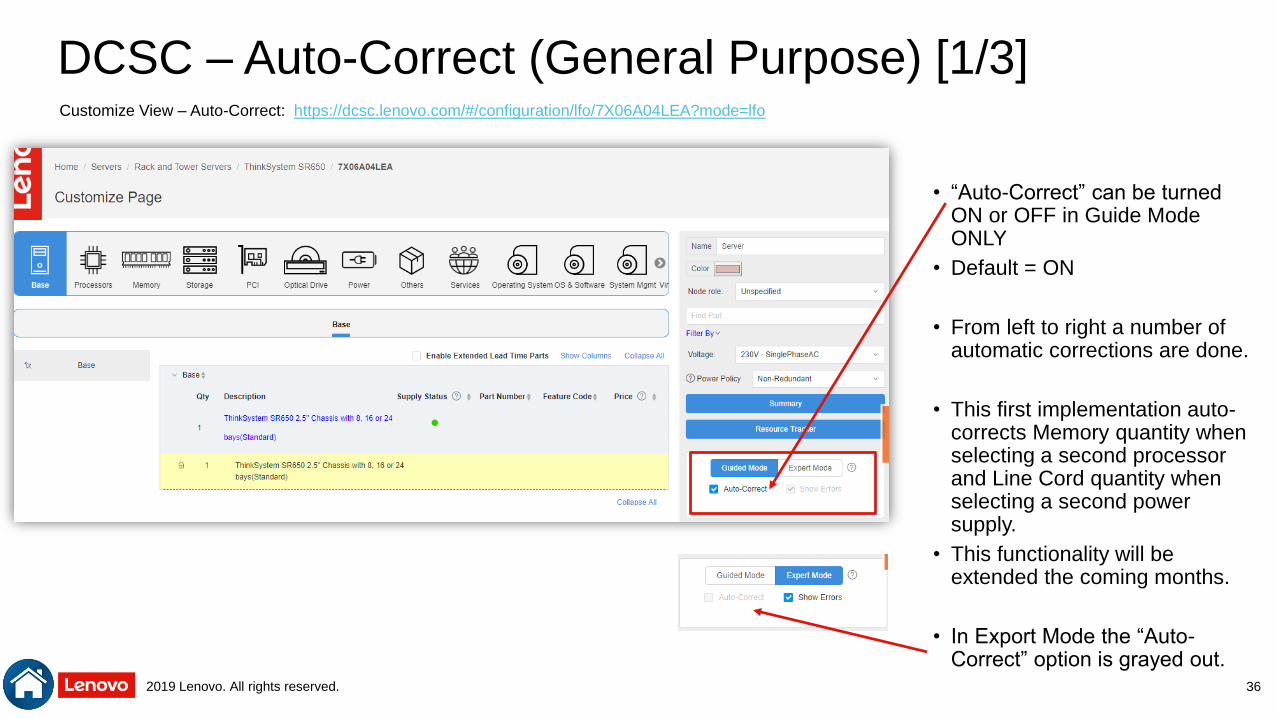
DCSC – Auto-Correct (General Purpose) [1/3]
• “Auto-Correct” can be turned ON or OFF in Guide Mode ONLY
• Default = ON
• From left to right a number of automatic corrections are done.
• This first implementation auto-corrects Memory quantity when selecting a second processor and Line Cord quantity when selecting a second power supply.
• This functionality will be extended the coming months.
• In Export Mode the “Auto-Correct” option is grayed out.
36
Customize View – Auto-Correct: https://dcsc.lenovo.com/#/configuration/lfo/7X06A04LEA?mode=lfo
2019 Lenovo. All rights reserved.
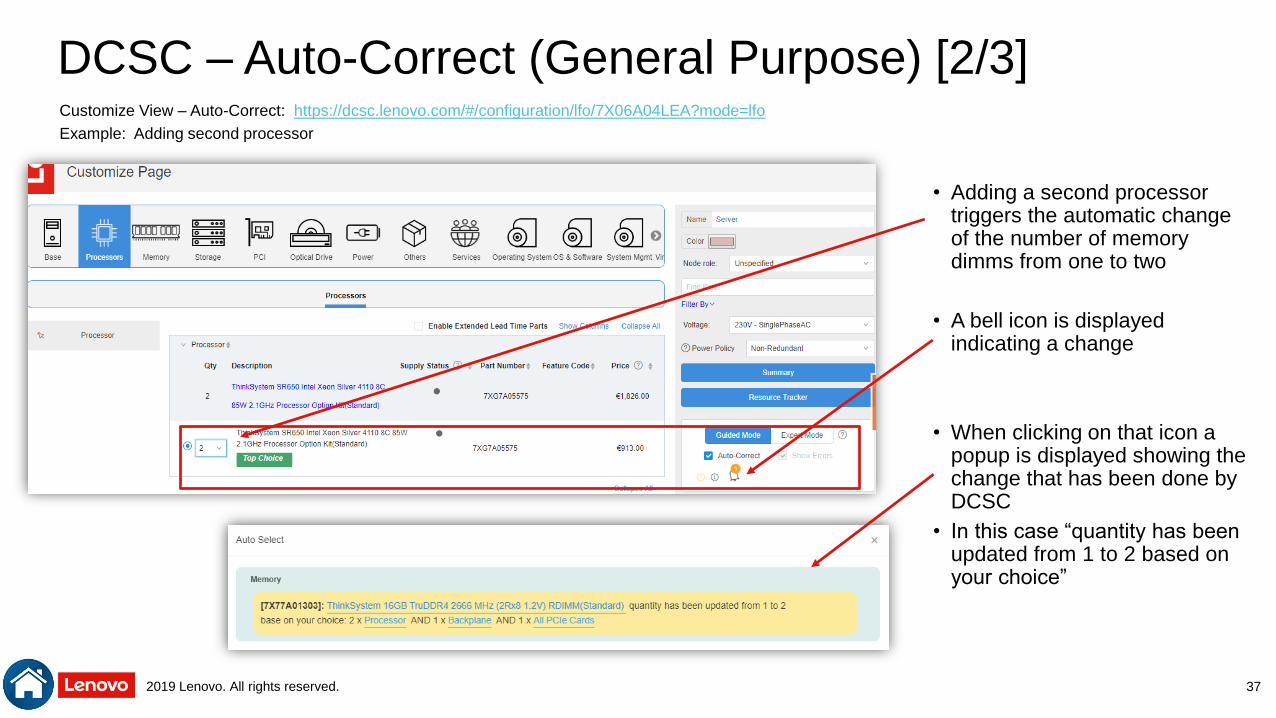
DCSC – Auto-Correct (General Purpose) [2/3]
• Adding a second processor triggers the automatic change of the number of memory dimms from one to two
• A bell icon is displayed indicating a change
• When clicking on that icon a popup is displayed showing the change that has been done by DCSC
• In this case “quantity has been updated from 1 to 2 based on your choice”
37
Customize View – Auto-Correct: https://dcsc.lenovo.com/#/configuration/lfo/7X06A04LEA?mode=lfo
Example: Adding second processor
2019 Lenovo. All rights reserved.
DCSC – Auto-Correct (General Purpose) [3/3]
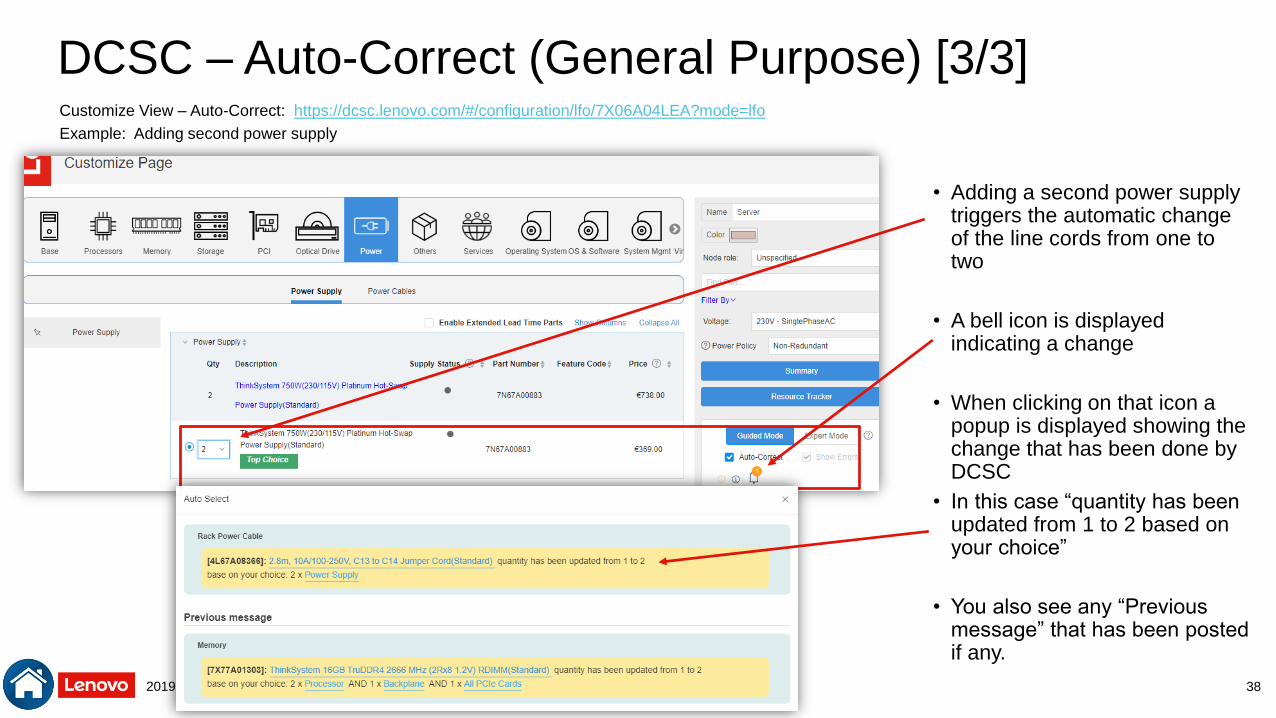
• Adding a second power supply triggers the automatic change of the line cords from one to two
• A bell icon is displayed indicating a change
• When clicking on that icon a popup is displayed showing the change that has been done by DCSC
• In this case “quantity has been updated from 1 to 2 based on your choice”
• You also see any “Previous message” that has been posted if any.
38
Customize View – Auto-Correct: https://dcsc.lenovo.com/#/configuration/lfo/7X06A04LEA?mode=lfo
Example: Adding second power supply
2019 Lenovo. All rights reserved.
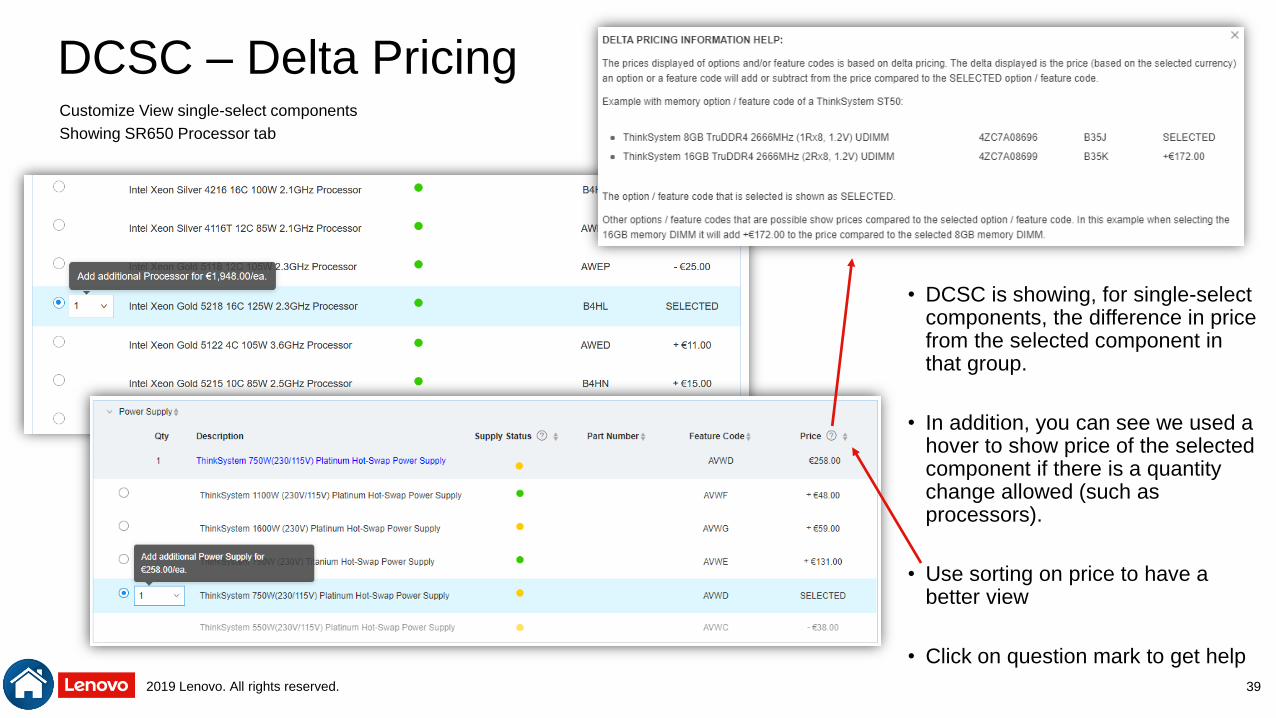
DCSC – Delta Pricing
• DCSC is showing, for single-select components, the difference in price from the selected component in that group.
• In addition, you can see we used a hover to show price of the selected component if there is a quantity change allowed (such as processors).
• Use sorting on price to have a better view
• Click on question mark to get help
39
Customize View single-select components
Showing SR650 Processor tab
2019 Lenovo. All rights reserved.
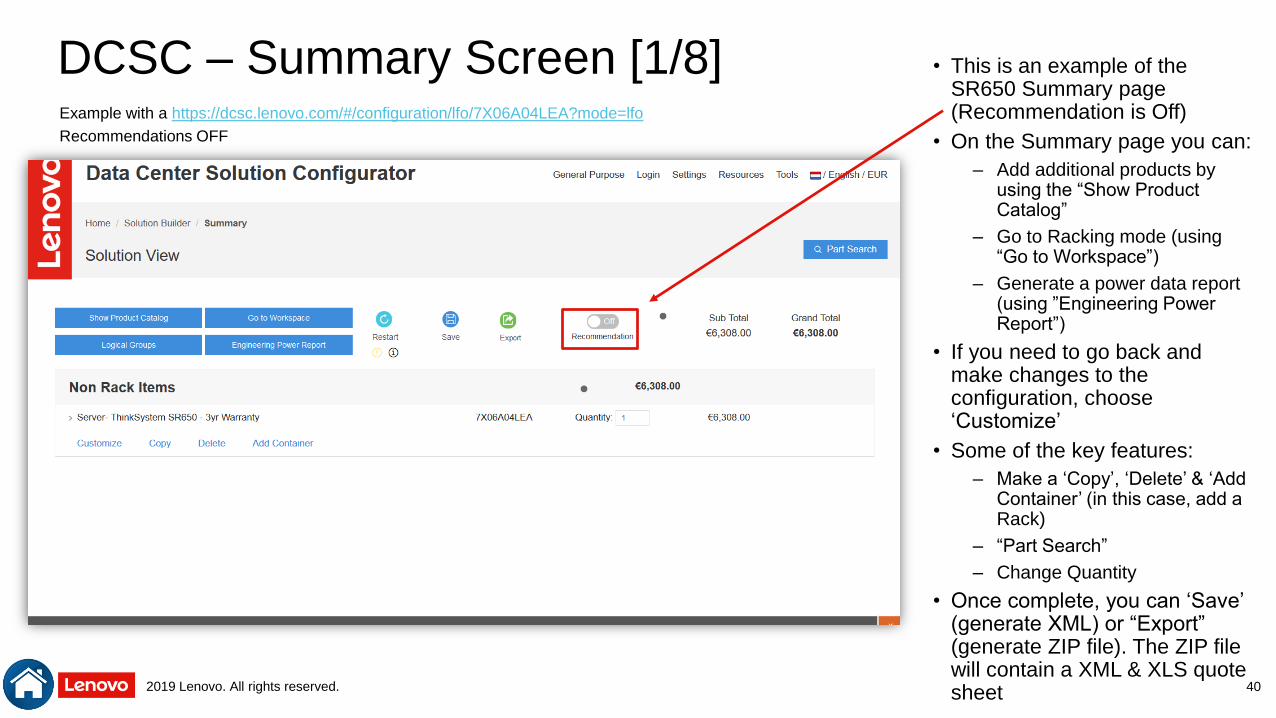
DCSC – Summary Screen [1/8] • This is an example of the SR650 Summary page (Recommendation is Off)
• On the Summary page you can:
– Add additional products by using the “Show Product Catalog”
– Go to Racking mode (using “Go to Workspace”)
– Generate a power data report (using ”Engineering Power Report”)
• If you need to go back and make changes to the configuration, choose ‘Customize’
• Some of the key features:
– Make a ‘Copy’, ‘Delete’ & ‘Add Container’ (in this case, add a Rack)
– “Part Search”
– Change Quantity
• Once complete, you can ‘Save’ (generate XML) or “Export” (generate ZIP file). The ZIP file will contain a XML & XLS quote sheet 40
Example with a https://dcsc.lenovo.com/#/configuration/lfo/7X06A04LEA?mode=lfo
Recommendations OFF
2019 Lenovo. All rights reserved.
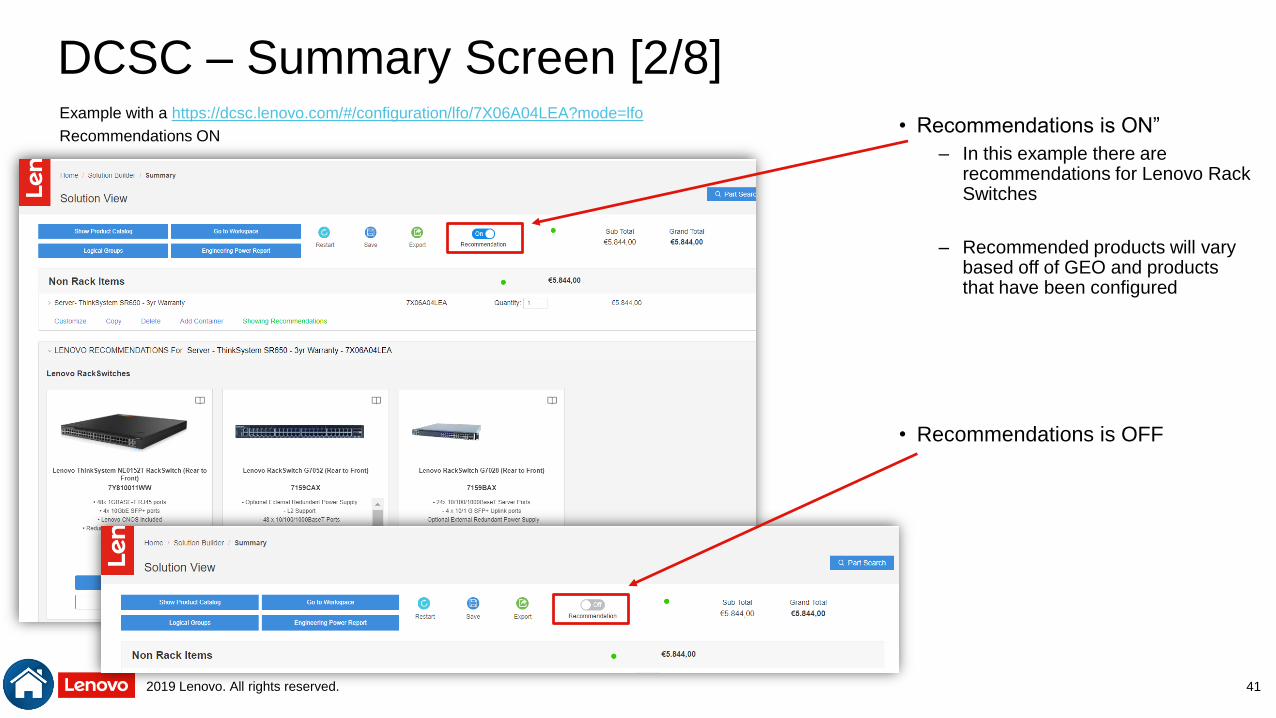
DCSC – Summary Screen [2/8]
• Recommendations is ON”
– In this example there are recommendations for Lenovo Rack Switches
– Recommended products will vary based off of GEO and products that have been configured
• Recommendations is OFF
41
Example with a https://dcsc.lenovo.com/#/configuration/lfo/7X06A04LEA?mode=lfo
Recommendations ON
2019 Lenovo. All rights reserved.
DCSC – Summary Screen [3/8]
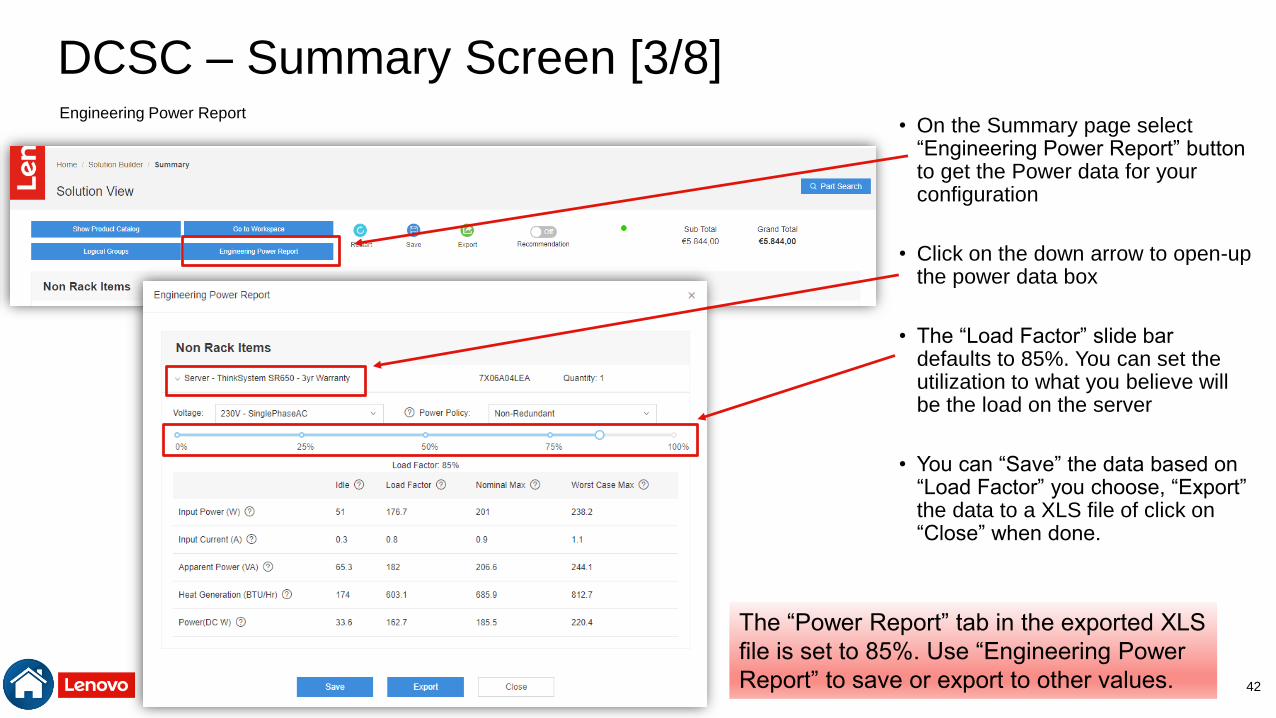
• On the Summary page select “Engineering Power Report” button to get the Power data for your configuration
• Click on the down arrow to open-up the power data box
• The “Load Factor” slide bar defaults to 85%. You can set the utilization to what you believe will be the load on the server
• You can “Save” the data based on “Load Factor” you choose, “Export” the data to a XLS file of click on “Close” when done.
42
Engineering Power Report
The “Power Report” tab in the exported XLS
file is set to 85%. Use “Engineering Power
Report” to save or export to other values.
2019 Lenovo. All rights reserved.
DCSC – Summary Screen [4/8]
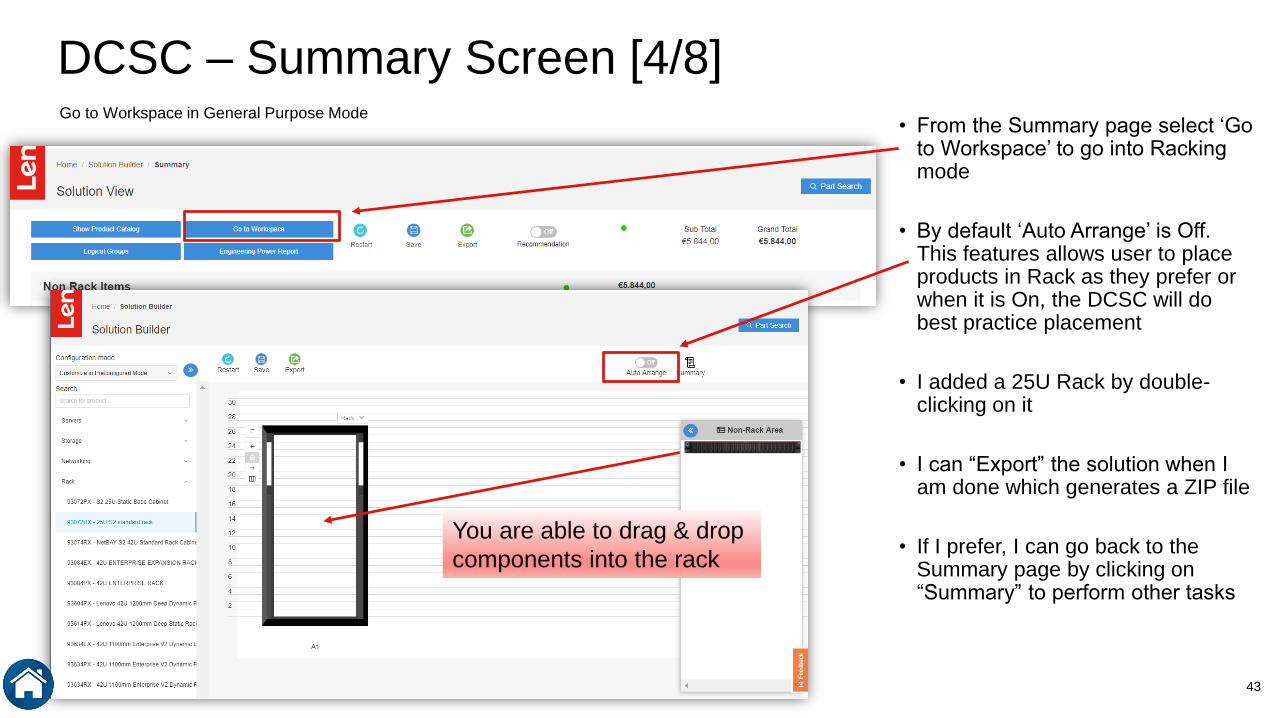
• From the Summary page select ‘Go to Workspace’ to go into Racking mode
• By default ‘Auto Arrange’ is Off. This features allows user to place products in Rack as they prefer or when it is On, the DCSC will do best practice placement
• I added a 25U Rack by double-clicking on it
• I can “Export” the solution when I am done which generates a ZIP file
• If I prefer, I can go back to the Summary page by clicking on “Summary” to perform other tasks
43
Go to Workspace in General Purpose Mode
You are able to drag & drop
components into the rack
2019 Lenovo. All rights reserved.
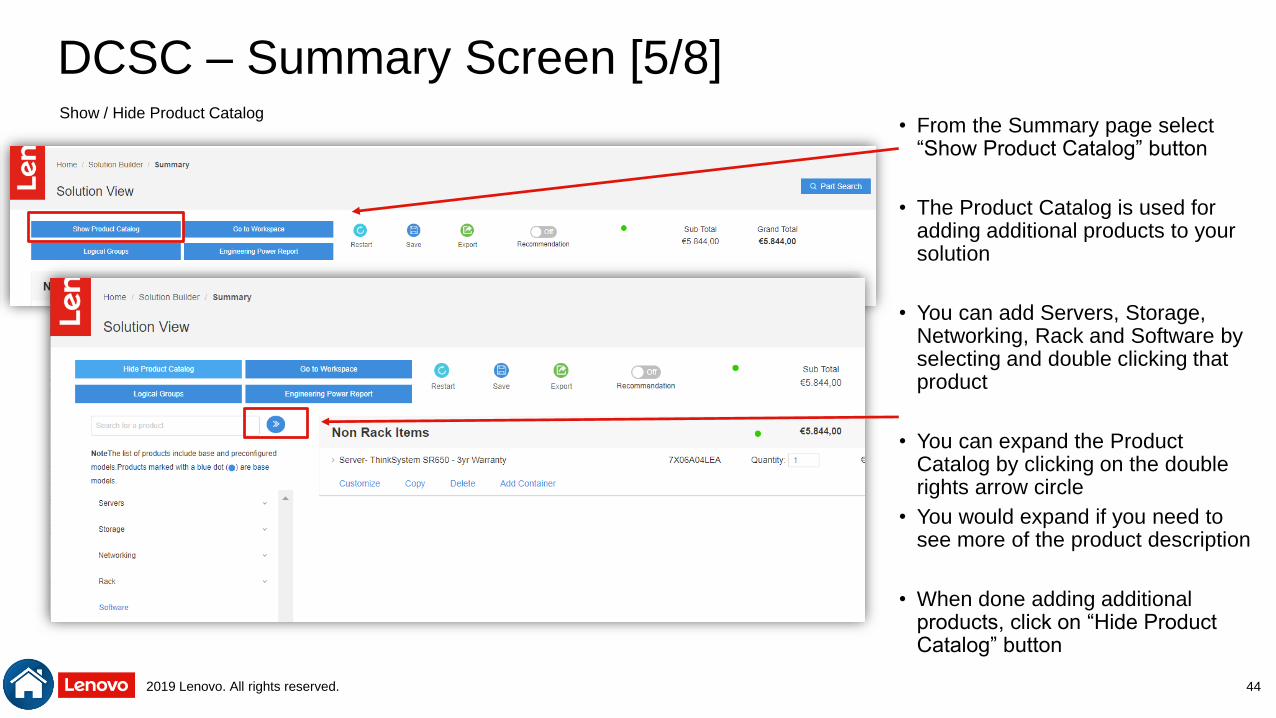
DCSC – Summary Screen [5/8]
• From the Summary page select “Show Product Catalog” button
• The Product Catalog is used for adding additional products to your solution
• You can add Servers, Storage, Networking, Rack and Software by selecting and double clicking that product
• You can expand the Product Catalog by clicking on the double rights arrow circle
• You would expand if you need to see more of the product description
• When done adding additional products, click on “Hide Product Catalog” button
44
Show / Hide Product Catalog
2019 Lenovo. All rights reserved.
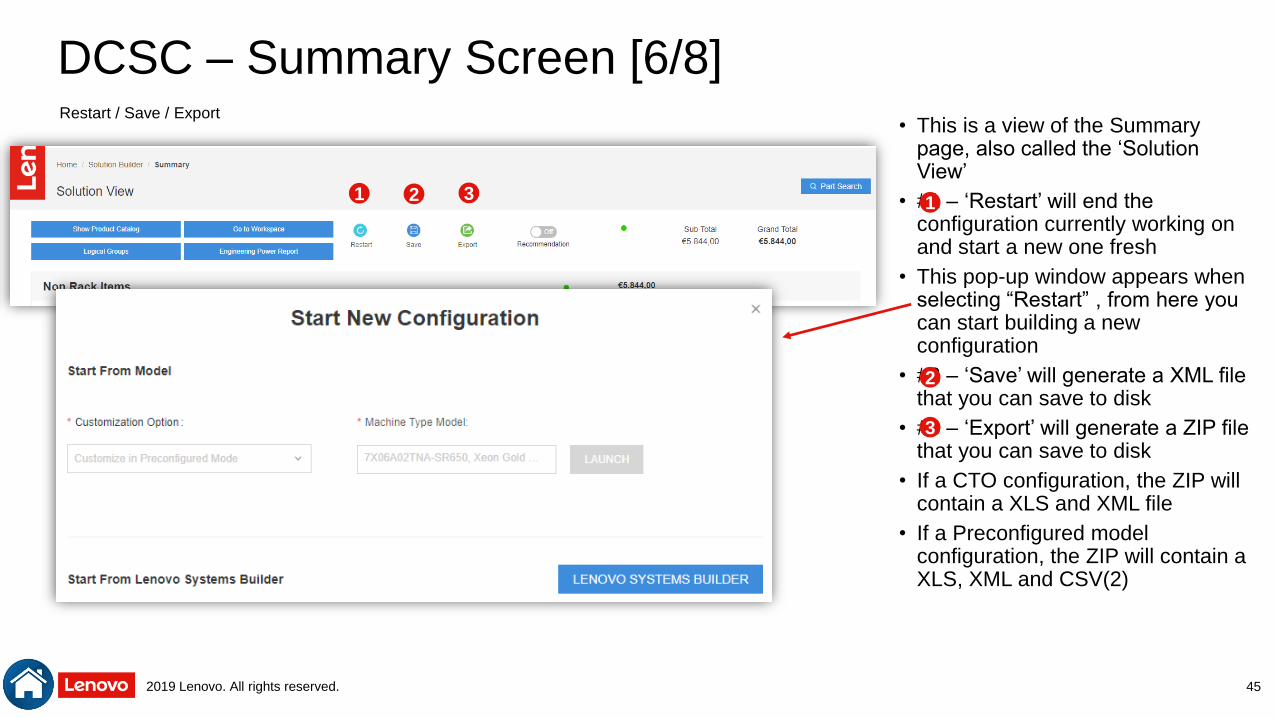
DCSC – Summary Screen [6/8]
• This is a view of the Summary page, also called the ‘Solution View’
• #1 – ‘Restart’ will end the configuration currently working on and start a new one fresh
• This pop-up window appears when selecting “Restart” , from here you can start building a new configuration
• #2 – ‘Save’ will generate a XML file that you can save to disk
• #3 – ‘Export’ will generate a ZIP file that you can save to disk
• If a CTO configuration, the ZIP will contain a XLS and XML file
• If a Preconfigured model configuration, the ZIP will contain a XLS, XML and CSV(2)
45
Restart / Save / Export
112 3
2
3
2019 Lenovo. All rights reserved.
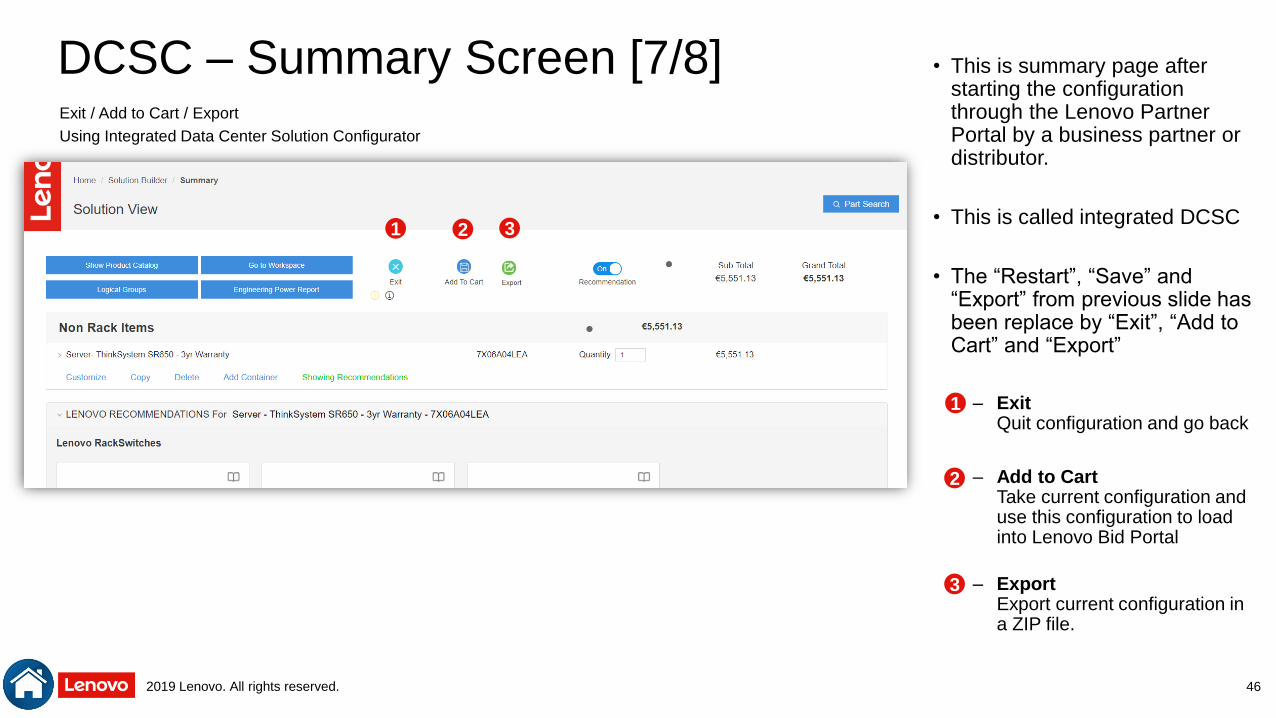
DCSC – Summary Screen [7/8] • This is summary page after starting the configuration through the Lenovo Partner Portal by a business partner or distributor.
• This is called integrated DCSC
• The “Restart”, “Save” and “Export” from previous slide has been replace by “Exit”, “Add to Cart” and “Export”
– ExitQuit configuration and go back
– Add to CartTake current configuration and use this configuration to load into Lenovo Bid Portal
– ExportExport current configuration in a ZIP file.
46
Exit / Add to Cart / Export
Using Integrated Data Center Solution Configurator
1 2 3
1
2
3
2019 Lenovo. All rights reserved.
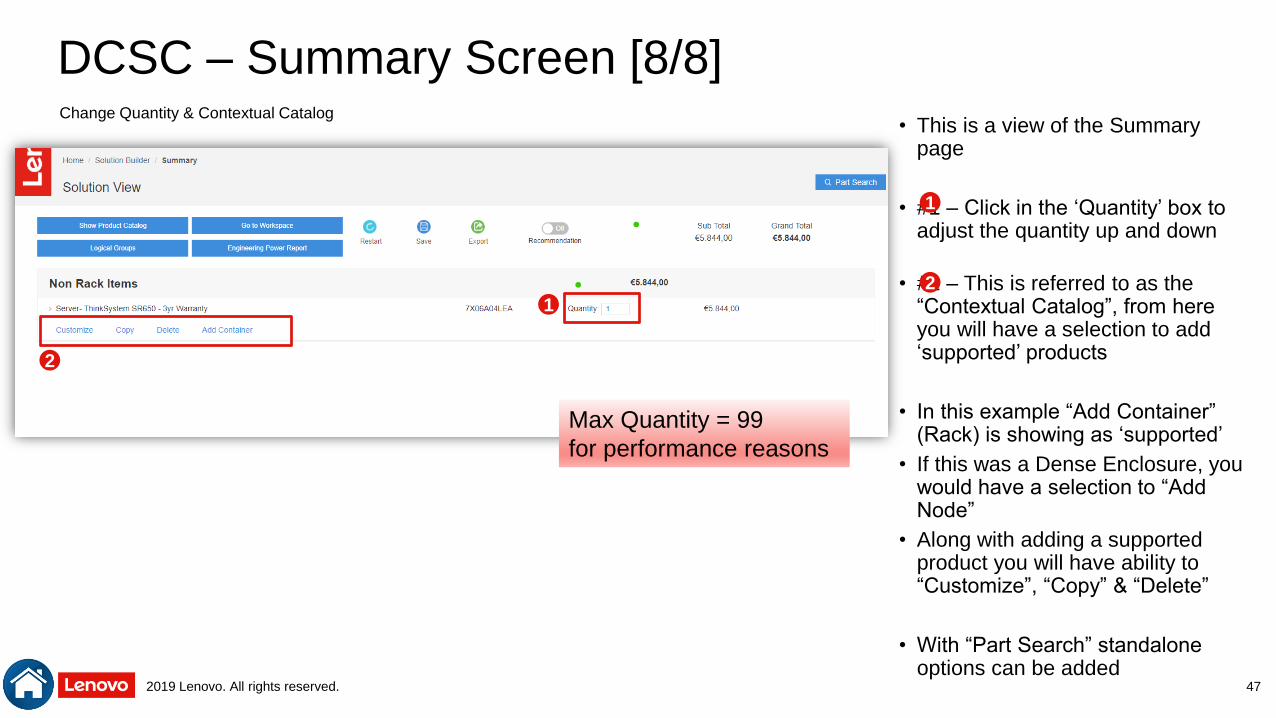
DCSC – Summary Screen [8/8]
• This is a view of the Summary page
• #1 – Click in the ‘Quantity’ box to adjust the quantity up and down
• #2 – This is referred to as the “Contextual Catalog”, from here you will have a selection to add ‘supported’ products
• In this example “Add Container” (Rack) is showing as ‘supported’
• If this was a Dense Enclosure, you would have a selection to “Add Node”
• Along with adding a supported product you will have ability to “Customize”, “Copy” & “Delete”
• With “Part Search” standalone options can be added
47
Change Quantity & Contextual Catalog
1
1
2
2
Max Quantity = 99
for performance reasons
2019 Lenovo. All rights reserved.
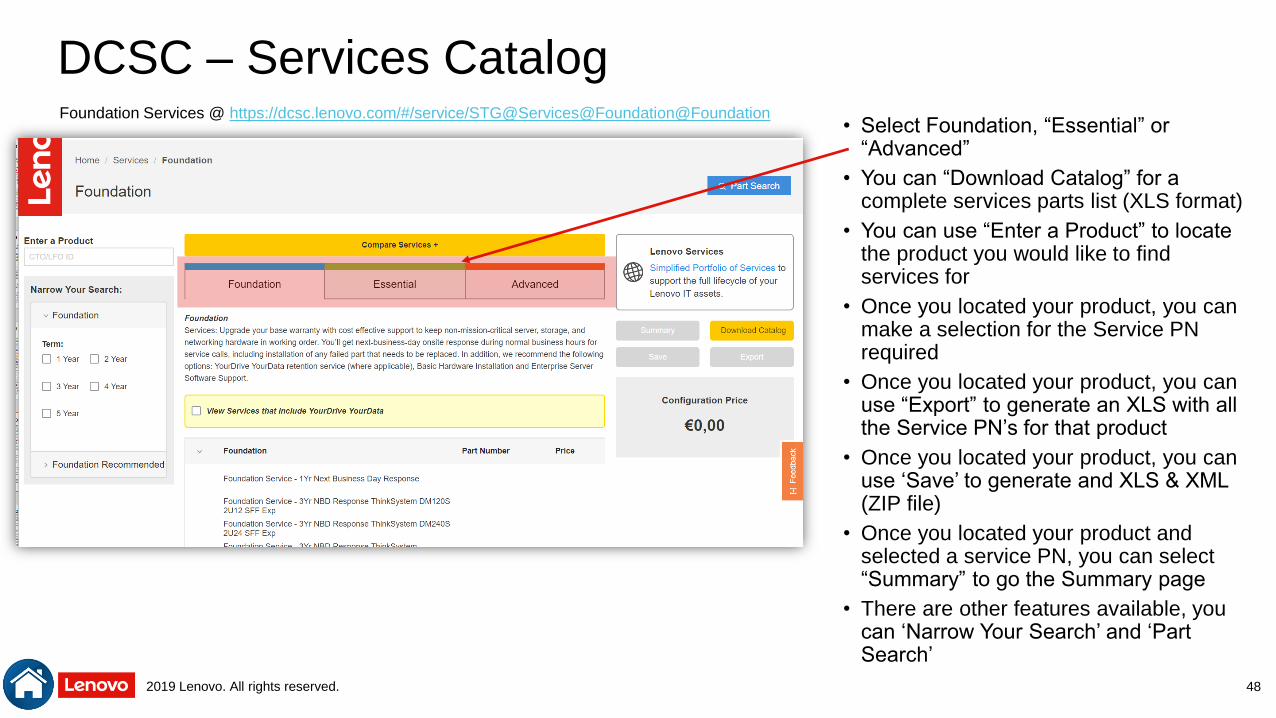
DCSC – Services Catalog
• Select Foundation, “Essential” or “Advanced”
• You can “Download Catalog” for a complete services parts list (XLS format)
• You can use “Enter a Product” to locate the product you would like to find services for
• Once you located your product, you can make a selection for the Service PN required
• Once you located your product, you can use “Export” to generate an XLS with all the Service PN’s for that product
• Once you located your product, you can use ‘Save’ to generate and XLS & XML (ZIP file)
• Once you located your product and selected a service PN, you can select “Summary” to go the Summary page
• There are other features available, you can ‘Narrow Your Search’ and ‘Part Search’
48
Foundation Services @ https://dcsc.lenovo.com/#/service/STG@Services@Foundation@Foundation
2019 Lenovo. All rights reserved.
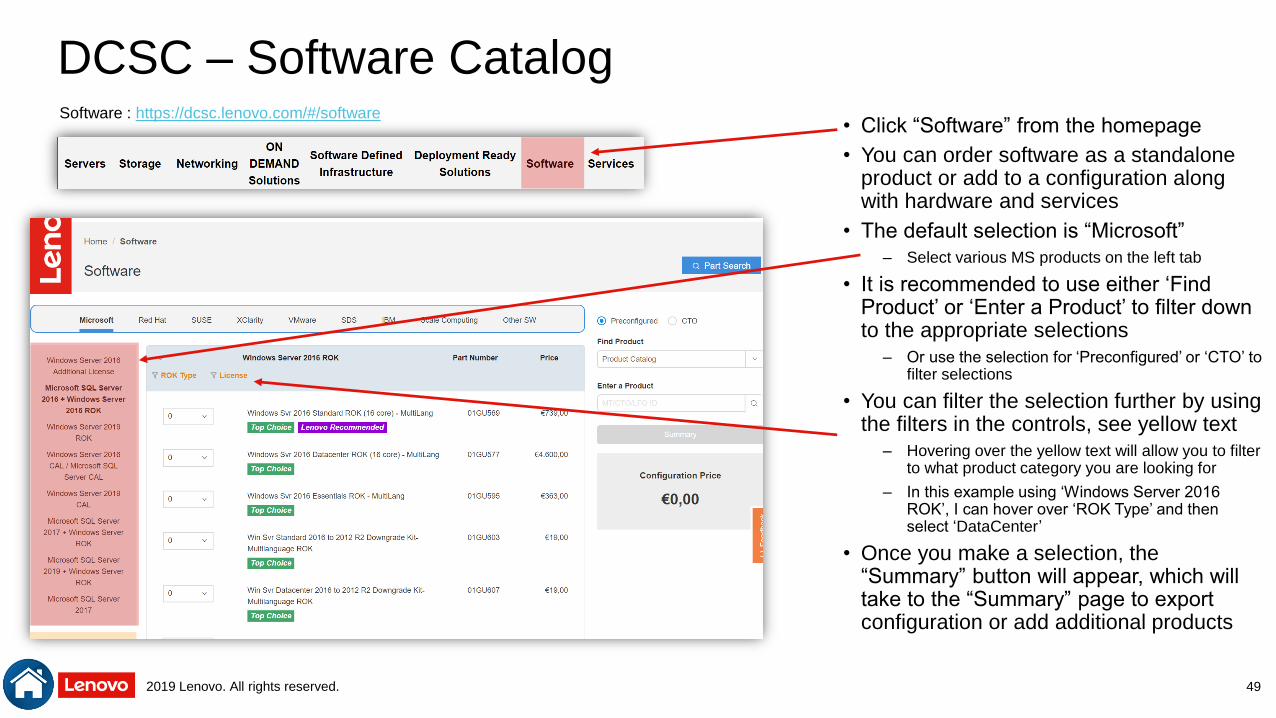
DCSC – Software Catalog
• Click “Software” from the homepage
• You can order software as a standalone product or add to a configuration along with hardware and services
• The default selection is “Microsoft”
– Select various MS products on the left tab
• It is recommended to use either ‘Find Product’ or ‘Enter a Product’ to filter down to the appropriate selections
– Or use the selection for ‘Preconfigured’ or ‘CTO’ to filter selections
• You can filter the selection further by using the filters in the controls, see yellow text
– Hovering over the yellow text will allow you to filter to what product category you are looking for
– In this example using ‘Windows Server 2016 ROK’, I can hover over ‘ROK Type’ and then select ‘DataCenter’
• Once you make a selection, the “Summary” button will appear, which will take to the “Summary” page to export configuration or add additional products
49
Software : https://dcsc.lenovo.com/#/software

2019 Lenovo. All rights reserved.
DCSC – Workspace / Solution Builder (General Purpose)
• Go to Racking mode from the DCSC homepage, choosing “Solution Builder”, or from the “Summary” page, choose “Go to Workspace”
• In this example I built an SR650 and selected ‘Add Container’ from the Summary Page, then added the 25U Rack, then I added a SR250
• From Summary Page I selected ‘Go to Workspace’, which brought me to the ‘Solution Builder’
• From the Solution Builder you can add additional product using the Product Catalog
– Click on the blue double arrow to make the product catalog wider to see more of the description
• The SR250 in currently in the ‘Non-Rack Area’, you can drag & drop into the Rack, if needed
• You can also go back to the Summary Page by selecting “Summary” button
• When complete, choose ‘Save’ (XML) or ‘Export’ (XLS & XML in a ZIP file) 50
Workspace / Solution Builder : https://dcsc.lenovo.com/#/rack-configuration
2019 Lenovo. All rights reserved.
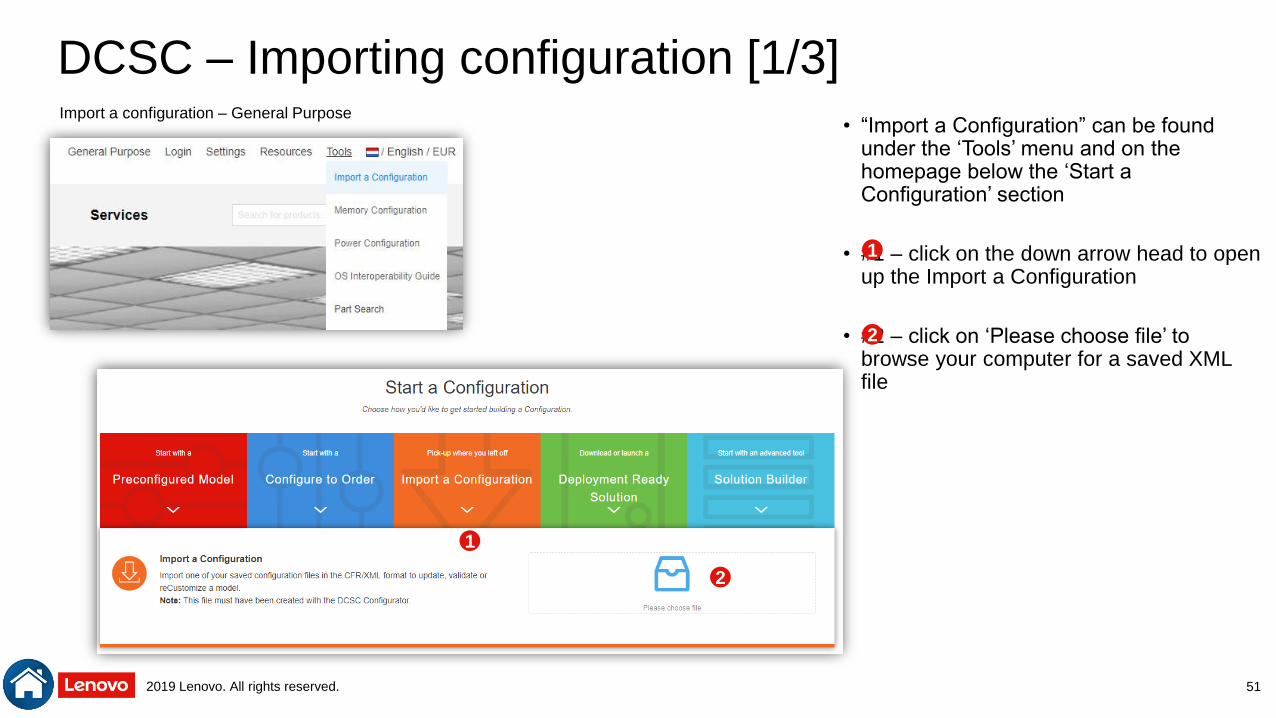
DCSC – Importing configuration [1/3]
• “Import a Configuration” can be found under the ‘Tools’ menu and on the homepage below the ‘Start a Configuration’ section
• #1 – click on the down arrow head to open up the Import a Configuration
• #2 – click on ‘Please choose file’ to browse your computer for a saved XML file
51
Import a configuration – General Purpose
1
1
2
2
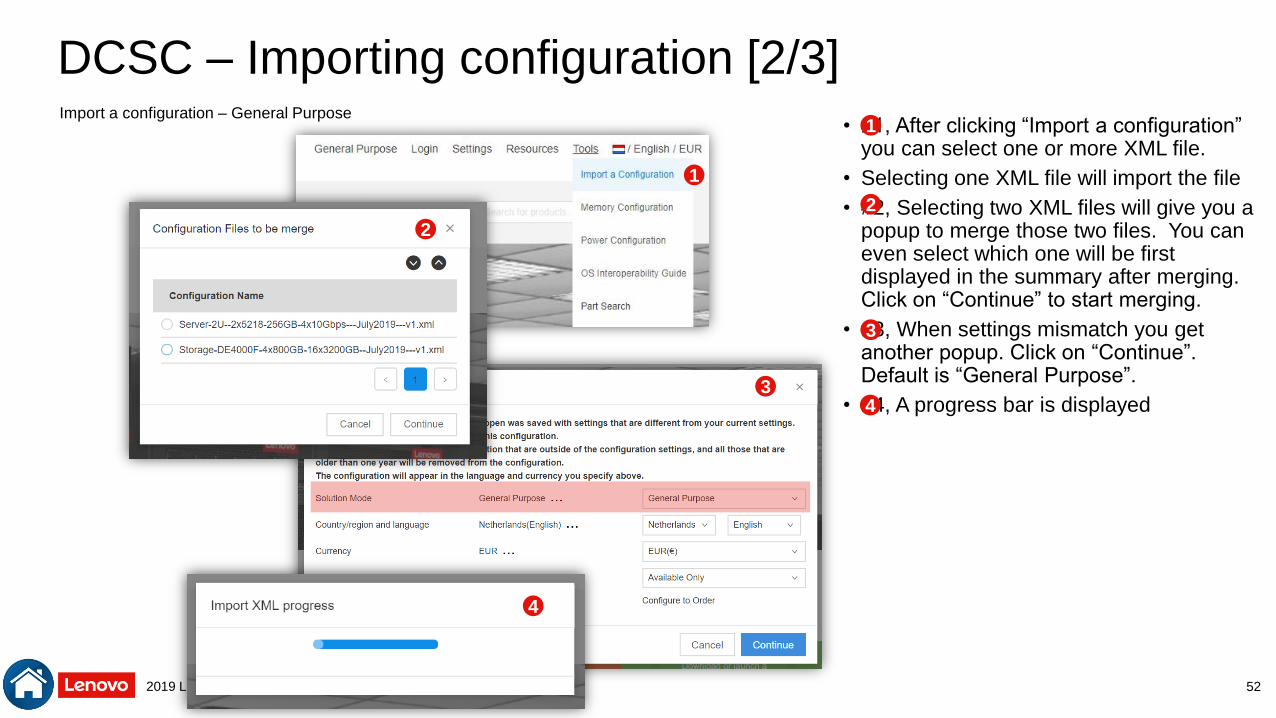
2019 Lenovo. All rights reserved.
DCSC – Importing configuration [2/3]
• #1, After clicking “Import a configuration” you can select one or more XML file.
• Selecting one XML file will import the file
• #2, Selecting two XML files will give you a popup to merge those two files. You can even select which one will be first displayed in the summary after merging. Click on “Continue” to start merging.
• #3, When settings mismatch you get another popup. Click on “Continue”.Default is “General Purpose”.
• #4, A progress bar is displayed
52
Import a configuration – General Purpose
1
2
3
4
1
2
3
4

2019 Lenovo. All rights reserved.
DCSC – Importing configuration [3/3]
• #1 After import the tool could show you a new screen to let you know if any change was done in automatic into your configuration due to withdrawn products, country availability, change in rules, etc. The tool will display at CTO level which parts were:
– Removed
– Added.
– Change Quantity
Not all the changes could apply, the tool only will show the once that apply for your configuration
• #2 When done, you will be at the summary screen with the two XML files merged with the Server XML first, following by the Storage XML
• #3 The information of import can also be review in summary page by clicking on “Import Information” for feature reference.
53
Import a configuration – General Purpose
11
2
3
2
3

2019 Lenovo. All rights reserved.
DCSC – Exporting configuration
• #1 On the “Summary” page choose “Export” to generate a ZIP file with the XLS & XML files
– If a CTO config, the ZIP will contain a XLS and XML
– If a Preconfigured model config, the ZIP will contain a XLS, CSV(2) and XML
• #2 User is able to select the formats to be included in ZIP file before export.
• #3 From the “Workspace” (aka Solution Builder) choose “Export” to generate ZIP file
– If a CTO config, the ZIP will contain a XLS and XML
– If a Preconfigured model config, the ZIP will contain a XLS, CSV(2) and XML
54
Export in General Purpose (Summary and Solution Builder)
RECOMMENDATION !!
Give the exported file a meaningful name, so you can easily find your configuration even if you have made several iterations. Default
generated name is “workspace_” and then 14 random numbers e.g. “workspace_1563923781060.zip” which is hard to distinguish.
Better to use something like “CustomerName_date-of-today_type-of-config_version” e.g. “Lenovo_20190731_SR650_v1.zip”
1
1
2
3
3
2
2019 Lenovo. All rights reserved.
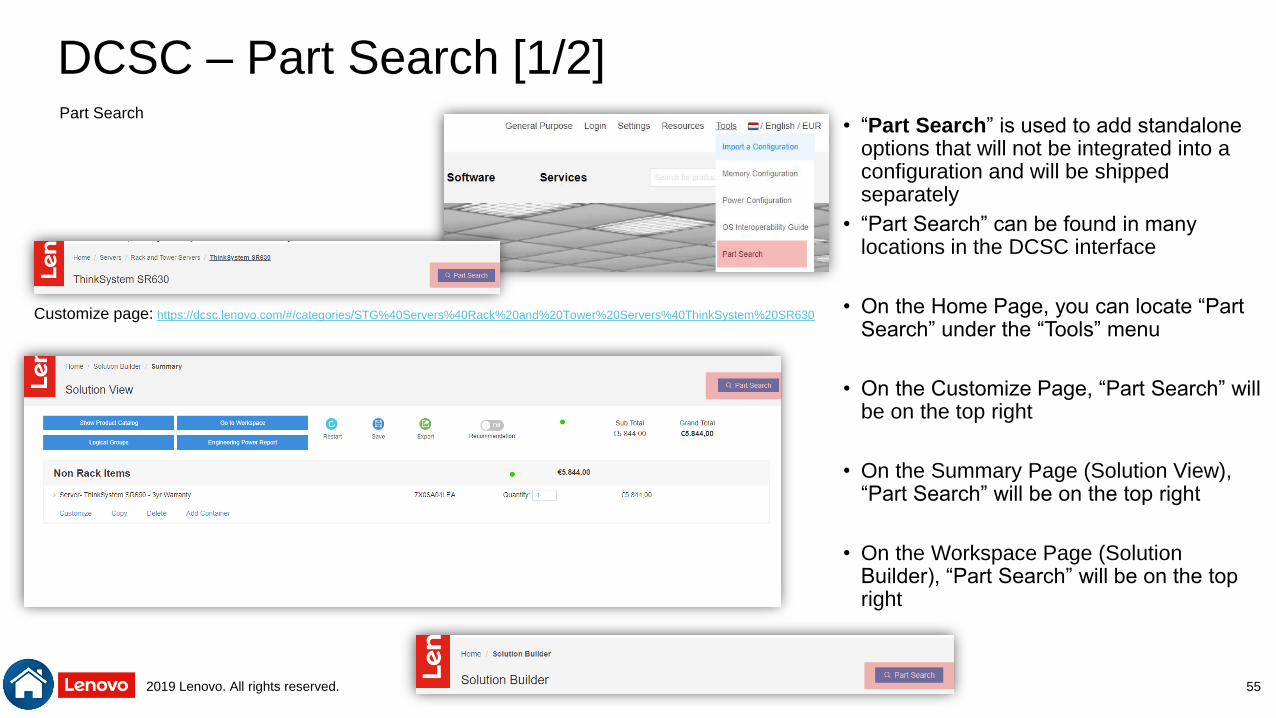
DCSC – Part Search [1/2]
• “Part Search” is used to add standalone options that will not be integrated into a configuration and will be shipped separately
• “Part Search” can be found in many locations in the DCSC interface
• On the Home Page, you can locate “Part Search” under the “Tools” menu
• On the Customize Page, “Part Search” will be on the top right
• On the Summary Page (Solution View), “Part Search” will be on the top right
• On the Workspace Page (Solution Builder), “Part Search” will be on the top right
55
Part Search
Customize page: https://dcsc.lenovo.com/#/categories/STG%40Servers%40Rack%20and%20Tower%20Servers%40ThinkSystem%20SR630
2019 Lenovo. All rights reserved.
DCSC – Part Search [2/2]
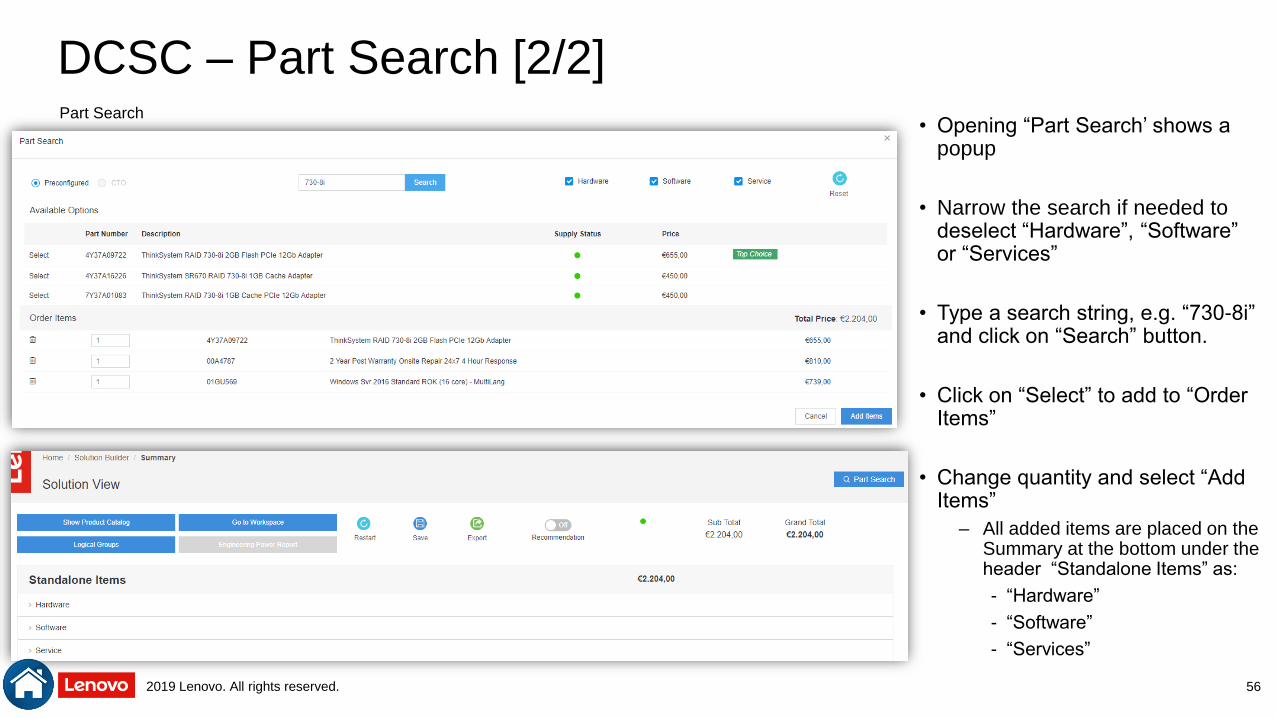
• Opening “Part Search’ shows a popup
• Narrow the search if needed to deselect “Hardware”, “Software” or “Services”
• Type a search string, e.g. “730-8i” and click on “Search” button.
• Click on “Select” to add to “Order Items”
• Change quantity and select “Add Items”
– All added items are placed on the Summary at the bottom under the header “Standalone Items” as:
- “Hardware”
- “Software”
- “Services”
56
Part Search
2019 Lenovo. All rights reserved.
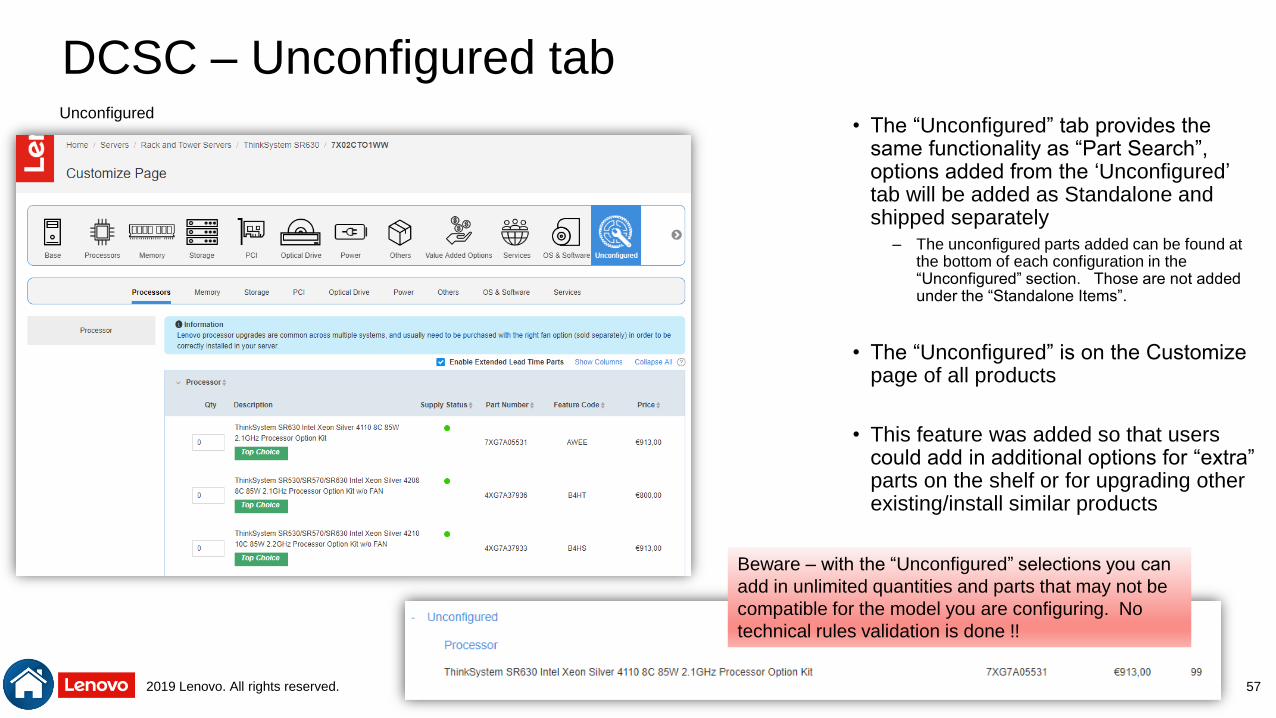
DCSC – Unconfigured tab
• The “Unconfigured” tab provides the same functionality as “Part Search”, options added from the ‘Unconfigured’ tab will be added as Standalone and shipped separately
– The unconfigured parts added can be found at the bottom of each configuration in the “Unconfigured” section. Those are not added under the “Standalone Items”.
• The “Unconfigured” is on the Customize page of all products
• This feature was added so that users could add in additional options for “extra” parts on the shelf or for upgrading other existing/install similar products
57
Unconfigured
Beware – with the “Unconfigured” selections you can
add in unlimited quantities and parts that may not be
compatible for the model you are configuring. No
technical rules validation is done !!
2019 Lenovo. All rights reserved.
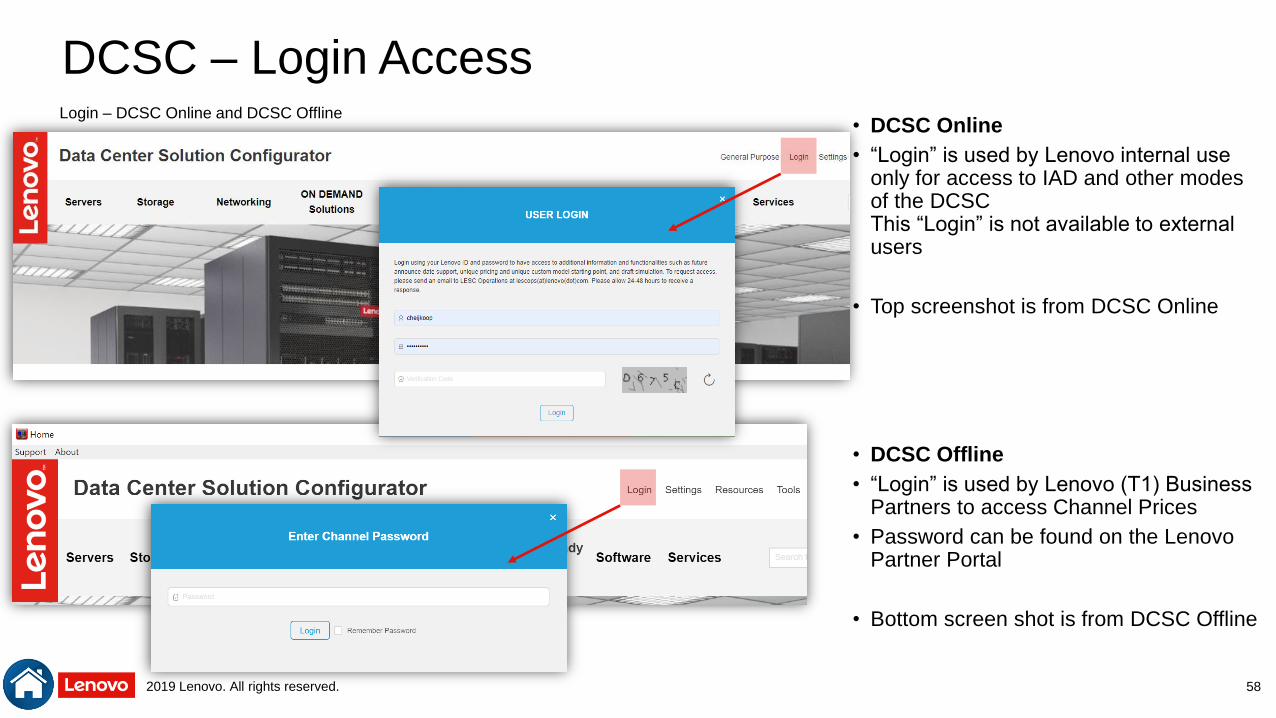
DCSC – Login Access
• DCSC Online
• “Login” is used by Lenovo internal use only for access to IAD and other modes of the DCSC This “Login” is not available to external users
• Top screenshot is from DCSC Online
• DCSC Offline
• “Login” is used by Lenovo (T1) Business Partners to access Channel Prices
• Password can be found on the Lenovo Partner Portal
• Bottom screen shot is from DCSC Offline
58
Login – DCSC Online and DCSC Offline

2019 Lenovo. All rights reserved.
• In “Customize” and “Solution Builder” views there are two configuration modes:
• Guided ModeHelps user avoid errors by greying-out and hiding invalid selections as you move from left to right across the tabs.
• Expert Mode Keeps all selections available and give the user option to suppress error messages until they are ready to trigger a check.
• In “HPC and AI – LESI Solution” and “HPC and IA - Systems”modes the user is able to customize the level of rules making a click in settings button; this will help to allow to enable or disable partial rules.
• Click on the question mark to get additional help
DCSC Guided Mode versus Expert Mode [1/3]
1
2
A
1
2
A
59
2019 Lenovo. All rights reserved.
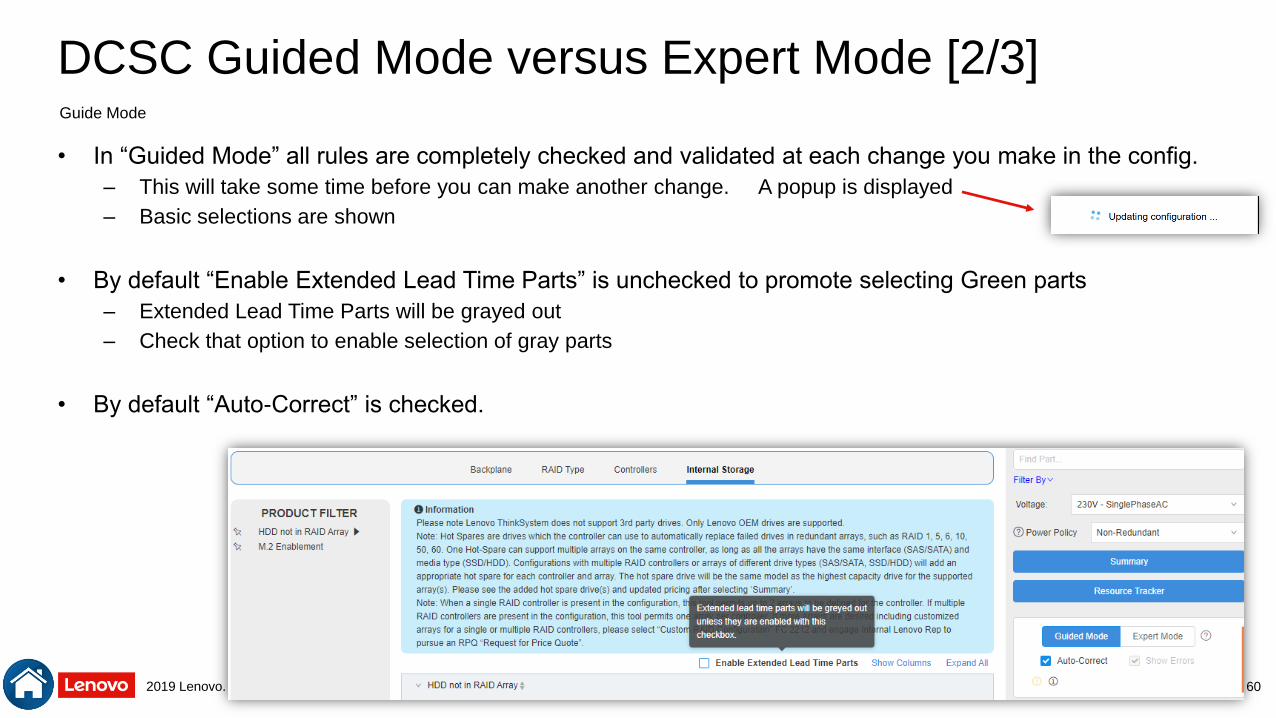
DCSC Guided Mode versus Expert Mode [2/3]
• In “Guided Mode” all rules are completely checked and validated at each change you make in the config.
– This will take some time before you can make another change. A popup is displayed
– Basic selections are shown
• By default “Enable Extended Lead Time Parts” is unchecked to promote selecting Green parts
– Extended Lead Time Parts will be grayed out
– Check that option to enable selection of gray parts
• By default “Auto-Correct” is checked.
Guide Mode
60
2019 Lenovo. All rights reserved.
DCSC Guided Mode versus Expert Mode [3/3]
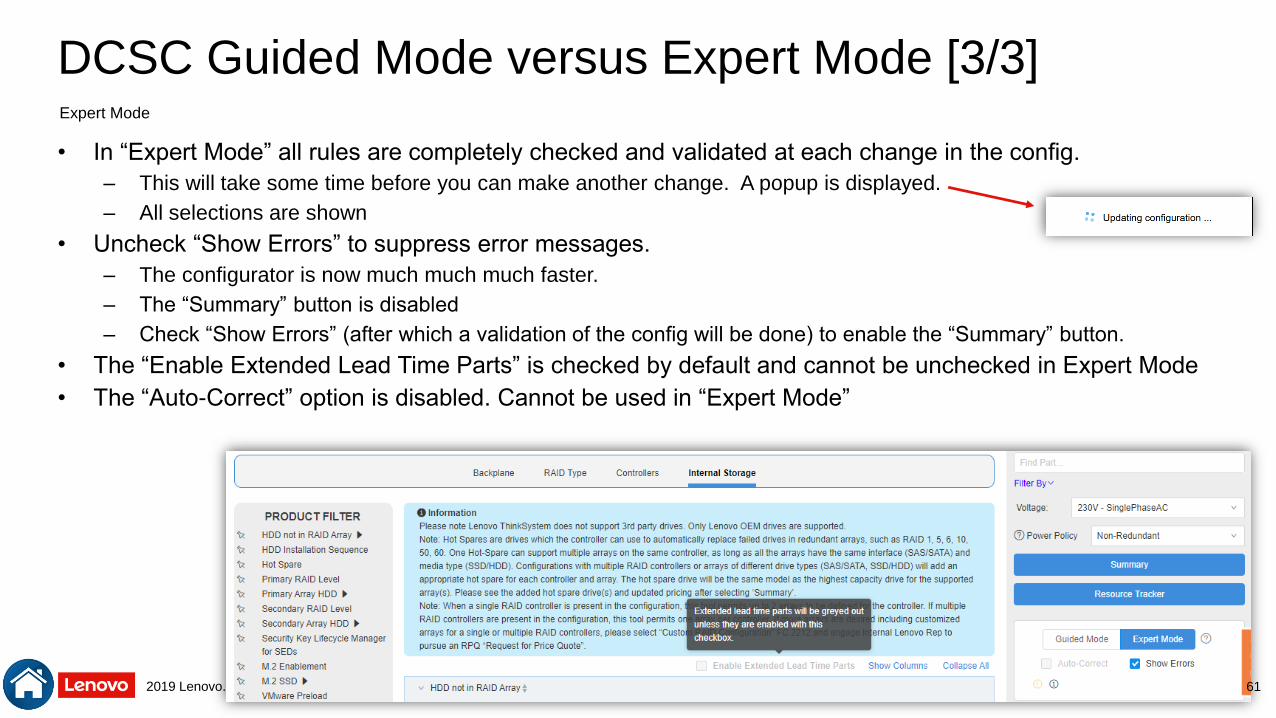
• In “Expert Mode” all rules are completely checked and validated at each change in the config.
– This will take some time before you can make another change. A popup is displayed.
– All selections are shown
• Uncheck “Show Errors” to suppress error messages.
– The configurator is now much much much faster.
– The “Summary” button is disabled
– Check “Show Errors” (after which a validation of the config will be done) to enable the “Summary” button.
• The “Enable Extended Lead Time Parts” is checked by default and cannot be unchecked in Expert Mode
• The “Auto-Correct” option is disabled. Cannot be used in “Expert Mode”
Expert Mode
61
2019 Lenovo. All rights reserved.
DCSC Performance
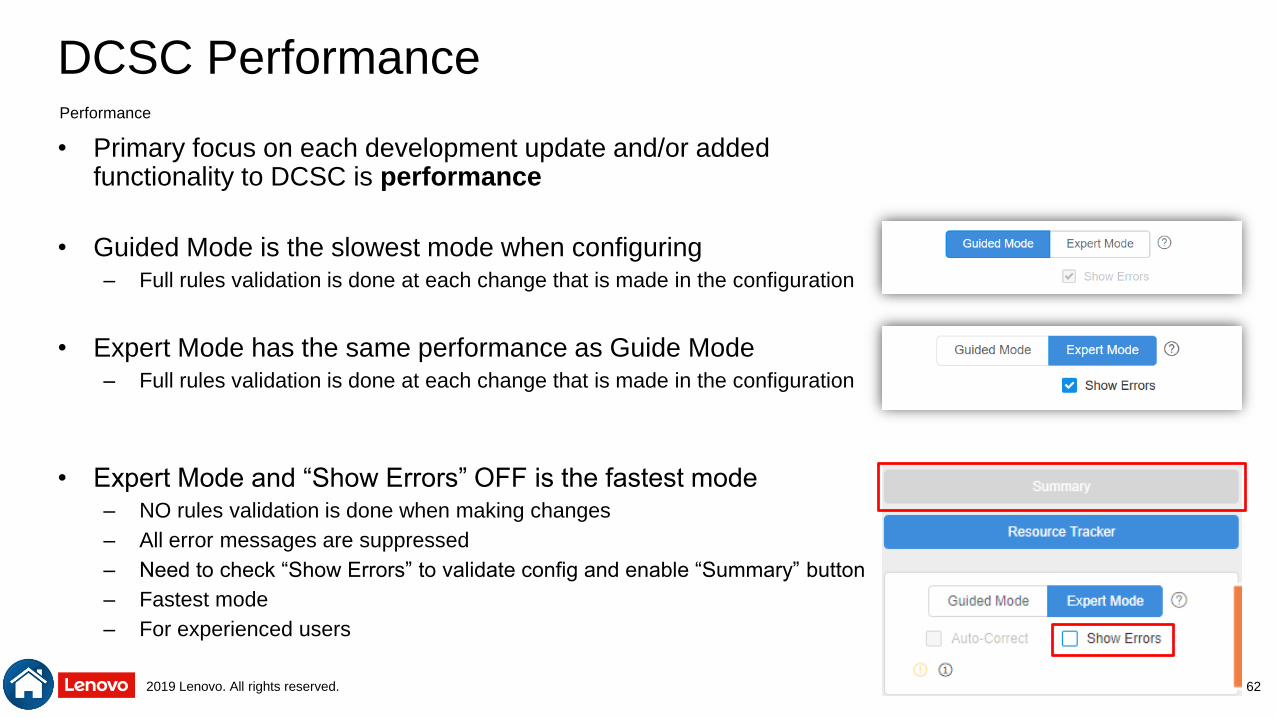
• Primary focus on each development update and/or added functionality to DCSC is performance
• Guided Mode is the slowest mode when configuring – Full rules validation is done at each change that is made in the configuration
• Expert Mode has the same performance as Guide Mode– Full rules validation is done at each change that is made in the configuration
• Expert Mode and “Show Errors” OFF is the fastest mode– NO rules validation is done when making changes
– All error messages are suppressed
– Need to check “Show Errors” to validate config and enable “Summary” button
– Fastest mode
– For experienced users
Performance
62
2019 Lenovo. All rights reserved.
DCSC – Recovery
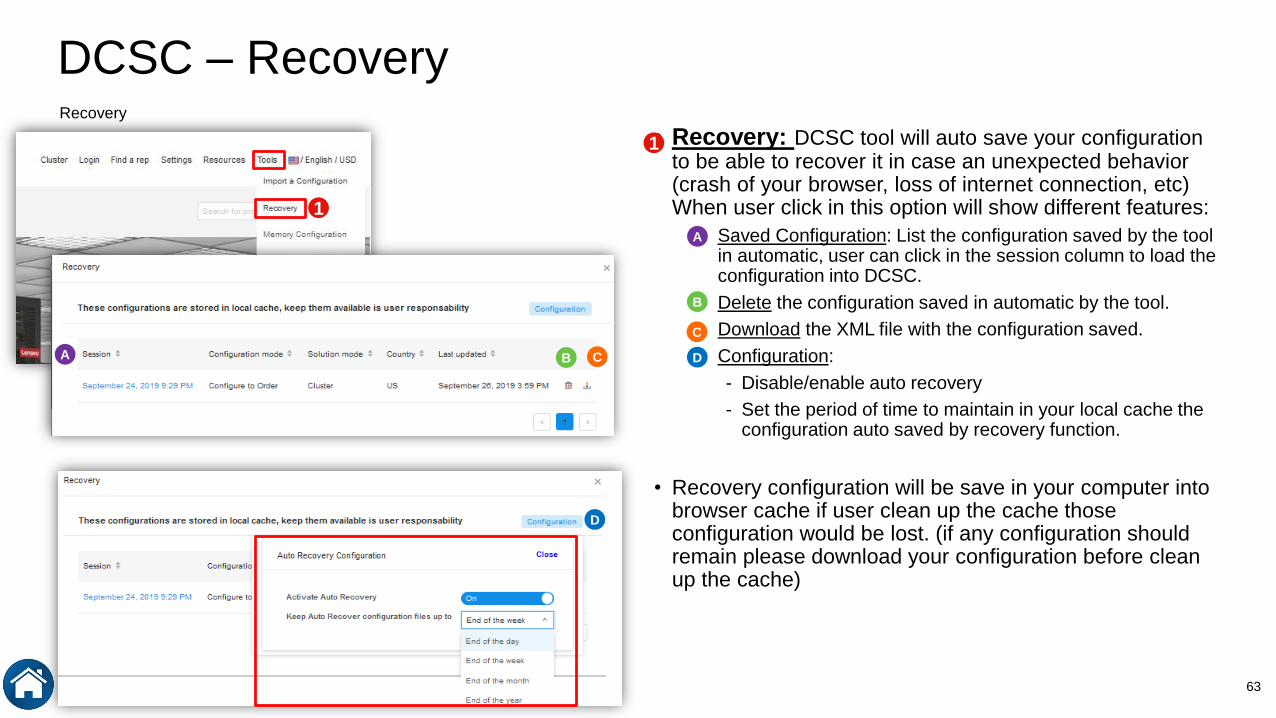
• Recovery: DCSC tool will auto save your configuration to be able to recover it in case an unexpected behavior (crash of your browser, loss of internet connection, etc) When user click in this option will show different features:
– Saved Configuration: List the configuration saved by the tool in automatic, user can click in the session column to load the configuration into DCSC.
– Delete the configuration saved in automatic by the tool.
– Download the XML file with the configuration saved.
– Configuration:
- Disable/enable auto recovery
- Set the period of time to maintain in your local cache the configuration auto saved by recovery function.
• Recovery configuration will be save in your computer into browser cache if user clean up the cache those configuration would be lost. (if any configuration should remain please download your configuration before clean up the cache)
1
A
1
B C
D
A
B
C
D
Recovery
63
2019 Lenovo. All rights reserved.
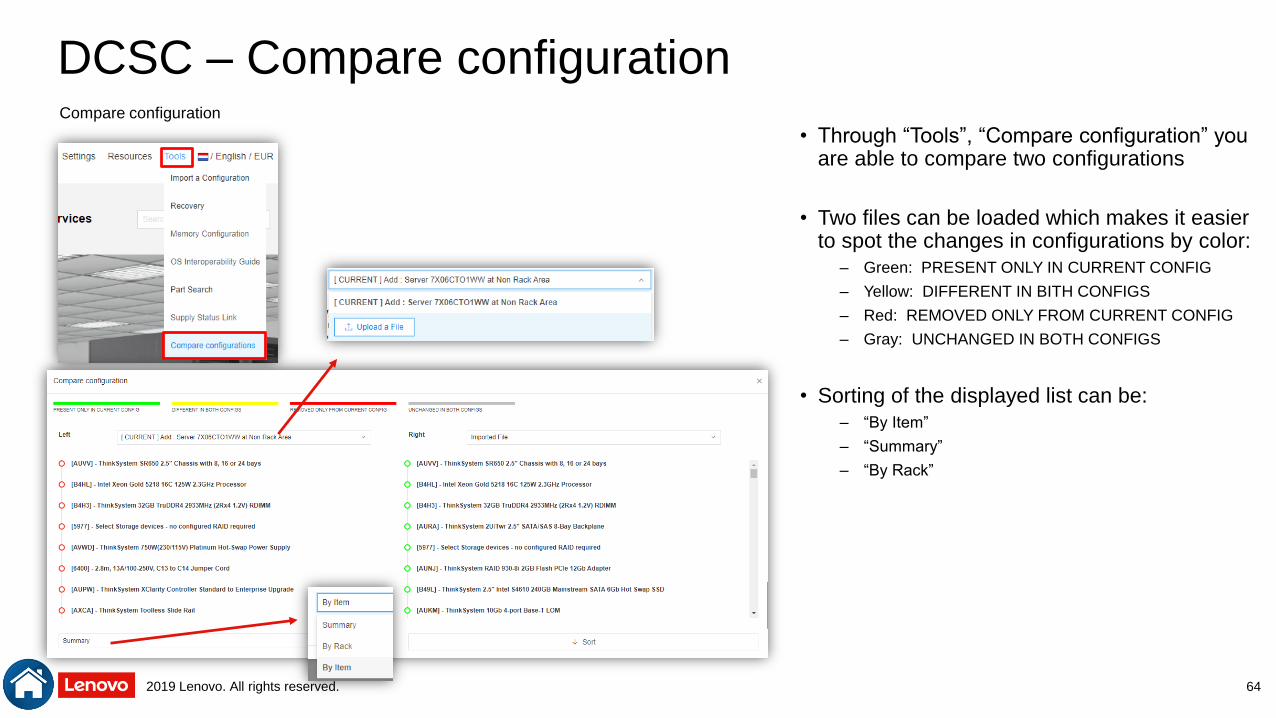
DCSC – Compare configuration
• Through “Tools”, “Compare configuration” you are able to compare two configurations
• Two files can be loaded which makes it easier to spot the changes in configurations by color:
– Green: PRESENT ONLY IN CURRENT CONFIG
– Yellow: DIFFERENT IN BITH CONFIGS
– Red: REMOVED ONLY FROM CURRENT CONFIG
– Gray: UNCHANGED IN BOTH CONFIGS
• Sorting of the displayed list can be:
– “By Item”
– “Summary”
– “By Rack”
Compare configuration
64
2019 Lenovo. All rights reserved.
Data Center Solution ConfiguratorBeginners Guide - Advanced
65

2019 Lenovo. All rights reserved.
Add LFO to a CTO config
• When you start a CTO configuration and want to add a LFO to it, this is possible by using the “Part Search” option at the summary page. Select “Standalone” and press “Add Items”.
• That LFO will be added as “Standalone Items”
Summary tab
exported XLS
• Works in both DCSC Online & DCSC Offline
66
2019 Lenovo. All rights reserved.
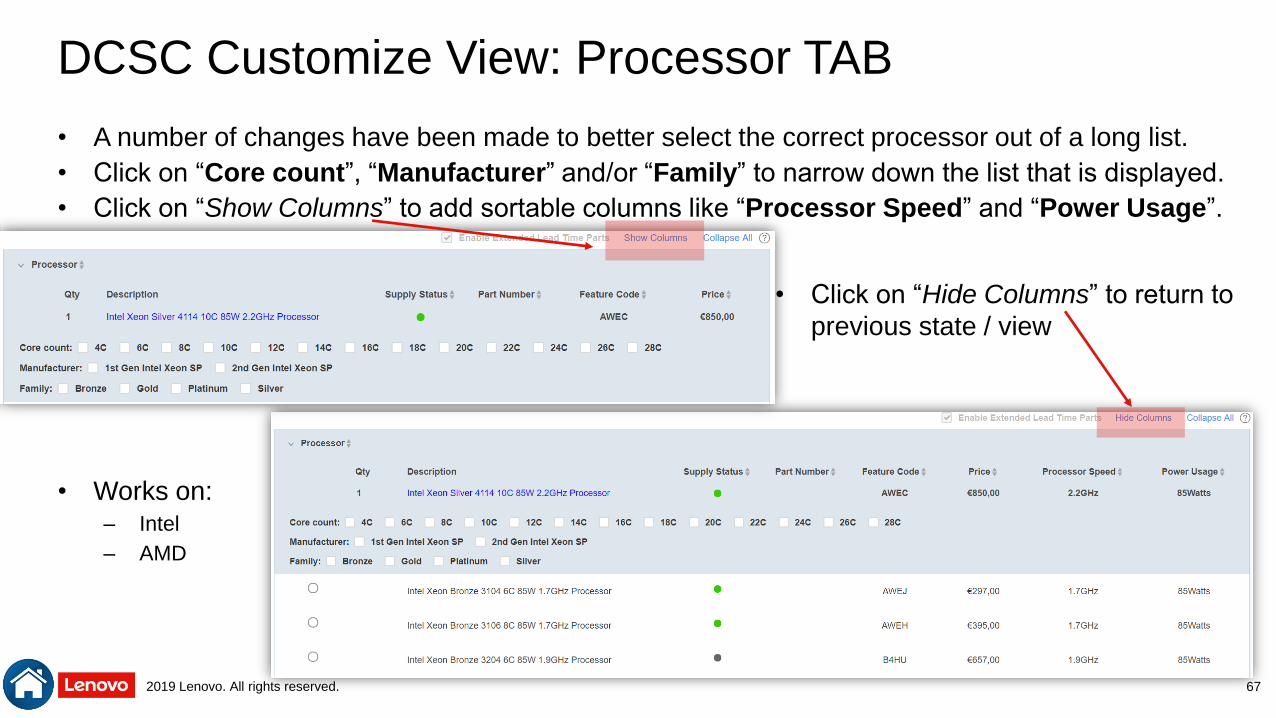
DCSC Customize View: Processor TAB
• A number of changes have been made to better select the correct processor out of a long list.
• Click on “Core count”, “Manufacturer” and/or “Family” to narrow down the list that is displayed.
• Click on “Show Columns” to add sortable columns like “Processor Speed” and “Power Usage”.
• Works on:– Intel
– AMD
• Click on “Hide Columns” to return to
previous state / view
67
2019 Lenovo. All rights reserved.
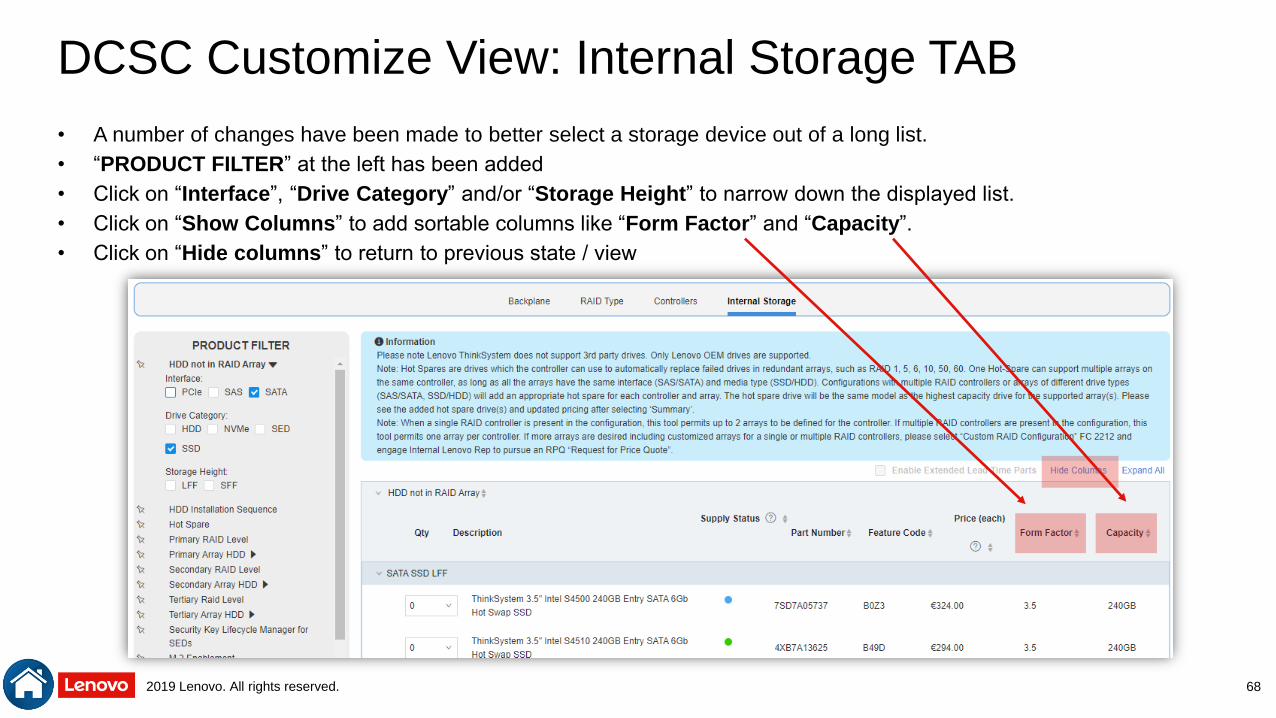
DCSC Customize View: Internal Storage TAB
• A number of changes have been made to better select a storage device out of a long list.
• “PRODUCT FILTER” at the left has been added
• Click on “Interface”, “Drive Category” and/or “Storage Height” to narrow down the displayed list.
• Click on “Show Columns” to add sortable columns like “Form Factor” and “Capacity”.
• Click on “Hide columns” to return to previous state / view
68
2019 Lenovo. All rights reserved.
Data Center Solution ConfiguratorBeginners Guide –“HPC and AI”
69
2019 Lenovo. All rights reserved.
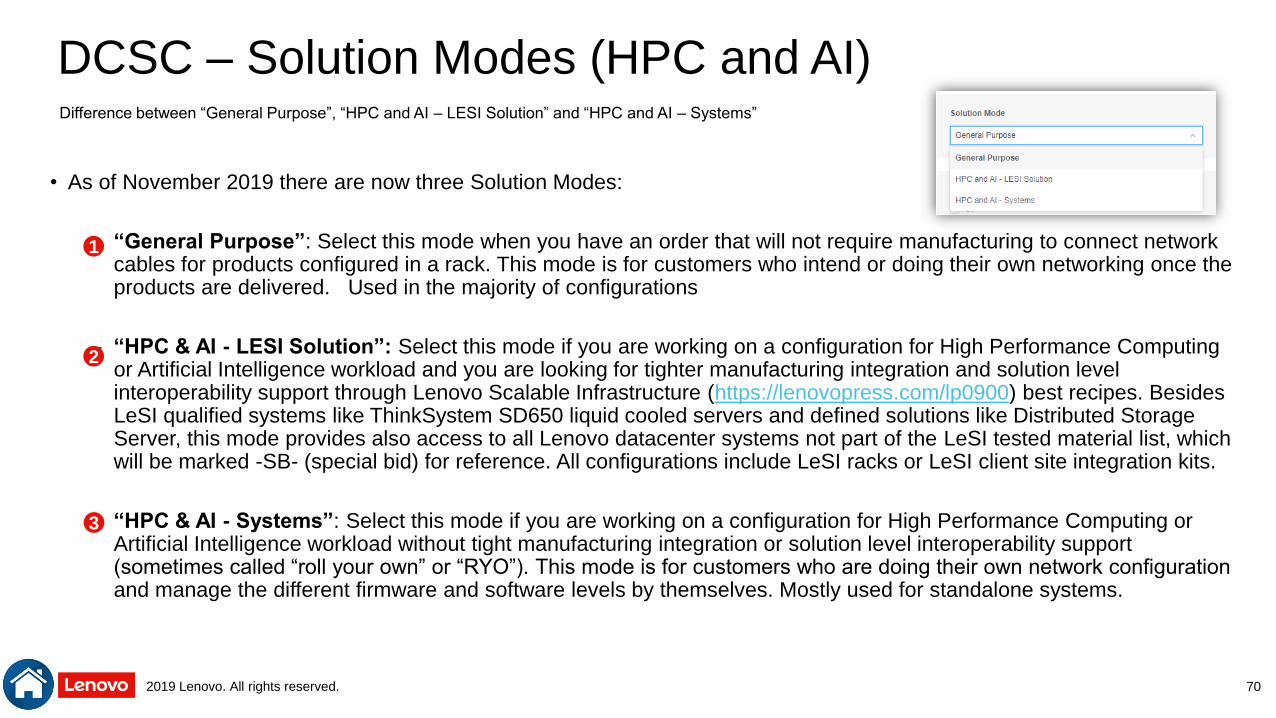
DCSC – Solution Modes (HPC and AI)
• As of November 2019 there are now three Solution Modes:
– “General Purpose”: Select this mode when you have an order that will not require manufacturing to connect network cables for products configured in a rack. This mode is for customers who intend or doing their own networking once the products are delivered. Used in the majority of configurations
– “HPC & AI - LESI Solution”: Select this mode if you are working on a configuration for High Performance Computing or Artificial Intelligence workload and you are looking for tighter manufacturing integration and solution level interoperability support through Lenovo Scalable Infrastructure (https://lenovopress.com/lp0900) best recipes. Besides LeSI qualified systems like ThinkSystem SD650 liquid cooled servers and defined solutions like Distributed Storage Server, this mode provides also access to all Lenovo datacenter systems not part of the LeSI tested material list, which will be marked -SB- (special bid) for reference. All configurations include LeSI racks or LeSI client site integration kits.
– “HPC & AI - Systems”: Select this mode if you are working on a configuration for High Performance Computing or Artificial Intelligence workload without tight manufacturing integration or solution level interoperability support (sometimes called “roll your own” or “RYO”). This mode is for customers who are doing their own network configuration and manage the different firmware and software levels by themselves. Mostly used for standalone systems.
1
2
3
Difference between “General Purpose”, “HPC and AI – LESI Solution” and “HPC and AI – Systems”
70
2019 Lenovo. All rights reserved.
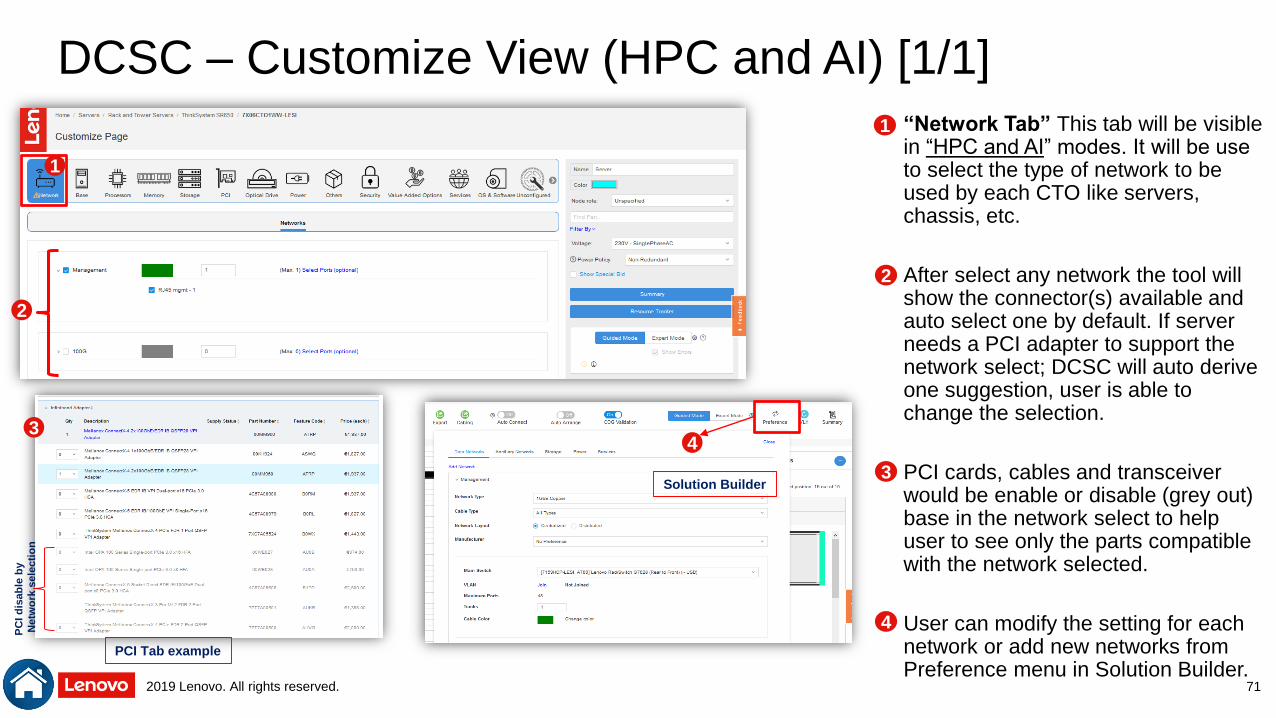
DCSC – Customize View (HPC and AI) [1/1]
• “Network Tab” This tab will be visible in “HPC and AI” modes. It will be use to select the type of network to be used by each CTO like servers, chassis, etc.
• After select any network the tool will show the connector(s) available and auto select one by default. If server needs a PCI adapter to support the network select; DCSC will auto derive one suggestion, user is able to change the selection.
• PCI cards, cables and transceiver would be enable or disable (grey out) base in the network select to help user to see only the parts compatible with the network selected.
• User can modify the setting for each network or add new networks from Preference menu in Solution Builder.
1
1
2
2
3
4
Solution Builder
4
3
PCI Tab example
PC
I d
isab
le b
y
Netw
ork
sele
cti
on
71

2019 Lenovo. All rights reserved.
DCSC – Workspace/Solution Builder (HPC and AI) [1/7]• “Workspace Bar”: User will be able to see different set of
features in each Solution mode.
– Common tools between modes:
- Restart (restart your configuration without save)
- Save (Save your configuration in a XML File)
- Export (Different format by Solution mode available)
- Error Message (Show Error/Warning/Informative message for all the configuration)
- Auto Arrange (Enable or disable best practice for placement in rack)
- Summary
– Cluster unique features:
- Cabling (export P2P report -cabling information)
- COG Validation (Enable or disable stability calculations)
- Guide mode/ Expert mode: (enable or disable rules improve performance and/or create special configurations)
- Preference (All the settings for auto connection (P2P) function)
- VLH (create VLH products as holder in the configuration to
request Vendor products by RPQ process)
• “Workspace Panels”: this user interface can be collapse or expand and also minimize to improve visibility of racks.
– “About Configuration”: Let user know if the configuration is cluster approval base in some criteria defined. No Cluster approved configuration could impact in time of configuration validation outside DCSC configurator. (Only available in both HPC and AI modes)
– “Non Rack Area”: this is the same as before, show all the CTOs outside of the Rack.
– “History Panel”: The tool will track each change made by user and allow to user to undo or redo any change during the actual session. 72
Workspace / Solution Builder HPC and AI Modes : https://dcsc.lenovo.com/#/rack-configuration1
1
A
A
A
A
BB
B
2
2
C
D
E
C
D
E

2019 Lenovo. All rights reserved.
DCSC – Workspace/Solution Builder (HPC and AI) [2/7]• Auto Connection rule customization: User is able to
customize the rules that auto connection will run making a click in setting button.
– Add switches automatically: the tool will add in automatic the number of switches need it for the configuration.
– Automated Rack PDU: the tool will add in automatic the number of PDUs need it for the configuration.
– P2P Cabling: the tool will make the connection between products for Network, Storage, Power, Console.
73
Workspace / Solution Builder HPC and AI Modes : https://dcsc.lenovo.com/#/rack-configuration1
A
B
1
C
A
B
C
2019 Lenovo. All rights reserved.
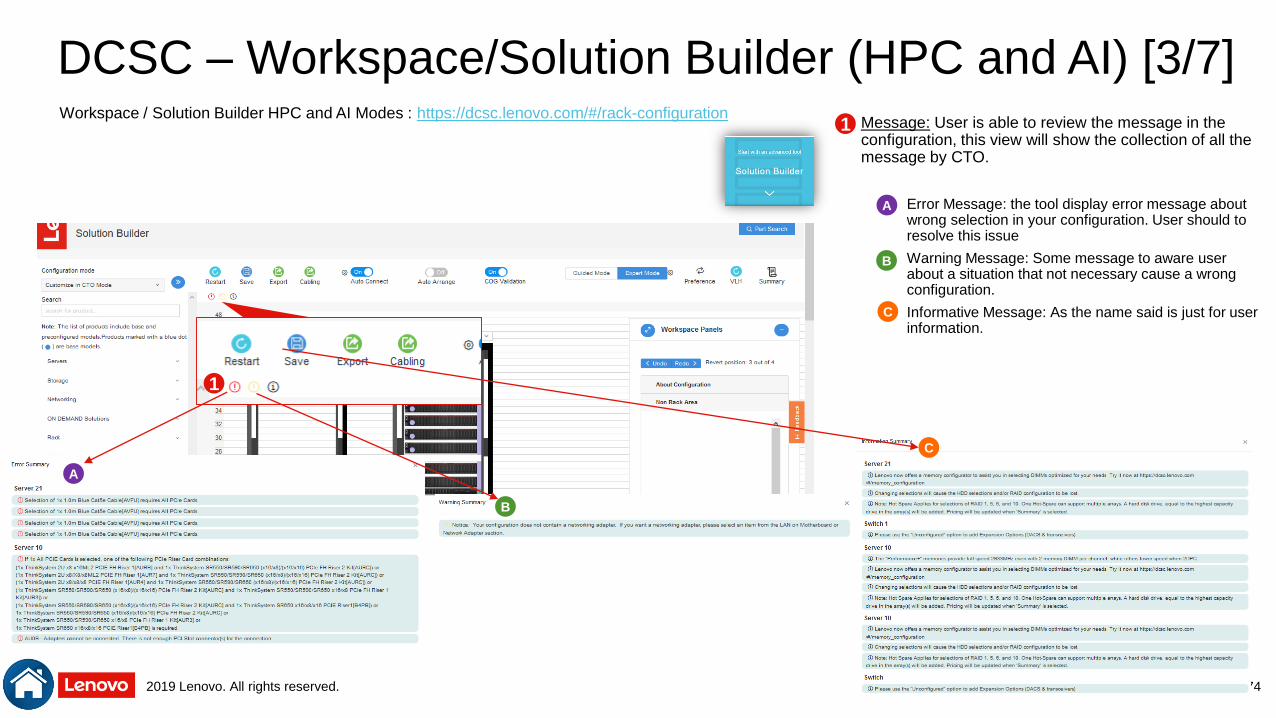
DCSC – Workspace/Solution Builder (HPC and AI) [3/7]• Message: User is able to review the message in the
configuration, this view will show the collection of all the message by CTO.
– Error Message: the tool display error message about wrong selection in your configuration. User should to resolve this issue
– Warning Message: Some message to aware user about a situation that not necessary cause a wrong configuration.
– Informative Message: As the name said is just for user information.
74
Workspace / Solution Builder HPC and AI Modes : https://dcsc.lenovo.com/#/rack-configuration1
A
B
C
A
B
C
1
2019 Lenovo. All rights reserved.
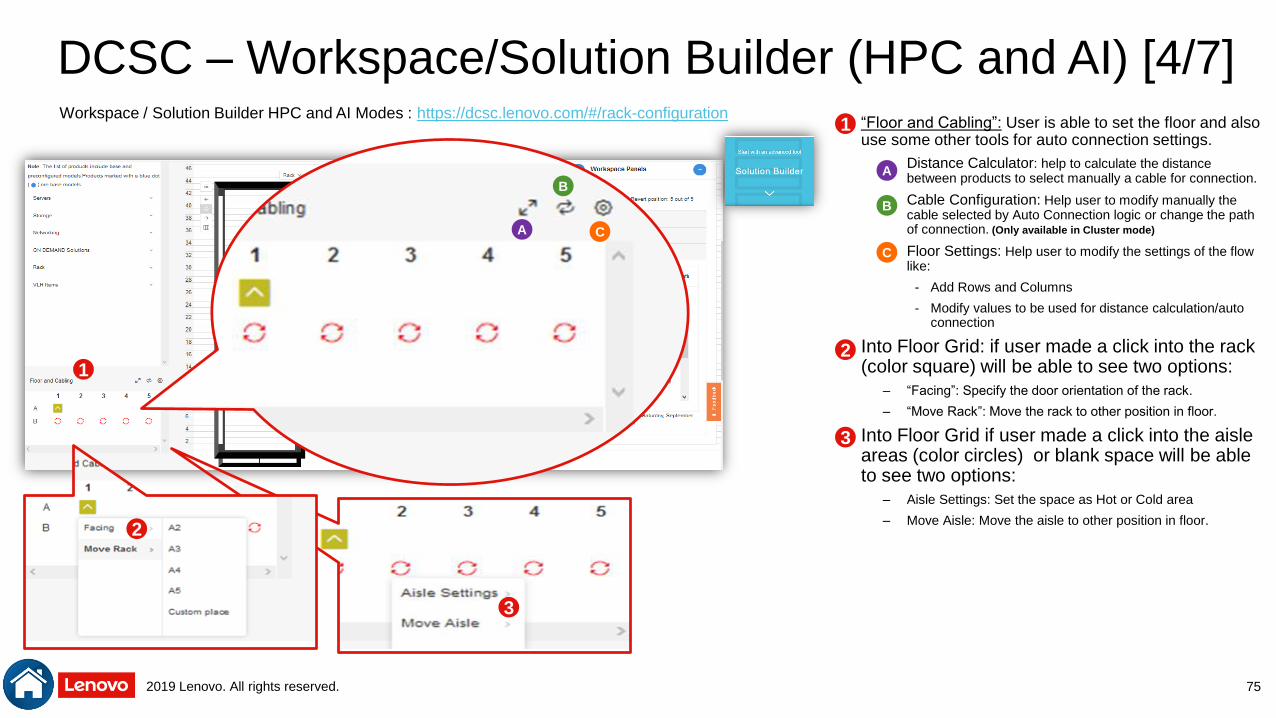
DCSC – Workspace/Solution Builder (HPC and AI) [4/7]• “Floor and Cabling”: User is able to set the floor and also
use some other tools for auto connection settings.
– Distance Calculator: help to calculate the distance between products to select manually a cable for connection.
– Cable Configuration: Help user to modify manually the cable selected by Auto Connection logic or change the path of connection. (Only available in Cluster mode)
– Floor Settings: Help user to modify the settings of the flow like:
- Add Rows and Columns
- Modify values to be used for distance calculation/auto connection
• Into Floor Grid: if user made a click into the rack (color square) will be able to see two options:
– “Facing”: Specify the door orientation of the rack.
– “Move Rack”: Move the rack to other position in floor.
• Into Floor Grid if user made a click into the aisle areas (color circles) or blank space will be able to see two options:
– Aisle Settings: Set the space as Hot or Cold area
– Move Aisle: Move the aisle to other position in floor.
75
Workspace / Solution Builder HPC and AI Modes : https://dcsc.lenovo.com/#/rack-configuration1
A
B
1
C
A
B
C
2
3
3
2
2019 Lenovo. All rights reserved.
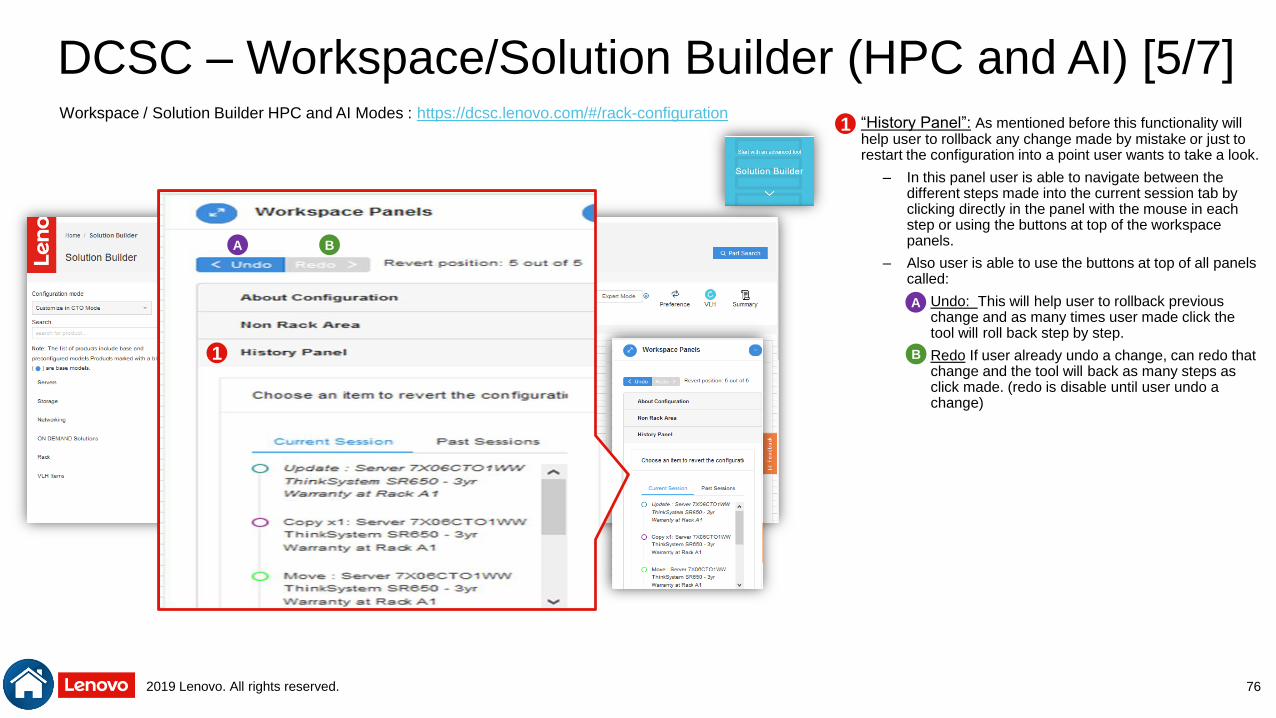
DCSC – Workspace/Solution Builder (HPC and AI) [5/7]• “History Panel”: As mentioned before this functionality will
help user to rollback any change made by mistake or just to restart the configuration into a point user wants to take a look.
– In this panel user is able to navigate between the different steps made into the current session tab by clicking directly in the panel with the mouse in each step or using the buttons at top of the workspace panels.
– Also user is able to use the buttons at top of all panels called:
- Undo: This will help user to rollback previous change and as many times user made click the tool will roll back step by step.
- Redo If user already undo a change, can redo that change and the tool will back as many steps as click made. (redo is disable until user undo a change)
76
Workspace / Solution Builder HPC and AI Modes : https://dcsc.lenovo.com/#/rack-configuration1
1
A B
A
B

2019 Lenovo. All rights reserved.
DCSC – Workspace/Solution Builder (HPC and AI) [6/7]
• “Rack Submenu”: user is able to select different options:
– Clone Rack: All clones that below to same group of clones will be affected by any change in any of them.
- Clone Rack: Create one singe clone instance; floor will show the position for each clone and workspace will show the quantity of the rack at top in a circule.
- Clone Multiple: Select the quantity of clones)
– Copy Rack: Create one copy of the rack this instance is independent and any change will affect only to it.
– Delete Rack
– Change Rack model: this function allow to change the rack model and the tool will try to place all the CTOs inside into the new model. If user select an small rack the tool will ask what to do with the CTOs that cannot be place in the rack.
– Customize. Update the racks parts selected.
– View Config Details View the detail of parts selected in the rack without go to customize. 77
Workspace / Solution Builder HPC and AI Modes: https://dcsc.lenovo.com/#/rack-configuration1
A
B
1
B
A
2019 Lenovo. All rights reserved.
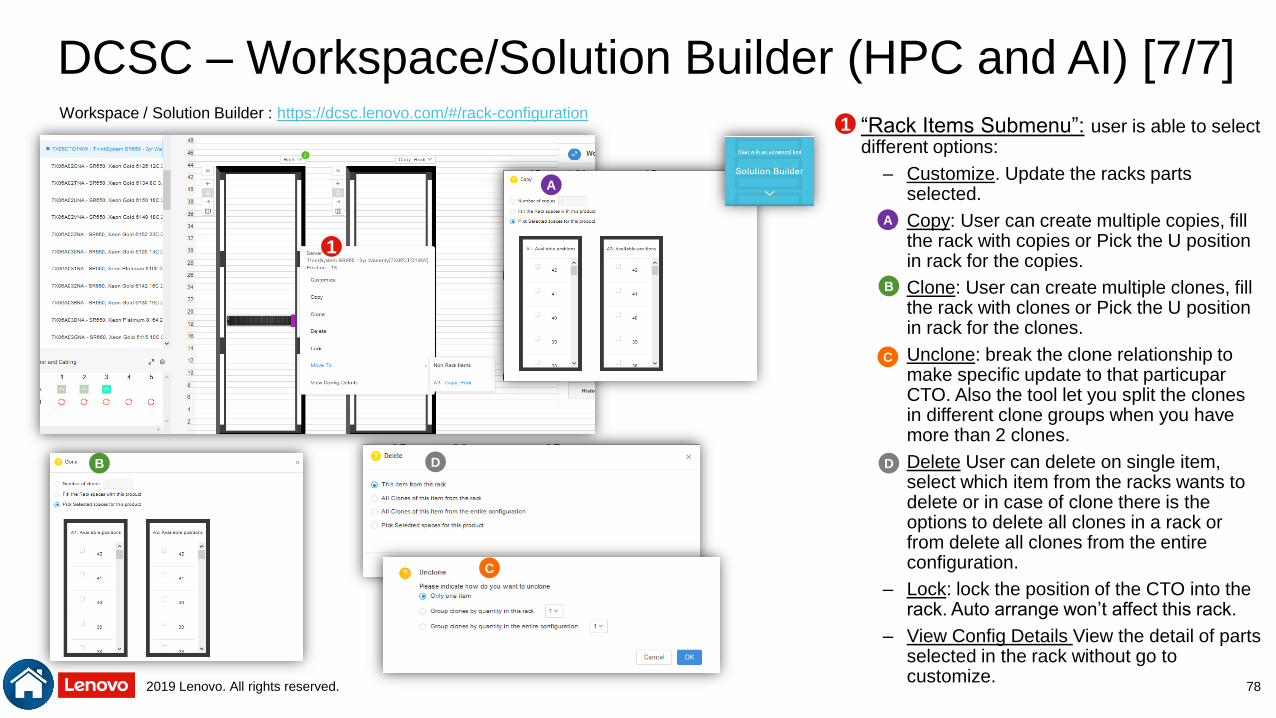
• “Rack Items Submenu”: user is able to select different options:
– Customize. Update the racks parts selected.
– Copy: User can create multiple copies, fill the rack with copies or Pick the U position in rack for the copies.
– Clone: User can create multiple clones, fill the rack with clones or Pick the U position in rack for the clones.
– Unclone: break the clone relationship to make specific update to that particuparCTO. Also the tool let you split the clones in different clone groups when you have more than 2 clones.
– Delete User can delete on single item, select which item from the racks wants to delete or in case of clone there is the options to delete all clones in a rack or from delete all clones from the entire configuration.
– Lock: lock the position of the CTO into the rack. Auto arrange won’t affect this rack.
– View Config Details View the detail of parts selected in the rack without go to customize.
DCSC – Workspace/Solution Builder (HPC and AI) [7/7]
78
Workspace / Solution Builder : https://dcsc.lenovo.com/#/rack-configuration1
D
C
A
B
1
D
C
A
B
2019 Lenovo. All rights reserved.
DCSC – Importing configuration (HPC and AI) [1/2]
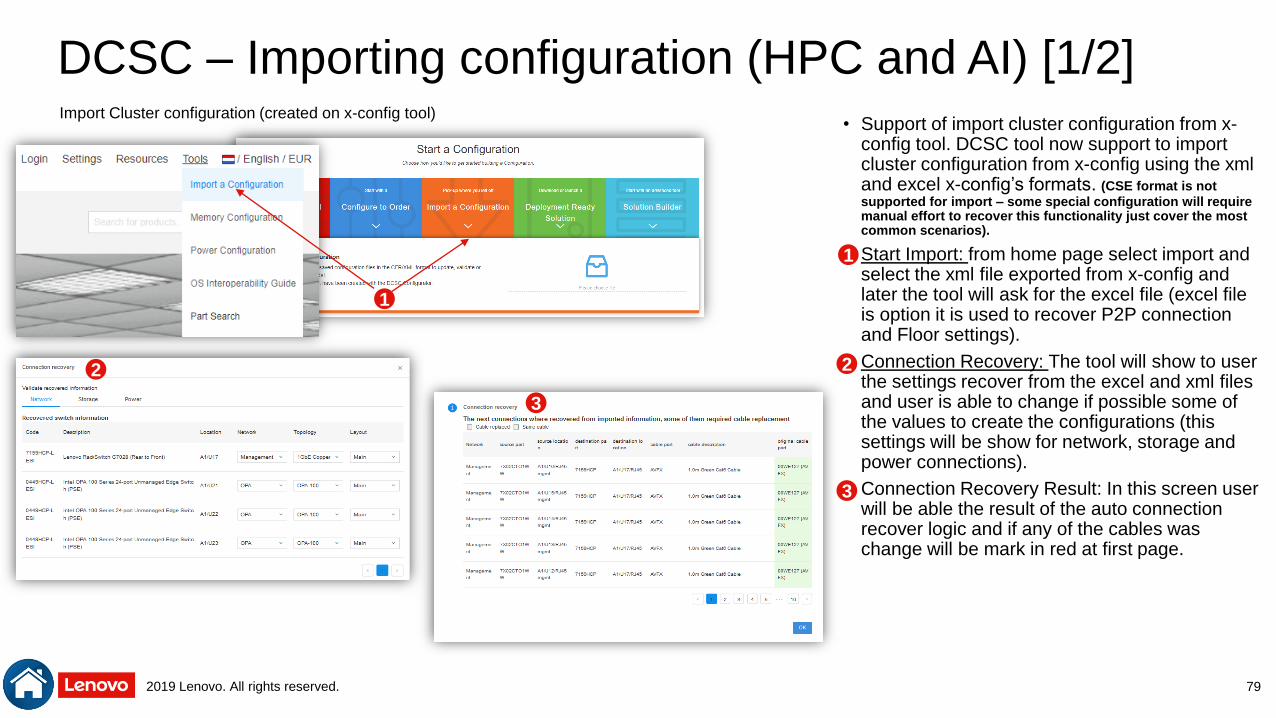
• Support of import cluster configuration from x-config tool. DCSC tool now support to import cluster configuration from x-config using the xml and excel x-config’s formats. (CSE format is not
supported for import – some special configuration will require manual effort to recover this functionality just cover the most common scenarios).
• Start Import: from home page select import and select the xml file exported from x-config and later the tool will ask for the excel file (excel file is option it is used to recover P2P connection and Floor settings).
• Connection Recovery: The tool will show to user the settings recover from the excel and xml files and user is able to change if possible some of the values to create the configurations (this settings will be show for network, storage and power connections).
• Connection Recovery Result: In this screen user will be able the result of the auto connection recover logic and if any of the cables was change will be mark in red at first page.
79
Import Cluster configuration (created on x-config tool)
1
1
22
3
3
2019 Lenovo. All rights reserved.
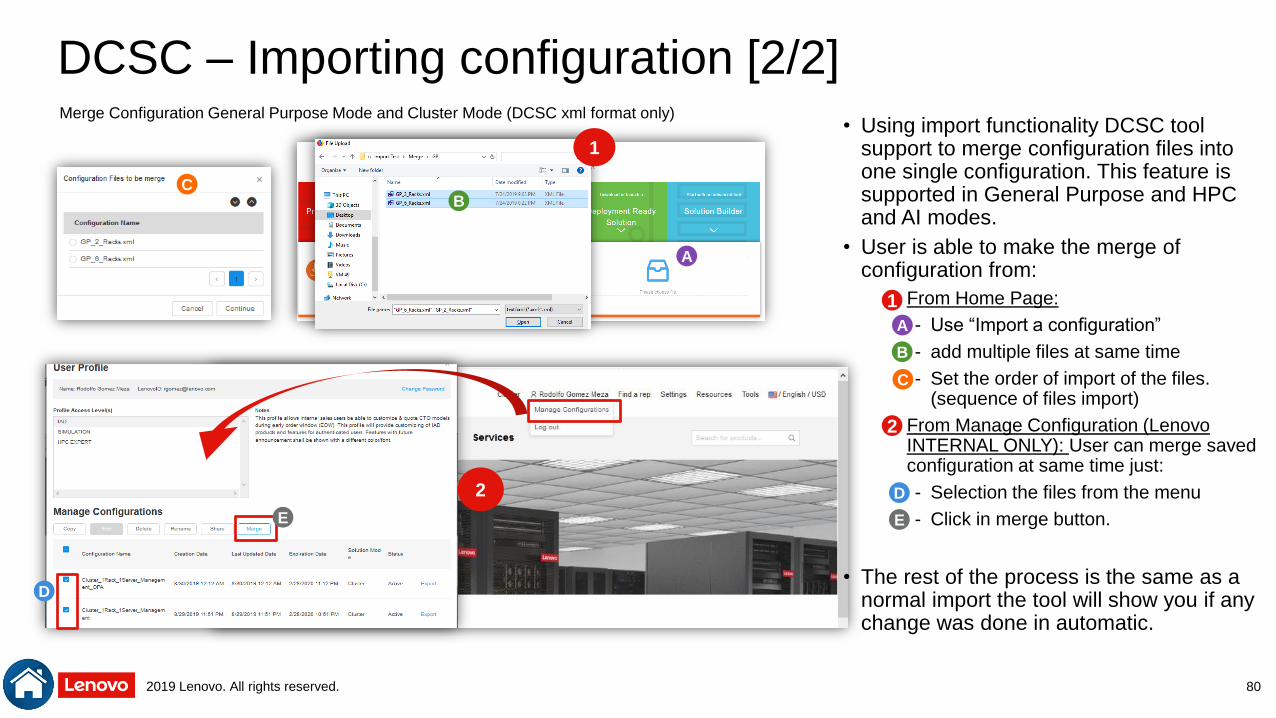
DCSC – Importing configuration [2/2]
• Using import functionality DCSC tool support to merge configuration files into one single configuration. This feature is supported in General Purpose and HPC and AI modes.
• User is able to make the merge of configuration from:
– From Home Page:
- Use “Import a configuration”
- add multiple files at same time
- Set the order of import of the files. (sequence of files import)
– From Manage Configuration (Lenovo INTERNAL ONLY): User can merge saved configuration at same time just:
- Selection the files from the menu
- Click in merge button.
• The rest of the process is the same as a normal import the tool will show you if any change was done in automatic.
80
Merge Configuration General Purpose Mode and Cluster Mode (DCSC xml format only)
1
2
2
A
B
C
A
BC
D
E
D
E
1
2019 Lenovo. All rights reserved.
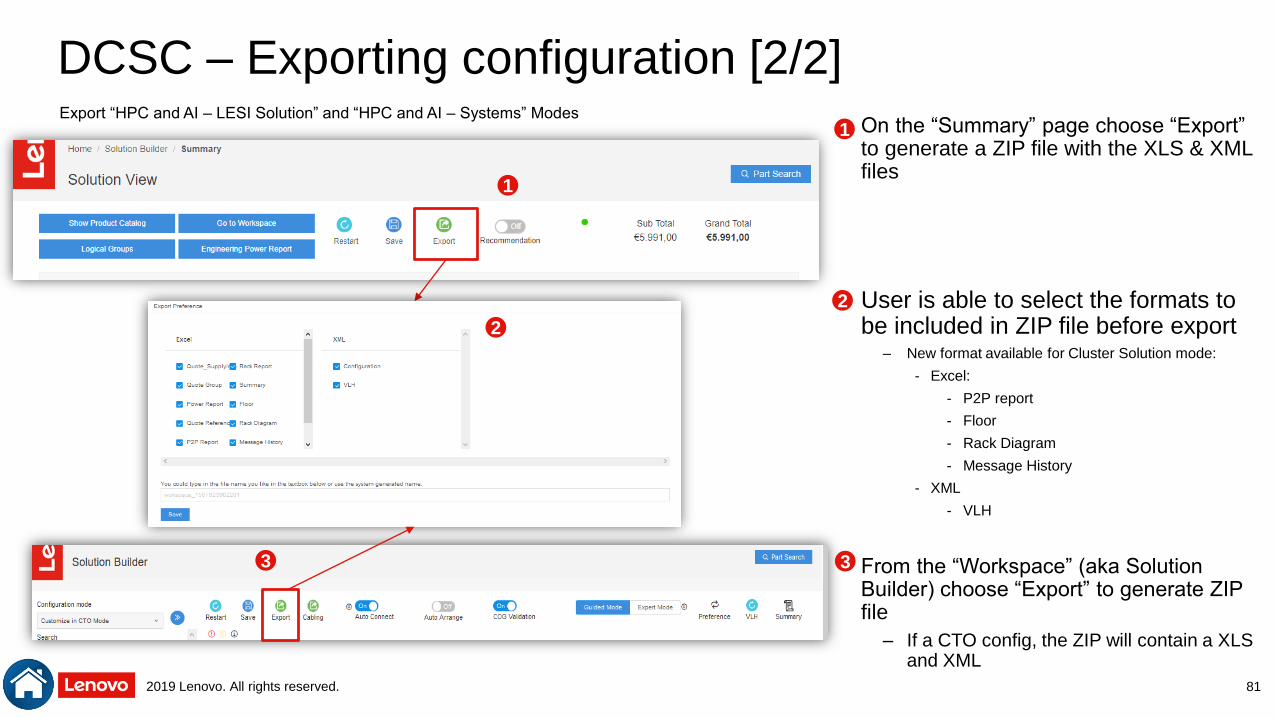
DCSC – Exporting configuration [2/2]
• On the “Summary” page choose “Export” to generate a ZIP file with the XLS & XML files
• User is able to select the formats to be included in ZIP file before export
– New format available for Cluster Solution mode:
- Excel:
- P2P report
- Floor
- Rack Diagram
- Message History
- XML
- VLH
• From the “Workspace” (aka Solution Builder) choose “Export” to generate ZIP file
– If a CTO config, the ZIP will contain a XLS and XML
81
Export “HPC and AI – LESI Solution” and “HPC and AI – Systems” Modes1
2
3
1
2
3

2019 Lenovo. All rights reserved.
DCSC – Recovery
• Recovery: DCSC tool will auto save your configuration to be able to recover it in case an unexpected behavior (crash of your browser, loss of internet connection, etc) When user click in this option will show different features:
– Saved Configuration: List the configuration saved by the tool in automatic, user can click in the session column to load the configuration into DCSC.
– Delete the configuration saved in automatic by the tool.
– Download the XML file with the configuration saved.
– Configuration:
- Disable/enable auto recovery
- Set the period of time to maintain in your local cache the configuration auto saved by recovery function.
• Recovery configuration will be save in your computer into browser cache if user clean up the cache those configuration would be lost. (if any configuration should remain please download your configuration before clean up the cache)
1
A
1
B C
D
A
B
C
D
Recovery
82

2019 Lenovo. All rights reserved.
Supply Status
83

2019 Lenovo. All rights reserved.
Supply Status Initial Color - LFO
• Supply healthy level will display as Blue/Green/Yellow/Gray color in “Supply Status” column
• “Supply Status” column is a sortable column to filter healthy supply.
• Hover on the “Supply Status” color (which indicated the first 4 weeks), and a detailed 1~13week supply status color and description appears
84
LFO = Lenovo Fixed Offering
Screenshot from product / catalog view @ https://dcsc.lenovo.com/#/categories/STG%40Servers%40Rack%20and%20Tower%20Servers%40ThinkSystem%20SR650
Currently
based on
inventory from
Lenovo only
Product / Catalog View

2019 Lenovo. All rights reserved.
Supply Status Initial Color – FC / Option
• Supply healthy level will display as Blue/Green/Yellow/Gray color in “Supply Status” column
• “Supply Status” column is a sortable column to filter healthy supply.
• Hover on the “Supply Status” color (which indicated the first 4 weeks), and a detailed 1~13week supply status color and description appears
85
Currently
based on
inventory from
Lenovo only
FC = Feature Code
Option = Option part number
Customize View
2019 Lenovo. All rights reserved.
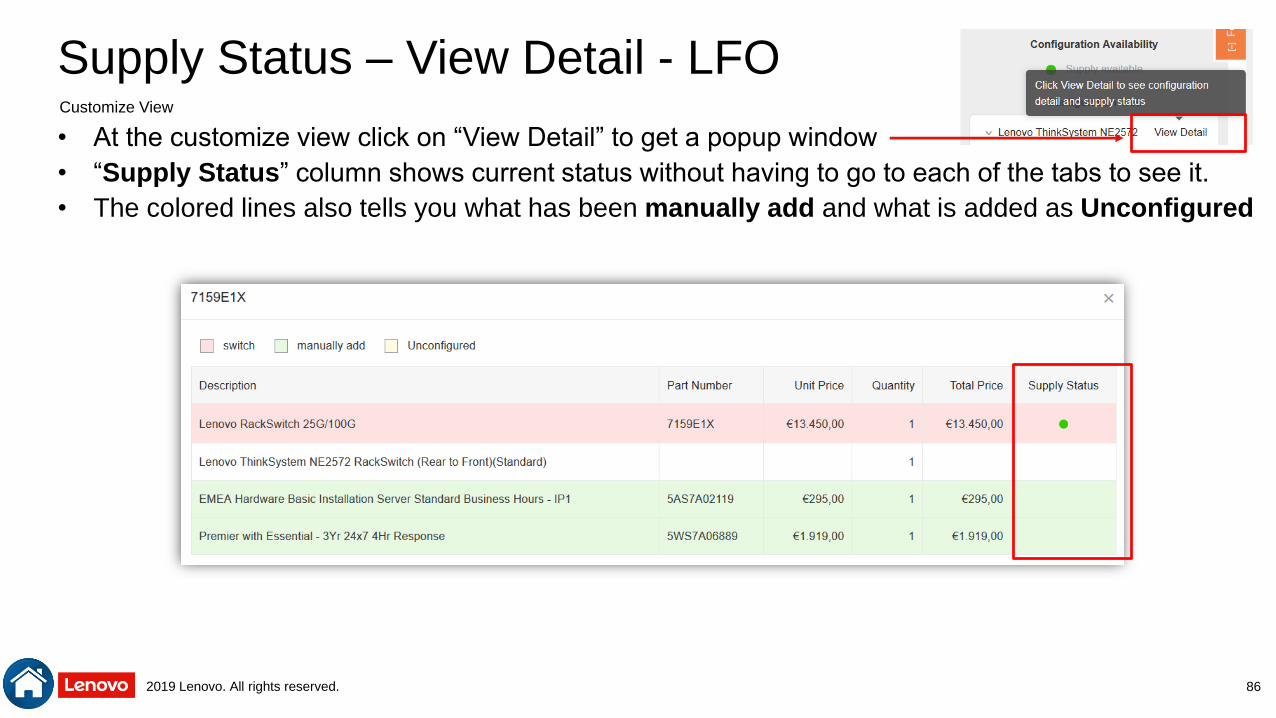
Supply Status – View Detail - LFO
• At the customize view click on “View Detail” to get a popup window
• “Supply Status” column shows current status without having to go to each of the tabs to see it.
• The colored lines also tells you what has been manually add and what is added as Unconfigured
86
Customize View
2019 Lenovo. All rights reserved.
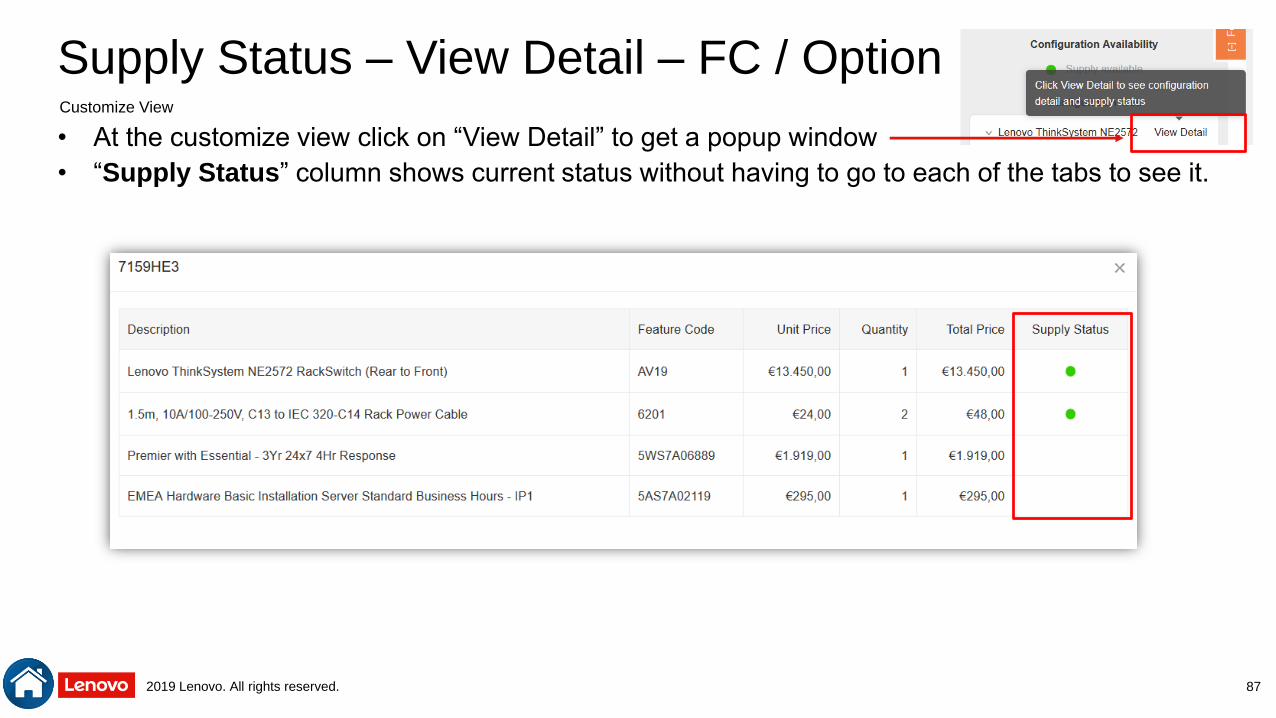
Supply Status – View Detail – FC / Option
• At the customize view click on “View Detail” to get a popup window
• “Supply Status” column shows current status without having to go to each of the tabs to see it.
87
Customize View
2019 Lenovo. All rights reserved.
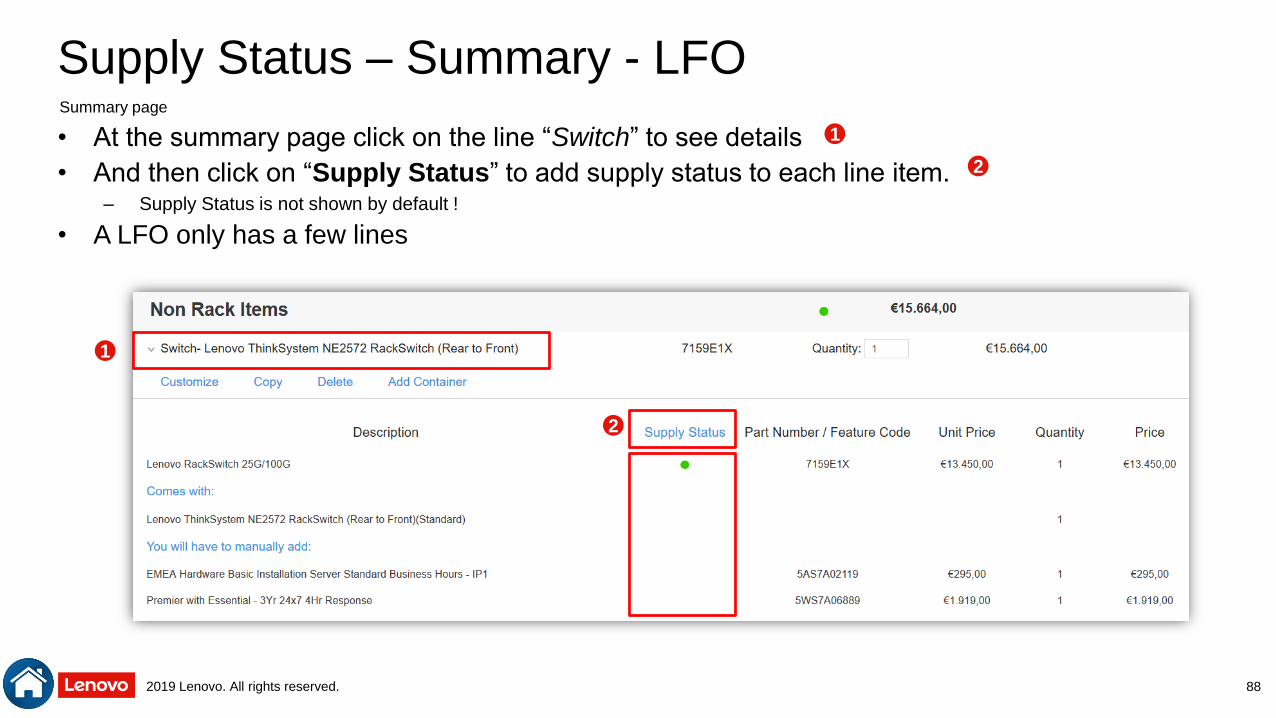
Supply Status – Summary - LFO
• At the summary page click on the line “Switch” to see details
• And then click on “Supply Status” to add supply status to each line item.– Supply Status is not shown by default !
• A LFO only has a few lines
88
1
1
2
2
Summary page
2019 Lenovo. All rights reserved.
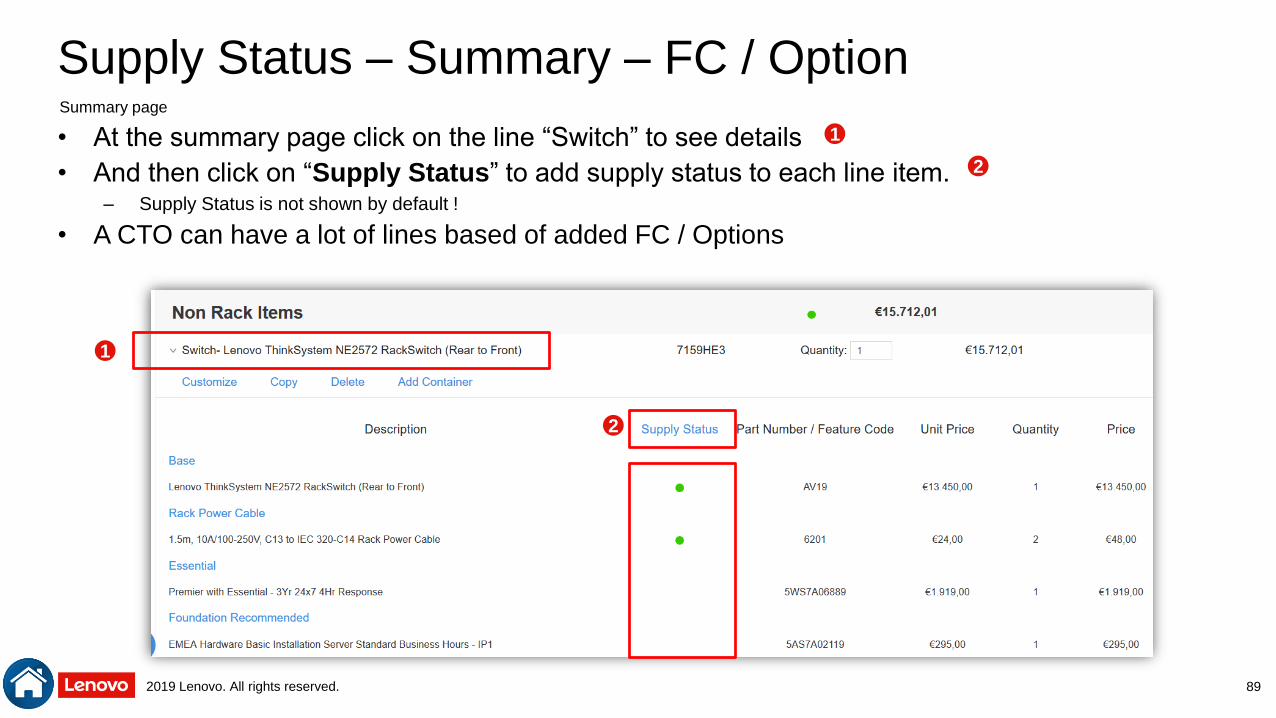
Supply Status – Summary – FC / Option
• At the summary page click on the line “Switch” to see details
• And then click on “Supply Status” to add supply status to each line item.– Supply Status is not shown by default !
• A CTO can have a lot of lines based of added FC / Options
89
1
1
2
2
Summary page
2019 Lenovo. All rights reserved.
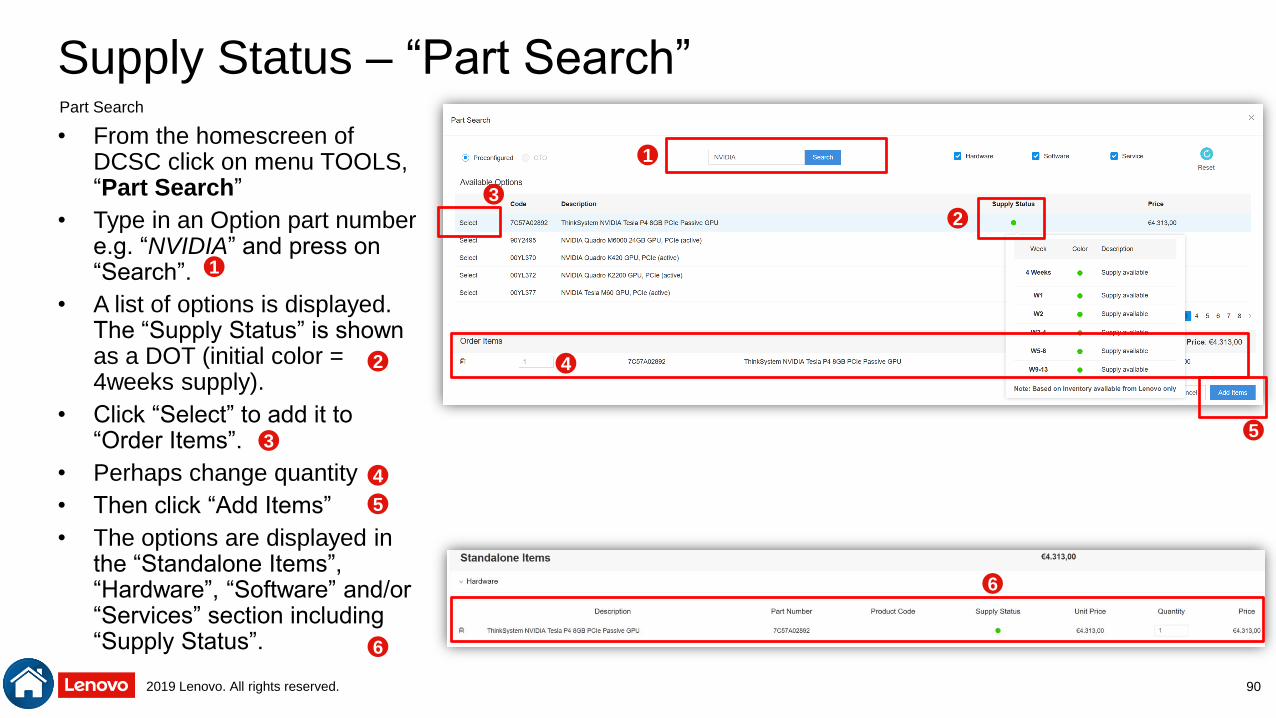
Supply Status – “Part Search”
• From the homescreen of DCSC click on menu TOOLS, “Part Search”
• Type in an Option part number e.g. “NVIDIA” and press on “Search”.
• A list of options is displayed. The “Supply Status” is shown as a DOT (initial color = 4weeks supply).
• Click “Select” to add it to “Order Items”.
• Perhaps change quantity
• Then click “Add Items”
• The options are displayed in the “Standalone Items”, “Hardware”, “Software” and/or “Services” section including “Supply Status”.
90
1
1
2
2
3
3
4
6
4
5
5
6
Part Search
2019 Lenovo. All rights reserved.
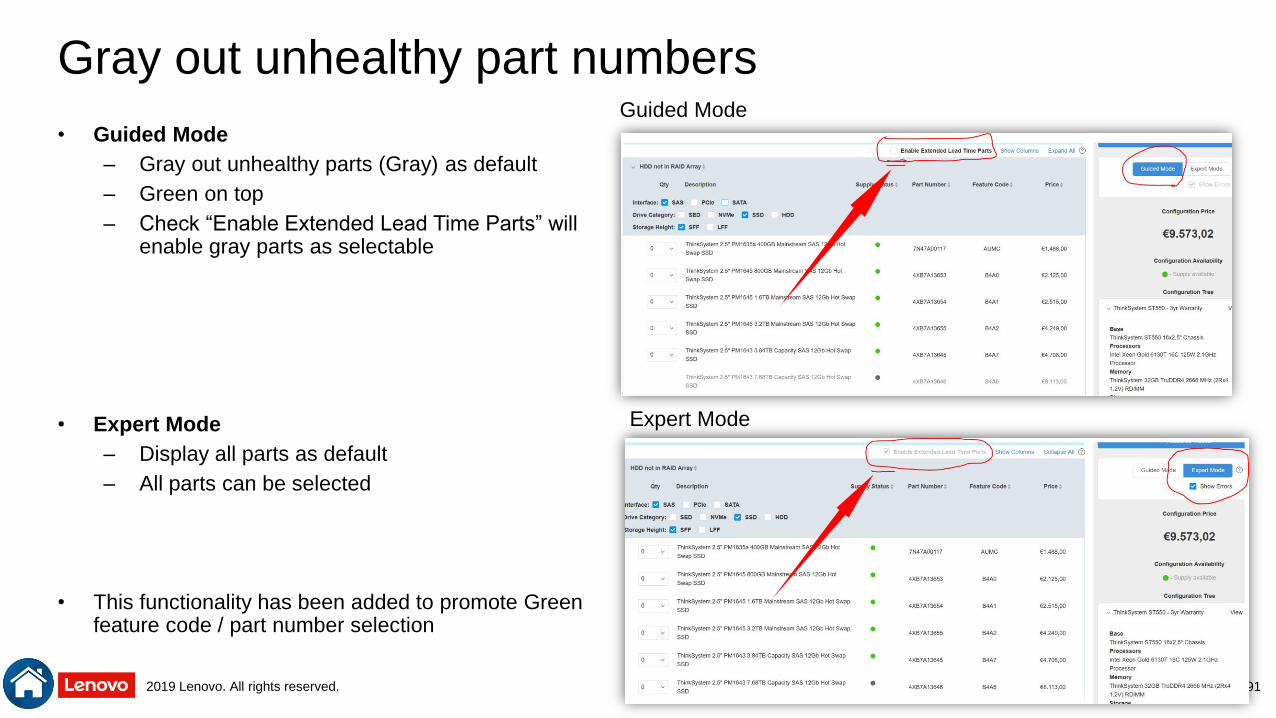
Gray out unhealthy part numbers
• Guided Mode
– Gray out unhealthy parts (Gray) as default
– Green on top
– Check “Enable Extended Lead Time Parts” will enable gray parts as selectable
• Expert Mode
– Display all parts as default
– All parts can be selected
• This functionality has been added to promote Green feature code / part number selection
91
Guided Mode
Expert Mode
2019 Lenovo. All rights reserved.
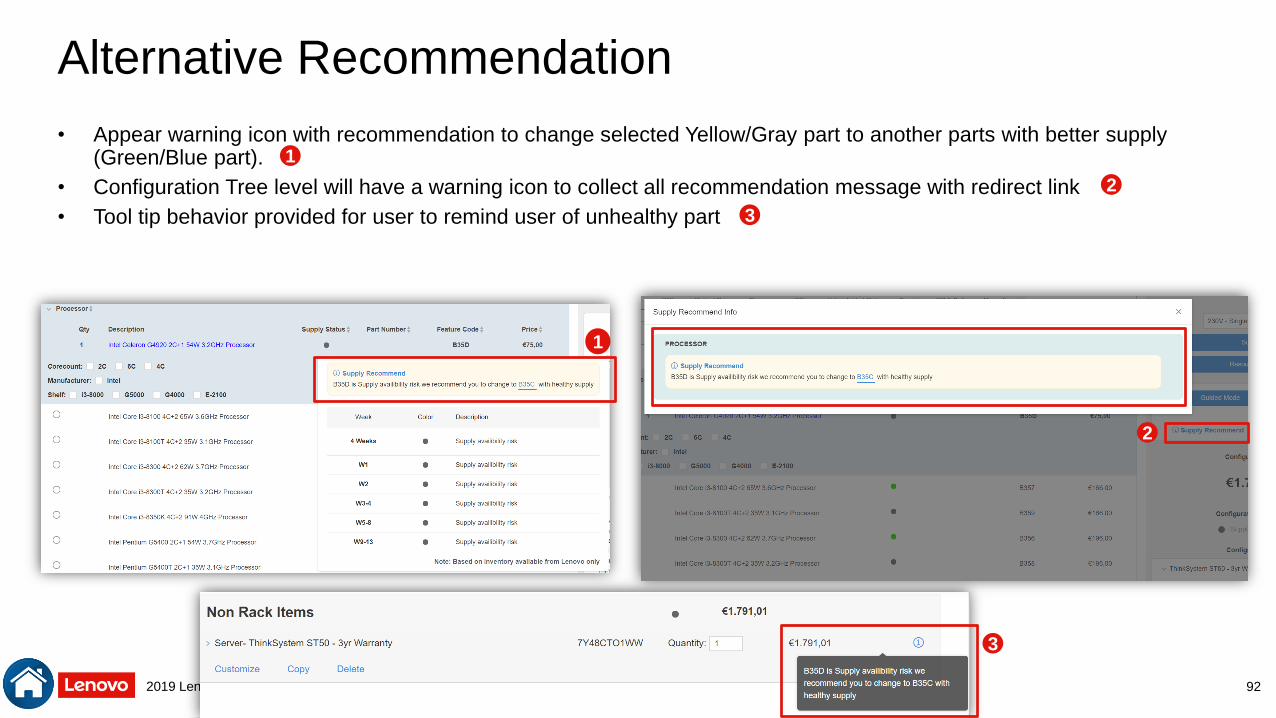
Alternative Recommendation
• Appear warning icon with recommendation to change selected Yellow/Gray part to another parts with better supply (Green/Blue part).
• Configuration Tree level will have a warning icon to collect all recommendation message with redirect link
• Tool tip behavior provided for user to remind user of unhealthy part
2
3
1
1
2
3
92
2019 Lenovo. All rights reserved.
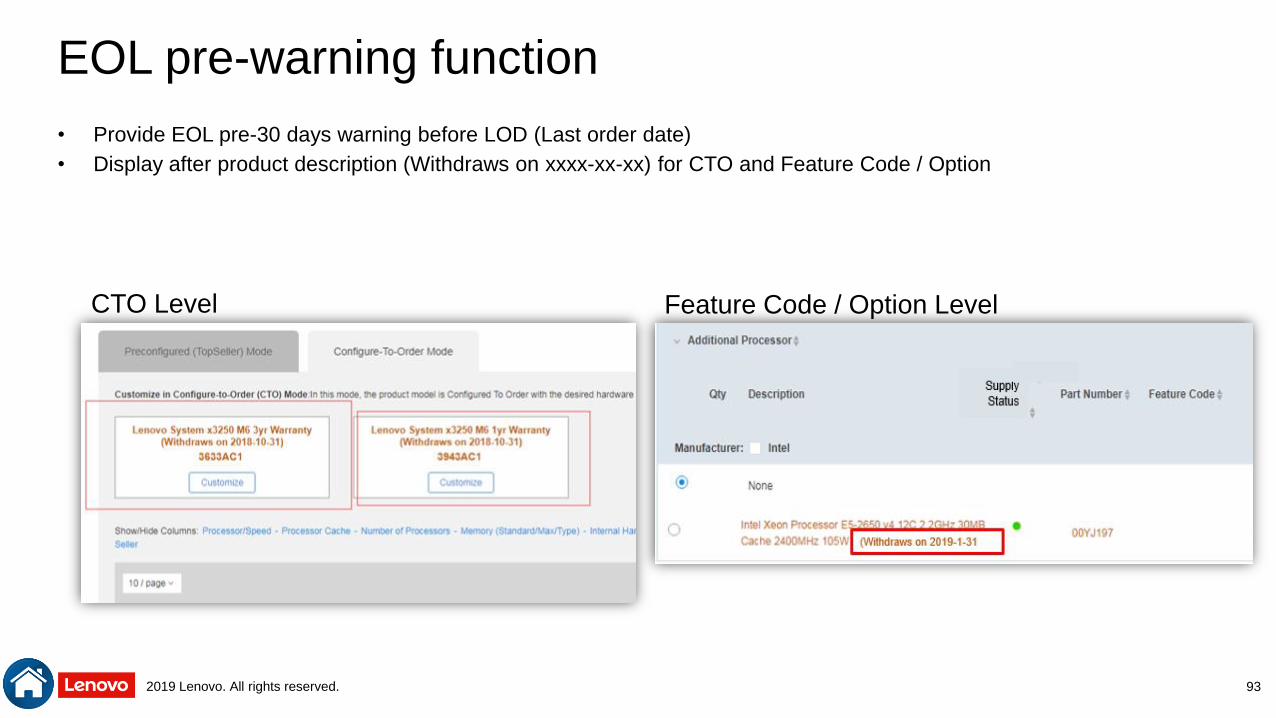
EOL pre-warning function
• Provide EOL pre-30 days warning before LOD (Last order date)
• Display after product description (Withdraws on xxxx-xx-xx) for CTO and Feature Code / Option
93
CTO Level Feature Code / Option Level

2019 Lenovo. All rights reserved.
Supply Risk Alert
• Hover on “Supply Status” color to see detailed 13week supply availability with description
• Highlight Special “Supply Status” with alert message as below sample.
94
Long Lead TimeReadily Available
SupplyEOL Soon
New Product
without Ship
Support
• Extremely long lead
time material
• EOL soon, with
limited supply
availability
• New Product Ship
Support on
xxxx.xx.xx
• Readily Available
Supply
Buy to Order
• Buy to order
material,
purchasing supply
when requested
2019 Lenovo. All rights reserved.
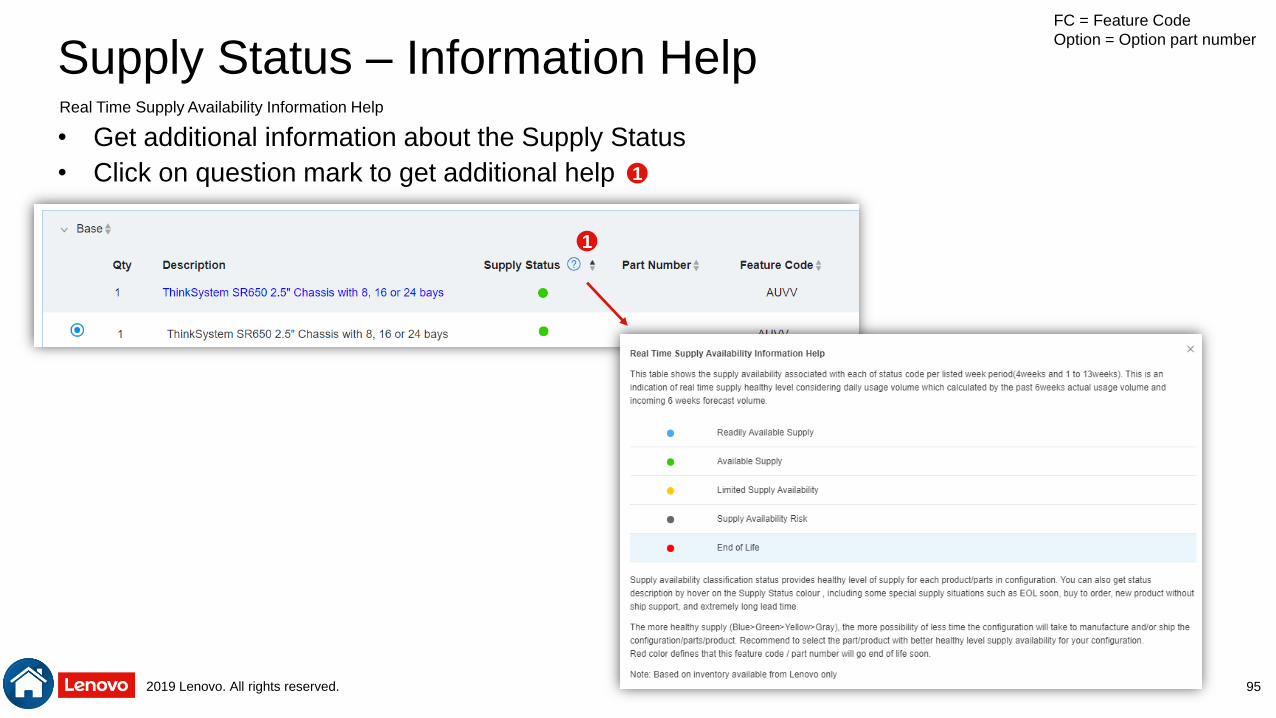
Supply Status – Information Help
• Get additional information about the Supply Status
• Click on question mark to get additional help
95
FC = Feature Code
Option = Option part number
Real Time Supply Availability Information Help
1
1

2019 Lenovo. All rights reserved.
Memory Wizard
96
2019 Lenovo. All rights reserved.
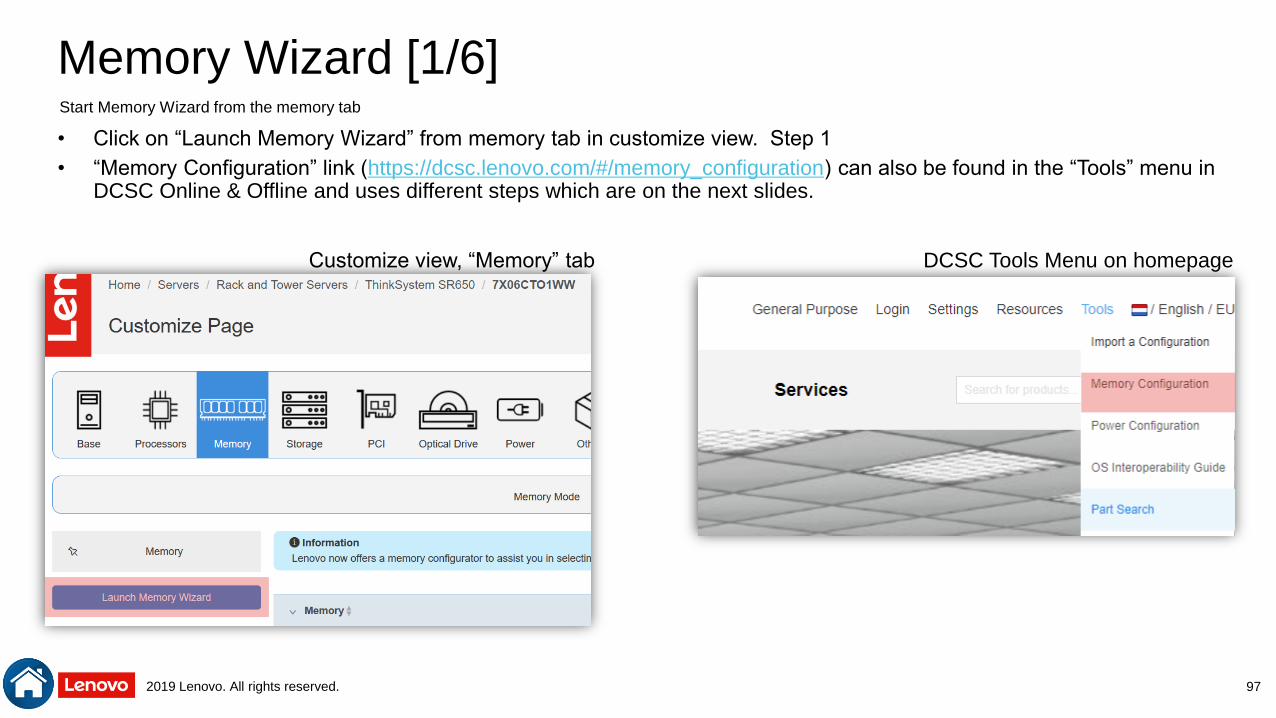
Memory Wizard [1/6]
• Click on “Launch Memory Wizard” from memory tab in customize view. Step 1
• “Memory Configuration” link (https://dcsc.lenovo.com/#/memory_configuration) can also be found in the “Tools” menu in DCSC Online & Offline and uses different steps which are on the next slides.
DCSC Tools Menu on homepageCustomize view, “Memory” tab
97
Start Memory Wizard from the memory tab
2019 Lenovo. All rights reserved.
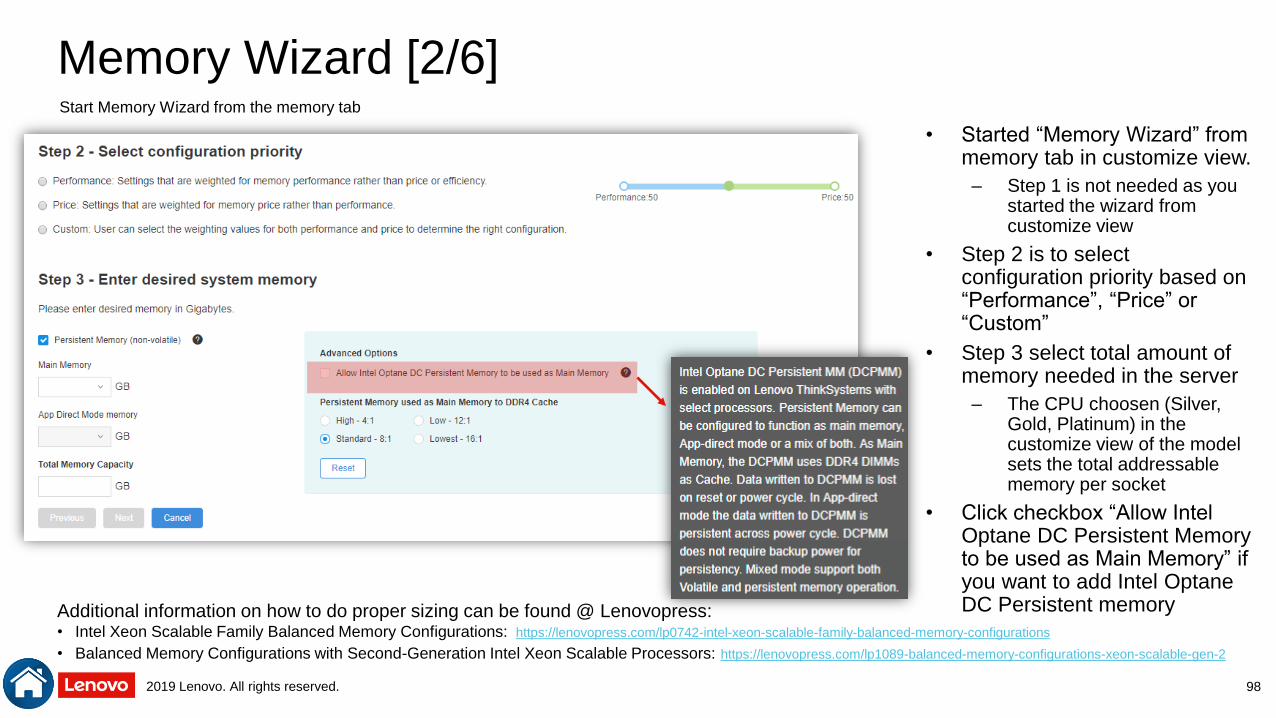
Memory Wizard [2/6]
• Started “Memory Wizard” from memory tab in customize view.
– Step 1 is not needed as you started the wizard from customize view
• Step 2 is to select configuration priority based on “Performance”, “Price” or “Custom”
• Step 3 select total amount of memory needed in the server
– The CPU choosen (Silver, Gold, Platinum) in the customize view of the model sets the total addressable memory per socket
• Click checkbox “Allow Intel Optane DC Persistent Memory to be used as Main Memory” if you want to add Intel OptaneDC Persistent memory Additional information on how to do proper sizing can be found @ Lenovopress:
• Intel Xeon Scalable Family Balanced Memory Configurations: https://lenovopress.com/lp0742-intel-xeon-scalable-family-balanced-memory-configurations
• Balanced Memory Configurations with Second-Generation Intel Xeon Scalable Processors: https://lenovopress.com/lp1089-balanced-memory-configurations-xeon-scalable-gen-2
1
98
Start Memory Wizard from the memory tab
2019 Lenovo. All rights reserved.
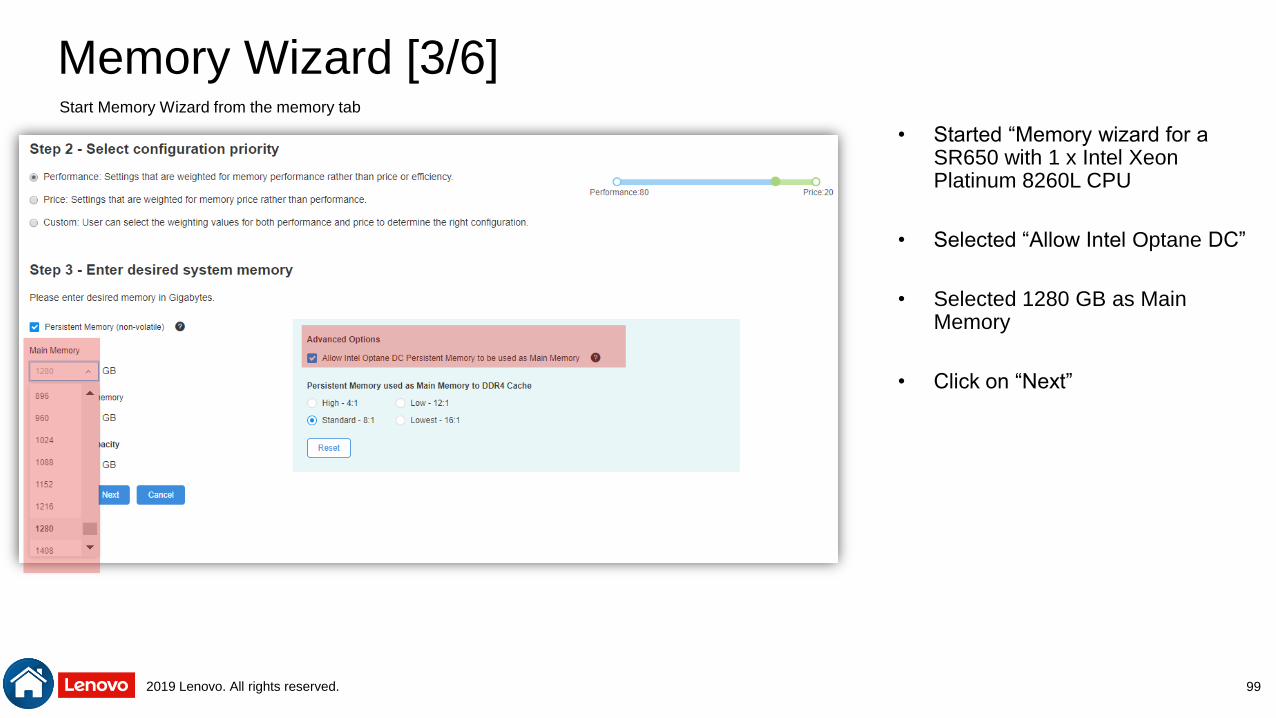
Memory Wizard [3/6]
• Started “Memory wizard for a SR650 with 1 x Intel Xeon Platinum 8260L CPU
• Selected “Allow Intel Optane DC”
• Selected 1280 GB as Main Memory
• Click on “Next”
99
Start Memory Wizard from the memory tab

2019 Lenovo. All rights reserved.
Memory Wizard [4/6]
• Choose correct Memory Option
• Options can be “Balanced”, “Near-balanced” or “Unbalanced”
• Choose option depending on expandability both for Main Memory as for Persistent Memory
• Click on “Select’ and on “Next” to go to the next step
• In this example we choose Option 1
100
Start Memory Wizard from the memory tab
2019 Lenovo. All rights reserved.
Memory Wizard [5/6]
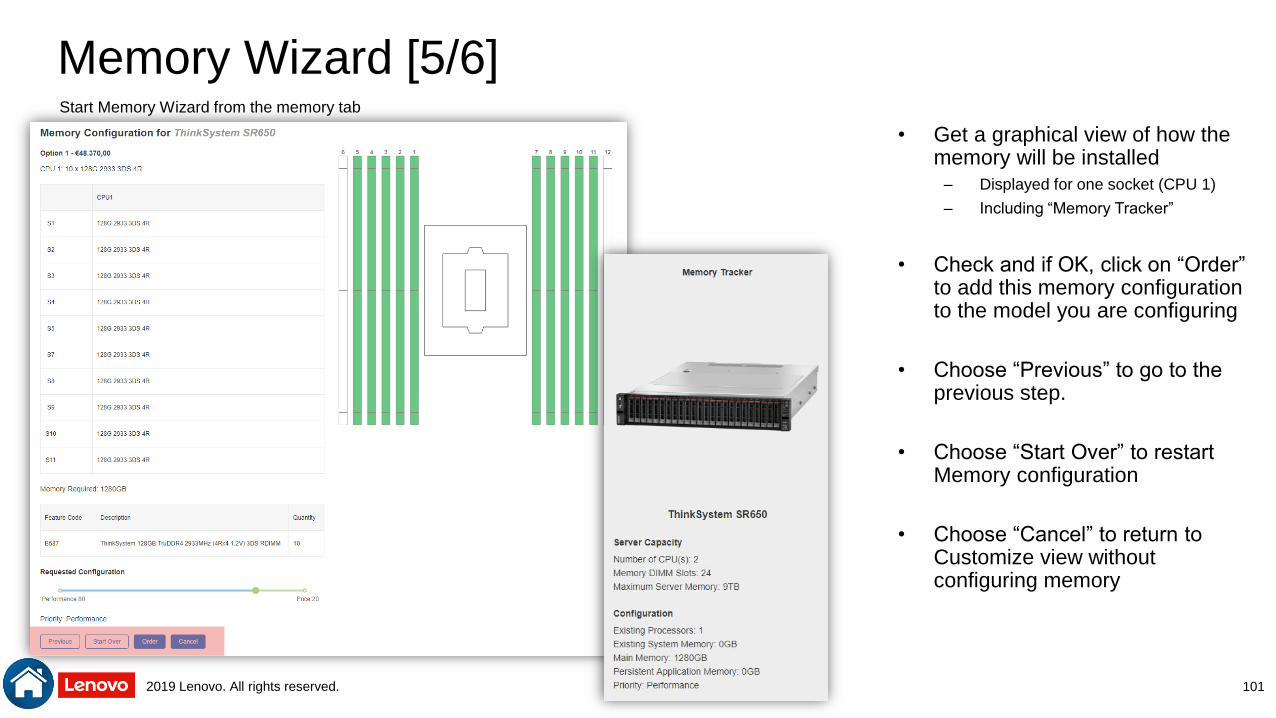
• Get a graphical view of how the memory will be installed
– Displayed for one socket (CPU 1)
– Including “Memory Tracker”
• Check and if OK, click on “Order” to add this memory configuration to the model you are configuring
• Choose “Previous” to go to the previous step.
• Choose “Start Over” to restart Memory configuration
• Choose “Cancel” to return to Customize view without configuring memory
101
Start Memory Wizard from the memory tab
2019 Lenovo. All rights reserved.
Memory Wizard [6/6]
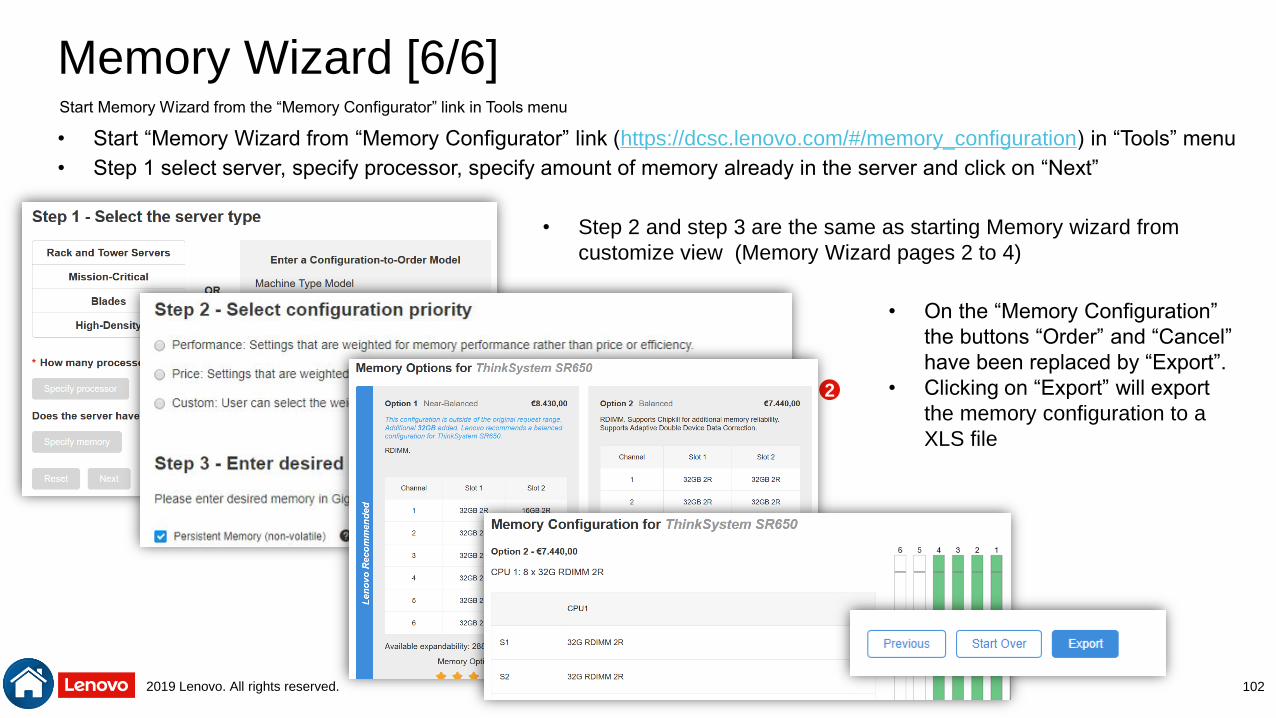
• Start “Memory Wizard from “Memory Configurator” link (https://dcsc.lenovo.com/#/memory_configuration) in “Tools” menu
• Step 1 select server, specify processor, specify amount of memory already in the server and click on “Next”
• Step 2 and step 3 are the same as starting Memory wizard from
customize view (Memory Wizard pages 2 to 4)
1
2
3
• On the “Memory Configuration”
the buttons “Order” and “Cancel”
have been replaced by “Export”.
• Clicking on “Export” will export
the memory configuration to a
XLS file
102
Start Memory Wizard from the “Memory Configurator” link in Tools menu