data security & privacy risk management
TRANSCRIPT

WolfPAC Integrated Risk Management
Data Security & Privacy Risk Management User Guide
Version: 1.1
1-16-2020

Wolf & Company, P.C. i
Copyright © 2020
WolfPAC Integrated Risk Management® is a secure, web-based enterprise risk management solution used by over 170
banks, credit unions, and technology companies to automate the identification of risks, threats, and control gaps.
Developed by financial professionals, WolfPAC® provides tools to review and monitor information technology, privacy,
vendor, and other enterprise-wide risk assessments. Quarterly methodology updates are designed to align with changing
business environments and emerging compliance and examination standards. A robust suite of reports allows
management to analyze their control gaps and benchmark risk profiles against peers. WolfPAC keeps institutions safe and
sound, and maximizes the outcome of strategic objectives.
Copyright
Copyright 2020 © Wolf and Company, P.C.
Confidential and Proprietary Information of Wolf and Company, P.C.
All rights reserved. No part of this publication may be reproduced, distributed, or transmitted in any form or by any means, including
photocopying, recording, or other electronic or mechanical methods, without prior written permission of Wolf and Company, P. C.
Wolf and Company, P.C.
99 High Street
Boston, MA 02110
Telephone: 617-439-9700
Website: www.wolfandco.com
Wolf & Company, P.C. ii
Copyright © 2020
Contents
Introduction......................................................................................................................................................................... 1
What is the Data Security & Privacy Risk Management Module? ............................................................................................................... 1
Getting Started .................................................................................................................................................................... 2
Login .................................................................................................................................................................................................................................. 2
Navigate to the Data Security & Privacy Risk Management Module ........................................................................................................ 3
Reviewing the Methodology for the Data Security & Privacy Risk Management Module ................................................................ 4
Help and Support: How to Use KnowledgePAC ................................................................................................................................................ 5
Administrative Tasks ........................................................................................................................................................... 6
Manage Permissions .................................................................................................................................................................................................... 6
Manage Processes ........................................................................................................................................................................................................ 9
Manage Documents .................................................................................................................................................................................................. 11
Add New Document ............................................................................................................................................................................................. 11
Edit Document ........................................................................................................................................................................................................ 13
Delete Document................................................................................................................................................................................................... 13
Edit Assignments ........................................................................................................................................................................................................ 14
Manage Controls ........................................................................................................................................................................................................ 20
Manage Response Options .................................................................................................................................................................................... 22
Entity-Level Risk Assessment ........................................................................................................................................... 23
Document Questionnaire .................................................................................................................................................. 27
Data Security Risk Assessment ......................................................................................................................................... 29
Identity Theft Red Flags Assessment ............................................................................................................................... 35
Privacy Risk Assessment ................................................................................................................................................... 37
Reports ............................................................................................................................................................................... 39

Wolf & Company, P.C. 1
Copyright © 2020
Introduction
Welcome to the Data Security & Privacy Risk Management module user guide. This user guide is designed to provide
documentation for people who will use WolfPAC’s Data Security & Privacy Risk Management Module to manage data
security and privacy risk. This document is designed to be read by any user of the module, as most users will have access
to the features documented here. Administrator features are also documented in this guide.
What is the Data Security & Privacy Risk Management Module?
The Data Security & Privacy Module Risk Management module (DSP) is a component of the WolfPAC Risk Management
suite that allows you to manage data security and privacy risk. Within the module you can create an inventory of all
documents used by your organization that contain non-public personal information (NPPI), assess and mitigate threats,
and perform risk assessments.

Wolf & Company, P.C. 2
Copyright © 2020
Getting Started
This section will show you the basic functionality of how to log in and navigate the WolfPAC system.
Login
To access the Data Security & Privacy Risk Management module, you will need to log into WolfPAC.
1. Navigate to the WolfPAC Login Page
Set your browser to: https://wolfpac.wolfandco.com/application/login/
2. Enter Your Username and Password
The WolfPAC login screen will display. Enter your username and password into the Username and Password fields. Click
the Login button.
3. Authenticate Your Login with Two-Factor Authentication
For more information on this process, please refer to the WolfPAC Account Management User Guide.

Wolf & Company, P.C. 3
Copyright © 2020
Navigate to the Data Security & Privacy Risk Management Module
To access the Data Security & Privacy Risk Management module, you will first need to log into WolfPAC.
From the WolfPAC homepage, click on the Data Security and Privacy Risk icon within the wheel. You may also hover
over the Risk Management menu and select the Data Security and Privacy Risk link to access the module.

Wolf & Company, P.C. 4
Copyright © 2020
Reviewing the Methodology for the Data Security & Privacy Risk Management
Module
Before you get started on the Data Security & Privacy Risk Management module, you should review the methodology
used to calculate risk in this module. The methodology document will step you through important concepts and
calculations for inherent and residual risk values used in this module.
To access this document, click the Assessment Methodology PDF link on the module homepage. The document will
display in PDF format.

Wolf & Company, P.C. 5
Copyright © 2020
Help and Support: How to Use KnowledgePAC
Access to help features and the ability to contact WolfPAC support is available in the KnowledgePAC feature located at the
top right of the WolfPAC home page by clicking Help & Support.
Features available to you in KnowledgePAC:
FAQs: View Frequent and Latest FAQs about WolfPAC features.
Search: Search all FAQs using the search box.
Contact Support: Create a ticket to the WolfPAC Support team.
Request Technology and Vendor: If you use a technology that is not on the technology list, you can request
WolfPAC to add it to the list.
Blog: Links you to the WolfPAC blog where you can read articles relating to WolfPAC and Risk Management.
Webinars: Links you to the WolfPAC Resource Library which contains past recordings, articles and more.
Add to FAQ: Ask a question about WolfPAC.
Request Webinar: Request a webinar on a WolfPAC topic.
User Group Board: Links to WolfPAC user group activities.
Request Product Demo: You can request demos of WolfPAC modules you currently do not license.
Request Due Diligence: Request documents that are helpful when performing due diligence on a vendor such as
a Business Continuity Plan or SOC report.
Request Training: You can request additional training on WolfPAC.
Release Activities: Search release notes for any module.

Wolf & Company, P.C. 6
Copyright © 2020
Administrative Tasks
This section explains some required Administrative activities such as managing documents, setting up Owner and
Reviewer assignments, and managing controls. Unless a user has been designated a WolfPAC Administrator, they will not
be able to perform these activities. For more information on user maintenance, refer to WolfPAC Account Management
User Guide available within the Help & Support menu.
Manage Permissions
WolfPAC allows Administrators to manage the level of access that each user has to the Data Security & Privacy Risk
Management module. Access is divided into the following options: Read, Read & Write, or Report. Any combination of
these permissions may be granted to each user.
Read: The user can access and view the module in read-only mode. They cannot edit anything.
Read & Write: The user can access and make edits/updates/changes to the module (depending on what they
have been specifically assigned to).
Report: The user can access and generate reports for the module.
1. Navigate to User Maintenance
From the WolfPAC homepage, click on the Manage People icon in the center of the wheel. Alternatively, you may hover
over the Administration menu and select Manage Organization > User Maintenance. Both options will redirect to the
User Maintenance screen.

Wolf & Company, P.C. 7
Copyright © 2020
Click on the edit users link beside your organization name.
2. Update Permissions Individually
Locate the desired user in the table and hover over the blue Operation icon. Select the edit link. Then click on the Manage
Permissions tab on the left-hand side of the screen. Use the checkboxes to enable or disable Read, Read & Write, and/or
Report access to each module that your organization has licensed. Be sure to click on the Save button when finished and
note that the new permissions will go into effect on the user’s next login.

Wolf & Company, P.C. 8
Copyright © 2020
3. Update Permissions In Bulk
On the edit users page, use the checkboxes on the left-hand side of the screen to select multiple individuals and edit their
permissions at the same time.
Note: If the first individual selected is an Administrator, you will only be able to select other individuals who are
also Administrators. If the first individual you select is a User, you will only be able to select other individuals who
are also Users. This is due to Administrators and Users having slightly different permissions.
When the desired users have been selected, click on the Set Permissions button above the table. In the popup window
that appears, use the checkboxes to enable/disable the group’s ability to Read, Read & Write, or view Reports for each of
the available modules.

Wolf & Company, P.C. 9
Copyright © 2020
Manage Processes
1. Navigate to Manage Processes
From the Data Security & Privacy Risk Management homepage, click on the Manage Processes icon. A link to Manage
Processes is also accessible on the WolfPAC homepage.
2. Review the Products/Services, Business Processes, and Business Functions
Ensure that the listing is an accurate representation of the products/services, business processes and business functions
offered or performed at your institution. The Active Products and Services radio button will display all of the items
selected for your institution, whereas the All Products and Services radio button will show WolfPAC’s global library of
functions. Use the checkboxes to select or de-select a particular item.

Wolf & Company, P.C. 10
Copyright © 2020
3. Link Items to Business Processes
Click on the name of a business process and select the Edit link. On the right side of the screen, expand the Link
Documents section and click on the Link Documents button to link relevant documents to that process.
Repeat the same step for Technologies, Third Parties, and Regulations and link the appropriate items that support each
business process.
When linking items to a process, you must use the Business Functions dropdown to select the specific functions within
that process that utilize the selected object.
You may also link items to business functions, and that linkage will roll up to the business process level as well.

Wolf & Company, P.C. 11
Copyright © 2020
Manage Documents
You must create an inventory of documents used at your organization. Follow the steps below to do so.
Add New Document
1. Navigate to Manage Documents
From the Data Security & Privacy Risk Management homepage, click on the Manage Documents icon.
At the top of the Manage Documents screen, click on the Add New Document button.

Wolf & Company, P.C. 12
Copyright © 2020
2. Enter Document Details
On the next screen, enter information about the document. Note that the Name, Type, Category, and Classification are all
required fields.
3. Save Document
When finished entering the details of the document, click on the Save button to save and remain on the current page, or
click Save Changes & Return to save and return to the document inventory.
Wolf & Company, P.C. 13
Copyright © 2020
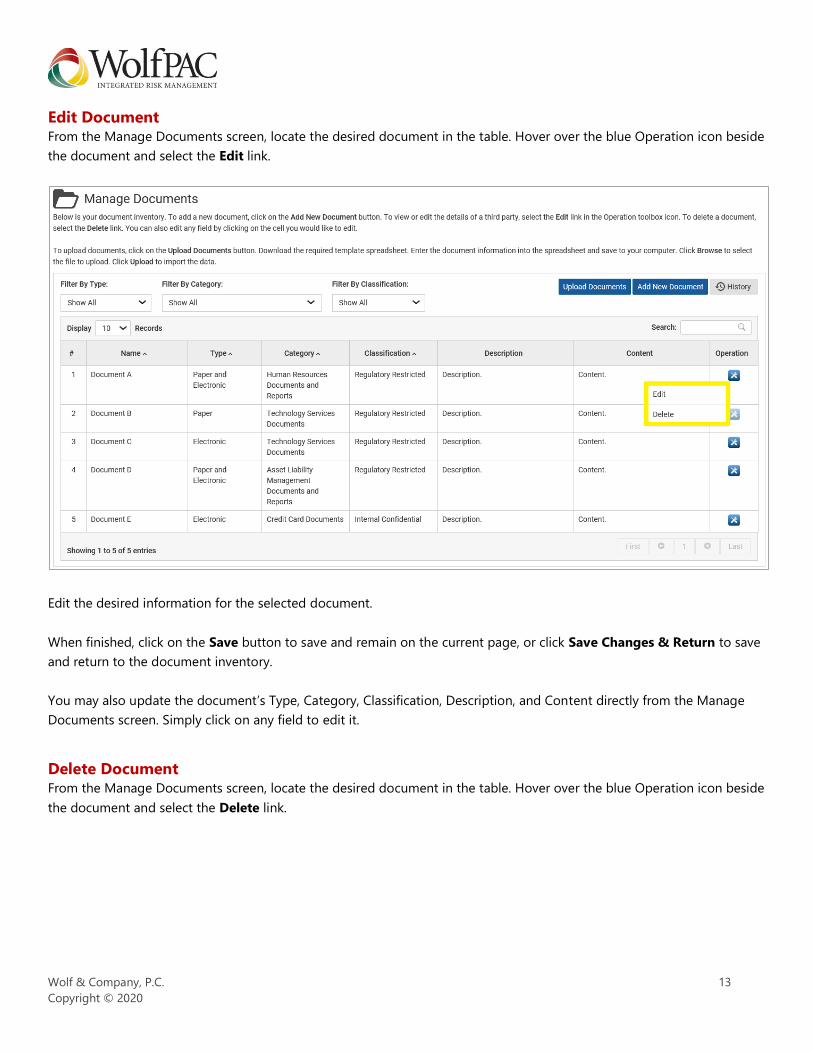
Edit Document From the Manage Documents screen, locate the desired document in the table. Hover over the blue Operation icon beside
the document and select the Edit link.
Edit the desired information for the selected document.
When finished, click on the Save button to save and remain on the current page, or click Save Changes & Return to save
and return to the document inventory.
You may also update the document’s Type, Category, Classification, Description, and Content directly from the Manage
Documents screen. Simply click on any field to edit it.
Delete Document From the Manage Documents screen, locate the desired document in the table. Hover over the blue Operation icon beside
the document and select the Delete link.

Wolf & Company, P.C. 14
Copyright © 2020
Edit Assignments
Administrators must assign an Owner and Reviewer to each risk assessment within the Data Security & Privacy Risk
Management module. The Owner is responsible to complete their assigned assessments, and the Reviewer is responsible
for reviewing the Owner’s work. Owner and Reviewers are assigned on the Edit Assignments screen. Note that if the
Owner or Reviewer is assigned to the (Anyone) option, then all users within your organization will be able to access that
risk assessment.
1. Navigate to Edit Assignments
From the Data Security & Privacy Risk Management homepage, click on the Edit Assignments icon (outlined in red
below). Note that only Administrators have access to this functionality.
2. Entity-Level Risk Assessment Assignments
Use the Owner and Reviewer dropdown menus on the Entity-Level Risk Assessment tab to assign an Owner and
Reviewer for the Entity-Level Risk Assessment.

Wolf & Company, P.C. 15
Copyright © 2020
3. Data Security Risk Assessment Assignments
Click on the Data Security Risk tab to edit the assignments for the Data Security Risk Assessment. Click on a name in the
Owner or Reviewer column to bring up the dropdown menu where a new Owner or Reviewer may be assigned. Your
changes will be saved automatically.
To assign Owners and Reviewers to multiple business processes at once, select the Multiple Assignment radio button.
This will bring up two additional dropdown menus to select an Owner and Reviewer from. Select the Owner checkbox if
updating the Owner in bulk, and select the Reviewer checkbox if updating the Reviewer in bulk. Then use the checkboxes
in the table to indicate where to apply the new Owner and/or Reviewer. Click on the Save button to apply your changes.
Wolf & Company, P.C. 16
Copyright © 2020
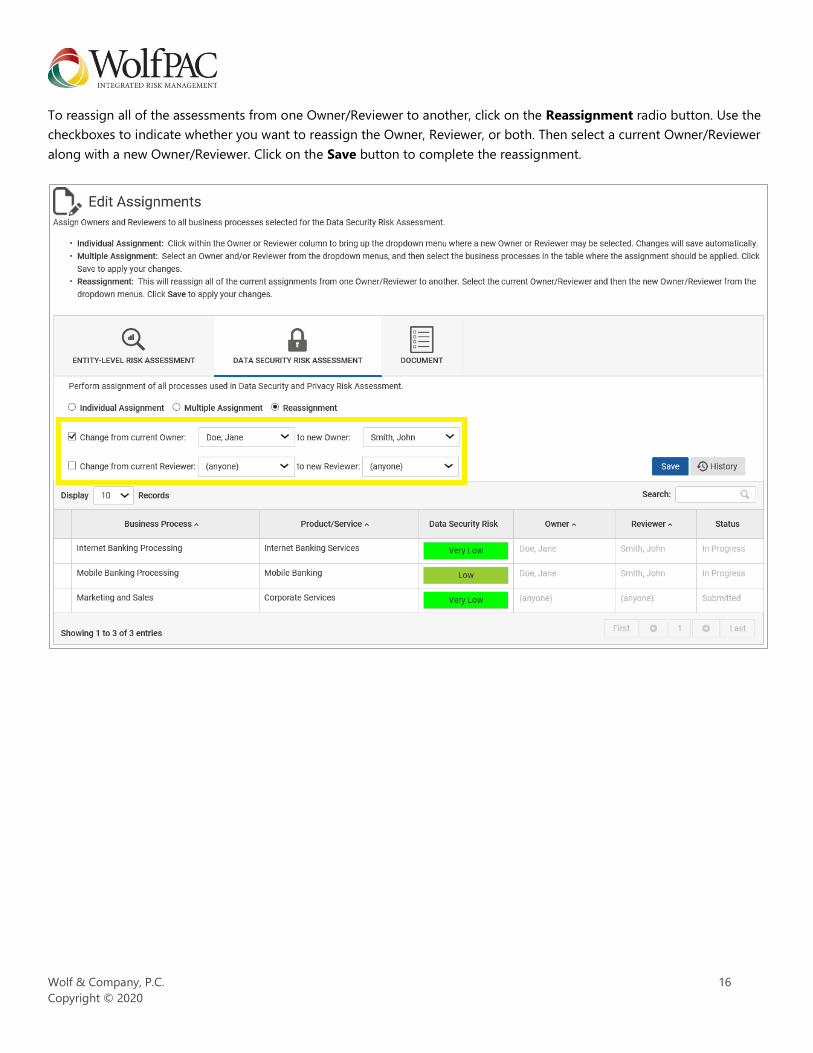
To reassign all of the assessments from one Owner/Reviewer to another, click on the Reassignment radio button. Use the
checkboxes to indicate whether you want to reassign the Owner, Reviewer, or both. Then select a current Owner/Reviewer
along with a new Owner/Reviewer. Click on the Save button to complete the reassignment.

Wolf & Company, P.C. 17
Copyright © 2020
4. Document Questionnaire Assignments
Click on the Documents tab to edit the assignments for the Document Questionnaire. . Click on a name in the Owner or
Reviewer column to bring up the dropdown menu where a new Owner or Reviewer may be assigned. Your changes will be
saved automatically.

Wolf & Company, P.C. 18
Copyright © 2020
To assign Owners and Reviewers to multiple documents at once, select the Multiple Assignment radio button. This will
bring up two additional dropdown menus to select an Owner and Reviewer from. Select the Owner checkbox if updating
the Owner in bulk, and select the Reviewer checkbox if updating the Reviewer in bulk. Then use the checkboxes in the
table to indicate where to apply the new Owner and/or Reviewer. Click on the Save button to apply your changes.

Wolf & Company, P.C. 19
Copyright © 2020
To reassign all of the documents from one Owner/Reviewer to another, click on the Reassignment radio button. Use the
checkboxes to indicate whether you want to reassign the Owner, Reviewer, or both. Then select a current Owner/Reviewer
along with a new Owner/Reviewer. Click on the Save button to complete the reassignment.

Wolf & Company, P.C. 20
Copyright © 2020
Manage Controls
From the Data Security & Privacy Risk Management homepage, click on the Manage Controls icon. A list of data security
and privacy controls will display.
1. Classify Controls
Review each control and click within the Classify column to bring up the dropdown menu. Use this dropdown menu to
indicate whether the control is a Process Control or an Entity Level Control, which are defined below. You may also opt
to Hide a control.
- Process Control: Default setting for all controls. When this option is selected, the control will display on the
Control Selection page of the Entity-Level and Data Security risk assessments whenever an applicable threat is
identified. The control will be unchecked on all Control Selection pages and can be checked off on an individual
basis within the risk assessments. You may also opt to apply a Process Control to specific business processes by
selecting them from the dropdown menu in the Select Processes column.
- Entity Level Control: Selecting the Entity Level Control option will cause that control to be automatically checked
off within the Entity-Level and Data Security risk assessments. It will be displayed with the label ENTITY on all
Control Selection pages. Use this option to indicate that the control is implemented throughout the organization
with no exceptions.
- Hide: Hides the control from all risk assessments including the Entity-Level Risk Assessment and Data Security
Risk Assessment. Use this option to hide all controls that do not apply to the organization or will never be
implemented in the future.

Wolf & Company, P.C. 21
Copyright © 2020
2. Update Control Descriptions
WolfPAC has provided user-friendly descriptions for each control. To update a control’s description, click directly on the
description text and it will change to a textbox which can be edited. Click on the blue checkmark icon to save your
changes.
You may also use the links below each description to modify it. Select the NIST link to use the NIST description for that
control (if available). Select the Custom link to enter a custom description of your choosing.
3. Export Controls
Click on the Export button at the top of the screen to generate an Excel version of the control listing.
4. Import Controls
To update control classifications or descriptions in bulk, the Import feature can be used. Click on the Import button at the
top of the screen, and then click on the Download button to generate a copy of the import template. It will pull a current
listing of the controls and their classification.
To update the classification of a control, use the Classify Control column in the spreadsheet. Enter the phrase Entity
Level Control or Process Control into this column update the control classification on the next import.
To customize the description of a control, enter the desired description into the Custom Description column.
Please note that the Classify Control and Control Description columns are the only columns that can be modified for the
import. All other columns should not be modified in any way,
When the spreadsheet is ready to be imported, click on the Browse button to locate it from your local PC. Then click on
the Upload button to complete the import.

Wolf & Company, P.C. 22
Copyright © 2020
Manage Response Options
Administrators have the ability to customize the response options for the following question in the Data Security Risk
Assessment Questionnaire. To do so, click on the Data Security Risk Assessment icon on the module homepage. Then
click on the Manage Response Options button at the top of the page. Click into the Custom Responses column to
update the each response option. Click on the blue checkmark button to save your changes.
Question Default Response Options
What is the typical volume
of documents received per
year?
Less than 1000
Between 1001 - 10000
Between 10001 - 25000
Between 25001 - 50000
Greater than 50000
Wolf & Company, P.C. 23
Copyright © 2020
Entity-Level Risk Assessment
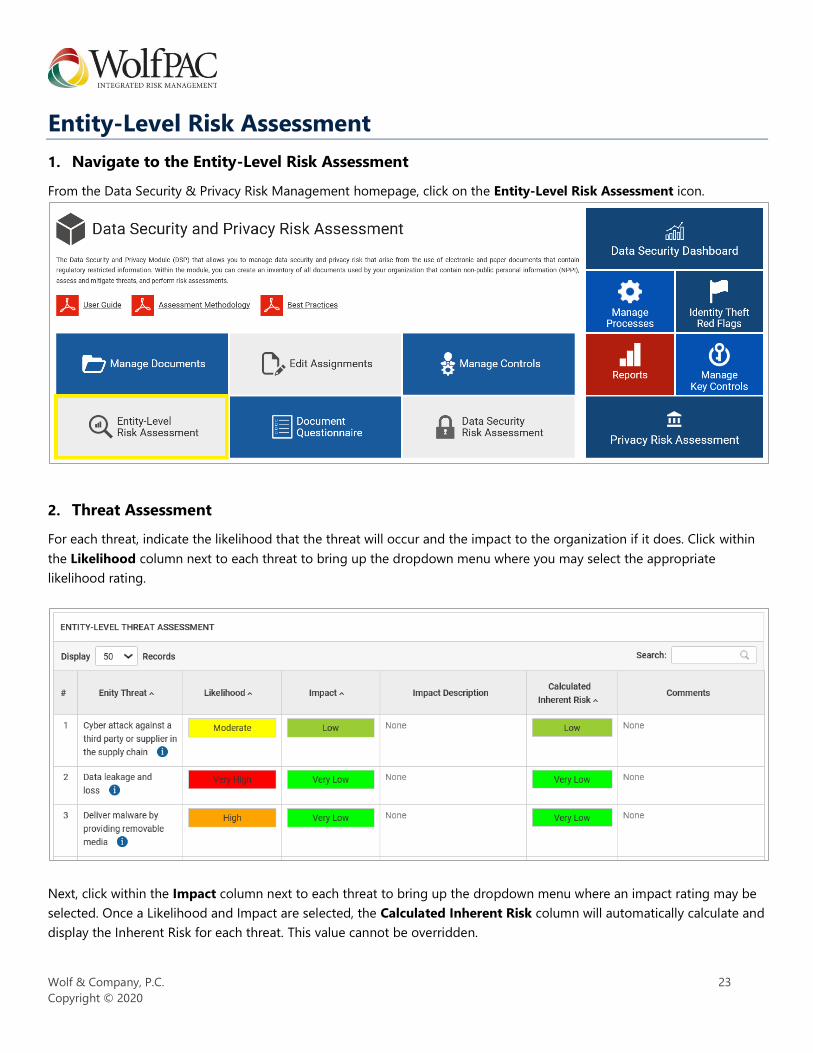
1. Navigate to the Entity-Level Risk Assessment
From the Data Security & Privacy Risk Management homepage, click on the Entity-Level Risk Assessment icon.
2. Threat Assessment
For each threat, indicate the likelihood that the threat will occur and the impact to the organization if it does. Click within
the Likelihood column next to each threat to bring up the dropdown menu where you may select the appropriate
likelihood rating.
Next, click within the Impact column next to each threat to bring up the dropdown menu where an impact rating may be
selected. Once a Likelihood and Impact are selected, the Calculated Inherent Risk column will automatically calculate and
display the Inherent Risk for each threat. This value cannot be overridden.

Wolf & Company, P.C. 24
Copyright © 2020
3. Control Selection
Once the Threat Assessment is complete, click on the Control Selection tab to proceed to the next step. In this section
you will select the controls you have in place in your organization to mitigate the entity-level threats. The controls
displayed on this page are based on the threats identified in the Threat Assessment step. For each control that you have in
place in your organization, click the checkbox in the Select Control column.
Controls that have been classified as Entity Level on the Manage Controls page will display with the word ENTITY instead
of a checkbox and there is no additional action required for these controls. They have been pre-selected.
There is filtering available to help you with control selection. The Filter By Category dropdown allows you to filter by
control category. The control categories are pre-defined for each control. The Filter By Selection dropdown allows you to
see the controls you have already selected or not selected. The Filter By Threat dropdown allows you to filter all controls
by threat.
If you do not have a control in place and wish to create a remediation item, click on the Create New link in the Control
Remediation column.
Use Link Additional Controls to link other controls available in WolfPAC.
Wolf & Company, P.C. 25
Copyright © 2020
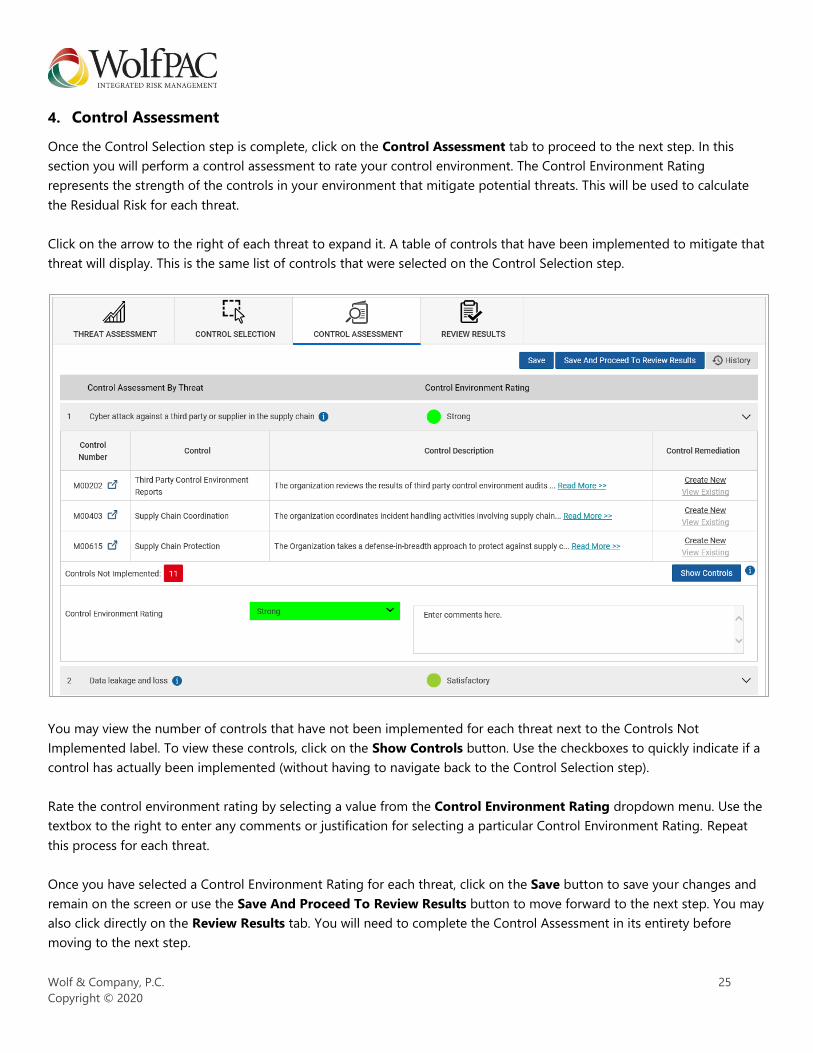
4. Control Assessment
Once the Control Selection step is complete, click on the Control Assessment tab to proceed to the next step. In this
section you will perform a control assessment to rate your control environment. The Control Environment Rating
represents the strength of the controls in your environment that mitigate potential threats. This will be used to calculate
the Residual Risk for each threat.
Click on the arrow to the right of each threat to expand it. A table of controls that have been implemented to mitigate that
threat will display. This is the same list of controls that were selected on the Control Selection step.
You may view the number of controls that have not been implemented for each threat next to the Controls Not
Implemented label. To view these controls, click on the Show Controls button. Use the checkboxes to quickly indicate if a
control has actually been implemented (without having to navigate back to the Control Selection step).
Rate the control environment rating by selecting a value from the Control Environment Rating dropdown menu. Use the
textbox to the right to enter any comments or justification for selecting a particular Control Environment Rating. Repeat
this process for each threat.
Once you have selected a Control Environment Rating for each threat, click on the Save button to save your changes and
remain on the screen or use the Save And Proceed To Review Results button to move forward to the next step. You may
also click directly on the Review Results tab. You will need to complete the Control Assessment in its entirety before
moving to the next step.

Wolf & Company, P.C. 26
Copyright © 2020
5. Review Results
This page displays the results of the risk assessment.
If you are done with the risk assessment, click on the Save & Submit button. The risk assessment will be saved and the
status will automatically change to Submitted. The assigned Reviewer will receive an email indicating the risk assessment is
available for review. If you are the assigned Reviewer and your review of the risk assessment is complete, click on the Save
& Finish button to automatically change the status to Reviewed. The assigned Owner will receive an email indicating the
risk assessment is now complete.

Wolf & Company, P.C. 27
Copyright © 2020
Document Questionnaire
1. Navigate to the Document Questionnaire
From the Data Security & Privacy Risk Management homepage, click on the Document Questionnaire icon.
Click on the name of a document in blue to access the questionnaire for that document. Note that the Document
Questionnaire may only be performed on documents with a Classification of Regulatory Restricted, and therefore only
Regulatory Restricted documents will appear on this page. You may also update the status by clicking within the Status
column.

Wolf & Company, P.C. 28
Copyright © 2020
2. Complete Questionnaire
Use the dropdown menus in the Response column to answer each question in the questionnaire. Depending on how you
answer each question, you may be prompted to answer additional follow-up questions. Continue to select a response for
each question until there are none left to answer. The percentage meter at the top of the page will display 100% once you
have answered all questions.
3. Add Comments
Use the Comments box located to the right of each question to provide any additional information to the Reviewer.
4. Save Changes and Update Status
When the Document Questionnaire is 100% complete, click on the Save button to save your changes. If you are the
Owner, remember to update the Status field at the top of the page to Submitted to trigger an email to the Reviewer to let
them know the questionnaire is ready for their review. If you are the Reviewer, update the Status field to Reviewed to
notify the assigned Owner that the questionnaire has been fully completed and reviewed.

Wolf & Company, P.C. 29
Copyright © 2020
Data Security Risk Assessment
1. Navigate to the Data Security Risk Assessment
From the Data Security & Privacy Risk Management homepage, click on the Data Security Risk Assessment icon.
Click on the name of a Business Process in blue to access the Data Security Risk Assessment for that process. You may also
update the status of a risk assessment by clicking within the Status column.

Wolf & Company, P.C. 30
Copyright © 2020
2. Questionnaire
If you wish to opt out of completing a risk assessment on a particular business process altogether, select the Opt Out Of
Risk Assessment checkbox at the top of the page and remember to update the status. No future action is required.
Otherwise, to continue with the risk assessment process, proceed with the instructions below.
Use the dropdown menus in the Response column to answer each question in the questionnaire. Depending on how you
answer each question, you may be prompted to answer additional follow-up questions. Continue to select a response for
each question until there are none left to answer. The percentage meter at the top of the page will display 100% once you
have answered all questions.
Use the Comments box located to the right of each question to provide any additional information to the Reviewer.
Click on the Save button to save your answers and remain on the screen or use the Save And Proceed to Threat
Assessment button to move forward to the next step. You will need to complete the questionnaire in its entirety before
moving to the next step. You may also click directly on the Threat Assessment tab to proceed.

Wolf & Company, P.C. 31
Copyright © 2020
3. Threat Assessment
In this step you will assess the likelihood of a given threat occurring for the business process. Based on how you have
answered the questions in the Questionnaire step, WolfPAC will determine which threats may be applicable to the
business process.
Review each threat and use the Likelihood Rating dropdown menu to select the Likelihood of the threat occurring,
assuming that there are no controls in place in your organization. If a threat is not applicable to your organization, use the
Not Applicable option. Use the Comments field to enter any additional information as needed.
Click on the Likelihood Definitions link to help you determine which Likelihood rating to choose.
WolfPAC will automatically calculate the Impact Ratings (Confidentiality, Integrity, and Availability) based on how the
Questionnaire was answered. Review these values and ensure that you agree with all three. You may override the
calculated Impact Ratings by selecting the Override checkbox and selecting a new value from the dropdown menu. You
will be required to enter a reason for overriding the impact in the Comments box.
Once you have completed both the Likelihood Assessment and the Impact Assessment, the calculated Overall Inherent
Risk will appear at the bottom of the page. If you have licensed the Information Technology module (4.0) and/or Third
Party Risk Management module (4.0), then the Technology Inherent Risk and Third Party Inherent Risk will also be factored
in the Overall Inherent Risk calculation for on any technologies or third parties selected in the Questionnaire.
Click on the Save button to save your changes and remain on the screen or use the Save And Proceed To Control
Selection button to move forward to the next step. You will need to complete the Threat Assessment in its entirety before
moving to the next step.

Wolf & Company, P.C. 32
Copyright © 2020
4. Control Selection
In this step, you will select the controls you have in place in your organization to mitigate the threats against the business
process. The controls that display on this page are based on the threats identified for the business process. Review the
Associated Threats column to see which threat(s) each control mitigates.
For each control that you have in place in your organization, select the checkbox in the Select Control column. Controls
that have been classified as Entity Level on the Manage Controls page will display with the word ENTITY instead of a
checkbox and there is no additional action required for these controls. They have been pre-selected.
There are filters available to help you with the control selection process. The Filter By Category dropdown allows you to
filter by control category. The control categories are pre-defined for each control. The Filter By Selection dropdown
allows you to see the controls you have already selected or not selected. The Filter By Threat dropdown is a good way to
evaluate all controls by threat.
If you wish to customize any of the control descriptions, you may do so using the textbox in the Control Description
column. WolfPAC has provided user-friendly descriptions for each control. However, you can change the control
description at the individual risk assessment level. To revert back to the default description, select the WOLFPAC option
from the Use Alternate Description section. The word [selected] will display next to the description type selected for the
control.
If you do not have a control in place or have a control weakness and wish to create a remediation item for it, click on the
Create New link in the Control Remediation column.
Use Link Additional Controls link at the top of the page to link any other controls that your organization has in place.

Wolf & Company, P.C. 33
Copyright © 2020
There is no need to save your work. As you check off each control, the information will be saved automatically. Click on the
Proceed To Control Assessment button to move forward to the next step of the process. You may also click directly on
the Control Assessment tab.
5. Control Assessment
In this section you will assess the strength of the controls you have in place by identifying a Control Environment Rating
for each threat. This rating represents the strength of the controls that mitigate potential threats against the business
process.
Click on the arrow to the right of each threat. A table of controls that have been implemented to mitigate that threat will
display. This is the same list of controls that were selected on the Control Selection step.
You may view the number of controls that have not been implemented for each threat next to the Controls Not
Implemented label. To view these controls, click on the Show Controls button. Use the checkboxes to quickly indicate if a
control has actually been implemented (without having to navigate back to the Control Selection step).
Rate the control environment rating by selecting a value on the Control Environment Rating dropdown menu. Use the
textbox to the right to enter any comments or justification for selecting a particular Control Environment Rating. Repeat
this process for each threat.
If you do not have a control in place or have a control weakness and wish to create a remediation item for it, click on the
Create New link in the Control Remediation column.
Once you have selected a Control Environment Rating for each threat, click on the Save button to save your changes and
remain on the screen or use the Save And Proceed To Review Results button to move forward to the next step. You may
also click directly on the Review Results tab. You will need to complete the Control Assessment in its entirety before
moving to the next step.

Wolf & Company, P.C. 34
Copyright © 2020
6. Review Results
This page displays the results of the risk assessment. The top of the page will indicate the Overall Inherent Risk, Control
Environment Rating, and Residual Risk that has been determined for the risk area of the business process.
Scroll down to the table to view a summary of each threat and their risk ratings. Click on the plus (+) sign before each
threat to expand the controls implemented for that threat.
If you are the assigned Owner and have completed the assessment, click on the Save & Submit button. The risk
assessment will be saved and the status will automatically change to Submitted. The assigned Reviewer will receive an
email indicating the risk assessment is available for review.
If you are the assigned Reviewer and accept the results of the risk assessment, click on the Accept Risk Assessment
Results button to automatically change the status to Reviewed. This will also send an automatic email to the Owner
indicating that the risk assessment is now complete. If you do not agree with the risk assessment results, click on the
Reject Risk Assessment Results button. This will change the status of the assessment back to In Progress and will trigger
an email to the assigned Owner. You must enter an Assessment Conclusion Comment.

Wolf & Company, P.C. 35
Copyright © 2020
Identity Theft Red Flags Assessment
1. Navigate to the Identity Theft Red Flags Assessment
From the Data Security & Privacy Risk Management homepage, click on the Identity Theft Red Flags icon.
2. Manage Covered Accounts
Then, from the Identity Theft Red Flags Risk Assessment homepage, click Manage Covered Accounts. Select the
checkbox beside all covered accounts that the institution decides to assess. When finished, click on the Save Changes and
Continue to User Assignments button at the bottom of the page.
For each covered account, select an Assigned User who is primarily responsible for completion and upkeep of the
Covered account in WolfPAC an Assigned Reviewer. Enter an Organization-Specific Description for each covered
account. Click Save Changes and Return to Identity Theft Red Flags Homepage when finished.
3. Manage Red Flags Procedures
From the Identity Theft Red Flags Risk Assessment homepage, click Add/Edit Red Flags Procedures.
Click the Add new procedure… link at the top of the screen to add any institution-specific red flags. Enter information
about the procedure, and then click Save Changes and Continue.

Wolf & Company, P.C. 36
Copyright © 2020
4. Assess Identity Theft Red Flags Risk
From the Identity Theft Red Flags Risk Assessment homepage, click Assess Identity Theft Red Flags Risk. For each
covered account, select the questionnaire link. Within the questionnaire, select the questions link beside each section to
view and answer questions.
Select an appropriate response for each question in the Response column, and enter any Comments as needed. When
finished with each section, click on the Save and Continue to Next Category button to proceed. You may also click on
Save and Return to Questionnaire to exit to the previous screen.
When all sections are complete, click on the Save Changes and Continue button to return to the covered account listing.
Remember to update the status of the covered account to either Submitted or Reviewed.
Wolf & Company, P.C. 37
Copyright © 2020
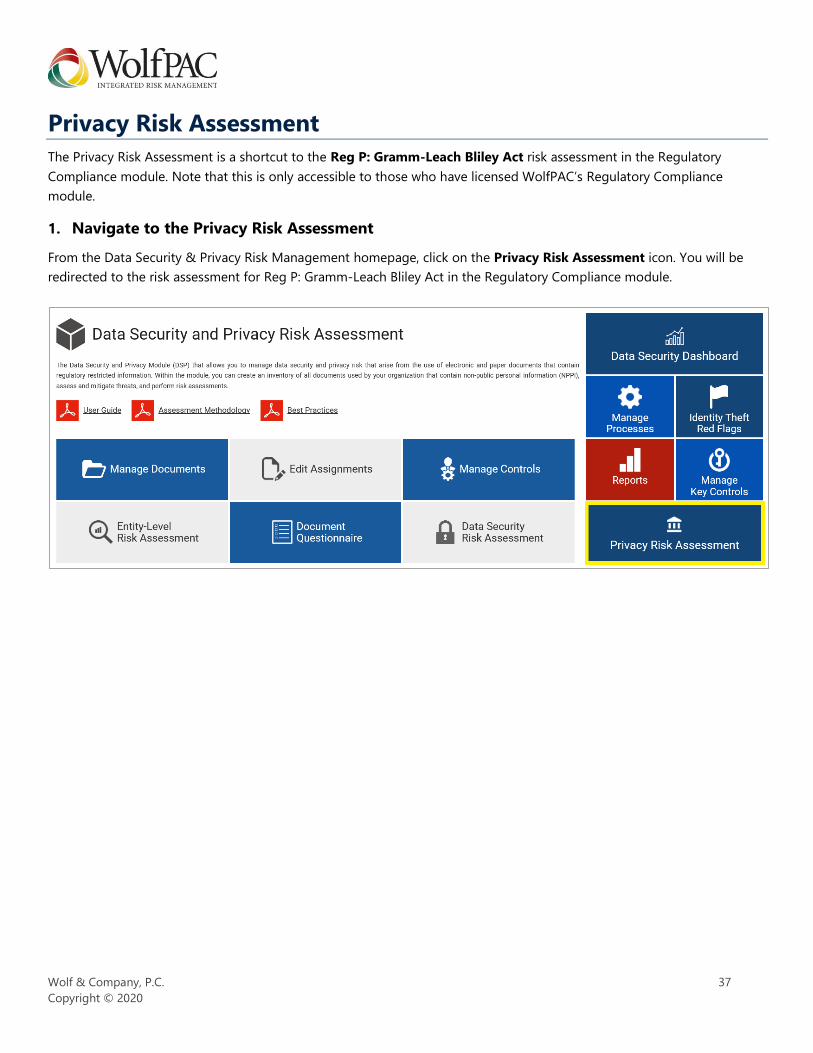
Privacy Risk Assessment
The Privacy Risk Assessment is a shortcut to the Reg P: Gramm-Leach Bliley Act risk assessment in the Regulatory
Compliance module. Note that this is only accessible to those who have licensed WolfPAC’s Regulatory Compliance
module.
1. Navigate to the Privacy Risk Assessment
From the Data Security & Privacy Risk Management homepage, click on the Privacy Risk Assessment icon. You will be
redirected to the risk assessment for Reg P: Gramm-Leach Bliley Act in the Regulatory Compliance module.

Wolf & Company, P.C. 38
Copyright © 2020
2. Complete Assessment
Expand each section by clicking on the gray bar or by clicking on the blue arrow. For each question, select a Response
from the dropdown menu and enter any Comments as needed.
For the Quality of Inherent Risk sections, a Calculated Quantity of Inherent Risk will be determined based on the
responses given. Select an appropriate Management's Assessment of Risk from the dropdown menu in each section. Be
sure to enter a comment if departing from the calculated risk score.
For the Quality of Mitigating Controls sections, respond to each question and then determine the Overall Quality of
Mitigating Controls for that section via the dropdown menu.
When all sections are complete, the Quantity of Inherent Risk, Quality of Mitigating Controls, and Residual Risk will be
calculated at the bottom of the page. To override these scores, select the Use override value checkbox and be sure to
enter a comment.
To save your changes, click on the Save or Save Changes and Return button.

Wolf & Company, P.C. 39
Copyright © 2020
Reports
1. Navigate to Reports
From the Data Security & Privacy Risk Management homepage, click on the Reports icon.
Select the desired report from the Report Type dropdown menu.