data-voice-video 3g power solutions installation guide · data-voice-video 3g power solutions...
TRANSCRIPT

Data-Voice-Video 3G Power Solutions
Installation and Operation Guide
Issue: IPN 997-00012-54D
Issue Date: November 2012
Refer to the separate SC200 or SC100 system controller handbook for full details of the system controller operation -
dcpower.eaton.com/Manuals.asp
Eaton Corporation
Telecommunications Power Solutions
dcpower.eaton.com

The product discussed in this literature is subject to terms and conditions outlined in Eaton selling policies. The sole source governing the rights and remedies of any purchaser of this equipment is the relevant Eaton selling policy.
No warranties, express or implied, including warranties of fitness for a particular purpose or merchantability, or warranties arising from course of dealing or usage of trade, are made regarding the information, recommendations and descriptions contained herein.
In no event will Eaton be responsible to the purchaser or user in contract, in tort (including negligence), strict liability or otherwise for any special, indirect, incidental or consequential damage or loss whatsoever, including but not limited to damage or loss of use of equipment, plant or power system, cost of capital, loss of power, additional expenses in the use of existing power facilities, or claims against the purchaser or user by its customers resulting from the use of the information, recommendations and descriptions contained herein.
The information contained in this literature is subject to change without notice.
Subject to the right to use its equipment, Eaton Corporation does not convey any right, title or interest in its intellectual property, including, without limitation, its patents, copyrights and know-how.
No part of this literature may be reproduced or transmitted in any form, by any means or for any purpose other than the Purchaser’s personal use, without the express written permission of Eaton Corporation.
Eaton®, Matrix, Powerware
®, Intergy
TM, CellSure
TM, SiteSure
TM, PowerManagerII
TM and DCTools
TM are trade
names, trademarks, and/or service marks of Eaton Corporation or its subsidiaries and affiliates. Unless otherwise noted, brands, product names, trademarks or registered trademarks are the property of their respective holders.
Copyright © 2005-2012 Eaton Corporation. All Rights Reserved.

About This Guide
Copyright © 2005-2012 Eaton Corporation. All Rights Reserved.
IPN 997-00012-54D November 2012 i
About This Gui de
Purpose
This guide provides instructions to correctly install, commission and operate Eaton Data-Voice-Video 3G Power Solutions (DV2-3G).
Audience
This guide is intended for use by:
Installers competent in:
installing and commissioning dc power systems
safe working practices for ac and dc powered equipment
the relevant local electrical safety regulations and wiring standards
Operators and maintenance staff competent in:
operation of dc power systems
safe working practices for ac and dc powered equipment
Scope
This guide covers installation, commissioning, operation and maintenance of Eaton Data-Voice-Video 3G Power Solutions.
It does not cover:
System controller operations; installation of external alarm and user digital inputs cabling; or setup of communications options or software. For details refer to the system controller operation handbook listed under Related Information.
Installation and configuration of Eaton SiteSure and CellSure modules. For details, refer to the relevant guide listed under Related Information.
Related Information
PowerManagerII Online Help
DCTools Online Help
SC100 System Controller Operation Handbook – IPN 997-00012-63*
SC200 System Controller Operation Handbook – IPN 997-00012-50*
SiteSure-3G Installation and Operation Guide – IPN 997-00012-51
CellSure Installation Guide – IPN 997-00012-20
* Download from: http://dcpower.eaton.com/Manuals.asp.

Data-Voice-Video 3G Power Solutions Installation Guide
ii Copyright © 2005-2012 Eaton Corporation. All Rights Reserved.
IPN 997-00012-54D November 2012
Reporting Problems with this Guide
Please use this email address to report any problems you find in this guide:
Eaton DC Product Marketing Communications
EMAIL: [email protected]
For Further Information and Technical Assistance
For further information and technical assistance see Worldwide Support on page 103.

Table of Contents
Copyright © 2005-2012 Eaton Corporation. All Rights Reserved.
IPN 997-00012-54D November 2012 iii
Tabl e of C ontents
About This Guide Purpose ....................................................................................................................................... i Audience ..................................................................................................................................... i Scope ........................................................................................................................................... i Related Information .................................................................................................................. i Reporting Problems with this Guide ..................................................................................... ii For Further Information and Technical Assistance ............................................................. ii
Chapter 1 General Description Overview ................................................................................................................................... 1 Typical DV2-3G DC Power Systems ...................................................................................... 2 Rectifiers .................................................................................................................................... 3 System Controller ..................................................................................................................... 4
SC200 System Controller ................................................................................................................ 4 SC100 System Controller ................................................................................................................ 5 Compatible Software ....................................................................................................................... 5
Input/Output Board ................................................................................................................ 6 Connections ...................................................................................................................................... 7
Other Features .......................................................................................................................... 8 External communications ............................................................................................................... 8 Low Voltage Disconnect (LVD) option ......................................................................................... 8 External current shunts/sensors option ....................................................................................... 8 Battery Mid-point Monitoring Description (SC200 only) ........................................................... 9 Battery Time Remaining ................................................................................................................. 9
Chapter 2 Preparation Overview ................................................................................................................................. 11 Warnings ................................................................................................................................. 12 Inspecting the Equipment and Reporting Damage ........................................................... 14
Chapter 3 Installation Overview ................................................................................................................................. 15 Installation Tasks .................................................................................................................... 16
DC Installation Practices ............................................................................................................... 16 Order of Tasks ................................................................................................................................ 17
Task 1 - Check the AC Supply and Earthing ...................................................................... 17 Task 2 - Fixing the Power System Cabinet(s) ..................................................................... 20 Task 3 - Connect the Output to Earth .................................................................................. 22 Task 4 - Connect the DC Load Cables ................................................................................. 24 Task 5 - Connect Battery Cables (if required) ..................................................................... 25 Task 6 - Install the Batteries .................................................................................................. 27 Task 7 - Mount the Battery Temperature Sensor ............................................................... 30 Task 8 - Connect External Current Sensors/Shunts (if required) .................................... 31 Task 9 - Connect Input/Output Cabling (if required) ...................................................... 31 Task 10 - Connect Additional Input/Output (if required) ............................................... 32 Task 11 - Connect Battery Fuse Fail (if required) ............................................................... 32 Task 12 - Connect to the AC Supply .................................................................................... 33 Installation Completed .......................................................................................................... 36

Data-Voice-Video 3G Power Solutions Installation Guide
iv Copyright © 2005-2012 Eaton Corporation. All Rights Reserved.
IPN 997-00012-54D November 2012
Chapter 4 Start-Up Overview .................................................................................................................................. 37 Start-Up Tasks ......................................................................................................................... 38 Task 1 - Inserting the Rectifiers ............................................................................................. 38 Task 2 - Pre-Power-Up Checklist .......................................................................................... 39 Task 3 - Applying AC Power ................................................................................................. 39 Task 4 - Configuring the DC Power System ........................................................................ 40 Task 5 - Apply DC Power to Battery and Load .................................................................. 41 Start-Up Completed ................................................................................................................ 42
Chapter 5 System Controller Configuration File ................................................................................................................... 44
Backup and Restore ....................................................................................................................... 44 Starting the SC200 or SC100 .................................................................................................. 45
SC200 ............................................................................................................................................... 45 SC100 ............................................................................................................................................... 45
SC200 or SC100 Operation using the Keypad and Screen ................................................. 46 Keypad Access Security ................................................................................................................ 46 Alarm Indicators ............................................................................................................................ 47
SC200 or SC100 Operation Using a PC/Laptop ................................................................. 48 Using DCTools via USB (SC200 only) ......................................................................................... 48 Using DCTools via RS232 ............................................................................................................. 48
SC200 or SC100 Identity Information ................................................................................... 50
Chapter 6 Maintenance Overview .................................................................................................................................. 51 Troubleshooting ...................................................................................................................... 52 Replacing or Adding a Rectifier ............................................................................................ 56 Replacing or Adding a Load MCB ....................................................................................... 57 Replacing a Load or Battery Fuse Link ................................................................................ 58 Adding a Load Fuse................................................................................................................ 59 Replacing the System Controller........................................................................................... 59 Replacing the Input/Output Board ...................................................................................... 61 Monitoring and Replacing Transient Protective Devices .................................................. 63 Battery Mid-point Monitoring (String Fail) Alarm (SC200 only) ..................................... 63 Battery Disposal and Recycling............................................................................................. 64

Table of Contents
Copyright © 2005-2012 Eaton Corporation. All Rights Reserved.
IPN 997-00012-54D November 2012 v
Appendix A Equipment and Tools Safety Equipment .......................................................................................................................... 65 Essential Tools................................................................................................................................ 65 Recommended Tools ..................................................................................................................... 65
Spare Parts ............................................................................................................................... 66 Standard Torque Settings ...................................................................................................... 67
Appendix B Specifications
Appendix C Cable Ratings
Appendix D Controller Menus SC200 Menu ............................................................................................................................ 77 SC100 Menu ............................................................................................................................ 78
Appendix E Connector Pin-outs System Controller Connector Pin-outs ................................................................................ 79 I/O Board (IOBGP-00, -01) Connector Pin-outs ................................................................. 80
Appendix F System Components External Current Sensors ....................................................................................................... 83
CS04-A11 current sensor .............................................................................................................. 83
Appendix G Transient Protection
Appendix H Commissioning Analog Inputs ......................................................................................................................... 90 System Controls ...................................................................................................................... 92 System Alarms ........................................................................................................................ 95 Digital Inputs .......................................................................................................................... 98 Digital Outputs (Relays) ........................................................................................................ 99 Commissioning Completed .................................................................................................. 99
Equipment Incident Report
Worldwide Support
Index

Data-Voice-Video 3G Power Solutions Installation Guide
vi Copyright © 2005-2012 Eaton Corporation. All Rights Reserved.
IPN 997-00012-54D November 2012
Chapter 1
General Description
Copyright © 2005-2012 Eaton Corporation. All Rights Reserved.
IPN 997-00012-54D November 2012 1
C h a p t e r 1
Gener al D escription
Overview
Topic Page
Typical DV2-3G DC Power Systems 2
Rectifiers 3
System Controller 4
Input/Output Board 6
Other Features 8

Data-Voice-Video 3G Power Solutions Installation Guide
2 Copyright © 2005-2012 Eaton Corporation. All Rights Reserved.
IPN 997-00012-54D November 2012
Typical DV2-3G DC Power Systems
Typical system (rectifiers only)
Typical system with integrated batteries
Battery rack (option)
DC distribution section.
Input/Output (I/O) board (on back of door). See details on page 6.
SC200 or SC100 system controller. See details on page 4. (For more details refer to the relevant system controller handbook listed under Related Information.)
AC distribution with isolator switch and surge protection (located behind door in most models).
Rectifier magazine(s)* for up to 10 rectifiers per magazine. See details of rectifiers on page 3.
Combined ac and dc distribution section.
Battery shelves with battery MCBs. (A battery shelf front cover is also supplied, but is not shown.)
Optional plinth for use with raised floors (Eaton part number: PLINIR-A00). See details on page 20.
An optional security door (not shown) is also available.
These diagrams show typical layouts of 43U high racks. Actual system configuration may vary from that shown.

General Description
Copyright © 2005-2012 Eaton Corporation. All Rights Reserved.
IPN 997-00012-54D November 2012 3
Rectifiers
Data-Voice-Video 3G Power Solutions are fitted with either 48V, 2000W (APR48-ES); 48V, 1800W (APR48-3G); or 24V, 1440W (APR24-3G) rectifiers. The rectifiers are fan-cooled and hot-pluggable.
See Specifications on page 69 for further information. See Troubleshooting on page 52 for details of rectifier alarms.
Left: APR24-3G and APR48-3G
Right: APR48-ES
Power On LED (Green)
Minor Alarm LED (Yellow)
Major Alarm LED (Red)
Serial Number
Retaining Screw. Tighten to 1.5Nm (13.3 inch-pounds).

Data-Voice-Video 3G Power Solutions Installation Guide
4 Copyright © 2005-2012 Eaton Corporation. All Rights Reserved.
IPN 997-00012-54D November 2012
System Controller
The SC200 or SC100 system controller provides control, communications and alarm functions.
The system controller is supplied pre-configured. Configuration changes can be made with the keypad, or via a PC connected to the USB connector (SC200) or RS232 (SC100) connector. Or changes can be made remotely (see External Communications on page 8).
For basic operating information see System Controller on page 43. For further details refer to the System Controller Operation Handbook (see Related Information).
See Troubleshooting on page 52 for details of system controller alarms.
SC200 System Controller
The SC200 system controller is an advanced control and monitoring solution which provides a full suite of communications options, including built-in Ethernet interface, Web server, and SNMP agent.
Alarm notifications may be by Email, SNMP traps, SMS text messaging, dial-out to PowerManagerII remote monitoring software, or relay contact closures.
Power on LED (green)
Minor alarm LED (yellow)
Critical/Major alarm LED (red)
Color LCD
Soft keys (2)
Navigation keys (4)
USB 1.1 connector (12Mb/s)
Retaining screw
Power and system communications connector
RS232 connector
Ethernet connector and status LEDs
General Description
Copyright © 2005-2012 Eaton Corporation. All Rights Reserved.
IPN 997-00012-54D November 2012 5
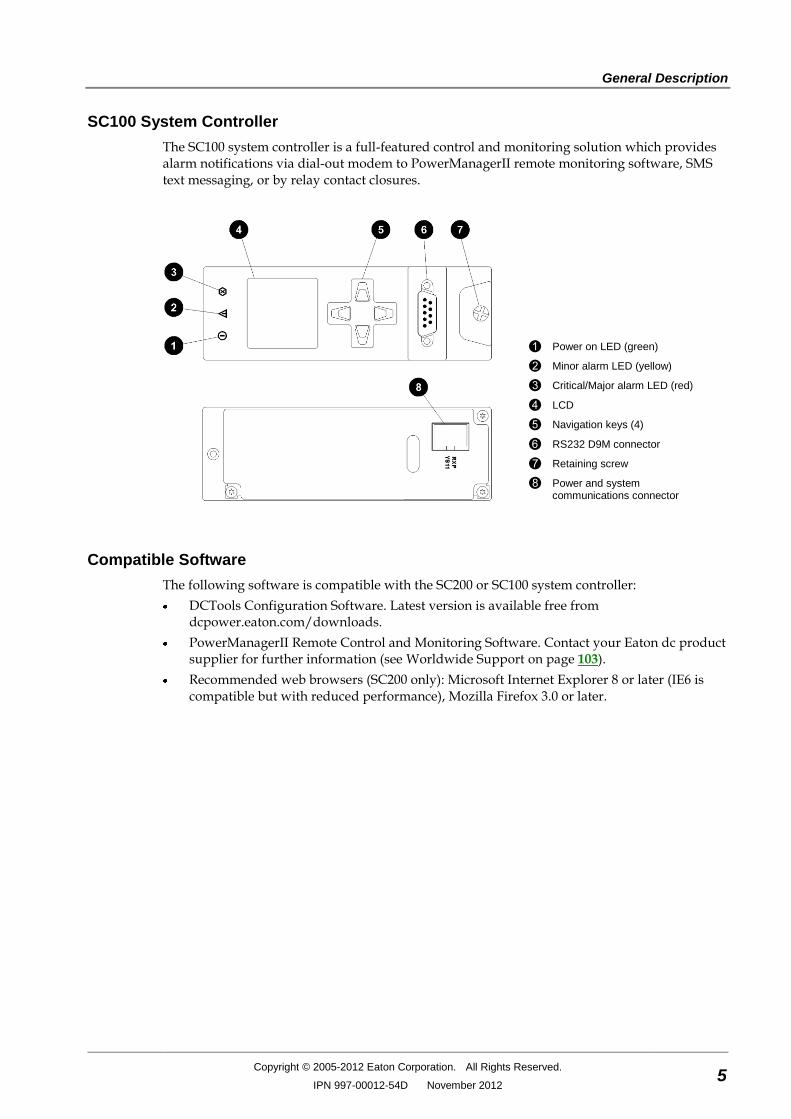
SC100 System Controller
The SC100 system controller is a full-featured control and monitoring solution which provides alarm notifications via dial-out modem to PowerManagerII remote monitoring software, SMS text messaging, or by relay contact closures.
Power on LED (green)
Minor alarm LED (yellow)
Critical/Major alarm LED (red)
LCD
Navigation keys (4)
RS232 D9M connector
Retaining screw
Power and system communications connector
Compatible Software
The following software is compatible with the SC200 or SC100 system controller:
DCTools Configuration Software. Latest version is available free from dcpower.eaton.com/downloads.
PowerManagerII Remote Control and Monitoring Software. Contact your Eaton dc product supplier for further information (see Worldwide Support on page 103).
Recommended web browsers (SC200 only): Microsoft Internet Explorer 8 or later (IE6 is compatible but with reduced performance), Mozilla Firefox 3.0 or later.

Data-Voice-Video 3G Power Solutions Installation Guide
6 Copyright © 2005-2012 Eaton Corporation. All Rights Reserved.
IPN 997-00012-54D November 2012
Input/Output Board
The input/output (I/O) board provides the I/O interfaces and connections for the SC200 or SC100 system controller.
The I/O board includes a range of sense inputs for dc power system control and monitoring. It also allows real time data collection from building services and other external devices, and relay outputs for alarm signals or control of external devices.
The I/O functions are:
Sensors: Current - 3, Bus voltage - 1, Temperature - 2, Battery Mid-point - 4 (SC200 only)
Input/Output: Digital inputs: 4 pre-defined system functions, 6 user-defined Relay outputs: 6 (one also used as Monitor OK alarm) LVD contactor outputs: 2
For input and output specifications see details on page 73. For connector pin-outs see details on page 80.
Bus voltage sense input - XH9
Power/Comms OK LED (green)
Digital inputs D1-D6 (6 user defined) - XH15A, XH15B
Digital (relay) outputs RY1-RY6 (6) - XH16-XH21
LVD contactor 2 status LED (green)
LVD contactor 2 connector - XH5
LVD contactor 1 status LED (green)
LVD contactor 1 connector - XH4
LVD power input connector - XH8
Power and RXP comms input - YH11
Current sense inputs (3) - XH6
Temperature sense inputs (2) - XH7
Battery Mid-point Monitoring sense inputs (SC200 only) - XH12
DC power system digital inputs (4 pre-defined: Load Fuse Fail, Battery Fuse Fail, AC Distribution Fan Fail, AC Distribution MOV Fail) - YH3
See Troubleshooting on page 52 for details of I/O board LED signals.

General Description
Copyright © 2005-2012 Eaton Corporation. All Rights Reserved.
IPN 997-00012-54D November 2012 7
Connections
The following diagram shows the connections between the SC200 or SC100, the I/O board, the other dc power system components and external devices.
SC200 or SC100 system controller
I/O board
Voltage feed module
USB communications (SC200 only)
Ethernet communications (SC200 only)
RS232 communications
Digital relay outputs (6) to external devices and/or alarm indication system
Digital inputs (6) from external voltage-free switches or relay contacts
Connection to additional I/O board(s) and/or SiteSure-3G I/O module(s) via RJ45 splitter (see details on page 32) (SC200 only)
Connection to dc common bus
Connection to dc live bus
Communications to rectifiers
DC power system digital inputs (Load Fuse Fail, Battery Fuse Fail, AC Distribution Fan Fail, AC Distribution MOV Fail)
Connections to battery mid-points (4) (SC200 only)
Connection to temperature sensors (2)
Connection to current sensors (3)
Optional LVD contactor and auxiliary switch (see details on page 8)
Optional LVD contactor and auxiliary switch (see details on page 8)
Bus voltage sense and LVD power connections
I/O and system controller power and RXP comms connections
For connector pin-outs see details on page 80. For input and output specifications see details on page 69.

Data-Voice-Video 3G Power Solutions Installation Guide
8 Copyright © 2005-2012 Eaton Corporation. All Rights Reserved.
IPN 997-00012-54D November 2012
Other Features
External communications
Refer to the system controller handbook for information on these communications options.
Communications options SC200 SC100
Communication with DCTools via USB -
Communication with DCTools or PowerManagerII via RS232
Communication with DCTools or PowerManagerII via an external PSTN or GSM modem (dial-in and dial-out on alarm)
Communication with DCTools or PowerManagerII via Ethernet -
Communication with web browser software via an IP network -
Communication with a Network Management System (NMS) using SNMP
-
Communication with a Building Management System (BMS) using Modbus
-
Alarm and status messages to GSM Short Messaging Service (SMS) text capable cell phones
Communication with an alarm management system using voltage-free relay contacts (on an IOBGP I/O board)
Low Voltage Disconnect (LVD) option
Data-Voice-Video 3G Power Solutions may be fitted with one or more Low Voltage Disconnects (LVDs). The way LVDs can be connected is determined by the type of dc power system:
In dc power systems without integrated batteries the LVD(s) can be connected either as load or battery disconnect(s).
In dc power systems with integrated batteries the LVD(s) can only be connected as a battery disconnect.
LVDs have two purposes:
to protect a VRLA battery from deep discharge and premature failure, and/or
to reduce the load on a battery under discharge so that high priority equipment operates for a longer time after an ac supply failure.
Refer to the SC200 or SC100 system controller handbook for information on how to configure the LVD channels.
External current shunts/sensors option
Various models of external current shunts/sensors are available for use with the Data-Voice-Video 3G Power Solutions to measure battery and/or load currents. The Eaton CS04-A11 current sensor is also available to measure currents in larger systems. See details on page 83.
External current shunts/sensors are connected to the I/O board or to a SiteSure-3G module.

General Description
Copyright © 2005-2012 Eaton Corporation. All Rights Reserved.
IPN 997-00012-54D November 2012 9
Battery Mid-point Monitoring Description (SC200 only)
Battery Mid-point Monitoring provides a cost-effective method for the early detection of internal battery faults. The voltages of the two halves of a battery string are measured and the system controller generates an alarm signal if a voltage imbalance is detected.
A voltage imbalance is an indication that one or more cells has an internal fault. Further investigation can then isolate the faulty cell(s) and action can be taken to correct the problem and prevent a total battery failure.
To connect Battery Mid-point Monitoring see details on page 27. If a String Fail alarm is generated see Troubleshooting on page 52.
To ensure reliable operation Mid-point Monitoring operates only when the battery is in float charge and after a configurable lockout period since the last battery discharge, Fast Charge, Equalize or Battery Test.
Battery Time Remaining
The SC200 or SC100 obtains characterization data from either periodic battery discharges (SC100) or every full battery discharge (SC200), to a specified end voltage.
During a battery discharge, the SC200 or SC100 uses this characterization data to calculate an estimated time until the battery will reach the specified end voltage.
If a battery disconnect LVD is fitted then the end voltage will usually be the voltage at which the LVD disconnects the battery.
Battery Time Remaining is designed for a constant power load. The accuracy of the time remaining calculation will be reduced if the dc power system is connected to a predominantly resistive (constant current) load.
The time remaining calculation will not be correct if a non-essential load is disconnected during the battery discharge.
For details refer to Battery Time Remaining in the SC200 or SC100 System Controller Operation Handbook (see Related Information).

Data-Voice-Video 3G Power Solutions Installation Guide
10 Copyright © 2005-2012 Eaton Corporation. All Rights Reserved.
IPN 997-00012-54D November 2012

Chapter 2
Preparation
Copyright © 2005-2012 Eaton Corporation. All Rights Reserved.
IPN 997-00012-54D November 2012 11
C h a p t e r 2
Prepar ation
Overview
Topic Page
Warnings 12
Inspecting the Equipment and Reporting Damage 14

Data-Voice-Video 3G Power Solutions Installation Guide
12 Copyright © 2005-2012 Eaton Corporation. All Rights Reserved.
IPN 997-00012-54D November 2012
Warnings
This section contains important warnings. Read these warnings before installing or operating Data-Voice-Video 3G Power Solutions dc power systems.
Electrical Safety
The dc earth/ground link must be rated to carry the combined fault current of battery strings. See details on page 22.
If the dc power system is to be installed in a location where the ambient temperature may rise above 45ºC (113ºF), then 105°C rated cable rated cable must be used for all connections.
The dc power system is not compatible with IT (Impedance Terra) ac supply. For advice see Worldwide Support on page 103.
A registered electrician (or suitably qualified person) must check the integrity of the installed cabling, BEFORE the dc power system is powered up.
Commissioning must be performed in the sequence documented in this guide.
Location and Environment
For ease of access and to maintain optimum system cooling observe the clearances stated on page 20.
Dust build-up within the dc power system may cause premature failure. In dusty environments filter the ventilation air entering the equipment room. Ensure regular cleaning of the air filters.
Do not allow water or any foreign object to enter the dc power system. Do not place objects containing liquid on top of or near the unit.
Flooded cell and VRLA lead acid batteries can emit explosive gases and must be installed with adequate ventilation. Refer to the battery manufacturer or supplier for advice on minimum ventilation levels.
Reverse Polarity
Always check that the battery cables have been terminated to the correct system polarity BEFORE connecting the batteries or closing the battery disconnect device. Connecting batteries to the dc power system with incorrect system polarity will damage the rectifiers and void all warranty claims.
Hazardous Energy Levels
Rectifiers and batteries contain hazardous energy levels. Only personnel trained and experienced in dc power systems are to service/maintain this equipment.
Always use insulated tools.
Do not short-circuit the live and common bus bars or cables.

Preparation
Copyright © 2005-2012 Eaton Corporation. All Rights Reserved.
IPN 997-00012-54D November 2012 13
Batteries
The plastic cases of batteries installed in Eaton dc power system racks must have a flammability rating of UL 94-V2 or better.
Flooded cell and VRLA lead acid batteries can emit explosive gases and must be installed with adequate ventilation. Refer to the battery manufacturer or supplier for advice on minimum ventilation levels.
Do not wear a synthetic dust-coat or overalls. Synthetic fabrics can hold static electric charges that create sparks during discharge.
Remove rings, wristwatch and other metal jewelry that might be exposed to battery terminals, before installing batteries.
Batteries are powerful sources of energy and present a potential electrical shock and energy hazard. The energy hazard is always present, even if the batteries are not connected. Avoid short circuiting terminals of opposite polarity.
Always use insulated tools.
Do not place tools, loose cables or metal objects (such as interconnecting bars) on top of batteries.
Do not drop tools, loose cables or metal objects onto intercell connections or terminals of opposite polarity.
Only terminate cables and interconnecting bars after confirming that the termination will not create a short circuit.
Always tighten battery terminal bolts according to the battery manufacturer’s specification. Failing to do so can cause erratic battery performance, possible damage to the battery, and/or personal injury.
There is a risk of electric shock or explosion if a battery is replaced by an incorrect type.
Dispose of batteries according to the instructions on page 64.
Rectifiers
Only operate the rectifiers when the surrounding area is clean and dust free.
To reduce the risk of electric shock and maintain optimum system cooling, always cover empty rectifier slots with blanking panels.
To avoid electrical shock, do not place hands inside the rectifier magazine.
Rectifier cases may exceed 100ºC (212ºF), especially after prolonged operation. Use suitable gloves when removing a rectifier from the magazine.
Do not attempt to disassemble faulty rectifiers. Return them (in their original packaging) with a completed Equipment Incident Report on page 101.
Ensure that any upstream Residual Current Devices (RCDs) are appropriately rated for the rectifiers' maximum earth leakage current (see Specifications on page 69 for value).
DC Distribution(s)
The dc common bus of the dc power system can be connected to earth (ground). If this connection is made all of the following conditions must be met:
Your equipment and the dc power system must be located within the same premises.
No switching or disconnecting devices are allowed in the conductor between the dc common line and the point of connection to the earth electrode conductor.
Follow all applicable local and national rules and regulations when making field connections.
Tighten all electrical connections to the torques stated in this guide or on the manufacturer's label.

Data-Voice-Video 3G Power Solutions Installation Guide
14 Copyright © 2005-2012 Eaton Corporation. All Rights Reserved.
IPN 997-00012-54D November 2012
Servicing and Maintenance
The DV2-3G contains hazardous voltages and hazardous energy levels. Before undertaking any maintenance task refer to the Warnings on page 12.
If a maintenance task must be performed on a "live" system then take all necessary precautions to avoid short-circuits or disconnection of the load equipment, and follow any "live-working" instructions applicable to the site.
Only perform the maintenance tasks described in the Maintenance chapter. All other tasks are classified as Servicing. Servicing must only be performed according to specific instructions and only by personnel authorized by Eaton. This includes disassembly and/or servicing of any modules.
For further information on Servicing contact your local Eaton dc product supplier, or refer to the contact details on page 103.
EMC Compliance
This dc power system may be used in close proximity to other electronic equipment, provided installation is carried out according to instructions in this guide. However, proper installation and compliance with EMC standards does not guarantee that the dc power system will not respond to electromagnetic disturbances, or will not cause interference to other equipment in a particular installation.
In a domestic environment this product may cause radio interference in which case the user may be required to take adequate measures.
This equipment generates, uses, and can radiate radio frequency energy and, if not installed and used in accordance with the instructions, may cause harmful interference to radio communications. However, there is no guarantee that the interference will not occur in a particular installation. If this equipment does cause harmful interference to radio or television reception, which can be determined by turning the equipment off and on, the user is encouraged to try to correct the interference by one or more of the following measures:
Reorient or relocate the receiving antenna.
Increase the separation between the equipment and receiver.
Connect the equipment into an outlet on a circuit different from that to which the receiver is connected.
Consult the dealer or an experienced radio/TV technician for help.
Inspecting the Equipment and Reporting Damage
Unpack the equipment and inspect it carefully for possible damage that may have occurred while in transit. Do not use any damaged equipment.
Report any damage immediately, using a completed Equipment Incident Report on page 101.
Keep the original packaging to use if any item needs to be returned for replacement or repair.

Chapter 3
Installation
Copyright © 2005-2012 Eaton Corporation. All Rights Reserved.
IPN 997-00012-54D November 2012 15
C h a p t e r 3
Installation
Overview
Topic Page
Installation Tasks 16
Task 1 - Check the AC Supply and Earthing 17
Task 2 - Fixing the Power System Cabinet(s) 20
Task 3 - Connect the Output to Earth 22
Task 4 - Connect the DC Load Cables 24
Task 5 - Connect Battery Cables (if required) 25
Task 6 - Install the Batteries 27
Task 7 - Mount the Battery Temperature Sensor 30
Task 8 - Connect External Current Sensors/Shunts (if required) 31
Task 9 - Connect Input/Output Cabling (if required) 31
Task 10 - Connect Additional Input/Output (if required) 32
Task 11 - Connect Battery Fuse Fail (if required) 32
Task 12 - Connect to the AC Supply 33
Installation Completed 36

Data-Voice-Video 3G Power Solutions Installation Guide
16 Copyright © 2005-2012 Eaton Corporation. All Rights Reserved.
IPN 997-00012-54D November 2012
Installation Tasks
Before starting the installation, review the following information:
Required Equipment and Tools on page 65
Warnings and Cautions on page 12
Inspecting the Equipment and Reporting Damage on page 14
DC Installation Practices
Read the following dc Installation Practices before connecting the dc load and battery cables:
To avoid excessive voltage drop and overheating, ensure that the dc load and battery cables are appropriately sized to handle the maximum dc output current. Also refer to the table of minimum cable sizes for specific MCBs or fuses on page 75. We recommend multi-strand cable with insulation rating of 600-1000V.
Run the dc load and battery cables through cable glands where they pass through metal parts or covers. Also ensure that each cable gland provides firm strain relief and adequate anchorage for the cable.
Secure and support all dc load and battery cabling (especially at their connection points) to prevent excessive strain on these cables.
To reduce inductive coupling, separate dc load, battery and control cabling from ac supply cables. If the cables have to cross, run them at right angles to the ac supply cables.
In order to minimize parasitic cable inductance and reduce electromagnetic interference (EMI), route all dc load cables in close proximity to one another, and avoid large current loops. The same applies to battery cables.
Ensure that MCBs/fuses in the dc distribution(s) are clearly labeled.
Only perform electrical insulation and continuity tests, once all dc load and battery cabling are in place and dc common bus has been earthed.

Installation
Copyright © 2005-2012 Eaton Corporation. All Rights Reserved.
IPN 997-00012-54D November 2012 17
Order of Tasks
Complete the installation tasks in the following order:
Task Description Reference
1 Check the AC Supply and Earthing See details on page 17
2 Fixing the Power System Cabinet(s) See details on page 20
3 Connect the Output to Earth See details on page 22
4 Connect the dc Load Cables See details on page 24
5 Connect Battery Cables (if required) See details on page 25
6 Install the Batteries See details on page 27
7 Mount the Battery Temperature Sensor See details on page 30
8 Connect External Current Sensors/Shunts (if required) See details on page 31
9 Connect Input/Output Cabling (if required) See details on page 31
10 Connect Additional Input/Output (if required) See details on page 32
11 Connect Battery Fuse Fail (if required) See details on page 32
12 Connect to AC Supply See details on page 33
For installation of external communications refer to Communications Options in the system controller Operation Handbook (see Related Information).
Task 1 - Check the AC Supply and Earthing
It is important that the ac supply for the Data-Voice-Video 3G Power Solutions dc power system includes the correct levels of protection.
Step 1 - Check transient voltage protection at the site
1 Confirm that there is a transient protection plan (compliant with IEC 61643-12) for the site.
For more information see Transient Protection on page 85.
2 If necessary, install suitable transient protection.

Data-Voice-Video 3G Power Solutions Installation Guide
18 Copyright © 2005-2012 Eaton Corporation. All Rights Reserved.
IPN 997-00012-54D November 2012
Step 2 - Check high ac voltage protection at the site
1 Check if the ac voltage is expected to exceed 275V (L-N).
2 If so, then it is strongly recommended that an external high voltage protection unit (HVPU) be installed. This will automatically disconnect the ac at high voltage and reconnect it at normal voltage.
3 Install the HVPU as in the following diagram.
4 Connect the High VAC alarm output to one of the Digital Inputs on the I/O board (see the diagram on page 6 for location).
The High VAC alarm signal lines must be isolated from the ac supply by a voltage-free relay contact.
YH3
AC supply
Primary transient protection devices
High voltage protection unit with alarm output
DV2-3G dc power system
Secondary transient protection devices (MOVs)
I/O board
SC200 or SC100 system controller
Rectifiers
Step 3 - Check the type of ac supply, disconnect device and RCDs
1 Check the type of ac supply. Only the types of ac supply listed in the Specifications on page 69 are suitable for the DV2-3G.
Only use a delta (L-L) ac supply if referenced to earth, or a protection system is in place so that the phase-earth voltage cannot exceed the rating of the rectifier.
2 Check that the DV2-3G will be connected to a suitable upstream ac disconnect device(s).
3 Check the disconnect device will isolate both the phase and neutral conductors in single-phase and three-phase connections, unless the neutral conductor is clearly identified.
4 Check that any Residual Current Devices (RCD) upstream of the DV2-3G are rated for the maximum earth leakage current of the rectifiers. If necessary, install higher rated RCD(s).
The maximum earth leakage current of the rectifiers is given in the Specifications on page 69.

Installation
Copyright © 2005-2012 Eaton Corporation. All Rights Reserved.
IPN 997-00012-54D November 2012 19
Step 4 - Check ac discrimination
Each rectifier has internal fast-acting fuses. Under certain internal fault conditions these fuses will blow.
If there is insufficient discrimination between these fuses and any upstream ac supply-disconnect device then the upstream ac supply-disconnect device will operate before a rectifier fuse blows. This will disconnect the ac supply to all rectifiers.
1 Check the time-current (tripping) curve(s) of all ac supply-disconnect device(s) upstream of the DV2-3G with the following curve for the rectifier fuses.
Refer to the manufacturer's data for tripping curves.
Time-Current Curve (minimum and maximum) for internal rectifier fuses (IEC 60127-2).
Source: Schurter SP 5x20 Pigtail data sheet.
2 No action is required if the time-current curves of the upstream ac supply-disconnect devices are entirely to the right of the curves for the rectifier fuses.
3 If the curve of an upstream ac supply-disconnect device crosses the curve for the rectifier fuse there may not be adequate discrimination.
If necessary, replace the upstream ac supply-disconnect device to achieve adequate discrimination. Or, contact your Eaton dc product supplier for advice (see Worldwide Support on page 103).

Data-Voice-Video 3G Power Solutions Installation Guide
20 Copyright © 2005-2012 Eaton Corporation. All Rights Reserved.
IPN 997-00012-54D November 2012
Step 5 - Check the earthing arrangements at the site
Confirm that all earths are brought together at one "star" point so that surge currents cannot flow in "earth loops" and create large voltages.
For more information see Transient Protection on page 85.
Procedure complete
Task 2 - Fixing the Power System Cabinet(s)
The dc power system must be installed in a location classified as ‘Restricted Access’. A key
or tool is required to gain access to the power system. A sign must also be displayed, warning that the power system metalwork may be hot.
The dc power system must meet the fire and electrical enclosure requirements specified in AS/NZS 60950.1, EN 60950-1, IEC 60950-1 and UL 60950-1. To maintain compliance with these requirements, all covers must be fitted (including the bottom cover plate, if bottom cable access is not required.)
Lifting equipment and at least two people are required to safely move the power system. Without lifting equipment four people are required to move the power system safely.
Data-Voice-Video 3G Power Solutions racks are supplied completely assembled. Rectifiers and batteries are always shipped separately.
Step 1 - Check route and clearances
1 Check the route of the power system to its final position. Check for:
clearances at doorways and other points
that the floor can support the weight of the rack and lifting equipment
that protective floor coverings are available (if required).
2 Check there will be the following minimum clearances around the power system in its final position:
Front Clearance – 600mm (24“) from walls and other equipment required for access.
Top Clearance – 200mm (8“) from ceilings or overhead cable trays/ducting, required for optimum system cooling.
Single Side or Back Clearance – 600mm (24“) from walls and other equipment recommended to assist access.
Back Clearance – 600mm (24“) from walls if the vented back panel is fitted.

Installation
Copyright © 2005-2012 Eaton Corporation. All Rights Reserved.
IPN 997-00012-54D November 2012 21
Step 2 - Unpack the power system
1 Before the dc power system is unpacked, ensure that:
The site has been thoroughly cleaned and is dust free. (It is strongly recommended that you do NOT unpack the power system until all building work at the site has been completed. If building work is still in progress, store the power system in its original packaging in a dry and level location inside the building.)
Lifting equipment and at least two people are available. (Without lifting equipment four people are required to move the power system safely.)
2 When the site is clean and dust free, remove the packaging from the power system and stand the rack upright.
3 Carefully inspect the power system for possible damage that may have occurred while in transit. Report any damage immediately, using a completed Equipment Incident Report on page 101.
Step 3 - Fix the cabinet(s) directly to the floor (if required)
Ignore this Step if the site has a raised floor.
1 Mark the positions of fixing holes on the floor using the following template. Allow for the required clearances (see Step 1).
2 Drill the mounting holes. Remove any shavings and dust.
3 Before moving the cabinet(s), ensure that:
protective floor coverings are in place (if required)
the floor can support the weight of the power system.
4 Move the cabinet(s) into position.
Use lifting equipment and at least two people (or four people without lifting equipment) to move a power system safely.
5 Bolt the cabinet(s) to the floor using fasteners to suit the weight of the cabinet and type of floor.
Front
Recommended fixing holes. Remove cabinet side panels to access.
Alternate fixing holes. Bottom rectifier magazine must be removed to access front two holes.

Data-Voice-Video 3G Power Solutions Installation Guide
22 Copyright © 2005-2012 Eaton Corporation. All Rights Reserved.
IPN 997-00012-54D November 2012
Step 4 - Fix the cabinet(s) on a raised floor (if required)
Ignore this Step if the cabinet is fixed directly to the floor.
1 Assemble the plinth(s) (Eaton part number: PLINIR-A00).
2 Remove the appropriate floor tile(s).
3 Fix the plinth(s) to the floor support pillars.
4 Before moving the cabinet(s), ensure that:
protective floor coverings are in place (if required)
the floor can support the weight of the power system.
5 Move the cabinet(s) into position on the plinth.
Use lifting equipment and at least two people (or four people without lifting equipment) to move a power system safely.
6 Bolt the cabinet(s) to the plinth(s) using bolts supplied.
Procedure complete
Task 3 - Connect the Output to Earth
Step 1 - Connect dc common busbar to earth
Install a separate conductor from the dc common busbar to the customer dc earth. This conductor must be rated to carry the combined fault current of all battery strings.
If this conductor is not installed then battery fault current will be carried by the ac-dc earth link and the ac earth conductor which are typically too small for such currents.
Step 2 - Check ac-dc Earth Link
A 50 mm2 yellow/green ac-dc earth link is factory fitted in the dc power system as shown in the following diagram.
Rack cabinet
AC earth link
AC earth / communications earth
DC common bus
Customer dc earth
Cabinet bond
Factory fitted ac-dc earth link
If your installation uses a mesh earth, then Eaton recommends that this factory fitted ac-dc earth link is retained. No further action is then required (ignore Step 3).
However, if your policy is not to bond the ac/communications earth and dc earth, then go to Step 3.

Installation
Copyright © 2005-2012 Eaton Corporation. All Rights Reserved.
IPN 997-00012-54D November 2012 23
Step 3 - Remove or replace the ac-dc Earth Link (if required)
Ignore this Step if the factory fitted ac-dc earth link is used.
There are two options if the ac-dc earth link cannot be retained. Either:
If the site surge protection is designed to limit transient ac earth - dc earth voltages to less than 1500V at the dc power system, then remove the ac-dc earth link.
Rack cabinet
AC earth link
AC earth / communications earth
DC common bus
Customer dc earth
Cabinet bond
Or, if the site surge protection is not designed to limit transient ac earth - dc earth voltages to less than 1500V at the dc power system, then replace the ac-dc earth link with a surge protection device.
The transient protective device bonds the ac and dc earths during transient activity to prevent damage to the rectifiers. The preferred transient protective device is a transient earth clamp (TEC).
Rack cabinet
AC earth link
AC earth / communications earth
DC common bus
Customer dc earth
Cabinet bond
Transient earth clamp surge protection device
The path between ac earth and dc common bus (via the transient earth clamp) must be as short and straight as possible, preferably less than 500mm (20").
The transient earth clamp must have the following minimum specifications.
Nom. dc Spark-over Voltage 600V
Impulse Spark-over Voltage at 1 kV/μs < 1400V
Nom. Impulse Discharge Current – 8/20μs wave shape 20kA
Insulation Resistance at 100V 1010
Capacitance < 1.5pF
A larger transient earth clamp with a high kA rating must be used if the potential severity of a lightning strike is high.
Procedure complete

Data-Voice-Video 3G Power Solutions Installation Guide
24 Copyright © 2005-2012 Eaton Corporation. All Rights Reserved.
IPN 997-00012-54D November 2012
Task 4 - Connect the DC Load Cables
A wide range of dc distribution modules is available for Data-Voice-Video 3G Power Solutions with MCBs or fuses or both.
Step 1 - Access MCBs and/or fuses
See the diagram on page 2 for location of the dc distribution with the load MCBs/fuses.
Step 2 - Connect load cables to load MCBs (if required)
Ignore this Step if the dc distribution does not have load MCBs.
1 Switch off all load MCBs.
2 Terminate the load live cable(s) at the load MCB(s).
The current rating of the MCBs must be derated to 80%.
Refer to the table of minimum cable sizes for specific MCBs on page 75.
Ensure that the fuse fail detection wires are properly terminated as shown.
3 Terminate the load common cable(s) at the dc common bar.
Load MCB
Load live cable
Fuse fail detection wire
Step 3 - Connect load cables to load fuses (if required)
Ignore this Step if the dc distribution does not have load fuses.
1 Remove all load fuse links.
2 Terminate the load live cable(s) at the load fuse(s).
The current rating of the fuses must be derated to 75%.
Refer to the table of minimum cable sizes for specific fuses on page 75.
Ensure that the fuse fail detection wires are properly terminated as shown.
3 Terminate the load common cable(s) at the dc common bar.
Load fuse link
Load live cable
Fuse fail detection wire
Procedure complete

Installation
Copyright © 2005-2012 Eaton Corporation. All Rights Reserved.
IPN 997-00012-54D November 2012 25
Task 5 - Connect Battery Cables (if required)
Ignore this task if the dc power system is a single cabinet with integrated battery shelves (no separate battery cabinets or racks).
There are two options for the connection of battery cables from a separate battery cabinet or rack:
1 Connect battery cables direct to bus bars (via LVD if fitted) in the dc power system cabinet.
Battery MCBs or fuses must be fitted at the separate battery cabinet or rack to protect the battery cables.
2 Connect battery cables to MCBs or fuses in the dc power system cabinet.
Step 1 - Connect battery cables direct to bus bars (if required)
Ignore this Step if the dc distribution has battery MCBs or fuses (go to Step 2). See the diagram on page 2 for location of the dc distribution.
1 Switch off all battery MCBs or remove fuse links to isolate the batteries.
2 Route the battery cables to the dc power system.
3 Terminate the battery live cable(s) at the battery bus bar.
4 Terminate the battery common cable(s) at the common bus bar.
5 Secure all cables to prevent strain on the terminals.
Step 2 - Connect battery cables to battery fuses (if required)
Ignore this Step if the dc distribution does not have battery fuses. See the diagram on page 2 for location of the dc distribution.
1 Remove all battery fuse links.
Ensure that the fuse fail detection boards are fitted as shown. (When a fuse link is replaced ensure the board is removed from the blown fuse and re-fitted to a new striker type fuse link).
2 Terminate the battery live cable(s) at the battery fuse(s).
The current rating of the fuses must be derated to 75%.
Refer to the table of minimum cable sizes for specific fuses on page 75.
3 Terminate the battery common cable(s) at the dc common bar.
Battery fuse link (striker type)
Battery live cable
Fuse fail detection board

Data-Voice-Video 3G Power Solutions Installation Guide
26 Copyright © 2005-2012 Eaton Corporation. All Rights Reserved.
IPN 997-00012-54D November 2012
Step 3 - Connect battery cables to battery MCBs (if required)
This Step only applies to a rectifier cabinet without integrated battery shelves. Ignore this Step if the dc distribution does not have battery MCBs. See the diagram on page 2 for location of the dc distribution.
1 Switch off all battery MCBs.
2 Terminate the battery live cable(s) at the battery MCB(s).
The current rating of the MCBs must be derated to 80%.
Refer to the table of minimum cable sizes for specific MCBs on page 75.
3 Terminate the battery common cable(s) at the dc common bar.
Procedure Complete

Installation
Copyright © 2005-2012 Eaton Corporation. All Rights Reserved.
IPN 997-00012-54D November 2012 27
Task 6 - Install the Batteries
Always check that the battery cables have been terminated to the correct system polarity
BEFORE connecting the batteries or closing the battery disconnect device.
Connecting batteries to the system with incorrect system polarity will void all warranty claims.
See Warnings on page 12.
The following are recommended Battery Installation Practices. These supplement any specific installation instructions from the battery manufacturer.
General
Do not wear a synthetic dust-coat or overalls. Synthetic fabrics can hold a static electric charge, creating sparks during discharge.
Remove rings, wristwatch and other metal jewelry that might be exposed to battery terminals, before installing batteries.
Only use a clean soft damp cloth for cleaning the batteries. Do not use cleaning detergents or chemicals.
Flooded cell and VRLA lead acid batteries can emit explosive gases and must be installed with adequate ventilation. Refer to the battery manufacturer or supplier for advice on minimum ventilation levels.
Ensure that the battery strings are disconnected from the dc power system, by switching off all battery MCBs or removing all battery fuses.
Unpacking and Inspecting the Batteries
Unpack the batteries and inspect them carefully for leaks, corrosion and possible damage. Report any damage or other battery related problems immediately to the battery supplier.
Do not remove the factory-fitted transit insulation covers from the batteries until access to the battery terminals is required.
Connecting the Batteries
Only terminate battery cables and interconnecting bars after confirming that the termination will not create a short circuit.
Always use insulated tools.
Always tighten battery terminal bolts according to the battery manufacturer’s specification. Failing to do so can cause erratic battery performance, possible damage to the batteries, and/or personal injury.
Do not place tools, loose cables, or metal objects (such as interconnecting bars) on top of batteries.
Do not drop tools, loose cables, or metal objects onto intercell connections or terminals of opposite polarity.
Check that loose cables cannot make contact with other cables or terminals which may be live.

Data-Voice-Video 3G Power Solutions Installation Guide
28 Copyright © 2005-2012 Eaton Corporation. All Rights Reserved.
IPN 997-00012-54D November 2012
Installation procedure
The following procedure applies to batteries installed in the Data-Voice-Video 3G Power Solutions integrated battery shelves or the optional additional battery racks only. For batteries installed in separate battery racks consult the manufacturer's installation instructions.
Notes:
1 Check that loose cables cannot make contact with other cables or terminals which may be live.
2 Always equip the lowest battery shelf in a rack first to ensure rack stability.
3 The following order of connection must be followed.
Battery MCB
Live (negative) lead
Battery Mid-point Monitoring sense wire (SC200 only)
Common (positive) lead
Interconnecting links
Typical battery arrangement (-48V)
Step 1 - Inspect first (lowest) battery shelf and prepare cables
1 Remove the battery shelf front cover.
2 Check the first (lowest) battery shelf in the rack is clean and clear of obstruction.
3 Pull both cables to the front of the rack in preparation for fitting the batteries.
4 Check the battery MCB is OFF.
5 If required, route one of the Battery Mid-point Monitoring sense wires from XH12A on the input/output board (see location on page 2) to the battery shelf (SC200 only).
Connect the wire from XH12A pin 1 to string 1, and so on.
Step 2 - Fit the batteries
1 Slide a battery to the left hand side of the shelf (position 1).
Use a suitable mechanical lifting aid to fit batteries in the rack.
2 Slide another battery to the right hand side of the shelf (position 4).
3 Slide the third battery next to the battery on the left hand side (position 2).
4 Slide in the last battery (position 3).

Installation
Copyright © 2005-2012 Eaton Corporation. All Rights Reserved.
IPN 997-00012-54D November 2012 29
Step 3 - Connect cables
1 Connect the positive battery cable to the positive terminal of the battery in position 4.
2 Tighten the bolt on the battery terminal to the torque recommended by the battery manufacturer.
3 Connect the negative battery cable (connected to the MCB) to the negative terminal of the battery in position 1.
4 Tighten the bolt on the battery terminal to the torque recommended by the battery manufacturer.
5 Check that the battery terminal connections are not touching metalwork and that there is a sufficient gap between the terminals and the rack sides. Do not proceed until this has been checked and corrected if necessary.
Step 4 - Interconnect batteries
1 Remove the covers from batteries 3 and 4.
2 Connect the first interconnecting link between the positive (+ve) terminal of battery 4 and the negative (–ve) terminal of battery 3.
3 Adjust the battery positions so that the connection places no strain on the terminal screw in any direction.
4 Tighten according to the manufacturer's recommended torque settings.
5 Replace the cover on battery 4.
6 Repeat procedure for batteries 2 and 3, and connect the Mid-point monitoring sense wire (SC200 only).
7 Repeat procedure for batteries 1 and 2.
Mid-point sense wire from XH12A on the input/output board (SC200 only)
Middle interconnecting link
Step 5 - Check voltage and polarity
1 Remove the covers from batteries 1 and 4.
2 Check with a voltmeter that the negative terminal of battery 4 is more than 48V negative of the positive terminal of battery 1.
3 Check all terminal covers are in place.

Data-Voice-Video 3G Power Solutions Installation Guide
30 Copyright © 2005-2012 Eaton Corporation. All Rights Reserved.
IPN 997-00012-54D November 2012
Step 6 - Check terminals
Check that the battery terminal connections are not touching metalwork and that there is a sufficient gap between the terminals and the rack. Do not proceed until this has been checked and corrected if necessary.
Step 7 - Install remaining batteries
1 Repeat the above procedure for the remaining battery shelves to be populated. Work from the bottom to top shelf.
2 Repeat for additional battery racks if required.
Step 8 - Insulate any unconnected sense wires (SC200 only)
Insulate and secure any un-connected Battery Mid-point Monitoring sense wires.
Step 9 - Replace the battery shelf front cover(s)
Procedure complete
Task 7 - Mount the Battery Temperature Sensor
The DV2-3G is supplied with a battery temperature sensor and standard 8m (26 feet) long RJ45 cable, already connected to the IOBGP input/output (I/O) board to measure the ambient air temperature around the batteries. This is required for the temperature compensation control process.
Step 1 - Connect and route cable
1 Connect the temperature sensor cable supplied to socket XH7 on the I/O board.
If required extend the cable using an RJ45 patch cable and in-line joiner. Recommended maximum cable length is 20m (65 feet) because of noise considerations.
2 Route the temperature sensor cable to the middle battery shelf or the middle of the external battery stand.
Do not run the sensor cable along ac supply cables. Interference may cause false readings.
Installation
Copyright © 2005-2012 Eaton Corporation. All Rights Reserved.
IPN 997-00012-54D November 2012 31
Step 2 - Fix sensor
Fix the sensor above the batteries. To avoid false readings:
Do not attach the sensor to a battery case, battery cables, terminals or interconnecting bars.
Do not expose the sensor to direct sunlight, or air movements from air-conditioning systems or open windows.
Procedure complete
Task 8 - Connect External Current Sensors/Shunts (if required)
External current shunts/sensors are connected to the system controller either directly (depending on the number of internal current shunts/sensors fitted) or through a SiteSure-3G module.
See External Current Shunts/Sensors on page 83 for further installation information.
Refer to the System Controller Operation Handbook for details of connection of external current shunts/sensors. See Related Information.
See Connect Additional Input/Output on page 32 for information on installing SiteSure-3G modules.
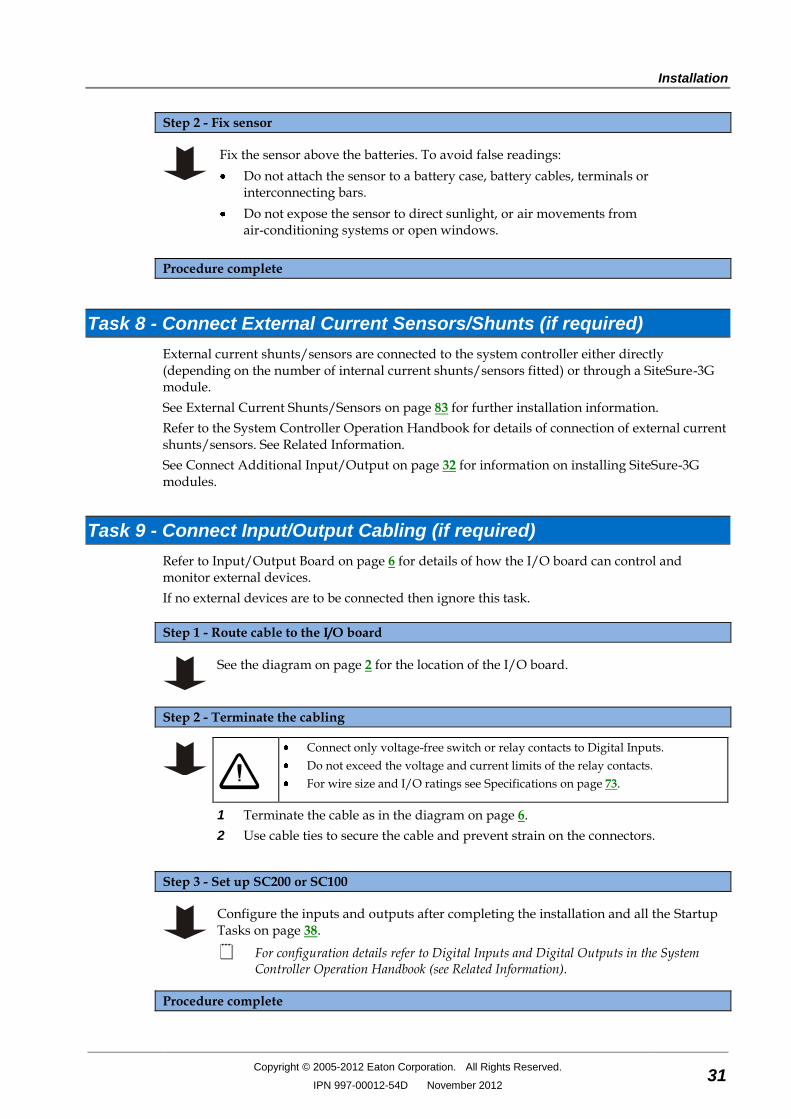
Task 9 - Connect Input/Output Cabling (if required)
Refer to Input/Output Board on page 6 for details of how the I/O board can control and monitor external devices.
If no external devices are to be connected then ignore this task.
Step 1 - Route cable to the I/O board
See the diagram on page 2 for the location of the I/O board.
Step 2 - Terminate the cabling
Connect only voltage-free switch or relay contacts to Digital Inputs.
Do not exceed the voltage and current limits of the relay contacts.
For wire size and I/O ratings see Specifications on page 73.
1 Terminate the cable as in the diagram on page 6.
2 Use cable ties to secure the cable and prevent strain on the connectors.
Step 3 - Set up SC200 or SC100
Configure the inputs and outputs after completing the installation and all the Startup Tasks on page 38.
For configuration details refer to Digital Inputs and Digital Outputs in the System Controller Operation Handbook (see Related Information).
Procedure complete

Data-Voice-Video 3G Power Solutions Installation Guide
32 Copyright © 2005-2012 Eaton Corporation. All Rights Reserved.
IPN 997-00012-54D November 2012
Task 10 - Connect Additional Input/Output (if required)
If additional input/outputs are required then SiteSure-3G modules can be connected to the dc power system. A SiteSure-3G input/output module has the following features:
Digital Inputs: 10
Digital Outputs (relays): 6
Analog Inputs (-10V to +10V): 4
Current Sense Inputs: 3
Temperature Sense Inputs: 2
Bus Voltage Input (0-60V): 1
Enclosure: Wall or panel mounting plastic case
Use the following procedure to connect a SiteSure-3G input/output module, if required.
Step 1 - Route and connect cable to DV2-3G
1 Route an RJ45 patch cable from the SiteSure-3G module to the DV2-3G.
2 Connect the cable to an RJ45 socket (S1, S2 or S3) on the Voltage Feed Module board via an RJ45 splitter. See the diagram on page 7 for socket location.
3 Use cable ties to secure the cable and prevent strain on the connectors.
4 Test the insulation and continuity of the conductors.
Step 2 - Connect the cable to socket YH11 on the SiteSure-3G module
Procedure complete
For details on setup refer to the SiteSure-3G Installation Guide. See Related Information.
Task 11 - Connect Battery Fuse Fail (if required)
This Task only applies to a system with one or more additional battery cabinets with MCBs.
Step 1 - Connect battery MCB fuse fail detect wires (if required)
Use 2-core 0.5mm2 flex (or similar) to connect from the terminal block in the battery cabinet to the auxiliary switch on the first battery MCB in the rectifier rack (see following diagram).
All auxiliary switches are connected in parallel. The auxiliary switch contacts will close when an MCB is OFF.

Installation
Copyright © 2005-2012 Eaton Corporation. All Rights Reserved.
IPN 997-00012-54D November 2012 33
Rectifier cabinet with integrated battery shelves.
Additional battery cabinets with MCBs.
Battery MCB fuse fail detect wires connected to terminal block in the battery cabinet.
Fuse fail detect board in Rectifier cabinet.
Fuse fail detect wires to other battery MCBs.
Connection to other battery cabinets (if required).
Step 2 - Connect to other battery cabinets (if required)
Extend the wiring to the terminal block(s) in any additional battery cabinets.
Procedure complete
Task 12 - Connect to the AC Supply
If the dc power system is to be installed in a location where the ambient temperature may
rise above 50ºC (122ºF), then 105°C rated cable rated cable must be used for all connections.
Only use a three-phase ( ) ac supply that is referenced to earth, or has a protection system in place to prevent the phase-earth voltage exceeding the rating of the rectifier.
Step 1 - Access ac MCBs (systems with integrated battery shelves)
Ignore this Step if system does not have integrated battery shelves (go to Step 2).
1 The ac MCBs are fitted in the combined ac and dc distribution section. See the diagram on page 2 for location. The layout of the ac MCBs is shown in the following diagram.
2 To access the MCBs:
Open ac/dc distribution space door.
Switch the ac isolator to the OFF position.
Undo the four screws securing the Perspex cover and remove the cover.
3 Go to Step 3.

Data-Voice-Video 3G Power Solutions Installation Guide
34 Copyright © 2005-2012 Eaton Corporation. All Rights Reserved.
IPN 997-00012-54D November 2012
L1 L2 L3
E N
E L1 L2 L3
Typical arrangement with Neutral
Typical arrangement without Neutral
Earth cable to rack earth stud.
Phase and Neutral (if fitted) cables.
AC isolator switch (1, 2 or 3-phase as required). May be fitted next to MOVs depending on model.
Rectifier or magazine MCBs (arrangement depends on model)
Surge protection MOVs (2, 3 or 4 as required).
AC earth termination point.
Other cables not shown for clarity.
Step 2 - Access ac MCBs (systems without integrated battery shelves)
Ignore this Step if system has integrated battery shelves (see Step 1).
1 The ac MCBs are fitted in the ac distribution. See the diagram on page 2 for location. The layout of the MCBs is shown in the following diagram.
2 To access the MCBs:
Switch the isolator to the OFF position.
Undo the four screws holding the front panel.
Remove the front cover and isolator switch handle.

Installation
Copyright © 2005-2012 Eaton Corporation. All Rights Reserved.
IPN 997-00012-54D November 2012 35
AC isolator switch (shaft not shown)
Neutral bar termination (if fitted)
AC cable entry glands
Isolator switch terminals
Rectifier MCBs (3 only shown)
Surge protection MOVs
MOV MCB (located next to MOVs in some models)
Step 3 - Check the connection of the ac terminals
Check the ac terminals on the DV2-3G are connected to suit the type of ac supply. Data-Voice-Video 3G Power Solutions dc power systems can only be connected to one of the following:
AC source Voltage (nominal)* AC MCB (if fitted)
1-phase, neutral and Protective Earth (PE) 220-240V phase-neutral 1-pole
2-phase and PE 208V phase-phase 2-pole (linked)
3-phase, neutral and PE 220-240V phase-neutral 3-pole
3-phase and PE 208V phase-phase 3-pole (linked)
*See Specifications on page 69 for the ac voltage range and ac input current.
Data-Voice-Video 3G Power Solutions Installation Guide
36 Copyright © 2005-2012 Eaton Corporation. All Rights Reserved.
IPN 997-00012-54D November 2012
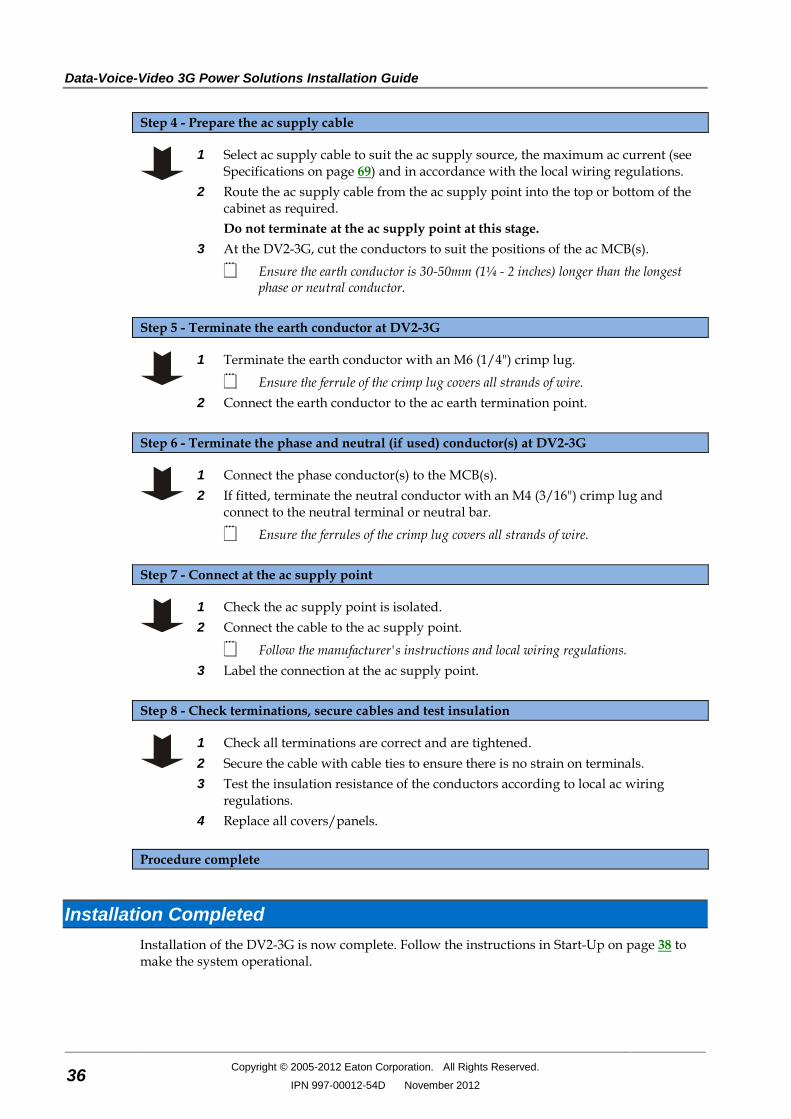
Step 4 - Prepare the ac supply cable
1 Select ac supply cable to suit the ac supply source, the maximum ac current (see Specifications on page 69) and in accordance with the local wiring regulations.
2 Route the ac supply cable from the ac supply point into the top or bottom of the cabinet as required.
Do not terminate at the ac supply point at this stage.
3 At the DV2-3G, cut the conductors to suit the positions of the ac MCB(s).
Ensure the earth conductor is 30-50mm (1¼ - 2 inches) longer than the longest phase or neutral conductor.
Step 5 - Terminate the earth conductor at DV2-3G
1 Terminate the earth conductor with an M6 (1/4") crimp lug.
Ensure the ferrule of the crimp lug covers all strands of wire.
2 Connect the earth conductor to the ac earth termination point.
Step 6 - Terminate the phase and neutral (if used) conductor(s) at DV2-3G
1 Connect the phase conductor(s) to the MCB(s).
2 If fitted, terminate the neutral conductor with an M4 (3/16") crimp lug and connect to the neutral terminal or neutral bar.
Ensure the ferrules of the crimp lug covers all strands of wire.
Step 7 - Connect at the ac supply point
1 Check the ac supply point is isolated.
2 Connect the cable to the ac supply point.
Follow the manufacturer's instructions and local wiring regulations.
3 Label the connection at the ac supply point.
Step 8 - Check terminations, secure cables and test insulation
1 Check all terminations are correct and are tightened.
2 Secure the cable with cable ties to ensure there is no strain on terminals.
3 Test the insulation resistance of the conductors according to local ac wiring regulations.
4 Replace all covers/panels.
Procedure complete
Installation Completed
Installation of the DV2-3G is now complete. Follow the instructions in Start-Up on page 38 to make the system operational.

Chapter 4
Start-Up
Copyright © 2005-2012 Eaton Corporation. All Rights Reserved.
IPN 997-00012-54D November 2012 37
C h a p t e r 4
Start-Up
Overview
Topic Page
Start-Up Tasks 38
Task 1 - Inserting the Rectifiers 38
Task 2 - Pre-Power-Up Checklist 39
Task 3 - Applying AC Power 39
Task 4 - Configuring the DC Power System 40
Task 5 - Apply DC Power to Battery and Load 41
Start-Up Completed 42

Data-Voice-Video 3G Power Solutions Installation Guide
38 Copyright © 2005-2012 Eaton Corporation. All Rights Reserved.
IPN 997-00012-54D November 2012
Start-Up Tasks
Complete all the Installation tasks (see details) before starting these Start-Up tasks.
Complete the Start-Up tasks in the following order:
Task Description Reference
1 Insert the Rectifiers See details on page 38
2 Complete the Pre-Power-Up Checklist See details on page 39
3 Apply AC Power See details on page 39
4 Configure the DC Power System See details on page 40
5 Apply DC Power to Battery and Load See details on page 41
Task 1 - Inserting the Rectifiers
Do NOT install the rectifiers until the room has been cleaned and is dust free.
Do NOT switch on the ac supply at this stage.
Step 1 - Unpack the rectifiers
Unpack the rectifiers and inspect them carefully for possible transport damage. Report any damage immediately using a completed Equipment Incident Report on page 101.
Keep the original packaging to return a rectifier for replacement or repair, if required.
Step 2 - Fit first rectifier
1 Align the rectifier with the left side of the shelf.
2 Push in the rectifier until the retaining screw contacts the shelf.
3 Check the rectifier's rear connector is correctly aligned with the shelf connector or damage may occur.
4 Tighten the retaining screw to 1.5Nm (13.3 inch-pounds). This will locate the rectifier in its rear connector.

Start-Up
Copyright © 2005-2012 Eaton Corporation. All Rights Reserved.
IPN 997-00012-54D November 2012 39
Step 3 - Repeat for other rectifiers or fit blank panels
1 Fit the rectifiers in positions 1-4-7-2-5-8-3-6-9-10 to balance the load on the three ac phases.
2 Fit rectifier blank panels in any vacant rectifier positions.
Procedure complete
Task 2 - Pre-Power-Up Checklist
Complete the checklist to confirm initial work is complete before progressing further.
All cabling is installed, securely tied and correctly insulated
Upstream surge protection is fitted (see Input Transient Protection on page 85)
Earth bonding is correct (see details on page 22)
Battery and load cabling has the correct polarity
A registered electrician or other suitable approved person has checked the integrity of the installed cabling
All panels are in place and all empty rectifier slots are covered with blanking panels
AC isolator and all ac MCBs are switched off
All dc distribution MCBs are switched off and/or fuses removed
AC supply is isolated at each point of isolation leading back to the ac supply point
Batteries are electrically isolated from the dc power system
The site is clean
Task 3 - Applying AC Power
A registered electrician (or suitably qualified person) must check the integrity of
the installed cabling, BEFORE the dc power system is powered up.
1 Ensure all ac MCBs are off.
2 Switch on the ac supply.
3 Switch on the ac MCB (or the first, if more than one).
Rectifier(s) start up (after the startup delay).
The rectifier alarm LEDs will turn on for a short time.
The SC200 or SC100 system controller will turn on (green Power On LED is on) when dc power is available from the rectifier(s).
During start-up of the SC200 or SC100 system controller, the yellow alarm LED on the rectifier(s) will flash until rectifier registration is completed.
Data-Voice-Video 3G Power Solutions Installation Guide
40 Copyright © 2005-2012 Eaton Corporation. All Rights Reserved.
IPN 997-00012-54D November 2012
4 After start-up of the SC200 or SC100:
Press any key to silence the alarm.
Depending on the configuration file settings, the alarm LED(s) may be on and the SC200 or SC100 will display some system alarm messages. This is normal. For an explanation of alarm messages see Alarm Descriptions in the System Controller Operation Handbook.
The LCD module shows the default screen. See details on page 45.
If no load or battery is connected the current will be 0A.
If fitted and enabled, the LVD(s) operate.
5 Check for correct operation of the rectifier(s). Check only the green Power On LED(s) are on (no alarm LEDs).
Use the SC200 or SC100 keypad to check that all rectifiers are registered. See details in the System Controller Operation Handbook.
6 If any problems see Troubleshooting on page 52. Otherwise switch on all remaining rectifiers.
Task 4 - Configuring the DC Power System
The operational settings of the dc power system are stored in a configuration file loaded into the SC200 or SC100 system controller. See details on page 44.
The system controller is supplied pre-loaded with a configuration file. If this configuration file has been customized for the site then no further configuration changes will be necessary.
If the configuration file has not been customized for the site, then check the following settings and change if necessary.
Other configuration settings can be changed after all Start-Up tasks are complete. Refer to the System Controller Operation handbook (see Related Information) for details on how to customize the system's configuration.
Parameter Action Where to find
Float Voltage Set to the value recommended by the battery manufacturer.
SC100: Menu > Configuration > System > Edit > Float Voltage
SC200: Control Processes > Voltage Control > Float Voltage
DCTools: Control Processes > Voltage Control > Float Voltage
Battery Capacity Set to the rated 10 hour capacity of the installed battery strings, or set to zero if no battery connected.
SC100: Menu > Configuration > System > Edit > Battery Capacity >Edit
SC200: Battery > Battery > Battery Capacity
DCTools: Batteries
Cells Per String Set to the number of cells in each battery string (if battery connected).
SC100: Menu > Configuration > Temp Compensation > Edit > Cells Per String
SC200: Battery > Battery > Cells Per String
DCTools: Batteries

Start-Up
Copyright © 2005-2012 Eaton Corporation. All Rights Reserved.
IPN 997-00012-54D November 2012 41
Parameter Action Where to find
Temperature Compensation
Enable (if battery and battery temperature sensor connected) and check the settings.
SC100: Menu > Configuration > Temp Compensation > Edit
SC200: Control Processes > Temp. Compensation > Enable
DCTools: Control Processes > Temperature Compensation
Low Voltage Disconnect (LVD)
Enable (if LVD(s) installed and battery connected) and check the settings.
SC100: Menu > Configuration > LVD1/LVD2
SC200: Battery > LVDs > LVD x
DCTools: Control Processes > LVD
System controller time (SC200 only)
Connect using Web to set correct time manually or connect using DCTools to synchronize to PC time. See details in the System Controller Operation Handbook.
Web: Configuration > Time
DCTools: Configuration > Time > Time Synchronization
Task 5 - Apply DC Power to Battery and Load
Reverse Polarity
Always check that the battery cables have been terminated to the correct system polarity BEFORE connecting the batteries or closing the battery disconnect device. Connecting batteries to the dc power system with incorrect system polarity will damage the rectifiers and void all warranty claims.
Step 1 - Check dc voltage and polarity
Check the dc output voltage and polarity of the power system and the battery string(s).
Step 2 - Connect batteries
1 If connecting multiple battery strings then check the individual strings are of similar voltage.
2 Switch on all Battery MCB(s) and/or fit the battery fuses.
3 Check the Battery Fuse Fail alarm clears.
All Battery MCBs (including any unused MCBs) must be switched on to clear the alarm.
4 Check the battery current. The actual value depends on the state of charge of the batteries.
Step 3 - Connect load
1 Switch on the Load MCB(s) and/or fit the Load fuses.
2 Check the equipment powers up and the Load Fuse Fail alarm clears.

Data-Voice-Video 3G Power Solutions Installation Guide
42 Copyright © 2005-2012 Eaton Corporation. All Rights Reserved.
IPN 997-00012-54D November 2012
Step 4 - Check the rectifier currents
1 Check the rectifier currents.
2 Verify the load current is as expected for the load and battery size and does not exceed the maximum load rating (see details on page 69).
Step 5 - Charge the batteries
1 Charge the batteries according to the battery manufacturer’s recommendations.
2 If an Equalize charge is recommended by the battery manufacturer then follow the instructions in the System Controller Operation Handbook for details (see Related Information).
Equalize increases the system voltage to the Equalize voltage for the Equalize duration. After the Equalize duration has expired, the dc power system voltage reverts to float voltage automatically.
Procedure complete
Start-Up Completed
Start-Up of the DV2-3G is now complete and the system is operational.
If a formal commissioning test is required then see the Commissioning check lists on page 89.
The System Controller Operation Handbook (see Related Information) describes how to use the SC200 or SC100 system controller. See:
System Operation to customize the system configuration settings, and
Communications to setup the remote communications options.
For information on alarms, or operation problems see Maintenance on page 51.

Chapter 5
System Controller
Copyright © 2005-2012 Eaton Corporation. All Rights Reserved.
IPN 997-00012-54D November 2012 43
C h a p t e r 5
System C ontroller
Topic Page
Configuration File 44
Starting the SC200 or SC100 45
SC200 or SC100 Operation using the Keypad and Screen 46
SC200 or SC100 Operation Using a PC/Laptop 48
SC200 or SC100 Identity Information 50

Data-Voice-Video 3G Power Solutions Installation Guide
44 Copyright © 2005-2012 Eaton Corporation. All Rights Reserved.
IPN 997-00012-54D November 2012
Configuration File
The operational settings of the dc power system are stored in a configuration file loaded into the SC200 or SC100 system controller.
The SC200 or SC100 is supplied pre-loaded with a configuration file. If this configuration file has been customized for the site then no further configuration changes will be necessary.
Otherwise, it is important that the settings of this configuration file are checked and changed as required for site-specific conditions. In particular, settings that may affect the performance and life expectancy of the battery must be checked and set according to the battery manufacturer’s recommendations.
Some settings in the configuration file can be edited using the system controller's keypad (see details on page 46), or all settings can be edited using a PC/laptop with DCTools (see details on page 48) or remotely, see Communications Options in the System Controller Operation Handbook.
Backup and Restore
The configuration file settings in the SC200 or SC100 can be saved to (Backup) or loaded from (Restore) a PC/laptop using DCTools.
Backup and Restore can be used to:
Load a standard (master) configuration file into an SC200 or SC100 for customization.
Copy a customized configuration file from one SC200 or SC100 to others (at similar sites).
Save a copy of a customized configuration file. This is recommended in case the SC200 or SC100 has to be replaced.
► To use DCTools for Backup and Restore
1 Connect to the SC200 or SC100 with DCTools. See Communications Options in the System Controller Operation Handbook.
2 In DCTools go to File > ICE Backup/Restore and follow the prompts.
The saved file does not include site specific settings including Site Identity, IP Address, S3P Address, battery characterization data.
► To use a web browser for Backup (SC200 only)
1 Connect to the SC200 via a web browser. For details see Ethernet Communications in the System Controller Operation Handbook.
2 Go to Tools.
3 Select Backup Tool.
4 Select the file type:
System Snapshot (*.dcs): Configuration file including site specific settings.
Configuration (*.dcc): Configuration file without site specific settings - Site Identity, IP Address, S3P Address, battery characterization data).
5 Click Proceed to Backup the configuration.

System Controller
Copyright © 2005-2012 Eaton Corporation. All Rights Reserved.
IPN 997-00012-54D November 2012 45
► To use a web browser for Restore (SC200 only)
1 Connect to the SC200 via a web browser. For details see Ethernet Communications in the System Controller Operation Handbook.
2 Go to Tools.
3 Select Restore Tool.
4 Select the file type:
System Snapshot (*.dcs): Configuration file including site specific settings.
Configuration (*.dcc): Configuration file without site specific settings - Site Identity, IP Address, S3P Address, battery characterization data).
Fragment (*.dcf): Restore part of a configuration file (such as battery characterization data).
5 Click Next, and then select a file name to Restore a configuration.
Starting the SC200 or SC100
When dc power is applied to the SC200 or SC100 (via the RXP connector YS11) the start-up sequence begins.
SC200
Approx.
120s
Start-up screen Main screen Menu screen
The values shown are configurable, see details in the System Controller Operation Handbook. All active Critical, Major, Minor and Warning
alarms are displayed.
See navigation details on page 77.
If Logon is required see Keypad Access Security on page 46.
SC100
Approx
20s
Start-up screen First status screen Main menu
All active alarms are displayed. See details on page 78.

Data-Voice-Video 3G Power Solutions Installation Guide
46 Copyright © 2005-2012 Eaton Corporation. All Rights Reserved.
IPN 997-00012-54D November 2012
SC200 or SC100 Operation using the Keypad and Screen
LCD
Soft key 1 label (SC200 only)
Soft key 1 (SC200 only)
Navigation keys (Up - Down - Left - Right)
Soft key 2 (SC200 only)
Soft key 2 label (SC200 only)
Keypad Access Security
SC200 System Controller
This feature prevents accidental or unauthorized changes to settings from the SC200 keypad.
All access to change an SC200's settings will be lost if:
All communications are disabled (see S3P Access and HTTP/HTTPS Access in the System Controller Operation Handbook), and
Keypad access is Read Only, or PIN Protected and the keypad access PIN is lost.
The SC200 will continue to function, but no configuration changes can be made. Contact your Eaton dc product supplier or Eaton for advice (see Worldwide Support on page 103).
► To use DCTools to enable/disable keypad access
In DCTools go to Communications > Front Panel.
Set Access to:
Unprotected - keypad access is allowed to view and change parameters, or
Read Only - keypad access is allowed to view parameters only, or
PIN Protected - keypad access is allowed to view and change parameters if the correct 4-digit number is typed in the Access PIN field. Otherwise, Read Only access is allowed.
► To use the SC200 when access is set to PIN Protected
At the Main Screen press Menu. The Logon screen appears.
If the Access PIN is not known then press Skip to use the SC200 with Read Only access.
If the Access PIN is known:
Use the Left and Right keys to access each digit position. Use the Up and Down keys to change the digits.
When the correct digits are entered, press Logon.
Keypad access will return to PIN Protected mode when the display returns to the Main Screen.

System Controller
Copyright © 2005-2012 Eaton Corporation. All Rights Reserved.
IPN 997-00012-54D November 2012 47
SC100 System Controller
This feature prevents accidental or unauthorized changes to settings from the SC100 keypad.
► To use DCTools to enable/disable keypad access
In DCTools go to Communications.
Set UI Access to:
Unprotected - keypad access is allowed, or
Protected - keypad access is denied (can be temporarily over-ridden, see below).
► To temporarily enable keypad access at the SC100 when access is set to Protected
Press Up and Down keys together for 5 seconds.
Keypad access is now temporarily enabled. Keypad access control reverts back to Protected mode after the display goes back to the Summary screen.
Alarm Indicators
Visual indicators
Power on LED (green)
Minor Alarm LED (yellow)
Critical/Major Alarm LED (red)
??? The system value cannot be displayed because of a failed, disconnected or unconfigured sensor.
Audible indicator
One beep – indicates an invalid key press
Three beeps every 2 seconds – refer to the alert message on the display (SC200 only)
One beep every 2 seconds – Minor alarm is active
Continuous sound – Critical/Major alarm is active
Critical/Major alarms always override Minor alarms.
► To stop the audible indicator
Press any key
The audible indicator will restart at the next active alarm or alert message.

Data-Voice-Video 3G Power Solutions Installation Guide
48 Copyright © 2005-2012 Eaton Corporation. All Rights Reserved.
IPN 997-00012-54D November 2012
► To enable/disable the audible alarm indicator
Either:
On SC200 go to: Alarms > Alarm Settings > Audible Alarms > Edit.
or on SC100 go to: Menu > Configuration > Audible Alarm.
Or:
In DCTools go to: Alarms > Alarm Configuration.
When Disabled, the audible indicator will still indicate an invalid key press.
SC200 or SC100 Operation Using a PC/Laptop
DCTools is configuration software for editing a system controller's configuration file (on-line) and monitoring the operation of Eaton's dc power systems. It is available free from dcpower.eaton.com/downloads.
Using DCTools via USB (SC200 only)
DCTools can be run on a PC/laptop connected to the SC200's USB port.
DCTools can also be run on a remote PC/laptop connected to the SC200's RS232 serial port (via a modem) or Ethernet port. For remote PC/laptop connection details see Communications Options in the System Controller Operation Handbook.
Before you start you will need:
The latest version of DCTools available from dcpower.eaton.com/downloads.
A PC/laptop with USB port and USB A/B cable (RadioShack 55010997, Jaycar WC7700, or equivalent).
► To connect a PC/laptop to the SC200:
1 Download the latest version of DCTools from dcpower.eaton.com/downloads.
2 Install DCTools on the PC/laptop.
3 Connect a USB A/B cable from a USB port on the PC/laptop to the USB port on the SC200.
See the diagram on page 4 for location of the USB port.
4 DCTools will now connect to the SC200.
If connection is not successful refer to DCTools Help (press F1) or Troubleshooting on page 52.
5 For details of the SC200 control and monitoring functions available via DCTools see System Operation in the System Controller Operation Handbook.
For help using DCTools press F1.
Using DCTools via RS232
DCTools can be run on a PC/laptop connected to the SC200 or SC100's RS232 port.
For remote PC/laptop connection details see Communications Options in the System Controller Operation Handbook.
Before you start you will need:
The latest version of DCTools available from: dcpower.eaton.com/downloads.
A PC/laptop with USB port (for use with SC200) or RS232 port (for use with SC100)

System Controller
Copyright © 2005-2012 Eaton Corporation. All Rights Reserved.
IPN 997-00012-54D November 2012 49
► To connect a PC/laptop to the SC200 or SC100:
1 Download the latest version of DCTools from: dcpower.eaton.com/downloads.
2 Install DCTools on the PC/laptop.
3 Connect a null-modem cable from the COM1 RS232 port on the PC/laptop to the RS232 connector on the SC200 or SC100.
Ensure the cable is secured so that no force is applied to the RS232 connector as this may damage the connector.
If COM1 port is not available or for more details see Direct RS232 Communications in the System Controller Operation Handbook.
4 Start DCTools to open the Connection List. Check the box for the COM1 connection.
5 DCTools will now connect to the SC200 or SC100.
If connection is unsuccessful refer to DCTools help (press F1) or Troubleshooting on page 52.
6 For details of the SC200 or SC100 control and monitoring functions available via DCTools see System Operation in the System Controller Operation Handbook.
For help using DCTools press F1.

Data-Voice-Video 3G Power Solutions Installation Guide
50 Copyright © 2005-2012 Eaton Corporation. All Rights Reserved.
IPN 997-00012-54D November 2012
SC200 or SC100 Identity Information
The following identity information is stored in the SC200 or SC100.
Parameter Description Where to find:
Serial Number The SC200 or SC100 serial number (factory set).
SC100: Menu > Identity >SC100 Identity
SC200: Settings > Info
DCTools: Configuration > Identity > Software
Software Version (App Version)
The version of the embedded software in the SC200 or SC100 (factory set).
If required, the following site specific information can be stored in the SC200 or SC100 to assist site management.
Parameter Description Where to find:
System Manufacturer
The manufacturer of the dc power system.
DCTools: Configuration > Identity
System Type The DV2-3G model number.
System Serial Number
The DV2-3G serial number.
System Location Location of DV2-3G at the site.
Site Name Name of the site.
Site Address Address of the site.
Site Notes Any notes relevant to site access, location or other matters.
Contact Contact name, phone number, and so on.
Configuration Name
Reference name of the configuration file in the SC200 or SC100.

Chapter 6
Maintenance
Copyright © 2005-2012 Eaton Corporation. All Rights Reserved.
IPN 997-00012-54D November 2012 51
C h a p t e r 6
Maintenance
Overview
The DV2-3G contains hazardous voltages and hazardous energy levels. Before undertaking
any maintenance task refer to the Warnings on page 12.
If a maintenance task must be performed on a "live" system then take all necessary precautions to avoid short-circuits or disconnection of the load equipment, and follow any "live-working" instructions applicable to the site.
Only perform the maintenance tasks described in the Maintenance chapter. All other tasks are classified as Servicing. Servicing must only be performed according to specific instructions and only by personnel authorized by Eaton. This includes disassembly and/or servicing of any modules.
For further information on Servicing contact your local Eaton dc product supplier, or refer to the contact details on page 103.
Topic Page
Troubleshooting 52
Replacing or Adding a Rectifier 56
Replacing or Adding a Load MCB 57
Replacing a Load or Battery Fuse Link 58
Adding a Load Fuse 59
Replacing the System Controller 59
Replacing the Input/Output Board 61
Monitoring and Replacing Transient Protective Devices 63
Battery Mid-point Monitoring (String Fail) Alarm (SC200 only) 63
Battery Disposal and Recycling 64

Data-Voice-Video 3G Power Solutions Installation Guide
52 Copyright © 2005-2012 Eaton Corporation. All Rights Reserved.
IPN 997-00012-54D November 2012
Troubleshooting
Use the table to troubleshoot minor installation and operational problems. For additional assistance see contact details on page 103. Return items for replacement or repair with a completed Equipment Incident Report on page 101.
Problem Possible Cause Required Action
SC200 or SC100 alarm. See Troubleshooting in the SC200 or SC100 Operation Handbook.
All rectifiers are off (no LEDs on) and system controller display is blank.
AC supply to the system is off and the batteries are fully discharged or disconnected.
Restore ac supply.
Green LED of one or more rectifiers is off.
AC supply to rectifier(s) off or one or more phases are off.
Restore the ac supply.
Rectifier(s) not fully inserted. Insert rectifier and tighten retaining screw.
Internal rectifier fault. Remove the rectifier and insert another one in the same slot. If second rectifier fails to start then there is a fault with the rectifier position. Check ac connections.
If the second rectifier operates normally, the first rectifier is faulty and must be returned for service.
All rectifier LEDs flash. The rectifier Identify function. Normal operation. See details in the System Controller Operation Handbook.
Rectifier yellow LED flashes The system controller is starting. Wait for system controller to complete start-up.
Rectifier has not registered with the system controller.
Remove, and then re-insert the rectifier.
Replace the rectifier with another rectifier. If second rectifier fails to register, then there is a fault with the rectifier position. Check rectifier comms bus wiring.
If second rectifier registers, then first rectifier is faulty and must be returned for service.

Maintenance
Copyright © 2005-2012 Eaton Corporation. All Rights Reserved.
IPN 997-00012-54D November 2012 53
Problem Possible Cause Required Action
Rectifier yellow LED on.
Rectifier power limit or current limit is active.
Power system is charging the batteries.
If required, activate the Battery Current Limit control process.
Load current exceeds the total rectifier capacity.
Install additional rectifiers.
Rectifier temperature turndown is active due to low ac supply voltage or high ambient temperature.
Power system will return to normal operation when the ac supply voltage and/or ambient temperature are within the specified ranges. See Specifications on page 69.
System controller has shut down the rectifier. (Depending on model, rectifier may also click every 5-15 seconds.)
Normal operation. See Rectifier Shutdown in the System Controller Operation Handbook.
If required, restart the rectifier.
Rectifier red LED on.
Very high or low ac voltage, or ac supply failed.
Power system will return to normal operation when the ac supply voltage is within the specified range. See Specifications on page 69.
DC overvoltage Remove and re-insert rectifier(s) or shut down and restart using DCTools.
Internal rectifier fault. Replace the rectifier.
Low system output voltage (rectifiers not in current limit).
Rectifiers off. Restore the ac supply.
Temperature Compensation is active and the battery temperature is above the reference temperature.
None. This is normal operation (if batteries are connected). Disable Temperature Compensation if no batteries connected.
Battery Test or Battery Characterization is active.
None. Output voltage will return to normal when Battery Test or Battery Characterization is completed.
Incorrect float voltage setting at system controller.
Correct the float voltage setting of the system controller.
Record new setting.
Low system output voltage and rectifier yellow LEDs are on (rectifiers are in current limit).
Load is too high for rectifier capacity.
Install additional rectifiers.
Battery is recharging after ac supply failure.
Check battery has recharged within expected time.

Data-Voice-Video 3G Power Solutions Installation Guide
54 Copyright © 2005-2012 Eaton Corporation. All Rights Reserved.
IPN 997-00012-54D November 2012
Problem Possible Cause Required Action
High system output voltage. Temperature Compensation is active and the battery temperature is below the reference temperature.
None. This is normal operation (if batteries are connected). Disable Temperature Compensation if no batteries connected.
Equalize or Fast Charge is active.
None. Output voltage will return to normal when Equalize or Fast Charge is completed.
Incorrect float voltage setting at system controller.
Correct the float voltage setting of the system controller.
Record new setting.
Faulty rectifier. Locate the rectifier with the highest output current and remove this one first.
If the first rectifier removed is not faulty, remove each of the remaining rectifier modules one at a time, until the faulty rectifier is found. (The output voltage returns to normal when faulty rectifier is removed.)
Replace faulty rectifier with one that is working.
Return the faulty rectifier for service.
System has no dc output (rectifiers are on).
Load fuse or MCB open. Check for open fuse or MCB.
LVD contactor has disconnected the load.
Use DCTools to check LVD is enabled and set to correct values. (LVD status LED on the I/O board is on when contactor is energized.)
Check that the I/O board is connected (Power LED is on).
Check that the LVD control and power cables connections on page 7.
Check the connections from the load bus to the LVD.
System has no battery input Battery MCBs or fuses open. Check for open battery MCBs or fuses.
LVD has disconnected the battery because ac supply is off and the battery is fully discharged.
None. The battery will be automatically reconnected when the ac supply is restored.
LVD contactor is open. Use DCTools to check LVD is enabled and set to correct values. (LVD status LED on the I/O board is on when contactor is energized.)
Check that the I/O board is connected (Power LED is on).
Check that the LVD control and power cables are connected. See Connections on page 7.
Check the connections from the battery bus to the LVD.
Maintenance
Copyright © 2005-2012 Eaton Corporation. All Rights Reserved.
IPN 997-00012-54D November 2012 55
Problem Possible Cause Required Action
String Fail Alarm (SC200 only)
The Battery Mid-point Monitoring system has detected a voltage imbalance in one of the battery strings.
See Battery Mid-point Monitoring on page 63.
A Battery Mid-point Monitoring sense wire is disconnected.
Check the sense wires.
I/O board Power/Comms OK LED is off
I/O board is not powered or faulty.
Check connection to YH3 on I/O board. See Connections on page 7.
Replace I/O board if faulty.
I/O board Power/Comms OK LED is flashing.
I/O board is responding to an Identify command from the SC200 or SC100.
None, this is normal operation. See details in the System Controller Operation Handbook.
LVD Status LED(s) (on I/O board) are on.
LVD contactor is energized. None, this is normal operation.
LVD Status LED(s) are off (I/O board Power On LED is on).
LVD contactor is de-energized. None, this is normal operation.
LVD Status LED(s) flashing. The contactor is in the wrong state (SC200 or SC100 internal state does not match signal from contactor auxiliary switch).
Check the electrical and mechanical operation of the contactor and auxiliary switch.
Check all wiring and connectors. See Connections on page 7.
LVD Type setting is incorrect. Check LVD Type setting.
LVD contactor(s) not operating.
LVD settings incorrect. Check LVD is enabled and set to correct values. See details in the System Controller Operation Handbook.
Check that the LVD manual control is set to AUTO. See details in the System Controller Operation Handbook.
Check that the contactor is correctly configured and mapped to the I/O board. See details in the System Controller Operation Handbook (SC200 only).
Contactor is disconnected. Check the control and dc power cables are connected. See details on page 7.
MOV Fail Alarm active. One or more MOVs have failed because of lightning strike(s) or ac transients.
Check the visual indicators on all the MOVs. If a visual indicator indicates a failed MOV, replace all the MOVs as soon as possible. See Monitoring and Replacing Transient Protective Devices on page 63, on page 85.
One or more MOV cartridges not properly fitted.
Check that the MOV cartridges are properly inserted in the MOV cartridge holders.
Faulty MOV Fail alarm wiring. Check the MOV Fail alarm wiring.
All other SC200 or SC100 problems.
See Troubleshooting in the SC200 or SC100 Operation Handbook.

Data-Voice-Video 3G Power Solutions Installation Guide
56 Copyright © 2005-2012 Eaton Corporation. All Rights Reserved.
IPN 997-00012-54D November 2012
Replacing or Adding a Rectifier
Rectifiers can be replaced without switching off the dc power system and disconnecting the equipment it powers.
To reduce the risk of electric shock and maintain optimum system cooling, always cover
empty rectifier slots with blanking panels.
To avoid electric shock do not place hands inside the rectifier shelf.
Do not attempt to disassemble faulty rectifiers. Return them (in their original packaging) with a completed Equipment Incident Report on page 101.
Removing a Rectifier
Step 1 - Undo the rectifier retaining screw
This will release the rectifier from its rear connector.
Step 2 - Pull out the rectifier
The rectifier may be hot, especially after prolonged operation. Use suitable gloves.
Step 3 - Replace rectifier or fit blank panel
Insert a replacement rectifier into the empty slot (see details in following section), or fit a blank panel.
Procedure complete
Installing a Replacement Rectifier
Step 1 - Remove rectifier blank panel (if fitted)
Step 2 - Align the rectifier with the guides
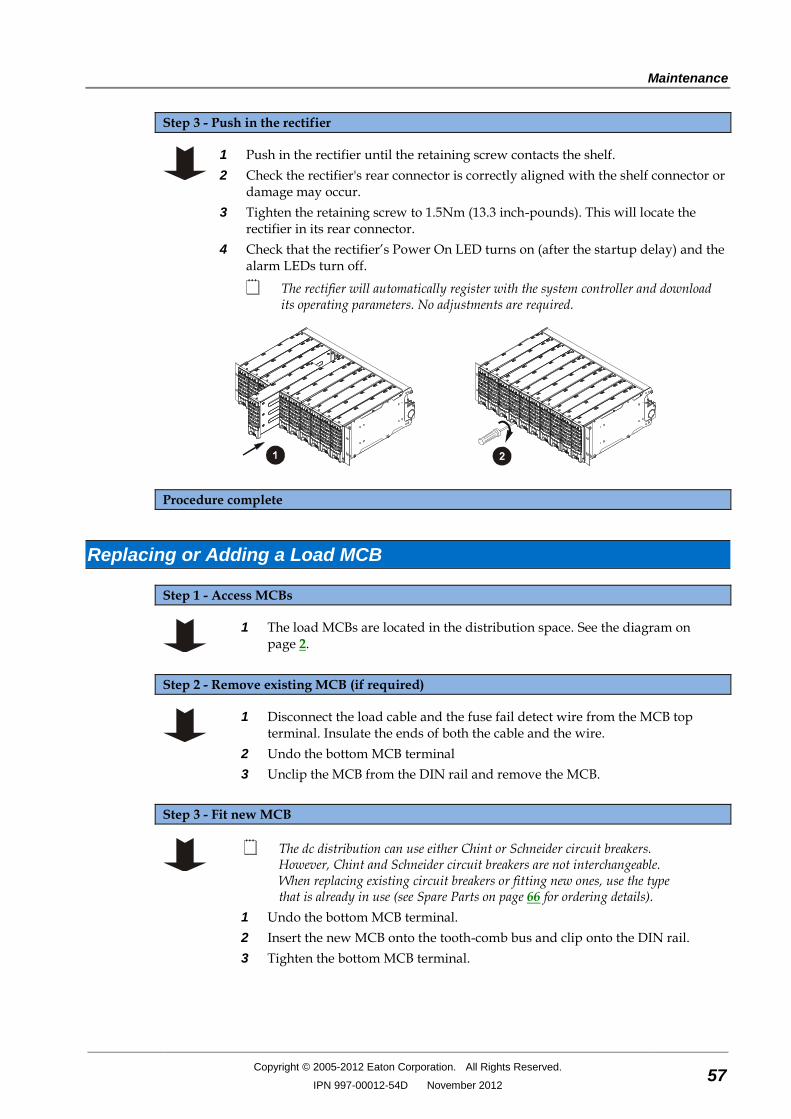
Maintenance
Copyright © 2005-2012 Eaton Corporation. All Rights Reserved.
IPN 997-00012-54D November 2012 57
Step 3 - Push in the rectifier
1 Push in the rectifier until the retaining screw contacts the shelf.
2 Check the rectifier's rear connector is correctly aligned with the shelf connector or damage may occur.
3 Tighten the retaining screw to 1.5Nm (13.3 inch-pounds). This will locate the rectifier in its rear connector.
4 Check that the rectifier’s Power On LED turns on (after the startup delay) and the alarm LEDs turn off.
The rectifier will automatically register with the system controller and download its operating parameters. No adjustments are required.
Procedure complete
Replacing or Adding a Load MCB
Step 1 - Access MCBs
1 The load MCBs are located in the distribution space. See the diagram on page 2.
Step 2 - Remove existing MCB (if required)
1 Disconnect the load cable and the fuse fail detect wire from the MCB top terminal. Insulate the ends of both the cable and the wire.
2 Undo the bottom MCB terminal
3 Unclip the MCB from the DIN rail and remove the MCB.
Step 3 - Fit new MCB
The dc distribution can use either Chint or Schneider circuit breakers. However, Chint and Schneider circuit breakers are not interchangeable. When replacing existing circuit breakers or fitting new ones, use the type that is already in use (see Spare Parts on page 66 for ordering details).
1 Undo the bottom MCB terminal.
2 Insert the new MCB onto the tooth-comb bus and clip onto the DIN rail.
3 Tighten the bottom MCB terminal.

Data-Voice-Video 3G Power Solutions Installation Guide
58 Copyright © 2005-2012 Eaton Corporation. All Rights Reserved.
IPN 997-00012-54D November 2012
Step 4 - Fit a fuse fail detect wire
1 Place a spare fuse fail detect wire into the top terminal of the MCB.
2 Tighten the top MCB terminal.
Step 5 - Connect load cable (if required)
Follow the procedure on page 24, ensuring that the load cable size is sufficient for the MCB (see details on page 75).
Procedure complete
Replacing a Load or Battery Fuse Link
Step 1 - Access the fuses
The load fuses are located in the distribution space. See the diagram on page 2.
Step 2 - Remove blown fuse link
1 Identify the blown fuse.
2 For battery fuses disconnect the fuse fail detect wires.
3 Remove the fuse link using the tool provided.
Step 3 - Fit new fuse link
1 Use the tool supplied to fit a new fuse link of the required rating.
2 For battery fuses only:
Use a striker type fuse link.
Remove the fuse fail detection board from the old fuse and fit to new fuse.
Re-connect the fuse fail detect wires.
Fuse link (striker type for battery fuses only)
Live cable
Fuse fail detection board (battery fuses only)
Procedure complete

Maintenance
Copyright © 2005-2012 Eaton Corporation. All Rights Reserved.
IPN 997-00012-54D November 2012 59
Adding a Load Fuse
Step 1 - Access the fuses
1 The load fuses are located in the distribution space. See the diagram on page 2.
Step 2 - Fit new fuse base and link
1 Bolt the new fuse base to the live bus.
2 Tighten the bolt according to the Standard Torque Settings on page 67.
Step 3 - Fit a fuse fail detect wire
1 Place a spare fuse fail detect wire into the top terminal of the fuse.
2 Tighten the top terminal.
Step 4 - Connect load cable (if required)
Follow the procedure on page 24, ensuring that the load cable size is sufficient for the fuse (see details on page 75).
Procedure complete
Replacing the System Controller
The SC200 or SC100 system controller can be replaced without switching off the dc power system and disconnecting the equipment it powers.
Before you start you will require:
A PC/Laptop with DCTools* connected to the system controller or (SC200 only) a web browser* connected to the system controller via an IP network.
*See Communications Options in the System Controller Operation Handbook.
A replacement SC200 or SC100 system controller.
A new system controller is factory loaded with a 48V (nominal) default configuration file. DCTools (SC200 only) can be used to modify the configuration file already loaded in a system controller. However, a system controller configured for a particular nominal system voltage (48V or 24V) can only be converted to the other nominal system voltage by loading a new configuration file.
A copy of the appropriate configuration file, either:
use the configuration file saved from the existing system controller, or
contact your Eaton dc power system supplier to obtain a master configuration file to suit the dc power system. This file will have to be customized for the site.
Step 1 - Backup the configuration file of the old SC200 or SC100 if possible
If the old system controller is still operational use DCTools to backup its configuration file.
See Backup and Restore on page 44.
Data-Voice-Video 3G Power Solutions Installation Guide
60 Copyright © 2005-2012 Eaton Corporation. All Rights Reserved.
IPN 997-00012-54D November 2012
Step 2 - Remove the system controller
1 Open the distribution space door to access the rear of the system controller.
2 Label, and then disconnect the cables from the rear connectors.
When the system controller stops communicating the rectifier output voltage will be unchanged for 2 minutes. After 2 minutes the rectifier output voltage will change to the Float Voltage and the rectifier yellow LEDs will flash.
3 Undo the four retaining screws.
4 Remove the SC200 or SC100.
Step 3 - Insert the new SC200 or SC100
1 Insert the SC200 or SC100 and tighten the retaining screws.
2 Connect the cables to the rear connectors.
The system controller will start. See Starting the SC200 or SC100 on page 45. Various alarms may appear because of incorrect configuration file settings. Press any key to silence the alarm.
Step 4 - Download the configuration file
1 Connect to the system controller with DCTools. See details on page 48 in the System Controller Operation Handbook.
2 If a copy of the old configuration file, or a master configuration file is available, then use DCTools to restore (download) it to the new system controller.
See Backup and Restore on page 44 in the System Controller Operation Handbook.
If you receive an error message about the MIB file version, please contact your Eaton dc product supplier for advice.
3 If a copy of the old configuration file, or a master configuration file is not available, then use the keypad or DCTools to change the configuration settings to the correct values (provided the system controller is set for the correct nominal system voltage).
Step 5 - Check the system controller operation
1 Map the I/O board (SC200 only):
In DCTools go to: RXP.
Copy the I/O board serial number(s) from the RXP Devices table to the I/O Board to Serial Number Mapping table to map an IOB Number to each I/O board (overwrite an existing serial number if required).
If multiple SiteSure-3G modules are connected use the I/O board Identify function to physically identify each module. See details in the System Controller Operation Handbook.
2 Check that the system controller has registered all rectifiers.
3 Check all control processes, alarms and current measurement(s).
4 Check the power system identification parameters and communications settings.
5 Change the configuration file as required to ensure that the system controller operates as intended.
6 Check the system controller time (SC200 only). See details in the System Controller Operation Handbook.

Maintenance
Copyright © 2005-2012 Eaton Corporation. All Rights Reserved.
IPN 997-00012-54D November 2012 61
Step 6 - LVD Characterization Alarm
If LVD(s) are fitted the system controller may indicate an LVD Characterization alarm.
If there is no alarm, then no further action is required.
1 On the SC200 go to: Battery > LVDs > LVD x > Not Characterized > Edit, or on the SC100 go to: Menu > Configuration > LVD1/LVD2
2 If available, select Characterize With IOB Values. Press Enter. Repeat for other LVD(s) if fitted. No further action is required.
3 If Characterize With IOB Values is not available, the LVD(s) must be characterized. This will cause the LVD(s) contactor(s) to disconnect for a few seconds:
If a battery disconnect LVD is fitted, then the load equipment will continue to be powered by the rectifiers.
If a load disconnect LVD is fitted, then connect a temporary bridge cable from the rectifier bus to the load bus to power the low priority load equipment when the load LVD disconnects. See Replacing the Input/Output Board.
4 On the SC200 go to: Battery > LVDs > LVD x > Not Characterized > Edit, or on the SC100 go to: Menu > Configuration > LVD1/LVD2
Select Characterize. Press Enter.
The LVD contactor will disconnect and connect.
Repeat for other LVD(s) if fitted.
5 Remove the LVD bridge cable if fitted.
Procedure Complete
Return the faulty system controller with a completed Equipment Incident Report on page 101.
Replacing the Input/Output Board
When the I/O board is removed any LVD fitted will disconnect:
If a battery disconnect LVD is fitted the battery will be disconnected when the I/O board is removed (the load equipment will continue to operate from the rectifiers).
If a load disconnect LVD is fitted then this LVD must be bridged so that the low priority loads are not disconnected when the I/O board is removed.
Before you start you will require:
A PC/Laptop with DCTools* connected to the system controller or (SC200 only) a web browser* connected to the system controller via an IP network.
*See Communications Options in the System Controller Operation Handbook.
A replacement input/output board.
An anti-static wrist strap to prevent damage to the static sensitive components on the input/output board.
An LVD bridge cable if a load disconnect LVD is fitted.
Step 1 - Bridge load disconnect LVD(s) (if fitted)
Ignore this Step if there is no load disconnect LVD fitted.
1 Connect suitable cable(s) from the rectifier bus to the load bus to bridge the load disconnect LVD(s).
2 Tighten the bolts according to the standard torque settings on page 67.

Data-Voice-Video 3G Power Solutions Installation Guide
62 Copyright © 2005-2012 Eaton Corporation. All Rights Reserved.
IPN 997-00012-54D November 2012
Step 2 - Remove the I/O board
1 The I/O board is located on the back of the distribution space door. See the diagram on page 2.
2 Label then disconnect all I/O board cables.
Any LVDs fitted will disconnect. A Missing Hardware and other alarms will appear. Press any key to silence the alarm.
3 Remove the I/O board.
4 Place the board in an anti-static bag and return for service. See Equipment Incident Report on page 101.
Step 3 - Fit the new I/O board
1 Reconnect all cables.
2 Check the I/O board Power On LED is on. If not see Troubleshooting on page 52.
Some alarms will clear. The Missing Hardware and LVD alarms (if LVDs are fitted) will still be present. A New Hardware alarm will appear because of the I/O board mapping change. Press any key to silence the alarm.
Step 4 - Update I/O board mapping (SC200 only)
1 In DCTools go to: Configuration > RXP > I/O Board to Serial Number Mapping.
2 Copy the I/O board serial number from the RXP Devices table to the I/O Board to Serial Number Mapping table to map an IOB Number to the I/O board (overwrite existing serial number).
The alarms (except LVD alarms, if LVDs are fitted) will clear.
Step 5 - Clear LVD Characterization alarm(s) (if required)
Ignore this Step if there is no LVD Characterization Error alarm.
1 On the SC200 go to: Battery > LVDs > LVD x > Not Characterized > Edit, or on the SC100 go to: Menu > Configuration > LVD1/LVD2
2 Select Use SC Values. Press Enter. No further action is required - go to (3). If Use SC Values is not available then the LVD must be characterized. This will cause the LVD contactor(s) to disconnect for a few seconds.
If LVD is a battery disconnect LVD then the load equipment will continue to be powered by the rectifiers.
If LVD is a load disconnect LVD then the low priority load equipment will continue to be powered via the LVD bridge cable.
On the SC200 go to: Battery > LVDs > LVD x > Not Characterized > Edit, or on the SC100 go to: Menu > Configuration > LVD1/LVD2
The LVD contactor will disconnect and connect. When the characterization is complete the LVD Characterization Error alarm will clear.
3 Repeat for other LVD(s) if fitted.

Maintenance
Copyright © 2005-2012 Eaton Corporation. All Rights Reserved.
IPN 997-00012-54D November 2012 63
Step 6 - Remove the LVD bridge cable(s) (if fitted)
Ignore this Step if no LVD bridge cable was fitted.
Procedure complete
Monitoring and Replacing Transient Protective Devices
For information on transient protection devices see Input Transient Protection on page 85.
Metal oxide varistors (MOVs) are the most widely used transient protective devices. MOVs are generally fitted in the main ac switchboard of the building for primary transient protection, and in the ac sub-switchboard or dc power system's ac distribution module for secondary transient protection.
Monitoring the MOVs
MOVs are fitted with alarm contacts and visual indicators. Connect these alarms to the system controller and from there extended to the building or network management system. If the MOVs are not monitored automatically, then regular visual inspections must be carried out.
Replacing the MOVs
MOVs must be functional at all times. In practice, it is impossible to predict when a MOV will fail. That depends entirely on the number and magnitude of the transients sustained.
For that reason we recommend the following, depending on how accessible the site is.
For easily accessible sites – If a MOV has failed (as indicated by a MOV Fail alarm or the visual indicator), then replace all the MOVs as soon as possible.
For remote sites with difficult access – Replace all the MOVs during scheduled maintenance visits, whether they have failed or not.
We strongly recommend inspecting the MOVs in the main ac switchboard at the same time and replacing them as appropriate.
If any MOV or other transient protection device has failed then the design of the primary and secondary transient protection systems, and the maintenance plan, at that site must be reviewed.
Battery Mid-point Monitoring (String Fail) Alarm (SC200 only)
Use the following procedure if a String Fail alarm is generated.
Step 1 - Identify the faulty battery string
1 Press any button on the SC200 to silence the alarm.
2 Connect to the SC200 using DCTools/Web. Go to Batteries > Mid-point Monitoring.
3 Click + to expand the Mid-point Monitoring table to identify which battery string has failed.
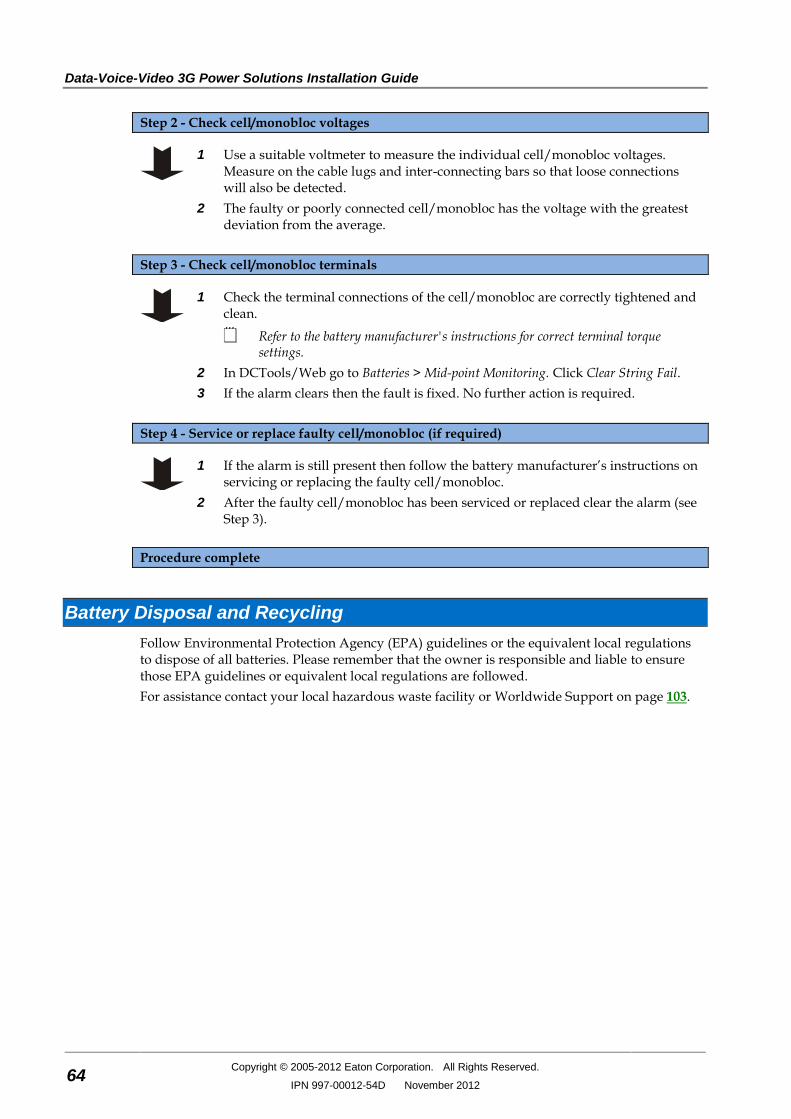
Data-Voice-Video 3G Power Solutions Installation Guide
64 Copyright © 2005-2012 Eaton Corporation. All Rights Reserved.
IPN 997-00012-54D November 2012
Step 2 - Check cell/monobloc voltages
1 Use a suitable voltmeter to measure the individual cell/monobloc voltages. Measure on the cable lugs and inter-connecting bars so that loose connections will also be detected.
2 The faulty or poorly connected cell/monobloc has the voltage with the greatest deviation from the average.
Step 3 - Check cell/monobloc terminals
1 Check the terminal connections of the cell/monobloc are correctly tightened and clean.
Refer to the battery manufacturer's instructions for correct terminal torque settings.
2 In DCTools/Web go to Batteries > Mid-point Monitoring. Click Clear String Fail.
3 If the alarm clears then the fault is fixed. No further action is required.
Step 4 - Service or replace faulty cell/monobloc (if required)
1 If the alarm is still present then follow the battery manufacturer’s instructions on servicing or replacing the faulty cell/monobloc.
2 After the faulty cell/monobloc has been serviced or replaced clear the alarm (see Step 3).
Procedure complete
Battery Disposal and Recycling
Follow Environmental Protection Agency (EPA) guidelines or the equivalent local regulations to dispose of all batteries. Please remember that the owner is responsible and liable to ensure those EPA guidelines or equivalent local regulations are followed.
For assistance contact your local hazardous waste facility or Worldwide Support on page 103.

Appendix A
Equipment and Tools
Copyright © 2005-2012 Eaton Corporation. All Rights Reserved.
IPN 997-00012-54D November 2012 65
A p p e n d i x A
Equipment and Tools
Safety Equipment
Use approved safety equipment as required by local health and safety regulations including (but not restricted to):
Safety glasses
Safety gloves
Safety footwear
Appropriate handling equipment for batteries and other heavy items
Appropriate platform(s) and access for working at height (if required)
Essential Tools
Standard electrical toolkit with insulated tools, plus:
Cable crimping tool and crimp lugs suitable for all cable sizes and connectors used
Torque wrench with pivot head and insulated handle
Heatshrink tubing and heat gun
Digital multimeter
Insulation tester
Non-static clothing
Recommended Tools
Laptop with:
USB port (for use with SC200) or RS232 port (for use with SC100)
DCTools software (download from dcpower.eaton.com/downloads).
Test load (to suit maximum output of dc power system)
Labeling tool and labels
Clamp-on ammeter

Data-Voice-Video 3G Power Solutions Installation Guide
66 Copyright © 2005-2012 Eaton Corporation. All Rights Reserved.
IPN 997-00012-54D November 2012
Spare Parts
Item Description Part Number
1 Rectifier See replacement procedure on page 56.
48V, 2000W: Eaton APR48-ES 48V, 1800W: Eaton APR48-3G 24V, 1440W: Eaton APR24-3G
2 Rectifier blank panel (to cover un-used rectifier positions)
Eaton RMB1U-00
3 System controller See replacement procedure on page 59.
Eaton SC100-00 or SC200-00
4 Input/Output Board. See replacement procedure on page 61.
Eaton IOBGP-01
5 USB A/B cable for use with SC200 system controller
RadioShack 55010997, Jaycar WC7700, or equivalent.
6 RS232 DB9 F/F Null-modem cable - for use with SC100 system controller
RadioShack 55010600, Jaycar WC7513, or equivalent. (Cross-over connections: 5-5, 2-3, 3-2)
7 SiteSure-3G Input/Output Module (optional) (SC200 only)
Eaton IOBSS-00. See details on page 32.
8 Dual temperature sensors (2m leads) Eaton TS2-200
9 Battery Mid-point Monitoring connection kit for use with SC200 (for two battery strings)
Eaton MPTLOOM-3300 (2 x 3m sense wires), or Eaton MPTLOOM-7600 (1 x 7m, 1 x 6m sense wires)
10 Chint or Schneider circuit breakers Contact Eaton

Equipment and Tools
Copyright © 2005-2012 Eaton Corporation. All Rights Reserved.
IPN 997-00012-54D November 2012 67
Standard Torque Settings
Use the following torque settings unless specific values are stated on the fastener or elsewhere.
For battery terminals use the torque values specified by the battery manufacturer.
Thread Size ISO Coarse
Minimum - Maximum Torque
M2.5 0.3 - 0.4Nm (2.7 - 3.5 inch-pounds)
M3 0.5 - 0.6Nm (4.5 - 5.3 inch-pounds)
M4 1.1 - 1.3Nm (9.8 - 11.5 inch-pounds)
M5 2.3 - 2.7Nm (20.5 - 23.9 inch-pounds)
M6 3.9 - 4.5Nm (35 - 39 inch-pounds)
M8 9.5 - 11.1Nm (85 - 98 inch-pounds)
M10 18.7 - 21.9Nm (166 - 194 inch-pounds)
M12 32.8 - 38.4Nm (292 - 340 inch-pounds)
M16 81.5 - 95.1Nm (724 - 844 inch-pounds)
Notes:
1 Torque settings are for mild steel, brass and stainless steel.
2 Torque is based on 60% of yield stress of the material. Yield for the purposes of this chart is 240MPa.
3 Tolerance range is 60 - 70 % of yield.
4 When a bolt and nut is torqued use a spanner to prevent rotation.
5 Use hand tools when loosening and tightening stainless steel fasteners. Lubricate bolts before tightening to prevent them locking up.

Data-Voice-Video 3G Power Solutions Installation Guide
68 Copyright © 2005-2012 Eaton Corporation. All Rights Reserved.
IPN 997-00012-54D November 2012

Appendix B
Specifications
Copyright © 2005-2012 Eaton Corporation. All Rights Reserved.
IPN 997-00012-54D November 2012 69
A p p e n d i x B
Specificati ons x
System Input
Input Voltage Refer to the rectifier specifications for range.
220-240V (nominal L-N) 208V (nominal L-L)
Input Current (maximum) (per phase @ V = 175V)
Systems with integrated batteries:
1P+N+PE (220-240V nom.): 120A
2P+PE (208V nom.): 120A/ph
3P+N+PE (220-240V nom.): 48A/ph
3P+PE (208V nom.): 73A
Systems without integrated batteries:
3P+N+PE (220-240V nom.): 168A/ph
3P+PE (208V nom.): 280A/ph
Frequency Range 45-66Hz
Earth Leakage Current (maximum) 1.3mA per rectifier
System Output
Output Voltage (nominal) 24V / 48V (dependent on rectifier model)
Output Power (maximum) Systems with integrated batteries:
24V: APR24-3G rectifiers: 14.4kW* 48V: APR48-3G rectifiers: 18kW* APR48-ES rectifiers: 20kW*
Systems without integrated batteries:
24V: APR24-3G rectifiers: 57.6kW* 48V: APR48-3G rectifiers: 72kW* APR48-ES rectifiers: 80kW*
Output Voltage Range 21.5 - 32V / 43 - 57.5V
* subject to the maximum load currents as follows
Load Currents
Module Type Number Description Load Current (Maximum)
DCDIX1618-010 DV2-3G Distribution with Load MCBs - 16 x
18mm, Battery fuses - 2 x DIN02, Battery Shunt x 1. 600A capacity.
Load: 600A Battery: 500A
DCDIX2418-101 DV2-3G Distribution with Load MCBs - 12 x
18mm priority and 12 x 18mm non-priority, Load LVD x 1. 400A + 400A capacity.
2*400A
DCMIX2418-000 DV2-3G Distribution with Load MCBs - 24 x
18mm. 1000A capacity. 1000A
DCMIX1627-000 DV2-3G Distribution with Load MCBs – 16 x
27mm. 1000A capacity. 1000A
DCFIX1000-000 DV2-3G Distribution with Load fuses – 10 x
DIN00. 1200A capacity. 1200A

Data-Voice-Video 3G Power Solutions Installation Guide
70 Copyright © 2005-2012 Eaton Corporation. All Rights Reserved.
IPN 997-00012-54D November 2012
DCFIX0602-000 DV2-3G Distribution with Load fuses – 6 x
DIN02. 1500A capacity. 1500A
DCFIX0403-000 DV2-3G Distribution with Load fuses – 4 x
DIN03. 1500A capacity. 1500A
DCFIX0404-000 DV2-3G Distribution with Load fuses – 4 x
DIN04. 2400A capacity. 2400A
DCF14TPS-00 DV2-3G Distribution with Load fuses – 14 x
TPS. 600A capacity. 600A
LVDIX0601-211 DV2-3G LVD with Single 600A Contactor,
Battery fuses – DIN03 x 2, Battery Current Shunt.
Load: 330A Battery: 450A
LVDIX0602-211 DV2-3G LVD with Dual 600A Contactors,
Battery fuses – DIN03 x 2, Battery Current Shunt.
Load: 2*300A Battery: 2*400A
LVDIX0602-011 DV2-3G LVD with Dual 600A Contactors,
CS04-A11 Current Shunt. Load: 2*400A Battery: 2*475A
LVDIX1001-000 DV2-3G LVD with Single 1000A Contactor. 800A
LVDIX1002-000 DV2-3G LVD with Dual 1000A Contactors. 2*800A
LVDIX2001-000 DV2-3G LVD with Single 2000A Contactor. 1600A
LVDIX2002-000 DV2-3G LVD with Dual 2000A Contactors. 2*1600A
DCFIX0203-001 DV2-3G Distribution with fuses – 2 x DIN03,
945A capacity. 2*472.5A
DCFIX0204-001 DV2-3G Distribution with fuses – 2 x DIN04,
1875A capacity. 2*937.5A
DCFIX0204A-010 DV2-3G Distribution with fuses – 2 x EFEN
04A, 1 for Load, 1 for Battery with CS04-A11, Feed from -V00
Load: 1200A Battery: 1200A
DCFIX0204A-011 DV2-3G Distribution with fuses – 2 x EFEN
04A For Loads, Feed from -HL0 2*1200A
DV2-A10B-400 +E, RACKIX200, DOORIX8 (DCDIR1, No
LVD, ACDIR410), RM10(x1), BTRAYIX(x4) Max current per DCD and total load current: 337.5A
DV2-A10B-401 +E, RACKIX200, DOORIX8 (DCDIR1,
LVDIX401, ACDIR410), RM10(x1), BTRAYIX(x4)
Max current per DCD and total load current: 337.5A
DV2-A10B-402 +E, RACKIX200, DOORIX8 (DCDIR1,
LVDIX402, ACDIR410), RM10(x1), BTRAYIX(x4)
Max current per DCD and total load current: 337.5A
DV2-A20-4000 +E, APR48-3G or APR48-ES, 3P+N+PE Star,
RACKIX200, DOORIX34, (SC200, ACDIX425-10000), 1U, RM10(x2), 2U
750A or 832A
DV2-A20-3000 +E, APR48-3G or APR48-ES,3P+PE Delta, RACKIX200, DOORIX34,(SC200,ACDIX425-10000),1U,RM10(x2),2U
750A or 832A
DV2-A40-4000 +E, APR48-3G or APR48-ES, 3P+N+PE Star, RACKIX200, DOORIX28,(SC200,ACDIX425-10000),1U,RM10(x4),2U
1500A or 1664A
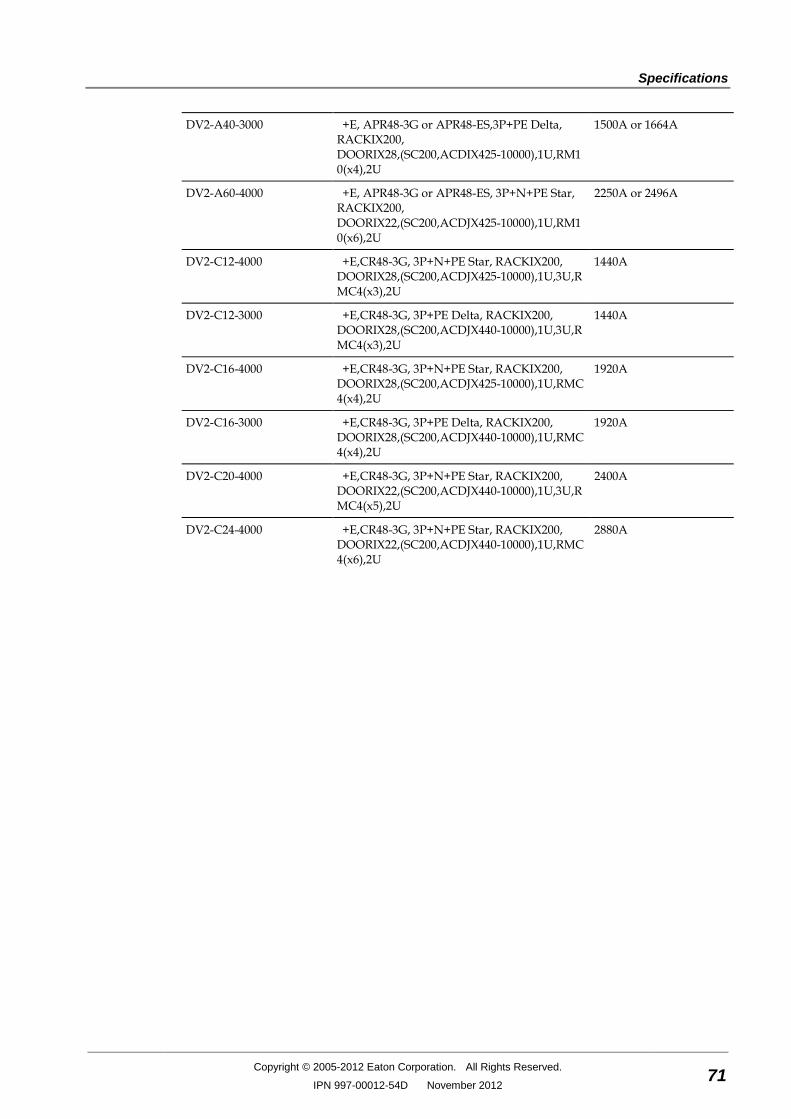
Specifications
Copyright © 2005-2012 Eaton Corporation. All Rights Reserved.
IPN 997-00012-54D November 2012 71
DV2-A40-3000 +E, APR48-3G or APR48-ES,3P+PE Delta, RACKIX200, DOORIX28,(SC200,ACDIX425-10000),1U,RM10(x4),2U
1500A or 1664A
DV2-A60-4000 +E, APR48-3G or APR48-ES, 3P+N+PE Star, RACKIX200, DOORIX22,(SC200,ACDJX425-10000),1U,RM10(x6),2U
2250A or 2496A
DV2-C12-4000 +E,CR48-3G, 3P+N+PE Star, RACKIX200,
DOORIX28,(SC200,ACDJX425-10000),1U,3U,RMC4(x3),2U
1440A
DV2-C12-3000 +E,CR48-3G, 3P+PE Delta, RACKIX200,
DOORIX28,(SC200,ACDJX440-10000),1U,3U,RMC4(x3),2U
1440A
DV2-C16-4000 +E,CR48-3G, 3P+N+PE Star, RACKIX200,
DOORIX28,(SC200,ACDJX425-10000),1U,RMC4(x4),2U
1920A
DV2-C16-3000 +E,CR48-3G, 3P+PE Delta, RACKIX200,
DOORIX28,(SC200,ACDJX440-10000),1U,RMC4(x4),2U
1920A
DV2-C20-4000 +E,CR48-3G, 3P+N+PE Star, RACKIX200,
DOORIX22,(SC200,ACDJX440-10000),1U,3U,RMC4(x5),2U
2400A
DV2-C24-4000 +E,CR48-3G, 3P+N+PE Star, RACKIX200,
DOORIX22,(SC200,ACDJX440-10000),1U,RMC4(x6),2U
2880A

Data-Voice-Video 3G Power Solutions Installation Guide
72 Copyright © 2005-2012 Eaton Corporation. All Rights Reserved.
IPN 997-00012-54D November 2012
Rectifiers
Operating Ranges APR24-3G/APR48-3G:
Rated: 175 – 275V Full output up to 50°C [122°F]
Extended: 90 – 300V Reduced output power below 175V
APR48-ES: Rated: 185 – 275V Full output up to 50°C [122°F]
Extended: 90 – 300V Reduced output power below 185V
Input Current (maximum) 20°C [68°F]
APR24-3G: 9.5A @ 175V ac APR48-3G: 12A @ 175V ac APR48-ES: 12A @ 185V ac
Rated Output Power APR24-3G: 1440W
APR48-3G: 1800W APR48-ES: 2000W
Rated Output Current APR24-3G: 50A @ 28.8V
APR48-3G: 37.5A @ 48V APR48-ES: 41.7A @ 48V
Preset Voltage APR24-3G: 27V ± 0.1V
APR48-3G: 54.5V ± 0.1V APR48-ES: 54.5V ± 0.1V
Rectifier Input Fuses (internal) 16A, 250V
Environment
Ambient Temperature Range (operating) -5°C to 50°C [ 23°F to 122°F]
Relative Humidity (operating and storage) <95% (non condensing)
Dimensions H, W, D
Cabinets 43U racks: 2000mm [78.7"], 600mm [23.6”],
600mm [23.6”]
Rectifiers 3U: 133mm [5.25"], 42mm [1.65”], 266mm
[10.45”] overall
Weight
Excluding rectifiers and batteries Systems with integrated batteries:
85kg [188 lb] typical
Systems without integrated batteries:
120kg [264 lb] typical
Additional battery rack option:
85kg [188 lb] typical
Rectifier module 1.7kg [3.7 lb]

Specifications
Copyright © 2005-2012 Eaton Corporation. All Rights Reserved.
IPN 997-00012-54D November 2012 73
Digital Outputs/Alarm Relays (IOBGP)
Number of Digital Outputs/Relays 6 (one also used for Monitor OK alarm)*
Contact Arrangement One changeover contact per relay
Contact Rating 0.1A @ 60V dc maximum
Connectors Screwless terminal blocks
Wire Size 0.5 - 2.0mm2 [20 - 14 AWG]
Maximum Cable Length 20m (65 feet)
Isolation Relay connections are isolated to 500V dc from all
other circuitry, earth and system common.
* Digital Output 6 is also used as the Monitor Fail alarm relay. It will de-energize if the I/O board loses power or loses communication with the SC200 or SC100.
Digital Inputs (IOBGP)
Number of Digital Inputs 6
Connectors Screwless terminal blocks
Wire Size 0.5 - 2.0mm2 [20 - 14 AWG]
Maximum Cable Length 20m (65 feet)
Input Types Voltage-free switch or relay contacts only
Input Range Live Bus to Live Bus + 5V
Input Common Same bus as used for current shunts (Live bus is
standard)
Input Protection Protected against damage from short circuit to live
or common bus
Temperature Sense Inputs (IOBGP)
Number of Temperature Sense Inputs 2 - One only connected as standard. Second input
available (requires additional temperature sensor).
Range 2.53V to 3.43V (-20 to +70°C [-4 to +158°F])
Resolution < 0.01V (< 1°C [1.8°F])
Accuracy ±1°C [1.8°F] at 25°C [77°F], ±2°C [3.6°F] over rated
temperature range
Maximum Cable Length 20m (65 feet)
Connector RJ45
Current Sense Inputs (IOBGP)
Number of Current Sense Inputs 3 (one used for internal current shunt)
Range –50 to +50mV
Resolution <50µV
Accuracy ±0.5% at 25°C [77°F], ±1% over rated temperature
range
Maximum Cable Length 10m (32 feet)
Connector RJ45

Data-Voice-Video 3G Power Solutions Installation Guide
74 Copyright © 2005-2012 Eaton Corporation. All Rights Reserved.
IPN 997-00012-54D November 2012
Battery Mid-point Monitoring (SC200 only)
Number of Strings Standard:
Maximum: 4 24 (with additional IOBGP-01 I/O boards)
Range –35V to +35V
Resolution <30mV
Accuracy ±0.5% at 25°C [77°F], ±1% over rated temperature
range
Maximum Cable Length 20m (65 feet)
Low Voltage Disconnect (IOBGP)
Number of contactor connections 2 per IOBGP I/O board
Number of LVD channels SC100 systems: 2, SC200 systems: 16
Contactor Type Normally Open (NO) or Normally Closed (NC)*, with or without auxiliary contacts.
* For NC contactor operation the SC100 and IOBGP must be powered from the battery side of the LVD.
Contactor Coil Voltage (nominal) With auxiliary contacts: 12V, 24V or 48V
Without auxiliary contacts: Equal to nominal system voltage
Maximum Hold-in Current 1.2A (per contactor)
Maximum Cable Length 3m (10 feet)
Connector MTA156 (4-way)
Communications
USB (SC200 only) Version:
Connector:
1.1 (12Mbits/s)
USB B (female)
RS232 Interface:
Connector:
RS232 (DTE)
DB9M
Ethernet (SC200 only) Interface:
Connector:
Protocols:
10baseT
RJ45
TCP/IP, SNMP, S3P over IP, http (Web), https (secure Web), SNTP, Modbus-TCP, Serial Server
MAC Address: See details in the System
Controller Operation Handbook.
Web browser: Microsoft Internet Explorer 8 or later (IE6 is compatible but with reduced performance), Mozilla Firefox 3.0 or later.
External modem options Type:
Operation:
PSTN or GSM
Dial in/Dial out on alarm*
* Can operate as a backup for Ethernet communications (SC200 only).

Appendix C
Cable Ratings
Copyright © 2005-2012 Eaton Corporation. All Rights Reserved.
IPN 997-00012-54D November 2012 75
A p p e n d i x C
Cabl e R ati ngs
18 mm DIN rail MCB's
Eaton Part Number*
Chint NB1 Series Max Load Current 80% of Current Rating
Minimum cable size
307-900600-61 Chint, NB1-63 UL Series, 6A, Curve 4.8A 1mm2 / 16AWG
307-901000-61 Chint, NB1-63 UL Series, 10A, Curve 8A 1.25mm2 / 16AWG
307-901600-61 Chint, NB1-63 UL Series, 16A, Curve 12.8A 2.5mm2 / 12AWG
307-902000-61 Chint, NB1-63 UL Series, 20A, Curve 16A 4mm2 / 10AWG
307-902500-61 Chint, NB1-63 UL Series, 25A, Curve 20A 4mm2 / 10AWG
307-903200-61 Chint, NB1-63 UL Series, 32A, Curve 25.6A 6mm2 / 8AWG
307-904000-61 Chint, NB1-63 UL Series, 40A, Curve 32A 10mm2 / 6AWG
307-905000-61 Chint, NB1-63 UL Series, 50A, Curve 40A 16mm2 / 4AWG
307-906300-61 Chint, NB1-63 UL Series, 63A, Curve 50.4A 16mm2 / 4AWG
27 mm DIN rail MCB's
Eaton Part Number*
Chint DZ158-125 Series Max Load Current 80% of Current Rating
Minimum cable size
307-908019-61 Chint, DZ158-125 Series, 80A, Curve 64A 25mm2 / 2AWG
307-910019-61 Chint, DZ158-125 Series, 100A, Curve 80A 35mm2 / 1AWG
307-912519-61 Chint, DZ158-125 Series, 125A, Curve 100A 50mm2 / 0AWG
* or local equivalent. Please contact your local Eaton sales office.

Data-Voice-Video 3G Power Solutions Installation Guide
76 Copyright © 2005-2012 Eaton Corporation. All Rights Reserved.
IPN 997-00012-54D November 2012
DIN Fuse Links
Eaton Part Number
DIN Fuses Max Load Current 75% of Current Rating
Minimum cable size
305-910034-00 DIN00 Fuse link, 100A 75A 35mm2 / 1AWG
305-912534-00 DIN00 Fuse link, 125A 93A 50mm2 / 0AWG
305-916034-00 DIN00 Fuse link, 160A 120A 70mm2 /000AWG
305-920034-02 DIN02 Fuse link, 200A 150A 120mm2 / 250KCMIL
305-925034-02 DIN02 Fuse link, 250A 187A 150mm2 / 300KCMIL
305-931534-02 DIN02 Fuse link, 315A 236A 240mm2 / 500KCMIL
305-940034-02 DIN02 Fuse link, 400A 300A 300mm2 / 600KCMIL
305-940034-03 DIN03 Fuse link, 400A 300A 300mm2 / 600KCMIL
305-950034-03 DIN03 Fuse link, 500A 375A 2*150mm2 /
2*300KCMIL
305-963034-03 DIN03 Fuse link, 630A 472A 2*240mm2 /
2*500KCMIL
305-980034-04 DIN04 Fuse link, 800A 600A 2*300mm2 /
2*600KCMIL
305-910034-04 DIN04 Fuse link, 1000A 750A 4*150mm2 /
4*300KCMIL
305-912534-04 DIN04 Fuse link, 1250A 937A 4*240mm2 /
4*500KCMIL
305-916034-05 DIN04A Fuse link, 1600A 1200A 4*300mm2 /
4*600KCMIL
305-916037-00 EFEN Fuse, NH-SI 4A 1600A, P/N
35097.0110 1200A 4*300mm2 /
4*600KCMIL

Appendix D
Controller Menus
Copyright © 2005-2012 Eaton Corporation. All Rights Reserved.
IPN 997-00012-54D November 2012 77
A p p e n d i x D
Controller M enus
SC200 Menu
At each menu screen press Enter to access the associated configuration menu screen(s).
These menus have multiple configuration menu screens. See details in the System Controller Operation Handbook.

Data-Voice-Video 3G Power Solutions Installation Guide
78 Copyright © 2005-2012 Eaton Corporation. All Rights Reserved.
IPN 997-00012-54D November 2012
SC100 Menu
The following diagram shows the Status Screens and main navigation.
See Analog System Values for details of the values displayed.
Any active alarms are displayed in rotation.
Scroll to show any other rectifiers.
List of any active alarms.
Operate control processes.
SC100, I/O board and rectifier identity information.
Configure control processes.
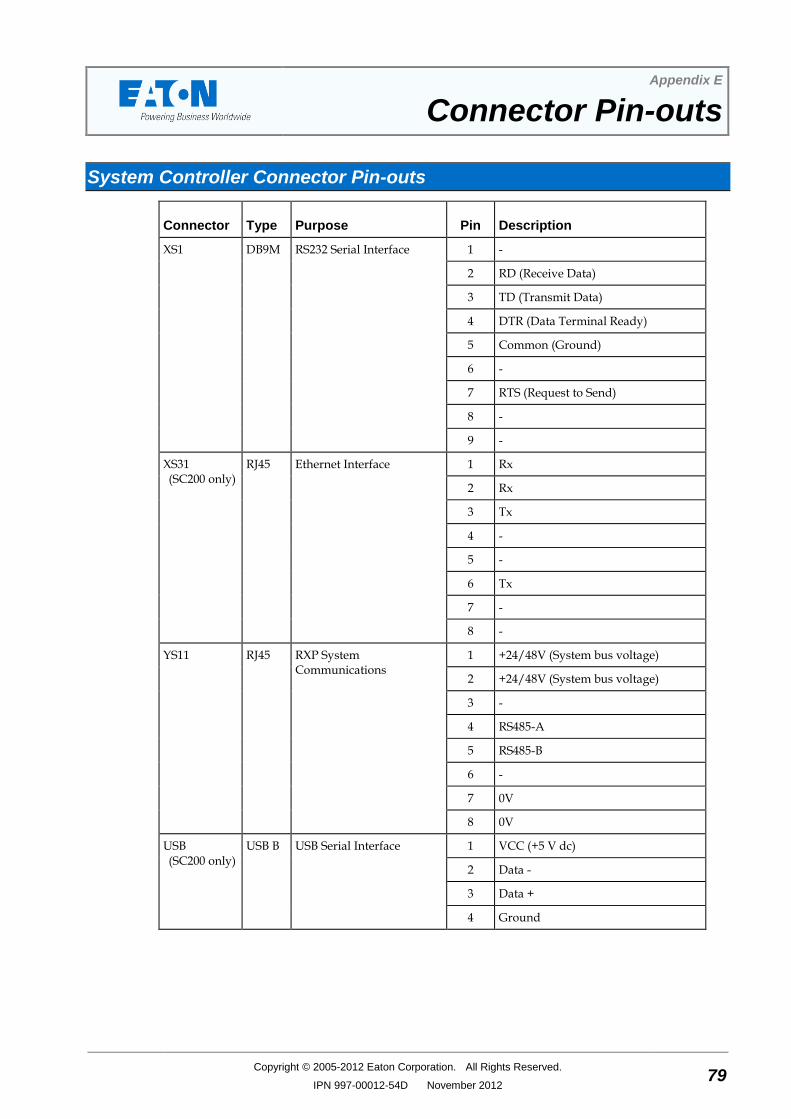
Appendix E
Connector Pin-outs
Copyright © 2005-2012 Eaton Corporation. All Rights Reserved.
IPN 997-00012-54D November 2012 79
A p p e n d i x E
Connector Pi n-outs
System Controller Connector Pin-outs
Connector Type Purpose Pin Description
XS1 DB9M RS232 Serial Interface 1 -
2 RD (Receive Data)
3 TD (Transmit Data)
4 DTR (Data Terminal Ready)
5 Common (Ground)
6 -
7 RTS (Request to Send)
8 -
9 -
XS31 (SC200 only)
RJ45 Ethernet Interface 1 Rx
2 Rx
3 Tx
4 -
5 -
6 Tx
7 -
8 -
YS11 RJ45 RXP System Communications
1 +24/48V (System bus voltage)
2 +24/48V (System bus voltage)
3 -
4 RS485-A
5 RS485-B
6 -
7 0V
8 0V
USB (SC200 only)
USB B USB Serial Interface 1 VCC (+5 V dc)
2 Data -
3 Data +
4 Ground

Data-Voice-Video 3G Power Solutions Installation Guide
80 Copyright © 2005-2012 Eaton Corporation. All Rights Reserved.
IPN 997-00012-54D November 2012
8
1
1 8
RS232 D9M and RJ45 connector pin-outs RJ45 plug pin-outs
I/O Board (IOBGP-00, -01) Connector Pin-outs
See input and output specifications on page 69.
Connector Type Purpose Pin Description
XH4 MTA 156
LVD 1 Interface 1 Coil -
2 Coil +
3 LVD 1 auxiliary switch
4 Auxiliary switch common
XH5 MTA 156
LVD 2 Interface 1 Coil -
2 Coil +
3 LVD 2 auxiliary switch
4 Auxiliary switch common
XH6 RJ45 Current Sense Inputs 1 Current Input 1 Common
2 Current Input 1
3 +12V out
4 Current Input 2 Common
5 Current Input 2
6 0V out
7 Current Input 3 Common
8 Current Input 3
XH7 RJ45 Temperature Sense Inputs 1 -
2 -
3 -
4 Temp Sense 1+
5 Temp Sense 1-
6 -
7 Temp Sense 2+
8 Temp Sense 2-

Connector Pin-outs
Copyright © 2005-2012 Eaton Corporation. All Rights Reserved.
IPN 997-00012-54D November 2012 81
Connector Type Purpose Pin Description
XH8 MTA 156
LVD Power 1 Bus live
2 Common
XH9 MTA 156
Bus Voltage Sense Input 1 Controller reference (Live)
2 Controller sense (Com)
XH12A MTA 156
Battery Mid-point Monitoring sense inputs (SC200 only)
1 String 1 Mid-point
2 String 2 Mid-point
3 String 3 Mid-point
4 String 4 Mid-point
XH15A Digital inputs D1-D3 1 D1 input
2 0V
3 D2 input
4 0V
5 D3 input
6 0V
XH15B Digital inputs D4-D6 1 D4 input
2 0V
3 D5 input
4 0V
5 D6 input
6 0V
XH16/XH17 Digital relay outputs 1-2 1 Relay 1 normally closed (NC)
2 Relay 1 normally open (NO)
3 Relay 1 Common (COM)
4 Relay 2 normally closed (NC)
5 Relay 2 normally open (NO)
6 Relay 2 Common (COM)
XH18/XH19 Digital relay outputs 3-4 1 Relay 3 normally closed (NC)
2 Relay 3 normally open (NO)
3 Relay 3 Common (COM)
4 Relay 4 normally closed (NC)
5 Relay 4 normally open (NO)
6 Relay 4 Common (COM)

Data-Voice-Video 3G Power Solutions Installation Guide
82 Copyright © 2005-2012 Eaton Corporation. All Rights Reserved.
IPN 997-00012-54D November 2012
Connector Type Purpose Pin Description
XH20/XH21 Digital relay outputs 5-6* 1 Relay 5 normally closed (NC)
2 Relay 5 normally open (NO)
3 Relay 5 Common (COM)
4 Relay 6 normally closed (NC)
5 Relay 6 normally open (NO)
6 Relay 6 Common (COM)
YH3 RJ45 DC power system digital inputs
1 Load Fuse Fail
2 Battery Fuse Fail
3 +12V out
4 AC Distribution Fan Fail
5 AC Distribution MOV Fail
6 0V out (system live - protected)
7 -
8 System common - protected
YH11 RJ45 RXP System Communications
1 +24/48V (System bus voltage)
2 +24/48V (System bus voltage)
3 -
4 RS485-A
5 RS485-B
6 -
7 0V
8 0V
* Digital Output 6 is also used as the Monitor Fail alarm relay. It will de-energize if the I/O board loses power or loses communication with the SC200 or SC100.
8
1
1 8
RJ45 connector pin-outs RJ45 plug pin-outs

Appendix F
System Components
Copyright © 2005-2012 Eaton Corporation. All Rights Reserved.
IPN 997-00012-54D November 2012 83
A p p e n d i x F
System C omponents
External Current Sensors
CS04-A11 current sensor
Current rating: > 500A
Mounting: Screws (supplied) to the LIVE bus
Output signal: 60mV at maximum rated current
Communication cable: 8m (26’) RJ45 (supplied)
Extension PCB: For measurement on very large busbars
Busbar material: Copper or Aluminum
CS04 Current Sensor Extension PCB (optional)
Current Sensor Pickup Contacts
Temperature sensing inductor
Potentiometer for fine-tuning the Current Sensor Gain
RJ45 Current Sense Signal Output (XU1) – to supervisory module (via intermediate current sensor, if fitted)
RJ45 Current Sense Signal Input (XU2) – from other current sensor (if fitted)
For full information on installing the CS04-A11 Current Sensors see Application Note AN0046.
To receive application notes see Worldwide Support on page 103.

Data-Voice-Video 3G Power Solutions Installation Guide
84 Copyright © 2005-2012 Eaton Corporation. All Rights Reserved.
IPN 997-00012-54D November 2012

Appendix G
Transient Protection
Copyright © 2005-2012 Eaton Corporation. All Rights Reserved.
IPN 997-00012-54D November 2012 85
A p p e n d i x G
Transi ent Protecti on
To prevent damage to Eaton Data-Voice-Video 3G Power Solutions from lightning and transient over-voltages, structural lightning protection and transient protection must be installed at each site.
Transient protection will also protect against other sources of transients, such as:
Circuit or grid switching by the power company
Electrical switching of large inductive loads (such as motors, transformers, and electrical drives) or capacitive loads (such as power factor correction) or manufacturing equipment.
Use a suitably qualified consultant to develop a transient protection plan (compliant with IEC 61643-12) for the equipment to be installed at the site. The transient protection plan and associated installation must:
1 Capture the lightning strike at a known and preferred point outside the building
2 Conduct the main lightning energy safely to earth
3 Dissipate the lightning energy into a low impedance earthing system
4 Eliminate earth potential differences inside the building
5 Protect the ac supply using a coordinated transient voltage surge suppression plan, that includes:
Primary surge protection
Secondary surge protection
Primary / secondary surge decoupling coils
Secondary / tertiary surge decoupling coils
6 Protect the data and control lines using a coordinated transient voltage surge suppression plan
Earthing (Grounding)
The most important aspect of any power system installation at a site is the integrity of the earthing systems. Effective earthing will significantly increase site protection. Most sites have a number of earthing systems such as:
AC Power earth
DC Power earth
Tower / building lightning protection earth
For optimum protection, all earths must be brought together at one "star" point. Otherwise, surge currents can flow within the system creating large voltages. These can cause damage to equipment that does not normally require surge protection, such as rectifier outputs and communications interfaces.
If there is a tower on the site then use the tower earth as the "star" point. This is because it conducts the majority of the surge to earth, especially if the site is lightning-prone. For other sites, a 'direct-lightning' earth will not be available therefore a structural or power system earth will be used. In multi-floor buildings, always try to use structural earths if the common earth point cannot be found at ground level. For basements / single floor buildings, the ac supply earth is usually the most appropriate.

Data-Voice-Video 3G Power Solutions Installation Guide
86 Copyright © 2005-2012 Eaton Corporation. All Rights Reserved.
IPN 997-00012-54D November 2012
Primary Transient Protection
Primary transient protection must be considered at all sites. Eaton recommends primary transient protection on the incoming ac supply either at the main ac switchboard or sub-switchboard.
In the absence of sufficient information, primary transient protective devices with a minimum repeat strike rating of 100kA (8/20μs wave shape) are recommended.
In addition, primary transient protection must be coordinated with downstream secondary transient protection via suitably rated surge decoupling coils. These should have been specified as part of the transient protection plan for the site. If no surge decoupling coils were specified,
then air-core 15 H surge decoupling coils are suitable.
Installation
Install the transient protection according to the following diagram.
Supply transformer
Building entrance
Main switchboard
Fuses
Primary transient protection (refer to text for rating)
Building earth/ground busbar
Primary/secondary surge decoupling coils (4, refer to text for rating)
AC sub-switchboard or DV2-3G dc power system
Secondary transient protection
MOVs (3, phase-neutral, refer to text for rating)
Spark gap (neutral-earth)
Switchboard earth/ground busbar
Secondary/Tertiary surge decoupling
coils (4 x 11 H minimum)
Access Power Rectifiers

Transient Protection
Copyright © 2005-2012 Eaton Corporation. All Rights Reserved.
IPN 997-00012-54D November 2012 87
Transient protective devices are fitted with alarm contacts and visual indicators. Monitor the status of all externally installed transient protective devices. Either:
Regularly inspect the visual indicators
Connect the alarm contacts to the MOV Fail termination on the I/O board (preferred option) or to the building management system. See the Connections diagram on page 7 for location of MOV Fail termination (YH3) and connector pin-outs on page 80.
The alarm signal lines of the external transient protective devices must be isolated from the ac supply (by voltage-free relay contacts) before connecting these signal lines to the DV2-3G dc power system.
Secondary Transient Protection
Secondary transient protection (downstream from the primary transient protection) must be present at all sites to protect the dc power system from transients.
Data-Voice-Video 3G Power Solutions are factory-fitted with secondary transient protection. This will protect the power system from a limited number of repeated 15kA transients (8/20µs wave shape).
Factory-fitted secondary transient protection consists of:
Phase-to-neutral metal oxide varistors (MOVs) with a voltage rating of 440V, capable of withstanding temporary over-voltages
A neutral-to-earth spark gap (gas discharge tube)
Surge decoupling coils
If secondary transient protection is not fitted inside the Data-Voice-Video 3G Power Solutions, then external secondary transient protection must be installed in the ac switchboard that supplies the dc power system.
Carefully consider the residual voltage seen by the dc power system (maximum 6kV) and the decoupling between the transient protection system and the dc power system. Transients must be limited to less than 2kA.
Tertiary Transient Protection
Eaton rectifiers are fitted with 6kV/3kA transient protection. This is designed to protect the rectifiers from voltage spikes generated during operation of the upstream transient protection system. Do not install rectifiers without adequate upstream surge protection.

Data-Voice-Video 3G Power Solutions Installation Guide
88 Copyright © 2005-2012 Eaton Corporation. All Rights Reserved.
IPN 997-00012-54D November 2012

Appendix H
Commissioning
Copyright © 2005-2012 Eaton Corporation. All Rights Reserved.
IPN 997-00012-54D November 2012 89
A p p e n d i x H
Commissioning
Complete the tasks in this appendix only if a formal commissioning test is required.
Before starting these Commissioning tasks:
Complete all the Installation tasks (see details)
Complete all the Start-Up tasks (see details on page 38)
Save a copy of the configuration file.
Complete the Commissioning tasks in the following order:
During the testing, note any changes to the configuration file that are incorrect.
Task Description Reference
1 Analog Inputs See details on page 90
2 System Controls See details on page 92
3 System Alarms See details on page 95
4 Digital Inputs See details on page 98
5 Digital Outputs (Relays) See details on page 99
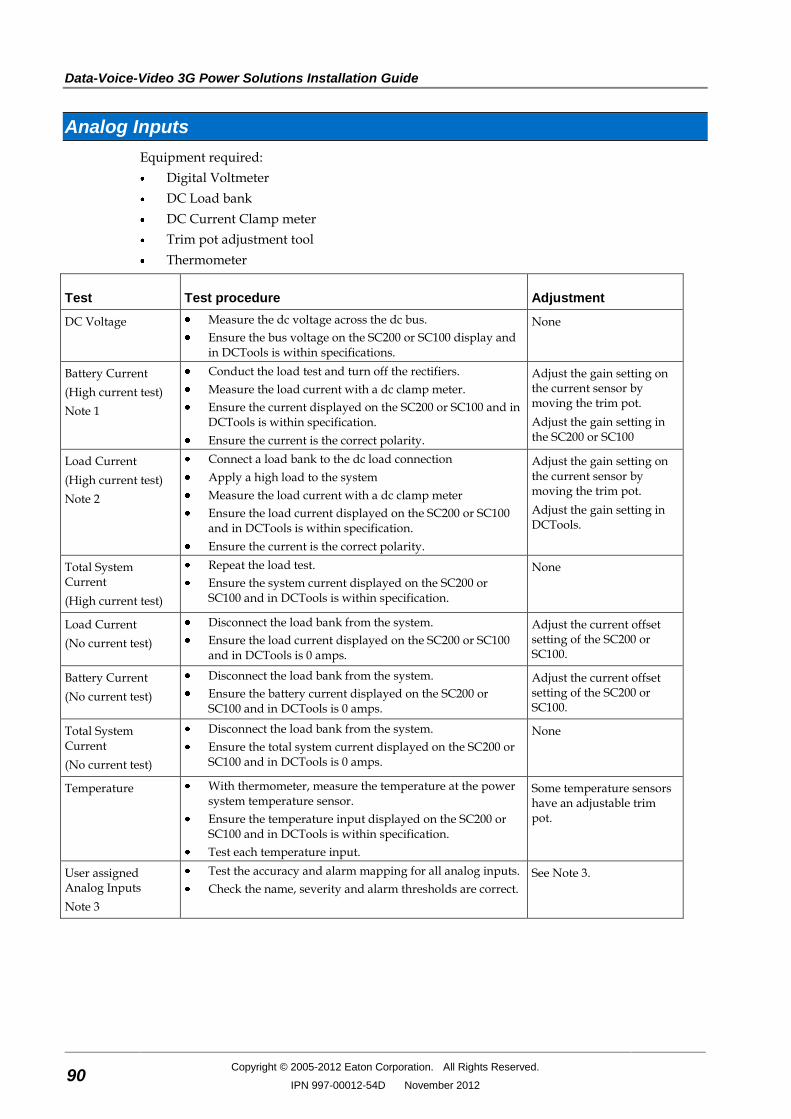
Data-Voice-Video 3G Power Solutions Installation Guide
90 Copyright © 2005-2012 Eaton Corporation. All Rights Reserved.
IPN 997-00012-54D November 2012
Analog Inputs
Equipment required:
Digital Voltmeter
DC Load bank
DC Current Clamp meter
Trim pot adjustment tool
Thermometer
Test Test procedure Adjustment
DC Voltage Measure the dc voltage across the dc bus.
Ensure the bus voltage on the SC200 or SC100 display and in DCTools is within specifications.
None
Battery Current
(High current test)
Note 1
Conduct the load test and turn off the rectifiers.
Measure the load current with a dc clamp meter.
Ensure the current displayed on the SC200 or SC100 and in DCTools is within specification.
Ensure the current is the correct polarity.
Adjust the gain setting on the current sensor by moving the trim pot.
Adjust the gain setting in the SC200 or SC100
Load Current
(High current test)
Note 2
Connect a load bank to the dc load connection
Apply a high load to the system
Measure the load current with a dc clamp meter
Ensure the load current displayed on the SC200 or SC100 and in DCTools is within specification.
Ensure the current is the correct polarity.
Adjust the gain setting on the current sensor by moving the trim pot.
Adjust the gain setting in DCTools.
Total System Current
(High current test)
Repeat the load test.
Ensure the system current displayed on the SC200 or SC100 and in DCTools is within specification.
None
Load Current
(No current test)
Disconnect the load bank from the system.
Ensure the load current displayed on the SC200 or SC100 and in DCTools is 0 amps.
Adjust the current offset setting of the SC200 or SC100.
Battery Current
(No current test)
Disconnect the load bank from the system.
Ensure the battery current displayed on the SC200 or SC100 and in DCTools is 0 amps.
Adjust the current offset setting of the SC200 or SC100.
Total System Current
(No current test)
Disconnect the load bank from the system.
Ensure the total system current displayed on the SC200 or SC100 and in DCTools is 0 amps.
None
Temperature With thermometer, measure the temperature at the power system temperature sensor.
Ensure the temperature input displayed on the SC200 or SC100 and in DCTools is within specification.
Test each temperature input.
Some temperature sensors have an adjustable trim pot.
User assigned Analog Inputs
Note 3
Test the accuracy and alarm mapping for all analog inputs.
Check the name, severity and alarm thresholds are correct.
See Note 3.

Commissioning
Copyright © 2005-2012 Eaton Corporation. All Rights Reserved.
IPN 997-00012-54D November 2012 91
Notes
1 When the rectifiers are turned off, the battery current will supply all the current to the load. At this time the battery current will equal the load current. This test assumes there is a current sensor on the dc Load Bus. If batteries are not installed on the system, connect the load bank to the battery bus. If the battery current is determined by a summation, conduct the load current test before the battery current test.
2 The test should be done at the maximum expected system load current. This test assumes there is a current sensor on the dc load bus.
3 As the analog inputs can be configured for many different types of analog signal, tests have not been detailed on this test sheet. User assigned analog inputs are not available on all systems.

Data-Voice-Video 3G Power Solutions Installation Guide
92 Copyright © 2005-2012 Eaton Corporation. All Rights Reserved.
IPN 997-00012-54D November 2012
System Controls
Equipment Required:
DC Load bank
Test Test procedure Adjustment
Voltage Control
Note 1
Apply a load to the power system.
With DCTools, ensure the bus voltage matches the Target Voltage as shown on the Voltage Control Summary of DCTools.
None
Temperature Compensation
Note 2
Heat the battery temperature sensor.
Ensure the system voltage changes in accordance with the configured slope.
None
Equalize Set the Equalize Duration to 1 minute.
Start an Equalize.
Ensure the system voltage increases to the Equalize Voltage.
Ensure the SC200 or SC100 indicates an Equalize has started.
Ensure the Equalize stops after the 1 minute duration.
Return the Equalize duration to the original setting.
None
Fast Charge
Note 3
Set the Fast Charge Max Duration to 1 minute.
Set the Fast Charge Voltage Threshold to a value approximately 1V below the system float voltage.
Connect load to the system.
Turn off the ac to the system.
Allow the system voltage to fall below the Fast Charge Voltage Threshold.
Turn on the ac.
Ensure the system performs a Fast Charge.
Ensure the SC200 or SC100 indicates a Fast Charge has started.
Ensure the Fast Charge Voltage is correct.
Ensure the Fast Charge stops after 1 minute.
Return the Fast Charge settings to the original values.
None
Generator Control Option (SC200 only)
Note 4
Set the Voltage Threshold to a value approximately 1V below the system float voltage.
Connect load to the system.
Turn off the ac to the system.
Allow the system voltage to fall below the Voltage Threshold.
Ensure the system performs a Fast Charge.
Ensure the SC200 indicates a Generator Enable.
Ensure the Generator Enable digital output activates.
Turn on the ac.
Ensure the Generator Enable stops after 1 minute.
Return the settings to the original values.
None
Battery Current Limit
Note 5
Reduce the Battery Current Limit setting to 5%.
Connect load to the system.
Turn off the ac to the system.
Allow the battery to discharge for a period.
Turn on the ac.
Monitor the battery current to ensure the Battery Current Limit control process is operating.
None

Commissioning
Copyright © 2005-2012 Eaton Corporation. All Rights Reserved.
IPN 997-00012-54D November 2012 93
Test Test procedure Adjustment
Current Share
Note 6
View the individual rectifier currents with the SC200 or SC100 or DCTools.
Ensure the currents are all at 0 amps.
Connect load to the system.
Ensure that all rectifiers share the load evenly and any variation is within specification.
None
Battery Test Set the Battery Test Interval to 0 days.
Set the Battery Test Duration to 30 minutes
Set the Battery Test Termination Voltage to a value approximately 2 volts below the float voltage.
Connect load to the system.
Start the Battery Test.
Ensure the SC200 or SC100 indicates that a Battery Test has started.
Wait until the system voltage reduces below the Termination Voltage.
Confirm the Battery Test fails.
Ensure the Battery Test Fail alarm is displayed on the SC200 or SC100.
Ensure the Battery Test stops and the system voltage returns to the float voltage setting.
Clear the Battery Test Fail alarm in DCTools.
Set the Battery Test Duration to 1 minute.
Set the Battery Test Termination Voltage to a value approximately 10 volts below the float voltage.
Connect load to the system.
Start the Battery Test.
Ensure the SC200 or SC100 indicates that a Battery Test has started.
Wait for the Battery Test Duration time to expire.
Confirm the Battery Test passes.
Ensure the Battery Test stops and the system voltage returns to the float voltage setting.
Reset the Battery Test settings to the original values.
None
Low Voltage Disconnect – Manual Operation
Note 7
Set the LVD manual control to CONNECT.
Ensure the LVD contactor is connected.
Ensure the SC200 or SC100 displays an LVD Manual alarm.
Ensure the I/O board LVD LED is on.
Set the LVD manual control to AUTO.
Ensure the SC200 or SC100 shows no LVD alarms.
Ensure the I/O board LVD LED is on.
Set the LVD manual control to DISCONNECT.
Ensure the LVD contactor disconnects.
Ensure the SC200 or SC100 displays an LVD Manual alarm.
Ensure the I/O board LVD LED is off.
Set the LVD manual control to AUTO.
Ensure the LVD connects.
Ensure the SC200 or SC100 shows no LVD alarms.
Ensure the I/O board LVD LED is on.
None

Data-Voice-Video 3G Power Solutions Installation Guide
94 Copyright © 2005-2012 Eaton Corporation. All Rights Reserved.
IPN 997-00012-54D November 2012
Test Test procedure Adjustment
Low Voltage Disconnect – Automatic Operation
Note 7
Check the LVD contactor is connected.
Increase the LVD Disconnect Voltage Threshold.
Reduce the system voltage below the LVD Disconnect Voltage Threshold.
Wait for the configured Recognition Period.
Ensure the LVD disconnects.
Ensure the SC200 or SC100 displays an LVD Disconnected alarm
Ensure the I/O board LVD LED is off.
Increase the system voltage above the configured Reconnect Voltage.
Wait for the configured Recognition Period.
Ensure the LVD connects.
Ensure the SC200 or SC100 shows no LVD alarms.
Ensure the I/O board LVD LED is on.
None
Low Voltage Disconnect – Alarms
Note 7
Disconnect each LVD control cable from the I/O board.
Ensure the SC200 or SC100 displays an LVD Fail alarm.
Ensure the I/O board LVD LED is flashing.
Reconnect the cables.
Ensure the LVD connects.
Ensure the SC200 or SC100 shows no LVD alarms.
Ensure the I/O board LVD LED is on.
None
Notes
1 AVC must be enabled. Allow up to 1 minute for the system to stabilize after load or voltage changes.
2 Breathing on the sensor can increase the temperature.
3 Battery Current Limit control process may have to be turned off to allow the Fast Charge voltage to reach its value within the 1 minute test duration.
4 For details see Generator Control Option in the System Controller Operation Handbook.
5 There may be slight current fluctuations above and below the configured current limit setting. This can be due to the current control within the factory preset deadband. Confirmation of this control process may be witnessed in the Fast Charge test.
6 There may be a delay of up to 2 minutes before the currents stabilize between rectifiers.
7 There may be a delay of up to 10 seconds before the LVD changes state. APS systems may not display a Manual Connect alarm on the SC200 or SC100 if the system voltage is above the LVD disconnect voltage. Perform the test on each LVD control module within the system. For manual LVD operation see details in the System Controller Operation Handbook. For an explanation of LVD LED indications see Troubleshooting on page 52.

Commissioning
Copyright © 2005-2012 Eaton Corporation. All Rights Reserved.
IPN 997-00012-54D November 2012 95
System Alarms
Equipment Required:
dc load bank
dc power supply
Test Test procedure Adjustment
General notes about alarm testing
For all alarms check the following where applicable:
SC200 or SC100 LED status.
SC200 or SC100 display indication.
DCTools alarm indication
Remote alarm indication (PowerManagerII, SNMP traps, and so on)
Digital outputs (relays).
Reducing the alarm recognition time will reduce the alarm testing time.
There may be more than 1 method to perform the following alarm tests.
Low Float
Note 1
Increase the Low Float Threshold to just below the float voltage.
Reduce the system voltage by heating the battery temperature sensor
- or -
Disconnect the battery from the system.
Start a Battery Test.
The system voltage will fall.
Ensure alarm operates.
Low Load Test as for the Low Float test. Note that the Low Load Threshold is lower than the Low Float threshold.
Ensure alarm operates.
High Float
Note 1
Set the system Float Voltage above the High Float Threshold.
- or -
Reduce the High Float Threshold and increase the system voltage by starting an Equalize.
- or -
Reduce the High Float Threshold and increase the system voltage by cooling the battery temperature sensor.
Ensure alarm operates.
High Load Increase the system voltage.
Test as for the High Float test.
Note the High Load Threshold is higher than the High Float Threshold
Ensure alarm operates.
Rectifier Fail Turn off a rectifier ac MCB (if fitted).
The rectifier will turn off.
Ensure alarm operates.
Multiple rectifier fail Turn off the ac MCBs to 2 rectifiers (if fitted).
The rectifiers will turn off.
Ensure alarm operates.
Rectifier comms lost Remove a rectifier from the system.
Ensure alarm operates.

Data-Voice-Video 3G Power Solutions Installation Guide
96 Copyright © 2005-2012 Eaton Corporation. All Rights Reserved.
IPN 997-00012-54D November 2012
Test Test procedure Adjustment
Multiple Rectifier comms lost
Remove 2 rectifiers from the system.
Ensure alarm operates.
Partial AC Fail Turn off the ac to more than 20% of the rectifiers in the system.
Ensure alarm operates.
AC Fail Turn off all ac to the system.
Ensure alarm operates.
System Overload Reduce the System Overload Recognition Period to 0 minutes.
Apply load to the system.
Turn off rectifiers until the System Overload Threshold is exceeded.
Ensure alarm operates.
Load Fuse Fail
Note 2
Apply load to the system.
Turn off the MCB feeding the load bank.
Ensure alarm operates.
Battery Fuse Fail Turn off a Battery MCB or remove a Battery Fuse.
Ensure alarm operates.
Battery Test Fail See Battery Test in the System Controller Operation Handbook for details.
MOV Fail Remove a MOV cartridge from the MOV housing (if fitted).
Ensure alarm operates.
ACD Fan Fail Stop the ACD Fan (if fitted).
Ensure alarm operates.
LVD alarms See LVD test on page 92 for details.
Battery Temperature Low
Increase the Battery Temperature Low Threshold above the current temperature.
- or -
Cool the temperature sensor until the threshold is exceeded.
Ensure alarm operates.
Battery Temperature High
Reduce the Battery Temperature High Threshold below the current temperature.
- or -
Heat the battery temperature sensor until the threshold is exceeded.
Ensure alarm operates.
Sensor Fail Disconnect the battery temperature sensor from the I/O board (XH7).
Ensure alarm operates.
Replace the battery temperature sensor.
Disconnect the current sensor (XH6).
Ensure alarm operates.
Replace the current sensor.
Disconnect the voltage sensor (XH9).
Ensure alarm operates.
Replace the voltage sensor.
Equalize For details see Equalize test in System Controls on page 92.

Commissioning
Copyright © 2005-2012 Eaton Corporation. All Rights Reserved.
IPN 997-00012-54D November 2012 97
Test Test procedure Adjustment
Fast Charge For details see Fast Charge test in System Controls on page 92.
Battery Test For details see Battery Test in System Controls on page 92.
In Discharge
Note 3
Connect load to the system.
Turn off the ac supply to the rectifiers.
Allow the battery to start discharging.
Ensure alarm operates.
Config Error
Note 4
Load incorrect configuration file.
- or -
Remove all rectifiers from the system.
Apply an incorrect external voltage to the system:
24V for a 48V system
48V for a 24V system
Ensure alarm operates.
User Assigned Alarms
See User Digital Input test on page 98.
Battery Current Limit
For details see Battery Current Limit test in System Controls on page 92.
Rectifier No Load Ensure the dc load and batteries are isolated from the system.
Ensure alarm operates.
Rectifier Current Limit
Apply a dc load to the system.
Turn off rectifiers until the remaining rectifiers reach the Rectifier Current Limit threshold.
- or -
Set the Rectifier Current Limit slightly below the existing rectifier current being delivered to the load.
Ensure alarm operates.
High Rectifier Temperature
Note 5
Unable to test.
AC Phase 1/2/3 Fail
Note 6
Turn off ac phase 1 to the power system.
Ensure alarm operates.
Repeat for phase 2 and phase 3.
AC Phase 1/2/3 Voltage
Note 6
Reduce the High AC Threshold below the existing ac voltage.
Ensure alarm operates.
Increase the Low AC Threshold above the existing ac voltage.
Ensure alarm operates.
AC Frequency
Note 6
Change the Nominal AC Frequency setting.
Change the AC Frequency Threshold.
Ensure alarm operates.
Engine Run Option
Note 7
Change the state of the digital input with Engine Run function.
Ensure alarm operates.

Data-Voice-Video 3G Power Solutions Installation Guide
98 Copyright © 2005-2012 Eaton Corporation. All Rights Reserved.
IPN 997-00012-54D November 2012
Notes
1 Ensure Alarm Tracking is disabled. Ensure Temperature Compensation is enabled.
2 If the load is not connected to the load MCBs and if an electronic Fuse Fail detect circuits is installed, this test can also be performed as follows:
Turn off the load MCB
Connect a high impedance path >100k ) between the end load side of the MCB and the Common Bus. (The impedance path can also be created by touching these points with your hand.)
3 Ensure the battery discharge is high enough. Allow for the recognition time.
4 This alarm will be displayed if the incorrect configuration or incorrect rectifiers are used in the system. It is not recommended that this be tested as it is very unlikely for an incorrect configuration to be installed after commissioning.
5 This alarm is originated from the rectifier. It can only be tested by increasing the internal temperature of the rectifier.
6 These alarms are only available with the external ac metering option.
7 A digital input must be configured for this test to function. See details in the System Controller Operation Handbook.
Digital Inputs
Test Test procedure Adjustment
Digital Input 1 Change the state of the Digital input.
Ensure any alarms mapped to the digital output (relay) activate.
Ensure the Digital Input Alarm Name is correct.
Digital Input 2 As for Digital Input 1.
Digital Input 3 As for Digital Input 1.
Digital Input 4 As for Digital Input 1.
Digital Input 5 As for Digital Input 1.
Digital Input 6 As for Digital Input 1.
User Assigned Digital Inputs
Note 1
As for Digital Input 1.
Check the severity and digital output (relay) mapping is correct.
Notes
1 As the Digital Inputs can be configured for many different digital input devices, specific tests have not been detailed on this test sheet.

Commissioning
Copyright © 2005-2012 Eaton Corporation. All Rights Reserved.
IPN 997-00012-54D November 2012 99
Digital Outputs (Relays)
Test Test procedure Adjustment
Digital Output 1
Note 1
Refer to Digital Outputs in the SC200 or SC100 handbook. Follow the instructions to manually change the state of the digital output.
When the digital output is Active, check any remote alarms are extended.
When the digital output is Inactive, check any remote alarms are return to their original state.
Digital Output 2 As for Digital Output 1.
Digital Output 3 As for Digital Output 1.
Digital Output 4 As for Digital Output 1.
Digital Output 5 As for Digital Output 1.
Digital Output 6
Note 2
As for Digital Output 1.
User assigned Digital Outputs
As for Digital Output 1.
Notes
1 Digital Outputs can also be checked as other system tests are performed.
2 Digital Output 6 is also used as the Monitor Fail alarm relay. It will de-energize if the I/O board loses power or loses communication with the SC200 or SC100. Test extended alarms by removing the power to the I/O board. This will de-energize the relay.
Commissioning Completed
Restore the original (backed-up prior to the testing) configuration file.
Use DCTools to change any configuration file settings that were noted as incorrect during the Commissioning tests.

Data-Voice-Video 3G Power Solutions Installation Guide
100 Copyright © 2005-2012 Eaton Corporation. All Rights Reserved.
IPN 997-00012-54D November 2012

Copyright © 2005-2012 Eaton Corporation. All Rights Reserved.
IPN 997-00012-54D November 2012 101
Equipment Inci dent Report
EQUIPMENT INCIDENT REPORT
Please enter as much information as you can. Send the completed form, together with the item for repair to your nearest authorized service agent. NOTE: Only one fault to be recorded per form.
For further information contact your local Eaton dc product supplier or Eaton (see contact details on page 103). Or email: [email protected]
Date: ________________
Customer Information
Company: _______________________________________________________________________
Postal Address: _______________________________________________________________________
_______________________________________________________________________
Return Address: (Not PO Box)
_______________________________________________________________________
_______________________________________________________________________
Telephone: _______________ Fax: _______________ Email: _________________
Contact Name: _______________________________________________________________________
Location of Failure
Product code: ___________ Serial number: __________ Document number: _____________
System type installed in: _________________________ Serial number: _____________
Site name or location: __________________________________________________________
Fault discovered Delivery Unpacking Installation
Initial test Operation after _____ years Other _______________
Failure source Design Manufacturing Documentation
Transportation Installation Handling
______________
Effect on system operation None Minor Major _______________________
INFORMATION (fault details, circumstances, consequences, actions)
______________________________________________________________________________________
______________________________________________________________________________________
______________________________________________________________________________________
______________________________________________________________________________________
______________________________________________________________________________________
Internal use only.
Reference No: __________ RMA: __________ NCR: _________ Signature: _________________ Date: _____________

102 Copyright © 2005-2012 Eaton Corporation. All Rights Reserved.
IPN 997-00012-54D November 2012
INFORMATION continued (fault details, circumstances, consequences, actions)
______________________________________________________________________________________
______________________________________________________________________________________
______________________________________________________________________________________
______________________________________________________________________________________
______________________________________________________________________________________
______________________________________________________________________________________
______________________________________________________________________________________
______________________________________________________________________________________
______________________________________________________________________________________
______________________________________________________________________________________
______________________________________________________________________________________
______________________________________________________________________________________
______________________________________________________________________________________
______________________________________________________________________________________
______________________________________________________________________________________
______________________________________________________________________________________
______________________________________________________________________________________
______________________________________________________________________________________
______________________________________________________________________________________
______________________________________________________________________________________
______________________________________________________________________________________
______________________________________________________________________________________
______________________________________________________________________________________
______________________________________________________________________________________
______________________________________________________________________________________
______________________________________________________________________________________
______________________________________________________________________________________
______________________________________________________________________________________
______________________________________________________________________________________
______________________________________________________________________________________
______________________________________________________________________________________
______________________________________________________________________________________
______________________________________________________________________________________
SG/03 ISS06

Worldwide Support
Copyright © 2005-2012 Eaton Corporation. All Rights Reserved.
IPN 997-00012-54D November 2012 103
Worldwide Support
For product information and a complete listing of worldwide sales offices, visit Eaton's website at: dcpower.eaton.com or email: [email protected]
For technical support contact either your local Eaton dc product representative, the closest office from the following list, telephone (+64) 3-343-7448, or email [email protected]
Australia: 1300-877-359
Canada: 1-800-461-9166
Central America: +52 55-9000-5252
China: +86 755-2757-2666 - extension 3024
Europe / Middle East / Africa: +44 1243-810-500
Hong Kong / Korea / Japan: +852 2745-6682
India: +91 11-4223-2325
New Zealand 0508 NZ Service (0508-697-378)
Singapore / South East Asia: +65 6825-1668
South America: +54 11-4124-4000
South Pacific: +64 3-343-7448
Taiwan: +886 2-6600-6688 or free call 0800-038-168
United States of America (Toll Free): 1-800-843-9433 - option 2 - option 6

Data-Voice-Video 3G Power Solutions Installation Guide
104 Copyright © 2005-2012 Eaton Corporation. All Rights Reserved.
IPN 997-00012-54D November 2012

Index
Copyright © 2005-2012 Eaton Corporation. All Rights Reserved.
IPN 997-00012-54D November 2012 105
Index
?
??? on SC200 or SC100 Display • 47
A
AC Earth
AC-DC Earth Connection • 22
Site Earth • 17
AC Supply
AC Discrimination • 17
AC Isolator • 2
AC MCB • 2
Connection to AC Supply • 33, 39
Earth Leakage Current • 17, 69
High AC Voltage Protection • 17
Specifications • 69
Startup • 39
Transient Voltage Protection • 17, 85
Tripping Curve • See AC Discrimination
Accessories • See Spares
Alarms
Audible Alarm Indication • 47
LEDs (SC200 or SC100) • 47
LVD Status LED • 6, 55
Monitor OK Alarm • 6
Rectifier Alarms • 3, 39
Rectifier LEDs • 3
Relays • See Digital Outputs (Relays)
SC200 or SC100 Alarms • 39, 47
Sound • See Audible Alarm Indication
APR-3G Series Rectifiers • See Rectifiers
Audible Alarm Indication • 47
B
Battery
Battery Charging • 41
Battery Fuses • 2, 25, 32, 54, 58
Disposal and Recycling • 64
Location • 2
Mid-Point Monitoring (MPM) • 9, 27, 74
Reverse Polarity • 41
Shelves • 27
String Fail Alarm • 9, 55, 63
Temperature Sensor • 6, 7, 30, 73
Time Remaining • 9
Battery Circuit Breakers • 54
Connecting to MCBs • 25
Location • 2
Browsers (recommended) • 5
Bus Voltage
Bus Voltage Sense • 6
C
Characterization of LVD • 61
Circuit Breakers
Battery Circuit Breakers • 54
Connecting to MCBs • 25
Load Circuit Breakers • 24, 54
Location • 2
Replacing or Adding a Load MCB • 57
Clearances • 20
Commissioning • 89
Communications • 4, 74
Browsers (recommended) • 5
Communications Options • 8
Connector • 4, 7
DCTools • 5, 8, 48, 65
Ethernet Communications • 8
GSM Modem Communications • 8
PSTN Modem Communications • 8
SNMP • 8
USB Communications • 48
Web Server • 8
Configuration File • 40, 44, 59
Backup and Restore • 44
Connection to AC Supply • 33, 39
Current
Rectifier Current • 45
Current Sense • 6, 7, 8, 31, 73
External Current Sensor • 31, 83
D
Damage (transport) • 14, 38
DC Common
AC-DC Earth Connection • 22

Data-Voice-Video 3G Power Solutions Installation Guide
106 Copyright © 2005-2012 Eaton Corporation. All Rights Reserved.
IPN 997-00012-54D November 2012
DCTools • 5, 8, 48, 65
Software Versions • 5
Digital Inputs • 73
Connectors • 6, 7, 80
Digital Outputs (Relays) • 8, 73
Connectors • 6, 7, 80
Discrimination • See AC Discrimination
E
Earth
AC-DC Earth Connection • 22
Earth Leakage Current • 17, 69
Site Earth • 17
Ethernet
Connector • 4, 7
Ethernet Communications • 8
Problems • See Troubleshooting
External Current Sensor • 31, 83
F
Floor
Floor Fixing • 20
Plinth (for raised floors) • 2
Fuse
Battery Fuses • 2, 25, 32, 54, 58
Load Fuses • 24, 54, 58, 59
Rectifier Fuses • See AC Discrimination
G
GSM Modem Communications • 8
H
High AC Voltage Protection • 17
I
Identity Information • 50
Input/Output (I/O) Board
Additional I/O • See SiteSure-3G I/O module
Connections to other system components • 7
Connector Pin-outs • 80
Description • 6
Digital Inputs • 73
I/O Board Mapping • 59, 61
Input/Output Cabling • 31
Location • 2
LVD Status LED • 6, 55
Power On LED • 6, 55, 61
Repair and Return • 101
Replacing the Input/Output Board • 61
K
Keypad
Keypad Access Security • 46
L
LCD • 46
LEDs
LEDs (SC200 or SC100) • 47
LVD Status LED • 6, 55
Power On LED • 6, 55, 61
Rectifier LEDs • 3
Troubleshooting • 52
Lightning Protection • See Transient Voltage Protection
Load Circuit Breakers • 24, 54
Connecting to MCBs • 25
Location • 2
Replacing or Adding a Load MCB • 57
Load Fuses • 24, 54, 58, 59
Low Voltage Disconnect (LVD) • 8
Characterization of LVD • 61
Connectors • 6, 7, 80
LVD Alarms • See Troubleshooting
LVD Status LED • 6, 55
Problems • 55
LVD • See Low Voltage Disconnect (LVD)
M
Main Screen • 45
Mid-Point Monitoring (MPM) • 9, 27, 74
String Fail Alarm • 9, 55, 63
Modem (PSTN, GSM) • See Communications
Monitor OK Alarm • 6
MOVs • See Transient Voltage Protection
Monitoring and replacing MOVs • 63
MOV Fail Alarm • 85
MPM • See Mid-Point Monitoring (MPM)

Index
Copyright © 2005-2012 Eaton Corporation. All Rights Reserved.
IPN 997-00012-54D November 2012 107
N
Network Management System (NMS) • See SNMP
O
Options • 8, See Spares
Output Voltage and Current • 69
P
PC/Laptop (Connection via USB) • See USB Communications
Plinth (for raised floors) • 2
Polarity
Reverse Polarity • 41
Power
System Power • 69
PowerManagerII • 5
Protection
Transient Voltage Protection • 17, 85
PSTN Modem Communications • 8
R
Raised Floor Plinth • See Plinth (for raised floors)
Rectifiers • 72
Description • 3
Earth Leakage Current • 17, 69
Inserting the Rectifiers • 38
Location • 2
Output Voltage and Current • 69
Problems • See Troubleshooting
Rectifier Alarms • 3, 39
Rectifier blank panel • 56
Rectifier Current • 45
Rectifier Fuses • See AC Discrimination
Rectifier LEDs • 3
Rectifier Replacement • 56
Registration • 39
Repair and Return • 101
Startup • 39
System Power • 69
Relays • See Digital Outputs (Relays)
Monitor OK Alarm • 6
Repair and Return • 101
Residual Current Devices (RCD) • 17
Reverse Polarity • 41
RS232 • 48
Connector • 4, 7
Modem (PSTN, GSM) • See Communications
Null-modem RS232 Cable • 65, 66
S
Safety Equipment • See Tools
SC200 or SC100
??? on SC200 or SC100 Display • 47
Configuration File • 40, 44, 59
Connections to other system components • 7
Connector Pin-outs • 79, 80
Description • 4
Identity Information • 50
Keypad • 46
LEDs (SC200 or SC100) • 47
Location • 2
Main Screen • 45
Problems • See Troubleshooting
Repair and Return • 101
Replacing the System Controller • 59
SC200 or SC100 Alarms • 39, 47
Security • See Keypad Access Security
Startup • 45
Security
Keypad Access Security • 46
Security Door • 2
Servicing • 14, 101, 103
SiteSure-3G I/O module • 32
Connection to DV2-3G • 32
SMS Text Messaging • See GSM Modem Communications
SNMP • 8
Software Versions • 5
Sound • See Audible Alarm Indication
Spares • 66
Specifications • 69
String Fail Alarm • 9, 55, 63
System Power • 69
T
Technical Assistance • 103
Temperature
Temperature Sensor • 6, 7, 30, 73

Data-Voice-Video 3G Power Solutions Installation Guide
108 Copyright © 2005-2012 Eaton Corporation. All Rights Reserved.
IPN 997-00012-54D November 2012
Text Messaging (SMS) • See GSM Modem Communications
Time Remaining • 9
Tools • 65
Torque Settings • 67
Transient Voltage Protection • 17, 85
Monitoring and replacing MOVs • 63
MOV Fail Alarm • 85
Troubleshooting • 52
Damage (transport) • 14, 38
Repair and Return • 101
Servicing • 14, 101, 103
Technical Assistance • 103
U
USB
Connector • 4, 7
USB Cable • 48, 66
USB Communications • 48
V
Voltage (Bus) • See Bus Voltage Sense
Voltage Control
Bus Voltage Sense • 6
Voltage Feed Module • 7
W
Web
Browsers (recommended) • 5
Web Server • 8