dc input a0/a1 controller assembly operation/installation ... · devices. the system is also avian...
TRANSCRIPT

Document Number: 9100-127-2799-99 Release Date: 5/31/16
1501 Route 34 South, Farmingdale, NJ 07727
Tel: (732) 919-3119 Fax: (732) 751-5778 www.dialight.com
DO NOT let any supply cords touch hot surfaces higher than cord ratings.
DO NOT mount near gas or electric heaters
Equipment should be mounted in locations and at heights where it will not be subjected to tampering by unauthorized personnel.
The use of accessory equipment not recommended by the manufacturer may cause unsafe conditions.
DO NOT use this equipment for other than intended use.
SAVE THESE INSTRUCTIONS!!
The operation and maintenance must be carried out by authorized personnel.
Repairs and Installation must only be carried out by a qualified electrician.
Only genuine Dialight replacement parts must be used when unforeseen repairs are required.
Observe the national safety rules and regulations during installation!
Earth Grounding is required throughout the install process. Failure to do so could void all warranties!
No alterations should be done without the agreement from Dialight Corp. Alterations other than written in this manual will void all warranties.
DC Input A0/A1 Controller Assembly Operation/Installation Manual
READ AND FOLLOW ALL SAFETY INSTRUCTIONS

1501 Route 34 South, Farmingdale, NJ 07727
Tel: (732) 919-3119 Fax: (732) 751-5778 www.dialight.com
pg. 2
Notice and Warnings:
This manual contains important information regarding the proper installation, operation,
and maintenance of this product. Before using the product, read and understand all
instructions, cautions, notes and warnings, as well as all of the labels affixed to the
product. Failure to do so could result in personal injury or damage to equipment and/or
void the product warranty.
FAILURE TO LEAVE THE ENCLOSURES FREE FROM DEBRIS UPON COMPLETION OF
INSTALLATION MAY CAUSE SHORT CIRCUITS AND VOID THE SYSTEM WARRANTY
CAUTION: ONLY APPROVED PHOTOCELLS CAN BE USED WITH THIS SYSTEM
WARNING: FAILURE TO PROPERLY BOND THE L810 AND L864 LIGHTS AND
CONTROLLER ENCLOSURES TO THE TOWER STRUCTURE WILL RESULT IN EVENTUAL
LIGHTNING DAMAGE OF THIS SYSTEM. THE SYSTEM’S WARRANTY SHALL BE VOID IF
ALL LIGHTS AND CONTROLLER ENCLOSURES ARE NOT PROPERLY BONDED TO THE
TOWER STRUCTURE. TO AVOID WARRANTY NULLIFICATION, FOLLOW THE
DIRECTIONS IN THEIR ENTIRETY.
CAUTION: NEVER LOOK AT THE OBSTRUCTION LIGHTS WHILE THE SYSTEM IS
ENERGIZED. THE LIGHTS COULD ILLUMINATE CAUSING TEMPORARY BLINDNESS
WHICH WOULD BE DANGEROUS AT HIGH ELEVATIONS.

1501 Route 34 South, Farmingdale, NJ 07727
Tel: (732) 919-3119 Fax: (732) 751-5778 www.dialight.com
pg. 3
Introduction This manual is for the installation and configuration of the Dialight DC input A0/A1 Red Controller system. Table of contents:
Front Matter
o Personal hazard warning
o Notice and warnings
o Introduction
1) Operation and Installation
A. System overview
Parts supplied with A0/A1 Low/Medium Intensity Controller
Typical basic system diagrams
Detail view of power supply/controller
B. Installation Procedures – Lighting and Controller
Controller mounting dimensions
Installation requirements
DC input connection to Controller/Power requirements
Connecting L810 and/or L864 lights
Photocell connection
Configuring/Calibrating the Controller
o Calibration of L810/L864 output ports
o Setting flash/steady modes
o Setting flash rate
Connecting alarm dry contacts
2) Troubleshooting
Diagnostics
Troubleshooting Table

1501 Route 34 South, Farmingdale, NJ 07727
Tel: (732) 919-3119 Fax: (732) 751-5778 www.dialight.com
pg. 4
1. Operation and Installation
A. System Overview: Dialight’s LED based Red Obstruction System is ideal for A0 and A1 FAA tower types and can be used to mark other structures as well. The operation of the lights is configurable and fully monitored. The side markers and/or beacons can be run in steady burn or flashing mode, each of two outputs individually mode selectable. The flash rate of the lights is also configurable. The system will support the optional Dialight INEM remote monitor and system controller as well as other approved remote monitoring devices. The system is also avian compliant and will support any A style avian friendly type installations as needed. Parts supplied with A0/A1 Medium Intensity Controller 1x DC Input Controller 4x Cable entry glands 1x ¾ NPT plug 6x 3 position Phoenix connector plugs
Typical Basic System Diagrams
Typical System A0 Connection Configuration

1501 Route 34 South, Farmingdale, NJ 07727
Tel: (732) 919-3119 Fax: (732) 751-5778 www.dialight.com
pg. 5
Typical System A1 or A1 Avian Connection Configuration

1501 Route 34 South, Farmingdale, NJ 07727
Tel: (732) 919-3119 Fax: (732) 751-5778 www.dialight.com
pg. 6
Detail View of the Power Supply/Controller
Figure 1
UN-Calibrate button – Pushing and holding this button will put the controller in “current sense mode,” reading and recording currents on each port DC surge protection – This feature will ensure the controller and lights will withstand power surges in volatile environments Controller PCB – The main circuit board of the system, where connections and selections are made L864/L810 Outputs – These are the two switched DC outputs to connect up to two L864 beacons or up to four L810 units per port DC Input – This terminal block input is used for connection of the 30-60V DC input to the controller Photocell Input – Interfaces the photocell to the system

1501 Route 34 South, Farmingdale, NJ 07727
Tel: (732) 919-3119 Fax: (732) 751-5778 www.dialight.com
pg. 7
Reset Button – Pushing this will reset the microprocessor of the system, will read the calibration settings upon each reset
Flash rate selector DIP Switch Bank – Used to select either 20, 30 or 40 flashes per minute, each at a 50% duty cycle. When all switched are in the down position, Avian mode is selected, specifying that an A1 or A1+1 Avian tower is operating, with 30 flashes per minute and flashing side marker lights. Flash/Steady mode DIP Switch bank – Used to select steady burn or flashing operation of the L864/L810 output ports, individually controlled. Force Day and Force Night buttons – Used to manually select day and night modes of the system Dry Contact Connections – These are the dry contacts of the alarm relays 1, 2, 3 and 4 INEM/Master Input – This is the input for an optional Dialight control/monitoring device or third part approved devices.

1501 Route 34 South, Farmingdale, NJ 07727
Tel: (732) 919-3119 Fax: (732) 751-5778 www.dialight.com
pg. 8
B. Installation Procedures – Lighting and Controller
During installation on the tower, proper grounding techniques must be utilized. The system has built in Lightning and RF immunity at each section, but for it to be effective proper ground connection techniques must be used. For more details, contact your local sales rep. A0/A1 Controller: Mounting Dimensions of the Controller Note – All dimensions shown in inches, mounting hole openings can accommodate up to 3/8” screws/bolts.
Figure 2
Installation Requirements
Mount the L864 and/or L810 lights, Photocell and Controller to their intended locations
Apply DC power to terminal block, Figure 3 o DC supply requirements, 30-60 volts, capable of supplying up to 100
Watts depending on lighting requirements. o A minimum of 14 AWG (2.08mm2) cable is to be used. The terminal block
can accept up to 8 AWG (8.36 mm2) cable.
1501 Route 34 South, Farmingdale, NJ 07727
Tel: (732) 919-3119 Fax: (732) 751-5778 www.dialight.com
pg. 9
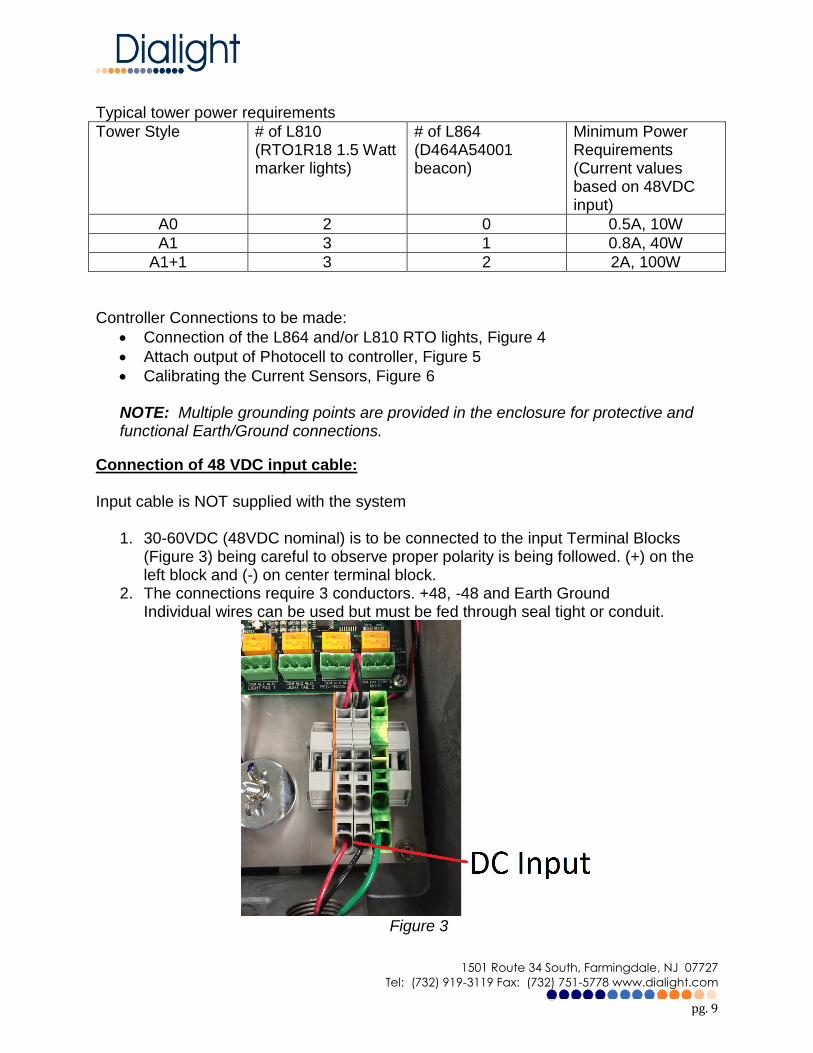
Typical tower power requirements
Tower Style # of L810 (RTO1R18 1.5 Watt marker lights)
# of L864 (D464A54001 beacon)
Minimum Power Requirements (Current values based on 48VDC input)
A0 2 0 0.5A, 10W
A1 3 1 0.8A, 40W
A1+1 3 2 2A, 100W
Controller Connections to be made:
Connection of the L864 and/or L810 RTO lights, Figure 4
Attach output of Photocell to controller, Figure 5
Calibrating the Current Sensors, Figure 6
NOTE: Multiple grounding points are provided in the enclosure for protective and functional Earth/Ground connections.
Connection of 48 VDC input cable: Input cable is NOT supplied with the system
1. 30-60VDC (48VDC nominal) is to be connected to the input Terminal Blocks (Figure 3) being careful to observe proper polarity is being followed. (+) on the left block and (-) on center terminal block.
2. The connections require 3 conductors. +48, -48 and Earth Ground Individual wires can be used but must be fed through seal tight or conduit.
Figure 3

1501 Route 34 South, Farmingdale, NJ 07727
Tel: (732) 919-3119 Fax: (732) 751-5778 www.dialight.com
pg. 10
WARNING: Failure to use properly rated cable will VOID all warranties and could cause premature failures. The controller has been designed to accept any of the following connection options. Individual wires can be used but must be fed through seal tight or conduit.
Earth Ground
+
Battery
-
+
Battery
-
+
-
TB 1
Option 2
+
-
TB 1
Earth Ground Ground
+
Battery -
+
Battery
-
Option 1
+
-
TB 1
+
Battery -
+
Battery -
Option 4
+
-
TB 1
Earth Ground
+
Battery -
+
Battery -
Option 3
Earth Ground

1501 Route 34 South, Farmingdale, NJ 07727
Tel: (732) 919-3119 Fax: (732) 751-5778 www.dialight.com
pg. 11
NOTE: Additional Earth ground may be included in the installation process and is so MUST be connected to the Aluminum plate located inside the enclosure. WARNING: If any of the above options are not suited for the installation then contact your local sales representative or supplier of the system. Located at the bottom right hand side of the enclosure is the terminal block required for connecting the input voltage.
Connection of the Marker Lights (L810’s) to the Controller:
WARNING: Refer to table for compatible L864 beacons and L810 marker lights. Supported Dialight L810 and L864 lights
L864 Beacon D464A54001
L810 Marker RTO1R18 1.5 Watt marker light RTO1R08 3.5 Watt marker light
1. L810 marker specifics: a. When L810 marker lights are being used, they must be connected to
Port 1 (L.T. 1) b. A minimum of two L810 RTO, or maximum of 4 L810 RTO lights are to
be wired in parallel at their location on the structure, all wired to the three conductor cable, keeping wire colors consistent.
2. L864 beacon specifics: a. When an L864 beacon is to be used, it must be connected to Port 2
(L.T. 2) b. The port will support up to 2 L864. In no circumstances are L810’s and
L864’s to be sharing a single port.
3. A typical A1 tower will have one L864 wired to port 2 (L.T. 2) and three L810 lights wired in parallel to port 1 (L.T.1).
4. The three conductor DC cable to the tower lights shall be connected to the controller at the driver board follows; (Figure 4)
Positive (red) cable to “+” connection of terminal block LT.1 or LT.2.
Negative (black) cable to “-” connection of terminal block LT.1 or LT.2.
The Earth ground, GREEN wire of the three conductor cable will be secured in the Earth Ground Block

1501 Route 34 South, Farmingdale, NJ 07727
Tel: (732) 919-3119 Fax: (732) 751-5778 www.dialight.com
pg. 12
Figure 4
Photocell Connection:
The Photocell requires use of the three conductor cable, with a minimum of 18 AWG conductor. Photocell connectors are labeled on both the Photocell PCB and the Controller PCB. Ensure consistency of connections on both connection points.
1. Unscrew the photocell cover to expose the screw terminal Phoenix connector,
pull connector from Photocell PCB. 2. Connect the RED wire of the three conductor cable to the +V location indicated
on the Photocell PCB. 3. Connect the GREEN wire of the three conductor cable to the SIG IN location
indicated on the Photocell PCB. 4. Connect the Black wire of the three conductor cable to the RET location indicated
on the Photocell PCB.

1501 Route 34 South, Farmingdale, NJ 07727
Tel: (732) 919-3119 Fax: (732) 751-5778 www.dialight.com
pg. 13
5. Repeat connections to the Controller PCB J4 respectively. (Figure 5)
Figure 5

1501 Route 34 South, Farmingdale, NJ 07727
Tel: (732) 919-3119 Fax: (732) 751-5778 www.dialight.com
pg. 14
Configuring/Calibrating the Controller
1) Calibrating the L864/L810 ports
a. Apply DC power to the system b. Push and hold the SW4 Un-Calibrate button (figure 6) c. When the red FAULT1 and FAULT2 indicator LED’s (figure 6) on the
driver board light, release Un-Calibrate button d. Press the SW1 RESET button to finish calibration sequence. (figure 6)
Figure 6
Note that a correct calibration will have a green LED lit labeled OK1 if there is a connection detected at Port 1, and a green LED lit labeled OK2 if there is a connection detected at Port 2. A red FAULT LED followed by an alarm will indicate that there are two or more L810 lights not functioning or if port is being utilized for an L864 beacon, the beacon is not functioning.

1501 Route 34 South, Farmingdale, NJ 07727
Tel: (732) 919-3119 Fax: (732) 751-5778 www.dialight.com
pg. 15
2) Configuring ports - Flashing or Steady and Flash Rate
Warning: Do not set dip switches in any configurations other than pictured below.
a. For Avian compliant A1/A1+1 towers, SW2 must be set as shown below; this setting overrides any other setting of SW1 block.
SW2 Positions Flashes Per Minute (FPM)
1 2 3
X
X
X 20 30 40
Positions 1,2,3 down
30 FPM, L810 and L864 flashing in sync
b. Flashing or steady as well as flash rate is controlled by settings on DIP switch blocks SW2 and SW3.
c. Determine if lights are to be flashing or steady burn. If flashing, decide on their flash rate. 20, 30 and 40 flashes per minute are available, all operating on a 50% duty cycle.
d. If flashing is desired on one or both ports, settings are as table 2 indicates.

1501 Route 34 South, Farmingdale, NJ 07727
Tel: (732) 919-3119 Fax: (732) 751-5778 www.dialight.com
pg. 16
Flash/Steady output selection – all tower types excluding Avian compliant
SW3 Positions Status
1 2 3 4
X
X
X
X FF FS SS SF
Position 1 (FF) up, 2-4 down
Both ports (L.T.1 and L.T.2) have flashing output
1 2 3 4
X
X
X
X FF FS SS SF
Position 2 (FS) up, 1, 3, 4 down
Port 1 (L.T.1) flashing output, Port 2 (L.T.2), steady burn output
1 2 3 4
X
X
X
X FF FS SS SF
Position 3 up, 1, 2, 4 down
Both ports (L.T.1 and L.T.2) have steady burn output
1 2 3 4
X
X
X
X
FF FS SS SF
Position 4 up, 1-3 down
Port 1 (L.T.1) Steady burn output, Port 2 (L.T.2) flashing output

1501 Route 34 South, Farmingdale, NJ 07727
Tel: (732) 919-3119 Fax: (732) 751-5778 www.dialight.com
pg. 17
Flash Rate Selection
SW2 Positions Flashes Per Minute (FPM)
1 2 3 X
X
X 20 30 40
Position 1 up, 2-3 down
20 FPM
1 2 3
X
X
X 20 30 40
Position 2 up, 1 and 3 down
30 FPM
1 2 3
X
X
X
20 30 40 Position 3 up, 1 and 2 down
40 FPM

1501 Route 34 South, Farmingdale, NJ 07727
Tel: (732) 919-3119 Fax: (732) 751-5778 www.dialight.com
pg. 18
Alarm Dry Contacts - Connections: Utilize the dry contact alarm terminals to monitor the status of the lighting system. Table 4 – Alarm Dry Contact descriptions
Title Status: No Alarm Status: Alarm or power lost to controller
Light Fail 1 (J7) (Alarm occurs when current on port 1 (L.T.1) drops greater than 25% of calibrated current)
COM-AL.C = open, COM-AL.O = closed
COM-AL.C = closed, COM-AL.O = Open, AL1 LED lit when power is present to controller
Light Fail 2 (J8) (Alarm occurs when current on port 2 (L.T.2) drops greater than 25% of calibrated current)
COM-AL.C = open, COM-AL.O = Open
COM-AL.C = closed, COM-AL.O = Open, AL2 LED lit when power is present to controller
PEC/TRANS Fail (J9) (Alarm occurs when electronic connection to photocell is lost or if a day-night or night-day transition has not occurred in over 18 hours
COM-AL.C = open, COM-AL.O = Open
COM-AL.C = closed, COM-AL.O = Open, AL3 LED lit when power is present to controller
Status Dry Contact - Connections: Utilize this dry contact terminal set to monitor that the system is in Day or Night mode Table 5 – Status Dry Contact description
Title Mode: Day or power lost to controller
Mode: Night
Mode (J10) Indicates if the system is operating in Day or Night mode
COM-DAY.C = closed, COM-DAY.O = open DAY LED indicator is lit when power is present at the controller
COM-DAY.C = open, COM-DAY.O = closed Night LED indicator is lit

1501 Route 34 South, Farmingdale, NJ 07727
Tel: (732) 919-3119 Fax: (732) 751-5778 www.dialight.com
pg. 19
2. Troubleshooting
This system has built in diagnostic modes enabling the user to manually switch into Day or Night. To force into either mode, use the buttons labeled DAY and NIGHT, SW5 and SW8. By holding the desired button down for three seconds, the system will manually change modes, and hold that mode for two minutes. The system will return to its normal operation automatically, using photocell input to determine the correct mode. Table 6 - Troubleshooting Table
No power to the system Ensure proper connections and voltage at the DC terminal block input, 30-60VDC.
Restore connections at the DC terminal blocks, turn on circuit breaker if off on the DC supply to the system
No L810 or L864 lights are lit, system on in night mode
Ensure proper connections to the light output ports. Night LED on bottom right of controller PCB should be on, if not on, manually force system into night mode using SW8-Night button.
Restore connections at output ports if found to be improperly connected. If lights turned on while manually forcing system into Night mode, check for proper photocell wiring and functionality
Will not switch from Day to Night, or Night to day
Ensure connections at the Photocell PCB and the Driver board are consistent on both ends of the photocell wire
Using the Dialight 3 conductor cable, ensure that BLACK is connected to RET on the boards, RED to V+ and GREEN to SIG IN
Alarm indicated at port 1 or 2
Verify that alarm LED AL1, AL2 or AL3 are lit on board. If not lit, check that alarm wiring is properly connected. If lit, refer to below steps for each individual alarm.
Correct improper alarm contact wiring as necessary, refer to table 1, dry contact descriptions
AL1 present Reset system, then manually force system into Night mode. Immediately check using DC volt meter, ensure there is DC voltage present at port 1 output. Note that this voltage will be turning on and off if port is specified to flash, and will only remain present until alarm occurs.
If voltage is present, the lights or their wiring is suspect. If no voltage is present, there is a possibility of an open fuse on the controller PCB. Note that fuses are not user serviceable, contact Dialight support at this time.
AL2 present Reset system, then manually force system into
If voltage is present, the lights or their wiring is
1501 Route 34 South, Farmingdale, NJ 07727
Tel: (732) 919-3119 Fax: (732) 751-5778 www.dialight.com
pg. 20
Night mode. Immediately check using DC volt meter, ensure there is DC voltage present at port 2 output. Note that this voltage will be turning on and off if port is specified to flash, and will only remain present until alarm occurs.
suspect. If no voltage is present, there is a possibility of an open fuse on the controller PCB. Note that fuses are not user serviceable, contact Dialight support at this time.
AL3 present Ensure consistent wiring from photocell connector to the connection at the controller PCB. Ensure there are no obstructions interfering with the photocell sensor
Repair wiring as necessary and remove any obstructions to the photocell.
1501 Route 34 South, Farmingdale, NJ 07727
Tel: (732) 919-3119 Fax: (732) 751-5778 www.dialight.com
pg. 21
REVISION HISTORY
REV ECO No. DRN CKD APP QA CM DATE
A 34285 CAG SA KH YS JN 5/31/16