dcs a-10c operator checklists 8b
TRANSCRIPT


DCS-A-10C-CL
SCOPE. This checklist contains the operators checks to be accomplished during normal DCS A-10C operations. For emergency operation refer to the appropriate Emergency Checklist.
GENERAL. The checklist contains: normal procedures, weapons employment, hot refuel, rearming, repairs and air to air refueling. This checklist reflects the systems which are modeled and functioning in the simulation. If a system is not modeled then it is not checked or actioned in this checklist.
When a checklist continues on a following page, it will be noted at the bottom of the page by “continued”.
TERMINOLOGY. “Set.” There is a setting of a switch or grouping of switches pertinent to that phase of flight. “As req'd.” There is more than one position for the switch or switches.
NORMAL CHECKLIST PHILOSOPHY. Checklists are used as verification to ensure that certain critical steps have been completed. This checklist is configured as a Do-list. In this method, the checklist is used to “lead” and direct the pilot in configuring the aircraft using a step-by-step, “cook book” approach.
SYMBOLS. The * symbol indicates steps mandatory for all flights, including “thru” flights. Thru flights are flights where repairs, hot pit refueling or rearming has been carried out or any flight where the after landing checklist has been actioned.
SUMMARY OF CHANGES. See page 41 for a list of changes in this revision.
Revision: 8b Return to TOC 2
DCS A-10C Normal Checklist & QRH Mar 29, 2012
TABLE OF CONTENTSCOCKPIT CHECK....................................4BEFORE START.......................................5BEFORE TAXI.........................................6TAKEOFF & APPROACH SPEEDS............8TAXI......................................................9BEFORE TAKEOFF..................................9LINEUP CHECK......................................9EDITING WEAPON PROFILES..............10WEAPON PROFILE NOTES...................11FENCE IN/OUT....................................12GAU-8.................................................13ROCKETS.............................................14UNGUIDED BOMBS (CCIP) MAN.........15UNGUIDED BOMBS (CCIP) CR.............16UNGUIDED BOMBS (CCRP).................17LASER GUIDED BOMBS.......................18GBU-38 IAM.......................................19AGM-65 MAVERICK............................20AIR TO AIR WEAPONS.........................21ILLUMINATION FLARES.......................22CLEARING HUNG STORE.....................23JTAC COORDINATES............................24CREATING MARKPOINTS....................24AIR REFUELING...................................25REPAIRS..............................................26HOT REFUEING...................................27HOT REARMING.................................28AFTER LANDING.................................29SHUTDOWN.......................................30CMSP DISPENSE PROGRAMS..............31THREAT CHART....................................329-LINE BRIEFING.................................33WEAPON Z-DIAGRAM CHARTS...........34WEAPONS & CAPABILITIES CHART......35AIRPORT DATA CHART.........................36CROSS WIND CHART...........................37MISSION DATA CARD..........................38
Revision: 8b Return to TOC 3
DCS A-10C Normal Checklist & QRH Mar 29, 2012

COCKPIT CHECKThrottles…………......…….……………............................OFF Speed brake................................….set to center pos'nFlap lever.………………...........................set to flap pos'nAPU………………………................................................OFF Engine operate switches....................................NORMEngine fuel flow switches .................................NORMEAC.........................................................................OFFRDR ALTM...............................................................DISAC Gen L & R…..…..............................................…PWRBattery……..……………............................................PWRInverter……...........................................................STBY Signal lights........................................................testedFire detection system.........................................tested Fuel………….………...............................tested/qty check Oxygen supply…..........................................ON/tested Boost pumps main..................................................ON Boost pumps wing..................................................ON
Revision: 8b Return to TOC 4
DCS A-10C Normal Checklist & QRH Mar 29, 2012

Revision: 8b Return to TOC 5
DCS A-10C Normal Checklist & QRH Mar 29, 2012
BEFORE START
APU………………………......................…............…...…START
APU Gen..........................................................…...PWRCDU..........................................................................ONEGI............................................................................ONVHF/FM………………………....................…….............TR/setUHF…………………..............................….…........MAIN/setVHF/AM…………………...........................................TR/setSeat.....................................................................adjustRequest eng start........................ATC on VHF/AM (fwd)Master exterior lights switch ........................cycled/aftPosition lights………….....................................…...FLASH
Left engine…........................…………............….……..startLeft eng instruments & hyd…..................…...……..checkRight engine………............................................…….startRight eng instruments & hyd.............................…check
NOTE: Monitor that APU EGT stabilizes between 400-450° c and APU RPM at 100% before turning APU gen on (PWR).
CAUTION: Attempting to start with ITT above 150º c will result in a hot start.
NOTE: Transient ITT of up to 900°C for no more than 12 seconds is acceptable during start.

Revision: 8b Return to TOC 6
DCS A-10C Normal Checklist & QRH Mar 29, 2012
BEFORE TAXI pg. 1/2 *Intercom selector....................................................VHF *Flaps.......................................................cycle/MVR set Speed Brakes........................................................check Flight Controls......................................................check
Yaw & Pitch SAS........................................................ON *T/O Trim..................................................pushed/green *CMSP mode switch.................................................STBY *CMSP subsystems (MWS/JMR/RWR)................as req'd *CMSP PROG.....................................as req'd (see pg 31)
CDU align page.................................................NAV LSK *Nav mode select panel..............................EGI & STR PT
Steering bars.....................................................as req'dIFFCC test switch...........................................TEST pos'nJTRS...........................................................................ONCICU..........................................................................ONMFCD L & R...............................................................ONStandby Attitude.................................................uncage
*G-Meter..................................................................resetAltimeter...................................................................set
MFCD LOAD ALL OSB............................................select *TGP switch.........................................................as req'd
Engage IFFCC preflight BIT test..............................enterIFFCC switch (when BIT complete)...........................ON
*Stick master mode..........................................as req'dWaypoint advance........MAN/AUTO (UFC FUNC 5 FPM)CDU...........WP PAGE (UFC FUNC 3 WP>CDU OSB 7 WP)
continued
Wait until EGI INS alignment indicates complete by: T = 4.0. 0.8 on the CDU

Revision: 8b Return to TOC 7
DCS A-10C Normal Checklist & QRH Mar 29, 2012
BEFORE TAXI pg. 2/2 ALT ALRT..............................................UFC set as req'd
*LMFCD.....................................................................TAD *RMFCD...................................................................CDU *Steerpoint switch.............................................FLT PLN
TAD FLT PLN...................confirm FLT PLN WP's loadedWP...........................set as req'd (HUD SOI>DMS FWD)TAD datalink network configuration................as req'd SADL OWNSHIP ID...........................................as req'dSADL GROUP ID...............................................as req'dTAD flight member symbols.................confirm on TADCursor slew rate....................................adjust as req'd
*DSMS wep profiles.......configured as per pages 10-11 *TGP laser code.........................................................set *Latch on...........................................................as req'd *MSL OSB missile control page............................EO ON *LMFCD....................................................................TAD *ILS...................................................................PWR/set *TACAN.................................................................TR/set *APU Gen………………...............................…....OFF/RESET *APU…………………..............................…...............……OFF
EAC.......................................................................ARMRDR ALTM.............................................................NRMLadder...............................................................stowed
*Takeoff speed....................................see chart on pg 8
Notes: 1. Cursor slew rate: STAT page 2 scroll to THRTL and adjust slew rate for cursors on TAD, TGP and HUD. Use UFC for numerical values then hit SLEW OSB to enter the value.2. The ALT ALRT on the UFC can be set for terrain avoidance when not actively engaging a target, i.e. when the MRS/MRC aren't displayed or usable. It can also be used to avoid known/suspected threat WEZ..(MRS/MRC are set via weapons profile.) To change ALT ALRT select ALT ALRT on UFC and choose AGL, MSL or Ceiling alert as desired. Change value with UFC DATA rocker. Fourth press of ALT ALRT button exits the function.
Revision: 8b Return to TOC 8
DCS A-10C Normal Checklist & QRH Mar 29, 2012
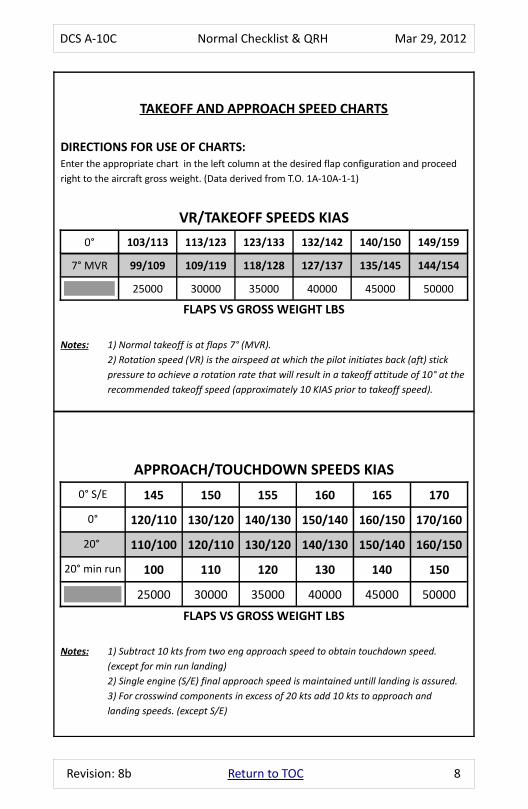
TAKEOFF AND APPROACH SPEED CHARTS
DIRECTIONS FOR USE OF CHARTS:Enter the appropriate chart in the left column at the desired flap configuration and proceed right to the aircraft gross weight. (Data derived from T.O. 1A-10A-1-1)
VR/TAKEOFF SPEEDS KIAS0° 103/113 113/123 123/133 132/142 140/150 149/159
7° MVR 99/109 109/119 118/128 127/137 135/145 144/154
25000 30000 35000 40000 45000 50000
FLAPS VS GROSS WEIGHT LBS
Notes: 1) Normal takeoff is at flaps 7° (MVR).2) Rotation speed (VR) is the airspeed at which the pilot initiates back (aft) stick pressure to achieve a rotation rate that will result in a takeoff attitude of 10° at the recommended takeoff speed (approximately 10 KIAS prior to takeoff speed).
APPROACH/TOUCHDOWN SPEEDS KIAS0° S/E 145 150 155 160 165 170
0° 120/110 130/120 140/130 150/140 160/150 170/160
20° 110/100 120/110 130/120 140/130 150/140 160/150
20° min run 100 110 120 130 140 150
25000 30000 35000 40000 45000 50000
FLAPS VS GROSS WEIGHT LBS
Notes: 1) Subtract 10 kts from two eng approach speed to obtain touchdown speed. (except for min run landing)2) Single engine (S/E) final approach speed is maintained untill landing is assured.3) For crosswind components in excess of 20 kts add 10 kts to approach and landing speeds. (except S/E)

Revision: 8b Return to TOC 9
DCS A-10C Normal Checklist & QRH Mar 29, 2012
TAXI *NWS........................................................................ON
*Request taxi....................................ATC/VHF/AM (fwd)*Taxi Light.................................................................ON*Brakes.................................................................check*Turn needle.........................................................check*Flaps.....................................................................MVR*Speed Brakes...................................................CLOSED*Canopy……….....................................CLOSED/light out*Ejection seat………….......................................…ARMED
BEFORE TAKEOFF *Position Lights.................................................STEADY*Anti-Collision.....................................................FLASH*Request T/O...................................ATC/VHF/AM (fwd)*Landing light...........................................................ON
LINEUP CHECK“Flaps, lights, APU, anti-skid, seat & heat”
*Flaps...................................................confirm at MVR*Lights........................................................confirm ON*APU..........................................................confirm OFF*Anti-Skid.................................................................ON*Seat....................................................confirm ARMED*Heat (pitot).............................................................ON*Engine runup.................................................90% core*Eng instruments & caution lights....................checked*Throttles................................................................max*NWS..........................................................off at 50 kts

Revision: 8b Return to TOC 10
DCS A-10C Normal Checklist & QRH Mar 29, 2012
WEAPON PROFILE SETTINGS:DSMS - INV - Bomb Laser Code....................set as req'dRelease type..............................................select (OSB 6)Fuze Type..................................................select (OSB 7)Ripple quantity..........................................select (OSB 8)Ripple Interval................................................set (OSB 9)Release mode.....................................................as req'dAuto-lase................................................as req'd (OSB 6)Lase time.................................................12 sec (OSB17)MIN ALT warning...........................................set in PROFHOT (Height Over Target)...............(Flares)HOT (OSB 20)Escape Manouver (SEM)..............................set (OSB 20)CCIP CONSENT OPT........................5 MIL or 3/9 as req'dSAVE new profile (OSB 3) & return to STAT page (OSB 1)Configure TGP:RMFCD - TGP ...........................select A-G mode (OSB 1)LATCH ON/OFF....................................................as req'dLSS (laser spot search)...........code set as req'd (OSB 17)L (Laser designation code).....code set as req'd (OSB 18)
return to BEFORE TAXI checklist (pg 2/2)
Notes: 1. Fuze type: If a MK82AIR is selected, setting the fuze to NOSE will have the bomb drop without the ballute deploying (low drag). If you select N/T or TAIL, the bomb will be dropped as a high drag bomb with the ballute deploying. 2. Ripple interval has more to do with the weapons you are using than the target spread. Suggested ripple intervals: Mk-82 = 75' Mk-84 = 150' CBU-87 = 500' CBU-97 = 600'.3. To chng CBU HOF:DSMS >INV> select stn to adjust>CBU>choose CBU type>HOF OSB to cycle. 4. Adjust the DSMS MIN ALT setting as required in order to determine the appropriate MRS (minimum range staple) for weapon release. To set min alt: DSMS>SEL desired stn>PROF>CHG SET>enter desired min alt on scratch pad>MIN ALT OSB>SAVE OSB>STAT.5. CCRP mode only uses 5 MIL mode (MAN and 3/9 modes not valid)6. Latch on/off - When set to ON, selecting the NWS button once will fire the laser and second press will discontinue it. When latch off, will only fire as long as nws button held.7. Set the laser code that the laser will fire. If self-designating, you will want to make sure this code matches the laser code set for the weapon in the DSMS Inventory Store page. (By default both bomb and TGP will be set to code 1688) If buddy-lasing for another aircraft, this code will need to match the code the other aircraft is searching for in Laser Spot Search (LSS) mode. To set TGP laser code: select TGP>A-G >CNTL page> enter code on UFC > OSB 22 (L). 8. To set the laser code for the LGB store: select DSMS>INV>GBU-12>GBU>GBU-12>enter code on UFC>OSB 7 (LSR CODE).

Revision: 8b Return to TOC 11
DCS A-10C Normal Checklist & QRH Mar 29, 2012
EDITING WEAPON PROFILES NOTES:1. Temporary change to stored profile: If you select weapons using the MFCD OSB's on the main DSMS page an "M/" will be displayed in front of the weapon profile name. This “M/” indicates you are creating a temporary manual profile that WILL BE LOST once you deselect that profile.
2. Edit stored profile: To edit and change a stored profile, ensure no weapons are selected on the DSMS page. Press the PROF button (OSB 1) to list stored DSMS profiles. The profile names are listed in the left column. Select the profile you wish to edit by pressing OSB 19 and 20 (up/down arrows). Press the VIEW PRO button (OSB 3) and edit the profile as desired. When finished making changes to the profile, press SAVE (OSB 3). You have now changed the stored profile and saved it to DSMS memory, while keeping its original name.
3. Create new profile: This method involves editing a stored profile, renaming and saving it as new. A new profile will be added to the list, without changing or deleting the original profile. Ensure no weapons are selected on the DSMS page. Press the PROF button (OSB 1). You will see a list of stored profiles. Select the profile you want to edit by pressing OSB 19 and 20 (up/down arrows). Now press the VIEW PRO button (OSB 3) and edit the profile as desired. (select RET to return to PROF MAIN page, if you were on CHG SET page). Now create a name for your new profile by typing it into the CDU scratchpad and then press []NEW (OSB 18). (or use the UFC by pressing LTR and then typing in the new name on the UFC scratchpad and then []NEW.) Now save your new profile by pressing SAVE (OSB 3). You have now stored the profile in DSMS memory and will see it has been added to the profile list. When you select left or right DMS with the HUD as SOI, you will see your profile in the cycle. You can store up to a total of 20 weapon profiles in the DSMS.
4. Multiple profiles: based on attack type not just each weapon. Ie A profile for Mk-82 20° low angle low drag delivery, another for Mk-82 medium alt toss, another for Mk-82 45° high alt dive bomb. A profile for Mavericks and one or two for rocket profiles.

Revision: 8b Return to TOC 12
DCS A-10C Normal Checklist & QRH Mar 29, 2012
FENCE INTACAN/NAV......................................................as req'dFuel check............................................balance/BINGOExt Lights.......................................................OFF (mid)CMSP switches (MWS/JMR/RWR)...........................ONCMSP mode selector...........MAN/SEMI/AUTO as req'dCMSP PROG......................................................as req'dECM PROG........................................................as req'dMaster arm..............................................................ONGUN/PAC................................ARM/GUNARM as req'dTGP...........................................................................ONLaser arm.................................................................ONDSMS................................................set as per briefingAGM..........................................................MSL (OSB 2)AGM EO......................................................confirm ONAIM9 cool.............................MSL>OSB 19 (OFF) selectContact JTAC.....................................................as req'd
FENCE OUTStick master mode.................................................NAVTACAN..............................................................as req'dMaster arm...........................................................SAFEGUN/PAC...............................................................SAFETGP..........................................................................OFFLaser arm..............................................................SAFECMSP mode selector.............................................STBYAGM EO..................................................................OFF Ext Lights.....................................ON (aft)/STDY FLASHFlight Check..............................................damage/fuel
Note : Complete FENCE IN check prior to entering the combat area. In actual combat, most of theitems in the fence check should be done prior to or right after takeoff.

Revision: 8b Return to TOC 13
DCS A-10C Normal Checklist & QRH Mar 29, 2012
GAU-8Configure weapon:GUN/PAC................................ARM/GUNARM as req'dSet HUD as SOI...............................China Hat Up ShortMIN ALT...................set as req'd in IFFCC 30mm menu
Notes: 1. Complete FENCE IN check prior to entering the combat area. (pg 12)
2. If GUN/PAC switch set to ARM, PAC will be engaged with the first stage of the trigger and will attempt to keep pipper over target. Second stage of trigger will fire gun. If set to GUNARM, PAC is disabled. Use GUNARM for strafing along length of a convoy.3. CCIP gun reticle is default. To cycle to the other gunsights set HUD as SOI then press DMS Left Short.4. If “CCIP INVALID” message appears on HUD during a gun run, you have two options a) Increase altitude above target altitude or min alt warning in IFFCC 30mm menu. b) Switch to 4/8/12 gun reticle or 4000' wind corrected gun cross.5. To set min alt in IFFCC 30mm menu: IFFCC switch to TEST> on HUD menu SEL WEAPONS>ENTER>SEL 30MM>ENTER>SEL MIN ALT>SEL STORE>ENTER>SEL EXIT>ENTER.IFFCC switch to ON.6. GAU-8 gunsights, there are four available gunsights. The first is the default CCIP GUN RETICLE and provides the most aiming info of the four. With CM ammo seected there will be two pippers in the center of the reticle. The center most pipper is for armour piercing (AP) rounds, the one to the lower right is for high explosive incendiary (HEI) rounds. If a min alt other than 0 has been entered in the IFFCC 30MM menu, the min range cue indicator will be displayed to the right of the reticle. The second sight is the CCIP GUN CROSS. Much like the CCIP gun reticle, but more compact and removes the analog range bar and moving target indices. Third sight is the 4/8/12 GUN RETICLE. When accurate target elevation is not available, this reticle provides three pippers (from the top ) calibrated to 4000', 8000' and 12000' slant ranges. The fourth sight is the 4000' GUN CROSS. It provides a 4000' wind corrected slant range solution.7. To switch between the four available gunsights use DMS left short.
Weapon Employment:1) Stick master mode GUNS2) Gunsight select as req`d DMS left short3) Place pipper on target and pull trigger to PAC-1 to stabilize.4) In range with pipper on target, pull trigger to PAC-2 to fire.

Revision: 8b Return to TOC 14
DCS A-10C Normal Checklist & QRH Mar 29, 2012
ROCKETS
Notes: 1. Complete FENCE IN check prior to entering the combat area. (pg 12) 2. In Rocket sight mode (“RKT” indication on bottom of reticule), the HUD will display theCCIP gun cross sight to follow a rocket attack with gun strafe.3. Rocket time of flight indicated at top of HUD data block, bottom left corner of HUD.4. To set min alt: DSMS>SEL desired stn>PROF>CHG SET>enter desired min alt via UFC scratch pad>MIN ALT OSB>SAVE OSB>STAT.5. When releasing a ripple of rockets, they will land centered around the pipper aim point. 6. DO NOT select weapons using the MFCD OSBs on the main DSMS page. Use either the DMS (left/right short) with HUD as SOI, or select rocker on the UFC or the profile page on the DSMS and the activate profile OSB.
Weapon Employment:1) Stick master mode CCIP2) Set HUD as SOI 3) DMS left/right to select desired profile
4) Place the CCIP Rocket Reticle over target by manoeuvring the aircraft. 5) Within 2 nm of target, the range bar in the reticle starts to unwind. 6) At around 1 nm, press and hold pickle to launch rockets.

Revision: 8b Return to TOC 15
DCS A-10C Normal Checklist & QRH Mar 29, 2012
UNGUIDED BOMBS (CCIP) MAN REL
Notes: 1. Complete FENCE IN check prior to entering the combat area. (pg 12) 2. Adjust the DSMS MIN ALT setting as required in order to determine the appropriate MRS (minimum range staple) for weapon release. To set MIN ALT: DSMS>SEL desired stn>PROF>CHG SET>enter desired min alt on scratch pad>MIN ALT OSB>SAVE OSB>STAT.3. DO NOT select weapons using the MFCD OSBs on the main DSMS page.4. Enter ripple interval via UFC scratch pad.Left side of HUD shows countdown to first bomb impact. Bombs will land centered around pipper aim point.
5. Fuze type: If a MK82AIR is selected, setting the fuze to NOSE will have the bomb drop without the ballute deploying (low drag). If however you select N/T or TAIL, the bomb will be dropped as a high drag bomb with the ballute deploying. 6. Ripple interval has more to do with the weapons you are using than the target spread. The Mk-82 as an example, you're ripple spacing is 75ft. Because 75ft between each bomb is the spacing at which the explosive yield of the Mk-82 produces the most damage. Any closer and you are not making the most of the weapons capability, any further and you're spreading your bombs too thin, and will be less effective as a result.Suggested ripple intervals: Mk-82 int = 75' Mk-84 int = 150' CBU-87 int = 500' CBU-97 int = 600'. Ripple single for soft targets. Ripple pairs for armoured targets.
Weapon Employment:1) Stick master mode CCIP2) Set HUD as SOI 3) DMS left/right to select desired profile4) Set the desired dive angle (10-45°) with the TVV. 5) Make lateral corrections as req`d to put the PBIL on the target.6) Allow Pipper to track upwards along the PBIL toward the target.7) Pickle when the Pipper is on the target.

Revision: 8b Return to TOC 16
DCS A-10C Normal Checklist & QRH Mar 29, 2012
UNGUIDED BOMBS (CCIP) CR
Notes: 1. Complete FENCE IN check prior to entering the combat area. (pg 12) 2. Adjust the DSMS MIN ALT setting as required in order to determine the appropriate MRS (minimum range staple) for weapon release. To set MIN ALT: DSMS>SEL desired stn>PROF>CHG SET>enter desired min alt on scratch pad>MIN ALT OSB>SAVE OSB>STAT.3. DO NOT select weapons using the MFCD OSBs on the main DSMS page.4. Enter ripple interval via UFC scratch pad.Left side of HUD shows countdown to first bomb impact. Bombs will land centered around pipper aim point.
5. To set CCIP CR (consent to release) >IFFCC switch test>HUD menu> UFC DATA rocker cycles CONSENT OPT: OFF, 5 MIL & 3/9>IFFCC switch back to ON.6. Fuze type: If a MK82AIR is selected, setting the fuze to NOSE will have the bomb drop without the ballute deploying (low drag). If however you select N/T or TAIL, the bomb will be dropped as a high drag bomb with the ballute deploying.7. GBU-10/12's and CBU-97 are not eligible for the 5 MIL release inhibit.
Weapon Employment:1) Stick master mode CCIP2) Set HUD as SOI 3) DMS left/right to select desired profile4) Set the the desired dive angle with the TVV.5) Make lateral corrections to place dashed reticle and pipper on target.6) Press and HOLD the pickle button.7) Make lateral corrections to place the PBIL on the Solution Cue8) Maintain the dive angle, or make a gentle pull to "toss" the weapon.9) The bomb(s) will come off as CCRP Aim Point flies through the Pipper.

Revision: 8b Return to TOC 17
DCS A-10C Normal Checklist & QRH Mar 29, 2012
UNGUIDED BOMBS (CCRP)
Notes: 1. Complete FENCE IN check prior to entering the combat area. (pg 12) 2. DO NOT select weapons using the MFCD OSBs on the main DSMS page.3. Hook means to select an object on the TAD. Valid objects to hook are: aircraft symbols, steerpoint symbols, transmitted SPI symbols, bullseye symbols and, MARK symbols.4. With SPI set, the Azimuth Steering Line (ASL) on the HUD will indicate heading to SPI (target). 5. Time to Release Numeric (TTRN) next to the Solution Cue on the ASL will indicate the time in seconds until the weapon should be released. 6. When releasing a ripple of bombs, they will land centered around the pipper aim point.7. CCRP mode only uses 5 MIL mode (MAN and 3/9 modes not valid)8. Time to impact of first bomb displayed on left side of HUD once weapon away.9. Abort on MRS.
Weapon Employment:1) Stick master mode CCRP2) Set HUD as SOI 3) DMS left/right to select desired profile4) Set desired target/location as SPI using one of the following methods:
a) HUD TDC over target and press TMS Fwd Longb) TGP cursor on target, laser on, press TMS Fwd Long, laser offc) Lock target with Maverick and press TMS Fwd Longd) Hook TAD object TMS FWD Short then make SPI with TMS Fwd long
5) When the SPI has been set, the Azimuth Steering Line (ASL) on the HUD will indicate heading to SPI (target). 6) Designated target SPI will have SPI locator line extending from it to the TVV, or the TVV will have SPI locator line extending to the target, depending on if the SPI target is within the HUD field of view. 7) Manoeuvre the aircraft to align the IAM Reticle on the ASL. 8)The Release Cue will move from 12 o’clock of the IAM Reticle counter clockwise and when Release Cue is between the Max and the Min Range Caret, MAN REL will appear in the In Range Indication field.When In Range, HOLD DOWN the pickle button to drop weapon. Do not tap pickle button or this could result in a hung store.

Revision: 8b Return to TOC 18
DCS A-10C Normal Checklist & QRH Mar 29, 2012
LASER GUIDED BOMBS (LGB)
Designate Target:1) RMFCD select TGP > A/G OSB 2) RMFCD make SOI3) China Hat Aft Long slave to SPI4) Crosshair slew to target5) TMS Fwd Short. Select AREA/POINT6) DMS UP/DOWN zoom in/out7) Laser on, create SPI (TMS Fwd Long), laser off
Notes: 1. Complete FENCE IN check prior to entering the combat area. (pg 12)2. As the bomb guides to target, ensure that the targeting pod has an unobstructed line of sight to the target. Avoid any masking of the target by the aircraft. Is there is masking, the M indication will be visible on the HUD. A high altitude and keeping the targeting pod on the same side as the target will reduced masking probability. Use the situational awareness cue on the TGP display to monitor this.3. To the left of the laser status indication is the countdown timer of bomb time to impact.4. DO NOT select weapons using the MFCD OSBs on the main DSMS page.5. Lase 8-10 seconds for static targets. longer (ie 12 sec) for moving targets.
Weapon Employment:1) Stick master mode CCRP2) Set HUD as SOI 3) DMS left/right to select desired profile4) Both the Azimuth Steering Line (ASL) and the SPI will indicate the proper heading to reach the target.5) Manoeuvre the aircraft to align the PBIL on top of the ASL.6) As range to target decreases, Time To Release Numeric (TTRN) will appear next to the Solution Cue and display time in seconds til bomb release. 7) When approx. 6 seconds from release, the ASL and Solution Cue will drop down the HUD, then HOLD DOWN the pickle button till solution cue passes through CCRP Bombing Reticle, the bomb(s) will then be released. 8) With the bomb(s) released, press the NWS button to fire the laser if AUTO LASE is not set ON. If laser firing, the “L” on the left side of the HUD will flash.

Revision: 8b Return to TOC 19
DCS A-10C Normal Checklist & QRH Mar 29, 2012
JDAM GBU-38 (Designation via TGP)LMFCD – DSMS............................select desired stationTGP.............................................RMFCD make TGP SOISlew TGP to WP...............................china hat fwd longZoom TGP......................................china hat fwd shortSlew TGP........................................onto desired targetLaser..............................................................on (NWS)Create SPI..............................................TMS Fwd LongLaser..............................................................off (NWS)Master mode switch...................................set to CCRP
JDAM (IAM) GBU-38 (Designation via mission planner and WP over known fixed target)
Set the steerpoint as SPI...........................TMS aft longDSMS......................................................select GBU-38Master mode switch...................................set to CCRP
Notes: 1. Complete FENCE IN check prior to entering the combat area. (pg 12) 2. Fly straight and level towards long line.3. Method 2 good for attacking target with known coordinates through an overcast cloud layer. WP must be placed over target in mission editor.4. DO NOT select weapons using the MFCD OSBs on the main DSMS page.
Weapon Employment:
1) When the SPI has been set, the Azimuth Steering Line (ASL) on the HUD will indicate heading to the SPI (target).2) Designated target SPI will have a SPI locator line extending from it to the TVV, or the TVV will have a SPI locator line extending to the target, depending if the target is within the HUD field of view.3) Manoeuvre the aircraft to align the IAM reticule on the ASL.4) The release cue will move from the 12 o`clock of the IAM reticule counter clockwise. When the release cue is between the Max and Min range caret, MAN REL will appear in the range indication field.5) When in range, HOLD down the pickle button to drop the weapon. DO NOT tap the weapon release button as this can cause a hung store.

Revision: 8b Return to TOC 20
DCS A-10C Normal Checklist & QRH Mar 29, 2012
AGM-65 MAVERICK
LMFCD...................................................set to TGP>A-GRMFCD.........................................................set to MAVSwap MFCD's..............................coolie hat down shortTGP..............................................RMFCD make TGP SOISlew TGP to WP................................china hat fwd longZoom TGP.......................................china hat fwd shortSlew TGP.........................................onto desired targetTGP to Point Mode...................................TMS up shortLaser on, create SPI (TMS Fwd Long), laser off
Notes: 1. Complete FENCE IN check prior to entering the combat area. (pg 12)
2. Lock on indicated by cross hair slightly vibrating.3. It may take several attempts to lock Maverick even within range.4. Switch to TGP as SOI and repeat above steps for next target. 5. If there are other targets nearby you can return to SPI by pressing china hat forward long and then slew the sensor onto a nearby target. It should snap onto them. I6. TGP should be loaded on the right wing (stn 10), TGP should be displayed on RMFCD, MAV on LMFCD. This is why we swap MFCD's. Orbit to the right, towards the TGP.8. To switch MAV seeker to boresight, china hat aft short. Then use MAV or HUD as SOI and slew MAV seeker as desired. 9. Ground stabilize MAV with TMS down short. (this will also break a bad MAV lock)Space stabilize MAV with TMS left long.10. DO NOT select weapons using the MFCD OSBs on the main DSMS page.
Weapon Employment:1) Set HUD as SOI 2) DMS left/right to select desired profile3) Set MAV as SOI on LMFCD.4) Slew MAV to SPI with china hat fwd long5) Zoom view as desired with china hat fwd short6) Lock MAV to target with TMS fwd short. (locked if crosshair flashing)7) Keep hitting TMS fwd short until a vaild lock is achieved. 8) When lock is achieved, press pickle button to launch MAV. Call “Rifle”.9) If more targets in same SPI area, repeat steps 4-9.

Revision: 8b Return to TOC 21
DCS A-10C Normal Checklist & QRH Mar 29, 2012
AIR TO AIR WEAPONS
Gun Use Master mode control..........A2A mode (press and hold) HUD as SOI...............................................Coolie Hat UPCycle AAS options......................DMS left or right short
AIM-9To lock the seeker on to a target, you have several options: a) Boresight: Uncage seeker with china hat fwd short b) Target set as SPI, Slave all to SPI with China Hat Fwd Longc) Initiate a seeker conical scan with TMS Fwd Short
Notes: 1. Complete FENCE IN check prior to entering the combat area. (pg 12) 2. When the missile has acquired a target, the tone changes to a higher pitched 'growl'. The pitch will vary according to the quality of the IR lock.3. Boresight mode: (default) Seeker fixed to boresight line. When attacking a target in boresight mode, uncage seeker prior to launch to confirm seeker has a good lock. Seeker will track if IR intensity is strong enough; otherwise seeker will start to drift and will need to be recaged. Manoeuvre aircraft to place reticle over target for a valid lock prior to launch. 4. Uncaged mode: Seeker no longer bound to boresight line and floating around the scan zone. 5. Conical scan mode: Seeker performs a conical scan pattern around boresight line to cover a greater volume of airspace ahead of aircraft.6. HOTAS commands, Track =TMS fwd , Break Lock =TMS aft , Missile Reject =China Hat aft , Uncage Seeker = China Hat fwd.
Weapon Employment:1) Lock seeker to target. 2) When good tone, press and hold pickle button.
Weapon Employment:Place target wingtips in funnel & squeeze trigger to fire.

Revision: 8b Return to TOC 22
DCS A-10C Normal Checklist & QRH Mar 29, 2012
ILLUMINATION FLARES
Notes: 1. Complete FENCE IN check prior to entering the combat area. (pg 12) 2. Hook means to select an object on the TAD.3. In order to "hook" an object, there must be one there in the first place! Valid objects to hook are: aircraft symbols, steerpoint symbols, transmitted SPI symbols (mini wedding cakes), bullseye symbols and, MARK symbols.4. With SPI set, the Azimuth Steering Line (ASL) on the HUD will indicate heading to SPI (target). 5. Time to Release Numeric (TTRN) next to the Solution Cue on the ASL will indicate the time in seconds until the weapon should be released. 6. Unlike bombing CCRP, you must manually press the weapon release button and not simply hold it down for automatic release when solution is achieved. 7. DO NOT select weapons using the MFCD OSBs on the main DSMS page.
Weapon Employment:1) Stick master mode CCRP2) Set HUD as SOI 3) DMS left/right to select desired profile4) Set desired target/location as SPI using one of the following methods:
a) HUD TDC over target and press TMS Fwd Longb) TGP cursor on target, laser on, press TMS Fwd Long, laser offc) Lock target with Maverick and press TMS Fwd Longd) Hook TAD object TMS FWD Short then make SPI with TMS Fwd long
Flare Employment:1) Stick master mode CCRP2) Set HUD as SOI 3) DMS left/right to select desired profile1. At 6 seconds on the TTRN, the Solution Cue will start fall down the ASL. 2. Manoeuvre so that the Solution Cue falls through the CCRP pipper. 3. When Solution Cue falls through the CCRP pipper, press the pickle button.

Revision: 8b Return to TOC 23
DCS A-10C Normal Checklist & QRH Mar 29, 2012
CLEARING HUNG STORE
Flight conditions................................Level flight/AP OnWep station/class/type........note on MFCD DSMS pageINV page...................................................select (OSB 5)Hung station OSB..................................................selectWeapon class........................................................selectWeapon type.........................................................selectLOAD station.............................................select (OSB 9)STAT page..................................................select (OSB 1)On DSMS main page.......................select STAT (OSB 12)Up/Down arrows.................scroll to hung station storePOWER OSB......................................cycle OFF then ONOSB 12 Press/Hold til..............DISPLAY PROGRAM page LOAD OSB..............................................................selectOSB 12................................select to designate as LOADOSB 12..............select again to access DTS Upload pageLOAD ALL OSB 10..................select to reload DTS (dots)DSMS OSB............select & check hung stn is now green
Note: 1. Hung store indicated oby red DSMS station.2. HOLD DOWN the pickle button to drop weapon.3. In order to avoid getting a hung store remember to press and hold the pickle until you hear or see that the store is released. Do not tap pickle button as this can result in a hung store. 4.The length of time pressing and holding the weapon release button is generally for 2-3 seconds.

Revision: 8b Return to TOC 24
DCS A-10C Normal Checklist & QRH Mar 29, 2012
JTAC DATAMethod 1 (manually enter JTAC coordinates in CDU)CDU.........................................................WAYPT MODEOSB 9?..........................................................make WPTWP name..........................................................enteredOSB 7............................................................save nameOSB 10....................................................switch to UTMGrid check.....................................................37T or 38TCoordinates...............................................enter in CDU OSB 16............................................................save WPTSTEER PT dial...................................................MISSIONTGP slave all to SPI...........................china hat fwd long
Method 2 (hook JTAC target data red triangle on TAD)Make TAD SOI..........................................coolie hat leftCursor....................slew onto JTAC target (red triangle)Hook JTAC target....................................TMS fwd ShortMake hooked JTAC target SPI..................TMS fwd Long Slave all to SPI..................................China hat fwd long
CREATING OVERHEAD MARKPOINTS:CDU MK (Mark Point) button................................press
orCREATING DESIGNATED MARKPOINT:HUD TDC, TAD, TGP or MAV seeker.......TMS right short
Notes: 1. With either overhead or designated markpoints set STEER PT dial MARK2. CDU +- rocker to cycle mark points3. To delete markpoints: TAD as SOI> Slew TAD cursor over map object (markpoints, red triangles etc.)>TMS up short to hook>Press OSB 17 on the TAD.4. 25 markpoints available. If all used first will be overwritten.5. To clear JTAC data target red triangle from TAD, use CNC (OSB 7). CNC = CaNCel
CAS 9-LINE BRIEFING..............proceed to card (pg 33)

Revision: 8b Return to TOC 25
DCS A-10C Normal Checklist & QRH Mar 29, 2012
AIR REFUELING (AR)
Contact tanker VHF/AM.....................request refuelingTACAN............................................REC/tanker freq setMaster arm............................................................SAFE GUN/PAC................................................................SAFETGP...........................................................................OFFLaser arm...............................................................SAFEDSMS status page................................deselect all stns
PRECONTACT: CMSP mode switch................................................STBYRCVR LT.............................................................as req'd Exterior lights...................................................as req'dAir refuel control lever.................open/READY light onContact tanker..................request contact on VHF/AM
CONTACT: Air refuel status lights.....................................LATCHEDFuel flow............................................confirm on gauge
DISCONNECT: Refuel/reset...........................press/hold (NWS button)Air refuel status lights...............................DISCONNECT
POST AIR REFUELING: Air refuel control lever......................................CLOSEDFuel quantity....................................................checked RCVR LT....................................................................OFFExterior lights....................................................as req'd
Notes: 1. For another contact press refuel/reset button (NWS) confirm READY light on.
2. Precontact position is 1 nm behind tanker, in trail. 3.Ready light will stay illuminated 3 minutes after refuel control lever closed4. When air refuel contact lever is open the EAC is disabled and autopilot will not work.

Revision: 8b Return to TOC 26
DCS A-10C Normal Checklist & QRH Mar 29, 2012
REPAIRS
HOT PIT: AFTER LANDING checks.......complete checklist (pg 29)NWS..........................................................................OFFAPU generator/APU..................................................OFF DSMS status page.................................deselect all stnsIntercom control rotary selector...............................INTContact ground crew..................request ground power Engines..........................................................shut down
(Wait for Repairs to be completed. When repaired continue checklist below)
Request eng start........................ATC on VHF/AM (fwd)Left engine…........................…………............…...…....startLeft eng instruments & hyd…..................…....……..checkRight engine……….............................................…….startRight eng instruments & hyd..............................…check Contact ground crew.............ground power disconnect
REARMING.........................proceed to checklist (pg 28)orREFUELING.........................proceed to checklist (pg 27)or
Takeoff without rearm/refuel, go to checklist below:
BEFORE TAXI (* items).........proceed to checklist (pg 6)
Notes: 1. The airfield must belong to your coalition for it to rearm, refuel, repair. If unsure use F11 and check bottom left colour block. blue=friendly, grey=neutral, red=enemy.2. Ask for ground power to keep CDU and other flight computers online during the time your engines are not providing electricity. (Going from APU power will cause some systems to reset)3. Wait approximately 3 minutes for repairs to commence.4. All panels will open, the jet goes up on invisible jacks, and repairs commence. Once the jet is lowered back to the ground, all panels close, and you are ready to rearm/refuel as req'd.
5. Engine ITT has to be at 150c or lower to start. Motor your engines till ITT less than 150c.6. If proceeding to the before taxi checklist, complete only items preceded by a *

Revision: 8b Return to TOC 27
DCS A-10C Normal Checklist & QRH Mar 29, 2012
HOT REFUELING
HOT PIT: AFTER LANDING checks.......complete checklist (pg 29)NWS..........................................................................OFFAPU generator/APU..................................................OFF DSMS status page.................................deselect all stnsCanopy...........................................................as desiredFuel display selector..............................................MAINIntercom control rotary selector...............................INTContact ground crew...........................request fuel load
When refueling complete:Fuel display.........................................confirm fuel load
REARMING.........................proceed to checklist (pg 28)
Takeoff without rearm continue to checklist below:
BEFORE TAXI (* items).........proceed to checklist (pg 5)
Notes: 1.Do not turn on TGP until clear of hot pit area.2. The airfield must belong to your coalition for it to rearm, refuel, repair. If unsure use F11 and check bottom left colour block. blue=friendly, grey=neutral, red=enemy.3. If proceeding to the before taxi checklist, complete only items preceded by a *

Revision: 8b Return to TOC 28
DCS A-10C Normal Checklist & QRH Mar 29, 2012
HOT REARM
HOT PIT: AFTER LANDING checks.......complete checklist (pg 29)NWS..........................................................................OFFAPU generator/APU..................................................OFF DSMS status page.................................deselect all stnsCanopy...........................................................as desiredIntercom control rotary selector...............................INTContact ground crew...............request desired payload
When rearming complete:DSMS..............................update per new load as belowOSB 12 Press/Hold til..............DISPLAY PROGRAM pageLOAD OSB..............................................................selectOSB 12................................select to designate as LOADOSB12 ..............select again to access DTS Upload pageLOAD DSMS OSB 18.....................select to reload DSMS
REFUELING.........................proceed to checklist (pg 27)orTakeoff without refueling continue checklist below:
BEFORE TAXI (* items).........proceed to checklist (pg 5)
Notes: 1. Do not turn on TGP until clear of hot pit area.2. The airfield must belong to your coalition for it to rearm, refuel, repair. If unsure use F11 & check bottom left colour block. blue=friendly, grey=neutral, red=enemy.3. If proceeding to the before taxi checklist, complete only items preceded by a *

Revision: 8b Return to TOC 29
DCS A-10C Normal Checklist & QRH Mar 29, 2012
AFTER LANDING
Speed brakes.......................................................closedFlaps..........................................................................UP Anti-skid switch.......................................................OFF Landing/taxi light.........................................as required TGP...........................................................................OFFEjection seat ground safety lever...........................SAFE Canopy...........................................................as desiredCMSP MODE switch...............................................STBY CMSP system switches.............................................OFFCMSP........................................................................OFFPitot heat.................................................................OFFPosition lights......................................................FLASHAnti-collision lights..................................................OFF
REPAIRS..............................proceed to checklist (pg 26)orREARMING.........................proceed to checklist (pg 28)orREFUELING.........................proceed to checklist (pg 27)orSHUTDOWN.......................proceed to checklist (pg 30)

Revision: 8b Return to TOC 30
DCS A-10C Normal Checklist & QRH Mar 29, 2012
SHUTDOWN
Landing/taxi light.....................................................OFFNWS.........................................................................OFFStandby attitude indicator......................................cageMASTER armament switch.....................................SAFEGUN/PAC armament switch...................................SAFELASER armament switch........................................SAFETGP...........................................................................OFFCICU.........................................................................OFF JTRS..........................................................................OFFIFFCC switch.............................................................OFFMFCD (L/R)...............................................................OFFEGI switch.................................................................OFFCDU switch...............................................................OFF
(After 5 minutes at idle. Taxi time may be included if core rpm < 80%)
Left throttle..............................................................OFFRight throttle............................................................OFFCanopy..................................................................OPENInverter switch.........................................................OFFBattery switch..........................................................OFFBoarding ladder...................................................deploy

Revision: 8b Return to TOC 31
DCS A-10C Normal Checklist & QRH Mar 29, 2012
CMSP DISPENSE PROGRAMSPROG CHAFF FLARE INTERVAL CYCLE THREAT
A 2 0 1 sec 10 RDR
B 4 0 0.5 sec 10 RDR
C 0 4 1 sec 10 IR
D 2 2 1 sec 10 RDR/IR
E 2 2 0.5 sec 10 RDR/IR
F 4 4 1 sec 10 RDR/IR
G 4 4 0.5 sec 10 RDR/IR
H 1 0 1 sec 1 RDR
I 2 0 1 sec 1 RDR
J 0 1 1 sec 1 IR
K 0 2 1 sec 1 IR
L 1 0 1 sec 20 RDR
M 0 1 1 sec 20 IR
N 2 1 2.25 sec 2 RDR/IR
Return to BEFORE TAXI checks (pg 6)Notes: There are six general types of dispense programs:1. Mix of chaff and flares released in a fast interval to defend against an incoming missile of unknown type (infrared or radar guided). (i.e. PROG E)
2. Mix of chaff and flares released at a low interval over a long period of time. When entering a target area, you may wish to activate such a program to act as a preventative measure against both infrared and radar guided air defence systems. (i.e. PROG F)
3. Chaff-only released at a fast interval. Use this program to defend against an incoming radar guided air defense system. (i.e. PROG B)
4. Chaff-only released at a low interval over a long period. When entering a target area, you may wish to use such a program to act as preventative measure against radar guided air defense systems. (i.e. PROG L)
5. Flares-only released at a fast interval. Use this program to defend against an incoming infrared guided missile system. (i.e. manually program 1 flare, every .50 sec, x20).
6. Flares-only released at a low interval over a long period. When entering a target area, you may wish to use such a program to act as preventative measure against infrared guided missile systems. (i.e. PROG M)
Modifying a CMSP program. Use the NXT rocker to select which of the 26 available PROG's you want to modify. (PROG's O-Z are all identical so it is best to only manually program these slotsl). Now right click DISP switch to go to menu, use SET buttons to select value, use NXT rocker to adjust selected value, when finished push RTN button to save the modified program and left click DISP switch x2 to exit menu.

Revision: 8b Return to TOC 32
DCS A-10C Normal Checklist & QRH Mar 29, 2012
RWR THREAT CHARTRWR
SYMBOLWEAPON NAME GUIDANCE ENGAGEMENT
MAX RANGE ENGAGEMENT
MAX ALTECM
PROG
-- ZU-23 OPT 1.0nm 6500' --
-- SA-18 “IGLA” IR 2.5nm 7000' --
-- SA-9 “STRELA-1” IR 6.5nm 11000' --
-- SA-13 “STRELA-10” IR 2.7nm 15000' --
A ZSU-23 “SHILKA” RADAR 1.5nm 6500' AAA
S6 SA-19 “TUNGUSKA” RADAR 4.0nm 16000' SAM2
03 SA-3 “GOA” RADAR 8.5nm 59000' SAM1
06 SA-6 “KUB” RADAR 13.0nm 33000' SAM1
08 SA-8 “OSA” RADAR 5.0nm 21000' SAM1
10 SA-10 “S-300”TRACKING RADAR
RADAR 32.0nm 98000' SAM2
BB SA-10 “S-300”SEARCH RADAR
SEARCH 32.0nm 98000' SAM2
11 SA-11/17 “BUK” RADAR 19.0nm 73000' SAM2
15 SA-15 “TOR” RADAR 6.5nm 26000' SAM2
50 A-50U RADAR -- -- AIR
23 Mig-23 RADAR -- -- AIR
25 Mig-25 RADAR -- -- AIR
29 Mig-29 RADAR -- -- AIR
29 Su-27 RADAR -- -- AIR
29 Su-33 RADAR -- -- AIR
29 Su-30 RADAR -- -- AIR
29 Su-34 RADAR -- -- AIRNotes: 1)Max engagement range/alt tested using player controlled A-10C. (exceptions were the SA-3, SA-10, SA-11 as these weapons reach well beyond the ceiling of the A-10C). 2)Plan flight to stay outside or above the engagement envelope of the threat weapon.3) For an IR only threat such as the SA-18 “IGLA” consider manually programming a flares-only, fast release program.

Revision: 8b Return to TOC 33
DCS A-10C Normal Checklist & QRH Mar 29, 2012
CAS 9-LINE BRIEFING1. IP:______________________________________
2. Heading:_________________________________
Offset:___________________________________
3. Distance: (IP to Target in NM)_________________
4. Target Elevation (in Feet/MSL)________________
5 Target Description: _________________________
6 Target Location:____________________________ (Lat/Long, Grid, Offset or Visual)
7. Target Mark:______________________________ (WP, Laser, IR, Beacon)
Code: (actual Code)_________________________
8. Location of Friendlies:_______________________
Position Marked By:_________________________
9 Egress:____________________________________ REMARKS:
JTAC COORDINATES.....................return to checklist (pg 24)

Revision: 8b Return to TOC 34
DCS A-10C Normal Checklist & QRH Mar 29, 2012
WEAPON PROFILE Z-DIAGRAM CHARTS

Revision: 8b Return to TOC 35
DCS A-10C Normal Checklist & QRH Mar 29, 2012
WEAPONS & CAPABILITIES GUIDENAME GUIDANCE TARGETS NOTES
30 mm CM (GAU-8 ) N/A Soft skinned up to armour Combat mix of 1 HEI every 5 AP
30 mm HEI (GAU-8) N/A Soft skinned High explosive incendiary
Mk1 (training rocket) N/A Training only Inert warhead practice round
MK5 (Rocket) N/A Armour High explosive anti-tank round
MK61 (training rocket) N/A Training only Inert warhead practice round
M151 (Rocket) N/A Personnel Anti-personnel fragmentation
M156 ( WP rocket) N/A Target marking White phosphorus smoke
M274 (training rocket) N/A Training only Training smoke marker
M257 (Illumination rocket) N/A Battlefield illumination Para-flare warhead, 100 sec burn
Mk-82 (unguided bomb) N/A Unarmored & lightly armored targets
LDGP 500 lb. Mount on TER or SER
Mk-82AIR (unguided bomb) N/A Unarmored & lightly armored targets
500 lb. ballute high or low drag Mount on TER or SER racks
Mk-84 (unguided bomb) N/A Armored targets 2000 lb. SER only
CBU-87 (cluster bomb) N/A Anti-Armour/personnel 950 lb All purpose cluster bomb
CBU-97 (cluster bomb) N/A Armour 1000 lb. 40 IR sensor skeets
BDU-50LD & HD (training bomb) N/A Training only Inert version of Mk-82LD & HD
BDU-33 (training bomb) N/A Training only Inert. Mimics Mk-82 ballistics
LUU-2 (paraflare) N/A Battlefield illumination Visible spectrum, 4.5 min burn 8 LUU-2 per Suu-25 dispenser
GBU-10 (guided bomb) Laser (LGB) Mobile hard, fixed soft, fixed hard
2500 lb, LGB version of Mk-84. SER only
GBU-12 (guided bomb) Laser (LGB) Mobile hard, fixed soft, fixed hard, armour
600 lb, LGB version of Mk-82 SER or TER capable
GBU-38 (guided bomb) GPS (JDAM) High priority fixed Day/night, all weather, fire & forget version of Mk-82.
GBU-31 (guided bomb) GPS (JDAM) High priority fixed Day/night, all weather, fire & forget version of Mk-84.
CBU-103 (guided cluster bomb) Inertial Nav As per CBU-87 CBU-87 with WCMD via INS
CBU-105 (guided cluster bomb) Inertial Nav As per CBU-97 CBU-97 with WCMD via INS
AGM-65D (guided missile) IIR seeker Armour, air defence, fortified
Day/night/all weather, 125 lb shaped charge warhead.
AGM-65G (guided missile) IIR seeker Hardened tactical Day/night/all weather 300 lb blast penetrator fragmentation
AGM-65H (guided missile) EO CCD TV seeker
Armour, air defence, fortified
Day/good weather, 125 lb shaped charge warhead
AGM-65K (guided missile) EO CCD TV seeker
Large Hardened Day/good weather. 300 lb blast penetrator fragmentation
TGM-65D/G/H & CATM-65K As per AGM-65D/G/H/K
Training only Inert training versions of the AGM-65D/G/H/K
AIM-9M (guided missile) IIR seeker Aircraft/Helo's Mounted on dual rail

Revision: 8b Return to TOC 36
DCS A-10C Normal Checklist & QRH Mar 29, 2012
AIRPORT DATA
AIRPORT ELEV RUNWAY LENGTH TACAN CH ILS TOWER FRQ
Gudauta 82' 15/33 8200' -- -- 130.00
Soganlug 1469' 13/31 7800' -- -- 139.00
Vaziani 1492' 14/32 8200' 22X 108.75 140.00
Kobuleti 59' 07/25 7800' 57X RWY 07-111.5 133.00
Kopitnari 148' 08/26 8200' 44X RWY 08-109.5 134.00
Senaki 39' 09/27 7800' 31X RWY 09-108.7 132.00
Batumi 36' 13/31 7800' 16X RWY 13-110.3 131.00
Sukhumi 39' 12/30 8200' -- -- 129.00
Tbilisi Lochini 1528' 13/31 9800' -- RWY 13-110.3RWY 31-108.9
138.00
Anapa 148' 04/22 9500' -- -- 121.00
Gelendzhik 82' 04/22 5900' -- -- 126.00
Maykop 590' 04/22 10500' -- -- 125.00
Krasnodar Center
98' 09/27 8200' -- -- 122.00
KrasnodarPashkovsky
112' 05/23 10100' -- -- 128.00
Novorossiysk 131' 04/22 5800' -- -- 123.00
Krymsk 66' 04/22 8500' -- -- 124.00
Mineralnye Vody 1050' 12/30 12700' -- RWY 12-111.7RWY 30-109.3
135.00
Nalchik 1410' 06/24 7500' -- RWY 24-110.5 136.00
Beslan 1771' 10/28 9800' -- RWY 10-110.5 141.00
Sochi Adler 98' 06/24 10100' -- RWY 06-111.1 127.00
Mozdok 499' 08/26 10100' -- -- 137.00
Nellis 1870' 03L/21R03R/21L
10100'10000'
-- -- --
Reserved
Reserved
Reserved

Revision: 8b Return to TOC 37
DCS A-10C Normal Checklist & QRH Mar 29, 2012
CROSSWIND CHART
DCS A-10C CROSSWIND LIMITS (Maximum)
Dual hydraulic system operating 35 knots
Single hydraulic system operating 30 knots
Manual reversion (two engines) 20 knots
Manual reversion (single engine) 10 knots (only if ejection not possible)
Formation take-off & landing 15 knots (steady or gust)
External fuel tanks 25 knots
X-wind greater than 20 knots Add 10 knots to approach and landing speeds (unless single engine)
Example: Runway in use is rwy 27, winds are 315 at 20 kts. The winds are 45 degrees off the runway heading. (315 minus 270 = 45) Enter chart at 45° and follow it down until it intersects the 20 kt arc. Where it intersects drop straight down to read the crosswind component of approx. 14 knots. To convert m/s to kts multiply m/s x 1.9438444.

Revision: 8b Return to TOC 38
DCS A-10C Normal Checklist & QRH Mar 29, 2012
MISSION DATA CARDCALLSIGN FLT 1/ TASK FUEL WT Lbs T/O WT Lbs VR
OWNID GROUPID WEAPONS WT Lbs
CM HEI TP WEAPONS LOADOUT (STNS L-R) CHAFF FLARES
1 2 3 4 5 6 7 8 9 10 11
ECM TGP AIM-9x2
PRI TARGET STP WEAPON DELIVERY THREATS CM/ECM PROG MIN SAFE ALT
SEC TARGET STP WEAPON DELIVERY THREATS CM/ECM PROG MIN SAFE ALT
BINGO FUEL TANKER CS TANKER TCN TANKER FRQ TANKER ALT
T/O FIELD TWR FRQ STP TCN ILS/RWY RWY LENGTH WX
LAND FIELD TWR FRQ STP TCN ILS/RWY RWY LENGTH WX
DIVERT FIELD TWR FRQ STP TCN ILS/RWY RWY LENGTH WX
TGP LASER CODE LASER SS CODE GBU LASER CODE BULLSEYE
AWACS (CS/FRQ) SEAD (CS/FRQ CAP/ESCORT (CS/FRQ) JTAC (CS/FRQ)
NOTES

Revision: 8b Return to TOC 39
DCS A-10C Normal Checklist & QRH Mar 29, 2012
PILOT NOTES:

Revision: 8b Return to TOC 40
DCS A-10C Normal Checklist & QRH Mar 29, 2012
Author Notes and Acknowledgments
Originally a rough collection of notes and tips gleaned from the manuals, forums, training guides, video's and checklists for my own personal use. I've tidied it up a bit and am putting it out for anyone who would like to use it for non-commercial use.
Reasons for this checklist/QRH (Quick Reference Handbook)...
1) I wanted a checklist that was formatted to more closely resemble the checklists used in my flt ops dept.
2) I've gone through the lessons and used many of the superb community based training guides and checklists. I'm getting comfortable with the location of the various switches and controls in the virtual A-10C, and as such wanted a checklist that reflected this and was presented in a more abbreviated format.
3) The checklist should be in a format that works equally well as both a printed and electronic document. Designed to fit in standard plastic approach plate protectors 5.5x8.5” (ie the ASA 7-Ring Approach Plate Sheet Protectors), this PDF also works very well on the IPAD being fully indexed with hyperlinks and return to index link on each page.
4) I am not able to fly the sim every day, so it was important that the checklist would guide me (acting as a refresher) and help me to take a cold jet through to takeoff, fence in/out checks, after landing and shutdown checks. After landing if you need repairs, refuel or rearm you stay in the checklist and it will flow you all the way back to take-off. As well the checklist would incorporate quick reference guides for weapons employment, air refueling, hot pit rearming, refueling and repairs.
5) The checklist includes items on TM Warthog HOTAS to ensure it is properly configured prior to start.
I can not take credit for all of the information in this document. My contribution is to a certain degree, the assembling and reformatting information it into a single document.
This checklist would not be possible without the invaluable help found on the DCS and SimHQ forums, as well as the training documents and checklists created by the community. With this in mind I would like to thank the following in particular: BlueRidgeDx, Derelor, EinsteinEP, James “Eddie” Knight, MemphisBelle, nemises, paulrkii, shu77, toby23, War Hawks, WarriorX. Special thanks to the teams at Eagle Dynamics and Digital Combat Simulator, for an amazing simulation.
Any errors in the document are mine.
Cheers
Lobo

Revision: 8b Return to TOC 41
DCS A-10C Normal Checklist & QRH Mar 29, 2012
SUMMARY OF CHANGES
Revision # 8a
Original public release version.
Revision # 8b
Page # Remarks
2 Note added regarding the summary of changes page
3 Index renamed “TABLE OF CONTENTS”
3 “Return to Index” hyperlink on each page renamed “Return to TOC”
3 TOC updated with pages added for crosswind and weapon capabilities
6 Error in EGI INS alignment note corrected
6 Spelling error of CICU corrected
32 Corrected errors showing SA-9 and SA-13 displaying RWR symbols.
32 Changed color and order of RWR threats. Grouped based on guidance
35 Added weapons & capability guide for the A-10C
37 Added crosswind chart & max limits for A-10 under various conditions
41 Added summary of changes page
35-41 Pages reordered & renumbered

Revision: 8b Return to TOC 42
DCS A-10C Normal Checklist & QRH Mar 29, 2012
INTENTIONALLY BLANK