dcs: f-5e tiger ii health warning - belsimtek.com•-3_qfm_eng.pdf · dcs: f-5e tiger ii...
TRANSCRIPT
DCS: F-5E TIGER II HEALTH WARNING
1

DCS: F-5E TIGER II HEALTH WARNING
1
HEALTH WARNING!
Please read before using this computer game or allowing your children to use it.
A very small proportion of people may experience a seizure or loss of
consciousness when exposed to certain visual images, including flashing lights or light patterns that can occur in computer games. This may happen even
with people who have no medical history of seizures, epilepsy, or “photosensitive epileptic seizures” while playing computer games.
These seizures have a variety of symptoms, including light-headedness, dizziness, disorientation, blurred vision, eye or face twitching, loss of
consciousness or awareness even if momentarily.
Immediately stop playing and consult your doctor if you or your children experience any of the above symptoms.
The risk of seizures can be reduced if the following precautions are taken, (as
well as a general health advice for playing computer games):
Do not play when you are drowsy or tired.
Play in a well-lit room.
Rest for at least 10 minutes per hour when playing the computer
game.
DCS: F-5E TIGER II INSTALLATION AND LAUNCH
2
INSTALLATION AND LAUNCH
Place the Setup.exe file and all .bin files in the same folder and double click
on the Setup.exe file to begin installation. Then follow the on-screen instructions.
Note: You will need to be logged into Windows with Administrator rights in order to install the game.
L a u n c h i n g D C S : F - 5 E T I G E R I I
After installation, you will have icon on your desktop, DCS World.
DCS World is the PC simulation environment that the F-5E TIGER II
simulation operates within. When you run DCS World, you in turn launch
DCS: F-5E TIGER II.
As part of DCS World, the Su-25T Frogfoot attack aircraft and TF-51 training
aircraft are also included for free.
After executing the DCS World icon on your desktop, the DCS World Main
Menu page is opened. From the Main Menu, you can read DCS news, change
your wallpaper by selecting either the F-5E TIGER II or Su-25T Frogfoot icons at the bottom of the page, or select any of the options along the right side of
the page. To get started quickly, you can select Instant Action and play any of the missions listed in the F-5E TIGER II tab.
G a m e P r o b l e m s
If you encounter a problem, particularly with controls, we suggest you back
up and then delete your Saved Games\User Name\DCS\Config folder, which is
created by DCS on your operating system drive at first launch. Restart the
game and this folder will be rebuilt automatically with default settings,
including all of the controller input profiles.
If problems persist, we suggest consulting our online technical support
forums at http://forums.eagle.ru/forumdisplay.php?f=251
DCS: F-5E TIGER II INSTALLATION AND LAUNCH
3
G a m e M a n u a l s
The Activation Guide describing serial key activation/deactivation is available in the /Doc folder of the game’s root installation directory.
Additional documentation for DCS: F-86F Sabre, including the complete Flight
Manual and a key commands guide can be found in the /Mods/aircraft/F-5E/Doc folder of the game installation directory.
U s e f u l L i n k s
DCS Homepage:
http://www.digitalcombatsimulator.com/
DCS: F-5E TIGER II forum:
http://forums.eagle.ru/forumdisplay.php?f=332
DCS Wiki:
http://en.wiki.eagle.ru/wiki/Main_Page
DCS: F-5E TIGER II FLIGHT CONTROL
4
FLIGHT CONTROL
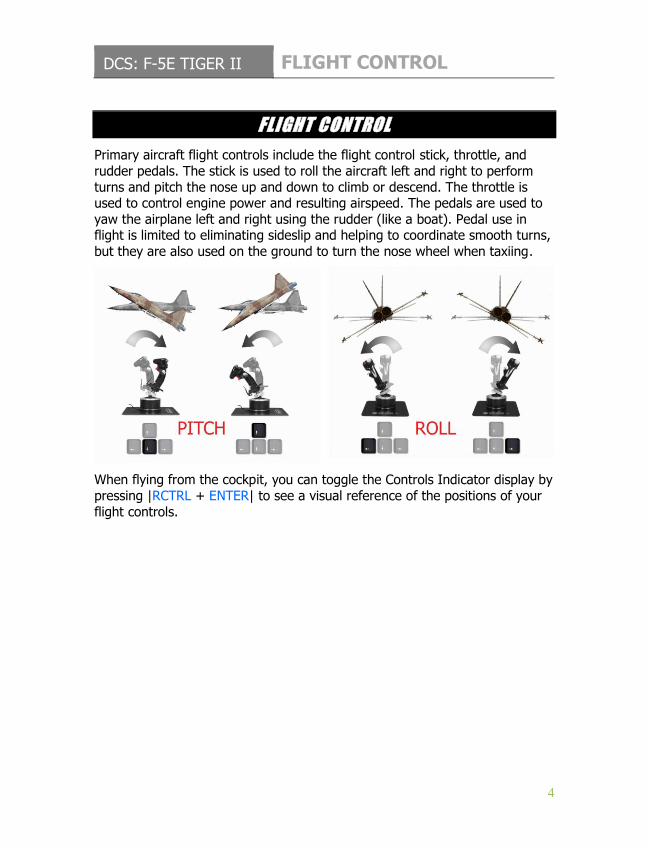
Primary aircraft flight controls include the flight control stick, throttle, and
rudder pedals. The stick is used to roll the aircraft left and right to perform
turns and pitch the nose up and down to climb or descend. The throttle is used to control engine power and resulting airspeed. The pedals are used to
yaw the airplane left and right using the rudder (like a boat). Pedal use in flight is limited to eliminating sideslip and helping to coordinate smooth turns,
but they are also used on the ground to turn the nose wheel when taxiing.
When flying from the cockpit, you can toggle the Controls Indicator display by
pressing |RCTRL + ENTER| to see a visual reference of the positions of your
flight controls.

DCS: F-5E TIGER II FLIGHT CONTROL
5
1. Left Throttle and Position
Indication 2. Right Throttle and Position
Indication 3. Aileron Spring Stop 4. Control Stick and Position
Indication 5. Trim Tab Position (mechanism
used to reduce pressure on control stick)
6. Pedals and Rudder Pedal Indicator
7. Wheel Brake pressure Indicator 8. Maximum Pitch Trim Deviation
Indicator. Before takeoff, the pitch trim indicator (5) shall be set approximately to a neutral position
If you are flying on keyboard only, the primary flight control keys will be:
arrow keys to control roll and pitch, |Numpad+| and |Numpad-| to control throttle, and |Z| / |X| to control pedals. If you do have a joystick, it may be
equipped with a throttle handle and/or a twist grip, which will allow you to
control the pedals.
DCS: F-5E TIGER II COCKPIT
6
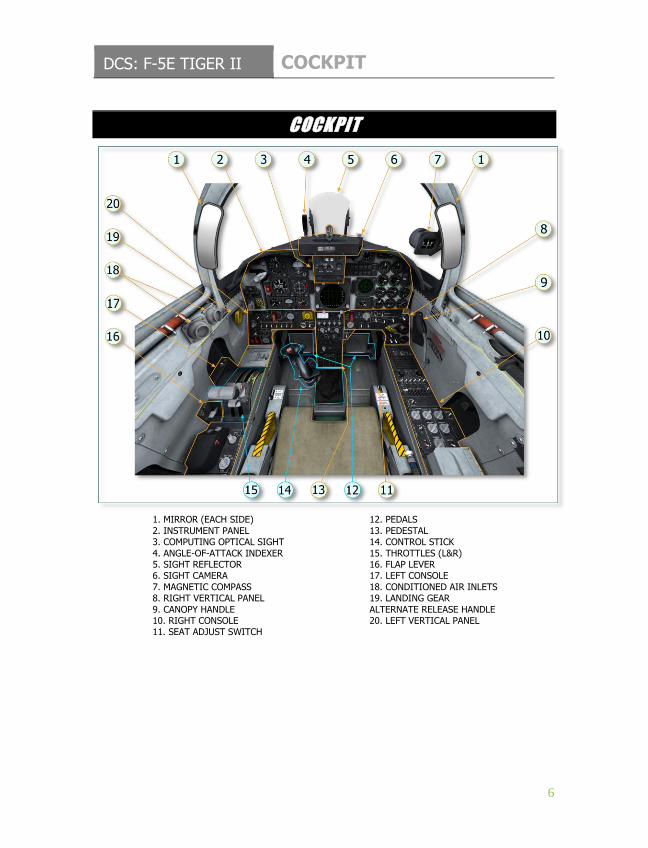
COCKPIT
1. MIRROR (EACH SIDE)
2. INSTRUMENT PANEL 3. COMPUTING OPTICAL SIGHT
4. ANGLE-OF-ATTACK INDEXER 5. SIGHT REFLECTOR 6. SIGHT CAMERA
7. MAGNETIC COMPASS 8. RIGHT VERTICAL PANEL
9. CANOPY HANDLE 10. RIGHT CONSOLE 11. SEAT ADJUST SWITCH
12. PEDALS
13. PEDESTAL 14. CONTROL STICK
15. THROTTLES (L&R) 16. FLAP LEVER 17. LEFT CONSOLE
18. CONDITIONED AIR INLETS 19. LANDING GEAR
ALTERNATE RELEASE HANDLE 20. LEFT VERTICAL PANEL
DCS: F-5E TIGER II COCKPIT
7
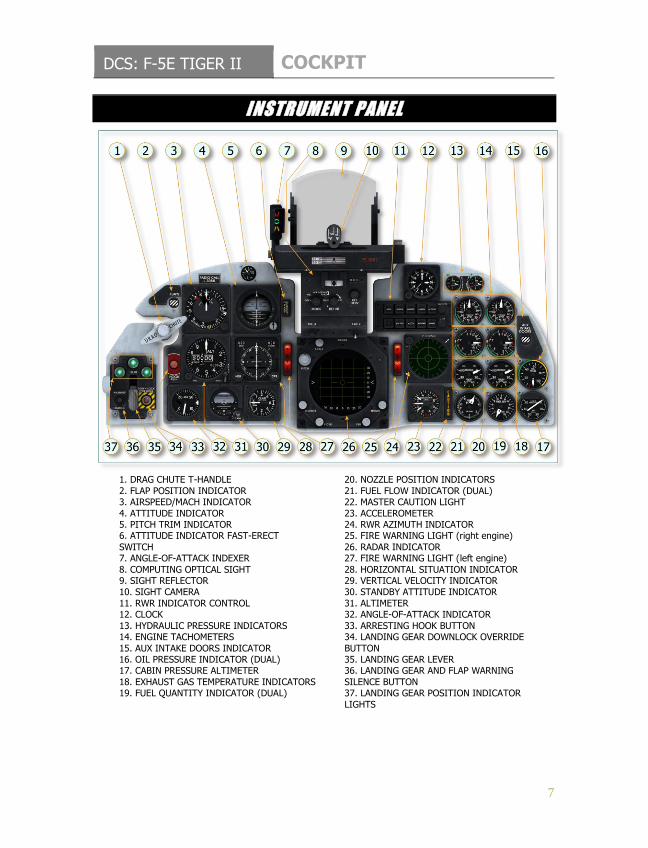
INSTRUMENT PANEL
1. DRAG CHUTE T-HANDLE
2. FLAP POSITION INDICATOR 3. AIRSPEED/MACH INDICATOR
4. ATTITUDE INDICATOR 5. PITCH TRIM INDICATOR 6. ATTITUDE INDICATOR FAST-ERECT
SWITCH 7. ANGLE-OF-ATTACK INDEXER
8. COMPUTING OPTICAL SIGHT 9. SIGHT REFLECTOR 10. SIGHT CAMERA
11. RWR INDICATOR CONTROL 12. CLOCK
13. HYDRAULIC PRESSURE INDICATORS 14. ENGINE TACHOMETERS
15. AUX INTAKE DOORS INDICATOR 16. OIL PRESSURE INDICATOR (DUAL) 17. CABIN PRESSURE ALTIMETER
18. EXHAUST GAS TEMPERATURE INDICATORS 19. FUEL QUANTITY INDICATOR (DUAL)
20. NOZZLE POSITION INDICATORS
21. FUEL FLOW INDICATOR (DUAL) 22. MASTER CAUTION LIGHT
23. ACCELEROMETER 24. RWR AZIMUTH INDICATOR 25. FIRE WARNING LIGHT (right engine)
26. RADAR INDICATOR 27. FIRE WARNING LIGHT (left engine)
28. HORIZONTAL SITUATION INDICATOR 29. VERTICAL VELOCITY INDICATOR 30. STANDBY ATTITUDE INDICATOR
31. ALTIMETER 32. ANGLE-OF-ATTACK INDICATOR
33. ARRESTING HOOK BUTTON 34. LANDING GEAR DOWNLOCK OVERRIDE
BUTTON 35. LANDING GEAR LEVER 36. LANDING GEAR AND FLAP WARNING
SILENCE BUTTON 37. LANDING GEAR POSITION INDICATOR
LIGHTS
DCS: F-5E TIGER II COCKPIT
8
INSTRUMENT PANEL INDICATORS AND INSTRUMENTS
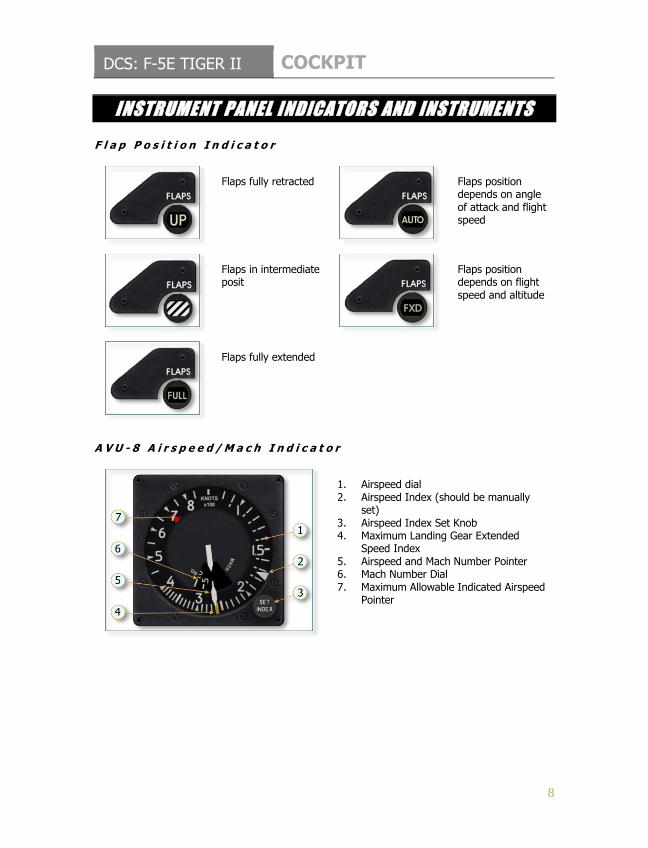
F l a p P o s i t i o n I n d i c a t o r
Flaps fully retracted
Flaps position depends on angle of attack and flight speed
Flaps in intermediate posit
Flaps position depends on flight speed and altitude
Flaps fully extended
A V U - 8 A i r s p e e d / M a c h I n d i c a t o r
1. Airspeed dial 2. Airspeed Index (should be manually
set) 3. Airspeed Index Set Knob 4. Maximum Landing Gear Extended
Speed Index 5. Airspeed and Mach Number Pointer 6. Mach Number Dial 7. Maximum Allowable Indicated Airspeed
Pointer
DCS: F-5E TIGER II COCKPIT
9
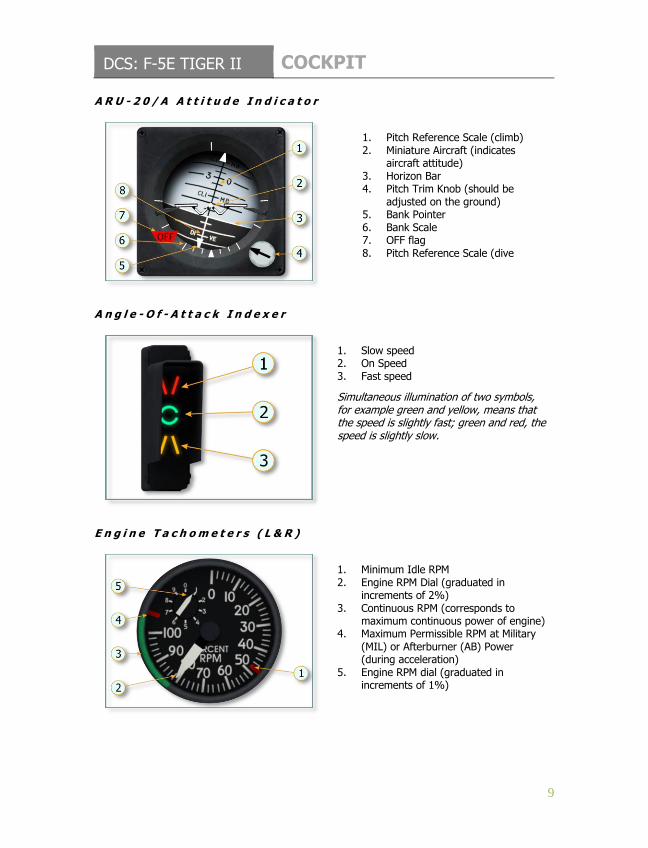
A R U - 2 0 / A A t t i t u d e I n d i c a t o r
1. Pitch Reference Scale (climb) 2. Miniature Aircraft (indicates
aircraft attitude) 3. Horizon Bar 4. Pitch Trim Knob (should be
adjusted on the ground) 5. Bank Pointer 6. Bank Scale 7. OFF flag 8. Pitch Reference Scale (dive
A n g l e - O f - A t t a c k I n d e x e r
1. Slow speed 2. On Speed 3. Fast speed
Simultaneous illumination of two symbols, for example green and yellow, means that the speed is slightly fast; green and red, the speed is slightly slow.
E n g i n e T a c h o m e t e r s ( L & R )
1. Minimum Idle RPM 2. Engine RPM Dial (graduated in
increments of 2%) 3. Continuous RPM (corresponds to
maximum continuous power of engine) 4. Maximum Permissible RPM at Military
(MIL) or Afterburner (AB) Power (during acceleration)
5. Engine RPM dial (graduated in increments of 1%)
DCS: F-5E TIGER II COCKPIT
10
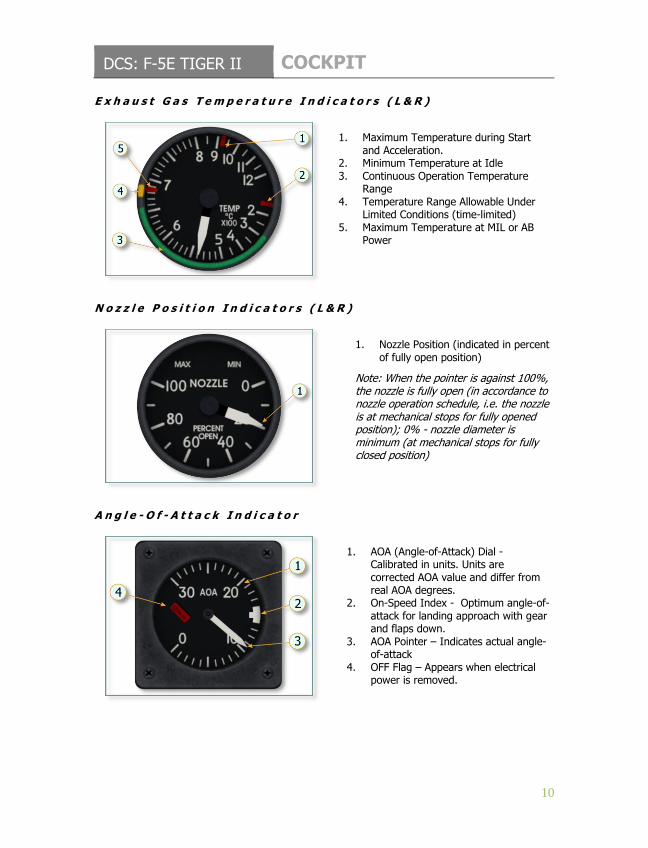
E x h a u s t G a s T e m p e r a t u r e I n d i c a t o r s ( L & R )
1. Maximum Temperature during Start
and Acceleration. 2. Minimum Temperature at Idle 3. Continuous Operation Temperature
Range 4. Temperature Range Allowable Under
Limited Conditions (time-limited) 5. Maximum Temperature at MIL or AB
Power
N o z z l e P o s i t i o n I n d i c a t o r s ( L & R )
1. Nozzle Position (indicated in percent
of fully open position)
Note: When the pointer is against 100%, the nozzle is fully open (in accordance to nozzle operation schedule, i.e. the nozzle is at mechanical stops for fully opened position); 0% - nozzle diameter is minimum (at mechanical stops for fully closed position)
A n g l e - O f - A t t a c k I n d i c a t o r
1. АОА (Angle-of-Attack) Dial -
Calibrated in units. Units are corrected AOA value and differ from real AOA degrees.
2. On-Speed Index - Optimum angle-of-attack for landing approach with gear and flaps down.
3. АОА Pointer – Indicates actual angle-of-attack
4. OFF Flag – Appears when electrical power is removed.
DCS: F-5E TIGER II COCKPIT
11
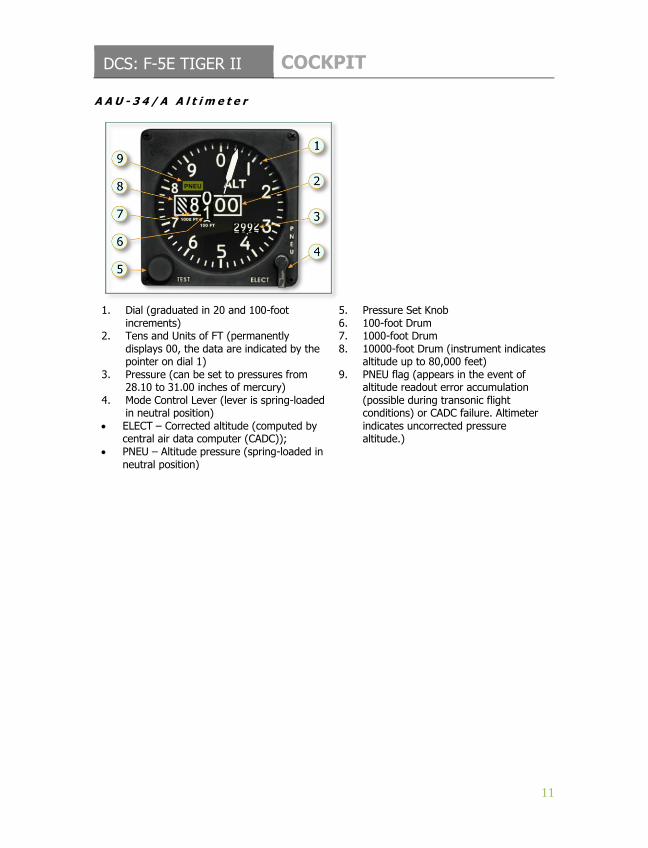
A A U - 3 4 / A A l t i m e t e r
1. Dial (graduated in 20 and 100-foot increments)
2. Tens and Units of FT (permanently displays 00, the data are indicated by the pointer on dial 1)
3. Pressure (can be set to pressures from 28.10 to 31.00 inches of mercury)
4. Mode Control Lever (lever is spring-loaded in neutral position)
ELECT – Corrected altitude (computed by central air data computer (CADC));
PNEU – Altitude pressure (spring-loaded in neutral position)
5. Pressure Set Knob 6. 100-foot Drum 7. 1000-foot Drum 8. 10000-foot Drum (instrument indicates
altitude up to 80,000 feet) 9. PNEU flag (appears in the event of
altitude readout error accumulation (possible during transonic flight conditions) or CADC failure. Altimeter indicates uncorrected pressure altitude.)
DCS: F-5E TIGER II COMBAT EMPLOYMENT
12
PROCEDURES
C o l d S t a r t
The automatic start-up procedure can be activated by pressing |LWin + Home| Automatic shutdown can be activated by pressing |LWin + End|
All procedures from the start of the engine before the flight to the after flight
procedures are described in the FLIGHT MANUAL.
DCS: F-5E TIGER II COMBAT EMPLOYMENT
13
AIR-TO-AIR COMBAT EMPLOYMENT
J O I N T O P E R A T I O N O F R A D A R A N D S I G H T S Y S T E M D U R I N G A I R - T O - A I R C O M B A T
M S L M o d e
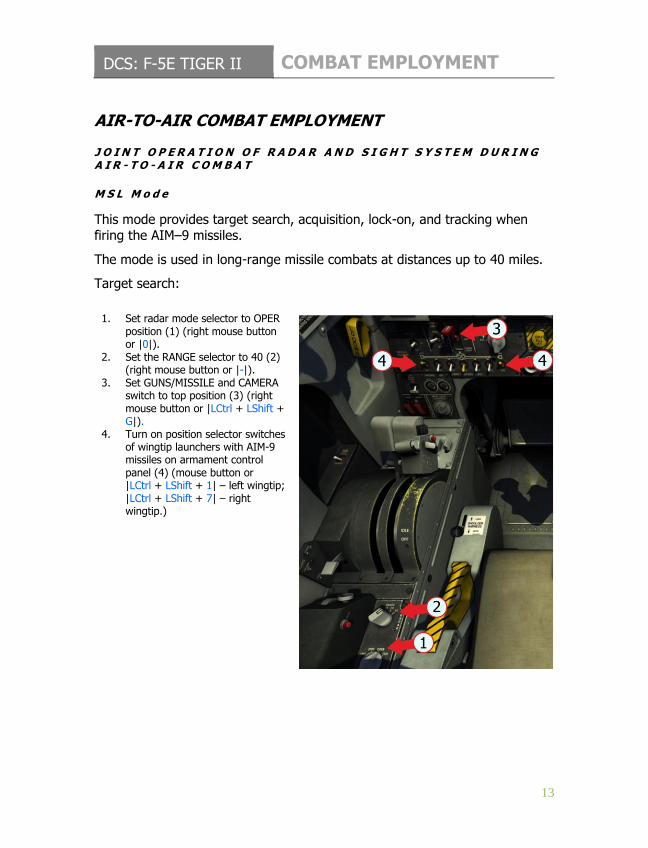
This mode provides target search, acquisition, lock-on, and tracking when firing the AIM–9 missiles.
The mode is used in long-range missile combats at distances up to 40 miles.
Target search:
1. Set radar mode selector to OPER
position (1) (right mouse button or |0|).
2. Set the RANGE selector to 40 (2) (right mouse button or |-|).
3. Set GUNS/MISSILE and CAMERA switch to top position (3) (right mouse button or |LCtrl + LShift + G|).
4. Turn on position selector switches of wingtip launchers with AIM-9 missiles on armament control panel (4) (mouse button or |LCtrl + LShift + 1| – left wingtip; |LCtrl + LShift + 7| – right wingtip.)
DCS: F-5E TIGER II COMBAT EMPLOYMENT
14
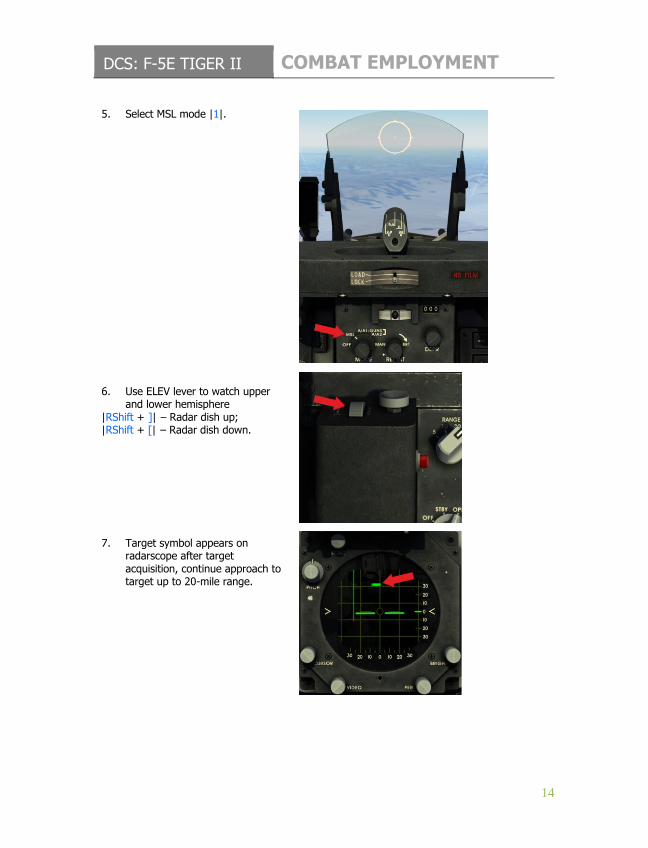
5. Select MSL mode |1|.
6. Use ELEV lever to watch upper
and lower hemisphere |RShift + ]| – Radar dish up; |RShift + [| – Radar dish down.
7. Target symbol appears on
radarscope after target acquisition, continue approach to target up to 20-mile range.

DCS: F-5E TIGER II COMBAT EMPLOYMENT
15
8. Set RANGE selector to 20 |–|.
9. Target acquisition symbol appears, continue approach to target up to 10-mile range.
Target lock-on and tracking:
1. When 10-mile range is reached, align acquisition symbol with target using TDC button (1) (|;| – up, |,| – left, |.| – down, |/| – right), and push AСQ button (2) |Enter| to lock on the target, at the same time radar display scale is automatically changed to 10 miles.
DCS: F-5E TIGER II COMBAT EMPLOYMENT
16
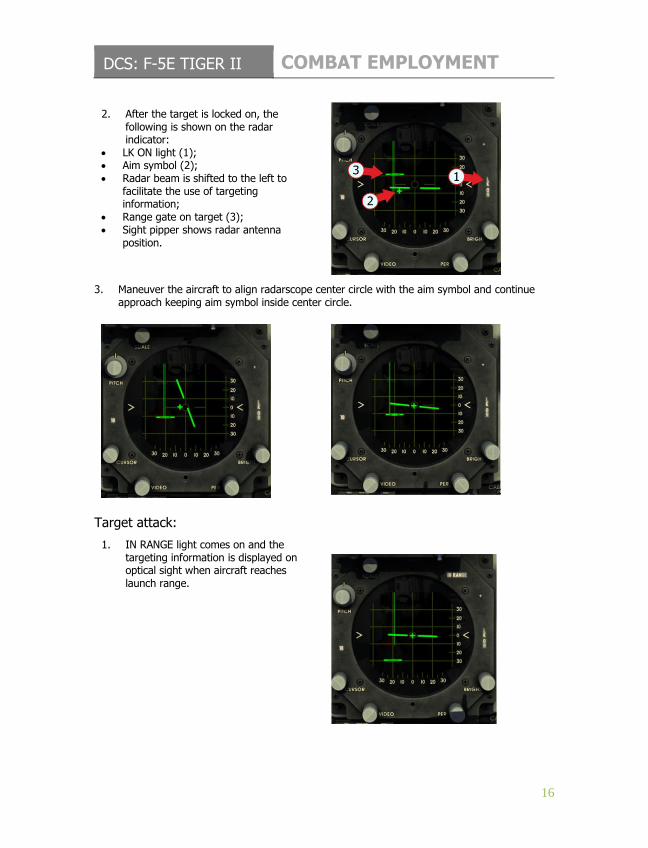
2. After the target is locked on, the
following is shown on the radar indicator:
LK ON light (1); Aim symbol (2); Radar beam is shifted to the left to
facilitate the use of targeting information;
Range gate on target (3); Sight pipper shows radar antenna
position.
3. Maneuver the aircraft to align radarscope center circle with the aim symbol and continue approach keeping aim symbol inside center circle.
Target attack:
1. IN RANGE light comes on and the targeting information is displayed on optical sight when aircraft reaches launch range.

DCS: F-5E TIGER II COMBAT EMPLOYMENT
17
2. Continue target approach until seeker
lock-on audio tone is heard. Press and hold MISSILE UNCAGE switch |RShift + M| after seeker lock-on to facilitate maneuvering to advantageous attack position.
3. After attack position is taken, push BOMB-ROCKET button to initiate launch |RAlt + Space|.
In MSL mode, the radar stores target parameters for 1.75 s after target lock-on is lost. The radar continues to track the target if it appears within
1.75 s.
If target does not appear, radar initiates search phase.
Radar antenna returns to the position held during previous search phase.
Acquisition symbol appears in last target position before lock-on was lost.
Perform target acquisition and lock-on once again.
If it is necessary to break lock-on, push ACQ button |Enter|
Radar initiates target acquisition; Acquisition symbol reappears at the last range and azimuth position before lock-
on was broken.
In order to go back to target search phase, push DOGFIGHT/RESUME
SEARCH switch on the aircraft control stick |R|. Radar antenna will initiate
target search.

DCS: F-5E TIGER II COMBAT EMPLOYMENT
18
D o g f i g h t M i s s i l e ( D M ) M o d e
This mode provides target search, acquisition, and lock-on when firing AIM–9 missiles.
The mode shall be used in short-range air-to-air combats.
It is recommended to perform target search and acquisition in 20-mile range before selecting DM mode.
Target search:
1. Set radar mode selector to
OPER position |0|. 2. Set RANGE selector to 20 |-|. 3. Set GUNS/MISSILE and
CAMERA switch to top position |LCtrl + LShift + G|.
4. Turn on position selector switches of wingtip launchers with AIM-9 missiles on armament control panel |LCtrl + LShift + 1| – left wingtip; |LCtrl + LShift + 7| – right wingtip.
DCS: F-5E TIGER II COMBAT EMPLOYMENT
19
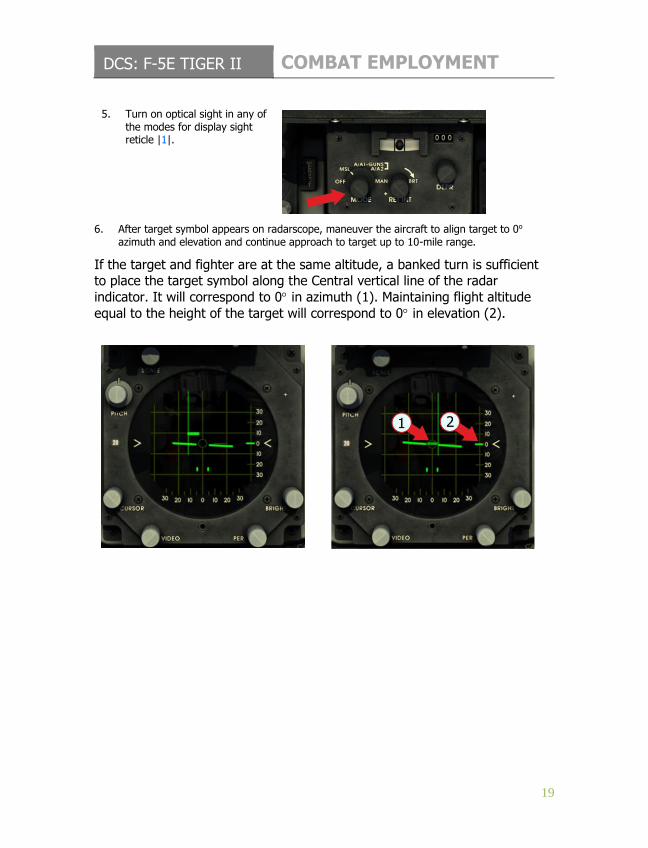
5. Turn on optical sight in any of
the modes for display sight reticle |1|.
6. After target symbol appears on radarscope, maneuver the aircraft to align target to 0o azimuth and elevation and continue approach to target up to 10-mile range.
If the target and fighter are at the same altitude, a banked turn is sufficient
to place the target symbol along the Central vertical line of the radar
indicator. It will correspond to 0 in azimuth (1). Maintaining flight altitude
equal to the height of the target will correspond to 0 in elevation (2).
DCS: F-5E TIGER II COMBAT EMPLOYMENT
20
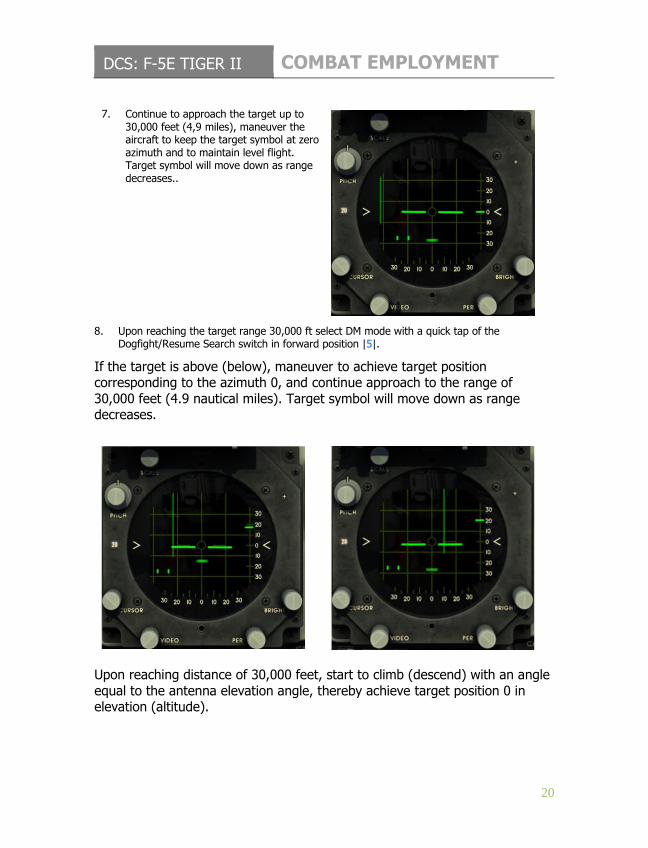
7. Continue to approach the target up to
30,000 feet (4,9 miles), maneuver the aircraft to keep the target symbol at zero azimuth and to maintain level flight. Target symbol will move down as range decreases..
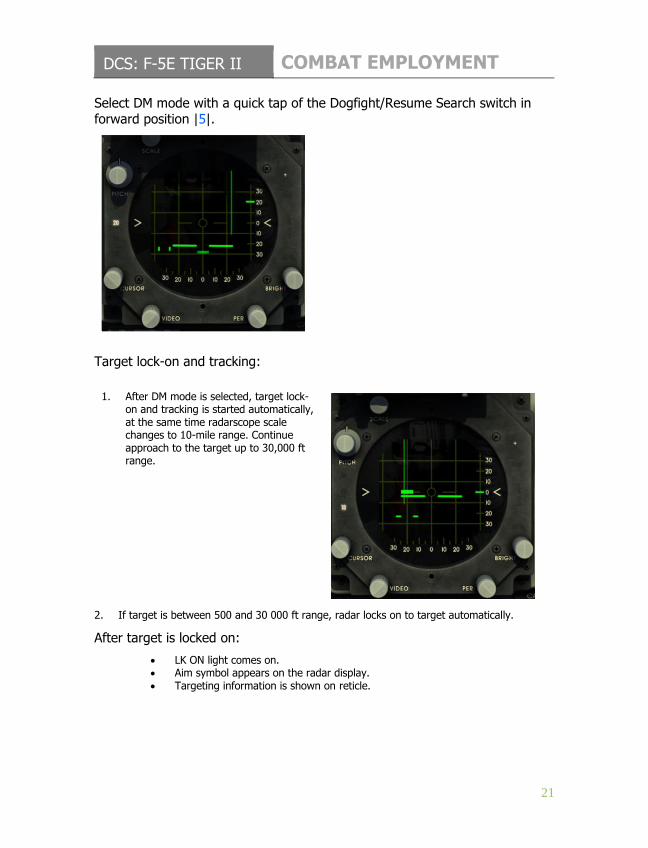
8. Upon reaching the target range 30,000 ft select DM mode with a quick tap of the Dogfight/Resume Search switch in forward position |5|.
If the target is above (below), maneuver to achieve target position corresponding to the azimuth 0, and continue approach to the range of
30,000 feet (4.9 nautical miles). Target symbol will move down as range decreases.
Upon reaching distance of 30,000 feet, start to climb (descend) with an angle
equal to the antenna elevation angle, thereby achieve target position 0 in elevation (altitude).
DCS: F-5E TIGER II COMBAT EMPLOYMENT
21
Select DM mode with a quick tap of the Dogfight/Resume Search switch in forward position |5|.
Target lock-on and tracking:
1. After DM mode is selected, target lock-
on and tracking is started automatically, at the same time radarscope scale changes to 10-mile range. Continue approach to the target up to 30,000 ft range.
2. If target is between 500 and 30 000 ft range, radar locks on to target automatically.
After target is locked on:
LK ON light comes on. Aim symbol appears on the radar display. Targeting information is shown on reticle.
DCS: F-5E TIGER II COMBAT EMPLOYMENT
22
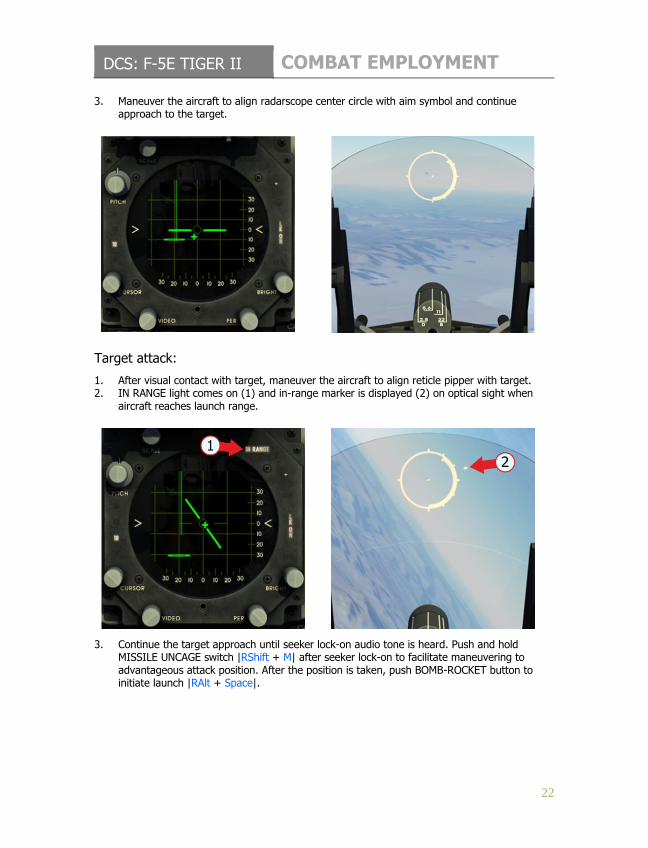
3. Maneuver the aircraft to align radarscope center circle with aim symbol and continue approach to the target.
Target attack:
1. After visual contact with target, maneuver the aircraft to align reticle pipper with target. 2. IN RANGE light comes on (1) and in-range marker is displayed (2) on optical sight when
aircraft reaches launch range.
3. Continue the target approach until seeker lock-on audio tone is heard. Push and hold MISSILE UNCAGE switch |RShift + M| after seeker lock-on to facilitate maneuvering to advantageous attack position. After the position is taken, push BOMB-ROCKET button to initiate launch |RAlt + Space|.
DCS: F-5E TIGER II COMBAT EMPLOYMENT
23
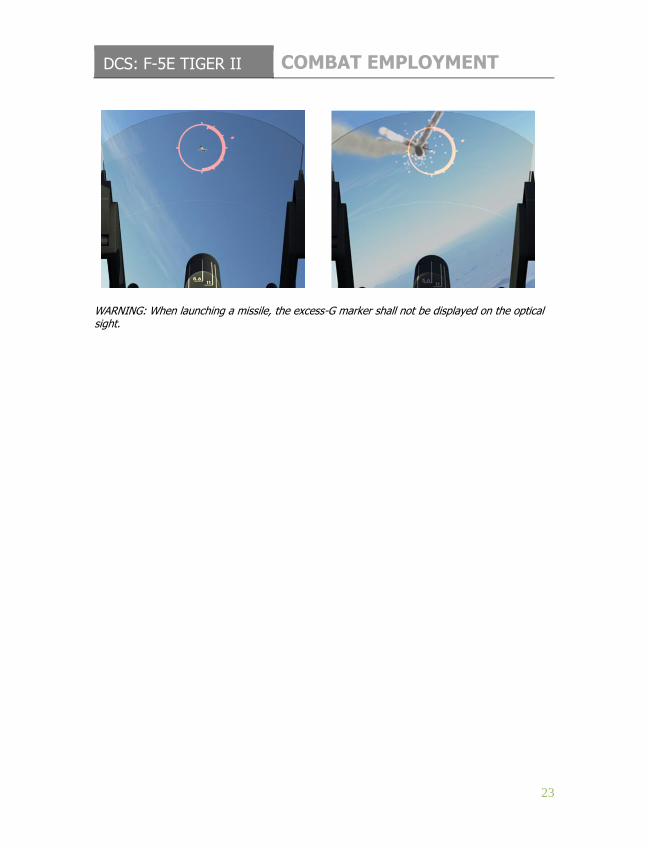
WARNING: When launching a missile, the excess-G marker shall not be displayed on the optical sight.
DCS: F-5E TIGER II COMBAT EMPLOYMENT
24
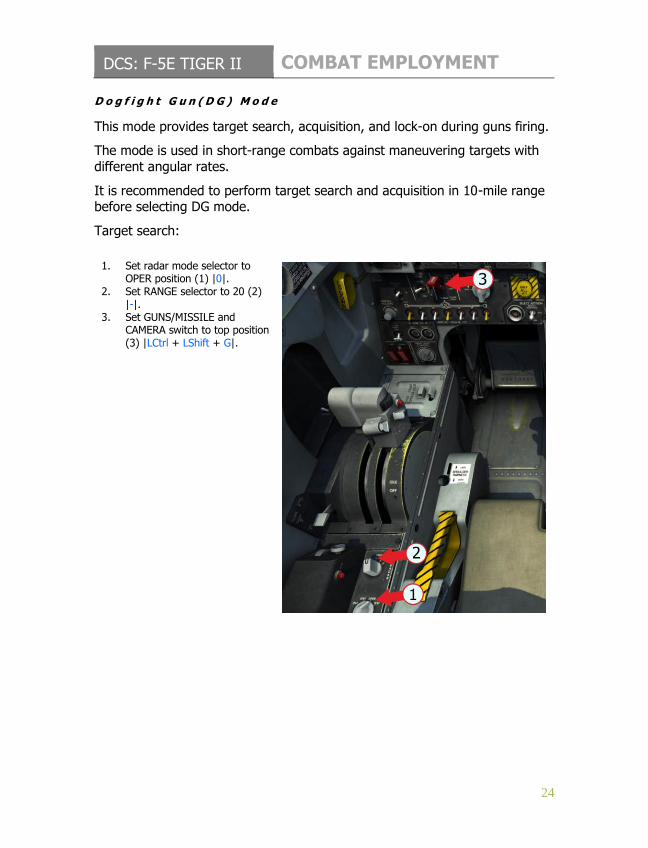
D o g f i g h t G u n ( D G ) M o d e
This mode provides target search, acquisition, and lock-on during guns firing.
The mode is used in short-range combats against maneuvering targets with
different angular rates.
It is recommended to perform target search and acquisition in 10-mile range before selecting DG mode.
Target search:
1. Set radar mode selector to
OPER position (1) |0|. 2. Set RANGE selector to 20 (2)
|-|. 3. Set GUNS/MISSILE and
CAMERA switch to top position (3) |LCtrl + LShift + G|.
DCS: F-5E TIGER II COMBAT EMPLOYMENT
25
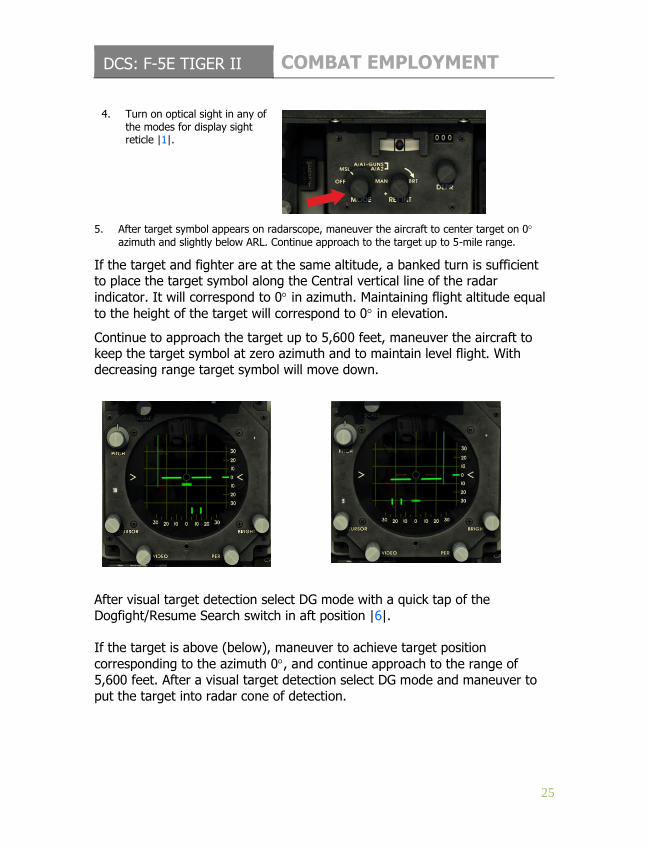
4. Turn on optical sight in any of
the modes for display sight reticle |1|.
5. After target symbol appears on radarscope, maneuver the aircraft to center target on 0
azimuth and slightly below ARL. Continue approach to the target up to 5-mile range.
If the target and fighter are at the same altitude, a banked turn is sufficient to place the target symbol along the Central vertical line of the radar
indicator. It will correspond to 0 in azimuth. Maintaining flight altitude equal
to the height of the target will correspond to 0 in elevation.
Continue to approach the target up to 5,600 feet, maneuver the aircraft to keep the target symbol at zero azimuth and to maintain level flight. With
decreasing range target symbol will move down.
After visual target detection select DG mode with a quick tap of the
Dogfight/Resume Search switch in aft position |6|.
If the target is above (below), maneuver to achieve target position
corresponding to the azimuth 0, and continue approach to the range of
5,600 feet. After a visual target detection select DG mode and maneuver to
put the target into radar cone of detection.
DCS: F-5E TIGER II COMBAT EMPLOYMENT
26
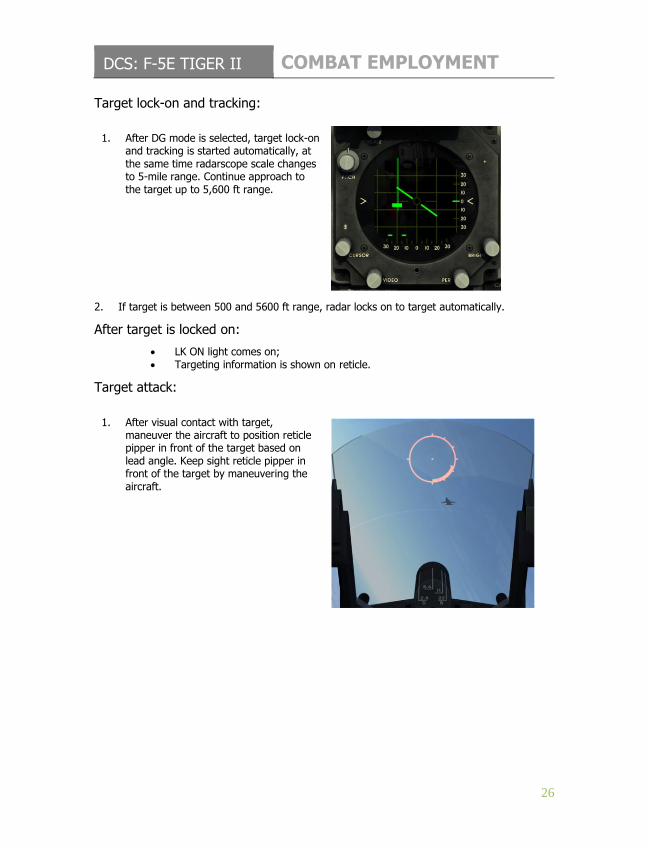
Target lock-on and tracking:
1. After DG mode is selected, target lock-on
and tracking is started automatically, at the same time radarscope scale changes to 5-mile range. Continue approach to the target up to 5,600 ft range.
2. If target is between 500 and 5600 ft range, radar locks on to target automatically.
After target is locked on:
LK ON light comes on; Targeting information is shown on reticle.
Target attack:
1. After visual contact with target,
maneuver the aircraft to position reticle pipper in front of the target based on lead angle. Keep sight reticle pipper in front of the target by maneuvering the aircraft.
DCS: F-5E TIGER II COMBAT EMPLOYMENT
27
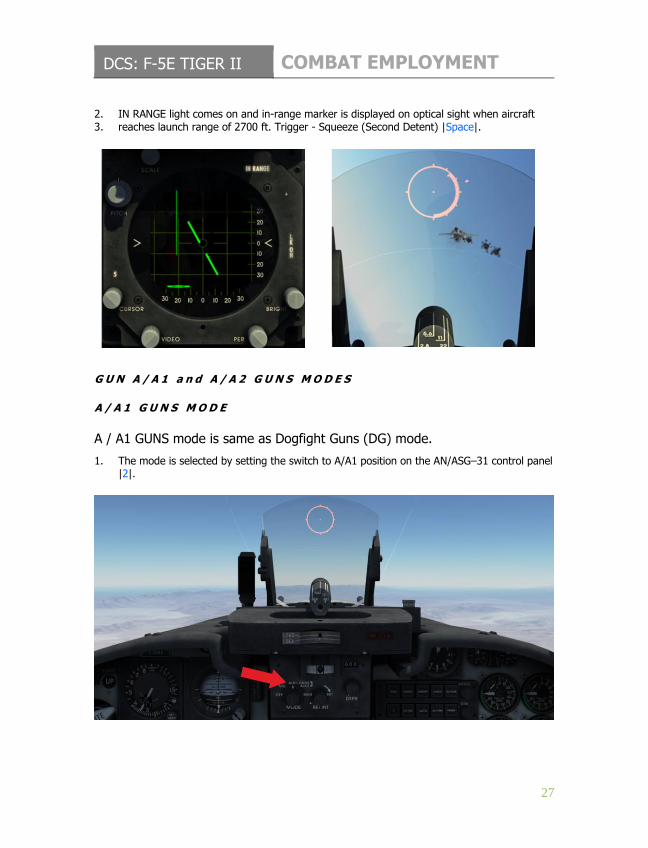
2. IN RANGE light comes on and in-range marker is displayed on optical sight when aircraft 3. reaches launch range of 2700 ft. Trigger - Squeeze (Second Detent) |Space|.
G U N А / А 1 a n d А / А 2 G U N S M O D E S
А / А 1 G U N S M O D E
A / A1 GUNS mode is same as Dogfight Guns (DG) mode.
1. The mode is selected by setting the switch to А/А1 position on the AN/ASG–31 control panel |2|.
DCS: F-5E TIGER II COMBAT EMPLOYMENT
28
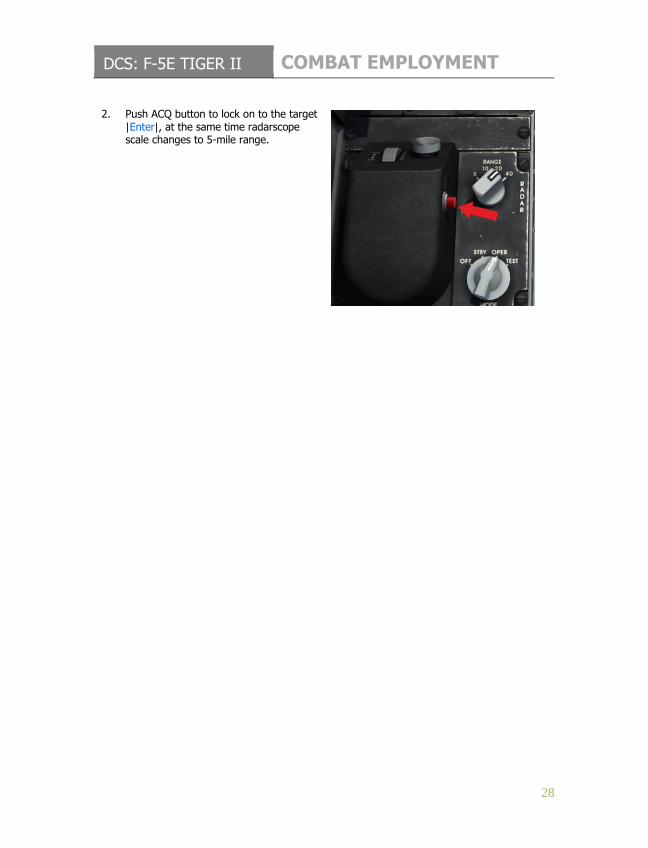
2. Push ACQ button to lock on to the target
|Enter|, at the same time radarscope scale changes to 5-mile range.
DCS: F-5E TIGER II COMBAT EMPLOYMENT
29
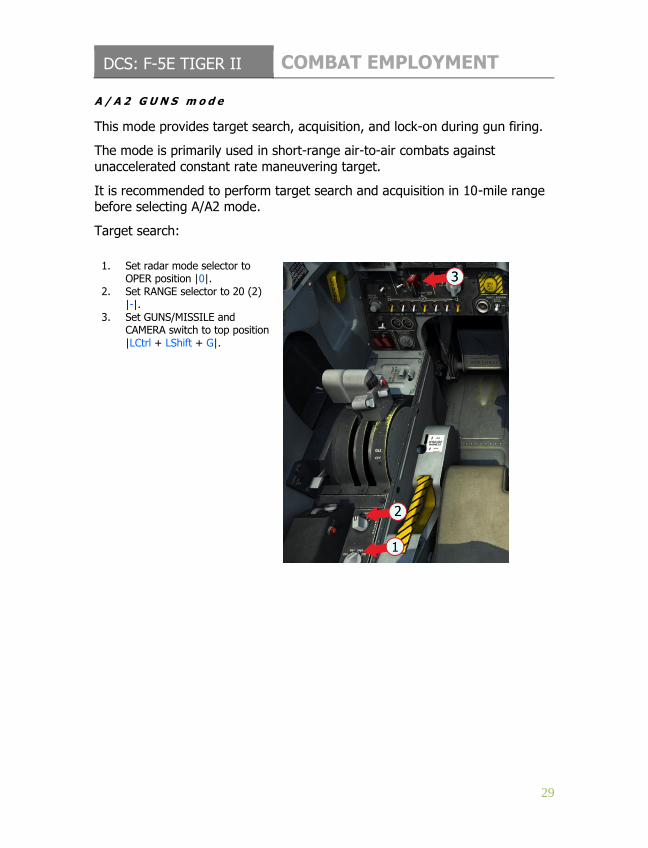
А / А 2 G U N S m o d e
This mode provides target search, acquisition, and lock-on during gun firing.
The mode is primarily used in short-range air-to-air combats against
unaccelerated constant rate maneuvering target.
It is recommended to perform target search and acquisition in 10-mile range before selecting A/A2 mode.
Target search:
1. Set radar mode selector to
OPER position |0|. 2. Set RANGE selector to 20 (2)
|-|. 3. Set GUNS/MISSILE and
CAMERA switch to top position |LCtrl + LShift + G|.
DCS: F-5E TIGER II COMBAT EMPLOYMENT
30
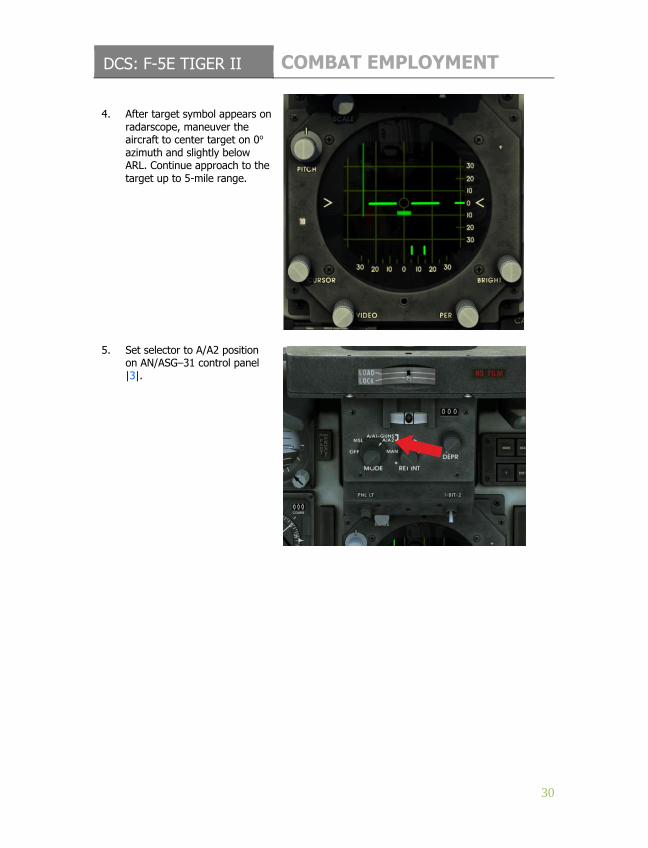
4. After target symbol appears on
radarscope, maneuver the aircraft to center target on 0o azimuth and slightly below ARL. Continue approach to the target up to 5-mile range.
5. Set selector to А/А2 position
on AN/ASG–31 control panel |3|.
DCS: F-5E TIGER II COMBAT EMPLOYMENT
31
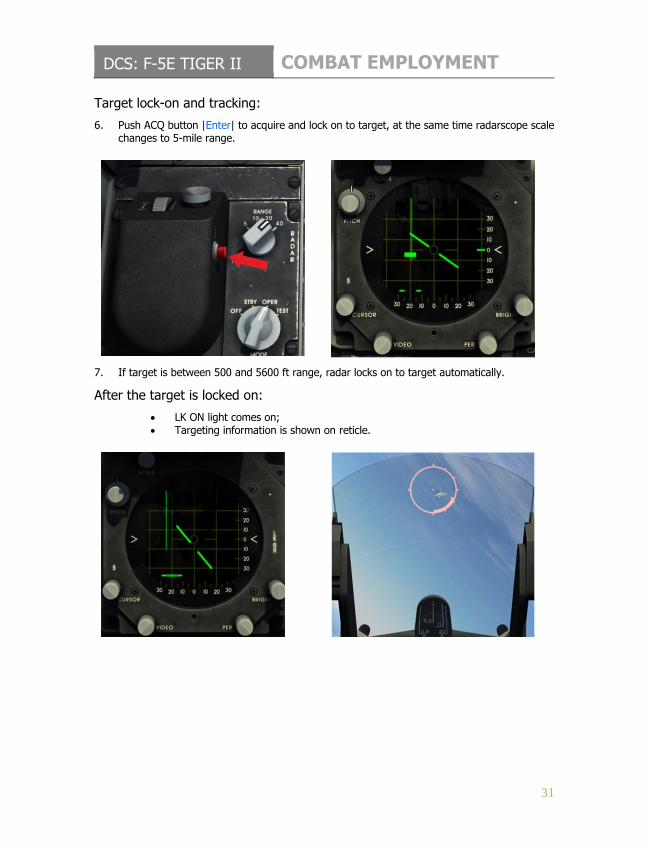
Target lock-on and tracking:
6. Push AСQ button |Enter| to acquire and lock on to target, at the same time radarscope scale changes to 5-mile range.
7. If target is between 500 and 5600 ft range, radar locks on to target automatically.
After the target is locked on:
LK ON light comes on; Targeting information is shown on reticle.
DCS: F-5E TIGER II COMBAT EMPLOYMENT
32
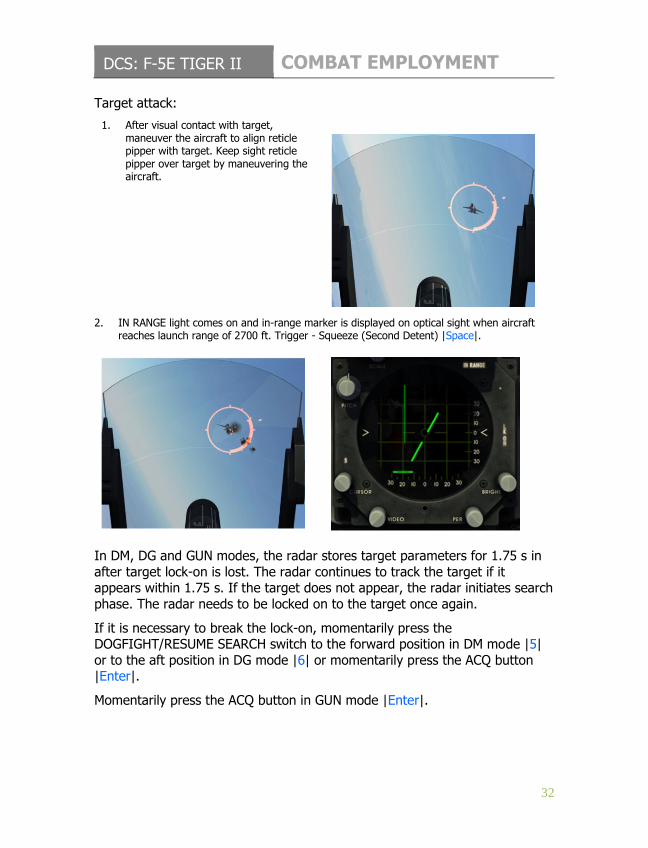
Target attack:
1. After visual contact with target, maneuver the aircraft to align reticle pipper with target. Keep sight reticle pipper over target by maneuvering the aircraft.
2. IN RANGE light comes on and in-range marker is displayed on optical sight when aircraft reaches launch range of 2700 ft. Trigger - Squeeze (Second Detent) |Space|.
In DM, DG and GUN modes, the radar stores target parameters for 1.75 s in
after target lock-on is lost. The radar continues to track the target if it appears within 1.75 s. If the target does not appear, the radar initiates search
phase. The radar needs to be locked on to the target once again.
If it is necessary to break the lock-on, momentarily press the DOGFIGHT/RESUME SEARCH switch to the forward position in DM mode |5|
or to the aft position in DG mode |6| or momentarily press the AСQ button |Enter|.
Momentarily press the ACQ button in GUN mode |Enter|.

DCS: F-5E TIGER II COMBAT EMPLOYMENT
33
Range gate resumes slewing from rejected target to lock on to the first target that is at least 450 feet or further in range.
If the target is locked on in MSL and GUN modes, transition to DM and DG modes does not break target lock-on.
Press DOGFIGHT/RESUME SEARCH Switch on the aircraft control stick to
reinitiate target search |R|.
Pressing and holding the ACQ switch causes the range gate to return and
stow at minimum range.
O P T I C A L S I G H T O P E R A T I O N D U R I N G A I R - T O - A I R C O M B A T .
A I M – 9 P M i s s i l e E m p l o y m e n t
Target search and acquisition:
1. Acquire target visually. 2. Select MSL mode on the sight control panel |0|.
DCS: F-5E TIGER II COMBAT EMPLOYMENT
34
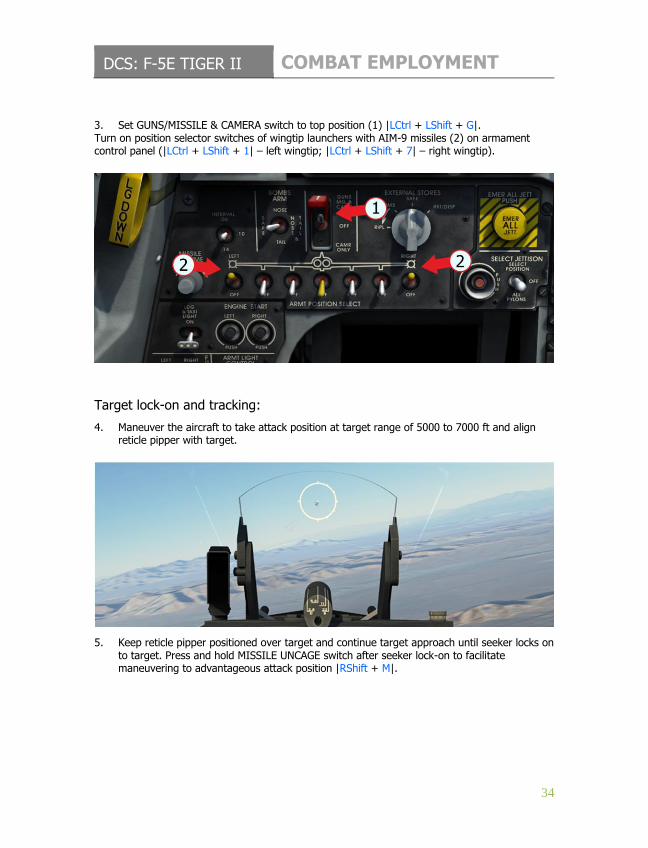
3. Set GUNS/MISSILE & CAMERA switch to top position (1) |LCtrl + LShift + G|. Turn on position selector switches of wingtip launchers with AIM-9 missiles (2) on armament control panel (|LCtrl + LShift + 1| – left wingtip; |LCtrl + LShift + 7| – right wingtip).
Target lock-on and tracking:
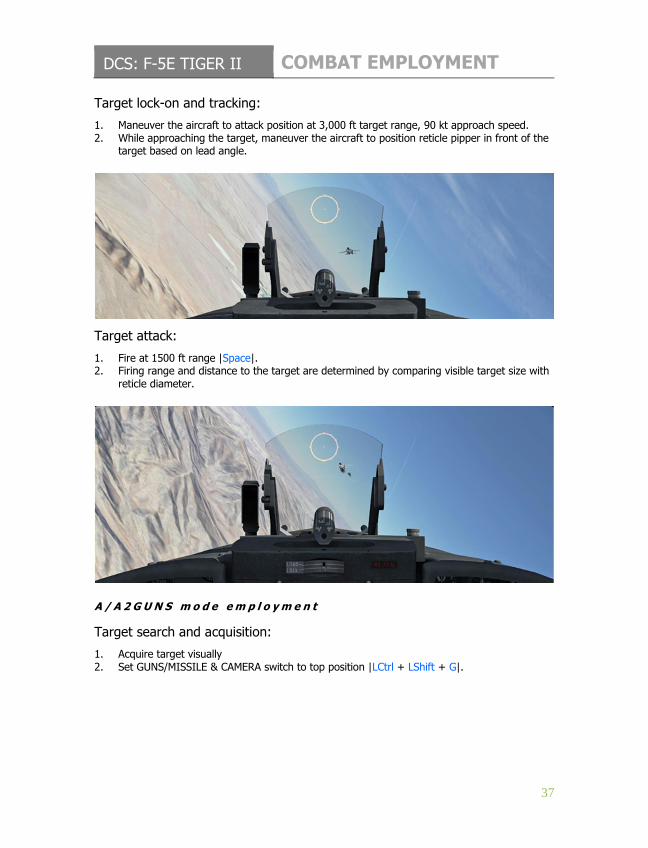
4. Maneuver the aircraft to take attack position at target range of 5000 to 7000 ft and align reticle pipper with target.
5. Keep reticle pipper positioned over target and continue target approach until seeker locks on to target. Press and hold MISSILE UNCAGE switch after seeker lock-on to facilitate maneuvering to advantageous attack position |RShift + M|.

DCS: F-5E TIGER II COMBAT EMPLOYMENT
35
Target attack:
1. Push bomb-rocket button after attack position is achieved |RAlt + Space|. 2. Launch range is to be determined by comparison of visible target size with reticle diameter.
DCS: F-5E TIGER II COMBAT EMPLOYMENT
36
S C O P E S I G H T O P E R A T I O N D U R I N G A I R - T O - A I R C O M B A T W I T H М - 3 9 А 3 G U N S
А / А 1 G U N S M o d e E m p l o y m e n t
Target search and acquisition:
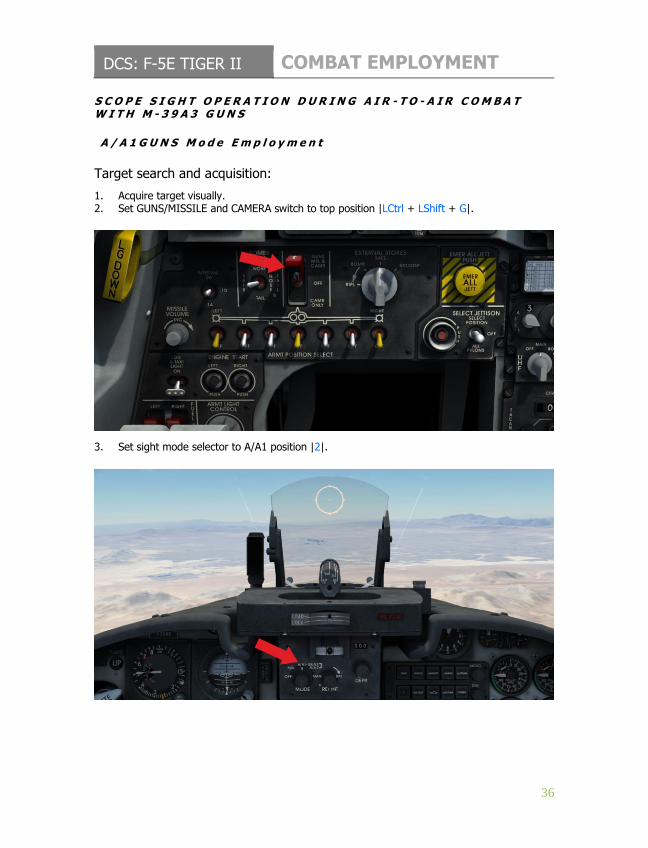
1. Acquire target visually. 2. Set GUNS/MISSILE and CAMERA switch to top position |LCtrl + LShift + G|.
3. Set sight mode selector to A/A1 position |2|.
DCS: F-5E TIGER II COMBAT EMPLOYMENT
37
Target lock-on and tracking:
1. Maneuver the aircraft to attack position at 3,000 ft target range, 90 kt approach speed. 2. While approaching the target, maneuver the aircraft to position reticle pipper in front of the
target based on lead angle.
Target attack:
1. Fire at 1500 ft range |Space|. 2. Firing range and distance to the target are determined by comparing visible target size with
reticle diameter.
А / А 2 G U N S m o d e e m p l o y m e n t
Target search and acquisition:
1. Acquire target visually 2. Set GUNS/MISSILE & CAMERA switch to top position |LCtrl + LShift + G|.

DCS: F-5E TIGER II COMBAT EMPLOYMENT
38
3. Set sight mode selector to A/A2 position |3|.
Target lock-on and tracking:
1. Maneuver the aircraft to attack position at 3000 ft target range, 90 kt approach speed. 2. Perform target approach and maneuver the aircraft to align reticle pipper with target, keep
reticle pipper over target by equalizing angular velocities.

DCS: F-5E TIGER II COMBAT EMPLOYMENT
39
Target attack:
1. Fire at 1500 ft range |Space|. 2. Firing range and distance to the target are determined by comparing visible target size with
reticle diameter. Ref. Fig.
WARNING: When the trigger is fully squeezed to the second detent, firing is carried out in 0,25 s. Take this into account when firing.
DCS: F-5E TIGER II COMBAT EMPLOYMENT
40
Air-to-ground Combat Employment
М К - 8 2 , 8 3 , 8 4 a n d М 1 1 7 B o m b D r o p p i n g
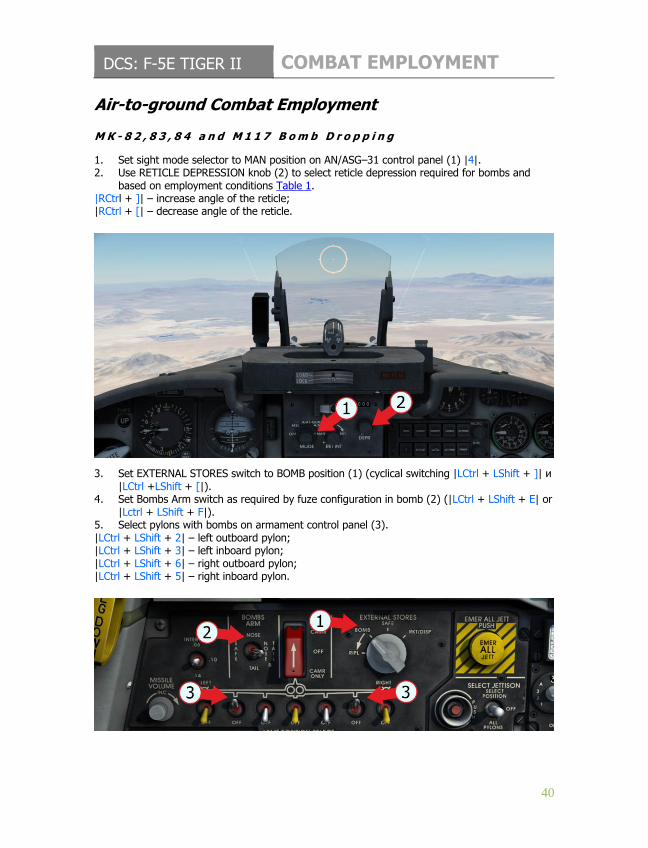
1. Set sight mode selector to MAN position on AN/ASG–31 control panel (1) |4|. 2. Use RETICLE DEPRESSION knob (2) to select reticle depression required for bombs and
based on employment conditions Table 1. |RCtrl + ]| – increase angle of the reticle; |RCtrl + [| – decrease angle of the reticle.
3. Set EXTERNAL STORES switch to BOMB position (1) (cyclical switching |LCtrl + LShift + ]| и |LCtrl +LShift + [|).
4. Set Bombs Arm switch as required by fuze configuration in bomb (2) (|LCtrl + LShift + E| or |Lctrl + LShift + F|).
5. Select pylons with bombs on armament control panel (3). |LCtrl + LShift + 2| – left outboard pylon; |LCtrl + LShift + 3| – left inboard pylon; |LCtrl + LShift + 6| – right outboard pylon; |LCtrl + LShift + 5| – right inboard pylon.
DCS: F-5E TIGER II COMBAT EMPLOYMENT
41
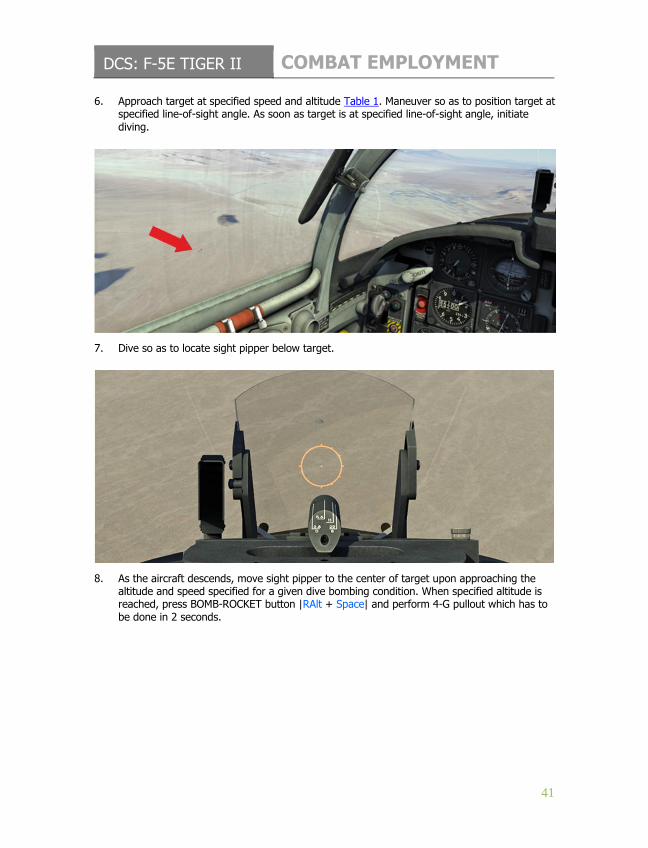
6. Approach target at specified speed and altitude Table 1. Maneuver so as to position target at specified line-of-sight angle. As soon as target is at specified line-of-sight angle, initiate diving.
7. Dive so as to locate sight pipper below target.
8. As the aircraft descends, move sight pipper to the center of target upon approaching the altitude and speed specified for a given dive bombing condition. When specified altitude is reached, press BOMB-ROCKET button |RAlt + Space| and perform 4-G pullout which has to be done in 2 seconds.
DCS: F-5E TIGER II COMBAT EMPLOYMENT
42
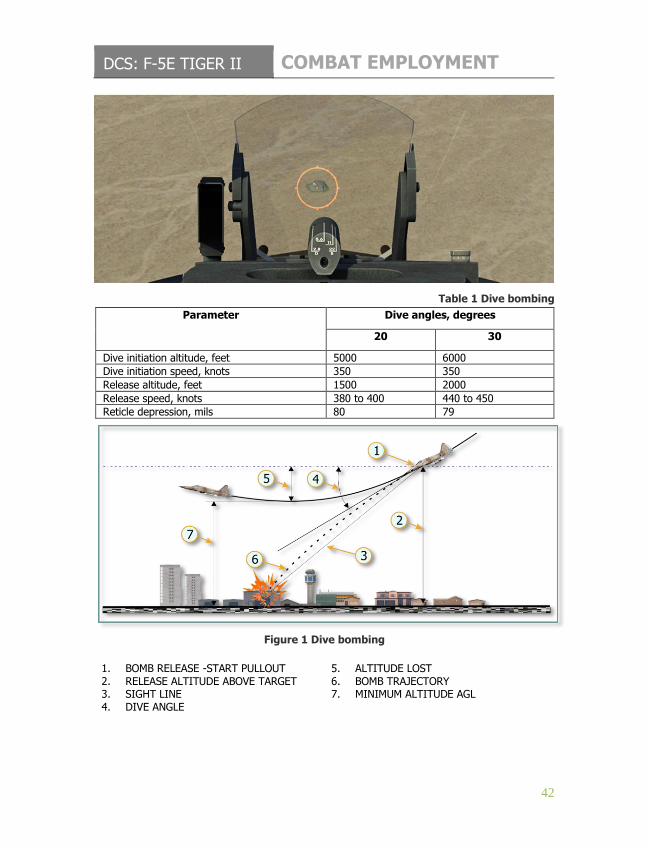
Table 1 Dive bombing
Parameter Dive angles, degrees
20 30
Dive initiation altitude, feet 5000 6000
Dive initiation speed, knots 350 350
Release altitude, feet 1500 2000
Release speed, knots 380 to 400 440 to 450
Reticle depression, mils 80 79
Figure 1 Dive bombing
1. BOMB RELEASE -START PULLOUT 2. RELEASE ALTITUDE ABOVE TARGET 3. SIGHT LINE 4. DIVE ANGLE
5. ALTITUDE LOST 6. BOMB TRAJECTORY 7. MINIMUM ALTITUDE AGL
DCS: F-5E TIGER II COMBAT EMPLOYMENT
43
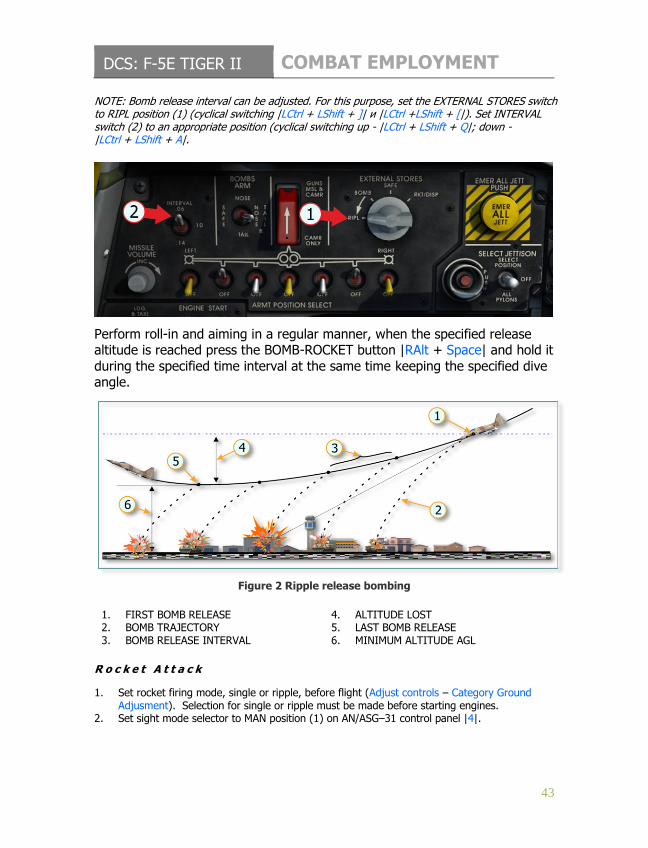
NOTE: Bomb release interval can be adjusted. For this purpose, set the EXTERNAL STORES switch to RIPL position (1) (cyclical switching |LCtrl + LShift + ]| и |LCtrl +LShift + [|). Set INTERVAL switch (2) to an appropriate position (cyclical switching up - |LCtrl + LShift + Q|; down - |LCtrl + LShift + A|.
Perform roll-in and aiming in a regular manner, when the specified release altitude is reached press the BOMB-ROCKET button |RAlt + Space| and hold it
during the specified time interval at the same time keeping the specified dive angle.
Figure 2 Ripple release bombing
1. FIRST BOMB RELEASE 2. BOMB TRAJECTORY 3. BOMB RELEASE INTERVAL
4. ALTITUDE LOST 5. LAST BOMB RELEASE 6. MINIMUM ALTITUDE AGL
R o c k e t A t t a c k
1. Set rocket firing mode, single or ripple, before flight (Adjust controls – Category Ground Adjusment). Selection for single or ripple must be made before starting engines.
2. Set sight mode selector to MAN position (1) on AN/ASG–31 control panel |4|.
DCS: F-5E TIGER II COMBAT EMPLOYMENT
44
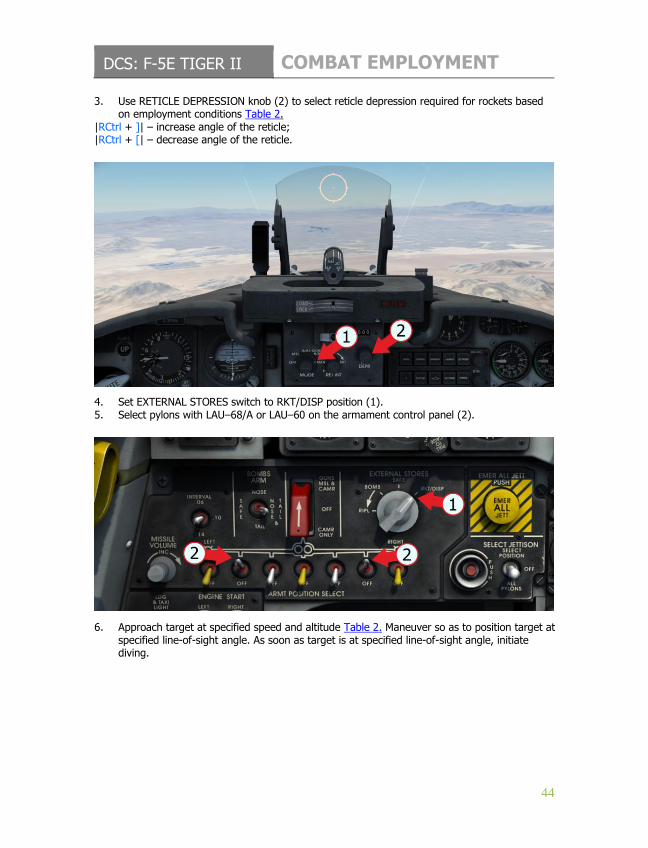
3. Use RETICLE DEPRESSION knob (2) to select reticle depression required for rockets based on employment conditions Table 2.
|RCtrl + ]| – increase angle of the reticle; |RCtrl + [| – decrease angle of the reticle.
4. Set EXTERNAL STORES switch to RKT/DISP position (1). 5. Select pylons with LAU–68/A or LAU–60 on the armament control panel (2).
6. Approach target at specified speed and altitude Table 2. Maneuver so as to position target at specified line-of-sight angle. As soon as target is at specified line-of-sight angle, initiate diving.
DCS: F-5E TIGER II COMBAT EMPLOYMENT
45
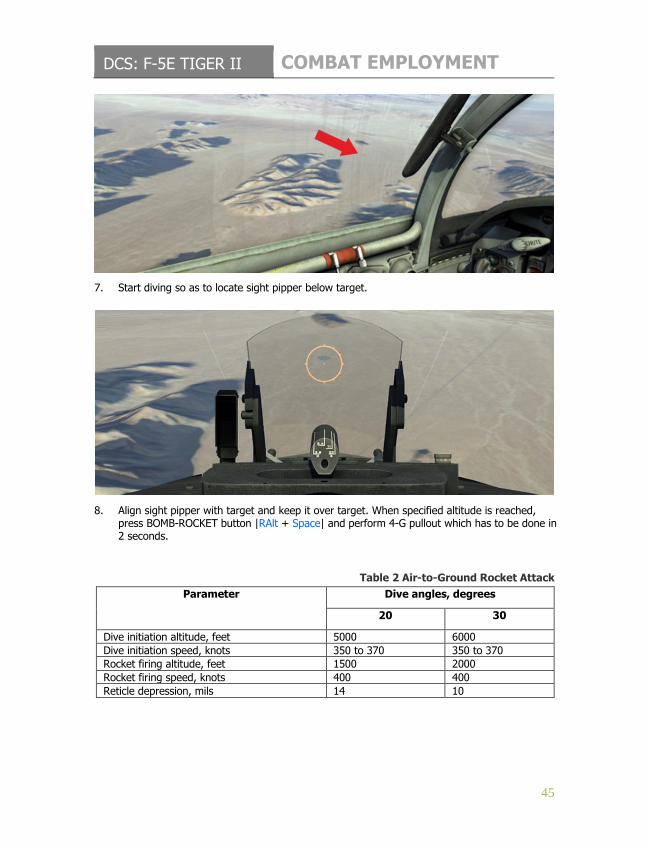
7. Start diving so as to locate sight pipper below target.
8. Align sight pipper with target and keep it over target. When specified altitude is reached, press BOMB-ROCKET button |RAlt + Space| and perform 4-G pullout which has to be done in 2 seconds.
Table 2 Air-to-Ground Rocket Attack
Parameter Dive angles, degrees
20 30
Dive initiation altitude, feet 5000 6000
Dive initiation speed, knots 350 to 370 350 to 370
Rocket firing altitude, feet 1500 2000
Rocket firing speed, knots 400 400
Reticle depression, mils 14 10

DCS: F-5E TIGER II COMBAT EMPLOYMENT
46
G u n A t t a c k
1. Set sight mode selector to MAN position (1) on AN/ASG–31 control panel |4|. 2. Use RETICLE DEPRESSION knob (2) to select reticle depression as required by gun
employment conditions Table 3 |RCtrl + ]| – increase angle of the reticle; |RCtrl + [| – decrease angle of the reticle.
3. Set GUNS/MISSILE and CAMERA switch to top position |LCtrl + LShift + G|.
4. Approach target at specified speed and altitude Table 3. Maneuver so as to position target at specified line-of-sight angle. As soon as target is at specified line-of-sight angle, initiate diving.
DCS: F-5E TIGER II COMBAT EMPLOYMENT
47
5. Start diving so as to locate sight pipper below target. 6. Align sight pipper with target and keep it over target. 7. When specified altitude is reached, squeeze TRIGGER |Space| and perform 4-G pullout which
has to be done in 2 seconds.
Table 3 Air-to-Ground Gun Attack
Parameter Dive angles, degrees
20 30
Dive initiation altitude, feet 5000 6000
Dive initiation speed, knots 350 to 370 350 to 370
Firing altitude, feet 2000 3000
Speed at the moment of firing, knots 400 400
Reticle depression, mils 12 8
DCS: F-5E TIGER II COMBAT EMPLOYMENT
48
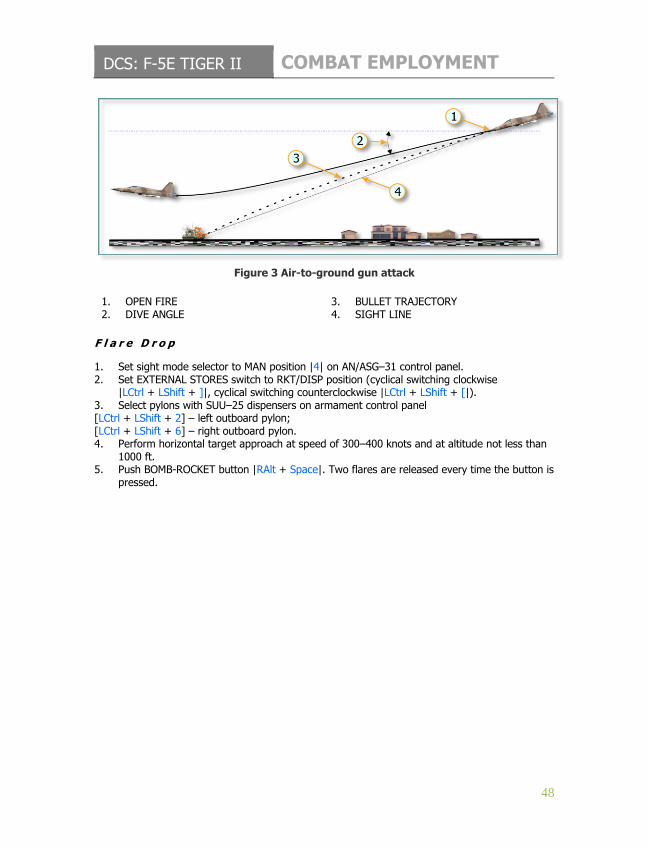
Figure 3 Air-to-ground gun attack
1. OPEN FIRE 2. DIVE ANGLE
3. BULLET TRAJECTORY 4. SIGHT LINE
F l a r e D r o p
1. Set sight mode selector to MAN position |4| on AN/ASG–31 control panel. 2. Set EXTERNAL STORES switch to RKT/DISP position (cyclical switching clockwise
|LCtrl + LShift + ]|, cyclical switching counterclockwise |LCtrl + LShift + [|). 3. Select pylons with SUU–25 dispensers on armament control panel [LCtrl + LShift + 2] – left outboard pylon; [LCtrl + LShift + 6] – right outboard pylon. 4. Perform horizontal target approach at speed of 300–400 knots and at altitude not less than
1000 ft. 5. Push BOMB-ROCKET button |RAlt + Space|. Two flares are released every time the button is
pressed.
DCS: F-5E TIGER II COMBAT EMPLOYMENT
49
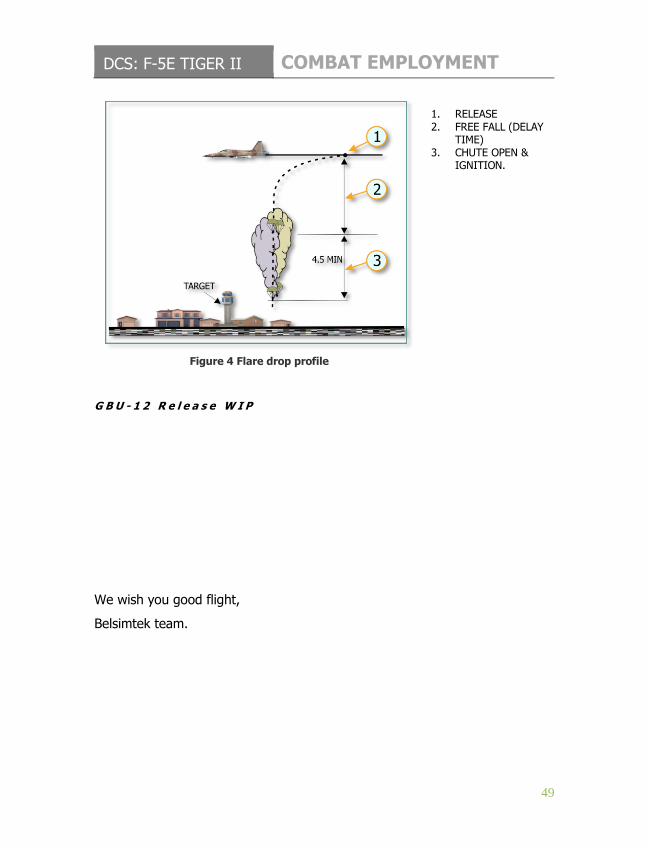
Figure 4 Flare drop profile
1. RELEASE 2. FREE FALL (DELAY
TIME) 3. CHUTE OPEN &
IGNITION.
G B U - 1 2 R e l e a s e W I P
We wish you good flight,
Belsimtek team.