dcs800 controlbuilder dcs800 basic exercises - infoplc · c--1-8-b-11 dcs800 jan thoma dcs800...
TRANSCRIPT

© A
BB
DC
-Dri
ves -
1-
8-F
eb-1
1
DCS800
Jan Thoma
DCS800
ControlBuilder DCS800
basic exercises
DCS800
built on DCS technology
www.infoPLC.net
© A
BB
DE
AP
R/A
WV
-2
-
8-F
eb-1
1
Information
This presentation can be used for E-learning
and for group presentations
The advanced exercises build up on the
basic exercises
© A
BB
DE
AP
R/A
WV
-3
-
8-F
eb-1
1
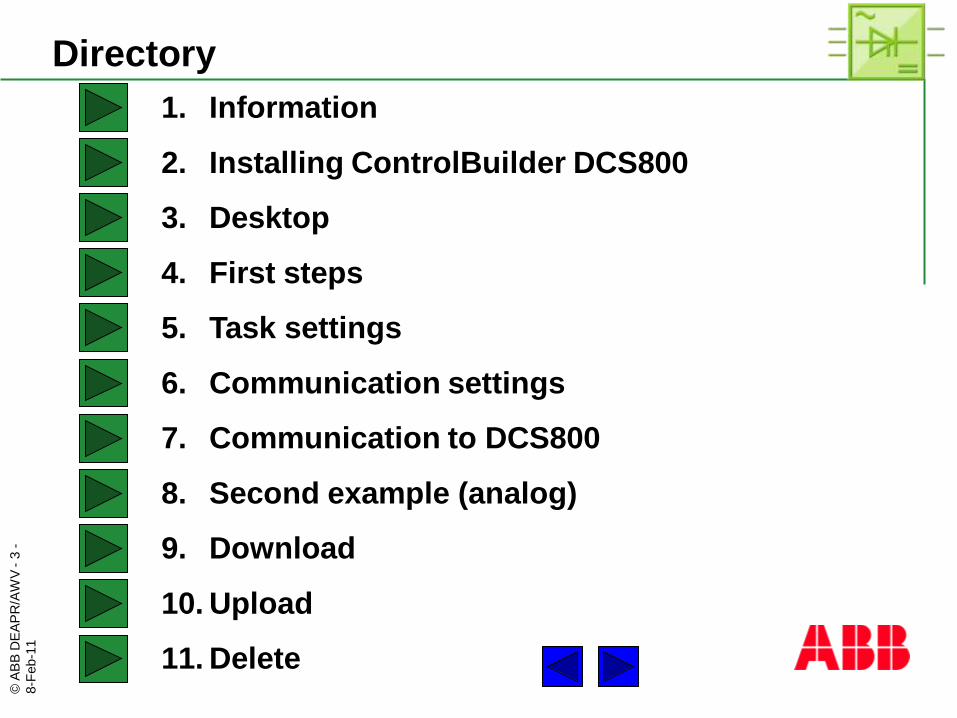
1. Information
2. Installing ControlBuilder DCS800
3. Desktop
4. First steps
5. Task settings
6. Communication settings
7. Communication to DCS800
8. Second example (analog)
9. Download
10. Upload
11. Delete
Directory
© A
BB
DE
AP
R/A
WV
-4
-
8-F
eb-1
1
ABB DC drives use the programming tool ControlBuilder
DCS800 for programming applications
The ControlBuilder DCS800 is based on CoDeSys
CoDeSys is a hardware independent IEC 61131-3
programming tool under Windows to create applications
The DCS800 target file and library are necessary to
develop applications. By means of functions from the
DCS800 library applications can be connected with the
DCS800 firmware
Additional libraries offer advanced functions to support
the application programming
Back to directory
1. PLC programming
© A
BB
DE
AP
R/A
WV
-5
-
8-F
eb-1
1
2. Installing CoDeSys
CoDeSys is on the DCS800 Target Installation CD and
delivered with every DCS800
Follow the setup wizard
Select your language
Updates can be downloaded from:
www.3s-software.com
Back to directory

© A
BB
DE
AP
R/A
WV
-6
-
8-F
eb-1
1
3. DesktopMenu bar
Tool bar
Object organizer
Message window
Editor window
Back to directory
Declaration window
Window change
© A
BB
DE
AP
R/A
WV
-7
-
8-F
eb-1
1
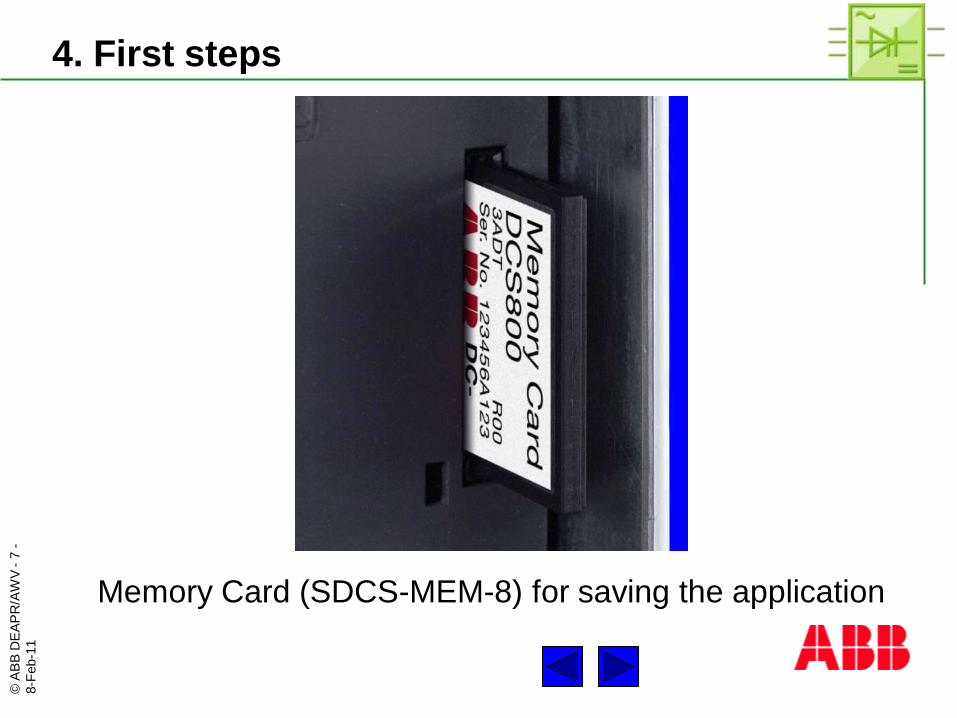
4. First steps
Memory Card (SDCS-MEM-8) for saving the application
© A
BB
DE
AP
R/A
WV
-8
-
8-F
eb-1
1
4. First steps
Used software:
CoDeSys (version: 2.3.6.1)
DCS800 Target and DCS800 Library
For online connection:
DCS800 unit (used firmware 80x150)
Memory Card (SDCS-MEM-8)
Serial cable (RS232)
If necessary: adapter … RS232
Back to directory

© A
BB
DE
AP
R/A
WV
-9
-
8-F
eb-1
1
4. Programming example
Read two DI’s
The signals are processed via an AND
The result is written to a DO
Back to directory
© A
BB
DE
AP
R/A
WV
-10
-
8-F
eb-1
1
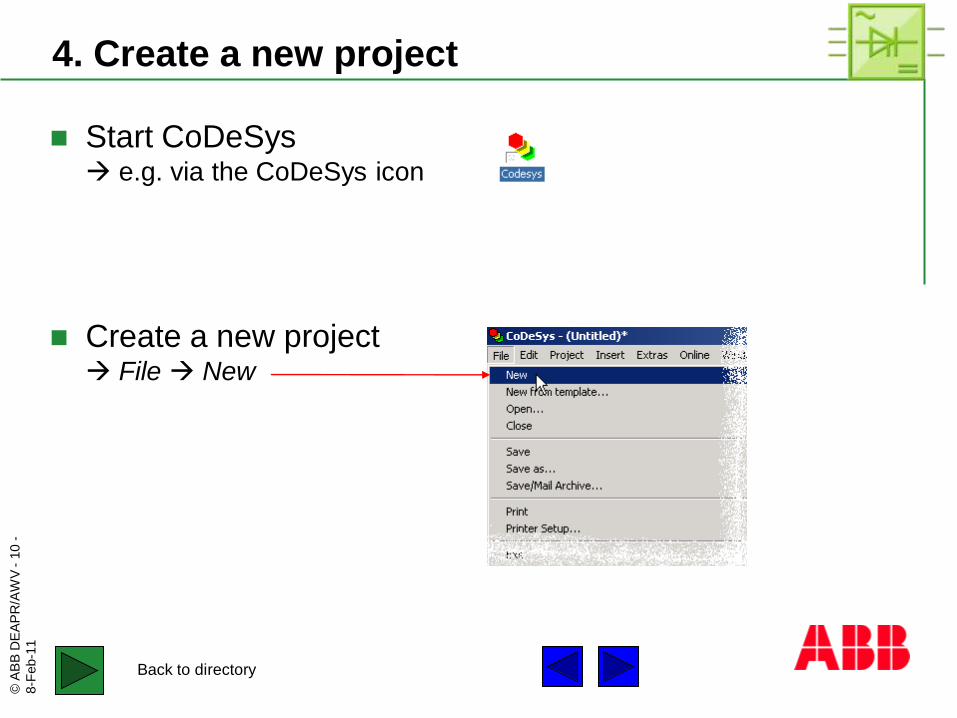
4. Create a new project
Start CoDeSys e.g. via the CoDeSys icon
Create a new project File New
Back to directory

© A
BB
DE
AP
R/A
WV
-11
-
8-F
eb-1
1
4. Select target
Select target Select DCS800
and click OK
The Target Settings of the DCS800 are correct and there
is no need to modify them
Back to directory

© A
BB
DE
AP
R/A
WV
-12
-
8-F
eb-1
1
4. Build a PLC_PRG in CFC
The name of the “main“
program must be
PLC_PRG
(POU = Program Organization Unit)
Programming language Select CFC and click OK
(CFC = Continuous Function Chart )
The other programming languages are:
• IL : Instruction List
• LD : Ladder Diagram
• FBD : Function Block Diagram
• SFC : Sequential Function Chart
• ST : Structured Text
Back to directory

© A
BB
DE
AP
R/A
WV
-13
-
8-F
eb-1
1
4. Program window
Now the first program window is open
In CFC comments can be inserted by Insert Comment
Back to directory

© A
BB
DE
AP
R/A
WV
-14
-
8-F
eb-1
1
4. Save project
The project can be saved by File Save as ...
E.g.: Type in name and
click Save
Back to directory
© A
BB
DE
AP
R/A
WV
-15
-
8-F
eb-1
1
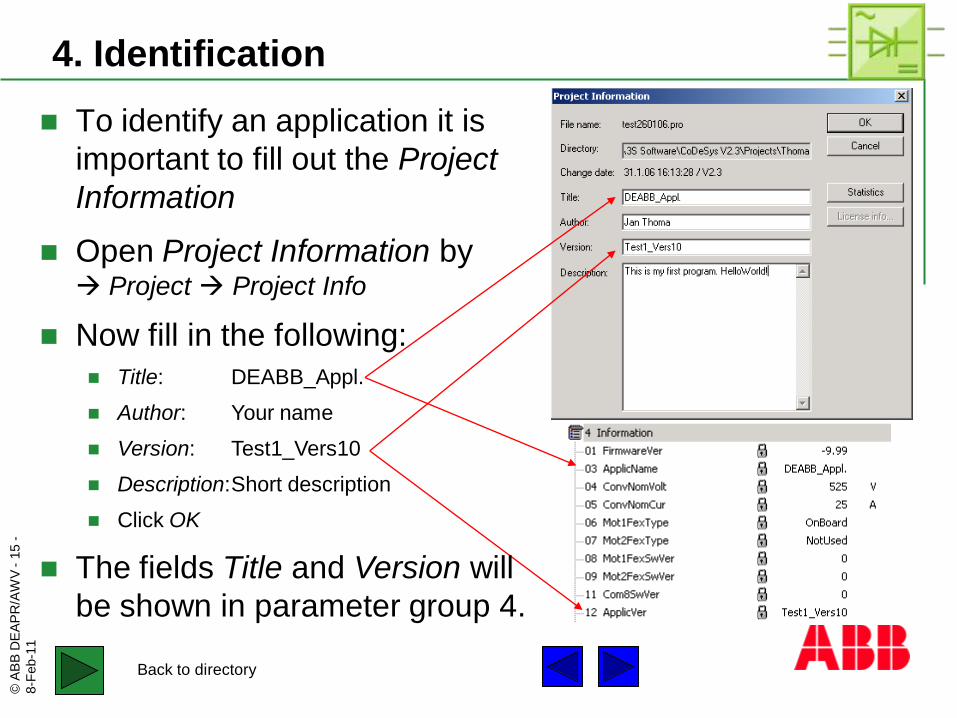
4. Identification
To identify an application it is
important to fill out the Project
Information
Open Project Information by Project Project Info
Back to directory
Now fill in the following:
Title: DEABB_Appl.
Author: Your name
Version: Test1_Vers10
Description:Short description
Click OK
The fields Title and Version will
be shown in parameter group 4.

© A
BB
DE
AP
R/A
WV
-16
-
8-F
eb-1
1
4. DCS800 library
1. Select tab Resources
1.
2.
4. Existing function blocks
of the DCS800 library
2. Double click on Library
Manager
3. Select DCS800lib.lib
3.
4.
Back to directory

© A
BB
DE
AP
R/A
WV
-17
-
8-F
eb-1
1
4. Change back to program window
1. Select tab POU
2. Double click on PLC_PRG to
open the program window
1.
2.
Back to directory

© A
BB
DE
AP
R/A
WV
-18
-
8-F
eb-1
1
4. Insert function blocks
Select the Box icon
Drag the Box into the Editor window. The inserted
box will always be an AND - default setting.
Back to directory

© A
BB
DE
AP
R/A
WV
-19
-
8-F
eb-1
1
4. Select the desired function
The first function to use is a DigIn
(DCS800 library) Mark AND by clicking on it
Get DigIn Press F2 on the keyboard and select Standard Function blocks
Select DigIn Select DigIn, click
OK then press Enter
( ) on the keyboard
Back to directory

© A
BB
DE
AP
R/A
WV
-20
-
8-F
eb-1
1
4. Select and insert further functions
In the same way insert an AND and a DigOut
Back to directory
© A
BB
DE
AP
R/A
WV
-21
-
8-F
eb-1
1
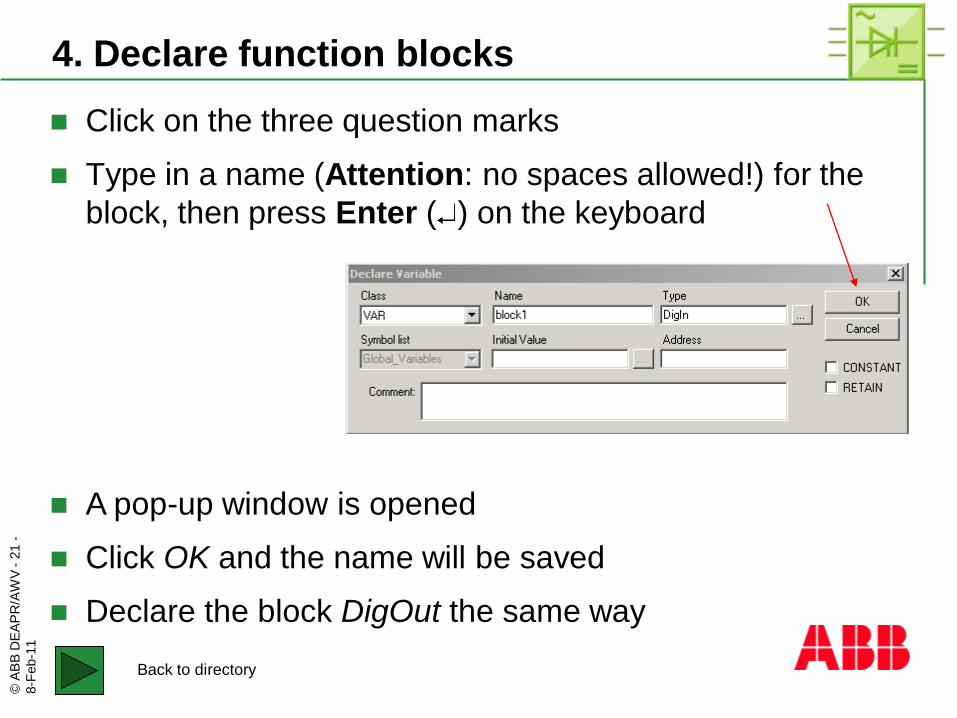
4. Declare function blocks
Click on the three question marks
Type in a name (Attention: no spaces allowed!) for the
block, then press Enter ( ) on the keyboard
A pop-up window is opened
Click OK and the name will be saved
Declare the block DigOut the same way
Back to directory

© A
BB
DE
AP
R/A
WV
-22
-
8-F
eb-1
1
4. Connect function blocks
To connect an output with an input start at the output
By pressing and holding the left mouse button drag the
output line to an input and release the mouse button
Back to directory

© A
BB
DE
AP
R/A
WV
-23
-
8-F
eb-1
1
4. Connect function blocks
Use the same method to make up all other connections
between the function blocks
Back to directory
© A
BB
DE
AP
R/A
WV
-24
-
8-F
eb-1
1
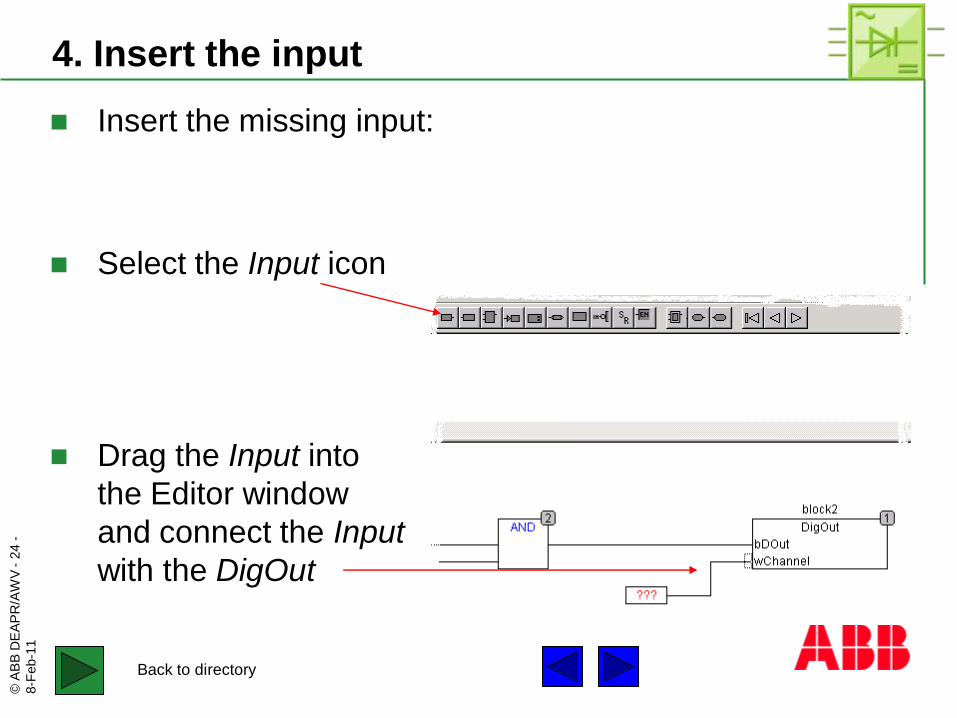
4. Insert the input
Insert the missing input:
Drag the Input into
the Editor window
and connect the Input
with the DigOut
Select the Input icon
Back to directory

© A
BB
DE
AP
R/A
WV
-25
-
8-F
eb-1
1
Click on the three question marks
Type in a number for the Input, then press Enter ( ) on
the keyboard
4. Declare the input value
Back to directory
By means of this Input the channel of the
DO is selected
In this example:
1 for DO1

© A
BB
DE
AP
R/A
WV
-26
-
8-F
eb-1
1
5. Task configuration
Open the Task configuration
by a double click
Open a new task Insert Append Task
Back to directory
Change back to
tap Resources
© A
BB
DE
AP
R/A
WV
-27
-
8-F
eb-1
1
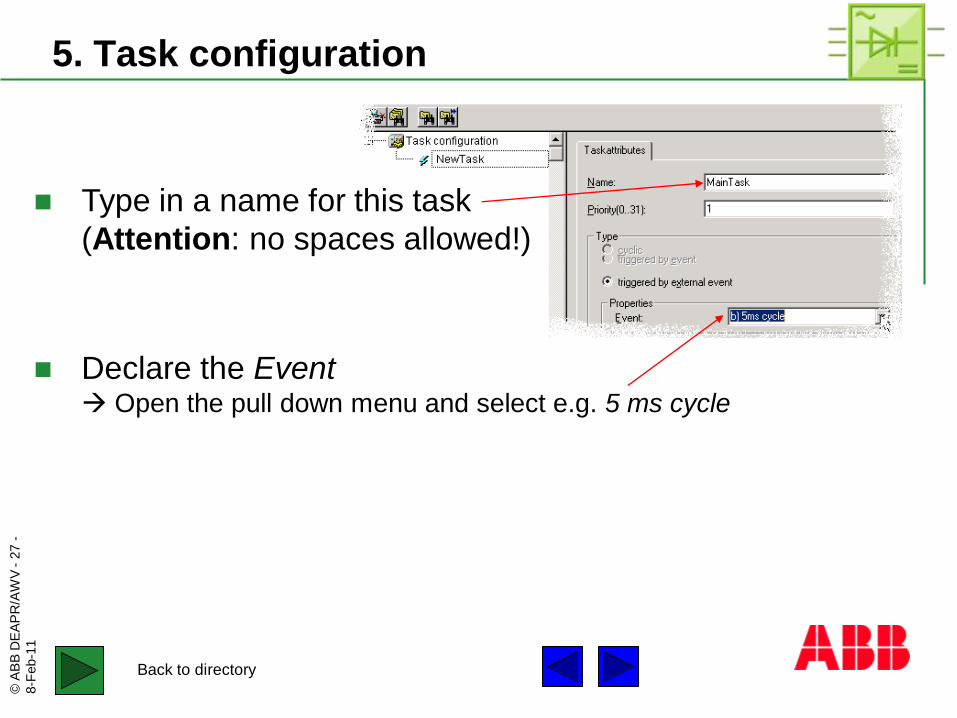
5. Task configuration
Type in a name for this task
(Attention: no spaces allowed!)
Declare the Event Open the pull down menu and select e.g. 5 ms cycle
Back to directory
© A
BB
DE
AP
R/A
WV
-28
-
8-F
eb-1
1
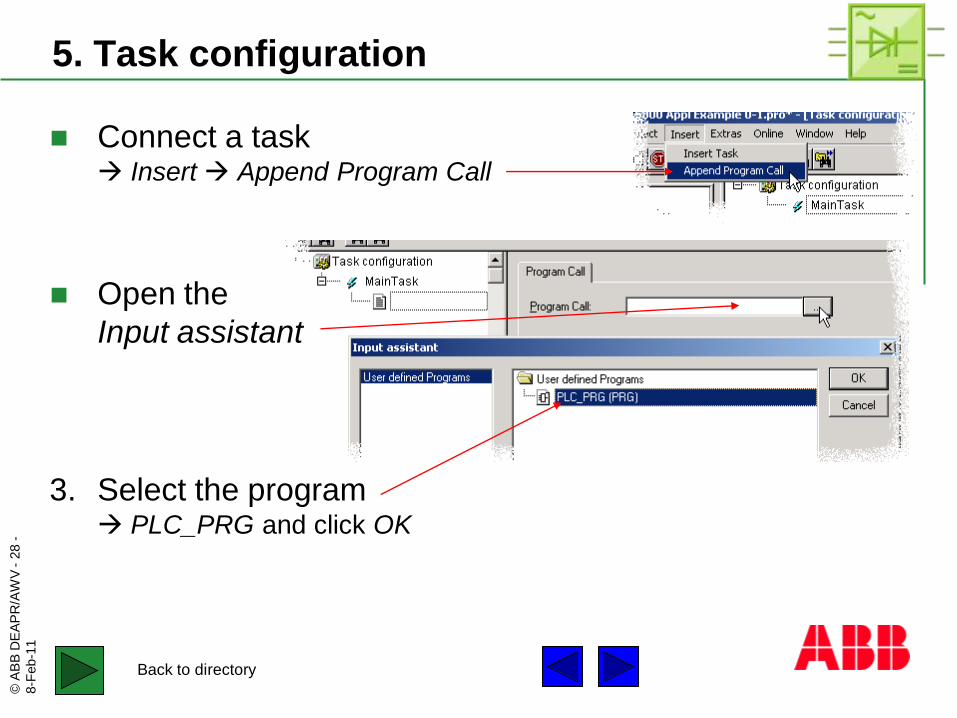
5. Task configuration
Connect a task Insert Append Program Call
Open the
Input assistant
3. Select the program PLC_PRG and click OK
Back to directory
© A
BB
DE
AP
R/A
WV
-29
-
8-F
eb-1
1
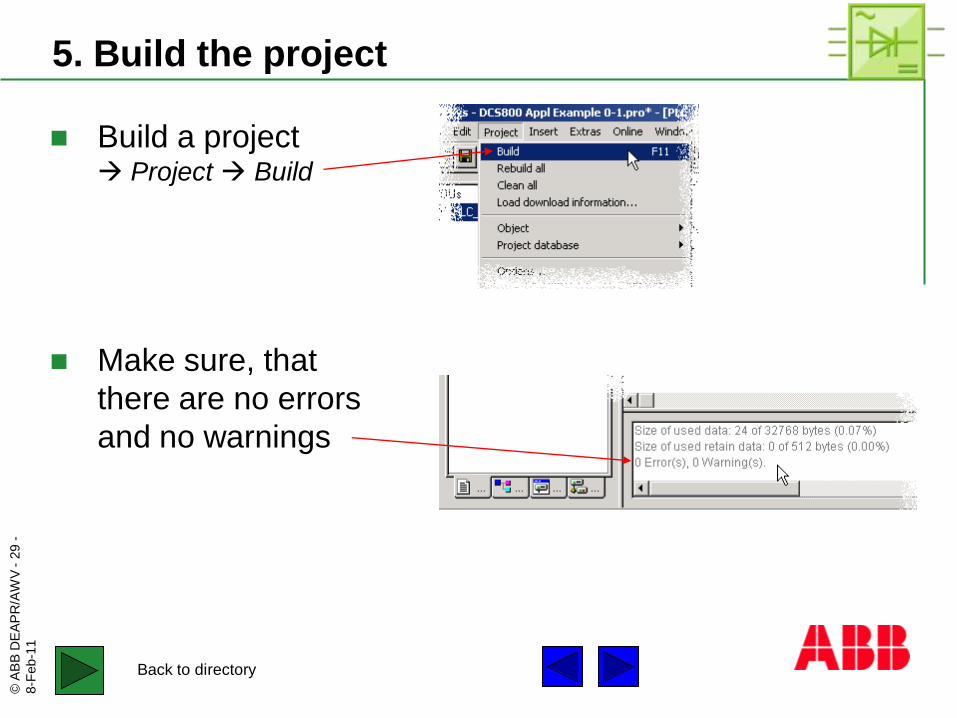
5. Build the project
Build a project Project Build
Make sure, that
there are no errors
and no warnings
Back to directory

© A
BB
DE
AP
R/A
WV
-30
-
8-F
eb-1
1
6. Communication parameters
Set communication Online Communication Parameters…
To declare a new channel
click on New…
Type in a name for the
new channel
Click OK to accept
Back to directory

© A
BB
DE
AP
R/A
WV
-31
-
8-F
eb-1
1
6. Communication parameters
Set the communication parameters like this:
Change the port, if COM1 is not used (see next slides!)
double click on COMx to change the COM port
Change the Baudrate, if applicable double click on Baudrate to change the value
The Stop bits = 1 and Motorola byteorder = Yes
Click OK to accept
Back to directory
© A
BB
DE
AP
R/A
WV
-32
-
8-F
eb-1
1
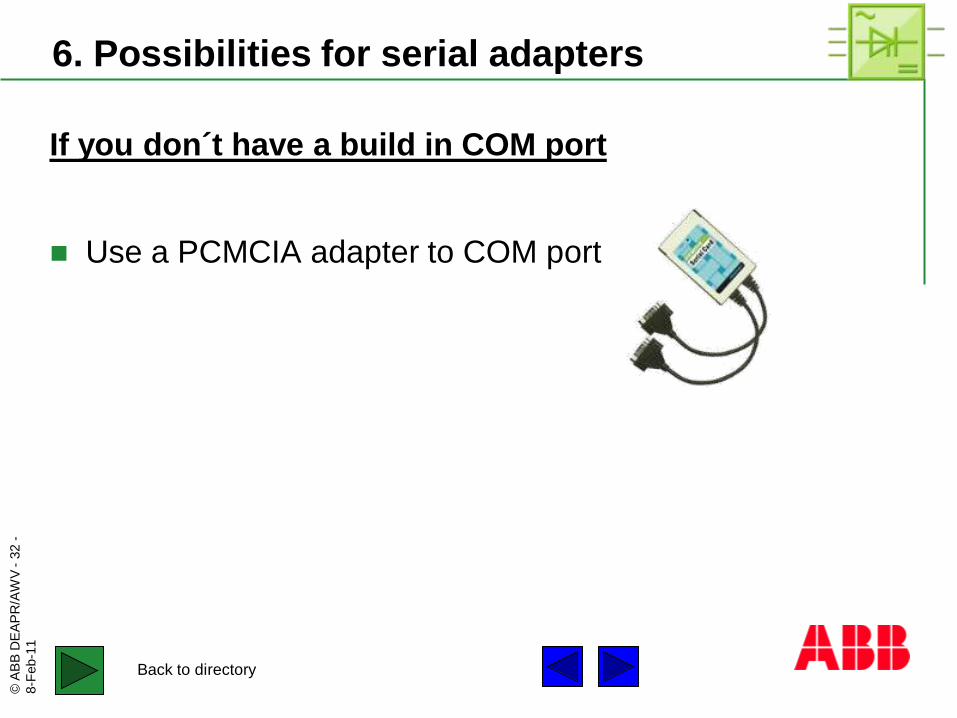
6. Possibilities for serial adapters
If you don´t have a build in COM port
Use a PCMCIA adapter to COM port
Back to directory

© A
BB
DE
AP
R/A
WV
-33
-
8-F
eb-1
1
6. Find out your communication channel
If you have a notebook without a build in COM port, you
need PCMCIA adapter to COM port
Open the System Configuration on your PC Start Settings Control Panel System
Choose the Device Manager Hardware Device Manager
Have a look at the Ports (COM&LPT)
Notice your selected COM port
Here USB Serial Port (COM3)
This port is used for either DriveWindow Light or CoDeSys
Back to directory
© A
BB
DE
AP
R/A
WV
-34
-
8-F
eb-1
1
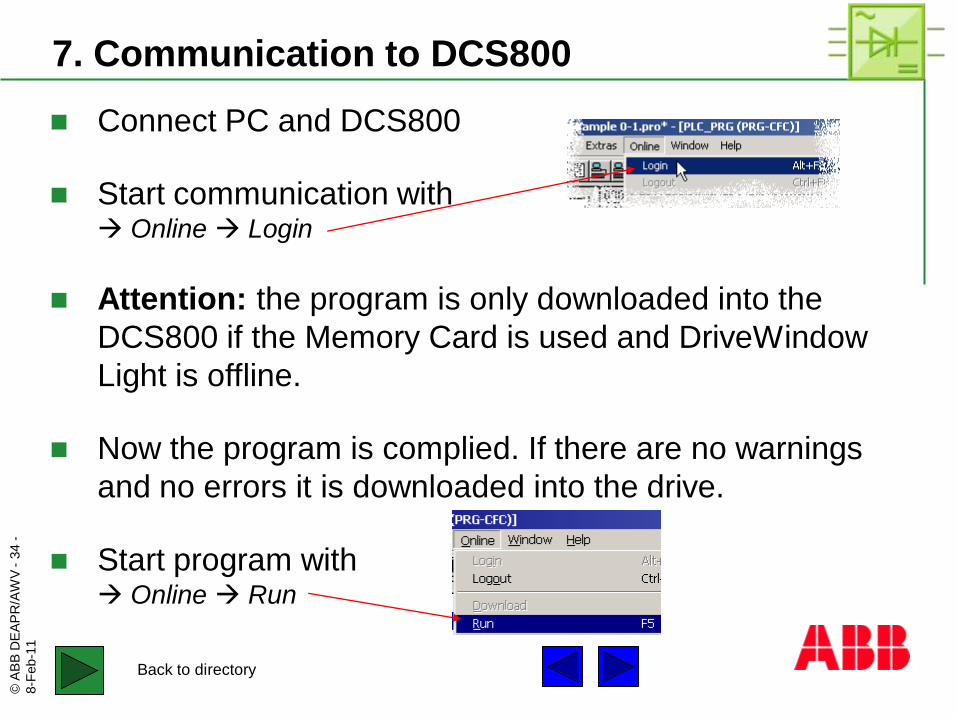
7. Communication to DCS800
Connect PC and DCS800
Start communication with Online Login
Now the program is complied. If there are no warnings
and no errors it is downloaded into the drive.
Start program with Online Run
Back to directory
Attention: the program is only downloaded into the
DCS800 if the Memory Card is used and DriveWindow
Light is offline.
© A
BB
DE
AP
R/A
WV
-35
-
8-F
eb-1
1
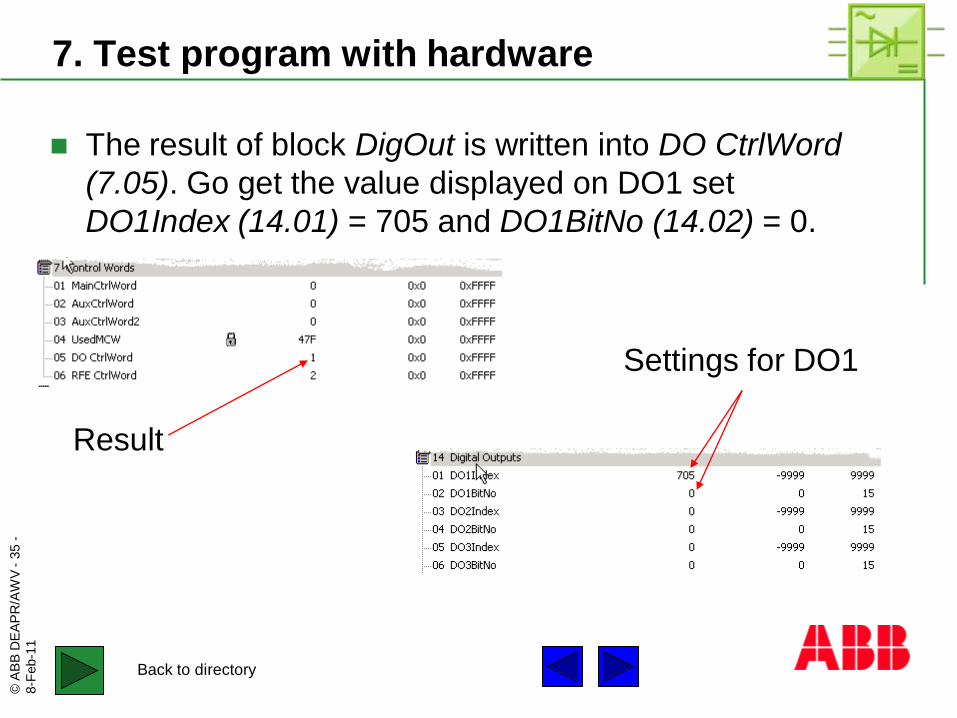
7. Test program with hardware
The result of block DigOut is written into DO CtrlWord
(7.05). Go get the value displayed on DO1 set
DO1Index (14.01) = 705 and DO1BitNo (14.02) = 0.
Result
Settings for DO1
Back to directory
© A
BB
DE
AP
R/A
WV
-36
-
8-F
eb-1
1
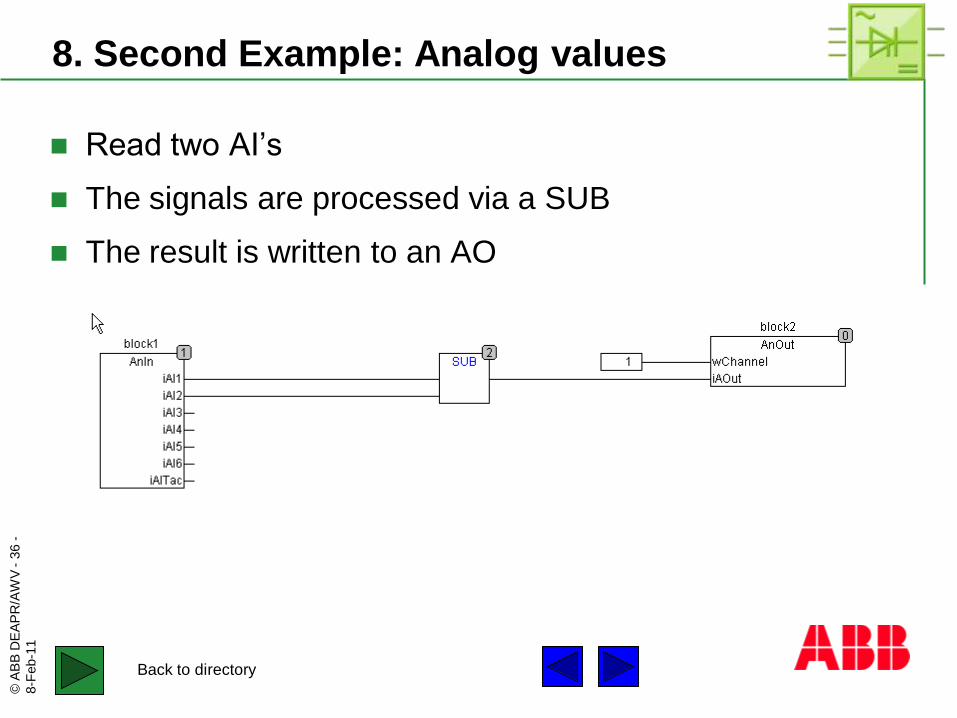
8. Second Example: Analog values
Read two AI’s
The signals are processed via a SUB
The result is written to an AO
Back to directory

© A
BB
DE
AP
R/A
WV
-37
-
8-F
eb-1
1
8. Steps
Create a new project (see step 4)
Select target (see step 4)
Build a PLC_PRG in CFC (see step 4)
Insert function blocks (see step 4)
Declare and connect the function blocks (see step 4)
Insert and declare input (see step 4)
Task configuration (see step 5)
Build the project (see step 5)
Configure the communication parameters (sees step 6)
Test program with hardware (see next page)
Back to directory

© A
BB
DE
AP
R/A
WV
-38
-
8-F
eb-1
1
8. Test program with hardware
The result of the calculation is written into CtrlWordAO1
(15.02). To get the value displayed on AO1 set IndexAO1
(15.01) = 1502.
Back to directory
Result
Setting for AO1

© A
BB
DE
AP
R/A
WV
-39
-
8-F
eb-1
1
9. Up- and download of applications
Back to directory

© A
BB
DE
AP
R/A
WV
-40
-
8-F
eb-1
1
9. Save an application on the Memory Card
Only when using the Memory Card (SDCS-MEM-8) all
possibilities to handle the application are available
The code can be downloaded without saving. If the drive’s
electronic is de-energized, the application is lost.
The code can be downloaded and saved on the Memory
Card. If the drive’s electronic is de-energized, the
application is automatically re-loaded at the next power up.
If the source code is saved on the Memory Card, it can be
uploaded by means of CoDeSys
With DriveWindow Light it is also possible to download
both the code and the source code into the drive
Back to directory

© A
BB
DE
AP
R/A
WV
-41
-
8-F
eb-1
1
9. Possibilities
Back to directory
Removing saved applications from the Memory
Card is only possible by means of CoDeSys!
Download (PC to DCS800)
Upload (DCS800 to PC)
CoDeSys
DriveWindow Light CoDeSys
With CoDeSys following files can be generated:
PRG (program file)
CHK (checksum file)
SRC (source code) If the SRC-file is not downloaded other users cannot open the application! The application can be protected with a password by means of function block “ProgProtect”.
With DriveWindow Light it is possible to download all generated files into the Memory Card. The files can only be generated by means of CoDeSys. To download files via DriveWindow Light a knowledge of CoDeSys is not necessary!
Only with CoDeSys it is possible to upload the source code (SRC-file) of an application from the Memory Card. To open the application the source code is needed! If only the PRG- and the CHK-files are saved it is not possible to open the application. If the application is protected with the function block “ProgProtect” password is needed for uploading the application!

© A
BB
DE
AP
R/A
WV
-42
-
8-F
eb-1
1
9. Saving with CoDeSys
Open a program for download File Open…
Back to directory
Built the program use F11 or Project Build
Choose the program
and press Open
Connect the drive and go online Online Login and Yes

© A
BB
DE
AP
R/A
WV
-43
-
8-F
eb-1
1
9. Saving with CoDeSys
The program is downloading
Back to directory
Start the program use F5 or Online Run
The program is running now,
but not saved jet!
To save the program a boot
project has to be created
Online Create boot project
The program was saved successfully,
confirm with OK
© A
BB
DE
AP
R/A
WV
-44
-
8-F
eb-1
1
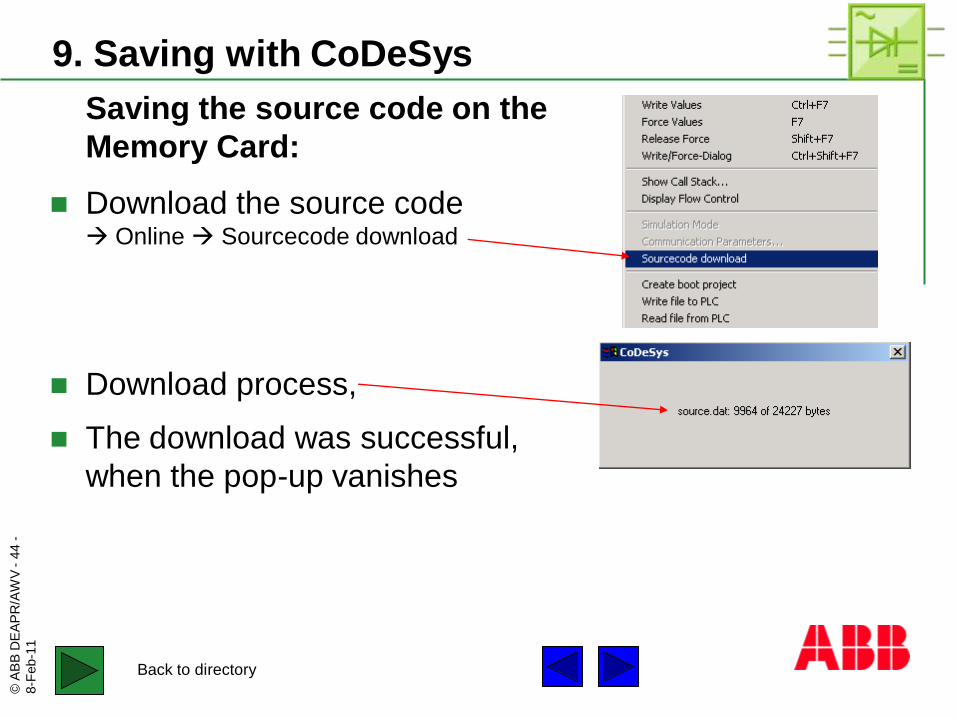
9. Saving with CoDeSys
Back to directory
Saving the source code on the
Memory Card:
Download the source code Online Sourcecode download
Download process,
The download was successful,
when the pop-up vanishes

© A
BB
DE
AP
R/A
WV
-45
-
8-F
eb-1
1
9. Saving with DriveWindow Light
For service personal, not working with CoDeSys, it is
possible to download applications with DWL
For example:
An engineer has to commission a drive. He can´t work
with CoDeSys, but he receives a program from the
application center.
Now he can download the program with DWL into the
drive!
Back to directory

© A
BB
DE
AP
R/A
WV
-46
-
8-F
eb-1
1
9. Generate files for DriveWindow Light
Logout Online Logout
Back to directory
Generate files Online Create boot project
The pass where to find the
generated files is shown

© A
BB
DE
AP
R/A
WV
-47
-
8-F
eb-1
1
9. Saving with DriveWindow Light
Open DWL and connect the drive
Select Offline
Downloading the application program
using DriveWindow Light:
Back to directory
Application Download Tools CoDeSys Application
Download
© A
BB
DE
AP
R/A
WV
-48
-
8-F
eb-1
1
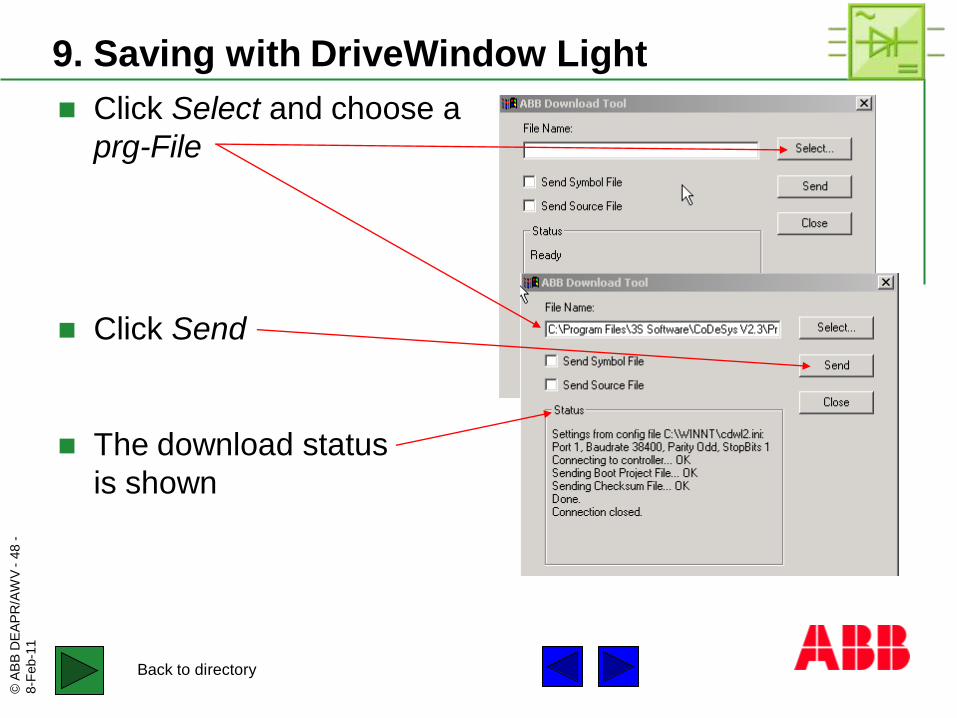
9. Saving with DriveWindow Light
Click Select and choose a
prg-File
Back to directory
Click Send
The download status
is shown
© A
BB
DE
AP
R/A
WV
-49
-
8-F
eb-1
1
9. Enable an application
To activate the application set:
ParApplSave (16.06) = EnableAppl
If the drive is de-energized now, the application is not lost
and will load the application when the drive is energized
again
With ParApplSave (16.06) it is also possible to save all
parameters on the Memory Card and load them into
another drive
Back to directory

© A
BB
DE
AP
R/A
WV
-50
-
8-F
eb-1
1
10. Upload an application
It is possible to upload a program with CoDeSys, if
the program is not protected using the function block
“ProgProtect”. If the program code is protected the
password is needed.
It is possible to upload a source code with CoDeSys.
The upload of the source code is only possible if the
source code was downloaded before.
Upload by means of DriveWindow light is not
possible at all
Back to directory

© A
BB
DE
AP
R/A
WV
-51
-
8-F
eb-1
1
10. Upload a program
Create a new project File New
Back to directory
Select
DCS800 as
target and
press OK
In New POU select OK
Connect the drive and go online Online Login and No
© A
BB
DE
AP
R/A
WV
-52
-
8-F
eb-1
1
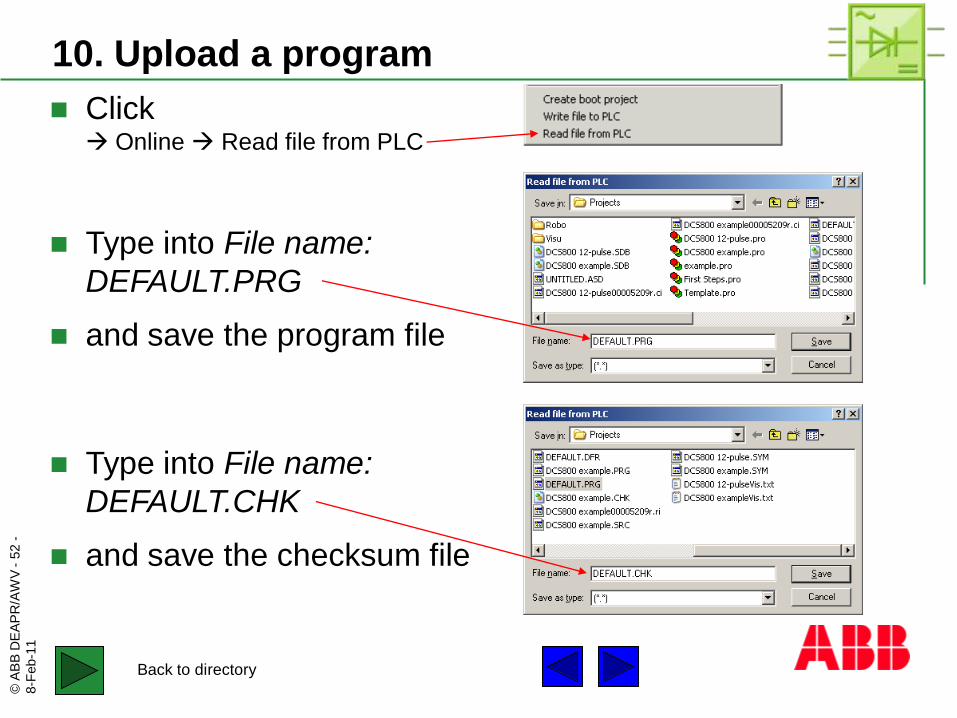
10. Upload a program
Click Online Read file from PLC
Back to directory
Type into File name:
DEFAULT.PRG
and save the program file
Type into File name:
DEFAULT.CHK
and save the checksum file
© A
BB
DE
AP
R/A
WV
-53
-
8-F
eb-1
1
10. Upload a program
Back to directory
Rename the files for better identification since it is not
possible to have an other name for the upload
The files can be downloaded by means of CoDeSys or
DriveWindow Light, see chapter 9

© A
BB
DE
AP
R/A
WV
-54
-
8-F
eb-1
1
10. Upload the source code
Open a project File Open
Back to directory
Open project from PLC
Select
DCS800 as
target and
press OK
© A
BB
DE
AP
R/A
WV
-55
-
8-F
eb-1
1
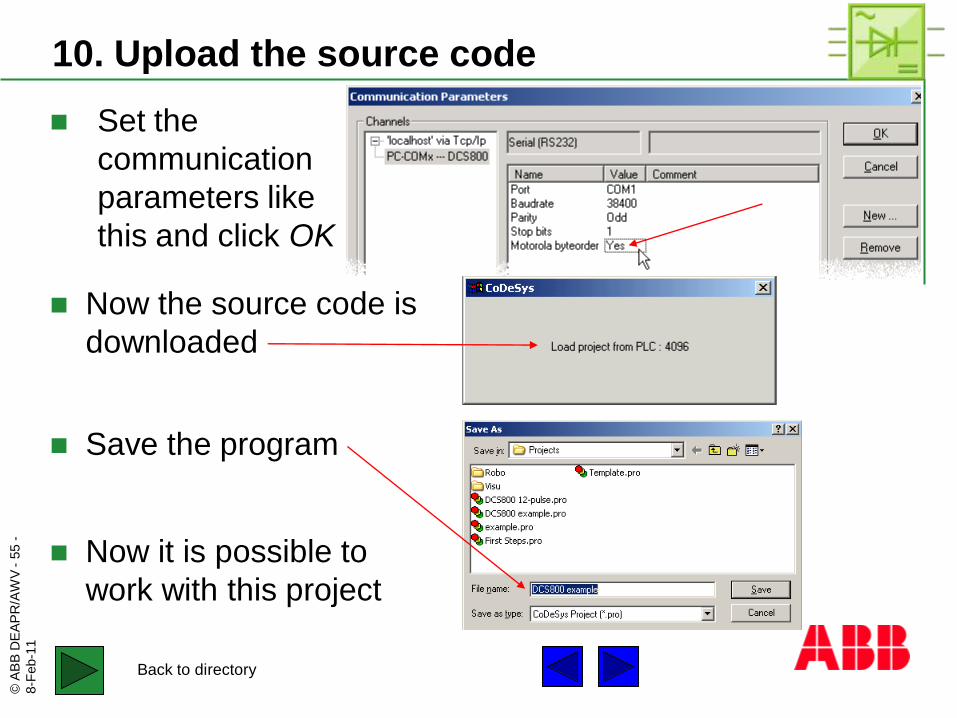
10. Upload the source code
Back to directory
Set the
communication
parameters like
this and click OK
Now the source code is
downloaded
Save the program
Now it is possible to
work with this project

© A
BB
DE
AP
R/A
WV
-56
-
8-F
eb-1
1
11. Delete an application with CoDeSys
ClickOnline Reset (Original)
Back to directory
Confirm with Yes
Delete a program on the Memory
Card with CoDeSys:
The program was deleted
successfully, confirm with OK
© A
BB
DE
AP
R/A
WV
-57
-
8-F
eb-1
1
DCS800
Thank You for Your attention!