dcw03 08 restore a photo
TRANSCRIPT
8/6/2019 DCW03 08 Restore a Photo
http://slidepdf.com/reader/full/dcw03-08-restore-a-photo 1/4
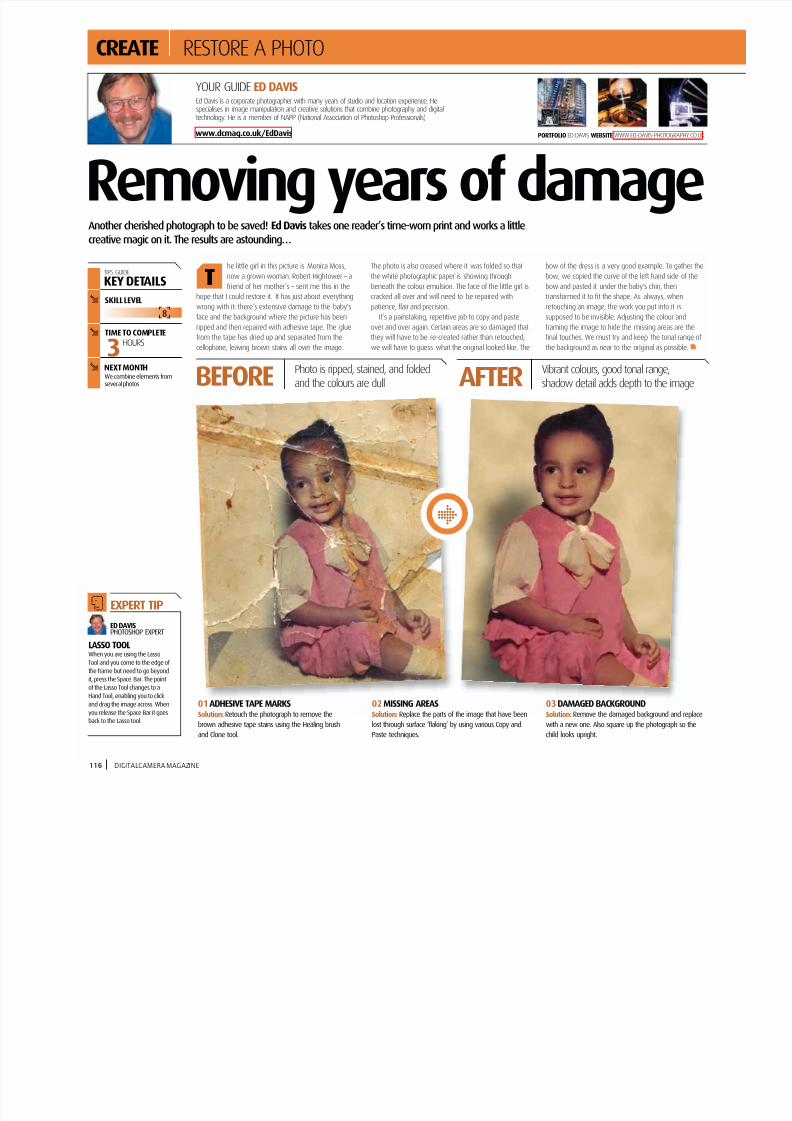
he little girl in this picture is Monica Moss,
now a grown woman. Robert Hightower – a
friend of her mother’s – sent me this in the
hope that I could restore it. It has just about everything
wrong with it: there’s extensive damage to the baby's
face and the background where the picture has been
ripped and then repaired with adhesive tape. The glue
from the tape has dried up and separated from the
cellophane, leaving brown stains all over the image.
The photo is also creased where it was folded so that
the white photographic paper is showing through
beneath the colour emulsion. The face of the little girl is
cracked all over and will need to be repaired with
patience, flair and precision.
It’s a painstaking, repetitive job to copy and paste
over and over again. Certain areas are so damaged that
they will have to be re-created rather than retouched;
we will have to guess what the original looked like. The
bow of the dress is a very good example. To gather the
bow, we copied the curve of the left hand side of the
bow and pasted it under the baby's chin, then
transformed it to fit the shape. As always, when
retouching an image, the work you put into it is
supposed to be invisible. Adjusting the colour and
framing the image to hide the missing areas are the
final touches. We must try and keep the tonal range of
the background as near to the original as possible.
Removing years of damageAnother cherished photograph to be saved! Ed Davis takes one reader’s time-worn print and works a littlecreative magic on it. The results are astounding…
YOUR GUIDE ED DAVISEd Davis is a corporate photographer with many years of studio and location experience. Hespecialises in image manipulation and creative solutions that combine photography and digitaltechnology. He is a member of NAPP (National Association of Photoshop Professionals)
www.dcmag.co.uk/EdDavis
116 DIGITALCAMERAMAGAZINE
T
CREATE RESTORE A PHOTO
PORTFOLIOED DAVIS WEBSITE WWW.ED-DAVIS-PHOTOGRAPHY.CO.UK
TIPS GUIDE
KEY DETAILS
We combine elements fromseveral photos
NEXTMONTH
SKILLLEVEL
TIMETO COMPLETEHOURS
2
2
2
3
8
EXPERT TIP0
LASSO TOOLWhen you are using the Lasso
Tool and you come to the edge of
the frame but need to go beyondit, press the Space Bar. The point
of the Lasso Tool changes to a
Hand Tool, enabling you to click
and drag the image across. When
you release the Space Bar it goesback to the Lasso tool.
ED DAVISPHOTOSHOP EXPERT
8
Photo is ripped, stained, and foldedand the colours are dullBEFORE Vibrant colours, good tonal range,
shadow detail adds depth to the imageAFTER
01ADHESIVE TAPE MARKSSolution:Retouch the photograph to remove the
brown adhesive tape stains using the Healing brush
and Clone tool.
02MISSING AREASSolution:Replace the parts of the image that have been
lost through surface ‘flaking’ by using various Copy and
Paste techniques.
03DAMAGED BACKGROUNDSolution:Remove the damaged background and replace
with a new one. Also square up the photograph so the
child looks upright.
8/6/2019 DCW03 08 Restore a Photo
http://slidepdf.com/reader/full/dcw03-08-restore-a-photo 2/4
DIGITAL CAMERAMAGAZINE 117
Double-click on the Zoom Tool to make your image 100%. Double click on the Hand
Tool to make the image fit the Photoshop work area
4ONE-CLICK
FIX
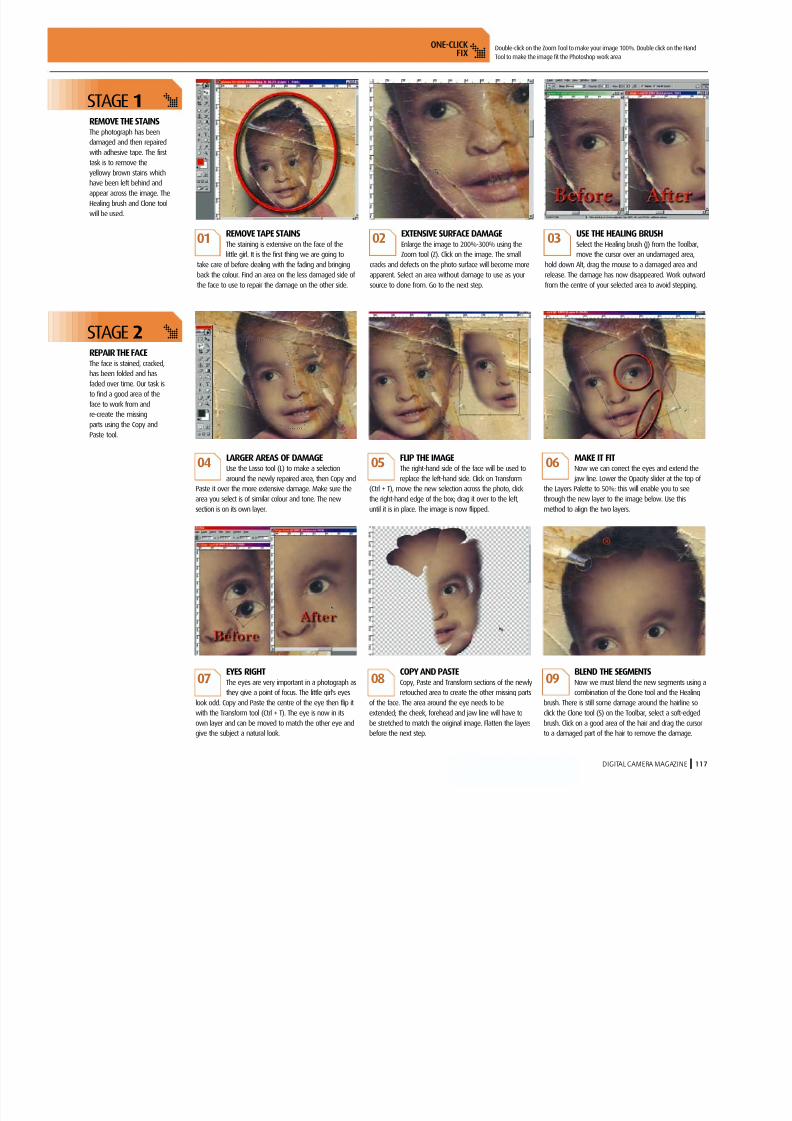
STAGE1
REMOVE TAPE STAINS
The staining is extensive on the face of thelittle girl. It is the first thing we are going to
take care of before dealing with the fading and bringing
back the colour. Find an area on the less damaged side of
the face to use to repair the damage on the other side.
EXTENSIVE SURFACE DAMAGE
Enlarge the image to 200%-300% using theZoom tool (Z). Click on the image. The small
cracks and defects on the photo surface will become more
apparent. Select an area without damage to use as your
source to clone from. Go to the next step.
02
USE THE HEALING BRUSH
Select the Healing brush (J) from the Toolbar,move the cursor over an undamaged area,
hold down Alt, drag the mouse to a damaged area and
release. The damage has now disappeared. Work outward
from the centre of your selected area to avoid stepping.
0301
LARGER AREAS OF DAMAGEUse the Lasso tool (L) to make a selection
around the newly repaired area, then Copy and
Paste it over the more extensive damage. Make sure thearea you select is of similar colour and tone. The new
section is on its own layer.
04 FLIP THE IMAGEThe right-hand side of the face will be used to
replace the left-hand side. Click on Transform
(Ctrl + T), move the new selection across the photo, clickthe right-hand edge of the box; drag it over to the left,
until it is in place. The image is now flipped.
05 MAKE IT FITNow we can correct the eyes and extend the
jaw line. Lower the Opacity slider at the top of
the Layers Palette to 50%: this will enable you to seethrough the new layer to the image below. Use this
method to align the two layers.
06
EYES RIGHTThe eyes are very important in a photograph as
they give a point of focus. The little girl's eyes
look odd. Copy and Paste the centre of the eye then flip it
with the Transform tool (Ctrl + T). The eye is now in its
own layer and can be moved to match the other eye and
give the subject a natural look.
07COPY AND PASTECopy, Paste and Transform sections of the newly
retouched area to create the other missing parts
of the face. The area around the eye needs to be
extended; the cheek, forehead and jaw line will have to
be stretched to match the original image. Flatten the layers
before the next step.
08BLEND THE SEGMENTSNow we must blend the new segments using a
combination of the Clone tool and the Healing
brush. There is still some damage around the hairline so
click the Clone tool (S) on the Toolbar, select a soft-edged
brush. Click on a good area of the hair and drag the cursor
to a damaged part of the hair to remove the damage.
09
REMOVE THE STAINSThe photograph has been
damaged and then repaired
with adhesive tape. The first
task is to remove the
yellowy brown stains which
have been left behind and
appear across the image. The
Healing brush and Clone tool
will be used.
2
STAGE2
REPAIR THE FACEThe face is stained, cracked,
has been folded and has
faded over time. Our task is
to find a good area of the
face to work from and
re-create the missing
parts using the Copy and
Paste tool.
2
8/6/2019 DCW03 08 Restore a Photo
http://slidepdf.com/reader/full/dcw03-08-restore-a-photo 3/4
118 DIGITAL CAMERAMAGAZINE
PATCH THE DRESS TEXTURE
There’s some damage to the texture of thedress. The Patch tool will clone it and retain the
clarity. Click Patch tool (J) on the Tool Bar. On the Options
bar set the tool to Destination, select a ‘clean’ area with
similar texture and drag the new piece over the damage.
CLOSE-UP ON THE DAMAGE
The surface of the whole photo is pitted andcracked. This part of the retouching will be
time consuming. Use the method in Step Two. Repair a
section using the Clone tool and the Healing brush then
use the section you have repaired to clean up the rest.
11
DRESS AND BOW
The neckline and right side of the bow arebadly damaged and must be re-constructed
from good sections. Use the Clone tool (S) to repair small
bits of damage. Then Paste the repaired area over the
damage. Move into place with the Transform command.
1210
CREATE THE BOWTo create the loop at the top of the bow, Copy
and Paste part of the large bow then using
Transform, (Ctrl + T) move the new section into positionand adjust. Continue doing this with as many parts of the
existing bow and surrounding dress as necessary.
THE DRESSMake a selection around the damage with the
Lasso Tool (L). Click inside the selection and
drag it to a repaired area. Now click Copy then Paste tocreate a new layer. Click the Move tool (V) to move the
new section over the damage you need to repair.
14 CONTINUE UNTIL DONEAs you add new layers the whole picture starts
to look better. Continue until the girl is finished.
Before moving on to the next stage, merge all layers. Clickon the small arrow at the top of the Layers palette and on
the drop-down menu click on Merge Visible.
1513
SELECT THE GIRLClick the Lasso tool (L) on the Toolbar, set the
feather setting on the Option bar to 2px and
go around the little girl. Don't worry if your selection is
not perfect, it can be added to and subtracted from,
once the selection is complete.
CORRECT THE SELECTIONIn Photoshop 6 and 7 you have a set of icons
on the Options bar that let you add to and
subtract from the selected area. Click on the icon required
and draw around the area you want to add or subtract.
Release the mouse, the selection is now correct.
17REMOVE THE BACKGROUNDDouble click on the Hand tool (H) – this fits the
whole image on the screen. Copy (Ctrl + C)
and Paste (Ctrl + V) – the little girl is now on her own
Layer. Turn off the background layer by clicking the eye
icon next to the background layer on the Layers palette.
1816
CREATE RESTORE A PHOTO
STAGE3
THE BACKGROUNDThe background is very badly
damaged and discoloured. It
is not of great interest and
can be replaced. Select thelittle girl using the Lasso tool
then Copy and Paste her
onto a new layer, and insert
a new background.
2
EXPERT TIP0
CLONE TOOLYou can either use the Clone
tool to clone from all the
layers or just the layer you
are working on. Click the
Use all Layers box on the
Option bar.
ED DAVIS
PHOTOSHOP EXPERT
8/6/2019 DCW03 08 Restore a Photo
http://slidepdf.com/reader/full/dcw03-08-restore-a-photo 4/4DIGITALCAMERAMAGAZINE 119
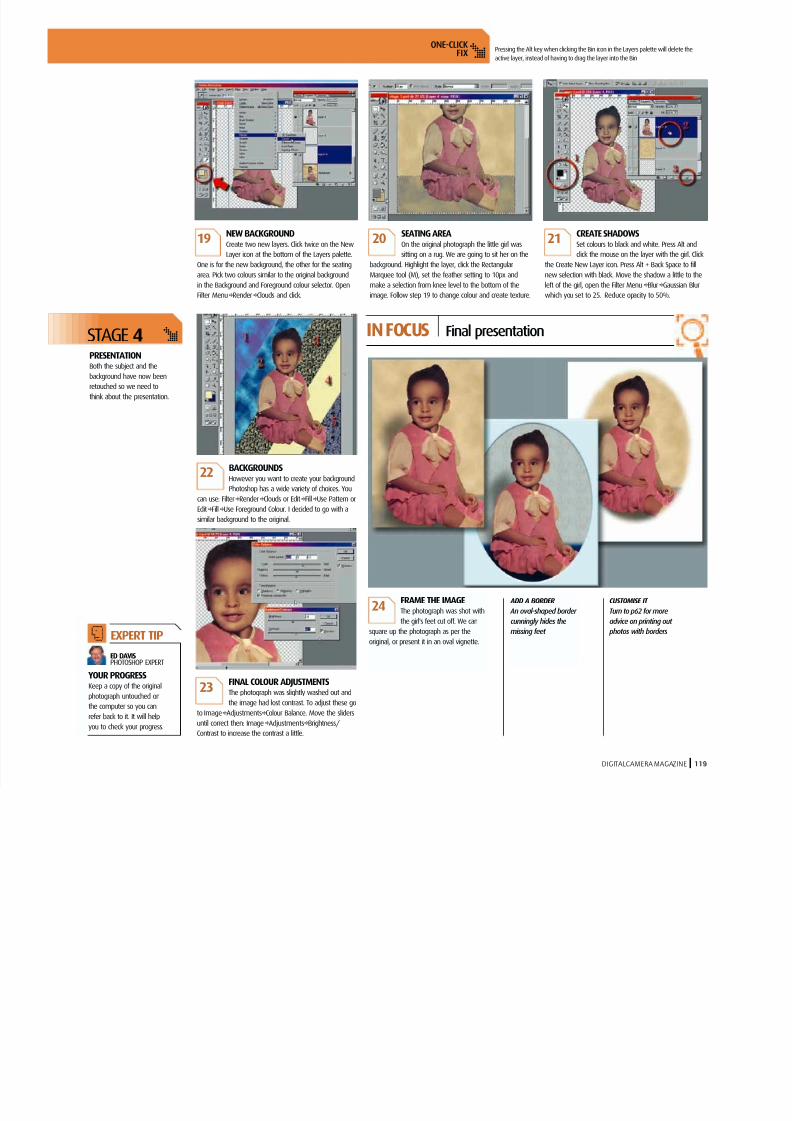
Pressing the Alt key when clicking the Bin icon in the Layers palette will delete the
active layer, instead of having to drag the layer into the Bin
STAGE4
PRESENTATION
Both the subject and thebackground have now been
retouched so we need to
think about the presentation.
2
BACKGROUNDSHowever you want to create your background
Photoshop has a wide variety of choices. Youcan use: Filter8Render8Clouds or Edit8Fill8Use Pattern or
Edit8Fill8Use Foreground Colour. I decided to go with a
similar background to the original.
22
FINAL COLOUR ADJUSTMENTSThe photograph was slightly washed out and
the image had lost contrast. To adjust these go
to Image8Adjustments8Colour Balance. Move the sliders
until correct then: Image8Adjustments8Brightness/
Contrast to increase the contrast a little.
23
NEW BACKGROUND
Create two new layers. Click twice on the NewLayer icon at the bottom of the Layers palette.
One is for the new background, the other for the seating
area. Pick two colours similar to the original background
in the Background and Foreground colour selector. Open
Filter Menu8Render8Clouds and click.
SEATING AREA
On the original photograph the little girl wassitting on a rug. We are going to sit her on the
background. Highlight the layer, click the Rectangular
Marquee tool (M), set the feather setting to 10px and
make a selection from knee level to the bottom of the
image. Follow step 19 to change colour and create texture.
20
CREATE SHADOWS
Set colours to black and white. Press Alt andclick the mouse on the layer with the girl. Click
the Create New Layer icon. Press Alt + Back Space to fill
new selection with black. Move the shadow a little to the
left of the girl, open the Filter Menu8Blur8Gaussian Blur
which you set to 25. Reduce opacity to 50%.
2119
INFOCUS Final presentation
FRAME THE IMAGE
The photograph was shot withthe girl's feet cut off. We can
square up the photograph as per the
original, or present it in an oval vignette.
24 ADD A BORDER
An oval-shaped border cunningly hides the
missing feet
CUSTOMISE IT
Turn to p62 for moreadvice on printing out
photos with borders
4ONE-CLICK
FIX
EXPERT TIP0
YOUR PROGRESSKeep a copy of the original
photograph untouched on
the computer so you can
refer back to it. It will help
you to check your progress.
ED DAVISPHOTOSHOP EXPERT