decomposition service and tools guide - product...
TRANSCRIPT

Xerox DocuPrint Network Printer Series Decomposition Service and Tools Guide
Version 3.0bJuly 1998721P84271

Xerox Corporation701 S. Aviation BoulevardEl Segundo, CA 90245
©1997, 1998 by Xerox Corporation. All rights reserved.
Copyright protection claimed includes all forms of matters of copyrightable material and information now allowed by statuory or judicial law or hereinafter granted, including without limitation, material generated from the software programs which are displayed on the screen such as icons, screen displays, looks, and so on.
Printed in the United States of America.
Publication number: 721P84271
Xerox® and all Xerox product names mentioned in this publication are trademarks of Xerox Corporation. Products and trademarks of other companies are also acknowledged.
Changes are periodically made to this document. Changes, technical inaccuracies and typographic errors will be corrected in subsequent editions.

DECOMPOSITION SERVICE AND TOOLS GUIDE iii
Conventions
This guide uses the following conventions:
• All caps and angle brackets — Within procedures, the names of keys are shown in all caps within angle brackets (for example, press <RETURN>).
• Angle brackets — Variable information, or the position of a specified argument in the command syntax, appears in angle brackets (for example, List Fonts <Pattern>).
• Bold — Within procedures, text and numbers that you enter are shown in bold (for example, enter privilege operator).
• “Enter” — Within procedures, the two-step process of keying in data and pressing <RETURN> (for example, enter y).
• Italics — Document and library names are shown in italics (for example, the Xerox DocuPrint Network Printer Series Guide to Submitting Your Jobs from the Client).
• Quotes — Keywords you can enter as arguments and paths appear in quotes (for example, “USLetter” and “/var/spool/data”).
• The use of upper and lower case letters used for the names of utilities and tools varies amoung the different environments. Examples follow:
— Within the Windows environment, the convention is to adopt the initial capitalization of tool names such as “XMerge” and “XCat”
— Within the UNIX environment, the convention is to use all lower case letters such as “formmerge”
— Within the DOS environment, there is an eight-character file name limitation and the case does not matter so “formmrg” is used.
Note: Notes are hints that help you perform a task or understand the text.
Caution: Cautions alert you to an action that could damage hardware or software.
!Warning: Warnings alert you to conditions that may affect the safety of people. !

iv DECOMPOSITION SERVICE AND TOOLS GUIDE
Xerox DocuPrint Network Printer Series
The Xerox DocuPrint Network Printer Series includes the following documents, besides this guide:
Installation Planning Guide
System Overview Guide
Guide to Managing Print Jobs
Guide to Performing Routine Maintenance
Guide to Submitting Jobs from the Client
Guide to Using PDL
Messages Guide
Troubleshooting Guide
Master Index
Printer Controller Commands Quick Reference Card
Submitting your Jobs from DOS Quick Reference Card
Submitting your Jobs from Macintosh Quick Reference Card
Submitting your Jobs from UNIX Quick Reference Card
Submitting your Jobs from Windows 3.1x Quick Reference Card
Submitting your Jobs from Windows 95 Quick Reference Card
Submitting your Jobs from Windows NT Quick Reference Card
Generic MICR Fundamentals Guide (for MICR systems)

DECOMPOSITION SERVICE AND TOOLS GUIDE v
Table of Contents
Conventions iii
Xerox DocuPrint Network Printer Series iv
1. Overview 1-1
Why Decomp Service? 1-1
Application examples 1-1
Print on demand 1-2
Personalized documents 1-2
Customized forms 1-3
Tools/macros 1-4
Summary of benefits 1-5
2. Installation 2-1
Windows 2-1
DOS 2-2
SunOS/Solaris 2-2
3. Using virtual printers to save forms 3-1
Disposition attribute 3-1
Differences between TIFF/G4 and ByteCode formats 3-2
Differences between mask and form formats 3-2
Example 3-5
4. Forms, variable data files, and file of files 4-1
How to create a form 4-2
How to create a variable data file 4-3
Microsoft Word 6.0 Mail Merge example 4-3
How to create a file of files 4-7
XCat 4-8
XMerge 4-9
5. Background forms 5-1
BackgroundForm attribute 5-1
Example 5-2
CycleForms 5-4
Values for CycleForms attribute 5-5
6. Client tools 6-1
Windows 6-1

TABLE OF CONTENTS
vi DECOMPOSITION SERVICE AND TOOLS GUIDE
Reprint 6-2
FormMerge 6-3
XMerge 6-4
Using XMerge 6-4
XMerge example 6-4
XCat 6-6
Select Paper dialog 6-7
Select Jobs dialog 6-8
Generate PostScript dialog 6-9
DOS 6-10
reprint 6-10
formmrg 6-10
xmerge 6-11
Using XMerge 6-11
xcat 6-12
SunOS/Solaris 6-14
reprint 6-14
formmerge 6-14
xmerge 6-15
Using XMerge 6-15
xcat 6-16
7. DocuPrint NPS controller commands 7-1
Create virtual printer 7-1
Change virtual printer 7-1
BackgroundForm 7-2
CycleForms 7-2
Disposition 7-3
Delete form 7-3
Delete virtual printer 7-4
List forms 7-4
List virtual printer 7-4
Print form sample 7-5
Set tray 7-5
Show log 7-6
Show status 7-7
Start virtual printer 7-7
Stop virtual printer 7-8

TABLE OF CONTENTS
DECOMPOSITION SERVICE AND TOOLS GUIDE vii
8. Postscript references/macros 8-1
run exec 8-1
Example 8-2
GetTiff 8-3
Example 8-4
Form reference in applications 8-6
Example 8-6
9. TIFF utilities 9-1
DOS 9-1
SunOS/Solaris 9-2
getg4 9-2
A. Decomposed form file format A-1
Form files for TIFF/G4 and ByteCode formats A-1
Form files common to both TIFF/G4 and ByteCode A-1
Files created when form is saved as TIFF/G4 A-1
Files created when form is saved as ByteCode A-2
Examples A-2
TIFF/G4 examples A-2
ByteCode examples A-3
B. Storage of forms or jobs in a different directory B-1
Example B-1
C. Storage of files in /var/spool/data C-1
FTP method C-1
NFS method C-2
D. Performance measurements D-1
Formulas D-1
Measurement methods D-2
Obtaining rough estimates D-2
Calculating throughput D-2
Getting a sense of performance improvement throughDecomp Service D-2
Example D-3
Get rough estimates D-3
Get sense of performance improvement D-5
E. TIFF file format E-1
TIFF 6.0 mandatory tags E-1
DocuPrint NPS TIFF E-1
Examination of tags in TIFF file E-2

TABLE OF CONTENTS
viii DECOMPOSITION SERVICE AND TOOLS GUIDE
F. Forms backup and restoration F-1
Backup forms F-1
Restore forms F-1
G. Example applications G-1
Variable Data PostScript "Address" File example G-1
Image Lift example G-3
Microsoft Word-based Variable Data Merge example G-4
Referencing the Static Form G-6
Print Merge G-7
Sending files to DocuPrint NPS G-7
Glossary GLOSSARY-1
Index INDEX-1

DECOMPOSITION SERVICE AND TOOLS GUIDE 1-1
1. 1Overview
This chapter explains the need for Decomposition Service and provides examples of its many practical applications. The tools and macros are briefly described and the benefits of using Decomposition Service are summarized.
Why Decomp Service?
There are many software applications available on the market today which emit Page Description Language (PDL) files in either PostScript or Hewlett Packard PCL. Sometimes these files can be extremely complex, especially when they include graphics, and the printer may take a long time to decompose (or translate the PDL) and print.
If printing a complex document is a one-time occurrence, nothing can really be done to improve the performance of the printer. However, if the document is to be printed many times and you wish to avoid the time-consuming decomposition that occurs each time, the Xerox Decomposition Service (hereafter referred to as “Decomp Service”) provides the solution.
With Decomp Service, complex documents can be decomposed once and then stored as a “form” on the DocuPrint to be printed very quickly upon demand. These forms usually print at or close to the rated speed of the destination printer and the typical performance improvement is two to five times faster than the original PDL file.
One important capability of Decomp Service is that it can produce forms in industry standard TIFF file format with CCITT/G4 image compression. These TIFF/G4 forms can be manipulated by many popular image editors and reused by other PostScript applications.
Decomp Service also provides several utility tools and macros which allow you to merge variable data with your forms, examine and print TIFF images, and build books.
Application examples
Practical uses for Decomp Service are endless. Decomp Service can help quickly print newsletters, mailers, forms, pricing lists, letters, contracts, surveys, travel maps, certificates, warranties, and so on. These documents can easily be personalized or customized.
The 1996 Olympics used the Xerox DocuPrint NPS network printers and Decomp Service to print more than 18 million documents. These documents displayed a unique watermark graphic for the sport (provided by a decomposed background form) and results for athletic events (provided by a variable data file).

OVERVIEW
1-2 DECOMPOSITION SERVICE AND TOOLS GUIDE
Three application examples follow:
• Print on demand
• Personalized documents
• Customized forms.
Print on demand
With Decomp Service, the demand reprint of a small number of copies is faster because the pages are already in print-ready format. A few additional comments follow:
• In particular, Decomp Service can improve performance for frequently used documents that do not have good single-copy performance.
• If the initial decomposition runs at printer speed, there is no performance gain.
A good example is a technical manual with complex graphics that is reprinted in small quantities a few times each week as shown in figure 1-1.
Figure 1-1. Technical manual
Personalized documents
Decomp Service enables the creation of personalized documents which allows you to merge the name of the recipient or personal data onto the document to make it look original.
An example is a benefits booklet which includes the name of the employee and employee number as shown in figure 1-2.

OVERVIEW
DECOMPOSITION SERVICE AND TOOLS GUIDE 1-3
Figure 1-2. Benefits booklet
Customized forms
Customized forms can have data specifically directed at a particular customer. These forms generally have a moderate to high amount of personalized data. In addition, different form pages might be used for each individual job.
The forms are stored on the DocuPrint controller by Decomp Service. When you are ready to print, submit a PostScript file with the variable data and a reference to the form(s).
Note: Variable data can be printed on all or some of the form pages.
An example is an insurance quote which has the name of the policy holder and the premium printed on the selected form pages as shown in figure 1-3.
Figure 1-3. Insurance quote

OVERVIEW
1-4 DECOMPOSITION SERVICE AND TOOLS GUIDE
Tools/macros
The following tools are available with Decomp Service:
• FormMerge — Generates a PostScript file to overlay form pages on variable data
• GetG4 — Decodes TIFF tags into human readable format and prints the values
• Reprint — Generates a PostScript file for printing previously decomposed forms
• XCat — Builds a book by generating a PostScript file to concatenate chapters of a book into a single job with optional duplexing and chapter starts
• XMerge — Generates a PostScript file to overlay variable data onto some or all of the form pages.
These utilities are available for the PC and Sun platforms but not all of them are supported for all operating systems. Table 1-1 shows which tools are supported by these operating systems.
Note: Earlier versions included tools for the Macintosh platform and a TiffEdit tool; these are no longer supported.
The Decomp Tools or Windows can be installed on PCs with Windows 3.1x, Windows 95, or Windows NT.
Two macros, which are automatically installed onto the DocuPrint by the DocuPrint NPS base software, are also available for PostScript programmers:
• run exec — Allows a PostScript program to print a form page as a background
• GetTiff — Enables a PostScript program to image and print a TIFF.
Table 1-1. Tools supported by PC and Sun operating systems
Utilities Windows DOS SunOS 4.1.3 Solaris 2.3
FormMerge X X X X
Reprint X X X X
XMerge X X X X
XCat X X X X
GetG4 X X X

OVERVIEW
DECOMPOSITION SERVICE AND TOOLS GUIDE 1-5
Summary of benefits
To summarize, the primary benefits of Decomp Service are:
• It permits FAST printing!
— Complex forms are already decomposed which saves time
— Client is freed up and network traffic is reduced as smaller amounts of data are sent
— Printer throughput is increased because only variable data has to be decomposed
• It is ideal for situations where documents are printed over and over.
• It can handle or produce files in industry standard TIFF/G4 format.
• It utilizes the DocuPrint NPS printer controller to merge forms and variable data.

OVERVIEW
1-6 DECOMPOSITION SERVICE AND TOOLS GUIDE

DECOMPOSITION SERVICE AND TOOLS GUIDE 2-1
2. 2Installation
Decomp Service is included with the DocuPrint NPS base software, no separate installation process is required.
The system requirements for Decomp Service follow:
• DocuPrint NPS software version 1.4x or later
• Enough disk space on the printer controller to store the needed forms.
There are tools available to facilitate development of Decomposition Service applications. These are installed from diskette on the client workstation: Windows, DOS, SunOS/Solaris. You can also develop Decomp applications without these tools.
Windows
To install Decomp Service for the Windows environment, insert the installation diskette for Windows into the drive and execute “A:\SETUP.” A prompt similar to figure 2-1 is displayed:
Figure 2-1. Decomp Service Install Options screen
The examples are referred to by the help file for each tool which facilitate understanding of how the tool works. The example files occupy approximately 1 megabyte. If you wish to conserve space on your PC, then select the second option “Installation Without Examples.” If you need to examine the examples in the future, you can always re-insert the installation diskette and install the examples by running the “SETUP” executable.

INSTALLATION
2-2 DECOMPOSITION SERVICE AND TOOLS GUIDE
You also have the option to specify a different destination directory where the “Decomp Tools for Windows” are installed. You may accept the default which is “C:\DECOMPn” (“n” is the current release number).
DOS
To install Decomp Service for DOS, create a directory and copy the tools from the diskette. An example follows:
SunOS/Solaris
The UNIX and Solaris versions are in the “tar” format. You may choose to create a different destination directory. An installation example follows:
C:\>mkdir DOSDCOMPC:\>cd DOSDCOMPC:\DOSDCOMP>copy a:*.*A:FORMMRG.EXEA:REPRINT.EXEA:XCAT.EXEA:XMERGE.EOPDXEA:GETG4.EXE 5 file(s) copied
% suPassword: *******# mkdir /usr/DecompTools# cd /usr/DecompTools# tar -xvf /dev/fd0c
DECOMPOSITION SERVICE AND TOOLS GUIDE 3-1
3. 3Using virtual printers to saveforms
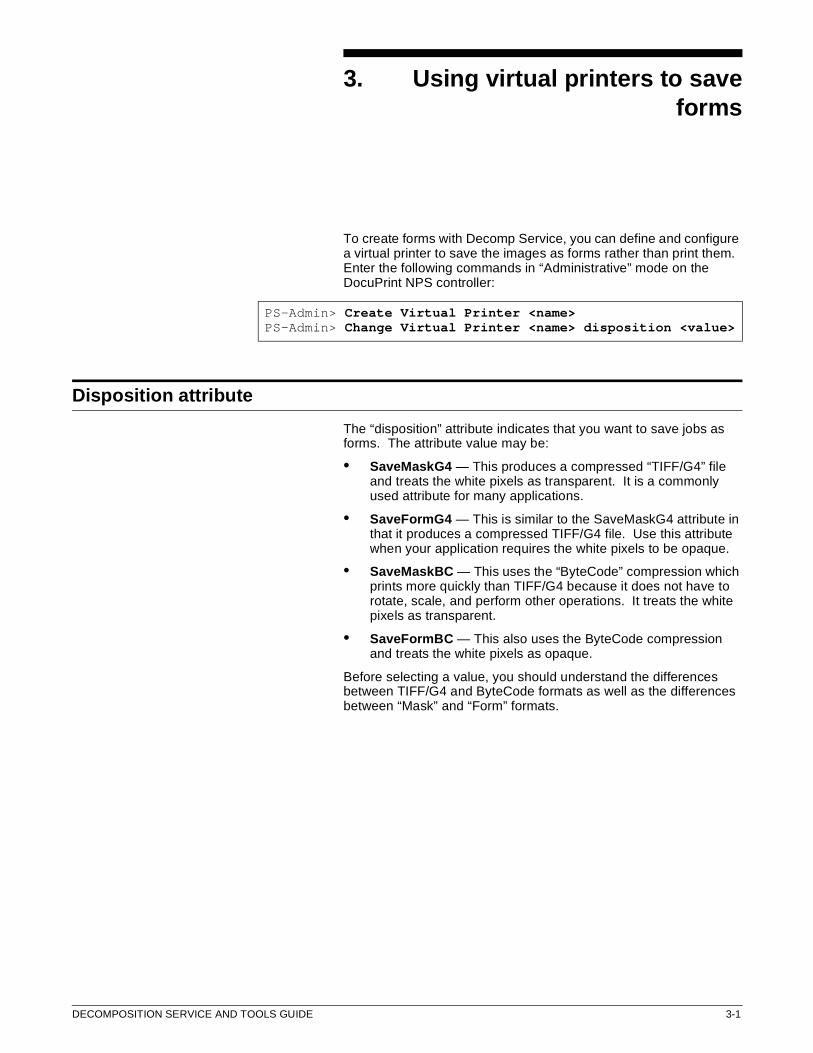
To create forms with Decomp Service, you can define and configure a virtual printer to save the images as forms rather than print them. Enter the following commands in “Administrative” mode on the DocuPrint NPS controller:
Disposition attribute
The “disposition” attribute indicates that you want to save jobs as forms. The attribute value may be:
• SaveMaskG4 — This produces a compressed “TIFF/G4” file and treats the white pixels as transparent. It is a commonly used attribute for many applications.
• SaveFormG4 — This is similar to the SaveMaskG4 attribute in that it produces a compressed TIFF/G4 file. Use this attribute when your application requires the white pixels to be opaque.
• SaveMaskBC — This uses the “ByteCode” compression which prints more quickly than TIFF/G4 because it does not have to rotate, scale, and perform other operations. It treats the white pixels as transparent.
• SaveFormBC — This also uses the ByteCode compression and treats the white pixels as opaque.
Before selecting a value, you should understand the differences between TIFF/G4 and ByteCode formats as well as the differences between “Mask” and “Form” formats.
PS-Admin> Create Virtual Printer <name>PS-Admin> Change Virtual Printer <name> disposition <value>

USING VIRTUAL PRINTERS TO SAVE FORMS
3-2 DECOMPOSITION SERVICE AND TOOLS GUIDE
Differences between TIFF/G4 and ByteCode formats
Table 3-1 summarizes the differences between TIFF/G4 and ByteCode formats:
The primary advantage of TIFF/G4 files is that they are transportable; this means you can use them on non-Xerox printers. They can also be edited using image editor programs such as “Adobe Photoshop” for the PC.
The primary advantages of ByteCode files are that they print much faster than TIFFs and work with background forms.
Caution: The ByteCode compression is proprietary to DocuPrint NPS and will not work on DocuTech or other printers. Therefore, if you need to use the form on another printer in the future, you should retain the original document.
Differences between mask and form formats
Another distinction to make is the use of either “Mask” or “Form” structure. This is for applications where the opacity of the white pixels is an issue. A few concepts to keep in mind follow:
• With the Mask format, the white pixels are transparent
• With the Form format, the white pixels are opaque
• All unwritten pixels are always transparent.
Following is an example that illustrates the differences between the Mask and Form formats. This example starts by examining two forms, one using Mask structure, and the other using Form structure. The example is shown in figure 3-1.
Table 3-1. Differences between TIFF/G4 and ByteCode formats
TIFF/G4 ByteCode
• An industry-standard format.
• Portable and editable.
• Flexible because of the ability to employ PostScript image operators.
• Does not work with Background Forms.
• Stored at printer resolution and orientation, producing a printer-efficient TIFF.
• Used where smaller file size is important.
• A Xerox proprietary format; not available on systems other than DocuPrint NPS.
• Not portable or editable.
• Fast, used for maximum speed; it can often print twice as fast as TIFF files.
• Required for Background Forms.
• Better with halftones than TIFF files.

USING VIRTUAL PRINTERS TO SAVE FORMS
DECOMPOSITION SERVICE AND TOOLS GUIDE 3-3
Figure 3-1. Form using Mask structure
Figure 3-2. Form using Form structure
Next, examine the variable data to get an idea of how the data is supposed to eventually fit on the form. The variable data is shown in figure 3-3.
Figure 3-3. Variable data
In applications (such as “FormMerge”) where the form is laid on top of data, the transparency or opacity of the form may be an issue. The previous two forms overlaid on top of the variable data are shown in figure 3-4 and figure 3-5.

USING VIRTUAL PRINTERS TO SAVE FORMS
3-4 DECOMPOSITION SERVICE AND TOOLS GUIDE
Figure 3-4. Form using Mask structure with variable data
Figure 3-5. Form using Form structure with variable data
Use either “Mask” or “Form” as appropriate for your situation. The Mask format is used in most circumstances.
In other applications (such as XMerge) where the form is printed first, with any additional or variable data printed on top of it, there is no difference between “mask” and “form” as shown in figure 3-6.

USING VIRTUAL PRINTERS TO SAVE FORMS
DECOMPOSITION SERVICE AND TOOLS GUIDE 3-5
Figure 3-6. Variable data merged over the form
In this case, the “Mask” format is recommended because there may be a small increase in performance and a smaller file size.
Note: All files processed by Decomposition Service and stored as print-ready images are generally referred to as “forms.” The word “form” does not indicate whether the file has been saved using a “mask” or as a “form.”
Example
For the purpose of this example, assume that you want to create a form in the commonly used TIFF/G4 and Mask formats. Enter the following commands in “Administrative” mode using the DocuPrint NPS controller to set up a virtual printer:
Note: The name of the virtual printer gives a clue to other printer users that it exists for Decomp Service form creation and that it indicates what formats are involved.
Any document that is submitted to this virtual printer (decomp_mg4) will be saved as a form.
Note: You can also use the lpr method of submitting a job to create a form. In the -C field, use the disposition attribute with one of the values listed earlier. Refer to the Guide to Submitting Jobs from the Client.
PS-Admin> Create Virtual Printer decomp_mg4PS-Admin> Change Virtual Printer decomp_mg4 disposition SaveMaskG4

USING VIRTUAL PRINTERS TO SAVE FORMS
3-6 DECOMPOSITION SERVICE AND TOOLS GUIDE

DECOMPOSITION SERVICE AND TOOLS GUIDE 4-1
4. 4Forms, variable data files, andfile of files
Many documents have a lot of static content with a smaller amount of variable data. Examples are form letters, invoices, statements, etc. Decomp Service can help make printing these documents more efficient by saving the static content in a print-ready form. Then only the variable data needs to be sent to the printer, along with a means of calling the desired form.
This chapter provides examples of this type of application, and describes how to create the ”form” and the “variable data file”. It also describes how to create a “file of files,” which is used for XMerge and XCat applications.
A master document containing both static and variable data is shown in figure 4-1.
Figure 4-1. Master document
For example, assume that you want to make at least 10 award certificates. Each one is identical except for three items:
• The name of the company that is being recognized
• The year
• The date.
These three variable items should be provided by a variable data file while the rest should be turned into a template or a form.

FORMS, VARIABLE DATA FILES, AND FILE OF FILES
4-2 DECOMPOSITION SERVICE AND TOOLS GUIDE
How to create a form
The steps in this section provide information on creating a form.
Note: This is one example of the procedure you can use. There are some variations. For example, you can use lpr instead of a virtual printer to create a form. You can use PCL instead of PostScript as the basis for the form.
Step 1. Either strip out the variable data or create a document from scratch that does not contain any variable data. A document without variable data is shown in figure 4-2. This document will be the basis for your form.
Figure 4-2. Document without variable data
Step 2. Create a PostScript file from this document by using a PostScript print driver.
Note: In Microsoft Word, you may use “Print To File” with a PostScript driver.
Step 3. Set up a virtual printer with the desired disposition attribute.
Note: The “Using virtual printers to create forms” chapter covered virtual printers and various disposition attributes in detail.
An example follows:
PS-Admin>create virtual printer decomp_fg4PS-Admin>change virtual printer decomp_fg4 disposition saveformG4

FORMS, VARIABLE DATA FILES, AND FILE OF FILES
DECOMPOSITION SERVICE AND TOOLS GUIDE 4-3
Step 4. Use any job submission method to submit the PostScript file to the new virtual printer (“decomp_fg4”). DocuPrint NPS produces a decomposed form and stores it in the “/var/db/forms” directory.
How to create a variable data file
There are several ways to create a variable data file; for example, you can write a PostScript program. The following example involves no programming and uses the Microsoft Word “Mail Merge” feature and an Excel spreadsheet containing names and other data.
Microsoft Word 6.0 Mail Merge example
The following steps show you how to create a variable data file using the Microsoft Word 6.0 Mail Merge feature.
Step 1. Make a copy of the previous document (which does not have any variable data in it) and insert frames where the incoming variable data should be. A sample document with frames for the variable data is shown in figure 4-3.
Figure 4-3. Document with frames for variable data
Next you will use the Microsoft Mail Merge feature to extract variable data from the Microsoft Excel spreadsheet shown in figure 4-4.

FORMS, VARIABLE DATA FILES, AND FILE OF FILES
4-4 DECOMPOSITION SERVICE AND TOOLS GUIDE
Figure 4-4. Microsoft Excel spreadsheet with variable data
Note: The rating data is not needed in the awards document.
Step 2. Return to your Word document, go to the “Tools” menu, and choose “Mail Merge.” Wait for the “Mail Merge Helper” to appear.
Step 3. From the “Main Document” select “Create”, choose “Form Letters”, and pick the “Active Window.”
Step 4. Configure the “Data Source”:
1. Select “Get Data” and choose “Open Data Source...”
2. Change to the proper directory and change “List File of Types” to Microsoft Excel Worksheet “*.xls.”
3. Specify the spreadsheet file name and click “OK.”
4. When asked if this is OK for the “Entire Spreadsheet”, click “OK.”
5. If prompted with “Word found no merge fields in your main document”, choose “Edit Main Document.”
Step 5. Merge the data with the document:
1. Select “Query Options...”
2. In “Filter Records”, set the first field to “Company” and “Comparison” to “is Not Blank” and click “OK.”
Note: This has the effect of reducing the number of records from 377 to 10 valid entries.
The Mail Merge Helper should now basically look like figure 4-5.

FORMS, VARIABLE DATA FILES, AND FILE OF FILES
DECOMPOSITION SERVICE AND TOOLS GUIDE 4-5
Figure 4-5. Mail Merge Helper
Step 6. Close the “Mail Merge Helper” and click inside the frame after the word “recognize”. On the new “Mail Merge toolbar”, click on “Insert Merge Field” and choose “Company.” This inserts “<<Company>>” in the frame.
Step 7. Click inside the frame after the first word “in”. Click again on “Insert Merge Field” and choose “Year.” Then click in the frame after the word “on”, go to the “Insert Merge Field”, choose “Date” and add a period.
Step 8. Finally, format the “<<>>” text inside the frames so that it has the proper font and size. It should look like figure 4-6.

FORMS, VARIABLE DATA FILES, AND FILE OF FILES
4-6 DECOMPOSITION SERVICE AND TOOLS GUIDE
Figure 4-6. Text with proper font and size formats
Note: You may also need to change the “Before Paragraph” spacing to align them with the rest of the text.
Step 9. There are two outer frames which contain static data for the certificate and a ribbon bitmap. Delete them and make the borders for the three inner frames invisible so that it looks like figure 4-7.
Figure 4-7. Three inner frames with invisible borders
Step 10. Execute “Mail Merge” by clicking on the button shown in figure 4-8.

FORMS, VARIABLE DATA FILES, AND FILE OF FILES
DECOMPOSITION SERVICE AND TOOLS GUIDE 4-7
Figure 4-8. Merge button
This button creates a variable data file.
Step 11. When the “Merge” window appears, have it merge to a “New Document” and click on “Merge.” The resulting file should roughly look like the scaled down pages depicted in figure 4-9.
Figure 4-9. Scaled down pages
Step 12. Save the file and then create a PostScript file from this document using a PostScript print driver.
Note: In Microsoft Word, you may use “Print To File” with a PostScript driver.
The variable data PostScript file can either reside locally on the PC or you may store it on the DocuPrint in “/var/spool/data”.
This variable data file can now be merged with the form that has been stored on your DocuPrint NPS. One way to do this is by using the Background Form capability. Refer to the chapter “Background forms.”
Even though in the example the variable data has only 10 entries, you would perform the same steps even if the data had 100, 1000, or 10,000 entries. By allowing the form to reside on the printer, the documents will print much more quickly than if you merged the form and data on your PC or workstation and then submitted them to the printer.
How to create a file of files
Two Decomp utilities (“XCat” and “XMerge”) use a “file of files” to specify which forms to use, and their sequence.
Note that they require different syntax for listing file names. XCat does not need paths but XMerge does. A file of files is an ASCII file which is normally denoted with an “.fof” extension. It specifies the order of the forms or jobs that are printed.
FORMS, VARIABLE DATA FILES, AND FILE OF FILES
4-8 DECOMPOSITION SERVICE AND TOOLS GUIDE
XCat
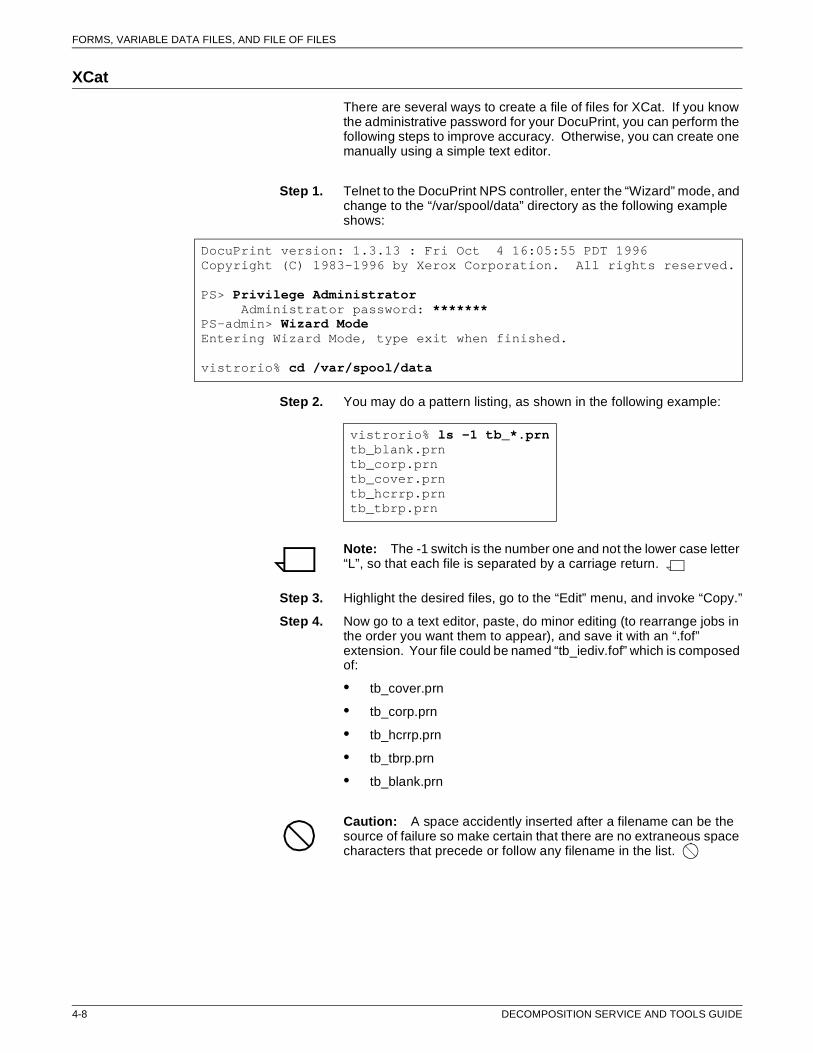
There are several ways to create a file of files for XCat. If you know the administrative password for your DocuPrint, you can perform the following steps to improve accuracy. Otherwise, you can create one manually using a simple text editor.
Step 1. Telnet to the DocuPrint NPS controller, enter the “Wizard” mode, and change to the “/var/spool/data” directory as the following example shows:
Step 2. You may do a pattern listing, as shown in the following example:
Note: The -1 switch is the number one and not the lower case letter “L”, so that each file is separated by a carriage return.
Step 3. Highlight the desired files, go to the “Edit” menu, and invoke “Copy.”
Step 4. Now go to a text editor, paste, do minor editing (to rearrange jobs in the order you want them to appear), and save it with an “.fof” extension. Your file could be named “tb_iediv.fof” which is composed of:
• tb_cover.prn
• tb_corp.prn
• tb_hcrrp.prn
• tb_tbrp.prn
• tb_blank.prn
Caution: A space accidently inserted after a filename can be the source of failure so make certain that there are no extraneous space characters that precede or follow any filename in the list.
DocuPrint version: 1.3.13 : Fri Oct 4 16:05:55 PDT 1996Copyright (C) 1983-1996 by Xerox Corporation. All rights reserved.
PS> Privilege Administrator Administrator password: ******* PS-admin> Wizard ModeEntering Wizard Mode, type exit when finished.
vistrorio% cd /var/spool/data
vistrorio% ls -1 tb_*.prntb_blank.prntb_corp.prntb_cover.prntb_hcrrp.prntb_tbrp.prn

FORMS, VARIABLE DATA FILES, AND FILE OF FILES
DECOMPOSITION SERVICE AND TOOLS GUIDE 4-9
XMerge
There are several ways to create a file of files for XMerge. Following are two examples, depending upon whether you know the DocuPrint NPS root password or not.
Step 1. Telnet to the DocuPrint NPS controller and enter the “Wizard” mode as shown in the following example:
Step 2. If you do not know the DocuPrint NPS root password, skip to Step 5. Otherwise, become “root” as shown in the following example:
Step 3. Do a pattern listing to list certain decomposed PostScript files associated with your form and redirect the output to create the file of files.
Note: You may wish to read the “Decomposed form file format” appendix first.
The switch is one and not the lower case “L” so that each file is separated by a carriage return.
In this case, assume that you want all of the decomposed PostScript files for the “newslttr” form. The following command will create the “newslttr.fof” and store it in “/var/spool/data”.
Step 4. Examine your new file of files to make sure it contains what you expected as shown in the following example:
Ensure that there is a single carriage return after the final filename in the list.
You have successfully created the file of files. Ignore the following steps as they apply only if you do not have the root password.
Step 5. Create a pattern listing to list certain decomposed PostScript files associated with the form as shown in the following example:
DocuPrint version: 1.3.13 : Fri Oct 4 16:05:55 PDT 1996Copyright (C) 1983-1996 by Xerox Corporation. All rights reserved.
PS> Privilege Administrator Administrator password: *******PS-admin> Wizard ModeEntering Wizard Mode, type exit when finished.
vistrorio% su root
vistrorio# ls -1 /var/db/forms/news*.p????.ps > /var/spool/data/newslttr.fof
vistrorio# cat /var/spool/data/newslttr.fof/var/db/forms/newslttr.prn.p0001.ps/var/db/forms/newslttr.prn.p0002.ps/var/db/forms/newslttr.prn.p0003.ps/var/db/forms/newslttr.prn.p0004.ps

FORMS, VARIABLE DATA FILES, AND FILE OF FILES
4-10 DECOMPOSITION SERVICE AND TOOLS GUIDE
Note: The -1 switch is one and not the lower case letter “L.”
Step 6. Highlight the desired files, go to the “Edit” menu, and invoke “Copy.”
Step 7. Go to a text editor, paste, do minor editing, (if necessary). Ensure that there is a single carriage return after the final filename in the list. Save the file with an “.fof” extension.
Caution: A space character accidently inserted after a filename can be the source of failure so make certain that there are no extraneous space characters that precede or follow any filename in the list.
Step 8. Use the new FTP login for Decomp users available in the DocuPrint NPS release 1.5 to store your file of files in “/var/spool/data/” on the DocuPrint NPS. The FTP login name is “decomp” and the default password is “decompuser.” If the default password does not work, consult your system administrator because the default password may have been changed.
Note: The default write permission for the /var/spool/data directory is “root.” If you need to be able store files in this directory, ask the printer controller administrator to change the owner of /var/spool/data to “decomp.”
vistrorio% ls -1 /var/db/forms/news*.p????.ps/var/db/forms/newslttr.prn.p0001.ps/var/db/forms/newslttr.prn.p0002.ps/var/db/forms/newslttr.prn.p0003.ps/var/db/forms/newslttr.prn.p0004.ps

DECOMPOSITION SERVICE AND TOOLS GUIDE 5-1
5. 5Background forms
This chapter discusses the “BackgroundForm” virtual printer attribute. One of the first major applications for this capability was the printing of event results for the 1996 Olympics. A decomposed form (which contained an unique watermark graphic for each sport) was assigned as a background form for the results reports for athletic events. The printed documents merged the results data with the background image.
You can use this capability so that a graphic, a company logo, a form, or other item automatically prints as a background image with your variable data.
BackgroundForm attribute
“BackgroundForm” is a document attribute whose value is the name of the file you will use as the background image. Once you have created the form, you may either use the “lpr” job submission command or a virtual printer to assign the background form.
An example of the lpr syntax is:
If you prefer to use the virtual printer method, enter the following commands in “Administrative” mode using the DocuPrint controller:
You can use any job submission method to submit any file to this particular virtual printer. Jobs submitted to this virtual printer will use the specified form.
Note: The form must be in “SaveMaskBC” format for Background Form use.
The ByteCode compression is proprietary to DocuPrint NPS and does not work on DocuTech or other printers. Therefore, you should retain the original document in case you need to recompress it on another machine in the future.
lpr -P[printer] -C"(bf=<form>)" <filename>
PS-Admin>create virtual printer <name>PS-Admin>change virtual printer <name> BackgroundForm <form>

BACKGROUND FORMS
5-2 DECOMPOSITION SERVICE AND TOOLS GUIDE
Example
Note: The example uses a simple one-page form and one-page document. You can use forms and documents with mulitple pages.
Assume that your company is a medical center and that you want your correspondence to display a medical graphic as a background image. An example of the graphic is shown in figure 5-1.
Note: There are several ways to create this application, depending on your needs and the software you are using. This example shows one possible way to create it.
Figure 5-1. Background image for correspondence
Step 1. While viewing a Microsoft Word document containing the medical graphic, use “Print To File” with a PostScript driver to produce a PostScript file named “medical.prn.”
Step 2. Set up a virtual printer using the disposition attribute by entering the following commands in “Administrative” mode on the DocuPrint NPS controller:
Step 3. Use any job submission method to submit “medical.prn” to the “decomp_maskBC” virtual printer. This decomposes the PostScript file into a form and stores it in “/var/db/forms” on the DocuPrint NPS controller.
PS-Admin>create virtual printer decomp_maskBCPS-Admin>change virtual printer decomp_maskBC disposition SaveMaskBC

BACKGROUND FORMS
DECOMPOSITION SERVICE AND TOOLS GUIDE 5-3
Step 4. Enter the “List Forms” command using the DocuPrint NPS controller to verify that “medical.prn” is now a form as shown in the following example:
Step 5. Now that you have a decomposed form ready, set up a background form virtual printer in “Administrative” mode using the DocuPrint controller as shown in the following example:
Step 6. At this point, any document you send to the “decomp_bkg” virtual printer will have the medical graphic printed as a background image. For example, assume that you want to have the document (“letter.doc”) shown in figure 5-2 printed with the background image.
Figure 5-2. Letter.doc
Step 7. Use any job submission method to submit “letter.prn” to the “decomp_bkg” virtual printer. The final output should look like figure 5-3.
PS> List FormsEnter the form name pattern: *Name Pages Format Date Createdmedical.prn 1 SaveMaskBC January 24, 1997 9:28:05 am PSTnewslttr.prn 1 SaveFormG4 January 13, 1997 1:14:25 pm PSTorder.prn 1 SaveFormG4 January 6, 1997 3:54:25 pm PST
PS-Admin>create virtual printer decomp_bkgPS-Admin>change virtual printer decomp_bkg BackgroundForm medical.prn

BACKGROUND FORMS
5-4 DECOMPOSITION SERVICE AND TOOLS GUIDE
Figure 5-3. Final output
CycleForms
The attribute CycleForms is sometimes used with BackgroundForm.
When the BackgroundForm attribute is used alone, the printer merges the form with the document being printed so that page 1 of the document appears on page 1 of the form, page 2 of the document appears on page 2 of the form, and so on.
In some cases, the form has a different number of pages from the job with which it is merged. Where the number of pages differ, you can use the CycleForms attribute to control how the form pages are applied to the job. This capability is useful in applications where a form is merged with variable data.
Like BackgroundForm, CycleForms is an attribute that can be set using lpr or a virtual printer. For lpr, the attribute can use either the attribute name “CycleForm” or the short-cut “cf”.
• The “lpr” method is shown in the following example:
• The “Virtual printer” method is shown in the following example:
The value you enter for this attribute (n) tells the system how to cycle the form.
% lpr -P[printer] -C”(cf=n)” <filename>
PS-Admin> change virtual printer <name> CycleForm=n

BACKGROUND FORMS
DECOMPOSITION SERVICE AND TOOLS GUIDE 5-5
Values for CycleForms attribute
To control cycling, set “n” as shown in table 5-1:
The following examples shown in table 5-2 through table 5-7 use a 4-page form (“4pages.ps” from “/usr/printing/sampledocs” on DocuPrint) which has been decomposed to a ByteCode form and attached to a virtual printer as a “background form.” The variable data file is a document named “67pages.ps.”
Table 5-1. Cycling control
n Resultant Behavior
Greater than “0” and less than or equal to the number of pages in the form
The form starts cycling on page n after the first complete form cycle is accomplished.
Greater than the number of pages in the form
The form cycles one time and then variable data is printed for the remainder of the job.
Equals “0” and there are an even number of pages in the form
The form cycles one time and then repeats the last two pages of the job.
Note: This is the same as pre-DocuPrint NPS 1.3.13 behavior.
Equals “0” and there are an odd number of pages in the form
The form cycles on the last page of the form.
Note: This is the same as pre-DocuPrint NPS 1.3.13 behavior.
Table 5-2. Example 1: Start cycling on page 1 of the form
Set the CycleForms attribute to 1 for the virtual printer. Then send the variable data file to the virtual printer to produce the following output:
V1F1 (on sheet1), V2F2 (sheet2), V3F3 (sheet3), V4F4 (sheet 4),V5F1 (on sheet5), V6F2 (sheet 6), V7F3 (sheet7), V8F4 (sheet8),V9F1 (on sheet9), V10F2 (sheet 10), V11F3 (sheet 11), V12F4 (sheet 12),and so on to the end of the job.
The form cycles 1,2,3,4,1,2,3,4,1,2,3,4 throughout the job._________________Vn = Variable Data PostScript File, page nFn = Form, page n

BACKGROUND FORMS
5-6 DECOMPOSITION SERVICE AND TOOLS GUIDE
Table 5-3. Example 2: Start cycling on page 2 of the form
Set the CycleForms attribute to 2 for the virtual printer. Then send the variable data file to the virtual printer to produce the following output:
V1F1 (on sheet1), V2F2 (sheet2), V3F3 (sheet3), V4F4 (sheet 4),V5F2 (on sheet 5), V6F3 (sheet6), V7F4 (sheet7),V8F2 (on sheet 8), V9F3 (sheet 9), V10F4 (sheet 10),and so on to the end of the job.
The form cycles 1,2,3,4,2,3,4,2,3,4,2,3,4 throughout the job.
Note that the form does 1 “complete” cycle before cycling 2,3,4 for the rest of the job._________________Vn = Variable Data PostScript File, page nFn = Form, page n
Table 5-4. Example 3: Start cycling on page 3 of the form
Set the CycleForms attribute to 3 for the virtual printer. Then send the variable data file to the virtual printer to produce the following output:
V1F1 (on sheet1), V2F2 (sheet2), V3F3 (sheet3), V4F4 (sheet 4),V5F3 (on sheet 5), V6F4 (sheet6), V7F3 (sheet7), V8F4 (sheet 8),and so on to the end of the job.
The form cycles 1,2,3,4,3,4,3,4,3,4 throughout the job.Note that the form does 1 “complete” cycle before cycling 3,4 for the rest of the job.
This is similar to Example 6 where cycleforms is set to “0” because this is a 4-page form._________________Vn = Variable Data PostScript File, page nFn = Form, page n
Table 5-5. Example 4: Start cycling on page 4 of the form
Set the CycleForms attribute to 4 for the virtual printer. Then send the variable data file to the virtual printer to produce the following output:
V1F1 (on sheet1), V2F2 (sheet2), V3F3 (sheet3), V4F4 (sheet 4),V5F4 (on sheet 5), V6F4 (sheet6), V7F4 (sheet7), V8F4 (sheet 8),and so on to the end of the job.
The form cycles 1,2,3,4,4,4,4 throughout the job.Note that the form does 1 “complete” cycle before cycling on 4 for the rest of the job._________________
Vn = Variable Data PostScript File, page nFn = Form, page n

BACKGROUND FORMS
DECOMPOSITION SERVICE AND TOOLS GUIDE 5-7
Table 5-6. Example 5: Cycle the form 1 time and continue with only the variable data part of the job
Set the CycleForms attribute to “5” for the virtual printer. Note that 5 is larger than the 4 pages in the form. Then send the variable data file to the virtual printer to produce the following output:
V1F1 (on sheet1), V2F2 (sheet2), V3F3 (sheet3), V4F4 (sheet 4),V5 (on sheet 5), V6 (sheet6), V7 (sheet7), V8 (sheet 8),and so on to the end of the job.
The form cycles 1,2,3,4 and then just the variable data is printed for the rest of the job.
Note that the form does 1 “complete” cycle before letting just the variable data get printed for the rest of the job._________________Vn = Variable Data PostScript File, page nFn = Form, page n
Table 5-7. Example 6: Let it work the way it used to (before DP 1.3.13)
Set the CycleForms attribute to “0” for the virtual printer. Then send the variable data file to the virtual printer to produce the following output:
V1F1 (on sheet1), V2F2 (sheet2), V3F3 (sheet3), V4F4 (sheet 4),V5F3 (on sheet 5), V6F4 (sheet6), V7F3 (sheet7), V8F4 (sheet 8),V9F3 (on sheet 9) V10F4 (sheet 10) and so on to the end of the job.The form cycles 1,2,3,4,3,4,3,4,3,4 throughout the job.
Note that the form does 1 “complete” cycle before cycling 3,4 for the rest of the job. This is not usually the desired result because the last 2 pages of the form are repeating after the form cycled 1 time.Therefore, the choice of “0” as a cycle form attribute may be unpopular.Please note that this is the way it used to work until the DocuPrint 1.3.13 release._________________Vn = Variable Data PostScript File, page nFn = Form, page n

BACKGROUND FORMS
5-8 DECOMPOSITION SERVICE AND TOOLS GUIDE

DECOMPOSITION SERVICE AND TOOLS GUIDE 6-1
6. 6Client tools
This chapter lists the tools by platform and in order of complexity. “Reprint” is the easiest tool to use and it is recommended that you try it first.
The client tools are:
• Reprint
Reprint is a utility that requests printing of a form that resides on the controller.
• FormMerge
FormMerge will overlay a one- or multi-page form on top of a PostScript file of variable data. It will match the pages of the form one for one with the variable data until the end of the form is reached. At this point, the form is reset to the beginning and the merge continues.
• XMerge
XMerge is used for applications where variable data will be included on a set of pages in a base document that is a form or set of forms. The form and the variable data for the application can have a different number of pages. The pages can come from different forms. XMerge overlays the variable data on top of the form.
• XCat
XCat concatenates PostScript files, recognizing chapter starts in duplex jobs, slipsheets, and can be useful for book printing applications.
Windows
The client tools for use with Windows are:
• Reprint
• FormMerge
• XMerge
• XCat.
The Decomp client tools for Windows can be installed on PCs with Windows 3.1x, Windows 95, or Windows NT.
The Windows tools feature online Help, with an example for each tool.
You can use the <ALT> key to move to any field or execute a command.

CLIENT TOOLS
6-2 DECOMPOSITION SERVICE AND TOOLS GUIDE
Reprint
If you want to print a form that already resides on the printer controller, the Reprint utility may be used to generate a small PostScript file which you can then submit to the printer to have the requested form printed. This is useful for demand reprint applications or for proofing a form.
The example shown in figure 6-1 specifies a form (“order.prn”) which resides on the printer controller in “/var/db/forms/”. When you click on the “Generate PostScript” button, the resulting PostScript file is named “C:\PRTORDER.PS”.
Figure 6-1. Reprint specifying ORDER.PRN
1 Enter the name of the form which resides on the printer controller.
2 Enter the directory path of where your desired form resides on the printer. The default path for decomposed forms is “/var/db/forms”.
3 Enter the name of the PostScript file that you will generate soon. The adjacent “Save As...” command may be used to help you select a path and/or PostScript file.
4 Click this button when all entries are correct. This generates a PostScript file which instructs the printer to print the desired form. Any job submission method can be used to submit the resulting file to the printer.
Note: Reprint does not communicate directly with the DocuPrint controller. If you specify an invalid remote path or form name, the job fails after submission.
If you have “Administrator” privileges for the DocuPrint NPS printer, there is an alternative to Reprint. You may use the “Print Form Sample” User Interface (UI) command using the DocuPrint controller to print your form as shown in the following example:
1
2
3
4
PS-Admin> Print Form SampleEnter the form name pattern: big_sale.prnEnter the number of copies to print: 5000Enter plex (simplex, duplex, tumbleDuplex): simplexEnter media specification: UsLetter::white

CLIENT TOOLS
DECOMPOSITION SERVICE AND TOOLS GUIDE 6-3
FormMerge
The “FormMerge” utility is an easy way for you to generate a PostScript file to overlay form pages on variable data.
Note: A reference mode is available in the Windows version. You may store the variable data file on the DocuPrint in “/var/spool/data” and reference it.
The example shown in figure 6-2 specifies a form (“certify.prn”) which resides on the printer controller in “/var/db/forms.” The variable data PostScript file (“certdata.prn”) also resides on the printer controller in “/var/spool/data”. When you click on the “Generate PostScript” button, the resulting PostScript file is named “C:\PRTCERT.PS”.
Figure 6-2. FormMerge specifying CERTIFY.PRN
1 Enter the name of the form which resides on the printer controller.
2 Enter the directory path where your desired form resides on the printer. The default path for decomposed forms is “/var/db/forms/”.
3 Enter the name of the variable data PostScript file. If it resides on the PC, then provide its path. The adjacent “Browse...” command may be used to help you locate your local variable data PostScript file.
4 Check this box if the variable data PostScript file, which you wish to merge with the form, already resides in “/var/spool/data/” on the printer.
5 Enter the name of the PostScript file that you will generate soon.
6 Click on this button when all entries are correct. This generates a PostScript file which instructs the printer to perform the merge and print. Any job submission method can be used to submit the resulting file to the printer.
FormMerge works by overlaying a one- or multi-page form on top of a PostScript file of variable data. It matches the pages of the form one for one with the variable data until the end of the form is reached.
1
2
3
4
5
6

CLIENT TOOLS
6-4 DECOMPOSITION SERVICE AND TOOLS GUIDE
At this point, the form is reset to the beginning and the merge continues.
Note: FormMerge creates the PostScript file without communicating with the printer controller.
Following are two reasons why the job may fail when you submit the PostScript file:
• You request a form that is not accessible on the printer with the remote path that you provided.
• You checked the “Use PostScript Reference Mode” box but the specified variable data PostScript file does not reside in “/var/spool/data” on the DocuPrint controller.
XMerge
XMerge is used to generate a PostScript file to overlay variable data on top of some or all form pages.
Note: A reference mode is available in the Windows version. You may store the variable data file on the DocuPrint in “/var/spool/data” and reference it.
Using XMerge
You should be aware of the following characteristics of XMerge functionality:
• XMerge requires a new single blank page to be added to the beginning of the variable data file.
• No error page is produced when your variable data runs out and printing may stop prematurely before the current set is completed.
Note: When your data is depleted, XMerge continues to print up to the next form page to be merged and then stops.
• An error page is produced when the number of sets is reached. It merely advises you to check the output in case you had more variable data that you wanted to print.
XMerge example
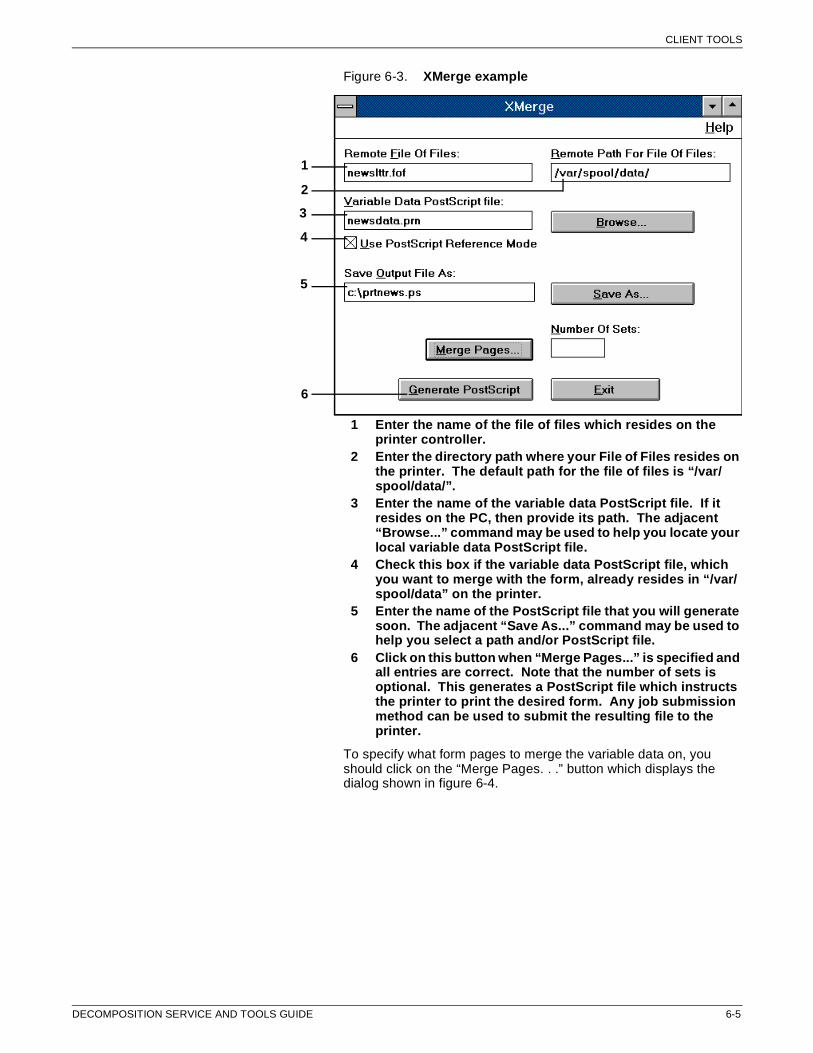
The example shown in figure 6-3 specifies a file of files (“newslttr.fof”) which resides on the printer controller in “/var/spool/data.” The variable data PostScript file (“newsdata.prn”) also resides on the printer controller in “/var/spool/data”. When you click on the “Generate PostScript” button, the resulting PostScript file is named “C:\PRTNEWS.PS”.
CLIENT TOOLS
DECOMPOSITION SERVICE AND TOOLS GUIDE 6-5
Figure 6-3. XMerge example
1 Enter the name of the file of files which resides on the printer controller.
2 Enter the directory path where your File of Files resides on the printer. The default path for the file of files is “/var/spool/data/”.
3 Enter the name of the variable data PostScript file. If it resides on the PC, then provide its path. The adjacent “Browse...” command may be used to help you locate your local variable data PostScript file.
4 Check this box if the variable data PostScript file, which you want to merge with the form, already resides in “/var/spool/data” on the printer.
5 Enter the name of the PostScript file that you will generate soon. The adjacent “Save As...” command may be used to help you select a path and/or PostScript file.
6 Click on this button when “Merge Pages...” is specified and all entries are correct. Note that the number of sets is optional. This generates a PostScript file which instructs the printer to print the desired form. Any job submission method can be used to submit the resulting file to the printer.
To specify what form pages to merge the variable data on, you should click on the “Merge Pages. . .” button which displays the dialog shown in figure 6-4.
1
2
3
4
5
6

CLIENT TOOLS
6-6 DECOMPOSITION SERVICE AND TOOLS GUIDE
Figure 6-4. Merge Pages dialog
Note: Make sure that the very first page of the variable data file contains a blank page which was created by the same application that created the file.
XMerge has no communication with the DocuPrint controller. Therefore, the information that you supply for the file of files and variable data must be correct; otherwise, the subsequent print job fails.
Caution: There is a known bug with the Windows 3.1 transparent client which causes the variable data to obscure the form. Consult the “Known Bug” section of the XMerge Help for more details.
XCat
XCat is a simple book building application which generates a PostScript file to concatenate chapters of a book into a single job with optional duplexing and chapter starts.
If you want to use the currently loaded media (“Paper type”, “Color”, and “Weight”), you can execute a “Show Status” command from the DocuPrint controller as shown in the following example:
PS> Privilege Administrator Administrator password: *******PS-admin> Show StatusPrinter Type: Xerox/4090, Duplex capableMedia Loaded: UsLetter::green: Tray 4 UsLetter:Cover:blue:113: Tray 3 UsLegal::white: Tray 2 UsLetter::white: Tray 1Paper Trays: 1: OK 2: OK 3: OK 4: OK

CLIENT TOOLS
DECOMPOSITION SERVICE AND TOOLS GUIDE 6-7
This provides information regarding the current DocuPrint media specifications. In the example, the following media are loaded:
• Tray 1 has UsLetter sized paper which is white
• Tray 2 also has white paper but it is UsLegal size
• Tray 3 has blue cover paper that is UsLetter sized and weighs 113 in grams per square meter (gsm)
• Tray 4 has UsLetter sized paper which is green.
You can set the same specifications in the “XCat -Select Paper” dialog so when the job is submitted, it will not have to wait because it requests media that is not currently available on the DocuPrint.
If, on the other hand, you require specific media, you can request that media, whether or not it is currently loaded. If it is not loaded on the system, the job will wait until the operator loads the specified paper stock.
Select Paper dialog
The “XCat-Select Paper” dialog is shown in figure 6-5.
Figure 6-5. XCat - Select Paper dialog
1 Select the desired paper size. The default is “UsLetter” and other available sizes are “UsLegal,” “A4,” “216x330mm” and “Other.” If “Other” is chosen, a new window appears which allows you to specify custom sizes.
2 Check “Duplex” if you want concatenated jobs to print double sided.
1
2
3
4
5
6

CLIENT TOOLS
6-8 DECOMPOSITION SERVICE AND TOOLS GUIDE
3 If you checked “Duplex”, you may also check “Chapter Starts” to ensure that each job starts on the right hand side of a bound book.
4 Check this if you want a blank page to be added between each job.
5 Check this if your printer has four trays such as DocuPrint NPS 4635.
6 When you are done entering values in this window, click this button to proceed to the next window (“Select Jobs”).
The “Paper Stock” fields should be filled in with the stocks you want, but it does not matter which row (or tray) they are in.
The “XCat-Select Jobs” dialog is displayed after you click “Next.”
Select Jobs dialog
The “XCat-Select Jobs” dialog is shown in figure 6-6.
The example is a telephone book where the front and back covers are on blue paper. Inside each cover is a green slipsheet. The phone list, which is represented by the inner jobs, is printed on white paper.
Figure 6-6. XCat - Select Jobs dialog
1 Read-only information that is based on your answers from the previous screen.
1
2
3
4
5

CLIENT TOOLS
DECOMPOSITION SERVICE AND TOOLS GUIDE 6-9
2 Enter the name of an individual job that you want to concatenate. Note that if you have several jobs listed in a file of files, click on the “Find” button instead.
3 The window underneath the job field lists jobs and slipsheets that you want to concatenate. It may also display a number to the left of the job name or slipsheet which indicates the assigned stock tray. Even though this window is read-only, you may manipulate the contents by selecting a job and invoking commands such as “Insert”, “Remove”, Insert Slip”, and so on. You can even add a job or slipsheet without having to make a prior selection in the job list. You may also clear the job list.
4 When you are done entering values in this window, click this button to proceed to the next window (“Generate PostScript”).
5 If you need to make paper stock changes, click this button to return to the previous window (“Select Paper”).
The “XCat-Select Jobs” dialog displays the paper stock values that you chose from the previous dialog. You may use the corresponding stock number with the “Job” and “Slipsheet Stock” menus to assign certain paper for a particular job.
If you do not want to enter each job individually, you may use a file of files. Click on the “Find” button, change the “List File Of Types” to “file of files” (*.fof) and select your file of files. Upon clicking the “OK” button, Find parses this file and automatically appends your jobs to the job list.
Generate PostScript dialog
The “XCat - Generate PS” dialog is shown in figure 6-7.
Figure 6-7. XCat - Generate PS dialog
1 Enter the directory path of where your jobs reside on the printer. The default path for XCat jobs is “/var/spool/data/”.
2 Enter the name of the PostScript file that you will generate soon. The adjacent “Save As...” command may be used to help you select a path and/or PostScript file.
3 Click on this button when all entries are correct. This generates a PostScript file which instructs the printer to print the desired form. Any job submission method can be used to submit the resulting file to the printer.
1
2
3
4

CLIENT TOOLS
6-10 DECOMPOSITION SERVICE AND TOOLS GUIDE
4 If you need to make changes, click this button to return to the previous window (“Select Jobs”).
This example shows that the selected jobs are in “/var/spool/data” and that the generated PostScript file is named “C:\PRTBOOK.PRN”.
Note: XCat creates the PostScript file without communicating with the DocuPrint controller. If you request files that are not accessible using the remote path (for example: “/var/spool/data”) on the DocuPrint, the job fails when you submit the PostScript file.
DOS
The tools for the DOS operating system are command-line driven. If you are not sure of the proper syntax, enter the tool name and press <RETURN>. A usage statement is produced for your convenience.
reprint
“reprint” can generate a PostScript file to print a previously decomposed form that is on the DocuPrint in “/var/db/forms”. An example follows:
Note: “reprint” does not communicate with the DocuPrint controller. If you specify an invalid form name, the job fails after submission.
If you have administrator privileges for the DocuPrint controller, you may use the “Print Form Sample” command as an alternative.
formmrg
The “formmrg” utility can generate a PostScript file to overlay a form on top of variable data. It matches the pages of the form one for one with the variable data until the end of the form is reached. At this point, the form is reset to the beginning and the merge continues.
An example follows:
Note: “formmrg” does not communicate with the DocuPrint controller. If you specify an invalid form, the PostScript job fails after you submit it.
C:\DOSDECOMP>reprintUsage: reprint formname > filenameC:\DOSDECOMP>reprint order.prn > c:\prtorder.ps
C:\DOSDECOMP>formmrgUsage: formmrg <PostScript File> <Form Name>C:\DOSDECOMP>formmrg certdata.prn certify.prn > c:\prtcert.ps

CLIENT TOOLS
DECOMPOSITION SERVICE AND TOOLS GUIDE 6-11
The variable data PostScript file (“certdata.prn”) must reside locally on the PC.
xmerge
The “xmerge” utility is used to generate a PostScript file to overlay variable data on top of some or all form pages.
Using XMerge
You should be aware of the following characteristics of XMerge functionality:
• XMerge requires a new single blank page to be added to the beginning of the variable data file.
• No error page is produced when your variable data runs out and printing may stop prematurely before the current set is completed.
Note: When your data is depleted, XMerge continues to print up to the next form page to be merged and then stops.
• An error page is produced when the number of sets is reached. It merely advises you to check the output in case you had more variable data that you wanted to print.
An example follows:
Note: The xmerge utility does not communicate with the DocuPrint controller. If you specify an invalid file of files (or it contains bad filenames), the PostScript job fails after you submit it.
The files should be stored in the “/var/spool/data” directory.
Unlike the Windows version, the prompt “How many sets are to be printed?” is not optional.
C:\DOSDECOMP>xmergeWhat is the name of the PostScript output file you wish to create?c:\prtnews.psWhat is the name of your Variable Data PostScript file?newsdata.prnWhat is the name of the Fixed Document Reference File?newslttr.fofWhat pages do you wish the variable data to be placed(Please separate page numbers with a space or a carriage return.When pages numbers have been entered, please terminate list with a carriage return and # character2 4#How many sets are to be printed?4Please make sure that the files newsdata.prn and newslttr.fofare in the /local/var/spool/data directory on the DocuPrint server.
You are now ready to submit the PostScript job c:\prtnews.psusing Xerox PostScript Document Submission procedures.

CLIENT TOOLS
6-12 DECOMPOSITION SERVICE AND TOOLS GUIDE
The “What is the name of the Fixed Document Reference File?” prompt is really asking for the file of files. It will be updated in the next DOS release for Decomp Service.
xcat
Note: “xcat” can generate a PostScript file to concatenate chapters of a book into a single job with optional duplexing and chapter starts.
“xcat” does not communicate with the DocuPrint controller. If you specify an invalid file of files (or it contains bad filenames), the PostScript job fails after you submit it.
The “What is the name of the file that contains the document name?” prompt is really asking for the file of files. It will be updated in the next DOS release for Decomp Service.
In order for the PostScript file to work, you must edit the generated PostScript file to remove the parentheses for the “Weight” field just prior to the “SetPageDevice” calls. Otherwise, submitting the un-edited PostScript job is likely to fail with a “setpagedevice” error. This will be fixed in the next DOS release for Decomp Service.
Unlike the Windows version, the DOS version requires that you fill in all corresponding fields (“Type”, “Color”, and “Weight”) for trays.
An example follows:

CLIENT TOOLS
DECOMPOSITION SERVICE AND TOOLS GUIDE 6-13
C:\DOSDECOMP>xcatWhat is the name of the PostScript OUTPUT file you wish to create?c:\prtbook.psWhat directory on the server do the documents you wish to print reside?/var/spool/dataWhat is the name of the file that contains the document name?tb_iediv.fofDo you wish the document to be printed duplex? (y/n)yDo you wish the concatenated jobs to print independently? (y/n)nDo you wish to use slip sheets between the jobs? (y/n)nDo you wish to use specific stock for any of the files? (y/n)yWhat Paper Size do you wish the documents to printed on? (A4, 216x330, UsLetter, UsLegal or Other)UsLetterYou may use up to 4 different stock types, Please enter how many you wish to use2
Please Define Stock #1Stock Type (ie. standard): StandardPaper Color: whiteStock Weight: 75
Please Define Stock #2Stock Type (ie. standard): CoverPaper Color: blueStock Weight: 113
Stock Types Available:1: Size: UsLetter, Type: Standard, Color: white, Weight: 752: Size: UsLetter, Type: Cover, Color: blue, Weight: 113
Please choose Stock number for File tb_cover.prn2Please choose Stock number for File tb_corp.prn1Please choose Stock number for File tb_hcrrp.prn1Please choose Stock number for File tb_tbrp.prn1Please choose Stock number for File tb_blank.prn2
done.Please make sure that all the files you wish to have printed are inthe /var/spool/data directory on the DocuPrint server.You are now ready to submit the PostScript job c:\prtbook.psusing Xerox PostScript Document Submission procedures.

CLIENT TOOLS
6-14 DECOMPOSITION SERVICE AND TOOLS GUIDE
SunOS/Solaris
The tools for the SunOS and Solaris operating systems are command-line driven. If you are not sure of the proper syntax, enter the tool name and press the <RETURN> key. A usage statement is produced for your convenience.
reprint
“reprint” can generate a PostScript file to print a previously decomposed form that is on the DocuPrint in “/var/db/forms”. An example follows:
Note: “reprint” does not communicate with the DocuPrint controller. If you specify an invalid form name, the job fails after submission.
If you have “Administrator” privileges for the DocuPrint controller, you may use the “Print Form Sample” command as an alternative.
formmerge
The “formmerge” utility can generate a PostScript file to overlay a form on top of variable data. It matches the pages of the form one for one with the variable data until the end of the form is reached. At this point, the form is reset to the beginning and the merge continues.
An example follows:
Note: “formmerge” does not communicate with the DocuPrint controller. If you specify an invalid form, the PostScript job fails after you submit it.
The variable data PostScript file (“certdata.prn”) must reside locally on the Sun.
% reprintUsage: reprint formname > filename% reprint order.prn > ~/prtorder.ps
% formmergeUsage: formmerge <PostScript File> <Form Name>% formmerge certdata.prn certify.prn > ~/prtcert.ps

CLIENT TOOLS
DECOMPOSITION SERVICE AND TOOLS GUIDE 6-15
xmerge
The “xmerge” utility is used to generate a PostScript file to overlay variable data on top of some or all form pages.
Using XMerge
You should be aware of the following characteristics of XMerge functionality:
• XMerge requires a new single blank page to be added to the beginning of the variable data file.
• No error page is produced when your variable data runs out and printing may stop prematurely before the current set is completed.
Note: When your data is depleted, XMerge continues to print up to the next form page to be merged and then stops.
• An error page is produced when the number of sets is reached. It merely advises you to check the output in case you had more variable data that you wanted to print.
An example follows:
Note: “xmerge” does not communicate with the DocuPrint controller. If you specify an invalid file of files (or it contains bad filenames), the PostScript job fails after you submit it.
The files should be stored in the “/var/spool/data” directory.
Unlike the Windows version, the prompt “How many sets are to be printed?” is not optional.
The “What is the name of the Fixed Document Reference File?” prompt is really asking for the file of files.
% xmergeWhat is the name of the PostScript output file you wish to create?~/prtnews.psWhat is the name of your Variable Data PostScript file?newsdata.prnWhat is the name of the Fixed Document Reference File?newslttr.fofWhat pages do you wish the variable data to be placed(Please separate page numbers with a space or a carriage return.When pages numbers have been entered, please terminate list with a carriage returnand # character2 4#How many sets are to be printed?4Please make sure that the files newsdata.prn and newslttr.fofare in the /local/var/spool/data directory on the DocuPrint server.
You are now ready to submit the PostScript job ~/prtnews.psusing Xerox PostScript Document Submission procedures.

CLIENT TOOLS
6-16 DECOMPOSITION SERVICE AND TOOLS GUIDE
xcat
“xcat” can generate a PostScript file to concatenate chapters of a book into a single job with optional duplexing and chapter starts. An example follows:
% xcatWhat is the name of the PostScript OUTPUT file you wish to create?~/prtbook.psWhat directory on the server do the documents you wish to print reside?/var/spool/dataWhat is the name of the file that contains the document name?tb_iediv.fofDo you wish the document to be printed duplex? (y/n)yDo you wish the concatenated jobs to print independently? (y/n)nDo you wish to use slip sheets between the jobs? (y/n)nDo you wish to use specific stock for any of the files? (y/n)yWhat Paper Size do you wish the documents to printed on? (A4, 216x330, UsLetter, UsLegal or Other)UsLetterYou may use up to 4 different stock types, Please enter how many you wish to use2
Please Define Stock #1Stock Type (ie. standard): StandardPaper Color: whiteStock Weight: 75
Please Define Stock #2Stock Type (ie. standard): CoverPaper Color: blueStock Weight: 113
Stock Types Available:1: Size: UsLetter, Type: Standard, Color: white, Weight: 752: Size: UsLetter, Type: Cover, Color: blue, Weight: 113
Please choose Stock number for File tb_cover.prn2Please choose Stock number for File tb_corp.prn1Please choose Stock number for File tb_hcrrp.prn1Please choose Stock number for File tb_tbrp.prn1Please choose Stock number for File tb_blank.prn2
done.Please make sure that all the files you wish to have printed are inthe /var/spool/data directory on the DocuPrint server.You are now ready to submit the PostScript job ~/prtbook.psusing Xerox PostScript Document Submission procedures.

CLIENT TOOLS
DECOMPOSITION SERVICE AND TOOLS GUIDE 6-17
Note: “xcat” does not communicate with the DocuPrint controller. If you specify an invalid file of files (or it contains bad filenames), the PostScript job fails after you submit it.
The “What is the name of the file that contains the document name?” prompt is really asking for the file of files. It will be updated in the next Sun release for Decomp Service.
In order for the PostScript file to work, you must edit the generated PostScript file to remove the parentheses for the “Weight” field just prior to the “SetPageDevice” calls. Otherwise, submitting the un-edited PostScript job is likely to fail with a “setpagedevice” error. This will be fixed in the next Sun release for Decomp Service.
Unlike the Windows version, the Sun version requires that you fill in all corresponding fields (“Type”, “Color”, and “Weight”) for trays.

CLIENT TOOLS
6-18 DECOMPOSITION SERVICE AND TOOLS GUIDE

DECOMPOSITION SERVICE AND TOOLS GUIDE 7-1
7. 7DocuPrint NPS controllercommands
The following DocuPrint NPS controller commands relate to Decomp Service. They are also discussed in the Guide to Configuring and Managing the System and the Guide to Managing Print Jobs.
• Create virtual printer
• Change virtual printer
• Delete form
• Delete virtual printer
• List forms
• List virtual printer
• Print form sample
• Set tray
• Show log
• Show status
• Start virtual printer
• Stop virtual printer.
Create virtual printer
To create a virtual printer, enter the following command in “Administrative” mode on the DocuPrint controller:
An example follows:
Change virtual printer
The “Change virtual printer” command may be used to set Decomp-related virtual printer attributes such as “BackgroundForm”, “CycleForms”, and “Disposition.”
PS-Admin>create virtual printer <name>
PS-Admin>create virtual printer mg4_plentywood

DOCUPRINT NPS CONTROLLER COMMANDS
7-2 DECOMPOSITION SERVICE AND TOOLS GUIDE
BackgroundForm
You can assign a background form to a virtual printer.
By default, the form prints once as a background image with your variable data. You may configure the image to cycle repeatedly with the “CycleForms” attribute.
This is an easy way to attach a watermark-type image. For more details, consult the “Background forms” chapter.
Note: You can also use lpr to submit a job with this attribute:
CycleForms
“CycleForms” is often used merging variable data with a form. When the last page of the form is reached, it continues to cycle the form and put variable data on the specified pages of the form until the variable data runs out.
To take advantage of this feature, enter the following command in “Administrative” mode on the DocuPrint NPS controller:
To control cycling, set “n” as shown in table 8-1:
PS-Admin> change virtual printer <name> BackgroundForm=<formname>
% lpr -P[printer] -C”(bf=<formname>)” <filename>
PS-Admin> Change Virtual Printer <name>Enter the attribute name: CycleFormsEnter the attribute value: n(where n is a numeric value)
Table 7-1. Cycling control
n Resultant Behavior
Greater than “0” and less than or equal to the number of pages in the form
The form starts cycling on n after the first complete form cycle is accomplished.
Greater than the number of pages in the form
The form cycles one time and then variable data is printed for the remainder of the job.
Equals “0” and there are an even number of pages in the form
The form cycles one time and then repeats the last two pages of the job.
Note: This is the same as pre-DP 1.3.13 behavior.

DOCUPRINT NPS CONTROLLER COMMANDS
DECOMPOSITION SERVICE AND TOOLS GUIDE 7-3
For more information, see the chapter on “Background forms.”
Disposition
To save a document as a form, enter the following command in “Administrative” mode as shown in the following example:
The disposition attribute may be one of the following:
• SaveMaskG4
• SaveFormG4
• SaveMaskBC
• SaveFormBC.
An example follows:
For more details, consult the “Virtual printers” chapter.
Delete form
To delete a form, use the following command in “Administrative” mode on the DocuPrint controller:
An example follows:
Equals “0” and there are an odd number of pages in the form
The form cycles on the last page of the form.
Note: This is the same as pre-DocuPrint NPS 1.3.13 behavior.
Table 7-1. Cycling control (continued)
n Resultant Behavior
PS-Admin>change virtual printer <name> disposition <attribute>
PS-Admin>change virtual printer mg4_seatonville disposition savemaskG4
PS-Admin> Delete Form
PS-Admin> Delete FormEnter the form name pattern: jun95news.psDelete jun95news? y

DOCUPRINT NPS CONTROLLER COMMANDS
7-4 DECOMPOSITION SERVICE AND TOOLS GUIDE
Delete virtual printer
To delete a virtual printer, enter the following command in “Administrative” mode on the DocuPrint controller:
An example follows:
List forms
To list all available forms, use the following command on the DocuPrint controller:
An example follows:
List virtual printer
To list all available virtual printers, use the following command on the DocuPrint controller:
An example follows:
PS-Admin>delete virtual printer <name>
PS-admin> Delete Virtual PrinterEnter the virtual printer name (soo, mg4_soo, mbc_soo): mg4_sooVirtual printer mg4_soo deleted
PS-Admin>List Forms
PS> List FormsEnter the form name pattern: *Name Pages Format Date Createdannouncement.ps 1 SaveFormG4 August 10, 1996 2:41:22 pm PSTcontract_a.ps 1 SaveMaskG4 November 9, 1996 1:11:54 pm PSTcontract_b.ps 1 SaveMaskG4 November 11, 1996 1:12:36 pm PSTgoodwork.ps 1 SaveMaskG4 April 4, 1996 2:15:45 pm PSTnewsletter.ps 1 SaveMaskG4 December 2, 1996 1:12:46 pm PSTnotices 1 SaveMaskG4 December 9, 1996 4:42:54 pm PSTsurvey.ps 2 SaveMaskG4 August 6, 1996 12:59:43 pm PSTwelcome.ps 2 SaveMaskG4 June 9, 1996 1:19:43 pm PST
PS-Admin>List Virtual Printers

DOCUPRINT NPS CONTROLLER COMMANDS
DECOMPOSITION SERVICE AND TOOLS GUIDE 7-5
Print form sample
To print a form, enter the following command in “Administrative” mode on the DocuPrint:
An example follows:
Set tray
Go to the DocuPrint controller, insert the proper paper in a tray (if necessary), and perform a “Set Tray” command in “Administrative” or “Operator” mode:
This is useful for enabling ineligible jobs (which are usually waiting for the proper paper and/or settings) to print.
An example follows:
PS> List Virtual Printersfbc_mentz Status: started Attribute: PrinterName, fbc_mentz Attribute: Disposition, SaveFormBC
fg4_mentz Status: started Attribute: PrinterName, fg4_mentz Attribute: Disposition, SaveFormG4
mentz Status: started Attribute: PrinterName, mentz
PS-admin> Print Form Sample
PS-admin> Print Form Sample Enter the form name pattern: demo.psEnter the number of copies to print: 1Enter plex (simplex, duplex, tumbleDuplex): simplexEnter media specification: UsLetter::white
PS-admin> Set Tray <tray number>
PS-admin> Set Tray 1Enter paper size (A4, 216x330, UsLetter, UsLegal, Default): UsLetterType: StandardPaper color: whiteWeight: 75Tray 1 set to: UsLetter:Standard:white:75

DOCUPRINT NPS CONTROLLER COMMANDS
7-6 DECOMPOSITION SERVICE AND TOOLS GUIDE
Show log
The “Show Log” command is very useful for performance measurements. To get such data, enter the following command in “Administrative” mode on the DocuPrint controller:
An example follows:
PS-admin> Show Log
PS-admin> Show Log 1 Quit 2 /var/log/DocuPrint.sequencer.Thu 3 /var/log/DocuPrint.Thu 4 /var/log/DocuPrint.Wed 5 /var/log/DocuPrint.sequencer.Wed 6 /var/log/DocuPrint.sequencer.Tue 7 /var/log/DocuPrint.Tue 8 /var/log/DocuPrint.Mon 9 /var/log/DocuPrint.sequencer.Mon 10 /var/log/DocuPrint.Fri 11 /var/log/DocuPrint.sequencer.Fri 12 /var/log/syslog 13 /var/adm/messages 14 /var/adm/messages.0 15 /usr/spool/xerox/log/nps.log.Mon Enter choice number: 2Enter number of lines from the end to show (or "All"): 20Job #126 stop, holdener, workaround.ps, December 12, 1996 3:41:T pages: 1, decomp: 5.17, elapsed: 66.27Job #127 start, cchu, C:\AUTOEXEC.BAT, December 12, 1996 3:42TPrinting duplex, 300 spi, 216 x 279 mm, 86 bufJob #127 stop, cchu, C:\AUTOEXEC.CAT, December 12, 1996 3:42:T pages: 1, decomp: 0.36, elapsed: 35.12Job #128 start, rlongo, test.ps, December 12, 1996 3:48TPrinting duplex, 300 spi, 216 x 279 mm, 86 bufNote, stapling capacity (50 sheets) exceeded near sheet 52Job #128 stop (warnings), rlongo, test.ps December 12,T pages: 119, decomp: 73.68, elapsed: 172.73, compress: 7.13x, min free: 9703K compress pages: 99, expand pages: 37Job #129 start, myamnicky, spar.ps, December 12, 1996 3:57:44 pm PSTPrinting duplex, 300 spi, 216 x 279 mm, 86 bufJob #129 stop, myamnicky, spar.ps, December 12, 1996 3:58:24 pm PST pages: 10, decomp: 7.20, elapsed: 40.09Job #131 start, rgomez-bravo, Mail Message for Gomez-Bravo,Ra, December 12, 199TPrinting duplex, 300 spi, 216 x 279 mm, 43 buf, black, red [r: 0.88, g: 0.00, b]Job #131 stop, rgomez-bravo, Mail Message for Gomez-Bravo,Ra, December 12, 1996T pages: 1, decomp: 1.13, elapsed: 77.70

DOCUPRINT NPS CONTROLLER COMMANDS
DECOMPOSITION SERVICE AND TOOLS GUIDE 7-7
Show status
To learn which media specifications (“Paper type”, “Color”, and “Weight”) that the DocuPrint is currently using, enter the “Show Status” command using the printer controller in any mode:
An example follows:
This information is particularly useful while XCat is being used. If you are not particular about the media used in the job, this can assist in preventing the subsequent PostScript job from becoming ineligible.
Show Status provides other valuable information, especially if it was executed while in “Administrative” or “Operator” mode.
Start virtual printer
To start a virtual printer that has been stopped, enter the following command in “Administrative” mode using the DocuPrint controller:
This command makes jobs submitted to the specified virtual printer eligible for printing.
PS-op> Show Status
PS-op> Show StatusPrinter Type: Xerox/4890, Duplex & Highlight Color capableMedia Loaded: UsLegal::white:75: Tray 4 UsLetter:drilled:white:75: Tray 3 UsLetter:transparency:white:75: Tray 2 UsLetter::white:75: Tray 1Paper Trays: 1: OK 2: OK 3: OK 4: OK No Printer Messages.Housings: State: OK, Color: RedSpooler status: AvailableFormatter status: AvailablePrinter status: BusyPrinting is Started.Queueing is Started.Scheduling Policy: resourceMatch
PS-Admin> start virtual printer <name>

DOCUPRINT NPS CONTROLLER COMMANDS
7-8 DECOMPOSITION SERVICE AND TOOLS GUIDE
Stop virtual printer
To stop a virtual printer, enter the following command in “Administrative” mode on the DocuPrint controller:
This command makes jobs submitted to the specified virtual printer ineligible for printing.
PS-Admin> stop virtual printer <name>

DECOMPOSITION SERVICE AND TOOLS GUIDE 8-1
8. 8Postscript references/macros
This chapter is for PostScript programmers who wish to maintain a high degree of control by referencing a form page with PostScript code. You should read the “Decomposed form file format” appendix first.
A form reference may be included in the PostScript code for a job by any of the following situations:
• Decomp Service utility tools automatically include form references when generating a PostScript file.
• The programmer manually adds the form reference and uses either “run exec” or “GetTiff.”
• You use an application which has the ability to insert form references.
The PostScript job may use all or a subset of form pages which can be in any order and not just in the original sequence.
run exec
If the intent of the application is to use the form page as a background, the programmer may reference the page by including a command in the PostScript file in the following format:
This form of reference does not require you to know whether a particular form page had highlight color, whether “mask” or “form” disposition is used, or whether it is in “TIFF/G4” or “ByteCode” format.
A segment of PostScript code which references a form follows:
In the example shown above, “demo.prn.p0001.ps” is the name of a specific form page. The page number must be a 4-digit number with leading zeroes. Since pages are referenced individually, they may be printed in a sequence other than the normal sequence of the form. Multiple pages may even be superimposed on each other if the PostScript code postpones the “showpage” operator. However, Decomp Service is optimized for page-oriented forms (which means one form per page).
(/var/db/forms/formname.pnnnn.ps) run exec
postscript commandsBookmanOldStyle setfont324 543 moveto(This is a test) show(/var/db/forms/demo.prn.p0001.ps) run execmore postscript commandsshowpage

POSTSCRIPT REFERENCES/MACROS
8-2 DECOMPOSITION SERVICE AND TOOLS GUIDE
Depending on the generating application, the printed image may appear larger, smaller, rotated, or cropped on the page. To ensure proper printing, surround the reference with the following PostScript commands:
Example
For this example, assume that you already have a form page with a logo that resides on the DocuPrint as “/var/db/forms/logo.prn.p0001.ps” as shown in figure 8-1.
Figure 8-1. /var/db/forms/logo.prn.p0001.ps
Reference this form page and write “The Document Company” underneath this logo using the following PostScript program:
After submitting the PostScript program to the DocuPrint, the output looks like that shown in figure 8-2.
gsaveinitgraphics(/var/db/forms/formname.pnnnn.ps) run execgrestore
%!PS-Adobe-3.0/Times-Bold findfont20 scalefontsetfont200 450 moveto(The Document Company) showgsaveinitgraphics(/var/db/forms/logo.prn.p0001.ps) run execgrestoreshowpagetext

POSTSCRIPT REFERENCES/MACROS
DECOMPOSITION SERVICE AND TOOLS GUIDE 8-3
Figure 8-2. Final output
GetTiff
The normal application for “GetTiff” is printing imported TIFF images. Although GetTiff can be used for printing Decomp Service forms, it is usually simpler and better to use the “run exec” method to print the “.ps” file for the form. Refer to the Guide to Managing Print Jobs chapter “Creating print jobs with referenced content” for more information on GetTiff.
GetTiff is designed to efficiently parse, decode, image, and print a “TIFF/G4” file. It uses the “imagemask” PostScript operator which makes white bits transparent. Multiple TIFF files may be imaged which results in overlaid images on a page.
To use GetTiff, insert the command into the PostScript code for the job. An example follows:
The printed images may be improperly scaled, rotated, or cropped. To ensure proper printing, surround the reference with the PostScript commands as follows:
GetTiff is sensitive to the TIFF tags and parses the TIFF header to reorient the page, if needed. The setting of the compression tag may be “Uncompressed” or “G4.”
When using GetTiff to improve performance, it may be worthwhile to experiment with uncompressed images, especially if the image size is small or the G4 compression ratio is low.
Caution: GetTiff is only guaranteed to work with TIFF files produced by DocuPrint NPS. Although it will work for bitmap TIFF files from many other sources, you must test to determine if GetTiff is suitable for those files.
(/var/db/forms/order.prn.p0001.b.tif) GetTiff
gsaveinitgraphics(/var/db/forms/order.prn.p0001.b.tif) GetTiffgrestore

POSTSCRIPT REFERENCES/MACROS
8-4 DECOMPOSITION SERVICE AND TOOLS GUIDE
Example
For example, suppose you wish to use the GetTiff alternative to print an order form which is composed of two TIFF files.
The first TIFF file, “order.prn.p0001.b.tif”, contains data for all the black pixels in the form as shown in figure 8-3.
The second TIFF file, “order.prn.p0001.h.tif”, contains data for all the pixels in highlight color for the form as shown in figure 8-4. The text “XYZ Inc.” and “Order Form” are in blue highlight color.
The two TIFF files follow:
Figure 8-3. /var/db/forms/order.prn.p0001.b.tif
Figure 8-4. /var/db/forms/order.prn.p0001.h.tif

POSTSCRIPT REFERENCES/MACROS
DECOMPOSITION SERVICE AND TOOLS GUIDE 8-5
You want to print a composite of these TIFF files to create an order form. Following is a PostScript program that does the job:
Notice that if you use GetTiff, you must determine whether the form was created in TIFF/G4 format and also whether there were highlight color or white pixels involved. You may need to make up to 3 GetTiff calls (one for the black pixels, one for highlight color pixels, and one for white pixels). This complexity could be avoided by replacing all “GetTiff” and “setrgbcolor” calls with a single “run exec” call as follows:
When you submit the above PostScript program, with GetTiff calls, to DocuPrint, the output looks like figure 8-5.
Figure 8-5. Composite TIFF file
%!PS-Adobe-3.0gsaveinitgraphics0 0 0 setrgbcolor(/var/db/forms/order.prn.p0001.b.tif) GetTiff0 0 1 setrgbcolor(/var/db/forms/order.prn.p0001.h.tif) GetTiffgrestoreshowpage
(/var/db/forms/order.prn.p0001.ps) run exec

POSTSCRIPT REFERENCES/MACROS
8-6 DECOMPOSITION SERVICE AND TOOLS GUIDE
Form reference in applications
Some applications allow you to insert a form reference in your document using fields. These references are included in the PostScript code when the document is converted to the PostScript format.
Example
Suppose you want to reference the logo form in the Microsoft Word 6.0 document shown in figure 8-6.
Figure 8-6. Microsoft Word 6.0 document
Perform the following steps:
Step 1. To insert a form reference in Microsoft Word, go to the “Insert” menu and select “Field...” A dialog box appears. You should select “Print” in the “Field Names” menu.
The field codes are displayed
Step 2. Append text to specify the printer instructions which should end up looking like the following example:
Make sure that you included double quotes and leading and trailing spaces. Then click “OK.”
Step 3. If you select the “View Field Codes” button, as shown in figure 8-7, then this becomes visible in your document so you may modify or delete it:
PRINT “ gsave initgraphics (/var/db/forms/logo.prn.p0001.ps) run exec grestore “

POSTSCRIPT REFERENCES/MACROS
DECOMPOSITION SERVICE AND TOOLS GUIDE 8-7
Figure 8-7. View Field Codes button
Step 4. Use “Print to File” with a PostScript driver. The resulting PostScript file includes the form reference. You may then use any job submission method to submit this file to the DocuPrint which produces the output depicted in figure 8-8.
Figure 8-8. Resulting PostScript file
{PRINT “ gsave initgraphics (/var/db/forms/logo.prn.p0001.ps) run exec restore “ \*MERGEFORMAT}

POSTSCRIPT REFERENCES/MACROS
8-8 DECOMPOSITION SERVICE AND TOOLS GUIDE

DECOMPOSITION SERVICE AND TOOLS GUIDE 9-1
9. 9TIFF utilities
This chapter is for those who are familiar with TIFF 6.0 specifications and wish to examine or manipulate TIFF images. It is recommended that you read the “Decomposed form file format” and “TIFF file format” appendices first.
There are several image editors available which can scale, rotate, cut/paste, and crop the TIFF image produced by Decomp Service such as:
• DSE (Document Structure Editor) — Provided from the Xerox Document On Demand program
• Photoshop — Provided by Adobe which is a more powerful image editor that can be used to perform detailed bitmap editing.
DOS
“getg4” is a TIFF utility provided for the DOS platform.
“getg4” reads and prints the TIFF tags in a readable format. This information can be helpful in determining the source of problems encountered when printing TIFF images or developing PostScript programs.
An example, after fetching and renaming the TIFF file to comply with DOS naming conventions, follows:

TIFF UTILITIES
9-2 DECOMPOSITION SERVICE AND TOOLS GUIDE
SunOS/Solaris
The TIFF utility “getg4” is available for the SunOS 4.1.3 and Solaris 2.x operating systems.
Note: The utility tiff2ps is no longer supported.
getg4
“getg4” reads and prints the TIFF tags in a readable format. This information can be helpful in determining the source of problems encountered when printing TIFF images or developing PostScript programs.
C:\DOS_DCOMP>getg4 c:\temp\logo_b.tifAnalyzing Job Byte Order Format: MM Version: 42 IFD Offset: 10 Image File Directories: 16 Image File Directory Information------------------------------------------------------------------------ Tag Description Type Count Value\Offset------------------------------------------------------------------------ 256 ImageWidth 4 1 3296 257 ImageLength 4 1 2551 258 BitsPerSample 3 1 1 259 Compression 3 1 4 262 PhotometricInterpretation 3 1 0 266 FillOrder 3 1 1 273 StripOffsets 4 1 300 274 Orientation 3 1 8 277 SamplesPerPixel 3 1 1 278 RowsPerStrip 4 1 2551 279 StripByteCounts 4 1 67048 282 XResolution 5 1 300 283 YResolution 5 1 300 284 PlanarConfiguration 3 1 1 293 T6Options 4 1 0 296 ResolutionUnit 3 1 2Next IFD offset: 0

TIFF UTILITIES
DECOMPOSITION SERVICE AND TOOLS GUIDE 9-3
An example follows:
sleuth:/home/DecompTools/Solaris2.x {32} getg4 ~/TIFFs/order.prn.p0001.b.tifAnalyzing Job Byte Order Format: MM Version: 42 IFD Offset: 10 Image File Directories: 16 Image File Directory Information------------------------------------------------------------------------ Tag Description Type CountValue\Offset------------------------------------------------------------------------ 256 ImageWidth 4 1 3296 257 ImageLength 4 1 2551 258 BitsPerSample 3 1 65536 259 Compression 3 1 262144 262 PhotometricInterpretation 3 1 0 266 FillOrder 3 1 65536 273 StripOffsets 4 1 300 274 Orientation 3 1 524288 277 SamplesPerPixel 3 1 65536 278 RowsPerStrip 4 1 2551 279 StripByteCounts 4 1 68064 282 XResolution 5 1 300 283 YResolution 5 1 300 284 PlanarConfiguration 3 1 65536 293 T6Options 4 1 0 296 ResolutionUnit 3 1 131072Next IFD offset: 0

TIFF UTILITIES
9-4 DECOMPOSITION SERVICE AND TOOLS GUIDE

DECOMPOSITION SERVICE AND TOOLS GUIDE A-1
A. ADecomposed form file format
Forms are generally saved in the “/var/db/forms” directory on the DocuPrint NPS printer controller. Each form actually consists of a set of files associated by naming convention.
The basic form name is the job name under which the PostScript job is submitted. To this basic name, suffixes are added to identify the several files which comprise the form.
Form files for TIFF/G4 and ByteCode formats
Three common files always get created for a decomposed form. It does not matter whether the form was in TIFF/G4 or ByteCode format.
By looking at the final extension of other files, it is easy to determine what format the decomposed form is in. If the extension is “.tif”, the form was created in TIFF/G4. If it is “.pg”, the form was created in ByteCode.
Form files common to both TIFF/G4 and ByteCode
The files that are created for both TIFF/G4 and ByteCode formats follow:
• formname.formDesc — This file describes the form and contains a list of the files which comprise it and the number of pages it contains. It is used by the DocuPrint NPS to manage the “forms” directory.
• formname.pnnnn.ps — These are the files generated for each page of the document which contains the PostScript commands that images the page.
• formname.pnnnn.form.ps — This file still gets created but it is now obsolete.
Files created when form is saved as TIFF/G4
In addition to the above files, the following files are created for forms in TIFF/G4 format:
• formname.pnnnn.b.tif — These are the file(s) containing the TIFF/G4 image of the black plane for page nnnn of the form. This file is present for every page when the disposition is “SaveFormG4” or “SaveMaskG4.”
• formname.pnnnn.h.tif — These are the file(s) containing the TIFF/G4 image of the highlight color plane for page nnnn of the form. This file is present when the disposition is SaveFormG4

DECOMPOSED FORM FILE FORMAT
A-2 DECOMPOSITION SERVICE AND TOOLS GUIDE
or SaveMaskG4, the DocuPrint NPS is a highlight color model and page nnnn contains highlight color data.
• formname.pnnnn.w.tif — These are the file(s) containing the TIFF/G4 image of the white plane for page nnnn of the form. This file is present when the disposition is SaveFormG4.
Files created when form is saved as ByteCode
In addition to the common files, the following files are created for the ByteCode format:
• formname.pnnnn.or.pg — These are the file(s) containing the ByteCode image of the black plane for page nnnn of the form. This file is present for every page when the disposition is “SaveFormBC” or “SaveMaskBC.”
• formname.pnnnn.hc.pg — These are the file(s) containing the ByteCode image of the highlight color plane for page nnnn of the form. This page is present when the disposition is SaveFormBC or SaveMaskBC, the DocuPrint NPS is a highlight color model and page nnnn contains highlight color data.
• formname.pnnnn.and.pg — These are the file(s) containing the ByteCode image of the white plane for page nnnn of the form. This file is present when the disposition is SaveFormBC.
Examples
Examples for TIFF/G4 and ByteCode follow:
TIFF/G4 examples
If you submit a one-page black and white PDL file named “STATEMNT.PS” saved as TIFF/G4 with a mask format, the resulting file names are as follows:
• STATEMNT.PS.formDesc
• STATEMNT.PS.p0001.b.tif
• STATEMNT.PS.p0001.form.ps
• STATEMNT.PS.p0001.ps.
If the same PDL file included highlight color, the file names are as follows:
• STATEMNT.PS.formDesc
• STATEMNT.PS.p0001.b.tif
• STATEMNT.PS.p0001.form.ps
• STATEMNT.PS.p0001.h.tif
• STATEMNT.PS.p0001.ps.

DECOMPOSED FORM FILE FORMAT
DECOMPOSITION SERVICE AND TOOLS GUIDE A-3
If the same PDL file included highlight color and used the form format, the file names are as follows:
• STATEMNT.PS.formDesc
• STATEMNT.PS.p0001.b.tif
• STATEMNT.PS.p0001.form.ps
• STATEMNT.PS.p0001.h.tif
• STATEMNT.PS.p0001.ps
• STATEMNT.PS.p0001.w.tif.
ByteCode examples
If you submit a one-page black and white PDL file named “STATEMNT.PS” saved as ByteCode with a mask format, the resulting file names are as follows:
• STATEMNT.PS.formDesc
• STATEMNT.PS.p0001.form.ps
• STATEMNT.PS.p0001.or.pg
• STATEMNT.PS.p0001.ps.
If the same PDL file included highlight color, the file names are as follows:
• STATEMNT.PS.formDesc
• STATEMNT.PS.p0001.form.ps
• STATEMNT.PS.p0001.hc.pg
• STATEMNT.PS.p0001.or.pg
• STATEMNT.PS.p0001.ps.

DECOMPOSED FORM FILE FORMAT
A-4 DECOMPOSITION SERVICE AND TOOLS GUIDE

DECOMPOSITION SERVICE AND TOOLS GUIDE B-1
B. BStorage of forms or jobs in adifferent directory
If you wish to have your forms stored in a directory other than “/var/db/forms”, it is strongly recommended that you read the “Decomposed Form File Format” appendix first to become familiar with files created by a decomposed form.
The new Windows tools allow you to use forms in a directory other than “/var/db/forms.” In addition, it also allows you to use the XCat jobs or the XMerge file of files in a directory other than “/var/spool/data”.
To take advantage of this feature, you move the appropriate file(s) to the desired directory, edit file(s) if necessary, update the “/var/db/PS.prefix.read” file to include the new directory, and restart the sequencer. An example with detailed instructions follows.
After your file(s) are moved to another directory that you have access to, you may specify the new directory path in the “Remote Path” field for various Decomp utilities.
Note: The “formname.pnnnn.ps” files in the new directory must be edited to change the “/var/db/forms” path to the new path so the proper TIFF files can be located.
After updating the “/var/db/PS.prefix.read” file, execute the “Restart Sequencer” to make the new directory accessible.
In a future release, the DOS and SunOS/Solaris tools will be upgraded to allow you to specify the remote path for forms, jobs, or file of files.
Example
For example, assume that you want to move “order.prn” files from “/var/db/forms” to “/var/db/forms/marketing.” Perform the following steps:
Step 1. Use “List Forms” to verify that order.prn exists:
PS> List Forms Enter the form name pattern: *Name Pages Format Date Createdcertify.prn 1 SaveFormG4 January 15, 1997 3:15:47 pm PSTnewslttr.prn 4 SaveFormG4 March 3, 1997 10:37:17 am PSTorder.prn 1 SaveFormG4 March 12, 1997 3:52:18 pm PST

STORAGE OF FORMS OR JOBS IN A DIFFERENT DIRECTORY
B-2 DECOMPOSITION SERVICE AND TOOLS GUIDE
Step 2. Logon as an “Administrator”, enter “Wizard” mode, go to the “/var/db” directory, and examine the “PS.prefix.read” file as shown in the following example:
Step 3. Edit “/var/db/PS.prefix.read” by appending the new directory path to the end of the file as shown in the following example:
Step 4. Go to “/var/db/forms”, create a “marketing” directory, and move the files related to “order.prn” into the new subdirectory as shown in the following example:
Step 5. Verify that “/var/db/forms/marketing” has the form-related files for “order.prn” as shown in the following example:
PS> Privilege Administrator Administrator password: *********PS-admin> Wizard ModeEntering Wizard Mode, type exit when finished.phoenix% cd /var/dbphoenix% cat PS.prefix.read/var/spool/data/ /var/db/forms/
phoenix% cat PS.prefix.read/var/spool/data/ /var/db/forms/ /var/db/forms/marketing/
phoenix% cd /var/db/formsphoenix% mkdir marketingphoenix% mv order.prn* marketing
phoenix% cd marketingphoenix% ls -1 order.prn*order.prn.formDescorder.prn.p0001.b.tiforder.prn.p0001.form.psorder.prn.p0001.psorder.prn.p0001.w.tif

STORAGE OF FORMS OR JOBS IN A DIFFERENT DIRECTORY
DECOMPOSITION SERVICE AND TOOLS GUIDE B-3
Step 6. Examine the “order.prn.p0001.ps” file. You should notice that two of the last five lines refer to TIFF files from the “old” location.
Step 7. Edit the “order.prn.p0001.ps” file so that two of the last five lines refer to TIFF files in the “new” location. It should look like the following example:
phoenix% cat order.prn.p0001.ps%!% SaveFormG4 order.prn.p0001 (March 12, 1997 3:52:18 pm PST){ save 12 dict begin/g4rows 2551 def/g4cols 3296 def/g4rot 90 def/g4resX 300.0 def/g4resY 300.0 def/doPlane { /g4key exch def /g4file exch def statusdict g4key known {statusdict g4key get} {true} ifelse {mark {g4file (r) file /g4file exch def} stopped cleartomark g4file type /filetype eq {g4file 300 setfilepositiong4cols g4rows true [g4cols 0 0 g4rows neg g4cols 2 div g4rows 2 div]g4file << /K -1 /Columns g4cols /Rows g4rows /BlackIs1 true >> /CCITTFaxDecode kg4file closefile} if } if } bind defg4rows g4resY div 36.0 mul g4cols g4resX div 36.0 mul translateg4rot rotateg4cols g4resX div 72.0 mul g4rows g4resY div 72.0 mul scale1 setgray (/var/db/forms/order.prn.p0001.w.tif) /allowWhitePlane doPlane0 setgray (/var/db/forms/order.prn.p0001.b.tif) /allowBlackPlane doPlaneend restore }
phoenix% cat order.prn.p0001.ps%!% SaveFormG4 order.prn.p0001 (March 12, 1997 3:52:18 pm PST){ save 12 dict begin/g4rows 2551 def/g4cols 3296 def/g4rot 90 def/g4resX 300.0 def/g4resY 300.0 def/doPlane { /g4key exch def /g4file exch def statusdict g4key known {statusdict g4key get} {true} ifelse {mark {g4file (r) file /g4file exch def} stopped cleartomark g4file type /filetype eq {g4file 300 setfilepositiong4cols g4rows true [g4cols 0 0 g4rows neg g4cols 2 div g4rows 2 div]g4file << /K -1 /Columns g4cols /Rows g4rows /BlackIs1 true >> /CCITTFaxDecode kg4file closefile} if } if } bind defg4rows g4resY div 36.0 mul g4cols g4resX div 36.0 mul translateg4rot rotateg4cols g4resX div 72.0 mul g4rows g4resY div 72.0 mul scale1 setgray (/var/db/forms/marketing/order.prn.p0001.w.tif) /allowWhitePlane doPlane0 setgray (/var/db/forms/marketing/order.prn.p0001.b.tif) /allowBlackPlane doPlaneend restore }

STORAGE OF FORMS OR JOBS IN A DIFFERENT DIRECTORY
B-4 DECOMPOSITION SERVICE AND TOOLS GUIDE
Step 8. Exit the “Wizard” mode and restart the sequencer to make the “PS.prefix.read” change effective and “/var/db/forms/marketing” accessible.
Step 9. You may now enter “/var/db/forms/marketing/” in the “Remote Form Path” field if you are using the Windows tools.
Note: If your forms are moved to directories other than “/var/db/forms”, the DocuPrint controller UI commands such as “List Forms”, “Print Form Sample”, and “Delete Form” currently do not locate the moved forms.
phoenix% exitphoenix% Exiting Wizard Mode.PS-admin> Restart Sequencer Sequencer restarted

DECOMPOSITION SERVICE AND TOOLS GUIDE C-1
C. CStorage of files in /var/spool/data
Variable data PostScript files can be stored on the DocuPrint under the “/var/spool/data” directory. Two methods are available to accomplish this task:
• FTP
• Network File System for UNIX (NFS).
FTP method
The basic steps involved if you know the root password of your DocuPrint follow:
Step 1. Use FTP to connect to the DocuPrint and log in as “root” or “decomp”.
Step 2. Change the directory to “/var/spool/data”.
Step 3. Store your variable data PostScript file.
Step 4. Disconnect from FTP.
Note: The DocuPrint NPS 1.5 release introduces a new FTP login to enable you to store files in”/var/spool/data” without having to know the DocuPrint root password. The FTP login name is “decomp” and the default password is “decompuser”. If the password does not work, consult your DocuPrint administrator because the default password may have been changed.
NFS method
If you have NFS capabilities, the DocuPrint exports the “/var/spool/data” directory if the XIPP prescan is enabled. For more information, refer to the “Creating print jobs with referenced content” chapter in the DocuPrint Programmer’s Guide.

STORAGE OF FILES IN /VAR/SPOOL/DATA
C-2 DECOMPOSITION SERVICE AND TOOLS GUIDE

DECOMPOSITION SERVICE AND TOOLS GUIDE D-1
D. DPerformance measurements
DocuPrint creates a log file of job information which can be used to calculate print speeds. This is the preferred method over stopwatch timing; it does not require physical coordination and the times are accurately recorded in a readable format.
The terminology used in this section is defined in the glossary.
In order to examine the performance of your job, perform the following steps using the DocuPrint controller:
Step 1. Execute “Show Log” from “Operator”, “Administrative”, or “Service” mode.
Step 2. After a menu presents you with different logs, choose the current sequencer log which is “/var/log/DocuPrint.sequencer”.
Step 3. Specify how many lines you want to show from the end of the log (for example: “20”).
Step 4. Look for the “start” and “stop” entries in your job.
a. If your job was not decomposed; note the “Pages”, “Decomp time”, and the “Elapsed time.” These are used to determine the pages per minute (PPM) for the job and provide a clue as to how it may be improved through Decomp Services.
b. If your job was decomposed, note the pages and elapsed time. These are used to determine the PPM.
A job entry sample with pages, decomp time, and elapsed time in italics follows:
Formulas
Print speed as a measure of throughput, in Pages Per Minute, can be calculated with the following formula:
PPM = pages/(elapsed time in seconds / 60).
To calculate a theoretical maximum speed at which the job could print, given an infinitely fast printer, use the following formula:
Decomp PPM = pages/(decomp time in seconds / 60).
Job #15 start, byee, demo.ps, December 10, 1996 2:11:03 pm PSTPrinting duplex, 300 spi, 216 x 356 mm, 25 bufJob #15 stop, byee, demo.ps, December 10, 1996 2:12:06 pm PST pages: 48, decomp: 32.10, elapsed: 62.77

PERFORMANCE MEASUREMENTS
D-2 DECOMPOSITION SERVICE AND TOOLS GUIDE
Measurement methods
There are three measurement methods:
• Obtaining rough estimates
• Calculating throughput
• Getting a sense of performance improvement through Decomp Services.
Obtaining rough estimates
Rough estimates can be obtained simply by submitting a job and using the decomp time to calculate PPM and rounding off at the maximum rated speed of the printer, if the calculated value is higher.
However, the actual print speed (throughput) is greatly affected by factors outside of the raw decomp time such as job size, duplexing, using highlight color, and so on. More comprehensive testing is usually necessary.
Calculating throughput
When calculating throughput, it is desirable to obtain measurements while the DocuPrint is running so as to avoid including the startup time in the elapsed time for the job.
To obtain measurements while the DocuPrint is running, perform the following steps:
Step 1. Either send the same job or a series of jobs representing the typical work load and calculate the elapsed time from the “stop time” of the first job to the stop time of the last job.
Note: This ensures that the “cycle up” time of the printer is not included in the calculations.
Step 2. Adjust the elapsed time to account for paper jams or loading. If necessary, rerun the test until “clean” data results.
Step 3. Calculate the number of pages printed and account for duplex images/sheets. Plug the number into the PPM formula.
Getting a sense of performance improvement throughDecomp Service
In order to get a sense of the performance improvement that can be obtained by converting your original Postscript file into a decomposed form, send the document in the “original form” and in the “converted form” to the DocuPrint and time each job.

PERFORMANCE MEASUREMENTS
DECOMPOSITION SERVICE AND TOOLS GUIDE D-3
Note: In the latter case, send the document to a decomp virtual printer to convert it into a form and use either the “Print Form Sample” or the “Reprint” utility to print the form.
If the variable data content of the document is reasonably small, it is not necessary to separate the document into static (decomposed form) and variable components (variable data file) to obtain estimated performance.
Example
For example, assume that your company has the order form shown in figure D-1 which you ship with your catalogs or products so that your customers can complete it to order more products from you.
Figure D-1. Order form
Furthermore, assume that your company intends to print an average of 100 order forms daily.
At first glance, this order form appears to be a good candidate for conversion into a decomposed form because there are a lot of graphics and text which remain unchanged and because this form is printed over and over again.
Get rough estimates
To get a rough estimate, submit a single order form (“order.prn”) to the DocuPrint and see how it did by entering the following commands using the DocuPrint controller:

PERFORMANCE MEASUREMENTS
D-4 DECOMPOSITION SERVICE AND TOOLS GUIDE
PS> Privilege Administrator Administrator password: ********PS-admin> Show Log 1 Quit 2 /var/log/DocuPrint.sequencer 3 /var/log/DocuPrint 4 /var/log/DocuPrint.Tue 5 /var/log/DocuPrint.sequencer.Tue 6 /var/log/DocuPrint.Mon 7 /var/log/DocuPrint.Sun 8 /var/log/DocuPrint.Sat 9 /var/log/DocuPrint.Fri 10 /var/log/DocuPrint.Thu 11 /var/log/DocuPrint.Wed 12 /var/log/DocuPrint.sequencer.Wed 13 /var/log/DocuPrint.sequencer.Mon 14 /var/log/DocuPrint.sequencer.Thu 15 /var/log/DocuPrint.sequencer.Sun 16 /var/log/DocuPrint.sequencer.Fri 17 /var/log/syslog 18 /var/adm/messages 19 /var/adm/messages.0 20 /var/adm/messages.1 21 /var/adm/messages.2 22 /var/adm/messages.3 23 /usr/spool/xerox/log/nps.log.Wed 24 /usr/spool/xerox/log/nps.log.Tue 25 /usr/spool/xerox/log/nps.log.Fri 26 /usr/spool/xerox/log/nps.log.Mon Enter choice number: 2Enter number of lines from the end to show (or "All"): 4Job #309 start, LTerry, order.prn, March 19, 1997 11:21:29 am PSTPrinting simplex, 300 spi, 216 x 279 mm, 32 bufJob #309 stop, LTerry, order.prn, March 19, 1997 11:21:44 am PST pages: 1, decomp: 1.52, elapsed: 15.83 1 Quit 2 /var/log/DocuPrint.sequencer 3 /var/log/DocuPrint 4 /var/log/DocuPrint.Tue 5 /var/log/DocuPrint.sequencer.Tue 6 /var/log/DocuPrint.Mon 7 /var/log/DocuPrint.Sun 8 /var/log/DocuPrint.Sat 9 /var/log/DocuPrint.Fri 10 /var/log/DocuPrint.Thu 11 /var/log/DocuPrint.Wed 12 /var/log/DocuPrint.sequencer.Wed 13 /var/log/DocuPrint.sequencer.Mon 14 /var/log/DocuPrint.sequencer.Thu 15 /var/log/DocuPrint.sequencer.Sun 16 /var/log/DocuPrint.sequencer.Fri 17 /var/log/syslog 18 /var/adm/messages 19 /var/adm/messages.0 20 /var/adm/messages.1 21 /var/adm/messages.2 22 /var/adm/messages.3 23 /usr/spool/xerox/log/nps.log.Wed

PERFORMANCE MEASUREMENTS
DECOMPOSITION SERVICE AND TOOLS GUIDE D-5
Notice that a menu is produced immediately after the performance of the job is listed. You may have to scroll back to find your particular jobs.
Find the entries for “order.prn”, make several notations, and compute the PPM and Decomp PPM. The entries and formula follow:
There is a significant difference between PPM and Decomp PPM so Decomp Service holds some promise of improving the print speed for this particular job.
Get sense of performance improvement
Perform the following steps to see which format works the best:
Step 1. Send a 100 page document (“order100.prn”), which has the order form on each page, to the DocuPrint.
Step 2. Use the DocuPrint “Print Form Sample” to print 100 copies of the decomposed order form in “SaveFormG4” format.
Step 3. Use the DocuPrint Print Form Sample to print 100 copies of the decomposed order form in “SaveFormBC” format.
All of the jobs listed above are sent when the printer is running other job(s). This should reduce the “cycle up” time between each job.
Start preparing the DocuPrint by sending a small job or two to get the IOT out of “power saver” mode, replenishing the paper stock, (because you are going to print at least 300 pages) and removing any output so that an “elevator tray” fault can not occur.
24 /usr/spool/xerox/log/nps.log.Tue 25 /usr/spool/xerox/log/nps.log.Fri 26 /usr/spool/xerox/log/nps.log.Mon Enter choice number: 1PS-admin>
Document (“order.prn”)pages = 1decomp time = 1.52elapsed time = 15.83
PPM = 1/(15.83/60) = 1/0.2638 = 3.7903Decomp PPM = 1/(1.52/60) = 1/0.0253= 39.4737

PERFORMANCE MEASUREMENTS
D-6 DECOMPOSITION SERVICE AND TOOLS GUIDE
Perform a “Show Status” and “List Forms” to ensure the printer is ready and has the decomposed order forms as shown in the following example:
Note: Show Status lists the printer type as “Xerox DocuPrint 4090.”
Get your DocuPrint in motion by printing something that takes a few minutes so that you have some time to send your three jobs.
Quickly submit “order100.prn” from your client workstation and return to the DocuPrint controller to send your other two jobs.
Note: This is easy if you “Telnet” to the DocuPrint from your client workstation.
PS-admin> Show StatusPrinter Type: Xerox/4090, Duplex capableMedia Loaded: UsLetter::white: Tray 4 UsLetter:Cover:blue:113: Tray 3 UsLegal::white: Tray 2 UsLetter:Standard:white:75: Tray 1Paper Trays: 1: OK 2: OK 3: OK 4: OK No Printer Messages.Spooler status: AvailableFormatter status: AvailablePrinter status: AvailablePrinting is Started.Queueing is Started.Scheduling Policy: resourceMatch
PS-admin> List Forms Enter the form name pattern: *Name Pages Format Date Creatednewslttr.prn 4 SaveFormG4 March 3, 1997 10:37:17 am PSTorder_bc.prn 1 SaveFormBC March 20, 1997 3:28:50 pm PSTorder_g4.prn 1 SaveFormG4 March 20, 1997 3:34:48 pm PST
PS-admin> Print Form SampleEnter the form name pattern: newslttr.prnEnter the number of copies to print: 5Enter plex (simplex, duplex, tumbleDuplex): simplexEnter media specification: UsLetter::whitePrint Form Sample newslttr.prn at March 20, 1997 3:49:46 pm PST submitted as do1

PERFORMANCE MEASUREMENTS
DECOMPOSITION SERVICE AND TOOLS GUIDE D-7
See if you were fast enough to put your jobs in the queue:
PS-admin> Print Form SampleEnter the form name pattern: order_bc.prnEnter the number of copies to print: 100Enter plex (simplex, duplex, tumbleDuplex): simplexEnter media specification: UsLetter::whitePrint Form Sample order_bc.prn at March 20, 1997 3:50:31 pm PST submitted as do4
PS-admin> Print Form SampleEnter the form name pattern: order_g4.prnEnter the number of copies to print: 100Enter plex (simplex, duplex, tumbleDuplex): simplexEnter media specification: UsLetter::whitePrint Form Sample order_g4.prn at March 20, 1997 3:50:43 pm PST submitted as do5
PS-admin> List Documents Doc # Sender Name Document Name Status 352 LTerry order100.prn Printing 354 Administrator Print Form Sample order_bc.prn a Pending 355 Administrator Print Form Sample order_g4.prn a In prescan3 Documents Listed.

PERFORMANCE MEASUREMENTS
D-8 DECOMPOSITION SERVICE AND TOOLS GUIDE
Execute “List Documents” periodically until “order_g4.prn” completes and then execute “Show Log” as follows:
PS-admin>Show Log 1 Quit 2 /var/log/DocuPrint.sequencer 3 /var/log/DocuPrint 4 /var/log/DocuPrint.Wed 5 /var/log/DocuPrint.sequencer.Wed 6 /var/log/DocuPrint.Tue 7 /var/log/DocuPrint.sequencer.Tue 8 /var/log/DocuPrint.Mon 9 /var/log/DocuPrint.Sun 10 /var/log/DocuPrint.Sat 11 /var/log/DocuPrint.Fri 12 /var/log/DocuPrint.Thu 13 /var/log/DocuPrint.sequencer.Mon 14 /var/log/DocuPrint.sequencer.Thu 15 /var/log/DocuPrint.sequencer.Sun 16 /var/log/DocuPrint.sequencer.Fri 17 /var/log/syslog 18 /var/adm/messages 19 /var/adm/messages.0 20 /var/adm/messages.1 21 /var/adm/messages.2 22 /var/adm/messages.3 23 /usr/spool/xerox/log/nps.log.Wed 24 /usr/spool/xerox/log/nps.log.Tue 25 /usr/spool/xerox/log/nps.log.Fri 26 /usr/spool/xerox/log/nps.log.Mon Enter choice number: 2Enter number of lines from the end to show (or "All"): 20Printing simplex, 300 spi, 216 x 279 mm, 32 bufJob #350 stop, Administrator, worm.ps, March 20, 1997 3:45:31 pm PST pages: 1, decomp: 0.96, elapsed: 15.00Job #351 start, Administrator, Print Form Sample newslttr.prn at March 20, 1997 3:49:53 pm PSTPrinting simplex, 300 spi, 216 x 279 mm, 32 bufJob #351 stop, Administrator, Print Form Sample newslttr.prn at March 20, 1997 3:50:21 pm PST pages: 20, decomp: 2.07, elapsed: 29.52Job #352 start, LTerry, order100.prn, March 20, 1997 3:50:27 pm PSTPrinting simplex, 300 spi, 216 x 279 mm, 32 bufJob #354 start, Administrator, Print Form Sample order_bc.prn at March 20, 1997 3:54:29 pm PSTJob #352 stop, LTerry, order100.prn, March 20, 1997 3:54:43 pm PST pages: 100, decomp: 118.91, elapsed: 255.75, compress: 11.18x, min free: 10K compress pages: 10, expand pages: 0Job #355 start, Administrator, Print Form Sample order_g4.prn at March 20, 1997 3:55:23 pm PSTJob #354 stop, Administrator, Print Form Sample order_bc.prn at March 20, 1997 3:55:48 pm PST pages: 100, decomp: 0.82, elapsed: 79.04, compress: 12.52x, min free: 10240K compress pages: 13, expand pages: 0Job #355 stop, Administrator, Print Form Sample order_g4.prn at March 20, 1997 3:56:53 pm PST pages: 100, decomp: 1.06, elapsed: 91.04, compress: 20.89x, min free: 10228K compress pages: 3, expand pages: 0

PERFORMANCE MEASUREMENTS
DECOMPOSITION SERVICE AND TOOLS GUIDE D-9
Compute the performance of your three jobs as shown in the following three examples:
After comparing the PPM rates, you conclude that the order form would print the fastest in decomposed ByteCode format at nearly 76 PPM. This is fairly close to the maximum rated speed of 90 ppm for the DocuPrint 4090 which is not bad for such a complex page.
Document (“order100.prn”)pages = 100decomp time = 118.91elapsed time = 255.75
PPM = 100/(255.75/60) = 100/4.2625 = 23.4604Decomp PPM = 100/(118.91/60) = 100/1.9818 = 50.4583
G4 Decomposed Form (“order_g4.prn”)pages = 100elapsed time = 91.04
PPM = 100/(91.04/60) = 100/1.5173 = 65.9051
BC Decomposed Form (“order_bc.prn”)pages = 100elapsed time = 79.04
PPM = 100/(79.04/60) = 100/1.3173 = 75.9109

PERFORMANCE MEASUREMENTS
D-10 DECOMPOSITION SERVICE AND TOOLS GUIDE

DECOMPOSITION SERVICE AND TOOLS GUIDE E-1
E. ETIFF file format
This chapter lists the TIFF tags used by DocuPrint NPS and briefly explains how to view tags from a TIFF file.
The TIFF format used by DocuPrint NPS is TIFF 6.0.
TIFF 6.0 mandatory tags
According to the TIFF 6.0 specifications, only the following tags are required for bitmap images:
• ImageWidth
• ImageLength
• Compression
• Photometric-Interpretation
• StripOffsets
• XResolution
• YResolution
• ResolutionUnit.
DocuPrint NPS TIFF
The DocuPrint NPS TIFF software generates legal TIFF files with the required tags, plus the following tags:
• BitsPerSample (value always 1)
• FillOrder (value always 1)
• Orientation
• SamplesPerPixel (value always 1)
• PlanarConfiguration (value always 1)
• Group4Options (also known as T6Options).
DocuPrint NPS only generates single strip (and single page) TIFF files with bitmap images.
For tag assignments and value interpretations, the TIFF 6.0 specification should be referenced.

TIFF FILE FORMAT
E-2 DECOMPOSITION SERVICE AND TOOLS GUIDE
Examination of tags in TIFF file
If you want to view the tags of a given TIFF file, use the “GetG4” utility. It decodes the tags into human-readable form and prints them.

DECOMPOSITION SERVICE AND TOOLS GUIDE F-1
F. FForms backup and restoration
When a DocuPrint is to be upgraded with a new DocuPrint NPS release, your local System Administrator should back up the forms. After the installation is over, the entire “/var/db/forms” directory is erased. Your Administrator can then restore the forms.
Your Administrator or Operator is responsible for creating and maintaining an adequate backup process. Some thought should be given as to whether to back up the data in “/var/spool/data” as well because they are not automatically backed up by the commands that are covered in this chapter.
Backup forms
To back up forms, enter the following command in “Administrative” or “Service” mode using the DocuPrint controller:
If you choose to backup to either diskette or tape, this automatically backs up all files in the “/var/db/forms” directory. “PS.prefix.read” and “PS.prefix.write” in “/var/db” are also backed up along with other files.
Restore forms
To restore the forms, enter the following command in “Administrative” or “Service” mode using the DocuPrint controller:
PS-Admin> Backup Site Files1) Backup to floppy2) Backup to tape3) ExitPlease select 1, 2 or 3 and press RETURN: 2
PS-Admin> Restore Site Files1) Restore from floppy2) Restore from tape3) ExitPlease select 1, 2 or 3 and press RETURN: 2

FORMS BACKUP AND RESTORATION
F-2 DECOMPOSITION SERVICE AND TOOLS GUIDE

DECOMPOSITION SERVICE AND TOOLS GUIDE G-1
G. GExample applications
These Decomposition Service application examples may be useful for advanced users. They demonstrate preparing and merging fixed (static) and variable data from PostScript data streams. You should already know where and in what format the variable data is acquired and converted, as well as, where and how this data is overlaid on a fixed document. In many cases, custom programming is required to achieve the desired end result.
Variable Data PostScript "Address" File example
This application example explains generating a variable data PostScript file for "Set Addressing," a commonly and widely used application where address labels are "pasted on" a document. In the code shown, the address list is taken from an ASCII data stream and each address record starts the generation of a page containing only an address at a specific location and the font type and size on that page. Instructions for where the address record is to be "pasted on" and what font is used are encoded in the application specific PostScript program. Merging this variable data PostScript file with a previously stored newsletter (in TIFF image format) is accomplished by using the XMerge Utility.
The example below uses a sample code that will generate a PostScript file from an ASCII record oriented address list. The addresses consist of a first name, middle initial, last name, street name and number, mail code, city, zip code, and mail code.

EXAMPLE APPLICATIONS
G-2 DECOMPOSITION SERVICE AND TOOLS GUIDE
% ** Read in the Users Datafile and define corresponding variables
/READDataFile {/Datafield 150 string def/firstname 11 string def/mi 9 string def/lastname 17 string def/street 26 string def/citystzip 30 string def/mailcode 8 string defDatafile Datafield readline exch pop /amidone exch defDatafield 0 11 getinterval /firstname exch defDatafield 12 9 getinterval /mi exch defDatafield 21 17 getinterval /lastname exch defDatafield 39 7 getinterval /mailcode exch defDatafield 46 26 getinterval /street exch defDatafield 72 30 getinterval /citystzip exch def} def
% ***END READ DATA FILE/getnames {firstname showmi showlastname showy 8 sub x exch movetomailcode showy 16 sub x exch movetostreet showy 24 sub x exch movetocitystzip show} def/placename{ /NewCenturySchlbk-Roman findfont 8 scalefont setfont/x xorig def/y yorig defx y movetogetnames
} def% ****** MAIN PROGRAM **********/Datafile (DataFile.db) (r) file def‰%Reads in a formatted Ascii Database%****** Place Images on the First page ******gsave(/var/db/forms/BlackTiff.tif)GetTiff1 0 0 setrgbcolor(/var/db/forms/HighlightTiff.tif)GetTiff0 0 0 setrgbcolorgrestore% ****** Place Variable Data *********
gsaveREADDataFileplacenamegrestoreshowpageDatafile closefile

EXAMPLE APPLICATIONS
DECOMPOSITION SERVICE AND TOOLS GUIDE G-3
Image Lift example
This application example is an Image Lift application where two half-page images are pulled from a data base of G4/TIFF images, overlaid on a blank page and then variable data overlaid on each half-page.
Image Lift printing is the process of taking an image that is smaller than a full page and placing it directly where the user wishes it to be placed on the page. One example of this is importing an image into a document created on a standard word processing package and also using an image as a logo for the letterhead.
Decomposition Service creates the tiff differently than creating a form. The user must retrieve the tiff from the Printer Controller and copy it to a software package that can perform cropping (such as XDOD’s Document Assembler). The cropped tiff is then copied to the Printer Controller.
This process is recommended since the amount of disk space that the smaller tiff requires results in a higher performance speed of the Postscript. The Image Lift application allows the user to control where the tiff will be placed on the page, and allows the option of using more than one tiff per page, while still maintaining a higher print speed.
The example below is of a simple PostScript program that overlays two half-page images on a blank page and then overlays variable data on the same page:

EXAMPLE APPLICATIONS
G-4 DECOMPOSITION SERVICE AND TOOLS GUIDE
Microsoft Word-based Variable Data Merge example
Efficient variable data printing involves the creation of a "static form" which can be overlaid on variable data during print time to speed the printing of complex PostScript documents. The example describes how to accomplish this using MS Windows platforms.
Note: This example illustrates the creation of a variable data printing application using Microsoft Word, although a static form can be used from another application, such as Adobe Illustrator or Aldus Pagemaker, capable of creating a PostScript format document. Also, the Mail Merge feature is commonly found in word processors, but the ability to include PostScript output directly into the output stream
%*********************************%** Place GetTiff macro here **%*********************************/inch {72 mul} def/name 80 string def/data 80 string def/Courier findfont 12 scalefont setfont/Datafile (/Datafile.db) (r) file def/Imageletter {gsave 7 inch 9 inch translate (/var/db/forms/CompanyLogo) GetTiff grestore 1 inch 7 inch moveto (Dear) show
name show 1 inch 6 inch moveto (Please come into our store and receive 50% off all merchandise) show 5 inch 5 inch move to (Sincerely) show 5 inch 4 inch moveto (John T. Executive) show gsave 5 inch 4.5 inch translate (/var/db/forms/CEOSignature.tif) GetTiff grestore showpage} def%** Main Program ****% Read in a line from the data file, if it is the last name, Print letter and exit loop{
% readline leaves a boolean on the stack that gets set to false if EOF is reached Datafile data readline exch /name exch def {Imageletter} {Imageletter exit} ifelse}loop

EXAMPLE APPLICATIONS
DECOMPOSITION SERVICE AND TOOLS GUIDE G-5
is less common. If your word processor supports such a feature, the basic underlying principles described below will enable use of Decomposition Service on DocuPrint NPS.
Figure G-1. Variable data merge example
As shown in the figure above, the process involves creating two independent, but related, documents: the static form which contains the information that does not change from page to page, and the variable data document which differs for each page. The static form(s) are sent to a "forms queue" in the DocuPrint NPS where they are decomposed into a fast-printing format and saved. The variable data in this example is created with the Print Merge function of MS Word and includes references to the static form so that it is superimposed on the page at print time.
Refer to the following for detailed steps of this process.
Document Creation
1. Create two copies of a complete document template.
2. In one of the copies, remove all the data that will change from page to page to create the static form (this document can be multiple pages). Be sure that line spacing does not change as you delete data since this will affect registration between the merged pages. If substituting different variable data into a line would cause the line or paragraph to “wrap,” any text subject to movement must be considered variable.
3. Using the other copy of the base document, carefully remove the static data, leaving only the variable components. This variable document is what MS Word calls the "main document."
4. Submit the static data document with the Disposition attribute set to SaveMaskG4 or SaveMaskBC to save it as a static form.
Note: Print the original document and uniquely highlight the static and variable data identified in the steps above for future reference.
alternatively,introduce formfrom anotherapplication
print fileto DP
removevariabledata
removestaticdata
copy
OneCompleteDocument
WordDataDocument
printmerge
process
variabledataform
staticimageform
printmerged
fileto DP

EXAMPLE APPLICATIONS
G-6 DECOMPOSITION SERVICE AND TOOLS GUIDE
Referencing the Static Form
On each page of the variable document (main document) you created and that you want DocuPrint NPS to overlay a static form, you must include a reference to the static form. This is accomplished by inserting a PostScript fragment that identifies the form and causes it to be merged with the page from the main document. The following PostScript commands must be included in the output stream:
gsave initgraphics(staticfilename.pnnnn.ps) run execgrestore
Substitute the full pathname of the static form file name as stored on the DocuPrint NPS Printer Controller for staticfilename. (You can find this filename by looking in the /var/db/forms directory of the DocuPrint NPS, using the List Forms command, or by creating it with the same name of the document when sent to the forms queue.) The DocuPrint NPS assigned name will be:
/var/db/forms/staticfilename.pnnnn.ps
nnnn is a string of digits, such as 0001 for page 1, 0019 for page 19, and so on.
Word 6.0 The method for inserting these commands varies with the versions of Word (prior to the 6.0 release, MS Word did not include this feature). Refer to the following for the appropriate method for your version of MS Word:
Note: It is very helpful to have the “fields” visible.
1. From the Tools menu, choose Options, then select view/show/field codes.
2. Insert a field in the document on the page you want to overlay with the form. (From the Insert menu, choose Field Name Print.) This inserts a Print Field into the document, and anything you enter there will be included directly in the output without being translated into printable form.
3. Type the PostScript commands shown above into this field between double quotes (it can all be on typed as one line, use a space instead of an Enter). Make sure to both precede and follow your commands with a space character. The Print Field will appear as:
{PRINT " gsave initgraphics (/var/db/forms/staticfilename.pnnnn.ps) run exec restore " \*MERGEFORMAT}
Once the field has been inserted and is visible, text can be typed directly into it.

EXAMPLE APPLICATIONS
DECOMPOSITION SERVICE AND TOOLS GUIDE G-7
Print Merge
After the static form has been created, the variable document (main document) constructed according to MS Word instructions for Print Merge documents and the instructions for printing above, and the data document created, you are ready to create a file to be printed.
Note: It is not possible to print directly to the DocuPrint NPS. Instead, you must create a PostScript file that is sent to the DocuPrint NPS in a separate step.
1. With MS Word, use the File-Print Merge command to select the records and the "Merge and Print results" option.
2. When the print dialog appears, select the destination option of "File" and Save.
3. In the Save dialog, name your file, select ASCII and Level 1 compatible.
4. Select the appropriate options (such as "All but standard 13" for font inclusion) and Save. This step creates a PostScript file that must be sent to DocuPrint NPS for printing.
Sending files to DocuPrint NPS
Sending the files to DocuPrint NPS is highly dependent upon your network and environment. Refer to the Xerox DocuPrint Network Printer Series Guide to Submitting Jobs from the Client.

EXAMPLE APPLICATIONS
G-8 DECOMPOSITION SERVICE AND TOOLS GUIDE

DECOMPOSITION SERVICE AND TOOLS GUIDE GLOSSARY-1
Glossary
BackgroundForm A virtual printer attribute which allows you to print a form as a background image with your variable data.
ByteCode Compression scheme that is proprietary to DocuPrint NPS which can often print forms twice as fast as TIFF files and works with background forms.
CycleForms A virtual printer attribute which allows you to put your variable data on a form. When the last page of the form is reached, it continues to cycle the form and put variable data on the specified pages of the form until the variable data runs out.
Decomped Slang for a form that has already been decomposed by Decomp Services.
Decomp PPM Formula To calculate a theoretical maximum speed at which the job could print, given an infinitely fast printer, use the formula: Decomp PPM = pages/decomp time in seconds * 60.
Decomp time Decomp time is the time spent by the sequencer decomposing the job (translating PostScript).
Disposition There are four different disposition attributes to alter the virtual printer to dispose of its bit images into a form rather than print it: SaveMaskG4, SaveFormG4, SaveMaskBC, and SaveFormBC.
Elapsed time The Elapsed time is equal to the “Stop time” minus the “Start time.” This is the number of seconds that the DocuPrint spent working on the job. It also includes any delays such as paper loading, jam clearing, and so on.
File Of Files ASCII file that specifies the order of the forms (or XCat jobs) that are printed.
Form A form is a compressed version of a document whose PostScript commands have already been translated, or decomposed, by the DocuPrint. Forms usually reside on /var/db/forms on the DocuPrint.
FormMerge FormMerge is a utility for generating PostScript files that overlay a multi-page form on sets of variable data created by any application. It merges variable data onto every page of the form.
GetTiff A macro which enables a PostScript program to image and print a TIFF.

GLOSSARY
GLOSSARY-2 DECOMPOSITION SERVICE AND TOOLS GUIDE
Pages Pages represent the number of images printed, not the number of sheets printed. For example: If you were yo run a duplex job which has 20 images but prints only 10 sheets. The pages are 20.
PCL Acronym for Printer Command Language which is a popular PDL supported by Hewlett-Packard for their LaserJet printers.
PDL Acronym for Page Description Language which is usually a PostScript or PCL file.
PPM Acronym for Pages Per Minute which is a measurement of the actual print speed.
PPM formula Print speed as a measure of throughput, in Pages Per Minute, can be calculated with the formula: PPM = pages/elapsed time in seconds * 60.
PostScript A popular PDL supported by Adobe.
Reprint Reprint is a utility for printing forms or reprinting previously decomposed documents. This can be used for demand reprint applications.
RIP The printer creates an image on the paper according to instructions provided by the printer controller, which must determine appropriate orientation, headers, footers, and so on for the entire job.
Therefore, the printer must first construct these images electronically (a process called raster image processing (RIP)) before it can print the pages you want. This process is commonly refered to as “RIPping” the job.
run exec A macro which allows a PostScript program to print a form page as a background.
SaveFormBC This disposition value uses the ByteCode compression and treats the white pixels as opaque.
SaveMaskBC This disposition value uses the ByteCode compression which prints much quicker because it does not have to rotate, scale, and perform other operations. It is similar to SaveMaskG4 by treating the white pixels as transparent.
SaveFormG4 This disposition value is similar to the SaveMaskG4 attribute in that it produces a compressed TIFF/G4 file. However, this value is used less often and treats the white pixels as opaque.
SaveMaskG4 This is the most commonly used disposition value for Decomp Service which produces a compressed TIFF/G4 file and treats the white pixels as transparent.

GLOSSARY
DECOMPOSITION SERVICE AND TOOLS GUIDE GLOSSARY-3
Start time Start time represents the time that the sequencer began to decompose the job.
Stop time Stop time represents the time the last page was printed on the printer.
TIFF Acronym for Tag Image File Format which is an industry standard for compressed bitmapped files.
Tiff2PS A tool which creates a printable PostScript or EPS (Encapsulated PostScript) file from a TIFF.
Throughput Actual print speed (or PPM).
Variable Data PostScript File A PostScript file that supplies pages of variable data (for example names and addresses) which are placed within the forms that are printed.
Virtual printer Virtual printer is an alternate name for a printer which allows different sets of default attributes to be applied to submitted jobs.
XCat XCat is a simple book building application that can join chapters of a “book” into a single job with optional duplexing and slipsheets.
XMerge XMerge is a utility that generates a PostScript file to overlay variable data on some or all pages of a multi-page form. It merges variable data onto specified pages of the form.

GLOSSARY
GLOSSARY-4 DECOMPOSITION SERVICE AND TOOLS GUIDE

DECOMPOSITION SERVICE AND TOOLS GUIDE INDEX-1
Index
Symbols
() (parentheses)DOS xcat, 6-12SunOS/Solaris formmerge, 6-17
/var/db/forms directory, 4-3, 6-2/var/spool/data directory
File of Files default, 6-4generating PostScript files, 6-2storing files, C-1Xcat jobs default, 6-9
A
address data, merging, G-1administrative mode, 5-3, 7-7, 7-8Adobe Photoshop, 9-1award certificate example, 4-1, 4-6
B
Background Formscreating, 5-1–5-3cycling, 5-4–5-7, 7-2
BackgroundForm, 5-1Backgroundform attribute, 7-2backing up forms, F-1benefits book example, 1-2BitsPerSample TIFF tag, E-1black pixels
GetTiff macro, 8-4blank pages
XCat, 6-8XMerge, 6-4, 6-6, 6-11, 6-15
borders, invisible frame, 4-6ByteCode files
files created, A-2proprietary compression, 5-1Tiff/G4 format compared, 3-2
C
calculating throughput, D-2Change virtual printer command
Backgroundform attribute, 7-2CycleForms attribute, 5-4–5-7, 7-2disposition attribute
examples, 3-5, 4-2Mask, Form formats, 3-2–3-5
syntax, 7-3Tiff/G4, ByteCode formats, 3-2values, 3-1
overview, 7-1chapters, concatenating
DOS xcat, 6-12Sun OS/Solaris, 6-16–6-17Windows XCat, 6-6–6-10
commandsmerge, inserting, G-6
compressionByteCode files, 3-2, 5-1
compression tag, TIFF, 8-3, E-1concatenating chapters
DOS XCat, 6-12Sun OS/Solaris, 6-16–6-17Windows XCat, 6-6–6-10
Create Virtual Printer command, 3-1, 7-1customized forms, 1-3cycle up time, D-2, D-5CycleForm value, 5-5CycleForms attribute, 5-4–5-7, 7-2
D
Decomp Service Install Options screen, 2-1decomposed forms
directory location, 4-3, 6-2file formats, A-1–A-3
decomposing Background Forms, 5-2Decomposition Service
application examples, 1-1–1-3benefits, 1-1, 1-5examples, G-1–G-6installing
DOS, 2-2overview, 2-1SunOS/Solaris, 2-2Windows, 2-1
overview, 1-1Delete Form command, 7-3Delete Virtual Printer command, 7-4deleting
forms, 7-3virtual printers, 7-4
directoriesforms location
decomposed forms, 4-3, 6-2non-default, B-1–B-4

INDEX
INDEX-2 DECOMPOSITION SERVICE AND TOOLS GUIDE
installationSunOS/Solaris, 2-2Windows, 2-2
Xcat jobs default, 6-9disposition attributes
examples, 3-5, 4-2, 7-3Mask, Form formats, 3-2–3-5Tiff/G4, ByteCode formats, 3-2values, 3-1, 7-3
Document Structure Editor (DSE), 9-1documents
Decomp Service examples, 1-1–1-3master, 4-1
DOSformmrg tool, 6-10getg4 tool, 9-1–9-2installing Decomp Services, 2-2reprint tool, 6-10xcat tool, 6-12xmerge tool, 6-11
DSE (Document Structure Editor), 9-1
E
elevator tray fault, D-5error page, 6-4, 6-11, 6-15estimates, rough performance, D-2Excel, Microsoft, 4-3–4-4
F
fields, form references, 8-6–8-7file
name, static form, G-6file formats, decomposed forms, A-1–A-3File of Files
different directories, B-1multiple print jobs (Windows XCat), 6-9XCat, 4-8XMerge, 4-9–4-10, 6-4
filename extensions.pg, A-1.tif, A-1
filenames, File of Filescarriage returns, 4-10space character, 4-8, 4-10
FillOrder TIFF tag, E-1Fixed Document Reference file, 6-12form files
ByteCode format, A-1–A-2TIFFg4 format, A-1–A-2
Form format, 3-2–3-5form references
applications, 8-6–8-7GetTiff macro, 8-3–8-5overview, 8-1run exec macro, 8-1–8-2
FormMerge dialog, 6-3formmerge tool
overview, 1-4SunOS/Solaris, 6-14Windows, 6-3–6-4
formmrg tool (DOS), 6-10forms
backing up, restoring, F-1creating, 4-2customized, 1-3Decomp Service benefits, 1-1definition, 3-5deleting, 7-3directory location
non-default, B-1–B-4listing, 5-3, 7-4Mask, Form structures, 3-2–3-3overlaying variable data
DOS formmrg tool, 6-10SunOS/Solaris formmerge, 6-14
printing controller-residentWindows FormMerge, 6-3–6-4Windows Reprint, 6-2
printing single, 7-5static, G-5virtual printer setup, 3-5
formulasDecomp PPM, D-1PPM, D-1
framesstatic data, 4-6variable data, 4-3
FTP login, 4-10, C-1
G
Generate PostScript dialog, 6-9getg4 tool
DOS, 9-1–9-2overview, 1-4SunOS/Solaris, 9-2–9-3viewing TIFF tags, E-2
GetTiff macro, 1-4, 8-3–8-5Group4Options TIFF tag, E-1
H
highlight color, A-2
I
imageoverlaying, G-3
image editors, 9-1Image Lift printing, G-3ImageLength TIFF tag, E-1imagemask PostScript operator, 8-3

DECOMPOSITION SERVICE AND TOOLS GUIDE INDEX-3
INDEX
imagesensuring proper printing
GetTiff macro, 8-3run exec macro, 8-2
overlayed variable data, 5-1–5-3, 7-2ImageWidth TIFF tag, E-1installing Decomposition Service
DOS, 2-2overview, 2-1SunOS/Solaris, 2-2Windows, 2-1
insurance quote example, 1-3
L
List Documents command, D-8List Forms command
locating moved forms, B-4performance measurements, D-6syntax and example, 7-4verifying forms, 5-3
List Virtual Printers command, 7-4–7-5listing
forms, 5-3, 7-4virtual printers, 7-4–7-5
lpr commandsyntax, 5-1virtual printer assignment, 5-4
M
Macintosh platforms, 1-4macros
GetTiff, 1-4, 8-3–8-5listed, 1-4run exec, 1-4, 8-1–8-2
Mail Merge Helper dialog, 4-4–4-5Mask format, 3-2–3-5master documents, 4-1measuring performance, 7-6, D-1–D-9media, determining specifications, 6-6–6-7, 7-7medical center example, 5-2–5-3merge
commands, inserting, G-6document, printing, G-7
Merge Pages dialog, 6-5merging files, 4-7Microsoft Word
data merge example, G-4–G-5inserting merge commands, G-6
O
Olympics, 1996Background Form use, 5-1Decomp Service use, 1-1
Orientation TIFF tag, E-1
overlayingimages, G-3
P
page numbers, run exec macro, 8-1pages
blankXCat, 6-8XMerge, 6-4, 6-6, 6-11, 6-15
specifying, cycling method, 5-4–5-7, 7-2superimposing multiple
GetTiff macro, 8-3, 8-4–8-5run exec macro, 8-1
XMerge caveats, 6-4, 6-6, 6-11, 6-15pages per minute (PPM), D-1paper stock
specifyingDOS xcat, 6-12SunOS/Solaris formmerge, 6-17
Windows XCat, 6-6–6-7, 6-9parentheses ()
DOS xcat, 6-12SunOS/Solaris formmerge, 6-17
passwordscreating File of Files, 4-8, 4-9–4-10FTP default, 4-10
pattern listing, creating File of Files, 4-9PC operating systems, tools supported, 1-4performance
improving GetTiff macro, 8-3measuring, 7-6, D-1–D-9
personalized documents, 1-2Photometric-Interpretation TIFF tag, E-1Photoshop, Adobe, 9-1pixels
distribution attributesTiff/G4, ByteCode compared, 3-2values, 3-1
GetTiff macro, 8-3, 8-4Mask, Form formats, 3-2–3-3
PlanarConfiguration TIFF tag, E-1platforms, tools supported, 1-4PostScript drivers, Microsoft Word, 4-2PostScript files
coding form referencesapplications, 8-6–8-7GetTiff macro, 8-3–8-5run exec macro, 8-1–8-2
generatingDOS formmrg tool, 6-10DOS reprint tool, 6-10DOS xcat tool, 6-12SunOS/Solaris FormMerge, 6-14SunOS/Solaris reprint, 6-14Windows FormMerge, 6-3–6-4Windows Reprint, 6-2

INDEX
INDEX-4 DECOMPOSITION SERVICE AND TOOLS GUIDE
Windows XCat, 6-9power saver mode, D-5PPM (pages per minute), D-1Print Form Sample command, D-3
DOS reprint alternative, 6-10locating moved forms, B-4syntax, example, 7-5Windows Reprint alternative, 6-2
print jobsconcatenating chapters, 6-9enabling ineligible, 7-5failures
DOS formmrg, 6-10DOS reprint, 6-10DOS xcat, 6-12DOS xmerge, 6-11SunOS/Solaris formmerge, 6-14Windows FormMerge, 6-4Windows XCat, 6-10
print on demand, 1-2printers
ByteCode compression, 3-2printing
controller-resident formsWindows FormMerge, 6-3–6-4Windows Reprint, 6-2
Decomp Service benefits, 1-1merge documents, G-7single forms, 7-5TIFF tags, 9-1–9-2
proceduresBackground Forms, creating, 5-2–5-3book building, 6-8, 6-9File of Files, creating
XCat, 4-8XMerge, 4-9–4-10
formscreating, 4-2printing (Windows Reprint), 6-2
PostScript files, generatingFormMerge (Windows), 6-3–6-4XMerge (Windows), 6-4–6-6
variable data files, creating, 4-3–4-7PS.prefix.read file, B-1, B-2, B-4, F-1PS.prefix.write file, F-1
R
reference mode, 6-4referencing forms, G-6Remote Form Path field, B-4Remote Path field, B-1Reprint command, D-3reprint tool
DOS, 6-10overview, 1-4SunOS/Solaris, 6-14
Windows, 6-2requirements, installation, 2-1ResolutionUnit TIFF tag, E-1Restart Sequencer, B-1restoring forms, F-1rough performance estimates, D-2run exec macro, 1-4, 8-1–8-2, 8-5
S
SamplesPerPixel TIFF tag, E-1SaveFormBC attribute, 3-1, A-2SaveFormBC format, D-5SaveFormG4 attribute, 3-1, A-1SaveFormG4 format, D-5SaveMaskBC attribute, 3-1, 7-3SaveMaskBC format, 5-1SaveMaskG4 attribute, 3-1, A-1saving print jobs, 3-1–3-5scaling images
run exec macro, 8-2TIFF images, 8-3
Select Jobs dialog, 6-8–6-9Select Paper dialog, 6-7Set Tray command, 7-5setpagedevice error
DOS xcat, 6-12SunOS/Solaris formmerge, 6-17
setrgbcolor call, 8-5Show Log command, 7-6, D-1Show Status command, 7-7, D-6showpage operator, 8-1Solaris 2.3
tools supported, 1-4space character, 4-8, 4-10Start Virtual Printer command, 7-7static data
frames, 4-6variable data compared, 4-1
static formscreating, G-5filename, G-6referencing, G-6submitting, G-5
Stop Virtual Printer command, 7-8stopping virtual printers, 7-8StripOffsets TIFF tag, E-1SunOS/Solaris
formmerge tool, 6-14getg4 tool, 9-2–9-3reprint tool, 6-14tools supported, 1-4xcat tool, 6-16–6-17
T
technical manual example, 1-2

DECOMPOSITION SERVICE AND TOOLS GUIDE INDEX-5
INDEX
Telnet, D-6TIFF file format, 8-3, E-1–E-2TIFF tags
mandatory, E-1printing
getg4 tool (DOS), 9-1–9-2getg4 tool (SunOS/Solaris), 9-2–9-3
TIFF utilitiesgetg4 (DOS), 9-1–9-2overview, 9-1
Tiff/G4 filesByteCode files compared, 3-2processing, GetTiff macro, 8-3–8-5
TIFF/G4 format, 8-5TiffEdit tool
Macintosh platform, 1-4Tiff/G4 files, 3-2
toolslisted, 1-4
traysdeterminig loaded media, 6-6–6-7Set Tray command, 7-5specifying
number, 6-8
U
UI commandsChange virtual printer
Backgroundform attribute, 7-2CycleForms attribute, 5-4–5-7, 7-2disposition attribute, 7-3overview, 7-1
Create Virtual Printer, 3-1, 7-1Delete Form, 7-3Delete Virtual Printer, 7-4List Documents, D-8List Forms, 7-4, B-4, D-6List Virtual Printers, 7-4–7-5listed, 7-1Print Form Sample, 7-5, B-4, D-3Reprint, D-3Set Tray, 7-5Show Log, 7-6, D-1Show Status, 7-7, D-6Start Virtual Printer, 7-7Stop Virtual Printer, 7-8
V
/var/db/forms directory, 4-3, 6-2/var/spool/data directory
generating PostScript files, 6-2File of Files default, 6-4storing files, C-1Xcat jobs default, 6-9
variable data
forms overlaying, 6-14Mask, Form formats, 3-3–3-5overlaying images, 5-1–5-3, 7-2specifying form pages, 6-5static data compared, 4-1
variable data filesblank page requirement, 6-4, 6-6, 6-11, 6-15caveats, 6-4, 6-11, 6-15creating, Word Mail Merge, 4-3–4-7directory storage methods, C-1locating local, 6-4
View Field Codes button, 8-6virtual printer attributes
Background Form, 5-1disposition, 3-1–3-5, 5-2
virtual printersCreate Virtual Printer command, 3-1, 7-1creating Background Forms, 5-1, 7-2defining, configuring
commands, 3-1example, 3-5mask/form formats, 3-2–3-5TIFF/G4, ByteCode formats, 3-2
deleting, 7-4restarting, 7-7stopping, 7-8
W
Weight field, Select Paper dialogediting, 6-12, 6-17
"What is..." promptDOS xcat, 6-12DOS xmerge, 6-12SunOS/Solaris formmerge, 6-17
Windowschanging form directory, B-1–B-4Decomp Service installation, 2-1FormMerge tool, 6-3–6-4Reprint tool, 6-2XCat tool
described, 6-6–6-10XMerge tool, 6-4–6-6
Windows platforms, 1-4, 6-1Wizard mode, B-2, B-4Word 6.0, Microsoft
inserting form references, 8-6Mail Merge
producing PostScript file, 5-2variable data files, 4-3–4-7
X
XCat toolcreating File of Files, 4-8overview, 1-4Windows

INDEX
INDEX-6 DECOMPOSITION SERVICE AND TOOLS GUIDE
described, 6-6–6-10xcat tool
DOS, 6-12Sun OS/Solaris, 6-16–6-17
XIPP prescan, C-1XMerge tool
creating File of Files, 4-9–4-10overview, 1-4Windows, 6-4–6-6
xmerge toolDOS, 6-11SunOS/Solaris, 6-15
XResolution TIFF tag, E-1
Y
YResolution TIFF tag, E-1