deep security 9.5 installation guide (vmware vshield)...deep security 9.5 installation guide (vmware...
TRANSCRIPT

Trend Micro Incorporated reserves the right to make changes to this document and to the products described herein without notice. Beforeinstalling and using the software, please review the readme files, release notes, and the latest version of the applicable user documentation,which are available from the Trend Micro Web site at:http://www.trendmicro.com/downloadTrend Micro, the Trend Micro t-ball logo, Deep Security, Control Server Plug-in, Damage Cleanup Services, eServer Plug-in, InterScan,Network VirusWall, ScanMail, ServerProtect, and TrendLabs are trademarks or registered trademarks of Trend Micro, Incorporated. Allother product or company names may be trademarks or registered trademarks of their owners.Document version: 1.2Document number: APEM96336/140306Release date: Aug 27, 2014Document generated: Aug 27, 2014 (18:34:09)
Table of Contents
Introduction ................................................................................................................................5
About Deep Security ....................................................................................................................................................................... 6
What's New in Deep Security 9.5 ...................................................................................................................................................... 9
About This Document.................................................................................................................................................................... 10
Preparation ............................................................................................................................... 12
System Requirements ................................................................................................................................................................... 13
What You Will Need (VMware vShield) ............................................................................................................................................. 17
Database Deployment Considerations.............................................................................................................................................. 20
Minimum VMware Privileges for DSVA Deployment............................................................................................................................ 22
Preparing a vShield Environment for Agentless Protection .................................................................................................................. 24
Installation ................................................................................................................................ 26
Installing the Deep Security Manager .............................................................................................................................................. 27
Installing the Deep Security Agent .................................................................................................................................................. 34
Installing and Configuring a Relay-enabled Agent.............................................................................................................................. 42
Deploying Agentless Protection in a vShield Environment ................................................................................................................... 43
Installing the Deep Security Notifier ................................................................................................................................................ 47
Quick Start ................................................................................................................................ 48
Quick Start: System Configuration .................................................................................................................................................. 49
Quick Start: Protecting a Computer................................................................................................................................................. 57
Upgrading ................................................................................................................................. 64
Upgrade Multi-Node Deep Security Manager..................................................................................................................................... 65
Upgrade Deep Security Agents and Relays ....................................................................................................................................... 66
Upgrade the Deep Security Notifier ................................................................................................................................................. 68
Uninstalling Deep Security from your vShield Environment................................................................ 69
Appendices ................................................................................................................................ 70

Deep Security Manager Memory Usage............................................................................................................................................ 71
Deep Security Virtual Appliance Memory Usage ................................................................................................................................ 72
Deep Security Manager Performance Features .................................................................................................................................. 73
Creating an SSL Authentication Certificate ....................................................................................................................................... 75
Silent Install of Deep Security Manager ........................................................................................................................................... 77
Deep Security Manager Settings Properties File ................................................................................................................................ 79

Introduction
About Deep Security
Deep Security provides advanced server security for physical, virtual, and cloud servers. It protects enterprise applications and data frombreaches and business disruptions without requiring emergency patching. This comprehensive, centrally managed platform helps you simplifysecurity operations while enabling regulatory compliance and accelerating the ROI of virtualization and cloud projects. The following tightlyintegrated modules easily expand the platform to ensure server, application, and data security across physical, virtual, and cloud servers, aswell as virtual desktops.Protection Modules
Anti-Malware
Integrates with VMware environments for agentless protection, or provides an agent to defend physical servers and virtual desktopsin local mode.Integrates new VMware vShield Endpoint APIs to provide agentless anti-malware protection for VMware virtual machines with zero in-guestfootprint. Helps avoid security brown-outs commonly seen in full system scans and pattern updates. Also provides agent-based anti-malwareto protect physical servers, Hyper-V and Xen-based virtual servers, public cloud servers as well as virtual desktops in local mode. Coordinatesprotection with both agentless and agent-based form factors to provide adaptive security to defend virtual servers as they move between thedata center and public cloud.
Web Reputation
Strengthens protection against web threats for servers and virtual desktops.Integrates with the Trend Micro Smart Protection Network web reputation capabilities to safeguard users and applications by blocking accessto malicious urls. Provides same capability in virtual environments in agentless mode through the same virtual appliance that also deliversagentless security technologies for greater security without added footprint.Firewall
Decreases the attack surface of your physical and virtual servers.Centralizes management of server firewall policy using a bi-directional stateful firewall. Supports virtual machine zoning and prevents Denialof Service attacks. Provides broad coverage for all IP-based protocols and frame types as well as fine-grained filtering for ports and IP and MACaddresses.Intrusion Prevention
Shields known vulnerabilities from unlimited exploits until they can be patched.Helps achieve timely protection against known and zero-day attacks. Uses vulnerability rules to shield a known vulnerability -- for examplethose disclosed monthly by Microsoft -- from an unlimited number of exploits. Offers out-of-the-box vulnerability protection for over 100applications, including database, web, email and FTP servers. Automatically delivers rules that shield newly discovered vulnerabilities withinhours, and can be pushed out to thousands of servers in minutes, without a system reboot.Defends against web application vulnerabilitiesEnables compliance with PCI Requirement 6.6 for the protection of web applications and the data that they process. Defends against SQLinjections attacks, cross-site scripting attacks, and other web application vulnerabilities. Shields vulnerabilities until code fixes can becompleted.
Deep Security 9.5 Installation Guide (VMware vShield) About Deep Security
6

Identifies malicious software accessing the networkIncreases visibility into, or control over, applications accessing the network. Identifies malicious software accessing the network and reducesthe vulnerability exposure of your servers.Integrity Monitoring
Detects and reports malicious and unexpected changes to files and systems registry in real time. Now available in agentless formfactor.Provides administrators with the ability to track both authorized and unauthorized changes made to the instance. The ability to detectunauthorized changes is a critical component in your cloud security strategy as it provides the visibility into changes that could indicate thecompromise of an instance.
Log Inspection
Provides visibility into important security events buried in log files.Optimizes the identification of important security events buried in multiple log entries across the data center. Forwards suspicious events to aSIEM system or centralized logging server for correlation, reporting and archiving. Leverages and enhances open-source software available atOSSEC.Deep Security Components
Deep Security consists of the following set of components that work together to provide protection:• Deep Security Manager, the centralized Web-based management console which administrators use to configure security policyand deploy protection to the enforcement components: the Deep Security Virtual Appliance and the Deep Security Agent.• Deep Security Virtual Appliance is a security virtual machine built for VMware vSphere environments that Agentlessly providesAnti-Malware, Web Reputation Service, Firewall, Intrusion Prevention, and Integrity Monitoring protection to virtual machines.• Deep Security Agent is a security agent deployed directly on a computer which provides Anti-Malware, Web Reputation Service,Firewall, Intrusion Prevention, Integrity Monitoring, and Log Inspection protection to computers on which it is installed.◦ The Deep Security Agent contains a Relay Module. A Relay-enabled Agent distributes Software and Security Updatesthroughout your network of Deep Security components.• Deep Security Notifier is a Windows System Tray application that communicates information on the local computer about securitystatus and events, and, in the case of Deep Security Relays, also provides information about the Security Updates being distributedfrom the local machine.
Deep Security Manager
Deep Security Manager ("the Manager") is a powerful, centralized web-based management system that allows security administrators to createand manage comprehensive security policies and track threats and preventive actions taken in response to them. Deep Security Managerintegrates with different aspects of the datacenter including VMware vCenter and Microsoft Active Directory. To assist in deployment andintegration into customer and partner environments, Deep Security has Web Service API that is exposed to allow for an easy, language-neutralmethod to externally access data and programming configurations.Policies
Policies are templates that specify the settings and security rules to be configured and enforced automatically for one or more computers.These compact, manageable rule sets make it simple to provide comprehensive security without the need to manage thousands of rules. DefaultPolicies provide the necessary rules for a wide range of common computer configurations.
Deep Security 9.5 Installation Guide (VMware vShield) About Deep Security
7
Dashboard
The customizable, web-based UI makes it easy to quickly navigate and drill down to specific information. It provides:• Extensive system, event and computer reporting• Graphs of key metrics with trends• Detailed event logs• Ability to save multiple personalized dashboard layoutsBuilt-in Security
Role-based access allows multiple administrators (Users), each with different sets of access and editing rights, to edit and monitor differentaspects of the system and receive information appropriate to them. Digital signatures are used to authenticate system components and verifythe integrity of rules. Session encryption protects the confidentiality of information exchanged between components.Deep Security Virtual Appliance
The Deep Security Virtual Appliance runs as a VMware virtual machine and protects the other virtual machines on the same ESXi Server, eachwith its own individual security policy.Deep Security Agent
The Deep Security Agent ("the Agent") is a high performance, small footprint, software component installed on a computer to provideprotection.The Deep Security Agent contains a Relay module (off by default). At least one Relay-enabled Agent is required in any Deep Securityinstallation to distribute Security and Software Updates throughout your Deep Security network. You can enable multiple Relays and organizethem into hierarchical groups to more efficiently distribute Updates throughout your network.Deep Security Notifier
The Deep Security Notifier is a Windows System Tray application that communicates the state of the Deep Security Agent and Deep SecurityRelay to client machines. The Notifier displays pop-up user notifications when the Deep Security Agent begins a scan, or blocks malware oraccess to malicious web pages. The Notifier also provides a console utility that allows the user to view events and configure whether pop-upsare displayed.
Deep Security 9.5 Installation Guide (VMware vShield) About Deep Security
8
What's New in Deep Security 9.5
VMware vSphere 5.5 Support
• Security for network virtualization and Software-Defined Data Center with NSX• Support for mixed-model deployments (NSX and vShield)Smarter, Lightweight Agent
• Lightweight installer• Selective deployment of Protection Modules to Agents based on Security Policy requirements results in smaller Agent footprint• Automatic support for new Linux KernelsTrend Micro Control Manager Enhancements
• More dashboard widgets with drill-down capability• Full Events for Anti-Malware and Web Reputation ServiceLinux Support
• New distributions: CloudLinux, Oracle Unbreakable• On-demand Anti-Malware scanning for all distributions• Real-Time Anti-Malware for Red Hat and SuSEFor a list of supported Deep Security features by software platform, see the document titled Deep Security 9.5 SupportedFeatures and Platforms. For a list of specific Linux kernels supported for each platform, see the document titled Deep Security9.5 Supported Linux Kernels.
Improvements to Security and Software Update Management
• Improved visibility into Security and Software Update status• Improved accessibilty to Software UpdatesMulti-Tenant Improvements
• Sign in as a Tenant• Security Model Usage Report
Note:
Deep Security 9.5 Installation Guide (VMware vShield) What's New in Deep Security 9.5
9
About This Document
Deep Security 9.5 Installation Guide (VMware vShield)
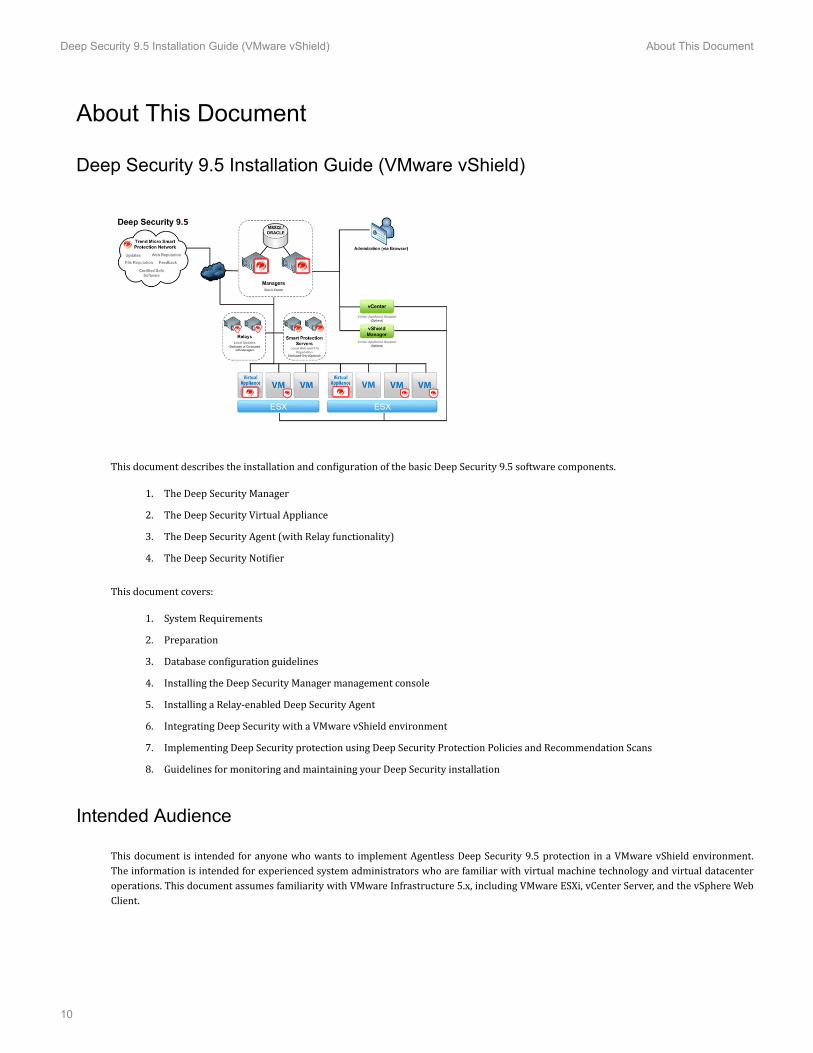
This document describes the installation and configuration of the basic Deep Security 9.5 software components.1. The Deep Security Manager2. The Deep Security Virtual Appliance3. The Deep Security Agent (with Relay functionality)4. The Deep Security NotifierThis document covers:1. System Requirements2. Preparation3. Database configuration guidelines4. Installing the Deep Security Manager management console5. Installing a Relay-enabled Deep Security Agent6. Integrating Deep Security with a VMware vShield environment7. Implementing Deep Security protection using Deep Security Protection Policies and Recommendation Scans8. Guidelines for monitoring and maintaining your Deep Security installation
Intended Audience
This document is intended for anyone who wants to implement Agentless Deep Security 9.5 protection in a VMware vShield environment.The information is intended for experienced system administrators who are familiar with virtual machine technology and virtual datacenteroperations. This document assumes familiarity with VMware Infrastructure 5.x, including VMware ESXi, vCenter Server, and the vSphere WebClient.
Deep Security 9.5 Installation Guide (VMware vShield) About This Document
10
Other Deep Security 9.5 Documentation
• Deep Security 9.5 Installation Guide (Basic)• Deep Security 9.5 Installation Guide (Cloud)• Deep Security 9.5 Installation Guide (VMware vShield)• Deep Security 9.5 User's Guide• Deep Security 9.5 Supported Features and Platforms• Deep Security 9.5 Supported Linux Kernels
Deep Security 9.5 Installation Guide (VMware vShield) About This Document
11

Preparation
System Requirements
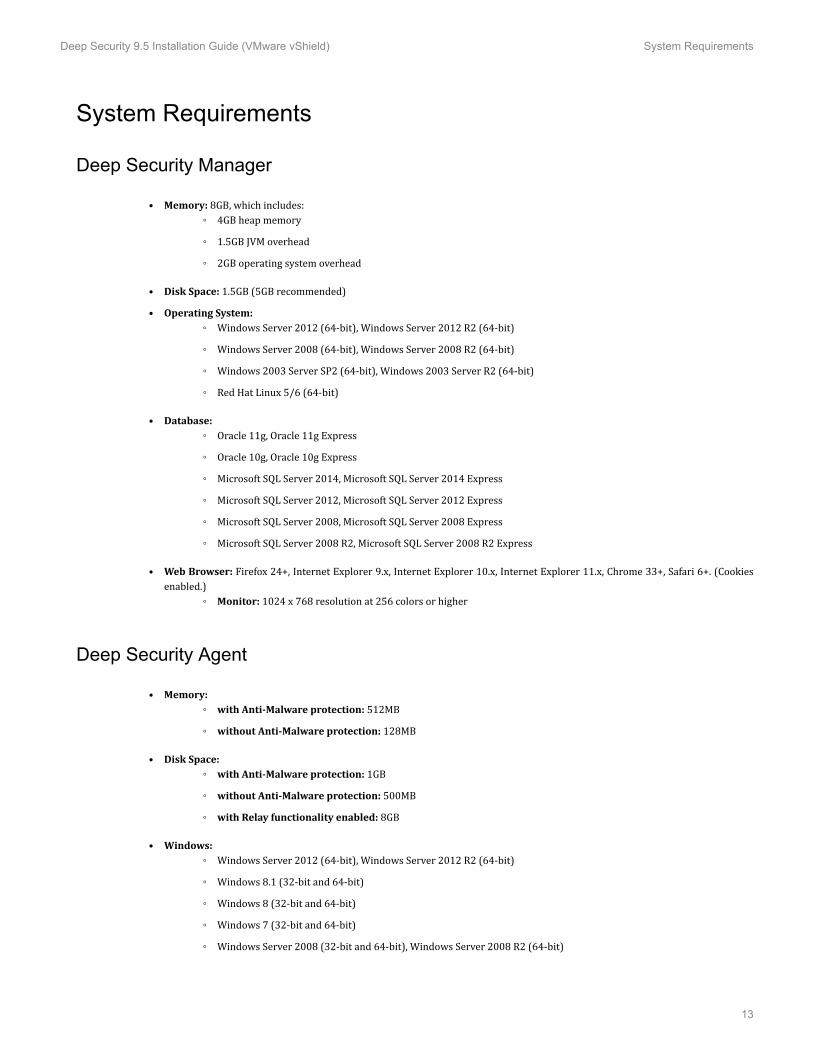
Deep Security Manager
• Memory: 8GB, which includes:◦ 4GB heap memory◦ 1.5GB JVM overhead◦ 2GB operating system overhead• Disk Space: 1.5GB (5GB recommended)• Operating System:◦ Windows Server 2012 (64-bit), Windows Server 2012 R2 (64-bit)◦ Windows Server 2008 (64-bit), Windows Server 2008 R2 (64-bit)◦ Windows 2003 Server SP2 (64-bit), Windows 2003 Server R2 (64-bit)◦ Red Hat Linux 5/6 (64-bit)• Database:◦ Oracle 11g, Oracle 11g Express◦ Oracle 10g, Oracle 10g Express◦ Microsoft SQL Server 2014, Microsoft SQL Server 2014 Express◦ Microsoft SQL Server 2012, Microsoft SQL Server 2012 Express◦ Microsoft SQL Server 2008, Microsoft SQL Server 2008 Express◦ Microsoft SQL Server 2008 R2, Microsoft SQL Server 2008 R2 Express• Web Browser: Firefox 24+, Internet Explorer 9.x, Internet Explorer 10.x, Internet Explorer 11.x, Chrome 33+, Safari 6+. (Cookiesenabled.)◦ Monitor: 1024 x 768 resolution at 256 colors or higher
Deep Security Agent
• Memory:◦ with Anti-Malware protection: 512MB◦ without Anti-Malware protection: 128MB• Disk Space:◦ with Anti-Malware protection: 1GB◦ without Anti-Malware protection: 500MB◦ with Relay functionality enabled: 8GB• Windows:◦ Windows Server 2012 (64-bit), Windows Server 2012 R2 (64-bit)◦ Windows 8.1 (32-bit and 64-bit)◦ Windows 8 (32-bit and 64-bit)◦ Windows 7 (32-bit and 64-bit)◦ Windows Server 2008 (32-bit and 64-bit), Windows Server 2008 R2 (64-bit)
Deep Security 9.5 Installation Guide (VMware vShield) System Requirements
13
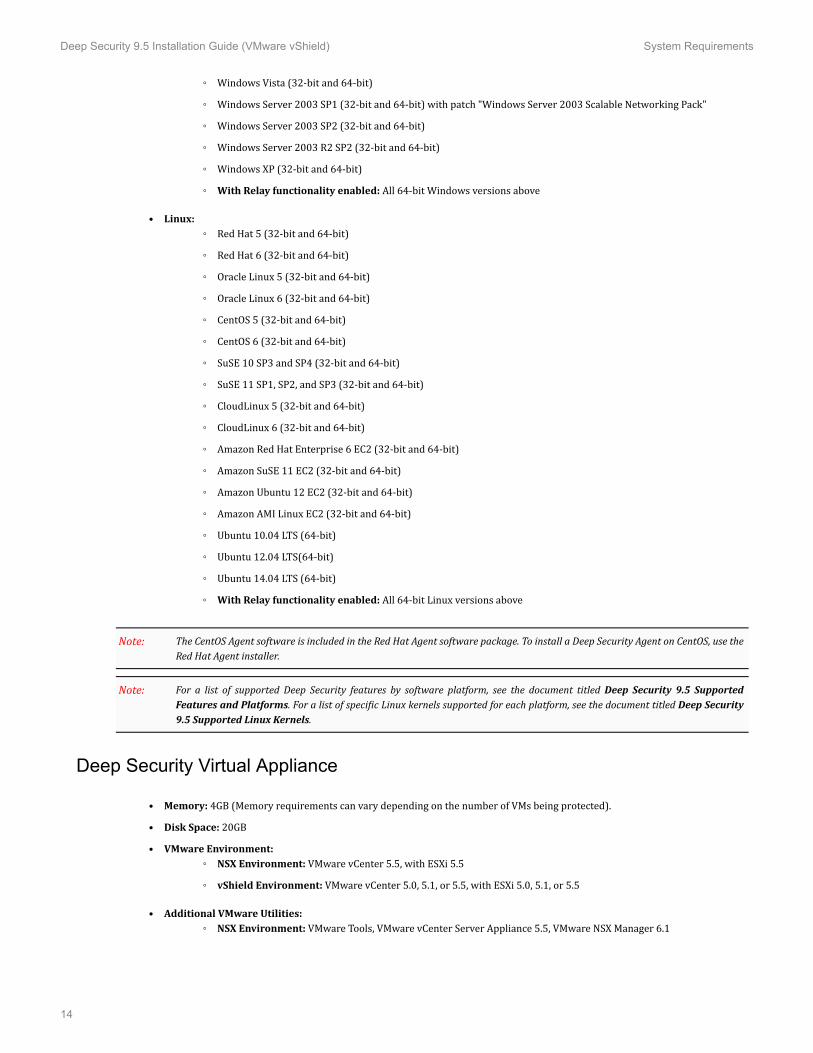
◦ Windows Vista (32-bit and 64-bit)◦ Windows Server 2003 SP1 (32-bit and 64-bit) with patch "Windows Server 2003 Scalable Networking Pack"◦ Windows Server 2003 SP2 (32-bit and 64-bit)◦ Windows Server 2003 R2 SP2 (32-bit and 64-bit)◦ Windows XP (32-bit and 64-bit)◦ With Relay functionality enabled: All 64-bit Windows versions above• Linux:◦ Red Hat 5 (32-bit and 64-bit)◦ Red Hat 6 (32-bit and 64-bit)◦ Oracle Linux 5 (32-bit and 64-bit)◦ Oracle Linux 6 (32-bit and 64-bit)◦ CentOS 5 (32-bit and 64-bit)◦ CentOS 6 (32-bit and 64-bit)◦ SuSE 10 SP3 and SP4 (32-bit and 64-bit)◦ SuSE 11 SP1, SP2, and SP3 (32-bit and 64-bit)◦ CloudLinux 5 (32-bit and 64-bit)◦ CloudLinux 6 (32-bit and 64-bit)◦ Amazon Red Hat Enterprise 6 EC2 (32-bit and 64-bit)◦ Amazon SuSE 11 EC2 (32-bit and 64-bit)◦ Amazon Ubuntu 12 EC2 (32-bit and 64-bit)◦ Amazon AMI Linux EC2 (32-bit and 64-bit)◦ Ubuntu 10.04 LTS (64-bit)◦ Ubuntu 12.04 LTS(64-bit)◦ Ubuntu 14.04 LTS (64-bit)◦ With Relay functionality enabled: All 64-bit Linux versions above
The CentOS Agent software is included in the Red Hat Agent software package. To install a Deep Security Agent on CentOS, use theRed Hat Agent installer.
For a list of supported Deep Security features by software platform, see the document titled Deep Security 9.5 SupportedFeatures and Platforms. For a list of specific Linux kernels supported for each platform, see the document titled Deep Security9.5 Supported Linux Kernels.
Deep Security Virtual Appliance
• Memory: 4GB (Memory requirements can vary depending on the number of VMs being protected).• Disk Space: 20GB• VMware Environment:◦ NSX Environment: VMware vCenter 5.5, with ESXi 5.5◦ vShield Environment: VMware vCenter 5.0, 5.1, or 5.5, with ESXi 5.0, 5.1, or 5.5• Additional VMware Utilities:◦ NSX Environment: VMware Tools, VMware vCenter Server Appliance 5.5, VMware NSX Manager 6.1
Note:
Note:
Deep Security 9.5 Installation Guide (VMware vShield) System Requirements
14
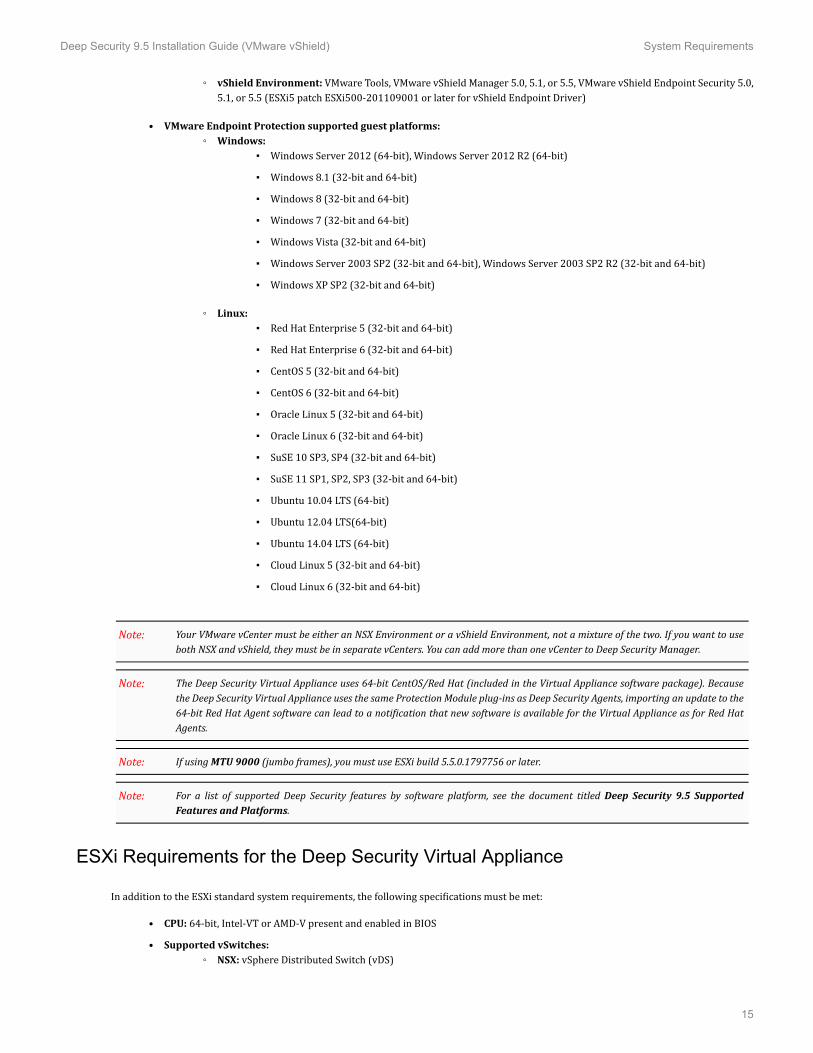
◦ vShield Environment: VMware Tools, VMware vShield Manager 5.0, 5.1, or 5.5, VMware vShield Endpoint Security 5.0,5.1, or 5.5 (ESXi5 patch ESXi500-201109001 or later for vShield Endpoint Driver)• VMware Endpoint Protection supported guest platforms:◦ Windows:
▪ Windows Server 2012 (64-bit), Windows Server 2012 R2 (64-bit)▪ Windows 8.1 (32-bit and 64-bit)▪ Windows 8 (32-bit and 64-bit)▪ Windows 7 (32-bit and 64-bit)▪ Windows Vista (32-bit and 64-bit)▪ Windows Server 2003 SP2 (32-bit and 64-bit), Windows Server 2003 SP2 R2 (32-bit and 64-bit)▪ Windows XP SP2 (32-bit and 64-bit)
◦ Linux:▪ Red Hat Enterprise 5 (32-bit and 64-bit)▪ Red Hat Enterprise 6 (32-bit and 64-bit)▪ CentOS 5 (32-bit and 64-bit)▪ CentOS 6 (32-bit and 64-bit)▪ Oracle Linux 5 (32-bit and 64-bit)▪ Oracle Linux 6 (32-bit and 64-bit)▪ SuSE 10 SP3, SP4 (32-bit and 64-bit)▪ SuSE 11 SP1, SP2, SP3 (32-bit and 64-bit)▪ Ubuntu 10.04 LTS (64-bit)▪ Ubuntu 12.04 LTS(64-bit)▪ Ubuntu 14.04 LTS (64-bit)▪ Cloud Linux 5 (32-bit and 64-bit)▪ Cloud Linux 6 (32-bit and 64-bit)
Your VMware vCenter must be either an NSX Environment or a vShield Environment, not a mixture of the two. If you want to useboth NSX and vShield, they must be in separate vCenters. You can add more than one vCenter to Deep Security Manager.
The Deep Security Virtual Appliance uses 64-bit CentOS/Red Hat (included in the Virtual Appliance software package). Becausethe Deep Security Virtual Appliance uses the same Protection Module plug-ins as Deep Security Agents, importing an update to the64-bit Red Hat Agent software can lead to a notification that new software is available for the Virtual Appliance as for Red HatAgents.
If using MTU 9000 (jumbo frames), you must use ESXi build 5.5.0.1797756 or later.
For a list of supported Deep Security features by software platform, see the document titled Deep Security 9.5 SupportedFeatures and Platforms.
ESXi Requirements for the Deep Security Virtual Appliance
In addition to the ESXi standard system requirements, the following specifications must be met:• CPU: 64-bit, Intel-VT or AMD-V present and enabled in BIOS• Supported vSwitches:◦ NSX: vSphere Distributed Switch (vDS)
Note:
Note:
Note:
Note:
Deep Security 9.5 Installation Guide (VMware vShield) System Requirements
15
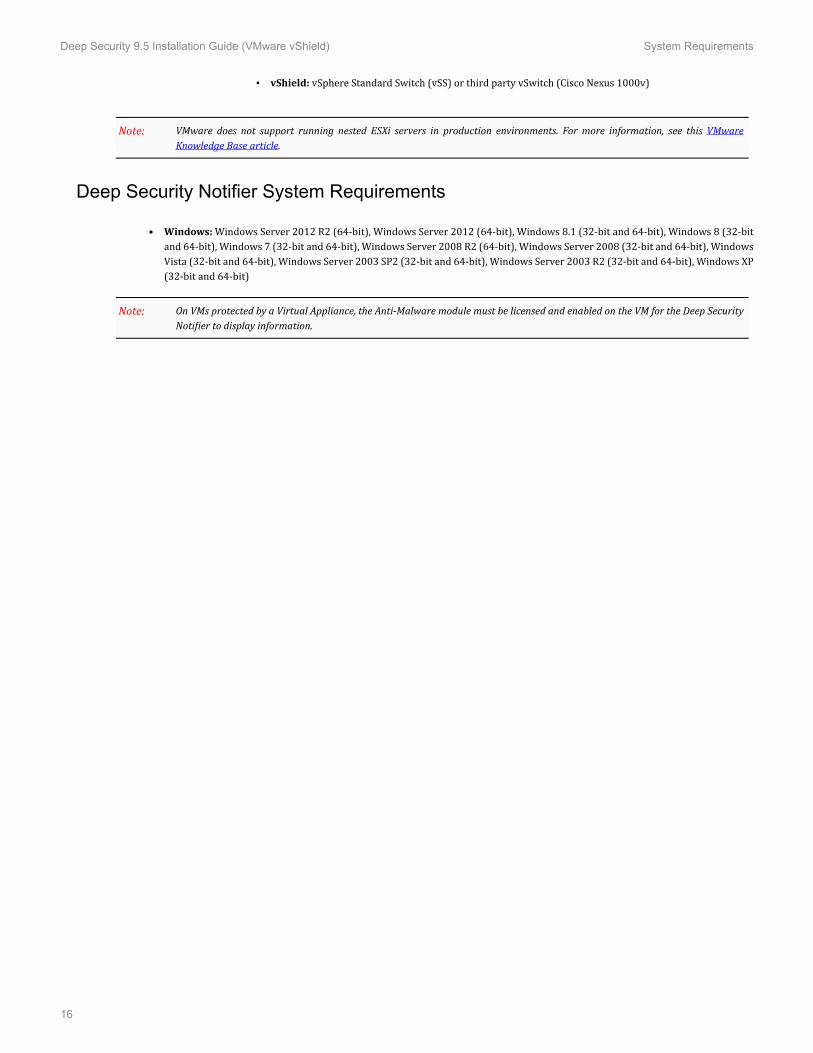
▪ vShield: vSphere Standard Switch (vSS) or third party vSwitch (Cisco Nexus 1000v)VMware does not support running nested ESXi servers in production environments. For more information, see this VMwareKnowledge Base article.
Deep Security Notifier System Requirements
• Windows: Windows Server 2012 R2 (64-bit), Windows Server 2012 (64-bit), Windows 8.1 (32-bit and 64-bit), Windows 8 (32-bitand 64-bit), Windows 7 (32-bit and 64-bit), Windows Server 2008 R2 (64-bit), Windows Server 2008 (32-bit and 64-bit), WindowsVista (32-bit and 64-bit), Windows Server 2003 SP2 (32-bit and 64-bit), Windows Server 2003 R2 (32-bit and 64-bit), Windows XP(32-bit and 64-bit)On VMs protected by a Virtual Appliance, the Anti-Malware module must be licensed and enabled on the VM for the Deep SecurityNotifier to display information.
Note:
Note:
Deep Security 9.5 Installation Guide (VMware vShield) System Requirements
16
What You Will Need (VMware vShield)
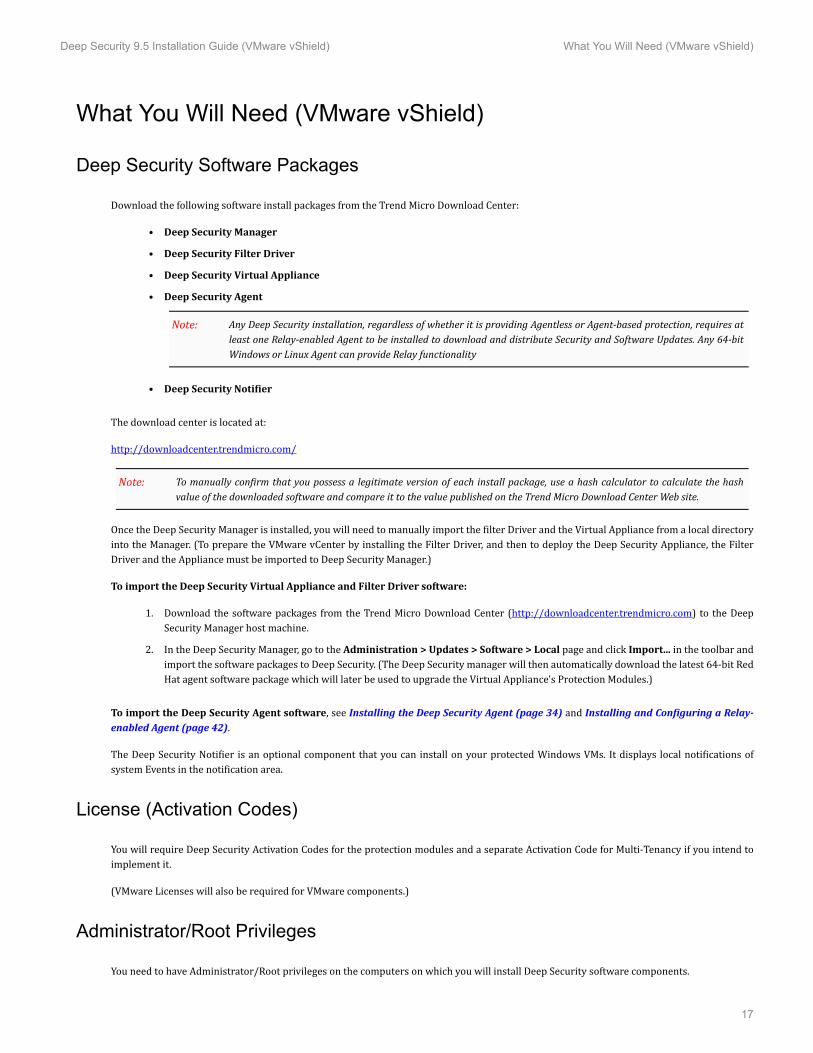
Deep Security Software Packages
Download the following software install packages from the Trend Micro Download Center:• Deep Security Manager• Deep Security Filter Driver• Deep Security Virtual Appliance• Deep Security Agent
Any Deep Security installation, regardless of whether it is providing Agentless or Agent-based protection, requires atleast one Relay-enabled Agent to be installed to download and distribute Security and Software Updates. Any 64-bitWindows or Linux Agent can provide Relay functionality
• Deep Security Notifier
The download center is located at:http://downloadcenter.trendmicro.com/To manually confirm that you possess a legitimate version of each install package, use a hash calculator to calculate the hashvalue of the downloaded software and compare it to the value published on the Trend Micro Download Center Web site.
Once the Deep Security Manager is installed, you will need to manually import the filter Driver and the Virtual Appliance from a local directoryinto the Manager. (To prepare the VMware vCenter by installing the Filter Driver, and then to deploy the Deep Security Appliance, the FilterDriver and the Appliance must be imported to Deep Security Manager.)To import the Deep Security Virtual Appliance and Filter Driver software:1. Download the software packages from the Trend Micro Download Center (http://downloadcenter.trendmicro.com) to the DeepSecurity Manager host machine.2. In the Deep Security Manager, go to the Administration > Updates > Software > Local page and click Import... in the toolbar andimport the software packages to Deep Security. (The Deep Security manager will then automatically download the latest 64-bit RedHat agent software package which will later be used to upgrade the Virtual Appliance's Protection Modules.)To import the Deep Security Agent software, see Installing the Deep Security Agent (page 34) and Installing and Configuring a Relay-enabled Agent (page 42).The Deep Security Notifier is an optional component that you can install on your protected Windows VMs. It displays local notifications ofsystem Events in the notification area.
License (Activation Codes)
You will require Deep Security Activation Codes for the protection modules and a separate Activation Code for Multi-Tenancy if you intend toimplement it.(VMware Licenses will also be required for VMware components.)Administrator/Root Privileges
You need to have Administrator/Root privileges on the computers on which you will install Deep Security software components.
Note:
Note:
Deep Security 9.5 Installation Guide (VMware vShield) What You Will Need (VMware vShield)
17

SMTP Server
You will need an SMTP server to send alert emails. The DSM uses Port 25 by default for connection to the SMTP Server.Available Ports
On the Deep Security Manager HostYou must make sure the following ports on the machine hosting Deep Security Manager are open and not reserved for other purposes:• Port 4120: The "heartbeat" port, used by Deep Security Agents and Appliances to communicate with Deep Security Manager(configurable).• Port 4119: Used by your browser to connect to Deep Security Manager. Also used for communication from ESXi and requests forSecurity Updates by the DSVA (configurable).• Port 1521: Bi-directional Oracle Database server port.• Ports 1433 and 1434: Bi-directional Microsoft SQL Server Database ports.• Ports 389, 636, and 3268: Connection to an LDAP Server for Active Directory integration (configurable).• Port 25: Communication to a SMTP Server to send email alerts (configurable).• Port 53: For DNS Lookup.• Port 514: Bi-directional communication with a Syslog server (configurable).• Port 443: Communication with VMware vCloud, vCenter,vShield/NSX Manager and Amazon AWS.For more details about how each of these ports are used by Deep Security, see Ports Used by Deep Security in the Referencesection of the online help or the Administrator's Guide.
On the Deep Security Relay, Agents, and AppliancesYou must make sure the following ports on the machine hosting Deep Security Relay are open and not reserved for other purposes:• Port 4122: Relay to Agent/Appliance communication.• Port 4118: Manager-to-Agent communication.• Port 4123: Used for internal communication. Should not be open to the outside.• Port 80, 443: connection to Trend Micro Update Server and Smart Protection Server.• Port 514: bi-directional communication with a Syslog server (configurable).The Deep Security Manager automatically implements specific Firewall Rules to open the required communication ports on machines hostingDeep Security Relays, Agents and Appliances.
Network Communication
Communication between Deep Security Manager and Deep Security Relay-enabled Agents, Agents/Appliances and hypervisors uses DNShostnames by default. In order for Deep Security Agent/Appliance deployments to be successful, you must ensure that each computer canresolve the hostname of the Deep Security Manager and a Relay-enabled Agent. This may require that the Deep Security Manager and Relay-enabled Agent computers have a DNS entry or an entry in the Agent/Appliance computer's hosts file.You will be asked for this hostname as part of the Deep Security Manager installation procedure. If you do not have DNS, enter anIP address during the installation.
Note:
Note:
Deep Security 9.5 Installation Guide (VMware vShield) What You Will Need (VMware vShield)
18
Reliable Time Stamps
All computers on which Deep Security Software is running should be synchronized with a reliable time source. For example, regularlycommunicating with a Network Time Protocol (NTP) server.Performance Recommendations
See Deep Security Manager Performance Features (page 73).Deep Security Manager and Database Hardware
Many Deep Security Manager operations (such as Updates and Recommendation Scans) require high CPU and Memory resources. Trend Microrecommends that each Manager node have four cores and sufficient RAM in high scale environments.The Database should be installed on hardware that is equal to or better than the specifications of the best Deep Security Manager node. Forthe best performance the database should have 8-16GB of RAM and fast access to the local or network attached storage. Whenever possible adatabase administrator should be consulted on the best configuration of the database server and a maintenance plan should be put in effect.For more information, see Database Deployment Considerations (page 20).Dedicated Servers
The Deep Security Manager and the database can be installed on the same computer if your final deployment is not expected to exceed 1000computers (real or virtual). If you think you may exceed 1000 computers, the Deep Security Manager and the database should be installedon dedicated servers. It is also important that the database and the Deep Security Manager be co-located on the same network with a 1GBLAN connection to ensure unhindered communication between the two. The same applies to additional Deep Security Manager Nodes. A twomillisecond latency or better is recommended for the connection from the Manager to the Database.High Availability Environments
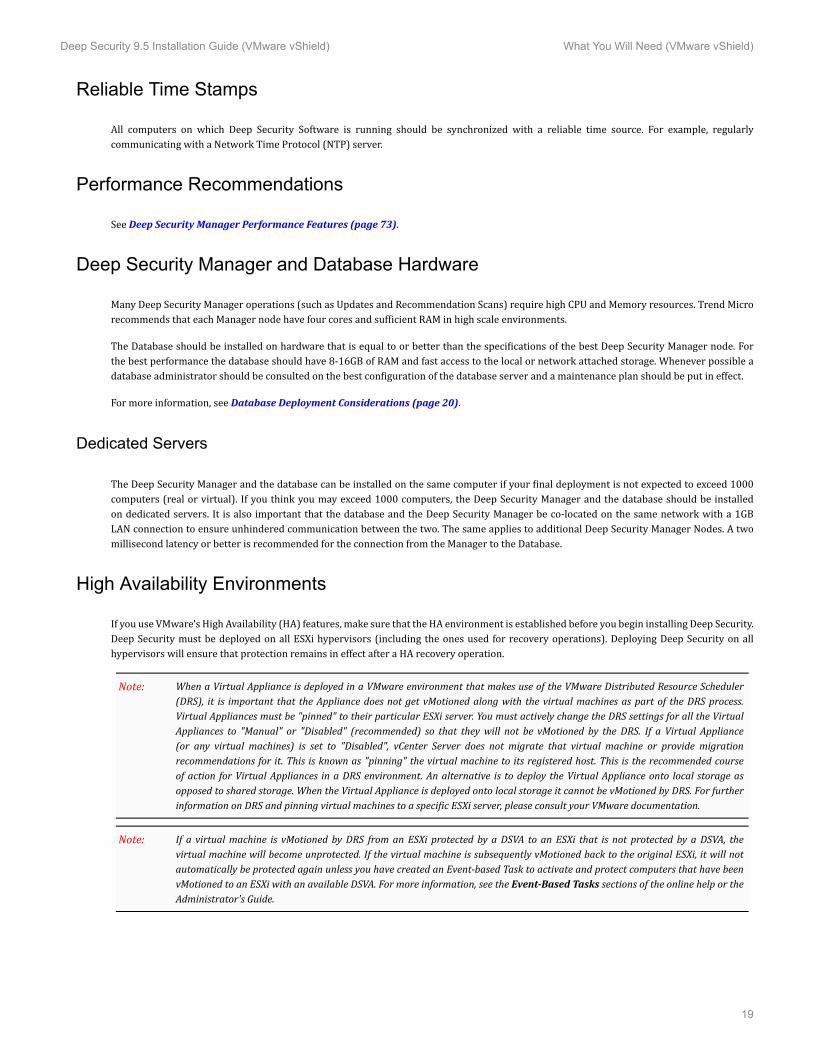
If you use VMware's High Availability (HA) features, make sure that the HA environment is established before you begin installing Deep Security.Deep Security must be deployed on all ESXi hypervisors (including the ones used for recovery operations). Deploying Deep Security on allhypervisors will ensure that protection remains in effect after a HA recovery operation.When a Virtual Appliance is deployed in a VMware environment that makes use of the VMware Distributed Resource Scheduler(DRS), it is important that the Appliance does not get vMotioned along with the virtual machines as part of the DRS process.Virtual Appliances must be "pinned" to their particular ESXi server. You must actively change the DRS settings for all the VirtualAppliances to "Manual" or "Disabled" (recommended) so that they will not be vMotioned by the DRS. If a Virtual Appliance(or any virtual machines) is set to "Disabled", vCenter Server does not migrate that virtual machine or provide migrationrecommendations for it. This is known as "pinning" the virtual machine to its registered host. This is the recommended courseof action for Virtual Appliances in a DRS environment. An alternative is to deploy the Virtual Appliance onto local storage asopposed to shared storage. When the Virtual Appliance is deployed onto local storage it cannot be vMotioned by DRS. For furtherinformation on DRS and pinning virtual machines to a specific ESXi server, please consult your VMware documentation.
If a virtual machine is vMotioned by DRS from an ESXi protected by a DSVA to an ESXi that is not protected by a DSVA, thevirtual machine will become unprotected. If the virtual machine is subsequently vMotioned back to the original ESXi, it will notautomatically be protected again unless you have created an Event-based Task to activate and protect computers that have beenvMotioned to an ESXi with an available DSVA. For more information, see the Event-Based Tasks sections of the online help or theAdministrator's Guide.
Note:
Note:
Deep Security 9.5 Installation Guide (VMware vShield) What You Will Need (VMware vShield)
19

Database Deployment Considerations
Refer to your database provider's documentation for instructions on database installation and deployment but keep the followingconsiderations in mind for integration with Deep Security.Version
Deep Security requires Microsoft SQL Server 2012 or 2008, or Oracle Database 11g or 10g for enterprise deployments. Deep Security Managercomes with an embedded Apache Derby database but this is only suitable for evaluation purposes. (You cannot upgrade from Apache Derby toSQL Server or Oracle Database.)Install before Deep Security
You must install the database software, create a database instance for Deep Security (if your are not using the default instance), and create auser account for Deep Security before you install Deep Security Manager.Location
The database must be located on the same network as the Deep Security Manager with a connection speed of 1Gb/s over LAN. (WANconnections are not recommended.)Dedicated Server
The database should be installed on a separate dedicated machine.Microsoft SQL Server
• Enable "Remote TCP Connections". (See http://msdn.microsoft.com/en-us/library/bb909712(v=vs.90).aspx)• The database account used by the Deep Security Manager must have db_owner rights.• If using Multi-Tenancy, the database account used by the Deep Security Manager must have dbcreator rights.• Select the "simple" recovery model property for your database. (See http://technet.microsoft.com/en-us/library/ms189272.aspx)Oracle Database
• Start the "Oracle Listener" service and make sure it accepts TCP connections.• The database account used by the Deep Security Manager must be granted the CONNECT and RESOURCE roles and CREATESEQUENCE, CREATE TABLE and CREATE TRIGGER system privileges.• If using Multi-Tenancy, the database account used by the Deep Security Manager must be granted the CREATE USER, DROP USER,ALTER USER, GRANT ANY PRIVILEGE and GRANT ANY ROLE system privileges.
Transport Protocol
The recommended transport protocol is TCP.If using Named Pipes to connect to a SQL Server, a properly authenticated Microsoft Windows communication channel must be availablebetween Deep Security Manager host and the SQL Server host. This may already exist if:
Deep Security 9.5 Installation Guide (VMware vShield) Database Deployment Considerations
20

• The SQL Server is on the same host as Deep Security Manager.• Both hosts are members of the same domain.• A trust relationship exists between the two hosts.If no such communication channel is available, Deep Security Manager will not be able to communicate to the SQL Server over named pipes.
Connection Settings Used During Deep Security Manager Installation.
During the Deep Security Manager installation, you will be asked for Database connection details. Enter the Database hostname under"Hostname" and the pre-created database for Deep Security under "Database Name".The installation supports both SQL and Windows Authentication. When using Windows Authentication, click on the "Advanced" button todisplay additional options. The screenshot above shows an example for connecting to a named SQL instance using Windows AuthenticationAvoid special Characters for the database user name (Oracle)
Although Oracle allows special characters when configuring the database user object, if they are surrounded by quotes. Deep Security does notsupport special characters for the database user.Keep the database Name Short (SQL Server)
If using Multi-Tenancy, keeping the main database name short will make it easier to read the database names of your Tenants. (ie. If the maindatabase is "MAINDB", the first Tenant's database name will be "MAINDB_1", the second Tenant's database name will be "MAINDB_2", and soon. )Oracle RAC Support
Deep Security supports:• SUSE Linux Enterprise Server 11 SP1 with Oracle RAC 11g R2 (v11.2.0.1.0)• Red Hat Linux Enterprise Server 5.8 with Oracle RAC 11g R2 (v11.2.0.1.0)Applying the default Linux Server Deep Security Policy to the Oracle RAC nodes should not cause any communication issues withOracle Automated Storage Management (ASM) and cluster services. However if you experience issues, try customizing the Firewallsettings according to the port requirements found in Oracle RAC documentation, or disabling the Firewall altogether.
http://docs.oracle.com/cd/E11882_01/install.112/e41962/ports.htm#BABECFJF
High Availability
The Deep Security database is compatible with database failover protection so long as no alterations are made to the database schema. Forexample, some database replication technologies add columns to the database tables during replication which can result in critical failures.For this reason, database mirroring is recommended over database replication.
Note:
Deep Security 9.5 Installation Guide (VMware vShield) Database Deployment Considerations
21

Minimum VMware Privileges for DSVA Deployment
The following tables list the VMware environment privileges required by the VMware role assigned to the account used by the Deep SecurityManager to deploy the Deep Security Virtual Appliance. (The account used to connect to the vCenter when importing the vCenter into the DeepSecurity Manager.)These privileges must be applied at the data center level in the Hosts and Clusters view.During synchronization with a vCenter, if the Deep Security Manager receives information about a new folder that is not the childof an existing folder, it will need to trace its parent folders up to the datacenter to determine which datacenter the folder belongsto. Applying these privileges only at the cluster level could result in synchronization errors.
The tables list the required privilege and the function for which the privilege is required. To set the privilege, use the vSphere Web Client to editthe properties of the role used by the Deep Security Manager to access the vCenter. The required privileges can be found in the Privileges treeof the vSphere Role editor.The tables are organized as follows:1. Preparing the ESXi Server. A kernel driver is loaded on the ESXi server, and a separate vSwitch is configured to facilitate internalconnectivity for the DSVA.2. Deploying the Virtual Appliance. The virtual appliance itself is deployed from an OVF file.3. Deploying into a DRS-enabled Cluster.4. Activating the Virtual Machine (the protected computer).5. Ongoing operations. Day to day Deep Security operations.Preparing the ESXi Server
Privilege FunctionHost > Configuration > Change Settings Query Modules on ESXiHost > Configuration > Maintenance Enter and Exit Maintenance ModeHost > Configuration > Network Configuration Add new virtual switch, port group, virtual NIC etc.Host > Configuration > Advanced Settings Setup networking for dvfilter communication on ESXiHost > Configuration > Query Patch Install Filter DriverHost > Configuration > Connection Disconnect/reconnect a hostHost > Configuration > Security profile and firewall Reconfiguration outgoing FW connections to allow retrieval of Filter Driver package from DSMGlobal > Cancel Task Required to cancel a task if requiredDeploying the Virtual Appliance
Privilege FunctionvApp > Import Deploy DSVA from OVF filevApp > vApp application configuration Upgrade the DSVADatastore > Allocate Space Allocate space for DSVA on datastore.Host > Configuration > Virtual machine autostart configuration Set DSVA to autostart on ESXiNetwork > Assign Network Assign DSVA to networksVirtual Machine > Configuration > Add new disk Add disks to DSVAVirtual Machine > Interaction > Power On Power on DSVAVirtual Machine > Interaction > Power Off Power off DSVA
Note:
Deep Security 9.5 Installation Guide (VMware vShield) Minimum VMware Privileges for DSVA Deployment
22
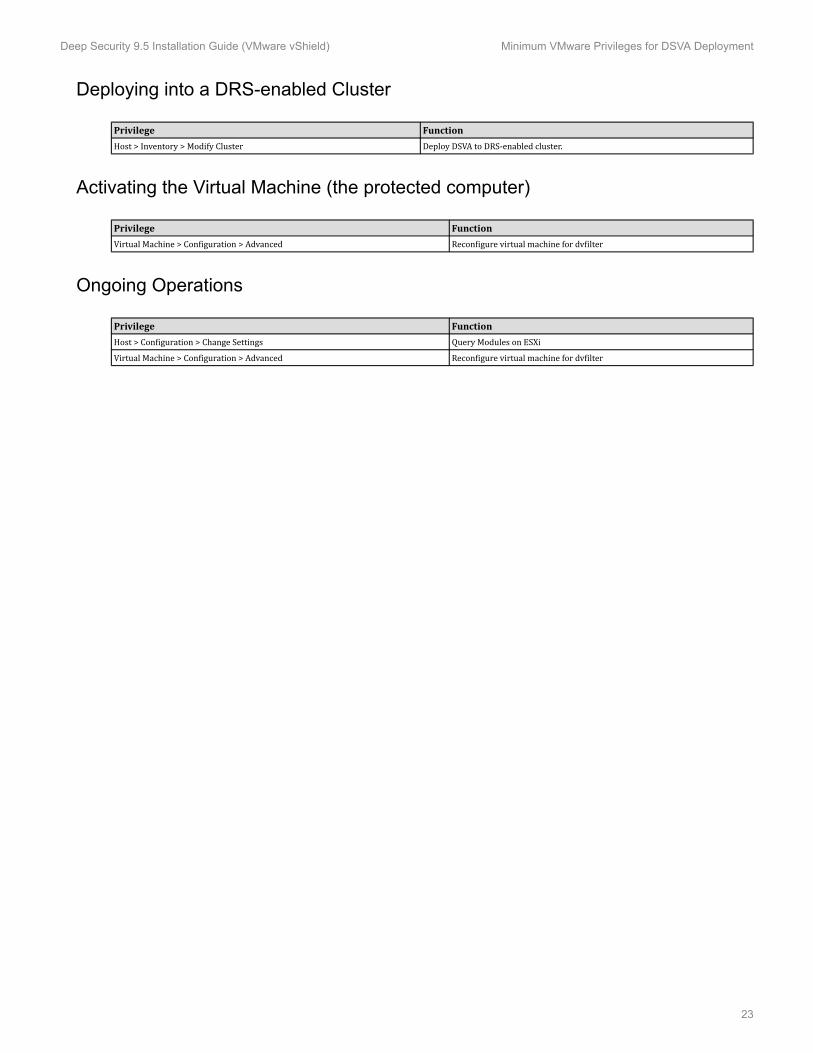
Deploying into a DRS-enabled Cluster
Privilege FunctionHost > Inventory > Modify Cluster Deploy DSVA to DRS-enabled cluster.Activating the Virtual Machine (the protected computer)
Privilege FunctionVirtual Machine > Configuration > Advanced Reconfigure virtual machine for dvfilterOngoing Operations
Privilege FunctionHost > Configuration > Change Settings Query Modules on ESXiVirtual Machine > Configuration > Advanced Reconfigure virtual machine for dvfilter
Deep Security 9.5 Installation Guide (VMware vShield) Minimum VMware Privileges for DSVA Deployment
23
Preparing a vShield Environment for Agentless Protection
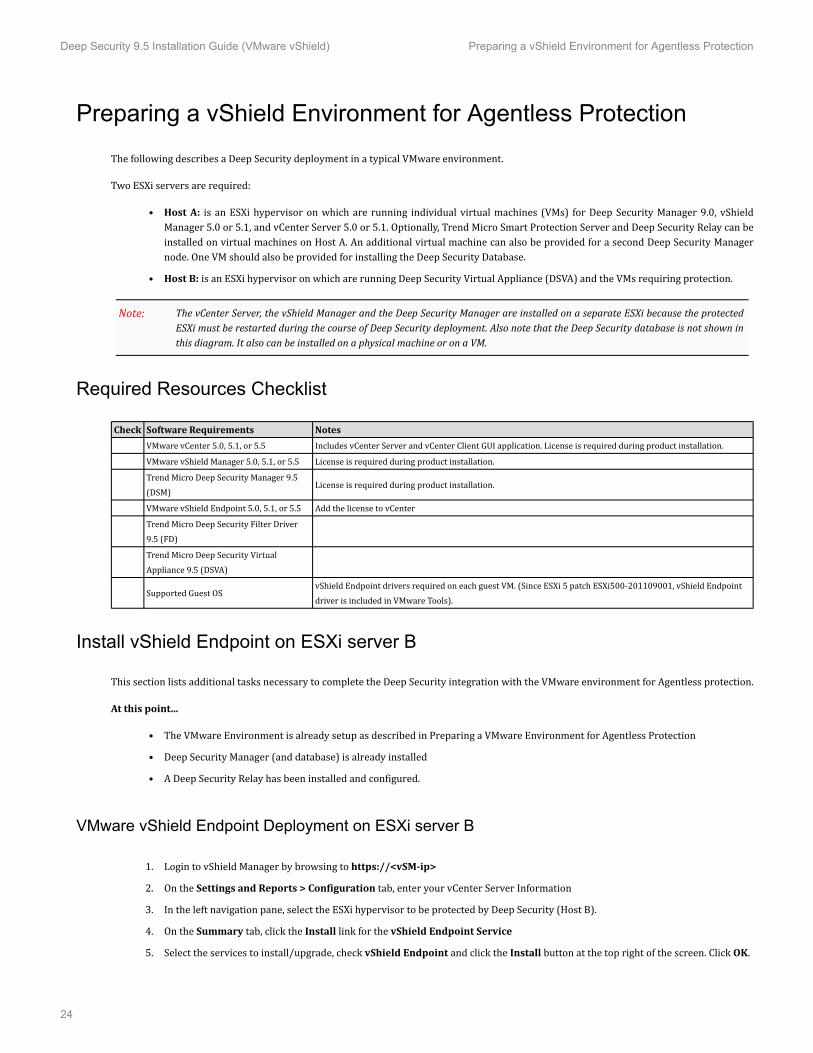
The following describes a Deep Security deployment in a typical VMware environment.Two ESXi servers are required:• Host A: is an ESXi hypervisor on which are running individual virtual machines (VMs) for Deep Security Manager 9.0, vShieldManager 5.0 or 5.1, and vCenter Server 5.0 or 5.1. Optionally, Trend Micro Smart Protection Server and Deep Security Relay can beinstalled on virtual machines on Host A. An additional virtual machine can also be provided for a second Deep Security Managernode. One VM should also be provided for installing the Deep Security Database.• Host B: is an ESXi hypervisor on which are running Deep Security Virtual Appliance (DSVA) and the VMs requiring protection.The vCenter Server, the vShield Manager and the Deep Security Manager are installed on a separate ESXi because the protectedESXi must be restarted during the course of Deep Security deployment. Also note that the Deep Security database is not shown inthis diagram. It also can be installed on a physical machine or on a VM.
Required Resources Checklist
Check Software Requirements NotesVMware vCenter 5.0, 5.1, or 5.5 Includes vCenter Server and vCenter Client GUI application. License is required during product installation.VMware vShield Manager 5.0, 5.1, or 5.5 License is required during product installation.Trend Micro Deep Security Manager 9.5(DSM) License is required during product installation.VMware vShield Endpoint 5.0, 5.1, or 5.5 Add the license to vCenterTrend Micro Deep Security Filter Driver9.5 (FD)Trend Micro Deep Security VirtualAppliance 9.5 (DSVA)Supported Guest OS vShield Endpoint drivers required on each guest VM. (Since ESXi 5 patch ESXi500-201109001, vShield Endpointdriver is included in VMware Tools).Install vShield Endpoint on ESXi server B
This section lists additional tasks necessary to complete the Deep Security integration with the VMware environment for Agentless protection.At this point...• The VMware Environment is already setup as described in Preparing a VMware Environment for Agentless Protection• Deep Security Manager (and database) is already installed• A Deep Security Relay has been installed and configured.
VMware vShield Endpoint Deployment on ESXi server B
1. Login to vShield Manager by browsing to https://<vSM-ip>2. On the Settings and Reports > Configuration tab, enter your vCenter Server Information3. In the left navigation pane, select the ESXi hypervisor to be protected by Deep Security (Host B).4. On the Summary tab, click the Install link for the vShield Endpoint Service5. Select the services to install/upgrade, check vShield Endpoint and click the Install button at the top right of the screen. Click OK.
Note:
Deep Security 9.5 Installation Guide (VMware vShield) Preparing a vShield Environment for Agentless Protection
24

6. After installing, make sure the Service vShield Endpoint correctly displays the installed version (The Install link will have changedto Uninstall)Install vShield Endpoint Drivers on the VMs to be protected on ESXi server B
On each VM to be protected agentlessly by a Deep Security Virtual Appliance1. Install guest OS. (If using Windows 2003 Server, make sure you install Service Pack 2)2. Install the VMware vShield Endpoint driver to this machine. The vShield Endpoint driver is contained within the vShield Drivers inVMware Tools. (Note that vShield Drivers are not installed by default during the installation of VMware Tools.)1. Launch the VMware Tools installer and select to perform an Interactive Install2. During VMware Tools installation, select Custom Install3. Expand VMware Device Drivers4. Expand VMCI Driver5. Select vShield Drivers and choose This feature will be installed on local drive.6. Click Yes to restart the machine.If you plan to use manual or scheduled scans be sure to turn off sleep and standby mode on the guest virtual machines. If aguest virtual machine goes into sleep or standby mode during a scan you will see an error indicating that the scan terminatedabnormally. Virtual Machines must be in the running state for scans to complete successfully.
In a High Availability environment, you must install Deep Security Virtual Appliances on all the ESXi hypervisors in a cluster inorder to provide Agentless protection for vMotioned guests.
Note:
Note:
Deep Security 9.5 Installation Guide (VMware vShield) Preparing a vShield Environment for Agentless Protection
25

Installation

Installing the Deep Security Manager
Before You Begin
Database
Before you install Deep Security Manager, you must install database software, create a database and user account for Deep Security Manager touse. For information on installing a database, see Database Deployment Considerations (page 20).Co-Located Relay-enabled Agent
A Deep Security deployment requires at least one Deep Security Relay (a Deep Security Agent with Relay functionality enabled). Relaysdistribute Software and Security Updates to Agents/Appliances which keep your protection up to date. Trend Micro recommends installing aRelay-enabled Agent on the same computer as the Deep Security Manager to protect the host computer and to function as a local Relay.During the installation of the Deep Security Manager, the installer will look in its local directory for an Agent install package (the full zippackage, not just the core Agent installer). If it doesn't find an install package locally, it will attempt to connect to the Trend Micro DownloadCenter over the Internet and locate an Agent install package there. If it locates an install package in either of those locations, it will give youthe option to install a co-located Relay-enabled Agent during the installation of the Deep Security Manager. (If Agent install packages are foundin both locations, the latest of the two versions will be selected.) The Agent can be used to protect the Deep Security manager host machine,however it will initially be installed with only the Relay module enabled. To enable protection you will have to apply an appropriate SecurityPolicy.If no Agent install package is available, the installation of the Deep Security Manager will proceed without it (but you will have to install a Relay-enabled Agent at a later time).Depending on your environment, additional Relay-enabled Agents can be installed at a later time. (For instructions on installinga Relay-enabled Agent, see Installing the Deep Security Agent (page 34) and Configuring a Relay (page 42). )
Proxy Server Information
If the Deep Security will need to use a proxy server to connect to Trend Micro Update Servers over the Internet, have your proxy server address,port, and log in credentials ready.Download the the Installer Package
Download the latest version of the Deep Security Manager (and optionally the Deep Security Agent) software from the Trend Micro DownloadCenter at:http://downloadcenter.trendmicro.com/Install the Deep Security Manager for Windows
1. Copy the Deep Security Manager installer package to the target machine. Start the Deep Security Manager installer by double-clicking the install package.
Note:
Deep Security 9.5 Installation Guide (VMware vShield) Installing the Deep Security Manager
27
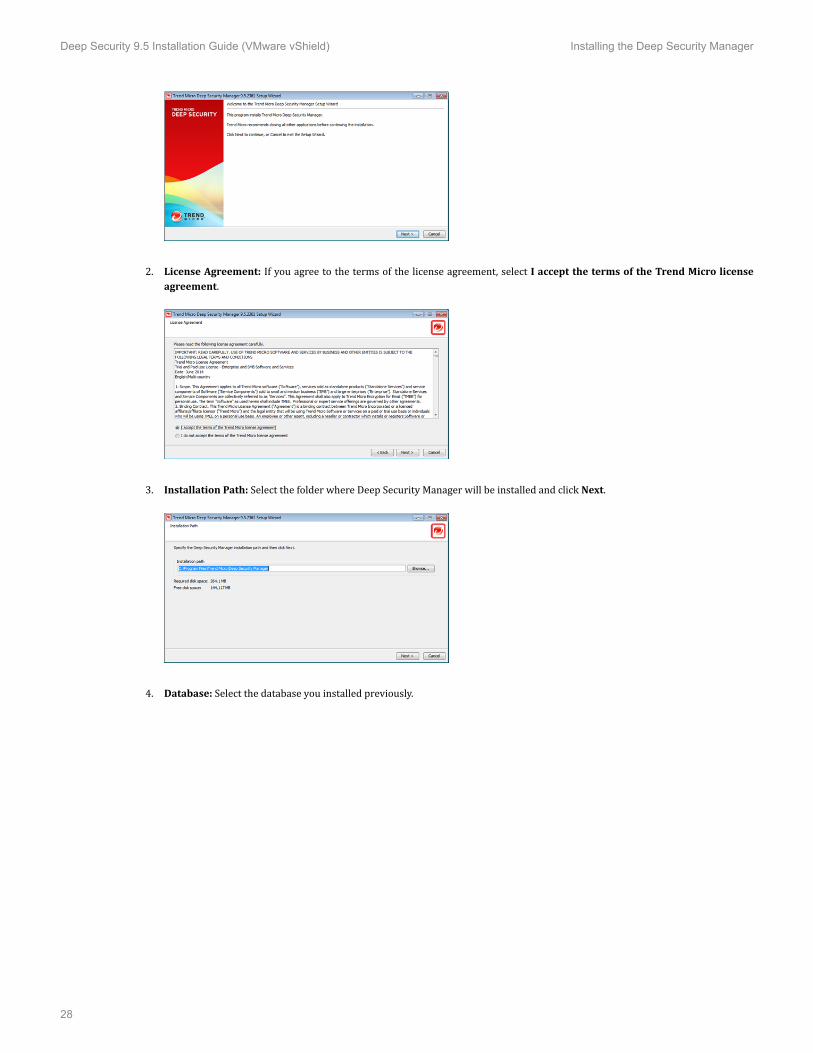
2. License Agreement: If you agree to the terms of the license agreement, select I accept the terms of the Trend Micro licenseagreement.
3. Installation Path: Select the folder where Deep Security Manager will be installed and click Next.
4. Database: Select the database you installed previously.
Deep Security 9.5 Installation Guide (VMware vShield) Installing the Deep Security Manager
28

If your database is SQL Server and you are using a named instance, click Advanced to enter the specifics.
5. Product Activation: Enter your Activation Code(s). Enter the code for All Protection Modules or the codes for the individualmodules for which you have purchased a license. You can proceed without entering any codes, but none of the Protection Moduleswill be available for use. (You can enter your first or additional codes after installation of the Deep Security Manager by going toAdministration > Licenses.)
6. Address and Ports: Enter the hostname, URL, or IP address of this computer. The Manager Address must be either a resolvablehostname, a fully qualified domain name, or an IP address. If DNS is not available in your environment, or if some computers areunable to use DNS, a fixed IP address should be used instead of a hostname. Optionally, change the default communication ports:The "Manager Port" is the port on which the Manager's browser-based UI is accessible through HTTPS. The "Heartbeat Port" is theport on which the Manager listens for communication from the Agents/Appliances.
Deep Security 9.5 Installation Guide (VMware vShield) Installing the Deep Security Manager
29
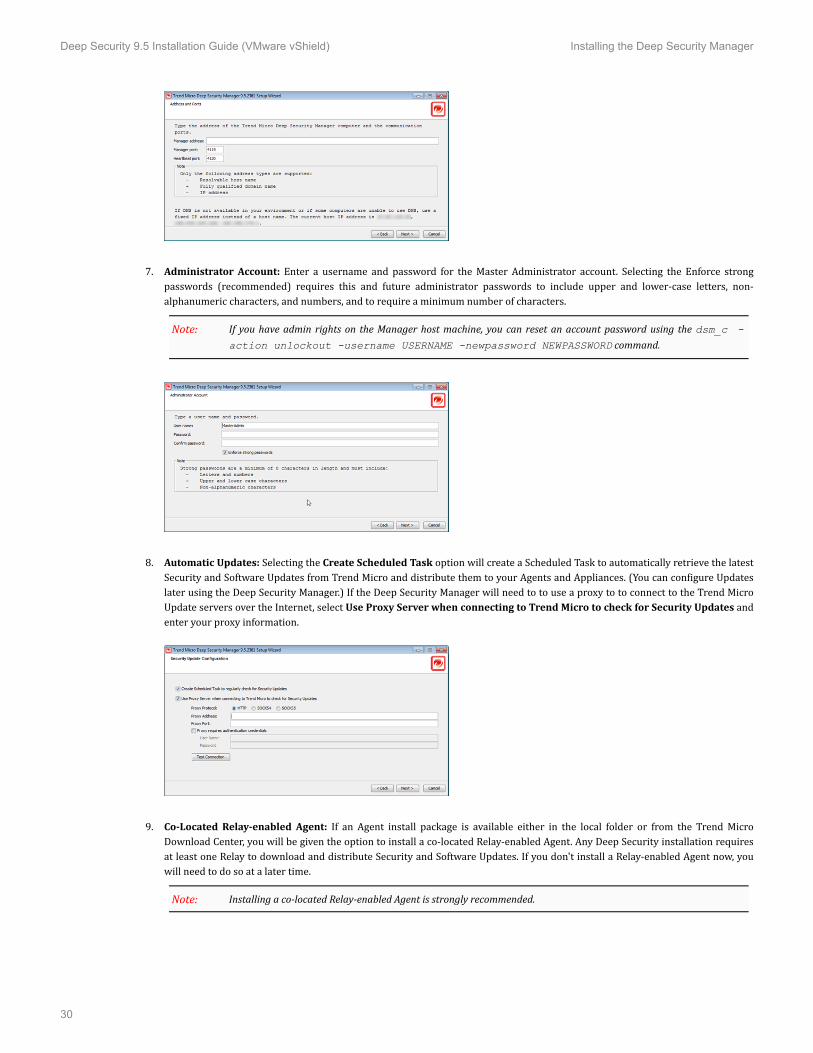
7. Administrator Account: Enter a username and password for the Master Administrator account. Selecting the Enforce strongpasswords (recommended) requires this and future administrator passwords to include upper and lower-case letters, non-alphanumeric characters, and numbers, and to require a minimum number of characters.If you have admin rights on the Manager host machine, you can reset an account password using the dsm_c -
action unlockout -username USERNAME -newpassword NEWPASSWORD command.
8. Automatic Updates: Selecting the Create Scheduled Task option will create a Scheduled Task to automatically retrieve the latestSecurity and Software Updates from Trend Micro and distribute them to your Agents and Appliances. (You can configure Updateslater using the Deep Security Manager.) If the Deep Security Manager will need to to use a proxy to to connect to the Trend MicroUpdate servers over the Internet, select Use Proxy Server when connecting to Trend Micro to check for Security Updates andenter your proxy information.
9. Co-Located Relay-enabled Agent: If an Agent install package is available either in the local folder or from the Trend MicroDownload Center, you will be given the option to install a co-located Relay-enabled Agent. Any Deep Security installation requiresat least one Relay to download and distribute Security and Software Updates. If you don't install a Relay-enabled Agent now, youwill need to do so at a later time.Installing a co-located Relay-enabled Agent is strongly recommended.
Note:
Note:
Deep Security 9.5 Installation Guide (VMware vShield) Installing the Deep Security Manager
30
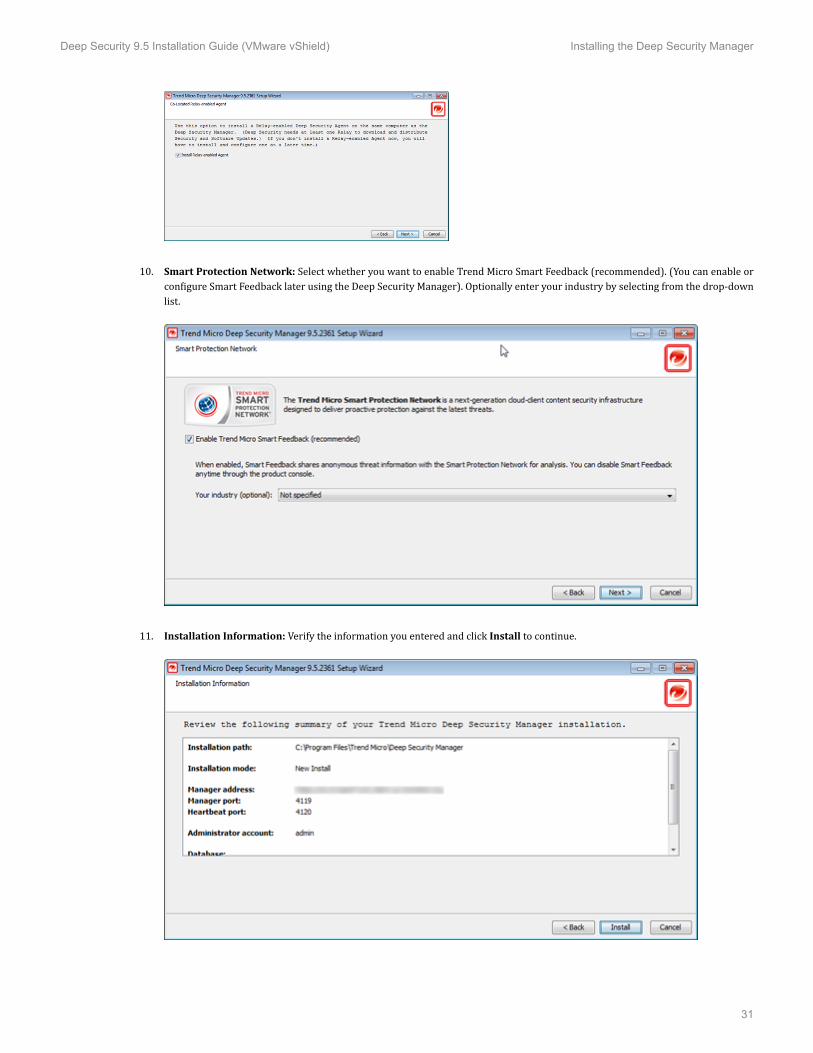
10. Smart Protection Network: Select whether you want to enable Trend Micro Smart Feedback (recommended). (You can enable orconfigure Smart Feedback later using the Deep Security Manager). Optionally enter your industry by selecting from the drop-downlist.
11. Installation Information: Verify the information you entered and click Install to continue.
Deep Security 9.5 Installation Guide (VMware vShield) Installing the Deep Security Manager
31

12. Select Launch the Deep Security Manager console to open web a browser to the Deep Security Manager URL when setup iscomplete. Click Finish to close the Setup wizard.
The Deep Security Manager service will start when setup is complete. The installer places a shortcut to Deep Security Manager in the programmenu. You should take note of this URL if you want to access the Manager from a remote location.Installing the Deep Security Manager for Linux
The sequence of steps for installing Deep Security Manager on a Linux OS with X Window System are the same as those described for Windows(above). For information on performing a silent Linux installation, see Silent Install of Deep Security Manager (page 77).If you are installing Deep Security Manager on Linux with iptables enabled, you will need to configure the iptables to allow trafficon TCP ports 4119 and 4120.
Starting Deep Security Manager
The Deep Security Manager service starts automatically after installation. The service can be started, restarted and stopped from the MicrosoftServices Management Console. The service name is "Trend Micro Deep Security Manager".To run the Web-based management console, go to the Trend Micro program group in the Start menu (MS Windows) or K-Menu (X Windows)and click Deep Security Manager.To run the Web-based management console from a remote computer you will have to make note of the URL:https://[hostname]:[port]/where [hostname] is the hostname of the server on which you have installed Deep Security Manager and [port] is the "Manager Port" youspecified in step 8 of the installation (4119 by default).Users accessing the Web-based management console will be required to sign in with their User Account credentials. (The credentials createdduring the installation can be used to log in and create other User accounts.)
The Deep Security Manager creates a 10-year self-signed certificate for the connections with Agents/Appliances, Relays, and Users'web browsers. However, for added security, this certificate can be replaced with a certificate from a trusted certificate authority(CA). (Such certificates are maintained after a Deep Security Manager upgrade.) For information on using a certificate from a CA,see Creating an SSL Authentication Certificate (page 75).
Manually Importing Additional Deep Security Software
Deep Security Agents and their supporting software packages can be imported from within the Deep Security Manager on the Administration> Updates > Software > Download Center page. Other software packages must be imported manually from the Trend Micro Download Centerweb site (http://downloadcenter.trendmicro.com/).To manually import additional Deep Security software to the Deep Security Manager:
Note:
Note:
Deep Security 9.5 Installation Guide (VMware vShield) Installing the Deep Security Manager
32

1. Download the software from the Trend Micro Download Center web site to a local directory.2. In the Deep Security Manager, go to Administration > Updates > Software > Local and click Import... in the toolbar to display theImport Software wizard.3. Use the Browse... option to navigate to and select your downloaded software.4. Click Next and then Finish to exit the wizard.
The software is now imported into the Deep Security Manager.
Deep Security 9.5 Installation Guide (VMware vShield) Installing the Deep Security Manager
33
Installing the Deep Security Agent
This section describes how to install and activate Deep Security Agents and how to enable Relay functionality (if required).Importing Agent Software
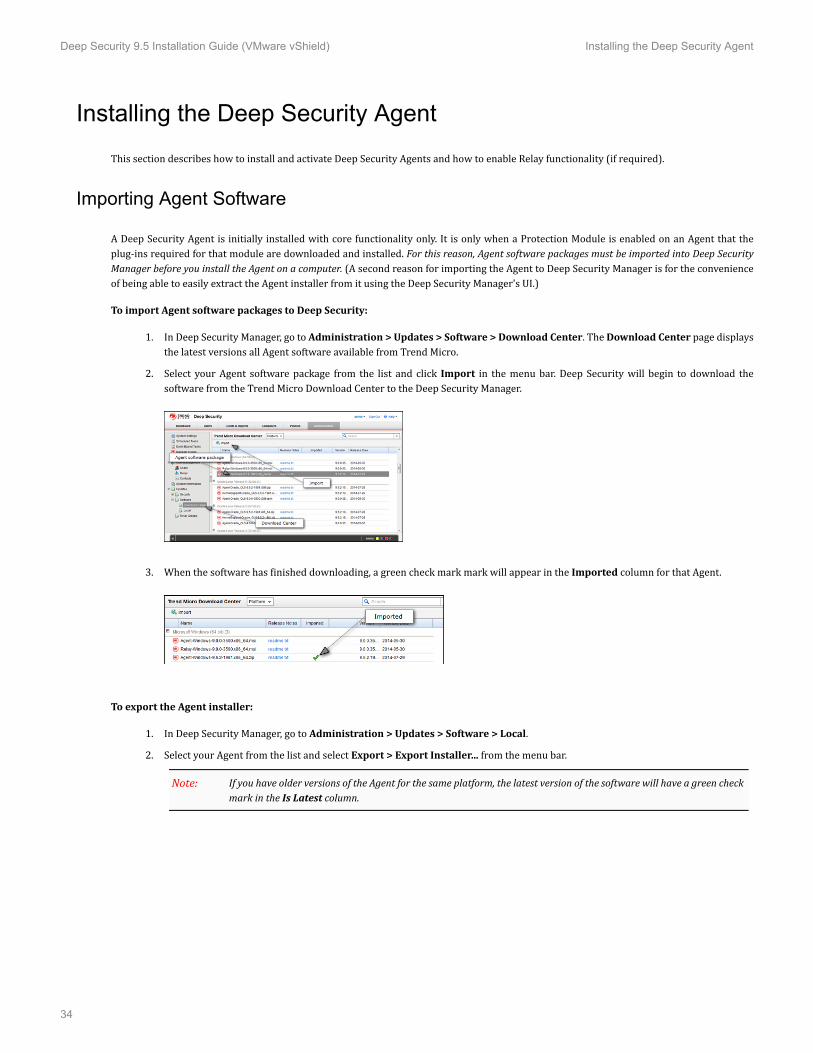
A Deep Security Agent is initially installed with core functionality only. It is only when a Protection Module is enabled on an Agent that theplug-ins required for that module are downloaded and installed. For this reason, Agent software packages must be imported into Deep SecurityManager before you install the Agent on a computer. (A second reason for importing the Agent to Deep Security Manager is for the convenienceof being able to easily extract the Agent installer from it using the Deep Security Manager's UI.)To import Agent software packages to Deep Security:1. In Deep Security Manager, go to Administration > Updates > Software > Download Center. The Download Center page displaysthe latest versions all Agent software available from Trend Micro.2. Select your Agent software package from the list and click Import in the menu bar. Deep Security will begin to download thesoftware from the Trend Micro Download Center to the Deep Security Manager.
3. When the software has finished downloading, a green check mark mark will appear in the Imported column for that Agent.
To export the Agent installer:1. In Deep Security Manager, go to Administration > Updates > Software > Local.2. Select your Agent from the list and select Export > Export Installer... from the menu bar.If you have older versions of the Agent for the same platform, the latest version of the software will have a green checkmark in the Is Latest column.
Note:
Deep Security 9.5 Installation Guide (VMware vShield) Installing the Deep Security Agent
34
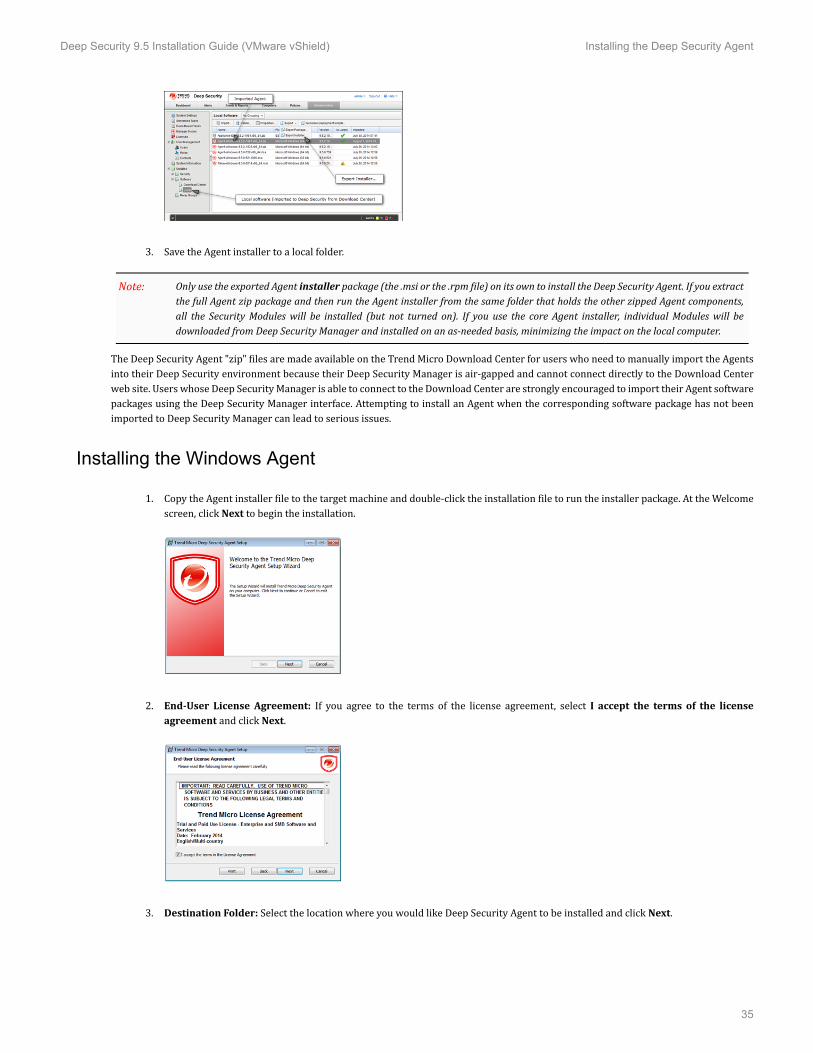
3. Save the Agent installer to a local folder.Only use the exported Agent installer package (the .msi or the .rpm file) on its own to install the Deep Security Agent. If you extractthe full Agent zip package and then run the Agent installer from the same folder that holds the other zipped Agent components,all the Security Modules will be installed (but not turned on). If you use the core Agent installer, individual Modules will bedownloaded from Deep Security Manager and installed on an as-needed basis, minimizing the impact on the local computer.The Deep Security Agent "zip" files are made available on the Trend Micro Download Center for users who need to manually import the Agentsinto their Deep Security environment because their Deep Security Manager is air-gapped and cannot connect directly to the Download Centerweb site. Users whose Deep Security Manager is able to connect to the Download Center are strongly encouraged to import their Agent softwarepackages using the Deep Security Manager interface. Attempting to install an Agent when the corresponding software package has not beenimported to Deep Security Manager can lead to serious issues.
Installing the Windows Agent
1. Copy the Agent installer file to the target machine and double-click the installation file to run the installer package. At the Welcomescreen, click Next to begin the installation.
2. End-User License Agreement: If you agree to the terms of the license agreement, select I accept the terms of the licenseagreement and click Next.
3. Destination Folder: Select the location where you would like Deep Security Agent to be installed and click Next.
Note:
Deep Security 9.5 Installation Guide (VMware vShield) Installing the Deep Security Agent
35
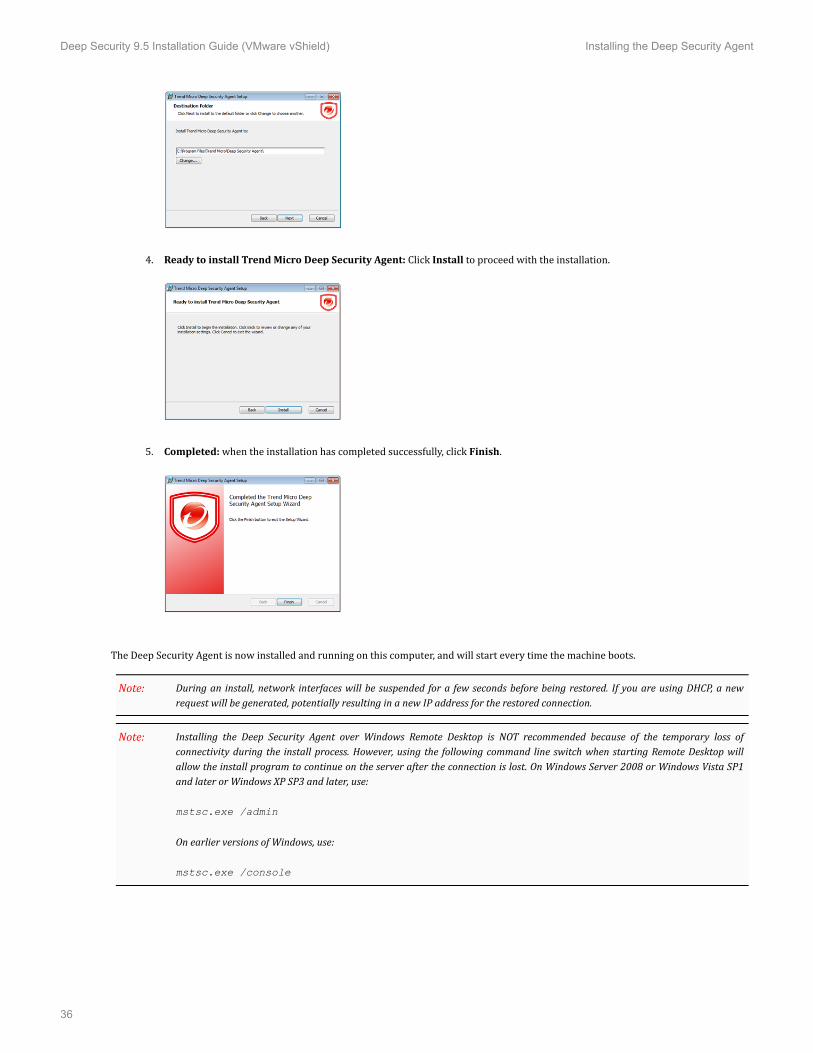
4. Ready to install Trend Micro Deep Security Agent: Click Install to proceed with the installation.
5. Completed: when the installation has completed successfully, click Finish.
The Deep Security Agent is now installed and running on this computer, and will start every time the machine boots.During an install, network interfaces will be suspended for a few seconds before being restored. If you are using DHCP, a newrequest will be generated, potentially resulting in a new IP address for the restored connection.
Installing the Deep Security Agent over Windows Remote Desktop is NOT recommended because of the temporary loss ofconnectivity during the install process. However, using the following command line switch when starting Remote Desktop willallow the install program to continue on the server after the connection is lost. On Windows Server 2008 or Windows Vista SP1and later or Windows XP SP3 and later, use:
mstsc.exe /admin
On earlier versions of Windows, use:
mstsc.exe /console
Note:
Note:
Deep Security 9.5 Installation Guide (VMware vShield) Installing the Deep Security Agent
36
Installing the Red Hat, SuSE, or Oracle Linux Agent
The following instructions apply to Red Hat, SuSE, and Oracle Linux. To install on SuSE or Oracle Linux, substitute the SuSE orOracle Linux RPM name in place of Red Hat.
You must be logged on as "root" to install the Agent. Alternatively, you can use "sudo".1. Copy the installation file to the target machine.2. Use "rpm -i" to install the ds_agent package:# rpm -i <package name>
Preparing... ########################################## [100%]
1:ds_agent ########################################## [100%]
Loading ds_filter_im module version ELx.x [ OK ]
Starting ds_agent: [ OK ]
(Use "rpm -U" to upgrade from a previous install. This approach will preserve your profile settings)3. The Deep Security Agent will start automatically upon installation.Installing the Ubuntu Agent
To install on Ubuntu, copy the installation file to the target machine and use the following command:sudo dpkg -i <driver_deb_pkg>where <driver_deb_pkg> is the Debian package with the driver that was built and placed in the <DS>/src/dsa/agent/deb/ directory.
Starting, stopping and resetting the Agent on Linux:
Command-line options:
To start the Agent:/etc/init.d/ds_agent startTo stop the Agent:/etc/init.d/ds_agent stop
/etc/init.d/ds_filter stopTo reset the Agent:/etc/init.d/ds_agent resetTo restart the Agent:/etc/init.d/ds_agent restart
Using Deployment Scripts to Install Agents
Adding a computer to your list of protected resources in Deep Security and implementing protection is a multi-step process. Most of these stepscan be performed locally from the command line on the computer and can therefore be scripted. The Deep Security Manager's DeploymentScript generator can be accessed from the Manager's Help menu.
Note:
Note:
Deep Security 9.5 Installation Guide (VMware vShield) Installing the Deep Security Agent
37
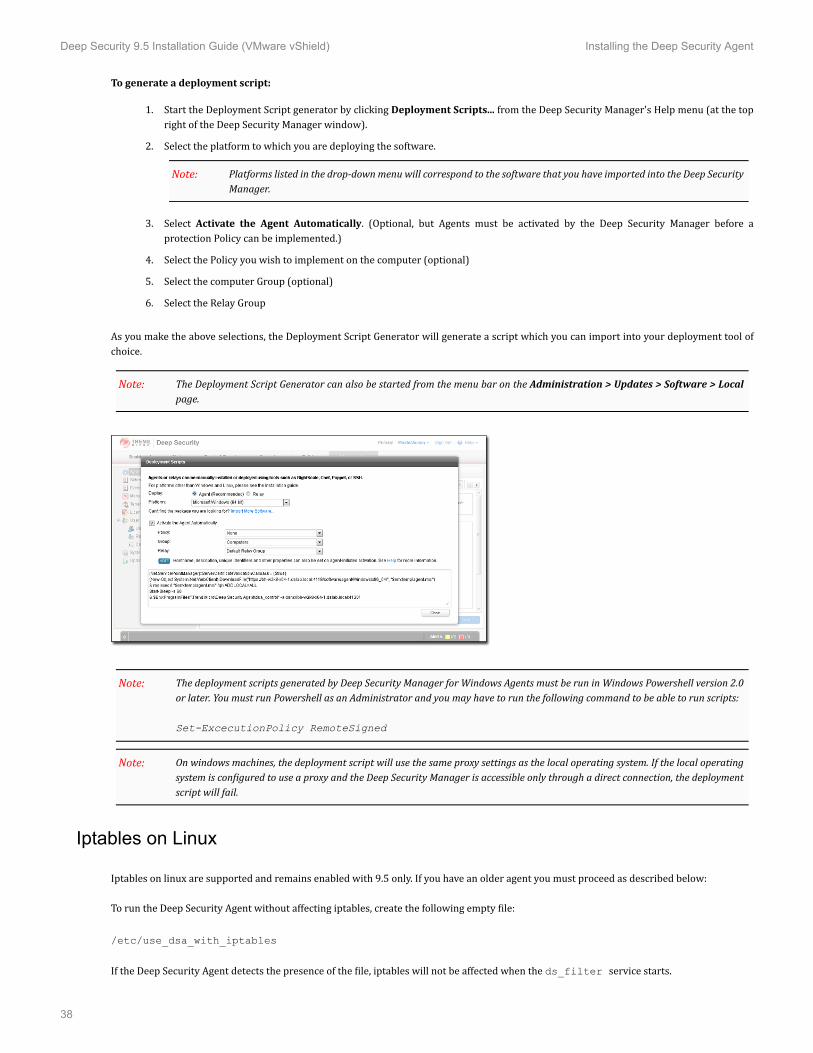
To generate a deployment script:1. Start the Deployment Script generator by clicking Deployment Scripts... from the Deep Security Manager's Help menu (at the topright of the Deep Security Manager window).2. Select the platform to which you are deploying the software.Platforms listed in the drop-down menu will correspond to the software that you have imported into the Deep SecurityManager.
3. Select Activate the Agent Automatically. (Optional, but Agents must be activated by the Deep Security Manager before aprotection Policy can be implemented.)4. Select the Policy you wish to implement on the computer (optional)5. Select the computer Group (optional)6. Select the Relay GroupAs you make the above selections, the Deployment Script Generator will generate a script which you can import into your deployment tool ofchoice.
The Deployment Script Generator can also be started from the menu bar on the Administration > Updates > Software > Localpage.
The deployment scripts generated by Deep Security Manager for Windows Agents must be run in Windows Powershell version 2.0or later. You must run Powershell as an Administrator and you may have to run the following command to be able to run scripts:
Set-ExcecutionPolicy RemoteSigned
On windows machines, the deployment script will use the same proxy settings as the local operating system. If the local operatingsystem is configured to use a proxy and the Deep Security Manager is accessible only through a direct connection, the deploymentscript will fail.
Iptables on Linux
Iptables on linux are supported and remains enabled with 9.5 only. If you have an older agent you must proceed as described below:To run the Deep Security Agent without affecting iptables, create the following empty file:/etc/use_dsa_with_iptables
If the Deep Security Agent detects the presence of the file, iptables will not be affected when the ds_filter service starts.
Note:
Note:
Note:
Note:
Deep Security 9.5 Installation Guide (VMware vShield) Installing the Deep Security Agent
38
For SuSE 11, on the target machine before beginning the installation procedure:in:/etc/init.d/jexec
after# Required-Start: $local_fs
add the line:# Required-Stop:
Activating the Agent
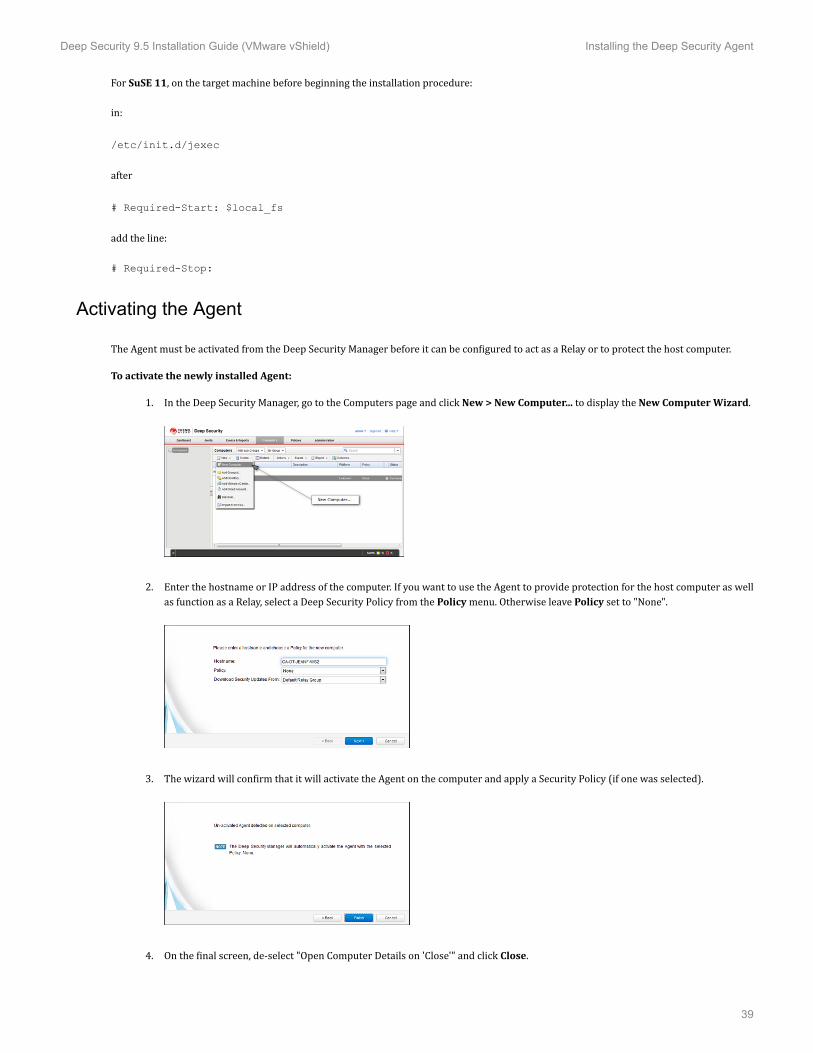
The Agent must be activated from the Deep Security Manager before it can be configured to act as a Relay or to protect the host computer.To activate the newly installed Agent:1. In the Deep Security Manager, go to the Computers page and click New > New Computer... to display the New Computer Wizard.
2. Enter the hostname or IP address of the computer. If you want to use the Agent to provide protection for the host computer as wellas function as a Relay, select a Deep Security Policy from the Policy menu. Otherwise leave Policy set to "None".
3. The wizard will confirm that it will activate the Agent on the computer and apply a Security Policy (if one was selected).
4. On the final screen, de-select "Open Computer Details on 'Close'" and click Close.
Deep Security 9.5 Installation Guide (VMware vShield) Installing the Deep Security Agent
39
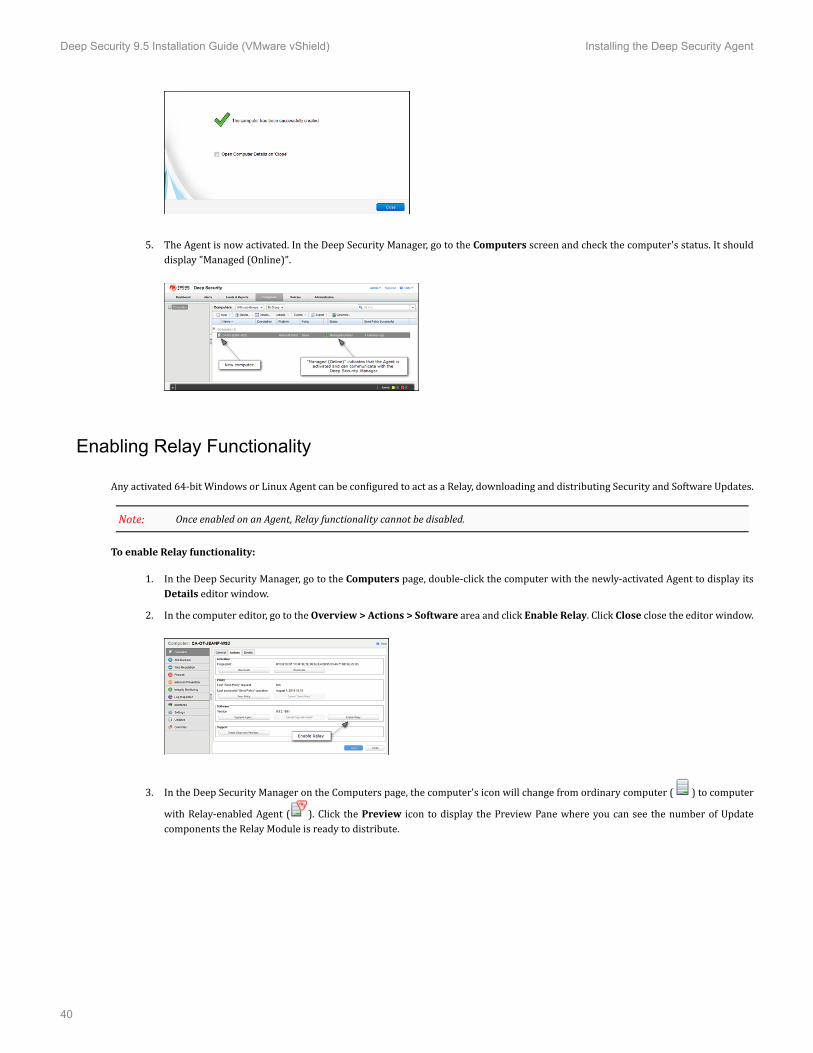
5. The Agent is now activated. In the Deep Security Manager, go to the Computers screen and check the computer's status. It shoulddisplay "Managed (Online)".
Enabling Relay Functionality
Any activated 64-bit Windows or Linux Agent can be configured to act as a Relay, downloading and distributing Security and Software Updates.Once enabled on an Agent, Relay functionality cannot be disabled.
To enable Relay functionality:1. In the Deep Security Manager, go to the Computers page, double-click the computer with the newly-activated Agent to display itsDetails editor window.2. In the computer editor, go to the Overview > Actions > Software area and click Enable Relay. Click Close close the editor window.
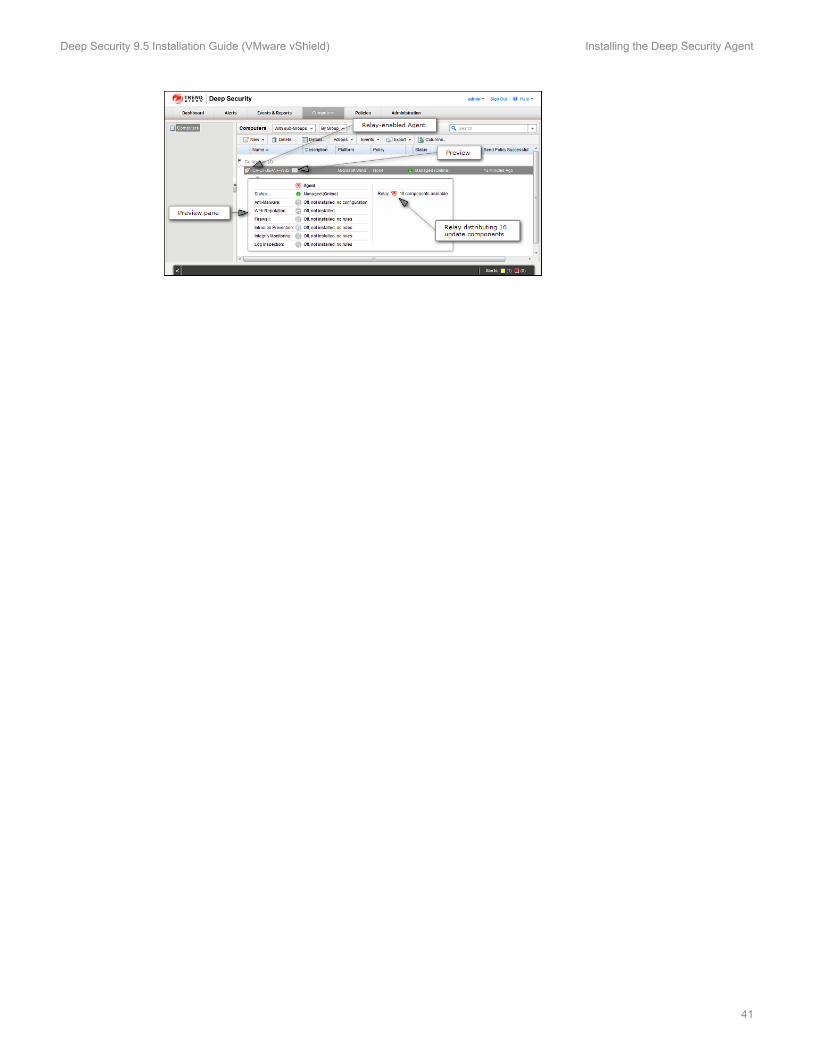
3. In the Deep Security Manager on the Computers page, the computer's icon will change from ordinary computer ( ) to computerwith Relay-enabled Agent ( ). Click the Preview icon to display the Preview Pane where you can see the number of Updatecomponents the Relay Module is ready to distribute.
Note:
Deep Security 9.5 Installation Guide (VMware vShield) Installing the Deep Security Agent
40
Deep Security 9.5 Installation Guide (VMware vShield) Installing the Deep Security Agent
41
Installing and Configuring a Relay-enabled Agent
The Deep Security Relay is a Deep Security Agent with Relay functionality enabled. Relays download and distribute Security and SoftwareUpdates to your Deep Security Agents and Appliances. You must have at least one Deep Security Relay to keep your protection up to date.Install and Activate a Deep Security Agent
If you do not already have an agent installed on a computer, do so by following the instructions in Installing the Deep Security Agent (page34). You skip ahead to the section on "Manual Installation".Once the Agent is installed, you need to Activate it.To Activate the Agent,1. In the Deep Security Manager, go to the Computers page.2. In the menu bar, click New > New Computer... to display the New Computer Wizard.3. For Hostname, enter the hostname or IP address of the computer on which you just installed the Agent.4. For Policy, select a Policy based on the operating system of your computer.5. For Download Security Updates From, leave the default setting (Default Relay Group).6. Click Finish. Deep Security Manager will import the computer to its Computers page and activate the Agent.
Enable Relay Functionality on a Deep Security Agent
To enable Relay functionality on an installed Deep Security Agent:1. The Adding a new computer and activation process should have finished by opening the Computer's Editor window. If it hasn't,follow step two (below) to open the window.2. In the Deep Security Manager, go to the Computers screen, find the Agent on which you want to enable Relay functionality anddouble-click it to open its Computer Editor window.3. In the Computer Editor window, go to Overview > Actions > Software and click Enable Relay.If you do not see the Enable Relay button, go to Administration > Updates > Software > Local to check whether thecorresponding package has been imported. Also ensure that the computer running a 64-bit version of the Agent.
Deep Security Manager will install the plug-ins required by the Relay Module, and the Agent will begin to function as a Deep Security Relay.If you are running Windows Firewall or iptables, you also need to add a Firewall Rule that allows TCP/IP traffic on port 4122 onthe Relay.
Relays are organized into Relay Groups. New Relays are automatically assigned to the Default Relay Group. The Default RelayGroup is configured to retrieve Security and Software Updates from the Primary Security Update Source defined in the DeepSecurity Manager on the Administration > System Settings > Updates tab. (The Primary Update Source by default is TrendMicro's Update Servers, but this configurable.)
Note:
Note:
Note:
Deep Security 9.5 Installation Guide (VMware vShield) Installing and Configuring a Relay-enabled Agent
42
Deploying Agentless Protection in a vShield Environment
Requirements
VMware Requirements
You must be running the following VMware software:• VMware vSphere 5.0, 5.1, or 5.5◦ VMware vCenter 5.0, 5.1, or 5.5
◦ VMware ESXi 5.0, 5.1, or 5.5
◦ VMware vSphere Web Client
Your vShield datacenter must meet the following configuration requirements:• VMware Endpoint service must be installed on all ESXi servers.• Virtual machines must have the latest VMware Tools installed, including the VMware Endpoint Driver.
Consult your VMware documentation for more detailed information on configuring your vShield environment to meet the above requirements.Deep Security Requirements
The following Trend Micro Deep Security software must be installed or imported:• The Deep Security Manager 9.5 must be installed, with a database. (See Installing the Deep Security Manager (page 27).)The Deep Security Manager should ideally be installed on a dedicated ESXi in the same datacenter.
• A Deep Security Agent with Relay functionality enabled must be installed and activated, and all Updates must havecompleted downloading. (For instructions on installing and configuring an Agent with a Relay, see Installing the Deep SecurityAgent (page 34) and Configuring a Relay (page 42).)• The Deep Security Virtual Appliance software package must be imported into Deep Security Manager. Once the VirtualAppliance is running in the datacenter, it will need to connect to a Relay-enabled Agent to have access to the latest Security andSoftware Updates.
This section describes how to prepare the vShield environment for Agentless protection using the DSVA.Add vCenter to the Deep Security Manager's list of Managed Computers.
Deep Security Manager configuration must be performed by using a Deep Security Manager user account with Full Access rights.1. From the Deep Security Manager Computers screen, click New > Add VMware vCenter...2. Enter the vCenter Server IP Address (or hostname if DNS is configured and able to resolve FQDN to IP addresses), and the Usernameand Password for the vCenter. Click Next.3. Enter the vShield Manager Server Address, Username and Password. (You can also configure this information later from the DeepSecurity Manager). Click Next.4. Accept the vShield Manager SSL certificate.5. Accept the vCenter certificate.
Note:
Deep Security 9.5 Installation Guide (VMware vShield) Deploying Agentless Protection in a vShield Environment
43

6. Review the vCenter information. Click Finish.7. The VMware vCenter has been successfully added message will be displayed. Click Close.In a large environment with more than 3000 machines reporting to a vCenter Server, this process may take 20 to 30 minutes tocomplete. You can check the vCenter's Recent Task section to verify if there are activities running.
Real-time synchronization will be maintained with this VMware vCenter to keep the information displayed in the Deep SecurityManager up-to-date (number of VMs, their status, etc.).
Prepare ESXi for Virtual Appliance deployment by Installing the Filter Driver
The ESXi will be placed in maintenance mode for this task. All virtual machines running on this ESXi must be stopped/pausedor vMotioned to another ESXi server (make sure a cluster server with vMotion support is set up so that this can be doneautomatically).1. From the Deep Security Manager, Select Computers > vCenter > Hosts and Clusters2. Find the ESXi server in the Computers list (its status column should read Unprepared), right-click and select Actions > Prepare
ESXi to display the Prepare ESXi Server Wizard. Click Next.3. Select Yes to allow the Deep Security Manager automatically bring the ESXi in and out of maintenance mode. Click Finish.4. The ESXi preparation process will complete all activities with no further input necessary. (The ESXi will be placed in maintenancemode, the Deep Security Filter Driver will be installed, and the ESXi will be restarted).5. Once the process is complete, you are given the option to continue with the next step, deploying the Deep Security Virtual Appliance.Select No thanks, I will deploy later. Click Close.The ESXi is now prepared for Deep Security Virtual Appliance deployment.
Deploy Deep Security Virtual Appliance to the ESXi
To Deploy Deep Security Virtual Appliance (DSVA) to the ESXi:1. From the Deep Security Manager, select Computers > vCenter.2. Right-click on the ESXi server being protected and select Actions > Deploy Appliance. Click Next.3. Enter an Appliance Name for the Appliance and select a Datastore for the Appliance.4. Select the Folder for the Datacenter and select the Management Network for the Appliance. Click Next.5. Define the Appliance Hostname. Enter the IPv4 Address and/or IPv6 Address for the Appliance. (DHCP is enabled by default). ClickNext.6. Select Thick Provisioned format.7. Click Finish and wait for for the DSVA to be uploaded.8. In the Activate Deep Security Appliance section, select No thanks, I will activate it later. (Activation is described later). ClickClose.
The Virtual Appliance is now displayed along with the other computers in the vCenter Group in the Deep Security Manager Computers >vCenter list.
When a Virtual Appliance is deployed in a VMware environment that makes use of the VMware Distributed Resource Scheduler(DRS), it is important that the Appliance does not get vMotioned along with the virtual machines as part of the DRS process.Virtual Appliances must be "pinned" to their particular ESXi server. You must proactively change the DRS settings for all theVirtual Appliances to "Manual" or "Disabled" (recommended) so that they will not be vMotioned by the DRS. If a VirtualAppliance (or any virtual machine) is set to "Disabled", vCenter Server will not migrate that virtual machine or provide migrationrecommendations for it. This is known as "pinning" the virtual machine to its registered host. This is the recommended course
Note:
Note:
Note:
Note:
Deep Security 9.5 Installation Guide (VMware vShield) Deploying Agentless Protection in a vShield Environment
44

of action for Virtual Appliances in a DRS environment. (An alternative is to deploy the Virtual Appliance onto a local store asopposed to a shared store. When the Virtual Appliance is deployed onto a local store it cannot be vMotioned by DRS.) For furtherinformation on DRS and pinning virtual machines to a specific ESXi consult your VMware documentation.
The Deep Security Manager puts the ESXi into maintenance mode during an install or upgrade of the Deep Security FilterDriver. (This done during the "Prepare ESXi" phase of installation.) When an ESXi already hosting a Virtual Appliance is put intomaintenance mode, the Deep Security Manager will automatically power the Virtual Appliance off and back on again when exitingmaintenance mode. If the ESXi is put into maintenance mode by means other than through the Deep Security Manager, the VirtualAppliance is not powered off/on automatically.
Activate the Deep Security Virtual Appliance
To activate the Virtual Appliance:1. From the Deep Security Manager, select Computers > vCenter2. Right Click on the DSVA machine and select Actions > Activate Appliance. Click Next.3. For Policy, select Deep Security Virtual Appliance. Click Next. The activation process is started.4. The DSVA will register itself with vShield Manager. You will see multiple tasks being executed in vCenter Console.The DSVA requires vShield Manager to configure the VMX file of each machine that is on the ESXi. Depending on thenumber of Virtual Machines, it could take several hours to complete the activation.If vShield Manager is experiencing problems, the DSVA may fail to activate. Check if you can open the vShield Manager web console.If it is not responding, you can reboot the vShield Manager and wait for a few minutes after vShield is back on line to attempt DSVAactivation again.5. In Activate Host Virtual Machines, select Yes. Click Close.
The Virtual Appliance is now activated. You can confirm this by finding the Virtual Appliance on the Deep Security Manager's Computers pageand seeing that it is in the "Managed (Online)" state:
Now that the Virtual Appliance is activated, all the VMs on the ESXi can be protected by assigning Deep Security Polcies to them through theDeep Security Manager interface.To enable Virtual Appliance protection on guest virtual machines:1. Right-click on a virtual machine in the computer list and select Actions > Activate.2. The Status column for the virtual machine will change to "Managed (Online)".The virtual machine is now protected by the Virtual Appliance even though no in-guest Agent is installed on the virtual machine. Policies canbe assigned to this virtual machine like any other computer being managed by Deep Security Manager.Once the Virtual Appliance is installed, any virtual machines that are added to the ESXi server afterwards can be automatically activated and aPolicy can be automatically applied. New virtual machines can automatically be assigned Policies when detected.
The Virtual Appliance requires that all VMs that are to be protected have been assigned unique UUIDs by the vCenter. A situationwith duplicate UUIDs can occur if you copy a VM. After copying a VM, you are asked by vCenter whether the new VM is a copy orwhether it was moved. If you select the I copied it option, vCenter will assign it a new UUID. However, if you select the I moved itoption (when in fact it was copied), vCenter will not assign it a new UUID. You will then have two VMs with the same UUID whichwill cause problems for the Virtual Appliance. If the Virtual Appliance is instructed to protect multiple VMs with the same UUID,an Alert will be raised and the operation will fail.
To implement coordinated protection by installing an Agent on a virtual machine:
Note:
Note:
Note:
Deep Security 9.5 Installation Guide (VMware vShield) Deploying Agentless Protection in a vShield Environment
45

To install a Deep Security Agent on a virtual machine, follow the same procedures as for any physical computer. A virtual machine beingprotected by both a Virtual Appliance and an Agent is referred to as "coordinated protection". The Virtual Appliance and the Agent are inconstant communication. As long as the Virtual Appliance detects the presence of an Agent on the virtual machine, it will pass all traffic to theAgent and let the Agent apply the security rules to the traffic. If the Agent fails or is stopped, the Virtual Appliance will take over the job ofapplying security rules to traffic.When a Policy is applied to an Agent on a VM that is also protected by a Virtual Appliance, then a copy of that Policy also goesto the Virtual Appliance. When the Agent is running on a VM, the Virtual Appliance is actually sitting idle. If the communicationbetween the Virtual Appliance and the Agent is interrupted (by the Agent going offline for some reason), then the Appliance startsprotecting the VM with the same Policy.
Both the ESXi and the Virtual Appliance may try to look up the hostname of the Manager and not find it if the Manager is in adifferent DNS domain. You can solve this by renaming the Manager to its fully qualified domain name (FQDN). To rename theManager, go to Administration > System Information > System Activity. Make sure Network Map with Activity Graph isselected, then click on the Manager in the Network Map to display the Manager's Properties window and edit the Hostname fieldto the FQDN.
Note:
Note:
Deep Security 9.5 Installation Guide (VMware vShield) Deploying Agentless Protection in a vShield Environment
46

Installing the Deep Security Notifier
The Deep Security Notifier is a utility for physical or virtual Windows machines which provides local notification when malware is detected ormalicious URLs are blocked. The Deep Security Notifier is automatically installed as part of the Deep Security Agent on Windows machines. Thestand-alone installation described here is intended for use on Agentless Windows VMs being protected by the Deep Security Virtual Appliance.Copy the Installation Package
Copy the installation file to the target machine.Installing the Deep Security Notifier for Windows
Remember that you must have administrator privileges to install and run the Deep Security Notifier on Windows machines.1. Double-click the installation file to run the installer package. Click Next to begin the installation2. Read the license agreement and click Next.3. Click Install to proceed with the installation.4. Click Finish to complete the installation.The Deep Security Notifier is now installed and running on this computer, and the Notifier icon appears in the Windows System Tray. TheNotifier will automatically provide pop-up notifications when malware is detected or a URL has been blocked. (You can manually disablenotifications by double-clicking the tray icon to open the Notifier status and configuration window).
On VMs protected by a Virtual Appliance, the Anti-Malware module must be licensed and enabled on the VM for the Deep SecurityNotifier to display information.
Note:
Note:
Deep Security 9.5 Installation Guide (VMware vShield) Installing the Deep Security Notifier
47

Quick Start
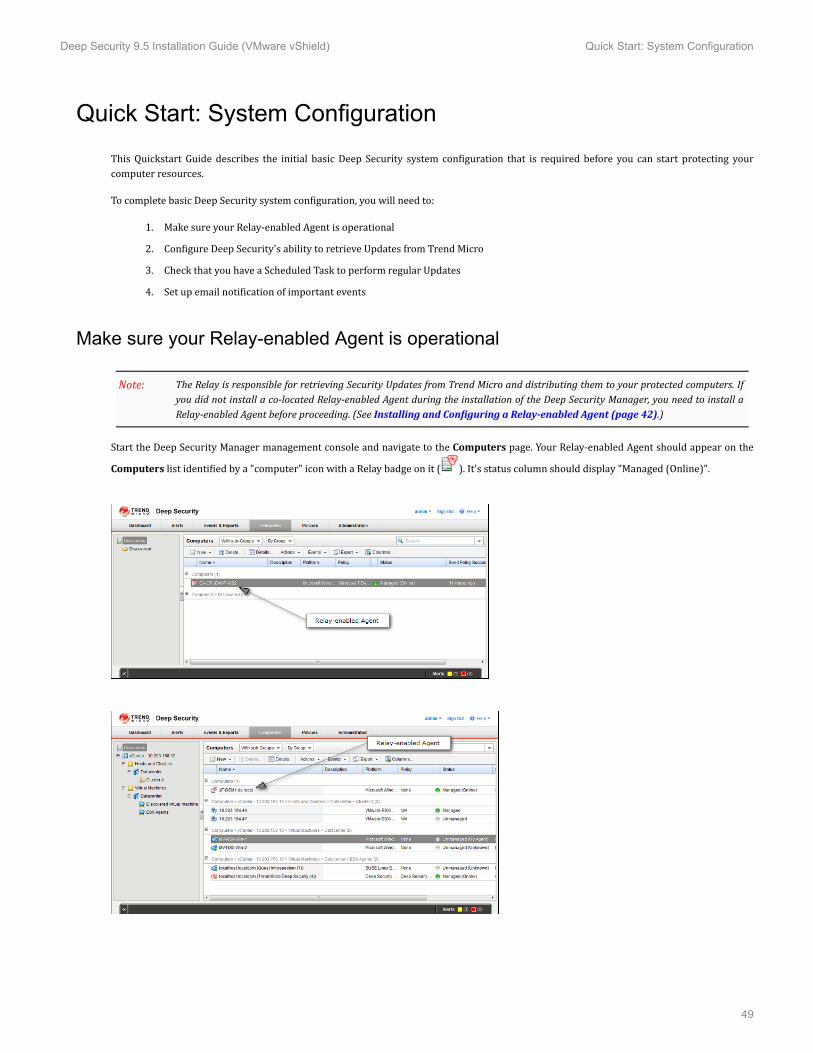
Quick Start: System Configuration
This Quickstart Guide describes the initial basic Deep Security system configuration that is required before you can start protecting yourcomputer resources.To complete basic Deep Security system configuration, you will need to:1. Make sure your Relay-enabled Agent is operational2. Configure Deep Security's ability to retrieve Updates from Trend Micro3. Check that you have a Scheduled Task to perform regular Updates4. Set up email notification of important eventsMake sure your Relay-enabled Agent is operational
The Relay is responsible for retrieving Security Updates from Trend Micro and distributing them to your protected computers. Ifyou did not install a co-located Relay-enabled Agent during the installation of the Deep Security Manager, you need to install aRelay-enabled Agent before proceeding. (See Installing and Configuring a Relay-enabled Agent (page 42).)
Start the Deep Security Manager management console and navigate to the Computers page. Your Relay-enabled Agent should appear on theComputers list identified by a "computer" icon with a Relay badge on it ( ). It's status column should display "Managed (Online)".
Note:
Deep Security 9.5 Installation Guide (VMware vShield) Quick Start: System Configuration
49
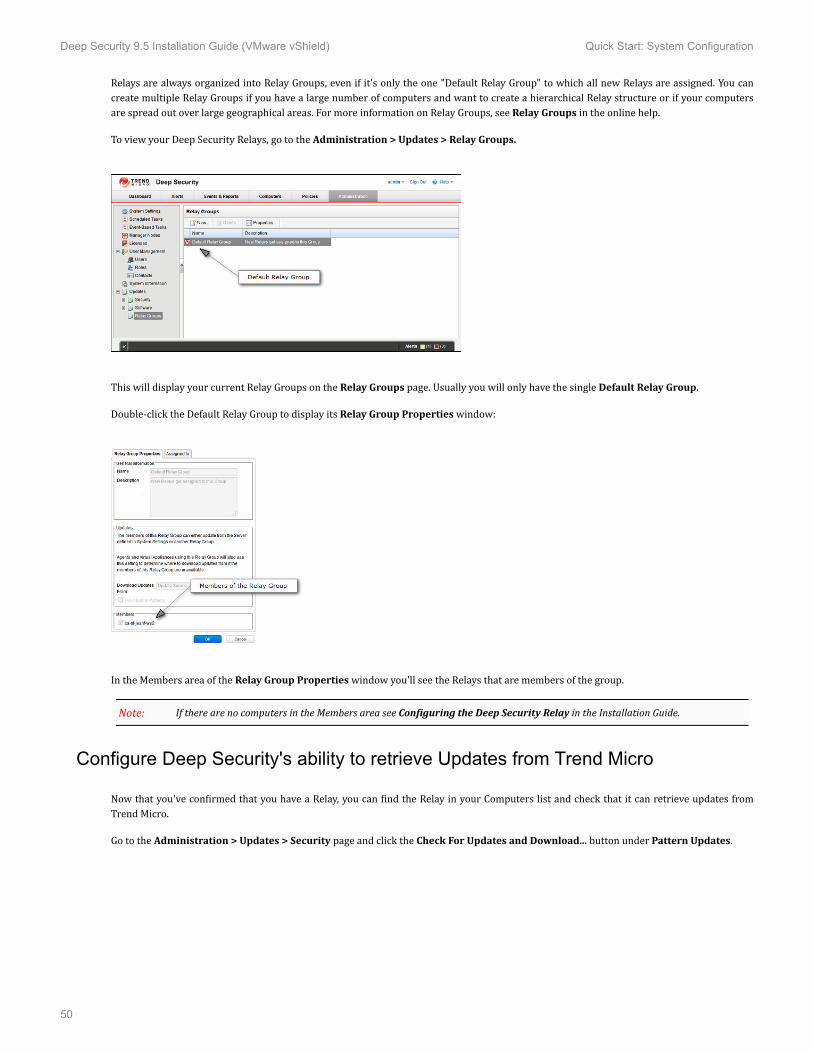
Relays are always organized into Relay Groups, even if it's only the one "Default Relay Group" to which all new Relays are assigned. You cancreate multiple Relay Groups if you have a large number of computers and want to create a hierarchical Relay structure or if your computersare spread out over large geographical areas. For more information on Relay Groups, see Relay Groups in the online help.To view your Deep Security Relays, go to the Administration > Updates > Relay Groups.
This will display your current Relay Groups on the Relay Groups page. Usually you will only have the single Default Relay Group.Double-click the Default Relay Group to display its Relay Group Properties window:
In the Members area of the Relay Group Properties window you'll see the Relays that are members of the group.If there are no computers in the Members area see Configuring the Deep Security Relay in the Installation Guide.
Configure Deep Security's ability to retrieve Updates from Trend Micro
Now that you've confirmed that you have a Relay, you can find the Relay in your Computers list and check that it can retrieve updates fromTrend Micro.Go to the Administration > Updates > Security page and click the Check For Updates and Download... button under Pattern Updates.
Note:
Deep Security 9.5 Installation Guide (VMware vShield) Quick Start: System Configuration
50

This will display the Download Patterns Wizard which contacts the Trend Micro Update Servers and downloads the latest Anti-MalwarePattern Updates and distributes them to your computers. (This is the default behavior. You can configure the automatic distribution of SecurityUpdates on the Administration > System Settings > Updates tab.) If upon completion the wizard displays the success message it means yourRelay-enabled Agent can communicate with the Update servers:
Check that you have a Scheduled Task to perform regular Updates
Now that you know your Relay can communicate with the Update servers, you should create a Scheduled Task which will regularly retrieve anddistribute security Updates.Go to Administration > Scheduled Tasks. There you should see at least one Scheduled Task called Default Check for Security Updates Task:
Double-click the Scheduled Task to view its Properties window:
Deep Security 9.5 Installation Guide (VMware vShield) Quick Start: System Configuration
51

Notice that (in this case) the Daily Check For Security Updates Task is set to perform a Security Update every day at 12:55.If you don't have a Daily Check For Security Updates Task in your list, you can create one by clicking on New on the ScheduledTask page toolbar and following the instructions in the New Scheduled Task wizard.
Updates Configuration in the System Settings
To configure the finer details of Update behavior, in the Deep Security Manager, go to the Updates tab in Administration > System Settings.
In the Security Updates area you can configure the following options (although the default settings are recommended):• Primary Update Source: this is the source that the Relays in all Relay Groups go to for Deep Security Rule and Pattern Updateswhich they can then distribute to Agents and Virtual Appliances. (Only change this if you have been instructed to do so by yoursupport provider.)• Patterns: Patterns are used by the Anti-malware Module. The default settings permits Agents and Virtual Appliances to downloadPattern Updates directly from the Primary Security Update Source (above) if for some reason they cannot contact a Relay or theDeep Security Manager. (For example because of local connectivity issues, or if the computer is a roaming laptop.)
Note:
Deep Security 9.5 Installation Guide (VMware vShield) Quick Start: System Configuration
52

• Rules: Updates to the Deep Security Rules used by the Firewall, Intrusion Prevention, Log Inspection, and Integrity MonitoringProtection Modules must be integrated into Policies at the Deep Security Manager level before they can be sent out to Agentsand Virtual Appliances. This setting (on by default) automatically integrates Rule Updates with the Policies in the Deep SecurityManager.In each Security Policy, there is a further setting (also on by default) to automatically update computers when therehas been a change to the Security Policy that is in use. This setting is found in the Policy/Computer Editor (the Detailswindow) in Settings > Computer > Send Policy Changes Immediately.
• Relays: The two settings under Relays determine if Deep Security will import updates for older 9.0 and earlier versions of theAgents and Appliances. Security Update architecture has changed substantially since 9.0 and the formats of the Updates for 9.0 and9.5 are different. Do not download Updates for older Agents if you do not them as this would consume unnecessary bandwidthand storage space. Similarly, only download Patterns for all "Regions" (determined by language) if you have Agents or Appliancesrunning in multiple Regions. Leaving this option unchecked will distribute only the package designed for the Region in which yourDeep Security Manager is installed.In the Software Updates area you can configure the following options (although the default settings are recommended):• Trend Micro Download Center: By default, Deep Security will "Automatically download updates to imported software." TrendMicro will periodically issue updated builds of already released Agent and Appliance software. Setting this option will automaticallydownload updates to any software that you have already imported to Deep Security (visible on the Administration > Updates >
Software > Local page) from the Trend Micro Download Center (the software available from the Trend Micro Download Center canbe see on the Administration > Updates > Software > Download Center page.)The installation of the software once it has been downloaded must be initiated manually. This last step cannot beautomated.
In the Virtual Appliance Version Control section, you can control the versions of the Protection Modules are installed on a newly activatedVirtual Appliance. The Deep Security Virtual Appliance is shipped with basic versions of the Protection Module plug-ins. The Appliance relieson the plug-ins that are shipped with the 64-bit Red hat Agent software package for Updates. By default, the Appliance will use the latest versionof the Red Hat package that has been imported to Deep Security (on the Updates > Software > Local page.) However you may wish to controlover the version of the Protection Modules get installed and you can do using this setting.For more information about the configuration options available on this page, see the associated online help for it in the DeepSecurity Manager.
Set up email notification of important events
Deep Security Alerts are raised when situations occur that require special attention. Alerts can be raised due to security Events such as thedetection of malware or an abnormal restart on a protected computer, or they can be system events like the Deep Security Manager runninglow on disk space. Deep Security can be configured to send email notifications when specific Alerts are raised.To configure which Alerts will generate an email notification, go to the Alerts page and click Configure Alerts... to display the list of DeepSecurity Alerts:
Note:
Note:
Note:
Deep Security 9.5 Installation Guide (VMware vShield) Quick Start: System Configuration
53
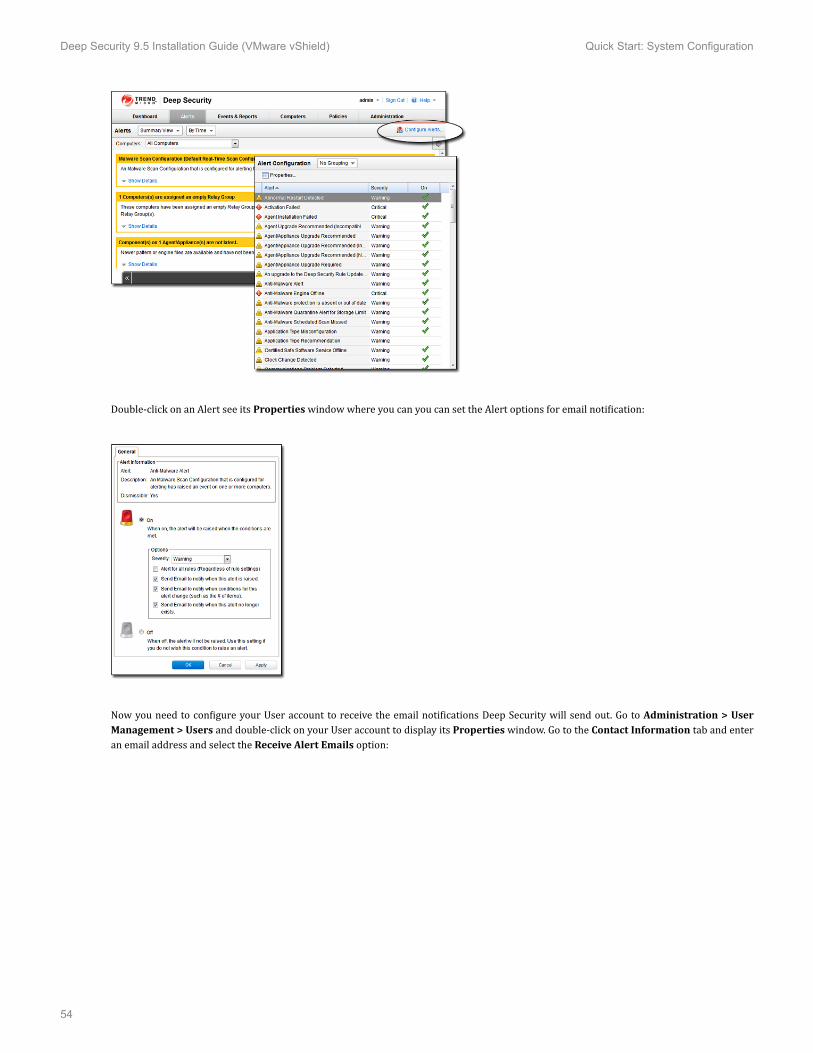
Double-click on an Alert see its Properties window where you can you can set the Alert options for email notification:
Now you need to configure your User account to receive the email notifications Deep Security will send out. Go to Administration > UserManagement > Users and double-click on your User account to display its Properties window. Go to the Contact Information tab and enteran email address and select the Receive Alert Emails option:
Deep Security 9.5 Installation Guide (VMware vShield) Quick Start: System Configuration
54
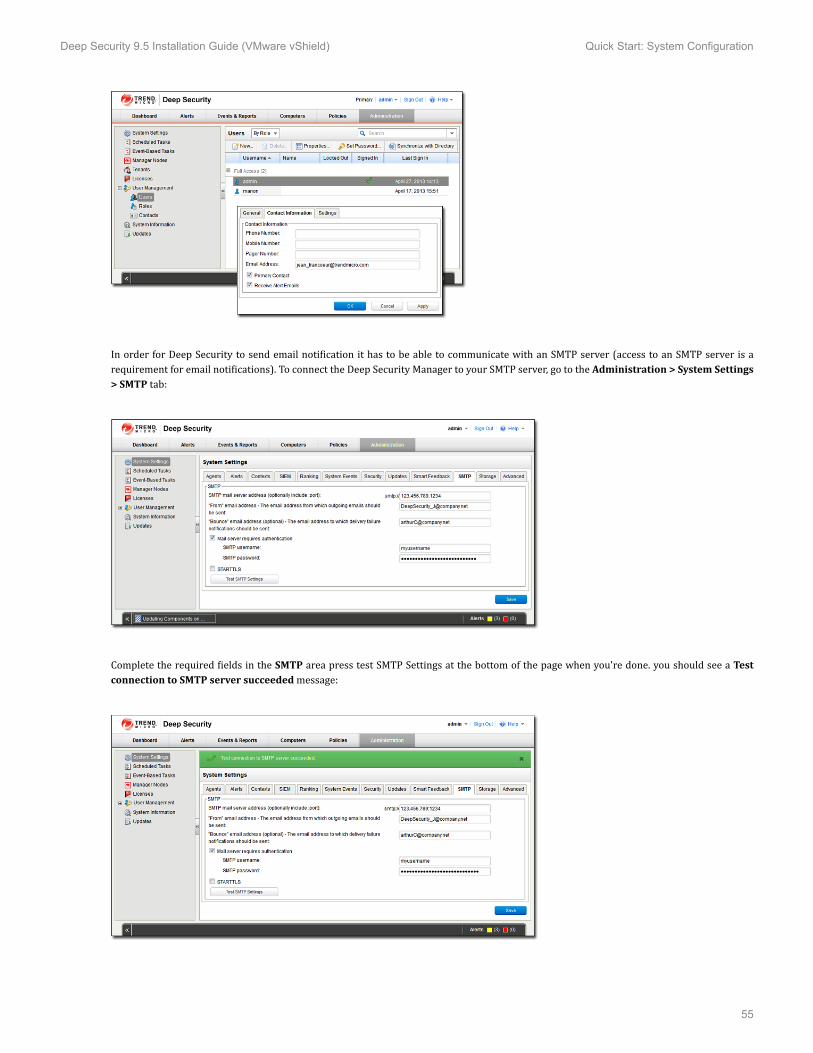
In order for Deep Security to send email notification it has to be able to communicate with an SMTP server (access to an SMTP server is arequirement for email notifications). To connect the Deep Security Manager to your SMTP server, go to the Administration > System Settings> SMTP tab:
Complete the required fields in the SMTP area press test SMTP Settings at the bottom of the page when you're done. you should see a Testconnection to SMTP server succeeded message:
Deep Security 9.5 Installation Guide (VMware vShield) Quick Start: System Configuration
55
If you unable to connect with your SMTP server, make sure the Manager can connect with the SMTP server on port 25.
Basic Configuration is complete
This completes the basic Deep Security system configuration. Deep Security is now configured to regularly contact Trend Micro for securityUpdates and distribute those Updates on regular basis, and it will send you email notifications when Alerts are raised. Now you need to applyDeep Security protection to your computers. For more information on protecting computer resources, see QuickStart: Protecting a Computer(page 57).
Note:
Deep Security 9.5 Installation Guide (VMware vShield) Quick Start: System Configuration
56

Quick Start: Protecting a Computer
The following describes how to use Deep Security to protect a Windows Server 2008 computer.It will involve the following steps:1. Adding the computer to the Deep Security Manager.2. Configuring and running a Recommendation Scan3. Automatically implementing scan recommendations4. Create a Scheduled Task to perform regular Recommendation Scans5. Monitoring Activity Using the Deep Security ManagerWe will assume that you have already installed the Deep Security Manager on the computer from which you intend to managethe Deep Security Agents throughout your network. We will also assume that you have installed (but not activated) DeepSecurity Agent on the computer you wish to protect. And finally, we will assume that you have a Deep Security Relay availablefrom which Deep Security can download the latest Security Updates. If any of these requirements are not in place, consult theInstallation Guide for instructions to get to this stage.
Adding the computer to the Deep Security Manager
There are several ways of adding computers to the Deep Security Manager's Computers page. You can add computers by:• Adding computers individually from a local network by specifying their IP addresses or hostnames• Discovering computers on a local network by scanning the network• Connecting to a Microsoft Active Directory and importing a list of computers• Connecting to a VMware vCenter and importing a list of computers• Connecting to computing resources from the following Cloud Provider services:◦ Amazon EC2◦ VMware vCloud
For the purposes of this exercise, we will add a computer from a local network but once a computer is added to the Manager, the protectionprocedures are the same regardless of where the computer is located.To add a computer from a local network:1. In the Deep Security Manager console, go to the Computers page and click New in the toolbar and select New Computer... fromthe drop-down menu.
Note:
Deep Security 9.5 Installation Guide (VMware vShield) Quick Start: Protecting a Computer
57

2. In the New Computer wizard, enter the hostname or IP address of the computer and select an appropriate security Policy to applyfrom the Policy tree in the drop-down menu. (In this case we will select the Windows Server 2008 Policy.) Click Next.
3. The wizard will contact the computer, add it to the Computers page, detect the unactivated Agent, activate it, and apply the selectedPolicy. Click Finish.
An Agent can be configured to automatically initiate its own activation upon installation. For details, see Command-Line Utilities in the Reference section of the online help.
4. When the computer has been added the wizard will display a confirmation message:
5. Deselect the Open Computer Details on 'Close' option and click Close.The computer now appears in the Deep Security Manager's list of managed computers on the Computers page.Deep Security will automatically download the latest Security Updates to the computer after activation. As well, the Windows Server 2008Policy that was assigned to the computer has Integrity Monitoring enabled and so it will start to Build an Integrity Monitoring baseline for thecomputer. You can see activities currently being carried out in the status bar of the Manager window:
Note:
Deep Security 9.5 Installation Guide (VMware vShield) Quick Start: Protecting a Computer
58

Once Deep Security Manager has completed its initial post-activation tasks, the computer's Status should display as Managed (Online).More information is available for each page in the Deep Security Manager by clicking the Help button in the menu bar.
Configuring and Running a Recommendation Scan
The security Policy that we assigned to the computer is made up of a collection of Rules and settings designed for a computer running theWindows Server 2008 operating system. However, a static Policy can soon fall out of date. This can be because of new software being installedon the computer, new operating system vulnerabilities being discovered for which Trend Micro has created new protection Rules, or evenbecause a previous vulnerability was corrected by an operating system or software service pack. Because of the dynamic nature of the securityrequirements on a computer, you should regularly run Recommendation Scans which will assess the current state of the computer and compareit against the latest Deep Security protection module updates to see if the current security Policy needs to be updated.Recommendation Scans make recommendations for the following protection modules:• Intrusion Prevention• Integrity Monitoring• Log Inspection
To run a Recommendation Scan on your computer:1. Go to the Computers page in the main Deep Security Manager console window.2. Right-click on your computer and select Actions > Scan for Recommendations:
Note:
Deep Security 9.5 Installation Guide (VMware vShield) Quick Start: Protecting a Computer
59

During the Recommendation Scan, your computer's Status will display Scanning for Recommendations. When the scan is finished, if DeepSecurity has any recommendations to make, you will see an Alert on the Alerts screen:
To see the results of the Recommendation Scan:1. Open the computer editor for your computer (Details... in the Computers page menu bar or from the right-click menu.)2. In the computer editor window, go to the Intrusion Prevention module page.In the Recommendations area of the General tab, you'll see the results of the scan:
The Current Status tells us that there are currently 179 Intrusion Prevention Rules assigned to this computer.Last Scan for Recommendations tells us that the last scan took place on December 18th, 2012, at 09:14.Unresolved Recommendations tells us that as a result of the scan, Deep Security recommends assigning an additional 28 Intrusion PreventionRules and unassigning 111 currently assigned Rules.The Note informs us that 111 of the Rules recommended for unassignment (all of them as it turn out) have been assigned at the Policy level(rather than directly here on the computer level). Rules that have been assigned at a level higher up the Policy tree can only be unassignedin the Policy where they were assigned -- in this case, the Windows Server 2008 Policy. (If we had opened the Windows Server 2008 Policyeditor, we would have seen the same recommendations and we could have unassigned them from there.)We are also told that 7 of the Rules that are recommended for assignment can't be automatically assigned. Usually these are either Rulesthat require configuration or Rules that are prone to false positives and whose behavior should be observed in detect-only mode being being
Deep Security 9.5 Installation Guide (VMware vShield) Quick Start: Protecting a Computer
60

enforced in prevent mode. To see which Rules have been recommended for assignment, click Assign/Unassign... to display the IPS Rules ruleassignment modal window. Then select Recommended for Assignment from the second drop-down filter list:
Rules that require configuration are identified by an icon with a small configuration badge ( ). To see the configurable options for a Rule,double-click the Rule to open its Properties window (in local editing mode) and go to the Configuration tab. To Assign a Rule, select thecheckbox next to its name.To view Rules that are recommended for unassignment, filter the list of Rules by selecting Recommended for Unassignment from the samedrop-down list. To unassign a Rule, deselect the checkbox next to its name.Rules that are in effect on a computer because they have been assigned in a Policy higher up the policy tree can't be unassignedlocally. The only way to unassign such Rules is to edit the Policy where they were originally assigned and unassign them fromthere. For more information on this kind of Rule inheritance, see Policies, Inheritance and Overrides in the Reference section ofthe online help.
Automatically implement scan recommendations
You can configure Deep Security to automatically assign and unassign Rules after a Recommendation Scan. To do so, open the computeror Policy editor and go to the individual protection module pages that support Recommendation Scans (Intrusion, Prevention, IntegrityMonitoring, and Log Inspection). In the Recommendation area on the General tab, set Automatically implement Intrusion PreventionRecommendations (when possible): to Yes.
Create a Scheduled task to perform regular Recommendation Scans
Performing regular Recommendation Scans ensures that your computers are protected by the latest relevant Rule sets and that those that areno longer required are removed. You can create a Scheduled Task to carry out this task automatically.To create a Scheduled Task:1. In the main Deep Security Manager window, go to Administration > Scheduled Tasks2. In the menu bar, click New to display the New Scheduled Task wizard.
Note:
Deep Security 9.5 Installation Guide (VMware vShield) Quick Start: Protecting a Computer
61

3. Select Scan Computers for Recommendations as the scan type and select Weekly recurrence. Click Next.4. Select a start time, select every 1 week, and select a day of the week. Click Next.5. When specifying which computers to Scan, select the last option (Computer) and select the Windows Server 2008 computer weare protecting. Click Next.6. Type a name for the new Scheduled Task. Leave the Run task on 'Finish' unchecked (because we just ran a Recommendation Scan).Click Finish.The new Scheduled task now appears in the list of Scheduled Tasks. It will run once a week to scan your computer and make recommendationsfor you computer. If you have set Automatically implement Recommendations for each of the three protection modules that support it, DeepSecurity will assign and unassign Rules are required. If Rules are identified that require special attention, an Alert will be raised to notify you.
Schedule Regular Security Updates
If you follow the steps described in Quick Start: System Configuration (page 49), your computer will now be regularly updated with the latestprotection from Trend Micro.Monitor Activity Using the Deep Security Manager
The Dashboard
After the computer has been assigned a Policy and has been running for a while, you will want to review the activity on that computer. Thefirst place to go to review activity is the Dashboard. The Dashboard has many information panels ("widgets") that display different types ofinformation pertaining to the state of the Deep Security Manager and the computers that it is managing.At the top right of the Dashboard page, click Add/Remove Widgets to view the list of widgets available for display.For now, we will add the following widgets from the Firewall section:• Firewall Activity (Prevented)• Firewall IP Activity (Prevented)• Firewall Event History [2x1]Select the checkbox beside each of the three widgets, and click OK. The widgets will appear on the dashboard. (It may take a bit of time togenerate the data.)• The Firewall Activity (Prevented) widget displays a list of the most common reasons for packets to be denied (that is, blockedfrom reaching a computer by the Agent on that computer) along with the number of packets that were denied. Items in this list willbe either types of Packet Rejections or Firewall Rules. Each "reason" is a link to the corresponding logs for that denied packet.
Deep Security 9.5 Installation Guide (VMware vShield) Quick Start: Protecting a Computer
62
• The Firewall IP Activity (Prevented) widget displays a list of the most common source IPs of denied packets. Similar to theFirewall Activity (Prevented) widget, each source IP is a link to the corresponding logs.• The Firewall Event History [2x1] widget displays a bar graph indicating how many packets were blocked in the last 24 hourperiod or seven day period (depending on the view selected). Clicking a bar will display the corresponding logs for the periodrepresented by the bar.
Note the trend indicators next to the numeric values in the Firewall Activity (Prevented) and Firewall IP Activity (Prevented)widgets. An upward or downward pointing triangle indicates an overall increase or decrease over the specified time period, and aflat line indicates no significant change.
Logs of Firewall and Intrusion Prevention Events
Now drill-down to the logs corresponding to the top reason for Denied Packets: in the Firewall Activity (Prevented) widget, click the firstreason for denied packets. This will take you to the Firewall Events page.The Firewall Events page will display all Firewall Events where the Reason column entry corresponds to the first reason from the FirewallActivity (Prevented) widget ("Out of Allowed Policy"). The logs are filtered to display only those events that occurred during the view periodof the Dashboard (Last 24 hours or last seven days). Further information about the Firewall Events and Intrusion Prevention Events pagecan be found in the help pages for those pages.
For the meaning of the different packet rejection reasons, see Firewall Events and Intrusion Prevention Events in the Referencesection of the online help.
Reports
Often, a higher-level view of the log data is desired, where the information is summarized, and presented in a more easily understood format.The Reports fill this Role, allowing you to display detailed summaries on computers, Firewall and Intrusion Prevention Event Logs, Events,Alerts, etc. In the Reports page, you can select various options for the report to be generated.We will generate a Firewall Report, which displays a record of Firewall Rule and Firewall Stateful Configuration activity over a configurabledate range. Select Firewall Report from the Report drop-down. Click Generate to launch the report in a new window.By reviewing scheduled reports that have been emailed by the Deep Security Manager to Users, by logging into the system and consulting thedashboard, by performing detailed investigations by drilling-down to specific logs, and by configuring Alerts to notify Users of critical events,you can remain apprised of the health and status of your network.
Note:
Note:
Deep Security 9.5 Installation Guide (VMware vShield) Quick Start: Protecting a Computer
63

Upgrading

Upgrade Multi-Node Deep Security Manager
Upgrading a Multi-node Deep Security manager requires no special preparation.To upgrade a Multi-node Manager:1. Run the Deep Security Manager install package on any node.The installer will instruct the other nodes to shut down (there is no need to manually shut down the services).The installer will upgrade the local Deep Security Manager and update the database.2. Run the Deep Security Manager installer on the remaining nodes.As each node is upgraded, the service will restart and the node will rejoin the network of Deep Security Managers.
Deep Security 9.5 Installation Guide (VMware vShield) Upgrade Multi-Node Deep Security Manager
65

Upgrade Deep Security Agents and Relays
Deep Security Agents and Relays must be of the same version or less than the Deep Security Manager being used to manage it. TheDeep Security Manager must always be upgraded before the Deep Security Agents and Relays.
When planning the upgrade of your Agents and Relays from 9.0 to 9.5, ensure that your 9.5 Agents are assigned to Relay Groupsthat contain only 9.5 Relays. You should upgrade all Relays in a Group to 9.5 (or create a new 9.5 Group) before configuring any9.5 Agents to receive updates from the group.
Deep Security 9.0 Agents can be upgraded using the Deep Security Manager interface (or by manual local upgrade), but the Agent softwaremust first be imported into the Deep Security Manager.Deep Security 9.0 Windows Relays can be upgraded to 9.5 Relay-enabled Agents using the Deep Security Manager interface (or by manual localupgrade). Deep Security 9.0 Linux Relays cannot be upgraded. They must be uninstalled and replaced with a fresh install of a 9.5 Linux Agent.(See Upgrade a Relay on Linux, below, for instructions.)To import Agent software packages to Deep Security:1. In Deep Security Manager, go to Administration > Updates > Software > Download Center. The Download Center page displaysthe latest versions all Agent software available from Trend Micro.2. Select your Agent software package from the list and click Import in the menu bar. Deep Security will begin to download thesoftware from the Trend Micro Download Center to the Deep Security Manager.
3. When the software has finished downloading, a green check mark mark will appear in the Imported column for that Agent.
To Upgrade Deep Security Agents and Windows Deep Security Relays using the Deep Security Manager:1. In the Deep Security Manager, go to the Computers screen.2. find the computer on which you want to upgrade the Agent or Relay.3. Right-click the computer and select Actions > Upgrade Agent software.4. The new Agent software will be sent to the computer and the Agent or Relay will be upgraded.You can manually upgrade the any Agents or Relays locally on a computer. To do this, follow the instructions in Installing theDeep Security Agent (page 34).
Note:
Note:
Note:
Deep Security 9.5 Installation Guide (VMware vShield) Upgrade Deep Security Agents and Relays
66
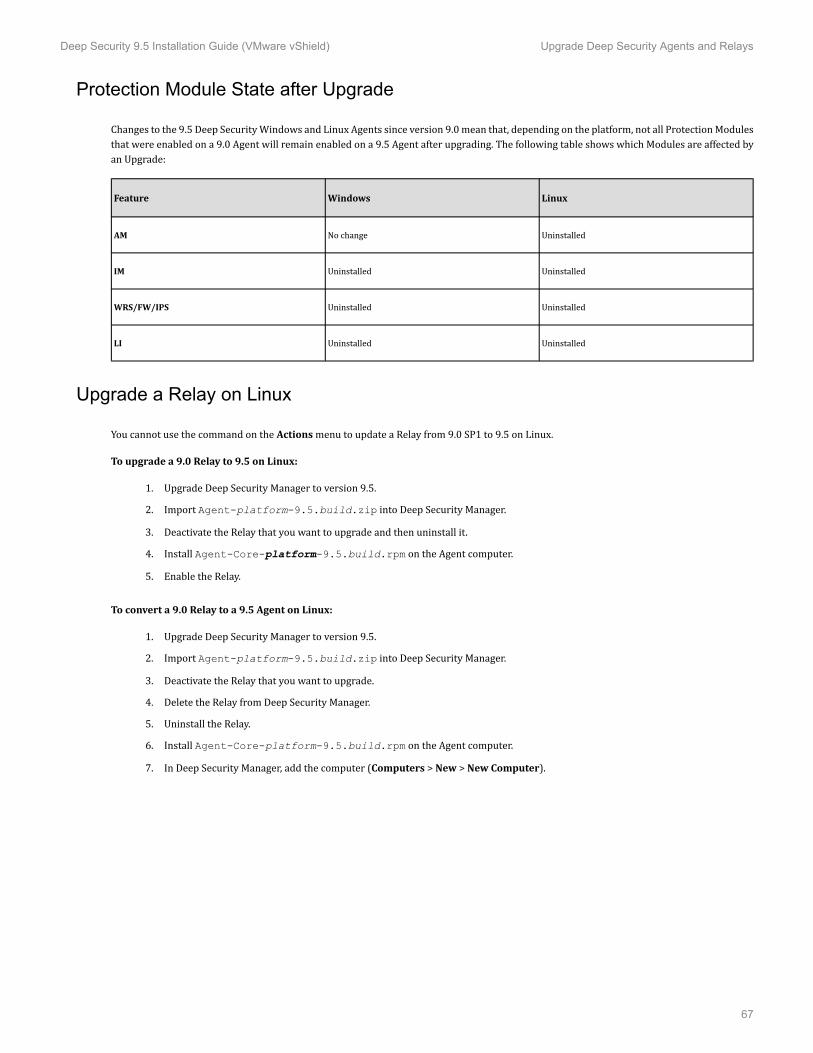
Protection Module State after Upgrade
Changes to the 9.5 Deep Security Windows and Linux Agents since version 9.0 mean that, depending on the platform, not all Protection Modulesthat were enabled on a 9.0 Agent will remain enabled on a 9.5 Agent after upgrading. The following table shows which Modules are affected byan Upgrade:Feature Windows Linux
AM No change UninstalledIM Uninstalled UninstalledWRS/FW/IPS Uninstalled UninstalledLI Uninstalled Uninstalled
Upgrade a Relay on Linux
You cannot use the command on the Actions menu to update a Relay from 9.0 SP1 to 9.5 on Linux.To upgrade a 9.0 Relay to 9.5 on Linux:1. Upgrade Deep Security Manager to version 9.5.2. Import Agent-platform-9.5.build.zip into Deep Security Manager.3. Deactivate the Relay that you want to upgrade and then uninstall it.4. Install Agent-Core-platform-9.5.build.rpm on the Agent computer.5. Enable the Relay.To convert a 9.0 Relay to a 9.5 Agent on Linux:1. Upgrade Deep Security Manager to version 9.5.2. Import Agent-platform-9.5.build.zip into Deep Security Manager.3. Deactivate the Relay that you want to upgrade.4. Delete the Relay from Deep Security Manager.5. Uninstall the Relay.6. Install Agent-Core-platform-9.5.build.rpm on the Agent computer.7. In Deep Security Manager, add the computer (Computers > New > New Computer).
Deep Security 9.5 Installation Guide (VMware vShield) Upgrade Deep Security Agents and Relays
67
Upgrade the Deep Security Notifier
Upgrading the Deep Security Notifier is only required on virtual machines being protected Agentlessly by a Deep Security VirtualAppliance. On machines with an in-guest Agent, the Notifier will be upgraded along with the Deep Security Agent.
To upgrade the Deep Security Notifier:1. Uninstall Deep Security Notifier 9.02. Install Deep Security Notifier 9.5 according to the procedures described in Installing the Deep Security Notifier (page 47).The Deep Security Notifier must always be the same version as the Deep Security Manager.
Note:
Note:
Deep Security 9.5 Installation Guide (VMware vShield) Upgrade the Deep Security Notifier
68

Uninstalling Deep Security from your vShieldEnvironment
When you uninstall an activated Agent or a Relay from a managed computer, the Deep Security Manager does not know that thesoftware has been uninstalled. The computer will remain listed in the Computers list and its status will be listed as "Managed(Offline)" or something equivalent depending on the context. To avoid this, either deactivate the Agent or Relay from the Managerbefore uninstallation, or simply delete the computer from the list.
To remove the Deep Security Virtual Appliance
To remove the Virtual Appliance:1. Use the Deep Security Manager to "deactivate" the Virtual Appliance.2. Log in to vCenter.3. Stop the Appliance.4. Delete from disk.To remove the Deep Security Filter Driver from a prepared ESXi
To restore the ESXi to its "un-prepared" state:1. From the Deep Security Manager Computers list, select the Virtual Center. Choose the Prepared Computer for un-deployment, right-click the Computer and select Restore ESX.2. Follow the wizard steps, accepting the defaults.3. Choose "Yes" to have the DSM handle the ESXi driver un-installation automatically.The Deep Security Manager will attempt to bring the ESXi into and out of maintenance mode automatically. Anyrunning virtual machines will need to be manually shutdown. At the end of the uninstallation process, the ESXi will beautomatically rebooted and brought out of maintenance mode.Or4. Choose "No" to manually put the ESXi into /out of maintenance mode.
The Deep Security Manager wizard will start the uninstallation of the Filter Driver automatically once the ESXi has been put intomaintenance mode. At the end of the uninstallation process, the ESXi will be automatically re-booted but remain in maintenancemode.
Note:
Note:
Note:
Deep Security 9.5 Installation Guide (VMware vShield) Uninstalling Deep Security from your vShield Environment
69

Appendices
Deep Security Manager Memory Usage
Configuring the Installer's Maximum Memory Usage
The installer is configured to use 1GB of contiguous memory by default. If the installer fails to run you can try configuring the installer to useless memory.To configure the amount of RAM available to the installer:1. Go to the directory where the installer is located.2. Create a new text file called "Manager-Windows-9.5.xxxx.x64.vmoptions" or "Manager-Linux-9.5.xxxx.x64.vmoptions", dependingon your installation platform (where "xxxx" is the build number of the installer).3. Edit the file by adding the line: "-Xmx800m" (in this example, 800MB of memory will be made available to the installer.)4. Save the file and launch the installer.
Configuring the Deep Security Manager's Maximum Memory Usage
The Deep Security Manager default setting for heap memory usage is 4GB. It is possible to change this setting.To configure the amount of RAM available to the Deep Security Manager:1. Go to the Deep Security Manager install directory (the same directory as Deep Security Manager executable).2. Create a new file. Depending on the platform, give it the following name:
◦ Windows: "Deep Security Manager.vmoptions".◦ Linux: "dsm_s.vmoptions".3. Edit the file by adding the line: " -Xmx10g " (in this example, "10g" will make 10GB memory available to the Deep SecurityManager.)4. Save the file and restart the Deep Security Manager.5. You can verify the new setting by going to Administration > System Information and in the System Details area, expand Manager
Node > Memory. The Maximum Memory value should now indicate the new configuration setting.
Deep Security 9.5 Installation Guide (VMware vShield) Deep Security Manager Memory Usage
71
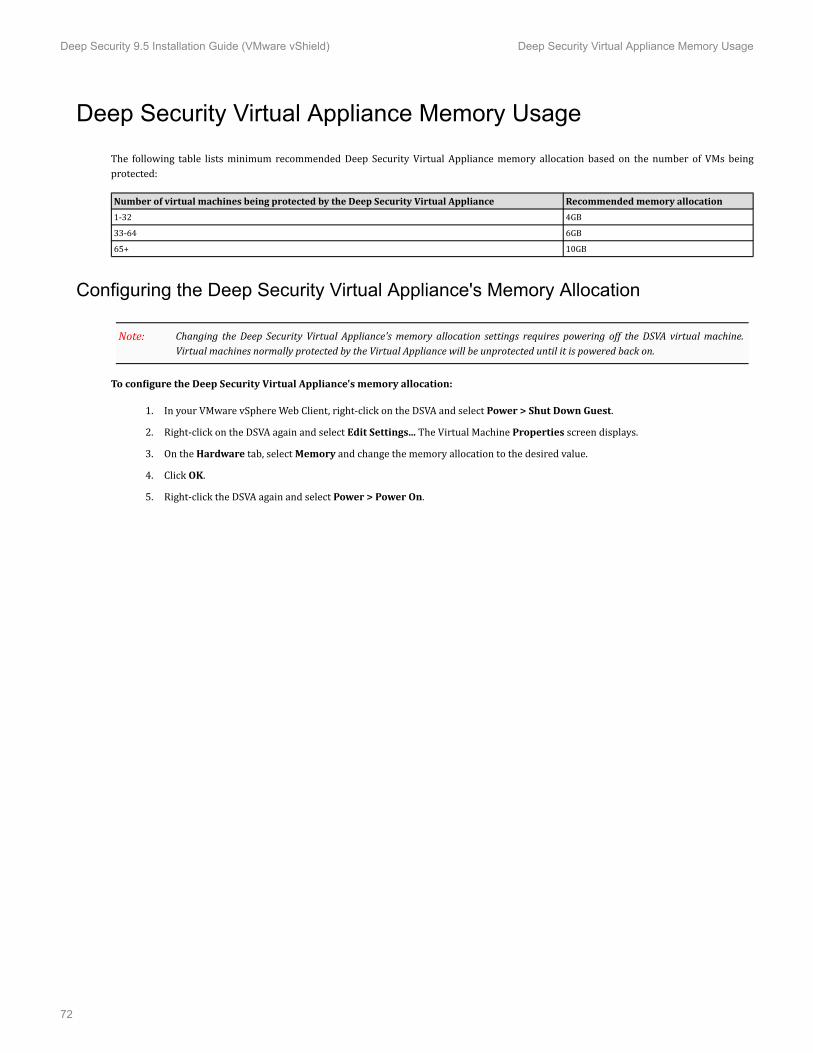
Deep Security Virtual Appliance Memory Usage
The following table lists minimum recommended Deep Security Virtual Appliance memory allocation based on the number of VMs beingprotected:Number of virtual machines being protected by the Deep Security Virtual Appliance Recommended memory allocation1-32 4GB33-64 6GB65+ 10GB
Configuring the Deep Security Virtual Appliance's Memory Allocation
Changing the Deep Security Virtual Appliance's memory allocation settings requires powering off the DSVA virtual machine.Virtual machines normally protected by the Virtual Appliance will be unprotected until it is powered back on.
To configure the Deep Security Virtual Appliance's memory allocation:1. In your VMware vSphere Web Client, right-click on the DSVA and select Power > Shut Down Guest.2. Right-click on the DSVA again and select Edit Settings... The Virtual Machine Properties screen displays.3. On the Hardware tab, select Memory and change the memory allocation to the desired value.4. Click OK.5. Right-click the DSVA again and select Power > Power On.
Note:
Deep Security 9.5 Installation Guide (VMware vShield) Deep Security Virtual Appliance Memory Usage
72

Deep Security Manager Performance Features
Performance Profiles
Deep Security Manager uses an optimized concurrent job scheduler that considers the impacts of each job on CPU, Database and Agent/Appliances. By default, new installations use the "Aggressive" performance profile which is optimized for a dedicated Manager. If the DeepSecurity Manager is installed on a system with other resource-intensive software it may be preferable to use the "Standard" performanceprofile. The performance profile can be changed by navigating to Administration > Manager Nodes. From this screen select a Manager nodeand open the Properties window. From here the Performance Profile can be changed via the drop-down menu.The Performance Profile also controls the number of Agent/Appliance-initiated connections that the Manager will accept. The default of eachof the performance profiles effectively balances the amount of accepted, delayed and rejected heartbeats.Low Disk Space Alerts
Low Disk Space on the Database Host
If the Deep Security Manager receives a "disk full" error message from the database, it will start to write events to its own hard drive and willsend an email message to all Users informing them of the situation. This behavior is not configurable.If you are running multiple Manager nodes, the Events will be written to whichever node is handling the Event. (For more information onrunning multiple nodes, see Multi-Node Manager in the Reference section of the online help or the Administrator's Guide.)Once the disk space issue on the database has been resolved, the Manager will write the locally stored data to the database.Low Disk Space on the Manager Host
If the available disk space on the Manager falls below 10%, the Manager generates a Low Disk Space Alert. This Alert is part of the normal Alertsystem and is configurable like any other. (For more information on Alerts, see Alert Configuration in the Configuration and Managementsection of the online help or the Administrator's Guide.)If you are running multiple Manager nodes, the node will be identified in the Alert.When the Manager's available disk space falls below 5MB, the Manager will send an email message to all Users and the Manager will shut down.The Manager cannot be restarted until the available disk space is greater than 5MB.You must restart the Manager manually.If you are running multiple nodes, only the node that has run out of disk space will shut down. The other Manager nodes will continueoperating.Agentless Protection
Scan Caching
Scan Caching improves the efficiency of on-demand scans performed by the Virtual Appliance. It eliminates the unnecessary scanning ofidentical content across multiple VMs in large VMware deployments.In addition,• Integrity Monitoring scan caching speeds up Integrity Monitoring scans by sharing Integrity Monitoring scan results
Deep Security 9.5 Installation Guide (VMware vShield) Deep Security Manager Performance Features
73
• Anti-Malware on-demand caching speeds up scans on subsequent cloned/similar VMs• Anti-Malware Real-time caching speeds up VM boot and application access time• Concurrent Scan feature allows further overall scan time improvement by allowing multiple VMs to be scanned concurrentlyHigh Availability Environments
If you intend to take advantage of VMware High Availability (HA) capabilities, make sure that the HA environment is established before youbegin installing Deep Security. All ESXi hypervisors used for recovery operations must be imported into the Deep Security Manager with theirvCenter, they must be "prepared", and a Deep Security Virtual Appliance must be installed on each one. Setting up the environment in this waywill ensure that Deep Security protection will remain in effect after a HA recovery operation.When a Virtual Appliance is deployed in a VMware environment that makes use of the VMware Distributed Resource Scheduler(DRS), it is important that the Appliance does not get vMotioned along with the virtual machines as part of the DRS process.Virtual Appliances must be "pinned" to their particular ESXi server. You must actively change the DRS settings for all the VirtualAppliances to "Manual" or "Disabled" (recommended) so that they will not be vMotioned by the DRS. If a Virtual Appliance(or any virtual machines) is set to "Disabled", vCenter Server does not migrate that virtual machine or provide migrationrecommendations for it. This is known as "pinning" the virtual machine to its registered host. This is the recommended courseof action for Virtual Appliances in a DRS environment. (An alternative is to deploy the Virtual Appliance onto a local store asopposed to a shared store. When the Virtual Appliance is deployed onto a local store it cannot be vMotioned by DRS.) For furtherinformation on DRS and pinning virtual machines to a specific ESXi server consult your VMware documentation.
If a virtual machine is vMotioned by HA from an ESXi protected by a DSVA to an ESXi that is not protected by a DSVA, thevirtual machine will become unprotected. If the virtual machine is subsequently vMotioned back to the original ESXi, it will notautomatically be protected again unless you have created an Event-based Task to activate and protect computers that have beenvMotioned to an ESXi with an available DSVA. For more information, see "Event-Based Tasks" in the Deep Security Manager Help.
Note:
Note:
Deep Security 9.5 Installation Guide (VMware vShield) Deep Security Manager Performance Features
74
Creating an SSL Authentication Certificate
The Deep Security Manager creates a 10-year self-signed certificate for the connections with Agents/Appliances, Relays, and Users' webbrowsers. However, for added security, this certificate can be replaced with a certificate from a trusted certificate authority (CA). (Suchcertificates are maintained after a Deep Security Manager upgrade.)Once generated, the CA certificate must be imported into the .keystore in the root of the Deep Security Manager installation directory and havean alias of "tomcat". The Deep Security Manager will then use that certificate.To create your SSL authentication certificate:1. Go to the Deep Security Manager installation directory (for the purpose of these instructions, we will assume it's "C:\Program
Files\Trend Micro\Deep Security Manager") and create a new folder called Backupkeystore2. Copy .keystore and configuration.properties to the newly created folder Backupkeystore3. From a command prompt, go to the following location: C:\Program Files\Trend Micro\Deep Security Manager\jre\bin4. Run the following command which will create a self signed certificate:C:\Program Files\Trend Micro\Deep Security Manager\jre\bin>keytool -genkey -alias tomcat -
keyalg RSA -dname cn=dsmserver
5. Choose password: changeit
NOTE: -dname is the common name of the certificate your CA will sign. Some CAs require a specific name to sign theCertificate Signing Request (CSR). Please consult your CA Admin to see if you have that particular requirement.
6. There is a new keystore file created under the user home directory. If you are logged in as "Administrator", You will see the.keystore file under C:\Documents and Settings\Administrator7. View the newly generated certificate using the following command:C:\Program Files\Trend Micro\Deep Security Manager\jre\bin>keytool -list -v
8. Run the following command to create a CSR for your CA to sign:C:\Program Files\Trend Micro\Deep Security Manager\jre\bin>keytool -certreq -keyalg RSA -
alias tomcat -file certrequest.csr
9. Send the certrequest.csr to your CA to sign. In return you will get two files. One is a "certificate reply" and the second is the CAcertificate itself.10. Run the following command to import the CA cert in JAVA trusted keystore:C:\Program Files\Trend Micro\Deep Security Manager\jre\bin>keytool -import -alias root -
trustcacerts -file cacert.crt -keystore "C:\Program Files\Trend Micro\Deep Security Manager\
jre\lib\security\cacerts"
11. Run the following command to import the CA certificate in your keystore:C:\Program Files\Trend Micro\Deep Security Manager\jre\bin>keytool -import -alias root -
trustcacerts -file cacert.crt
(say yes to warning message)
Note:
Deep Security 9.5 Installation Guide (VMware vShield) Creating an SSL Authentication Certificate
75
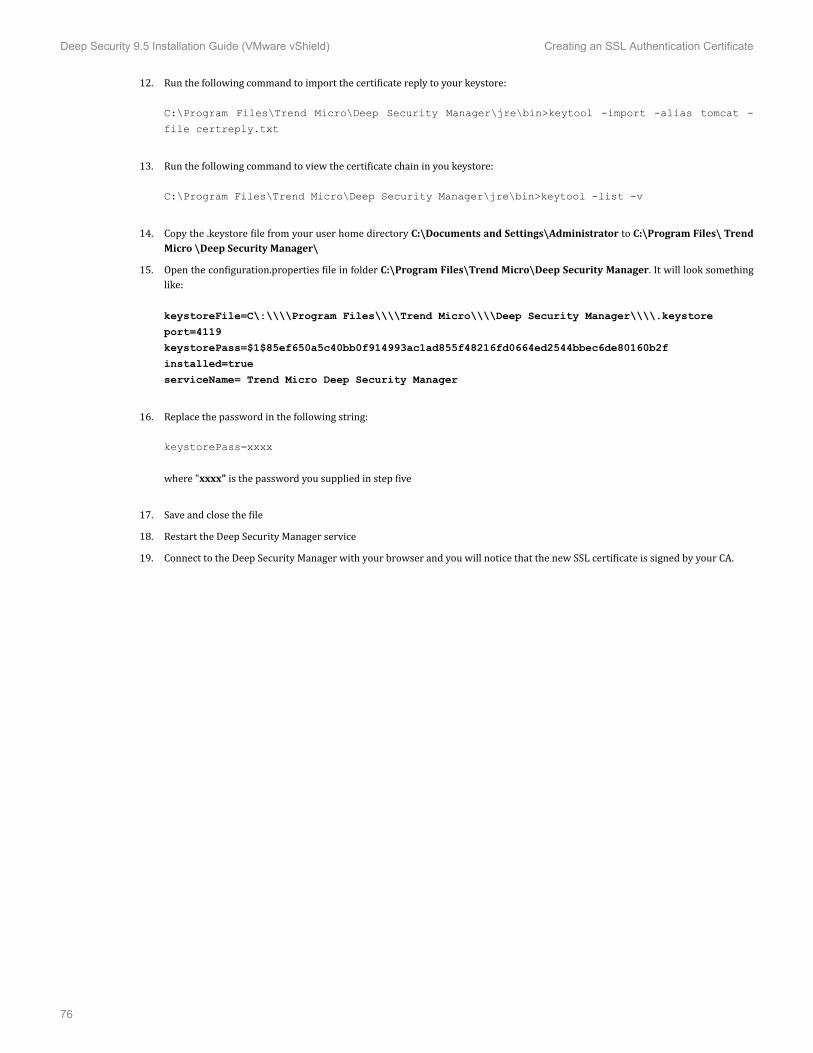
12. Run the following command to import the certificate reply to your keystore:C:\Program Files\Trend Micro\Deep Security Manager\jre\bin>keytool -import -alias tomcat -
file certreply.txt
13. Run the following command to view the certificate chain in you keystore:C:\Program Files\Trend Micro\Deep Security Manager\jre\bin>keytool -list -v
14. Copy the .keystore file from your user home directory C:\Documents and Settings\Administrator to C:\Program Files\ TrendMicro \Deep Security Manager\15. Open the configuration.properties file in folder C:\Program Files\Trend Micro\Deep Security Manager. It will look somethinglike:keystoreFile=C\:\\\\Program Files\\\\Trend Micro\\\\Deep Security Manager\\\\.keystore
port=4119
keystorePass=$1$85ef650a5c40bb0f914993ac1ad855f48216fd0664ed2544bbec6de80160b2f
installed=true
serviceName= Trend Micro Deep Security Manager
16. Replace the password in the following string:keystorePass=xxxx
where "xxxx" is the password you supplied in step five17. Save and close the file18. Restart the Deep Security Manager service19. Connect to the Deep Security Manager with your browser and you will notice that the new SSL certificate is signed by your CA.
Deep Security 9.5 Installation Guide (VMware vShield) Creating an SSL Authentication Certificate
76

Silent Install of Deep Security Manager
Windows
To initiate a silent install on Windows:
Manager-Windows-<Version>.x64.exe -q -console -Dinstall4j.language=<ISO code> -varfile
<PropertiesFile>
Linux
To initiate a silent install on Linux:
Manager-Linux-<Version>.x64.sh -q -console -Dinstall4j.language=<ISO code> -varfile <PropertiesFile>
Parameters
The "-q" setting forces install4j to execute in unattended (silent) mode.The "-console" setting forces messages to appear in the console (stdout).The -Dinstall4j.language=<ISO code> options lets you override the default installation language (English) if other languages areavailable. Specify a language using standard ISO language identifiers:• Japanese: jp• Simplified Chinese: zh_CN
The <PropertiesFile> argument is the complete/absolute path to a standard Java properties file. Each property is identified by its equivalentGUI screen and setting in the Windows Deep Security Manager installation (described above). For example, the Deep Security Manager addresson the "Address and Ports" screen is specified as:AddressAndPortsScreen.ManagerAddress=Most of the properties in this file have acceptable defaults and may be omitted. The only required values for a simple installation using anembedded database are:LicenseScreen.License
CredentialsScreen.Administrator.Username
CredentialsScreen.Administrator.PasswordFor a complete description of available settings, see Deep Security Manager Settings Properties File (page 79).Sample Properties File
The following is an example of the content of a typical properties file:AddressAndPortsScreen.ManagerAddress=10.201.111.91AddressAndPortsScreen.NewNode=TrueUpgradeVerificationScreen.Overwrite=FalseLicenseScreen.License.-1=XY-ABCD-ABCDE-ABCDE-ABCDE-ABCDE-ABCDEDatabaseScreen.DatabaseType=OracleDatabaseScreen.Hostname=10.201.xxx.xxxDatabaseScreen.Transport=TCP
Deep Security 9.5 Installation Guide (VMware vShield) Silent Install of Deep Security Manager
77

DatabaseScreen.DatabaseName=XEDatabaseScreen.Username=DSMDatabaseScreen.Password=xxxxxxxAddressAndPortsScreen.ManagerPort=4119AddressAndPortsScreen.HeartbeatPort=4120CredentialsScreen.Administrator.Username=masteradminCredentialsScreen.Administrator.Password=xxxxxxxxCredentialsScreen.UseStrongPasswords=FalseSecurityUpdateScreen.UpdateComponents=TrueSecurityUpdateScreen.UpdateSoftware=TrueRelayScreen.Install=TrueSmartProtectionNetworkScreen.EnableFeedback=False
Deep Security 9.5 Installation Guide (VMware vShield) Silent Install of Deep Security Manager
78
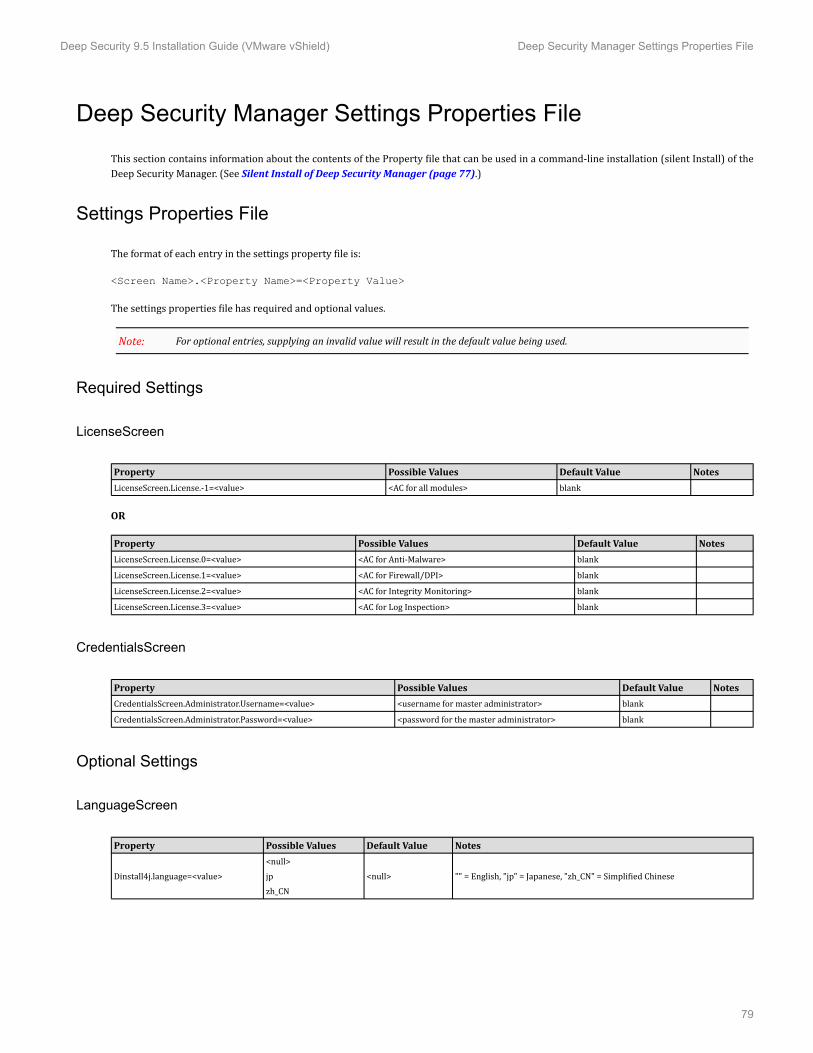
Deep Security Manager Settings Properties File
This section contains information about the contents of the Property file that can be used in a command-line installation (silent Install) of theDeep Security Manager. (See Silent Install of Deep Security Manager (page 77).)Settings Properties File
The format of each entry in the settings property file is:<Screen Name>.<Property Name>=<Property Value>The settings properties file has required and optional values.
For optional entries, supplying an invalid value will result in the default value being used.
Required Settings
LicenseScreen
Property Possible Values Default Value NotesLicenseScreen.License.-1=<value> <AC for all modules> blankOR
Property Possible Values Default Value NotesLicenseScreen.License.0=<value> <AC for Anti-Malware> blankLicenseScreen.License.1=<value> <AC for Firewall/DPI> blankLicenseScreen.License.2=<value> <AC for Integrity Monitoring> blankLicenseScreen.License.3=<value> <AC for Log Inspection> blankCredentialsScreen
Property Possible Values Default Value NotesCredentialsScreen.Administrator.Username=<value> <username for master administrator> blankCredentialsScreen.Administrator.Password=<value> <password for the master administrator> blankOptional Settings
LanguageScreen
Property Possible Values Default Value Notes
Dinstall4j.language=<value> <null>jpzh_CN <null> "" = English, "jp" = Japanese, "zh_CN" = Simplified Chinese
Note:
Deep Security 9.5 Installation Guide (VMware vShield) Deep Security Manager Settings Properties File
79

UpgradeVerificationScreen
This screen/setting is not referenced unless an existing installation is detected.
Property Possible Values Default Value NotesUpgradeVerificationScreen.Overwrite=<value> TrueFalse FalseSetting this value to True will overwrite any existing data in the database. It will do this without any further prompts.
DatabaseScreen
This screen defines the database type and optionally the parameters needed to access certain database types.The interactive install provides an "Advanced" dialog to define the instance name and domain of a Microsoft SQL server, butbecause the unattended install does not support dialogs these arguments are included in the DatabaseScreen settings below.
Property Possible Values Default Value Notes
DatabaseScreen.DatabaseType=<value> EmbeddedMicrosoft SQL ServerOracle Microsoft SQLServerDatabaseScreen.Hostname=<value> The name or IP address of thedatabase hostCurrent host name Current hostnameDatabaseScreen.DatabaseName=<value> Any string dsm Not required for embeddedDatabaseScreen.Transport=<value> Named PipesTCP Named Pipes Required for SQL Server onlyDatabaseScreen.Username=<value> Not required for EmbeddedDatabaseScreen.Password=<value> blank Not required for EmbeddedDatabaseScreen.SQLServer.Instance=<value> Blank implies default instance. Optional, required forSQL Server onlyDatabaseScreen.SQLServer.Domain=<value> Optional, required for SQL Server onlyDatabaseScreen.SQLServer.UseDefaultCollation=<value> TrueFalse False Optional, required for SQL Server only
AddressAndPortsScreen
This screen defines the hostname, URL, or IP address of this computer and defines ports for the Manager. In the interactive installer this screenalso supports the addition of a new Manager to an existing database, but this option is not supported in the unattended install.Property
PossibleValues
DefaultValue
Notes
AddressAndPortsScreen.ManagerAddress=<value><hostname,URL or IPaddress ofthe Managerhost>
<currenthostname>AddressAndPortsScreen.ManagerPort=<value> <valid portnumber> 4119AddressAndPortsScreen.HeartbeatPort=<value> <valid portnumber> 4120AddressAndPortsScreen.NewNode=<value> TrueFalse False True indicates that the current install is a new node. If the installer finds existing data inthe database, it will add this installation as a new node. (Multi-node setup is always asilent install). Note: The "New Node" installation information about the existing databaseto be provided via the DatabaseScreen properties.
Note:
Note:
Note:
Deep Security 9.5 Installation Guide (VMware vShield) Deep Security Manager Settings Properties File
80
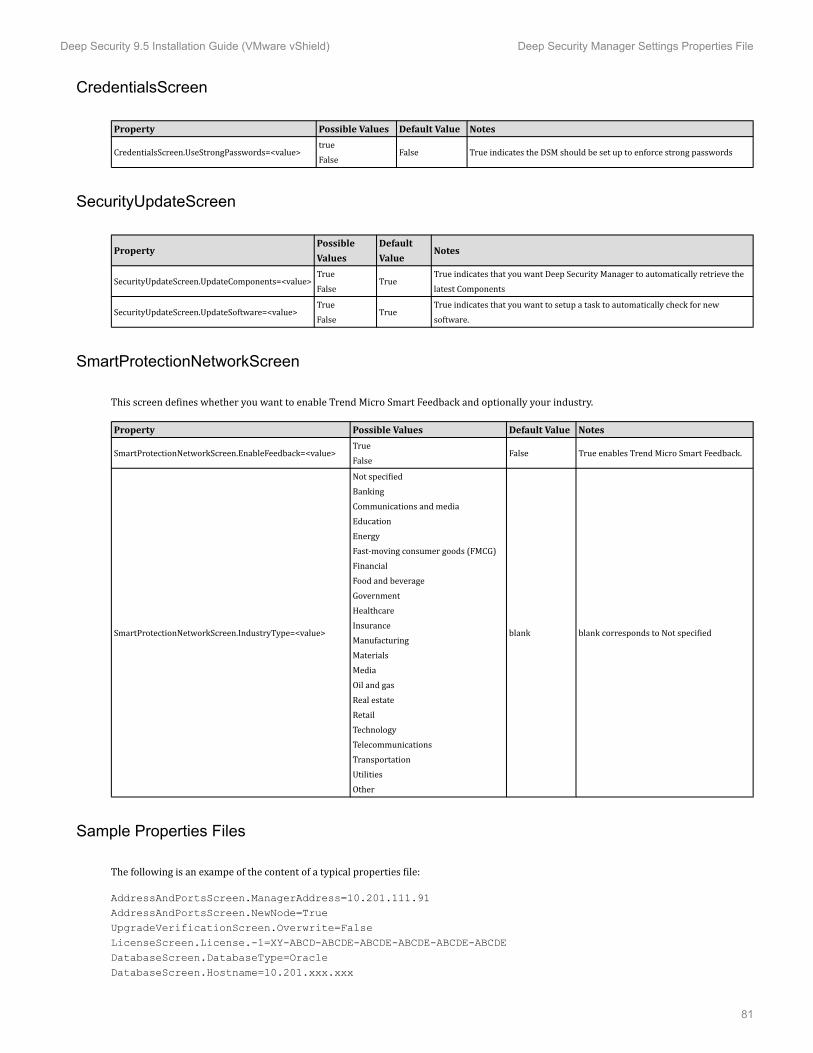
CredentialsScreen
Property Possible Values Default Value NotesCredentialsScreen.UseStrongPasswords=<value> trueFalse False True indicates the DSM should be set up to enforce strong passwordsSecurityUpdateScreen
PropertyPossibleValues
DefaultValue
Notes
SecurityUpdateScreen.UpdateComponents=<value> TrueFalse True True indicates that you want Deep Security Manager to automatically retrieve thelatest ComponentsSecurityUpdateScreen.UpdateSoftware=<value> TrueFalse True True indicates that you want to setup a task to automatically check for newsoftware.SmartProtectionNetworkScreen
This screen defines whether you want to enable Trend Micro Smart Feedback and optionally your industry.Property Possible Values Default Value NotesSmartProtectionNetworkScreen.EnableFeedback=<value> TrueFalse False True enables Trend Micro Smart Feedback.
SmartProtectionNetworkScreen.IndustryType=<value>
Not specifiedBankingCommunications and mediaEducationEnergyFast-moving consumer goods (FMCG)FinancialFood and beverageGovernmentHealthcareInsuranceManufacturingMaterialsMediaOil and gasReal estateRetailTechnologyTelecommunicationsTransportationUtilitiesOther
blank blank corresponds to Not specified
Sample Properties Files
The following is an exampe of the content of a typical properties file:AddressAndPortsScreen.ManagerAddress=10.201.111.91AddressAndPortsScreen.NewNode=TrueUpgradeVerificationScreen.Overwrite=FalseLicenseScreen.License.-1=XY-ABCD-ABCDE-ABCDE-ABCDE-ABCDE-ABCDEDatabaseScreen.DatabaseType=OracleDatabaseScreen.Hostname=10.201.xxx.xxx
Deep Security 9.5 Installation Guide (VMware vShield) Deep Security Manager Settings Properties File
81

DatabaseScreen.Transport=TCPDatabaseScreen.DatabaseName=XEDatabaseScreen.Username=DSMDatabaseScreen.Password=xxxxxxxAddressAndPortsScreen.ManagerPort=4119AddressAndPortsScreen.HeartbeatPort=4120CredentialsScreen.Administrator.Username=masteradminCredentialsScreen.Administrator.Password=xxxxxxxxCredentialsScreen.UseStrongPasswords=FalseSecurityUpdateScreen.UpdateComponents=TrueSecurityUpdateScreen.UpdateSoftware=TrueRelayScreen.Install=TrueSmartProtectionNetworkScreen.EnableFeedback=False
Installation Output
The following is a sample output from a successful install, followed by an example output from a failed install (invalid license). The [Error] tagin the trace indicates a failure.Successful Install
Stopping Trend Micro Deep Security Manager Service...Detecting previous versions of Trend Micro Deep Security Manager...Upgrade Verification Screen settings accepted...Database Screen settings accepted...License Screen settings accepted...Address And Ports Screen settings accepted...Credentials Screen settings accepted...All settings accepted, ready to execute...Uninstalling previous versionStopping ServicesExtracting files...Setting Up...Connecting to the Database...Creating the Database Schema...Updating the Database Data...Creating MasterAdmin Account...Recording Settings...Creating Temporary Directory...Installing Reports...Creating Help System...Setting Default Password Policy...Importing Example Security Profiles...Applying Security Update...Assigning IPS Filters to Example Security Profiles...Correcting the Port for the Manager Security Profile...Correcting the Port List for the Manager...Creating IP List to Ignore...Creating Scheduled Tasks...Creating Asset Importance Entries...Creating Auditor Role...Auditing...Optimizing...Recording Installation...Creating Properties File...Creating Shortcut...Configuring SSL...Configuring Service...
Deep Security 9.5 Installation Guide (VMware vShield) Deep Security Manager Settings Properties File
82

Configuring Java Security...Configuring Java Logging...Cleaning Up...Starting Deep Security Manager...Finishing installation...Failed Install
This example shows the output generated when the properties file contained an invalid license string:Stopping Trend Micro Deep Security Manager Service...Detecting previous versions of Trend Micro Deep Security Manager...Upgrade Verification Screen settings accepted...Database Screen settings accepted...Database Options Screen settings accepted...[ERROR] The license code you have entered is invalid.[ERROR] License Screen settings rejected...Rolling back changes...
Deep Security 9.5 Installation Guide (VMware vShield) Deep Security Manager Settings Properties File
83