defiance college networking handbook2) windows 7: click the start button and select control panel....
TRANSCRIPT

Defiance College
Networking Handbook
Installation Instructions and Reference Manual for Campus Network Connections including Residence
Halls and Wireless Access Points
Revision 20160826

2
Preface All residence hall rooms are wired to connect to the Defiance College (DC) campus computer network. This provides the opportunity to connect to the Internet, the campus E-Mail Server, and the campus Academic Server for residential students who have a personal computer that meets the specified requirements. This handbook will guide you through installation, configuration, and troubleshooting steps. It also provides information about how to obtain help if you should require it. You can also visit http://www.defiance.edu/pages/CS_home.html for more information on Residential and Campus Computer Networking.

3
Table of Contents
System Requirements 4
Usernames and Passwords 4
Configuring Wired Network Settings 5
Connecting to Wireless Hotspots
Windows 10 9
Windows 8 11
Windows 7 12
Manual Wireless Setup for Windows 12
Mac OS X 18
iPod , iPhone & iPad 20
Android Phones & Tablets 21
Registering Your Computer 22
Register Your Devices on the Wired Network 24
Connecting to the Virtual Private Network (VPN) 25
Personal Routers in the Residence Halls 27
Troubleshooting Tips 27
General Network and Program Settings 30
Email Client Settings (smart phone & computer) 30
Obtaining Further Assistance 31

4
System Requirements Following are the requirements for connecting your computer to the DC network: Windows 7, 8, or 10 or Mac OS X 10.6 or better 10/100 Ethernet Card Cat 5 or better network cable Antivirus Program Username and Password Computer Hardware suggestions: Intel / AMD 2GHz or better Intel based Apple Computer 4 Gig ram 120 Gig Hard Drive
Software Notes:
MS Office 365 is now available for all Defiance College students through Microsoft. Visit http://office.microsoft.com/getoffice365 to register your account and access Office.
Usernames and Passwords In this handbook, the terms <USERNAME> and <PASSWORD> refer to those issued to you during your orientation session or from the Registrar’s Office. If you have not received these, please visit the Registrar’s Office to request them.

5
Configuring Network Settings for Windows Vista, 7, & 8.
This section describes the basic configuration steps involved in networking a personal computer. However, every situation may have variations. There is a section of Troubleshooting Tips which you may wish to try. If you need further assistance, please refer to the “Obtaining Further Assistance” section of this handbook.
NOTE: Before you begin, make sure you have the original Windows CD-ROM that came with your computer or verify that the Windows installation files are pre-installed on your computer. You may be required to use the CD-ROM during the network setup procedure.
1) Verify that you have an Ethernet network adapter installed on your computer. If you need to install an Ethernet network adapter, follow the installation instructions provided by the adapter manufacturer. Connect your Ethernet adapter to the network jack using a Cat-5 network cable or better. 2) Windows 7: Click the Start button and select Control Panel. Click on Network and Internet, Network and Sharing Center and then Change Adapter Settings. Windows 8 & 10 Go to the start screen and type “Network and Sharing Center” and click on the search result. Then click on Change Adapter Settings. 3) Windows 7, 8, & 10: Double-Click the Local Area Connection or Ethernet icon.
6
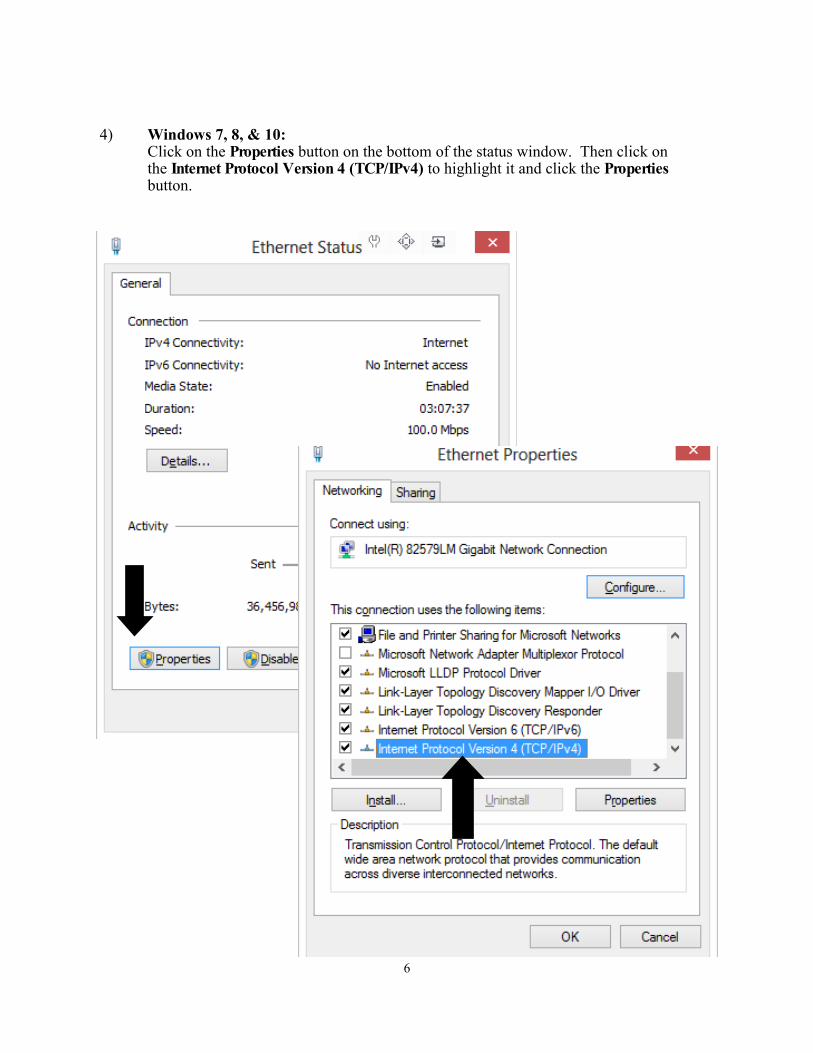
4) Windows 7, 8, & 10: Click on the Properties button on the bottom of the status window. Then click on the Internet Protocol Version 4 (TCP/IPv4) to highlight it and click the Properties button.

7
5) Click the bullet in front of Obtain an IP address automatically.
6) Click the Advanced button and then click on the WINS tab. Highlight each entry listed in the WINS... text box and click the Remove button. There should be no entries in the text box when this step is complete. 7) Click on the DNS tab and uncheck the box labeled Register this connection’s address in DNS. Then click the OK button. 8) Click the OK button on the Internet Protocol (TCP/IP) Properties dialog. Then click OK on the Local Area Connection Properties dialog. Close the Local Area Connection Status and Network [and Dial-up] Connections windows. 9) Your network connection should now be active. If not, you may need to restart your computer.

8
Configuring Network Settings for Mac OS X
This section describes the basic configuration steps involved in networking an Apple computer. However, every situation may have variations. There is a section of Troubleshooting Tips which you may wish to try. If you need further assistance, please refer to the “Obtaining Further Assistance” section of this handbook. 1) Verify that you have an Ethernet network adapter installed on your computer. If you need to install an Ethernet network adapter, follow the installation instructions provided by the adapter manufacturer. Connect your Ethernet adapter to the network jack using a Cat 5 network cable or better. 2) Open the System Preferences window. Choose Network. 3) Choose Ethernet in the window pane on the left. 4) Verify your system is configured to use DHCP. 5) If using a wireless Airport, choose Airport in the left window pane. Click the Advanced button. Ver ify the Airpor t is configured to use DHCP. Click OK. 6) Click Apply. Close the System Preferences window.

9
Connecting to Wireless Hotspots You can connect to the Defiance College Wireless Network using your wireless enabled device . Windows Automatic Configuration* 1) Click on your wireless network icon in the taskbar. 2) Double-Click the network “defiancecollege” 3) Enter your username in this manner: <username>@defiance.edu 4) Enter your password 5) Click Ok 6) If prompted click Connect * If this process does not work for your computer, follow the appropriate manual configu-ration for your operating system.
Windows 10 Wireless Configuration 1) Open the Networks screen, by clicking the wireless icon in the lower right corner. 2) Click on the network named “defiancecollege” or “defiancecollege-5GHz” 3) Click on Connect

10
4) Enter your <USERNAME>@defiance.edu and <PASSWORD> in the ap-propriate boxes. Click OK.
5) You’ll be prompted to verify the connection by clicking Connect once more.

11
Windows 8 Wireless Configuration 1) Open the Networks screen, by clicking the wireless icon in the lower right corner. 2) Click on the network named ““defiancecollege” or “defiancecollege-5GHz” 3) Click on Connect
4) Enter your <USERNAME>@defiance.edu and <PASSWORD> in the ap propriate boxes. Click OK,.
5) You’ll be prompted to verify the connection by clicking Connect once more. 6) You are now connected to Defiance College’s wireless network with your Windows 8 device..

12
Windows 7, 8, & 10 Manual Wireless Configuration
1) Windows 8 & 10: Go to the start screen and type “Network and Sharing Center” and click on the search result. Windows 7: Open the Control Panel. Choose Network and Internet then Network and Sharing Center 2) Windows 8 & 10: Click on “Setup a new connection or network” and then choose “manually connect to a wireless network”
Windows 7 Wireless Configuration* 1) Click on your wireless network icon in the taskbar. 2) Double-Click the network “defiancecollege” or “defiancecollege-5GHz” 3) Enter your username in this manner: <username>@defiance.edu 4) Enter your password 5) Click Ok 6) If prompted click Connect * If this process does not work for your computer, follow the manual configuration instructions below.
13
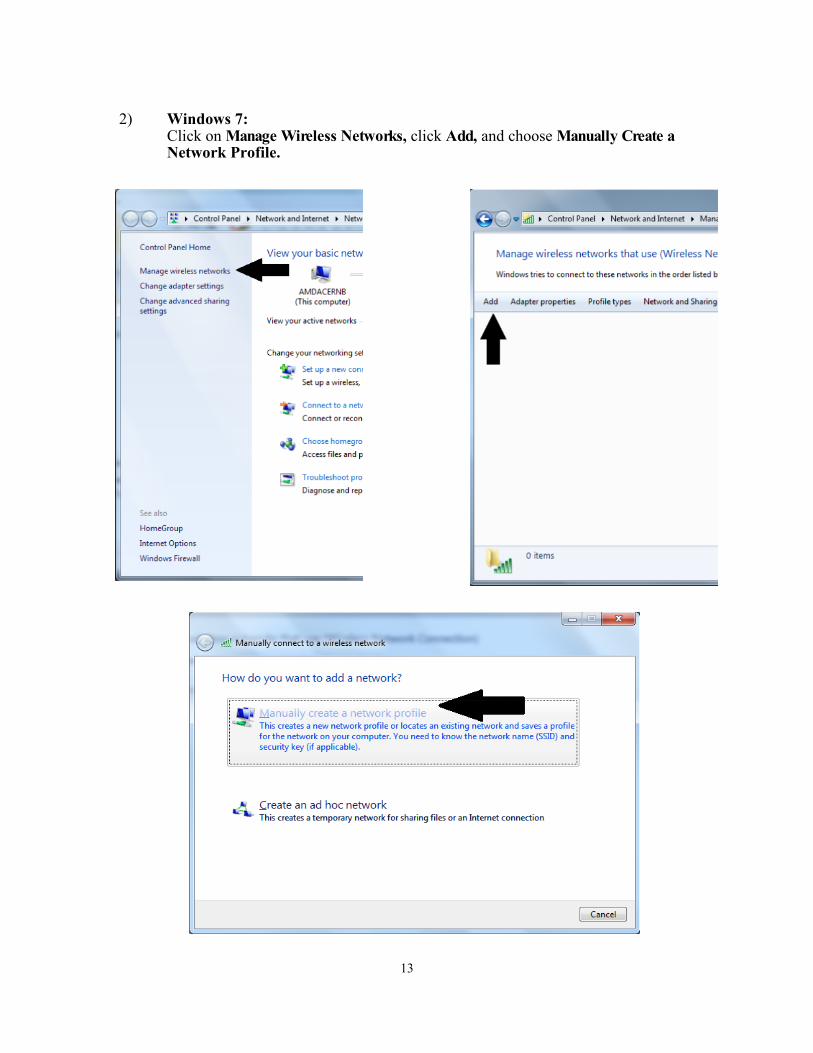
2) Windows 7: Click on Manage Wireless Networks, click Add, and choose Manually Create a Network Profile.

14
3) Following settings are for Windows 7, 8, & 10: On the information screen put in the following information:
Network Name: defiancecollege or defiancecollege-5GHz Security Type: WPA-Enterprise Data encryption: TKIP
4) Click Next, then click Change connection settings.

15
5) Click on the Security tab, then click the Settings button.
6) Uncheck Validate server certificate. 7) Set Authentication Method to
Secured password (EAP- MSCHAP v2) and click the
Configure button next to it.
16
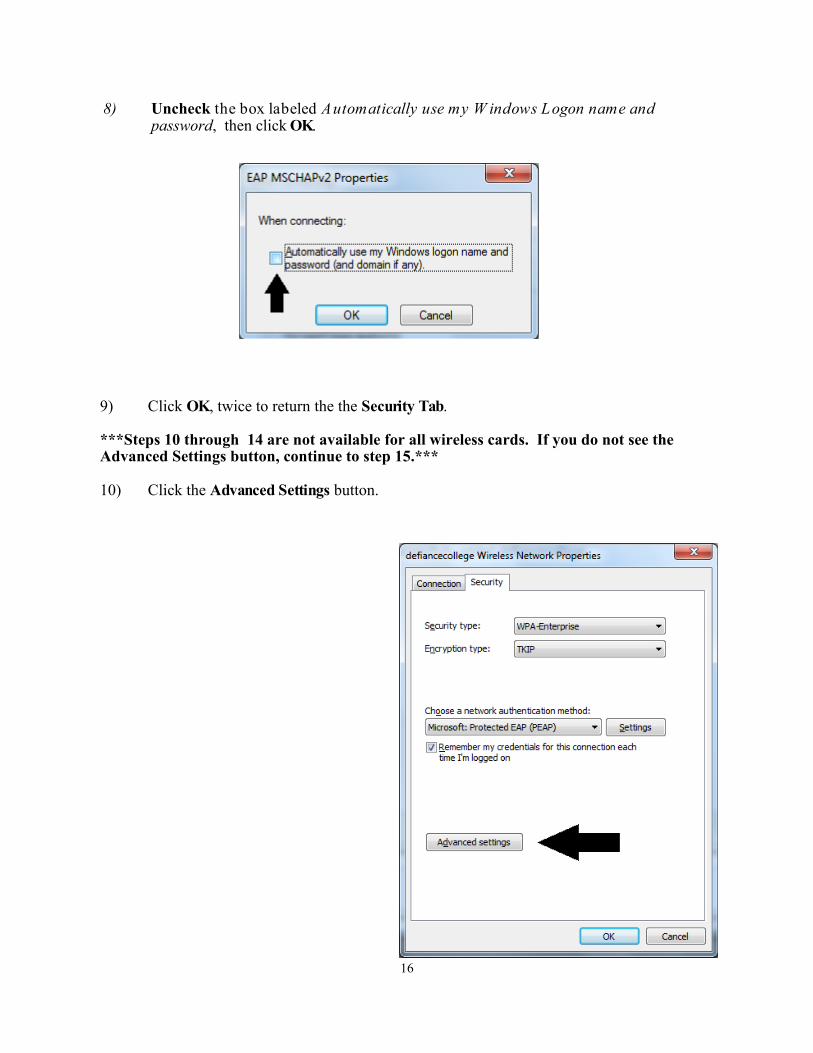
8) Uncheck the box labeled Automatically use my W indows Logon name and password, then click OK.
9) Click OK, twice to return the the Security Tab. ***Steps 10 through 14 are not available for all wireless cards. If you do not see the Advanced Settings button, continue to step 15.*** 10) Click the Advanced Settings button.

17
11) Check Specify Authentication Mode 12) Choose User Authentication from the drop down menu 13) Click Save Credentials button
14) Enter your <USERNAME>@defiance.edu and <PASSWORD> in the ap-propriate boxes. Click OK, 3 times, then click Close. 15) Close the Manage Wireless Networks window. 16) Congratulations, you should now be connected to the hotspot. Proceed to the Registering Your Computer section of this handbook.

18
Mac OS X Wireless Configuration 1) When you are in the vicinity of a Defiance College hotspot, it will appear in your wireless menu with the network name defiancecollege. Go to the menu and choose this network.
2) Enter your <USERNAME>@defiance.edu and <PASSWORD> in the appropriate boxes.
19
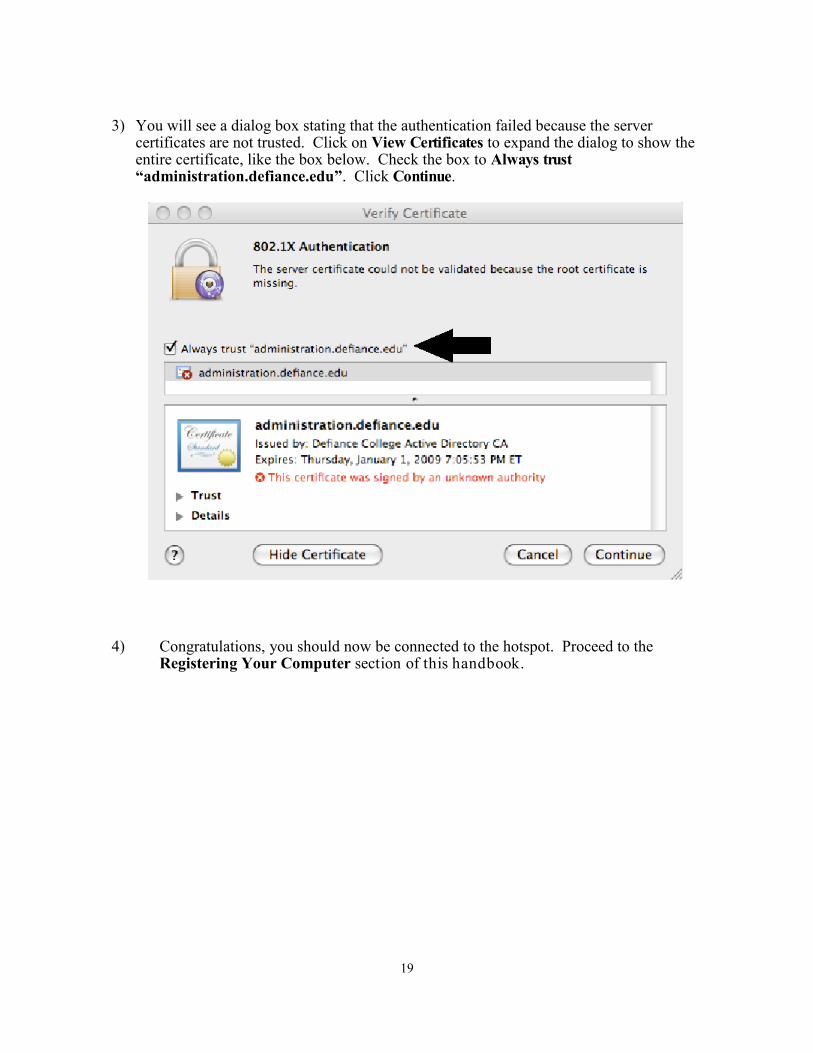
3) You will see a dialog box stating that the authentication failed because the server certificates are not trusted. Click on View Certificates to expand the dialog to show the entire certificate, like the box below. Check the box to Always trust “administration.defiance.edu”. Click Continue.
4) Congratulations, you should now be connected to the hotspot. Proceed to the Registering Your Computer section of this handbook.

20
Applie iPad, iPhone, & iPod Touch 1) Click on the Settings application button, then click on Wi-Fi. 2) Click on the “defiancecollege” wireless network 3) Enter your <USERNAME>@defiance.edu and <PASSWORD> in the appropriate boxes. Click OK, 3 times, then click Join.
4) Click the Accept button. 5) Open up Safari, and Proceed to the Registering Your Computer section of this handbook.

21
Android Phones & Tablets 1) Go to Settings, then click on Wi-Fi. 2) Click on the “defiancecollege” wireless network 3) Enter your <USERNAME>@defiance.edu for both the identity and Anonymous identity
and <PASSWORD> in the appropriate boxes. Click Connect. 4) Open up the browser, and Proceed to the Registering Your Computer section of this handbook. **You may be asked for a password after entering this information. This is a password set by you as an added security measure for the phone. You will need to contact your phone carrier’s support for help, if you do not remember what that password is.

22
Registering Your Computer on the Wired Network
Once your computer is capable of connecting to the campus network, you must go through a registration process using your Internet web browser. Your Internet connection will not work properly until you complete the following registration process. 1) Open your Internet browser. 2) You should be forwarded automatically to the ResNet Registration homepage. *If the registration page does not come up, type this URL into your web browser: http://192.168.5.39 3) Type your <E-MAIL USERNAME> and <PASSWORD> in the appropriate text boxes. 4) Read the Acceptable Network Usage Policy in its entirety. Check the box to indicate you have read it.
23
5) Click on the I Accept—Register Me button. 6) Reboot your computer when prompted. 7) You’re finished! Open a web browser to be sure that you are not redirected to the ResNet Registration page again. If you are redirected, please refer to the Trouble shooting Tips section of this handbook, specifically the paragraphs labeled Check the Protocol Settings. Notes:
You may register five devices at a time. If you need to have a registration deleted, please contact the Help Desk. Strictly speaking, it is the network card (not your computer) which is being
registered. This means that a computer which has both a wired network card as well as a wireless network card will use two of your allowed registrations if you choose to use it in these ways.
Devices can only be registered for the current term. You will have to re-register any device the first time you use it during each term.
Registering your computer does not grant you full access to the Defiance College network. It only allows you access to the Internet and a few other necessary services. Please read the section Connecting to the Virtual Private Network (VPN) for information on connecting to the file servers such as \\YELLOW-JACKET.

24
Registering Your Gaming Console or other Devices on the Wired Network
Game consoles without an integrated web browser will need to be manually registered. You will need to complete these following steps from your computer to complete your game console registration. 1) Open your Internet browser and type in the following URL: http://netreg.defiance.edu 2) Click the Register a Game Console button. 3) Type your <USERNAME> and <PASSWORD> in the appropriate text boxes. 4) Type your MAC/Hardware Address from your game console. * The MAC address is a 12 digit hexadecimal identifier unique to your game console’s network adapter. 5) Select the appropriate game console from the dropdown menu. 6) Read the Acceptable Network Usage Policy in its entirety. Check the box to indicate you have read it. 7) Click on the I Accept—Register Me button. 8) Reboot your game console.

25
Connecting to the Virtual Private Network (VPN)
Connecting to our VPN server, will grant you access to the network shares you have per-mission to, when you are on our wireless or off-campus. To connect to our VPN server, all you will need is a web browser. This makes accessing our network shares possible from computers, smart phones, and tablets. 1) Open your web browser of choice. 2) In the address bar, type: ssl-vpn.defiance.edu 3) Enter your <USERNAME> then click Login 4) Enter your <PASSWORD> then click Login

26
5) You will now see links to your available network shares 6) Click on the network share you wish to access. You will have a pop-up open with a list of available files and folders. If you do not get the pop-up with the file list, you will need to enable pop-ups for the domain ssl-vpn.defiance.edu. Since each web browser is different, we suggest you re-fer to your browser’s help menu in order to configure your pop-up blocker to allow them.

27
Troubleshooting Tips Checking the Physical Connection Over fifty percent of the problems students have getting online can be attributed to faulty connections. If you are getting error messages telling you that no DHCP server was found or your browser cannot establish a connection with a server, check the following:
Are you using a proper Ethernet cable? A phone cable will not work. Is each end of the Ethernet cable snug in its socket? Make sure the RJ-45
connectors are pushed in all the way into your adapter’s port on the back of your PC and into the wall connection.
Are you plugged into the data jack? The data jack on your wall box is the unmarked connection. The jack with a picture of a telephone is your telephone jack. Remember, plugging your computer into the telephone jack can result in serious damage to your system!
Is the Ethernet cable damaged? Running the cable under doors and furniture can wear away the insulation exposing the copper wiring and shorting the connection.
Switch cables. If you suspect your cable is faulty, borrow a good cable from a friend and test it on your system. If your connection works with your friend’s cable but not yours, you have a bad cable and will need to replace it.
Switch jacks. If you suspect your jack is bad, run your cable to a working jack. If your system works from this good jack and not from yours, there is a problem with the data jack on the wall or with the network equipment. Please report this problem using one of the methods in the “Obtaining Further Assistance” section of this handbook.
Check the Protocol Settings (Windows) If all the physical connections look OK, check to see that the computer is connecting to the network. You can do this by running a simple command prompt utility called ipconfig. To run this utility, click on the Start button, All Programs, Accessories, and then on Com-mand Prompt.
Personal Routers in the Residence Halls
Personally owned wireless routers and access points interfere with campus provided wireless connectivity, therefore use of these devices is prohibited on campus.
28
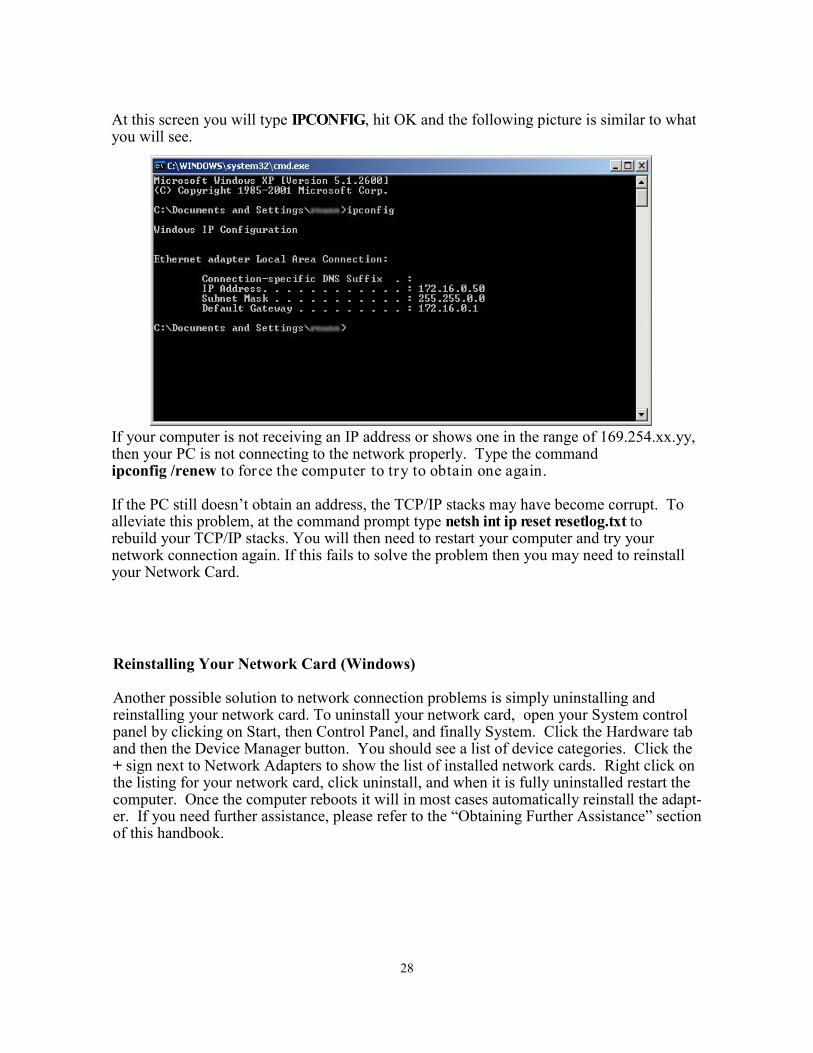
At this screen you will type IPCONFIG, hit OK and the following picture is similar to what you will see.
If your computer is not receiving an IP address or shows one in the range of 169.254.xx.yy, then your PC is not connecting to the network properly. Type the command ipconfig /renew to force the computer to try to obtain one again. If the PC still doesn’t obtain an address, the TCP/IP stacks may have become corrupt. To alleviate this problem, at the command prompt type netsh int ip reset resetlog.txt to rebuild your TCP/IP stacks. You will then need to restart your computer and try your network connection again. If this fails to solve the problem then you may need to reinstall your Network Card.
Reinstalling Your Network Card (Windows) Another possible solution to network connection problems is simply uninstalling and reinstalling your network card. To uninstall your network card, open your System control panel by clicking on Start, then Control Panel, and finally System. Click the Hardware tab and then the Device Manager button. You should see a list of device categories. Click the + sign next to Network Adapters to show the list of installed network cards. Right click on the listing for your network card, click uninstall, and when it is fully uninstalled restart the computer. Once the computer reboots it will in most cases automatically reinstall the adapt-er. If you need further assistance, please refer to the “Obtaining Further Assistance” section of this handbook.

29
Check the Protocol Settings (Mac) If all the physical connections look OK, check to see that the computer is connecting to the net-work. Open the System Preferences window. Choose Network. In the Show dropdown box, choose the Ethernet connection for your adapter. Click on the TCP/IP status window. You should see an IP Address. If your computer is not receiving an IP address or shows one in the range of 169.254.xx.yy, then your PC is not connecting to the net-work properly. Click the button to Renew DHCP Lease to force the computer to try again. If you need further assistance, please refer to the “Obtaining Further Assistance” section of this handbook.
To find the MAC address of Xbox One
1. Go to “My Games & Apps” 2. Select “settings” 3. Select “advanced settings” The MAC address will be displayed next to “wired MAC”
To find the MAC address of your Xbox 360
1. Go to the "System" area of the Xbox Dashboard; 2. Select "Network Settings"; 3. Select "Edit Settings."; 4. Select "Additional Settings"; 5. Select "Advanced Settings"; At the bottom of this screen you'll see a heading called "Wired MAC Address," which is your MAC address.
To find the MAC address of your PlayStation 3 & 4
1. On the main menu, select “Settings” 2. Select “System Settings” 3. Select “System Information The MAC address will be listed

30
General Network Settings
You may be able to connect other operating systems and software to the Defiance College network. However, please be aware that support for these systems will be limited. The following are general settings you should use when setting up the network software of your choice. Network Configuration
IP Address: Should be obtained automatically (DHCP) DNS Servers: Leave these blank. They will also be assigned automatically.
Web Browsers
Mail (SMTP) Server: mail.google.com/a/defiance.edu Wireless Clients
SSID: defiancecollege or defiancecollege-5GHz Network Authentication: WPA Data encryption: Use AES if your device supports it. If not, TKIP should work. EAP-Type: Protected EAP (PEAP) Domain: defiance.edu (may also try <USERNAME>@defiance.edu in the
username field)
Email Client Settings You can access your email from your smart phone or computer based email clients. To configure these clients use the following settings: Automatic Email Setup
Use the Gmail app available for your device. Manual E-Mail Clients (both Smart Phones & Computers)
IMAP Account: <USERNAME>@defiance.edu Return Address: <USERNAME>@defiance.edu IMAP Server or Incoming Mail Server: imap.gmail.com SMTP Server or Outgoing Mail Server: smtp.gmail.com Must use SSL SMTP requires authentication (same username/password as incoming) Ports: IMAP 993 SSL Encryption(incoming), SMTP 587 TLS encyption(outgoing)

31
Obtaining Further Assistance
Please use the following information to obtain further assistance from the Computer Services Department. Computer Services E-mail: [email protected] Help Desk Phone: On Campus x2599 or x 2342 Off Campus (419)783-2599 or 2312 Computer Services Web Site: http://www.defiance.edu/pages/CS_home.html