delco radio mod
TRANSCRIPT
7/14/2019 Delco Radio Mod
http://slidepdf.com/reader/full/delco-radio-mod 1/3
Connecting an MP3 Player to a Delco AM Radio
I own a 1966 impala convertible and have not been impressed with the sound quality of aftermarket radios; I wanted to keep the appearance original and still have addedfunctionality and acceptable sound quality. It turns out; I was able to accomplish this withminimal cost and effort. I modified the original radio with fairly impressive results. I attached a
stereo headphone jack which enables me to connect almost any portable device such as anMP3 player, tape player or CD player. Satellite radio works, but, it still sounds like satelliteradio.
Newer style replacement radios, with silicon transistors, provide a crisper sound. This may besuitable for newer music, but music recorded prior to the 1970’s and played on a newer radioseems to be lacking the base tones. There are a myriad of components available to improvethe sound quality of these radios (sub-amps, woofers etc), but they are generally expensiveand do not provide the desired results. Older Delco AM radios have a Germanium outputtransistor that provides a richer, fuller sound, similar to old vacuum tube amplifiers. Thesediffering sounds are a matter of preference but if you grew-up in the 1960’s, as I did, you arelikely to prefer the sound produced by the original Delco radio.
I decided to do a little investigation to determine if the original AM radio could be adapted toaccommodate a CD player or other sound producing device. After reviewing the schematicfor the Delco radio with some of the electronic wizards that I see at work each day, I waspleasantly surprised to find that this could be accomplished with little effort and for about $15.I have an extra AM radio that I used for experimentation; they are generally available on eBayfor about $20
I have tried to accurately document everything here but if you decide to make thismodification to your Delco AM radio there are some minor risks and I am not responsible foranything that might happen. Some audio producing products may be damaged by pluggingthe headphone jack into this circuit, I don’t know of any, but I suppose it is possible. All of the
components in the radio are probably about 40 years old; the increased stress could cause amarginal component to fail. I was advised to replace the electrolytic capacitors in the radio asthese are most susceptible to deterioration over time, I may do this someday. If you decide tomake this modification, you may want to check with your local electronics geek (everyoneknows at least one) to be sure I haven’t missed anything.
The Delco radios use a germanium output transistor that requires an 8 – 10 ohm speaker. This is absolutely necessary whether you make this modification or not, a common 4 ohmspeaker is not an option as it will result in poor sound quality and eventually destroy theoutput transistor. A good source for speakers is Electro-Tech Inc. at www.turnswitch.com
This is list of components that I purchased at a local electronics store, total cost about $15:
• 2740246 - Stereo headphone jack (1/8 inch)
• 2701801 - Project Box (3” X 2” X 1”)
• 2781224 - #22 Stranded wire (assorted colors)
• 2 - 1k ohm resistors (these are used for summing the right and left channels)
• 3ft - Headphone Cable with 1/8” stereo plug on each end.
7/14/2019 Delco Radio Mod
http://slidepdf.com/reader/full/delco-radio-mod 2/3
Preparing the pro ject box
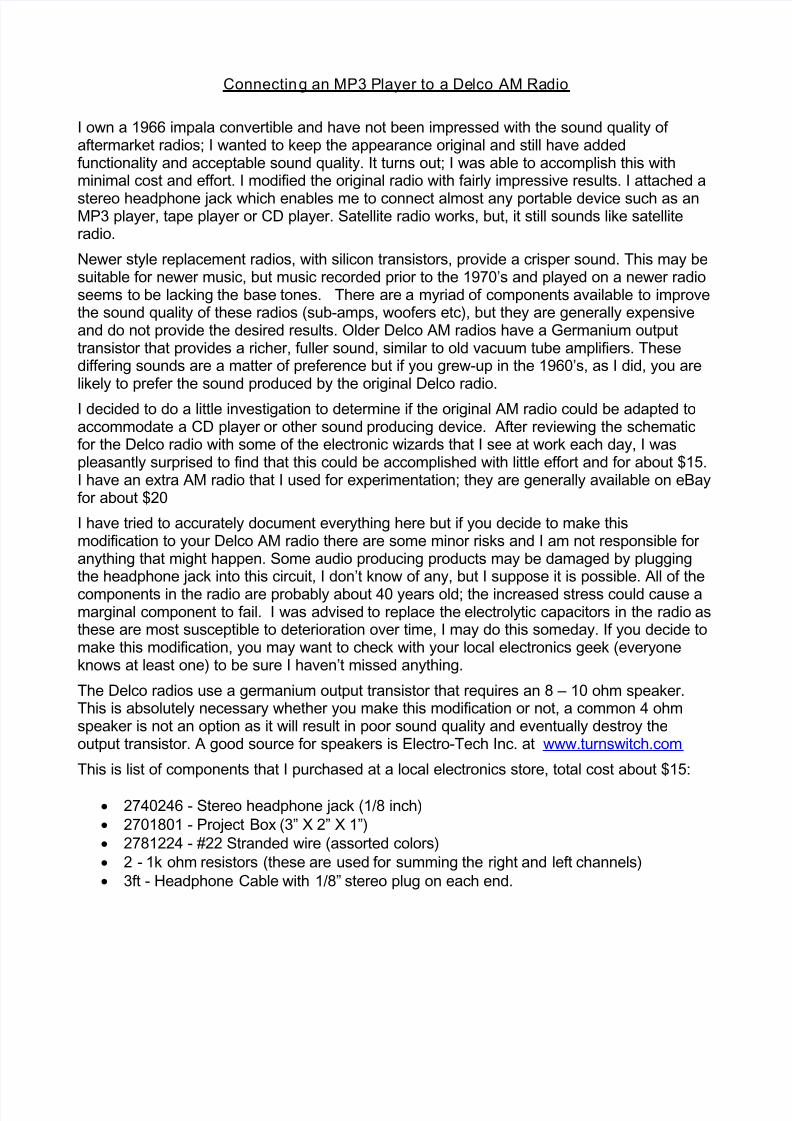
The diagram on the back of the package (from stereo headphone jack) shows the pin-out, Ihave included it below for reference.
Step 1: Drill a hole in one end of the project box and attach stereo headphone jack and asimilar hole in opposite end for the wires.
Step 2: Connect a length of black wire to pin 1 of the stereo headphone jack.
Step 3: Connect 1k ohm resistor to pin 2 and another to pin 5 of the jack
Step 4: Twist the free ends of the resistor leads together and connect a length of green wire.
Step 5: Connect orange wire to pin 3 (this restores AM radio when stereo plug is removed)
Note: I also slipped a length of heat shrink tubing over the wires that run between the project
box and the radio.
7/14/2019 Delco Radio Mod
http://slidepdf.com/reader/full/delco-radio-mod 3/3
Connecting the Radio
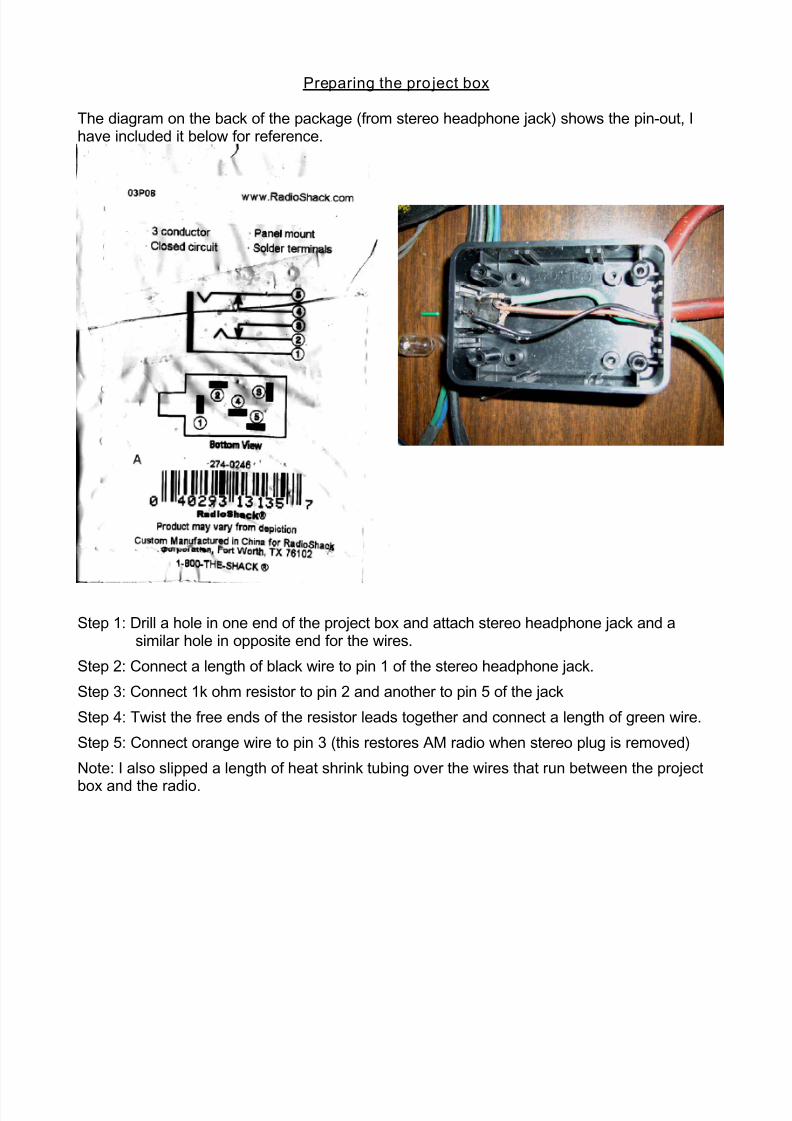
I removed the top cover from the radio to expose the circuit board and attached the blackwire to a ground pad. I learned from the schematic that one of the three wires that connect tothe tone control would work, but selecting the correct wire required a little experimentation. Idisconnected each of the three wires from the PCB (one at a time) and touched the green
lead to the vacated solder pad (with the tape player running and plugged into the headphone jack) to determine if it worked properly. In my radio, the blue wire yielded the desired result.
I soldered the orange wire to the solder pad in place of the blue wire. I then connected thegreen wire from the headphone jack to the free end of the blue wire. I checked to be surethat the tone control, volume control worked properly and that the radio and tape player werenot playing simultaneously. Once I was satisfied that it worked properly, I made theconnections permanent as noted below.
The next step was to double check to be sure that everything worked properly then I replacedthe cover on the radio and screwed the cover onto the project box. I sometimes like to listento Rush Limbaugh on AM radio, so I mounted project box under the dash (below the ashtray)with a strip of Velcro so that I can unplug the sound device from the headphone jack, thisrestores full function to the radio. I also recommend that the audio device to be set to lowvolume before plugging it in, so that the speaker isn’t damaged.
Removed blue wire
from circuit board and
attached the orangewire running from
project box
Attached the greenwire running from
project box to end
of blue wire.
The black wire is connected
to ground; either the chassis
or other suitable ground pad.