dell adamo teardown - amazon web services · step 1 — dell adamo teardown we're happy to be...
TRANSCRIPT
Dell Adamo TeardownWritten By: Andrew Bookholt
Dell Adamo Teardown
© iFixit — CC BY-NC-SA www.iFixit.com Page 1 of 26
INTRODUCTION
We partnered with TechRepublic to show you the beautiful inner details of Dell's all-new Adamo. Dellhas clearly positioned the Adamo as a competitor to the MacBook Air. Does it have a chance? We'llfind out.
TOOLS:iFixit Opening Tools (1)
Phillips #00 Screwdriver (1)
Spudger (1)
Metal Spudger (1)
Dell Adamo Teardown
© iFixit — CC BY-NC-SA www.iFixit.com Page 2 of 26

Step 1 — Dell Adamo Teardown
We're happy to be partnering with TechRepublic on this teardown. TechRepublic is a great newsand problem-solving resource for IT professionals.
We'll post updates on twitter about this and other things we take apart.
The shipping box is substantially larger than that of the MacBook Air (white box), but the twomachines are nearly identical in size.
Dell Adamo Teardown
© iFixit — CC BY-NC-SA www.iFixit.com Page 3 of 26

Step 2
Ladies and gentlemen, Adamo has left the building box.
Now we know why the the box was so large: the Adamo is encased in a "time-capsule" plasticcasing, which in turn is protected during shipping via black plastic shipping caps.
MacBook Air packaging requires less effort to remove.
Dell Adamo Teardown
© iFixit — CC BY-NC-SA www.iFixit.com Page 4 of 26
Step 3
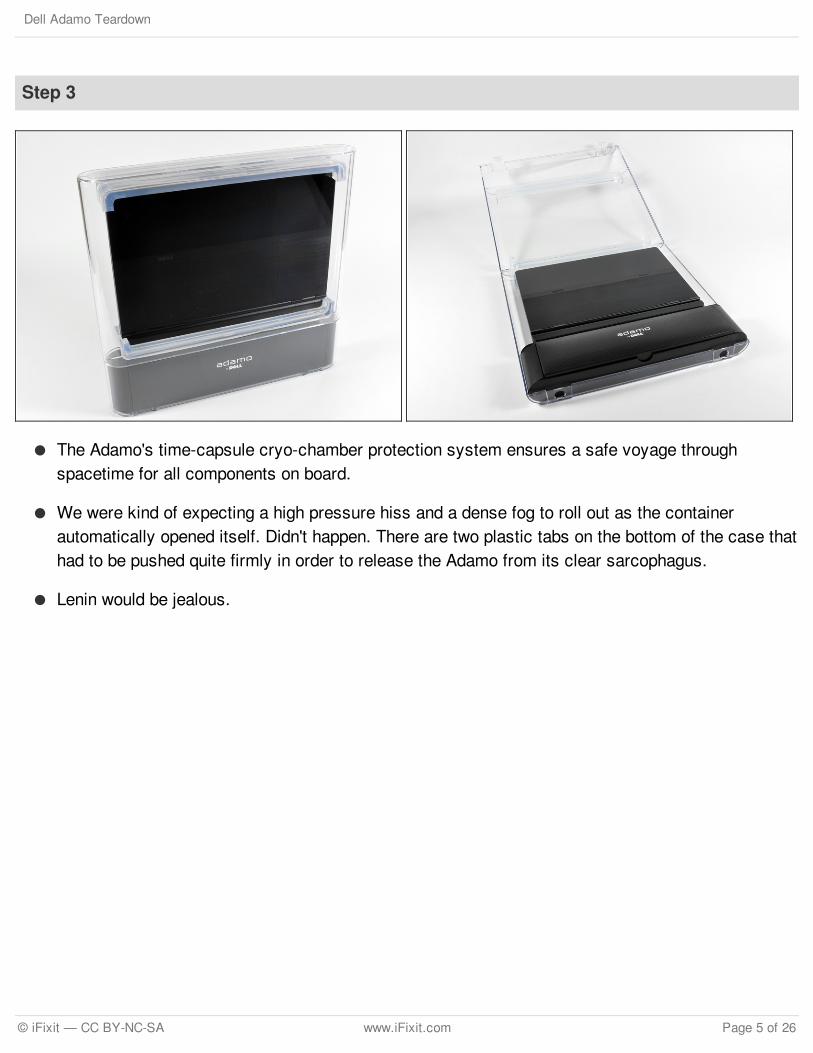
The Adamo's time-capsule cryo-chamber protection system ensures a safe voyage throughspacetime for all components on board.
We were kind of expecting a high pressure hiss and a dense fog to roll out as the containerautomatically opened itself. Didn't happen. There are two plastic tabs on the bottom of the case thathad to be pushed quite firmly in order to release the Adamo from its clear sarcophagus.
Lenin would be jealous.
Dell Adamo Teardown
© iFixit — CC BY-NC-SA www.iFixit.com Page 5 of 26

Step 4
The Adamo and the accessories. All our accessories were black, matching nicely with our "onyx"Adamo. We assume (given the price tag) your accessories will be white if you purchase the "pearl"version.
The AC adapter is 45 watts, just like the MacBook Air's. The power brick design is elegant, but theactual plug isn't nearly as slick as the Air's MagSafe connector.
Dell Adamo Teardown
© iFixit — CC BY-NC-SA www.iFixit.com Page 6 of 26

Step 5
The rear ports of the Adamo, from left to right:
RJ45 Ethernet
eSATA USB
2x USB
DisplayPort
AC Adapter
The right side of the Adamo houses a SIM card slot and an audio out/headphone jack.
You get a total of six ports with your Adamo, double that of the MacBook Air. It's a shame that theycouldn't just put a DVI display port on the computer itself, and instead chose to include a bulkyadapter.
Dell Adamo Teardown
© iFixit — CC BY-NC-SA www.iFixit.com Page 7 of 26
Step 6
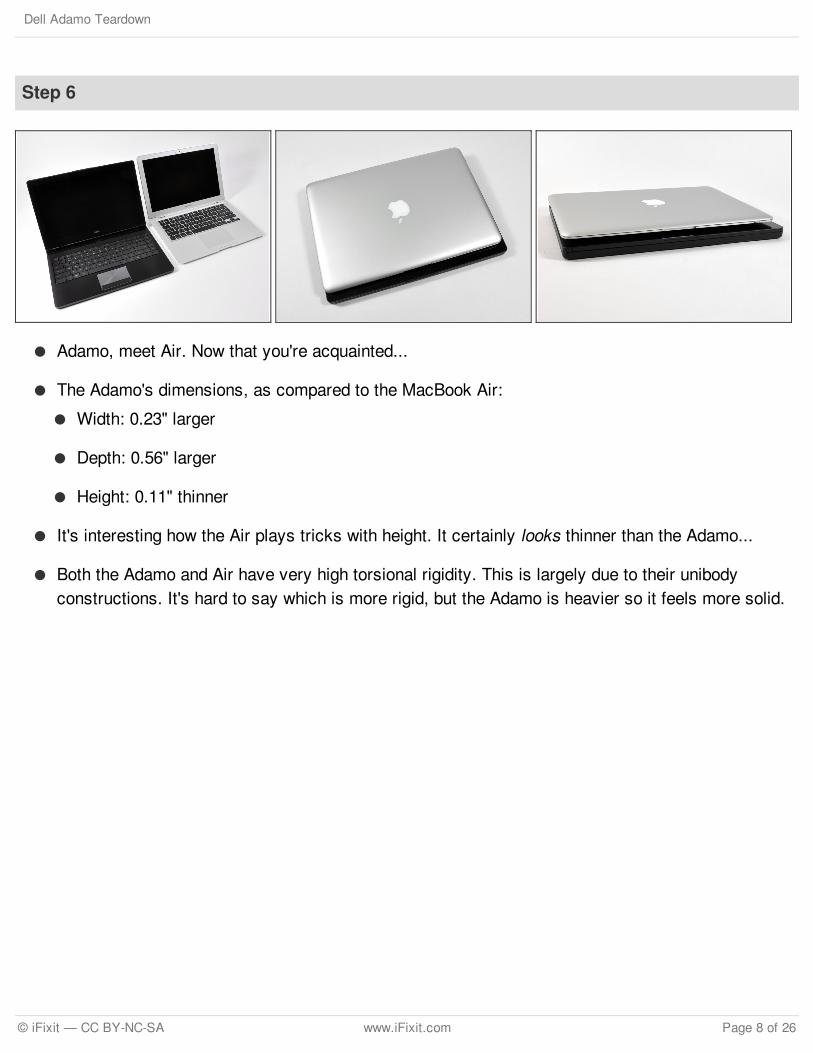
Adamo, meet Air. Now that you're acquainted...
The Adamo's dimensions, as compared to the MacBook Air:
Width: 0.23" larger
Depth: 0.56" larger
Height: 0.11" thinner
It's interesting how the Air plays tricks with height. It certainly looks thinner than the Adamo...
Both the Adamo and Air have very high torsional rigidity. This is largely due to their unibodyconstructions. It's hard to say which is more rigid, but the Adamo is heavier so it feels more solid.
Dell Adamo Teardown
© iFixit — CC BY-NC-SA www.iFixit.com Page 8 of 26

Step 7
The Adamo's elegance clearly beats the Air from this angle.
The Intel and Windows logos are not the typical stickers; they're painted into the case.
Unlike the Air, there are no visible screws on the bottom of the Adamo. However, the gaps betweencase bottom and frame are significantly larger than the Air's.
Getting inside may require some ingenuity...
Dell Adamo Teardown
© iFixit — CC BY-NC-SA www.iFixit.com Page 9 of 26
Step 8
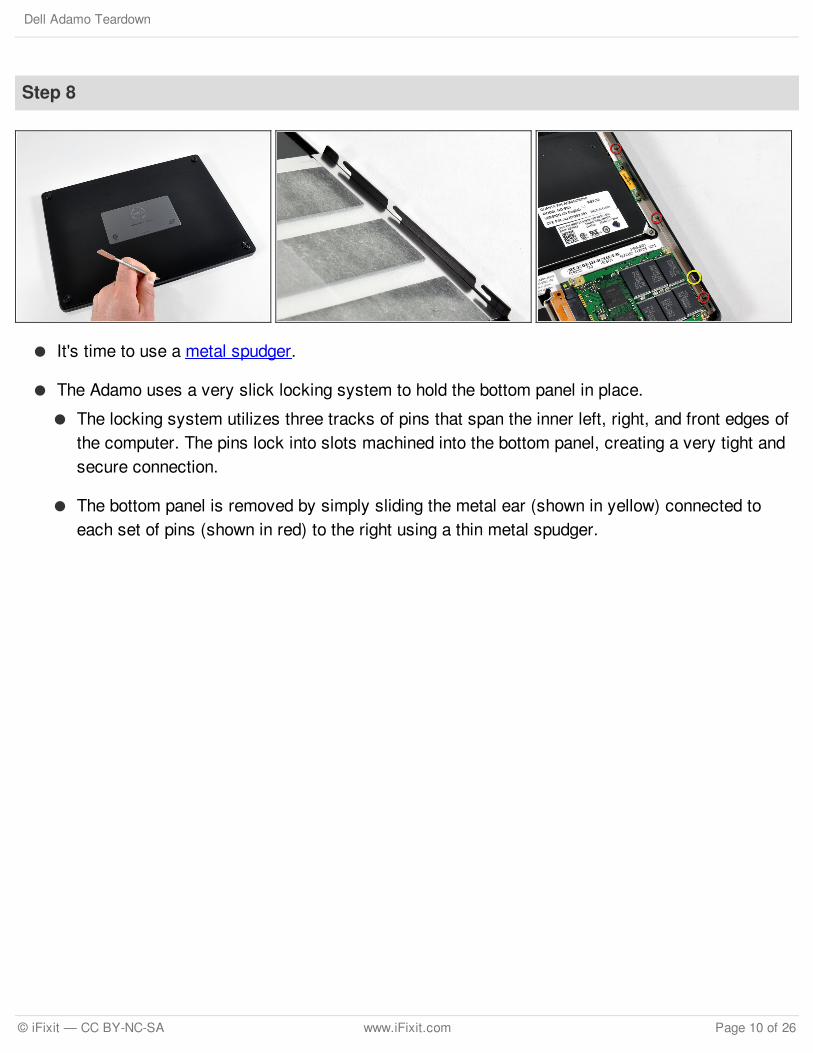
It's time to use a metal spudger.
The Adamo uses a very slick locking system to hold the bottom panel in place.
The locking system utilizes three tracks of pins that span the inner left, right, and front edges ofthe computer. The pins lock into slots machined into the bottom panel, creating a very tight andsecure connection.
The bottom panel is removed by simply sliding the metal ear (shown in yellow) connected toeach set of pins (shown in red) to the right using a thin metal spudger.
Dell Adamo Teardown
© iFixit — CC BY-NC-SA www.iFixit.com Page 10 of 26
Step 9
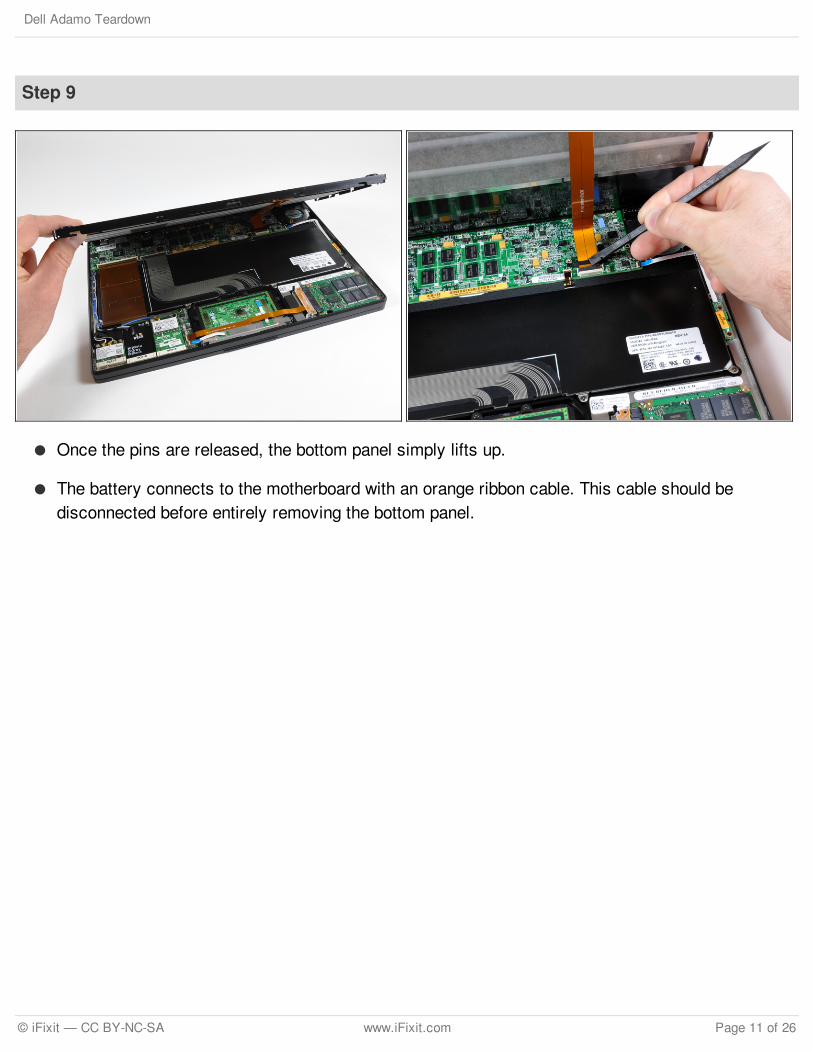
Once the pins are released, the bottom panel simply lifts up.
The battery connects to the motherboard with an orange ribbon cable. This cable should bedisconnected before entirely removing the bottom panel.
Dell Adamo Teardown
© iFixit — CC BY-NC-SA www.iFixit.com Page 11 of 26
Step 10
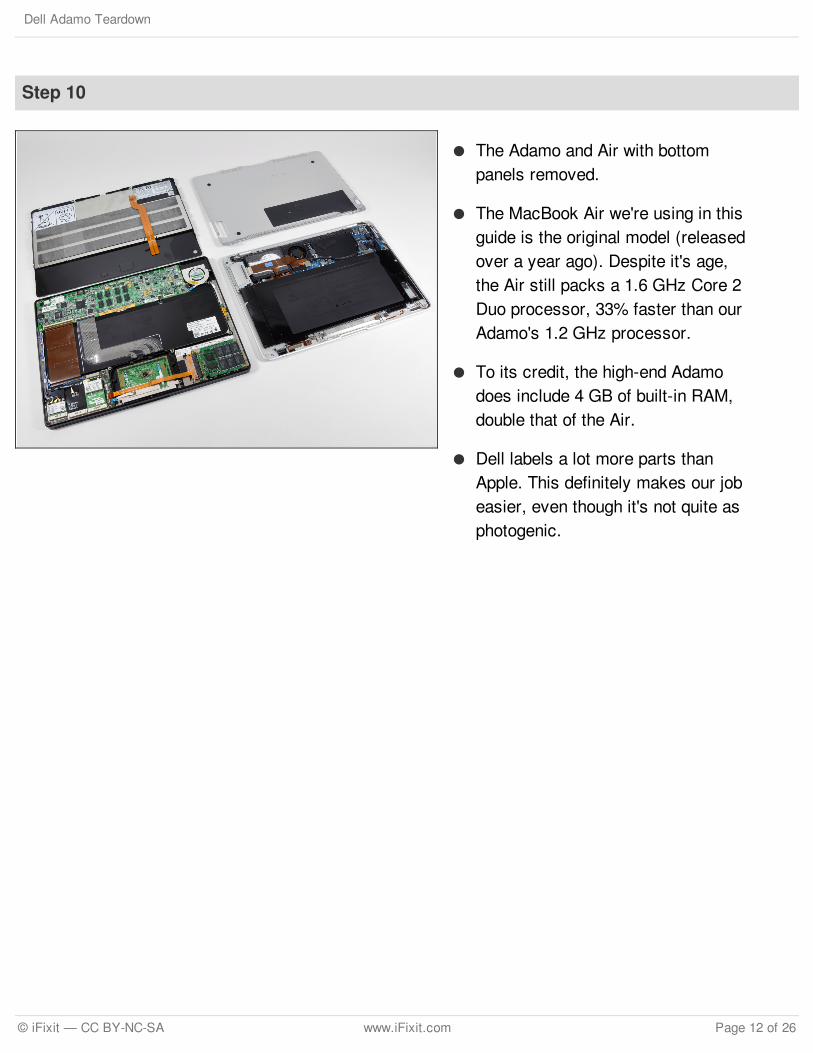
The Adamo and Air with bottompanels removed.
The MacBook Air we're using in thisguide is the original model (releasedover a year ago). Despite it's age,the Air still packs a 1.6 GHz Core 2Duo processor, 33% faster than ourAdamo's 1.2 GHz processor.
To its credit, the high-end Adamodoes include 4 GB of built-in RAM,double that of the Air.
Dell labels a lot more parts thanApple. This definitely makes our jobeasier, even though it's not quite asphotogenic.
Dell Adamo Teardown
© iFixit — CC BY-NC-SA www.iFixit.com Page 12 of 26

Step 11
The bottom panel contains an integrated 6 cell Li-Polymer battery pack.
The 11.1 V battery is rated at 40 Watt hours, an improvement over the MacBook Air's 7.2 V, 37Watt hour battery. (Dell's manual says 12.6 V, but we trust the battery more than their writers.)
The Adamo's advertised operating time is 5 hours, outliving Apple's claims for the MacBook Air by30 minutes.
According to the manual, the battery weighs in at 489 grams. That's 27% of the Adamo's weight. Incomparison, the MacBook Air's battery weighs in at 287 grams, only 21% of the Air's total weight.
You can recycle the battery... in Japan.
Dell Adamo Teardown
© iFixit — CC BY-NC-SA www.iFixit.com Page 13 of 26
Step 12
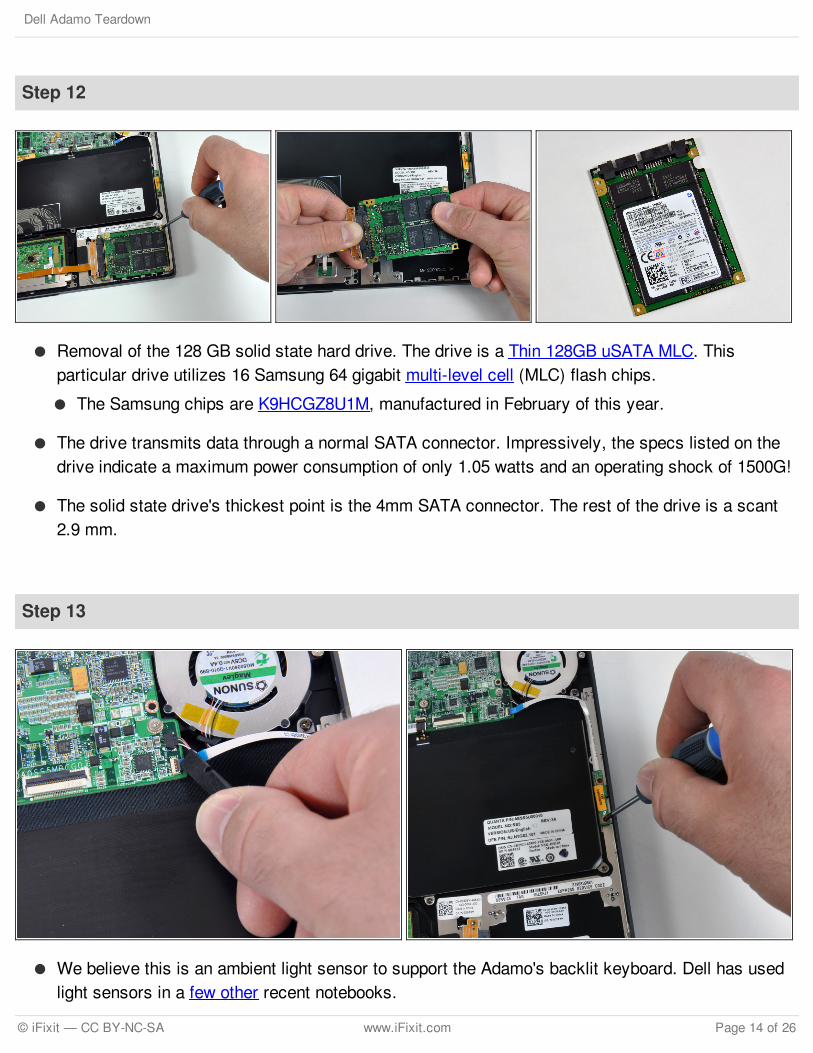
Removal of the 128 GB solid state hard drive. The drive is a Thin 128GB uSATA MLC. Thisparticular drive utilizes 16 Samsung 64 gigabit multi-level cell (MLC) flash chips.
The Samsung chips are K9HCGZ8U1M, manufactured in February of this year.
The drive transmits data through a normal SATA connector. Impressively, the specs listed on thedrive indicate a maximum power consumption of only 1.05 watts and an operating shock of 1500G!
The solid state drive's thickest point is the 4mm SATA connector. The rest of the drive is a scant2.9 mm.
Step 13
We believe this is an ambient light sensor to support the Adamo's backlit keyboard. Dell has usedlight sensors in a few other recent notebooks.
Dell Adamo Teardown
© iFixit — CC BY-NC-SA www.iFixit.com Page 14 of 26
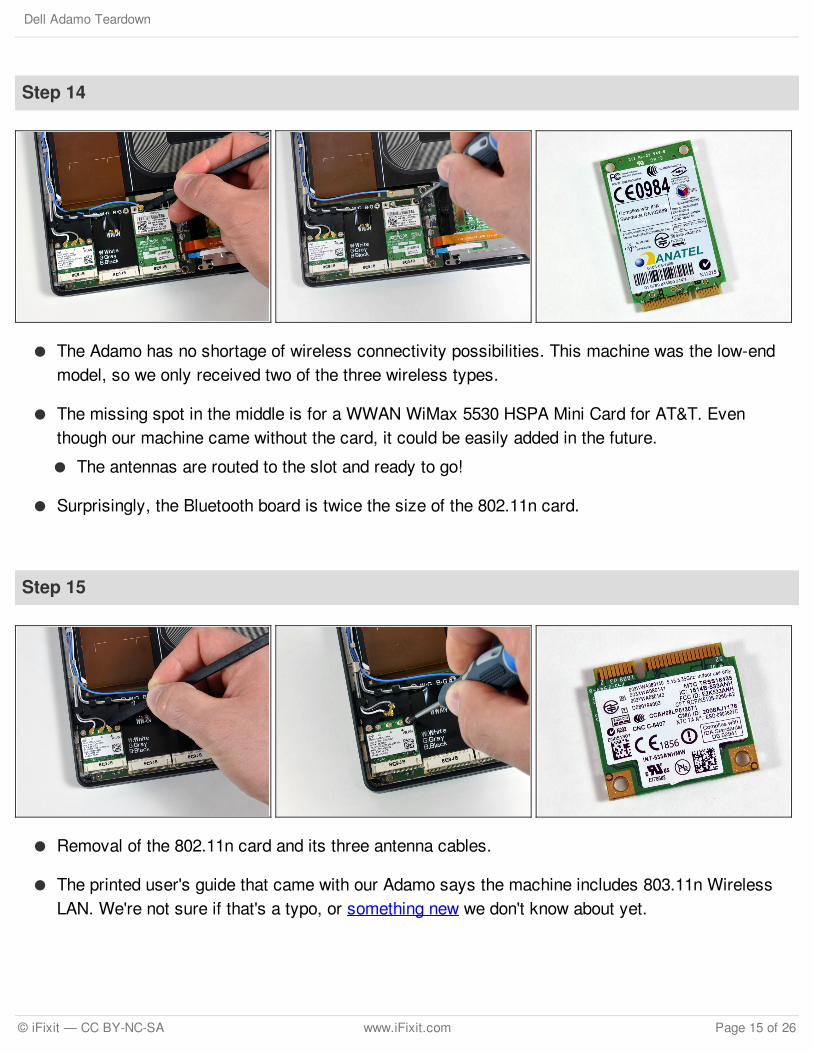
Step 14
The Adamo has no shortage of wireless connectivity possibilities. This machine was the low-endmodel, so we only received two of the three wireless types.
The missing spot in the middle is for a WWAN WiMax 5530 HSPA Mini Card for AT&T. Eventhough our machine came without the card, it could be easily added in the future.
The antennas are routed to the slot and ready to go!
Surprisingly, the Bluetooth board is twice the size of the 802.11n card.
Step 15
Removal of the 802.11n card and its three antenna cables.
The printed user's guide that came with our Adamo says the machine includes 803.11n WirelessLAN. We're not sure if that's a typo, or something new we don't know about yet.
Dell Adamo Teardown
© iFixit — CC BY-NC-SA www.iFixit.com Page 15 of 26

Step 16
The wireless cards are attached to the motherboard via a single wide ribbon cable.
The ribbon cable is held securely in place with adhesive, and peeling it up requires some patience.
Step 17
Removing the wireless data board.
Interestingly enough, the hard drive ribbon cable routes data through the wireless data board beforefinally reaching the motherboard.
You can see Dell's nice labels: WLAN, WWAN, and WPAN. If you fill in all slots, your networkingcapabilities will be local, wide, and personal.
Dell Adamo Teardown
© iFixit — CC BY-NC-SA www.iFixit.com Page 16 of 26
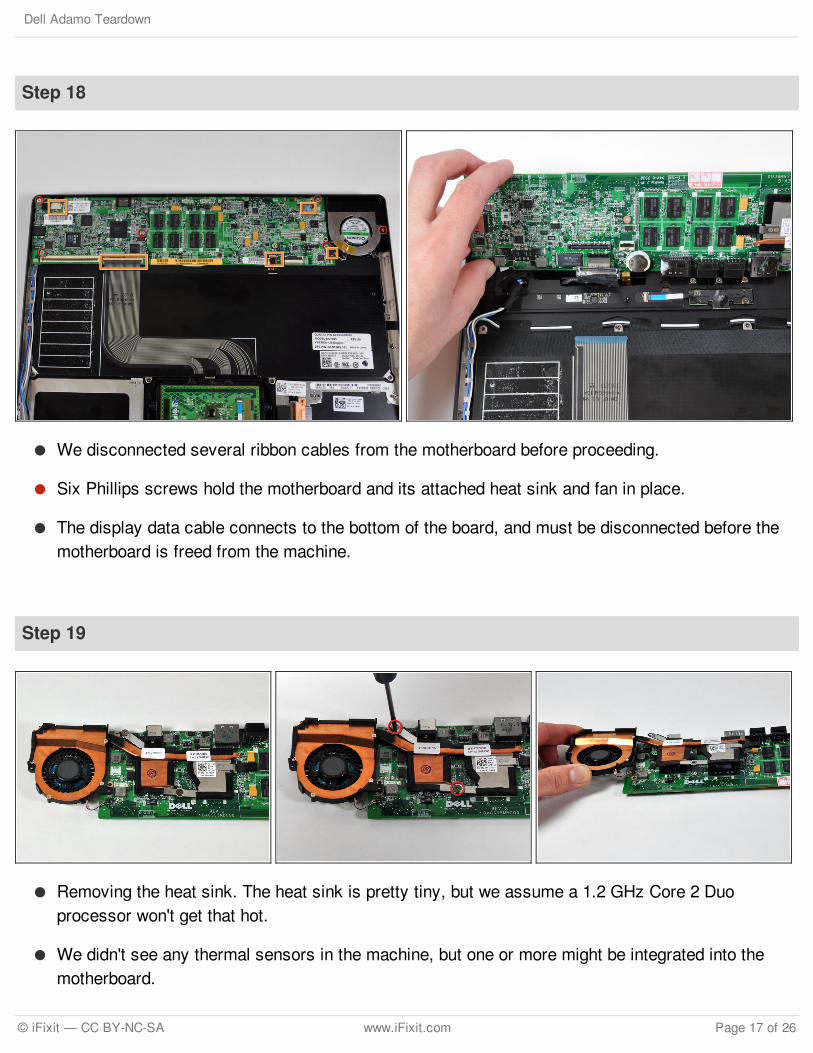
Step 18
We disconnected several ribbon cables from the motherboard before proceeding.
Six Phillips screws hold the motherboard and its attached heat sink and fan in place.
The display data cable connects to the bottom of the board, and must be disconnected before themotherboard is freed from the machine.
Step 19
Removing the heat sink. The heat sink is pretty tiny, but we assume a 1.2 GHz Core 2 Duoprocessor won't get that hot.
We didn't see any thermal sensors in the machine, but one or more might be integrated into themotherboard.
Dell Adamo Teardown
© iFixit — CC BY-NC-SA www.iFixit.com Page 17 of 26
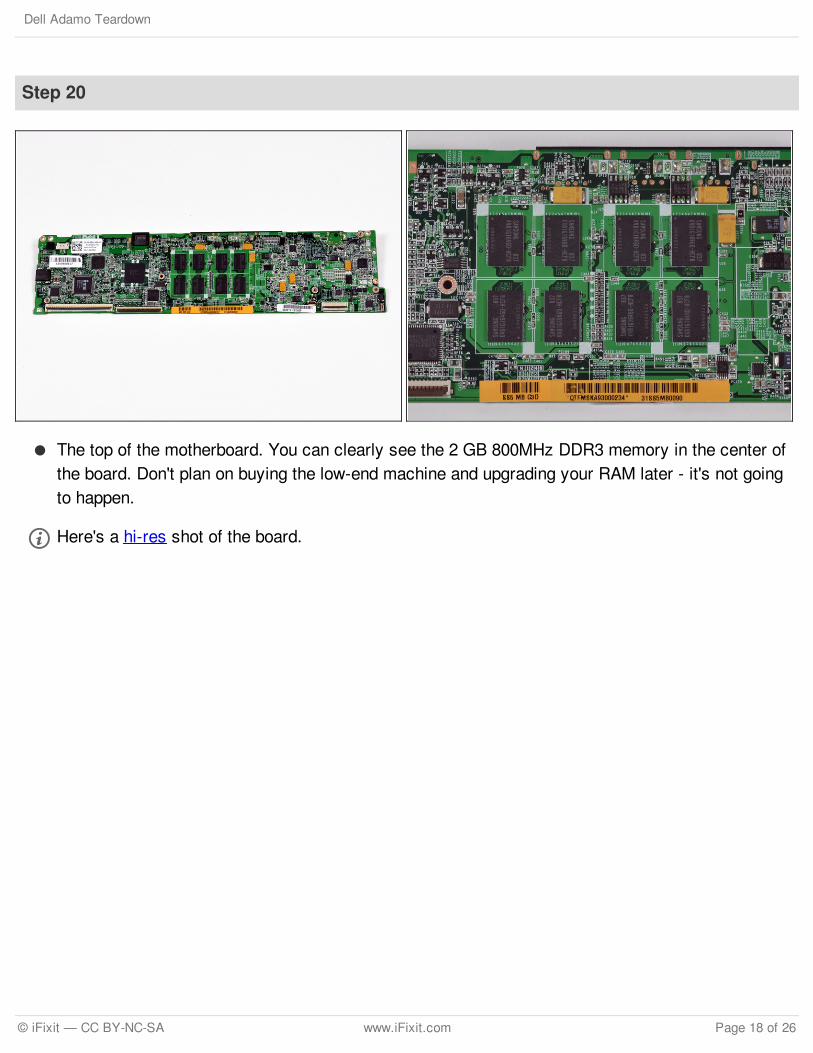
Step 20
The top of the motherboard. You can clearly see the 2 GB 800MHz DDR3 memory in the center ofthe board. Don't plan on buying the low-end machine and upgrading your RAM later - it's not goingto happen.
Here's a hi-res shot of the board.
Dell Adamo Teardown
© iFixit — CC BY-NC-SA www.iFixit.com Page 18 of 26

Step 21
The bottom of the motherboard.
Yes, the processors are soldered to the motherboard. That's not a surprise, and hopefully you'renot purchasing this machine to get the latest and greatest in processor technology.
Unfortunately, all the ports are integrated into the motherboard. Repair will not be cheap ifsomething goes wrong.
Here's a hi-res shot of the board.
Dell Adamo Teardown
© iFixit — CC BY-NC-SA www.iFixit.com Page 19 of 26
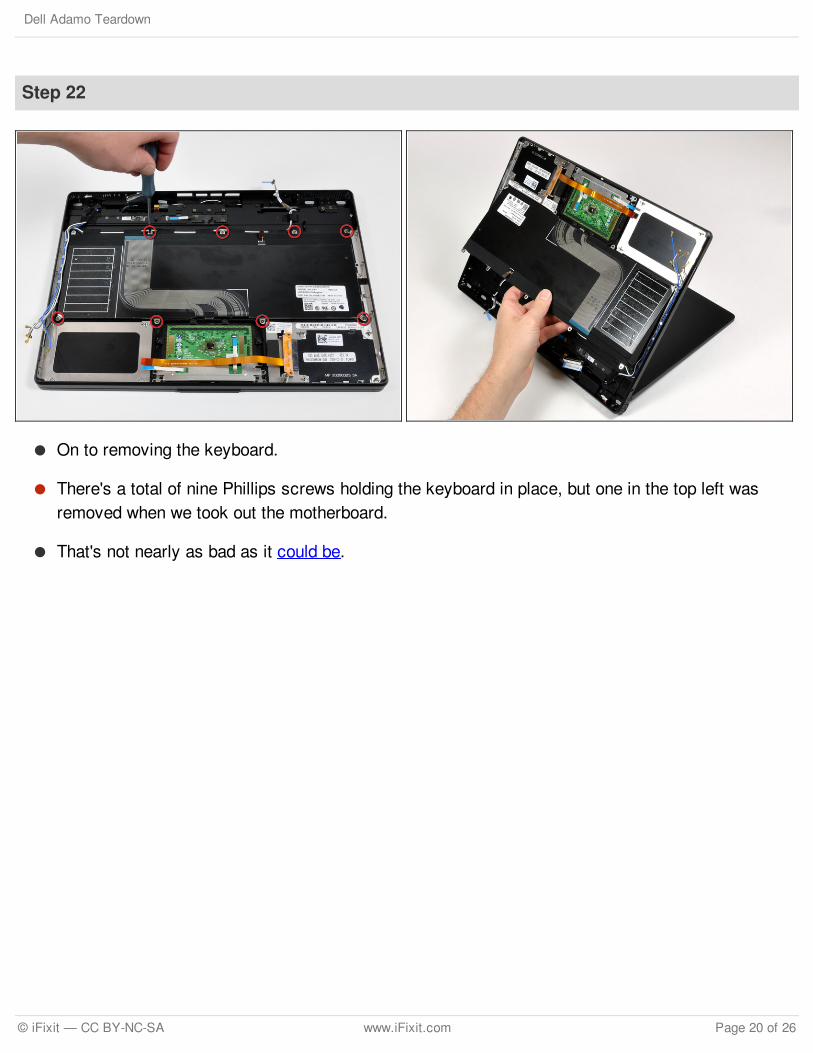
Step 22
On to removing the keyboard.
There's a total of nine Phillips screws holding the keyboard in place, but one in the top left wasremoved when we took out the motherboard.
That's not nearly as bad as it could be.
Dell Adamo Teardown
© iFixit — CC BY-NC-SA www.iFixit.com Page 20 of 26
Step 23
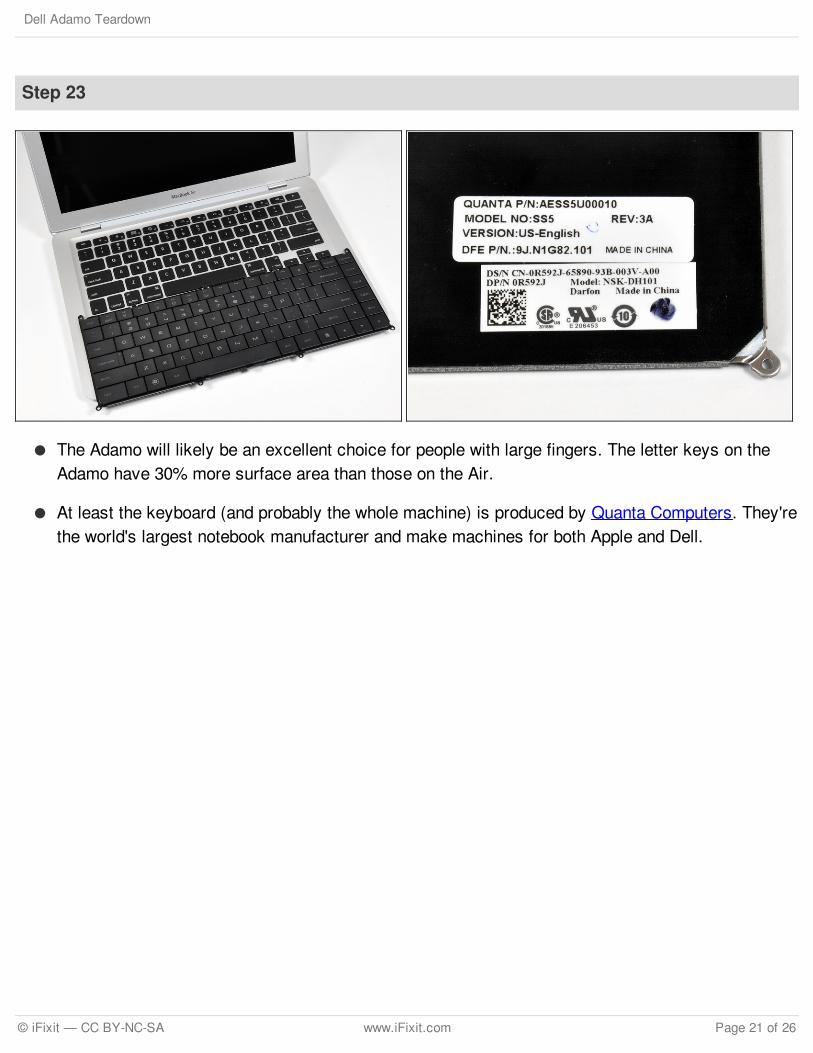
The Adamo will likely be an excellent choice for people with large fingers. The letter keys on theAdamo have 30% more surface area than those on the Air.
At least the keyboard (and probably the whole machine) is produced by Quanta Computers. They'rethe world's largest notebook manufacturer and make machines for both Apple and Dell.
Dell Adamo Teardown
© iFixit — CC BY-NC-SA www.iFixit.com Page 21 of 26
Step 24
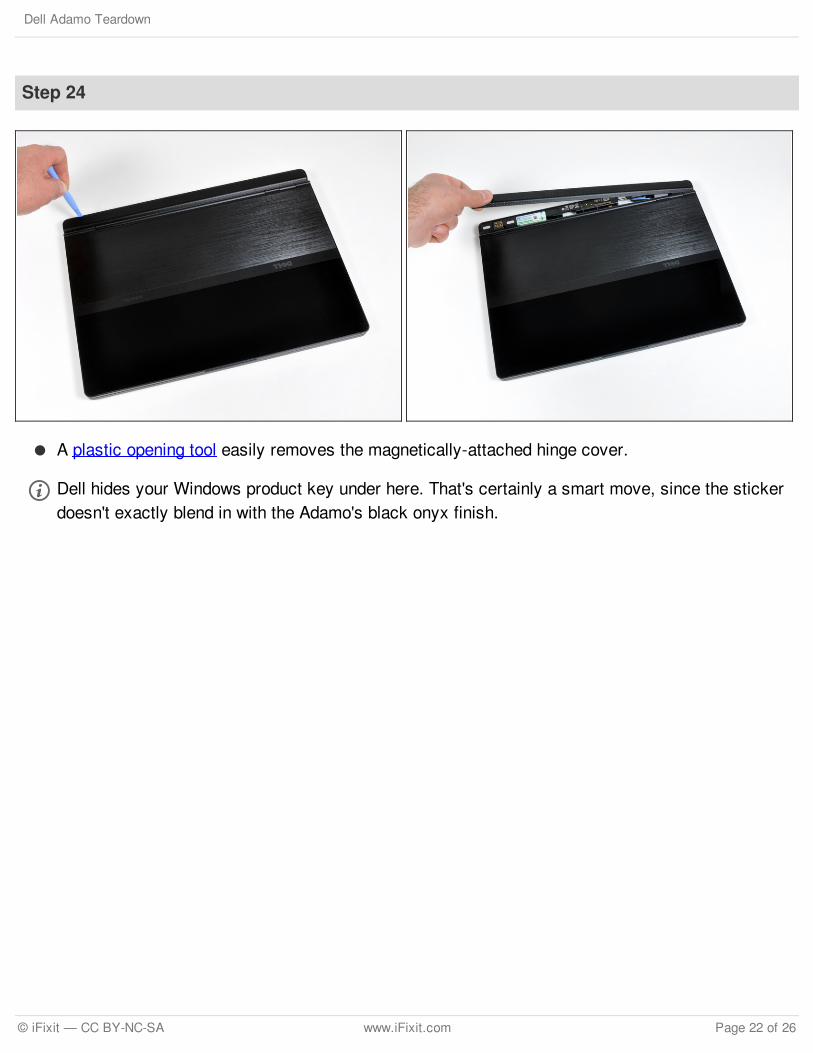
A plastic opening tool easily removes the magnetically-attached hinge cover.
Dell hides your Windows product key under here. That's certainly a smart move, since the stickerdoesn't exactly blend in with the Adamo's black onyx finish.
Dell Adamo Teardown
© iFixit — CC BY-NC-SA www.iFixit.com Page 22 of 26
Step 25
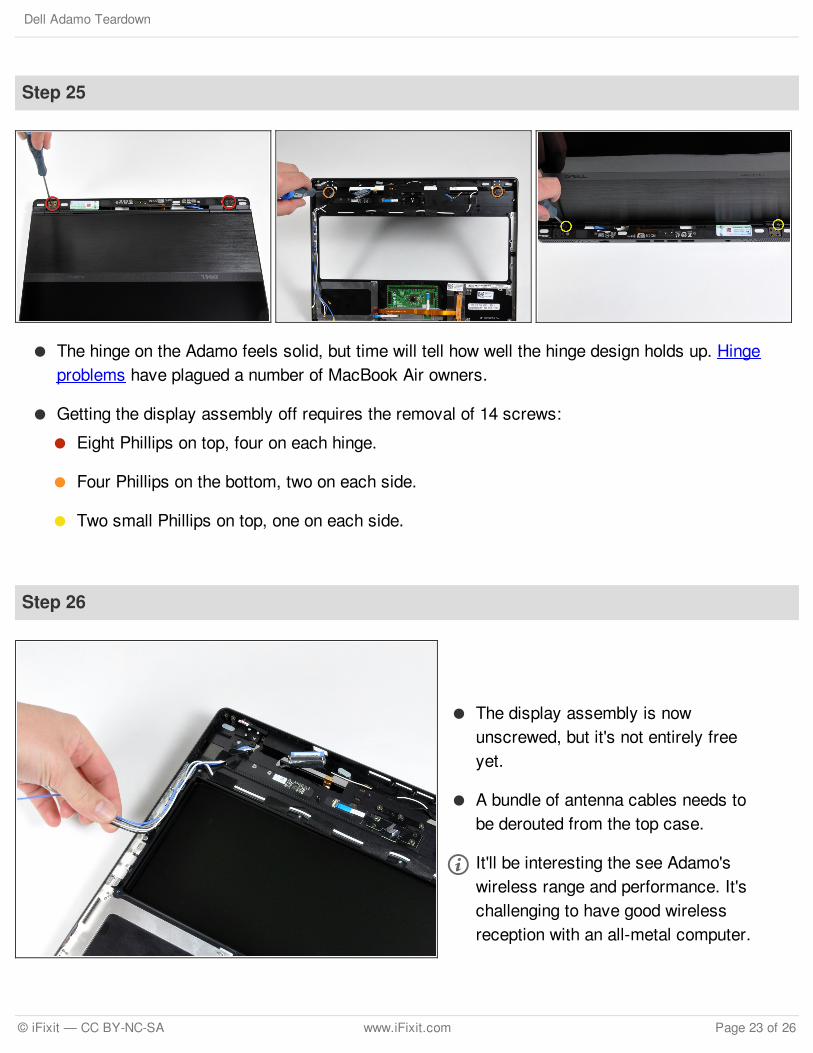
The hinge on the Adamo feels solid, but time will tell how well the hinge design holds up. Hingeproblems have plagued a number of MacBook Air owners.
Getting the display assembly off requires the removal of 14 screws:
Eight Phillips on top, four on each hinge.
Four Phillips on the bottom, two on each side.
Two small Phillips on top, one on each side.
Step 26
The display assembly is nowunscrewed, but it's not entirely freeyet.
A bundle of antenna cables needs tobe derouted from the top case.
It'll be interesting the see Adamo'swireless range and performance. It'schallenging to have good wirelessreception with an all-metal computer.
Dell Adamo Teardown
© iFixit — CC BY-NC-SA www.iFixit.com Page 23 of 26
Step 27
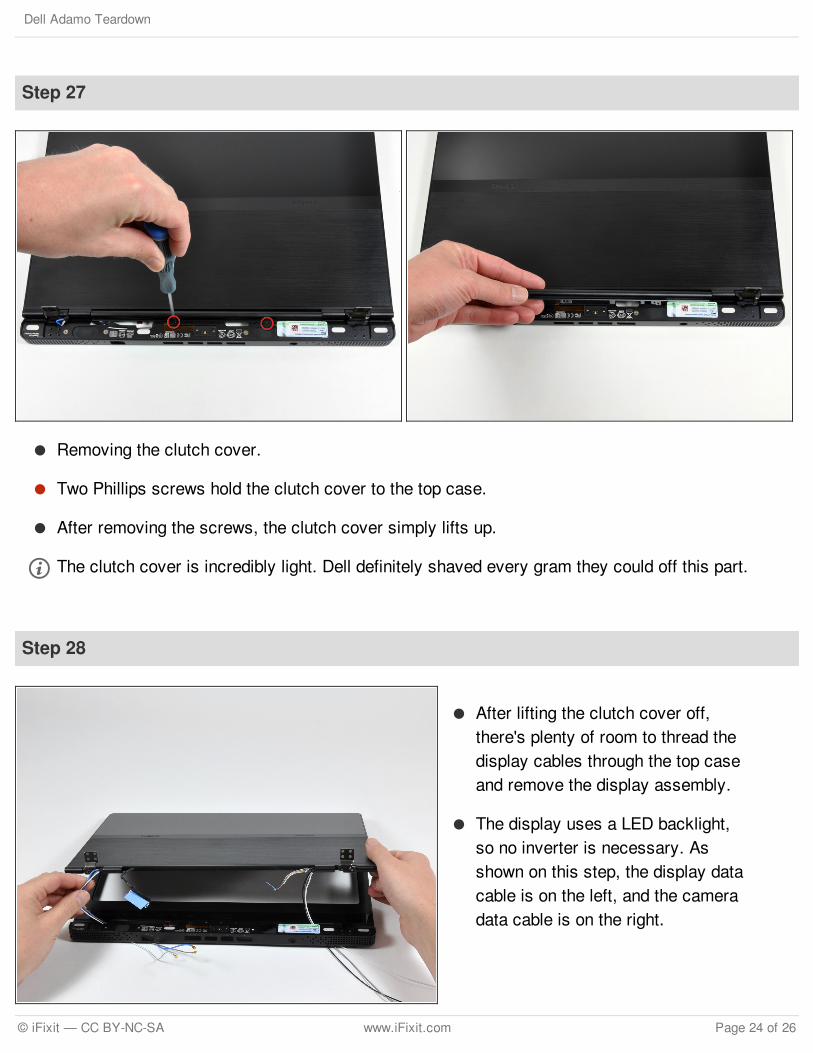
Removing the clutch cover.
Two Phillips screws hold the clutch cover to the top case.
After removing the screws, the clutch cover simply lifts up.
The clutch cover is incredibly light. Dell definitely shaved every gram they could off this part.
Step 28
After lifting the clutch cover off,there's plenty of room to thread thedisplay cables through the top caseand remove the display assembly.
The display uses a LED backlight,so no inverter is necessary. Asshown on this step, the display datacable is on the left, and the cameradata cable is on the right.
Dell Adamo Teardown
© iFixit — CC BY-NC-SA www.iFixit.com Page 24 of 26

Step 29
Free at last!
It's a beautiful display, except for themass of antenna wires. It woulddefinitely be a prettier picture if wegot out the scissors.
This display has a 16:9 resolution of1366x768. That's better than the16:10 1280x800 resolution of theMacBook Air. You'll get an extra25,088 pixels if you choose theAdamo.
The manual lists the display'smaximum power consumption asonly 3.6 watts!
Step 30
And here's the whole Adamo enchilada...
We included the final picture from our MacBook Air First Look for comparison purposes.
Dell Adamo Teardown
© iFixit — CC BY-NC-SA www.iFixit.com Page 25 of 26
This document was last generated on 2017-07-16 01:33:05 AM.
Dell Adamo Teardown
© iFixit — CC BY-NC-SA www.iFixit.com Page 26 of 26