dell c7765dn smart card reader installation and...
TRANSCRIPT
Dell™ C7765dn
Smart Card Reader
Installation and Configuration Guide
Regulatory Model: C7765dn

Information in this document is subject to change without notice.
© 2014 Dell Inc. All rights reserved.
This publication could include technical inaccuracies or typographical errors. Changes are periodically made to the information herein; these changes will be incorporated in later editions. Improvements or changes in the products or the programs described may be made at any time.
For Dell technical support and downloads, visit dell.com/support or contact Dell's ProSupport Help Desk for assistance by calling 1-866-516-3115, or by e-mailing [email protected].
Reproduction of these materials in any manner whatsoever without the written permission of Dell Inc. is strictly forbidden.
Trademarks used in this text: Dell and the DELL logo are trademarks of Dell Inc.; Microsoft, Windows, and Windows Server are either trademarks or registered trademarks of Microsoft Corporation in the United States and/or other countries; RSA and BSAFE are either registered trademarks or trademarks of EMC Corporation in the United States and/or other countries.
XML Paper Specification (XPS): This product may incorporate intellectual property owned by Microsoft Corporation. The terms and conditions upon which Microsoft is licensing such intellectual property may be found at http://go.microsoft.com/fwlink/?LinkId=52369.
NuanceTM OCR © 1994-2014 Nuance Communications. All Rights Reserved.
Other trademarks and trade names may be used in this document to refer to either the entities claiming the marks and names or their products. Dell Inc. disclaims any proprietary interest in trademarks and trade names other than its own.
The printer software uses some of the codes defined by the Independent JPEG Group.
SD Logo is a trademark of SD-3C, LLC.
As for RSA BSAFEThis printer includes RSA® BSAFE® Cryptographic software from EMC Corporation.
____________________
UNITED STATES GOVERNMENT RESTRICTED RIGHTS
This software and documentation are provided with RESTRICTED RIGHTS. Use, duplication or disclosure by the Government is subject to restrictions as set forth in subparagraph (c)(1)(ii) of the Rights in Technical Data and Computer Software clause at DFARS 252.227-7013 and in applicable FAR provisions: Dell Inc., One Dell Way, Round Rock, Texas, 78682, USA.
April 2014 Rev. A02

Table of Contents
3
Table of Contents
1 Before Using the Smart Card Solution .................................................................................5
Preface ........................................................................................................................................6
Conventions...............................................................................................................................6
Feature Overview......................................................................................................................7
Supported Card Readers .........................................................................................................8
Supported Card Types ............................................................................................................9
Compatibility ...........................................................................................................................10
2 Installation ................................................................................................................................ 11
Hardware Installation.............................................................................................................12
Initial Settings Procedures Using Dell Printer Configuration Web Tool ....................13Preparations for settings on Dell Printer Configuration Web Tool.........................13
Set SSL/TLS .........................................................................................................................14Import root CA and intermediate CA certificates for the Smart Card ...................16View the imported CA certificates ................................................................................. 17Set SMTP.............................................................................................................................. 17Set S/MIME..........................................................................................................................18Set LDAP Server .................................................................................................................19Set Kerberos Server .......................................................................................................... 20Set Certificate Revocation Retrieval ..............................................................................21Set FIPS140-2 .................................................................................................................... 22Set User ID Case Sensitivity ............................................................................................ 23Enable Plug-in Settings ................................................................................................... 23
Initial Settings Procedures Using Control Panel ............................................................. 24Authentication for entering the System Administration mode............................... 24Check the system clock.................................................................................................. 25Set NTP Time Synchronization...................................................................................... 25Set Authentication............................................................................................................ 26Set Use of Smart Card ..................................................................................................... 28Set Access Control ........................................................................................................... 29Set Private Charge Print .................................................................................................. 32
Initial Settings Procedures Using Printer Driver of User Client .................................... 33Configure the User Account .......................................................................................... 33
Installation of Plug-in ........................................................................................................... 34Installation.......................................................................................................................... 34Uninstallation and Version Upgrade............................................................................. 34
3 Usage Examples ..................................................................................................................... 35
User Authentication .............................................................................................................. 36
Digital Signature for S/MIME ................................................................................................37
Digital Signature for Scan Files ........................................................................................... 38
Private Charge Print .............................................................................................................. 39

4
4 Problem Solving......................................................................................................................41
Error Messages........................................................................................................................42
Technical Support ..................................................................................................................45Service Tag and Express Code45
5 Appendix...................................................................................................................................47
List of Configuring Procedures .......................................................................................... 48
Smart Card Certificate - Object Identifiers ...................................................................... 50
Index................................................................................................................................................. 51

1 Before Using the Smart Card Solution
This chapter describes the Smart Card (CAC/PIV) solution and the items to be confirmed.
• Preface............................................................................................................................6
• Conventions ..................................................................................................................6
• Feature Overview......................................................................................................... 7
• Supported Card Readers............................................................................................8
• Supported Card Types................................................................................................9
• Compatibility ...............................................................................................................10

1 Before Using the Smart Card Solution
6
Preface
This guide is intended for use by Dell service providers and network administrators responsible for the management of security appliances and software in the network environment of the organization where the machine is installed, and describes the setup procedures related to the Smart Card solution.
It may not include all options and settings available and configurable on the machine.
Please be aware that due to the differences in networks and needs, there may be alternative settings required for each installation.
For information on the other features available for the machine, refer to the following guidance.
• Dell C7765dn Color Multifunction Printer User’s Guide
Conventions
• The screen shots and illustrations used in this guide vary depending on the machine configuration, optional components installed, and operating system of your computer. Some of the items in the screen shots may not be displayed or available depending on the configuration of your machine.
• The procedures in this guide may vary depending on your environment.
• In this guide, "computer" refers to a personal computer or workstation.
• "Note" in this guide provides additional information on operations or features.
• The following symbols are used in this guide:
" " : • A cross-reference included in this guide.
• Names of CD-ROM, features, and touch screen messages and input text.
[ ] : • Folders, files, applications, button or menu names displayed on the touch screen.
• Names of menus, commands, windows, or dialog boxes displayed on the computer screen and their buttons and menu names.
< > button : Hardware buttons on the control panel.
< > key : Keys on the keyboard of the computer.

Feature Overview
7
Feature Overview
The Dell Smart Card solution brings an advanced level of security to sensitive information.
This ensures that only authorized users are able to copy, scan, print, e-mail, and fax information.
Once validated, a user is logged into the machine for all features.
This functionality requires the use of PKI certificates that must be made available to the machine. Once available, these certificates allow encryption and digital signing of e-mail messages and digital signing of PDF and XPS (XML Paper Specification) files.

1 Before Using the Smart Card Solution
8
Supported Card Readers
The following card readers are compatible with the solution:
• SCR331
• SCR3310 v2.0
Note • Other CCID compliant ISO-7816 card reader may function with the solution, but have not been validated.
• For Dell technical support and downloads, visit dell.com/support or contact Dell's ProSupport Help Desk for assistance by calling 1-866-516-3115, or by e-mailing [email protected].

Supported Card Types
9
Supported Card Types
The customer is responsible for purchasing and configuring the access cards. The following card types are recommended:
• Axalto Pegasus 64K / V2
• Axalto Cyberflex 32K / V1
• Axalto Cyberflex 64K / V2
• Gemplus GemXpresso 64K / V2
• Oberthur 72K / V2
• Oberthur Cosmopoll 32K / V1
• Oberthur D172K / V2 (contact-less and PIV)
• Gemalto 72K PIV ENDPOINT
• Gemalto 128K PIV ENDPOINT
• Gemalto 144K PIV ENDPOINT
Note • Other card types may function with the solution, but have not been validated.
• For Dell technical support and downloads, visit dell.com/support or contact Dell's ProSupport Help Desk for assistance by calling 1-866-516-3115, or by e-mailing [email protected].
1 Before Using the Smart Card Solution
10
Compatibility
This solution is compatible with the following product and configurations:
1 Press the <Machine Status> button on the control panel.
2 Select [Software Version] on the [Machine Information] screen.
You can identify the software versions of the components of the machine on the
screen.
Configuration Software Level CAC PIV
Dell C7765dn Controller ROM Ver. 2.205.0 and later
Yes Yes

2 Installation
This chapter provides instructions for installing and configuring the Smart Card solution. There are five main installation procedures to follow in sequence.
• Hardware Installation ................................................................................................ 12
• Initial Settings Procedures Using Dell Printer Configuration Web Tool ...... 13
• Initial Settings Procedures Using Control Panel ................................................24
• Initial Settings Procedures Using Printer Driver of User Client ......................33
• Installation of Plug-in ................................................................................................34

2 Installation
12
Hardware Installation
Connect your card reader to the available USB port.

Initial Settings Procedures Using Dell Printer Configuration Web Tool
13
Initial Settings Procedures Using Dell Printer Configuration Web Tool
This section describes the initial settings related to the Smart Card solution, and how to set them on Dell Printer Configuration Web Tool.
Preparations for settings on Dell Printer Configuration Web Tool................................... 13
Set SSL/TLS...................................................................................................................................... 14
Import root CA and intermediate CA certificates for the Smart Card ............................. 16
View the imported CA certificates .............................................................................................17
Set SMTP ...........................................................................................................................................17
Set S/MIME ...................................................................................................................................... 18
Set LDAP Server.............................................................................................................................. 19
Set Kerberos Server .......................................................................................................................20
Set Certificate Revocation Retrieval.......................................................................................... 21
Set FIPS140-2 .................................................................................................................................. 22
Set User ID Case Sensitivity......................................................................................................... 23
Enable Plug-in Settings................................................................................................................. 23
Preparations for settings on Dell Printer Configuration Web Tool
Prepare a computer supporting the TCP/IP protocol to use Dell Printer Configuration Web Tool. Dell Printer Configuration Web Tool supports the browsers that satisfy "SSL/TLS" conditions.
1 Open your Web browser, enter the TCP/IP address of the machine in the Address or Location field, and press the <Enter> key.
Note • If a certificate error screen appears, choose to ignore the error and continue.
2 Enter the System Administrator's ID and the passcode if prompted (default ID: “admin”, default passcode: “1111”).
3 Display the [Properties] screen by clicking the [Properties] tab.

2 Installation
14
Set SSL/TLS
Installation of the card reader requires HTTP - SSL/TLS communication between a network-connected computer and the machine.
1 Click [Security] on the [Properties] screen.
2 Click [Machine Digital Certificate Management].
3 Click [Create New Certificate].
Note • If [Create New Self Signed Certificate] is displayed, click it and go to step 5.
4 Select [Self-Signed Certificate] and click [Continue].
5 On the each menu, make the following settings as necessary:
• Public Key Size
• Issuer
• Days of Validity
6 Click [Apply].
7 Click [SSL / TLS Settings].

Initial Settings Procedures Using Dell Printer Configuration Web Tool
15
8 Check the [Enabled] box for [HTTP - SSL / TLS Communication] and [LDAP- SSL / TLS Communication].
Note • For the secure operation, you should check the [Enabled] box for [Verify Remote Server Certificate], and import the CA certificate. If SMTP server has SSL/TLS function and if you want to use a secure e-mail, configure the [SMTP - SSL / TLS Communication].
9 Click [Apply].
10 Click [Reboot Machine] if prompted.

2 Installation
16
Import root CA and intermediate CA certificates for the Smart Card
Import root CA and intermediate CA certificates for the Smart Card, Kerberos server, and OCSP responder.
Supported CA certificate formats
The CA certificate formats that can be used are as follows:
• DER encoded binary X.509 (.CER)
• Base 64 encoded X.509 (.CER)
• DER encoded binary PKCS #7 (.P7B)
Note • Base 64 encoded PKCS #7 is not supported.
How to import the certificates
1 Click [Security] on the [Properties] screen.
2 Click [Machine Digital Certificate Management].
3 Click [Upload Signed Certificate].
4 Enter a file name for the file you want to import, or select the file to be imported by clicking [Browse].
Note • Leave the password fields blank.
5 Click [Import].
6 Repeat steps 2 to 5 for each CA certificate.
Note • Both root CA and intermediate CA certificates need to be imported to the machine to establish a “Chain of Trust” for the certificates located on the operator's Smart Card.
Initial Settings Procedures Using Dell Printer Configuration Web Tool
17
View the imported CA certificates
The following steps are optional. You can check the imported CA certificates.
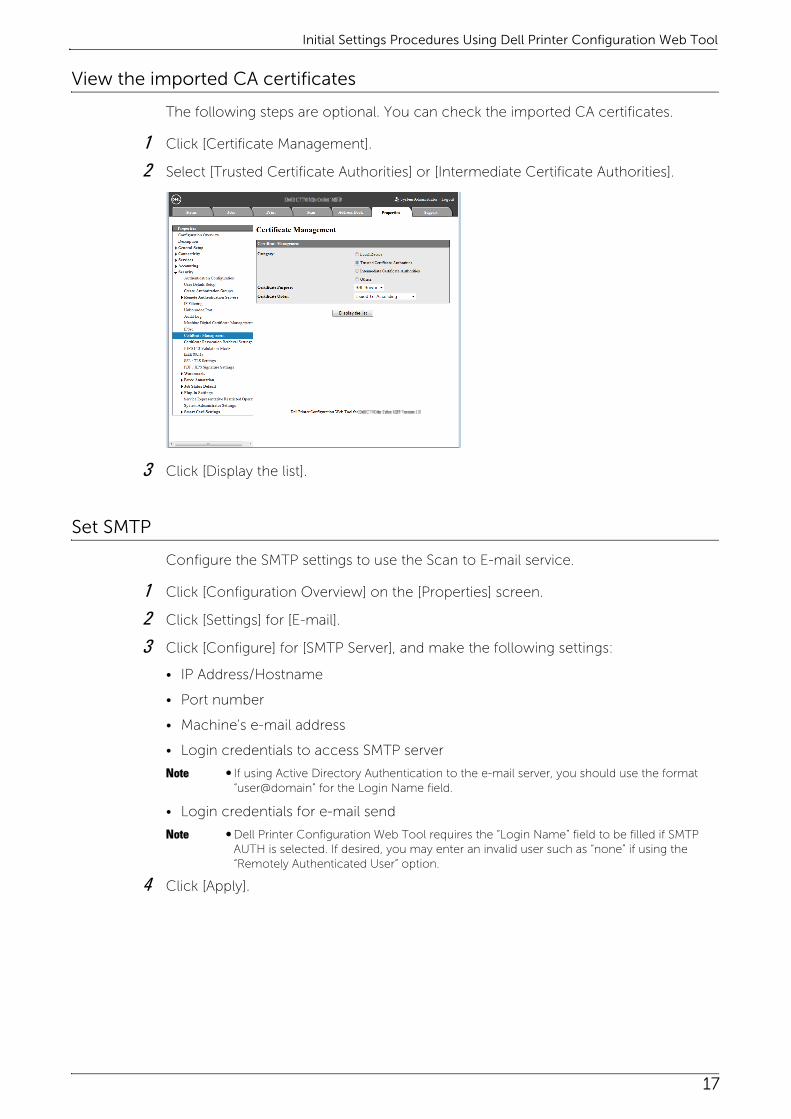
1 Click [Certificate Management].
2 Select [Trusted Certificate Authorities] or [Intermediate Certificate Authorities].
3 Click [Display the list].
Set SMTP
Configure the SMTP settings to use the Scan to E-mail service.
1 Click [Configuration Overview] on the [Properties] screen.
2 Click [Settings] for [E-mail].
3 Click [Configure] for [SMTP Server], and make the following settings:
• IP Address/Hostname
• Port number
• Machine's e-mail address
• Login credentials to access SMTP server
Note • If using Active Directory Authentication to the e-mail server, you should use the format “user@domain” for the Login Name field.
• Login credentials for e-mail send
Note • Dell Printer Configuration Web Tool requires the “Login Name” field to be filled if SMTP AUTH is selected. If desired, you may enter an invalid user such as “none” if using the “Remotely Authenticated User” option.
4 Click [Apply].

2 Installation
18
Set S/MIME
Enable the S/MIME communication to use the e-mail encryption and digital signature features. To use S/MIME on the machine, a certificate issued by another CA is required.
Creating a Certificate Signing Request (CSR)
1 Click [Security] on the [Properties] screen.
2 Click [Machine Digital Certificate Management].
3 Click [Create New Certificate].
4 Select [Certificate Signing Request (CSR)] and click [Continue].
5 Make the following settings and click [Apply].
• 2 Letter Country Code
• Organization Name
• Organization Unit
Note • Confirm that the e-mail address displayed here is the same with the machine’s e-mail address configured in "Set SMTP" (P.17).
6 Click [Download] to save the CSR.
7 Email the file to a trusted certificate authority to be signed.
Uploading a certificate
When a signed certificate is received back from a trusted certificate authority, you can upload the certificate to the machine.
Note • The signed certificate must match the CSR created by the machine.
• You must import certificates in the DER encoded PKCS #7 format only.
1 Click [Security] on the [Properties] screen.
2 Click [Machine Digital Certificate Management].
3 Click [Upload Signed Certificate].
4 If the certificate is password protected, type the password and retype to verify.
5 Click [Browse], navigate to the signed certificate in ".crt" format, and click [Open].
6 Click [Import].
Specifying a certificate to use
1 Click [Security] on the [Properties] screen.
2 Click [Certificate Management].
3 Select [Local Device] for [Category] and [S/MIME] for [Certificate Purpose].
Note • Set [Certificate Order] as necessary.
4 Click [Display the list].
5 Select a certificate from the list and click [Certificate Details].
6 Click [Use this certificate].

Initial Settings Procedures Using Dell Printer Configuration Web Tool
19
Note • If [Use this certificate] is not available, then the selected certificate has expired, or is not valid. All certificates in the certification path (chain of trust) must be installed on the machine and be valid.
7 Click [Reboot Machine] if prompted.
Enabling S/MIME communication
1 Click [Security] on the [Properties] screen.
2 Click [SSL / TLS Settings].
3 Check the [Enabled] box for [S/MIME Communication].
4 Click [Apply].
5 Click [Reboot Machine] if prompted.
For more information on the S/MIME settings, refer to "15 Tools" > "Connectivity & Network Setup" > "Security Settings" > "S/MIME Settings" in the User's Guide.
Set LDAP Server
Configure the LDAP server settings to use the Access Control feature.
1 Click [Connectivity] on the [Properties] screen.
2 Click [Protocols].
3 Click [LDAP].
4 Click [LDAP Server].
5 On the each menu, make the following settings:
• IP Address/Hostname
• Port number
• LDAP Server
• Search Directory Root
Note • Enter the distinguished name of the root node. (Example: CN=users, DC=mydomain, DC=dell, DC=com)
• Login credentials to Search Entries

2 Installation
20
Note • Using system credentials to authenticate to an Active Directory LDAP server, you must use the format “domain\user”.
6 Click [Apply].
7 Click [Reboot Machine] if prompted.
Set Kerberos Server
Configure the Kerberos server settings for authentication.
1 Click [Security] on the [Properties] screen.
2 Click [Kerberos Server] under [Remote Autentication Servers].
3 Check the [Enabled] box for [Server Certificate Validation].
4 On the each menu, make the following settings:
• Primary Server Name/IP Address
• Primary Server Port Number
• Domain Name
5 Click [Apply].
6 Click [Reboot Machine] if prompted.

Initial Settings Procedures Using Dell Printer Configuration Web Tool
21
Set Certificate Revocation Retrieval
Perform either of the following steps to configure the Certificate Revocation Retrieval settings.
Using CRL method
1 Click [Security] on the [Properties] screen.
2 Click [Certificate Revocation Retrieval settings].
3 Select [High] for [Level of Certificate Verification].
4 Select [By Retrieving CRL] for [Retrieval of Certificate status].
5 Check the [Enabled] box for [Auto Retrieval of CRL].
6 Click [Apply].
7 Click [Reboot Machine] if prompted.

2 Installation
22
Using OCSP method
1 Click [Security] on the [Properties] screen.
2 Click [Certificate Revocation Retrieval settings].
3 Select [High] for [Level of Certificate Verification].
4 Select [By OCSP] for [Retrieval of Certificate status].
5 Select [URL As Specified by Administrator] for [Send Query to OCSP Responder With].
6 Set the URL of OCSP for [URL of OCSP Responder].
7 Uncheck the [Enabled] box for [Auto Retrieval of CRL].
8 Click [Apply].
9 Click [Reboot Machine] if prompted.
Set FIPS140-2
1 Click [Security] on the [Properties] screen.
2 Click [FIPS140 Validation Mode].
3 Check the [Enabled] box.
4 Click [Apply].
5 Click [Reboot Machine] if prompted.

Initial Settings Procedures Using Dell Printer Configuration Web Tool
23
Set User ID Case Sensitivity
1 Click [Security] on the [Properties] screen.
2 Click [User Details Setup].
3 Select [Non-Case Sensitive] for [User ID for login].
4 Click [Apply].
5 Click [Reboot Machine] if prompted.
Enable Plug-in Settings
1 Click [Security] on the [Properties] screen.
2 Click [Plug-in Settings] under [Plug-in Settings].
3 Check the [Enabled] box.
4 Click [Apply].
5 Click [Reboot Machine] if prompted.

2 Installation
24
Initial Settings Procedures Using Control Panel
This section describes the initial settings related to the Smart Card solution, and how to set them on the machine’s control panel.
Authentication for entering the System Administration mode ......................................... 24
Check the system clock .............................................................................................................. 25
Set NTP Time Synchronization.................................................................................................. 25
Set Authentication......................................................................................................................... 26
Set Use of Smart Card.................................................................................................................. 28
Set Access Control........................................................................................................................ 29
Set Private Charge Print ............................................................................................................... 32
Authentication for entering the System Administration mode
1 Press the <Log In/Out> button.
<Log In/Out> button
2 Enter "admin" with the keyboard displayed. This is the factory default ID.
When a passcode is required, select [Next] and enter "1111" from the keyboard.
3 Select [Enter] on the touch screen.
4 Select [Tools].

Initial Settings Procedures Using Control Panel
25
Check the system clock
1 Select [System Settings] on the [Tools] screen.
2 Select [Common Service Settings].
3 Select [Machine Clock / Timers].
You can check the time and the date of the system clock. If you need to change the time and the date, refer to the following procedures.
4 Select the required option.
5 Select [Change Settings].
6 Change the required setting.
7 Select [Save].
Note • Kerberos authentication will not function properly without the machine and server being in time sync.
Set NTP Time Synchronization
The following steps are optional. You can configure the NTP Time Synchronization settings.
1 Select [System Settings] on the [Tools] screen.
2 Select [Common Service Settings].
3 Select [Machine Clock / Timers].
2 Installation
26
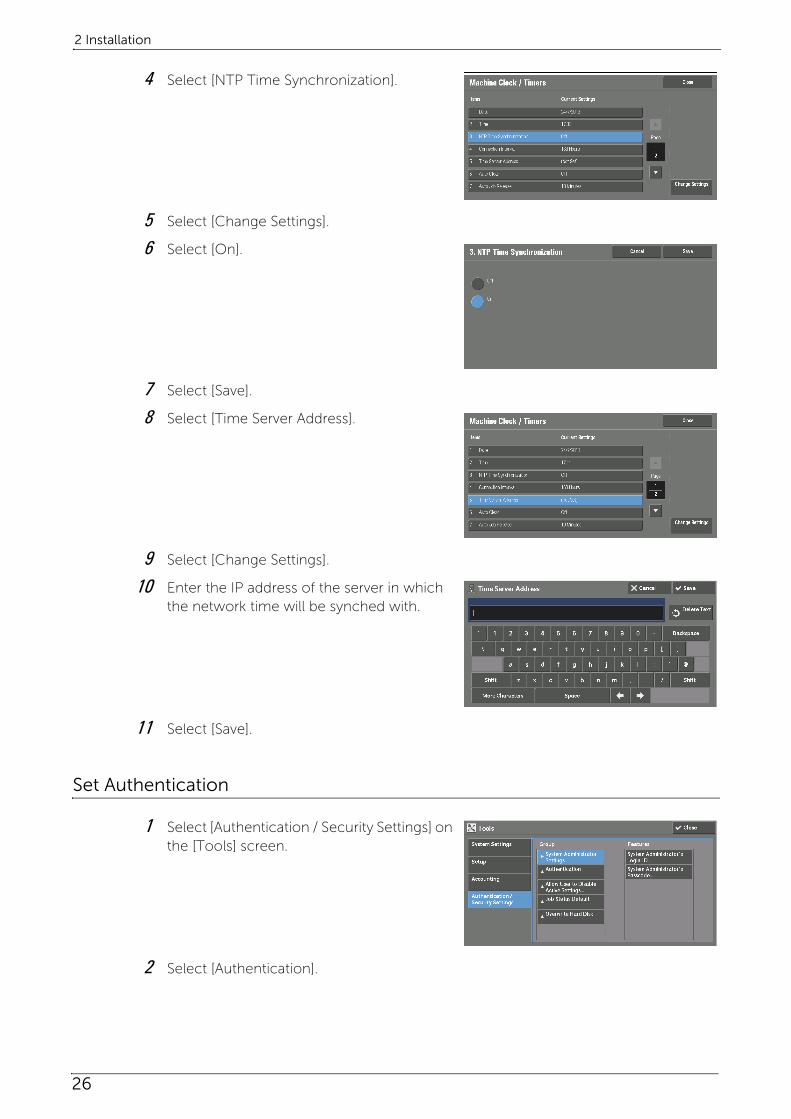
4 Select [NTP Time Synchronization].
5 Select [Change Settings].
6 Select [On].
7 Select [Save].
8 Select [Time Server Address].
9 Select [Change Settings].
10 Enter the IP address of the server in which the network time will be synched with.
11 Select [Save].
Set Authentication
1 Select [Authentication / Security Settings] on the [Tools] screen.
2 Select [Authentication].
Initial Settings Procedures Using Control Panel
27
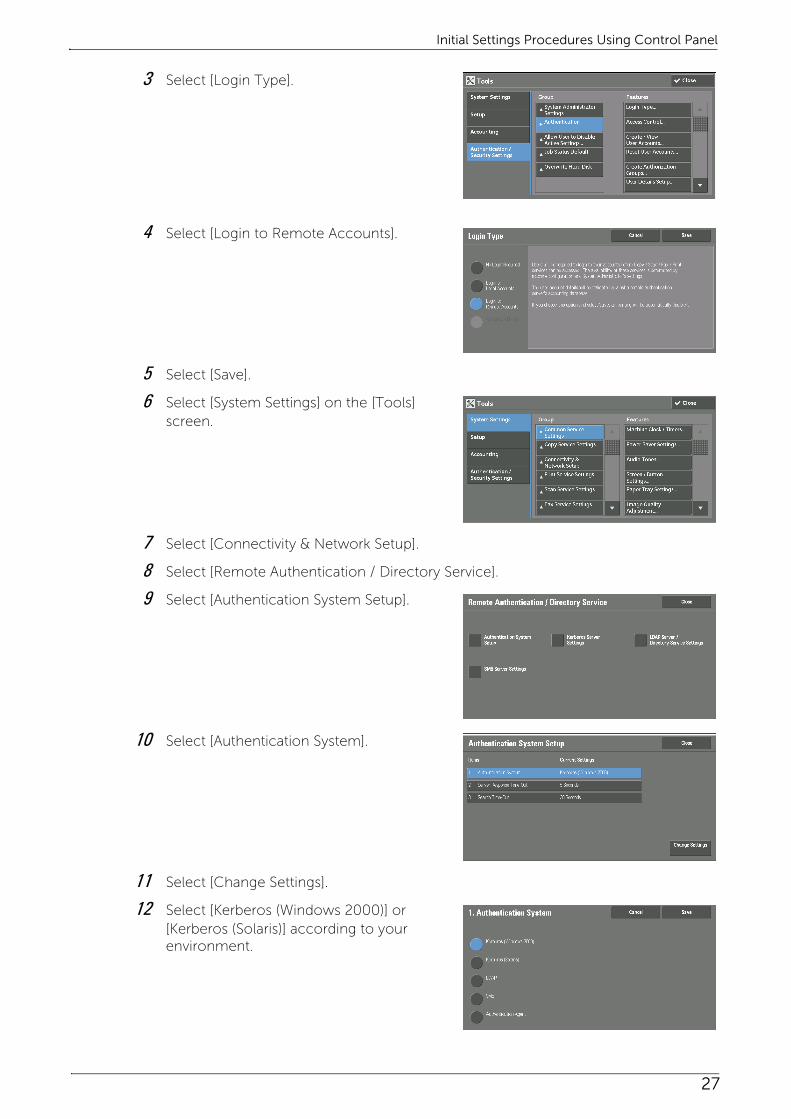
3 Select [Login Type].
4 Select [Login to Remote Accounts].
5 Select [Save].
6 Select [System Settings] on the [Tools] screen.
7 Select [Connectivity & Network Setup].
8 Select [Remote Authentication / Directory Service].
9 Select [Authentication System Setup].
10 Select [Authentication System].
11 Select [Change Settings].
12 Select [Kerberos (Windows 2000)] or [Kerberos (Solaris)] according to your environment.

2 Installation
28
13 Select [Save].
14 Select [Close] twice.
Set Use of Smart Card
1 Select [Authentication / Security Settings] on the [Tools] screen.
2 Select [Authentication].
3 Select [User Details Setup].
4 Select [Use of Smart Card].
5 Select [Change Settings].
6 Select [Enabled].
7 Select [Save].
8 Select [Smart Card Link Mode].
9 Select [Change Settings].

Initial Settings Procedures Using Control Panel
29
10 Select [No Passcode Required].
11 Select [Save].
12 Select [Smart Card Certificate Verification].
13 Select [Change Settings].
14 Select [Enabled].
15 Select [Save].
Note • After the Smart Card feature is enabled and the machine reboots, the machine may receive a “121-318” fault code. This is normal, and the machine will reboot again after several seconds.
• Generally, the object identifier settings for Smart Card certificate are not required. For more information, refer to "Smart Card Certificate - Object Identifiers" (P.50).
Set Access Control
1 Select [Authentication/Security Settings] on the [Tools] screen.
2 Select [Authentication].
2 Installation
30
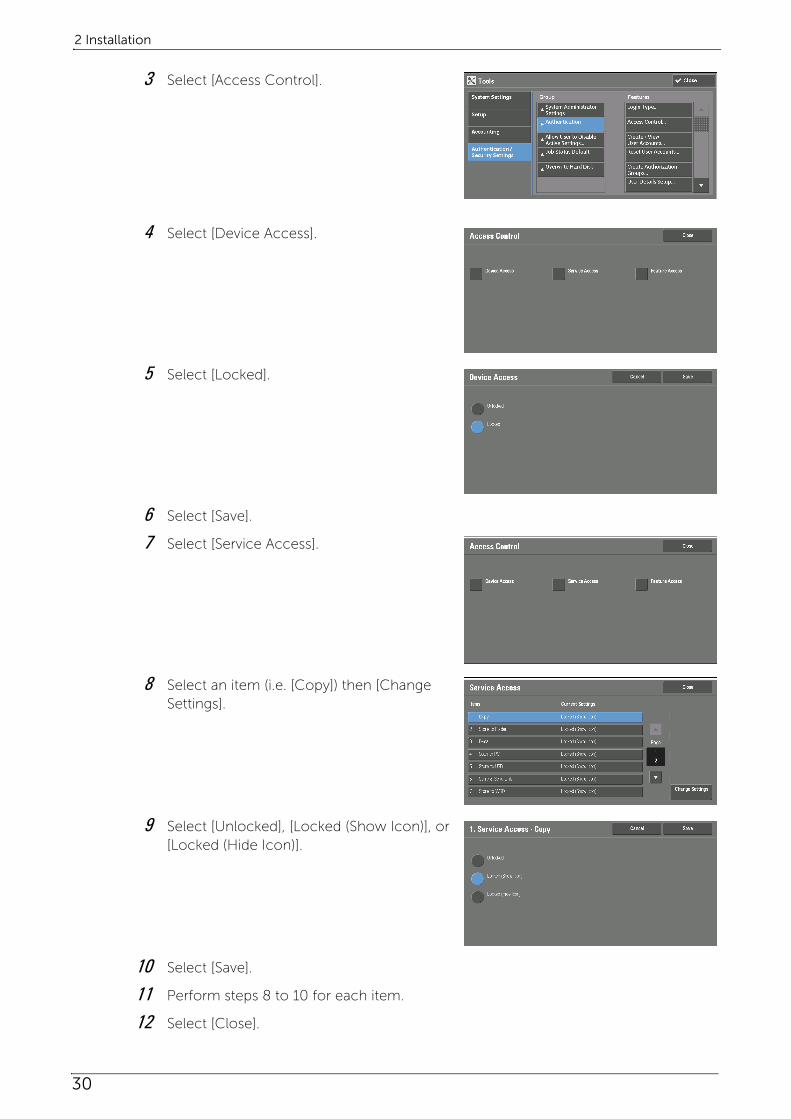
3 Select [Access Control].
4 Select [Device Access].
5 Select [Locked].
6 Select [Save].
7 Select [Service Access].
8 Select an item (i.e. [Copy]) then [Change Settings].
9 Select [Unlocked], [Locked (Show Icon)], or [Locked (Hide Icon)].
10 Select [Save].
11 Perform steps 8 to 10 for each item.
12 Select [Close].

Initial Settings Procedures Using Control Panel
31
13 Select [Feature Access].
14 Select an item (i.e. [Color Copying]) then [Change Settings].
15 Select [Unlocked] or [Locked].
16 Perform steps 14 and 15 for each item.
17 Select [Close].

2 Installation
32
Set Private Charge Print
Configure the settings for using Private Charge Print.
The Private Charge Print feature allows you to temporarily store print data for each authentication user ID, and request on the machine’s control panel to print the data.
1 Select [Authentication / Security Settings] on the [Tools] screen.
2 Select [Authentication].
3 Select [Charge / Private Print Settings].
4 Select [Receive Control].
5 Select [Change Settings].
6 Select [Save as Private Charge Print Job].
7 Select [Job Without User ID].
8 Select [Delete Job].
9 Select [Save].
10 Select [Save].
11 Select [Close].

Initial Settings Procedures Using Printer Driver of User Client
33
Initial Settings Procedures Using Printer Driver of User Client
This section describes the initial settings related to the Smart Card solution, and how to set them on the printer driver.
Note • The procedures may vary depending on the version of your driver and the operating system of your computer.
Configure the User Account
1 Right-click on the printer icon.
2 Select [Printer properties] from the displayed menu.
Note • If [Printer properties] is not displayed, click [Properties].
3 The [Properties] dialog box on the printer driver is displayed.
4 Click the [Configuration] tab.
5 Click [Accounting].
6 Click [Always Use Default User Details].
7 Select [Enter owner name] for [Specify Job Owner Name].
8 Enter the ID for [User ID].
Note • ID is the user name of certificate in the Smart Card.
9 Click [OK].

2 Installation
34
Installation of Plug-in
This section describes how to install, uninstall, and upgrade the plug-in for the Smart Card Reader.
Note • The procedures may vary depending on the version of the installation tool and the operating system of your computer.
• During machine operation or jobs in progress, installation process cannot be started. In this case, wait for a while and then start installation.
• During installation process, machine operation is out of service.
Installation
1 Save the installation tool to your computer.
Note • To obtain the installation tool, contact Customer Support at dell.com/contactdell.
2 Decompress the file (.zip) and double-click the exe file in the installation tool.
Note • A security warning screen may appear. In this case, click [Run] to continue.
3 Click [Next].
4 Enter the IP address or hostname of your machine, and then click [Next]. Example: 192.0.2.1
5 Enter the system administrator’s user ID and password, and then click [Next].
6 Click [Next].
7 Click [Finish].
Note • Several minutes may take before the installation process completes.
• To install the feature to another machine in succession, check the [Install on another device] box on the screen, and then click [Finish]. You can start from step 4.
Uninstallation and Version Upgrade
1 On your computer, double-click the exe file in the installation tool.
2 Click [Next].
3 Enter the IP address or hostname of your machine, and then click [Next]. Example: 192.0.2.1
4 Enter the system administrator’s user ID and password, and then click [Next].
5 Select [Reinstall (Retain settings)] for version upgrade, or [Remove (Remove settings)] for uninstallation, and then click [Next].
Note • When you select [Reinstall (Retain settings)], the settings related to the Smart Card authentication are not deleted. The settings are taken over the new version.
6 After the confirmation screen appears, click [Next].
7 Click [Finish].
3 Usage Examples
This chapter describes the operations using the Smart Card to use security features for authenticated users.
• User Authentication...................................................................................................36
• Digital Signature for S/MIME ...................................................................................37
• Digital Signature for Scan Files .............................................................................. 38
• Private Charge Print...................................................................................................39

3 Usage Examples
36
User Authentication
You can log in and out of the machine using a Smart Card.
Note • The screen display varies depending on the configuration of the machine.
1 Insert a Smart Card into the attached card reader.
2 Enter the PIN (Smart Card Passcode) with the numeric keypad or the keyboard displayed.
3 Select [Enter].
4 Once validated, all features that you are allowed to use become available.
If an authentication ends abnormally due to an error and an error message is displayed, refer to "Error Messages" (P.42) to rectify problems.
5 To end the session, remove the card from the card reader.
Digital Signature for S/MIME
37
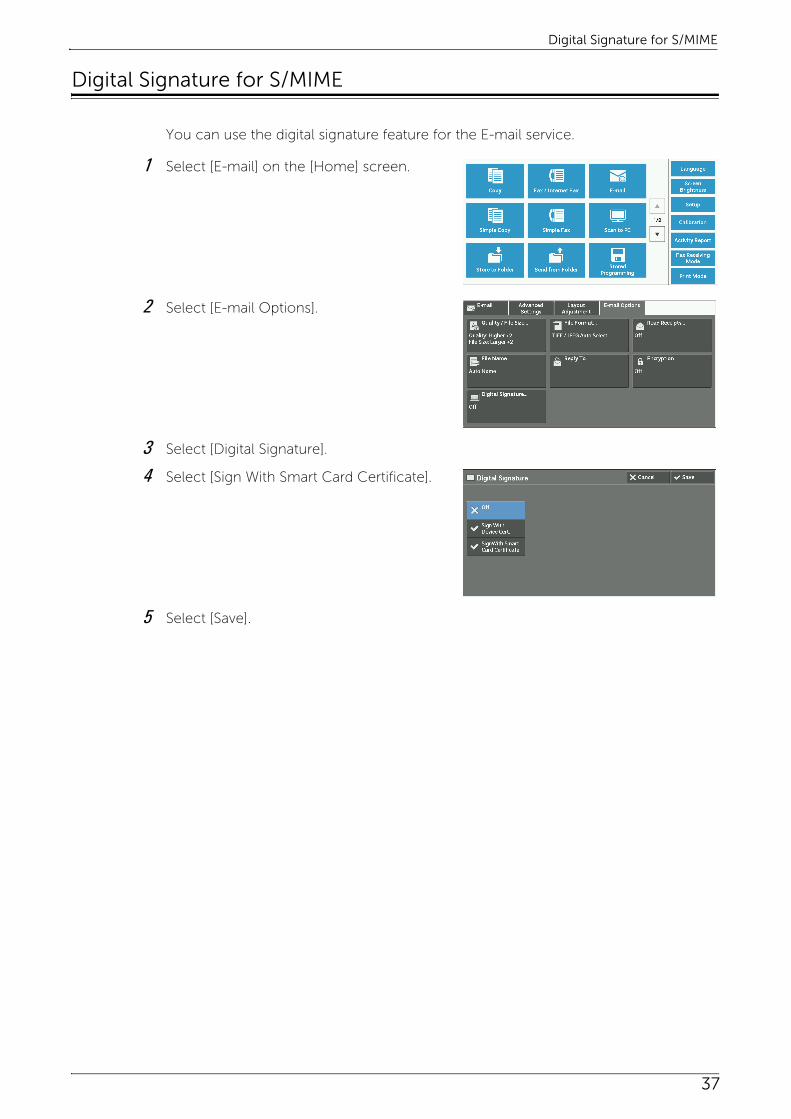
Digital Signature for S/MIME
You can use the digital signature feature for the E-mail service.
1 Select [E-mail] on the [Home] screen.
2 Select [E-mail Options].
3 Select [Digital Signature].
4 Select [Sign With Smart Card Certificate].
5 Select [Save].
3 Usage Examples
38
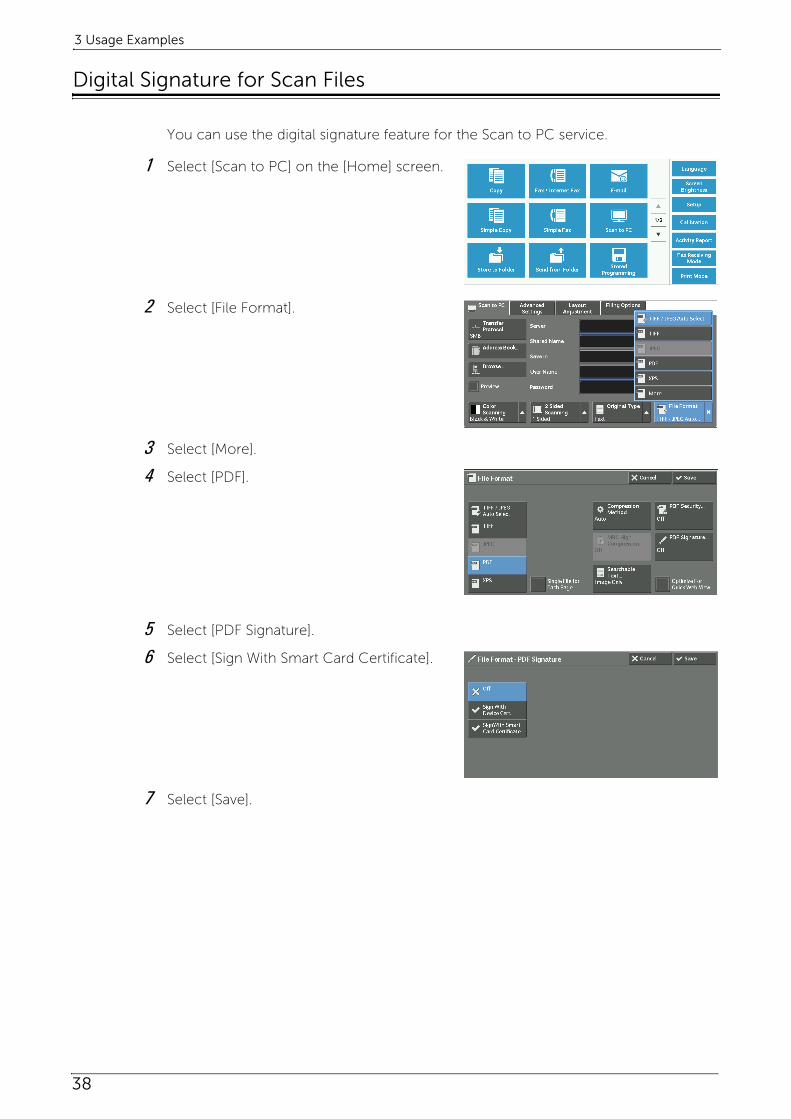
Digital Signature for Scan Files
You can use the digital signature feature for the Scan to PC service.
1 Select [Scan to PC] on the [Home] screen.
2 Select [File Format].
3 Select [More].
4 Select [PDF].
5 Select [PDF Signature].
6 Select [Sign With Smart Card Certificate].
7 Select [Save].

Private Charge Print
39
Private Charge Print
The Private Charge Print feature allows you to temporarily store print data for each authentication user ID, and request on the machine’s control panel to print the data.
The following describes how to print or delete a job stored with the Private Charge Print feature.
1 Press the <Job Status> button.
<Job Status> button
2 Select [Private Charge Print].
3 Select a job to be printed or deleted.
4 Select any option.
5 When printing, specify the number of print sets using the numeric keypad.

3 Usage Examples
40

4 Problem Solving
This chapter describes solutions to problems that you may come across while using the machine.
• Error Messages ...........................................................................................................42
• Technical Support......................................................................................................45

4 Problem Solving
42
Error Messages
The machine has certain built-in diagnostic capabilities to help you identify problems and faults, and displays error messages on the control panel, whenever problems or conflicts occur.
The followings are error messages related to the Smart Card solution.
UI Message Cause and Remedy
Message:Incorrect passcodeTry again.
[Cause] Incorrect PIN has been entered.
[Remedy] Carefully re-enter the PIN.
[Caution] Consecutive incorrect entries may lead to your card being locked.
Message:The passcode entered was incorrect and the card has now been locked.Please remove your card and contact the System Administrator.
[Cause] The card has been locked due to many failed login attempts.
[Remedy] Contact the Registration Authority to reset the PIN or to get a new card.
Message:Operator e-mail Address does not populate From: field
[Cause] This is usually because the machine does not trust the certificates on the card.
[Remedy] Make sure that all “Chain of Trust” certificates are imported on the machine. Check the Operator’s CAC to see what root CA and intermediate CA issued the CAC certificates. Try setting the Certificate Revocation Verification Level = “Low”. If fixed, then this is an indication that OCSP/CRL setting are incorrect, or the Smart Card certificates have been revoked.
Fault Code: 0l6-231Message:
A fault or an error has occurred.
[Cause] Certificates cannot be read off the card.
[Remedy] Contact the Registration Authority to reload the certificates or to get a new card. Check the USB device.
Fault Code: 016-533Message:
Login failed.Incorrect authentication system settings.
[Cause] Kerberos server authentication protocol error.
[Remedy] The time difference between the machine and the Kerberos server exceeded the clock skew limit value set on the Kerberos server. Check whether the clocks on the machine and Kerberos server are correctly set. Also check whether the summer time and the time zone are correctly set on the machine and Kerberos server. Ensure that NTP has been enabled and is properly configured.
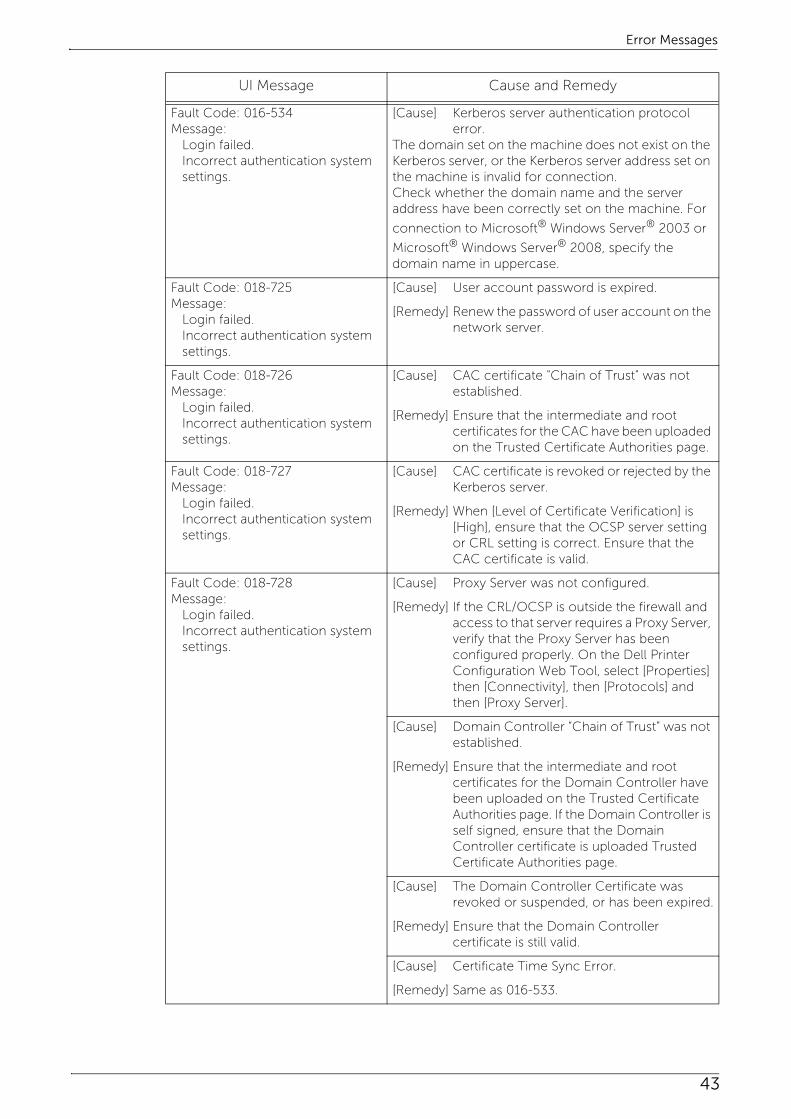
Error Messages
43
Fault Code: 016-534Message:
Login failed.Incorrect authentication system settings.
[Cause] Kerberos server authentication protocol error.
The domain set on the machine does not exist on the Kerberos server, or the Kerberos server address set on the machine is invalid for connection. Check whether the domain name and the server address have been correctly set on the machine. For
connection to Microsoft® Windows Server® 2003 or
Microsoft® Windows Server® 2008, specify the domain name in uppercase.
Fault Code: 018-725Message:
Login failed.Incorrect authentication system settings.
[Cause] User account password is expired.
[Remedy] Renew the password of user account on the network server.
Fault Code: 018-726Message:
Login failed.Incorrect authentication system settings.
[Cause] CAC certificate "Chain of Trust" was not established.
[Remedy] Ensure that the intermediate and root certificates for the CAC have been uploaded on the Trusted Certificate Authorities page.
Fault Code: 018-727Message:
Login failed.Incorrect authentication system settings.
[Cause] CAC certificate is revoked or rejected by the Kerberos server.
[Remedy] When [Level of Certificate Verification] is [High], ensure that the OCSP server setting or CRL setting is correct. Ensure that the CAC certificate is valid.
Fault Code: 018-728Message:
Login failed.Incorrect authentication system settings.
[Cause] Proxy Server was not configured.
[Remedy] If the CRL/OCSP is outside the firewall and access to that server requires a Proxy Server, verify that the Proxy Server has been configured properly. On the Dell Printer Configuration Web Tool, select [Properties] then [Connectivity], then [Protocols] and then [Proxy Server].
[Cause] Domain Controller “Chain of Trust” was not established.
[Remedy] Ensure that the intermediate and root certificates for the Domain Controller have been uploaded on the Trusted Certificate Authorities page. If the Domain Controller is self signed, ensure that the Domain Controller certificate is uploaded Trusted Certificate Authorities page.
[Cause] The Domain Controller Certificate was revoked or suspended, or has been expired.
[Remedy] Ensure that the Domain Controller certificate is still valid.
[Cause] Certificate Time Sync Error.
[Remedy] Same as 016-533.
UI Message Cause and Remedy

4 Problem Solving
44
Fault Code: 027-708Message:
Login failed. Untrusted certificate.
[Cause] A job is aborted by untrusted certificate of the sender or recipient.
[Remedy] Ensure that the recipient's certificate is valid and "Chain of Trust" could be established. Make sure that the e-mail address of the recipient and the e-mail address of his/her certificate are the same. Ensure that the sender's certificate is valid and "Chain of Trust" could be established.
Fault Code: 027-779Message:
Processing has been canceled due to an error.
[Cause] SMTP authentication via GSSAPI has failed on Exchange Server 2003.
[Remedy] Register the service principal to the domain controller of the domain which Exchange Server 2003 belongs to.
1) Install the Windows Server 2003 Support Tools to the domain controller.
http://support.microsoft.com/kb/926027/
2)Execute the following command at the command prompt of the domain controller to register the service principal.
setspn -A smtp/<FQDN of Exchange Server 2003> <host name of the domain controller>
Example: setspn -A smtp/exchange.example.com host
UI Message Cause and Remedy

Technical Support
45
Technical Support
If a fault cannot be resolved by following the instructions in the error message, identify whether it is related to the card reader device or the Dell device.
• For problems with the card reader device
Contact the manufacturer for further assistance.
• For problems with the Dell device
Have your Service Tag and Express Code ready, and visit dell.com/support or contact Dell's ProSupport Help Desk for assistance by calling 1-866-516-3115, or by e-mailing [email protected].
Service Tag and Express Code
Use the Service Tag and Express Code to identify your device when you contact support.
You can check them in the following procedures.
1 Press the <Machine Status> button.
2 Check the Service Tag and the Express Code displayed on the screen.

4 Problem Solving
46

5 Appendix
This chapter provides the list of configuring procedures.
• List of Configuring Procedures ............................................................................. 48
• Smart Card Certificate - Object Identifiers ......................................................... 50
5 Appendix
48
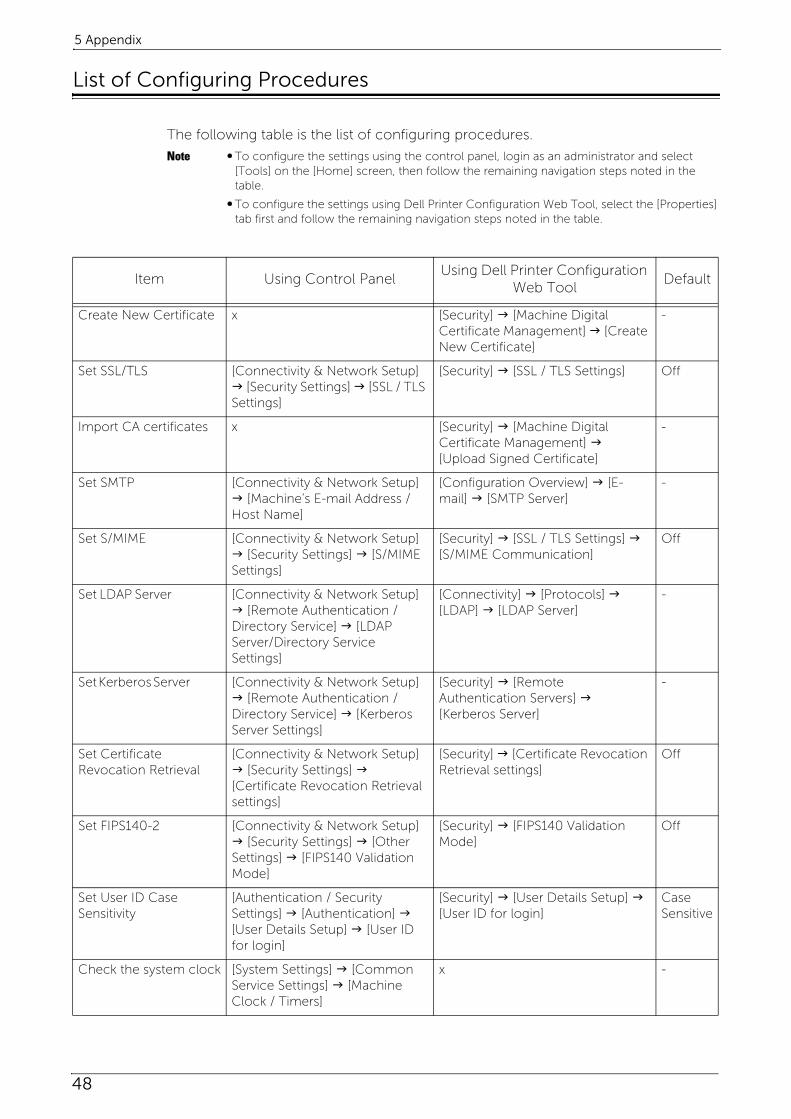
List of Configuring Procedures
The following table is the list of configuring procedures.
Note • To configure the settings using the control panel, login as an administrator and select [Tools] on the [Home] screen, then follow the remaining navigation steps noted in the table.
• To configure the settings using Dell Printer Configuration Web Tool, select the [Properties] tab first and follow the remaining navigation steps noted in the table.
Item Using Control PanelUsing Dell Printer Configuration
Web ToolDefault
Create New Certificate x [Security] [Machine Digital Certificate Management] [Create New Certificate]
-
Set SSL/TLS [Connectivity & Network Setup] [Security Settings] [SSL / TLS Settings]
[Security] [SSL / TLS Settings] Off
Import CA certificates x [Security] [Machine Digital Certificate Management] [Upload Signed Certificate]
-
Set SMTP [Connectivity & Network Setup] [Machine’s E-mail Address / Host Name]
[Configuration Overview] [E-mail] [SMTP Server]
-
Set S/MIME [Connectivity & Network Setup] [Security Settings] [S/MIME Settings]
[Security] [SSL / TLS Settings] [S/MIME Communication]
Off
Set LDAP Server [Connectivity & Network Setup] [Remote Authentication / Directory Service] [LDAP Server/Directory Service Settings]
[Connectivity] [Protocols] [LDAP] [LDAP Server]
-
Set Kerberos Server [Connectivity & Network Setup] [Remote Authentication / Directory Service] [Kerberos Server Settings]
[Security] [Remote Authentication Servers] [Kerberos Server]
-
Set Certificate Revocation Retrieval
[Connectivity & Network Setup] [Security Settings] [Certificate Revocation Retrieval settings]
[Security] [Certificate Revocation Retrieval settings]
Off
Set FIPS140-2 [Connectivity & Network Setup] [Security Settings] [Other Settings] [FIPS140 Validation Mode]
[Security] [FIPS140 Validation Mode]
Off
Set User ID Case Sensitivity
[Authentication / Security Settings] [Authentication] [User Details Setup] [User ID for login]
[Security] [User Details Setup] [User ID for login]
Case Sensitive
Check the system clock [System Settings] [Common Service Settings] [Machine Clock / Timers]
x -
List of Configuring Procedures
49
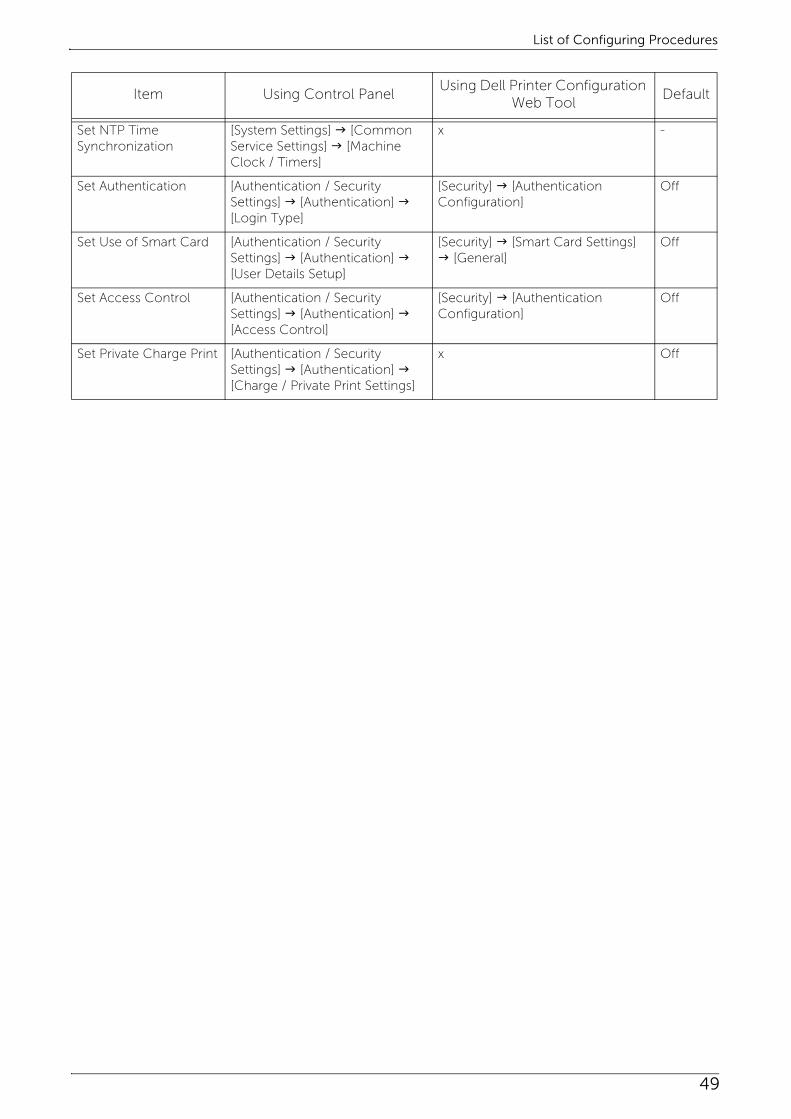
Set NTP Time Synchronization
[System Settings] [Common Service Settings] [Machine Clock / Timers]
x -
Set Authentication [Authentication / Security Settings] [Authentication] [Login Type]
[Security] [Authentication Configuration]
Off
Set Use of Smart Card [Authentication / Security Settings] [Authentication] [User Details Setup]
[Security] [Smart Card Settings] [General]
Off
Set Access Control [Authentication / Security Settings] [Authentication] [Access Control]
[Security] [Authentication Configuration]
Off
Set Private Charge Print [Authentication / Security Settings] [Authentication] [Charge / Private Print Settings]
x Off
Item Using Control PanelUsing Dell Printer Configuration
Web ToolDefault
5 Appendix
50
Smart Card Certificate - Object Identifiers
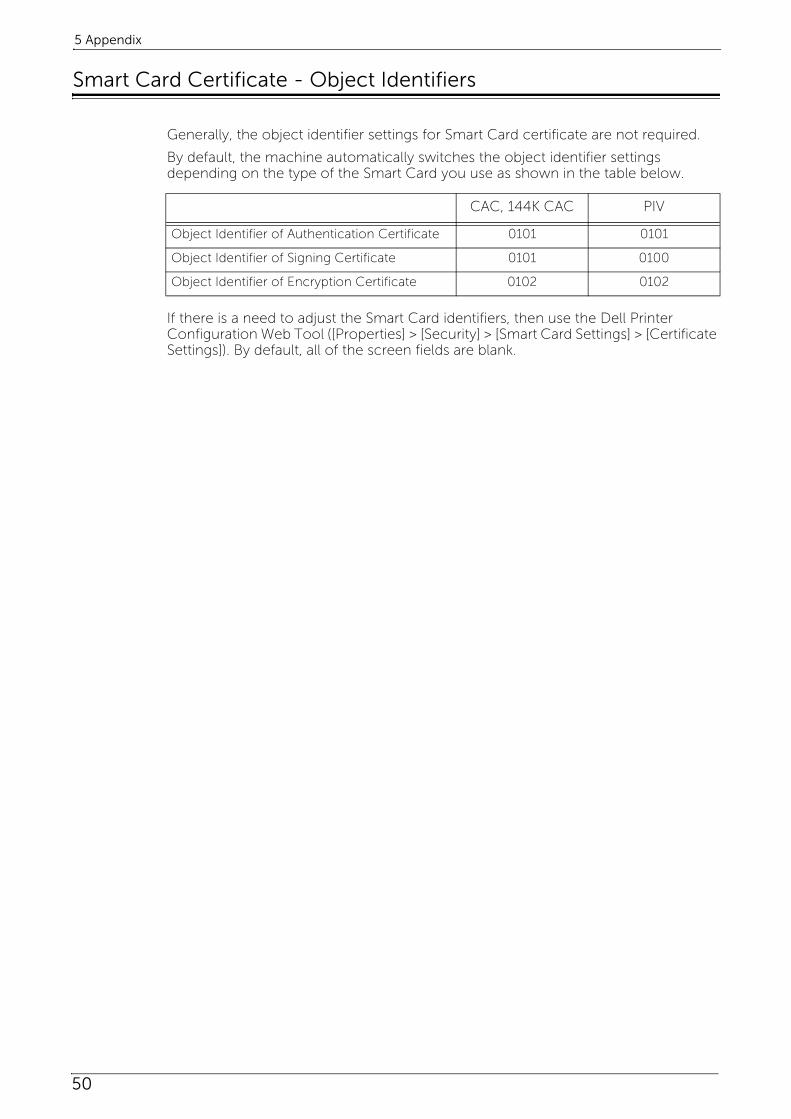
Generally, the object identifier settings for Smart Card certificate are not required.
By default, the machine automatically switches the object identifier settings depending on the type of the Smart Card you use as shown in the table below.
If there is a need to adjust the Smart Card identifiers, then use the Dell Printer Configuration Web Tool ([Properties] > [Security] > [Smart Card Settings] > [Certificate Settings]). By default, all of the screen fields are blank.
CAC, 144K CAC PIV
Object Identifier of Authentication Certificate 0101 0101
Object Identifier of Signing Certificate 0101 0100
Object Identifier of Encryption Certificate 0102 0102

Index
51
Index
A
Access Control ........................................................... 29
Authentication ............................................................ 26
C
Certificate Revocation Retrieval .............................. 21
Certificate Signing Request (CSR) ........................... 18
compatibility ............................................................... 10
control panel .............................................................. 24
CRL ............................................................................... 21
D
Dell Printer Configuration Web Tool ...................... 13
digital signature for S/MIME ..................................... 37
digital signature for scan files................................... 38
E
E-mail ........................................................................... 37
F
FIPS140-2..................................................................... 22
I
imported CA certificates ........................................... 17
importing CA certificates .......................................... 16
installing the Smart Card solution ........................... 11
K
Kerberos server........................................................... 20
L
LDAP server................................................................. 19
N
NTP Time Synchronization .......................................25
O
OCSP ............................................................................22
P
plug-in installation ......................................................34
plug-in settings ............................................................23
printer driver ................................................................33
Private Charge Print............................................. 32, 39problem solving ..........................................................41
R
RSA BSAFE......................................................................2
S
S/MIME .........................................................................18
Scan to PC ...................................................................38
SMTP .............................................................................17
SSL/TLS .........................................................................14
supported CA certificate formats.............................16
supported card readers ...............................................8
supported card types ...................................................9
System Administration mode ...................................24
system clock................................................................25
U
usage examples ..........................................................35
Use of Smart Card ......................................................28
user account ...............................................................33
user authentication ....................................................36
user ID case sensitivity ...............................................23

www.del l .com | del l .com/support
KE3037EN0-3