deluxe 8.7” slicer - cabela's · 2 ver. 1 introduction congratulations! you are now the...
TRANSCRIPT

Please read this manual in its entirety prior to using this product.Visit www.cabelas.com or call for assistance 1-800-237-4444.
Cabela’s Item Number: 54-1004
Deluxe 8.7” Slicer

2 Ver. 1
Introduction Congratulations! You are now the proud owner of Cabela's 8.7" Deluxe Meat Slicer. With Cabela's you can slice your favorite meats, cheeses, or vegetables with reliable precision, power and ease. You can count on Cabela's for all your slicing needs.
IMPORTANT SAFEGUARDS When using electrical appliances, basic safety precautions should always be followed, including the following:
1. READ All INSTRUCTIONS. 2. CHECK FOR DAMAGED PARTS. Before using the Deluxe Meat Slicer, check that all parts are operating properly and perform
the intended functions. Check for alignment of moving parts, binding of moving parts, mounting and any other conditions that may affect the operation.
3. Unplug power cord from outlet when not in use, before putting on or taking off parts, and before cleaning; Blade is exceptionally sharp. Handle very carefully.
4. This appliance is NOT intended for use by persons (including children) with reduced physical, sensory or mental capabilities, or lack of experience and knowledge, unless they have been given supervision or instruction concerning use of the appliance by a person responsible for their safety. Children should be supervised to ensure that they do not play with the appliance.
5. NEVER LEAVE MEAT SLICER UNATTENDED WHILE IT IS RUNNING! 6. Avoid contact with moving parts. NEVER PUT YOUR FINGERS NEAR THE BLADE WHILE IT IS IN OPERATION. 7. Never put the unit near a hot burner, in an oven, or in a dishwasher. NOT DISHWASHER SAFE. 8. DO NOT operate the Deluxe Meat Slicer, or any other electrical equipment, with a damaged cord or plug or after the unit
malfunctions. Return unit to the Authorized Service Center for examination, repair, or adjustment. 9. DO NOT use outdoors. This product is intended for Household Use Only. 10. DO NOT let cord hang over the edge of a table or counter, come into contact with sharp edges, or touch hot surfaces. 11. DO NOT let cord become kinked, trapped under or let it wind around the slicer. 12. DO NOT PULL the power cord to disconnect. 13. To reduce the risk of electric shock, this product has a polarized plug (one prong is wider than the other). The plug is intended
to fit in a polarized outlet only one way. When the plug does not fit fully in the outlet, reverse the plug. If it still does not fit, contact a qualified electrician to install the proper outlet. DO NOT make changes to the plug in any way.
14. Place the appliance on a firm and stable surface. Ensure that the appliance is not placed near the edge of the worktop, where it can be easily pushed off or fall.
15. DO NOT operate your slicer in an appliance garage or under a wall cabinet. When storing in an appliance garage, always unplug the unit from the electrical outlet. Not doing so could create a risk of fire, especially if the appliance touches the walls of the garage or the door touches the unit as it closes.
16. NEVER plug in the appliance where water may flood the area. 17. To protect against risk of electrical shock, do not put appliance in water or other liquids. 18. DO NOT operate Meat Slicer with wet hands or while standing on a wet floor. DO NOT use the Meat Slicer if it is wet or moist. 19. The use of attachments not recommended or sold by the manufacturer may cause fire, electric shock or injury. 20. NEVER use abrasive cleaning agents or abrasive cloths when cleaning the unit. 21. Use the slicer to cut ONLY designated food. Do not attempt to slice frozen food, bones, cardboard, plastic, etc. 22. DO NOT use appliance for other than intended use. 23. The Deluxe Meat Slicer has a sharp blade. To avoid injury, never hand-feed food to be sliced. Always use the unit when
completely assembled with food carriage and food pusher. 24. Touch the blade ONLY when the power is OFF to remove and clean according to instructions. 25. Follow instructions when lifting or moving the slicer. 26. When the blade is moving, place hands on the recommended push surface only. 27. After re-attaching the removable carriage, never use the slicer unless it is fully upright and completely assembled. 28. To avoid accidental contact with the blade when the slicer is not in use or when lifting the slicer, always turn
Adjustable Thickness Control2 to "0" so that the Adjustment Plate7 covers the edge of the blade. 29. When lifting the slicer, carefully position your body to avoid contact with the blade. 30. DO NOT use while under influence of drugs or alcohol. 31. The Manufacturer declines any responsibility in the case of improper use of Deluxe Meat Slicer. Improper use of the
Food Slicer voids the warranty.

3 Ver. 1
WARNING: The warnings, cautions, and instructions discussed in this instruction manual cannot cover all possible conditions or situations that could occur. It must be understood by the operator that common sense and caution are factors which cannot be built into this product, but must be supplied by the operator.
Thank you for purchasing Cabela’s 8.7"Deluxe Meat Slicer #54-1004. If you have questions or missing components or replacement parts, Do Not return it to Cabela’s.
Please call us toll free at 1-855-939-7263 or 216-455-1101 for instructions and service
(Monday thru Friday, 9AM to 5PM Eastern Standard Time).
WARNING! Before cleaning, assembling or disassembling the MEAT SLICER, check the plug and make sure PLUG IS REMOVED FROM THE OUTLET/POWER SOURCE!
SHARP BLADE
WARNING! HANDLE CAREFULLY! KEEP FINGERS AWAY FROM BLADE. NEVER USE FINGERS TO
FEED FOOD BY HAND. ALWAYS USE THE FOOD Carriage! Always use the meat slicer completely assembled with food carriage
and food pusher. Use protective cut-resistant gloves whenever handling the blade.
4 Ver. 1
IMPORTANT: To avoid injury when unpacking the unit, please follow these instructions. 1. Put the box on a large, sturdy flat surface. 2. Remove the instruction book and other literature. 3. Slide poly-foam packing up and off the unit. Lift slicer out of box and place on sturdy flat
surface. 4. Remove the protective bag. 5. To lift and move the unit, bend your knees to avoid back injuries and place one hand on the
bottom of the motor housing and the other one under the carriage of the meat slicer. 6. Remove orange blade guards from the cutting blade before turning the unit on. 7. Please use extreme caution when handling the blade. We suggest you save all the packing
material in the event that future shipping of the machine is needed. 8. Keep all plastic bags away from children.
REPACKING INSTRUCTIONS 1. Put food slicer on a large, sturdy flat surface. 2. Put food slicer into plastic bag. 3. Position poly-foam inserts on each end of the food slicer. 4. Put the packaged unit into the upright box. 5. Replace top corrugated insert, instruction book and other literature.
UNPACKING & REPACKING INSTRUCTIONS
5 Ver. 1
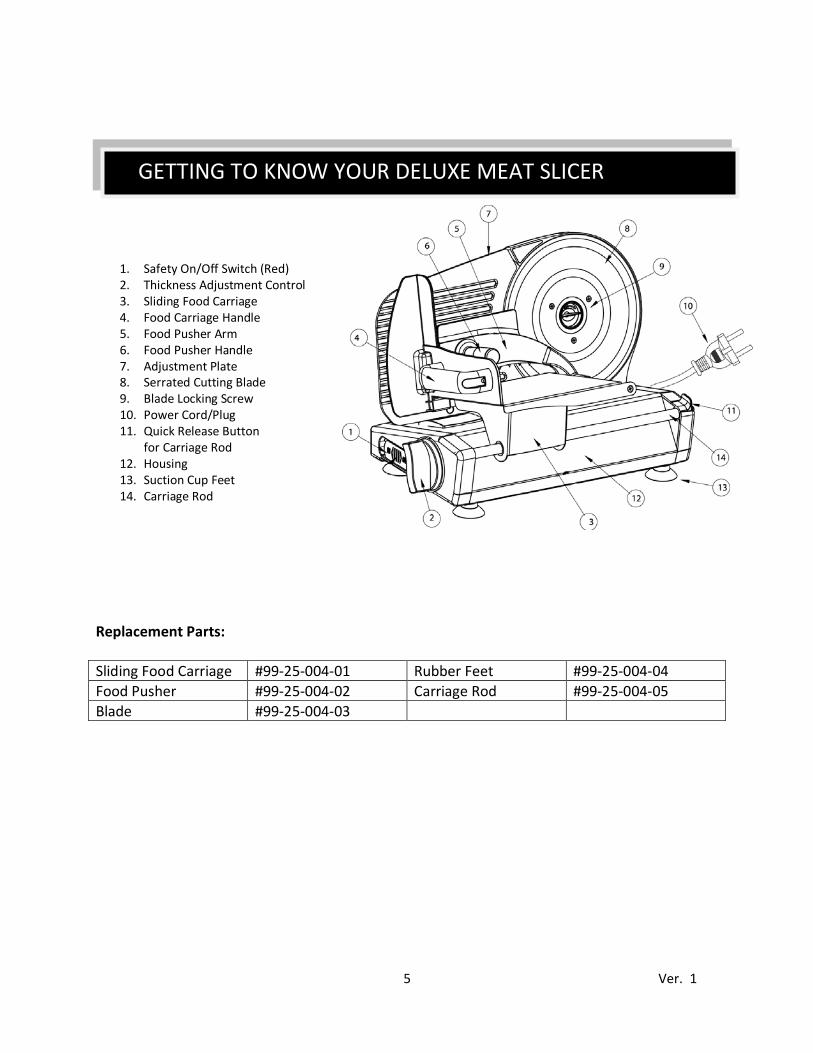
1. Safety On/Off Switch (Red) 2. Thickness Adjustment Control 3. Sliding Food Carriage 4. Food Carriage Handle 5. Food Pusher Arm 6. Food Pusher Handle 7. Adjustment Plate 8. Serrated Cutting Blade 9. Blade Locking Screw 10. Power Cord/Plug 11. Quick Release Button
for Carriage Rod 12. Housing 13. Suction Cup Feet 14. Carriage Rod
Replacement Parts: Sliding Food Carriage #99-25-004-01 Rubber Feet #99-25-004-04 Food Pusher #99-25-004-02 Carriage Rod #99-25-004-05 Blade #99-25-004-03
GETTING TO KNOW YOUR DELUXE MEAT SLICER
6 Ver. 1
WARNING Read carefully and understand all instructions before operating. Failure to follow the safety rules and other basic safety precautions may result in serious personal injury. Save these instructions in a safe place and on hand so that they can be read when required.
WARNING! Before cleaning, assembling or disassembling the MEAT SLICER, check the plug and make sure PLUG IS REMOVED FROM THE OUTLET/POWER SOURCE!
SHARP BLADE
WARNING! HANDLE CAREFULLY! KEEP FINGERS AWAY FROM BLADE. NEVER USE FINGERS TO
FEED FOOD BY HAND. ALWAYS USE THE FOOD Carriage! Always use the meat slicer completely assemble with food carriage
and food pusher. If possible use protective cut-resistant gloves whenever handling the blade.
IMPORTANT Before using your Meat Slicer for the first time, wash all parts thoroughly, taking particular care to remove all grease and oil from surface. Dry all parts thoroughly before reassembling. Caution! Blade Sharp! (REFER TO CLEANING & MAINTENANCE SECTION OF MANUAL ON PAGE 8)
Now that your Cabela's Deluxe Meat Slicer is fully assembled and ready to use, it is time to slice your favorite meats , cheeses and vegetables. Be sure to read and fully understand the General Safety Rules at the beginning of this manual before you start.
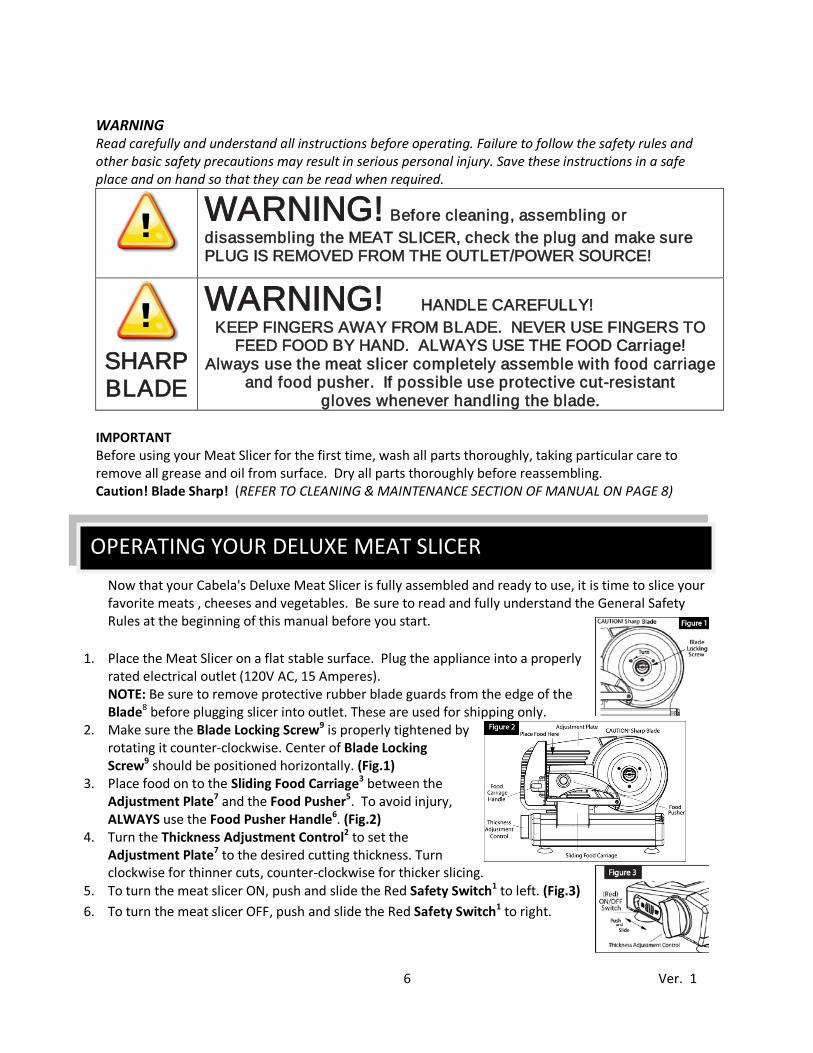
1. Place the Meat Slicer on a flat stable surface. Plug the appliance into a properly rated electrical outlet (120V AC, 15 Amperes). NOTE: Be sure to remove protective rubber blade guards from the edge of the Blade8 before plugging slicer into outlet. These are used for shipping only.
2. Make sure the Blade Locking Screw9 is properly tightened by rotating it counter-clockwise. Center of Blade Locking Screw9 should be positioned horizontally. (Fig.1)
3. Place food on to the Sliding Food Carriage3 between the Adjustment Plate7 and the Food Pusher5. To avoid injury, ALWAYS use the Food Pusher Handle6. (Fig.2)
4. Turn the Thickness Adjustment Control2 to set the Adjustment Plate7 to the desired cutting thickness. Turn clockwise for thinner cuts, counter-clockwise for thicker slicing.
5. To turn the meat slicer ON, push and slide the Red Safety Switch1 to left. (Fig.3) 6. To turn the meat slicer OFF, push and slide the Red Safety Switch1 to right.
OPERATING YOUR DELUXE MEAT SLICER

7 Ver. 1
Important: Refer to "Food Slicing Tips" section, when slicing different types of food items.
7. When operating slicer, stand to the (left) side of the slicer opposite the blade. 8. Place a tray or plate behind the Meat Slicer and below the Blade8 to collect the sliced food as it exits
the blade area. 9. Hold the Food Carriage Handle4 with left hand and the Food Pusher Handle6 with right hand; keep
your hands protected behind the Food Pusher5. 10. Using an even, steady motion, SLOWLY begin slicing. Lightly push food toward the Adjustment Plate7
with the Food Pusher5 while sliding the food over Blade8 with the Sliding Food Carriage3. Continue sliding SLOWLY, back and forth, until you have sliced the desired amount of meat.
11. When finished, turn the meat slicer "OFF" by pushing and sliding the Red Safety Switch1 to the right.(Fig.3)
12. Always unplug meat slicer from power source when the Meat Slicer is not in use. 13. For safety, always rotate the Thickness Adjustment Control2 all the way to the “0” position after use
to properly shield the sharp edge of Blade8.
WARNING: This Meat Slicer is not meant to cut through any bones! Sever damage to Meat Slicer will occur and Warranty will be voided!
Food Slicing Tips
• Always debone meat before slicing • Fruits should be free of seeds (peaches, apples, avocadoes etc.) The exception is tomatoes. • DO NOT slice fully frozen foods. • If you have to large of a cut of meat (roast or slab bacon) you may need to cut into a more
manageable slicing pieces. • Food with an uneven texture, like fish and thin steaks, are often difficult to slice. Put in freezer
for approx. 20 minutes to partially freeze. Cheese
Cheese can be difficult to slice (especially soft cheeses). A tiny amount of Mineral Oil
Cold cuts
can be lightly applied to blade with a paper towel, to keep the cheese from sticking during slicing. Caution -Blade Sharp. Chill cheese thoroughly to approx. 40o - 48o before slicing. Before serving, allow cheese to reach room temperature-this enhances the natural flavor.
Cold cuts keep longer and retain flavor if sliced as needed. For best results, chill to approx. 40o - 48o . Remove any plastic or hard casings before slicing. Use a constant, gentle pressure for uniform slicing.
Breads, Cakes and Cookies Freshly baked bread should be cooled to room temperature before serving. Use day old bread for extra thin slices for toast. Your slicer is ideal for all types of breads, pound cake or fruit cake. Chill breads or cakes to approx. 40o - 48o for easier slicing and to avoid tearing or crumbling.
Hot Roasts: Beef, Pork, Lamb, Turkey, Ham
When slicing warm boneless roasts, remove from oven and let it set for 20-30 minutes (room temp) before slicing. They will retain more natural juices and slice evenly without crumbling. Cut the roast if necessary, to fit on the feeder. If roast is tied, remove strings before slicing.

8 Ver. 1
WARNING! Before cleaning, assembling or disassembling the MEAT SLICER, check the plug and make sure PLUG IS REMOVED FROM THE OUTLET/POWER SOURCE!
SHARP BLADE
WARNING! HANDLE CAREFULLY! KEEP FINGERS AWAY FROM BLADE. NEVER USE FINGERS TO
FEED FOOD BY HAND. ALWAYS USE THE FOOD Carriage! Always use the meat slicer completely assemble with food carriage
and food pusher. Use protective cut-resistant gloves whenever handling the blade.
To Disassemble Slicer: ALWAYS turn Meat Slicer OFF and unplug from the power source before cleaning.
1. The slicer should be cleaned after every use as perishable food scraps could accumulate on the slicer or behind cutting Blade8.
2. Do not use steel wool or harsh abrasives to clean any part of the Meat Slicer. 3. Rotate the Thickness Adjustment Control2 all the way to the “0” position. 4. While holding the Food Carriage Handle4 with left hand, push out the black
Quick Release Switch11 on the right to release Carriage Rod14. (Fig.4) 5. Lift upward to remove Food Carriage3, Food Pusher5 and Carriage Rod14
to allow for easy access to the Blade8. 6. To remove the Blade8 turn the Blade Locking Screw9 clockwise until the
center tab is at the 12 o’clock position. The Blade8 is now released from shaft and can be removed by gently pulling outward. (Fig.5)
NOTE: Use extreme caution when handling or cleaning the Blade8, as it is extremely sharp! It is highly recommended to wear cut-resistant gloves when removing, cleaning and re-installing the blade.
7. Wipe away from the Blade8, NEVER wipe toward the Blade8. 8. NEVER clean Blade8 underwater! Handling sharp objects
under water is Extremely Dangerous. 9. The Blade8, Food Pusher5 and Food Carriage3 all can be hand washed in hot soapy water.
Because these parts come in contact with food, they should be sanitized properly. Allow sanitized parts to air dry.
10. Never immerse the Motor Assembly of the Meat Slicer in water or other liquid. 11. Clean the outer surface of the Meat Slicer Body/Motor with a damp cloth and mild detergent.
DO NOT WASH ANY PART OF THIS SLICER IN A DISHWASHER
CLEANING YOUR DELUXE MEAT SLICER

9 Ver. 1
To Reassemble Slicer: 1. Attach Blade8 by holding Blade Locking Screw9 and connect to the Body/Motor face. 2. Rotate the Blade Locking Screw9 counter-clockwise to tighten. The center tab of
Blade Locking Screw9 should be in a horizontal position. (Fig.1) 3. Slide Food Carriage3 and Food Pusher5 onto Carriage Rod14 with handles facing left. 4. Reconnect Carriage Rod14 by inserting rod into left side slot first. Retract Quick Release
Button11 to allow rod to adjust into right connecting slot. Release Quick Release Button11 to lock in Carriage Rod14 into place. (Fig. 4)
5. Rotate the Sliding Food Carriage3 and Food Pusher5 forward to its proper slicing position.
Storage
1. Make sure Blade8 is securely tightened and locked. 2. Rotate the Thickness Adjustment Control2 all the way to the "0" position. 3. ALWAYS Align Adjustment Plate7 with Blade8 to protect the Blade8 when the
slicer is stored. 4. A storage cover is provided, cover and store in a dry, warm, low humidity area.

10 Ver. 1
Warranty Information
Save this warranty information for your records. Blue Sky Innovation Group warrants to the ORIGINAL RETAIL PURCHASER of this product that if operated in accordance with the printed instruction accompanying it, then for a period of 1 year from the date of purchase, the product shall be free from defects in material and workmanship. The Warranty Card, along with a copy of the original receipt, must be received by Blue Sky Innovation Group within 30 days from purchase date for the warranty to apply. Failure to send the completely filled out Warranty Card, along with a copy of the original receipt, will void the warranty. The product must be delivered to or shipped freight prepaid to Blue Sky Innovation Group for warranty services, in either its original packaging or similar packaging affording an equal degree of protection. Damage due to shipping is not the responsibility of the company. Blue Sky Innovation Group charges a $35.00 per hour bench charge. NOTE: No repairs will be started without the authorization of the customer. The return shipping cost to the customer will be added to the repair invoice. Blue Sky Innovation Group will repair (or at its discretion, replace) the product free of charge, if in the judgment of the company, it has been proven to be defective as to seller’s labor and material, within the warranty period. New or rebuilt replacements for factory defective parts will be supplied for one (1) year from the date of purchase. Replacement parts are warranted for the remainder of the original warranty period. For non-warranty repairs, contact Blue Sky Innovation Group Customer Service at 1-855-939-7263 M-F 8:00 am-5:00 pm EST to obtain a Return Merchandise Authorization Number (RMA
LIMITATIONS: The warranty is void if the product is used for any purpose other than that for which it is designed. The product must not have been previously altered, repaired, or serviced by anyone else other than Blue Sky Innovation Group. If applicable, the serial number must not have been altered or removed. The product must not have been subjected to accident in transit or while in the customer’s possession, misused, abused, or operated contrary to the instructions contained in the instruction manual. This includes failure caused by neglect of reasonable and necessary maintenance, improper line voltage and acts of nature. This warranty is not transferable and applies only to U.S. and Canadian sales.
Number). Blue Sky Innovation Group will refuse all returns that do not contain this number. DO NOT RETURN THE UNIT WITHOUT PROPER AUTHORIZATION FROM BLUE SKY INNOVATION GROUP.
Except to the extent prohibited by applicable law, no other warranties whether expressed or implied, including warranty merchantability and fitness for a particular purpose, shall apply to this product. Under no circumstances shall Blue Sky Innovation Group be liable for consequential damages sustained in connection with said product and Blue Sky Innovation Group neither assumes nor authorizes any representative or other person to assume for it any obligation or liability other than such as is expressly set forth herein. Any applicable implied warranties are also limited to the one (1) year period of the limited warranty. This warranty covers only the product and its specific parts, not the food or other products processed in it. CUT ALONG THE DOTTED LINE AND SEND THE WARRANTY CARD ALONG WITH A COPY OF YOUR ORIGINAL PURCHASE RECEIPT TO:
Blue Sky Innovation Group - WARRANTY DEPARTMENT 33800 Lear Industrial Parkway, Avon, OH 44011
Toll Free: 1-855-939-7263 Office:1-216-455-1101 M-F 9:00AM - 5:00PM EST
Blue Sky Innovation Group Warranty Card Customer Name: _________________________________ Address: _______________________________________ City/State/Zip: ___________________________________ Telephone Number: (_________) ____________________ E-Mail Address: _________________________________ Original Date of Purchase: ______/________/________ Product Model #: _________________________________
Serial # (if applicable): ______________________