demo lab guide wireless - amazon s3 · demo lab guide – wireless byod and mobility demo product...
TRANSCRIPT

Demo Lab Guide – Wireless
BYOD and Mobility Demo
Product Domain: Networking
Author: Colin King
Version: 1.01 Date: 20/01/2016

Table of Contents 1 Product Overview ............................................................................................................................................ 3
1.1 Lab Preparation Considerations and Caveats .................................................................................. 3
2 Introduction ..................................................................................................................................................... 4
2.1 Lab Topology and Essential Information ......................................................................................... 4
2.1.1 Lab Addressing and Login Details ...................................................................................................... 5
2.1.2 Element Access ..................................................................................................................................... 5
3 Wireless .......................................................................................................................................................... 10
3.1 Guest Access ...................................................................................................................................... 10
3.1.1 Pre-requisite Information ................................................................................................................. 10
3.1.2 W-Series Controller Configuration .................................................................................................. 12
3.1.3 W-ClearPass Policy Manager and Guest configuration ............................................................... 16
3.1.4 W-ClearPass Guest Module Configuration ................................................................................... 20
3.1.5 Testing Guest Access with a Wireless Client ................................................................................ 22
3.2 BYOD, W-ClearPass Onboard Lab .................................................................................................. 26
3.2.1 W-Series Controller Configuration ................................................................................................. 26
3.2.2 W-ClearPass Policy Manager and Onboard configuration ........................................................ 34
3.2.3 Test BYOD, Onboard with Wireless Client .................................................................................... 43
4 Summary ........................................................................................................................................................ 49

3 Dell Demo Center – https://demos.dell.com | Dell Inc., 2016
1 Product Overview
This should be used to provide a high level overview of the product. Content from the product
marketing deck or PDF would be applicable.
1.1 Lab Preparation Considerations and Caveats
It is in your best interests to ensure the demo environment you will be demonstrating is clean & tidy
before you begin. For this reason we would recommend, where possible, you log in to your demo at
least 15 minutes prior to delivery and check the following;
1. Familiarize yourself with the environment during this time and check any specific features you are
expecting to demo.
2. Most importantly, be crystal clear with yourself on what it is you plan to show. A full demo of every
feature described below (with questions) can take several hours. If you only have a short time slot
be sure to focus on the key points that address the customer’s pain points and will drive value
home to them.
3. Ensure that you have scheduled the demo for sufficient time so as not to have the demo end
before you are finished with the customer.
Any other guidance on how the user should prepare for the lab can be added here. If there are
limitation or something the user should be aware of call out also.

4 Dell Demo Center – https://demos.dell.com | Dell Inc., 2016
2 Introduction
The purpose of this lab is to introduce the BYOD access solution using both the W-Series controller and
W-ClearPass Access Management System. Interaction of wireless access, authentication, authorization,
and policy enforcement will be shown.
The following features are used in this lab:
W-Series Controller
- WLAN access, with policy enforcement through user roles and firewall policies
W-ClearPass Policy Manager
- Identification, Authentication, Authorization, and policy enforcement
W-ClearPass Guest
- Self-registration through captive portal
W-ClearPass Onboard
- Single SSID client WLAN configuration with certificate installation through the Onboard
application
2.1 Lab Topology and Essential Information
VLAN 1920192.168.3.0/24
S4810
Layer 3
Layer 2
Layer 2
Campus Server VM
VLAN 200192.168.2.0/24
Secure
MLAG N4032-2N4032-1
VLAN 210192.168.4.0/24
Guest
VLTS4810-1 S4810-2
3200 ControllerAD Server VM ClearPass VM
N3000 Stack
Access Points
C3750

5 Dell Demo Center – https://demos.dell.com | Dell Inc., 2016
2.1.1 Lab Addressing and Login Details
Lab addressing information:
Device IP Address Mask Gateway
Pod Landing VM 172.20.3.10 255.255.255.0 172.20.3.1
W3200 Controller 172.203.30 255.255.255.0 172.20.3.1
Client VM 192.168.1.19 255.255.255.0 192.168.1.1
Wireless Client 01 172.20.3.21 255.255.255.0 N/A
Wireless Client 02 172.20.3.22 255.255.255.0 N/A
ClearPass 192.168.3.6 255.255.255.0 192.168.3.1
Note: The logon credentials required to run the demo and access elements are detailed were
required within the steps of the demo.
Lab usernames and passwords
IP Address System Username Password
172.20.3.4 AD Server campus\administrator password
172.20.3.21 Wireless Client 01 demouser password
172.20.3.22 Wireless Client 02 demouser password
172.20.3.20 W3200 admin campus
192.168.3.6 ClearPass admin campus
2.1.2 Element Access
New for 2014 is the use of Remote Desktop Manager (RDM). RDM is a simple tool to provide quick
access to all of the pod hardware from a single tabbed window. All demos are accessible from RDM
and each demo is grouped into a single folder on the left-hand side of the screen. These folders can

6 Dell Demo Center – https://demos.dell.com | Dell Inc., 2016
be expanded for each demo, and the hardware access to each device is achieved by simply double-
clicking on the item. Here is a screenshot. The red items are all part of Demo 1.
Each section has an icon to fully deploy the working configurations or to reset the switches back to a
base configuration with only IP, username, and password configured.
Note: When the “Deploy Lab” option is selected please allow 10 minutes for all the hardware
elements in the environment to be configured. (See example deployment below)

7 Dell Demo Center – https://demos.dell.com | Dell Inc., 2016
When an item is accessed, it will appear as a tab at the top of the RDM window. You can have a
separate tab for each type of connection, such as SSH, HTTP, RDP, etc… Below is a screenshot of
RDM with several connections open. Notice the tabs.

8 Dell Demo Center – https://demos.dell.com | Dell Inc., 2016
Note: The credentials required to access an item within the RDM interface are embedded within the
application. You don’t not have to remember any usernames or password to access any of the items
within the demo. The exceptions being
ClearPass WebConsole – The Web Console is accessed from within the Active Directory Server (AD).
There is a shortcut provided on the AD server desktop to launch the ClearPass Web Console.
To launch and RDP session to the AD server select “Wireless AD” icon within the RDM interface (see
below), double clicking the icon to launch the session:

9 Dell Demo Center – https://demos.dell.com | Dell Inc., 2016
If you want to reset to a base configuration or reset to a working demo configuration, simply double
click the appropriate icon for that group and watch for the process to complete. All demos utilize the
same switch hardware, so if you cannot run both demos at once. For example, if you want to run the
RVLT demo, you will need to run “Deploy Lab – Routed VLT with MLAG”. After that demo, you can run
“Deploy Lab – VRRP with MLAG” to do the VRRP version of the demo. It takes approximately 10 minutes
to deploy the hardware for a given demo

10 Dell Demo Center – https://demos.dell.com | Dell Inc., 2016
3 Wireless
3.1 Guest Access
Users connect to an open SSID and browses to any web page. A captive portal redirects the user to a
web form that instructs them to register to gain access. Appropriate policies are assigned to the user, a
username and password is generated, and the user is redirected to a designated URL.
Objectives
- Configure W-3200 controller AP group
- Provision APs to the AP group
- Create Virtual AP for a Guest SSID
- Create User roles and policies
- Create W-ClearPass Guest service
- Create Self Registration portal
- Test with a Win7 client
3.1.1 Pre-requisite Information
To start the demo lab please select the folder “ Lab 3 – Wireless”. Expand the folder and search for the
“Deploy Lab – Wireless” icon. Double click the icon.

11 Dell Demo Center – https://demos.dell.com | Dell Inc., 2016
1.
A task will start, this task configures all hardware within the lab for the Wireless Demo.
Note: The task will take 10 minutes to complete
Once the task has completed the environment is now ready for you to undertake and complete the
following labs
Guest Registration
BYOD, W-ClearPass Onboard
Note: Please note when entering Guest and Employee SSID’s during the configuration stage and setup
stage replace # with the demo POD number, for example Guest01 would be the SSID to be used if
you are using POD01. You can find the POD number the on the web browser homepage displayed
when you access the demo (see below).

12 Dell Demo Center – https://demos.dell.com | Dell Inc., 2016
3.1.2 W-Series Controller Configuration
1. W-Series Controller Configuration
2. Now we are going to configure the W-Series Controller. Please select the Demo Lab
environment - “Lab3 – Wireless” folder.
3. Open the webGUI for the Controller by clicking on “AP Controller”
4. Username: admin
5. Password: campus
Note: The controller Web Console will appear as a tab at the top of the RDM interface
6. From within the W-Series web console select the Configuration tab and then Campus WLAN (see
below).

13 Dell Demo Center – https://demos.dell.com | Dell Inc., 2016
7. Click New AP Group, enter BYOD, OK.
8. Click New WLANs for BYOD, enter Guest(#)
9. Click, OK
10. Click Next, lower right.
11. Use defaults, click Next
12. VLAN: choose 210
13. Choose Guest, click Next
14. Use defaults, click Next
15. Use defaults, click Next
16. Add, Select from known servers, choose clearpass, OK, click Next
17. Use defaults, click Next
18. Click Finish
19. Click Close
You have now created an AP group, which will contain all the settings that will be pushed to the APs,
including the SSID. Only one AP group can be assigned to a single AP.
Next we will configure the Access Points for use.
1. Select Configuration tab
2. Select AP
3. Use defaults, click Next
4. Choose All APs
5. Use defaults, click Next

14 Dell Demo Center – https://demos.dell.com | Dell Inc., 2016
6. Use defaults, click Next
7. Click drop-down, choose BYOD
8. Click Configure APs Now
9. Click Close
You have just assigned the APs to the BYOD AP group you previously configured. The APs will
download the new configuration and reboot. This process will take about 2-3 minutes. You can
monitor the APs in the Monitoring Tab.
The APs are ready when they all show “up” in the WLAN Network Status
1.
15 Dell Demo Center – https://demos.dell.com | Dell Inc., 2016
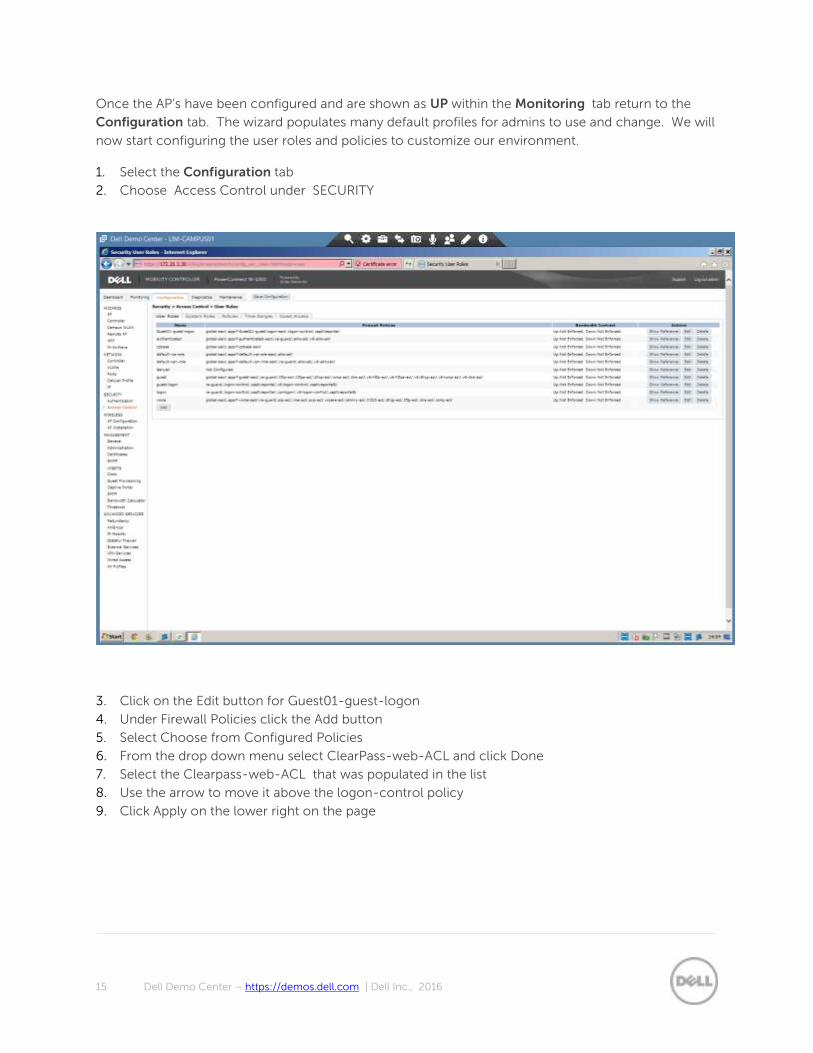
Once the AP’s have been configured and are shown as UP within the Monitoring tab return to the
Configuration tab. The wizard populates many default profiles for admins to use and change. We will
now start configuring the user roles and policies to customize our environment.
1. Select the Configuration tab
2. Choose Access Control under SECURITY
3. Click on the Edit button for Guest01-guest-logon
4. Under Firewall Policies click the Add button
5. Select Choose from Configured Policies
6. From the drop down menu select ClearPass-web-ACL and click Done
7. Select the Clearpass-web-ACL that was populated in the list
8. Use the arrow to move it above the logon-control policy
9. Click Apply on the lower right on the page
16 Dell Demo Center – https://demos.dell.com | Dell Inc., 2016
Note: The ClearPass policy you added above is not a default policy, we configured that for you use in
this lab. It restricts the user to only access the ClearPass server IP address, which is where the captive
portal web page is located.
If you click on a policy, you can see the firewall rules for each policy. These are typical firewall rules and
they are evaluated from top to bottom.
Next we will configure the Authentication setting.
10. Select Authentication under Security
11. Select the L3 Authentication tab
12. Select + to expand the Captive Portal Authentication
13. Click on the name (not +) of Guest01-cp-prof
14. Look for Login page
15. Enter the following: https://clearpass.campus.local/guest/reg.php
16. Click Apply in the lower right
You have just configured the user role and captive portal redirect address to enable the Guest
registration. The address above is a webserver hosted on W-ClearPass. The controller configuration is
complete.
3.1.3 W-ClearPass Policy Manager and Guest configuration
Return to the Remote Desktop Manager dashboard. This is the blue icon found on the taskbar. It is
highlighted below for reference:

17 Dell Demo Center – https://demos.dell.com | Dell Inc., 2016
Now we will configure the ClearPass server. To configure the ClearPass server please follow the steps
below:
1. Click on the Wireless –AD under the Wireless RDP Access section on the left hand side
2. Close the Server Manager
3. Click on the Firefox icon labelled ClearPass
a. Username: admin
b. Password: campus

18 Dell Demo Center – https://demos.dell.com | Dell Inc., 2016
The ClearPass Policy Manager GUI is now open. The dashboard is open by default. Use the left hand
side to get to the Configuration area.
4. Select Configuration
5. Select Start Here
6. Scroll down and select the Guest Access Template
7.
Note: ClearPass uses tabs across the top to move through the configuration. Depending on the
configuration area, you must either click the next tab, or you can use the Next button at the lower
right.
8. In the General Tab enter a Name Prefix of Self Registration Lab
9. Click Next button
10. Wireless SSID for Guest access: Guest- (and POD Number)

19 Dell Demo Center – https://demos.dell.com | Dell Inc., 2016
Note: Enter the exact WLAN name you used on the controller. For example Guest- (and POD
Number) if you’re using Lab Pod 1
11. Select wireless controller: Controller (this network device setting has already been configured
for you)
12. Click Next button
13. Click Add Service button
14. Click Save button
15. Once completed should see your service in the list at the bottom.
16. Click on the Service name to open it.
17. Select the Service Tab, use defaults
18. Select the Authentication Tab, use defaults
19. Select the Roles Tab, use defaults
20. Select the Enforcement Tab, click Modify (new set of tabs opens)
21. Click on Rules Tab
22. Click Add Rule
23. Click to add… (under Conditions)

20 Dell Demo Center – https://demos.dell.com | Dell Inc., 2016
24. Type: Authentication, Name: Username, Operator: EXISTS, Value: no entry
25. Click on the Disk icon to save the condition
26. Under Enforcement Profiles --Select to Add—
27. From the dropdown list select [RADIUS] Authenticated
28. Click Save
29. Click Save
30. Click Save
Note: The rule you added is applied through the Authenticated enforcement policy to any Guest that
registers. The Authenticated policy corresponds to the “authenticated” role within the Controller. This
roles is a default “allow all” policy. Real World admins would designate a more appropriate role and
policy for Guests. This is just for lab demonstration.
This completes the Policy Manager Service. We now must move to the Guest module within ClearPass
to configure the self-registration portal.
3.1.4 W-ClearPass Guest Module Configuration
The following steps detail the configuration task to be undertaken to complete the configuration for the
ClearPass self-registration portal.
1. Click on the Dashboard section in the upper left of the GUI.
2. There should be an Applications window near the center of the screen.

21 Dell Demo Center – https://demos.dell.com | Dell Inc., 2016
3. Click on Guest
4. Another browser tab should open with the Guest Manager GUI.
5. Click on Configuration on the left hand side
6. Click on Guest Self-Registration
7. Click on Create new self-registration page (upper right)
8. Enter a name Guest Lab
9. Enter the Register Page reg
Note: The register page is the http address you entered into the controller for the redirect. You must
use the same page. The above “reg” corresponds to https://clearpass.campus.local/guest/reg.php
which was directed in the controller section.
10. Click Save and Continue
11. Scroll down to Allowed Access and enter 192.168.4.0/24
12. Click Save and Continue
13. On the Register Page UI accept the defaults
14. Click Save and Continue
15. On the Receipt Page UI accept the defaults
16. Click Save and Continue
17. One the Receipt Actions page accepts the defaults
18. Click Save and Continue
19. On the NAS Login page change * IP Address to 192.168.3.20

22 Dell Demo Center – https://demos.dell.com | Dell Inc., 2016
20. Set the Default Destination
21. *Default URL to http://demos.dell.com
22. Override Destination: Select Force Default
23. Click Save and Continue
24. On the Login Form accept the defaults
25. Click Save and Continue
26. On the Self-Service Portal accept the defaults
27. Click Save Changes
Now we have completed the necessary configurations steps to allow guest access to our Wireless
solution we are READY to TEST……………………………………………………………..
3.1.5 Testing Guest Access with a Wireless Client
For the purposes of the Lab to Wireless Clients are available for testing purposes. The can be found
within the Remote Desktop Manager Navigation Menu under Wireless RDP Access, To begin:
1. Please double click on Wireless Client 1
2. A Windows 7 Remote Desktop will be displayed within the RDM dashboard
3. Connect to the Guest(#) SSID you created in the previous steps

23 Dell Demo Center – https://demos.dell.com | Dell Inc., 2016
4. Launch the Firefox browser session
5. Enter a website address. You will be redirect to a Self Registration page
6. This will be an Untrusted site. Please select I Understand the Risk and Add Exception.
7. A popup will appear
8. Select Confirm Security Exception
9. A page will appear for Guest Registration

24 Dell Demo Center – https://demos.dell.com | Dell Inc., 2016
10. Enter * Your Name
11. And * Email Address
12. Confirm that you I accept the terms of use
13. You will receive a Guest Registration Receipt

25 Dell Demo Center – https://demos.dell.com | Dell Inc., 2016
14, Click on the Log in button, it will take you to a redirect page, and then to the URL that was entered
for the forced default destination (http://demos.dell.com)

26 Dell Demo Center – https://demos.dell.com | Dell Inc., 2016
3.2 BYOD, W-ClearPass Onboard Lab
Users connect to a secure SSID and enter in a corporate username and password. A captive portal
redirects the user to a web form that instructs them to register to gain access. W-ClearPass evaluates
if the user is allowed to Onboard their personal device onto the network. After authorization, the user
is redirected to an Onboard application download page. The application is downloaded and executed
on the user’s device. Network settings and a certificate are installed onto the client through the Onboard
application. Once complete the user re-authenticates to the same SSID, and authenticates using the
new network settings and certificate.
Objectives
- Create Virtual AP for an Employee SSID
- Create User roles and policies
- Create W-ClearPass Onboard service
- Create Onboard application, network and portal
- Test with a Win7 client
3.2.1 W-Series Controller Configuration
We are now going to start the configuration steps for the BYOD Onboard Lab.
1. Select the Lab 3 – Wireless folder from within the Remote Desktop Manager interface

27 Dell Demo Center – https://demos.dell.com | Dell Inc., 2016
2. Open the Web GUI for the Controller by double clicking on “AP Controller” icon
3. Login in with the credentials below:
a. Username: admin
b. Password: campus
Note If you have completed the previous Guest lab exercise, the AP Group and provisioned APs
should ready to use for this lab. If you have not completed the Guest lab exercise, please follow the
Guest lab until you complete the provisioning of the APs and return to this section.
Start by adding a new Virtual AP to the BYOD AP group you configured in the Guest exercise.
1. From within the W3200 Controller Web Portal select the Configuration
2. Select Campus WLAN
3. From the Specify Wireless LAN (WLAN) select the BYOD AP Group
4. Under WLAN’s for BYOD Click New
5. Enter Employee(#)
Note: You will have a Guest01 and an Employee01 SSID within the BYOD AP group
6. Click Next, lower right.
7. Use defaults, click Next
8. Enter VLAN 1920 and click Next

28 Dell Demo Center – https://demos.dell.com | Dell Inc., 2016
9. Use defaults (Internal), click Next
10. Use defaults, click Next
11. Step 6 Captive Portal should be disabled, skip to step number 7
12. Select Add, from the known servers choose clearpass, click OK, select Next
13. Use defaults, click Next
14. Click Finish
15. Click Close, bottom right

29 Dell Demo Center – https://demos.dell.com | Dell Inc., 2016
For Access control we now need to create two roles.
- Logon
- Authenticated
The logon role will allow users to access W-ClearPass for the purpose of Onboarding the network
settings and certificate. The authenticated role will allow users with certificates to access the corporate
network.
1. Select the Configuration tab
2. Under Security select Access Control
3. Select the User Roles tab
4. Click the Add button

30 Dell Demo Center – https://demos.dell.com | Dell Inc., 2016
5. Complete the fields under Misc. Configuration
6. Role Name – BYOD-Employee-auth
7. Click Apply
8. Click the Add button
9. Complete the fields under Misc. Configuration
10. Role Name – BYOD-Employee-logon
11. Click Apply
12. Click Edit next to the BYOD-Employee-auth role
13. Select Firewall Policies
14. Click the Add button
15. Select from the Choose from Configured Policies dropdown menu
16. Select option BYOD-Employee1-auth(session)
17. Click Done
18. Click Apply
19. Click Back (upper right)
20. Click Edit next to the BYOD-Employee-logon
21. Select the Firewall Policies tab
22. Click the Add button
23. Make sure the Choose from Configured Policies dropdown menu is selected
a. Select BYOD-Employee1-logon-control(session)
24. Click Done
Before applying any changes we will add three policies to the controller.
1. Select the Add button

31 Dell Demo Center – https://demos.dell.com | Dell Inc., 2016
2. Ensure Choose From Configured Policies dropdown is selected
a. From the dropdown menu select BYOD-Employee1-allow-external-captive-
portal(session)
3. Click Done
4. Select the Add button
5. Ensure Choose From Configured Policies dropdown is selected
a. From the dropdown menu select BYOD-Employee1-captive-portal(session)
6. Click Done
Note: Before applying the changes take a moment to verify the order of the policies you have
defined. The order in which the policies are applied is very important. See below for reference:
7. Click Apply
8. Click Back (upper right)
9. The next stage in the configuration process is to create a Captive Portal policy. The following
steps outline the task to be undertake to create the policy.
10. Under Security select Authentication
11. Select the L3 Authentication tab
12. Click on the name (not +) of Captive Portal Authentication
13. In the text box enter BYOD-Employee and click Add
14. Click on the name of BYOD-Employee

32 Dell Demo Center – https://demos.dell.com | Dell Inc., 2016
15. Look for Login page
16. Enter the following in the textbox: https://clearpass.campus.local/onboard/ob.php
17. Click Apply, bottom right (you may need to scroll to the bottom of the page)
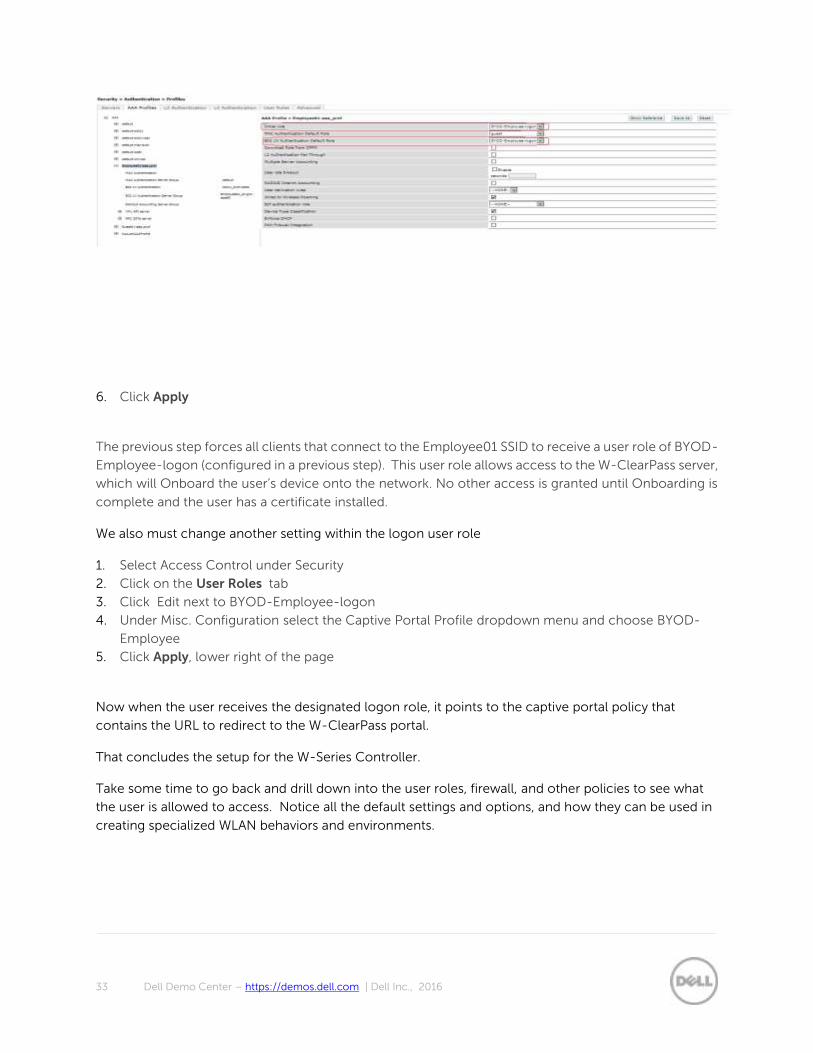
Once we have defined and saved the various Captive Portal Policies the next stage is to modify the AAA
profile for the Employee(#) SSID.
1. Select Authentication under Security
2. Click on the AAA Profiles tab
3. Click on the name (not +) of Employee(#)-aaa_prof
4. From the Initial role dropdown menu choose BYOD-Employee-logon
5. From the 802.1X Authentication Default Role dropdown menu choose BYOD-Employee-logon
33 Dell Demo Center – https://demos.dell.com | Dell Inc., 2016
6. Click Apply
The previous step forces all clients that connect to the Employee01 SSID to receive a user role of BYOD-
Employee-logon (configured in a previous step). This user role allows access to the W-ClearPass server,
which will Onboard the user’s device onto the network. No other access is granted until Onboarding is
complete and the user has a certificate installed.
We also must change another setting within the logon user role
1. Select Access Control under Security
2. Click on the User Roles tab
3. Click Edit next to BYOD-Employee-logon
4. Under Misc. Configuration select the Captive Portal Profile dropdown menu and choose BYOD-
Employee
5. Click Apply, lower right of the page
Now when the user receives the designated logon role, it points to the captive portal policy that
contains the URL to redirect to the W-ClearPass portal.
That concludes the setup for the W-Series Controller.
Take some time to go back and drill down into the user roles, firewall, and other policies to see what
the user is allowed to access. Notice all the default settings and options, and how they can be used in
creating specialized WLAN behaviors and environments.

34 Dell Demo Center – https://demos.dell.com | Dell Inc., 2016
3.2.2 W-ClearPass Policy Manager and Onboard configuration
The next stage is to define the necessary configuration on the W-ClearPass Policy Manager for the
Employee01 SSID created in the previous steps. Return to the Remote Desktop Manager dashboard
this is the Blue icon on the taskbar.
1. Double-click on the Wireless-AD icon found within the Lab3 – Wireless folder
2. Close Server Manager as this may be open when you log into the AD server
3. On the Desktop launch the shortcut for W-Clearpass
4. Log into the W-ClearPass Web Console with the following credentials
a. Username: admin
b. Password: campus
5. Once logged into the ClearPass Policy Manager web console the dashboard view should be
displayed.
6. The ClearPass Policy Manager GUI is now open. The dashboard is open by default. Use the left
hand side to get to the Configuration area.
7. Select Configuration and Start Here
8. Click on the Onboard template
9. In the General Tab enter a name of Onboard Lab
10. Click Next
11. Under Wireless Setting select wireless controller Controller (these setting have been pre-
configured for you)
12. Click Next
13. Click Next at Device Access Restrictions
14. Under Provisioning Wireless Network Settings select Employee(#) for Wireless SSID for Onboard

35 Dell Demo Center – https://demos.dell.com | Dell Inc., 2016
Note: Enter the exact WLAN name used on the controller. For example Employee01.
15. Click the Add Service button
16. Click Save. You should see three Services in the list at the bottom.
17. Click on the Onboard Lab Onboard Provisioning Service name to open it.
18. Select the Service Tab and use defaults
19. Select the Authentication tab
20. Under Authentication Methods remove all default methods
21. From the dropdown list select
a. EAP TTLS
b. EAP TLS
c. EAP PEAP
d. MSCHAP
e. EAP MSCHAPv2
22. Select Authentication Sources
23. Click on the [Guest User Repository], click Remove
24. From the dropdown list select pod1 Active Directory [Active Directory]

36 Dell Demo Center – https://demos.dell.com | Dell Inc., 2016
Note: The Authentication sources is the same across all environments. These setting have been
predefined for you.
25. Select the Roles tab
26. From the dropdown list select Onboard Lab AppAuth Role Mapping
2.

37 Dell Demo Center – https://demos.dell.com | Dell Inc., 2016
27. Select the Enforcement tab using the defaults
28. Click Save
29. Click on the Onboard Lab Onboard Authorization service name to open it
30. Go to the Authorization tab
31. Select the [Guest User Repository] and click Remove
32. From the dropdown list select pod1 Active Directory [Active Directory]
33. For all other tabs relating to this service please accept the defaults
34. Click Save
35. Select the Onboard Lab Onboard Pre-Auth service
36. Select the Authentication tab
37. Click on the [Guest User Repository] and click Remove
38. From the dropdown list select pod1 Active Directory [Active Directory]
39. Accept defaults for all other tabs
40. Click Save
Take some time to navigate through each Service. W-ClearPass classifies each authentication request
by the service rules. It retrieves information from the databases configured in the Authorization and
Authentication sources, and applies roles based on rules set in the Role Mapping, and finally enforces
the policy rules set in Enforcement Policies. There are an infinite amount of classification, actions, and
settings that can be used to set access policies around any device or user authentication through W-
ClearPass.

38 Dell Demo Center – https://demos.dell.com | Dell Inc., 2016
The necessary configuration steps have been completed for the Policy Manager Service, The next
stage is to undertake the configuration of the Self-Registration Portal. This is done under the Guest
module.
1. Select the Dashboard within the upper left of the GUI
2. An Applications window will be displayed on the screen
3. Click on Onboard + Workspace
Note: The W-ClearPass product does not support WorkSpace. Although admin can see configuration
options and set them in the GUI, no WorkSpace product or license exists for the Dell version of
ClearPass.
4. A new browser tab should open with the Onboard manager GUI.
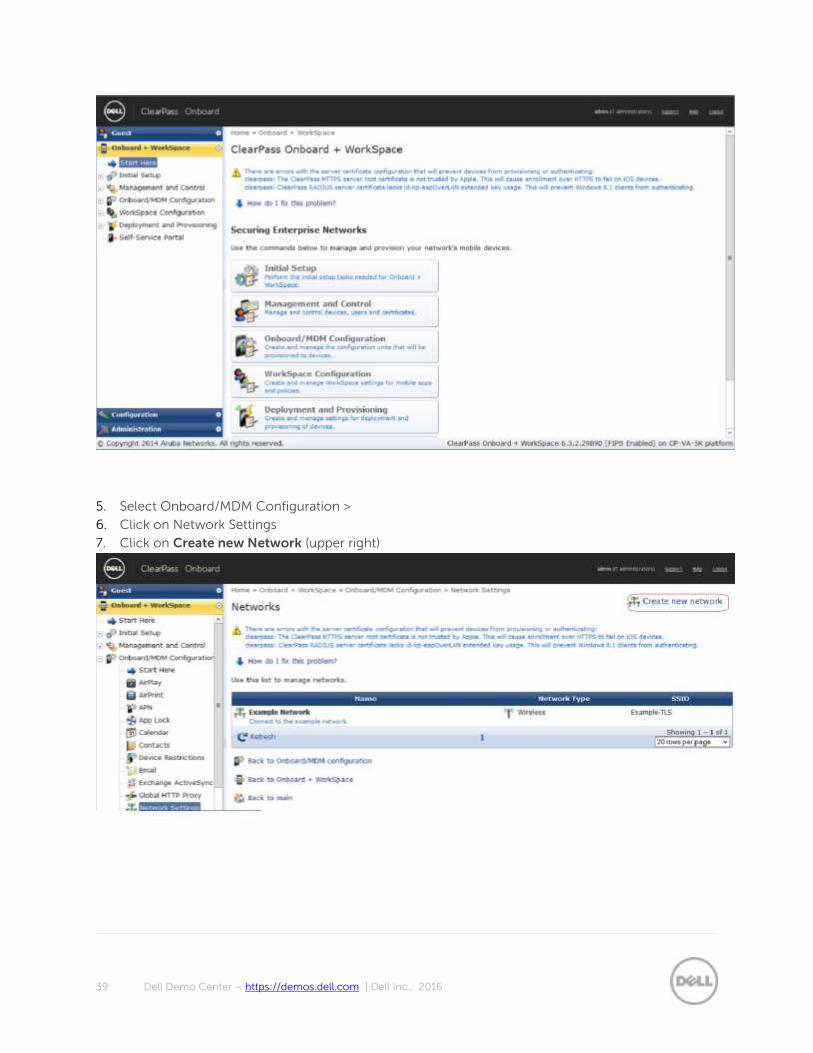
39 Dell Demo Center – https://demos.dell.com | Dell Inc., 2016
5. Select Onboard/MDM Configuration >
6. Click on Network Settings
7. Click on Create new Network (upper right)
40 Dell Demo Center – https://demos.dell.com | Dell Inc., 2016
8. Enter a name at Name: Onboard Network
9. Enter the SSID of your pod at SSID: Employee01(replace the Example-TLS test)
10. Click Next
11. You will be brought to the Protocols Tab
12. From the Windows EAP dropdown list choose TLS
13. Click Next
14. You will be brought to the Authentication tab
15. Accept the defaults
16. Click Next
17. On the Trust tab from the Configure Trust dropdown list select Manually configure certificate
trust setting
18. In the Trust Server Names text box enter *.campus.local
19. Under Trusted Certificates click inside the box next to default entry and select Admin-Root-CA
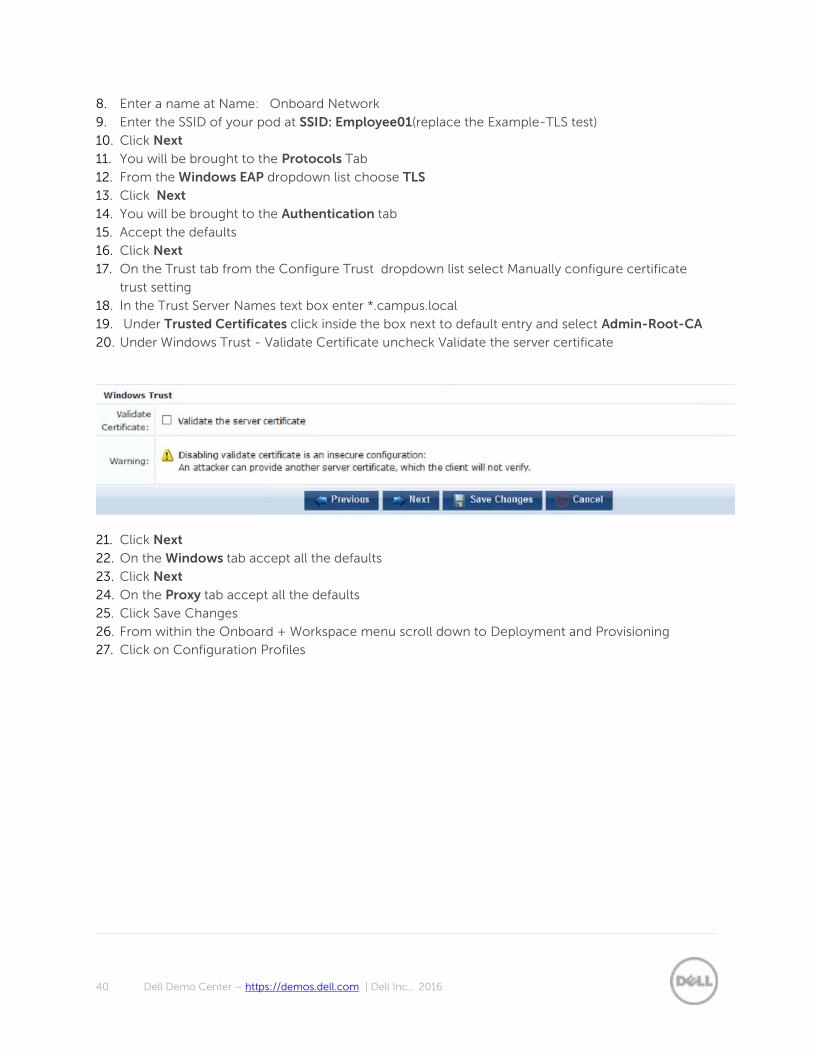
20. Under Windows Trust - Validate Certificate uncheck Validate the server certificate
21. Click Next
22. On the Windows tab accept all the defaults
23. Click Next
24. On the Proxy tab accept all the defaults
25. Click Save Changes
26. From within the Onboard + Workspace menu scroll down to Deployment and Provisioning
27. Click on Configuration Profiles
41 Dell Demo Center – https://demos.dell.com | Dell Inc., 2016
28. Click on Create new configuration profile (upper right)
29. Enter a name at Name: Onboard config profile
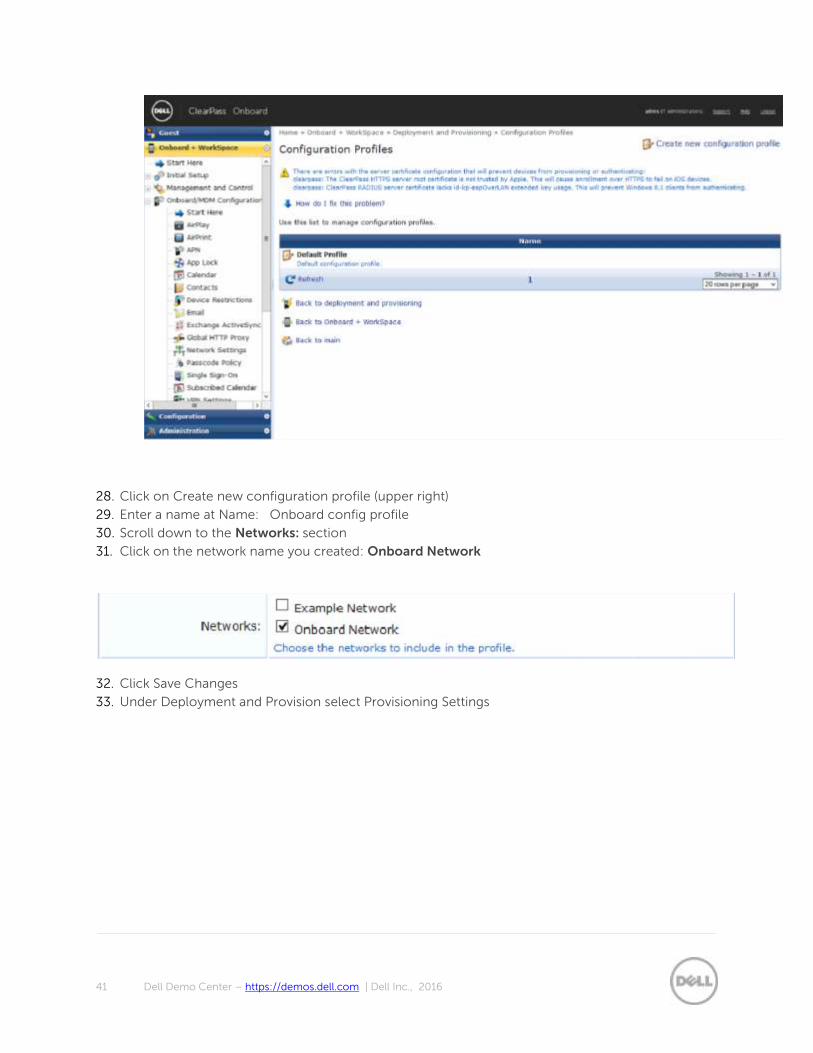
30. Scroll down to the Networks: section
31. Click on the network name you created: Onboard Network
32. Click Save Changes
33. Under Deployment and Provision select Provisioning Settings
42 Dell Demo Center – https://demos.dell.com | Dell Inc., 2016
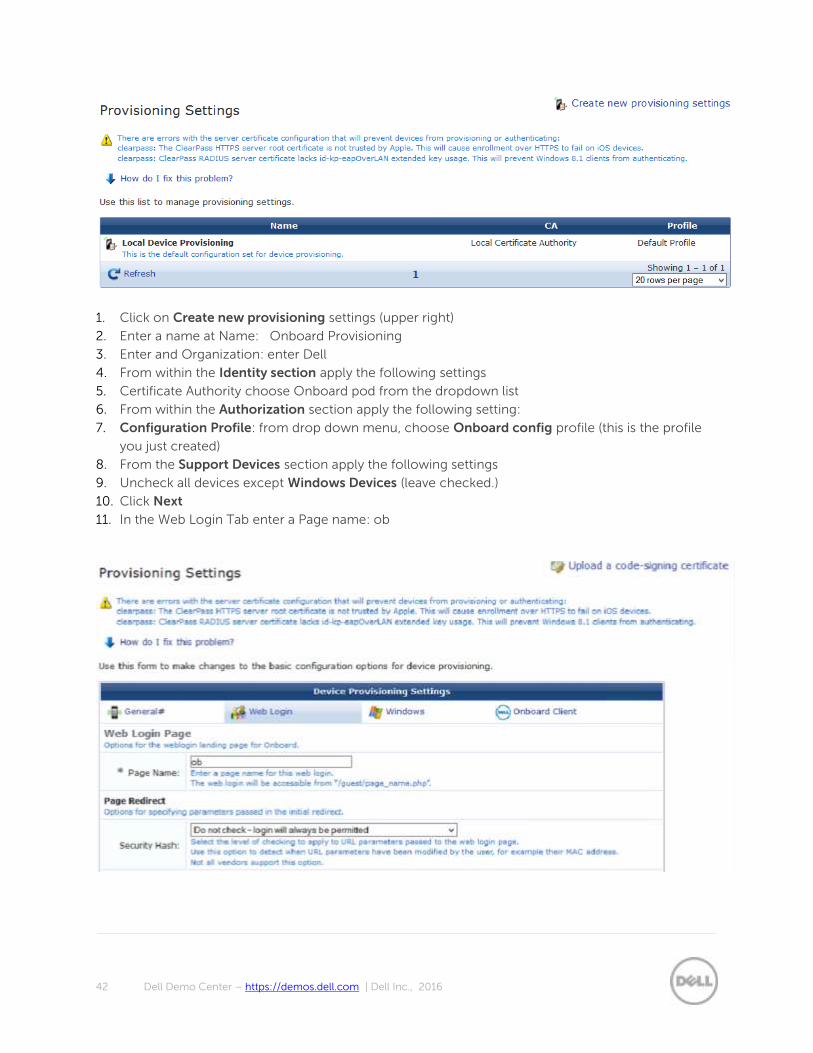
1. Click on Create new provisioning settings (upper right)
2. Enter a name at Name: Onboard Provisioning
3. Enter and Organization: enter Dell
4. From within the Identity section apply the following settings
5. Certificate Authority choose Onboard pod from the dropdown list
6. From within the Authorization section apply the following setting:
7. Configuration Profile: from drop down menu, choose Onboard config profile (this is the profile
you just created)
8. From the Support Devices section apply the following settings
9. Uncheck all devices except Windows Devices (leave checked.)
10. Click Next
11. In the Web Login Tab enter a Page name: ob

43 Dell Demo Center – https://demos.dell.com | Dell Inc., 2016
Note: This entry must match the URL you entered in the Captive Portal Authentication profile you
configured in the Controller. “ob” corresponds to https://clearpass.campus.local/onboard/ob.php
The full URL is not used in this field, only the final name of the .php
12. Click Next
13. Accept all defaults in the Windows tab
14. Click Next
15. Within the Onboard Client tab from the Validate certificate dropdown list select No, do not
validate this web server certificate
16. Click Save Changes
The Onboard configuration is not complete and we are Ready to Test ……………………………..
3.2.3 Test BYOD, Onboard with Wireless Client
This lab uses self-signed certificates for all certificates and Certificate Authorities. This lab’s
configuration uses settings that would not be used in a secure deployment. During the client testing
you may have to bypass or acknowledge some security warnings. Please always accept the warning
and continue. Do not terminate or cancel any authentication due to security warnings.
1. Launch Wireless Client 2 by double clicking the icon within Remote Desktop Manager Console.
2. A Win 7 client RDP session will launch.
3. Connect to the Employee# SSID
a. User name: user2
b. Password: password
Note: You may have to enter this username/password more than once. This may be due to the Lab
environment or with Windows itself.

44 Dell Demo Center – https://demos.dell.com | Dell Inc., 2016
4. Choose Connect
5. Open the Firefox browser.
6. Enter any website address. The redirect should open the Self Registration page
7. Enter the same login details as step 3
a. Username: user2
b. Password: password

45 Dell Demo Center – https://demos.dell.com | Dell Inc., 2016
8. Click on the Start QuickConnect
9. Click Save File
10. Go to the Firefox download arrow icon, click to run the executable

46 Dell Demo Center – https://demos.dell.com | Dell Inc., 2016
11. Click Run

47 Dell Demo Center – https://demos.dell.com | Dell Inc., 2016
12. Click Next
13. Finally Click Connect
14. Upon successfully authentication a message will be displayed similar to below:

48 Dell Demo Center – https://demos.dell.com | Dell Inc., 2016
15. Click Close
16. Return to Firefox and enter a web site address for example www.google.com to test that the
onboarding process has been successful.
The application configures the Employee01 wireless profile for EAP TLS, certificate based authentication.
Pressing the Connect button will disconnect from the Employee[#] SSID and reconnect you to the same
SSID. This time the authentication changes from EAP-PEAP username/password, to EAP TLS. A new
role is assigned to give access to the corporate network.

49 Dell Demo Center – https://demos.dell.com | Dell Inc., 2016
4 Summary
This lab uses the very basic setting to authenticate and Onboard clients. It is meant to demonstrate the
method of configuring policies on Policy Manager, web and application services on Onboard, and how
ClearPass interacts with the W-Series Controller for access/enforcement.
Please take some time to go through ClearPass , Guest , and Onboard to see all the many options that
are available to customers. Control of users and devices has an infinite amount of possibilities. Users
can be identified and fingerprinted through the devices they have to steer automated policy decisions.