deore xt mega-9 rapidfire lever sl-m770 - art's …vid.artscyclery.com/pdf/shimano mtb/shimano...
TRANSCRIPT

DESCRIPTIONSHIMANOCODE NO.
ITEMNO.
**
*
*
1
2
3
4
5
67
8
R.H. Shifting Lever UnitL.H. Shifting Lever UnitInner Hole CapR.H. Indicator UnitL.H. Indicator UnitR.H. Cable Adjustting Bolt UnitL.H. Cable Adjustting Bolt UnitR.H. BracketL.H. BracketSL Fixing Bolt (M4) 2pcs.Clamp Bolt (M6 x 15)R.H. Base Hole Cap & Bolt UnitL.H. Base Hole Cap & Bolt Unit
Y-6MPY-6MPY-6CDY-6MPY-6MPY-6GRY-6MPY-6MPY-6NXY-6MPY-8U9Y-6MPY-6MP
98010980203300098030980409809098070010005100098080140009809098100
A: Same parts.B: Parts are usable, but differ in materirals, appearance, finish, size, etc.Absence of mark indicates non-interchangeability.
INTERCHANGE-ABILITY
SL-M770DEORE XT Mega-9 Rapidfire Lever
0707-2708A
w/o Indicator Type w/o Indicator Type
For Left Hand For Right Hand
3 3
44
88
1 1
6 6
22
7
55
7
SL-M
970
SL-M
760
SL-M
952
A
BB
A
BB
B
A
BB
B

50 mm 50 mm
44T 44T / 48T
X
X
22T
12T
S, M, L
66° - 69°
50 mm
44T
FD-M770-E
X
X
22T
12T
–
66° - 69°
FD-M770 FD-M771
X
X
22T
12T
S, M, L
66° - 69°
50 mm
44T / 48T
FD-M772 /M772AFD-M773
X
X
22T
12T
S, M, L
63° - 66°
If not using the indicator, this shifting lever can be installed eitheron the inside or the outside of the brake lever.If adjusting the position, remove the indicator, and then be sureto secure it in the new position with the two fixing bolts.
• FD-M771/FD-M773
• Install the shifting lever in a position where it will not obstruct brakeoperation and gear shifting operation.
• Do not use in a combination which causes brake operation to beobstructed.
The level section of the chain guideouter plate should be directly aboveand parallel to the largest chainring.Secure using a 5 mm Allen key.
Series XT
Rapidfire (Shifting lever) SL-M770
Outer casing SIS-SP41
Front derailleur FD-M770 / FD-M771 / FD-M772 / FD-M773 / FD-M770-E / FD-M772A
Front chainwheel FC-M770 / FC-M771-K
Chain CN-HG93
Bottom bracket cable guide SM-SP17 / SM-BT17
Technical Service Instructions SI-6MPFA-003
Front Drive System
In order to realize the best performance, we recommend that the following combination be used.
SIS Adjustment
Installation of the lever
Adjust and then install the front derailleur as shown in theillustration. Do not remove the Pro-Set alignment block at this time.
Gear teeth should comewithin this range
Pro-Set gauge
Tightening torque : 5 - 7 N·m {44 - 60 in. lbs.}
Chainwheel (largest chainring)
Chain guide
Chain lengthAdd 2 links (with the chain on boththe largest sprocket and the largestchainring)
Largest sprocket Largest chainring
Chain
Be sure to follow the sequence described below.
1. Low adjustmentFirst remove the Pro-Set alignment block .Next, set so that the clearance between the chain guide innerplate and the chain is 0 - 0.5 mm.
AB
BA
FD-M771/M773
FD-M770/ M772/M772A
Low adjustmentscrew
Chain
Pro-Set alignmentblock
Chain guide inner plate
Chain position
Largest sprocket
Smallestchainring
After taking up the initial slack in the cable, re-secure to the frontderailleur as shown in the illustration.
Normal type
< Normal type >
• FD-M770/FD-M772/FD-M772A< Top route type >
Top route type
Pull
Pull
FD-M770/M772/M772A
FD-M771/M773
Chain
5 mm Allen key
Chain guideouter plate
Top adjustmentscrew
AB
Chain
Chain guideinner plate
A
B
Outer casing adjustment barrel
Chain position
Smallest sprocket
Largest chainring
Chain position
Largest sprocket
Intermediatechainring
3. Top adjustmentSet so that the clearancebetween the chain guide outerplate and the chain is 0 - 0.5 mm.
4. Adjustment of the intermediatechainringWhen carrying out adjustment, set thechain to the largest sprocket, and at thefront, set the chain to the intermediatechainring. Adjust using the outer casingadjustment barrel so that the clearancebetween the chain guide inner plate andthe chain is 0 - 0.5 mm.
Note: Pass the cablethrough as shownin the illustration.
Wire fixing bolt
Pro-Set alignment block
For bracket typeInstall as shown in theillustration.
Bolt
AdapterAdapter
Front Derailleur
Front Chainwheel
Tightening torque : 35 - 50 N·m {305 - 435 in. lbs.}
To shift from a small chainring to a larger chainringWhen lever (A) is pressed once, there is a shift of one step from a small chainring to a larger chainring.
Example: from intermediate chainring to largest chainring.
To shift from a large chainring to a smaller chainringWhen lever (B) is pressed once, there is a shift of one step from a largechainring to a smaller chainring.
Example: from largest chainring to intermediate chainring.
Gear shifting operationThis release lever is equipped with a 2-way release mechanism which allows release operations to be carried out by either pushing or pullingthe lever.Both lever (A) and lever (B) always return to the initial position when they are released after shifting.When operating one of the levers, always be sure to turn the crank arm at the same time.
Lever (A) initial position Lever (B)2-way release
2. Connecting and securing the inner cableOperate lever (B) two times ormore, and check on the indicatorthat the lever is at the lowestposition. Then remove the innerhole cover and connect the innercable.
Inner hole cover
Lever (B)
Inner cable
Install the inner hole cover by turning it asshown in the illustration until it stops.Do not turn it any further than this, otherwiseit may damage the screw thread.
Inner hole cover
Use a handlebar grip with amaximum outer diameter of 36 mm.
Tightening torque : 5 N·m {44 in. lbs.}4 mm Allen key
If the chain falls to the crankside.
If shifting is difficult from theintermediate chainring to thesmallest chainring.
Tighten the top adjustment screwclockwise (about 1/4 turn).
Loosen the top adjustment screwcounterclockwise (about 1/8 turn).
Loosen the low adjustment screwcounterclockwise (about 1/4 turn).
If there is interference betweenthe chain and the front derailleurinner plate at the largestchainring.
If there is interference betweenthe chain and the front derailleurouter plate at the largestchainring.
Tighten the top adjustment screwclockwise (about 1/8 turn).
Loosen the top adjustment screwcounterclockwise (about 1/8 turn).
If the intermediate chainring isskipped when shifting from thelargest chainring.
Loosen the outer casingadjustment barrelcounterclockwise (1 or 2 turns).
If the chain falls to the bottombracket side.
If the lever is stiff when shiftingfrom the intermediate chainringto the largest chainring
Tighten the outer casingadjustment barrel clockwise (1 or 2 turns).
Tighten the low adjustment screwclockwise (about 1/2 turn).
Loosen the top adjustment screwcounterclockwise (about 1/4turn).
5. Troubleshooting chartAfter completion of steps 1 - 4, move the shifting lever to check theshifting. (This also applies if shifting becomes difficult during use.)
If there is interference betweenthe chain and front derailleurinner plate when the rearsprocket is shifted to the largestsprocket when the chainwheel isat the intermediate chainringposition.
If shifting is difficult from theintermediate chainring to thelargest chainring.
Tightening torque :6 - 7 N·m {52 - 60 in. lbs.}
Specifications
Model number
Normal type
Top route type
Front chainwheel tooth difference
Min. difference between top and intermediate
Front derailleur installation band diameter
Chainstay angle (a)
Applicable chain line
X = AvailableFront Derailleur
Applicable front chainwheel
Installation band diameters:S (28.6 mm), M (31.8 mm), L (34.9 mm)
When using the S, M size, use aninstallation band with a diameter of 28.6 mm, 31.8mm and install it to a L size adapter.
Chainstay angle
ChainwheelModel number
Chainwheel tooth combination
Bolt circle diameter
Crank arm length
Chain line
Bottom bracket shell width
Thread dimensions
Applicable bottom bracket
FC-M770
44-32-22T
104 mm / 64 mm
165 mm, 170 mm, 175 mm, 180 mm
50 mm
68, 73 mm
BC1.37 (68, 73mm)
SM-BB70
FC-M771-K
48-36-26T
104 mm / 64 mm
165 mm, 170 mm, 175 mm, 180 mm
50 mm
68, 73 mm
BC1.37 (68, 73mm)
! Refer to the Service Instructions for the Rear DriveSystem for details on replacing and installing theindicator unit.
Tightening torque : 2.5 N·m {22 in. lbs.}
3 mm Allen key
Note: Pass the cable through as shownin the illustration.
FD-M771 FD-M773
Wire fixing bolt
Outboard Inboard
3 mm Allen key
One Holland, Irvine, California 92618, U.S.A. Phone: +1-949-951-5003
Industrieweg 24, 8071 CT Nunspeet, The Netherlands Phone: +31-341-272222 3-77 Oimatsu-cho, Sakai-ku, Sakai-shi, Osaka 590-8577, Japan
* Service Instructions in further languages are available at :http://techdocs.shimano.com
Please note: specifications are subject to change for improvement without notice. (English) © Apr. 2009 by Shimano Inc. XBC SZK Printed in Japan.
This service instruction explains how to useand maintain the Shimano bicycle partswhich have been used on your new bicycle.For any questions regarding your bicycle orother matters which are not related toShimano parts, please contact the place ofpurchase or the bicycle manufacturer.
General Safety Information
WARNING• Use neutral detergent to clean the chain. Do not use alkali-based or acid based detergent such as rust cleaners as it may result
in damage and/or failure of the chain.• Use the reinforced connecting pin only for connecting the narrow type of chain.• There are two different types of reinforced connecting pins available. Be sure to check the table below before selecting which
pin to use.If connecting pins other than reinforced connecting pinsare used, or if a reinforced connecting pin or tool whichis not suitable for the type of chain is used, sufficientconnection force may not be obtained, which couldcause the chain to break or fall off.
• If it is necessary to adjust the length of the chain dueto a change in the number of sprocket teeth, make thecut at some other place than the place where the chainhas been joined using a reinforced connecting pin or an end pin. The chain will be damaged if itis cut at a place where it has been joined with a reinforced connecting pin or an end pin.
• Be careful not to let the cuffs of your clothes get caught in the chain while riding, otherwise youmay fall off the bicycle.
• Check that the tension of the chain is correct and that the chain is not damaged. If the tensionis too weak or the chain is damaged, the chain should be replaced. If this is not done, the chainmay break and cause serious injury.
• Use a front chainwheel which is compatible with 9-speed chains in conjunction with Shimano CN-7701, CN-HG93 and CN-HG73 chains. If a chainwheel for an 8-speed chain or less is used, front chainwheel gear shifting problemsmay occur, or the chain pins might fall out, causing the chain to break.
• The two left crank arm mounting bolts should be tightened alternately in stages rather than each bolt being fully tightened all atonce. Use a torque wrench to check that the final tightening torques are within the range of 12 - 14 N·m.Furthermore, after riding approximately 100 km (60 miles), use a torque wrench to re-check the tightening torques.It is also important to periodically check the tightening torques.If the tightening torques are too weak or if the mounting bolts are not tightened alternately in stages, the left crank arm maycome off and the bicycle may fall over, and serious injury may occur as a result.
• Check that there are no cracks in the crank arms before riding the bicycle. If there are any cracks, the crank arm may break andyou may fall off the bicycle.
• If the inner cover is not installed correctly, the axle may rust and become damaged, and the bicycle may fall over and seriousinjury may occur as a result.
• Obtain and read the service instructions carefully prior to installing the parts. Loose, worn or damaged parts may cause thebicycle to fall over and serious injury may occur as a result. We strongly recommend only using genuine Shimano replacementparts.
• Obtain and read the service instructions carefully prior to installing the parts. If adjustments are not carried out correctly, thechain may come off and this may cause you to fall off the bicycle which could result in serious injury.
• Read these Technical Service Instructions carefully, and keep them in a safe place for later reference.
Chain toolChain
9-speed super narrowchain such as
CN-7701 / CN-HG938- / 7- / 6-speed narrow
chain such as CN-HG50 / CN-HG40
Reinforced connecting pin
TL-CN32 / TL-CN27
TL-CN32 / TL-CN27
6.5mm
7.1mm
Silver
Black
Reinforced Connecting Pin
End Pin Link Pin
Note• In addition, if pedaling performance does not feel normal, check this once more.• Before riding the bicycle, check that there is no play or looseness in the connection. Also, be sure to retighten the crank arms
and pedals at periodic intervals.• If a squeaking noise is heard coming from the bottom bracket axle and the left crank arm connector, apply grease to the connector and
then tighten it to the specified torque.• Do not wash the bottom bracket with high-pressure jets of water.• If you feel any looseness in the bearings, the bottom bracket should be replaced.• If gear shifting operations do not feel smooth, wash the derailleur and lubricate all moving parts.• If the amount of looseness in the links is so great that adjustment is not possible, you should replace the derailleur.• You should periodically wash the chainrings in a neutral detergent and then lubricate them again. In addition, cleaning the chain
with neutral detergent and lubricating it can be an effective way of extending the useful life of the chainrings and the chain.• If the chain keeps coming off the chainrings during use, replace the chainrings and the
chain.• When the chain is in the position shown in the illustration, the chain may contact the front
chainrings or front derailleur and generate noise. If the noise is a problem, shift the chainonto the next-larger rear sprocket or the one after.
• Apply grease to the left and right adapters before installing them.• For smooth operation, use the specified outer casing and the bottom bracket cable guide.• This front derailleur is for triple front chainwheel use only. It cannot be used with the
double front chainwheel, as the shifting points do not match.• When installing the top route type, choose a frame that has three outer casing holders as shown in the
illustration at right.• Use an outer casing which still has some length to spare even when the handlebars are turned all the way
to both sides. Furthermore, check that the shifting lever does not touch the bicycle frame when thehandlebars are turned all the way.
• A special grease is used for the gear shifting cable (SIS-SP41). Do not use DURA-ACE grease or othertypes of grease, otherwise they may cause deterioration in gear shifting performance.
• Grease the inner cable and the inside of the outer casing before use to ensure that they slide properly.• Operation of the levers related to gear shifting should be made only when the front chainwheel is turning.• If the brake fluid used in the oil disc brakes is of a type which tends to adhere to the plastic parts of the shifting lever, this may
cause the plastic parts to crack or become discolored. Therefore, you should make sure that the brake fluid does not adhere tothese plastic parts.The mineral oil which is used in SHIMANO disc brakes does not cause cracking or discoloration if it adheres to plastic parts, butsuch parts should be cleaned with alcohol beforehand to prevent foreign particles from adhering.
• Do not disassemble the indicator and shifting lever unit, as this may damage them or cause mis-operation.• Parts are not guaranteed against natural wear or deterioration resulting from normal use.• For maximum performance we highly recommend Shimano lubricants and maintenance products• For any questions regarding methods of installation, adjustment, maintenance or operation, please contact a professional
bicycle dealer.
Outer casing holders
Frontchainrings
Rearsprockets
! NoteWhen installing the components to carbon frame/handle barsurfaces, verify with the manufacturer of the carbon frame/parts fortheir recommendation on tightening torque in order to prevent overtightening that can cause damage to the carbon material and/orunder tightening that can cause lack of fixing strength for thecomponents.
Attach the same outer end cap to the cut end of the outer casing.
Outer end cap
Cutting the outer casingWhen cutting the outer casing, cut the opposite end to the endwith the marking. After cutting the outercasing, make the end round so that theinside of the hole has a uniform diameter.
SI-6MPFA-003-00
Band Type Bracket Type
< FC-M770 > < FC-M771-K >Band Type Chaincase Stay Type Bracket Type
68 mm
2.5 mm 1.8 mm 0.7 mm
Spacer
68 mm BB mount-type bracket
73 mm 73 mm
68 mm 68 mm Chaincase stay
73 mm 73 mm
68 mm BB mount-type bracket
73 mm
FA
FAFA
FAFC
FC
FCFB
FAFA
FAFA FAFAFAFA FA FA
FA FB FC
Installation of the Front Chainwheel and Front DerailleurFollow the procedure in the figure.
1, 2 Use the special tool TL-FC32/36 to install the right adapter(counterclockwise thread) and the left adapter (clockwisethread).Tightening torque: 35 - 50 N·m {305 - 435 in. lbs.}
3 Insert the right crank unit.
4 Set section A of the left crank into the axle of the right crank unitwhere the groove is wide.
5 Use the TL-FC16/18 to tighten the cap.Tightening torque: 0.7 - 1.5 N·m {6 - 13 in. lbs.}
6 Push in the stopper plate and check that the plate pin is securelyin place, and then tighten the bolt of the left crank arm. (5 mmAllen key)Note : Each of the bolts should be evenly and equally tightened
to 12 - 14 N·m {106 - 122 in. lbs.}.
! Spacer installation method(1) Check whether the width of the bottom bracket
shell is 68 mm or 73 mm.(2) Next, install the adapter while referring to the
illustrations below.
*1 If using three 2.5 mm spacers with a band type and a bottom bracket shell having a width of 68 mm, install the three spacers so that there are two on the right and one on theleft.
*2 1.8 mm corresponds to the thickness of the chain case.
*1*2
5
62
4
1
3
Wide groove area
TL-FC16
TL-FC32
Stopper plate
Plate pin
Push up
Note : Set the stopper plate inthe right direction asshown in illustration.
Inner cover
[Installation]3. Operate lever B eight times or more
to set the lever to the top position.4. Check that the indicator needle is
pointing to the left, and then insertthe pin at the bottom of the indicatorinto the hole in the winder. Next,insert the two bosses on theindicator into the shifting lever unitso that they are aligned with the omarks, and then turn the indicatorunit counterclockwise to set it intoplace.
5. Turn the indicator counterclockwise, and thentighten the two indicator fixing screws.
6. Check the operation of the indicator. If it doesnot operate correctly, reinstall it while payingparticular attention to steps 3 and 4.
Series XT
RAPIDFIRE (Shifting lever) SL-M770
Outer casing SIS-SP41
Rear derailleur RD-M771
Type SGS / GS
Freehub FH-M770 / FH-M775
Gears 9
Cassette sprocket
Chain
Bottom bracket guide
CS-M770
CN-HG93
SM-SP17 / SM-BT17
Technical Service Instructions SI-6MPRA-003
Rear Drive System
In order to realize the best performance, we recommend that the following combination be used.
Specifications
Replacing and installing the indicator
Model number
Type
Gears
Total capacity
Largest sprocket
Smallest sprocket
Front chainwheel tooth difference
RD-M771
SGS GS
33T
34T
11T
22T
9
45T
34T
11T
22T
Rear Derailleur
Model number
CS-M770
Group name
aQ
as
Gears
9
9
Tooth combination
11, 12, 14, 16, 18, 21, 24, 28, 32T
11, 13, 15, 17, 20, 23, 26, 30, 34T
Cassette sprocket tooth combination
Model number
Gears
FH-M770 / FH-M775
9
36 / 32No. of spoke holes
Freehub
Disassembly and reassembly should only be carried out whenremoving or replacing the indicator. For the front, the direction ofrotation when removing and installing is opposite to the position ofthe needle.
Chain length on bicycles with rear suspension
The length of A will vary depending on the movement of the rearsuspension. Because of this, an excessive load may be placed onthe drive system if the chain length is too short. Set the length ofthe chain by adding two links to the chain when the rear suspensionis at a position where dimension "A" is longest and the chain is onthe largest sprocket and the largest chainring. If the amount ofmovement of the rear suspension is large, the slack in the chainmay not be taken up properly when the chain is on the smallestchainring and smallest sprocket.
A
A'
Add 2 links (with the chain onboth the largest sprocket andthe largest chainring)
Largestsprocket
ChainLargest
chainring
Installation of the sprockets
[Removal]1. Remove the two indicator fixing screws
which are securing the indicator.2. Turn the indicator unit clockwise as shown
in the illustration to remove it.
<If not installing the indicator>1. Remove the indicator bracket protective cover which is attached
to the indicator, starting from the shorter tab as shown in theillustration.
2. First insert the tab of the indicator bracket protective cover asshown in the illustration, and then set it onto the shifting lever unitand secure it with the indicator fixing screws.
32T
ba
ba
28T
ba
24T
ba21T
apba
18T 11T
aQ
ar
ba
12T
aQ
ar
ba
9S CS-
6
JP
AA
N
M9
0
H PY EER G LI D
11T
ap
aQ
ba
ar
16T a
p
aQ
ar
ba
14T
ap
as
34T
ap
as
30T
ap
as
26T
ap
as
23T
as
20T
as
17T
as
au
11T
as
au
13T
as
au
15T
CS-
6
JP
AA
N
M9
0
H PY EER G LID
11T
For each sprocket, thesurface that has the groupmark should face outwardand be positioned so thatthe wider part of eachsprocket and the A part(where the groove width iswide) of the freewheelbody are aligned.
CS-M770 (aQ)
CS-M770 (as)
The groove iswide at oneplace only.
ac-14T
A
Wide part
Sprocket spacer
Lock ring spacer
Lock ring spacer
Lock ring
Lock ring
• For installation of the sprockets, usethe special tool (TL-LR15) to tightenthe lock ring.
• To replace the sprockets, use thespecial tool (TL-LR15) and TL-SR21to remove the lock ring.
Tightening torque: 30 - 50 N·m {261 - 434 in. lbs.}
Gear shifting operationThis release lever is equipped with a 2-way release mechanism which allows release operations to be carried out by either pushing or pullingthe lever.Both lever (A) and lever (B) always return to the initial position when they are released after shifting. When operating one of the levers,always be sure to turn the crank arm at the same time.
These Service Instructions describe the operation method when using the RAPIDFIRE SL-M770 in combination with the RD-M771 topnormal-type rear derailleur. If using in combination with the RD-M770 reverse spring-type derailleur, the operations and indicatordisplays will be reversed.
To shift from a small sprocket to a larger sprocket (Lever A)To shift one step only, press lever (A) to the (1) position. To shift twosteps at one time, press to the (2) position.
To shift from a large sprocket to a smaller sprocket (Lever B)Press lever (B) once to shift one step from a larger to a smallersprocket.
Lock ring
Tool (TL-SR21)
DisassemblyTL-LR15
5. SIS AdjustmentOperate the shifting lever several times to move the chain to the2nd sprocket. Then, while pressing the lever just enough to takeup the play in the lever, turn the crank arm.
When shifting to3rd
Tighten the outer casingadjustment barrel until thechain returns to the 2ndsprocket. (clockwise)
Loosen the outer casingadjustment barrel until thechain touches the 3rd sprocketand makes noise. (counterclockwise)
When no soundat all is heard
Best settingThe best setting is when the shifting lever isoperated just enough to take up the play and thechain touches the 3rd sprocket and makes noise.* Return the lever to its original position (the position where
the lever is at the 2nd sprocket setting and it has beenreleased) and then turn the crank arm clockwise. If thechain is touching the 3rd sprocket and making noise, turn the outercasing adjustment barrel clockwise slightly to tighten it until the noisestops and the chain runs smoothly.
Operate lever to change gears, and check that no noise occursin any of the gear positions.
For the best SIS performance, periodically lubricate all power-transmission parts.
Adjustment bolt Adjustment bolt
Lever (A) initial positionLever (B)2-way release
Installation of the rear derailleurWhen installing, be careful not to let the B-tension adjustment screwcome into contact with the dropout tab, otherwise deformation may result.
Bracket spindle Tightening torque : 8 - 10 N·m {70 - 86 in. lbs.}
5 mm Allen key
Dropout tab
B-tension adjustment screw
Install the inner hole cover by turning itas shown in the illustration until it stops.Do not turn it any further than this,otherwise it may damage the screwthread.
1
1 2
2
Largestsprocket
Guide pulley
Low adjustmentscrew
3. Low adjustmentTurn the low adjustment screw so that the guide pulley moves toa position directly in line with the largest sprocket.
4. How to use the B-tension adjustment screwMount the chain on the smallest chainring and the largestsprocket, and turn the crank arm backward. Then turn the B-tension adjustment screw to adjust the guide pulley as close tothe sprocket as possible but not so close that it touches. Next,set the chain to the smallest sprocket and repeat the above tomake sure that the pulley does not touch the sprocket.
1
2
1 2
2
1
Largest sprocket Smallest sprocket
B-tensionadjustment screw
Connect the cable to the rearderailleur and, after taking upthe initial slack in the cable, re-secure to the rear derailleuras shown in the illustration.
Pull
Tightening torque :6 - 7 N·m {52 - 60 in. lbs.}
1. Top adjustmentTurn the top adjustment screwto adjust so that the guidepulley is in line with the outerline of the smallest sprocketwhen looking from the rear.
2. Connection and securing of the inner cableOperate lever (B) eight times ormore, and check on the indicatorthat the lever is at the highestposition. Then remove the inner holecover and connect the inner cable.
1 2
1 2
Outer line of smallest sprocket
Guide pulley
Top adjustmentscrew
Lever (B)
Inner hole cover
SIS Adjustment
Groove
Note: Be sure that the cable issecurely in the groove.
Inner hole cover
Inner cable
Cutting the outer casingWhen cutting the outer casing, cut theopposite end to the end with the marking.After cutting the outer casing, make theend round so that the inside of the hole has a uniform diameter.
Attach the same outerend cap to the cut endof the outer casing.
Outer end cap
The sealed cap withtongue and the rubbershield should beinstalled to the outercasing stopper of theframe. Rubber shield
Rubber shieldBe careful not to bend
Sealed cap with tongue
* If the rear derailleur moves to a large degree, such as inbicycles with rear suspension, itis recommended that you replacethe cap with the accessoryaluminum cap.
The end of the outer casingwhich has the aluminum cap should be at the derailleur side.
Aluminum cap
Derailleur side
! Read these Service Instructions in conjunction with theService Instructions for the FH-M770/M775.
Indicator unit
Shorter tab
Indicator bracketprotective cover
Shifting lever unit
Indicator bracketprotective cover
Tightening torque : 0.2 N·m {1 in. lbs.}
Tightening torque : 0.2 N·m {1 in. lbs.}
Bosses
Indicator fixing screws
Indicator unit
Pin
Winder hole
If not using the indicator, this shifting lever can be installed eitheron the inside or the outside of the brake lever.If adjusting the position, remove the indicator, and then be sureto secure it in the new position with the two fixing bolts.
• Install the shifting lever in a position where it will not obstruct brakeoperation and gear shifting operation.
• Do not use in a combination which causes brake operation to beobstructed.
• When installing the components to carbon frame/handle barsurfaces, verify with the manufacturer of the carbon frame/parts fortheir recommendation on tightening torque in order to prevent overtightening that can cause damage to the carbon material and/orunder tightening that can cause lack of fixing strength for thecomponents.
Installation of the lever
Use a handlebar grip with a maximumouter diameter of 36 mm.
Tightening torque : 5 N·m {44 in. lbs.} 4 mm Allen key
Tightening torque : 2.5 N·m {22 in. lbs.}
3 mm Allen key
Inboard Outboard
3 mm Allen key
One Holland, Irvine, California 92618, U.S.A. Phone: +1-949-951-5003 Industrieweg 24, 8071 CT Nunspeet, The Netherlands Phone: +31-341-272222 3-77 Oimatsu-cho, Sakai-ku, Sakai-shi, Osaka 590-8577, Japan
* Service Instructions in further languages are available at : http://techdocs.shimano.comPlease note: specifications are subject to change for improvement without notice. (English) © May 2009 by Shimano Inc. XBC SZK Printed in Japan.
This service instruction explains how to use and maintain the Shimano bicycle parts which have been used on your new bicycle.For any questions regarding your bicycle or other matters which are not related to Shimano parts, please contact the place ofpurchase or the bicycle manufacturer.
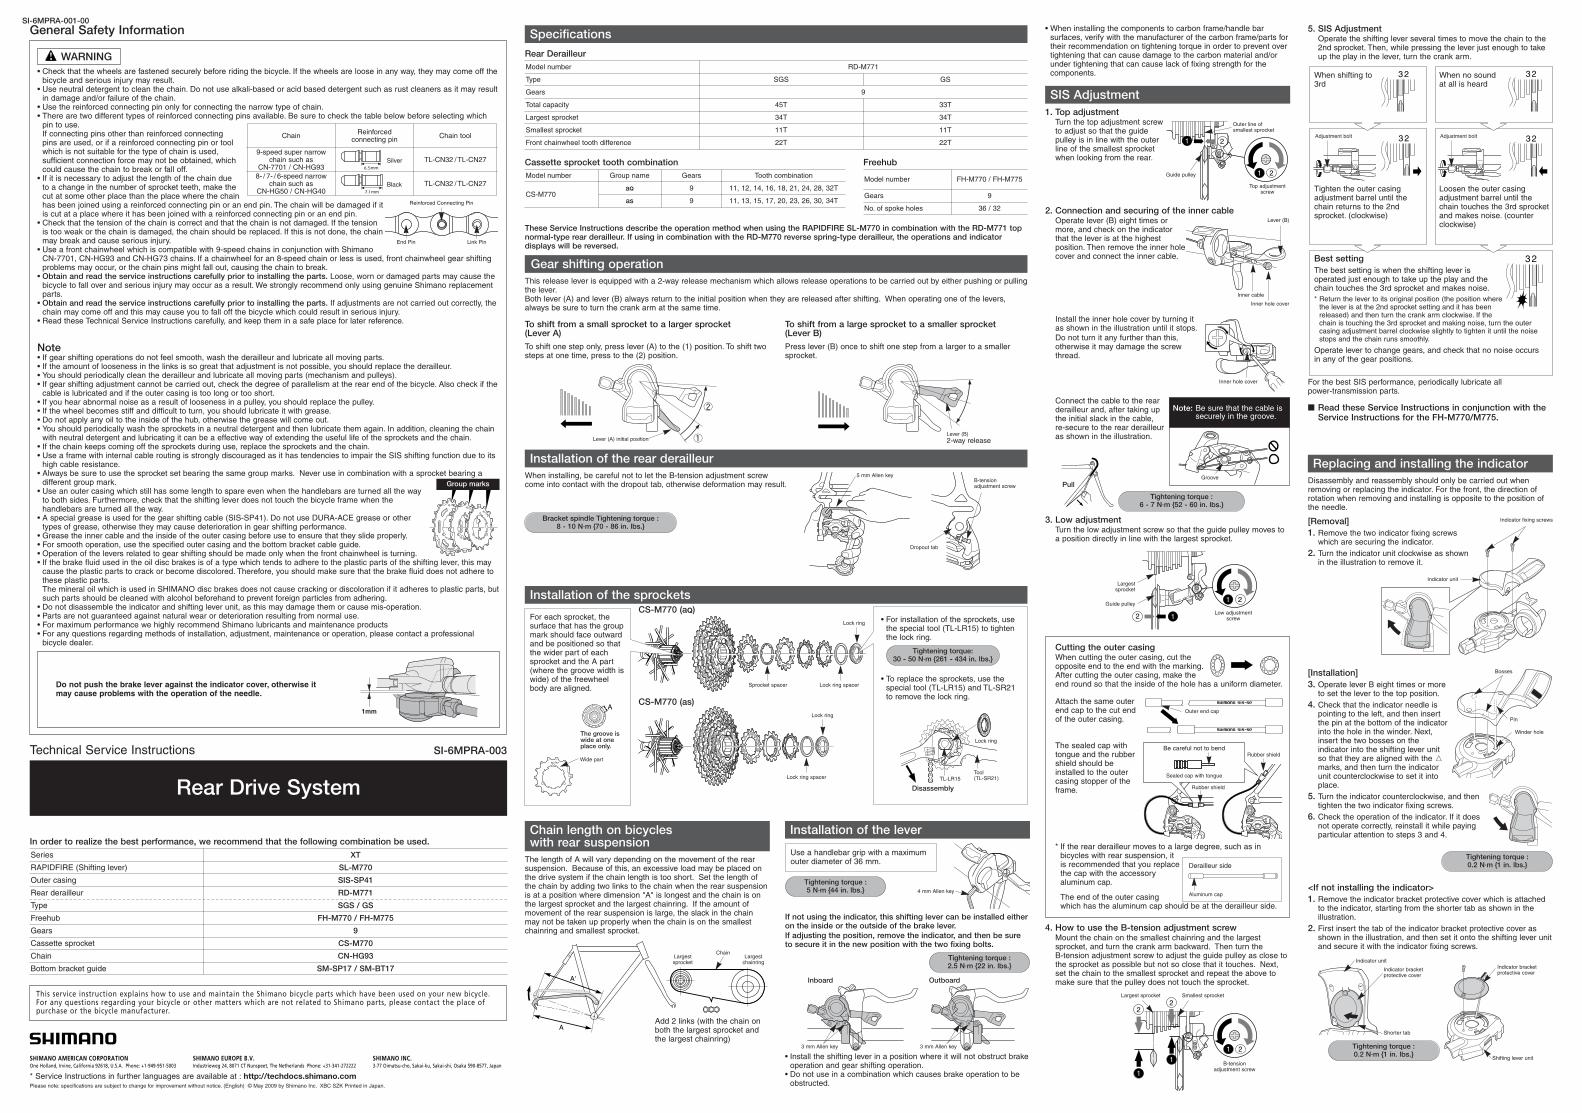
General Safety Information
WARNING
Note• If gear shifting operations do not feel smooth, wash the derailleur and lubricate all moving parts.• If the amount of looseness in the links is so great that adjustment is not possible, you should replace the derailleur.• You should periodically clean the derailleur and lubricate all moving parts (mechanism and pulleys).• If gear shifting adjustment cannot be carried out, check the degree of parallelism at the rear end of the bicycle. Also check if the
cable is lubricated and if the outer casing is too long or too short.• If you hear abnormal noise as a result of looseness in a pulley, you should replace the pulley.• If the wheel becomes stiff and difficult to turn, you should lubricate it with grease.• Do not apply any oil to the inside of the hub, otherwise the grease will come out.• You should periodically wash the sprockets in a neutral detergent and then lubricate them again. In addition, cleaning the chain
with neutral detergent and lubricating it can be a effective way of extending the useful life of the sprockets and the chain.• If the chain keeps coming off the sprockets during use, replace the sprockets and the chain.• Use a frame with internal cable routing is strongly discouraged as it has tendencies to impair the SIS shifting function due to its
high cable resistance.• Always be sure to use the sprocket set bearing the same group marks. Never use in combination with a sprocket bearing a
different group mark.• Use an outer casing which still has some length to spare even when the handlebars are turned all the way
to both sides. Furthermore, check that the shifting lever does not touch the bicycle frame when thehandlebars are turned all the way.
• A special grease is used for the gear shifting cable (SIS-SP41). Do not use DURA-ACE grease or othertypes of grease, otherwise they may cause deterioration in gear shifting performance.
• Grease the inner cable and the inside of the outer casing before use to ensure that they slide properly.• For smooth operation, use the specified outer casing and the bottom bracket cable guide.• Operation of the levers related to gear shifting should be made only when the front chainwheel is turning.• If the brake fluid used in the oil disc brakes is of a type which tends to adhere to the plastic parts of the shifting lever, this may
cause the plastic parts to crack or become discolored. Therefore, you should make sure that the brake fluid does not adhere tothese plastic parts.The mineral oil which is used in SHIMANO disc brakes does not cause cracking or discoloration if it adheres to plastic parts, butsuch parts should be cleaned with alcohol beforehand to prevent foreign particles from adhering.
• Do not disassemble the indicator and shifting lever unit, as this may damage them or cause mis-operation.• Parts are not guaranteed against natural wear or deterioration resulting from normal use.• For maximum performance we highly recommend Shimano lubricants and maintenance products• For any questions regarding methods of installation, adjustment, maintenance or operation, please contact a professional
bicycle dealer.
• Check that the wheels are fastened securely before riding the bicycle. If the wheels are loose in any way, they may come off thebicycle and serious injury may result.
• Use neutral detergent to clean the chain. Do not use alkali-based or acid based detergent such as rust cleaners as it may resultin damage and/or failure of the chain.
• Use the reinforced connecting pin only for connecting the narrow type of chain.• There are two different types of reinforced connecting pins available. Be sure to check the table below before selecting which
pin to use.If connecting pins other than reinforced connectingpins are used, or if a reinforced connecting pin or toolwhich is not suitable for the type of chain is used,sufficient connection force may not be obtained, whichcould cause the chain to break or fall off.
• If it is necessary to adjust the length of the chain dueto a change in the number of sprocket teeth, make thecut at some other place than the place where the chainhas been joined using a reinforced connecting pin or an end pin. The chain will be damaged if itis cut at a place where it has been joined with a reinforced connecting pin or an end pin.
• Check that the tension of the chain is correct and that the chain is not damaged. If the tensionis too weak or the chain is damaged, the chain should be replaced. If this is not done, the chainmay break and cause serious injury.
• Use a front chainwheel which is compatible with 9-speed chains in conjunction with ShimanoCN-7701, CN-HG93 and CN-HG73 chains. If a chainwheel for an 8-speed chain or less is used, front chainwheel gear shiftingproblems may occur, or the chain pins might fall out, causing the chain to break.
• Obtain and read the service instructions carefully prior to installing the parts. Loose, worn or damaged parts may cause thebicycle to fall over and serious injury may occur as a result. We strongly recommend only using genuine Shimano replacementparts.
• Obtain and read the service instructions carefully prior to installing the parts. If adjustments are not carried out correctly, thechain may come off and this may cause you to fall off the bicycle which could result in serious injury.
• Read these Technical Service Instructions carefully, and keep them in a safe place for later reference.
Chain toolChain
9-speed super narrowchain such as
CN-7701 / CN-HG938- / 7- / 6-speed narrow
chain such as CN-HG50 / CN-HG40
Reinforced connecting pin
TL-CN32 / TL-CN27
TL-CN32 / TL-CN27
6.5mm
7.1mm
Silver
Black
ga -18T
-
S
HIM
ANO
HYPERGLIDEC
ag-15Tag-13T
Group marks
Reinforced Connecting Pin
End Pin Link Pin
SI-6MPRA-001-00
1mm
Do not push the brake lever against the indicator cover, otherwise itmay cause problems with the operation of the needle.