dep sop training for sample collection - tallahassee, fl meter calibration and verification ... sop...
TRANSCRIPT
DEP Requirements for Sample Collection
South District
AUGUST 2016
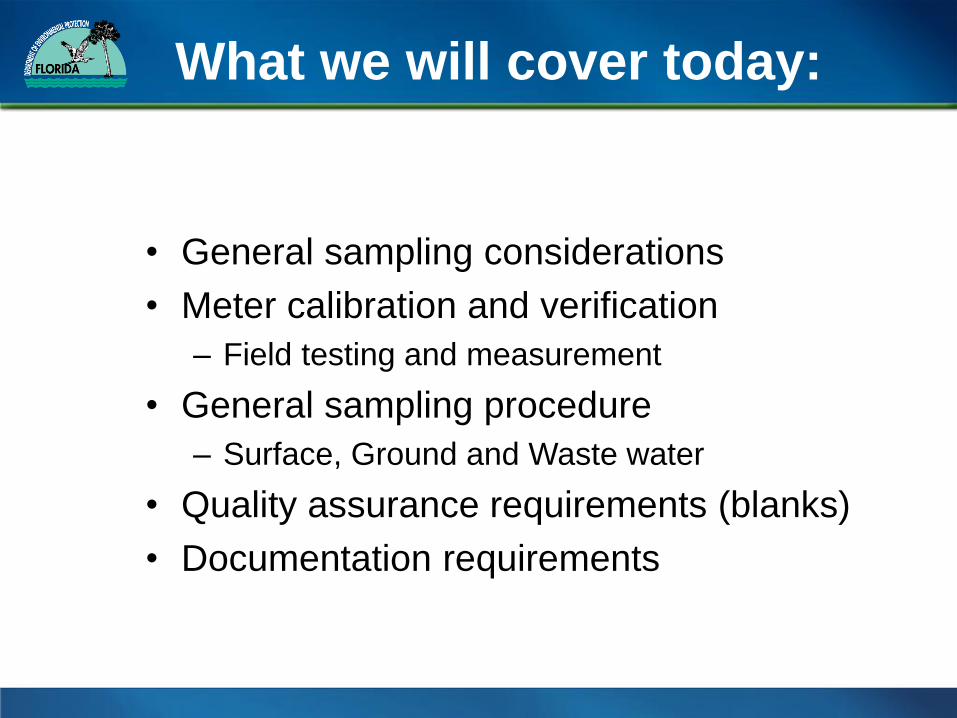
What we will cover today:
• General sampling considerations
• Meter calibration and verification
– Field testing and measurement
• General sampling procedure
– Surface, Ground and Waste water
• Quality assurance requirements (blanks)
• Documentation requirements
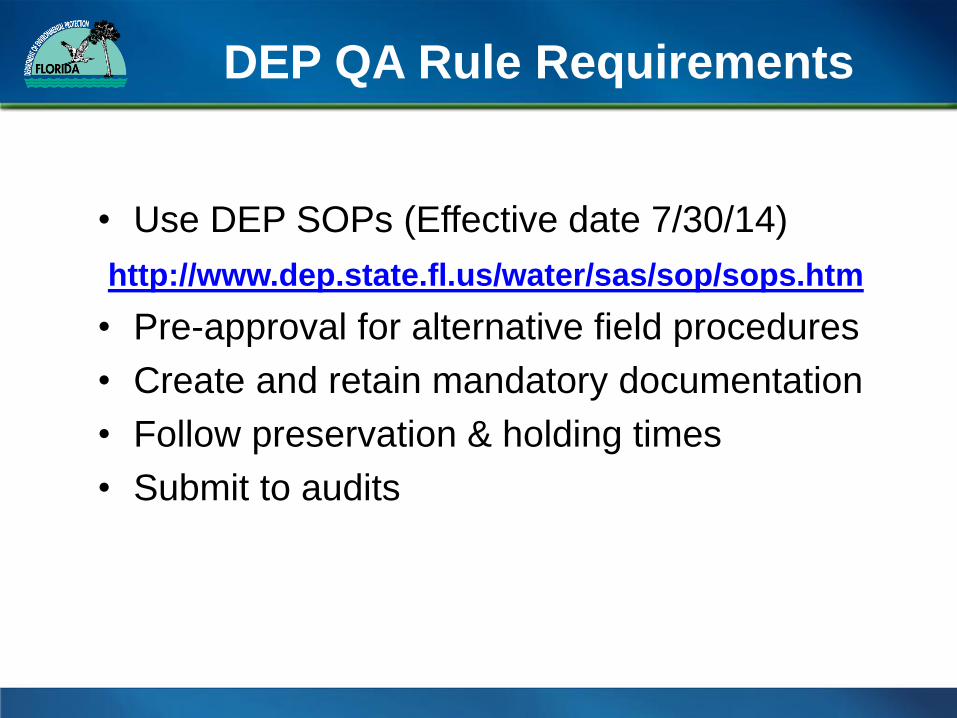
DEP QA Rule Requirements
• Use DEP SOPs (Effective date 7/30/14)
http://www.dep.state.fl.us/water/sas/sop/sops.htm
• Pre-approval for alternative field procedures
• Create and retain mandatory documentation
• Follow preservation & holding times
• Submit to audits

Naming Conventions for Field SOPs
• FA Administrative & Quality Systems
• FC Field Cleaning
• FD Documentation
• FM Mobilization & Laboratory
• FQ Quality Control
• FS Sampling Procedures
• FT Field Testing
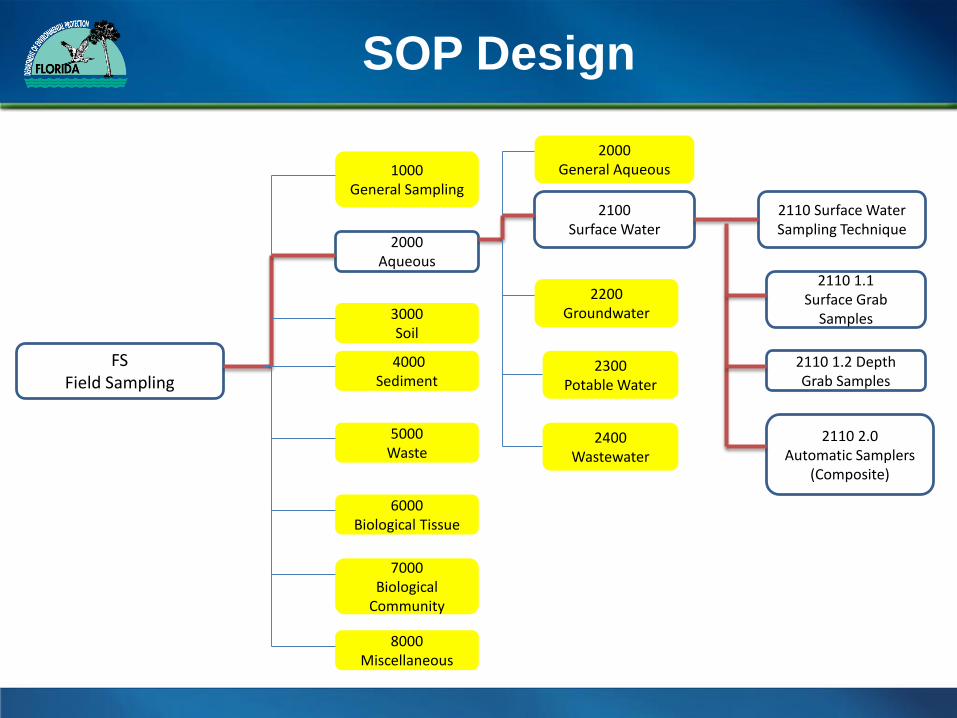
SOP Design
FSField Sampling
1000General Sampling
2000Aqueous
2000General Aqueous
2100Surface Water
2110 Surface Water Sampling Technique
3000Soil
4000Sediment
5000Waste
6000Biological Tissue
7000Biological
Community
8000Miscellaneous
2200 Groundwater
2300Potable Water
2400 Wastewater
2110 1.1Surface Grab
Samples
2110 1.2 Depth Grab Samples
2110 2.0Automatic Samplers
(Composite)

FT 1000 General Field Testing
and Measurement
• Verification
• Calibration
• Documentation
Using meters to collect data in the field
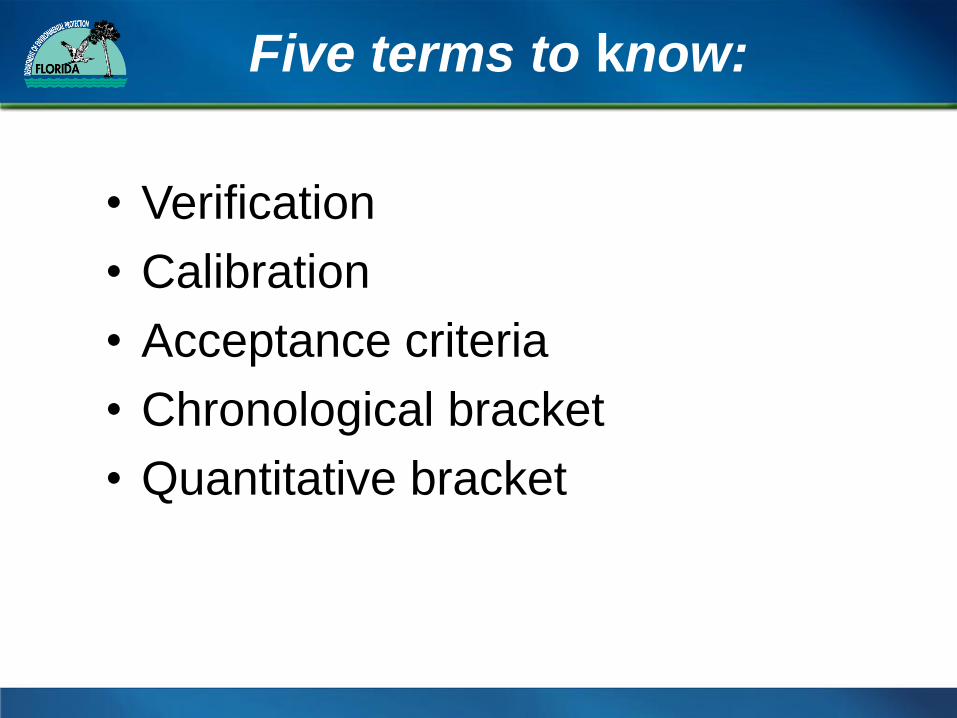
Five terms to know:
• Verification
• Calibration
• Acceptance criteria
• Chronological bracket
• Quantitative bracket

Verification:
• Measuring a known standard with the instrument as if the standard was a water sample.
Calibration:
• Changing the reading of an instrument by setting it to a known standard.

WHY VERIFY?
• Instrument calibrations are not always reliable or
stable due to drift or other errors
• Establishes chronological and quantitative
brackets for the sample measurements
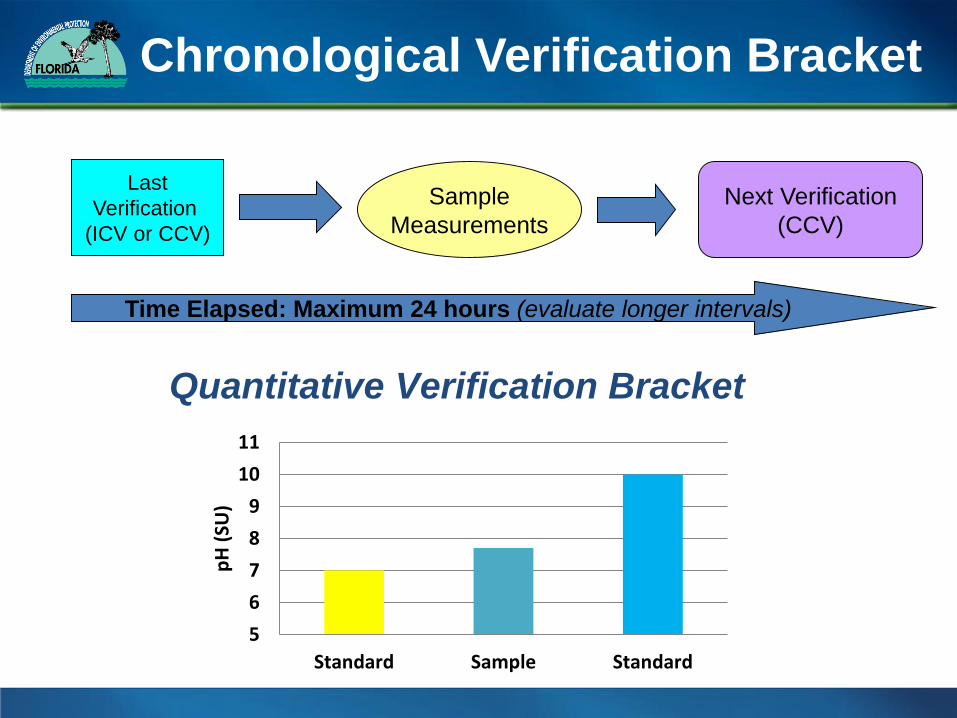
Chronological Verification Bracket
Sample
Measurements
Next Verification
(CCV)
Time Elapsed: Maximum 24 hours (evaluate longer intervals)
Last
Verification
(ICV or CCV)
Quantitative Verification Bracket
5
6
7
8
9
10
11
Standard Sample Standard
pH
(SU
)

What if verification fails?
• Repeat verification, if it still fails…
• “J” qualify the sample data
(J = estimated value)
• Perform calibration

Parameter Acceptance Criteria
pH + 0.2 Standard pH Units of calibration buffer
Specific Conductance + 5% of calibration standard value
Dissolved Oxygen + 0.3 mg/L of theoretical value
Temperature + 0.5 oC. of NIST-traceable value (w/correction factors)
Verification over range of sample values
Turbidity
0.1-10 NTU : + 10% of standard value
11-40 NTU : + 8% of standard value
41-100 NTU : + 6.5% of standard value
> 100 NTU : + 5% of standard value
Total residual chlorine
0.995 calibration curve correlation coefficient
+ 10% of primary standard value
+ 10% of secondary standard value
Color comparator acceptance criterion
+ 10% of primary standard value
Field Testing Acceptance Criteria
per DEP-SOP-001/01

FT 1100 pH
• Calibrate with 2 standards (2-point)
• Start with pH 7
• Rinse probe with deionized water between
standards
• Verify with 1 standard
• Bracket with verifications
• Acceptance criterion is ± 0.2 s.u.
• Weekly check % theoretical slope, if meter allows
pH Sample Measurement
• Select representative sampling point
• Ensure flow of refreshed sample around probe
• Stabilize reading before recording
• Because of temperature dependence also be sure of stable temperature reading before recording
• Record value to one decimal place

FT 1200 Specific Conductance
• Conductivity: 1-point calibration
• 100 µmhos standard sufficient for lower end of
quantitative bracket
• Ensure stable temperature prior to calibration,
verification or sample measurement
• Rinse probe between standards with deionized
water.
• Acceptance criteria: + 5% of calibration standard
value

Specific Conductance Sample
Measurement
• Select representative sampling point
• Ensure flow of refreshed sample around probe
• Stabilize reading before recording
• Because of temperature dependence also be sure of stable temperature reading before recording
FT 1500 Dissolved Oxygen
– Calibrate and verify with 100% humid air
(enclosed chamber)
– Ensure that the temperature is stable
– Set atmospheric pressure (760 mm Hg
default)
– Compare meter reading to theoretical
saturation (look-up table)
– Acceptance criterion is ± 0.3 mg/L
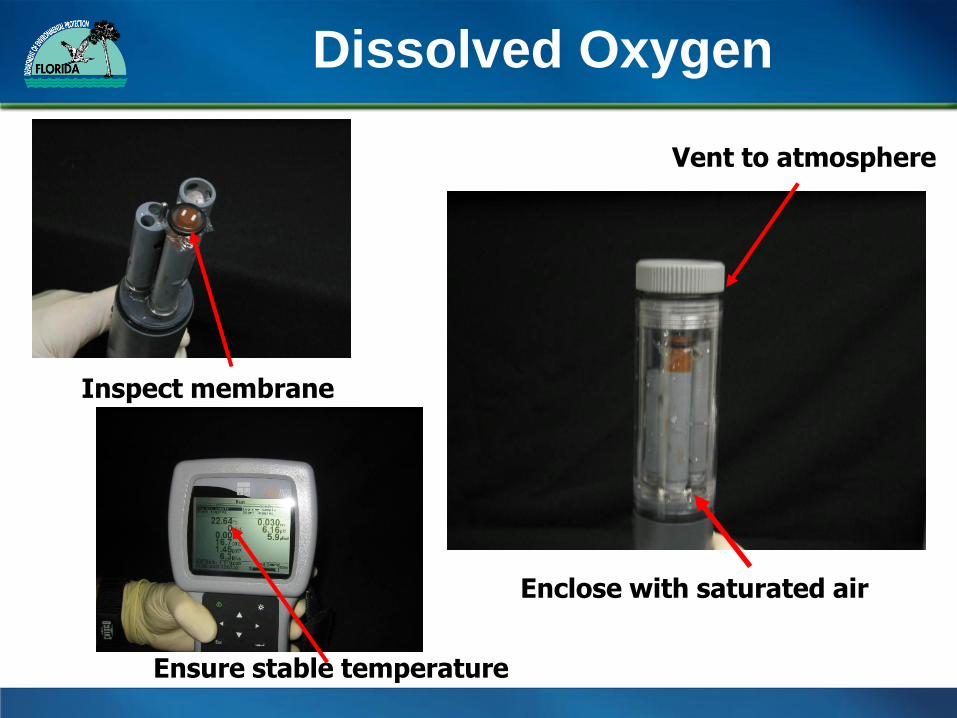
Dissolved Oxygen
Inspect membrane
Enclose with saturated air
Vent to atmosphere
Ensure stable temperature
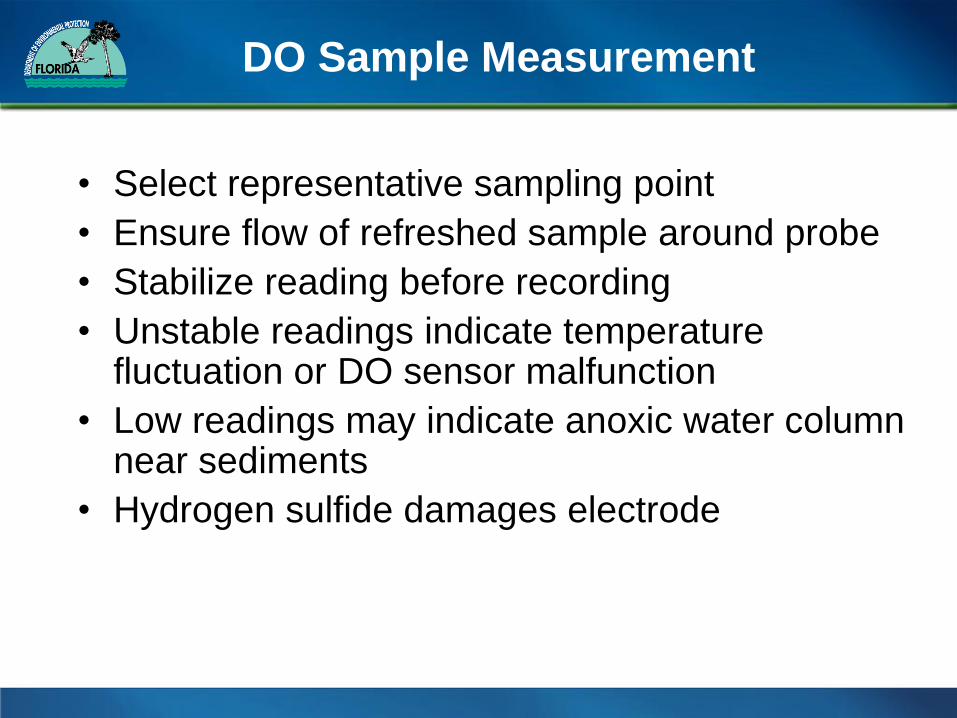
DO Sample Measurement
• Select representative sampling point
• Ensure flow of refreshed sample around probe
• Stabilize reading before recording
• Unstable readings indicate temperature fluctuation or DO sensor malfunction
• Low readings may indicate anoxic water column near sediments
• Hydrogen sulfide damages electrode

FT 1400 Temperature
• Verify field-temperature devices against NIST-
traceable thermometer
• Bracket sample measurements with appropriate
verification temperatures
• Verify at demonstrated time intervals
• Document all deviations from NIST thermometer
verification values
• Measure samples in situ, to one decimal place

FT 1600 Turbidity
Standard turbidimeter design
In-situ turbidity probes for monitoring well purging and
other applications

FT 1600 Turbidity
• Hand-held turbidimeter typically used
• Primary standards for initial calibration
• Secondary standards for everyday use
Settled formazin Gel standard(Use for field verification)
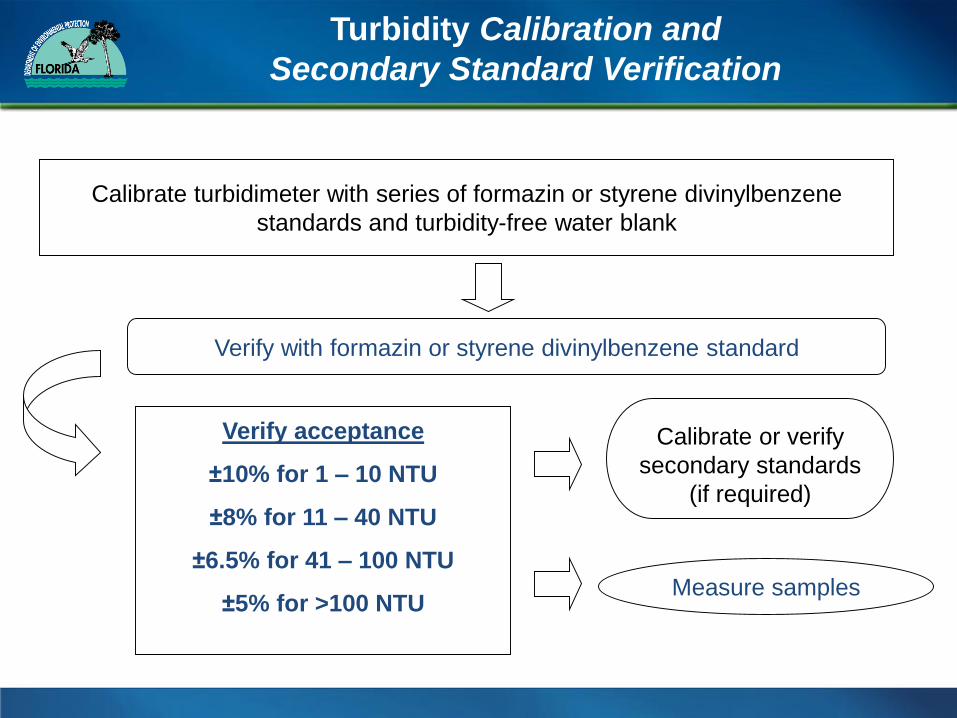
Turbidity Calibration and
Secondary Standard Verification
Calibrate turbidimeter with series of formazin or styrene divinylbenzene
standards and turbidity-free water blank
Measure samples
Verify with formazin or styrene divinylbenzene standard
Calibrate or verify
secondary standards
(if required)
Verify acceptance
±10% for 1 – 10 NTU
±8% for 11 – 40 NTU
±6.5% for 41 – 100 NTU
±5% for >100 NTU

Secondary Turbidity Standards
• Use secondary standards for continuing
calibration verification only
• Typically manufacturer-specific
• Field-rugged for routine use
• Assign values using calibrated meter
• Verify against manufacturer tolerances
• Discard when no longer verifiable
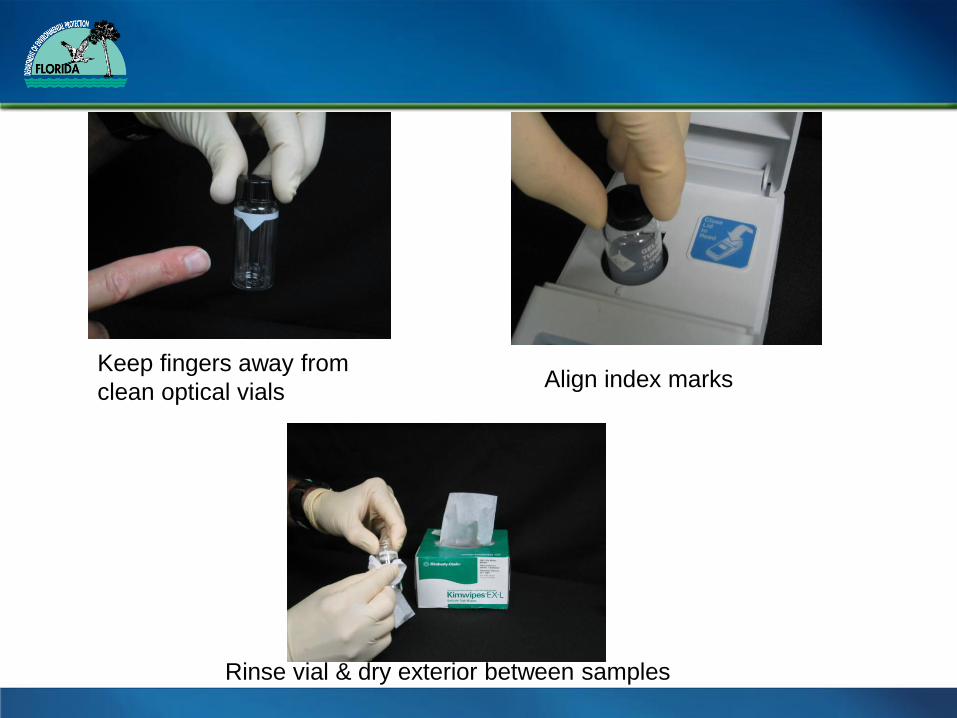
Keep fingers away from
clean optical vials
Rinse vial & dry exterior between samples
Align index marks

FT 2000 Residual Chlorine Methods
DPD Colorimetric
Titration
Electrode
DPD Color comparator
(drinking water only)
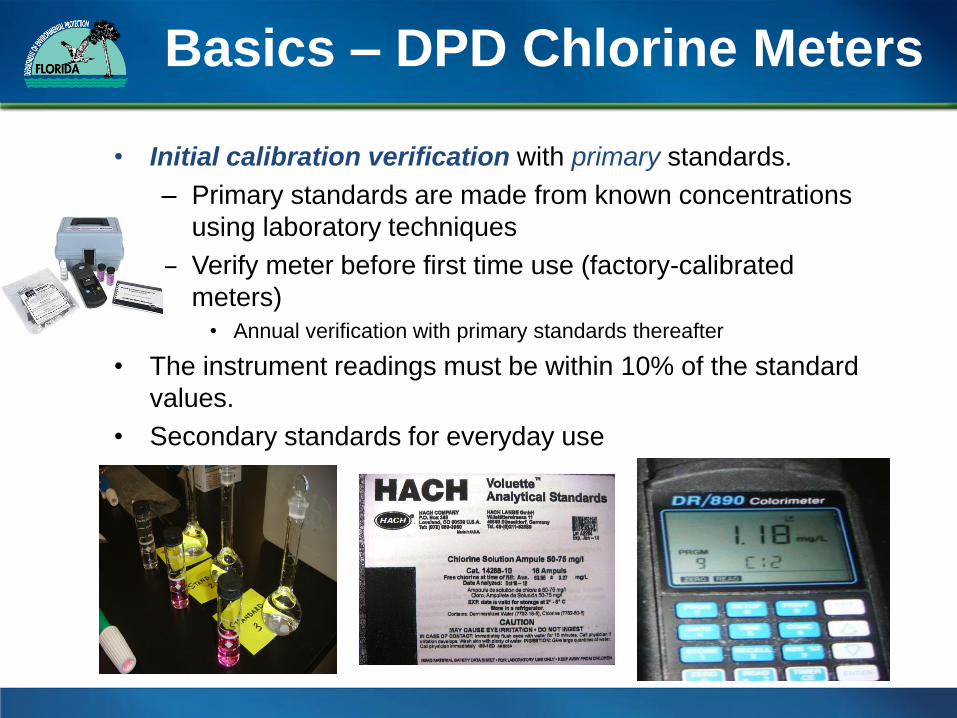
Basics – DPD Chlorine Meters
• Initial calibration verification with primary standards.
– Primary standards are made from known concentrations
using laboratory techniques
– Verify meter before first time use (factory-calibrated
meters)
• Annual verification with primary standards thereafter
• The instrument readings must be within 10% of the standard
values.
• Secondary standards for everyday use

Secondary Standards for Chlorine
• Measure (read) secondary standards with a calibrated meter that has been verified with primary standards
– At least annually
– If routine (daily or other) field verifications fail
– If standards have been discolored or damaged
• Assign measured values to the secondary standards
– Or accept previously assigned values
• Measured values within ±10% of assigned values?
• If not, are measured values within manufacturer’s tolerances?
– If yes, assign new measured values
– If no, discard secondary standards
Use secondary standards for field verifications

Keep fingers away from
clean optical vials
Rinse vial & dry exterior between samples
Mix color reagents with sample

Align index marks
Cover optical chamber prior to reading sample

Continuous Monitoring
• Calibration & verification for installed meters
• Same calibration, verification, and bracketing
rules apply
– Calibration prior to installation
• Daily verification with grab sample
– Use grab sample acceptance criteria in FT
1900
• Maximum period between verifications is one
month

Continuous Monitoring (con’t)
• If verification fails-
– Perform instrument maintenance and reduce
time interval.
– Perform initial calibration when instrument is
taken off-line, after preventative maintenance,
or immediately after verification criteria are
not met.

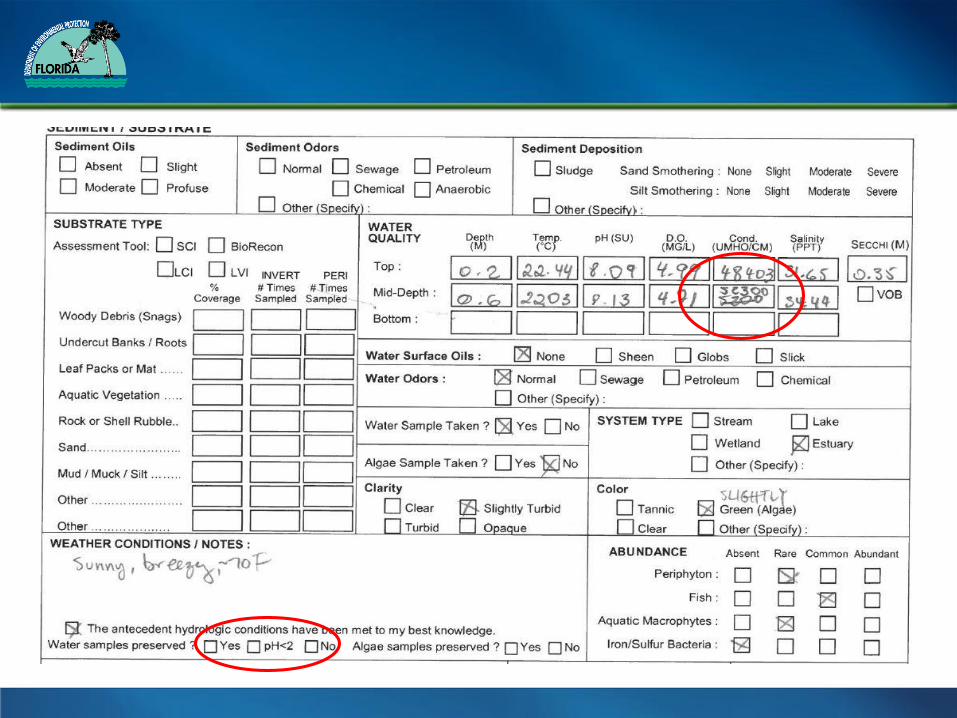
FD 1000 Documentation
• Sign or initial all documentation.
• Record enough information so interpretations are not necessary.
• Clearly link documentation with the associated sample or measurement.
• Make corrections with a line through the error so that it is still legible. Initial the error and its correction.
• Keep electronic or hard copies of all documentation for at least 5 years after the date of generation or completion of the documentation.

Example sample collection form
Details about sample method,
samplers, and site
Holly Sample
Mark MetricJohn Gather
Water Pond 01/01/2006 1200 1 1234ab
A4567

Example sample collection form
(cont)
1
2
1
Specific information by parameter
A6897
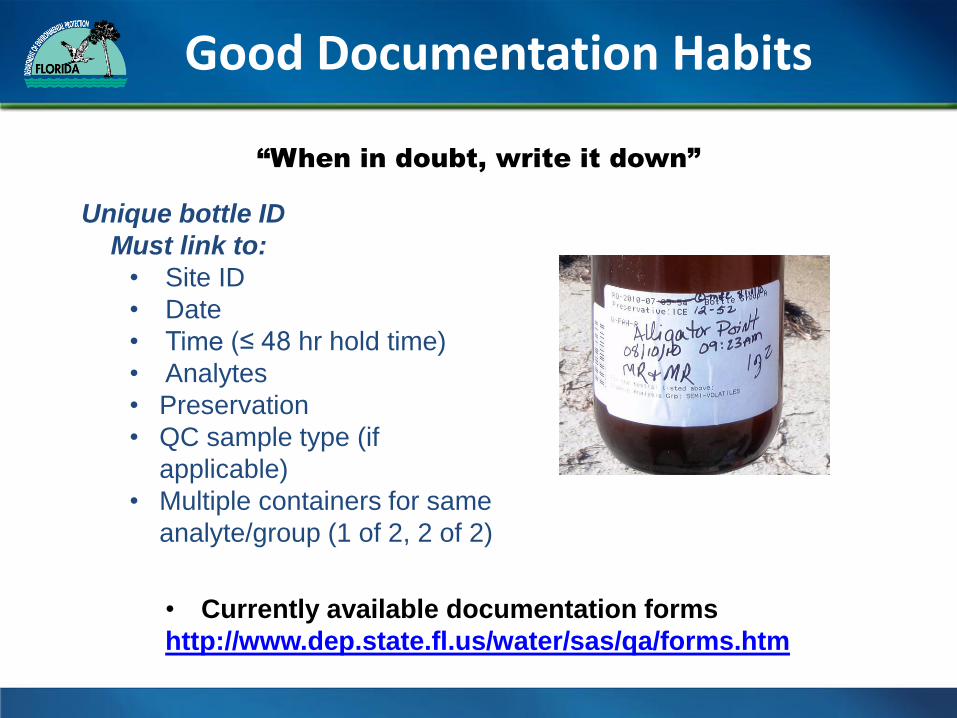
Good Documentation Habits
“When in doubt, write it down”
• Currently available documentation forms
http://www.dep.state.fl.us/water/sas/qa/forms.htm
Unique bottle ID
Must link to:
• Site ID
• Date
• Time (≤ 48 hr hold time)
• Analytes
• Preservation
• QC sample type (if
applicable)
• Multiple containers for same
analyte/group (1 of 2, 2 of 2)

FQ 1000 Quality Control Samples
Required
• Field Blanks
Optional
• Duplicates or Replicates
• Split Samples
SOP tells you which analytes require QC blanks

Why use blanks?
– Monitor sampling environment (container,
cleaning, preservatives, analyte-free water,
storage, and transport conditions).
– Show that samples are not contaminated.
– Ensure that samples are representative of
the sampling source and not biased by a
contamination error.

Field Blanks
Analyte-free water collected directly into a
sample bottle at the sampling site.

Equipment Blanks
Analyte-free water collected by rinsing the sampling
equipment at the sampling site.
FQ 1210
Collect before using pre-cleaned equipment
Collect after cleaning equipment in the field

Trip Blanks (VOCs Only)
VOC vials filled with analyte-free water
accompany the empty vials and real VOC
samples through the entire sampling trip.
Remain unopened until analysis
Minimum of 1 vial per VOC cooler and trip.
Multiple sites in same cooler OK, if all samples
and trip blank analyzed by the same lab.

Blank Collection Frequency
• Equipment & Field Blanks– Minimum of 1 blank annually for each
required analyte/matrix combination
– 5% of total number of samples collected for
each combination over the life of the project as
applicable
• Trip Blanks (VOCs)– Each sampling trip, at least one per cooler with
VOCs

Handle blanks exactly like the
associated environmental samples!
• Same sample containers
• Same preservation
– Add maximum amount of preservative
that was added to any samples
– Don’t preserve with too much acid (may
interfere with analysis)
• Same storage conditions

“Performance-Based” Cleaning
– Demonstrate effective cleaning with blanks
– See Table FC 1000-1
Cleaning to meet a
performance
specification (no
detections in field-QC
blanks) rather than
following a rigid,
required procedure

Field Planning and Mobilization
• Not a required SOP
• Working with Labs
• Trip Planning
• Equipment and Supply Preparations
• Table FM 1000-1 Lists Data Qualifier Codes
– Reproduced from table of required codes in QA Rule
• General Field Equipment Checklists

General Considerations for Sampling
• Understand sampling plan, Data Quality
Objectives, and if applicable permit
specifications
• Collect a representative sample
• Maintain the integrity of the sample
• Complete all documentation

FS 1000 General Sampling Procedures
• Useful tables:
– Sample Preservation,
Holding Times &
Container Types
– Construction Materials
& Approved Sampling
Equipment
Important information for all types of sampling
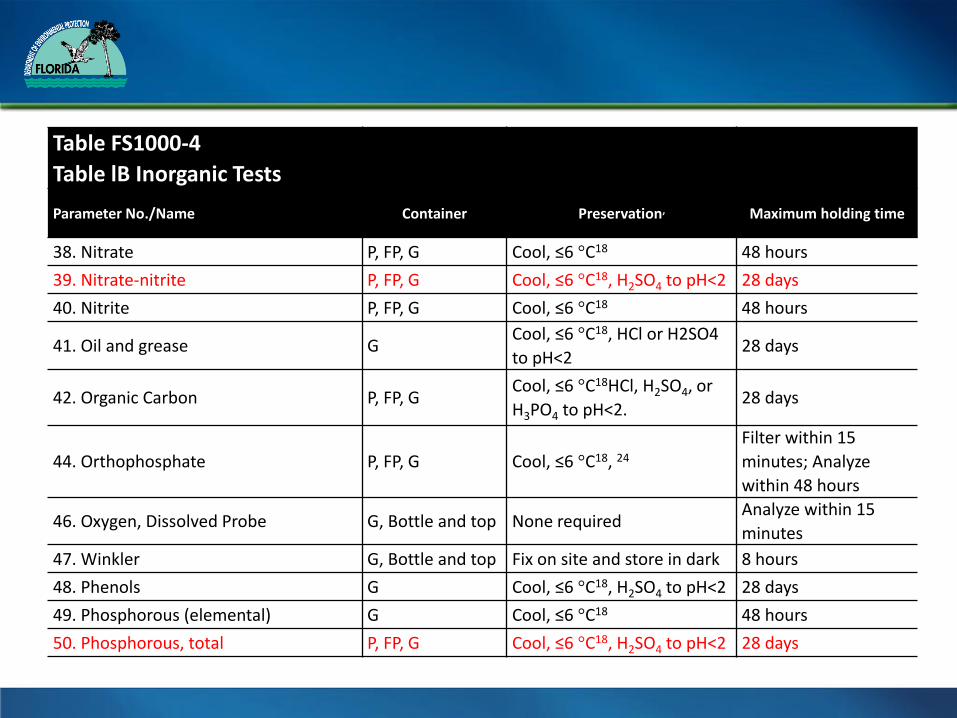
Example hold times for analysis Table FS1000-4
Table lB Inorganic Tests
Parameter No./Name Container Preservation, Maximum holding time
38. Nitrate P, FP, G Cool, ≤6 °C18 48 hours
39. Nitrate-nitrite P, FP, G Cool, ≤6 °C18, H2SO4 to pH<2 28 days
40. Nitrite P, FP, G Cool, ≤6 °C18 48 hours
41. Oil and grease GCool, ≤6 °C18, HCl or H2SO4
to pH<228 days
42. Organic Carbon P, FP, GCool, ≤6 °C18HCl, H2SO4, or
H3PO4 to pH<2.28 days
44. Orthophosphate P, FP, G Cool, ≤6 °C18, 24
Filter within 15
minutes; Analyze
within 48 hours
46. Oxygen, Dissolved Probe G, Bottle and top None requiredAnalyze within 15
minutes
47. Winkler G, Bottle and top Fix on site and store in dark 8 hours
48. Phenols G Cool, ≤6 °C18, H2SO4 to pH<2 28 days
49. Phosphorous (elemental) G Cool, ≤6 °C18 48 hours
50. Phosphorous, total P, FP, G Cool, ≤6 °C18, H2SO4 to pH<2 28 days

Sampling Strategies
• Consider– Representative sampling points – Location relative to artificial structures
• Collect – Least to most contaminated
• Downstream to upstream
– Upwind and away from fuel sources• Bow of the boat
– Upstream and away from body– Sample water before sediments– Don’t suspend bottom material into water
column

Collecting Grab Samples
• A grab sample is a snapshot in time.
• A discrete sample collected over a
period of time not to exceed 15
minutes.
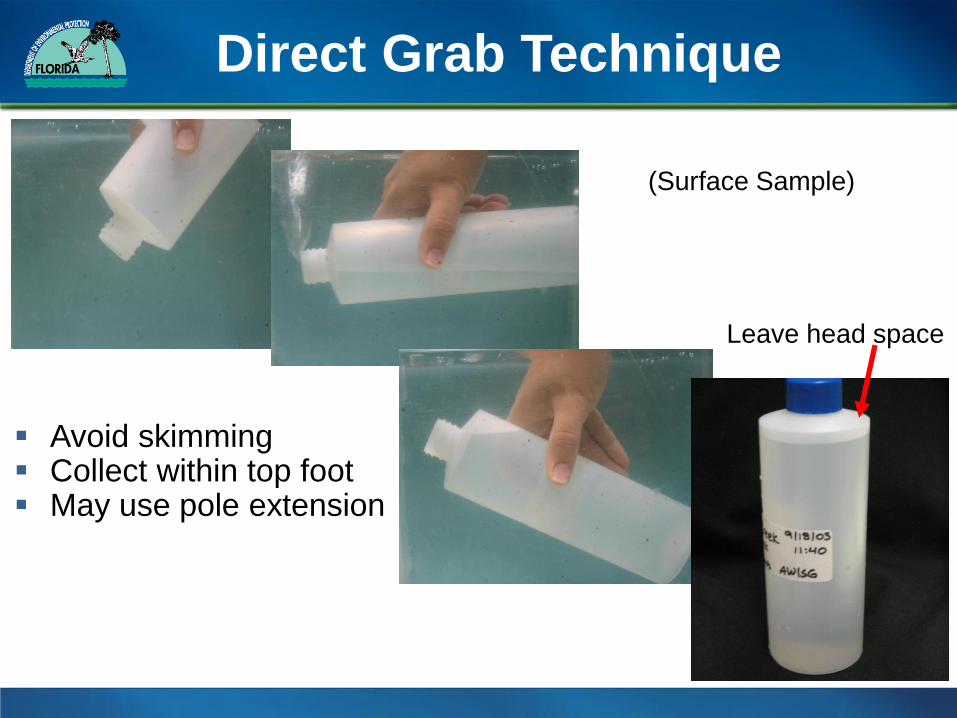
Direct Grab Technique
Leave head space
Avoid skimming Collect within top foot May use pole extension
(Surface Sample)

Intermediate Device
(Using Sample Container Or Other Device)
Direct grab is preferred, but some
samples may require an
intermediate device.
– Pre-preserved containers
– Depth sampling

Equipment depends
on project
objectives and
analyte groups
Examples of Intermediate Devices

Grabs using an intermediate device
• Rinse the intermediate vessel with ample amounts of site water prior to collecting the first sample.
• Discard rinsate away from and downstream of the sampling site.
• Do not touch the sample container with the intermediate vessel.

Composite Sample
Indicated Uses:• Continuous flow
• Limited analytical capacity
• Calculating mass/unit time loadings
• Correlating concentration data with flow
• Average analyte concentration over time
• Reducing sampling errors and hazard exposure using autosamplers
• Unattended sampling with autosamplers
A sample collected over time, taken either by continuous sampling or by mixing discrete samples. Composite samples
reflect the average characteristics during the compositing period

Most Common Composite Types
• Time– Discrete aliquots collected in 1 container at
constant time intervals• Use if flow rate varies less than ±10% of the
average flow rate
– Manual or automatic collection
• Flow Proportional– Collect with:
• Autosampler & flow measuring device• Semi-automatically w/ flow chart & autosampler• Manually
– Methods:• Collect constant volume @ time intervals proportional to
stream flow• Collect volume proportional to flow @ constant time
interval

DEP SOPs – Autosampler Info
• FC 1000 – Decontamination
• FS 1000 – Sample preservation & holding time
– Table FS 1000-4
• FS 2100 – Surface water deployment*
• FS 2400 – Wastewater deployment*
*Includes equipment blank requirements for
autosampler

FS 2000 – General Aqueous Sampling
• Do not composite (unless required in permit):
• Oil & Grease/TRPH/FL-PRO
• Microbiological analytes
• Orthophosphate
• Cyanide
• VOCs
• Total Phenols
• Un-ionized ammonia
• Others

Cleaning and Replacement
(see manufacturer’s manual also)
• Tubing
– Inspect at each site visit
– Replace discolored tubing
• Use new* or pre-cleaned tubing (delivery and pump)
– New tubing for each installation (EPA Region 4 SOP)*
– Teflon delivery tubing if organic analytes (EPA Region 4 SOP)*
• Tubing material choices per FS 1000 equipment tables for collected
analytes
• Recommend replace every six months, with loss of elasticity, algal growth,
or other degradation
– Recommended cleaning in FC 1000
• Field cleaning not recommended
• Composite sample containers
– Recommended cleaning in FC 1000 (field or lab/base of operations)
– Container materials per FS 1000 (Table FS 1000-4)

Inspect tubing and strainer

Equipment Blanks
• Tubing and composite containers are intermediate devices
used for sample collection
• Collect equipment blanks by pumping analyte-free water
through entire clean sample compositing train
– Frequency of compositing train blanks:
• 5% of tubing changes (recommended if routinely changed at each
site visit) or with each tubing change (recommended if changed
infrequently)
• At least annually (if applicable)
• Collect composite container blanks per FQ 1000
• Frequency: per 5% of samples collected, over project or permit
duration (e.g., 5-year permit cycle)
• At least one container blank annually (if applicable)

Set-up and Inspection
(see manufacturer’s manual also)
• Autosampler & tubing placement
– Elevate above sample point (25 feet or less)
– Taut tubing run with no kinks, bends, twists
• Inspect tubing for pooling of sample or restricted flow
• Tubing and intake/strainer placement must be at correct location and depth (per
permit, or in a position for representative sampling)
• Use conduit or other support for tubing (installation should prevent potential
contamination from support structures)
– Secure autosampler against tampering (lock, housing, tamper seals, etc)
– Protect against weather extremes (insulation, reflective paint, etc)
• Programming
– Follow manufacturer instructions for autosampler (and flow meter/pacer)
– Program sample collection settings according to permit, or per project sampling
design
• Programming must ensure that enough total volume is collected for all analytes
and lab sample containers

Autosampler Function Check
• Measure minimum volume collected
• Verify minimum 100 mL collection volume
–Lift height (head) should not affect volume collected
»Minimum volume should be adjustable manually or automatically
• Check flow meter/pacer functioning
• Check programmed purge/sample collection functioning
– Verify pre-rinse and purge for each sample collection cycle
– Pump speed should not allow solids to settle in tubing
– At least 2 ft/sec (EPA Region 4 SOP)
• Velocity is also a function of tubing diameter
– Use at least 0.25 inch I.D. tubing
• Look for bubbles in tubing during pump test
• Follow manufacturer’s suggested checks, diagnostics and maintenance
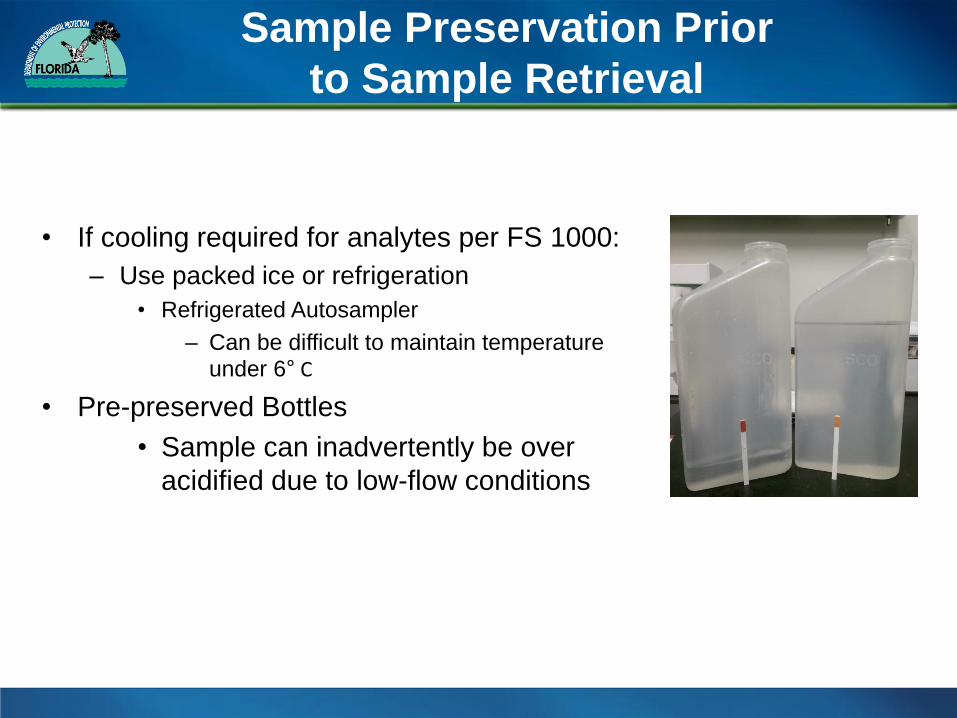
Sample Preservation Prior
to Sample Retrieval
• If cooling required for analytes per FS 1000:
– Use packed ice or refrigeration
• Refrigerated Autosampler
– Can be difficult to maintain temperature under 6° C
• Pre-preserved Bottles
• Sample can inadvertently be over
acidified due to low-flow conditions

Refrigerated Autosampler
daily flux

Refrigerated Autosampler
power outage

Composite Sample Retrieval
– Start of holding time depends on composite collection
period:
• 24 hours or less – holding time begins at the end of the
composite period (i.e., after collection of last sample)
• Exceeds 24 hours – holding time begins at first sample
collection
– Thoroughly mix composite sample prior to transferring to lab
bottles
– Any additional preservation must occur within 15 minutes of
end of composite period (i.e., after last sample collected)
• Preservation and holding times per FS 1000 tables (Table FS
1000-4)

Documentation
• FD 1000 Requirements
– Universal documentation for all samples – FD 1100
– Cleaning documentation – FD 2000
– Maintenance & diagnostic testing – FD 3000
– Requirements for all sample collection – FD 5000
– Aqueous sample documentation – FD 5100, including
surface water (sec. 4) or wastewater (sec. 5)
• Composite sample documentation
– Composite type (e.g., flow-proportional)
– Composite begin/end (dates & times)
– Equipment blank documentation – FD 5100 (sub-sec. 2.15)
and FQ 1250

Tubing Issues

Other Autosampler Issues
• Distributor arm (if used)
• Tubing slips or holes
• Tubing depth placement
• Lightning issues
• Strainer
• Programing errors
• Liquid detect errors


Discrete Bottle Contamination

Collecting VOC Samples
• Teflon-coated silicone cap liner (septum)
• Prevent contamination from fuel sources
• Do not open VOC vial until ready to fill
• No aeration or agitation of sample
• Reduce flow: pumps 100-400 mL/min; faucets ≤100 mL/min
• Dechlorinate per SOP instructions and restrictions
• Do not overfill pre-preserved vials
• Do not pour sample into vial cap
• No headspace in VOC vial after collection
• Do not re-open vials to refill or to remove bubbles (≤ 5mm total bubble diameter OK)

Sampling VOCs
• Can use gloves to help prevent sample
contamination
• No insect repellent or other sprays
• Don’t park vehicle by sampling site
• Avoid other fuel sources
• Fill VOC vial to form convex meniscus
• Slide cap septum over bottle opening (Teflon side
down) and screw cap tightly into place
• Overturn bottle and tap side to see if air bubbles
are present

Sampling for Hydrocarbons
(Oil &Grease, TRPH, FL-PRO)
• Do not skim surface of water (unless
required by sampling plan)
• Do not pre-rinse bottles with sample
• Do not use automatic samplers
• Preserve with sulfuric or hydrochloric
acid and chill

Sampling for Bacteria
• Sterilized containers required
• Use dechlorinating agent (if applicable)
• Thoroughly rinse any intermediate devices
• Keep fingers away from container opening
• Cool immediately with wet ice
* See allowance in DEP SOPs (FS 2000 and FS 2300) for sterilizing taps and spigots of questionable condition

What about Preservation?
• Dechlorinate and/or filter (if applicable) beforepreserving
• Preserve per tables in FS 1000 Appendix (matrix-specific)
• Preserve (and filter) within 15 minutes of collection
• Check pH of pH-preserved samples (see check frequencies in FS 2000) with narrow range pH paper (including pre-preserved containers, except VOCs)
• Don’t dip pH paper into the sample
• pH checks not required for VOCs
• Carry and add extra preservative if needed
• Avoid excess preservative (can dilute sample or cause analytical problems)
• Use ice to cool & keep samples at required temperatures
• Use refrigeration or ice for automatic samplers

FS 2400 Wastewater Sampling
• Representativeness
– The sampling location should be specified in
the permit
– If no other specifications, SOP requires
sampling at a depth in the center of flow
(adequate mixing)

FS 2450 Cryptosporidium and Giardia
Wastewater Sampling
• Use EPA method 1623
• Follow bacteriological sampling
restrictions in FS 2005

FS 2440 Biosolids
Important considerations for:
Sampling techniques and containers
Safety precautions
Compositing
Transporting infectious waste
Collect samples per rule, permit or sampling
plan requirements

Sampling Taps and Spigots
Purge
Reduce flow to
500 mL/min
Collect

Sampling VOCs from taps and spigots
Reduce flow to ≤100 mL/min

FS 2200 Groundwater Sampling
• Equipment Selection
• Measuring Water Level in Monitoring Wells
• Calculating Required Purge Volume
• Placement of Purging Devices in the Well
• Stabilization Parameter Measurement
• Purging Completion Criteria
• Purging & Sampling Techniques for Monitoring Wells
• Purging & Sampling Wells with Installed Plumbing
• Purging & Sampling Remediation Installations

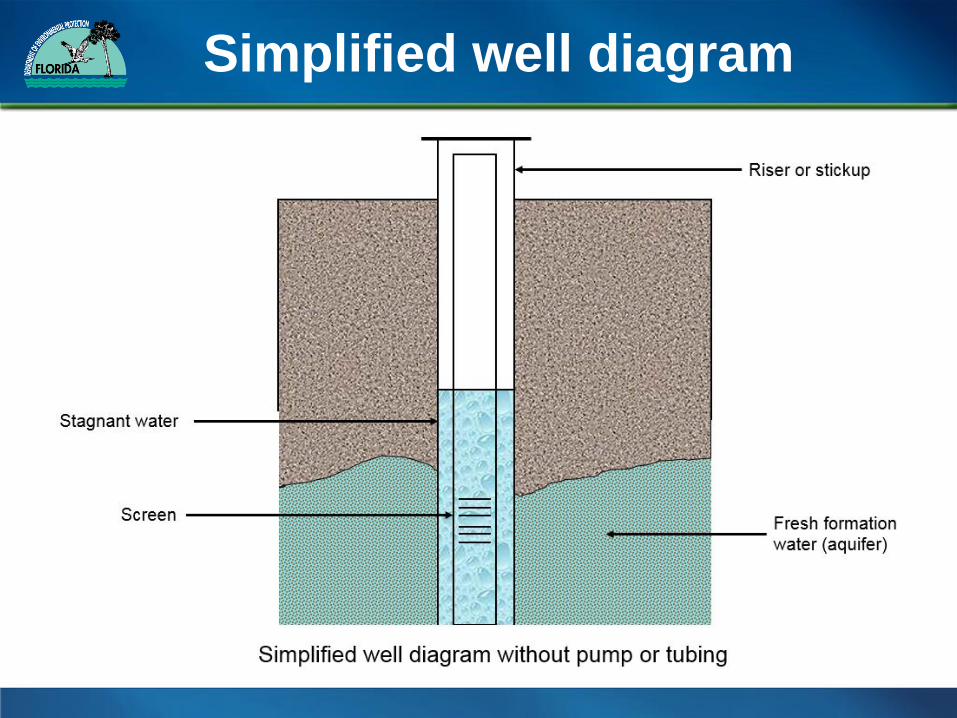
Simplified well diagram

Purging & Sampling Groundwater
Specifications to ensure:
Representative sample
• Collect fresh formation (aquifer) water
No Contamination
• Proper placement of purging devices
Appropriate equipment
• Bailers are not recommended
Proper purging completion
• Stable field measurements per SOP

Groundwater Scenarios
Important considerations also discussed
for:
– Can’t achieve purging completion criteria
– Purging low-recharge wells
– Maximum time between purging and
sampling
– Sampling wells with installed plumbing

Groundwater sampling flow chart
Use Ground Water Sampling Flow Chart for Monitor Well Scenarios

Common Sampling Mistakes
• Not following DEP SOPs
• Poor contamination control and sample handling (e.g., touching inside the lid with fingers, not rinsing intermediate vessels)
• DEP SOP calibration/verification protocols for testing instruments not followed
– Standards did not bracket sample values
– Calibration acceptance criteria were not assessed
– Pre-deployment checks on field testing and sampling equipment were not conducted
– Equipment does not work during sampling event

Common Documentation Errors
• Not documenting required information:
• Date and time of calibration, verification or sample
measurement
• Sample measurement results are not legible
• Forms are incomplete
• Linkage between meter calibration records and sample
measurement data
• No meter identification information
• Sources for field calibration standards not documented

Missing information errors
Obliteration errors

Incomplete form error

Stay up to date…
Quality of Science Newsletterhttp://www.dep.state.fl.us/water/sas/training/listserv.htm
Questions?