department of computer engineering lab...
TRANSCRIPT

1
Department of Computer Engineering
Lab Manual Final Year Semester-VII
Subject: Network Threats and Attacks Laboratory
Odd Semester

2
Institutional Vision, Mission and Quality Policy
Vision
To foster and permeate higher and quality education with value added engineering, technology
programs, providing all facilities in terms of technology and platforms for all round development with
societal awareness and nurture the youth with international competencies and exemplary level of
employability even under highly competitive environment so that they are innovative adaptable and
capable of handling problems faced by our country and world at large.
RAIT‘s firm belief in new form of engineering education that lays equal stress on academics and
leadership building extracurricular skills has been a major contribution to the success of RAIT as one
of the most reputed institution of higher learning. The challenges faced by our country and world in
the 21 Century needs a whole new range of thought and action leaders, which a conventional
educational system in engineering disciplines are ill equipped to produce. Our reputation in providing
good engineering education with additional life skills ensure that high grade and highly motivated
students join us. Our laboratories and practical sessions reflect the latest that is being followed in the
Industry. The project works and summer projects make our students adept at handling the real life
problems and be Industry ready. Our students are well placed in the Industry and their performance
makes reputed companies visit us with renewed demands and vigour.
Mission
The Institution is committed to mobilize the resources and equip itself with men and materials of
excellence thereby ensuring that the Institution becomes pivotal center of service to Industry,
academia, and society with the latest technology. RAIT engages different platforms such as
technology enhancing Student Technical Societies, Cultural platforms, Sports excellence centers,
Entrepreneurial Development Center and Societal Interaction Cell. To develop the college to become
an autonomous Institution & deemed university at the earliest with facilities for advanced research
and development programs on par with international standards. To invite international and reputed
national Institutions and Universities to collaborate with our institution on the issues of common
interest of teaching and learning sophistication.
RAIT‘s Mission is to produce engineering and technology professionals who are innovative and
inspiring thought leaders, adept at solving problems faced by our nation and world by providing
quality education.
The Institute is working closely with all stake holders like industry, academia to foster knowledge
generation, acquisition, dissemination using best available resources to address the great challenges
being faced by our country and World. RAIT is fully dedicated to provide its students skills that make
them leaders and solution providers and are Industry ready when they graduate from the Institution.

3
We at RAIT assure our main stakeholders of students 100% quality for the programmes we deliver.
This quality assurance stems from the teaching and learning processes we have at work at our campus
and the teachers who are handpicked from reputed institutions IIT/NIT/MU, etc. and they inspire the
students to be innovative in thinking and practical in approach. We have installed internal procedures
to better skills set of instructors by sending them to training courses, workshops, seminars and
conferences. We have also a full fledged course curriculum and deliveries planned in advance for a
structured semester long programme. We have well developed feedback system employers, alumni,
students and parents from to fine tune Learning and Teaching processes. These tools help us to ensure
same quality of teaching independent of any individual instructor. Each classroom is equipped with
Internet and other digital learning resources.
The effective learning process in the campus comprises a clean and stimulating classroom
environment and availability of lecture notes and digital resources prepared by instructor from the
comfort of home. In addition student is provided with good number of assignments that would trigger
his thinking process. The testing process involves an objective test paper that would gauge the
understanding of concepts by the students. The quality assurance process also ensures that the
learning process is effective. The summer internships and project work based training ensure learning
process to include practical and industry relevant aspects. Various technical events, seminars and
conferences make the student learning complete.
Quality Policy
Our Quality Policy
It is our earnest endeavour to produce high quality engineering professionals who are
innovative and inspiring, thought and action leaders, competent to solve problems
faced by society, nation and world at large by striving towards very high standards in
learning, teaching and training methodologies.
Our Motto: If it is not of quality, it is NOT RAIT!
Dr. Vijay D. Patil
President, RAES

4
Departmental Vision, Mission
Vision
To impart higher and quality education in computer science with value added engineering and
technology programs to prepare technically sound, ethically strong engineers with social awareness.
To extend the facilities, to meet the fast changing requirements and nurture the youths with
international competencies and exemplary level of employability and research under highly
competitive environments.
Mission
To mobilize the resources and equip the institution with men and materials of excellence to provide
knowledge and develop technologies in the thrust areas of computer science and Engineering. To
provide the diverse platforms of sports, technical, cocurricular and extracurricular activities for the
overall development of student with ethical attitude. To prepare the students to sustain the impact of
computer education for social needs encompassing industry, educational institutions and public
service. To collaborate with IITs, reputed universities and industries for the technical and overall
upliftment of students for continuing learning and entrepreneurship.

5
Departmental Program Educational Objectives
(PEOs)
1. Learn and Integrate
To provide Computer Engineering students with a strong foundation in the
mathematical, scientific and engineering fundamentals necessary to formulate, solve
and analyze engineering problems and to prepare them for graduate studies.
2. Think and Create
To develop an ability to analyze the requirements of the software and hardware,
understand the technical specifications, create a model, design, implement and verify
a computing system to meet specified requirements while considering real-world
constraints to solve real world problems.
3. Broad Base
To provide broad education necessary to understand the science of computer
engineering and the impact of it in a global and social context.
4. Techno-leader
To provide exposure to emerging cutting edge technologies, adequate training &
opportunities to work as teams on multidisciplinary projects with effective
communication skills and leadership qualities.
5. Practice citizenship
To provide knowledge of professional and ethical responsibility and to contribute to
society through active engagement with professional societies, schools, civic
organizations or other community activities.
6. Clarify Purpose and Perspective
To provide strong in-depth education through electives and to promote student
awareness on the life-long learning to adapt to innovation and change, and to be
successful in their professional work or graduate studies.

6
Departmental Program Outcomes (POs)
Pa. Foundation of computing - An ability to apply knowledge of computing, applied
mathematics, and fundamental engineering concepts appropriate to the discipline.
Pb. Experiments & Data Analysis - An ability to understand, identify, analyze and design
the problem, implement and validate the solution including both hardware and software.
Pc. Current Computing Techniques – An ability to use current techniques, skills, and tools
necessary for computing practice.
Pd. Teamwork – An ability to have leadership and management skills to accomplish a
common goal.
Pe. Engineering Problems – An ability to identify, formulates, and solve engineering
problems.
Pf. Professional Ethics – An understanding of professional, ethical, legal, security and
social issues and responsibilities.
Pg. Communication – An ability to communicate effectively with a range of audiences in
both verbal and written form.
Ph. Impact of Technology – An ability to analyze the local and global impact of computing
on individuals, organizations, and society.
Pi. Life-long learning – An ability to recognize the need for, and an ability to engage in
life-long learning.
Pj. Contemporary Issues – An ability to exploit gained skills and knowledge of
contemporary issues.
Pk. Professional Development – Recognition of the need for and an ability to engage in
continuing professional development and higher studies.
Pl. Entrepreneurship – An ability to match the industry requirements in the domains of
Database management, Programming and Networking with the required management
skills.

7
Index
Sr. No. Contents Page No.
1. List of Experiments 8
2. Course Objective, Course Outcome &
Experiment Plan 9
3. Study and Evaluation Scheme 11
4. Experiment No. 1 12
5. Experiment No. 2 18
6. Experiment No. 3 32
7. Experiment No. 4 49
8. Experiment No. 5 53
9. Experiment No. 6 63
10. Experiment No. 7 68
11. Experiment No. 8 75
12. Experiment No. 9 82
13. Experiment No. 10 85
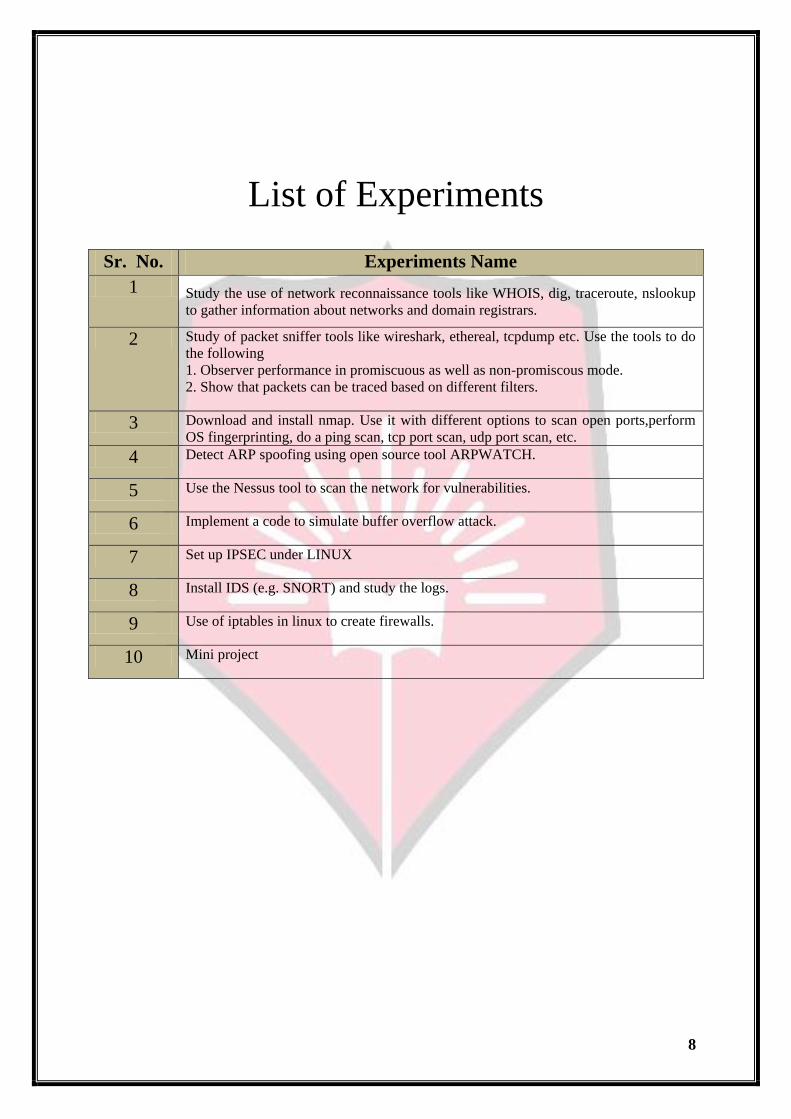
8
List of Experiments
Sr. No. Experiments Name
1 Study the use of network reconnaissance tools like WHOIS, dig, traceroute, nslookup
to gather information about networks and domain registrars.
2 Study of packet sniffer tools like wireshark, ethereal, tcpdump etc. Use the tools to do
the following
1. Observer performance in promiscuous as well as non-promiscous mode.
2. Show that packets can be traced based on different filters.
3 Download and install nmap. Use it with different options to scan open ports,perform
OS fingerprinting, do a ping scan, tcp port scan, udp port scan, etc.
4 Detect ARP spoofing using open source tool ARPWATCH.
5 Use the Nessus tool to scan the network for vulnerabilities.
6 Implement a code to simulate buffer overflow attack.
7 Set up IPSEC under LINUX
8 Install IDS (e.g. SNORT) and study the logs.
9 Use of iptables in linux to create firewalls.
10 Mini project
9
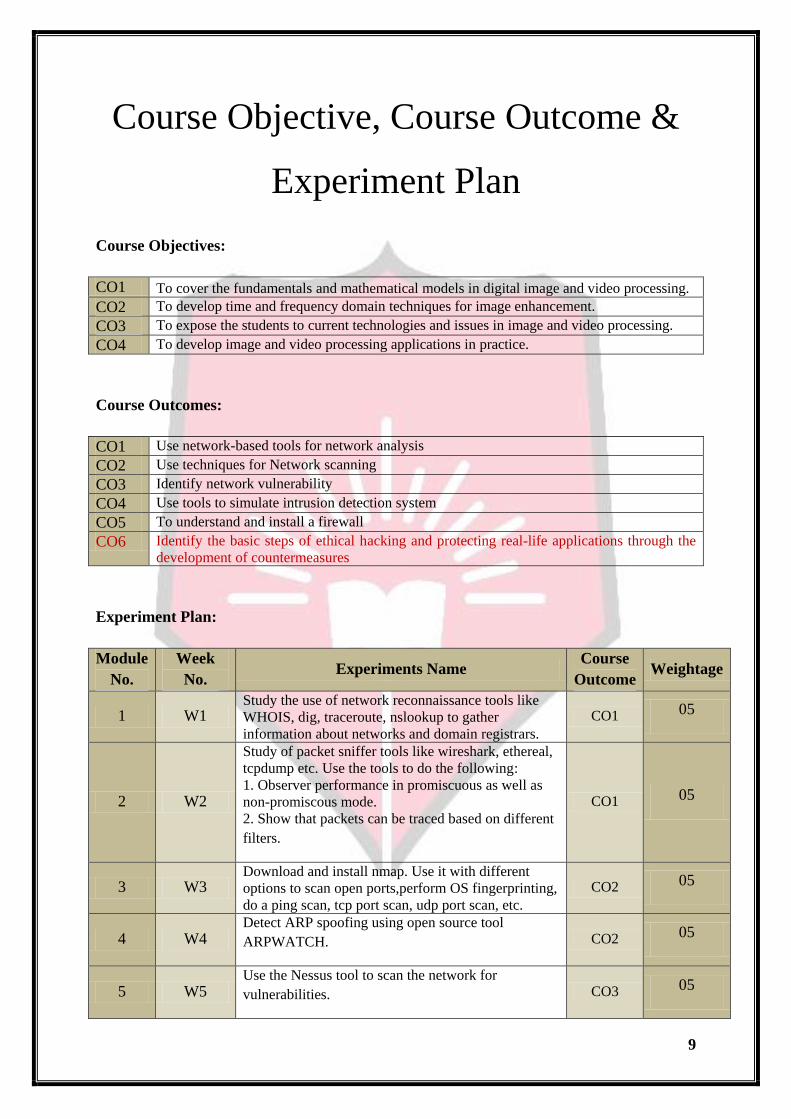
Course Objective, Course Outcome &
Experiment Plan
Course Objectives:
CO1 To cover the fundamentals and mathematical models in digital image and video processing.
CO2 To develop time and frequency domain techniques for image enhancement.
CO3 To expose the students to current technologies and issues in image and video processing.
CO4 To develop image and video processing applications in practice.
Course Outcomes:
CO1 Use network-based tools for network analysis
CO2 Use techniques for Network scanning
CO3 Identify network vulnerability
CO4 Use tools to simulate intrusion detection system
CO5 To understand and install a firewall
CO6 Identify the basic steps of ethical hacking and protecting real-life applications through the
development of countermeasures
Experiment Plan:
Module
No.
Week
No. Experiments Name
Course
Outcome Weightage
1 W1 Study the use of network reconnaissance tools like
WHOIS, dig, traceroute, nslookup to gather
information about networks and domain registrars.
CO1 05
2 W2
Study of packet sniffer tools like wireshark, ethereal,
tcpdump etc. Use the tools to do the following:
1. Observer performance in promiscuous as well as
non-promiscous mode.
2. Show that packets can be traced based on different
filters.
CO1 05
3 W3 Download and install nmap. Use it with different
options to scan open ports,perform OS fingerprinting,
do a ping scan, tcp port scan, udp port scan, etc.
CO2 05
4 W4 Detect ARP spoofing using open source tool
ARPWATCH. CO2 05
5 W5 Use the Nessus tool to scan the network for
vulnerabilities. CO3 05

10
6 W6 Implement a code to simulate buffer overflow attack. CO3 02
7 W7 Set up IPSEC under LINUX CO3 03
8 W8,W9 Install IDS (e.g. SNORT) and study the logs. CO4 10
9 W10 Use of iptables in linux to create firewalls. CO5 10
10 W11,W12 Mini project C06 10
Mapping of COs with Pos:
CO \ PO Pa Pb Pc Pd Pe Pf Pg Ph Pi Pj Pk Pl
PR
100
%
CO1: Use network-based tools for
network analysis
2 3 2 2 1
CO2: Use techniques for Network
scanning
3 2 2 1 1 1
CO3: : Identify network vulnerability 1 3 2 1 1 1 1
CO4: Use tools to simulate intrusion
detection system
3 2 1 2 1 1
CO5: To understand and install a
firewall
3 2 1 2 1 1
CO6: Identify the basic steps of
ethical hacking and protecting real-life
applications through the development of
countermeasures
1 2 1 2 1 1 1 1

11
Study and Evaluation Scheme
Course
Code Course Name Teaching Scheme Credits Assigned
CPL701
Network
Threats and
Attacks
Laboratory
(NT)
Theory Practical Tutorial Theory Practical Tutorial Total
--
04
--
--
02
--
02
Course Code Course Name Examination Scheme
CPL
701
Network
Threats and
Attacks
Laboratory
(NT)
Term Work Practical & Oral Total
25 50 75
Term Work:
1. Term work assessment must be based on the overall performance of the student with
every experiment graded from time to time. The grades should be converted into
marks as per the Credit and Grading System manual and should be added and
averaged.
2. The final certification and acceptance of term work ensures satisfactory performance
of laboratory work and minimum passing marks in term work.
Practical & Oral:
Practical & Oral exam will be based on the entire syllabus of Network Threats and
Attacks Laboratory (NT).
12
Network Threats and Attacks
Laboratory
Experiment No. : 1
Study the use of network
reconnaissance tools like WHOIS,
dig, traceroute, nslookup to gather
information about networks and
domain registrars.
13
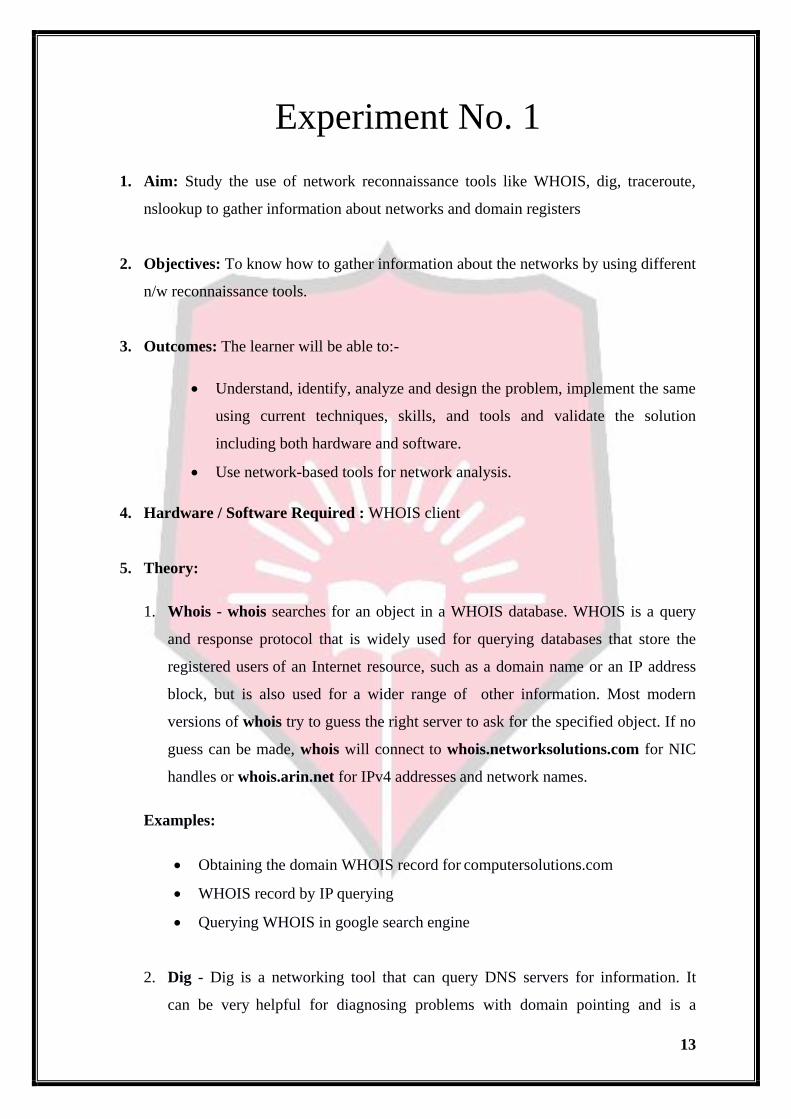
Experiment No. 1
1. Aim: Study the use of network reconnaissance tools like WHOIS, dig, traceroute,
nslookup to gather information about networks and domain registers
2. Objectives: To know how to gather information about the networks by using different
n/w reconnaissance tools.
3. Outcomes: The learner will be able to:-
Understand, identify, analyze and design the problem, implement the same
using current techniques, skills, and tools and validate the solution
including both hardware and software.
Use network-based tools for network analysis.
4. Hardware / Software Required : WHOIS client
5. Theory:
1. Whois - whois searches for an object in a WHOIS database. WHOIS is a query
and response protocol that is widely used for querying databases that store the
registered users of an Internet resource, such as a domain name or an IP address
block, but is also used for a wider range of other information. Most modern
versions of whois try to guess the right server to ask for the specified object. If no
guess can be made, whois will connect to whois.networksolutions.com for NIC
handles or whois.arin.net for IPv4 addresses and network names.
Examples:
Obtaining the domain WHOIS record for computersolutions.com
WHOIS record by IP querying
Querying WHOIS in google search engine
2. Dig - Dig is a networking tool that can query DNS servers for information. It
can be very helpful for diagnosing problems with domain pointing and is a

14
good way to verify that your configuration is working. The most basic way to
use dig is to specify the domain we wish to query: dig example.com
3. Traceroute - Traceroute prints the route that packets take to a network host.
Traceroute utility uses the TTL field in the IP header to achieve its operation. For
users who are new to TTL field, this field describes how much hops a particular
packet will take while traveling on network. So, this effectively outlines the
lifetime of the packet on network. This field is usually set to 32 or 64. Each
time the packet is held on an intermediate router, it decreases the TTL value by 1.
When a router finds the TTL value of 1 in a received packet then that packet
is not forwarded but instead discarded. After discarding the packet, router
sends an ICMP error message of ―Time exceeded‖ back to the source from
where packet generated. The ICMP packet that is sent back contains the IP
address of the router. So now it can be easily understood that traceroute operates
by sending packets with TTL value starting from 1 and then incrementing by
one each time. Each time a router receives the packet, it checks the TTL field, if
TTL field is 1 then it discards the packet and sends the ICMP error packet
containing its IP address and this is what traceroute requires. So traceroute
incrementally fetches the IP of all the routers between the source and the
destination.
Example: traceroute example.com
traceroute to example.com (64.13.192.208), 64 hops max, 40 byte
packets 1 72.10.62.1 (72.10.62.1) 1.000 ms 0.739 ms 0.702 ms
2 10.101.248.1 (10.101.248.1) 0.683 ms 0.385 ms 0.315 ms
3 10.104.65.161 (10.104.65.161) 0.791 ms 0.703 ms 0.686 ms
4 10.104.65.161 (10.104.65.161) 0.791 ms 0.703 ms 0.686 ms
5 10.0.10.33 (10.0.10.33) 2.652 ms 2.260 ms 5.353 ms
6 acmkokeaig.gs01.gridserver.com (64.13.192.208) 3.384 ms 8.001 ms 2.439 ms
4. Nslookup - The nslookup command is used to query internet name servers
interactively for information. nslookup, which stands for "name server lookup", is a
useful tool for finding out information about a named domain. By default, nslookup will
translate a domain name to an IP address (or vice versa). For instance, to find out what

15
the IP address of microsoft.com is, you could run the command:
nslookup microsoft.com
Server: 8.8.8.8
Address: 8.8.8.8#53
Non-authoritative
answer: Name:
microsoft.com
Address: 134.170.185.46
Name:
microsoft.com
Address: 134.170.188.221
Here, 8.8.8.8 is the address of our system's Domain Name Server. This is the server our
system is configured to use to translate domain names into IP addresses. "#53" indicates that
we are communicating with it on port 53, which is the standard port number domain name
servers use to accept queries. Below this, we have our lookup information for
microsoft.com. Our name server returned two entries, 134.170.185.46 and 134.170.188.221.
This indicates that microsoft.com uses a round robin setup to distribute server load. When
you accessmicrsoft.com, you may be directed to either of these servers and your packets
will be routed to the correct destination.You can see that we have received a "Non-
authoritative answer" to our query. An answer is "authoritative" only if our DNS has the
complete zone file information for the domain in question. More often, our DNS will have
a cache of information representing the last authoritative answer it received when it made
a similar query, this information is passed on to you, but the server qualifies it as "non-
authoritative": the information was recently received from an authoritative source, but the
DNS server is not itself that authority.

16
Using nslookup to enumerate basic mx records
4. Conclusion:
In this experiment you learned how to take the first steps toward ethical hacking.
Information gathering, in the form of reconnaissance, foot printing, and social
engineering, is necessary to learn as much about the target as possible. By
following the information-gathering methodology, ethical hackers can ensure they
are not missing any steps and valuable information.Time spent in the information-
gathering phase is well worth it to speed up and produce successful hacking
exploits.
5. Viva Questions:
How to use traceroute to identify network problem?
What is "WHOIS" database?
Which command is used for verifying and troubleshooting problems?
How to Use Nslookup to Verify DNS Configuration?

17
6. References:
http://www.howtogeek.com/134132/how-to-use-traceroute-to-identify-network-
problems/
http://www.networksolutions.com/whois/index.jsp?bookmarked=84d1182fe7fc4e
af63cca54a21b1:9jF4
https://www.google.co.in/url?sa=t&rct=j&q=&esrc=s&source=web&cd=3&cad=r
ja&uact=8&ved=0ahUKEwig2r6Fnc3NAhUBsI8KHVIWBd4QFggmMAI&url=h
ttp%3A%2F%2Fwww.tecmint.com%2F10-linux-dig-domain-information-groper-
commands-to-query-
dns%2F&usg=AFQjCNGQMPoL_ye2s1WW8UMerEFnSX_Xfw&sig2=38vl1gO
rm3zmMkLN7RVHBw
https://technet.microsoft.com/en-us/library/aa997324(v=exchg.65).aspx
18
Network Threats and Attacks
Laboratory
Experiment No. : 2
Study of packet sniffer tools like
wireshark, ethereal, tcpdump etc.

19
Experiment No. 2
1. Aim: Study of packet sniffer tools like wireshark, ethereal, tcpdump etc
2. Objectives: To observe the performance in promiscuous & non-promiscuous mode &
to find the packets based on different filters.
3. Outcomes: The learner will be able to:-
Identify different packets moving in/out of network using packet sniffer for
network analysis.
Understand professional, ethical, legal, security and social issues and
responsibilities. Also will be able to analyze the local and global impact of
computing on individuals, organizations, and society.
Match the industry requirements in the domains of Database management,
Programming and Networking with the required management skills.
4. Hardware / Software Required: Wireshark, Ethereal and tcpdump.
5. Theory:
Wireshark, a network analysis tool formerly known as Ethereal, captures packets in real
time and display them in human-readable format. Wireshark includes filters, color-coding
and other features that let you dig deep into network traffic and inspect individual packets.
Applications:
Network administrators use it to troubleshoot network problems
Network security engineers use it to examine security problems
Developers use it to debug protocol implementations
People use it to learn network protocol internals beside these examples can be
helpful in many other situations too.

20
Features:
The following are some of the many features wireshark provides:
Available for UNIX and Windows.
Capture live packet data from a network interface.
Open files containing packet data captured with tcpdump/WinDump, Wireshark,
and a number of other packet capture programs.
Import packets from text files containing hex dumps of packet data.
Display packets with very detailed protocol information.
Export some or all packets in a number of capture file formats.
Filter packets on many criteria.
Search for packets on many criteria.
Colorize packet display based on filters.
Create various statistics.
Capturing Packets
After downloading and installing wireshark, you can launch it and click the name of an
interface under Interface List to start capturing packets on that interface. For example, if you
want to capture traffic on the wireless network, click your wireless interface. You can
configure advanced features by clicking Capture Options.

21
As soon as you click the interface‘s name, you‘ll see the packets start to appear in real time.
Wireshark captures each packet sent to or from your system. If you‘re capturing on a
wireless interface and have promiscuous mode enabled in your capture options, you‘ll also
see other the other packets on the network.
22
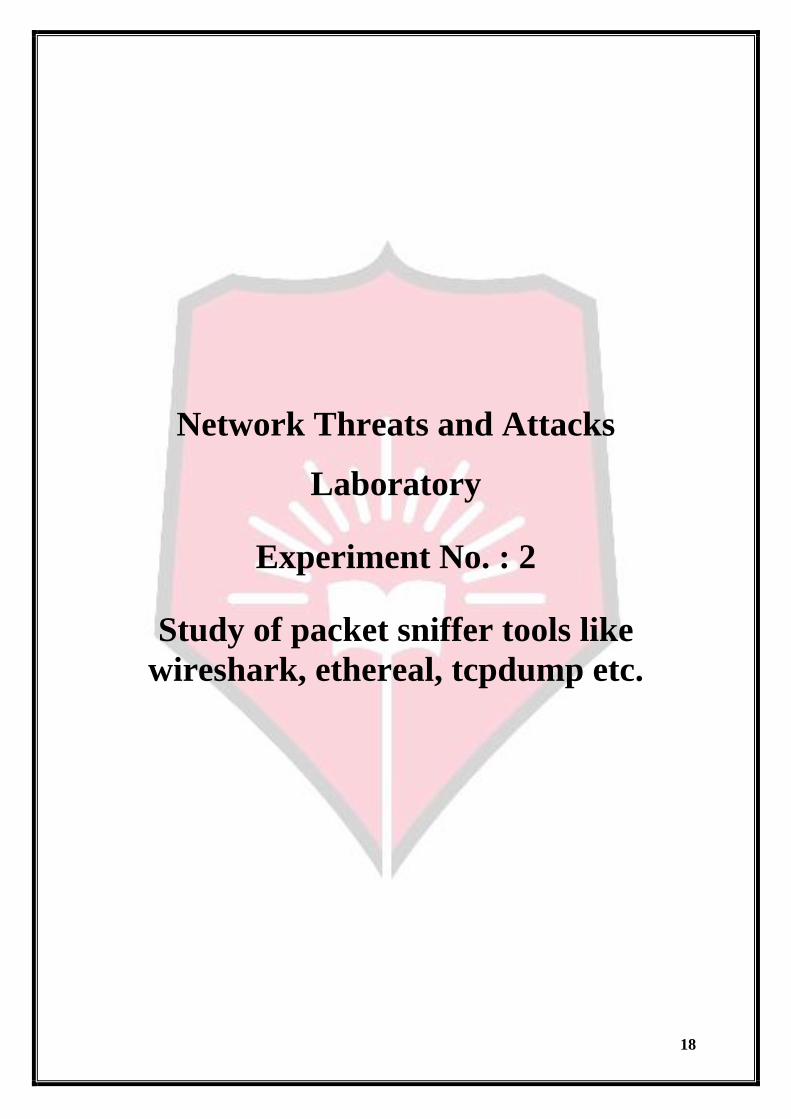
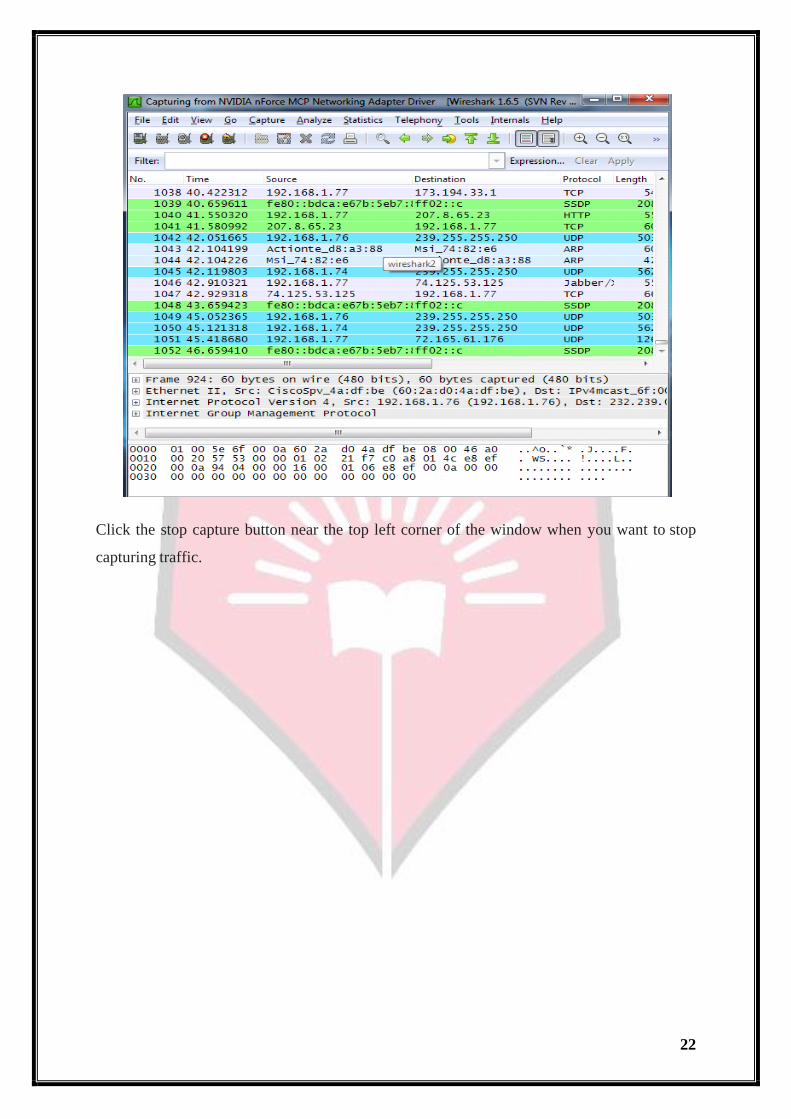
Click the stop capture button near the top left corner of the window when you want to stop
capturing traffic.
23
Wireshark uses colors to help you identify the types of traffic at a glance. By default,
green is TCP traffic, dark blue is DNS traffic, light blue is UDP traffic, and black identifies
TCP packets with problems — for example, they could have been delivered out-of-order.

24
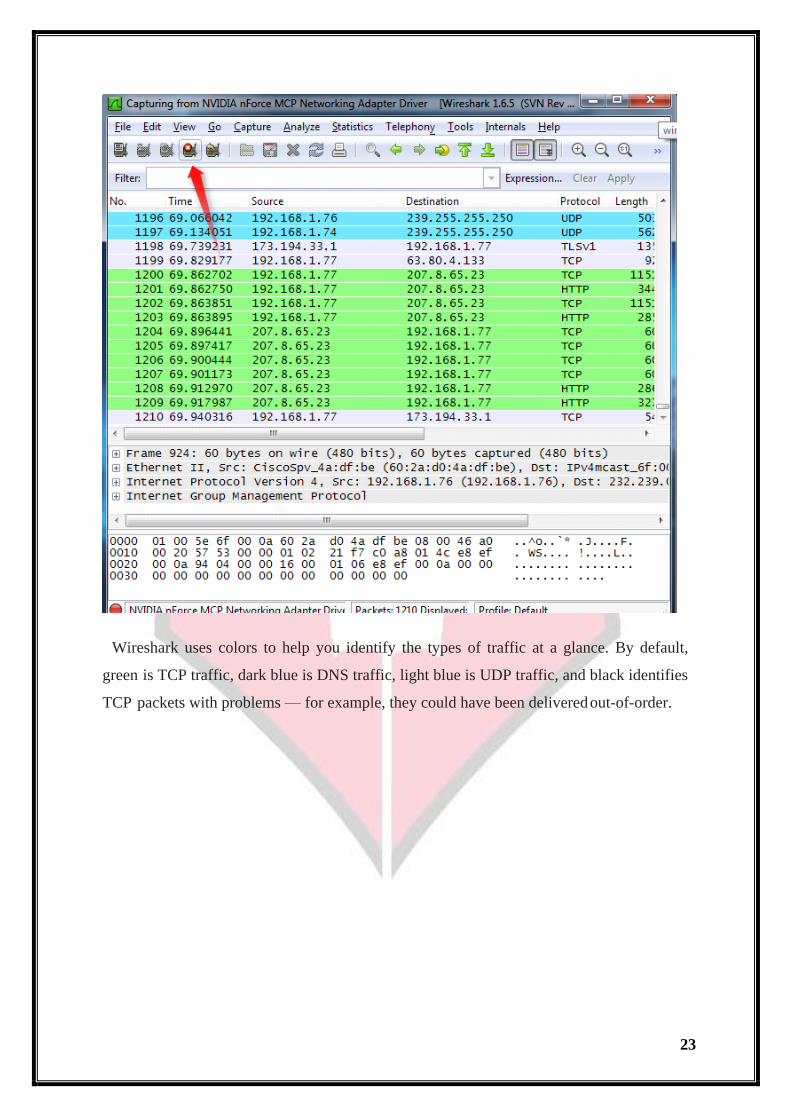
Filtering Packets
If you‘re trying to inspect something specific, such as the traffic a program sends when
phoning home, it helps to close down all other applications using the network so you can
narrow down the traffic. Still, you‘ll likely have a large amount of packets to sift through.
That‘s where Wireshark‘s filters come in.
The most basic way to apply a filter is by typing it into the filter box at the top of the
window and clicking Apply (or pressing Enter). For example, type ―dns‖ and you‘ll see
only DNS packets. When you start typing, Wireshark will help you autocomplete your
filter.
25
Another interesting thing you can do is right-click a packet and select Follow TCP Stream

26
You‘ll see the full conversation between the client and the server.
27
Close the window and you‘ll find a filter has been applied automatically — Wireshark is
showing you the packets that make up the conversation.

28
Inspecting Packets
Click a packet to select it and you can dig down to view its details.

29
You can also create filters from here — just right-click one of the details and use the
Apply as Filter submenu to create a filter based on it.
30
Wireshark is an extremely powerful tool, and this tutorial is just scratching the surface of
what you can do with it. Professionals use it to debug network protocol implementations,
examine security problems and inspect network protocol internals.
6. Conclusion:
In this experiment we analyze various packet sniffing tools that monitor network
traffic transmitted between legitimate users or in the network. The packet sniffer is
network monitoring tool. It is opted for network monitoring, traffic analysis,
troubleshooting, Packet grapping, message, protocol analysis, penetration testing and
many other purposes.
7. Viva Questions:
What is packet sniffer?

31
How to sniff passwords with wireshark?
List packet sniffing tools other than mentioned above?
8. References:
http://netsecurity.about.com/od/informationresources/a/What-Is-A-Packet-
Sniffer.htm
https://samsclass.info/120/proj/p3-wireshark.htm
http://sectools.org/tag/sniffers/
32
Network Threats and Attacks
Laboratory
Experiment No. : 3
Download and install nmap. Use it with
different options to scan open ports,
perform OS fingerprinting, do a ping
scan, tcp port scan, udp port scan, etc.
33
Experiment No. 3
1. Aim: Download and install nmap. Use it with different options to scan open
ports,perform OS fingerprinting, do a ping scan, tcp port scan, udp port scan, etc.
2. Objectives: objective of this module to learn nmap installation & use this to scan
different ports.
3. Outcomes: The learner will be able to:-
Scan the network using scanning techniques available in NMAP.
Use current techniques, skills, and tools necessary for computing practice
4. Hardware / Software Required : NMAP Tool
5. Theory:
Nmap (Network Mapper) is a security scanner originally written by Gordon Lyon (also
known by his pseudonym Fyodor Vaskovich) used to discover hosts and services on a
computer network, thus creating a "map" of the network. To accomplish its goal, Nmap sends
specially crafted packets to the target host and then analyzes the responses. Unlike many
simple port scanners that just send packets at some predefined constant rate, Nmap accounts
for the network
conditions (latency fluctuations, network congestion, the target interference with the scan)
during the run. Also, owing to the large and active user community providing feedback and
contributing to its features, Nmap has been able to extend its discovery capabilities beyond
simply figuring out whether a host is up or down and which ports are open and closed; it can
determine the operating system of the target, names and versions of the listening services,
estimated uptime,type of device, and presence of a firewall.
Nmap features include:
Host Discovery – Identifying hosts on a network. For example, listing the hosts which
respond to pings or have a particular port open.
Port Scanning – Enumerating the open ports on one or more target hosts.

34
Version Detection – Interrogating listening network services listening on remote devices
to determine the application name and version number.
OS Detection – Remotely determining the operating system and some hardware
characteristics of network devices.
Basic commands working in Nmap
For target specifications:
nmap <target‘s URL or IP with spaces between them>
For OS detection:
nmap -O <target-host's URL or IP>
For version detection:
nmap -sV <target-host's URL or IP>
After the installation of nmap:> sudo apt-get install nmap
SYN scan is the default and most popular scan option for good reasons. It can be
performed quickly, scanning thousands of ports per second on a fast network not
hampered by restrictive firewalls. It is also relatively unobtrusive and stealthy since it never
completes TCP connections.
35
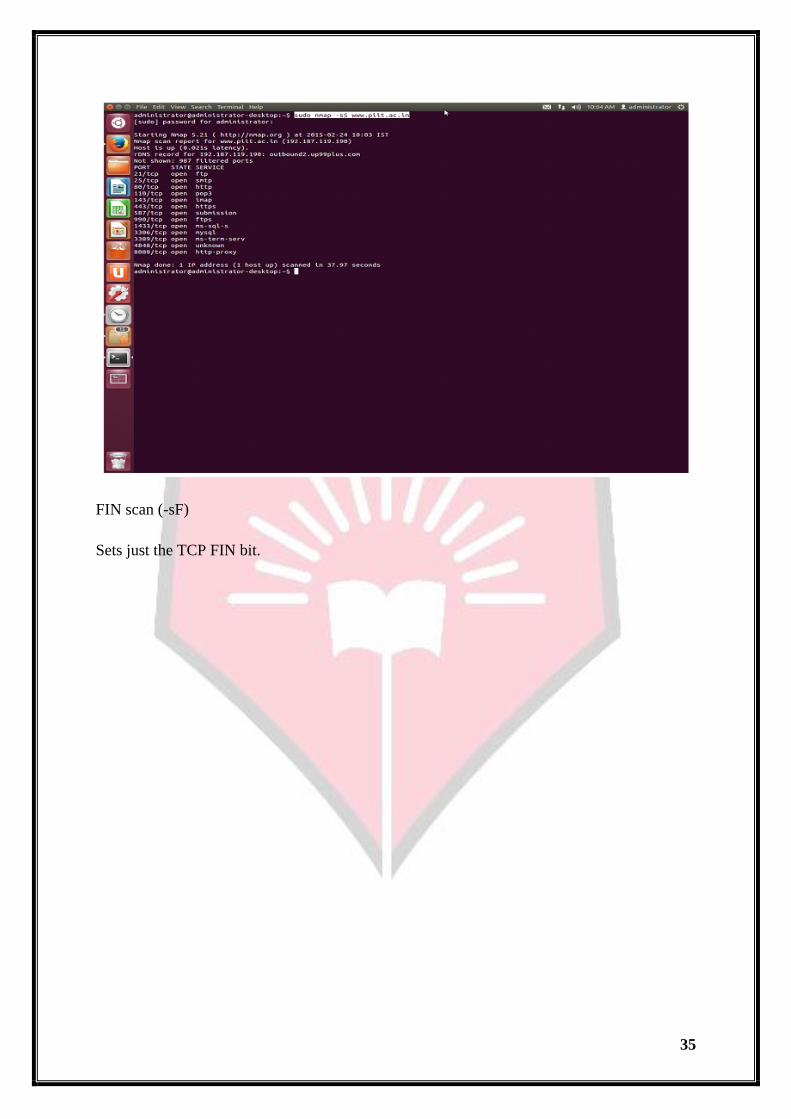
FIN scan (-sF)
Sets just the TCP FIN bit.

36
-sV (Version detection) :Enables version detection, as discussed above. Alternatively, we can
use -A, which enables version detection among other things.

37
-PO protocol list (IP Protocol Ping) :
The newest host discovery option is the IP protocol ping, which sends IP packets with the
specified protocol number set in their IP header. The protocol list takes the same format as do
port lists in the previously discussed TCP, UDP and SCTP host discovery options.

38
-p port ranges (Only scan specified ports) .
This option specifies which ports you want to scan and overrides the default. Individual port
numbers are OK, as are ranges separated by a hyphen (e.g. 1-1023). The beginning and/or
end values of a range may be omitted, causing Nmap to use 1 and 65535, respectively.

39
-sO (IP protocol scan) .
IP protocol scan allows you to determine which IP protocols (TCP, ICMP, IGMP, etc.) are
supported by target machines. This isn´t technically a port scan, since it cycles through IP
protocol numbers rather than TCP or UDP port numbers.

40
--open (Show only open (or possibly open) ports) .
Sometimes you only care about ports you can actually connect to (open ones), and don´t want
results cluttered with closed, filtered, and closed|filtered ports.

41
-p port ranges (Only scan specified ports) .
This option specifies which ports you want to scan and overrides the default. Individual port
numbers are OK, as are ranges separated by a hyphen (e.g. 1-1023). The beginning and/or
end values of a range may be omitted, causing Nmap to use 1 and 65535, respectively.
42
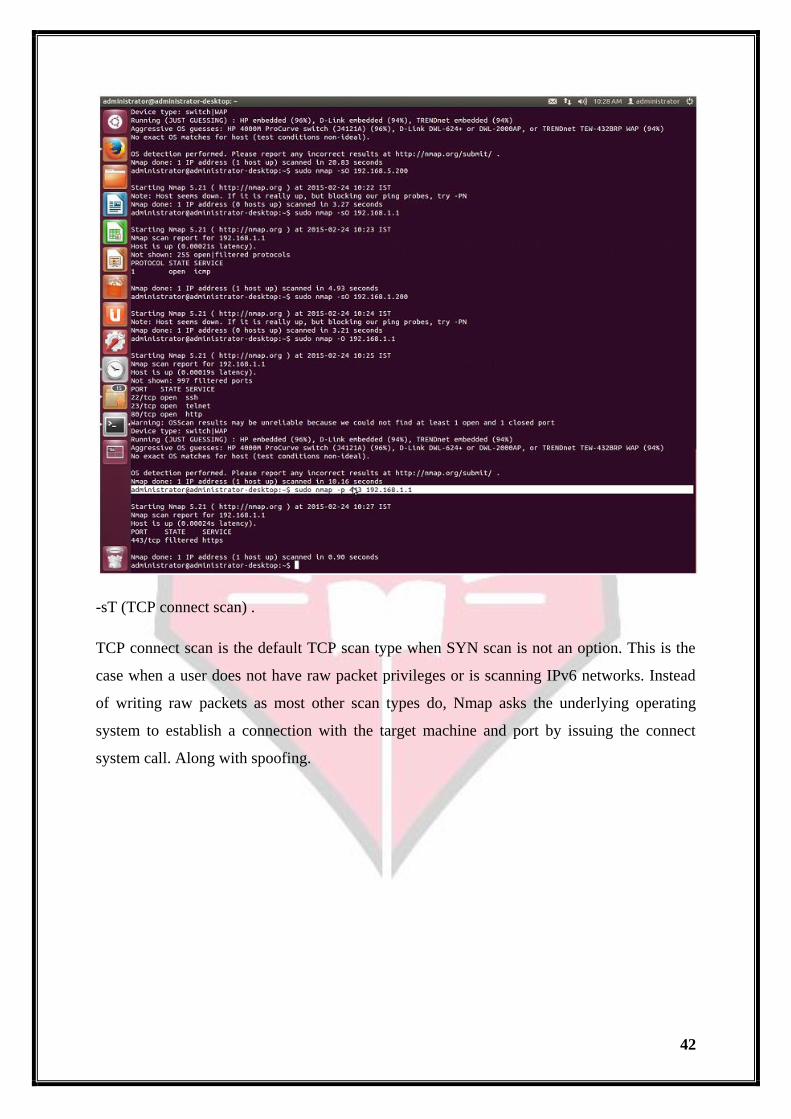
-sT (TCP connect scan) .
TCP connect scan is the default TCP scan type when SYN scan is not an option. This is the
case when a user does not have raw packet privileges or is scanning IPv6 networks. Instead
of writing raw packets as most other scan types do, Nmap asks the underlying operating
system to establish a connection with the target machine and port by issuing the connect
system call. Along with spoofing.
43
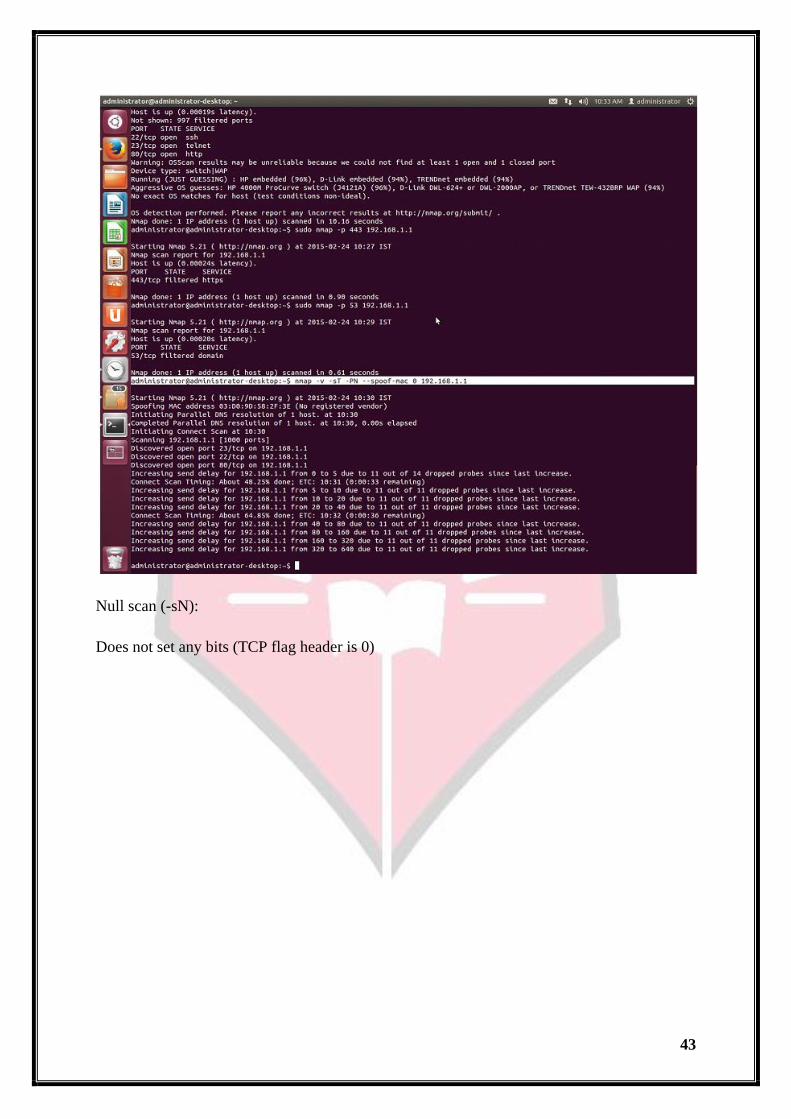
Null scan (-sN):
Does not set any bits (TCP flag header is 0)
44
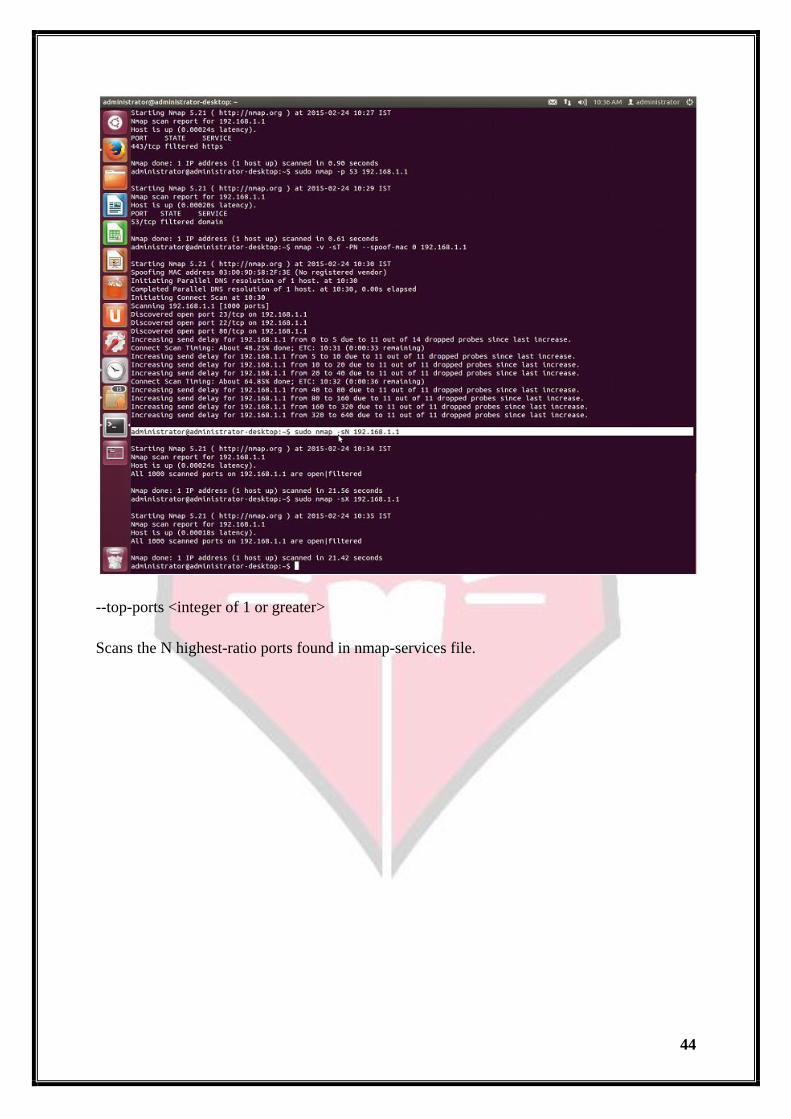
--top-ports <integer of 1 or greater>
Scans the N highest-ratio ports found in nmap-services file.

45
-PS port list (TCP SYN Ping) .
This option sends an empty TCP packet with the SYN flag set. The default destination port is
80 (configurable at compile time by changing DEFAULT_TCP_PROBE_PORT_SPEC
innmap.h). Alternate ports can be specified as a parameter. The syntax is the same as for the
-p except that port type specifiers like T: are not allowed.

46
nmap –iflist
host interface and route information with nmap by using ―–iflist‖ option.

47
6. Conclusion:
Network scanning provides a wealth of information about the target network, which is
valuable regardless of whether you're trying to attack the network or protect it from
attack. While performing a basic scan is a simple matter, the network scanners
covered in this experiment provide a wide array of options to tweak your scan to
achieve the best results. Nmap is used to detect IP spoofing and port scanning.
7. Viva Questions:
What is Host Discovery?
How to use nmap to detect remote OS?
How to check whether NMAP already installed or not?
what are the phases of NMAP scanning?
8. References:
https://nmap.org/docs/discovery.pdf
https://nmap.org/book/install.html#inst-already

48
https://books.google.co.in/books?id=hyi5BgAAQBAJ&pg=PA205&lpg=PA205&
dq=phases+of+nmap&source=bl&ots=BCACFIV8by&sig=QQ6BLonVo1UBblw
rdogaNJ_1FKI&hl=en&sa=X&ved=0ahUKEwiDjofJoc3NAhUESI8KHa1rBqsQ6
AEITTAJ#v=onepage&q=phases%20of%20nmap&f=false

49
Network Threats and Attacks
Laboratory
Experiment No. : 4
Detect ARP spoofing using open source
tool ARPWATCH

50
Experiment No. 4
1. Aim: Detect ARP spoofing using open source tool ARPWATCH.
2. Objectives: Objective of the module to find ARP spoofing using open source.
3. Outcomes: The learner will be able to:-
Identify network vulnerability with tool usage.
Also recognize the need of such tool to identify ARP spoofing, and an
ability to engage in life-long learning to exploit gained skills and
knowledge of contemporary issues.
4. Hardware / Software Required :ARPWATCH Tool
5. Theory:
Arpwatch Commands and Usage
To watch a specific interface, type the following command with ‗-i‗ and device name.
So, whenever a new MAC is plugged or a particular IP is changing his MAC address on the
network, you will notice syslog entries at ‗/var/log/syslog‗ or ‗/var/log/message‗ file.
Sample Output

51
The above output displays new workstation. If any changes are made, you will get following
output.
You can also check current ARP table, by using following command.
Sample Output:
If you want to send alerts to your custom email id, then open the main configuration
file‗/etc/sysconfig/arpwatch‗ and add the email as shown below.
Here is an example of an email report, when a new MAC is connected on.

52
6. Conclusion:
Arpwatch is a software or program tool for monitoring Address Resolution
Protocol traffic on a computer network. Its main goal is to detect arp poisoning
attacks like (e.g. ARP Poisoning, Ettercap, and Netcut) also detect intruders in your
network by sending an email to an administrator when new Ethernet MAC addresses
seen on the network.
7. Viva Questions:
What is ARP spoofing?
What is IP spoofing?
8. References:
http://www.veracode.com/security/arp-spoofing
http://searchsecurity.techtarget.com/definition/IP-spoofing
53
Network Threats and Attacks
Laboratory
Experiment No. : 5
Use the Nessus tool to scan the network
for vulnerabilities.
54
Experiment No. 5
1. Aim: Use the Nessus tool to scan the network for vulnerabilities.
2. Objectives: Objective of the module is scan system and network analysis.
3. Outcomes: The learner will be able to:- usage.
Identify network vulnerability with tool
Use current techniques, skills, and tools to find out different vulnerabilities
and the countermeasures for identified vulnerabilities.
4. Hardware / Software Required : Nessus Vulnerability Scanner | Tenable Network
Security tool
5. Theory:
Nessus is a proprietary comprehensive vulnerability scanner which is developed by Tenable
Network Security. It is free of charge for personal use in a non-enterprise environment.
Operation
Nessus allows scans for the following types of vulnerabilities:
Vulnerabilities that allow a remote hacker to control or access sensitive data
on a system.
Misconfiguration (e.g. open mail relay, missing patches, etc.).
Default passwords, a few common passwords, and blank/absent passwords on some system
accounts. Nessus can also call Hydra (an external tool) to launch a dictionary attack.Denials
of service against the TCP/IP stack by using malformed packets
Preparation for PCI DSS audits
On UNIX (including Mac OS X), it consists of nessusd, the Nessus daemon, which does the
scanning, and nessus, the client, which controls scans and presents the vulnerability results to
the user. In typical operation, Nessus begins by doing a port scan with one of its four internal

55
port scanners (or it can optionally use AmapM[4] or Nmap[5]) to determine which ports are
open on the target and then tries various exploits on the open ports. The vulnerability tests,
available as subscriptions, are written in NASL(Nessus Attack Scripting Language), a
scripting language optimized for custom network interaction. Tenable Network Security
produces several dozen new vulnerability checks (called plugins) each week, usually on a
daily basis. These checks are available for free to the general public; commercial customers
are not allowed to use this Home Feed any more. The Professional Feed (which is not free)
also give access to support and additional scripts (e.g. audit files, compliance tests, additional
vulnerability detection plugins). Optionally, the results of the scan can be reported in various
formats, such as plain text, XML, HTML and LaTeX. The results can also be saved in a
knowledge base for debugging. On UNIX, scanning can be automated through the use of a
command-line client. There exist many different commercial, free and open source tools for
both UNIX and Windows to manage individual or distributed Nessus scanners. If the user
chooses to do so (by disabling the option 'safe checks'), some of Nessus' vulnerability test
may try to cause vulnerable services or operating systems to crash. This lets a user test the
resistance of a device before putting it in production. Nessus provides additional functionality
beyond testing for known network vulnerabilities. For instance, it can use Windows
credentials to examine patch levels on computers running the Windows operating system, and
can perform password auditing using dictionary and brute force methods. Nessus 3 and later
can also audit systems to make sure they have been configured per a specific policy, such as
the NSA's guide for hardening Windows servers.
56
Basic Network scanning:
Advanced scanning in general search:

57
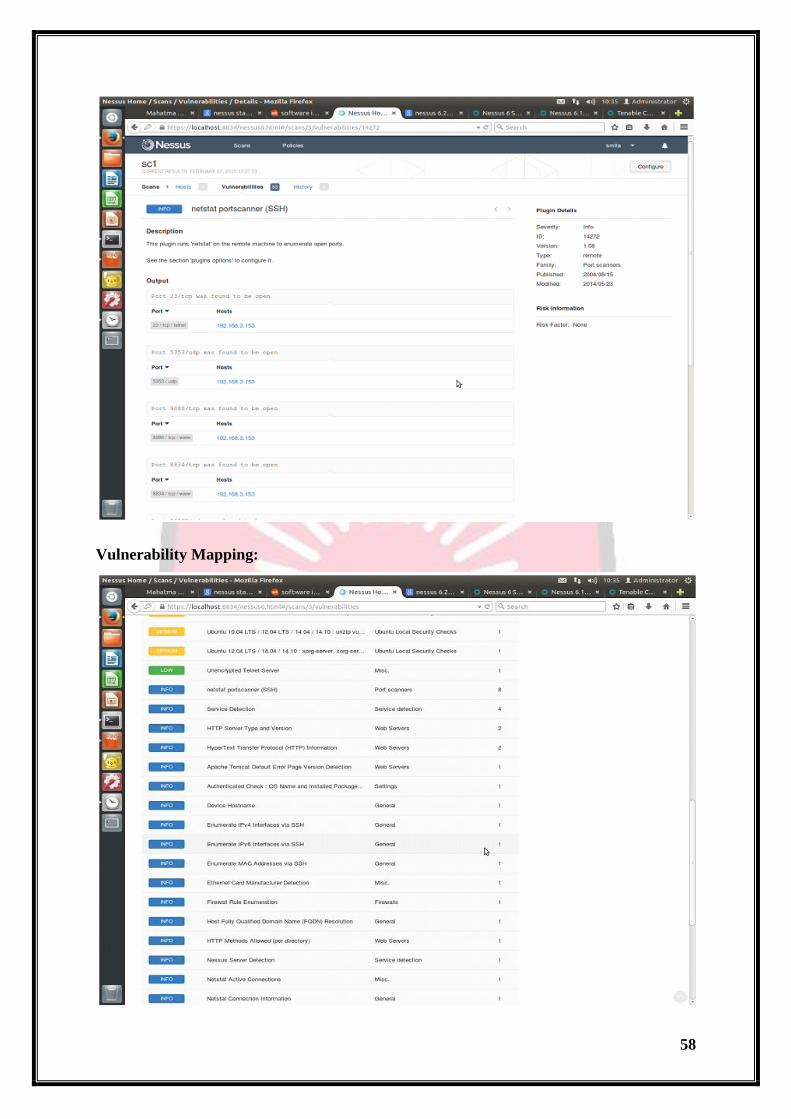
Ntstat port scanning:
58
Vulnerability Mapping:

59
Policies:
Plugins:

60
General Scanning:

61
Port Scanning:
6. Conclusion:
Running a security scanner against your systems is a very important part of the job. It is a
system administrator or security officer‘s job to keep their systems secure and the data
contained in them safe. Hackers have access to all the same information and tools that the rest
of us do. Hackers run the very same tools and it is advantageous to know what the results are
that they see if they scan your system. They find time to do the research, so we must also.
Nessus provides a lot of functionality in one tool. It utilizes Nmap, easy to update plug-ins,
and nice reporting tools for upper management. It is has repeatedly scored high on
comparisons between scanners including commercial scanners that come with a hefty price
tag. And of course as budgets tighten, remember Nessus is a free tool. The only cost is the
users time in learning it and using it, but that is a cost associated with all tools. And luckily

62
Nessus is an easy to learn tool. Using this tool and seeing the vulnerabilities will help you
gain knowledge of your systems and help teach you how to protect them.
7. Viva Questions:
What‘s the current version of Nessus?
What OS platforms does Nessus have builds for?
What are the system/hardware requirements for using Nessus?
What is the heart of the nessus?
When using the Nessus user interface, which of browsers are supported?
8. References:
http://www.tenable.com/products/nessus/nessus-faq
https://docs.tenable.com/nessus/6_7/index.htm#getting_started/hardware.htm
http://www.symarntec.com/connect/articles/introduction-nessus
https://docs.tenable.com/nessus/6_7/index.htm#getting_started/Browsers.htm%3F
TocPath%3DGetting%2520Started%7CSystem%2520Requirements%7C_____3

63
Network Threats and Attacks
Laboratory
Experiment No. : 6
Implement a code to simulate buffer
overflow attack.
64
Experiment No. 6
1. Aim: Implement a code to simulate buffer overflow attack.
2. Objectives: Objective of the module Is to check buffer overflow in an NS2
environment
3. Outcomes: The learner will be able to:-
Identify different type of types of buffer overflow vulnerabilities and
attacks, and survey the various defensive measures that mitigate buffer
overflow vulnerabilities.
Identify the use higher-level programming languages that are strongly
type, does not allow direct memory access and are effective
countermeasure to avoid buffer overflow attack.
Engage in life-long learning to exploit gained skills and knowledge of
contemporary issues.
4. Hardware / Software Required : Stack Guard compiler.
5. Theory:
A buffer overflow, or buffer overrun, is an anomaly where a program, while writing data to a
buffer, overruns the buffer's boundary and overwrites adjacent memory locations. This is a
special case of the violation of memory safety.
A buffer overflow occurs when a program or process tries to store more data in a buffer
(temporary data storage area) than it was intended to hold.
Buffer overflow:
Code:
#include <stdio.h>
#include <string.h>

65
int main(void)
{
char buff[15];
int pass = 0;
printf("\n Enter the password : \n");
gets(buff);
if(strcmp(buff, "thecorrectpaswd"))
{
printf ("\n Wrong Password \n");
}
else
{
printf ("\n Correct Password \n");
pass = 1;
}
if(pass)
{
/* Now Give root or admin rights to user*/
printf ("\n Root privileges given to the user \n");
}
return 0;
}
Output :
66
>>administrator@PIIT-05:~/Desktop/me CS pracs$ gcc -Wall -fno-stack-protector
bufferoverflow.c -o
>>bufferoverflow
The above command deactivates the default GC Compiler's flag which detects Stack
Smashing
>>administrator@PIIT-05:~/Desktop/me CS pracs$ ./bufferoverflow
>>Enter the password :
thewrong
Wrong Password
>>administrator@PIIT-05:~/Desktop/me CS pracs$ ./bufferoverflow
>>Enter the password :
thecorrectpaswd
Correct Password
Root privileges given to the user
administrator@PIIT-05:~/Desktop/me CS pracs$ ./bufferoverflow
Enter the password :
thewrongpasswordentered
Wrong Password
Root privileges given to the user
Here, the entered password length is above the permissible length with wrong contents still
the user is given the ROOT PRIVILEDGES. This demonstrates the Buffer Overflow.

67
6. Conclusion:
Buffer overflow has been the most exploited vulnerability for more than a decade.
Buffer overflow vulnerabilities are the most common way to gain control of a remote
host. Attacker can insert and execute attack code. Error is made at program creation,
is invisible to user. StackGuard is a systematic compiler tool that prevents a broad
class of buffer overflow security attacks from succeeding.
7. Viva Questions:
What can a buffer overflow attack do?
How do buffer overflow attacks work?
Explain how to protect against buffer overflow.
8. References:
http://www.windowsecurity.com/articles-
tutorials/windows_os_security/Analysis_of_Buffer_Overflow_Attacks.html
http://searchsecurity.techtarget.com/news/1048483/Buffer-overflow-attacks-How-
do-they-work
https://www.owasp.org/index.php/Buffer_overflow_attack
68
Network Threats and Attacks
Laboratory
Experiment No. : 7
Set up IPSEC under LINUX

69
Experiment No. 7
1. Aim: Set up IPSEC under LINUX.
2. Objectives: Objective of the module for implementing security vulnerabilities
3. Outcomes: The learner will be able to:-
Recognition of the need for end-to-end security.
Install and understand different security mechanisms for network security
like firewall,IPSEC.
Engage in continuing professional development and higher studies.
4. Hardware / Software Required : L2TP/IPsec VPN client setup
5. Theory:
Internet Protocol Security (IPsec) is a protocol suite for securing Internet Protocol (IP)
communications by authenticating and encrypting each IP packet of a communication
session. IPsec includes protocols for establishing mutual authentication between agents at the
beginning of the session and negotiation of cryptographic keys to be used during the session.
IPsec can be used in protecting data flows between a pair of hosts (host-to-host), between a
pair of security gateways (network-to-network), or between a security gateway and a host
(network-to-host).
Internet Protocol security (IPsec) uses cryptographic security services to protect
communications over Internet Protocol (IP) networks. IPsec supports network-level peer
authentication, data origin authentication, data integrity, data confidentiality (encryption), and
replay protection.
IPsec is an end-to-end security scheme operating in the Internet Layer of the Internet Protocol
Suite, while some other Internet security systems in widespread use, such as Transport Layer
Security (TLS) and Secure Shell (SSH), operate in the upper layers at Application layer.
Hence, only IPsec protects any application traffic over an IP network. Applications can be
automatically secured by IPsec at the IP layer.
70
The following commands will add the werner-jaeger PPA into your repo's, and then install
the 'l2tp-ipsec-vpn' package:
>>sudo apt-add-repository ppa:werner-jaeger/ppa-werner-vpn
>>sudo apt-get update
>>sudo apt-get install l2tp-ipsec-vpn
· Now, we will whitelist our system tray which will allow our newly installed package to
show up on our system tray:
>>gsettings set com.canonical.Unity.Panel systray-whitelist "['all']"
After whitelisting our system tray, it's imperative that you reboot/restart your
machine.
Once your machine has rebooted, click on the new icon, and click 'Edit
Connections ...' from the menu.
This will show the "VPN Connections" window. Click the "Add ..." button
and set the connection name to anything you'd like, e.g. "HostVPN-L2TP",
and click "OK".
71
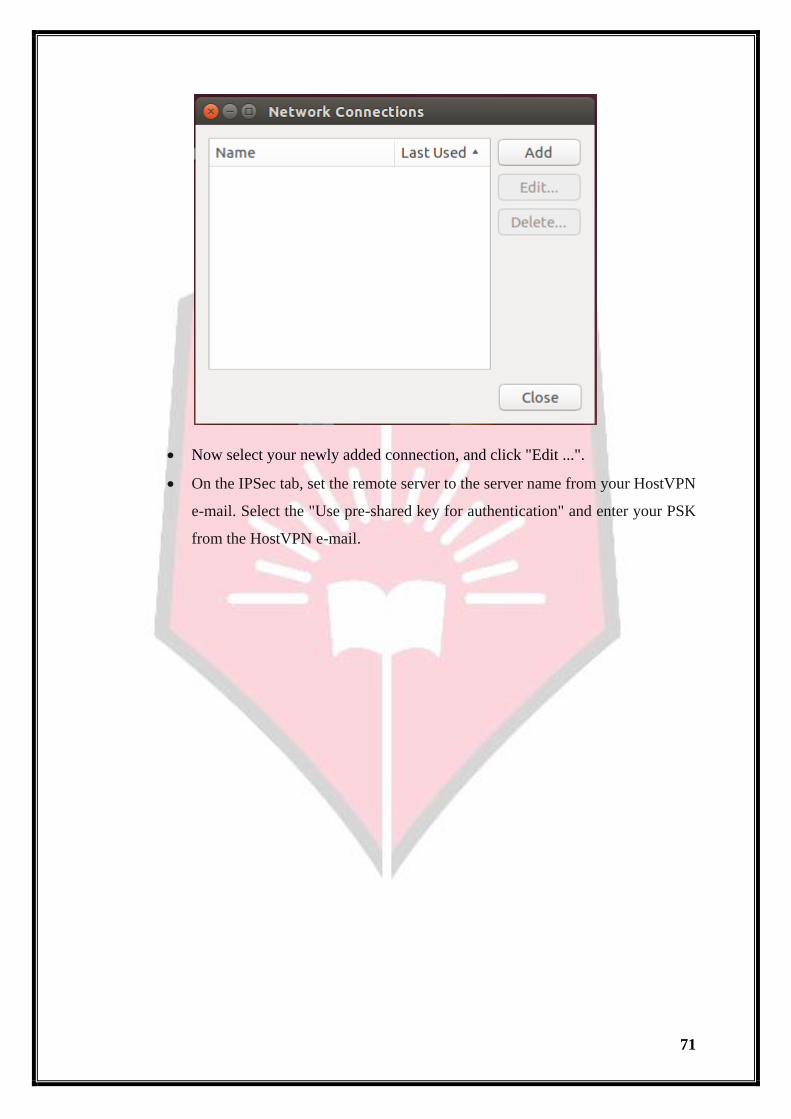
Now select your newly added connection, and click "Edit ...".
On the IPSec tab, set the remote server to the server name from your HostVPN
e-mail. Select the "Use pre-shared key for authentication" and enter your PSK
from the HostVPN e-mail.

72
On the PPP tab, select "Allow these protocols", and ensure all are selected
except "Microsoft CHAP Version 2 (MS-CHAPv2)". Fill in the "User name:"
and "Password:" fields with your HostVPN username and password, and then
click "OK". Now click "Close" on the "VPN Connections" window.

73
Click on the L2TP/IPSec VPN icon in the systray again and click on the
connection name that we just created.

74
6. Conclusion:
IPsec is an end-to-end security scheme operating in the Internet Layer of the Internet
Protocol Suite. IPsec protects all application traffic over an IP network. Also IPsec
supports network-level peer authentication, data origin authentication, data integrity,
data confidentiality (encryption), and replay protection.
7. Viva Questions:
Identify any other mechanism like IPSEC.
Explain different encryption mechanism used in IPSEC
8. References:
http://www.ciscopress.com/articles/article.asp?p=24833&seqNum=6
https://raymii.org/s/tutorials/IPSEC_L2TP_vpn_with_Ubuntu_14.04.html
https://riobard.com/2010/04/30/l2tp-over-ipsec-ubuntu/

75
Network Threats and Attacks
Laboratory
Experiment No. : 8
Install IDS (e.g. SNORT) and study the
logs.

76
Experiment No. 8
1. Aim: Install IDS (e.g. SNORT) and study the logs.
2. Objectives: From this experiment, the student will be able to
3. Outcomes: The learner will be able to:-
Simulate intrusion detection system using snort tool.
To use current techniques, skills, and IDS tools necessary for computing
practice.
Understand professional, ethical, legal, security and social issues and
responsibilities.
4. Hardware / Software Required: Snort tool.
5. Theory:
Snort is an intrusion detection system written by Martin Roesch. Snort is a lightweight
network intrusion detection system, capable of performing real-time traffic analysis and
packet logging on IP networks. It can perform protocol analysis, content searching/matching
and can be used to detect a variety of attacks and probes, such as buffer overflows, stealth
port scans, CGI attacks, SMB probes, OS fingerprinting attempts, and much more. Snort uses
a flexible rules language to describe traffic that it should collect or pass, as well as a detection
engine that utilizes a modular plugin architecture.
Snort can be configured to run in three modes:
Sniffer mode, which simply reads the packets off of the network and displays them
for you in a continuous stream on the console (screen).
Packet Logger mode, which logs the packets to disk.
Network Intrusion Detection System (NIDS) mode, the most complex and
configurable configuration, which allows Snort to analyze network traffic for matches
against a user-defined rule set and performs several actions based upon what it sees.

77
Inline mode, which obtains packets from iptables instead of from libpcap and then
causes iptables to drop or pass packets based on Snort rules that use inline-specific
rule types
Sniffer Mode:
If you just want to print out the TCP/IP packet headers to the screen (i.e. sniffer mode), try
following, this command will run Snort and just show the IP and TCP/UDP/ICMP headers,
nothing else.
./snort –v
If you want to see the application data in transit, try the following, this instructs Snort to
display the packet data as well as the headers.
./snort –vd
If you want an even more descriptive display, showing the data link layer headers, do this:
./snort -vde
Packet Logger Mode:
If you want to record the packets to the disk, you need to specify a logging directory and
Snort will automatically know to go into packet logger mode:
./snort -dev -l ./log
Of course, this assumes you have a directory named log in the current directory. If you don't,
Snort will exit with an error message. When Snort runs in this mode, it collects every packet
it sees and places it in a directory hierarchy based upon the IP address of one of the hosts in
the datagram.
If you just specify a plain -l switch, you may notice that Snort sometimes uses the address of
the remote computer as the directory in which it places packets and sometimes it uses the
local host address. In order to log relative to the home network, you need to tell Snort which
network is the home network:
78
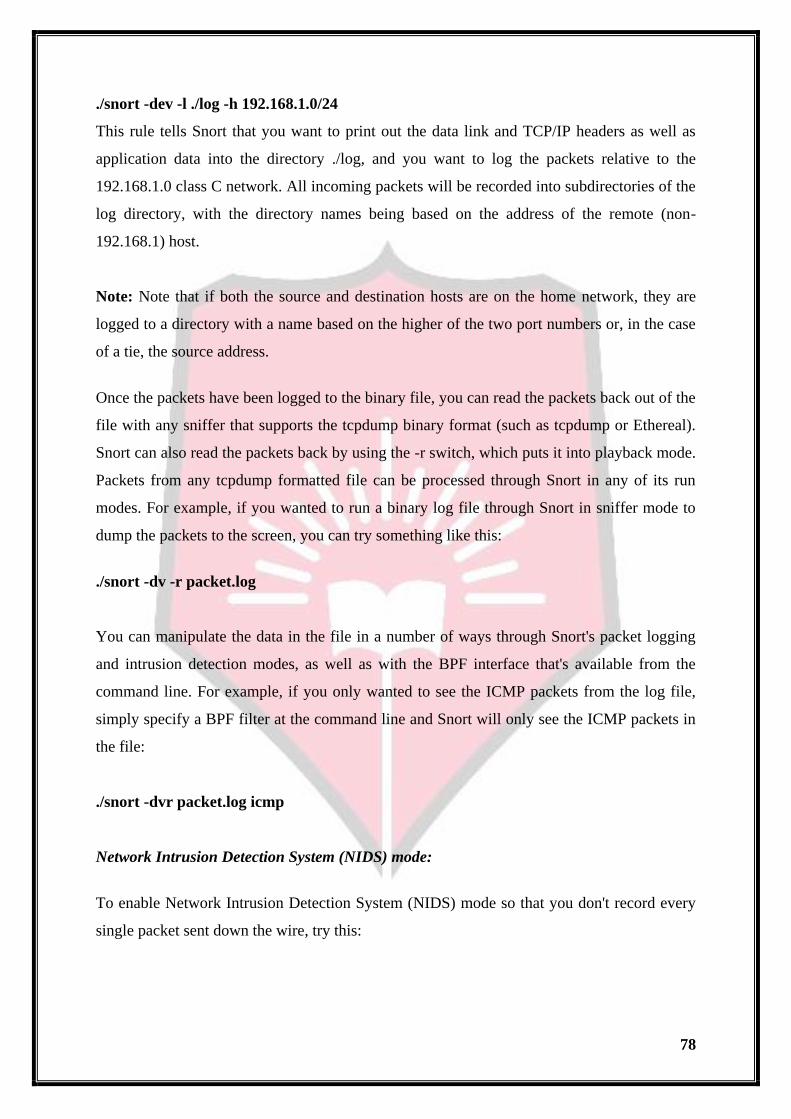
./snort -dev -l ./log -h 192.168.1.0/24
This rule tells Snort that you want to print out the data link and TCP/IP headers as well as
application data into the directory ./log, and you want to log the packets relative to the
192.168.1.0 class C network. All incoming packets will be recorded into subdirectories of the
log directory, with the directory names being based on the address of the remote (non-
192.168.1) host.
Note: Note that if both the source and destination hosts are on the home network, they are
logged to a directory with a name based on the higher of the two port numbers or, in the case
of a tie, the source address.
Once the packets have been logged to the binary file, you can read the packets back out of the
file with any sniffer that supports the tcpdump binary format (such as tcpdump or Ethereal).
Snort can also read the packets back by using the -r switch, which puts it into playback mode.
Packets from any tcpdump formatted file can be processed through Snort in any of its run
modes. For example, if you wanted to run a binary log file through Snort in sniffer mode to
dump the packets to the screen, you can try something like this:
./snort -dv -r packet.log
You can manipulate the data in the file in a number of ways through Snort's packet logging
and intrusion detection modes, as well as with the BPF interface that's available from the
command line. For example, if you only wanted to see the ICMP packets from the log file,
simply specify a BPF filter at the command line and Snort will only see the ICMP packets in
the file:
./snort -dvr packet.log icmp
Network Intrusion Detection System (NIDS) mode:
To enable Network Intrusion Detection System (NIDS) mode so that you don't record every
single packet sent down the wire, try this:

79
./snort -dev -l ./log -h 192.168.1.0/24 -c snort.conf
where snort.conf is the name of your rules file. This will apply the rules configured in the
snort.conf file to each packet to decide if an action based upon the rule type in the file should
be taken. If you don't specify an output directory for the program, it will default to
/var/log/snort.
One thing to note about the last command line is that if Snort is going to be used in a long
term way as an IDS, the -v switch should be left off the command line for the sake of speed.
The screen is a slow place to write data to, and packets can be dropped while writing to the
display.
It's also not necessary to record the data link headers for most applications, so you can
usually omit the -e switch, too.
./snort -d -h 192.168.1.0/24 -l ./log -c snort.conf
This will configure Snort to run in its most basic NIDS form, logging packets that trigger
rules specified in the snort.conf in plain ASCII to disk using a hierarchical directory structure
(just like packet logger mode).
Inline Mode:
Snort 2.3.0 RC1 integrated the intrusion prevention system (IPS) capability of Snort Inline
into the official Snort project. Snort Inline obtains packets from iptables instead of libpcap
and then uses new rule types to help iptables pass or drop packets based on Snort rules.
There are three rule types you can use when running Snort with Snort Inline:
drop - The drop rule type will tell iptables to drop the packet and log it via usual
Snort means.
reject - The reject rule type will tell iptables to drop the packet, log it via usual Snort
means, and send a TCP reset if the protocol is TCP or an icmp port unreachable if the
protocol is UDP.
sdrop - The sdrop rule type will tell iptables to drop the packet. Nothing is logged.

80
When using a reject rule, there are two options you can use to send TCP resets:
- You can use a RAW socket (the default behavior for Snort Inline), in which case you
must have an interface that has an IP address assigned to it. If there is not an interface
with an IP address assigned with access to the source of the packet, the packet will be
logged and the reset packet will never make it onto the network.
- You can also now perform resets via a physical device when using iptables. We take the
indev name from ip_queue and use this as the interface on which to send resets. We no
longer need an IP loaded on the bridge, and can remain pretty stealthy as the config
layer2_resets in snort_inline.conf takes a source MAC address which we substitue for the
MAC of the bridge.
For example:
config layer2resets
tells Snort Inline to use layer2 resets and uses the MAC address of the bridge as the
source MAC in the packet, and:
config layer2resets: 00:06:76:DD:5F:E3
will tell Snort Inline to use layer2 resets and uses the source MAC of 00:06:76:DD:5F:E3
in the reset packet.
- The command-line option -disable-inline-initialization can be used to not initialize
IPTables when in inline mode. To be used with command-line option -T to test for a
valid configuration without requiring opening inline devices and adversely affecting
traffic flow.
6. Conclusion:
SNORT is an open source network intrusion prevention and detection system utilizing
a rule-driven language, which combines the benefits of signature, protocol and
anomaly based inspection methods.

81
7. Viva Questions:
Can we use Snort to protect a network from denial-of-service attacks?
Can Snort decode encrypted traffic?
Can Snort detect layer 2 attacks?
Can Snort log flows or sessions?
Can Snort rebuild content from traffic?
8. References:
http://www.thegeekstuff.com/2010/08/snort-tutorial/
https://www.howtoforge.com/intrusion_detection_base_snort
https://www.snort.org/

82
Network Threats and Attacks
Laboratory
Experiment No. : 9
Use of iptables in linux to create
firewalls.
83
Experiment No. 9
1. Aim: Use of iptables in linux to create firewalls
2. Objectives: To study how to create and destroy firewall security parameters.
3. Outcomes: The learner will be able to:-
Recognize the need for having a security on host side by controlling
incoming / outgoing traffic using the acquired skills and knowledge.
Design rules for the INPUT/OUTPUT/FORWARD chain.
4. Hardware / Software Required :
5. Theory:
IPtables are the tables provided by the Linux kernel firewall (implemented as different
Netfilter modules) and the chains and rules it stores. Different kernel modules and programs
are currently used for different protocols; iptables applies to IPv4, ip6tables to IPv6, arptables
to ARP, and ebtables to Ethernet frames.
iptables requires elevated privileges to operate and must be executed by user root, otherwise
it fails to function. On most Linux systems, iptables is installed as /usr/sbin/iptables
and documented in its man pages which can be opened using man iptables when installed. It
may also be found in /sbin/iptables, but since iptables is more like a service rather than an
"essential binary", the preferred location remains /usr/sbin.
1. To drop all traffic:
# sudo iptables -P INPUT DROP
# sudo iptables -P OUTPUT DROP
# sudo iptables -P FORWARD DROP
# sudo iptables -L -v –n
84
2. Only Block Incoming Traffic
To drop all incoming / forwarded packets, but allow outgoing traffic,
# sudo iptables -P INPUT DROP
# sudo iptables -P FORWARD DROP
# sudo iptables -P OUTPUT ACCEPT
# sudo iptables -A INPUT -m state --state NEW,ESTABLISHED -j ACCEPT
# sudo iptables -L -v –n
3. Block Outgoing IPaddress
host -t a hostname
sudo iptables -A OUTPUT -d outgoing ipaddress -j DROP
4. Block or Allow ICMP ping request
sudo iptables -A INPUT -p icmp --icmp-type echo-request -j DROP/ACCEPT
6. Conclusion:
There are many other firewall utilities and some that may be easier, but iptables is a
good learning tool, if only because it exposes some of the underlying netfilter
structure and because it is present in so many systems.
7. Viva Questions:
List and implementation of extra commands.
Find another GUI tools to create firewalls.
8. References:
https://www.digitalocean.com/community/tutorials/how-to-set-up-a-firewall-
using-iptables-on-ubuntu-14-04
http://www.howtogeek.com/177621/the-beginners-guide-to-iptables-the-linux-
firewall/

85
Network Threats and Attacks
Laboratory
Experiment No. : 10
Mini Project

86
Experiment No. 10
1. Aim: Mini Project
2. Objectives: To implement Networking concepts.
3. Outcomes: The learner will be able to:-
Understand, identify, analyze and design the engineering problems,
implement the same using current techniques, skills, and tools and validate
the solution including both hardware and software.
Understand, identify vulnerabilities related to network security and also
present and communicate the countermeasures for the same.
Able to recognize the need of studied tools to exploit/ cover network
threats and attacks with the gained skills and knowledge that is useful for
life-long learning.
4. Hardware / Software Required: Tools required for performing network analysis
based on the mini- project.
5. Theory:
1. For mini-project group of 3 students is formed.
2. The students are required to make use of utilities and tools available for
network analysis.
3. The student also needs to provide the counter measures available for security
threats encountered during scanning of host and network.
6. Conclusion:
The implementation of mini project will provide the student opportunity to explore
even other available tools for performing network analysis and finding vulnerability,
threats and attack on the host and network.
7. Viva Questions:
Viva Questions will be asked based on the mini project implemented.