department of electrical · pdf file... static relays’ tata mc graw hill, 1979. 3. a.r....
TRANSCRIPT

DEPARTMENT OF ELECTRICAL ENGINEERING BENGAL ENGINEERING AND SCIENCE UNIVERSITY, SHIBPUR
Power system protection Laboratory (EE 852) 8th
Semester Electrical
Expt. No. 852/1
BIFFI’S METHOD FOR TESTING CURRENT TRANSFORMER
Apparatus under test : 10/5A,30VA,50Hz,Single phase, Class – C.T. (Lab. No. CT-31) Make : Transpegear Manufacturing Co. Ltd., Calcutta Procedure : Connect as per circuit diagram supplied. R1 = 0.1 ohm, R2 = 0.1 ohm, r1 = 0 to 1000 ohms (decade), r2 = 0 to 1000 ohms (decade) and c = 40 to 140 p. f. condenser. For burden use a variable 5 ohms resister. Connect the vibration galvanometer through an universal shunt and keep
the shunt in off position at start. For rated burden adjust the secondary current to 5 amps, by adjusting the primary injection set. Gradually increase the sensitivity and balance the bridge by varying r1 , r2 , & c. Throughout the experiment keep the C.T. secondary current constant at 5 amps. Under balanced condition note down the corresponding values.
Report : Calculate the ratio and phase angle error for C.T. under test. Reference :
E.W.Golding : Electrical Measurements & Measuring Instruments (pp 713) (P.T.O.) AKM-12/05 1 of 2

AKM-12/05 2 of 2
Fig. Circuit Diagram

DEPARTMENT OF ELECTRICAL ENGINEERING
BENGAL ENGINEERING AND SCIENCE UNIVERSITY, SHIBPUR Power System Protection Laboratory 8th
Semester Electrical
Expt. No. 852 / 2
DETERMINATION OF (a) INPUT-OUTPUT CHARACTERISTICS
(b) MAXIMUM BURDEN OF A CT
Equipment 5/5A, 30 VA, 50Hz, Single Phase, Class 0.5 C.T.(Lab. No. CT-28)
:
Procedure
:
First of all calculate the impedance of the rated burden of the C.T. Connect ‘x’ tunes the rated burden (variable resistance in your case) to the C.T. secondary, with two ammeters on either side as in figure below. Apply variable alternating current 0 to 10A in the primary and note down the corresponding secondary currents and tabulate the date. In the second part of the experiment connect a voltmeter (0-50V) across the C.T. Secondary. Vary the impedance of the burden and measure the secondary current and voltage keeping the primary current constant at 5A and tabulate the results so obtained. Report : (a) From the first part of the experiment draw the Output-input current curve for a fixed resistive burden.
(b) From the 2nd
part of the experiment determine the secondary output (VA) of the current transformer with varying secondary impedance and draw the characteristic so obtained.
What is the maximum VA ? Reference : 1. G.W. Stubbing : Automatic Protection of A.C. Circuits. (pp 31-33) 2. English Electric : Protective Relays Application Guide (pp 71-72) AKM-12/05 1 of 2

Fig. : Circuit Diagram AKM-12/05 2 of 2
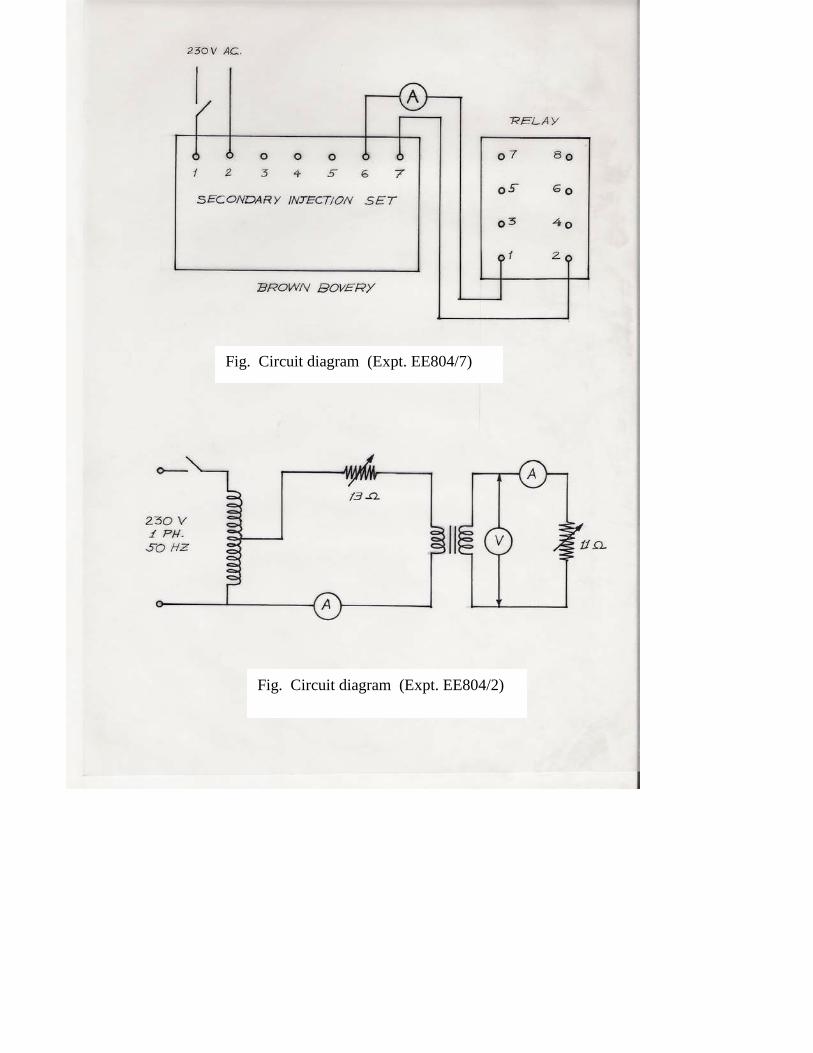
Fig. Circuit diagram (Expt. EE804/2)
Fig. Circuit diagram (Expt. EE804/7)

DEPARTMENT OF ELECTRICAL ENGINEERING BENGAL ENGINEERING AND SCIENCE UNIVERSITY, SHIBPUR
Power System Protection Laboratory 8th
Semester Electrical
Expt. No. EE 852/3
TESTS ON OVER CURRENT RELAY
(a) Over current relay : Type PBO, 100%, Current : 5A, 50 Hz, Make : Metropolitan Vickers. Plug setting : 50 – 75 - …….200% Time setting : 0 to 1 (Lab No. W/3/2)
Procedure : Connect the 0/C relay C-C terminals to the current terminals of the 3-phase Relay testing bench. Connect an Avometer (Ohm meter) across T-T of the relay. Energize the relay by pushing the start push button of the testing bench. Note down the operation time by means of a stop watch. Use P.S. – 75% and time setting : 0.8. Repeat the procedure for various values of currents ranging from 5A to 30A and tabulate the results in the usual form. Report : (a) Draw the time characteristics (time of operation at unity time setting vs. P.S.M.) for the relay in a squared paper.
(b) Draw the internal connection diagram of an over current relay. Reference : (1) Metropolitan Vicker’s Electric Co., Descriptive leaflet 341/9-1. (2) A.T. Starr : Generation, Transmission & Utilisation of Electric Power (pp. 247 & 248). (3) English Electric : Protective Relays Application Guide (pp 81-87) (4) Soni, Gupta, Bhatnagar : A course in Electrical Power (pp. 393) AKM-12/05 1 of 2

Fig. Circuit Diagram AKM-12/05 2 of 2

DEPARTMENT OF ELECTRICAL ENGINEERING BENGAL ENGINEERING AND SCIENCE UNIVERSITY, SHIBPUR
Power System Protection Laboratory 8th
Semester Electrical
Expt. No. EE 852/4
Relay under test : Directional Over-current Relay. Type : NPO, 100% current : 5A, 110V, 50Hz. Plug setting : 50 – 75 ……200% Time setting : 0 to 1.0 (Lab No. W-3/4) Make : Metropolitan Vickers. Procedure : Connect the relay as per circuit diagram shown. Use an electric time interval meter (Synchronour chronoscope) for measuring the time of operation of the relay. By adjusting the adjustable rheostat of the secondary injection set vary the relay exciting current in steps from 5 to 20A and note down the relay operating time from the time interval meter. Use plug setting = 100% and time setting = 1.0. (Note : If you change the terminals V-V without changing C-C of the relay, it will not operate. This is because of directional property). Report : (1) Draw the time of operation vs. exciting current in amps. Characteristics for the relay. (2) Draw the internal circuit diagram for the relay under test. Reference : 1. G.W. Stubbings : Automatic Protection of A.C. Circuits (pp. 142)
CHARACTERISTICS OF DIRECTIONAL OVER CURRENT RELAY
2. Metropolitan Vickers Electrical Co. Ltd. Descriptive leaflet 341/9-1.
3. Soni, Bhatnagar & Gupta : A Course in Electrical Power (pp. 396) AKM-12/05 1 of 2

Fig. Circuit Diagram AKM-12/05 2 of 2

DEPARTMENT OF ELECTRICAL ENGINEERING BENGAL ENGINEERING AND SCIENCE UNIVERSITY, SHIBPUR
Power System Protection Laboratory 8th Semester Electrical Expt. No. EE 852/5
CHARACTERISTIC OF PERCENTAGE DIFFERENTIAL RELAY Relay under Test : High speed Generator Differential Relay, Type : AGD-3SF : Make Universal Electrics Ltd., India, Rated Current = 5A, Percentage Bias = 5 or 10, Rated frequency = 50 Hz, Operating time : 15 millisecs. (approx.) Procedure : Take connection as shown in the circuit diagram. Use two 10A meters to note I1 and I2 and a 6A meter to note Id. Use two 10 ohms rheostats as R1 and R2. Energize, BARI, increase I slowly to 3 amp by adjusting the Varian not by lowering R1. Then energize VAR2 and adjust I to 3 amp. If the differential current (Id) is almost Zero, then your connection with respect to polarity is proper. If not, change the polarity on any one side and proceed. Then vary I1 and I2 to get different Id. For each step note Id, I1 and I2 when the relay just operates. Enter the results in the data sheet. Take at least seven sets of readings.
Sl. No.
I1 I2 Through Current ITH
Differential (Id)
1 2 3
Report : 1. On a squared paper draw the operating characteristic (Differential current vs through current) of the percentage differential relay. Distinctly mark the positive torque region. Reference : 1. Universal Electrics. High Speed Generator Differential Relay (technical literature),
Type : AGD – 3SF. 2. Mason : Art and Science of Protective Relaying (p 618) 3. Soni, Bhatnagar, Gupta : A Course on Electrical Power (p 404) AKM-12/05 1 of 2

Fig. Circuit Diagram AKM-12/05 2 of 2

DEPARTMENT OF ELECTRICAL ENGINEERING BENGAL ENGINEERING AND SCIENCE UNIVERSITY, SHIBPUR
Power System Protection Laboratory 8th
Semester Electrical
Expt. No. EE 852/6
TESTS ON STATIC AMPLITUDE COMPARATOR
EQUIPMENT UNDER TEST : An opposed Voltage diode bridge type amplitude Comparator. Input Voltages (O to 25V) A. C. & Comparator Output (o to IV) D.C. APPARATUS USED : Two Voltmeters:, one A.C. and the other D.C. Moving Coil type. PROCEDURE : 1. Study the circuit diagram (Fig.1) and various components of the Comparator. 2. Energise the Comparator through a phase shifting transformer so that the phase of one voltage may be varied from the other. A scott connected transformer with input voltage of 220V, 3 ph and output voltage of 110V each, 2 ph with 11 taps. 3. Keep one (E1) of the voltages constant at 20 to 22 V. Vary the other voltage (E2) slowly from 0 to 22V by means of a 70 ohm pot to obtain Comparator output (E0). Record readings of E1, E2 and E0. During this test keep the phase of E2 same as that of E1
.
4. Then vary the phase of E2 from 0 to + 1800 in steps of + 450. For any phase repeat the procedure as in (3) to determine E2 for which E0 is zero. For a particular phase of E2
tabulate the results as shown below :
Magnitude Magnitude Phase of E Comparator (E1 / E2 of E
) 1 of E2 w.r. to E1 output (E0
---------------------------------------------------------------------------------------------------- )
0 Ø ---------------------------------------------------------------------------------------------------- -450
‘---------------------------------------------------------------------------------------------------- Ø
Note : You may vary the phase of E2
by adding appropriate voltage from the quadrature transformer with that of the in-phase transformer.
REPORT : 1. Draw the curve of Comparator output (E0) against magnitude of (E1/E2
2. From the experimental results plot (E
) for Zero phase.
1/E2
) complex in polar form.
REFERENCES : 1. C.L. Wadhwa : ‘Electrical Power System’ , Second edition, New Age
International, 1985. 2. T.S.M. Rao : ‘Power System Protection – Static Relays’ Tata Mc Graw Hill, 1979. 3. A.R. Van. C. Warrington : ‘Protective Relays – their theory and practice – Vol 1’
Chapman and Hall, 1969. AKM-12/05 1 of 2

AKM-12/05 2 of 2
Fig. 2. Internal Circuit Diagram
Fig. 1. Test Circuit Diagram

DEPARTMENT OF ELECTRICAL ENGINEERING BENGAL ENGINEERING AND SCIENCE UNIVERSITY, SHIBPUR
Power System Protection Laboratory 8th
Semester Electrical
Expt. No. EE 852/ 7
STUDY OF OVER CURRENT TIME RELAY
Set under test : Over current time relay – type S. Maker : Brown Boveri. Time Setting : 0.2 to 10 secs. At 50 Hz Rated current setting : 2.5/5A (Lab. No. W-3/6) Procedure : Study the following parts and functional components of the relay : a. Service current indicator e. Contact terminals b. Setting rated current f. Setting pick up current c. Setting limit current g. Operating coil terminals d. Adjusting time-setting of the relay. First of all set the rated current In= 2.5A (i.e. use series connection) and Ipick up= In
Keeping the time setting at 5 secs., note down the relay operating time for various values of currents ranging from 2.5A to 4.5A and tabulate the results so obtained. Obtain two sets of data for each value of actuating current. Use stop-watch for noting the time.
x 1. Connect as per circuit diagram. Apply about 2.6A current from Borwn Boveri Secondary injection set to the terminals 1 & 2 and note the time of operation for various time set (e.g. 2,4,5,8,19 sec.) using a stop watch. Take two sets of readings in each case.
Reference : 1 . Brown Boveri : Testing Set – type C for secondary relays.
2. Brown Boveri : Overr current time relays Typs S.No. AK 90008E. Report : 1. Draw the curve of observed time vs. time set for constant actuating current of 2.6A. 2. Draw the time of operation vs. actuating current keeping time set constant at 5.0 sec. Precautions : Do not change any adjustment or disconnect any terminal when the relay is energized. AKM- 12/2004

DEPARTMENT OF ELECTRICAL ENGINEERING BENGAL ENGINEERING AND SCIENCE UNIVERSITY, SHIBPUR
Power System Protection Laboratory 8th Semester Electrical Expt. No. EE 852/8 TESTS ON POWER RELAY Apparatus under test : Reverse current relay, type FS Current : 100%
Volt : 100%, 110V % Rev. current : 7.5 – 10 – 15z Frequency : 50 Hz Make : Reyrolle – England, Lab. No. W-3/11.
Procedure : Connect as in circuit diagram supplied. Use 15% tap of the relay. Apply about 110V from the phase shifting transformer at different phase positions (varying from 0 to + 900) and note down the change in the relay operating current. Tabulate the results as below:- Experimental Data
No. of
Obvs.
In phase Voltage
Vx
Quadrature Voltate
Vy
Total applied Voltage
V
Minimum pickup Current ‘I’
Report : (1) From the experimental data prepare Table I. Table I No. of Obvs.
Applied Voltage
Pick up Current
Phase angle Pick up Current for V=110V
Pick up currents value Lag/lead Ix Iy
Ix - in phase component of I = I Cos Ø, Iy – Quadrature component of I = I Sin Ø ∴ Ø = tan-1 (IY / IX ) (2) From table I plot the polar characteristics of the relay on a square paper and calculate –
(a) V.I min product = (K2/ K1) (b) Angle of maximum torque = ( )
Reference:1. Reyrolle & Co. Ltd.: Pamphlet 1274 for Reverse – current relays, type Es
2. A. T. Starr : Generation, Transmission, Distribution & Utilisation of Electric Power (pp 247, 248)
3. C.R. Mason : Art & Science of Protective Relaying (Book) AKM-12/05 1 of 2

Fig. Circuit Diagram
AKM-12/05 2 of 2

DEPARTMENT OF ELECTRICAL ENGINEERING BENGAL ENGINEERING AND SCIENCE UNIVERSITY, SHIBPUR
Power System Protection Laboratory 8th
Expt. No. EE 852/9
Semester Electrical
TESTS ON NUMERICAL OVER CURRENT RELAY
Operating Instructions:
Numerical over current relay consists of three parts:-
i) Current Injection Set with Digital type AC ammeter: 0-50A. – Metal casing ii) Numerical over current relay – Metal [PC] casing iii) INTEL 8085 based Micro-Computer Kit.
1) Connect the two Red cables of 50 Amp rating to the input of the Over Current Relay [i.e. to 40/0.1A current
transformer] to the terminals [output terminals] of the back cover of the current injection set.
2) A PVC cable [Four core] with suitable jacks [4-point] is connected to the ‘Connection Board’ present in the back side of the main relay assembly unit to the similar jack [4-point] present in the back cover of the current injection set.
3) Connect the Micro-computer through the twenty-five (25) pin ‘D’ type connector cable supplied with the relay to the jacks provided inside the cover and marked “Connections to the Micro-computer” at the lower front portion of the relay after pressing its top portion gently to remove the cover. Connect the other side of the connector to the rear side jack of the micro-computer.
4) Press the Reset button of the microprocessor – The display shows ‘SBS – 1’.
5) Connect the 3-pin plug chord given to the metal PC casing and then connect three-pin-plug to the 230V, 50Hz supply. Switch on the supply by switching the switch present at the backside of the Relay unit ‘ON’.
6) Immediately the Time Interval meter will display; may start running.
7) Press the ‘Stop’ and ‘Reset’ push buttons to stop and reset the Time Interval Meter. The equipment is now ready for use.

A.
For Instantaneous Tripping Operation:
i) Move the 100% plug setting switch in the downward direction [to switch ON]. All switches in the plug setting bridge must be in the upward [switch OFF] direction. Remember, only one switch in the plug setting bridge can be lowered down or switched ‘ON’ at a time.
ii) If the current carrying cables (Red) are connected to the current injection set, then adjust the variac to set the current in the ammeter to 1.0A (Please note that the ON/OFF switch of the current injection set must be switched on beforehand). This means that the PSM has been adjusted to 2.
Imp.
The ammeter reading should be multiplied by 10 (since the CT ratio is 50/5) to get the actual current injected into the relay.
Example:
For PSM – 5, adjust the ammeter reading to 0.5A by using the variac. Use similar method for other PSM adjustment.
iii) Press ‘Go’ 0A00 ‘EXEC’ Display will show S – 01h Press ‘NEXT’ key, display will show FCL – 2Ch Press ‘NEXT’ key, display will show FCH – 01h Press ‘NEXT’ key, display will show PS – 13h Press ‘NEXT’ key, display will show CS – 00h Press ‘NEXT’, the relay will operate and show the time of operation (instantaneous). PS display shows P – 100 and TSM display shows t – 0.1.
B.
Items (i) and (ii) will be the same as mentioned in (A).
Definite Time-Current Characteristic:
(iii) Lower the 100% plug setting switch in the ‘ON’ mode.
Press ‘Go’ 0A00 ‘EXEC’ Display will show S – 01h Press ‘NEXT’ key, display will show FCL – 2Ch Press ‘NEXT’ key, display will show FCH – 01h Press ‘NEXT’ key, display will show PS – 13h Press ‘NEXT’ key, display will show CS – 00h, adjust it to CS – 01h Press ‘NEXT’, the relay will operate according to its time of operation.
PS display shows P – 100 and TSM display shows t – 0.1.

1. Instantaneous tripping and definite time characteristic are not dependent on TMS or the values of FCL and FCH, i.e. (N). They will operate as soon as PSM exceed 1.3.
Note:
2. In all cases, once the relay operates, the primary current circuit gets disconnected. Press Reset button of the microprocessor to energize it again.
C.
IDMT Characteristic:
PSM adjustment will be the same as in (i) and (ii) in (A). Set PS bridge 100% switch in the ON mode. (iii) Press ‘Go’ 0A00 ‘EXEC’
Display will show S – 01h, adjust it to S – 10h [for TMS = 1.0 setting] Press ‘NEXT’ key, display will show FCL – 2Ch, adjust it to FCL – B0h Press ‘NEXT’ key, display will show FCH – 01h, adjust it to FCH – 04h Press ‘NEXT’ key, display will show PS – 13h, no adjustment Press ‘NEXT’ key, display will show CS – 00h, adjust it to CS – 08h for IDMTL operation Press ‘NEXT’, the relay will operate according to its time of operation.
PS display shows P – 100 and TSM display shows t – 1.0.
Note:
After every relay operation, press the RE push buttons to reset the timer to 00.00 and press the ‘Reset’ button of the microprocessor to re-energize the primary current circuit [which will get de-energized after tripping].
D. Extremely Inverse Characteristic:
(𝑇𝑇 = 80𝐼𝐼2−1
)
PSM adjustment will be the same as in (i) and (ii) in (A). Set PS bridge 100% switch in the ON mode. (iii) Press ‘Go’ 0A00 ‘EXEC’
Display will show S – 01h, adjust it to S – 10h [for TMS = 1.0 setting] Press ‘NEXT’ key, display will show FCL – 2Ch, no adjustment Press ‘NEXT’ key, display will show FCH – 01h, no adjustment Press ‘NEXT’ key, display will show PS – 13h, no adjustment Press ‘NEXT’ key, display will show CS – 00h, adjust it to CS – 09h Press ‘NEXT’, the relay will operate according to its time of operation.
PS display shows P – 100 and TSM display shows t – 1.0.

Note:
In this case operating time is so small that at 20 PSM and t = 0.1 (S = 01), the time of operation will be approximately 0.0225s. This cannot be measured accurately because the minimum operating time of the mechanical relay is 0.04s.
Following the procedure listed above, the IDMT characteristic and the Extremely Inverse characteristics can be obtained for other plug setting and TMS.
IDMT
Table – IV
OP Time N
CS PSM IDMT (STD) (Sec)
IDMT (Exp) (Sec)
TMS FCL FCH
08 2 10.0 1.0 B0h 04h 08 3 7.0 1.0 B0h 04h 08 5 4.10 1.0 B0h 04h 08 10 3.00 1.0 B0h 04h 08 15 2.6 1.0 B0h 04h 08 20 2.2 1.0 B0h 04h
Extremely Inverse (𝑇𝑇 = 80𝐼𝐼2−1
)
Table – V
OP Time N
CS PSM (STD) (Sec)
(Exp) (Sec) TMS FCL FCH
09 2 27.0 1.0 2Ch 01h 09 3 10.0 1.0 2Ch 01h 09 5 3.33 1.0 2Ch 01h 09 10 0.799 1.0 2Ch 01h 09 15 0.357 1.0 2Ch 01h 09 20 0.2 1.0 2Ch 01h