deployment guide - dabcc · deployment guide a step-by-step technical guide ... and performance for...
TRANSCRIPT

Dynamic Caching for ASP.NETDeployment GuideA Step-by-Step Technical Guide
Deployment Guide

Deployment Guide
Notice:
The information in this publication is subject to change without notice.
THIS PUBLICATION IS PROVIDED “AS IS” WITHOUT WARRANTIES OF ANY KIND, EXPRESS OR IMPLIED, INCLUDING ANY WARRANTIES OF MERCHANTABILITY, FITNESS FOR A PARTICULAR PURPOSE OR NONINFRINGEMENT. CITRIX SYSTEMS, INC. (“CITRIX”), SHALL NOT BE LIABLE FOR TECHNICAL OR EDITORIAL ERRORS OR OMISSIONS CONTAINED HEREIN, NOR FOR DIRECT, INCIDENTAL, CONSEQUENTIAL OR ANY OTHER DAMAGES RESULTING FROM THE FURNISHING, PERFORMANCE, OR USE OF THIS PUBLICATION, EVEN IF CITRIX HAS BEEN ADVISED OF THE POSSIBILITY OF SUCH DAMAGES IN ADVANCE.
This publication contains information protected by copyright. Except for internal distribution, no part of this publication may be photocopied or reproduced in any form without prior written consent from Citrix.
The exclusive warranty for Citrix products, if any, is stated in the product documentation accompanying such products. Citrix does not warrant products other than its own.
Product names mentioned herein may be trademarks and/or registered trademarks of their respective companies.
Copyright © 2008 Citrix Systems, Inc., 851 West Cypress Creek Road, Ft. Lauderdale, Florida 33309-2009 U.S.A. All rights reserved.

Table of ContentsIntroduction ..........................................................................................................................................4Solution Requirements ..........................................................................................................................5Prerequisites .........................................................................................................................................5The Warehouse Application ..................................................................................................................6NetScaler Configuration ........................................................................................................................8
Identifying content to cache .............................................................................................................8Implementing NetScaler content groups and caching policies ..........................................................9Implementing cache invalidation and no-cache policies .................................................................12Testing the configuration ................................................................................................................14Conclusions ...................................................................................................................................17
Appendix A - NetScaler Application Switch Configuration ...................................................................18

4
IntroductionCitrix® NetScaler® optimizes the delivery of web applications — increasing security and improving performance and Web server capacity. This approach ensures the best total cost of ownership (TCO), security, availability, and performance for Web applications. The Citrix NetScaler solution is a comprehensive network system that combines high-speed load balancing and content switching with state-of-the-art application acceleration, layer 4-7 traffic management, data compression, dynamic content caching, SSL acceleration, network optimization, and robust application security into a single, tightly integrated solution. Deployed in front of application servers, the system significantly reduces processing overhead on application and database servers, reducing hardware and bandwidth costs.
The Integrated Caching feature of the Citrix Application Switch helps optimize the delivery of web content and applications. The Integrated Cache is a fast, in-memory cache that is HTTP/1.1 and HTTP/1.0 compliant by default, but can be configured to do much more. The Integrated Cache can store a variety of static and dynamic content and serve this content instantly to many users. At the origin (for example, data center deployments fronting the web servers), aside from the inherent benefits of the system, caching of HTTP content reduces the number of web server transactions.
Caching dynamic content reduces the latency and the computation cost (in the application and database servers) associated with the dynamic page generation process. Caching at the edge (for example, ISP and branch Enterprise deployments) can, in addition, result in significant reduction in page download time and in bandwidth utilization.
This article presents a practical example of using NetScaler dynamic content caching capabilities for optimizing an ASP.NET web application. It discusses the way an Application Expert would find out the potential caching scenarios that a web application can benefit from, and shows how to create and test the NetScaler caching policies and settings to put these scenarios into effect.

5
Solution RequirementsApplication Delivery Front-End
Dynamic Caching
ASP.NET
PrerequisitesCitrix NetScaler L4/7 Application Switch, running version 8.0+, (Quantity x 1 for single deployment, Quantity x 2 for HA deployment).
Layer 2/3 switch, w/support for 802.1q VLANs, (Quantity x 1)
Client laptop/workstation running Internet Explorer 6.0+, Ethernet port
9-pin serial cable -or- USB-to-serial cable
•
•
•
•
•
•
•
NOTE: The policies in this guide are based on the Policy Engine (PE) architecture in NetScaler version 8.0. The policies for NetScaler version 9.0+ use the Policy Infrastructure (PI) architecture which are different in syntax and methodology. Policy Infrastructure is not discussed in this guide.

6
The Warehouse ApplicationIn order to keep the example simple for illustration, we created an ASP.NET web application called warehouse, made up of just 5 web pages. The application manages details and stock quantity for a small number of products. The following figure shows a diagram of the application pages.
Each product is described with an identifier (product ID), a name, a description, and an integer value representing the stock available. The viewDetails.aspx page shows all of a product details except stock availability, whereas viewStocks.aspx shows only product ID and stock availability. In a similar fashion, the updDetails.aspx and updStocks.aspx pages are used to update the product details and the product stock availability respectively.
Figure 1.
Warehouse application diagram.
Figure 2.
Warehouse web application home
page.

7
In order to understand the navigation paths for this web application, figure 3 describes all the transitions that occur between the web pages of the application as the user clicks on buttons to perform actions:
1. View available product stocks – The user enters a product ID on the web application’s home page (Default.aspx) and then clicks the “View available product stocks” button. The user is then presented with a page which reports the availability for the specified product. If the product does not exist, the user stays on the main page, and an error message is displayed.
2. View product details - The user enters a product ID on the web application’s home page and then clicks the “View Product Details” button. The user is then presented with a page which reports the details (product ID, name, and description) for the specified product. If the product does not exist, the user stays on the main page, and an error message is displayed.
3. Update product stocks - The user enters a product ID on the web application’s home page and then clicks the “update product stocks” button. The user is then presented with a UPDATE form (see step 5) in which he can update the value of the stock availability for such product. If the product does not exist, the user stays on the main page, and an error message is displayed.
4. Update product details - The user enters a product code on the web application’s home page and then clicks the “Update Product Details” button. The user is then presented with an UPDATE form (see step 6) in which he can update the product details. If the product does not exist, the user stays on the main page, and an error message is displayed.
5. UPDATE (set new product stocks data) – After entering the stock available for the chosen product, the user submits the UPDATE form. As a result, the product is updated by the application, and the user is redirected back to the home page of the web application.
6. UPDATE (set new product details) – After entering the new details for the chosen product, the user submits the UPDATE form. As a result, the product is updated by the application, and the user is redirected back to the home page of the web application.
7. Reload product list – The user click the “Reload Product List” button from the home page to reload default data into the application. It is a kind of a reset of the application to its default state. This function is used only because data used by our application is actually not physically stored persistently (for simplicity, it is just hardcoded in the web application), and this is a way to return the application to its default state. After reloading product data, the user stays on the application home page.
Figure 3.
Transition diagram for the
warehouse web application.

8
NetScaler ConfigurationIdentifying content to cache
This simple web application provides three different kinds of information: product details for a product, stock availability for a product, and the number of products in the application (displayed in the home page in red – see figure 2).
The pages viewDetails.aspx and viewStocks.aspx are read-only pages, so it is worth caching them as long as the product details or stock haven’t been updated by the user. These contents have to be invalidated however whenever a product is updated using the update pages. More specifically, the content in the viewDetails.aspx page has to be invalidated when product details are updated (through page updDetails.aspx), and the content in the stock availability page (viewStocks.aspx) has to be invalidated when the product stock status is updated (by updStocks.aspx).
Even though the pages updDetails.aspx and updStocks.aspx, are the forms to update a product, they always show the current values of the product in the fields of the form (as shown in figure 4). The user can then change the values as required, and submit these forms. In this regard, the initial state of these forms is similar to the viewDetails.aspx and viewStocks.aspx (they display the current data about the product). The only difference is that the user can update the product details or stock status from these pages. It will be therefore worth caching these forms too when initially loaded, provided that there is a way for us to distinguish the HTTP request sent to the server when the page (form) is initially loaded, from the request sent when the form is later submitted (the “update” action). In other words, we want to be able to cache the response content of transition 3 and 4 in Figure 3, but not the response content of transition 5 and 6.
What about the caching behavior for the home page (Default.aspx)?
Since the number of products in the application displayed on the home page can be dynamic, and we assume that there is no way for us to know when the number of products in the warehouse changes (may be a backend system updates the warehouse database), it will be probably better to avoid caching this page. In addition, the home page may contain error messages shown to the user for various reasons (e.g. when the use enters a wrong product ID), and this is another reason why we shouldn’t cache this page.
Figure 4.
Page updDetails.aspx.

9
Implementing NetScaler content groups and caching policies
Once we built our web application, it was ready for deployment behind a NetScaler. We deployed it by configuring NetScaler with the following basic settings:
• One HTTP service physical address is 10.70.176.244 and port 80.
• One LB virtual server with VIP 10.70.177.244, port 80. The HTTP service is bound to this LB vserver.
In order to translate our caching statements in the previous section into effective caching policies on NetScaler, we need first to define a set of NetScaler content groups to store cached objects (responses to HTTP requests).
To achieve this, we analyzed the contents of the HTTP requests for each page of our application. In this section, we will discuss the caching of pages resulting from transition 1 to 4 in Figure 3, and we discuss the pages resulting from update actions (transitions 5 and 6) in the next one.
We used the Wireshark network analysis tool to extract the HTTP traffic of each page. For the sake of economy of space, cookie headers, as well as the “Accept” header are not shown in the traces of the HTTP requests.
For each page analyzed, we noticed that the content of the page always depends only on the value of the “prodID” request parameter. This means whenever this parameter has a different value in the HTTP request, the response page will be different. And whenever this parameter has the same value as a previous request, the response from the application is identical. This means that this request parameter is enough to uniquely identify responses to be cached, and there is no need in our case for employing other request parameters or cache selectors to uniquely identify a response.
So now we have to decide how many content groups in NetScaler we would use to store the objects we decide to cache. Because we need a request parameter to identify cached objects (in addition to the request URL), we have to use NetScaler’s parameterized content groups.
We could try to store all the cached objects from our application in one parameterized content group (with the parameter “ProdID” being the parameter for this content group). However, this choice is not very efficient with regards to invalidation. Indeed, stock pages must be invalidated when the stock quantity is modified, whereas details pages must be invalidated when product details are modified. Putting cached objects from both pages in the same content group wouldn’t allow us the flexibility to invalidate selectively just one type of information (product stock or product details) for a product.
Therefore, it is better to create two parameterized content groups in our case:
1. One for product details (product_details_views): This parameterized content group is used to cache objects resulting from transitions 2 and 4 (both are used to view product details).
2. One for product stocks (product_stocks_views). This parameterized content group is used to cache objects resulting from transitions 1 and 3 (both are used to view product stock)

10
In addition, we enable the ignoreReqCachingHdrs flag on the content groups, since HTTP requests from the client might contain a “cache-control” header with a value of “no-cache” that we want to ignore.
We also set the maximum memory size of both content groups to 4MB, and the maximum size for a single cache object to 80 KB. We didn’t impose a minimum cache object size.
Now that we defined the content groups that we need, the second step is to create the caching policies that would make use of these content groups.
We will create four caching policies because we have 4 different types of requests whose responses we want to cache (and to serve subsequent similar requests of from the cache):
1. A policy called cache_prod_details to cache responses of the viewDetails.aspx page in the content group product_details_views. The rule of this policy contains the expression that identifies the viewDetails.aspx page (see Figure 5).
2. A policy called cache_upd_details to cache objects of the updDetails.aspx page in the content group product_details_views. The rule of this policy contains the expression that identifies the updDetails.aspx page (see Figure 5).
3. A policy called cache_prod_stocks to cache objects of the viewStocks.aspx page in the content group product_stocks_views. The rule of this policy contains the expression that identifies the viewStocks.aspx page (see Figure 5).
4. A policy called cache_upd_stocks to cache objects of the updStocks.aspx page in the content group product_stocks_views. The rule of this policy contains the expression that identifies the updStocks.aspx page (see Figure 5).
All these policies will be bound globally, preceding default caching policies . Their priority is not important, since their rules identify totally disjoint traffic subsets (any request in our application would not match more than one of these policies).
NOTE: We could have combined the two first policies (the ones which use the product_details_view content group) into one policy, and the last two (the ones that use the product_stocks_view content group) into another, by combining their rule expressions into one expression using the OR expression operator. We would have had only 2 caching policies.

11
Figure 5.
HTTP Request for transitions 1 to 4.

12
Implementing cache invalidation and no-cache policies
As discussed in the previous section, the home page of the web application, Default.aspx, should not be cached. Therefore we also create a caching policy, with the action set to NOCACHE for all HTTP requests for this page.
For invalidation policies, they should invalidate product details (or product stocks) cache objects whenever the details (or stock) of a product changes. This can happen in three ways:
1. For product details: The “update” button is pressed on the updDetails.aspx form (transition 6 in figure 3). We need to create an invalidation policy that would invalidate all objects in the product_details_views content group that have the same value of the ProdID parameter as the “update” request of transition 6.
2. For stock availability: The “update” button is pressed on the updStock.aspx form for updating product stocks (transition 5 in figure 3). So, we would create an invalidation policy to invalidate objects in the product_stocks_views content group that have the same value of the ProdID parameter as the “update” request of transition 5.
To create our invalidation policies, we need to analyze the HTTP request that triggers the invalidation in each case.
In order to invalidate product details cache objects, the HTTP request sent when the update button is pressed (transition 6 in figure 3) has been analyzed. The content of the HTTP request of this transition is shown on Figure 6. This request will form the expression of the rule for our first invalidation policy.
Similarly, we also analyzed the request sent when the product stock availability form is submitted (transition 5 in figure 3). The content of the HTTP request of this transition is very similar to Figure 6 (the only difference is the name of the page). This request will form the rule expression of our second invalidation policy.
Because transition 4 and transition 6 (as well as transition 3 and 5) are almost identical in terms of HTTP request (except for the HTTP method which is GET in the former and POST in the latter), and because we want to cache objects of transition 4, while we want to use transition 6 to invalidate cached objects, we need a way to differentiate these 2 HTTP requests in our policy rules.
As it could be easily seen, the main difference is that the method employed is POST instead of GET. Another difference is that, in this case the POST Body contains a “Button1” parameter whose value is set to “Update” (the label of the button on the form).

13
As we cannot base invalidation or caching policy rules on parameters in the body of the request, we will need to base our invalidation rule on the request method (GET or POST) to differentiate between the two cases.
As a consequence, invalidation policies corresponding to product details (transition 6) and to stock availability updates (transition 5) will be written in the following way:
1. Invalidation Policy rule: REQ.HTTP.URL CONTAINS updDetails.aspx (updStocks.aspx) && REQ.HTTP.METHOD == POST
2. Invalidation target: objects in content group product_details_views (product_stocks_views); the invalidation will be performed through the invalObjects parameter in order to invalidate only the objects whose prodID parameter matches the invalidating request.
The CLI commands for all caching and invalidation policies described in this section and the previous one can be found in the ns.conf file listed in Appendix A.
Figure 6.
HTTP Request sent for updating
product details (transition 6).

14
Testing the configuration
After implementing our caching policies and content groups, we tested them, to make sure that we were getting the behavior we expect from dynamic caching.
We first tested the No-Cache policy for the home page. In order to perform such a test, we navigated to the application home page in the browser. This results in the following request sent to the application:
GET /warehouse/Default.aspx
Using the CLI command “show cache policy”, we found that the No-Cache policy was correctly hit as shown below:
Name: nocache_homepage
State: ACTIVE
Priority: 9
Rule: REQ.HTTP.URL CONTAINS default.aspx
Action: NOCACHE
Precede default HTTP rules: YES
Hits : 1
We then tested the 4 caching policies we defined. To do this, We clicked on the four buttons on the home page and these actions generated the following HTTP requests to the application:
GET /warehouse/viewDetails.aspx?prodID=2
GET /warehouse/viewStocks.aspx?prodID=2
GET /warehouse/updDetails.aspx?prodID=2
GET /warehouse/updStocks.aspx?prodID=2
This time we used the NSGUI console to check whether the caching policies were correctly hit and what objects were cached as a result. The screenshot of NSGUI below shows that indeed our caching policies were hit and the resulting cached object for product ProdID=2 were stored in the cache:
Figure 7.
Cache Objects stored
in the application switch’s content
groups.

15
We then tested, whether subsequent requests for product prodID=2 would be served from the cache (cache hits). So, we generated the following HTTP request 4 times:
GET /warehouse/viewDetails.aspx?prodID=2
Then we inspected the statistics of the “warehouse/viewDetails.aspx?prodID=2” cache object in NSGUI. The following figure shows as expected that the number of cache hits for this object is equal to 5, whereas the number of misses is equal to 1 (the first hit and miss in NetScaler correspond to the first time the object is requested and stored in the cache).
Figure 8.
Cached object details.

16
By inspecting responses received by the user web browser, it can be clearly seen that the content has been served by the NetScaler cache (and not by the application) as shown the cache headers below:
The last test we performed was for the invalidation policies. We filled and submitted the update details form (updDetails.aspx) for product ID 2. The following request is sent as a result to the application:
POST /warehouse/updDetails.aspx?prodID=2
We expect that all cache objects whose prodID parameter is equal to 2 in the product_details_views content group would be invalidated (removed from the cache) according to our invalidation policies. And this is confirmed by looking at the cache objects left in the NetScaler cache. Notice that compared to Figure 7, the “product details” cache objects whose ProdID is equal to 2 have disappeared from the NetScaler cache.
Figure 9.
HTTP Response header sent from
the NetScaler box.
Figure 10.
Objects in content groups after
invalidation.

17
Conclusions
In this article, we have walked you through an example of using NetScaler dynamic caching for a web application.
We have shown how an Application Expert would identify the parts of the web application that are eligible for dynamic caching. We have then proceeded to show what type of content groups need to be created and how many. We then analyzed the HTTP requests of the web application and based on this analysis, created no-cache, caching and invalidation policies. We finally discussed how to test the created policies to make sure they are achieving the expected result, and to find out the amount of caching that occur in the application for the different pages.
18
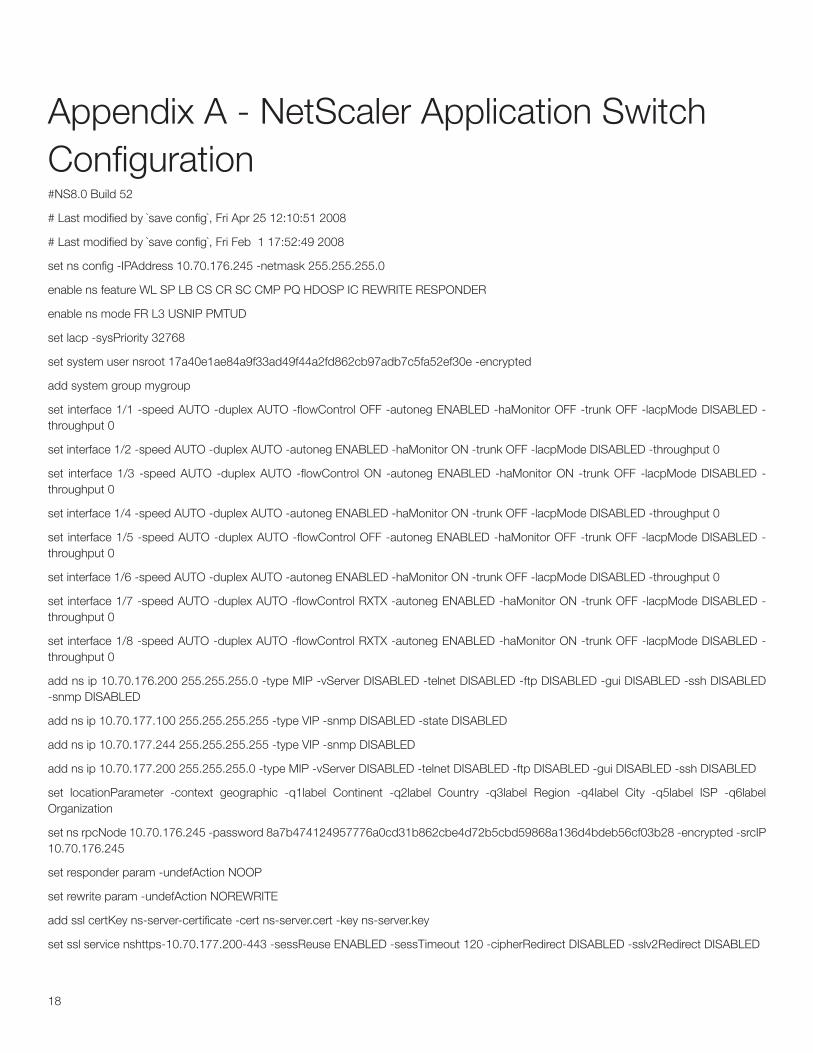
Appendix A - NetScaler Application Switch Configuration#NS8.0 Build 52
# Last modified by `save config`, Fri Apr 25 12:10:51 2008
# Last modified by `save config`, Fri Feb 1 17:52:49 2008
set ns config -IPAddress 10.70.176.245 -netmask 255.255.255.0
enable ns feature WL SP LB CS CR SC CMP PQ HDOSP IC REWRITE RESPONDER
enable ns mode FR L3 USNIP PMTUD
set lacp -sysPriority 32768
set system user nsroot 17a40e1ae84a9f33ad49f44a2fd862cb97adb7c5fa52ef30e -encrypted
add system group mygroup
set interface 1/1 -speed AUTO -duplex AUTO -flowControl OFF -autoneg ENABLED -haMonitor OFF -trunk OFF -lacpMode DISABLED -throughput 0
set interface 1/2 -speed AUTO -duplex AUTO -autoneg ENABLED -haMonitor ON -trunk OFF -lacpMode DISABLED -throughput 0
set interface 1/3 -speed AUTO -duplex AUTO -flowControl ON -autoneg ENABLED -haMonitor ON -trunk OFF -lacpMode DISABLED -throughput 0
set interface 1/4 -speed AUTO -duplex AUTO -autoneg ENABLED -haMonitor ON -trunk OFF -lacpMode DISABLED -throughput 0
set interface 1/5 -speed AUTO -duplex AUTO -flowControl OFF -autoneg ENABLED -haMonitor OFF -trunk OFF -lacpMode DISABLED -throughput 0
set interface 1/6 -speed AUTO -duplex AUTO -autoneg ENABLED -haMonitor ON -trunk OFF -lacpMode DISABLED -throughput 0
set interface 1/7 -speed AUTO -duplex AUTO -flowControl RXTX -autoneg ENABLED -haMonitor ON -trunk OFF -lacpMode DISABLED -throughput 0
set interface 1/8 -speed AUTO -duplex AUTO -flowControl RXTX -autoneg ENABLED -haMonitor ON -trunk OFF -lacpMode DISABLED -throughput 0
add ns ip 10.70.176.200 255.255.255.0 -type MIP -vServer DISABLED -telnet DISABLED -ftp DISABLED -gui DISABLED -ssh DISABLED -snmp DISABLED
add ns ip 10.70.177.100 255.255.255.255 -type VIP -snmp DISABLED -state DISABLED
add ns ip 10.70.177.244 255.255.255.255 -type VIP -snmp DISABLED
add ns ip 10.70.177.200 255.255.255.0 -type MIP -vServer DISABLED -telnet DISABLED -ftp DISABLED -gui DISABLED -ssh DISABLED
set locationParameter -context geographic -q1label Continent -q2label Country -q3label Region -q4label City -q5label ISP -q6label Organization
set ns rpcNode 10.70.176.245 -password 8a7b474124957776a0cd31b862cbe4d72b5cbd59868a136d4bdeb56cf03b28 -encrypted -srcIP 10.70.176.245
set responder param -undefAction NOOP
set rewrite param -undefAction NOREWRITE
add ssl certKey ns-server-certificate -cert ns-server.cert -key ns-server.key
set ssl service nshttps-10.70.177.200-443 -sessReuse ENABLED -sessTimeout 120 -cipherRedirect DISABLED -sslv2Redirect DISABLED
19
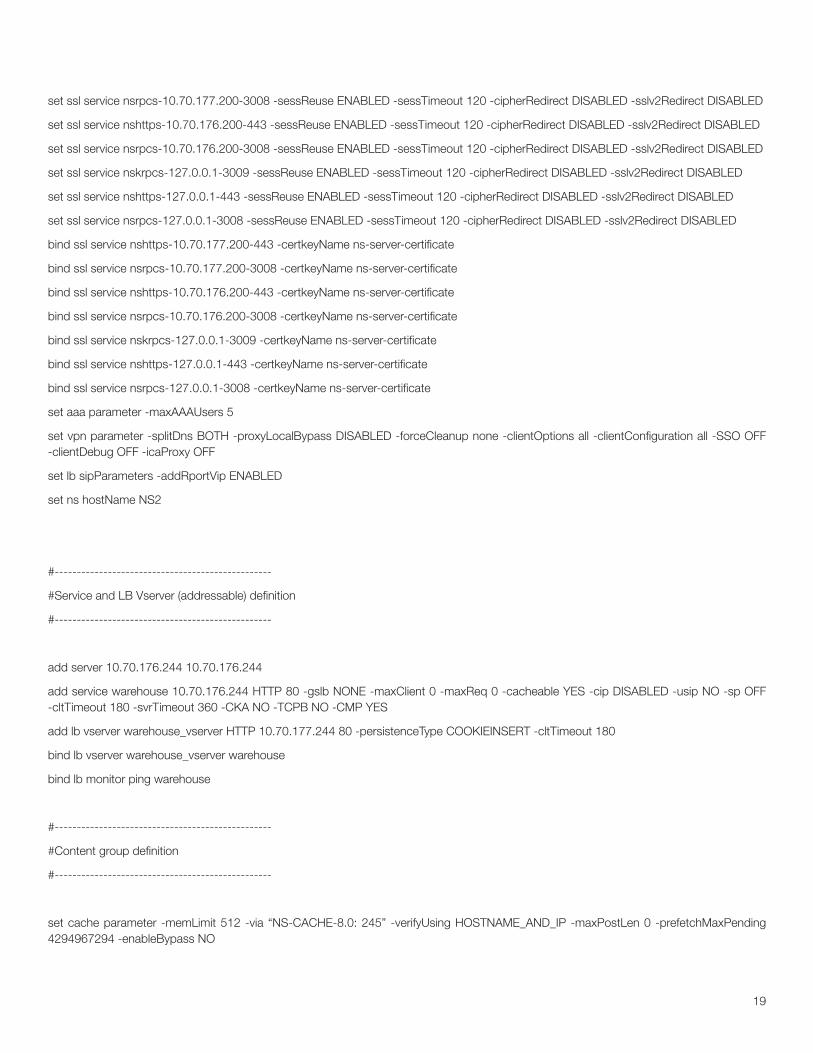
set ssl service nsrpcs-10.70.177.200-3008 -sessReuse ENABLED -sessTimeout 120 -cipherRedirect DISABLED -sslv2Redirect DISABLED
set ssl service nshttps-10.70.176.200-443 -sessReuse ENABLED -sessTimeout 120 -cipherRedirect DISABLED -sslv2Redirect DISABLED
set ssl service nsrpcs-10.70.176.200-3008 -sessReuse ENABLED -sessTimeout 120 -cipherRedirect DISABLED -sslv2Redirect DISABLED
set ssl service nskrpcs-127.0.0.1-3009 -sessReuse ENABLED -sessTimeout 120 -cipherRedirect DISABLED -sslv2Redirect DISABLED
set ssl service nshttps-127.0.0.1-443 -sessReuse ENABLED -sessTimeout 120 -cipherRedirect DISABLED -sslv2Redirect DISABLED
set ssl service nsrpcs-127.0.0.1-3008 -sessReuse ENABLED -sessTimeout 120 -cipherRedirect DISABLED -sslv2Redirect DISABLED
bind ssl service nshttps-10.70.177.200-443 -certkeyName ns-server-certificate
bind ssl service nsrpcs-10.70.177.200-3008 -certkeyName ns-server-certificate
bind ssl service nshttps-10.70.176.200-443 -certkeyName ns-server-certificate
bind ssl service nsrpcs-10.70.176.200-3008 -certkeyName ns-server-certificate
bind ssl service nskrpcs-127.0.0.1-3009 -certkeyName ns-server-certificate
bind ssl service nshttps-127.0.0.1-443 -certkeyName ns-server-certificate
bind ssl service nsrpcs-127.0.0.1-3008 -certkeyName ns-server-certificate
set aaa parameter -maxAAAUsers 5
set vpn parameter -splitDns BOTH -proxyLocalBypass DISABLED -forceCleanup none -clientOptions all -clientConfiguration all -SSO OFF -clientDebug OFF -icaProxy OFF
set lb sipParameters -addRportVip ENABLED
set ns hostName NS2
#-------------------------------------------------
#Service and LB Vserver (addressable) definition
#-------------------------------------------------
add server 10.70.176.244 10.70.176.244
add service warehouse 10.70.176.244 HTTP 80 -gslb NONE -maxClient 0 -maxReq 0 -cacheable YES -cip DISABLED -usip NO -sp OFF -cltTimeout 180 -svrTimeout 360 -CKA NO -TCPB NO -CMP YES
add lb vserver warehouse_vserver HTTP 10.70.177.244 80 -persistenceType COOKIEINSERT -cltTimeout 180
bind lb vserver warehouse_vserver warehouse
bind lb monitor ping warehouse
#-------------------------------------------------
#Content group definition
#-------------------------------------------------
set cache parameter -memLimit 512 -via “NS-CACHE-8.0: 245” -verifyUsing HOSTNAME_AND_IP -maxPostLen 0 -prefetchMaxPending 4294967294 -enableBypass NO

20
set cache contentGroup BASEFILE -relExpiry 86000 -maxResSize 256 -memLimit 2
set cache contentGroup DELTAJS -relExpiry 86000 -insertAge NO -maxResSize 256 -memLimit 1 -pinned YES
add cache contentGroup product_detail_views -heurExpiryParam 10 -hitParams prodID -invalParams prodID -matchCookies YES -ignoreReloadReq NO -removeCookies NO -prefetch NO -prefetchMaxPending 0 -memLimit 1
add cache contentGroup product_stock_views -heurExpiryParam 10 -hitParams prodID -invalParams prodID -matchCookies YES -ignoreReloadReq NO -removeCookies NO -prefetch NO -prefetchMaxPending 0 -memLimit 1
#-------------------------------------------------
#Policy expressions
#-------------------------------------------------
add policy expression homepage “REQ.HTTP.URL CONTAINS default.aspx”
add policy expression proddetails “REQ.HTTP.URL CONTAINS viewDetails.aspx”
add policy expression prodstocks “REQ.HTTP.URL CONTAINS viewStocks.aspx”
add policy expression upd_prodstocks “REQ.HTTP.URL CONTAINS updStocks.aspx”
add policy expression upd_proddetails “REQ.HTTP.URL CONTAINS updDetails.aspx”
#-------------------------------------------------
#Cache, No-cache and invalidation policies definition and binding
#-------------------------------------------------
add cache policy cache_prod_details -rule proddetails -action CACHE -storeInGroup product_detail_views
add cache policy cache_prod_stocks -rule prodstocks -action CACHE -storeInGroup product_stock_views
add cache policy cache_updprod_details -rule upd_proddetails -action CACHE -storeInGroup product_detail_views
add cache policy cache_updprod_stocks -rule upd_prodstocks -action CACHE -storeInGroup product_stock_views
add cache policy nocache_homepage -rule homepage -action NOCACHE
add cache policy inval_details_onpost -rule “upd_proddetails && REQ.HTTP.METHOD == POST “ -action INVAL -invalObjects product_detail_views
add cache policy inval_stocks_onpost -rule “upd_prodstocks && REQ.HTTP.METHOD == POST “ -action INVAL -invalObjects product_stock_views
bind cache global inval_details_onpost -priority 1 -precedeDefRules YES
bind cache global inval_stocks_onpost -priority 2 -precedeDefRules YES
bind cache global nocache_homepage -priority 6 -precedeDefRules YES

21
bind cache global cache_prod_details -priority 11 -precedeDefRules YES
bind cache global cache_prod_stocks -priority 12 -precedeDefRules YES
bind cache global cache_updprod_details -priority 21 -precedeDefRules YES
bind cache global cache_updprod_stocks -priority 22 -precedeDefRules YES
www.citrix.com
Citrix WorldwideWorldwide headquarters
Citrix Systems, Inc.851 West Cypress Creek RoadFort Lauderdale, FL 33309USAT +1 800 393 1888T +1 954 267 3000
Regional headquarters
AmericasCitrix Silicon Valley4988 Great America ParkwaySanta Clara, CA 95054USAT +1 408 790 8000
EuropeCitrix Systems International GmbHRheinweg 98200 SchaffhausenSwitzerlandT +41 52 635 7700
Asia PacificCitrix Systems Hong Kong Ltd.Suite 3201, 32nd FloorOne International Finance Centre1 Harbour View StreetCentralHong KongT +852 2100 5000
Citrix Online division5385 Hollister AvenueSanta Barbara, CA 93111USAT +1 805 690 6400
www.citrix.com
About CitrixCitrix Systems, Inc. (Nasdaq:CTXS) is the global leader and the most trusted name in application delivery infrastructure. More than 200,000 organizations worldwide rely on Citrix to deliver any application to users anywhere with the best performance, highest security and lowest cost. Citrix customers include 100% of the Fortune 100 companies and 98% of the Fortune Global 500, as well as hundreds of thousands of small businesses and prosumers. Citrix has approximately 6,200 channel and alliance partners in more than 100 countries. Annual revenue in 2006 was $1.1 billion.
Citrix®, NetScaler®, GoToMyPC®, GoToMeeting®, GoToAssist®, Citrix Presentation Server™, Citrix Password Manager™, Citrix Access Gateway™, Citrix Access Essentials™, Citrix Access Suite™, Citrix SmoothRoaming™ and Citrix Subscription Advantage™ and are trademarks of Citrix Systems, Inc. and/or one or more of its subsidiaries, and may be registered in the U.S. Patent and Trademark Office and in other countries. UNIX® is a registered trademark of The Open Group in the U.S. and other countries. Microsoft®, Windows® and Windows Server® are registered trademarks of Microsoft Corporation in the U.S. and/or other countries. All other trademarks and registered trademarks are property of their respective owners.