depthwiz tutorial - usps · depthwiz tutorial script depthwiz version 3.2 page 5 . task step 6:...
TRANSCRIPT

DepthWiz Tutorial
For DepthWiz Version 3.3
By Bill Lazear and Jim Trunck
This script leads you on a step-by-step walk-through of the DepthWiz program. It will provide you with all the data files and keystrokes needed to run DepthWiz and produce a simple depth chart. The time spent to do this is an investment that will save you a great deal of time when you enter your own data. For this Tutorial, let’s assume you have made a depth run. At each sounding you wrote down the depth and marked the position as a waypoint in your GPS. After the run you downloaded the waypoints to a computer file. All the data is in the DepthWiz file folder, and you are ready to have DepthWiz plot it on a chart. This is a summary of the five Procedures in DepthWiz for this Tutorial, leading to a depth chart: 1. Enter the Options. This gathers all the information about you and your equipment. It is saved for later runs. 2. Create a Parser. This tells DepthWiz how to read the downloaded waypoint file. It is also saved. 3. Record the written list of soundings, one for each waypoint, in a computer file. 4. Make a Waypoints Data Set. This combines the information about each waypoint with its sounding, adds all the other information about the run and corrects each sounding to datum (MLLW). This is saved as a Data Exchange Format (DEF) file, a text file that will contain all the information about your depth run.
5. Plot the soundings from the DEF file on the chart that you enter. Words in Bold type are words in DepthWiz boxes that you should click on. This means you use the mouse to put the point of the cursor arrow on the word and click the left mouse button. There is usually a hand pointing to the next place where you should act. If it is in (parentheses) it may or may not be necessary to click on it, depending on your computer set-up. Words in Italics are to be typed in. Put the cursor where you want it and click, then type. Words in “quotes” refer to words on DepthWiz pages. For more details in any step press F1 or the “Step Help” button if present. DISCLAIMER All the data and the chart used in this Tutorial were devised for illustrative purposes. It is not actual depth run data nor an actual site.
DepthWiz Tutorial Script DepthWiz Version 3.2 Page 1

=====================================================================
PROCEDURE 1: OPTIONS Start by telling DepthWiz how you want it to run, who you are and what equipment you are using. In DepthWiz, click on File in the Menu Bar in the top line for this drop-down menu.
This is typical of the way you move around in DepthWiz and select the next thing to do. You will notice that the illustrations here will show only the part of the window where you are working. Now click on “Options” in the drop-down menu to reach the four pages where you enter the information.
Options Notice that there is a tab for each page, with a label.
The first page, labelled “Start Up”, is showing on the screen. No change needed on this page. Click on the next tab:
File Directories
This window lets you change the file folders where you store your work. In a typical installation these files are located as shown. You will not change them. Now click on the next tab on the Options screen which is:
User Information You need to enter your name, etc. in the boxes. Listing things here means that you enter them only this one time instead of every time you run the program. Then Click on the next tab:
Equipment Enter as much information as you can. Like entering your name in “User Information”, it saves entering the data each time you use DepthWiz. Now save all the Options by a click on these buttons:
DepthWiz Tutorial Script DepthWiz Version 3.2 Page 2

Save Settings OK
Finished
DepthWiz Tutorial Script DepthWiz Version 3.2 Page 3

=====================================================================
PROCEDURE 2: ENTER PARSER INFORMATION On the Windows Menu Bar again click on:
File In the drop-down menu click on:
Parser Manager
You are going to teach DepthWiz how to read the file of waypoints that you downloaded from your GPS after the run. There is a wide variety of equipment and download programs and DepthWiz will try to handle them all, but you must tell it how. Your description will be stored as Parser Parameters for the downloaded waypoints file in this Tutorial. When you do this for your own downloaded waypoint file it will be saved for your type of file. For a full explanation of parsers and how to manage them see “Importing GPS data Into DepthWiz” included in DepthWiz. In the window under “ACTIVITIES” click on :
New Parser File In the right pane of the window click on:
Start This brings up the “Source File Analysis” pane with four steps. Step 1. Open the Waypoints source file you downloaded from the GPS. Click on:
Open Source File The standard “File Open” window appears, and you select your Waypoints file. For this Tutorial click on the text file which has been provided for you that has Waypoints in Columns:
DWT Waypoints Cols.txt (the “.txt” may not show) (Open)
A freeware downloadable program called “G7ToWin” took waypoints stored in a Garmin GPS receiver and made the waypoint file that is used in this script. It is a simple and easy program to use. Search for it on the Internet. After downloading you had to save your work in a file. That downloaded file was saved in the folder: C:\My Documents\DW Import Files so DepthWiz found it easily in this step. Step 2. You can see the first lines of the file you chose so that you can be sure it is the one you want. Use the scroll bars to see more of it. Step3. You designate this as a file with Waypoints, not Trackpoints. Click on:
Waypoints
Step 4. Describes the parser that will now be used. Click on: Continue
Task Step 1: Select a Waypoints Data Row. The top lines of your file appear again, and you are to designate the row that contains waypoint data.
DepthWiz Tutorial Script DepthWiz Version 3.2 Page 4
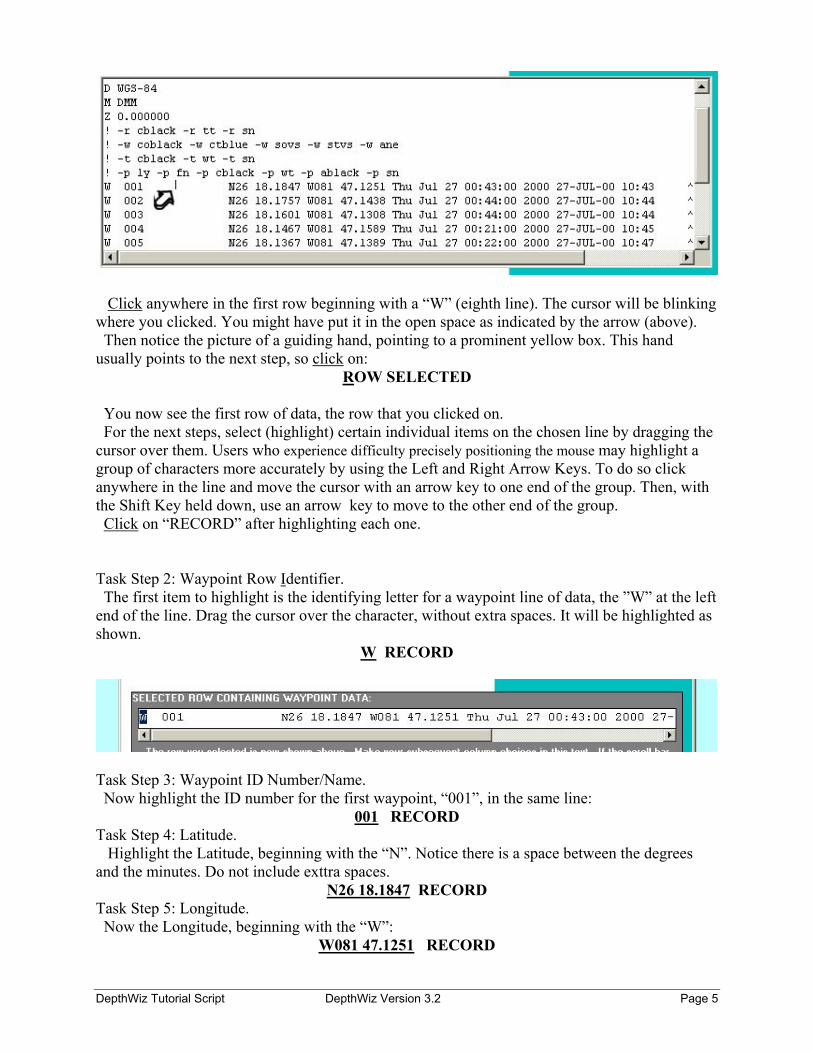
Click anywhere in the first row beginning with a “W” (eighth line). The cursor will be blinking where you clicked. You might have put it in the open space as indicated by the arrow (above). Then notice the picture of a guiding hand, pointing to a prominent yellow box. This hand usually points to the next step, so click on:
ROW SELECTED You now see the first row of data, the row that you clicked on. For the next steps, select (highlight) certain individual items on the chosen line by dragging the cursor over them. Users who experience difficulty precisely positioning the mouse may highlight a group of characters more accurately by using the Left and Right Arrow Keys. To do so click anywhere in the line and move the cursor with an arrow key to one end of the group. Then, with the Shift Key held down, use an arrow key to move to the other end of the group. Click on “RECORD” after highlighting each one. Task Step 2: Waypoint Row Identifier. The first item to highlight is the identifying letter for a waypoint line of data, the ”W” at the left end of the line. Drag the cursor over the character, without extra spaces. It will be highlighted as shown.
W RECORD
Task Step 3: Waypoint ID Number/Name. Now highlight the ID number for the first waypoint, “001”, in the same line:
001 RECORD Task Step 4: Latitude. Highlight the Latitude, beginning with the “N”. Notice there is a space between the degrees and the minutes. Do not include exttra spaces.
N26 18.1847 RECORD Task Step 5: Longitude. Now the Longitude, beginning with the “W”:
W081 47.1251 RECORD
DepthWiz Tutorial Script DepthWiz Version 3.2 Page 5

Task Step 6: Waypoint’s Date. The date is next but you will have to use the slider below the line to see more of the line (click on the gray bar directly under the line and drag it to the right with the mouse) so you can see the date in exactly this format:
27-Jul-00 RECORD Task Step 7: Waypoint’s Time. Highlight the time:
10:43 RECORD. Task Step 8: Depth Reading. You did not download depths with your waypoints, so there are none here: Click:
Next Task Step 9: L/L Format Choice. Now you need to tell the program just how your file shows Latitude and Longitude. Notice the box with “DD.ddddd” highlighted. This is the default choice (degrees and decimal parts of a degree), but your Latitude and Longitude do not have that format so you want to use a different format. There is a little down-arrow in a box to the right of the “DD.dddd”. You will see this often in DepthWiz. Clicking on it will bring down a menu of choices. Now click on the arrow to bring down the menu shown here with format choices.
Your data is in degrees (DD) and minutes (MM.mm) and has a space after the degrees, so you want the third choice down (the space is hard to see. By coincidence the hand points to it). Click on:
DD MM.mm Affirm that choice:
CHOICE SELECTED Task Step 10: Usage Description.
ENTER You can now type in a short phrase to describe the parser. Type:
DWT Waypoints Columns G7Parser. This will help identify it should you want to see what “My Parser” is in a later step.
Continue Task Step 11: Save these Parameters.
SAVE SETTINGS Type a name for this parser so that you can refer to it again. An example might be:
Garmin 76 Wpts. Save OK
Task Step 12: Apply Parameters. You now assign these parameters as the ones to be used right now for waypoints arranged in columns. Click on:
APPLY SETTINGS Yes
DepthWiz Tutorial Script DepthWiz Version 3.2 Page 6
You have finished describing the parser. FINISHED
Return to Main Menu by a click under “ACTIVITIES” on: Finished
DepthWiz Tutorial Script DepthWiz Version 3.2 Page 7

=====================================================================
PROCEDURE 3: SOUNDER RECORDER The depths that you recorded during the run are now to be loaded into a file using the DepthWiz Sounding Recorder. Before the run you can look in the DepthWiz directory for “User Forms” and open the “DepthWiz Soundings Recording Sheets”. Printing these gives you numbered forms on which you can write the depths. For now, use our list. In the Menu Bar, click on:
Tools Click on:
Soundings Recorder Start a new list. Click on:
New List.
Click in the white sounding entry box, indicated by the arrow.
[blank entry box] Type the following list of depths in that box, using the “Enter” Key after each one. DepthWiz will move it to the bottom of the list when you press “Enter” and be ready for the next one. Do not type the waypoint number underlined on the left, DepthWiz will add that for you as you go. 1 12.1 2 0.0 3 11.8 4 7.1 5 12.8 6 10.7 7 8.1 8 6.4 9 7.5 10 0.0 11 5.1 12 7.2 13 To delete an entire Row, place the mouse in the row to be deleted. Move the mouse to the left until the mouse pointer changes from Left Pointing to Right Pointing. Press the keyboard [Enter] key to highlight the row and then [Delete].
DepthWiz Tutorial Script DepthWiz Version 3.2 Page 8

Next to save the data you entered, click on: Save List
Type the location of your run as the name for your file. DepthWiz will add the .csv ending. New Pass
Then:
Save OK
Finished.
DepthWiz Tutorial Script DepthWiz Version 3.2 Page 9

=====================================================================
PROCEDURE 4: THE DATA SET You are now going to merge your waypoint file with your soundings file and add all the information about the run. This will create your Data Set, ready for plotting. Click these:
Data (in the Menu Bar) Waypoints Data Set Wizard
Begin
“Step 1. Select and Import a Waypoints File”
Import 1. In the first panel you select a Waypoint File file to import by clicking:
Select and Open File Open the same Tutorial Waypoints File you used when making the parser:
DWT Waypoints Cols.txt (Open)
2. In the second panel DepthWiz has your parser loaded so it suggests “My Data Parser” 3. In the third panel you accept this, by clicking on:
YES
“Step2. Review and Validate”
The file now shows the waypoint lines in this new form. DepthWiz has checked the data and tells you “All Rows Appear OK…”. If any rows appear in Red it means the data has not been parsed correctly.
Continue
“Step 3. Enter Depth Readings from a Soundings File” Input
DepthWiz Tutorial Script DepthWiz Version 3.2 Page 10

1. In the first panel, you select a Soundings file by clicking on:
Select and Open File You see the name of the one you just made with the Soundings Recorder. You could open it, or open the one DepthWiz already made for you:
DWT Depth Readings.csv (Open)
2. The first lines of the depth file are shown in the Preview Pane. Note that it has a special form, with a comma in each row separating the two numbers.
“Not Yet Selected” is highlighted, so you need to click on the little down-arrow on the right to see the parser choices. Click on:
Comma Separated Data 3. In the third panel you proceed to import this file, by clicking
YES The program tells you there were 12 Waypoints and 12 Soundings, no Failures. Good.
OK You now have added a Depth Reading to each waypoint.
“Step 4. General Information Data” For this run we want to change the TYPE for two special Waypoints, and this is a good place to do it. Waypoint 2: The depth is 0.0 because this waypoint is not a sounding. It was taken alongside an Aid To Navigation, R”6”, to verify its location. So, it is a Type M, for Mark, and will print a dot at the location instead of a sounding. In the line for Waypoint 2, click on:
S From the drop-down menu click on:
M
DepthWiz Tutorial Script DepthWiz Version 3.2 Page 11

Waypoint 10: This will require using the scroll bar to the right of the list to see further down the Waypoint List to Waypoint 10. This Waypoint was made exactly in the center of the harbor entrance. It is a Check Point, not a sounding, and will print a cross at the spot so that you can see the accuracy of your plotting. In the line for Waypoint 10 click on:
S From the menu click on:
C It is necessary to lock-in these changes, so press:
[Enter]
Input
This brings up a series of windows (Sections) in which you enter the information about the trip. It’s a lot of information, even though much of it may have been entered when you filled in the Options at the start, but it is essential in validating your work.
“Section: Basic Information” The first Section asking for Basic Information is shown, with four parts where the data is entered. 1. Click the little down-arrow and choose one of the Data Set Types listed.
Depth Chart 2. Type in a “Data Set Title” for the run that describes the area. Use one you will recognize later, so click on “Untitled” to highlight it and type this in its place:
New Pass 3. “Date of Survey Work” Enter the date of your soundings which is 07/27/2000. You first click on the month to highlight it and then replace it by typing;
07 Repeat for the day, typing:
27 And the year:
2000 The date could have been changed using the calendar that appears when you click on the little down-arrow. “Time Survey Work Started”: Change these times by clicking on the hour. Either enter “06” or use the little up-down arrows. 6 AM is the starting time, you were up early:
06 00 and Completed:
08 00 The Time Zone is “EDT”. Don’t change it:
4. Select Units of Measure… Click the down-arrow to bring down menus for each one. Select “Feet” for Depth Units:
Feet And “Statute” (miles) for Map Units:
Statute Go to the next section. Don’t click on “Continue”. Instead click on:
NEXT Section
DepthWiz Tutorial Script DepthWiz Version 3.2 Page 12

“Chart Information” 5. Enter the Chart Source and Number for your work area:
NOS/11425 And its Edition:
24 Name the area:
Naples, FL NEXT Section
“Equipment Employed - Part 1”
6. This describes the GPS. Use the dropdown menu. Click on:
DGPS (USCG) 7. The information you see is what you entered back in the File/Options step. If blank, type:
Garmin 12XL 3.53
The antenna type does not apply. Leave it as “[Not Selected]”. Then click on:
NEXT Section
“Equipment Employed - Part 2” 8 The information in this Section is the same as was entered in the earlier File/Options step. This describes your DGPS. 9. Name and describe your sonar. If blank (not previously entered in File/Options), type:
Lowrance X25B 200
NEXT Section
“Equipment Readings” 11. Enter your estimated speed for depth runs in knots:
5 12. Enter the GPS Datum that was set in your GPS:
NAD 83 13. You are going to tell DepthWiz that your GPS is offset 5 feet forward of your transducer. Obviously then they are not at the same spot at the same instant. A practical way of correcting for this is in the Soundings Manual.
5 14. Differential corrections are valuable for increasing the GPS accuracy. You used the ground based USCG Differential Station near St. Petersburg:
Egmont Key Your GPS said you were 75 miles away from it:
75 NEXT Section
DepthWiz Tutorial Script DepthWiz Version 3.2 Page 13

“GPS Performance Measures” 15. A confidence check was made. You checked the reading of the GPS at a known location. Pull down the menu and choose:
YES 16. Performance measurement. From the pull down list select:
EPE You now enter the EPE reading noted on the GPS during the run:
18 You also noted the number of satellites being used:
8 NEXT Section
17. Enter the weather here. It may show conditions that affect accuracy. Strong and steady winds can affect the tides. This day there was a nice light east wind:
5 E
A very high or low barometer will also affect the tides: 30.00
Enter the water temperature: 75
18. Use the Notes to record anything that might help judge accuracy. Type:
Clear and calm day NEXT Section
“Other Information”
19. If the boat was listed under Options no entry is needed. 20. Enter the miles of land travel:
20 And miles on the water:
5 “Total Project Hours” includes preparation and wind-up. This is not total man-hours.
8 Continue
“Step 5. What’s Next”
Continue
“Step 6. UTC Time Correction” Adjust
You need to decide if you need a Time Zone adjustment. Even if you display your Local Time in the GPS, the downloaded waypoint times are likely to be in UTC (Coordinated Universal Time, formerly Greenwich Mean Time). Note the times in the upper section, “About Your Data”. Do you need to enter a Time Zone Offset so that the Depth Sounding (D/S) times as downloaded are within the time span shown for the run? In this case, Yes, the soundings are not within the run times. Click the up-arrow by the Offset Box to get the correction in hours for EDT:
-4 That will correct the times for the soundings to put them within the times of the run.
DepthWiz Tutorial Script DepthWiz Version 3.2 Page 14
Continue
“Step 7. Transducer Correction” Input
This is where you enter the transducer correction. See the diagram to understand the correction. The sounder reading you subtract from the measured depth should be read while the boat is under way. This accounts for several things such as transducer depth, boat squat, water temperature, etc. 1.2 feet is the correction to enter here:
1.2 Continue
“Step 8. Tide Correction Methodology”
Select You are now to choose the way you correct your sounder readings for the tide. Proper tide corrections are essential for good soundings. Read the “Manual For Depth Readings” for more detailed advice on this important step. For this Demo we assume that you are not near a NOAA Tide Station that records Actual Tides and it’s data does not apply well where you are. You will use the Predicted Tides for a point near your run.. Click on:
“ENTER TIDAL CORRECTION INFORMATION” Continue
“Step 9. Correction For Tides”
Input
1. Look at this section to be sure that the times shown are the times that you actually took the soundings (eg. EDT). This assures that your time zone choice was correct. 2. You are now to enter the Predicted Tides, one near the time the run started and the next tide, for a site close to the run. If you used Predicted Tides from NOAA enter the Reference Station Number. If you used any other source enter “0”.
7725110 Reference Station Name. Use the name of the Reference Station that has daily predictions:
St. Petersburg The Source of Tidal Data was:
NOAA Next enter tide predictions after applying the Differences for New Pass. The date is the date of the run. You need to change the time of the first tide:
02 00 and enter the height:
0.5 Now enter the time and height of the next tide the same way:
08 15 4.5 Most of your soundings should lie between these times. The Manual For Depth Readings explains that soundings a little before or after will be corrected but not with the same accuracy. Enter the distance in miles from New Pass:
2
DepthWiz Tutorial Script DepthWiz Version 3.2 Page 15

Continue
“Step 10. Prediction Correction” Input
1. These are the times that include all your waypoints. Your correction to the predictions should be determined within these times to be most accurate. 2. Select a Prediction Correction Methodology. This time you made a measurement at a Tidal Benchmark to determine the actual height of the water at that instant. Click on:
“#1 Benchmark” 3. Enter the number of the NOAA Tidal Bench Mark near your run that you will use:
5391 G And its location:
Naples You need to change the date and time here to show the time of the benchmark reading:
07/27/2000 0630 It’s 2 miles away from the run area:
2 Enter the stated height above datum (MLLW) listed by NOAA for this Benchmark:
5.0 Enter the distance you measured down to the water surface from the Benchmark:
1.0 Continue.
DepthWiz uses these two numbers to determine that the actual height of the water from datum at that time was 4.0 feet (5.0-1.0). You didn’t see it but DepthWiz then computed the height of the predicted tide at 0630, the time the Benchmark was measured, (which came out to 3.8) and subtracted it from the actual height (4.0). It now knows that during the time your soundings were made the water was 0.2 feet higher than predicted. This is the Prediction Correction. By moving the slide bar under the file you can see the columns with the three corrections that are applied to the soundings. The Transducer Correction is added to the sounding, the Prediction Correction and Predicted Height Correction are subtracted.
“Step 11, Review Corrected Soundings”
You can ignore the charted depths for Waypoints 2 and 10. These were not soundings and will be designated as a type other than a sounding in a later step.
Continue
“Step 12. Contributing Personnel” You are going to enter a couple of names, people who did the work.
YES. “Last Name”. Click in the box under this label and enter your last name:
(your last name). Tab. Enter your first name now:
(first name). Tab. Click on the box for F.T.P (First Time Participant):
(Check). Tab Your duty was Helmsman:
Helmsman Tab
DepthWiz Tutorial Script DepthWiz Version 3.2 Page 16

You did half the work: 50 Tab
You worked 8 hours: 8
Skip the rest of the line for now. They show an organization you work with, such as the U.S. Power Squadrons. Now save your data in Line 1:
Enter Enter someone else who was with you in the top line, just as you did for yourself. Then:
Enter Continue
“Step 13. Notes and Comments”
Enter a little note: YES
Type the Date and Time of the note: 08/08/2000, 1400 Tab.
Your name as note writer: (Your name) Tab
Your note says: Soundings submitted
Enter Continue
“Step 14. Save the Data”
Save Save Data
Type a File Name related to the run (DepthWiz will add a .dww to the name): NewPass072700
Save Yes OK
Continue Finished
Congratulations, the biggest job is done, your data is in a Data Set, ready to plot.
DepthWiz Tutorial Script DepthWiz Version 3.2 Page 17

=====================================================================
PROCEDURE 5: THE SOUNDING CHART
Charts (On the main Menu Bar) Depth Chart Wizard
“Step 0. Welcome”
Begin
“Step 1. Select and Import Data” Select
1. Bring up a file list. Select and Open File
You can open the .dww file you just made or use this one we provided for you: DWT Waypoints Data Set.dww
(Open) 2. The first few lines are shown at the bottom. You can slide the bar at the bottom and see all of it if you want to. You do want to use this file:
YES
“Step 2. Review and Change Plotting Points”.
Now you can take a glance at the powerful Filters that DepthWiz has to affect the way your data displays.
YES You can see that there are Filters that can be used to select certain styles, such as plotting only depths more or less than a chosen depth. You can also change all the Type designations at once. We won’t choose any filters this time.
Finished NO.
“Step 3. Select A Chart Picture File”.
Select 1. You will bring up a list of chart files.
Select and Open File We provide a simple chart, ready to use. Normally you will have scanned in a chart section. Before using your own chart you should look at it using Tools then Image Calculator. This utility will check the size of your chart and tell you if it will print. The Help file will give details. For now, open:
DWT Depth Chart JPG.jpg (Open)
2. You do want to use it. Note that it is aligned with north exactly to the top: YES
“Step 4. Calibrate”
DepthWiz Tutorial Script DepthWiz Version 3.2 Page 18

To plot soundings DepthWiz must learn the Lat/Lon and scale of the chart, also known as “registering” it:
Calibrate Your cursor is now a “+”, ready to place on two points of known Latitude and Longitude. This chart has some parallels of Latitude and meridians of Longitude drawn on it. Their intersections can serve as accurate known positions. In the upper left of the chart a position is indicated by a small circle. Place the + exactly where the lines intersect..
Click After you click on the intersection an entry form appears. Enter the Latitude. You must enter a decimal point and the “N”, as shown on the chart:
N2618.2 Tab
And Longitude, including the W: W8147.2
Continue. Use both horizontal and vertical slider bars to see the lower right corner where another intersection has been circled and labeled for you. Click exactly on it. Be very careful not to click on the chart while sliding, you will need to click on “Abort” and start calibrating again if you do. Enter the Latitude and Longitude as before. These entries will require the decimal point.
N2618.0 Tab
W8147.0 Continue.
“Step 5. Customize”.
There are many choices to customize the way the chart is printed. Customize
The Title Box can be deselected (i.e. not shown), but here we will show it. Type a suitable Title for this chart:
THE PASS On the second line, Type:
FL We won’t explore all the other possibilities, but let’s look at one more. At the top, click on:
Rulers This lets you decide where to print the Graduated Neatlines (rulers), the Lat/Lon scales along the borders. menus. Change the rulers to be on all sides. For Latitude use the down-arrow to drop the menu and click on:
Both Sides of Chart Do the same with the next box for Longitude, selecting:
Both Bottom and Top. Continue
OK.
“Step 6. Review Completed Chart” Use the sliders to see the upper portion of the chart. Notice that the waypoint you designated as “M” in the data file has printed as a small circle at R”6”, right under the dot in the center of the symbol. You have confirmed the position of the Aid. Now look at the Harbor Entrance. The
DepthWiz Tutorial Script DepthWiz Version 3.2 Page 19

cross marks your Check Position, designated as “C”, the waypoint you set when you were exactly in the middle of the entrance. This Review Window is a good place to click on Step Help, on the left side. See how much it tells you about what you can do while looking at the chart, including moving the label. You could also eliminate any of the superimposed depths. The Escape Key brings you back. This is a good time to see how easy it is to see the Index Number for each waypoint. Click on “Indexes” under “View Chart” then on “View Chart”. Return to display soundings by clicking “Values” then :”View Chart”. You can also easily edit the waypoint file by clicking on “View Data”, making a change, and clicking “View Chart”.
Continue.
“Step 7. Notes and Comments”. We won’t add any notes at this point:
NO
“Step 8. Save the Chart Picture…” Save
“1. Select a name” Select
Name the chart and the format used to save it. Jpeg is the default format. New Pass
Save 2, 3. Accept the defaults for Color Depth and Image Quality.
Save OK
“Step 9. Save the Data…”
Save Save Data
Enter a Name for the data file, the ending will be assigned as .dwd. New Pass
Save Yes OK
Continue
“Step 10. Printing Options” Print.
You can decide to print the chart or the data points. Click on: Print Depth Chart
Print It displays what it is going to print. There is a Print box in the print window header. Click:
Print OK
Close the “Print” window by clicking on the “x” in its upper right corner. You made it!
Finished
DepthWiz Tutorial Script DepthWiz Version 3.2 Page 20

Finished
Try again? There are a couple of other downloaded files for this depth run, as if different download programs had been used, although they produce the same chart. One has data separated by Tabs. Another is a file with depths, resembling data that would download from automated depth readings made with combined instruments. You could try making parsers for these as in Procedure 2 to see the differences.
THERE’S MORE….
THE STATIC CHART
Your education can continue, for DepthWiz also has a program to determine a fixed position. This uses the Trackpoints that your GPS can record at regular intervals. It is a Static Test, for the GPS stays at a fixed position; it just thinks it is moving. You may be surprised at the results. Use a time period of 5 minutes when finding a position, such as of an Aid To Navigation for example, recording each 30 seconds. Extend the test up to 24 hours, at 5-minute intervals, to demonstrate the accuracy of your system. To do so place the GPS where it can be left without moving and start recording Trackpoints. It must be in the open but can be protected by a canvas. Later download the Trackpoints it has stored, using your download program, and run DepthWiz. You must first teach DepthWiz what its parser needs to know about your Trackpoint File, just as you did with the Waypoint File in this Script. Click on File, Parser Manager and Start. Open the file DWT Trackpoints Cols.txt. and designate it as Trackpoints. Go through the same steps to create and save the parser. You won’t need to do this again unless you change equipment. You are ready to make the Trackpoint Data Set for this Static Test. (Click Data then Trackpoints Data Set Wizard). You can click on Next for all the entries that have to do with time or depths, they are not involved. Use your Trackpoints Data Set to plot the data (Click Charts then Static Chart Wizard). The chart will be centered on the average of all the hits. Each number shows how many hits there were at that spot. A right-click on the number will tell you the trackpoint index numbers at that point. If a trackpoint is far from the center its number may tell you that it was the first or last and may be set to not plot. This can result when the body of the observer shields the GPS and prevents accurate readings when starting or ending a series. To determine a good Position, record trackpoints for several long periods, such as 24 hours, on separate days. A plot of these averages will give a fairly accurate position. When known, DepthWiz can be told to center future Static Test plots on this True Position. This position is also useful for making the Confidence Check of the GPS when called for.
DepthWiz Tutorial Script DepthWiz Version 3.2 Page 21

DepthWiz Tutorial Script DepthWiz Version 3.2 Page 22
THE SMALL STUFF Data can be plotted with DepthWiz that is entered through the Data Builder instead of being downloaded from a run, as when making up a test chart or getting data from some other source. Under File there is a small utility, the DEF File Editor, that is a good way to see the file that DepthWiz produces containing all the data of your run. Entries can be checked and, if necessary, edited. You can contribute to safer boating by using DepthWiz after you take soundings. The resulting depth chart can be distributed locally. We all like to go boating, and it is lots more fun when you are boating with your brain in gear and leaving more behind than holes in the water.