description of the gold wings manoeuvres, with...
TRANSCRIPT

1
PART 5.5 OF THE NMAS FLIGHT INSTRUCTION MANUAL
Description of the Gold Wings manoeuvres, with diagrams INTRODUCTION You only need a simple model with a 40-ish size engine to be able to perform the Gold Wings manoeuvres to a satisfactory standard. A low-cost „stick‟ type model is adequate for this purpose. Many trainer-type models are also quite capable of all the manoeuvres. The CFI and one Instructor are required to be present for the Gold Wings test. The test can be carried out over 4 consecutive flights on the same day if required. If assistance is required during the test another attempt cannot be made on the same day. The following pages explain how to approach your practice - Start by practicing straight and level lines parallel to the runway. At first, do them about 100 to 150 metres out, at about 40 to 50 metres up. Then do them about 40 metres out, and at about 50 metres in altitude. Try to get used to the two different „lines of flight‟… one close, the other further out & higher. Get your mates to tell you whether you‟re on line or not. When you feel you‟re ready to start practicing all the manoeuvres remember that some of them will require you to fly at some distance away from the runway… NEVER EVER fly at such a low height
that if the motor were to quit, you risk not being able to glide safely back to the runway. Always fly safely, do not put your model at risk, and don’t fly behind yourself. All manoeuvres start and end with a straight and level line of flight, parallel to the runway, of at least 30 metres. This includes for example, the spin entry and exit lines. All the manoeuvres should be centred in front of you. For manoeuvres that are in the vertical plane, the correct „line of flight‟ is about 100 to 150 metres out, but for manoeuvres 2, 3, 4, 5, 6, and 12, they are on a line of flight only about 40 metres out from the pilot. These are all horizontal plane manoeuvres where your model will spend some time a long way away from you, so start close.
Manoeuvre description and diagrams:
1. Dexterity, Theory and Pre-Flight Checks
2. Taxi Out and Take Off
3. Rectangular Approach Circuit
4. Outward Figure of Eight
5. Inward Figure of Eight
6. Procedure Turn
7. Cuban Eight
8. Immelman Turn
9. Single Outside Loop (NMAS)
10. Three Consecutive Inside Loops
11. Three Consecutive Horizontal Rolls
12. Inverted Rectangular Circuit (MAAA/NMAS)
13. Stall Turn or Hammerhead (NMAS)
14. Three Turn Spin or Spiral Dive
15. Touch & Go on Runway
16. Landing on Runway
17. Taxi Back and Shut Down the Motor

2
1. Dexterity, Theory and Pre-Flight Checks Dexterity The pilot must be able to locate and identify all transmitter controls without fumbling.
Theory The Pilot must be able to identify all major components of the aircraft and define functions, including effect of controls, and have a thorough knowledge of safety rules and regulations. A simple theory test (multiple choice) will also be conducted by the CFI to test your knowledge of the Club Rules, Procedures and Safety requirements.
Pre-Flight Checks Refer to the “pre-flight checks” identified in the NMAS Induction document under “IC and Electric Pilot Procedures”. In summary, and as given in the MAAA test sheet, the Pilot checks the engine mounting, plumbing (IC), centre of gravity location, security of undercarriage and signs of structural or covering problems that could affect flight, eg; presents of warps which could affect trim. The pilot also checks that the controls are neutral and control throws are correct and checks throttle settings, state of the battery and performs range check.

3
2. Taxi Out and Take Off During take-off the pilot demonstrates gradual application of power whilst keeping the aircraft straight, and using a little elevator to lift off, makes a gentle climb out with wings level until safe altitude is reached.
Taxiing
Blip the throttle to keep the model moving.
Place the model on the end of the runway facing into the wind ready for the take off roll.
Take Off Apply enough throttle to get the model rolling, use rudder to keep it in a straight line.
As soon as a straight roll is established, advance throttle to maximum.
As the model builds up speed the rudder takes over, therefore any rudder input to maintain a straight roll at low speed must be released.
When rotate speed is achieved, apply some up-elevator to rotate, then ease it off after rotation.
Use alerons to keep the wings level.
Do not climb too steeply, climb away in line with the runway.
Reduce speed to cruise speed, then turn to join the circuit.

4
3. Rectangular Approach Circuit
How to…
1. This is a very simple and straightforward manoeuvre, but often performed incorrectly. The manoeuvre is a rectangular landing approach, so don‟t make the mistake of flying it as a rectangular take-off approach. The model is flown in for 30 metres from position (1) at an altitude chosen by the pilot. From position (1), the model should not gain altitude during any part of the manoeuvre.
2. The model should be flown for a 30-metre entry line (1) over the far side of the runway, or even a bit further out (don‟t fly overhead.) at a height that is safe for the model for the whole circuit… without needing to climb. This may be about 40 to 100 metres up, depending on the size of the circuit, and how strong the wind is blowing. Try to position the model so you‟re looking up at 45 or 50 degrees as it passes in front of you.
3. At (2) (3) (5) and (7) the model makes turns of equal radius. (2) & (3) are to be at equal height.
4. At (4) on the downwind leg, the power is reduced. Where exactly depends on the individual model‟s characteristics (heavy/fast, or light/slow etc.). The turn at (5) can be a slightly descending turn, since it‟s safer to have the nose down a little when the power is down.
5. The leg at (6) is the descending leg, where height is reduced sufficiently for a final descending turn at (7), leaving enough height for a controlled descending trajectory for landing.
6. NEVER fly in such a place that you couldn‟t land safely if the motor stops. If you realise your entry line at (1) is lower than you had planned, just make the circuit smaller. In any event, you shouldn‟t really need to fly more than about 150 metres away from yourself at any point for this manoeuvre, unless you‟ve got a gas turbine missile!
Usual errors… 1. Any climbing at all after the entry line at (1). 2. All turns not of equal radius. 3. Respective opposite legs not the same length. 4. Deviations in lines.
5
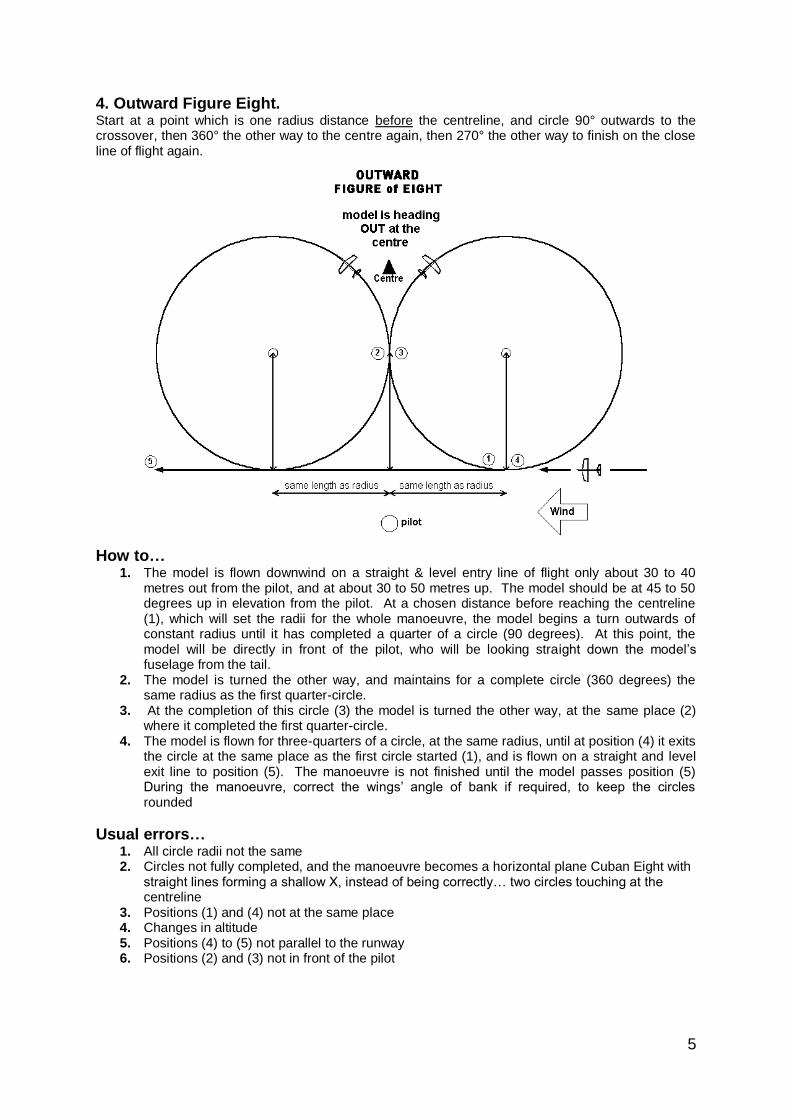
4. Outward Figure Eight. Start at a point which is one radius distance before the centreline, and circle 90° outwards to the crossover, then 360° the other way to the centre again, then 270° the other way to finish on the close line of flight again.
How to…
1. The model is flown downwind on a straight & level entry line of flight only about 30 to 40 metres out from the pilot, and at about 30 to 50 metres up. The model should be at 45 to 50 degrees up in elevation from the pilot. At a chosen distance before reaching the centreline (1), which will set the radii for the whole manoeuvre, the model begins a turn outwards of constant radius until it has completed a quarter of a circle (90 degrees). At this point, the model will be directly in front of the pilot, who will be looking straight down the model‟s fuselage from the tail.
2. The model is turned the other way, and maintains for a complete circle (360 degrees) the same radius as the first quarter-circle.
3. At the completion of this circle (3) the model is turned the other way, at the same place (2) where it completed the first quarter-circle.
4. The model is flown for three-quarters of a circle, at the same radius, until at position (4) it exits the circle at the same place as the first circle started (1), and is flown on a straight and level exit line to position (5). The manoeuvre is not finished until the model passes position (5) During the manoeuvre, correct the wings‟ angle of bank if required, to keep the circles rounded
Usual errors… 1. All circle radii not the same 2. Circles not fully completed, and the manoeuvre becomes a horizontal plane Cuban Eight with
straight lines forming a shallow X, instead of being correctly… two circles touching at the centreline
3. Positions (1) and (4) not at the same place 4. Changes in altitude 5. Positions (4) to (5) not parallel to the runway 6. Positions (2) and (3) not in front of the pilot

6
5. Inward Figure Eight Start one radius past centre, then circle 270° to come towards yourself at the crossover / centreline, then 360° circle the other way back to centre, then 90° the other way back to the close line of flight.
How to…
1. The model is flown upwind on a straight & level entry line of flight, parallel to the runway, only about 30 metres out from the pilot, and at about 30 metres up. After having passed the centreline, when at a chosen distance at (2) (which will set the radii for the entire manoeuvre), the model begins a turn outwards of constant radius until it has completed three-quarters of a circle (270 degrees). At this point (3) the model will be directly in front of (and heading towards) the pilot, who will be looking straight down the model‟s fuselage from the nose.
2. At position (3) the model is banked the other way and completes a full circle (360 Degrees). 3. At the position (4) the model will again be directly in front of (and heading towards) the pilot,
who will be looking straight down the model‟s fuselage from the nose. The wing is banked the other way and the model is flown for a quarter of a circle (90 degrees).
4. At (5) the model finishes the quarter-circle, and flies a straight and level exit line of 30 metres to (6).
5. During the manoeuvre, correct the wings‟ angle of bank if required, to keep the circles rounded.
Usual errors…
1. Circles not fully completed, and the manoeuvre becomes a horizontal plane Cuban Eight with straight lines forming a shallow X, instead of being correctly… two circles touching at the centreline.
2. All circle radii not the same (when circles or loops are not round, caused by visible changes of radius, the circle or loop is said to be „segmented‟).
3. Positions (2) and (5) not at the same place. 4. Changes in altitude. 5. Positions (1) to (6) not parallel to the runway. 6. Positions (3) and (4) not in front of the pilot.

7
6. Procedure Turn. From your entry line of flight, start turning at one radius distance before centre and circle 90° outwards, then, 270° the other way, and finish back on the entry line of flight, heading in the opposite direction. Maintain the same height and radii. Note that this manoeuvre can be performed either in front of the pilot or at either end of the runway. The circling should finish at one radius distance from the centreline on the other side to that which you started, and you should be flying your exit line on the same path as your entry line.
How to…
1. The model is flown on a straight & level entry line of flight, parallel to the runway, only about 30 or 40 metres out from the pilot, and at about 30 to 50 metres up. The model should be at 45 to 50 degrees up in elevation from the pilot. At a chosen distance before reaching the centreline (which sets the radii for the whole manoeuvre) the model begins a turn outwards of constant radius until it has completed a quarter of a circle.
2. The model is turned the other way, and maintains the same radius as the first quarter-circle. 3. The turn is maintained for a total of 270 degrees, or three-quarters of a circle. 4. Note where this circle finishes… exactly as far from the centre-line as the first quarter-circle
started. 5. The model is flown out at the same height as the entry line, but in the opposite direction. 6. During the manoeuvre, correct the wings‟ angle of bank if required, to keep the circles
rounded
Usual errors…
1. Changes in altitude 2. Changes in radius during any part-circle 3. All radii not the same 4. Entry and exit lines not parallel to the runway 5. Gross changes in the model‟s speed 6. Flown too far away, making it difficult to determine the positioning of the model, especially the
entry and exit lines coinciding.
8
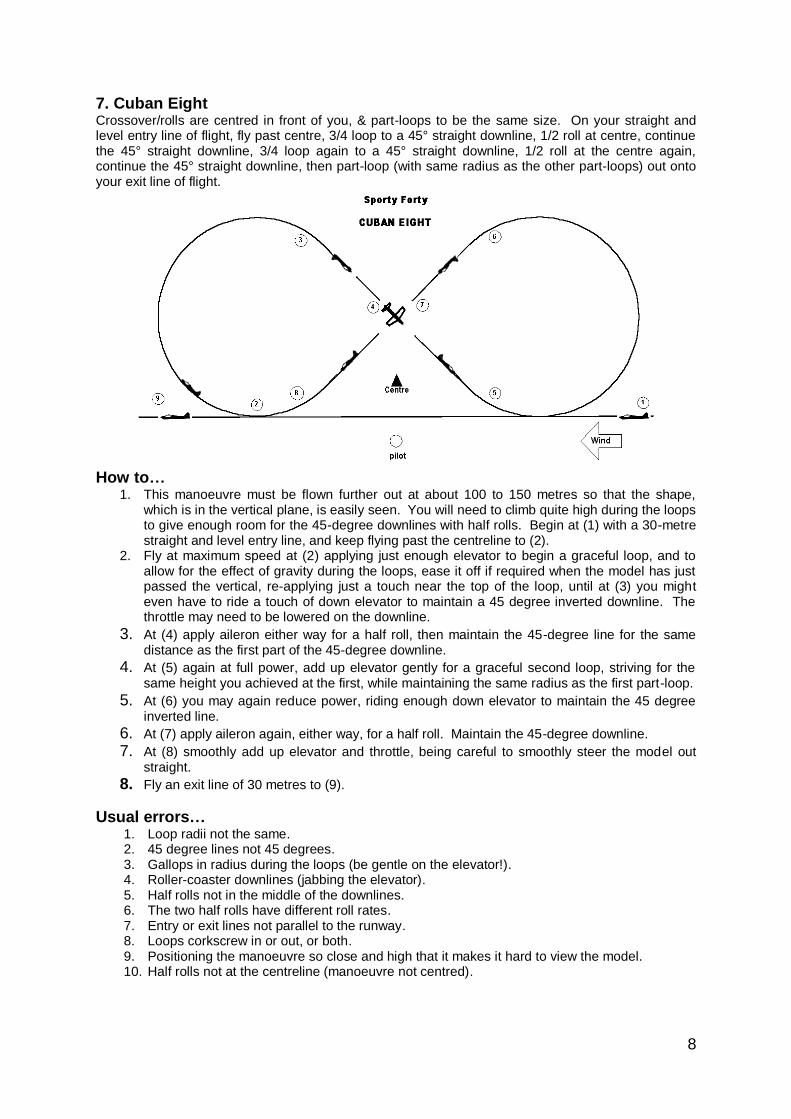
7. Cuban Eight Crossover/rolls are centred in front of you, & part-loops to be the same size. On your straight and level entry line of flight, fly past centre, 3/4 loop to a 45° straight downline, 1/2 roll at centre, continue the 45° straight downline, 3/4 loop again to a 45° straight downline, 1/2 roll at the centre again, continue the 45° straight downline, then part-loop (with same radius as the other part-loops) out onto your exit line of flight.
How to…
1. This manoeuvre must be flown further out at about 100 to 150 metres so that the shape, which is in the vertical plane, is easily seen. You will need to climb quite high during the loops to give enough room for the 45-degree downlines with half rolls. Begin at (1) with a 30-metre straight and level entry line, and keep flying past the centreline to (2).
2. Fly at maximum speed at (2) applying just enough elevator to begin a graceful loop, and to allow for the effect of gravity during the loops, ease it off if required when the model has just passed the vertical, re-applying just a touch near the top of the loop, until at (3) you might even have to ride a touch of down elevator to maintain a 45 degree inverted downline. The throttle may need to be lowered on the downline.
3. At (4) apply aileron either way for a half roll, then maintain the 45-degree line for the same distance as the first part of the 45-degree downline.
4. At (5) again at full power, add up elevator gently for a graceful second loop, striving for the same height you achieved at the first, while maintaining the same radius as the first part-loop.
5. At (6) you may again reduce power, riding enough down elevator to maintain the 45 degree inverted line.
6. At (7) apply aileron again, either way, for a half roll. Maintain the 45-degree downline. 7. At (8) smoothly add up elevator and throttle, being careful to smoothly steer the model out
straight. 8. Fly an exit line of 30 metres to (9).
Usual errors… 1. Loop radii not the same. 2. 45 degree lines not 45 degrees. 3. Gallops in radius during the loops (be gentle on the elevator!). 4. Roller-coaster downlines (jabbing the elevator). 5. Half rolls not in the middle of the downlines. 6. The two half rolls have different roll rates. 7. Entry or exit lines not parallel to the runway. 8. Loops corkscrew in or out, or both. 9. Positioning the manoeuvre so close and high that it makes it hard to view the model. 10. Half rolls not at the centreline (manoeuvre not centred).

9
8. Immelman Turn From your entry line of flight, begin a half-loop at the centre, in front of you. When at the top, half-roll & fly a straight and level exit line for about 30 meters. (A tip… if you half-roll just before the end of the half-loop, gravity will help finish the loop, and you‟ll come out flat. A small downgrade, but much better than a roller-coaster exit line because you did too much of a loop!). Remember there should not be any straight line between the end of the half-loop and the beginning of the ½ roll.
How to…
1. Because this manoeuvre is in the vertical plane, it is also flown at about 100 to 150 metres out from the pilot. Maintain a straight and level entry line into the wind, parallel to the runway, for at least 30 metres.
2. At (2) at full speed, begin a graceful half loop, squeezing the elevator to start with, backing it off if required when the vertical has been passed (effect of gravity) to keep the loop round.
3. At (3) when the half loop is finishing, apply aileron for a half roll. 4. The manoeuvre finishes after flying a 30-metre exit line.
Usual errors… 1. Half loop not round. 2. Changes in radius during the half loop. 3. Entry and exit lines not parallel to the runway. 4. Half roll not immediately at the end of the half loop. 5. Corkscrewing in or out. 6. Manoeuvre not centred in front of the pilot. 7. Manoeuvre flown too close, making it difficult to determine if the loop is round.
10
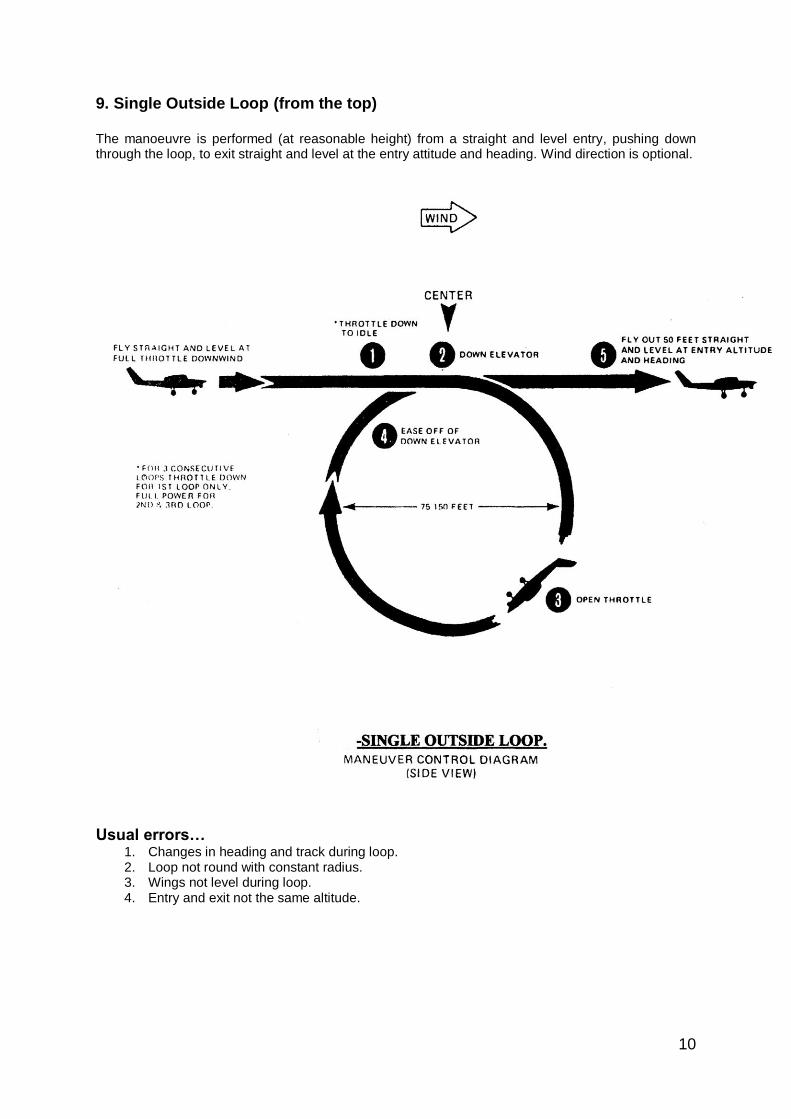
9. Single Outside Loop (from the top) The manoeuvre is performed (at reasonable height) from a straight and level entry, pushing down through the loop, to exit straight and level at the entry attitude and heading. Wind direction is optional.
Usual errors…
1. Changes in heading and track during loop. 2. Loop not round with constant radius. 3. Wings not level during loop. 4. Entry and exit not the same altitude.

11
10. Three Consecutive Inside Loops Start at the centre. To overcome the effect of gravity & keep the loops round and the same size, adjust the elevator as required. When you‟re just past vertical while going up, ease off a bit, and tighten after you‟re vertical, going down.
How to…
1. Because this manoeuvre is in the vertical plane, it needs to be flown on a line about 100 to 150 metres out to determine that the loops are indeed round. Fly high enough so that there is no danger of getting too low for your model‟s safety.
2. Enter at full power, straight (parallel to the runway) and level. 3. At the centreline, squeeze in enough elevator to achieve a graceful loop, making adjustments
as required to overcome the effect of gravity. The wings should be level at the top of the loop. 4. On the way down, you may need to back off the power a bit, but remember you still need to
do two more loops, so don‟t be any slower at the bottom than the entry line in! Wings should be level at the bottom.
5. Repeat for the second and third loops. 6. Fly an exit line of at least 30 metres.
Usual errors… 1. Entry or exit lines not parallel to the runway, or climbing or diving. 2. Entry and exit lines at different heights. 3. Loops not of the same radius, and therefore not the same size. 4. Corkscrewing in or out, or both! 5. Manoeuvre not centred. 6. Flown too close to determine that the loops are round or not. 7. Visible changes of radius during loops.

12
11. Three Consecutive Horizontal Rolls This starts & ends with straight & level lines. Fly safely, flying higher is quite OK.
How to…
1. Firstly, don‟t put your model at risk by flying too low! 2. Give yourself plenty of flying-room. Your line of flight should be about 100 to 150 metres out,
and maybe 100 metres up for early attempts. 3. When flying this manoeuvre downwind it‟s really easy to get blown back towards the
centreline much more than you realise during the turnaround! If it‟s windy, you might have to fly way, way, way upwind to be able to turn around and get onto a nice straight line in time to get the Three Rolls centred.
4. The wind-speed will add to your model‟s speed. It‟s usually better for „sport models‟ to fly at a fast airspeed for rolls rather than flying slowly, so expect to use up some sky!
5. Start the manoeuvre at least 100 metres or more distance to the centreline. 6. From (1) fly a 30-metre entry line. At (2) squeeze just a touch of up elevator, then let it off and
start rolling. What you want here is to lift the nose just a degree or three so that after you‟ve done the first part-roll to inverted the model will be about level again. Use aileron to complete three consecutive rolls (either way, so long as they‟re the same way, with no pauses!) Don‟t let the aileron off until you have finished the rolls!
7. Gravity will cause the nose to want to drop as soon as the wings are not level, so you will need to smoothly push in some down elevator as the wings pass through inverted at (3) to keep the nose up. Then let it off.
8. As the model becomes upright again, it should be at the centreline (4). As the wings pass through level, you will need to smoothly squeeze some up elevator to keep the nose up.
9. Repeat the process for the second and third rolls. 10. Fly a 30-metre exit line to (7), parallel to the runway. 11. If you roll too fast, the elevator inputs have to become „jabs‟, trying to „keep up‟, and the line
will look very jumpy. If your model takes about the same amount of time to do one roll with full aileron as it takes for you to mentally say to yourself „My model is performing a full axial roll‟, then that‟s a good roll speed
12. If you‟re thinking of using rudder during the rolls, you should be competing in F3A World Championships!
13. You can help the rolls a lot by squeezing in just a touch of up before the first roll, to lift the nose a tiny bit
14. Having a well trimmed model is an enormous advantage. It is worth seeking out some assistance in this area.
Usual errors… 1. Roll rate not constant. 2. Changes in heading or altitude. 3. Manoeuvre not centred. 4. Rolls are rushed and jerky, with no smoothness and gracefulness. 5. VERY BIG downgrade for no elevator inputs at all. 6. BIGGEST downgrade is for loss of control of the model… don‟t fly too low.
13
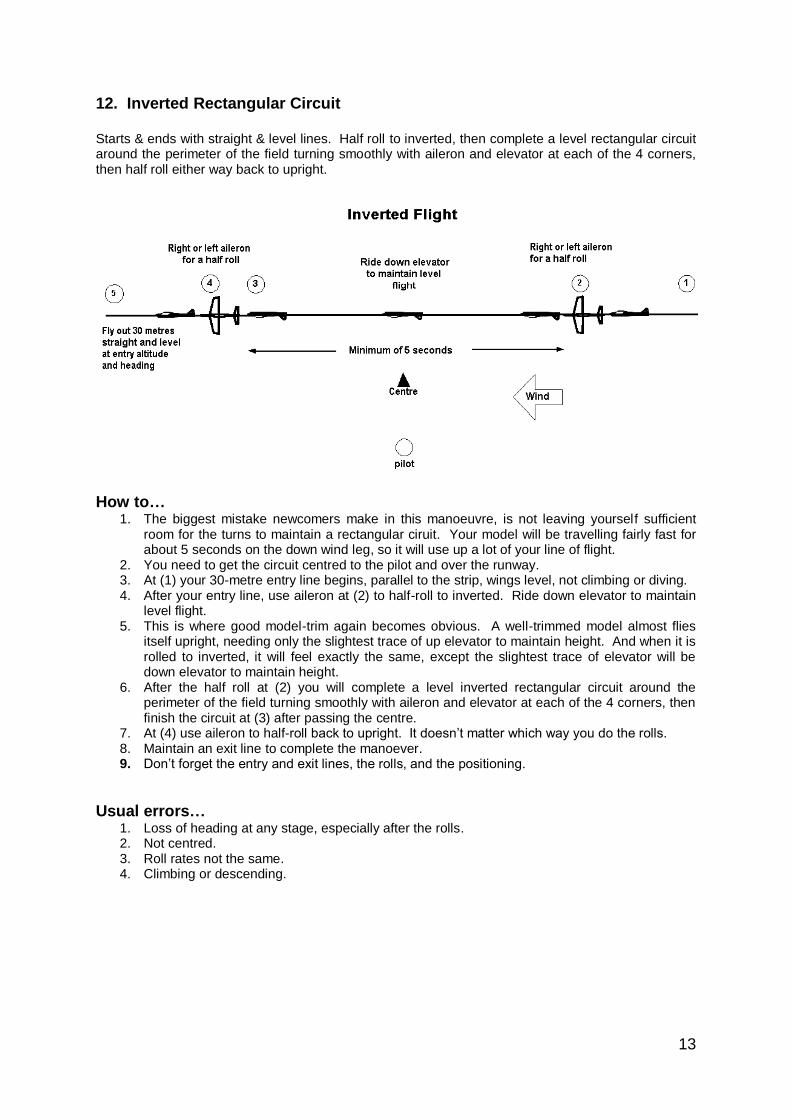
12. Inverted Rectangular Circuit Starts & ends with straight & level lines. Half roll to inverted, then complete a level rectangular circuit around the perimeter of the field turning smoothly with aileron and elevator at each of the 4 corners, then half roll either way back to upright.
How to…
1. The biggest mistake newcomers make in this manoeuvre, is not leaving yourself sufficient room for the turns to maintain a rectangular ciruit. Your model will be travelling fairly fast for about 5 seconds on the down wind leg, so it will use up a lot of your line of flight.
2. You need to get the circuit centred to the pilot and over the runway. 3. At (1) your 30-metre entry line begins, parallel to the strip, wings level, not climbing or diving. 4. After your entry line, use aileron at (2) to half-roll to inverted. Ride down elevator to maintain
level flight. 5. This is where good model-trim again becomes obvious. A well-trimmed model almost flies
itself upright, needing only the slightest trace of up elevator to maintain height. And when it is rolled to inverted, it will feel exactly the same, except the slightest trace of elevator will be down elevator to maintain height.
6. After the half roll at (2) you will complete a level inverted rectangular circuit around the perimeter of the field turning smoothly with aileron and elevator at each of the 4 corners, then finish the circuit at (3) after passing the centre.
7. At (4) use aileron to half-roll back to upright. It doesn‟t matter which way you do the rolls. 8. Maintain an exit line to complete the manoever. 9. Don‟t forget the entry and exit lines, the rolls, and the positioning.
Usual errors… 1. Loss of heading at any stage, especially after the rolls. 2. Not centred. 3. Roll rates not the same. 4. Climbing or descending.

14
13. Stall Turn or Hammerhead This manoeuvre is between “straight flight in” and “straight flight back”, the entry and exit paths should be the same with a ¼ loop at the bottom.
Usual Errors...
1. Model not level at start and finish. 2. Track does not become exactly vertical. 3. Model track not vertical at start and finish of stall turn. 4. Return path not parallel to entry path. 5. Pivot radius greater than ½ wingspan. 6. Pendulum movement after stall. 7. Loop segments not round with same size and radius.

15
14. Three Turn Spin Enter straight & level, slow down early to arrive at the centreline with motor idling. Hold increasing elevator as the model slows, to maintain the level line of flight. Keep the wings level. The model‟s fuselage should stay parallel with the runway, arriving at the centreline with an ever-increasing nose-high attitude. Remember… the model must stall, so that the nose then drops even though full up elevator is being held in. As the stall occurs, add and also hold full rudder to start the spin, and only then the ailerons. Some models spin OK without ailerons. Experiment! To avoid the model stalling and starting to spin one way, but you put in control for the other way, (maybe because you weren‟t quick enough to see which way it was going) try this… arrive at the centreline, idling, nose high, and just before the model stalls, slide the rudder over in the direction you want the spin to go, which will also force the stall to start that way. Don‟t use aileron at the stall entry, or you‟ll do a wing-over or even a snap-entry, which is not permitted. Time the release of the sticks so that the model stops spinning at the completion of three spins. The model is then flown vertically down for about 30 metres. Then do a smooth, graceful 1/4 loop to a straight & level exit line of flight for 30 meters.
How to…
1. Model is flown in on a slowing 30-metre entry line, parallel to the runway. At the centreline, the model should be quite nose-high, and about to stall. The model should still be aimed parallel to the runway.
2. At (2) full elevator is applied and held in, the model stalls, and the nose begins to drop. 3. Immediately add and hold in full rudder in the direction you want the model to spin. 4. Some models need aileron to spin, and others spin well with only rudder added to the full
elevator. 5. Just before (5) release the controls and the model will probably continue to turn for a quarter-
rotation or so all by itself. You just have to practice, practice… to get to know just when to release the sticks.
6. If you‟ve underdone the turns a little bit, finish with ailerons. If you‟ve overdone them a little bit, use the ailerons to „unturn‟ back to three turns. Finish the manoeuvre off properly with a nice vertical dive, smooth loop-out, and 30-metre exit line.
Usual errors… 1. Wing-over or snap-roll at entry to the spin. The cause is using the ailerons too soon. 2. Over or under rotation. Entry and exit lines not parallel to the runway. 3. Spiral dive (not stalled) or snap roll entry (model „flicks‟ over). 4. Flying too close.

16
15. Touch and Go on Runway This manoeuvre is an approach, followed by a landing on the runway, followed by a take off, all in one smooth continuous sequence.
Usual Errors..
1. Model jumps from the ground. 2. Retouches the ground after becoming airborne. 3. Steep climb angle. 4. Wings not level at any time. 5. Model does not perform the manoeuvre smoothly.

17
16. Landing on Runway Model should maintain a straight line, flare, hold off, and settle onto the main wheels without bouncing. If the model is a trike, the nose wheel should touch down only as the model slows. If it‟s a taildragger, the tailwheel may touch at the same time as the main gear. Model rolls to a halt, still facing forward in the line of flight.
Remember the following commonsense safety issues: -
DO NOT taxi toward, or steer the model so it faces toward anyone.
DO NOT collapse the antenna or turn off your transmitter while the engine is running.
How to…
1. From the final turn, the model is flown on a descending line that is aimed to contact the runway at a point that is about one-third the way up the runway. The model should be flying quite slowly at this time.
2. Ideally, the model should be kept in a flat attitude (1) horizontal with the runway. If there were no power available, the model would keep slowing down in this attitude, making more and more drag, until it stalled. If just a „click or three‟ of power is left on during this approach, the descending path shown (2) should be achieved. However with some „slippery‟ models, just two clicks might let the model fly on forever until the fuel is all gone!
3. If it looks like the model is going to land short, add a click or two more power to „drag‟ the model a little further along the strip. The model‟s attitude should not alter at all.
4. If the model looks like it‟s going to overshoot, then back off the power, and let it slow down some more.
5. When the model is about half a metre above the runway, the „flare‟ (3) should be started to slow it down more. This means simply adding and maintaining a touch more elevator to lift the nose a „degree or three‟, which will cause more drag. Be careful not to add too much though, or you might force a stall…
6. The model is then „held off‟, maintaining the slightly nose-high attitude. This causes drag, and the model keeps slowing down until it loses enough lift that it settles to the runway by itself (4).
7. The power can then be set to idle, and the model is allowed to roll to a stop (5) still parallel with the runway.
8. If you choose to taxi the model back, don‟t turn the model towards the pits or people. Instead, turn it outwards, away from everyone, and taxi back parallel with the runway. Do not point an unrestrained model at people with the motor running, especially when the model is close. Remember commonsense and safety.
9. Don‟t stop „controlling‟ the model until your assistant/caller has got the model restrained.
Usual errors… 1. Landing path not maintained straight in relation to the runway 2. Bouncing at touchdown (usually a result of still too much airspeed) 3. Loss of heading after touchdown, during the roll-out 4. Control not being shown (the landing is an „arrival‟) 5. Not following commonsense safety issues, especially after coming to a stop

18
17. Taxi Back and Shut Down the Motor Taxi back along the designated taxi way and shut down the motor at the designated point, all in accordance with Club Rules and Procedures.