description & operation - toyotadostlari.com · 1999-2000 accessories & equipment rear...
TRANSCRIPT
1999-2000 ACCESSORIES & EQUIPMENT
Rear Window & Mirror Defoggers
DESCRIPTION & OPERATION
Rear window defogger systems use a heating wire grid bonded to the inside of window. Electrical power to heating grid is supplied by defogger relay, which is controlled by defogger switch. Some switches have an integrated timer, which turns system off after 12-18 minutes of operation. Some models are equipped with outside rearview mirror defoggers.
ON-VEHICLE SERVICE
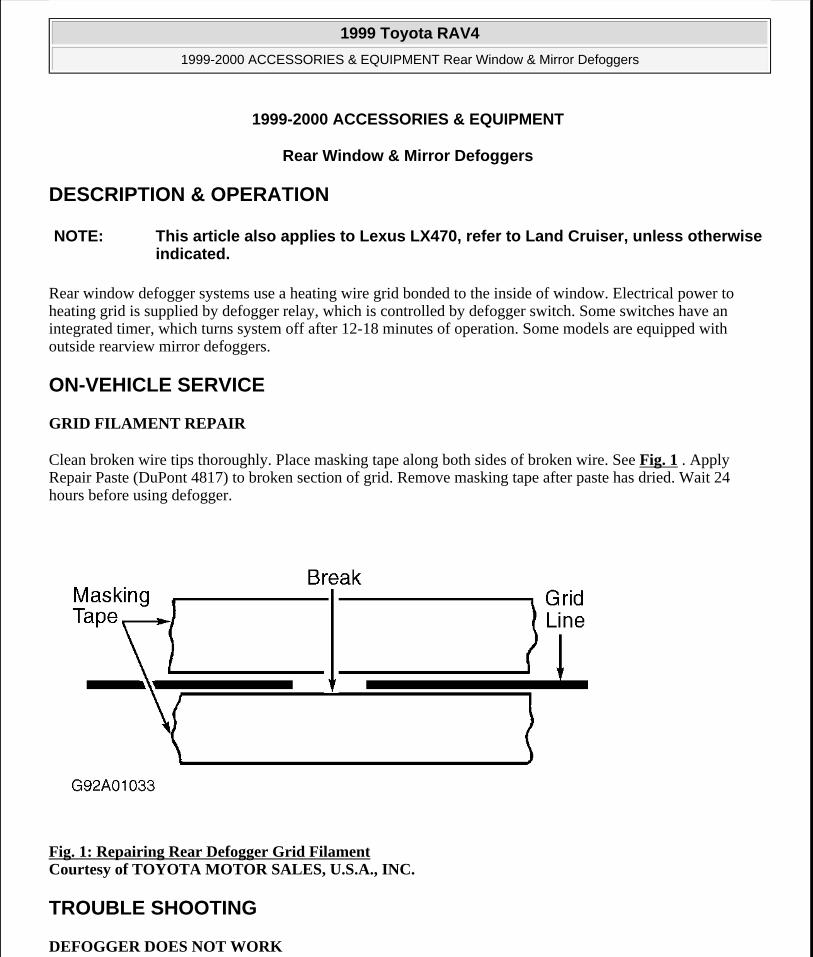
GRID FILAMENT REPAIR
Clean broken wire tips thoroughly. Place masking tape along both sides of broken wire. See Fig. 1 . Apply Repair Paste (DuPont 4817) to broken section of grid. Remove masking tape after paste has dried. Wait 24 hours before using defogger.
Fig. 1: Repairing Rear Defogger Grid Filament Courtesy of TOYOTA MOTOR SALES, U.S.A., INC.
TROUBLE SHOOTING
DEFOGGER DOES NOT WORK
NOTE: This article also applies to Lexus LX470, refer to Land Cruiser, unless otherwise indicated.
1999 Toyota RAV4
1999-2000 ACCESSORIES & EQUIPMENT Rear Window & Mirror Defoggers
1999 Toyota RAV4
1999-2000 ACCESSORIES & EQUIPMENT Rear Window & Mirror Defoggers
Microsoft
Sunday, November 22, 2009 10:55:09 AM Page 1 © 2005 Mitchell Repair Information Company, LLC.
Microsoft
Sunday, November 22, 2009 10:55:15 AM Page 1 © 2005 Mitchell Repair Information Company, LLC.

Blown fuse or poor contact. Defogger switch defective. Poor connections. Broken wire. Relay defective.
INDICATOR LIGHT DOES NOT WORK
Bulb burned out. Open wire or poor connection.
REAR WINDOW DEFOGGER SYSTEM CHECK
1. Ensure all in-line fuses or circuit breakers are okay. Turn ignition and control switches to ON position. Glass should feel warm after a few minutes.
2. If glass is not warm, use a test light or voltmeter to check for battery voltage at grid feed wire. If voltage is not correct, check wiring harness, control switch and timer/relay.
SYSTEM TESTS
DEFOGGER SWITCH CIRCUIT
2000 Celica
1. Disconnect defogger switch 10-pin connector. Check continuity between ground and defogger switch harness connector terminal No. 3 (White/Black wire). See Fig. 2 . If continuity exists, go to next step. If continuity does not exist, repair ground circuit as necessary. See WIRING DIAGRAMS .
2. Turn ignition on. Measure voltage between ground and defogger switch harness connector terminal No. 5 (Red/White wire). Battery voltage should exist. With ignition switch in LOCK or ACC position, no voltage should exist. If voltage is as specified, go to next step. If voltage is not as specified, repair appropriate circuit as necessary. See WIRING DIAGRAMS .
3. Connect defogger switch harness connector. Turn ignition on. Measure voltage between ground and defogger switch connector (backprobe) terminal No. 5 (Red/White wire). Battery voltage should exist. Turn defogger switch to ON position. No voltage should exist. If voltage is not as specified, replace defogger switch and retest system.
1999 Toyota RAV4
1999-2000 ACCESSORIES & EQUIPMENT Rear Window & Mirror Defoggers
Microsoft
Sunday, November 22, 2009 10:55:10 AM Page 2 © 2005 Mitchell Repair Information Company, LLC.

Fig. 2: Identifying Defogger Switch Harness Connector Terminals (2000 Celica) Courtesy of TOYOTA MOTOR SALES, U.S.A., INC.
MR2
1. Disconnect defogger switch 14-pin connector. Check continuity between ground and defogger switch harness connector terminal No. 4 (White/Black wire). See Fig. 3 . If continuity exists, go to next step. If continuity does not exist, repair ground circuit as necessary. See WIRING DIAGRAMS .
2. Turn ignition on. Measure voltage between ground and defogger switch harness connector terminal No. 12 (Pink/Blue wire). Battery voltage should exist. With ignition switch in LOCK or ACC position, no voltage should exist. If voltage is as specified, go to next step. If voltage is not as specified, repair appropriate circuit as necessary. See WIRING DIAGRAMS .
3. Connect defogger switch harness connector. Turn ignition on. Measure voltage between ground and defogger switch connector (backprobe) terminal No. 12 (Pink/Blue wire). Battery voltage should exist. Turn defogger switch to ON position. No voltage should exist. If voltage is not as specified, replace defogger switch and retest system.
1999 Toyota RAV4
1999-2000 ACCESSORIES & EQUIPMENT Rear Window & Mirror Defoggers
Microsoft
Sunday, November 22, 2009 10:55:10 AM Page 3 © 2005 Mitchell Repair Information Company, LLC.

Fig. 3: Identifying Defogger Switch Harness Connector Terminals (MR2) Courtesy of TOYOTA MOTOR SALES, U.S.A., INC.
DEFOGGER SWITCH TIMER CIRCUIT
Camry & Camry Solara
Disconnect defogger switch 6-pin connector. Use DVOM to check circuits as specified. See DEFOGGER TIMER CIRCUIT TEST (CAMRY & CAMRY SOLARA) table. If readings are not as specified, repair circuit as necessary. If readings are as specified, replace defogger switch and retest system.
DEFOGGER TIMER CIRCUIT TEST (CAMRY & CAMRY SOLARA) Check Between Ground & Pin No.(1) Condition Specification3 All Continuity4 IGN In LOCK/ACC Zero Volts4 IGN In ON Battery Voltage
1999 Toyota RAV4
1999-2000 ACCESSORIES & EQUIPMENT Rear Window & Mirror Defoggers
Microsoft
Sunday, November 22, 2009 10:55:10 AM Page 4 © 2005 Mitchell Repair Information Company, LLC.
Corolla & Tercel
Disconnect defogger switch 6-pin connector. Use DVOM to check circuits as specified. See DEFOGGER TIMER CIRCUIT TEST (COROLLA & TERCEL) table. If readings are not as specified, repair circuit as necessary. If readings are as specified, replace defogger switch and retest system.
DEFOGGER TIMER CIRCUIT TEST (COROLLA & TERCEL)
ECHO
Disconnect defogger switch 4-pin connector. Use DVOM to check circuits as specified. See DEFOGGER TIMER CIRCUIT TEST (ECHO) table. If readings are not as specified, repair circuit as necessary. If readings are as specified, replace defogger switch and retest system.
DEFOGGER TIMER CIRCUIT TEST (ECHO)
Land Cruiser
Disconnect control panel 22-pin connector C9. See Fig. 4 and Fig. 12 . Use DVOM to check circuits as specified. See CONTROL PANEL SWITCH CIRCUIT TEST (LAND CRUISER) table. If readings are as specified, replace switch and retest system. If readings are not as specified, repair circuit as necessary. If readings are as specified, replace defogger switch and retest system.
5 IGN In LOCK/ACC Zero Volts5 IGN In ON Battery Voltage(1) See Fig. 9 .
Check Between Ground & Pin No.(1) Condition Specification3 All Continuity2 IGN In LOCK/ACC Zero Volts2 IGN In ON Battery Voltage6 IGN In LOCK/ACC Zero Volts6 IGN In ON Battery Voltage(1) See Fig. 9 .
Check Between Ground & Pin No. (1) Condition Specification2 All Continuity3 IGN In LOCK/ACC Zero Volts3 IGN In ON Battery Voltage4 Defogger Switch Off No Continuity4 Defogger Switch On Continuity(1) See Fig. 11 .
1999 Toyota RAV4
1999-2000 ACCESSORIES & EQUIPMENT Rear Window & Mirror Defoggers
Microsoft
Sunday, November 22, 2009 10:55:10 AM Page 5 © 2005 Mitchell Repair Information Company, LLC.

CONTROL PANEL SWITCH CIRCUIT TEST (LAND CRUISER)
Fig. 4: Control Panel Connector C9 Terminals (Land Cruiser) Courtesy of TOYOTA MOTOR SALES, U.S.A., INC.
Sienna
Disconnect defogger switch 6-pin connector. Use DVOM to check circuits as specified. See DEFOGGER TIMER CIRCUIT TEST (SIENNA) table. If readings are not as specified, repair circuit as necessary. If readings are as specified, replace defogger switch and retest system.
DEFOGGER TIMER CIRCUIT TEST (SIENNA)
Check Between Ground & Pin No. (1) Condition Specification22 Constant Continuity12 Constant Battery Voltage1 Ignition In LOCK/ACC Zero Volts1 Ignition In ON Battery Voltage2 Ignition In LOCK Zero Volts2 Ignition In ACC/ON Battery Voltage(1) See Fig. 4 .
Check Between Ground & Pin No.(1) Condition Specification
1999 Toyota RAV4
1999-2000 ACCESSORIES & EQUIPMENT Rear Window & Mirror Defoggers
Microsoft
Sunday, November 22, 2009 10:55:10 AM Page 6 © 2005 Mitchell Repair Information Company, LLC.

4Runner
Disconnect defogger switch 6-pin connector. See WIRING DIAGRAMS . Use DVOM to check circuits as specified. See DEFOGGER TIMER CIRCUIT TEST (4RUNNER) table. If readings are not as specified, repair circuit as necessary. If readings are as specified, replace defogger switch and retest system.
DEFOGGER TIMER CIRCUIT TEST (4RUNNER)
INSTRUMENT PANEL JUNCTION BLOCK (REAR DEFOGGER)
Circuit Test (RAV4)
Remove instrument panel junction block located under driver's side of instrument panel. Inspect 23-pin connector "A" terminals with DVOM by backprobing specified terminals. Disconnect junction block 15-pin connector "B". Test specified terminal. See JUNCTION BLOCK CONNECTOR CIRCUIT TEST table.
See WIRING DIAGRAMS . If circuit is okay, replace relay. If circuit is not okay, repair as necessary.
JUNCTION BLOCK CONNECTOR CIRCUIT TEST
Operational Check (RAV4)
Disconnect 23-pin connector "A" from junction block. Connect positive lead of DVOM to junction block
3 All Continuity1 IGN In LOCK/ACC Zero Volts1 IGN In ON Battery Voltage2 IGN In LOCK/ACC Zero Volts2 IGN In ON Battery Voltage(1) See Fig. 9 .
Check Between Ground & Pin No.(1) Condition Specification4 All Continuity2 IGN In LOCK/ACC Zero Volts2 IGN In ON Battery Voltage6 IGN In LOCK/ACC Zero Volts6 IGN In ON Battery Voltage(1) See Fig. 14 .
Check Between Ground & Terminal No. Switch Position SpecificationA5 ON ContinuityA11 All Positions ContinuityB4 All Positions ContinuityB3 All Positions Battery Voltage
1999 Toyota RAV4
1999-2000 ACCESSORIES & EQUIPMENT Rear Window & Mirror Defoggers
Microsoft
Sunday, November 22, 2009 10:55:10 AM Page 7 © 2005 Mitchell Repair Information Company, LLC.

terminal C7 and negative lead to ground. Connect jumper wire between 23-pin connector "A" cavity terminal A5 and ground. See Fig. 5 . If continuity is not indicated, replace junction block.
Fig. 5: Identifying Junction Block Connector Terminals (RAV4)
1999 Toyota RAV4
1999-2000 ACCESSORIES & EQUIPMENT Rear Window & Mirror Defoggers
Microsoft
Sunday, November 22, 2009 10:55:10 AM Page 8 © 2005 Mitchell Repair Information Company, LLC.
Courtesy of TOYOTA MOTOR SALES, U.S.A., INC.
REARVIEW MIRROR DEFOGGER TIMER OPERATION
Land Cruiser
1. Remove climate control (A/C-heater control) panel. Connect (backprobe) DVOM negative lead to connector C9 terminal No. 22. Connect DVOM positive lead to connector C9 terminals No. 2 and 12, and connector C7 terminal No. 8. See Fig. 12 . Turn ignition switch to ON position and measure voltage.
2. With defogger switch OFF, voltage should be about 12 volts. Turn defogger switch ON and ensure DEF switch indicator is illuminated. Voltage should be less than one volt for about 15 minutes. After 15 minutes, defogger switch should turn off and voltage should be about 12 volts. Replace defogger switch if voltage is not as specified is not as specified.
COMPONENT TESTS
DEFOGGER SWITCH TEST
1999 Avalon
1. If equipped with automatic A/C-heater system, backprobe defogger switch terminal No. 10 (Blue/Yellow wire) with positive voltmeter lead and terminal No. 11 (White/Black wire) with negative lead. See Fig. 6 . If equipped with manual A/C-heater system, backprobe defogger switch terminal No. 11 (Blue/Yellow wire) with positive voltmeter lead and terminal No. 5 (White/Black wire) with negative lead. See Fig. 7 .
2. On all models, ensure battery voltage exists with defogger switch in OFF position. Turn defogger switch to ON position. Ensure indicator light is on and less than one volt exists. After 15 minutes, defogger switch should turn off and battery voltage should exist again. If defogger switch does not operate as specified, replace switch.
1999 Toyota RAV4
1999-2000 ACCESSORIES & EQUIPMENT Rear Window & Mirror Defoggers
Microsoft
Sunday, November 22, 2009 10:55:10 AM Page 9 © 2005 Mitchell Repair Information Company, LLC.

Fig. 6: Identifying Defogger Switch Terminals (1999 Avalon - With Automatic A/C-Heater System)
1999 Toyota RAV4
1999-2000 ACCESSORIES & EQUIPMENT Rear Window & Mirror Defoggers
Microsoft
Sunday, November 22, 2009 10:55:10 AM Page 10 © 2005 Mitchell Repair Information Company, LLC.

Fig. 7: Identifying Defogger Switch Terminals (1999 Avalon - With Manual A/C-Heater System)
2000 Avalon (With Automatic A/C-Heater System)
1. Disconnect A/C-heater control panel harness connectors. Connect jumper wires between battery positive and A/C-heater control panel 26-pin connector terminals No. 1 (White/Green wire) and No. 2 (Red/White wire). See Fig. 8 .
2. Connect another jumper wire between ground and A/C-heater control panel 26-pin connector terminal No. 24 (White/Black wire). Connect a 1.4-watt test light between battery positive and A/C-heater control panel 26-pin connector terminal No. 18 (Red/Black wire).
3. Turn rear window defogger switch on. Test light, rear window defogger indicator and mirror heater indicator (if equipped) should illuminate, then turn off after about 15 minutes. Replace A/C-heater control
NOTE: Defogger switch testing information for 2000 Avalon with manual A/C-heater system is not available from manufacturer.
1999 Toyota RAV4
1999-2000 ACCESSORIES & EQUIPMENT Rear Window & Mirror Defoggers
Microsoft
Sunday, November 22, 2009 10:55:10 AM Page 11 © 2005 Mitchell Repair Information Company, LLC.

panel if operation is not as specified.
Fig. 8: Testing Rear Window Defogger Switch (2000 Avalon With Automatic A/C-Heater System) Courtesy of TOYOTA MOTOR SALES, U.S.A., INC.
Camry & Camry Solara
1. Remove rear defogger switch. Terminals No. 2 and 6 are for bulb illumination. Using an ohmmeter, check for continuity between terminals No. 2 and 6 of switch. See Fig. 9 . Continuity should exist at all times. If continuity does not exist, check illumination bulb.
2. Connect battery positive lead to terminal No. 4, and battery negative lead to terminal No. 3. See Fig. 9 . Connect a 3.4-watt test light between battery voltage and terminal No. 5. Turn defogger on. Ensure test light comes on for 12-18 minutes and then goes out. If switch does not operate as specified, replace switch.
1999 Toyota RAV4
1999-2000 ACCESSORIES & EQUIPMENT Rear Window & Mirror Defoggers
Microsoft
Sunday, November 22, 2009 10:55:10 AM Page 12 © 2005 Mitchell Repair Information Company, LLC.

Fig. 9: Identifying Defogger Switch Terminals (Camry, Camry Solara, 1999 Celica, Corolla, Sienna, Tercel & 4Runner) Courtesy of TOYOTA MOTOR SALES, U.S.A., INC.
1999 Celica
1. Backprobe defogger switch terminal No. 5 with positive voltmeter lead and terminal No. 4 with negative lead. See Fig. 9 . Ensure battery voltage exists with defogger switch in OFF position. Turn defogger switch to ON position. Ensure indicator light is on and less than one volt exists. If voltage is not as specified, replace switch.
2. Terminals No. 2 and 6 are for bulb illumination. Using an ohmmeter, check for continuity between switch terminals No. 2 and 6. See Fig. 9 . Continuity should exist at all times.
3. If defogger switch is equipped with timer, ensure defogger switch turns off and battery voltage is again present after 12-18 minutes. If defogger switch does not operate as specified, replace switch.
2000 Celica
1. Disconnect defogger switch 10-pin connector. Connect a jumper wire between battery positive and defogger switch terminal No. 1. See Fig. 2 . Connect another jumper wire between ground and terminal No. 3.
2. Connect a 3.4-watt test light between battery positive and defogger switch terminal No. 5. Turn defogger switch to ON position. Test light and indicator light should illuminate on for 12-18 seconds, then turn off. If operation is not as specified, replace defogger switch.
Corolla (With Timer)
Disconnect defogger switch 6-pin connector. Connect fused jumper between battery positive lead and terminal No. 2 and battery negative lead to terminal No. 3 (switch side). Connect a 3.4-watt test light between terminal No. 6 and battery voltage. See Fig. 10 . Push defogger switch to ON position. Ensure test light and indicator
1999 Toyota RAV4
1999-2000 ACCESSORIES & EQUIPMENT Rear Window & Mirror Defoggers
Microsoft
Sunday, November 22, 2009 10:55:10 AM Page 13 © 2005 Mitchell Repair Information Company, LLC.

light come on for 12-18 minutes and then goes out. If switch does not operate as specified, replace switch.
Fig. 10: Testing Defogger Switch With Timer (Corolla & Tercel) Courtesy of TOYOTA MOTOR SALES, U.S.A., INC.
Corolla (Without Timer)
Disconnect defogger switch 6-pin connector. With defogger switch on, ensure continuity exists between terminals No. 3 and 6. See Fig. 9 . With switch off, continuity should not exist between any terminals. Check continuity between terminals No. 1 and 4 (light bulb). Continuity should exist at all times. If continuity is not as specified, replace switch.
ECHO (With Timer)
1. Disconnect defogger switch 4-pin connector. Connect a jumper wire between battery positive terminal and defogger switch terminal No. 3. See Fig. 11 . Connect another jumper wire between ground and terminal No. 4.
2. Connect a 3.4-watt test light between battery positive and terminal No. 2. Turn defogger switch to ON position. Indicator light and test light should come on, then turn off after 12-18 minutes. Replace switch if operation is not as specified.
ECHO (Without Timer)
1999 Toyota RAV4
1999-2000 ACCESSORIES & EQUIPMENT Rear Window & Mirror Defoggers
Microsoft
Sunday, November 22, 2009 10:55:10 AM Page 14 © 2005 Mitchell Repair Information Company, LLC.
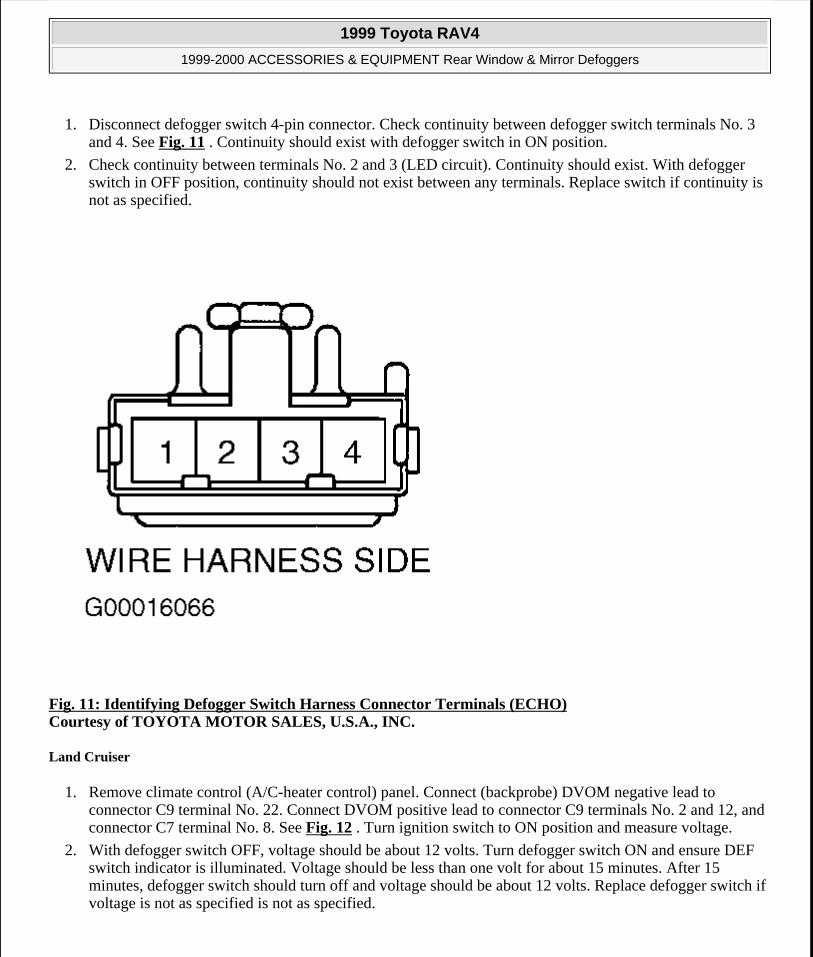
1. Disconnect defogger switch 4-pin connector. Check continuity between defogger switch terminals No. 3 and 4. See Fig. 11 . Continuity should exist with defogger switch in ON position.
2. Check continuity between terminals No. 2 and 3 (LED circuit). Continuity should exist. With defogger switch in OFF position, continuity should not exist between any terminals. Replace switch if continuity is not as specified.
Fig. 11: Identifying Defogger Switch Harness Connector Terminals (ECHO) Courtesy of TOYOTA MOTOR SALES, U.S.A., INC.
Land Cruiser
1. Remove climate control (A/C-heater control) panel. Connect (backprobe) DVOM negative lead to connector C9 terminal No. 22. Connect DVOM positive lead to connector C9 terminals No. 2 and 12, and connector C7 terminal No. 8. See Fig. 12 . Turn ignition switch to ON position and measure voltage.
2. With defogger switch OFF, voltage should be about 12 volts. Turn defogger switch ON and ensure DEF switch indicator is illuminated. Voltage should be less than one volt for about 15 minutes. After 15 minutes, defogger switch should turn off and voltage should be about 12 volts. Replace defogger switch if voltage is not as specified is not as specified.
1999 Toyota RAV4
1999-2000 ACCESSORIES & EQUIPMENT Rear Window & Mirror Defoggers
Microsoft
Sunday, November 22, 2009 10:55:10 AM Page 15 © 2005 Mitchell Repair Information Company, LLC.

Fig. 12: Identifying Front A/C-Heater Control Assembly Terminals (Land Cruiser) Courtesy of TOYOTA MOTOR SALES, U.S.A., INC.
MR2
1. Disconnect defogger switch 14-pin connector. Connect a jumper wire between battery positive and defogger switch terminal No. 1. See Fig. 3 . Connect another jumper wire between ground and terminal No. 4.
2. Connect a 3.4-watt test light between battery positive and terminal No. 12. Turn defogger switch on. Indicator and test light should turn on, then turn off after 12-18 minutes. Replace defogger switch if operation is not as specified.
RAV4
1. Remove rear defogger switch. Check continuity between specified switch terminals. See DEFOGGER SWITCH CONTINUITY TEST (RAV4) table. See Fig. 13 . If continuity is not as specified, replace switch.
DEFOGGER SWITCH CONTINUITY TEST (RAV4)
Switch Position (1) Terminals No. ContinuityOFF None NoON 3, 5 & 8 YesON (Illumination) 3 & 5 YesIllumination 2 & 6 Yes(1) See Fig. 13 .
1999 Toyota RAV4
1999-2000 ACCESSORIES & EQUIPMENT Rear Window & Mirror Defoggers
Microsoft
Sunday, November 22, 2009 10:55:10 AM Page 16 © 2005 Mitchell Repair Information Company, LLC.

Fig. 13: Identifying Defogger Switch Terminals (RAV4) Courtesy of TOYOTA MOTOR SALES, U.S.A., INC.
Sienna
1. Remove defogger switch. Terminals No. 1 and 4 are for bulb illumination. Check continuity between defogger switch terminals No. 1 and 3. See Fig. 9 . Continuity should exist at all times. If continuity does not exist, check illumination bulb.
2. Connect a jumper wire between battery positive and terminal No. 2. Connect another jumper wire between ground and terminal No. 4. Connect a 3.4-watt test light between battery positive and terminal No. 6. Turn defogger on. Ensure test light comes on for 12-18 minutes and then goes out. If switch does not operate as specified, replace switch.
Tercel
1. Remove defogger switch. Terminals No. 1 and 4 are for bulb illumination. Check continuity between defogger switch terminals No. 1 and 4. See Fig. 9 . If continuity exists, go to next step. If continuity does not exist, check illumination bulb.
2. On models without timer, check continuity between defogger switch terminals No. 2, 3 and 6 with switch in ON position. See Fig. 9 . With defogger switch off, continuity should not exist between any terminals. If continuity is not as specified, replace defogger switch and retest system.
3. On models with timer, connect jumper wire between battery positive lead and defogger switch terminal No. 2. Connect another jumper wire between ground and terminal No. 3. Connect a 3.4-watt test light between battery positive and terminal No. 6. See Fig. 10 . Turn defogger switch to ON position. Ensure indicator light and test light come on for 12-18 minutes and then go out. If defogger switch with timer does not operate as specified, replace switch.
4Runner
1999 Toyota RAV4
1999-2000 ACCESSORIES & EQUIPMENT Rear Window & Mirror Defoggers
Microsoft
Sunday, November 22, 2009 10:55:10 AM Page 17 © 2005 Mitchell Repair Information Company, LLC.

Disconnect defogger switch 10-pin connector. Check continuity between defogger switch terminals No. 7 and 10. See Fig. 14 . With defogger switch in ON position, continuity should exist. If continuity is not as specified, replace integration control panel.
Fig. 14: Identifying Defogger Switch Terminals (4Runner) Courtesy of TOYOTA MOTOR SALES, U.S.A., INC.
REARVIEW MIRROR DEFOGGER
1999 Avalon
Locate and disconnect outside rearview mirror 6-pin connector. Connect a jumper wire between battery positive and terminal No. 6 (Black/Red wire). Connect another jumper wire between ground and terminal No. 4 (White/Black wire). After a short time, ensure mirror becomes warm. If mirror does not become warm, replace mirror assembly.
2000 Avalon (With Memory)
Disconnect outside rearview mirror harness connector. Connect a jumper wire between battery positive and rearview mirror connector terminal No. 5 (Black wire). Connect another jumper wire between ground and rearview mirror connector terminal No. 10 (White/Black wire). After a short time, mirror should warm. If mirror does not warm, replace mirror assembly.
1999 Toyota RAV4
1999-2000 ACCESSORIES & EQUIPMENT Rear Window & Mirror Defoggers
Microsoft
Sunday, November 22, 2009 10:55:10 AM Page 18 © 2005 Mitchell Repair Information Company, LLC.
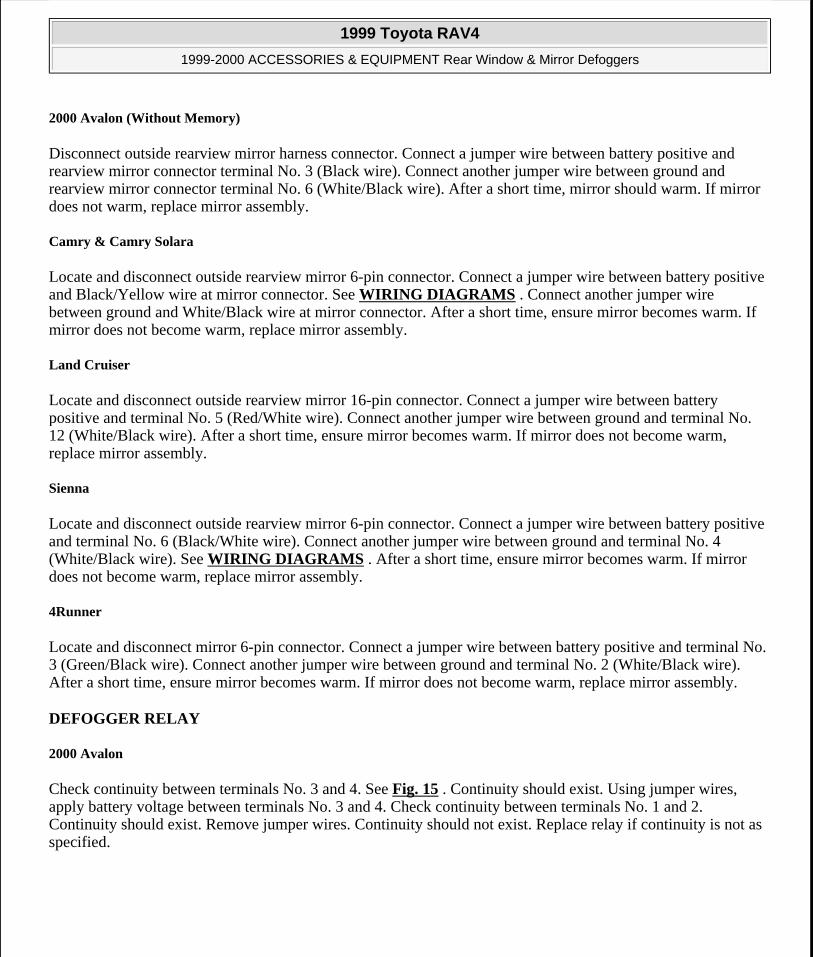
2000 Avalon (Without Memory)
Disconnect outside rearview mirror harness connector. Connect a jumper wire between battery positive and rearview mirror connector terminal No. 3 (Black wire). Connect another jumper wire between ground and rearview mirror connector terminal No. 6 (White/Black wire). After a short time, mirror should warm. If mirror does not warm, replace mirror assembly.
Camry & Camry Solara
Locate and disconnect outside rearview mirror 6-pin connector. Connect a jumper wire between battery positive and Black/Yellow wire at mirror connector. See WIRING DIAGRAMS . Connect another jumper wire between ground and White/Black wire at mirror connector. After a short time, ensure mirror becomes warm. If mirror does not become warm, replace mirror assembly.
Land Cruiser
Locate and disconnect outside rearview mirror 16-pin connector. Connect a jumper wire between battery positive and terminal No. 5 (Red/White wire). Connect another jumper wire between ground and terminal No. 12 (White/Black wire). After a short time, ensure mirror becomes warm. If mirror does not become warm, replace mirror assembly.
Sienna
Locate and disconnect outside rearview mirror 6-pin connector. Connect a jumper wire between battery positive and terminal No. 6 (Black/White wire). Connect another jumper wire between ground and terminal No. 4 (White/Black wire). See WIRING DIAGRAMS . After a short time, ensure mirror becomes warm. If mirror does not become warm, replace mirror assembly.
4Runner
Locate and disconnect mirror 6-pin connector. Connect a jumper wire between battery positive and terminal No. 3 (Green/Black wire). Connect another jumper wire between ground and terminal No. 2 (White/Black wire). After a short time, ensure mirror becomes warm. If mirror does not become warm, replace mirror assembly.
DEFOGGER RELAY
2000 Avalon
Check continuity between terminals No. 3 and 4. See Fig. 15 . Continuity should exist. Using jumper wires, apply battery voltage between terminals No. 3 and 4. Check continuity between terminals No. 1 and 2. Continuity should exist. Remove jumper wires. Continuity should not exist. Replace relay if continuity is not as specified.
1999 Toyota RAV4
1999-2000 ACCESSORIES & EQUIPMENT Rear Window & Mirror Defoggers
Microsoft
Sunday, November 22, 2009 10:55:10 AM Page 19 © 2005 Mitchell Repair Information Company, LLC.

Fig. 15: Testing Defogger Relay (2000 Avalon) Courtesy of TOYOTA MOTOR SALES, U.S.A., INC.
Tercel
1. Using an ohmmeter, ensure continuity exists between terminals No. 1 and 3. See Fig. 16 . Continuity should not exist between terminals No. 2 and 4. If continuity is not as specified, replace relay.
2. Connect battery positive lead to terminal No. 1 and battery negative lead to terminal No. 3. Continuity should exist between terminals No. 2 and 4. If operation is not as specified, replace relay.
1999 Toyota RAV4
1999-2000 ACCESSORIES & EQUIPMENT Rear Window & Mirror Defoggers
Microsoft
Sunday, November 22, 2009 10:55:10 AM Page 20 © 2005 Mitchell Repair Information Company, LLC.

Fig. 16: Testing Defogger Relay (Tercel) Courtesy of TOYOTA MOTOR SALES, U.S.A., INC.
Except Tercel & 2000 Avalon
1. Using an ohmmeter, ensure continuity exists between terminals No. 1 and 2. See Fig. 17 or Fig. 18 . Continuity should not exist between terminals No. 3 and 5. If continuity is not as specified, replace relay.
2. Connect battery positive lead to terminal No. 1 and battery negative lead to terminal No. 2. Continuity should exist between terminals No. 3 and 5. If operation is not as specified, replace relay.
NOTE: Testing for Land Cruiser mirror heater relay is the same as testing for defogger relay.
1999 Toyota RAV4
1999-2000 ACCESSORIES & EQUIPMENT Rear Window & Mirror Defoggers
Microsoft
Sunday, November 22, 2009 10:55:10 AM Page 21 © 2005 Mitchell Repair Information Company, LLC.
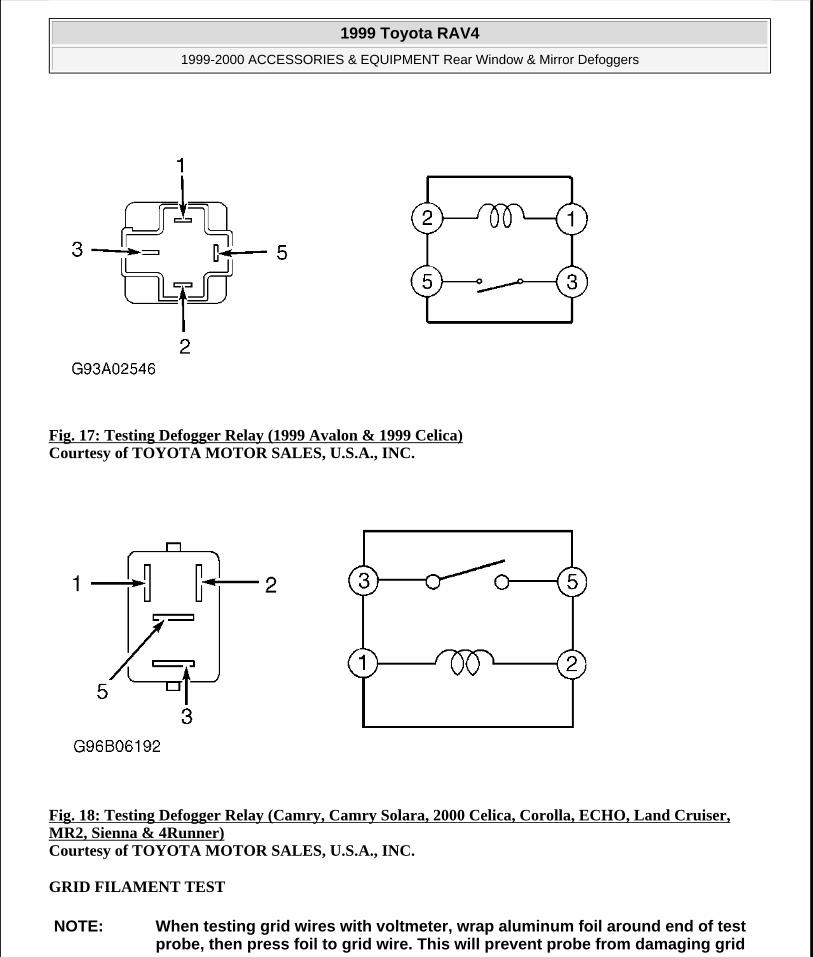
Fig. 17: Testing Defogger Relay (1999 Avalon & 1999 Celica) Courtesy of TOYOTA MOTOR SALES, U.S.A., INC.
Fig. 18: Testing Defogger Relay (Camry, Camry Solara, 2000 Celica, Corolla, ECHO, Land Cruiser, MR2, Sienna & 4Runner) Courtesy of TOYOTA MOTOR SALES, U.S.A., INC.
GRID FILAMENT TEST
NOTE: When testing grid wires with voltmeter, wrap aluminum foil around end of test probe, then press foil to grid wire. This will prevent probe from damaging grid
1999 Toyota RAV4
1999-2000 ACCESSORIES & EQUIPMENT Rear Window & Mirror Defoggers
Microsoft
Sunday, November 22, 2009 10:55:10 AM Page 22 © 2005 Mitchell Repair Information Company, LLC.

1. To locate breaks in grid wire filaments, attach a voltmeter to middle portion of each filament. Attach other meter probe to vertical section of window grid. See Fig. 19 .
2. If a grid is broken, meter will register zero volts or about 10 volts, depending on if grid is broken between or outside test leads. If wire is unbroken, meter will register about 5 volts. To locate break, move probe along wire until voltage changes abruptly.
wire.
1999 Toyota RAV4
1999-2000 ACCESSORIES & EQUIPMENT Rear Window & Mirror Defoggers
Microsoft
Sunday, November 22, 2009 10:55:10 AM Page 23 © 2005 Mitchell Repair Information Company, LLC.

Fig. 19: Testing Grid Filament Courtesy of TOYOTA MOTOR SALES, U.S.A., INC.
1999 Toyota RAV4
1999-2000 ACCESSORIES & EQUIPMENT Rear Window & Mirror Defoggers
Microsoft
Sunday, November 22, 2009 10:55:10 AM Page 24 © 2005 Mitchell Repair Information Company, LLC.

WIRING DIAGRAMS
1999 Toyota RAV4
1999-2000 ACCESSORIES & EQUIPMENT Rear Window & Mirror Defoggers
Microsoft
Sunday, November 22, 2009 10:55:10 AM Page 25 © 2005 Mitchell Repair Information Company, LLC.

1999 Toyota RAV4
1999-2000 ACCESSORIES & EQUIPMENT Rear Window & Mirror Defoggers
Microsoft
Sunday, November 22, 2009 10:55:10 AM Page 26 © 2005 Mitchell Repair Information Company, LLC.

Fig. 20: Rear Window Defogger System Wiring Diagram (1999 Avalon)
1999 Toyota RAV4
1999-2000 ACCESSORIES & EQUIPMENT Rear Window & Mirror Defoggers
Microsoft
Sunday, November 22, 2009 10:55:10 AM Page 27 © 2005 Mitchell Repair Information Company, LLC.

1999 Toyota RAV4
1999-2000 ACCESSORIES & EQUIPMENT Rear Window & Mirror Defoggers
Microsoft
Sunday, November 22, 2009 10:55:10 AM Page 28 © 2005 Mitchell Repair Information Company, LLC.
Fig. 21: Rear Window Defogger System Wiring Diagram (1999 Camry)
1999 Toyota RAV4
1999-2000 ACCESSORIES & EQUIPMENT Rear Window & Mirror Defoggers
Microsoft
Sunday, November 22, 2009 10:55:10 AM Page 29 © 2005 Mitchell Repair Information Company, LLC.

1999 Toyota RAV4
1999-2000 ACCESSORIES & EQUIPMENT Rear Window & Mirror Defoggers
Microsoft
Sunday, November 22, 2009 10:55:10 AM Page 30 © 2005 Mitchell Repair Information Company, LLC.

Fig. 22: Rear Window Defogger System Wiring Diagram (1999 Celica)
1999 Toyota RAV4
1999-2000 ACCESSORIES & EQUIPMENT Rear Window & Mirror Defoggers
Microsoft
Sunday, November 22, 2009 10:55:10 AM Page 31 © 2005 Mitchell Repair Information Company, LLC.

1999 Toyota RAV4
1999-2000 ACCESSORIES & EQUIPMENT Rear Window & Mirror Defoggers
Microsoft
Sunday, November 22, 2009 10:55:10 AM Page 32 © 2005 Mitchell Repair Information Company, LLC.

Fig. 23: Rear Window Defogger System Wiring Diagram (1999-2000 Camry Solara)
1999 Toyota RAV4
1999-2000 ACCESSORIES & EQUIPMENT Rear Window & Mirror Defoggers
Microsoft
Sunday, November 22, 2009 10:55:10 AM Page 33 © 2005 Mitchell Repair Information Company, LLC.

1999 Toyota RAV4
1999-2000 ACCESSORIES & EQUIPMENT Rear Window & Mirror Defoggers
Microsoft
Sunday, November 22, 2009 10:55:10 AM Page 34 © 2005 Mitchell Repair Information Company, LLC.

Fig. 24: Rear Window Defogger System Wiring Diagram (1999-2000 Corolla)
1999 Toyota RAV4
1999-2000 ACCESSORIES & EQUIPMENT Rear Window & Mirror Defoggers
Microsoft
Sunday, November 22, 2009 10:55:10 AM Page 35 © 2005 Mitchell Repair Information Company, LLC.

1999 Toyota RAV4
1999-2000 ACCESSORIES & EQUIPMENT Rear Window & Mirror Defoggers
Microsoft
Sunday, November 22, 2009 10:55:10 AM Page 36 © 2005 Mitchell Repair Information Company, LLC.

Fig. 25: Rear Window Defogger System Wiring Diagram (1999-2000 Land Cruiser)
1999 Toyota RAV4
1999-2000 ACCESSORIES & EQUIPMENT Rear Window & Mirror Defoggers
Microsoft
Sunday, November 22, 2009 10:55:10 AM Page 37 © 2005 Mitchell Repair Information Company, LLC.

1999 Toyota RAV4
1999-2000 ACCESSORIES & EQUIPMENT Rear Window & Mirror Defoggers
Microsoft
Sunday, November 22, 2009 10:55:10 AM Page 38 © 2005 Mitchell Repair Information Company, LLC.

Fig. 26: Mirror Defogger System Wiring Diagram (1999-2000 Land Cruiser)
1999 Toyota RAV4
1999-2000 ACCESSORIES & EQUIPMENT Rear Window & Mirror Defoggers
Microsoft
Sunday, November 22, 2009 10:55:10 AM Page 39 © 2005 Mitchell Repair Information Company, LLC.

1999 Toyota RAV4
1999-2000 ACCESSORIES & EQUIPMENT Rear Window & Mirror Defoggers
Microsoft
Sunday, November 22, 2009 10:55:10 AM Page 40 © 2005 Mitchell Repair Information Company, LLC.

Fig. 27: Rear Window Defogger System Wiring Diagram (1999-2000 RAV4)
1999 Toyota RAV4
1999-2000 ACCESSORIES & EQUIPMENT Rear Window & Mirror Defoggers
Microsoft
Sunday, November 22, 2009 10:55:10 AM Page 41 © 2005 Mitchell Repair Information Company, LLC.

1999 Toyota RAV4
1999-2000 ACCESSORIES & EQUIPMENT Rear Window & Mirror Defoggers
Microsoft
Sunday, November 22, 2009 10:55:10 AM Page 42 © 2005 Mitchell Repair Information Company, LLC.

Fig. 28: Rear Window Defogger System Wiring Diagram (1999-2000 Sienna)
1999 Toyota RAV4
1999-2000 ACCESSORIES & EQUIPMENT Rear Window & Mirror Defoggers
Microsoft
Sunday, November 22, 2009 10:55:10 AM Page 43 © 2005 Mitchell Repair Information Company, LLC.

1999 Toyota RAV4
1999-2000 ACCESSORIES & EQUIPMENT Rear Window & Mirror Defoggers
Microsoft
Sunday, November 22, 2009 10:55:10 AM Page 44 © 2005 Mitchell Repair Information Company, LLC.

Fig. 29: Rear Window Defogger System Wiring Diagram (1999-2000 4Runner)
1999 Toyota RAV4
1999-2000 ACCESSORIES & EQUIPMENT Rear Window & Mirror Defoggers
Microsoft
Sunday, November 22, 2009 10:55:10 AM Page 45 © 2005 Mitchell Repair Information Company, LLC.

1999 Toyota RAV4
1999-2000 ACCESSORIES & EQUIPMENT Rear Window & Mirror Defoggers
Microsoft
Sunday, November 22, 2009 10:55:10 AM Page 46 © 2005 Mitchell Repair Information Company, LLC.

Fig. 30: Rear Window Defogger System Wiring Diagram (2000 Avalon)
1999 Toyota RAV4
1999-2000 ACCESSORIES & EQUIPMENT Rear Window & Mirror Defoggers
Microsoft
Sunday, November 22, 2009 10:55:11 AM Page 47 © 2005 Mitchell Repair Information Company, LLC.

1999 Toyota RAV4
1999-2000 ACCESSORIES & EQUIPMENT Rear Window & Mirror Defoggers
Microsoft
Sunday, November 22, 2009 10:55:11 AM Page 48 © 2005 Mitchell Repair Information Company, LLC.

Fig. 31: Rear Window Defogger System Wiring Diagram (2000 Camry 2.2L & 3.0L)
1999 Toyota RAV4
1999-2000 ACCESSORIES & EQUIPMENT Rear Window & Mirror Defoggers
Microsoft
Sunday, November 22, 2009 10:55:11 AM Page 49 © 2005 Mitchell Repair Information Company, LLC.

1999 Toyota RAV4
1999-2000 ACCESSORIES & EQUIPMENT Rear Window & Mirror Defoggers
Microsoft
Sunday, November 22, 2009 10:55:11 AM Page 50 © 2005 Mitchell Repair Information Company, LLC.

Fig. 32: Rear Window Defogger System Wiring Diagram (2000 Camry 2.2L CNG)
1999 Toyota RAV4
1999-2000 ACCESSORIES & EQUIPMENT Rear Window & Mirror Defoggers
Microsoft
Sunday, November 22, 2009 10:55:11 AM Page 51 © 2005 Mitchell Repair Information Company, LLC.

1999 Toyota RAV4
1999-2000 ACCESSORIES & EQUIPMENT Rear Window & Mirror Defoggers
Microsoft
Sunday, November 22, 2009 10:55:11 AM Page 52 © 2005 Mitchell Repair Information Company, LLC.

Fig. 33: Rear Window Defogger System Wiring Diagram (2000 Celica)
1999 Toyota RAV4
1999-2000 ACCESSORIES & EQUIPMENT Rear Window & Mirror Defoggers
Microsoft
Sunday, November 22, 2009 10:55:11 AM Page 53 © 2005 Mitchell Repair Information Company, LLC.

1999 Toyota RAV4
1999-2000 ACCESSORIES & EQUIPMENT Rear Window & Mirror Defoggers
Microsoft
Sunday, November 22, 2009 10:55:11 AM Page 54 © 2005 Mitchell Repair Information Company, LLC.

Fig. 34: Rear Window Defogger System Wiring Diagram (2000 ECHO)
1999 Toyota RAV4
1999-2000 ACCESSORIES & EQUIPMENT Rear Window & Mirror Defoggers
Microsoft
Sunday, November 22, 2009 10:55:11 AM Page 55 © 2005 Mitchell Repair Information Company, LLC.

1999 Toyota RAV4
1999-2000 ACCESSORIES & EQUIPMENT Rear Window & Mirror Defoggers
Microsoft
Sunday, November 22, 2009 10:55:11 AM Page 56 © 2005 Mitchell Repair Information Company, LLC.

Fig. 35: Rear Window Defogger System Wiring Diagram (2000 MR2)
1999 Toyota RAV4
1999-2000 ACCESSORIES & EQUIPMENT Rear Window & Mirror Defoggers
Microsoft
Sunday, November 22, 2009 10:55:11 AM Page 57 © 2005 Mitchell Repair Information Company, LLC.