description & operation system teststoyotadostlari.com/uploads/cooling-fans.pdfdescription &...
TRANSCRIPT
1999-2000 ENGINE COOLING
Electric Cooling Fans
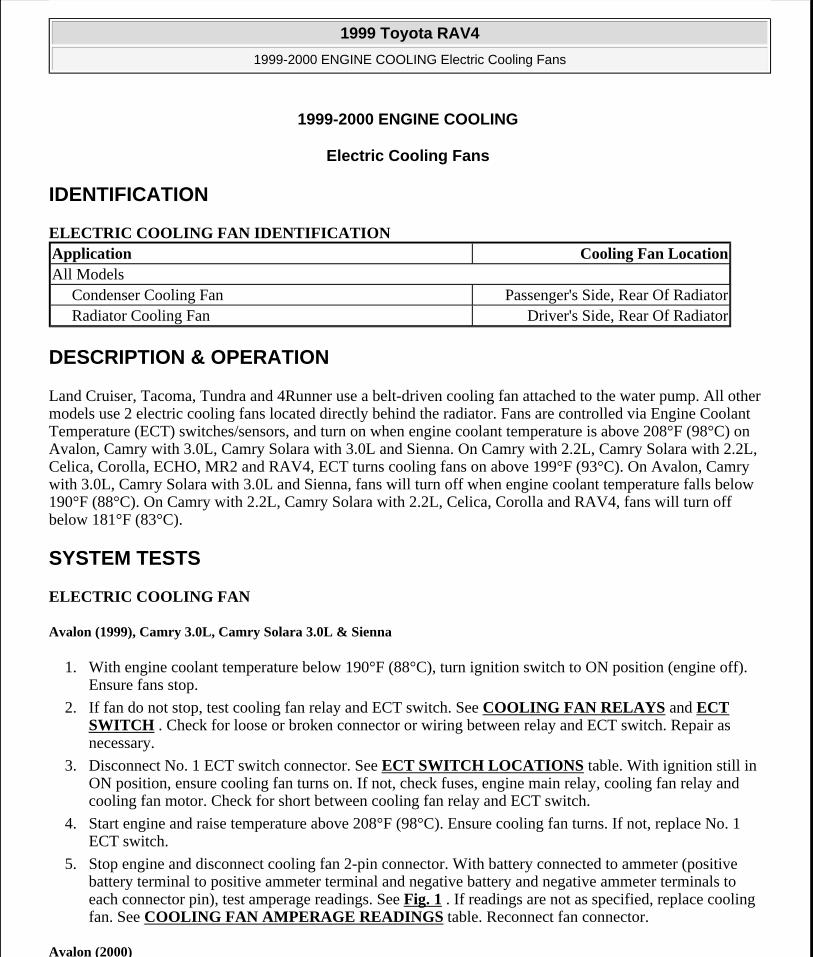
IDENTIFICATION
ELECTRIC COOLING FAN IDENTIFICATION
DESCRIPTION & OPERATION
Land Cruiser, Tacoma, Tundra and 4Runner use a belt-driven cooling fan attached to the water pump. All other models use 2 electric cooling fans located directly behind the radiator. Fans are controlled via Engine Coolant Temperature (ECT) switches/sensors, and turn on when engine coolant temperature is above 208°F (98°C) on Avalon, Camry with 3.0L, Camry Solara with 3.0L and Sienna. On Camry with 2.2L, Camry Solara with 2.2L, Celica, Corolla, ECHO, MR2 and RAV4, ECT turns cooling fans on above 199°F (93°C). On Avalon, Camry with 3.0L, Camry Solara with 3.0L and Sienna, fans will turn off when engine coolant temperature falls below 190°F (88°C). On Camry with 2.2L, Camry Solara with 2.2L, Celica, Corolla and RAV4, fans will turn off below 181°F (83°C).
SYSTEM TESTS
ELECTRIC COOLING FAN
Avalon (1999), Camry 3.0L, Camry Solara 3.0L & Sienna
1. With engine coolant temperature below 190°F (88°C), turn ignition switch to ON position (engine off). Ensure fans stop.
2. If fan do not stop, test cooling fan relay and ECT switch. See COOLING FAN RELAYS and ECT SWITCH . Check for loose or broken connector or wiring between relay and ECT switch. Repair as necessary.
3. Disconnect No. 1 ECT switch connector. See ECT SWITCH LOCATIONS table. With ignition still in ON position, ensure cooling fan turns on. If not, check fuses, engine main relay, cooling fan relay and cooling fan motor. Check for short between cooling fan relay and ECT switch.
4. Start engine and raise temperature above 208°F (98°C). Ensure cooling fan turns. If not, replace No. 1 ECT switch.
5. Stop engine and disconnect cooling fan 2-pin connector. With battery connected to ammeter (positive battery terminal to positive ammeter terminal and negative battery and negative ammeter terminals to each connector pin), test amperage readings. See Fig. 1 . If readings are not as specified, replace cooling fan. See COOLING FAN AMPERAGE READINGS table. Reconnect fan connector.
Avalon (2000)
Application Cooling Fan LocationAll Models
Condenser Cooling Fan Passenger's Side, Rear Of RadiatorRadiator Cooling Fan Driver's Side, Rear Of Radiator
1999 Toyota RAV4
1999-2000 ENGINE COOLING Electric Cooling Fans
1999 Toyota RAV4
1999-2000 ENGINE COOLING Electric Cooling Fans
Microsoft
Sunday, November 22, 2009 10:21:41 AM Page 1 © 2005 Mitchell Repair Information Company, LLC.
Microsoft
Sunday, November 22, 2009 10:21:45 AM Page 1 © 2005 Mitchell Repair Information Company, LLC.
1. With engine coolant temperature below 181°F (83°C), turn ignition switch to ON position (engine off). Ensure fans stop.
2. If fans do not stop, test cooling fan relays and ECT switches. See COOLING FAN RELAYS and ECT SWITCH . Check for loose or broken connector or wiring between relay and ECT switch. Repair as necessary.
3. Disconnect No. 1 ECT switch wire connector. Connect jumper wire to No. 1 ECT terminals. Ensure fan rotates at high speed. If fan does not rotate, check No. 1 cooling fan relay and cooling fan. Reconnect No. 1 switch connector.
4. Disconnect No. 2 switch connector. Ground terminal on No. 2 ECT switch wire harness side connector. Ensure No. 1 and No. 2 fans rotate at low speed. If fans do not rotate, check No. 2 cooling fan relay, No. 3 cooling fan relay and No. 2 cooling fan. Reconnect No. 2 ECT switch connector.
5. Inspect No. 1 and No. 2 cooling fans. Disconnect cooling fan connector. With battery connected to ammeter (positive battery terminal to positive ammeter terminal and negative battery and negative ammeter terminals to each connector pin), test amperage readings. See Fig. 1 . If readings are not as specified, replace cooling fan. See COOLING FAN AMPERAGE READINGS table. Reconnect fan connector.
1999 Toyota RAV4
1999-2000 ENGINE COOLING Electric Cooling Fans
Microsoft
Sunday, November 22, 2009 10:21:41 AM Page 2 © 2005 Mitchell Repair Information Company, LLC.

1999 Toyota RAV4
1999-2000 ENGINE COOLING Electric Cooling Fans
Microsoft
Sunday, November 22, 2009 10:21:41 AM Page 3 © 2005 Mitchell Repair Information Company, LLC.
Fig. 1: Testing Amperage At Fan Connectors (Corolla Shown; Other Models Similar)Courtesy of TOYOTA MOTOR SALES, U.S.A., INC.
Camry 2.2L, Camry Solara 2.2L, Celica, Corolla, ECHO, MR2 & RAV4
1. With engine coolant temperature below 181°F (83°C), turn ignition switch to ON position (engine off). Ensure fan stops.
2. If fan does not stop, test cooling fan relay and ECT switch/sensor. See COOLING FAN RELAYS and ECT SWITCH or ECT SENSOR . Check for loose or broken connector or wiring between relay and ECT switch. Repair as necessary.
3. Disconnect ECT switch/sensor connector. See ECT SWITCH LOCATIONS table. With ignition still in ON position, ensure cooling fan turns on. If not, check fuses, engine main relay (if equipped), cooling fan relay, and cooling fan motor. On MR2, check ECM. On all models, check for short between cooling fan relay and ECT switch.
4. Start engine and raise temperature above 199°F (93°C). Ensure cooling fan turns. If not, replace ECT switch/sensor.
5. Stop engine and disconnect cooling fan 2-pin connector. With battery connected to ammeter (positive battery terminal to positive ammeter terminal and negative battery and negative ammeter terminals to each connector pin), test amperage readings. See Fig. 1 . If readings are not as specified, replace cooling fan. See COOLING FAN AMPERAGE READINGS table. Reconnect fan connector.
ECT SWITCH LOCATIONS
COOLING FAN AMPERAGE READINGS
Application ECT Switch LocationAll Models
Condenser Cooling Fan Passenger's Side, Rear Of RadiatorRadiator Cooling Fan Driver's Side, Rear Of Radiator
Application Amps @ 68°F (20°C)Avalon
1999 9.2-11.02000 8.5-11.5
Camry & Camry Solara5S-FE 4.9-8.51MZ-FE 8.3-11.3
Celica1999 6.4-7.42000 5.2-8.2
Corolla 5.2-8.2
ECHO (1) 7.8-11.8
MR2 5.7-7.7RAV4 9.1-11.1Sienna
1999 Toyota RAV4
1999-2000 ENGINE COOLING Electric Cooling Fans
Microsoft
Sunday, November 22, 2009 10:21:41 AM Page 4 © 2005 Mitchell Repair Information Company, LLC.

COMPONENT TESTS
COOLING FAN RELAYS
Cooling Fan Relay No. 1 (Avalon, Celica & RAV4 - 1999)
1. Disconnect negative battery cable. Remove cooling fan relay No. 1 from fuse/relay box. See Fig. 2 , Fig. 5 and Fig. 10 . Using an ohmmeter, check for continuity between relay terminals No. 1 and 2, and No. 3 and 4 on Denso type relays. See Fig. 13 . On Bosch type relays, check for continuity between relay terminals No. 85 and 86, and No. 30 and 87a. If no continuity exists, replace relay.
2. To check relay operation, connect positive battery voltage to terminal No. 1 (Denso type), or No. 86 (Bosch type). Connect ground to terminal No. 2 (Denso type), or No. 85 (Bosch type). Check that no continuity exists between relay terminals No. 3 and 4 on Denso type relays. On Bosch type relays, check that no continuity exists between relay terminals No. 30 and 87a. If continuity exists, replace relay.
3. Reinstall cooling fan relay No. 1.
Cooling Fan Relay No. 1 (Avalon, Celica, ECHO & RAV4 - 2000)
1. Disconnect negative battery cable. Remove cooling fan relay No. 1 from fuse/relay box. See Fig. 3 , Fig. 6 , Fig. 8 and Fig. 11 . Using an ohmmeter, check for continuity between relay terminals No. 1 and 2. See Fig. 14 . If there is no continuity, replace relay. Check that no continuity exists between relay terminals No. 3 and 5. If continuity exists, replace relay.
2. To check relay operation, connect positive battery voltage to terminal No. 1 and ground to terminal No. 2. Check for continuity between relay terminals No. 3 and 5. If no continuity exists, replace relay.
3. Reinstall cooling fan relay No. 1.
Cooling Fan Relay No. 1 (Camry, Camry Solara, Corolla & Sienna)
1. Disconnect negative battery cable. Remove cooling fan relay No. 1 from fuse/relay box. See Fig. 4 , Fig. 7 and Fig. 12 . Using an ohmmeter, check for continuity between relay terminals No. 1 and 2, and No. 3 and 4. See Fig. 15 . If no continuity exists, replace relay.
2. To check relay operation, connect positive battery voltage to terminal No. 1 and ground to terminal No. 2. Check that no continuity exists between relay terminals No. 3 and 4. If continuity exists, replace relay.
3. Reinstall cooling fan relay No. 1.
With "S" Mark 8.5-11.5With "T" Mark 14.0-20.0
(1) Amps @ 77°F (25°C)
CAUTION: When battery is disconnected, vehicle computer and memory systems may lose memory data. Driveability problems may exist until computer systems have completed a relearn cycle.
NOTE: Place match marks on all relays for proper reinstallation.
1999 Toyota RAV4
1999-2000 ENGINE COOLING Electric Cooling Fans
Microsoft
Sunday, November 22, 2009 10:21:41 AM Page 5 © 2005 Mitchell Repair Information Company, LLC.

Cooling Fan Relay No. 2 (Except Avalon)
1. Disconnect negative battery cable. Remove cooling fan relay No. 2 from fuse/relay box. See Fig. 4 -Fig. 12 . Using an ohmmeter, check for continuity between relay terminals No. 1 and 2, and No. 3 and 4. See Fig. 13 -Fig. 15 . If no continuity exists, replace relay. Check that no continuity exists between relay terminals No. 3 and 5. If continuity exists, replace relay.
2. To check relay operation, connect positive battery voltage to terminal No. 1 and ground to terminal No. 2. Check that no continuity exists between relay terminals No. 3 and 4. If continuity exists, replace relay. Check for continuity between relay terminals No. 3 and 5. If no continuity exists, replace relay.
3. Reinstall cooling fan relay No. 2.
Cooling Fan Relay No. 2 (Avalon)
1. Disconnect negative battery cable. Remove cooling fan relay No. 2 from fuse/relay box. See Fig. 2 and Fig. 3 . Using an ohmmeter, check for continuity between relay terminals No. 1 and 2, and No. 3 and 4 on Denso type relay. On Bosch type relay, check for continuity between relay terminals No. 85 and 86, and No. 30 and 87a. See Fig. 13 and Fig. 14 . If there is no continuity, replace relay.
2. To check relay operation, connect positive battery voltage to terminal No. 1 (Denso type), or No. 85 (Bosch type). Connect ground to terminal No. 2 (Denso type), or No. 86 (Bosch type). Check that no continuity exists between relay terminals No. 3 and 4 (Denso type), or No. 30 and 87a (Bosch type). If continuity exists, replace relay. Check for continuity between relay terminals No. 3 and 5 (Denso), or No. 30 and 87 (Bosch). If no continuity exists, replace relay.
3. Reinstall cooling fan relay No. 2.
Cooling Fan Relay No. 3
1. Disconnect negative battery cable. Remove cooling fan relay No. 3 from fuse/relay box. See Fig. 2 - Fig. 12 . Using an ohmmeter, check for continuity between relay terminals No. 1 and 2 (Denso type), or No. 85 and 86 (Bosch type). See Fig. 13 - Fig. 15 . If no continuity exists, replace relay. Check that no continuity exists between relay terminals No. 3 and 5 (Denso type), or No. 30 and 87 (Bosch type). If continuity exists, replace relay.
2. To check relay operation, connect positive battery voltage to terminal No. 1 (Denso type), or No. 86 (Bosch type). Connect ground to terminal No. 2 (Denso type), or No. 85 (Bosch type). Check for continuity between relay terminals No. 3 and 5 (Denso type), or No. 30 and 87 (Bosch type). If no continuity exists, replace relay.
3. Reinstall cooling fan relay No. 3.
Engine Main Relay (Except 2000 Avalon, 2000 Celica, ECHO & MR2)
1. Disconnect negative battery cable. Remove engine main relay from fuse/relay box. See Fig. 2 -Fig. 12 . Using an ohmmeter, check for continuity between relay terminals No. 3 and 5, and No. 2 and 4. See Fig. 16 . If no continuity exists, replace relay. Check that no continuity exists between relay terminals No. 1 and 2. If continuity exists, replace relay.
NOTE: ECHO is not equipped with cooling fan relay No. 3.
1999 Toyota RAV4
1999-2000 ENGINE COOLING Electric Cooling Fans
Microsoft
Sunday, November 22, 2009 10:21:41 AM Page 6 © 2005 Mitchell Repair Information Company, LLC.

2. To check relay operation, connect positive battery voltage to terminal No. 3 and ground to terminal No. 5. Check that no continuity exists between relay terminals No. 2 and 4. If continuity exists, replace relay. Check for continuity between relay terminals No. 1 and 2. If no continuity exists, replace relay.
3. Reinstall engine main relay.
1999 Toyota RAV4
1999-2000 ENGINE COOLING Electric Cooling Fans
Microsoft
Sunday, November 22, 2009 10:21:41 AM Page 7 © 2005 Mitchell Repair Information Company, LLC.
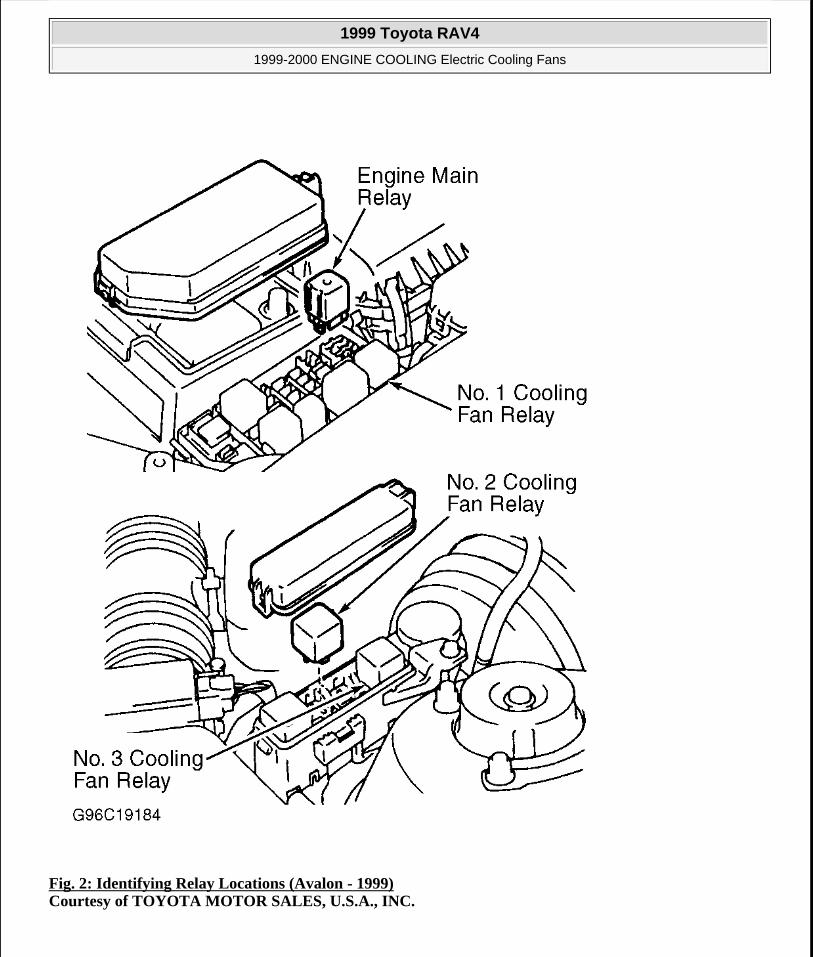
Fig. 2: Identifying Relay Locations (Avalon - 1999) Courtesy of TOYOTA MOTOR SALES, U.S.A., INC.
1999 Toyota RAV4
1999-2000 ENGINE COOLING Electric Cooling Fans
Microsoft
Sunday, November 22, 2009 10:21:41 AM Page 8 © 2005 Mitchell Repair Information Company, LLC.

Fig. 3: Identifying Relay Locations (Avalon - 2000) Courtesy of TOYOTA MOTOR SALES, U.S.A., INC.
1999 Toyota RAV4
1999-2000 ENGINE COOLING Electric Cooling Fans
Microsoft
Sunday, November 22, 2009 10:21:41 AM Page 9 © 2005 Mitchell Repair Information Company, LLC.

Fig. 4: Identifying Relay Locations (Camry & Camry Solara) Courtesy of TOYOTA MOTOR SALES, U.S.A., INC.
1999 Toyota RAV4
1999-2000 ENGINE COOLING Electric Cooling Fans
Microsoft
Sunday, November 22, 2009 10:21:41 AM Page 10 © 2005 Mitchell Repair Information Company, LLC.

Fig. 5: Identifying Relay Locations (Celica - 1999) Courtesy of TOYOTA MOTOR SALES, U.S.A., INC.
1999 Toyota RAV4
1999-2000 ENGINE COOLING Electric Cooling Fans
Microsoft
Sunday, November 22, 2009 10:21:41 AM Page 11 © 2005 Mitchell Repair Information Company, LLC.

Fig. 6: Identifying Relay Locations (Celica - 2000) Courtesy of TOYOTA MOTOR SALES, U.S.A., INC.
1999 Toyota RAV4
1999-2000 ENGINE COOLING Electric Cooling Fans
Microsoft
Sunday, November 22, 2009 10:21:41 AM Page 12 © 2005 Mitchell Repair Information Company, LLC.

Fig. 7: Identifying Relay Locations (Corolla) Courtesy of TOYOTA MOTOR SALES, U.S.A., INC.
1999 Toyota RAV4
1999-2000 ENGINE COOLING Electric Cooling Fans
Microsoft
Sunday, November 22, 2009 10:21:41 AM Page 13 © 2005 Mitchell Repair Information Company, LLC.
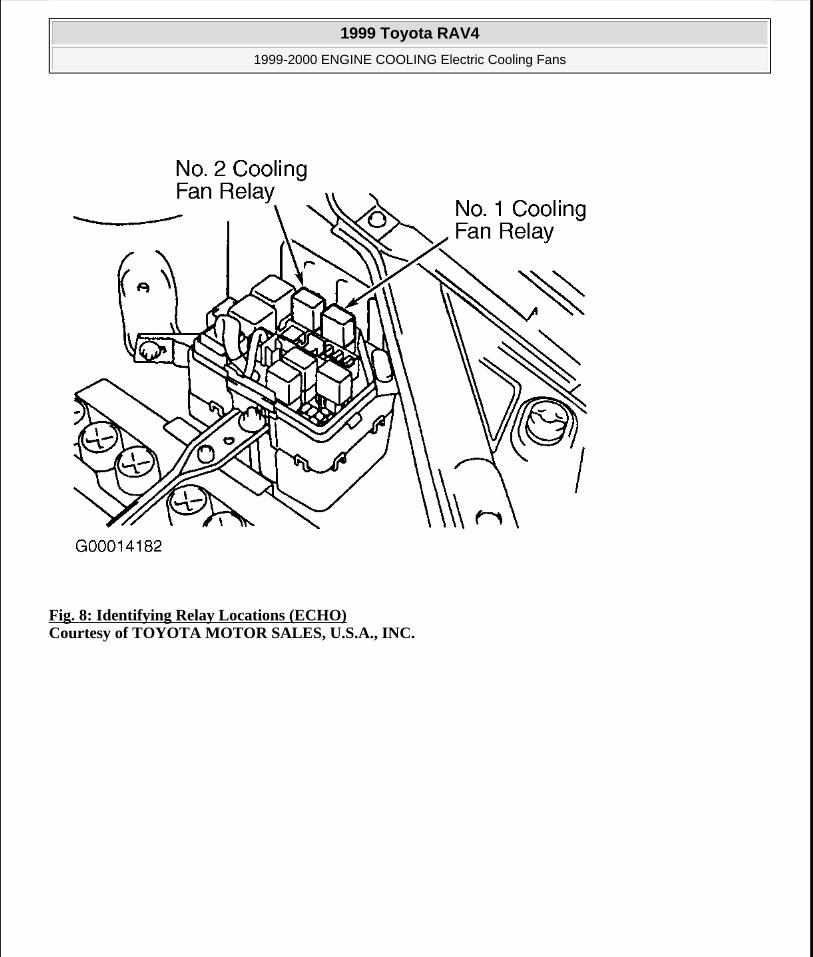
Fig. 8: Identifying Relay Locations (ECHO) Courtesy of TOYOTA MOTOR SALES, U.S.A., INC.
1999 Toyota RAV4
1999-2000 ENGINE COOLING Electric Cooling Fans
Microsoft
Sunday, November 22, 2009 10:21:41 AM Page 14 © 2005 Mitchell Repair Information Company, LLC.

Fig. 9: Identifying Relay Locations (MR2) Courtesy of TOYOTA MOTOR SALES, U.S.A., INC.
1999 Toyota RAV4
1999-2000 ENGINE COOLING Electric Cooling Fans
Microsoft
Sunday, November 22, 2009 10:21:41 AM Page 15 © 2005 Mitchell Repair Information Company, LLC.

Fig. 10: Identifying Relay Locations (RAV4 - 1999) Courtesy of TOYOTA MOTOR SALES, U.S.A., INC.
1999 Toyota RAV4
1999-2000 ENGINE COOLING Electric Cooling Fans
Microsoft
Sunday, November 22, 2009 10:21:41 AM Page 16 © 2005 Mitchell Repair Information Company, LLC.

Fig. 11: Identifying Relay Locations (RAV4 - 2000) Courtesy of TOYOTA MOTOR SALES, U.S.A., INC.
1999 Toyota RAV4
1999-2000 ENGINE COOLING Electric Cooling Fans
Microsoft
Sunday, November 22, 2009 10:21:41 AM Page 17 © 2005 Mitchell Repair Information Company, LLC.

Fig. 12: Identifying Relay Locations (Sienna) Courtesy of TOYOTA MOTOR SALES, U.S.A., INC.
1999 Toyota RAV4
1999-2000 ENGINE COOLING Electric Cooling Fans
Microsoft
Sunday, November 22, 2009 10:21:41 AM Page 18 © 2005 Mitchell Repair Information Company, LLC.

1999 Toyota RAV4
1999-2000 ENGINE COOLING Electric Cooling Fans
Microsoft
Sunday, November 22, 2009 10:21:41 AM Page 19 © 2005 Mitchell Repair Information Company, LLC.
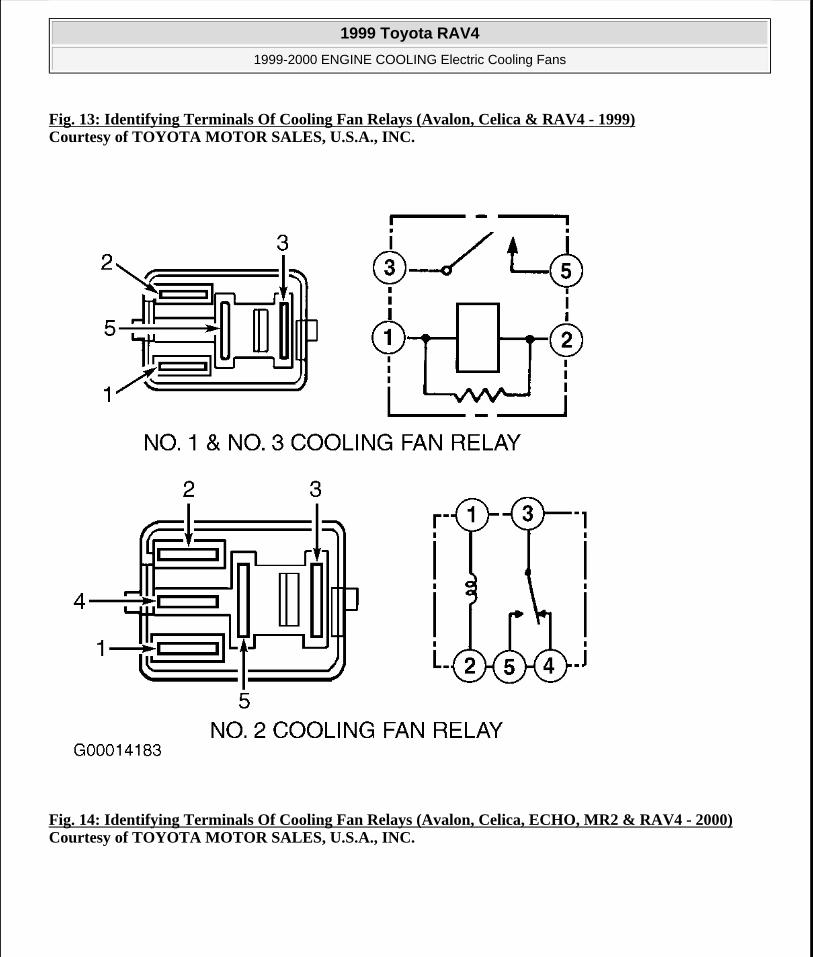
Fig. 13: Identifying Terminals Of Cooling Fan Relays (Avalon, Celica & RAV4 - 1999) Courtesy of TOYOTA MOTOR SALES, U.S.A., INC.
Fig. 14: Identifying Terminals Of Cooling Fan Relays (Avalon, Celica, ECHO, MR2 & RAV4 - 2000) Courtesy of TOYOTA MOTOR SALES, U.S.A., INC.
1999 Toyota RAV4
1999-2000 ENGINE COOLING Electric Cooling Fans
Microsoft
Sunday, November 22, 2009 10:21:41 AM Page 20 © 2005 Mitchell Repair Information Company, LLC.

Fig. 15: Identifying Terminals Of Cooling Fan Relays (Camry, Camry Solara, Corolla & Sienna) Courtesy of TOYOTA MOTOR SALES, U.S.A., INC.
Fig. 16: Identifying Terminals Of Engine Main Relay
1999 Toyota RAV4
1999-2000 ENGINE COOLING Electric Cooling Fans
Microsoft
Sunday, November 22, 2009 10:21:41 AM Page 21 © 2005 Mitchell Repair Information Company, LLC.
Courtesy of TOYOTA MOTOR SALES, U.S.A., INC.
ENGINE COOLANT TEMPERATURE (ECT) SWITCH
Avalon, Camry 3.0L, Camry Solara 3.0L, & Sienna
1. Drain engine coolant. Remove ECT switches. See ECT SWITCH LOCATION table. Place ECT switch thermal sensor into a water bath.
2. Using an ohmmeter, check that there is no continuity between ECT switch terminals when coolant temperature is above 208°F (98°C) on No. 1 ECT switch or below 181°F (83°C) on No. 2 ECT switch. If there is continuity, replace switch.
3. Cool water and check that there is continuity between the switch terminals when coolant temperature is below 190°F (88°C) or above 199°F (93°C), on Avalon, or above 201°F (94°C), on Camry with 3.0L, Camry Solara with 3.0L and Sienna. If there is no continuity, replace switch.
4. Reinstall switches. Fill with engine coolant.
Camry 2.2L, Camry Solara 2.2L, Celica (1999), Corolla, ECHO & RAV4
1. Drain engine coolant. Remove ECT switch. See ECT SWITCH LOCATION table. Place ECT switch thermal sensor into a water bath.
2. Using an ohmmeter, check that there is no continuity between ECT switch terminals when coolant temperature is above 199°F (93°C). If continuity exists, replace ECT switch.
3. Cool water and check that there is continuity when coolant temperature is below 181°F (83°C). If there is no continuity, replace ECT switch.
4. Reinstall switches. Fill with engine coolant.
ENGINE COOLANT TEMPERATURE (ECT) SENSOR
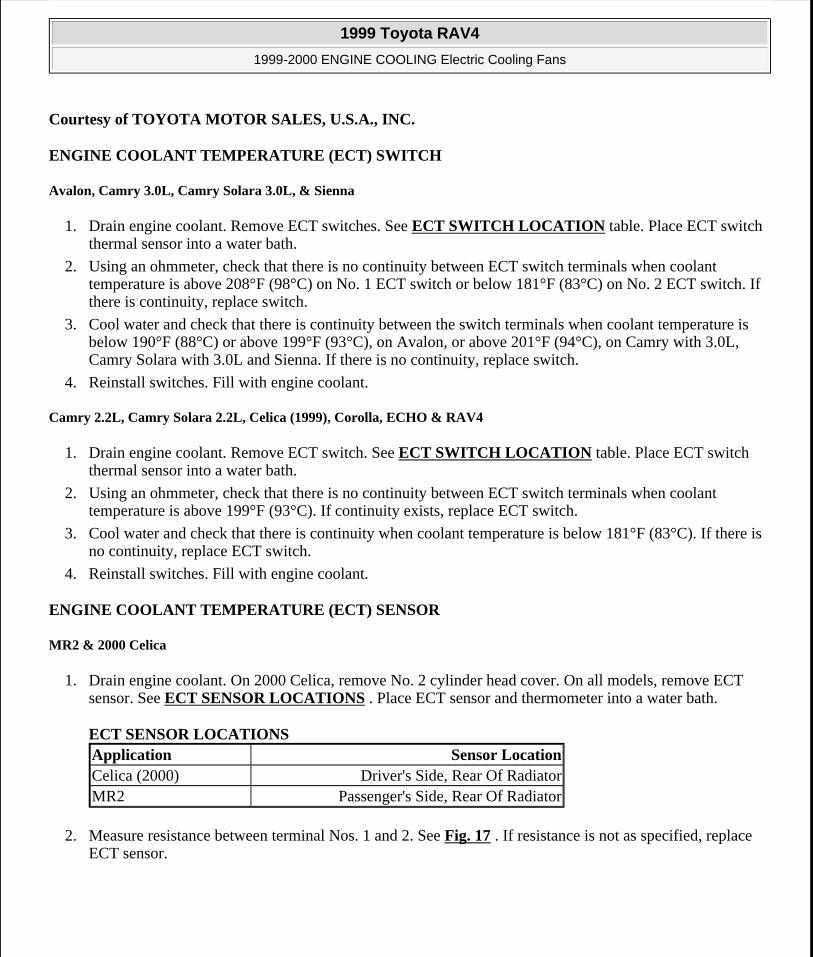
MR2 & 2000 Celica
1. Drain engine coolant. On 2000 Celica, remove No. 2 cylinder head cover. On all models, remove ECT sensor. See ECT SENSOR LOCATIONS . Place ECT sensor and thermometer into a water bath.
ECT SENSOR LOCATIONS
2. Measure resistance between terminal Nos. 1 and 2. See Fig. 17 . If resistance is not as specified, replace ECT sensor.
Application Sensor LocationCelica (2000) Driver's Side, Rear Of RadiatorMR2 Passenger's Side, Rear Of Radiator
1999 Toyota RAV4
1999-2000 ENGINE COOLING Electric Cooling Fans
Microsoft
Sunday, November 22, 2009 10:21:41 AM Page 22 © 2005 Mitchell Repair Information Company, LLC.

Fig. 17: Measuring ECT Sensor Resistance Courtesy of TOYOTA MOTOR SALES, U.S.A., INC.
3. Install NEW gasket on sensor, and reinstall ECT sensor. On 2000 Celica, reinstall No. 2 cylinder head
1999 Toyota RAV4
1999-2000 ENGINE COOLING Electric Cooling Fans
Microsoft
Sunday, November 22, 2009 10:21:41 AM Page 23 © 2005 Mitchell Repair Information Company, LLC.

cover. On all models, fill with engine coolant.
RADIATOR COOLING FAN
1. Disconnect electrical connector from radiator cooling fan. Connect battery and ammeter to electrical connector on radiator cooling fan.
2. Radiator cooling fan should operate smoothly and amperage draw should be within specification. See RADIATOR COOLING FAN AMPERAGE DRAW SPECIFICATIONS table.
3. Replace radiator cooling fan if fan fails to rotate smoothly or amperage draw is not within specification. Retest system.
RADIATOR COOLING FAN AMPERAGE DRAW SPECIFICATIONS
WIRING DIAGRAMS
Application Amps @ 68°F (20°C)Avalon
1999 5.1-6.32000 8.5-11.5
Camry2.2L (5S-FE) 4.9-8.53.0L (1MZ-FE) 8.3-11.3
Celica1999 5.7-7.72000 5.2-8.2
Corolla 5.2-8.2ECHO 7.8-11.8MR2 5.7-7.7RAV4 10.9-13.9
Sienna (1) "S1" & "S2" 8.5-11.5"T1" & "T2" 14-20
(1) Identification marking is at top of fan shroud.
1999 Toyota RAV4
1999-2000 ENGINE COOLING Electric Cooling Fans
Microsoft
Sunday, November 22, 2009 10:21:41 AM Page 24 © 2005 Mitchell Repair Information Company, LLC.

1999 Toyota RAV4
1999-2000 ENGINE COOLING Electric Cooling Fans
Microsoft
Sunday, November 22, 2009 10:21:41 AM Page 25 © 2005 Mitchell Repair Information Company, LLC.

Fig. 18: Electric Cooling Fan System Wiring Diagram (1999 Avalon)
1999 Toyota RAV4
1999-2000 ENGINE COOLING Electric Cooling Fans
Microsoft
Sunday, November 22, 2009 10:21:41 AM Page 26 © 2005 Mitchell Repair Information Company, LLC.

1999 Toyota RAV4
1999-2000 ENGINE COOLING Electric Cooling Fans
Microsoft
Sunday, November 22, 2009 10:21:41 AM Page 27 © 2005 Mitchell Repair Information Company, LLC.
Fig. 19: Electric Cooling Fan System Wiring Diagram (2000 Avalon)
1999 Toyota RAV4
1999-2000 ENGINE COOLING Electric Cooling Fans
Microsoft
Sunday, November 22, 2009 10:21:41 AM Page 28 © 2005 Mitchell Repair Information Company, LLC.

1999 Toyota RAV4
1999-2000 ENGINE COOLING Electric Cooling Fans
Microsoft
Sunday, November 22, 2009 10:21:41 AM Page 29 © 2005 Mitchell Repair Information Company, LLC.

Fig. 20: Electric Cooling Fan System Wiring Diagram (1999-2000 Camry & Camry Solara - 2.2L)
1999 Toyota RAV4
1999-2000 ENGINE COOLING Electric Cooling Fans
Microsoft
Sunday, November 22, 2009 10:21:41 AM Page 30 © 2005 Mitchell Repair Information Company, LLC.

1999 Toyota RAV4
1999-2000 ENGINE COOLING Electric Cooling Fans
Microsoft
Sunday, November 22, 2009 10:21:41 AM Page 31 © 2005 Mitchell Repair Information Company, LLC.

Fig. 21: Electric Cooling Fan System Wiring Diagram (1999-2000 Camry & Camry Solara - 3.0L)
1999 Toyota RAV4
1999-2000 ENGINE COOLING Electric Cooling Fans
Microsoft
Sunday, November 22, 2009 10:21:41 AM Page 32 © 2005 Mitchell Repair Information Company, LLC.

1999 Toyota RAV4
1999-2000 ENGINE COOLING Electric Cooling Fans
Microsoft
Sunday, November 22, 2009 10:21:41 AM Page 33 © 2005 Mitchell Repair Information Company, LLC.

Fig. 22: Electric Cooling Fan System Wiring Diagram (1999 Celica)
1999 Toyota RAV4
1999-2000 ENGINE COOLING Electric Cooling Fans
Microsoft
Sunday, November 22, 2009 10:21:41 AM Page 34 © 2005 Mitchell Repair Information Company, LLC.

1999 Toyota RAV4
1999-2000 ENGINE COOLING Electric Cooling Fans
Microsoft
Sunday, November 22, 2009 10:21:41 AM Page 35 © 2005 Mitchell Repair Information Company, LLC.

Fig. 23: Electric Cooling Fan System Wiring Diagram (2000 Celica)
1999 Toyota RAV4
1999-2000 ENGINE COOLING Electric Cooling Fans
Microsoft
Sunday, November 22, 2009 10:21:41 AM Page 36 © 2005 Mitchell Repair Information Company, LLC.

1999 Toyota RAV4
1999-2000 ENGINE COOLING Electric Cooling Fans
Microsoft
Sunday, November 22, 2009 10:21:41 AM Page 37 © 2005 Mitchell Repair Information Company, LLC.

Fig. 24: Electric Cooling Fan System Wiring Diagram (1999 Corolla)
1999 Toyota RAV4
1999-2000 ENGINE COOLING Electric Cooling Fans
Microsoft
Sunday, November 22, 2009 10:21:41 AM Page 38 © 2005 Mitchell Repair Information Company, LLC.

1999 Toyota RAV4
1999-2000 ENGINE COOLING Electric Cooling Fans
Microsoft
Sunday, November 22, 2009 10:21:41 AM Page 39 © 2005 Mitchell Repair Information Company, LLC.

Fig. 25: Electric Cooling Fan System Wiring Diagram (2000 Corolla)
1999 Toyota RAV4
1999-2000 ENGINE COOLING Electric Cooling Fans
Microsoft
Sunday, November 22, 2009 10:21:41 AM Page 40 © 2005 Mitchell Repair Information Company, LLC.

1999 Toyota RAV4
1999-2000 ENGINE COOLING Electric Cooling Fans
Microsoft
Sunday, November 22, 2009 10:21:41 AM Page 41 © 2005 Mitchell Repair Information Company, LLC.

Fig. 26: Electric Cooling Fan System Wiring Diagram (2000 ECHO)
1999 Toyota RAV4
1999-2000 ENGINE COOLING Electric Cooling Fans
Microsoft
Sunday, November 22, 2009 10:21:41 AM Page 42 © 2005 Mitchell Repair Information Company, LLC.

1999 Toyota RAV4
1999-2000 ENGINE COOLING Electric Cooling Fans
Microsoft
Sunday, November 22, 2009 10:21:41 AM Page 43 © 2005 Mitchell Repair Information Company, LLC.

Fig. 27: Electric Cooling Fan System Wiring Diagram (1999 Land Cruiser)
1999 Toyota RAV4
1999-2000 ENGINE COOLING Electric Cooling Fans
Microsoft
Sunday, November 22, 2009 10:21:41 AM Page 44 © 2005 Mitchell Repair Information Company, LLC.

1999 Toyota RAV4
1999-2000 ENGINE COOLING Electric Cooling Fans
Microsoft
Sunday, November 22, 2009 10:21:41 AM Page 45 © 2005 Mitchell Repair Information Company, LLC.
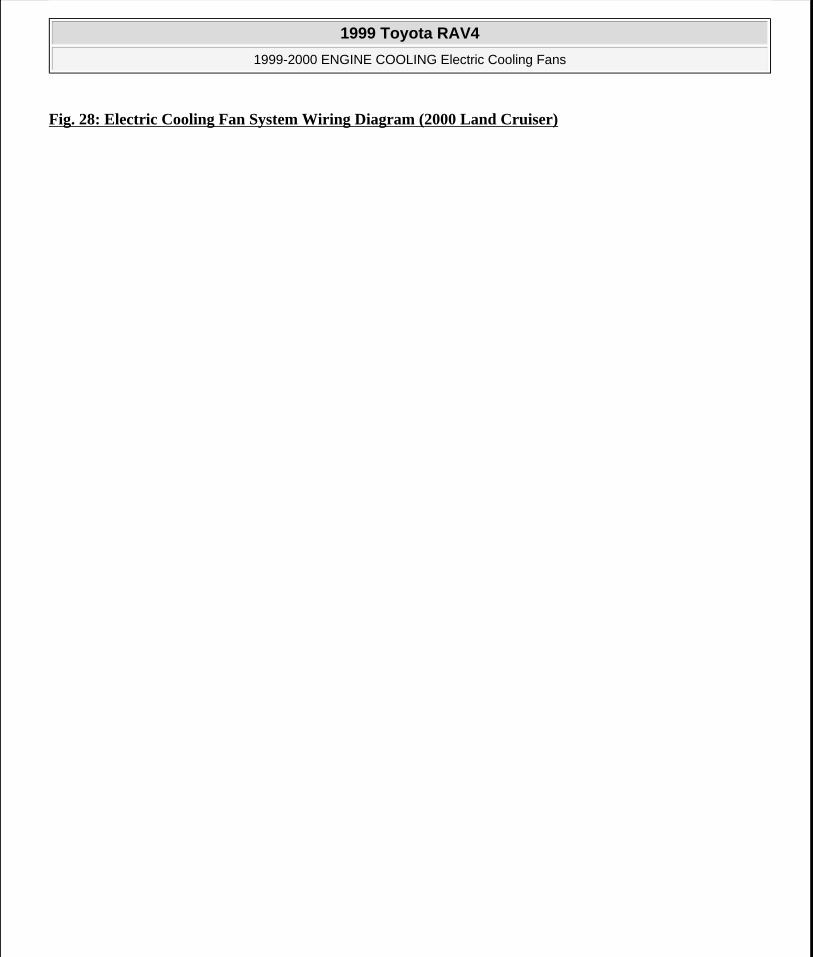
Fig. 28: Electric Cooling Fan System Wiring Diagram (2000 Land Cruiser)
1999 Toyota RAV4
1999-2000 ENGINE COOLING Electric Cooling Fans
Microsoft
Sunday, November 22, 2009 10:21:41 AM Page 46 © 2005 Mitchell Repair Information Company, LLC.

1999 Toyota RAV4
1999-2000 ENGINE COOLING Electric Cooling Fans
Microsoft
Sunday, November 22, 2009 10:21:41 AM Page 47 © 2005 Mitchell Repair Information Company, LLC.

Fig. 29: Electric Cooling Fan System Wiring Diagram (2000 MR2)
1999 Toyota RAV4
1999-2000 ENGINE COOLING Electric Cooling Fans
Microsoft
Sunday, November 22, 2009 10:21:41 AM Page 48 © 2005 Mitchell Repair Information Company, LLC.

1999 Toyota RAV4
1999-2000 ENGINE COOLING Electric Cooling Fans
Microsoft
Sunday, November 22, 2009 10:21:41 AM Page 49 © 2005 Mitchell Repair Information Company, LLC.

Fig. 30: Electric Cooling Fan System Wiring Diagram (1999-2000 RAV4)
1999 Toyota RAV4
1999-2000 ENGINE COOLING Electric Cooling Fans
Microsoft
Sunday, November 22, 2009 10:21:41 AM Page 50 © 2005 Mitchell Repair Information Company, LLC.

1999 Toyota RAV4
1999-2000 ENGINE COOLING Electric Cooling Fans
Microsoft
Sunday, November 22, 2009 10:21:41 AM Page 51 © 2005 Mitchell Repair Information Company, LLC.
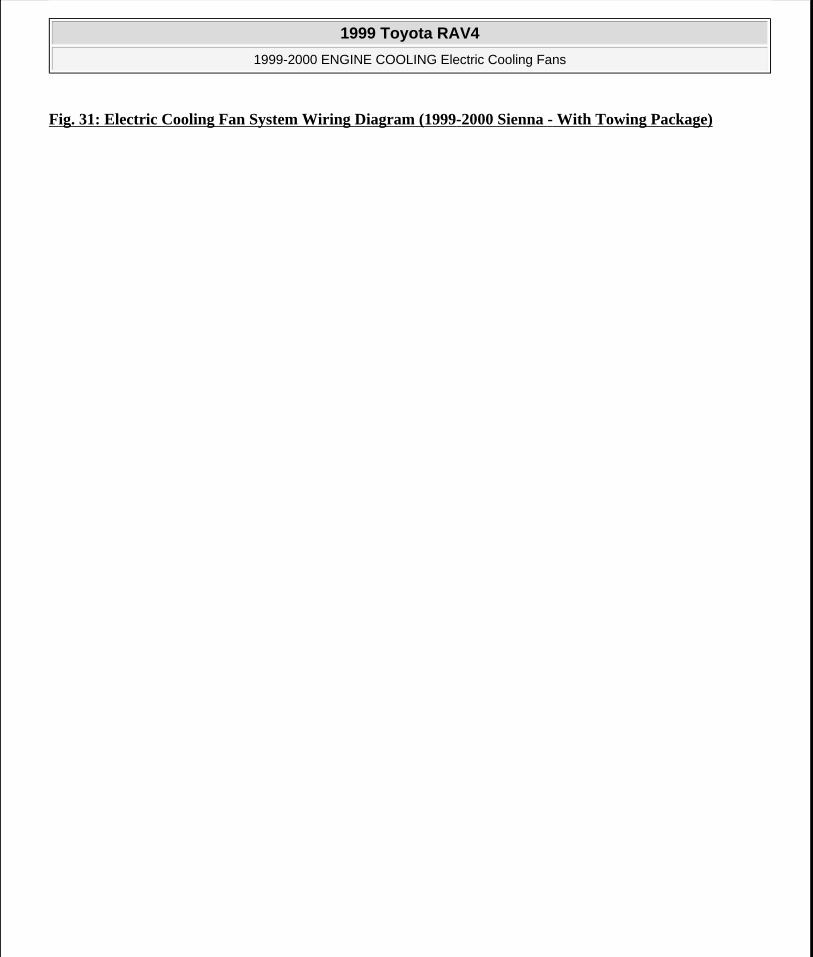
Fig. 31: Electric Cooling Fan System Wiring Diagram (1999-2000 Sienna - With Towing Package)
1999 Toyota RAV4
1999-2000 ENGINE COOLING Electric Cooling Fans
Microsoft
Sunday, November 22, 2009 10:21:41 AM Page 52 © 2005 Mitchell Repair Information Company, LLC.

1999 Toyota RAV4
1999-2000 ENGINE COOLING Electric Cooling Fans
Microsoft
Sunday, November 22, 2009 10:21:41 AM Page 53 © 2005 Mitchell Repair Information Company, LLC.

Fig. 32: Electric Cooling Fan System Wiring Diagram (1999-2000 Sienna - Without Towing Package)
1999 Toyota RAV4
1999-2000 ENGINE COOLING Electric Cooling Fans
Microsoft
Sunday, November 22, 2009 10:21:41 AM Page 54 © 2005 Mitchell Repair Information Company, LLC.