desi user guide - cti introduction congratulations on selecting desi, the most user-friendly and...
TRANSCRIPT

License Agreement
DESI
INSTALLING THIS SOFTWARE INDICATES THAT YOU AGREE TO THE TERMS AND CONDITIONS OF THISLICENSE AGREEMENT. PLEASE READ THIS AGREEMENT BEFORE INSTALLING THE SOFTWARE. IF YOU DONOT AGREE TO THE TERMS, PLEASE RETURN THIS MANUAL AND DISK TO YOUR PLACE OF PURCHASEWITHIN 15 DAYS FOR A FULL REFUND OF THE PURCHASE PRICE.
In consideration of full payment, Desi Telephone Labels, Inc. (DTL) grants you, the purchaser, a nontransfer-able and nonexclusive license to use this program under the terms and conditions of this agreement. DTLremains the sole proprietor of this program and licenses its use to you. You do not obtain title to the programor any copyrights or proprietary rights in the program. You assume responsibility for the selection of thissoftware to achieve your intended results, and for the installation, use, and results obtained from this program.
YOU MAY:
1. use this software on any one machine at a time.2. load this software on a network as long as only one user is granted access at a time.3. copy this software into any machine-readable form for backup purposes to protect your
investment.
YOU MAY NOT:
1. rent, sublease, sell, or otherwise transfer this program, documentation, or license to any otherparty.
2. copy this program for any other purpose than backup.3. modify, decompile, translate, reverse engineer, or disassemble the program to create derivative
works from it, nor may you transfer this program electronically through a time-sharing device orutility.
LIMITED WARRANTY
The media (not the software) is warranted to the original purchaser against defects in material and workman-ship for a period of ninety (90) days from the date of original purchaser.
THIS PROGRAM IS PROVIDED “AS IS” WITHOUT WARRANTY, EITHER EXPRESS OR IMPLIED, INCLUDING, BUTNOT LIMITED TO ANY IMPLIED WARRANTIES OF MERCHANTABILITY AND FITNESS FOR A PARTICULARPURPOSE. THE ENTIRE RISK AS TO THE QUALITY AND PERFORMANCE OF THIS PROGRAM IS WITH THE USER.
LIMITATION OF REMEDIES
DTL’s entire liability and your exclusive remedy shall be the replacement of any diskette not meeting DTL’s“Limited Warranty” and which is returned to your place of purchase. UNDER NO CIRCUMSTANCE SHALL DTLBE LIABLE FOR ANY LOSS OF PROFIT OR ANY OTHER DAMAGE, INCLUDING BUT NOT LIMITED TOINCIDENTAL, SPECIAL, CONSEQUENTIAL, DIRECT, INDIRECT, OR OTHER DAMAGE, even if DTL has beenadvised of the possibility of such damages by any other party. Some states do not allow the exclusion ofimplied warranties, so the above exclusion may not apply to you. This warranty gives you specific legal rightsand you may also have other rights which vary from state to state.

ii
Definition:
DESI n.- 1. short for “telephone designation strip”, a paper faceplatethat rests atop a telephone and labels the individual keys, histori-cally done slowly by hand or typewriter or with clumsy softwareprograms 2. the best software program for creating professionaldesignation strips.

iii
Introduction
Congratulations on selecting DESI, the most user-friendly and powerfuldesignation strip program available. Now the task of creating desi stripstakes minutes instead of hours. DESI also gives you amazing flexibility -you can apply different colors, fonts, and styles as you choose.
This manual is set up to walk you through the desi creation process, withadditional chapters on Advanced Features and Helpful Hints that willmake desis even faster and easier to create.
The phones you work with are state of the art,shouldn’t your desis be too?
iv
This documentation is provided for informational purposes only. Companies, phone systems,and names used in examples herein are fictitious unless otherwise noted. No portion of thismanual may be reproduced or transmitted in any form or by any means without the expresswritten permission of Desi Telephone Labels, Inc.
Windows, Windows 95, Windows 98, and Windows 2000 are registered trademarks ofMicrosoft Corporation.
Post-it is a registered trademark of 3M.
Copyright © 2001 by Desi Telephone Labels, Inc. All rights reserved.

Table of ContentsPage
I. Getting Started 1A. System requirements 1B. Installation 1C. Getting familiar with DESI 2
II. Creating Your First Desi 7A. Add extensions 7B. Delete extensions 12C. Saving your Desis 12
III. Customizing Your Desi 15A. Selecting text boxes 15B. Applying color 16C. Zoom 18D. Insert picture 19
IV. Creating Multiple Desis 21A. Templating 21B. Codes 23C. Rotating keys 27
V. Printing Your Desis 29
VI. Editing an Existing Desi File 31A. Change extension ID 31B. Change extension name 32
VII. Advanced Features 35A. Copy styles 35B. Options 37C. Find/Replace 38
VIII. Helpful Hints 39A. Creating Desis 39B. Editing Desis 40C. Printing 41
IX. Troubleshooting 43A. Printing Desis 43
X. Technical Information 47A. Version 1.0 compatibility & network installation of DESI 47
XI. DESI Pictograms 51
v

System Requirements
To run DESI effectively, you will need: • 386 or higher computer. • One (1) 1.44 MB 3.5” disk drive. • 3 MB available hard disk space. • 8 MB RAM (16 recommended). • Windows 3.1 or higher. • Sheet-fed printer with appropriate Windows™ printer driver.
Installing DESI (Windows 95, 98, 2000)
• Insert disk #1 into your 3.5" drive. • From your Start menu, select Settings, Control
Panel. • Double-click Add/Remove Programs - follow the
instructions on your screen.
Chapter 1 - Getting Started
1

Figure 1.1Main screen
Getting Familiar With DESI
When you start DESI, you are automatically brought to the main screen(Figure 1.1). It is from this screen that you will do all of your work. The leftside of the screen is the extension list and displays all of the extensionsyou have created in this file. The right side of the screen is the displayscreen - this is where you will work on your desis. Selecting an extensionfrom the extension list will bring that extension into view in the displayscreen (Figure 1.2).
Along the top of your screen is a list of choices (File, Edit, View, Format,Tools, Extension, Zoom, Help), called the menu bar (see Figure 1.3).
These choices give you different options for manipulating your currentdesi file.
Getting Started
2

• View: Shows/hides certain screen features and tools.
• Format: Assign text properties and place graphics.
• Tools: Rotate keys and utilize advanced features.
• Extension: Commands/options pertaining to individual extensions.
• Zoom: Changes the screen magnification of desis.
• Help: Information about DESI.
Figure 1.3Menu bar
Getting Started
• File: Database and printing options.
• Edit: Options to speed up the editing of individual desis.
3
Figure 1.2Extension list/display screen

Getting Started
4
Below the menu bar is the toolbar (Figure 1.4). The toolbar “buttons”control different features of the individual desis you are working on. Byplacing your mouse pointer over any button on the toolbar and leaving itstill for a few seconds, a tool tip will appear explaning the button’s func-tion and keyboard shortcut.
Descriptions of the toolbar functions are as follows:
Toggles screen view options.
Open a saved DESI database file.
Save the current DESI database file.
Print the selected extension(s).
Add a new extension(s) to the current DESI file.
Delete the selected extension(s).
Displays the font in the selected text box(es).Choose different fonts by clicking on the
button.
Figure 1.4Toolbar
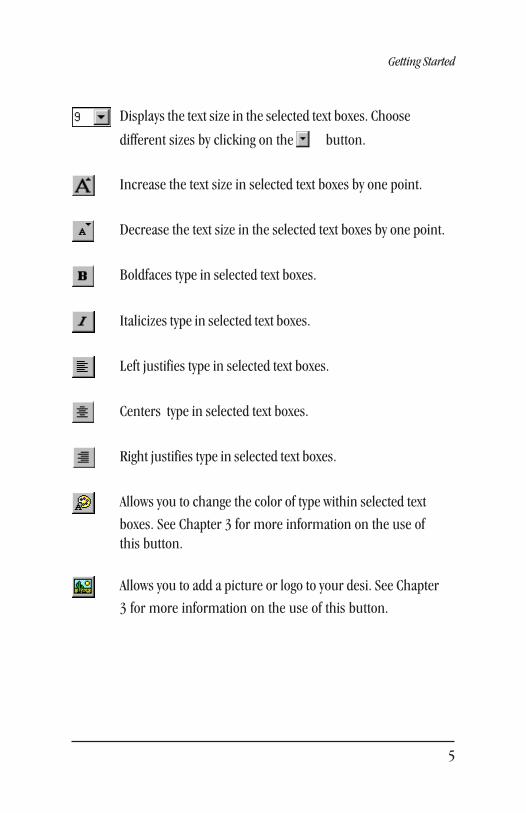
Displays the text size in the selected text boxes. Choose
different sizes by clicking on the button.
Increase the text size in selected text boxes by one point.
Decrease the text size in the selected text boxes by one point.
Boldfaces type in selected text boxes.
Italicizes type in selected text boxes.
Left justifies type in selected text boxes.
Centers type in selected text boxes.
Right justifies type in selected text boxes.
Allows you to change the color of type within selected text
boxes. See Chapter 3 for more information on the use ofthis button.
Allows you to add a picture or logo to your desi. See Chapter
3 for more information on the use of this button.
Getting Started
5
6
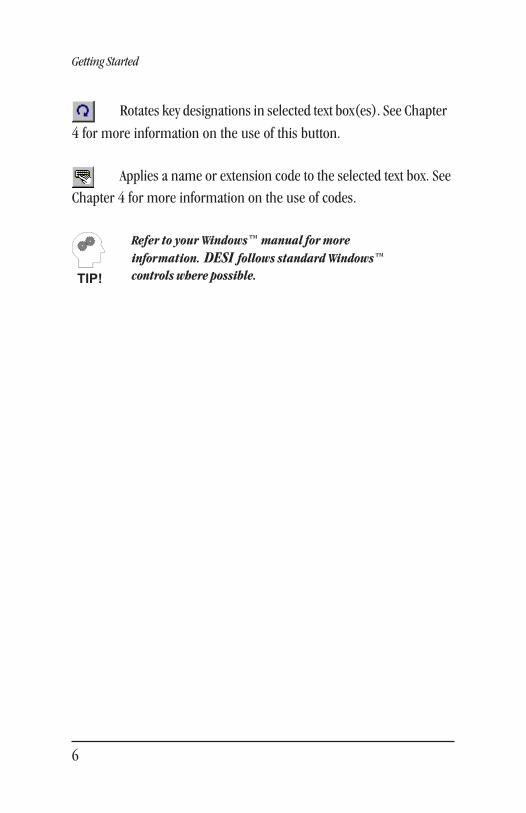
Rotates key designations in selected text box(es). See Chapter
4 for more information on the use of this button.
Applies a name or extension code to the selected text box. SeeChapter 4 for more information on the use of codes.
Getting Started
Refer to your Windows™ manual for moreinformation. DESI follows standard Windows™controls where possible.TIP!

Chapter 2 - Creating Your First Desi
When you start DESI, you are automatically brought to the main screen inan empty DESI database (Figure 2.1).
Figure 2.1Main screen
Add Extensions
To begin adding extensions to your database file, choose Extension fromthe menu bar and select New Extension, or press the “New Extension”button on the toolbar (see Chapter 1 for detailed descriptions of toolbarbuttons). After selecting New Extension, you will be presented with theAdd Extension screen (Figure 2.2).
On this screen, there are three required entries - Extensions To Add,Manufacturer, and Phone Type. The first entry, Extension(s) to Add, re-fers to the extension of the phone for which you are creating a desi. Thisentry can be a single extension (e.g., 100), several extensions separatedby commas (e.g., 100, 101, 103, 105), a range separated by a hyphen(e.g., 101-105), or a combination (e.g., 100, 103, 105-110).
7

Figure 2.2Add Extensions screen
Creating Your First Desi
8
The next step is to select the Manufacturer and Phone Type. By clickingon the button, you can select the desired manufacturer from thelist. The available desi layouts for that manufacturer will then be availablein the Phone Type list box. Click on the desired phone type.
The Template field allows you to rapidly create multiple desis from a“master”. This process will be covered in detail in Chapter 4.
If you wish to add a name (e.g., Susan) to your desis, you may type it in theName field. If you are creating several desis at this point, click the boxlabeled “Use Extension Name Wizard to name each extension”. Thisquickly walks you through naming each extension.
Once you have entered the appropriate information (Figure 2.3), clickOK to continue.

You will notice that the extensions you have just created are highlightedand displayed on the left side of the main screen, this is called the exten-sion list (Figure 2.4). The extension list has four columns: Extension,Type, Name, and Modified (see Tip on following page about viewing allcolumns at the same time). By clicking on any of the column headerboxes you can alter the order your desis are listed in. For instance, byclicking on the “Type” box, your desis will be sorted in alphabetical orderby phone type. Clicking the header a second time sorts the list in reversealphabetical order. The sorting method is indicated by an up or downarrow in the appropriate header box
Figure 2.3Add Extension screen- completed fields
Figure 2.4Main screen,newly addedextensions
Creating Your First Desi
9

The right side of the main screen is the display screen. When a singleextension is highlighted, its layout will be displayed in this portion of thescreen (Figure 2.5). With most desis, there are 3 different elements in thedisplay screen. Text boxes are the white boxes and are for key designa-tions and other text fields. Perforations are seen as dotted lines andrepresent cuts or holes on the actual DESI sheets. The comment field isblue-tinted and prints on the desi carrier page, not on the desi itself. Thiscomment field is for easy labeling and distribution of your desi strips (e.g.“Sally’s phone”).
To view more or less of either the extension list orthe display screen, move your mouse pointer overthe barrier between the list screen and the displayscreen until it changes to a double arrow symbol.Then click and hold your left mouse button anddrag the barrier left or right to its desired location.You can also toggle between split screen, full screenextension list, and full screen display by clicking
the button on the toolbar.
Figure 2.5Main screen, desiin display
Creating Your First Desi
10
TIP!

To edit a desi, simply select it from the extension list and it will be shownin the display window, as in Figure 2.5. Then simply select a text box withyour mouse and begin typing. As you type, a text editor will appear (Fig-ure 2.6). If you wish to have more than one line of type in a given text box,the ENTER key will move your cursor down one line. Once you have en-tered the desired information in the text editor, click OK. The informa-tion you just entered will be transferred to the text box (Figure 2.7).
For faster editing, hit the TAB key when you are finished typingin the text editor - this will transfer the information to the textbox and move you to the next text box in one step.
Figure 2.6Text Editor
Creating Your First Desi
11
TIP!

Saving Your Desis
DESI gives you the ability to save your desi database for future use. Whenyou save your extensions, you are saving them to a file - that is, all of thedesis shown in the extension list will be saved together. To save your file,press the button or select File from the menu bar and choose Save orSave As. From this screen, specify the location and name where you wishto save the file and click OK.
Delete Extensions
To delete a given extension(s), highlight the desired extensions from theextension list, select Extension from the menu bar and choose Delete.Alternatively, you could select the desired extensions and press the DELETE
key or press the key from the toolbar.
Figure 2.7Text Box
Creating Your First Desi
12

By saving your desis, in cases of employee transfers/turnover,you can simply open the saved file, make any desired changes,and reprint them.
Your desis are technically complete once you have entered all of theappropriate information. However, turn to Chapter 3 for information ongiving your desis a unique, professional look.
Creating Your First Desi
13
TIP!

14

Chapter 3 - Customizing Your Desis
DESI gives you virtually unlimited flexibility in customizing your desis.The following items can be changed with DESI:
• font • type style • text size • text color • alignment
DESI supports any Windows™-supported color or font, so any color,font, type size, or style on your computer is available from DESI. To applyany of these custom features, you need to first select a text box(es) toapply them to. Selected text boxes are identified by a darker border thanunselected boxes. You can select a single text box by simply clicking on itwith your mouse. Multiple text boxes can be selected two ways:
• Move your mouse so that it is on/near one of the textboxes you wish to select, hold down the left mouse button,drag your mouse until all of the desired text boxes areincluded within the dotted selection region (Figure 3.1), thenrelease the mouse button.
or
• Click one of the text boxes you wish to edit, hold down theCTRL key, and click on the other boxes you wish to include.
15

Figure 3.1Selection region
Once you have selected a text box or group of boxes you wish to apply acertain style to, simply choose that style(s) from the toolbar. Descriptionsof the toolbar and its functions are found in Chapter 1. You may alsoactivate tool tips by moving your mouse pointer over one of the toolbarbuttons and holding it still for a few seconds. This will bring up a briefdescription of the button’s function and the keystroke shortcut.
Applying color
To change the color of text within selected text boxes, simply click the button and choose the desired color from the pull-down list. If you wanta color not shown in this list, click Other. From here, you can select thedesired color from the color palette or click Define Custom Colors and“create” the color from the color spectrum by adjusting Hue, Satura-tion, and Luminescence (see Figures 3.2 & 3.3).
Customizing Your Desis
16
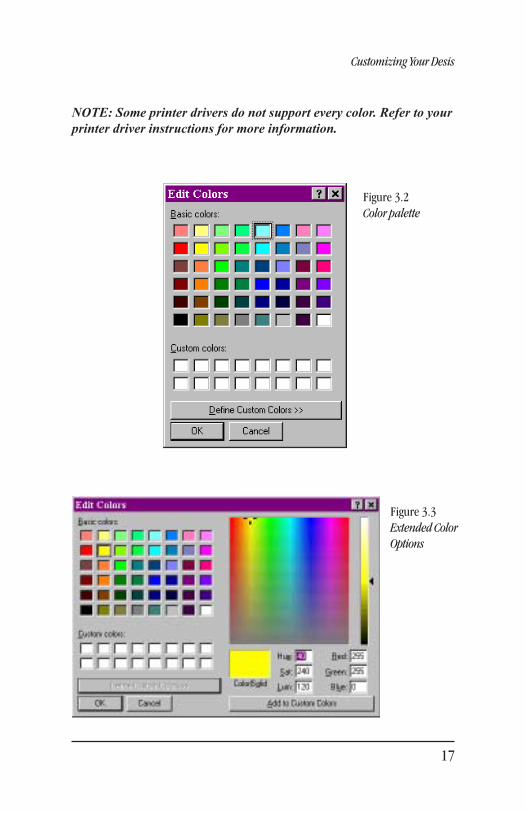
Figure 3.3Extended ColorOptions
17
Customizing Your Desis
NOTE: Some printer drivers do not support every color. Refer to yourprinter driver instructions for more information.
Figure 3.2Color palette

Fit to Window Width is a zoom command that sizes your extensions inthe display window so that the width of your extensions are the samescreen width as the display screen. Similarly, Fit Entire DESI in Windowsizes the extensions so that the entire extension fits in the display screen.
Zoom
When editing your desis, it may be helpful to see more or less of the desithan what appears in the display screen. You can adjust the screen mag-nification of your desis by using the Zoom feature. To adjust magnifica-tion, select Zoom from the menu bar and choose your desired magnifi-cation from the pick list (Figure 3.4), or choose Custom to set a manualzoom between 15% and 1000% (Figure 3.5).
Figure 3.4Zoom
18
Customizing Your Desis

Figure 3.5Custom Zoom
19
Customizing Your Desis
Insert PictureTo add a graphic or logo to your desi, simply press the button on thetoolbar and specify the name and location of the graphic file on yourcomputer or network. Acceptable file formats are .WMF and .BMP. Yourgraphic can be moved by clicking it and dragging it with your mouse. Youcan also adjust the size of your graphic by highlighting the image andclicking and dragging the “handles” at the corners of the image to thedesired size (Figure 3.6).
Figure 3.6Inserted graphicwith “handles”

20
Chapter 4 - Creating Multiple Desis
If the desis you are creating are all completely different, you can createmultiple desis by simply repeating the process detailed in Chapters 2 & 3.However if there are some similarities in layout between your desis, youcan take advantage of the features detailed in this chapter: Templating,Codes, and Key Rotation.
Templating
Often when creating a group of desis, there may be a number of keydesignations that are common to many or all of the extensions in a givenfile, that is, keys that are in the same position and style on several phones.Instead of creating each desi from scratch, you can use a feature calledtemplating. Templating simply involves creating a single desi with thecommon keys, styles, graphics, etc. and making copies of that desi. Anydesi can be used as a template. The following steps walk you through thetemplating process:
• Create a single desi that has the features and keys that arecommon to the extensions you wish to create. This will be themaster. See Chapter 2, Creating Your First Desi.
• Once the common features are in place, press the “NewExtension” button on the toolbar.
• From the Add Extensions screen, specify the extensionnumbers of the desis that will have the common features youcreated in the first desi. Do not click OK yet.
21
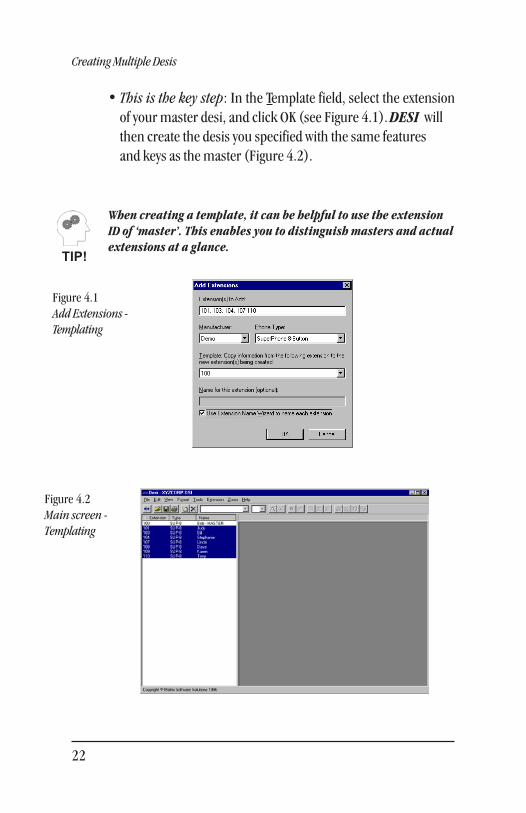
Figure 4.1Add Extensions -Templating
Figure 4.2Main screen -Templating
• This is the key step: In the Template field, select the extensionof your master desi, and click OK (see Figure 4.1). DESI willthen create the desis you specified with the same featuresand keys as the master (Figure 4.2).
When creating a template, it can be helpful to use the extensionID of ‘master’. This enables you to distinguish masters and actualextensions at a glance.
Creating Multiple Desis
22
TIP!

To insert an extension code: • Highlight the text box you wish to place the code in. • Press the code button from the toolbar or text editor. • Select Extension ID. This brings {Ext} into the text editor
(Figure 4.3). • Add any other desired text and click OK. The extension ID is
then transferred to the text box (Figure 4.4).
Codes
A useful feature that works well with templating is the application ofcodes. A code acts as a pointer to a piece of data within a DESI file. Thereare three types of codes: extension codes, name codes, and customcodes. The extension code points to the extension ID of the desi that isbeing edited. A name code points to the assigned name of the desi beingedited, or to the name of a different desi. Custom codes are codes thatyou create with commonly used information to make editing even faster.Codes are accessed by buttons on the text editor and toolbar.
The following two examples illustrate the use of codes:
Creating Multiple Desis
23
Figure 4.3Extensioncode

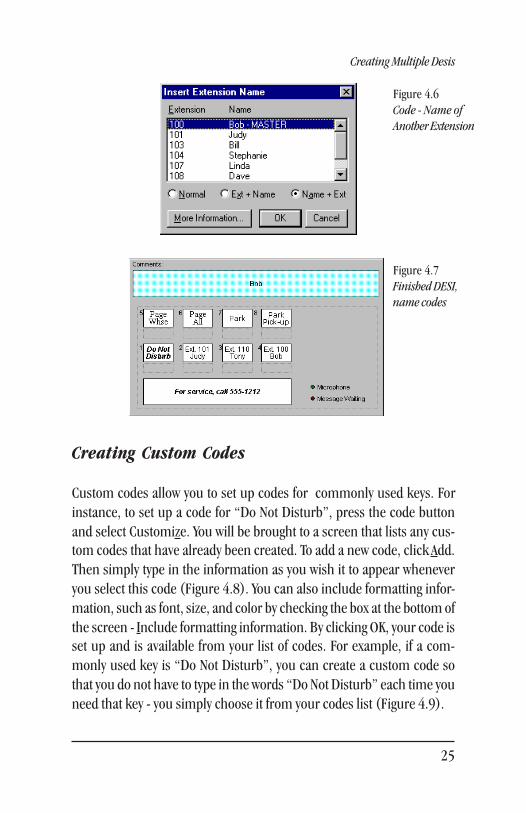
To insert a name code: • Highlight the text box you wish to place the code in. • Press the code button from the toolbar or text editor. • Select Name of This Extension or Name of Another Extension.
Name of This Extension automatically brings the code{Name} into the text editor (Figure 4.5). Name of AnotherExtension presents you with a list of available extensionnames to choose from, and the format you wish it to appearas (i.e. name only, extension over name, or name overextension), see Figure 4.6. By clicking OK, the appropriatecode is brought into the selected text box. Figure 4.7 shows acompleted DESI using name codes in text boxes 2, 3 & 4.
Creating Multiple Desis
24
Figure 4.4Extensioncode in use
Figure 4.5Name code
Creating Multiple Desis
25
Creating Custom Codes
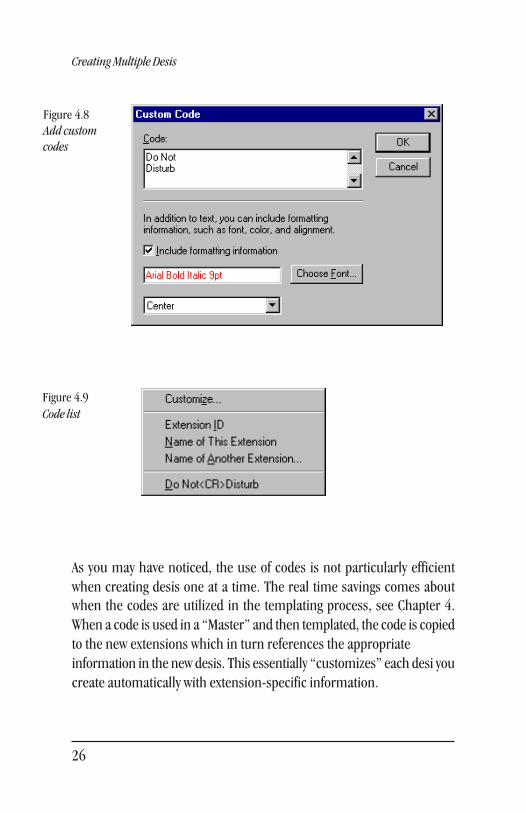
Custom codes allow you to set up codes for commonly used keys. Forinstance, to set up a code for “Do Not Disturb”, press the code buttonand select Customize. You will be brought to a screen that lists any cus-tom codes that have already been created. To add a new code, click Add.Then simply type in the information as you wish it to appear wheneveryou select this code (Figure 4.8). You can also include formatting infor-mation, such as font, size, and color by checking the box at the bottom ofthe screen - Include formatting information. By clicking OK, your code isset up and is available from your list of codes. For example, if a com-monly used key is “Do Not Disturb”, you can create a custom code sothat you do not have to type in the words “Do Not Disturb” each time youneed that key - you simply choose it from your codes list (Figure 4.9).
Figure 4.6Code - Name ofAnother Extension
Figure 4.7Finished DESI,name codes
26
Creating Multiple Desis
As you may have noticed, the use of codes is not particularly efficientwhen creating desis one at a time. The real time savings comes aboutwhen the codes are utilized in the templating process, see Chapter 4.When a code is used in a “Master” and then templated, the code is copiedto the new extensions which in turn references the appropriateinformation in the new desis. This essentially “customizes” each desi youcreate automatically with extension-specific information.
Figure 4.8Add customcodes
Figure 4.9Code list

27
Rotating Keys
To further speed your creation of desis, you may find it useful to be ableto rotate the key designations on a given desi or group of desis. To rotatea given set of keys:
• Select the text boxes that you wish to rotate (see Chapter 3 forinformation on selecting multiple text boxes).
• Click the button once for every clockwise rotation youwish to make. Holding down the SHIFT key while clicking the
button will rotate the selected keys in a counterclockwisedirection.
You can also use arithmetic functions within codes. Forexample, the code {Ext+100} would add 100 to the value ofthe existing extension (e.g. extension ID 122 would display asextension 222). With this “DESI Math”, you can add (+),subtract (-), multiply (*), and divide (/).
TIP!
Key rotation is most useful when creating desis for a group ofphones, as in an office setting. Simply set up your master,template copies, and then rotate whatever keys necessary ateach station.TIP!
Creating Multiple Desis
The extension code is very useful as part of a DID number. Forexample, if the last 3 digits of an individual’s DID number arehis/her extension ID, XXX-X{Ext} will complete the DIDnumber.TIP!

28

Chapter 5 - Printing Your Desis
Once you have created and edited your desis, it is time to print them.Printing in DESI is a quick, easy, and precise process that automaticallyallows for your printer’s offset.
To print, simply select the desis you wish to print from the extension listand press the button, or select File from the menu bar and choosePrint (for more information on selecting multiple items, refer to Chap-ter 3).
Before printing, DESI presents you with a screen verifying the type andnumber of desis you have selected to print, and the selected printer. Ifyou are printing a desi that comes more than one per page, you will begiven the option of choosing which desi to begin printing on. By selectingChoose Label, you can specify which desi to begin printing on (Figure5.1).
Figure 5.1Select label
29
To print multiple copies of a given desi, simply select the desi you wish toprint and press the print button. From the print screen you have theability to specify the number of copies you wish to print.

30
If you wish to change your print setup, select File from the menu bar andchoose Printer Setup. From this point you can change your designatedprinter, printer resolution, and other printer-specific options.
No manual printer adjustment is necessary. However, if you experienceany problems printing your desis, please refer to Chapter 9 - Trouble-shooting.
Printing Your Desis

Chapter 6 - Editing An Existing DESI File
Once you have saved your desis, it is a simple matter to go back and makechanges and/or reprint them. If you wish to open a saved desi file, clickFile from the menu bar and choose Open Database. From this screen,simply specify the location and filename of the DESI file you wish toopen and click OK (see Figure 6.1).
Once you are in the appropriate file, simply select the extension(s) youwish to edit and make the desired changes. Be sure to save any changes toyour file, otherwise they will be lost when you exit the file.
Change Extension ID
At any time in the desi editing process, you may find it helpful or neces-sary to change the ID of a given extension (e.g. change Ext. 110 to Ext.112). To do this, choose Extension from the menu bar and select ChangeExtension ID. Type in the new extension ID and click OK (see Figure 6.2).
Figure 6.1Open Database
31
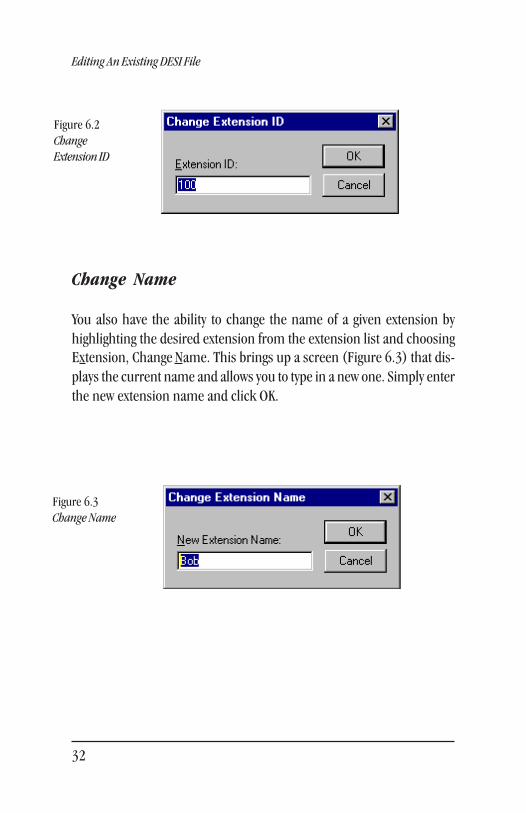
Figure 6.2ChangeExtension ID
Figure 6.3Change Name
Editing An Existing DESI File
Change Name
You also have the ability to change the name of a given extension byhighlighting the desired extension from the extension list and choosingExtension, Change Name. This brings up a screen (Figure 6.3) that dis-plays the current name and allows you to type in a new one. Simply enterthe new extension name and click OK.
32

When you need to reprint desis you have just edited, you canclick the “Modified” header in the extension list, and quicklyselect the extensions that have the most recent modified date/time.TIP!
Editing An Existing DESI File
33

34

In addition to DESI’s standard time-saving features, there are severalother tools that many users will find helpful.
Copy Styles
The process of copying styles makes for the quick application of a certain“look” or “format”. This means that once you have a color scheme,pattern, or any combination of fonts, graphics, even text, that you like,you can apply those styles to any number of desis that you have alreadycreated within the same file. The following example demonstrates thisprocess:
• You have created 10 extensions, numbered 101-110. Whileediting extension 101, you come up with a combination oftext styles that you like, and want to apply it to the remaining 9extensions. Choose Tools, Copy Styles. You will be presentedwith the first screen of the Copy Styles wizard (Figure 7.1).
• Specify the ID of the extension that you wish to copy stylesfrom (Figure 7.2).
• Specify the ID of the extension(s) you wish to copy styles to(Figure 7.3).
• Specify which elements and styles that you wish to copy(Figure 7.4).
• Click OK. NOTE: This feature takes the specifiedelements & styles and writes over any conflictingdata in the target extensions. Make sure that you
Chapter 7 - Advanced Features
35

Advanced Features
do wish to write over the existing informationbefore clicking OK.
Figure 7.1Copy styles 1
Figure 7.3Copy styles 3
Figure 7.2Copy styles 2
36

Advanced Features
Options
DESI gives you the ability to customize certain aspects of how it runs onyour system. These options are accessed by choosing Tools from the menubar and selecting Options (Figure 7.6). You have several options at thisscreen:
• Set the default font. You can choose from theavailable font styles by clicking Choose Font.
• Set the default text justification.
• Set the default zoom level.
• Set the default phone manufacturer. This manufacturerdisplays first when adding new extensions.
The “reset” button returns the above elements to their default settings.
Figure 7.5Copy styles 5
Figure 7.4Copy styles 4
37

Find and ReplaceFind and Replace are two features useful in editing existing DESI files.Both commands are accessed from the menu bar under the Edit menu.Find (Figure 7.7) searches for and takes you to each location in a givenfile that has the specified data (e.g.. name, word, number, etc.). Replace(Figure 7.8) acts in a similar fashion, but replaces the specified data witha new piece of information. Replace is especially useful in cases of em-ployee turnover/transfer - simply replace a given individual’s name withthat of their replacement.
Figure 7.8Replace
Figure 7.7Find
Figure 7.6Options
Advanced Features
38

Chapter 8 - Helpful Hints
This chapter is designed to aid you in becoming more proficient in creat-ing high-quality desis. Because some of the best suggestions for usingDESI often come from our users, we thank our customers who havecontributed to this chapter. This chapter will be broken into 3 sections -Creating Desis, Editing, and Printing.
Creating Desis
• If you are an interconnect or a company that installs phonesystems, you can create and save your desis to a floppy diskand keep it in the customer’s file. This will enable you toquickly find each customer’s DESI database and conservehard disk space.
• As shown in Chapter 4, you can create multiple desis from a“master”. This is particularly useful if a group(s) of phoneshas some common keys. This process allows you to create onedesi, then generate any number of copies from the master.See Chapter 4 for more information on Templating.
Editing Desis
• A handy shortcut in DESI is the right mouse button. By clickingthe right mouse button on a given item on screen, a feature-specific menu will appear. For instance, by clicking the rightmouse button on an extension in the extension list, you will bepresented with a menu that will allow you to select/unselectextensions, edit, delete, or print the extension, change theextension name, or change the extension ID. Experiment withthis feature and you will discover some real time savings.
39

• With DESI, your desis will print exactly as they appear onscreen. This means that if your text is too large to fit in a textbox on screen, it won’t print correctly either. Try changing thetext size or font so that your desis will print correctly.
• A helpful hint if you train people on using their phones - usedifferent colors to separate the different types of keys (e.g.DSS/BLF, speed dial, etc.). This can be very helpful to the endusers in understanding key functions. This does require acolor printer.
• The Copy Styles feature (Chapter 6) is an extremely valuabletool in setting up multiple desis. It allows you to come upwith a “look and feel” for your desis, and then apply thosestyles to other desis. However, use caution. If you use thisfeature to copy text from one desi to another, whatever wasin a given text box on the destination desi will be overwrittenwith the information being copied.
• When you view your list of created desis from the extensionlist, they are listed in ascending numerical order. You canchange this order by clicking on the header boxes (Extension,Type, Name, Modified). For example, clicking on “Type” will listyour DESIs alphabetically by phone type, and clicking on“Name” will list your desis alphabetically by extension name(those extensions with no name will be listed first).
Helpful Hints
40

• In instances of employee turnover, you can use the Find/Replace feature to change the individual’s name to that oftheir replacement, then click the “Modified” header in the listscreen to group extension by most recent time modified andprint the changes.
Printing
• DESI is equipped with an internal control system thatautomatically allows for your printer’s offset so that yourdesis will print exactly as they appear on screen. However,since it is virtually impossible to foresee every possiblehardware/software configuration, there is a manual adjustment. To utilize this feature, choose File from the menu barand select Precise Printer Adjustment. If for some reasonyour desis do not print perfectly aligned, this feature will helpyou to quickly adjust for your printer. See Chapter 9 -Troubleshooting for more information.
• To further assist you in your installs and system maintenance,DESI allows you to print a list of all extensions in a given file.To print this list, select File from the menu bar and choosePrint Extension list. You have the option of sorting this list byextension ID, phone type, extension name, or last datemodified, in either ascending or descending order.
Helpful Hints
41

42
Helpful Hints

Chapter 9 - Troubleshooting
Printing Desis
“My printer feeds the DESI sheets through without printing anything”or “My printer only prints the first few lines of the desi.”
This is caused by the “end-of-page” sensor in your printer. This sensor“sees” the holes in some desi sheets, and assumes that it has reached theend of the page. The printer will then stop printing and eject the page. Atest to verify that this sensor is causing the problem is to print a desi on aplain sheet of paper. If your desis print normally on a plain sheet of paperbut not on a desi sheet, the sensor is causing theproblem.
Solution: Desi Telephone Labels, Inc. produces specially-designedPost-it™ notes, called DESI Backers, that can be placed on theback of the DESI page to cover up the holes that are triggeringthe end-of-page sensor. See the front cover of this manual forinformation on ordering DESI Backers.
“My printout looks different than what I see on screen.”
This problem may include:
• Letters or words that show up on screen but aremissing on your printed desi.
• The first or last letters of a text box disappear on yourprinted desi.
• Letters or words that print out-of-bounds but look fineon screen.
43

Solution: If you have this problem, it is recommended that youuse “Print True Type As Graphics.” This slows down your printer,but will give you more accurate results. To enable this option:
• Select File from the menu bar, choose PrinterSetup
• Click the “Options” button • If your printer supports it, you will see a
checkbox labeled “Print True Type As Graphics”.Make sure the checkbox is turned on.
• Click OK to confirm your change.
“My desis print, but they are misaligned - all of the key designationsare off-center.”
DESI has been engineered to automatically adjust for your printer’soffset. However, in some cases, desis may not print properly aligned. Onepossible cause of this is you may be using a printer driver that was notdesigned for your specific printer model.
Solution: First of all, verify that you are using the correct printerdriver. If your driver is correct, then you need to manually ad-just for your printer’s offset using the Precise Printer Adjust-ment. To make a manual adjustment:
• From the menu bar, click File and select PrecisePrinter Adjustment.
• Verify that your printer symptoms indicate the needfor a manual adjustment and click Continue or Cancel.
Troubleshooting
44
• If necessary, make the appropriate vertical andhorizontal adjustments. When satisfied with thealignment, click OK to save your adjustment.
This adjustment will be stored within DESI and will not affectother programs. You will not need to make another adjustmentunless you print to another printer that experiences the sameproblem.
Troubleshooting
“My DESI sheets stick together as they feed through my printer.”
This is most likely caused by the perforations or holes in the DESI sheetsgetting caught on one another.
Solution: The easiest remedy is to “fan” the sheets before plac-ing them into your printer. Depending on the type of printeryou have, it may be helpful to place a sheet of plain paper be-tween your DESI sheets to act as a separator. Another option isto place DESI Backers on the back of the DESI sheets to cover upthe perforations. Simply attach the Backers to the back side ofthe DESI, with the adhesive edge on the side that will feedthrough the printer first. Call the number on the back cover ofthis manual to order DESI Backers.
45

46

Chapter 10 -Technical Information
This chapter covers information of primary interest to network adminis-trators.
Version 1 Compatibility & NetworkInstallation of DESI
This technical note is for network administrators who are:
• Upgrading from DESI 1.x to DESI 2.x
and • Installing DESI into a network directory (instead of
installing on each computer’s C: drive).
If you are not upgrading from DESI 1.x on a network, you do notneed to read this section.
Background
DESI has the ability to read and save files created with Desi 1.x. Thisability was not built directly into DESI because doing so would haverequired certain files to be present in the Windows SYSTEM directory,making network installation much more difficult.
Instead, support for Version 1 files is contained in a separate file:DSI1CVT.EXE. If DSI1CVT is installed, DESI automatically has the abilityto read Version 1 files as well as Version 2 files. In addition, you will be ableto choose either the Version 1 or Version 2 file format when saving files. Ifyou choose not to install DSI1CVT, Version 1 compatibility is automati-cally disabled and you will only be able to use the Version 2 format.
47

Technical Information
Using DSI1CVT on a network
Network administrators who are not concerned about V1 compatibilitycan simply choose not to install DSI1CVT (and skip the remainder of thistechnical note). Because DESI itself does not rely on any file located inthe Windows directory, it can immediately be run from any station on thenetwork as soon as it is installed on a network drive.
However, network administrators who want V1 compatibility must runsetup from every station which requires V1 compatibility. BecauseDSI1CVT relies on files in the Windows directory, you must run SETUP ateach workstation. Note that a network administrator may choose to in-stall V1 compatibility on only a few machines. If the administrator doesthis, then V1 compatibility will only be available on those machines onwhich the administrator has run DESI SETUP. On all other machines, V1compatibility will be disabled.
More Information
When DESI loads, it checks for the presence of DSI1CVT, and it alsochecks for the presence of certain files:
File Directory in which file is locatedDSI1CVT.EXE [DESI program directory]\DSI1CVTVBRUN300.DLL Windows SYSTEM directoryMSAES110.DLL Windows SYSTEM directoryMSAFINX.DLL Windows SYSTEM directoryMSAJT110.DLL Windows SYSTEM directoryVBDB300.DLL Windows SYSTEM directory
If any of the above files are missing, V1 compatibility is disabled.
48

Technical Information
49

50
Technical Information

51
Chapter 11 - DESI Pictograms
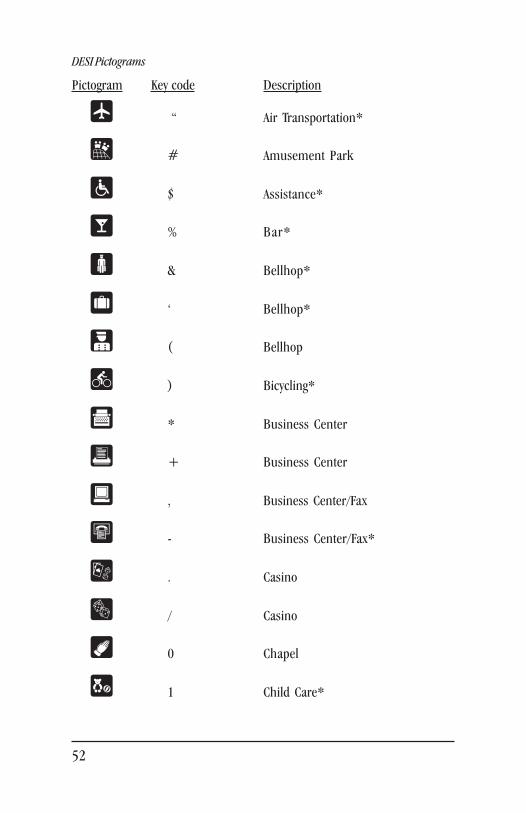
DESI Pictograms are special symbols that can be used within DESI forhospitality and other applications. Symbols noted with an asterisk(*) arecompliant with the International Pictograms Standard. To use a DESIPictogram:
• Choose the desired pictogram from the following pages, notethe key code for the pictogram.
• Click the text box within DESI where you want the pictogramto appear.
• Select the font "DESI Pictograms" or "DESI PictogramsInverse",whichever is appropriate.
• Type the appropriate key code and click “OK”
Since DESI Pictograms are fonts, changing the color or size of a symbol iseasy. Simply highlight the text box conataining the symbol you with tomodify and choose the desired effect from the toolbar (see Chapter III:Customizing Your Desi, for more information).
NOTE: The pictograms on the following pages are used by se-lecting the font "DESI Pictograms". To use the reverse of a se-lected pictogram, select the font "DESI Pictograms Inverse".
52
DESI Pictograms
" “ Air Transportation*
# # Amusement Park
$ $ Assistance*
% % Bar*
& & Bellhop*
' ‘ Bellhop*
( ( Bellhop
) ) Bicycling*
* * Business Center
+ + Business Center
, , Business Center/Fax
- - Business Center/Fax*
. . Casino
/ / Casino
0 0 Chapel
1 1 Child Care*
Pictogram Key code Description
53
DESI Pictograms
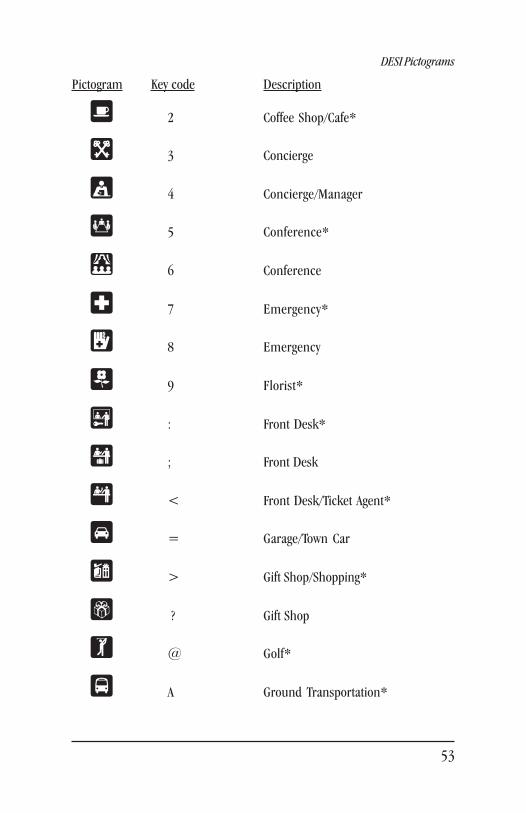
2 2 Coffee Shop/Cafe*
3 3 Concierge
4 4 Concierge/Manager
5 5 Conference*
6 6 Conference
7 7 Emergency*
8 8 Emergency
9 9 Florist*
: : Front Desk*
; ; Front Desk
< < Front Desk/Ticket Agent*
= = Garage/Town Car
> > Gift Shop/Shopping*
? ? Gift Shop
@ @ Golf*
A A Ground Transportation*
Pictogram Key code Description
DESI Pictograms
54
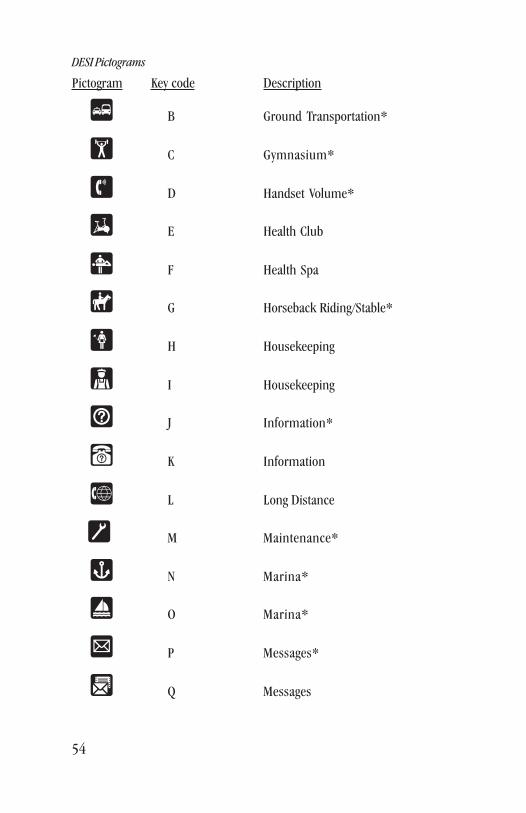
Pictogram Key code Description
B B Ground Transportation*
C C Gymnasium*
D D Handset Volume*
E E Health Club
F F Health Spa
G G Horseback Riding/Stable*
H H Housekeeping
I I Housekeeping
J J Information*
K K Information
L L Long Distance
M M Maintenance*
N N Marina*
O O Marina*
P P Messages*
Q Q Messages

55
DESI Pictograms
Pictogram Key code Description
R R Movie Theatre/Conference*
S S Nurse
T T Operator*
U U Operator
V V Pharmacy*
W W Photo Shop
X X Pizza
Y Y Rail Transportation*
Z Z Resort Activity
[ [ Restaurant*
\ \ Restaurant
a a Restaurant
b b Riverboat
c c Room Service*
d d Room Service
e e Room Service

DESI Pictograms
56
Pictogram Key code Description
f f Salon*
g g Scuba Diving
h h Skiing*
i i Snack Shop*
j j Swimming*
k k Taxi*
l l TDD*
m m Tennis/Racquetball*
n n Tickets/Show Reservations
o o Theatre/Performing Arts*
p p Travel Info*
q q Valet
r r Valet Parking
s s Valet Parking/Car Rental*
t t Valet/Shoe Shine*
u u Wake-Up Call

57
DESI Pictograms
Pictogram Key code Description
v v Wake-Up Call
w w Wake-Up Call
x x Water Transportation*
y y Weather Info/Time & Temperature
z z Weather Info/Lost & Found*