design - mytrainingbc.ca · electrical modules of youth explore trades skills. the mechanical...
TRANSCRIPT
Design Cover goes here
DESIGNActivity Plans
Youth Explore Trades Skills
DesignTable of Contents
Acknowledgements . . . . . . . . . . . . . . . . . . . . . . . . . . . . . . . . . . 3
About This Resource . . . . . . . . . . . . . . . . . . . . . . . . . . . . . . . . . 7
Introduction to Design . . . . . . . . . . . . . . . . . . . . . . . . . . . . . . . . . 13
Defining Design . . . . . . . . . . . . . . . . . . . . . . . . . . . . . . . . . . 17
Working as a Designer . . . . . . . . . . . . . . . . . . . . . . . . . . . . . . 21
Design Challence: the Gift-Giving Experience . . . . . . . . . . . . . . . . . . 37
Information Handouts
Problem-Solving Models . . . . . . . . . . . . . . . . . . . . . . . . . . . . . 47
The Design Process in Manufacturing . . . . . . . . . . . . . . . . . . . . . . 51

This work is licensed under a Creative Commons Attribution-NonCommercial-ShareAlike 4.0 International License unless otherwise indicated.
Youth Explore Trades Skills Design and Drafting
3
Acknowledgments and Third Party Copyright
Youth Explore Trades Skills Learning Resources DevelopmentOpen School BC, the Custom Programs work unit of the BC Ministry of Education, and the BC Industry Trades Authority are grateful to the following individuals and organizations for their contributions to the Youth Explore Trades Skills Learning Resources Development Project.
Resource Development Planning Session (Dec. 5–7, 2015)Steve Claassen, SD 71 (Comox Valley)
Sharissa Desrochers, SD 36 (Surrey)
Heather Elliott, SD 33 (Chilliwack)
Dunia Magnusson, Project Leader, BC Industry Training Authority
Sabinah Rafiq, Manager, Youth Initiatives, BC Industry Training Authority
Monica Strimbold, SD 54 (Bulkley Valley)
Jim Watkins (SD 64, Gulf Islands)
WritingSteve Claassen, SD 71 (Comox Valley)
Sharissa Desrochers, SD 36 (Surrey)
Heather Elliott, SD 33 (Chilliwack)
Monica Strimbold, SD 54 (Bulkley Valley)
Jim Watkins (SD 64, Gulf Islands)
ReviewMonica Strimbold, SD 54 (Bulkley Valley)
2013 Curriculum Advisory CommitteeBrian Campbell, District Principal, Careers and International Education, SD 60 (Peace River North)
Larry Espe, Superintendent of Trades and Student Transitions, BC Ministry of Education
Colleen Hannah, Aboriginal Agreements Coordinator, BC Ministry of Education
Rodger Hargreaves, Career Programs, SD 62 (Sooke)
Mike Howard, President, BC Technology Education Association, SD 19 (Revelstoke)
Erin Johnston, Manager, Labour Supply Initiatives, BC Industry Training Authority
Eleanor Liddy, Director, Open School BC
Eric MacNeil, President, BC Culinary Arts Specialist Association
Jim Pelton, former Director, Training Delivery, BC Industry Training Authority
Acknowledgments and Third Party Copyright Design and Drafting
4 Youth Explore Trades Skills
Glenn Rowan, Education Officer, Graduation, Dual Credit, Industry Training, BC Ministry of Education
Tim Winkelmans, Lead, Graduation Standards, Educational Technologies, Learning Alternatives, BC Ministry of Education
2013 Resource Development Planning Session (July 10, Victoria BC)Dick Brouwer, SD 63 (Saanich)
Jeff Dickson, SD 35 (Langley)
Brad Edmondson, SD 36 (Surrey)
Adrian Hill, Project Manager, Open School BC
Mike Howard, President, BC Technology Education Association, SD 19 (Revelstoke)
Tom Hoyme, SD 42 (Maple Ridge-Pitt Meadows)
Eleanor Liddy, Director, Open School BC
Erin Johnston, Manager, Labour Supply Initiatives, BC Industry Training Authority
Ken Jorgensen, SD 57 (Prince George)
Karen Larsen, Career Programs Coordinator, SD 39 (Vancouver)
Martin Lim, Vice-President, BC Technology Education Association, SD 36 (Surrey)
David Olsen, SD 69 (Qualicum)
Stu Rhodes, SD 63 (Saanich)
Glenn Rowan, Education Officer, Graduation, Dual Credit, Industry Training, BC Ministry of Education
Rhonda Stangeland, SD 38 (Richmond)
Chris Teskey, Project Manager, Open School BC
Cory Williams, Manager, Program Standards, BC Industry Training Authority
Open School BC Production TeamCopyright: Shannon Sangster
Editing: Keith Learmonth
Graphics: Max Licht (http://www.maxlicht.com)
Graphics Coordination: Christine Ramkeesoon
Photography: Dennis Evans
Project Managers: Adrian Hill, Tracey Peever, Chris Teskey
Project Supervision: Monique Brewer (Director), Jennifer Riddel (Manager, Instructional Services)
Production Technicians: Brian Glover, Beverly Hooks
Website Construction and Design: Christine Ramkeesoon

Design and Drafting Acknowledgments and Third Party Copyright
Youth Explore Trades Skills 5
Third Party CopyrightEvery effort has been made to contact copyright holders for third party works included in the Youth Explore Trades Skills learning resources. If you have any questions or concerns, please contact [email protected]
Drafting Dictionary (PPT)Staedler Drafting Dots—image courtesy of DickBlick.com and/or Blick Art Materials ph. #800-828-4548.

Acknowledgments and Third Party Copyright Design and Drafting
6 Youth Explore Trades Skills
This work is licensed under a Creative Commons Attribution-NonCommercial-ShareAlike 4.0 International License unless otherwise indicated.
Youth Explore Trades Skills Design and Drafting
7
About This ResourceOpen School BC’s Youth Explore Trades Skills resource development project involves creating learning resources to support the implementation of the BC Ministry of Education’s Youth Explore Trades Skills Program Guide.
On December 7-9, 2015 a Drafting and Design resource development planning session took place in Victoria, B.C. The purpose of the planning session was to develop an instructional design plan and draft Activity Plans for a Design and Drafting module, to be used within the Youth Explore Trades Skills course. The planning session brought together Drafting and Design educators who teach their students about the design process, as well as fundamental drafting (drawing) skills needed within all trades.
These resources have been designed to meet a range of students’ and teachers’ needs. Each activity has been created as a foundation lesson, many with suggested extension activities for students to further expand their knowledge.
This module introduces students to Board Drafting and Computer Aided Drafting (CAD). The Activity Plans cover both Architectural and Mechanical standards. Activity Plans are designed with flexible use in mind; lesson content has been divided into discrete chunks to allow for standalone use for ease of navigation by teachers, but can also be followed in sequence.
The Architectural Drafting Activity Plans can align directly to the Carpentry, Plumbing and Electrical modules of Youth Explore Trades Skills. The Mechanical Drafting module correlates with the Automotive module, but can also compliment the Metal Work module.
The planning team created broad activites in order that teachers can use the equipment available to them—both manual/board drafting equipment and computer software.
In this resource you will find:
• Detailed terminology related to the fields of design and drafting
• Detailed lists and descriptions of board drafting equipment
• Detailed information regarding current CAD software programs
• Detailed Activity Plans with activities, images and supporting instructional videos
All Activity Plans are available in both PDF Format and Word formats on the Youth Explore Trades Skills website: http://www.mytrainingbc.ca/skills-exploration/index.html
About This Resource Design and Drafting
8 Youth Explore Trades Skills
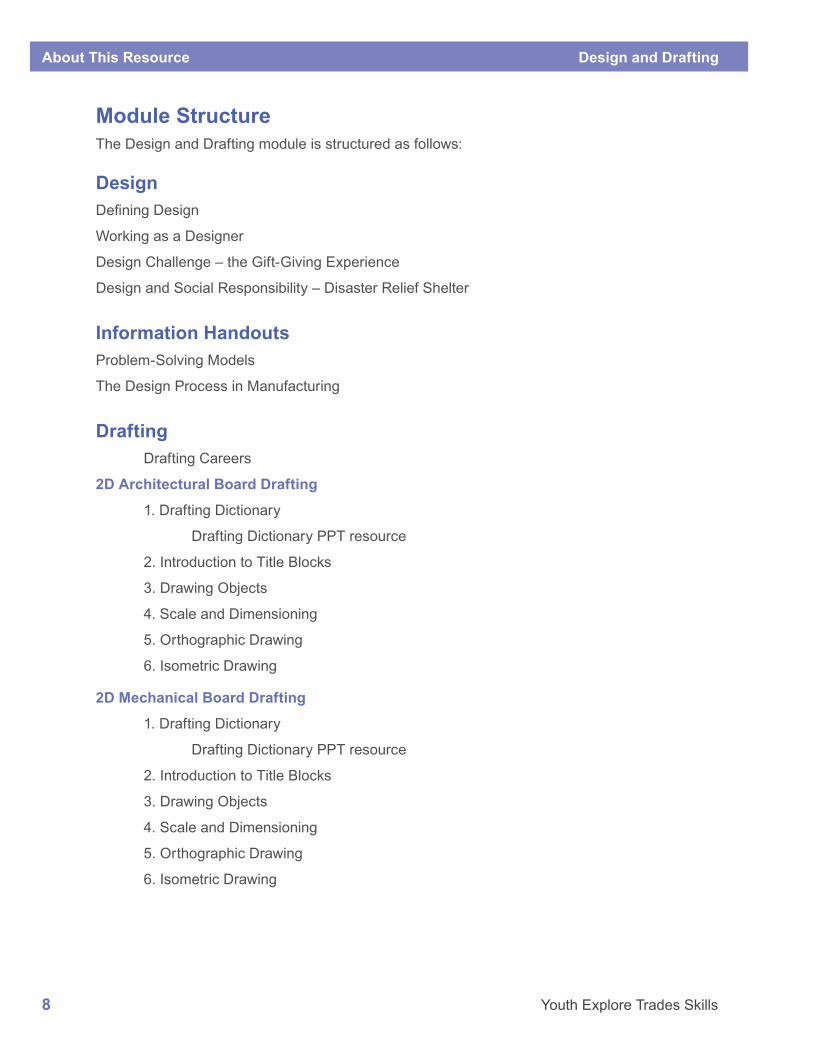
Module StructureThe Design and Drafting module is structured as follows:
DesignDefining Design
Working as a Designer
Design Challenge – the Gift-Giving Experience
Design and Social Responsibility – Disaster Relief Shelter
Information HandoutsProblem-Solving Models
The Design Process in Manufacturing
Drafting Drafting Careers
2D Architectural Board Drafting
1. Drafting Dictionary
Drafting Dictionary PPT resource
2. Introduction to Title Blocks
3. Drawing Objects
4. Scale and Dimensioning
5. Orthographic Drawing
6. Isometric Drawing
2D Mechanical Board Drafting
1. Drafting Dictionary
Drafting Dictionary PPT resource
2. Introduction to Title Blocks
3. Drawing Objects
4. Scale and Dimensioning
5. Orthographic Drawing
6. Isometric Drawing
Design and Drafting About This Resource
Youth Explore Trades Skills 9
2D Mechanical and Architectural CAD
1. Computer and Network Orientation
2. CAD Orientation
Teacher Video 2.1 - Intro to CAD Software for the Teacher-3
2.1 CAD Program Interface (MCAD)
2.2 Basic Command Line Entry and Page Setup for Activity 2 (MCAD)
2.3 Absolute and Relative Coordinate Entry (MCAD)
2.4 Polar Coordinate Entry and Mouse Entry (MCAD)
2.5 Offset Command-2 (MCAD)
2.6 Fillet Command (MCAD)
2.7 Move Command and Object Snap (MCAD)
2.8 Trim Command (MCAD)
2.9 Drawing a Simple Border (MCAD)
2.10 Inserting Text into a Title Block (MCAD)
2.11 Plotting or Printing Your Drawing-2
3. Set Up Your Model Space
3.1: Setting Up Your Model Space (Part 1)
3.2: Setting Up Your Model Space (Part 2)
4. Draw Your Border
4.1 Open a Drawing Template
4.2 Draw a Border and Title Block
4.3 Complete the Lines of the Title Block
4.4 Inserting Labels into Your Title Block
4.5 Drawing a Logo to Complete the Title Block and Border
4.6 Save Your Completed Border and Title Block as a Drawing Template
5. Create an Orthographic Drawing
5.1 Creating an Orthographic Drawing (Part 1)
5.2 Creating an Orthographic Drawing (Part 2)
5.3 Creating an Orthographic Drawing (Part 3)
6. Draw an Isometric Drawing
6.1 Creating an Isometric Drawing
7. Save Your Border and Title Block
7.1 Scaling Your Title Block
About This Resource Design and Drafting
10 Youth Explore Trades Skills
8. Dimension an Orthographic Drawing
8.1 Dimensioning an Orthographic Drawing
9. Fill in Your Title Block, Including Scale
9.1 Filling in Your Title Block
10. Set Up Your Plot Window, Print on 8.5 × 11 Paper
10.1 Plotting Your Drawing
Extension Activity – Setting Up to Export to Other Programs
1. AutoCAD to Laser
2. Exporting a Drawing
3D Modelling – Architectural CAD
11. Symbols and Standards
11.1: Changing Your Model Space
11.2: Drawing Architectural Blocks for a Building
12. Drawing a Simple Building
12.1: Drawing the External Walls of a Building
12.2: Placing Architectural Blocks into a Drawing
12.3: Scaling Your Border and Dimensioning a Floor Plan
13. Exploring SketchUp Make
13.1: Exploring SketchUp Make
14. Creating a Simple Architectural Structure
14.1 Creating a Simple Architectural Structure (Part 1)
14.2 Creating a Simple Architectural Structure (Part 2)
14.3 Creating a Simple Architectural Structure (Part 3)
14.4 Creating a Simple Architectural Structure (Part 4)
15. Modelling Your Structure
15.1: Modelling Your Structure
Extension Activity – Prototyping Your Model Using Printing and CNC Technology
3D Modelling (Inventor) – Mechanical CAD
11. 3D Modelling a Set of Stairs
11.1: Constraining and Dimensioning 2D Sketches
11.2: Drawing Your Stairs
11.3: Extruding Your Stairs

Design and Drafting About This Resource
Youth Explore Trades Skills 11
12. Drawing and Assembling
12.1: Drawing Side 1 of the Die
12.2: Adding a Sketch to a Surface of a Part
12.3: Assembling Your Die
Extension Activity – 3D Mode to 3D Printer – CNC Software
Exporting Your Final Part or Assembly to 3D Printer Software
Extension Activity – 3D Model to Laser Engraver Software
Exporting Parts to Be Cut on a Laser Engraver MCAD

About This Resource Design and Drafting
12 Youth Explore Trades Skills
This work is licensed under a Creative Commons Attribution-NonCommercial-ShareAlike 4.0 International License unless otherwise indicated.
Youth Explore Trades Skills Introduction to Design
13
Defining Design
DescriptionThis activity provides a short introduction to the concept of design and aims to get students thinking about the ubiquity of design in everyday life.
For an excellent overview of the design process, see pages 1–36 of Karl Ulrich’s Design: Creation of Artifacts in Society, listed in the Resources section. Information from the book could be used to supplement the Design component of this module.
Lesson ObjectivesThe student will be able to:
• Recognize that examples of design can be found everywhere that there are humans
• Recognize that designing always involves thinking creatively in order to solve problems
TerminologyArtifact: a product of human art and workmanship. Ulrich (2011, p. 2) describes an artifact as “any product of intentional creation, including physical goods, services, software, graphics, buildings, landscapes, organizations, and processes.”
Design: the act of developing solutions to problems through the creation of objects, systems, or environments.
Empathy: the ability to understand the feelings of another person. This is achieved through relationship building. Empathy involves listening, creating connections, and caring for others.
Design thinking: a methodology that combines the practice of empathy with creative and analytical approaches used to foster innovation. Design thinking involves cross-disciplinary collaboration; it draws inspiration from approaches used in engineering and manufacturing, the arts and social sciences, and business. Design thinking supports flexible approaches to problem solving, allowing the model to be personalized and customized to a wide variety of different settings.
Planned obsolescence: also known as built-in obsolescence, planned obsolescence involves intentionally designing products to possess a predetermined, limited life cycle. Some manufacturers consider designing for obsolescence a strategic advantage to boost sales over the long term of a product’s market availability.
Estimated Time40–60 minutes
Defining Design Introduction to Design
14 Youth Explore Trades Skills
Recommended Number of Students20, based on the BC Technology Educators’ Best Practice Guide
Facilities • Regular classroom space with desks/chairs for all students
• Projector with computer, speakers, and Internet access
Tools None
ResourcesDesign: Creation of Artifacts in Society by Karl T. Ulrich Freely available in digital format at http://opim.wharton.upenn.edu/~ulrich/designbook.html
Technology Education 11 and 12: Drafting and Design Integrated Resource Package, 2001 (BC Ministry of Education)http://tinyurl.com/z3kzczz
Technology Education 11 and 12: Industrial Design Integrated Resource Package, 1997 (BC Ministry of Education)http://tinyurl.com/jcmo3n4
Teacher-led ActivityPart 1: Design in the WorldInvite students to provide examples of anything that has been designed. Based on the examples provided and ensuing conversation, it should become clear that design and human creativity are intimately related to one another and that examples of design can be found anywhere that people are found.
Reinforce to students that within the discipline of design, regardless of what is being designed, it is always being designed for something, namely to solve a problem (i.e., meet a need). Though creativity is an essential ingredient of the design process, not all art is designed to solve a problem—within the fine arts, many works are created primarily to convey emotions and for their aesthetic appeal.
Invite students to engage in small-group discussion on the following topics:
Introduction to Design Defining Design
Youth Explore Trades Skills 15
Q1: Is creating something for profit the same as fulfilling a “need”?
A: Designing products can be a way to create a “need” that did not previously exist. Designers may also deliberately introduce planned obsolescence into the artifacts they create in order to increase profits. Examples include short-lived light bulbs, disposable batteries, and disposable cameras.
Q2: Do children and young adults need cell phones?
A: Answers may vary, and may contribute to a lively debate in the classroom.
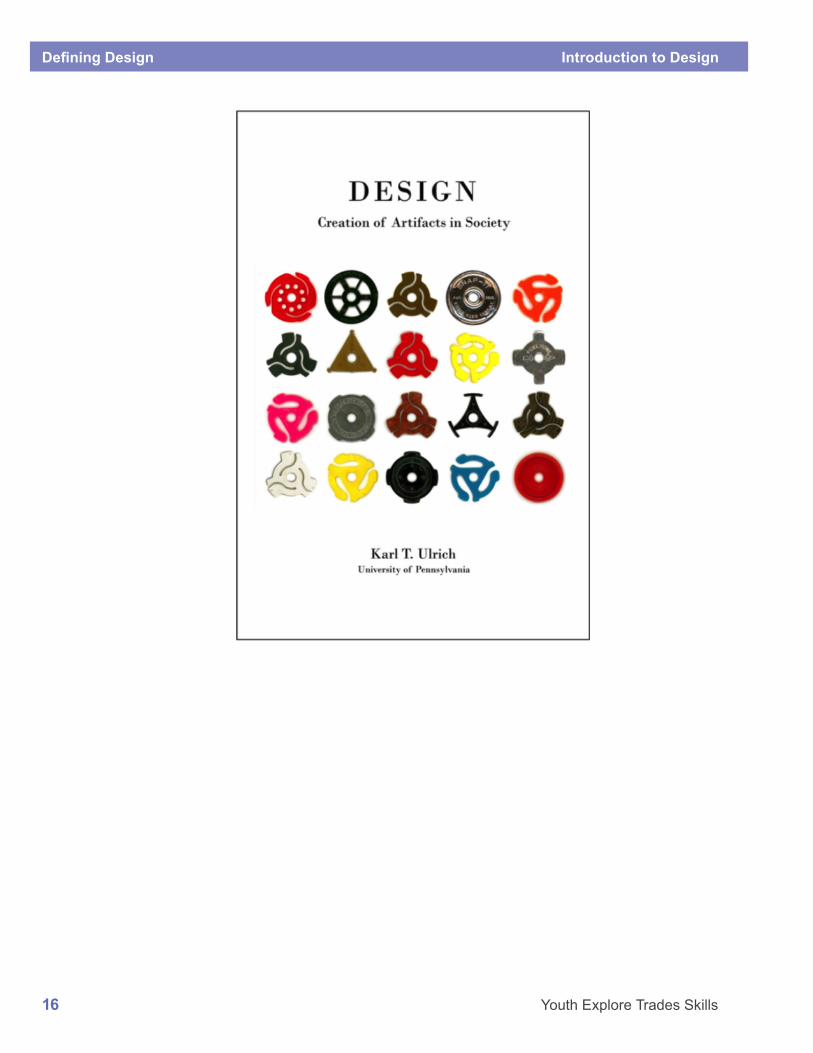
Part 2: Artifacts and DesignShow the students the cover of Karl Ulrich’s book Design: Creation of Artifacts in Society (see next page). Ask students to reflect on the full title of the book and examine its cover. You may wish to ask the following questions:
Q1: What is an artifact?
A: Any product of human art and workmanship
Q2: What are the artifacts that are being displayed on the cover?
A: Spindle adapters for 45 rpm records
Q3: Why do you think the author chose the artifacts he did for the book’s cover?
A: Answers may vary. The spindles may signify the inevitability of changes in technology over time and the creation of new artifacts to replace outmoded ones. Industry, manufacturing, the arts, and leisure and recreation are all impacted by these changes. Invite students to provide examples.
Invite students to reflect on how sometimes artifacts from the past can become fashionable again many years later (e.g., “retro” clothing, vehicles, furniture, and even sound systems). How does design impact these trends, and vice-versa?
The variety of spindles that appear on the cover may also demonstrate how a variety of objects that all serve the same purpose can be designed in many different ways.
Extension ActivityHave students choose any artifact that they can reasonably bring to class and briefly present it (2–5 minutes), explaining its unique design features and the solution that the artifact poses to a problem.
AssessmentStudent participation in class discussion.
Defining Design Introduction to Design
16 Youth Explore Trades Skills
This work is licensed under a Creative Commons Attribution-NonCommercial-ShareAlike 4.0 International License unless otherwise indicated.
Youth Explore Trades Skills Introduction to Design
17
Working as a Designer
DescriptionThis Activity Plan introduces students to possible career opportunities that formally involve design work. The goal of the resource is first and foremost to expose students to the existence of these careers in order to potentially inform their curiosity and interests.
Lesson ObjectivesThe student will be able to:
• Identify various careers formally involved with design work
• Identify the various training paths necessary to become a designer in different fields
AssumptionsThe student will have little familiarity with the occupations mentioned in this Activity Plan.
TerminologyArtifact: a product of human art and workmanship.
Computer Aided Drawing (CAD): the use of precision-drawing software programs to accelerate the design process by making it easier to create and modify draft designs. CAD used to be called CADD (Computer Aided Drafting and Design).
Design: a plan or drawing that demonstrates the form and function of a building, garment, or other object prior to its being created.
Domain: a discrete sphere of activity or knowledge.
Occupation: a job for which people are recruited, retained, and compensated, including self- employment. Occupations comprise many broad activities, called duties, that the incumbent performs. Trades are one occupational sub-category for which apprenticeship training is the traditional method of acquiring skill and knowledge.
Estimated Time45–90 minutes
Recommended Number of Students20, based on the BC Technology Educators’ Best Practice Guide
FacilitiesClassroom, library, or computer lab
Working as a Designer Introduction to Design
18 Youth Explore Trades Skills
ToolsComputer with speakers, projector, and Internet access. This activity could be conducted using mobile devices (e.g., tablets or phones) if there is no access to a computer lab.
ResourcesGallery Walkhttps://www.facinghistory.org/resource-library/teaching-strategies/gallery-walk
Teacher-led ActivityBegin by explaining to students that design is the cornerstone of our material world. From writing utensils to dishes, from computers and phones to cars and bikes, everything in our person-made lives first began as an idea. Then, it was designed.
Each of the following categories of design work can be understood as a discrete domain as well as an occupation. The list demonstrates the ubiquity of design in a wide variety of fields within which the design process can be applied.
Procedure1. Present the list below to students as a handout or a digital document:
Architectural designAutomotive designBusiness designCeramic and glass designColour designCommunication designEngineering designEnvironmental designExperience designFashion design Floral designFurniture designGame designGarden designGraphic designIndustrial designInformation designInstructional designInteraction design
Interior designLandscape designLighting designMachine designMechanical designNews designPackaging designProduct designProduction designService designSoftware designSound designSystem designTheatrical designType designUrban designUser experience designUser interface designWeb design
Introduction to Design Working as a Designer
Youth Explore Trades Skills 19
Assign to each student (or have each student choose) a design discipline from the list that will be researched. Require that each student answer the three prompts found below. The information students come up with should not exceed one page, including the image they choose. This activity could be done in class or as homework.
a. Briefly describe the design occupation. Include your name and a title indicating your topic.
b. Identify the training and education required to become a specialist in this area.
c. Pick an image that represents what someone might create within this career. Presentation may vary, but it could be digital or paper-based.
3. Have students print off their information pages and display them on the wall(s) of the classroom. Then have students conduct a gallery walk.
4. Ask students what all of these fields have in common; answers may vary. One element common to each is the application of design methodology and the presence of design thinking.
Extension ActivityBring in a guest speaker such as a post-secondary instructor who can describe programs, or someone employed as a designer working in the field.
AssessmentStudent participation in discussion
Completion of research activity
Participation in Gallery Walk

Working as a Designer Introduction to Design
20 Youth Explore Trades Skills

This work is licensed under a Creative Commons Attribution-NonCommercial-ShareAlike 4.0 International License unless otherwise indicated.
Youth Explore Trades Skills Introduction to Design
21
Design Challenge: Redefining the Gift-Giving Experience
DescriptionIn this Activity Plan, students will engage in design thinking through a fun and fast-paced design challenge. The challenge involves participants recollecting the last time they gave a gift to someone; their partners then “design” a solution to demonstrate how the experience could be improved in the future.
The activity is an adaptation of the “Virtual Crash Course in Design Thinking” created by Stanford University’s “d.school” (the Hasslo Plattner Institute of Design). d.school uses the design thinking methodology, in which designers stress the importance of developing empathy with users they’re working with, to ensure that useful and meaningful artifacts are created as a result of their work.
The primary intended outcome of this activity is to demonstrate to students how empathy can increase an audience’s engagement in the creative process, even during a relatively simple hour-long exercise such as this one.
By involving the user in the design process from the outset and by creating an emotional connection with the user by learning more about that person’s interests and passions, designers can be certain that what they produce is relevant to their users.
For more concrete applications of design to employment, see the Activity Plan “Working as a Designer.”
Lesson ObjectivesThe student will be able to:
• Recognize the stages involved in design thinking as outlined by the d.school
• Recognize the role of empathy in design thinking
Assumptions• Students will not have previously conducted this activity.
TerminologyArtifact: a product of human art and workmanship. Ulrich (2011, p. 2) describes an artifact as “any product of intentional creation, including physical goods, services, software, graphics, buildings, landscapes, organizations, and processes.”
Design: the act of developing solutions to problems through the creation of objects, systems, or environments.
Design Challenge: Redefining the Gift-Giving Experience Introduction to Design
22 Youth Explore Trades Skills
Empathy: the ability to understand the feelings of another person. This is achieved through relationship building. Empathy involves listening, creating connections, and caring for others.
Design thinking: a methodology that combines the practice of empathy with creative and analytical approaches used to foster innovation. Design thinking involves cross-disciplinary collaboration; it draws inspiration from approaches used in engineering and manufacturing, the arts and social sciences, and business. Design thinking supports flexible approaches to problem solving, allowing the model to be personalized and customized to a wide variety of different settings.
Estimated Time1–2 hours
Recommended Number of Students20, based on the BC Technology Educators’ Best Practice Guide
Facilities Regular classroom space with desks/chairs for all students, a projector with computer and speakers, and Internet access
Tools• Hot glue gun
• Scissors
• Staplers
• Utility knives (optional)
MaterialsAny combination of the following “scrappy” materials that can be used to create quick prototypes:
• Aluminum foil• Bamboo skewers• Brass split pins• Cardboard• Construction paper (coloured)• Felt• Hot glue sticks• Jute twine or butcher’s string• Paperclips• Paper cups
• Pipe cleaners• Popsicle sticks or tongue depressors• Sharpie pens• Straws (jumbo or regular-sized)• Tape: masking tape, duct tape, or
electrical tape (coloured)• Toothpicks• Velcro (adhesive backing)• White glue and/or glue sticks• Zap straps (coloured)
Introduction to Design Design Challenge: Redefining the Gift-Giving Experience
Youth Explore Trades Skills 23
ResourcesAn Introduction to Design Thinking: Process Guide (Hasslo Plattner Institute of Design at Stanford)https://dschool-old.stanford.edu/sandbox/groups/designresources/wiki/36873/attachments/74b3d/ModeGuideBOOTCAMP2010L.pdf
Design: Creation of Artifacts in Society by Karl T. Ulrich. Freely available in digital format at http://opim.wharton.upenn.edu/~ulrich/ulrichbook-10Aug12.pdf
Design Processes (University of British Columbia)http://dstudio.ubc.ca/toolkit/processes/
Maker Day Toolkit (Industry Training Authority)http://www.itabc.ca/sites/default/files/docs/discover/Final%20MakerDayToolKit.pdf
Technology Education 11 and 12: Drafting and Design Integrated Resource Package, 2001 (BC Ministry of Education)http://tinyurl.com/z3kzczz
Technology Education 11 and 12: Industrial Design Integrated Resource Package, 1997 (BC Ministry of Education)http://tinyurl.com/jcmo3n4
Go For a Ride!: Virtual Crash Course Video (the Gift-Giving Project)https://dschool.stanford.edu/resources/virtual-crash-course-video
AssessmentThe following scale may be used for the purposes of evaluation, in conjunction with the rubric found below. The rubric may be used to conduct teacher-led assessment, peer assessment, and/or individual assessment.
Beginning Attempted, but criteria not completed to satisfaction
Developing Attempted successfully at the minimum level
Accomplished Completed successfully at a higher than satisfactory level
Exemplary Completed successfully at an exceptional level
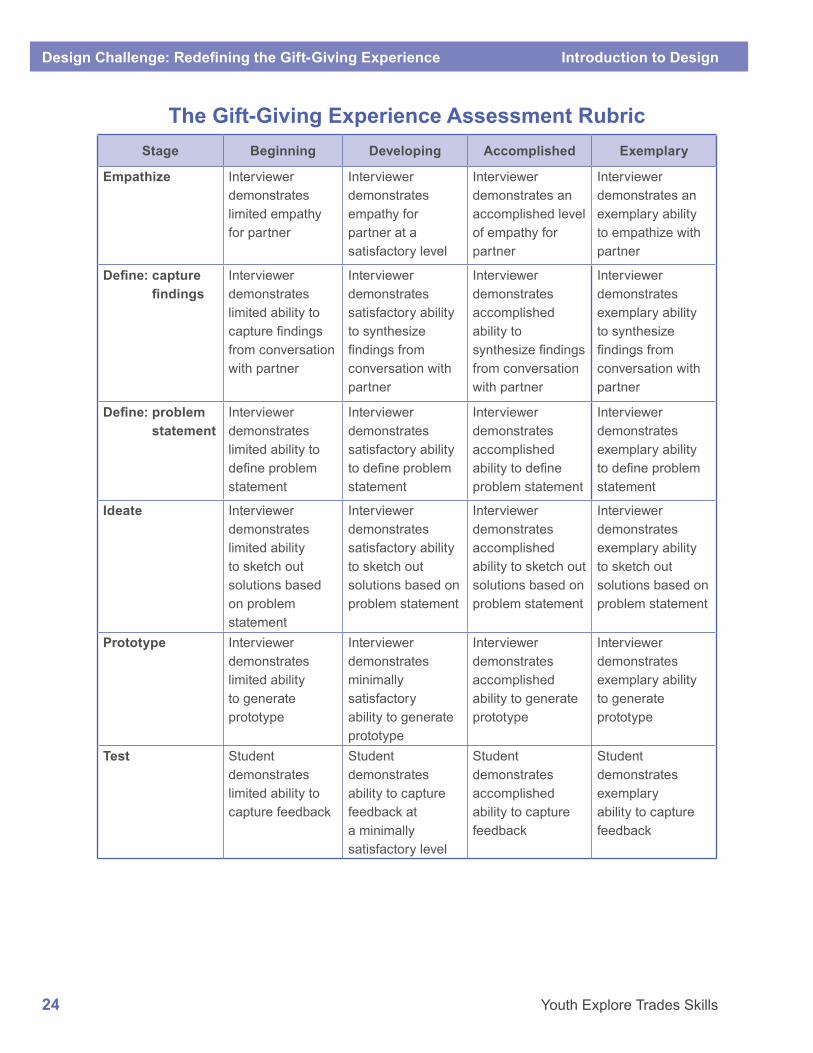
Design Challenge: Redefining the Gift-Giving Experience Introduction to Design
24 Youth Explore Trades Skills
The Gift-Giving Experience Assessment RubricStage Beginning Developing Accomplished Exemplary
Empathize Interviewer demonstrates limited empathy for partner
Interviewer demonstrates empathy for partner at a satisfactory level
Interviewer demonstrates an accomplished level of empathy for partner
Interviewer demonstrates an exemplary ability to empathize with partner
Define: capture findings
Interviewer demonstrates limited ability to capture findings from conversation with partner
Interviewer demonstrates satisfactory ability to synthesize findings from conversation with partner
Interviewer demonstrates accomplished ability to synthesize findings from conversation with partner
Interviewer demonstrates exemplary ability to synthesize findings from conversation with partner
Define: problem statement
Interviewer demonstrates limited ability to define problem statement
Interviewer demonstrates satisfactory ability to define problem statement
Interviewer demonstrates accomplished ability to define problem statement
Interviewer demonstrates exemplary ability to define problem statement
Ideate Interviewer demonstrates limited ability to sketch out solutions based on problem statement
Interviewer demonstrates satisfactory ability to sketch out solutions based on problem statement
Interviewer demonstrates accomplished ability to sketch out solutions based on problem statement
Interviewer demonstrates exemplary ability to sketch out solutions based on problem statement
Prototype Interviewer demonstrates limited ability to generate prototype
Interviewer demonstrates minimally satisfactory ability to generate prototype
Interviewer demonstrates accomplished ability to generate prototype
Interviewer demonstrates exemplary ability to generate prototype
Test Student demonstrates limited ability to capture feedback
Student demonstrates ability to capture feedback at a minimally satisfactory level
Student demonstrates accomplished ability to capture feedback
Student demonstrates exemplary ability to capture feedback
Introduction to Design Design Challenge: Redefining the Gift-Giving Experience
Youth Explore Trades Skills 25
Student Activity When you design, you are not designing for yourself but for someone else. In this activity, you will be redesigning your partner’s experience of giving a gift to someone. The goal is to empathize with your partner, to the point where you are able to redesign the gift-giving experience in order that the next time they give a gift, it may prove to be a better experience for them.
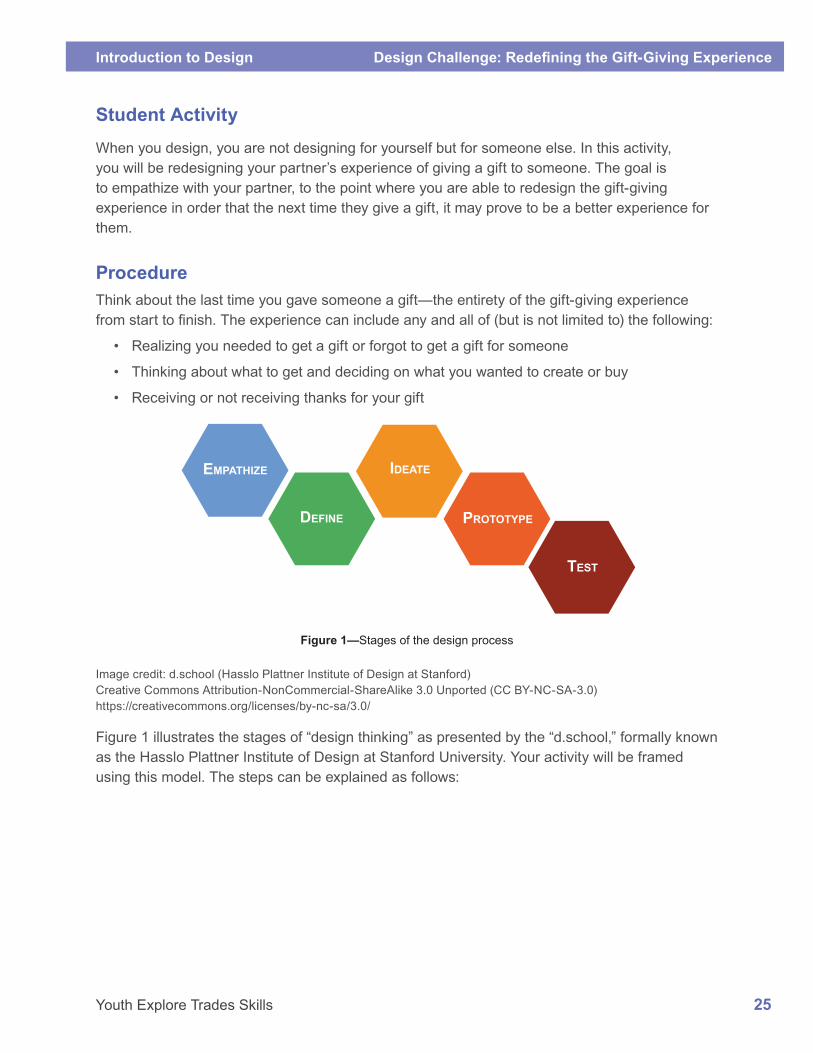
ProcedureThink about the last time you gave someone a gift—the entirety of the gift-giving experience from start to finish. The experience can include any and all of (but is not limited to) the following:
• Realizing you needed to get a gift or forgot to get a gift for someone
• Thinking about what to get and deciding on what you wanted to create or buy
• Receiving or not receiving thanks for your gift
EMPATHIZE IDEATE
DEFINE PROTOTYPE
TEST
Figure 1—Stages of the design process
Image credit: d.school (Hasslo Plattner Institute of Design at Stanford)Creative Commons Attribution-NonCommercial-ShareAlike 3.0 Unported (CC BY-NC-SA-3.0)https://creativecommons.org/licenses/by-nc-sa/3.0/
Figure 1 illustrates the stages of “design thinking” as presented by the “d.school,” formally known as the Hasslo Plattner Institute of Design at Stanford University. Your activity will be framed using this model. The steps can be explained as follows:
Design Challenge: Redefining the Gift-Giving Experience Introduction to Design
26 Youth Explore Trades Skills
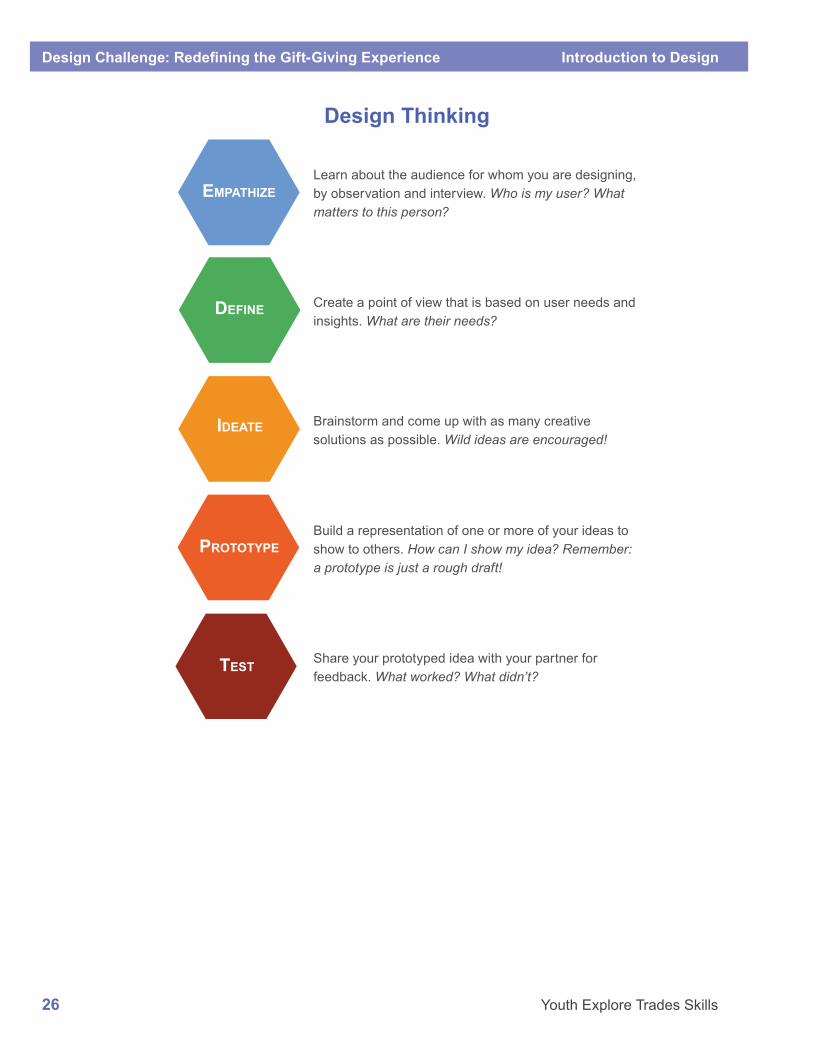
Design Thinking
EMPATHIZELearn about the audience for whom you are designing, by observation and interview. Who is my user? What matters to this person?
DEFINE Create a point of view that is based on user needs and insights. What are their needs?
IDEATE Brainstorm and come up with as many creative solutions as possible. Wild ideas are encouraged!
PROTOTYPEBuild a representation of one or more of your ideas to show to others. How can I show my idea? Remember: a prototype is just a rough draft!
TEST Share your prototyped idea with your partner for feedback. What worked? What didn’t?
Introduction to Design Design Challenge: Redefining the Gift-Giving Experience
Youth Explore Trades Skills 27
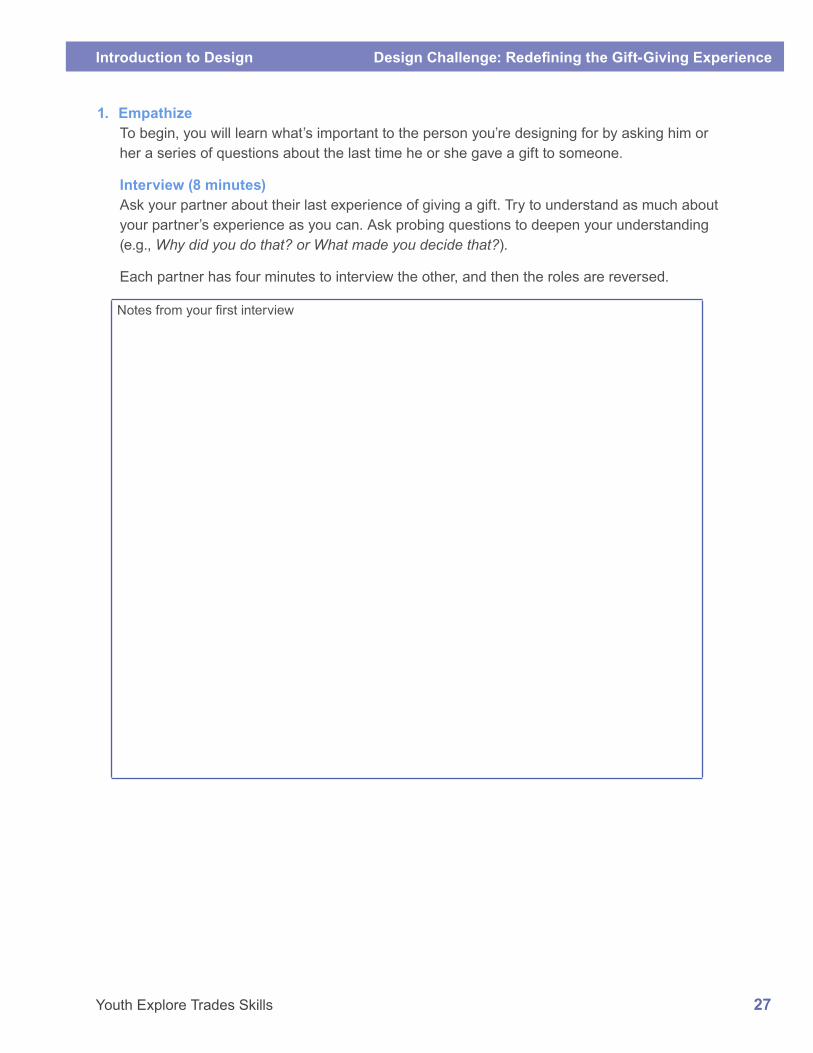
1. EmpathizeTo begin, you will learn what’s important to the person you’re designing for by asking him or her a series of questions about the last time he or she gave a gift to someone.
Interview (8 minutes)Ask your partner about their last experience of giving a gift. Try to understand as much about your partner’s experience as you can. Ask probing questions to deepen your understanding (e.g., Why did you do that? or What made you decide that?).
Each partner has four minutes to interview the other, and then the roles are reversed.
Notes from your first interview
Design Challenge: Redefining the Gift-Giving Experience Introduction to Design
28 Youth Explore Trades Skills
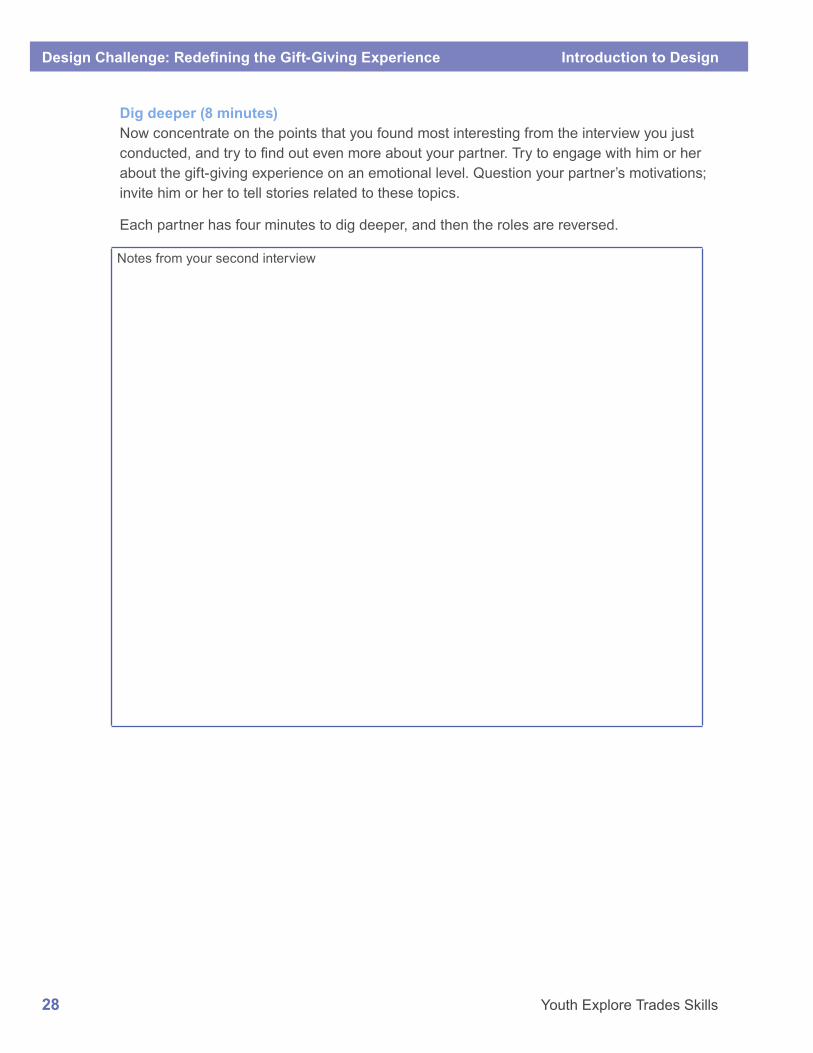
Dig deeper (8 minutes)Now concentrate on the points that you found most interesting from the interview you just conducted, and try to find out even more about your partner. Try to engage with him or her about the gift-giving experience on an emotional level. Question your partner’s motivations; invite him or her to tell stories related to these topics.
Each partner has four minutes to dig deeper, and then the roles are reversed.
Notes from your second interview

Introduction to Design Design Challenge: Redefining the Gift-Giving Experience
Youth Explore Trades Skills 29
2. DefineDuring the Define stage, you will synthesize the conversations you had with your partner to communicate a clear statement that captures his or her practical needs, as well as any insights you’ve gleaned into what’s important to them when it comes to giving gifts.
Capture findings (3 minutes)Take some time to reflect on the conversations you’ve been having with your user.
Identify needs Generate a list of the needs your partner is trying to accomplish by giving gifts (this list will usually include verbs (e.g., demonstrate gratitude, earn respect, show appreciation).
Clarify insightsInsights reveal personal information that relates to your partner’s personality. For example, maybe your partner only purchases gifts that support a local charity, which shows that they are socially engaged. Insights can tell you a lot about the person giving the gift, and not just the recipient. Insights may be inferences that you have derived from conversation with your partner, though your partner doesn’t have to have said any exact words that end up being recorded as insights—this may involve a creative leap or risk on your part.
Capture FindingsNeeds: things they are trying to do**use verbs
Insights: new learning about your partner’s feelings/worldview to leverage in your design**make inferences from what you heard
Design Challenge: Redefining the Gift-Giving Experience Introduction to Design
30 Youth Explore Trades Skills
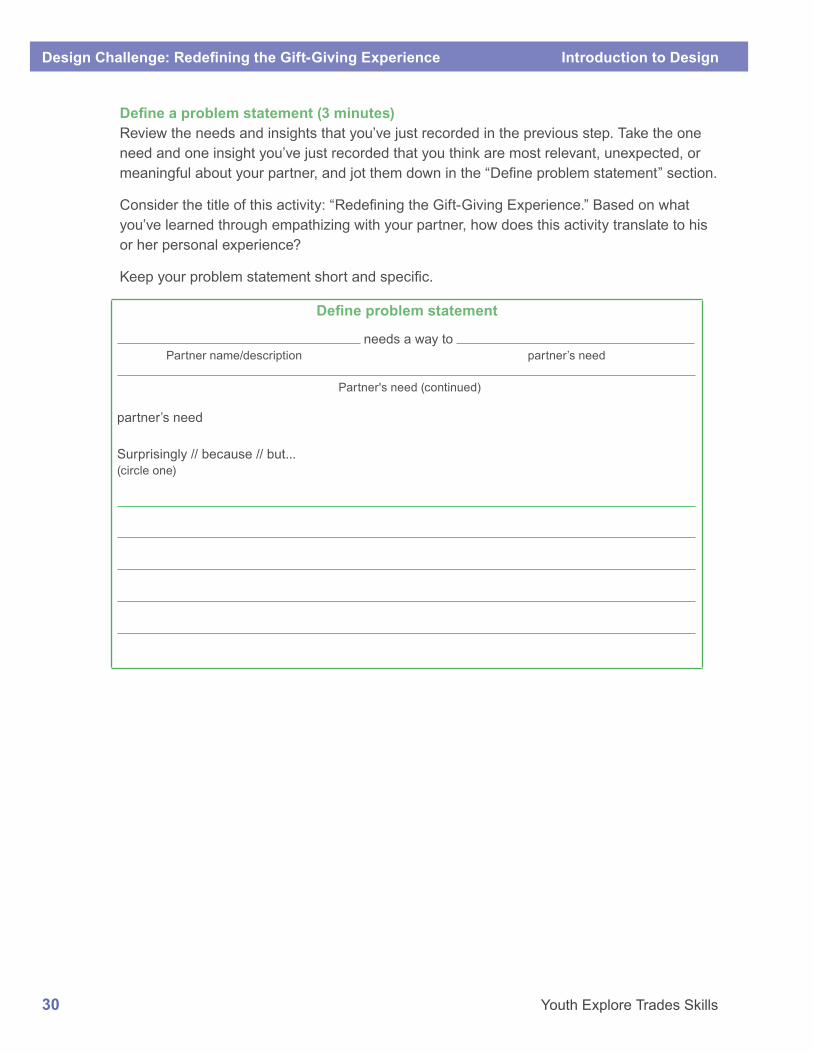
Define a problem statement (3 minutes)Review the needs and insights that you’ve just recorded in the previous step. Take the one need and one insight you’ve just recorded that you think are most relevant, unexpected, or meaningful about your partner, and jot them down in the “Define problem statement” section.
Consider the title of this activity: “Redefining the Gift-Giving Experience.” Based on what you’ve learned through empathizing with your partner, how does this activity translate to his or her personal experience?
Keep your problem statement short and specific.
Define problem statement
needs a way to Partner name/description partner’s need
Partner's need (continued)
partner’s need
Surprisingly // because // but...(circle one)
Introduction to Design Design Challenge: Redefining the Gift-Giving Experience
Youth Explore Trades Skills 31
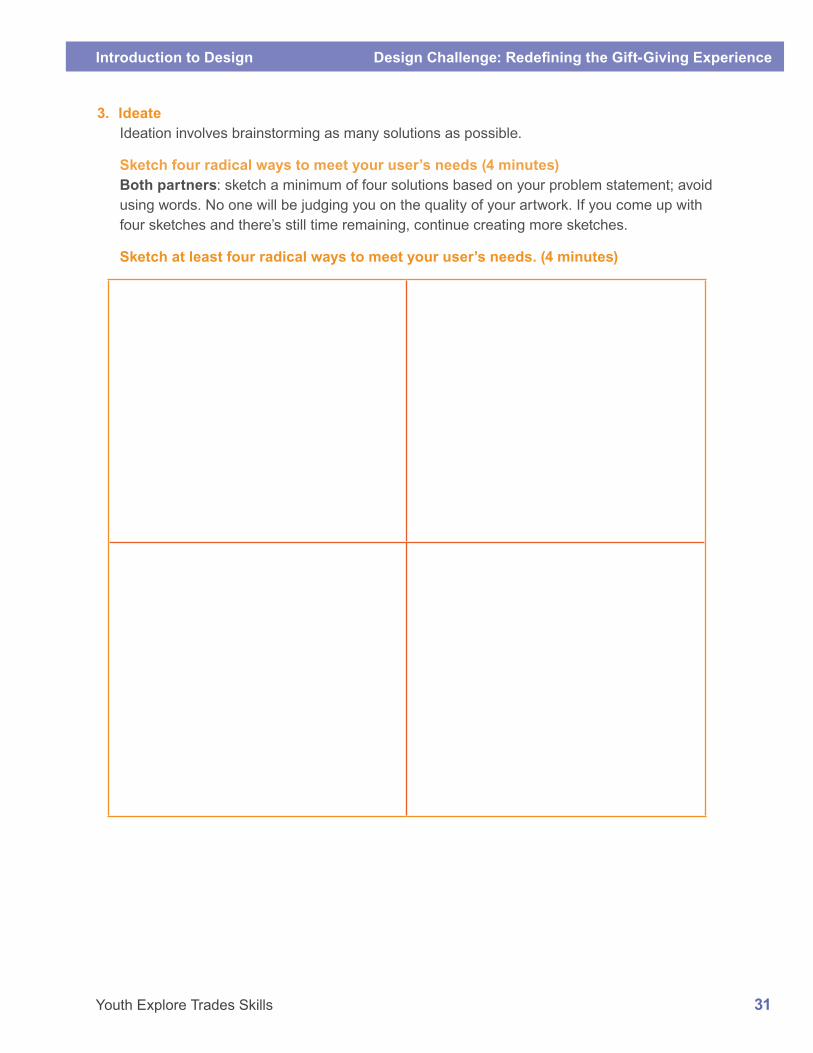
3. IdeateIdeation involves brainstorming as many solutions as possible.
Sketch four radical ways to meet your user’s needs (4 minutes)Both partners: sketch a minimum of four solutions based on your problem statement; avoid using words. No one will be judging you on the quality of your artwork. If you come up with four sketches and there’s still time remaining, continue creating more sketches.
Sketch at least four radical ways to meet your user’s needs. (4 minutes)
Design Challenge: Redefining the Gift-Giving Experience Introduction to Design
32 Youth Explore Trades Skills
4. PrototypeBuild Your Solution (10 minutes)Using the available materials, create an object that somehow represents the solution that you’ve previously identified in Step 3.
You have 10 minutes to create your prototype.
5. TestOn the basis of feedback from the prototype, how effective was this design challenge?
Share Your Solution and Get Feedback (8 minutes)Now that you’ve created your prototype, fill in the feedback grid. The goal is not to try and convince your partner that the prototype you’ve come up with is necessarily the best or only solution to the problem you’re trying to solve—instead, think of the prototype as one more point of entry into deepening the conversation around your partner’s needs. By thinking about what worked and what could be improved, and by asking questions and sharing ideas, you will learn even more about how to meet those needs.
Be sure to put your prototype in your partner’s hands and have them provide you with feedback.
After four minutes, be sure to switch roles with your partner.
Introduction to Design Design Challenge: Redefining the Gift-Giving Experience
Youth Explore Trades Skills 33
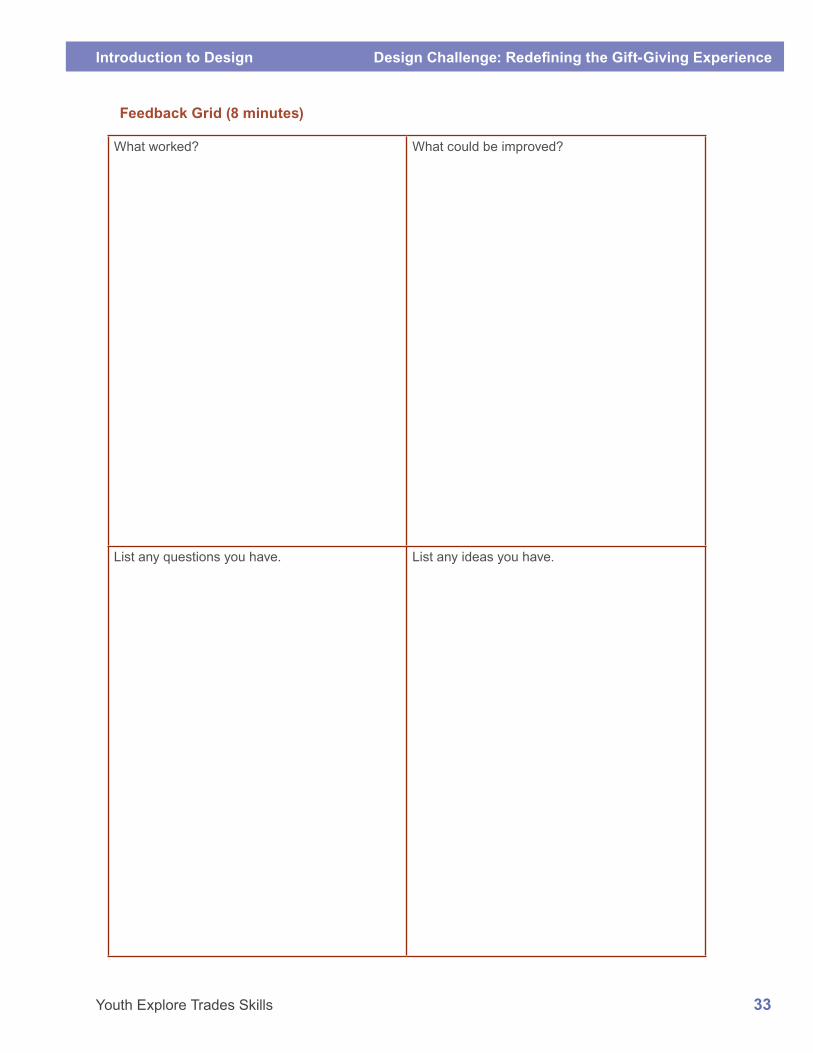
Feedback Grid (8 minutes)
What worked? What could be improved?
List any questions you have. List any ideas you have.
Design Challenge: Redefining the Gift-Giving Experience Introduction to Design
34 Youth Explore Trades Skills
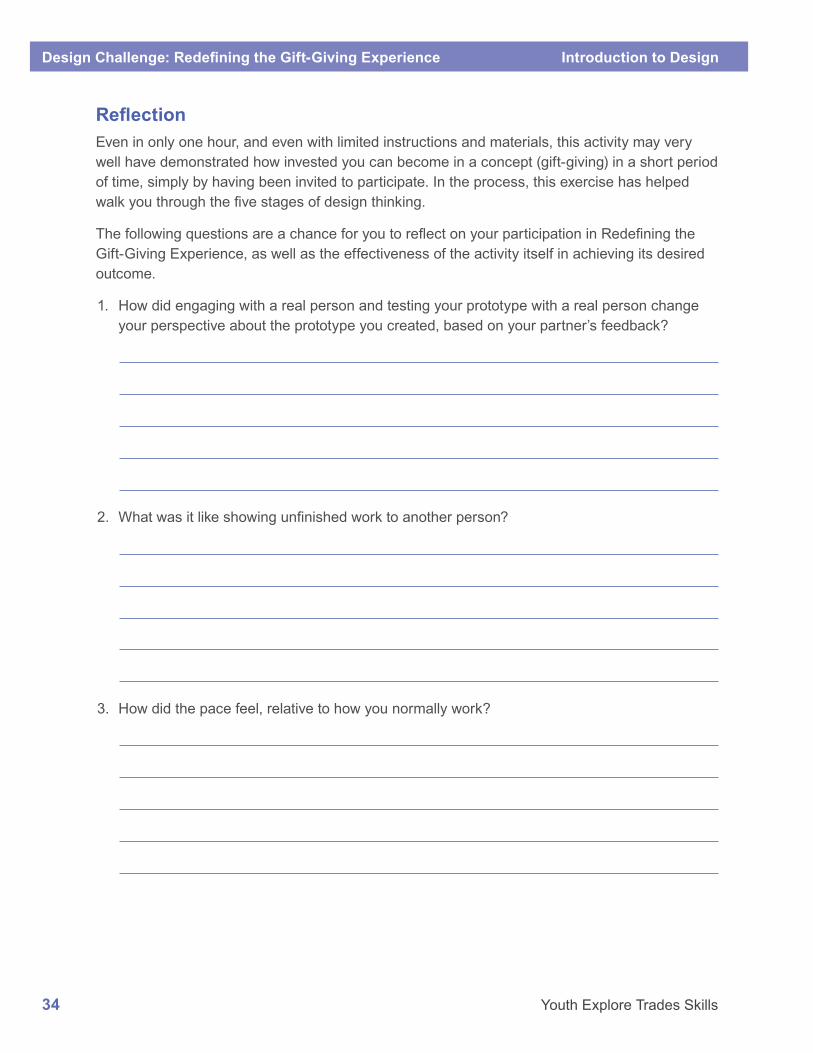
ReflectionEven in only one hour, and even with limited instructions and materials, this activity may very well have demonstrated how invested you can become in a concept (gift-giving) in a short period of time, simply by having been invited to participate. In the process, this exercise has helped walk you through the five stages of design thinking.
The following questions are a chance for you to reflect on your participation in Redefining the Gift-Giving Experience, as well as the effectiveness of the activity itself in achieving its desired outcome.
1. How did engaging with a real person and testing your prototype with a real person change your perspective about the prototype you created, based on your partner’s feedback?
2. What was it like showing unfinished work to another person?
3. How did the pace feel, relative to how you normally work?
Introduction to Design Design Challenge: Redefining the Gift-Giving Experience
Youth Explore Trades Skills 35
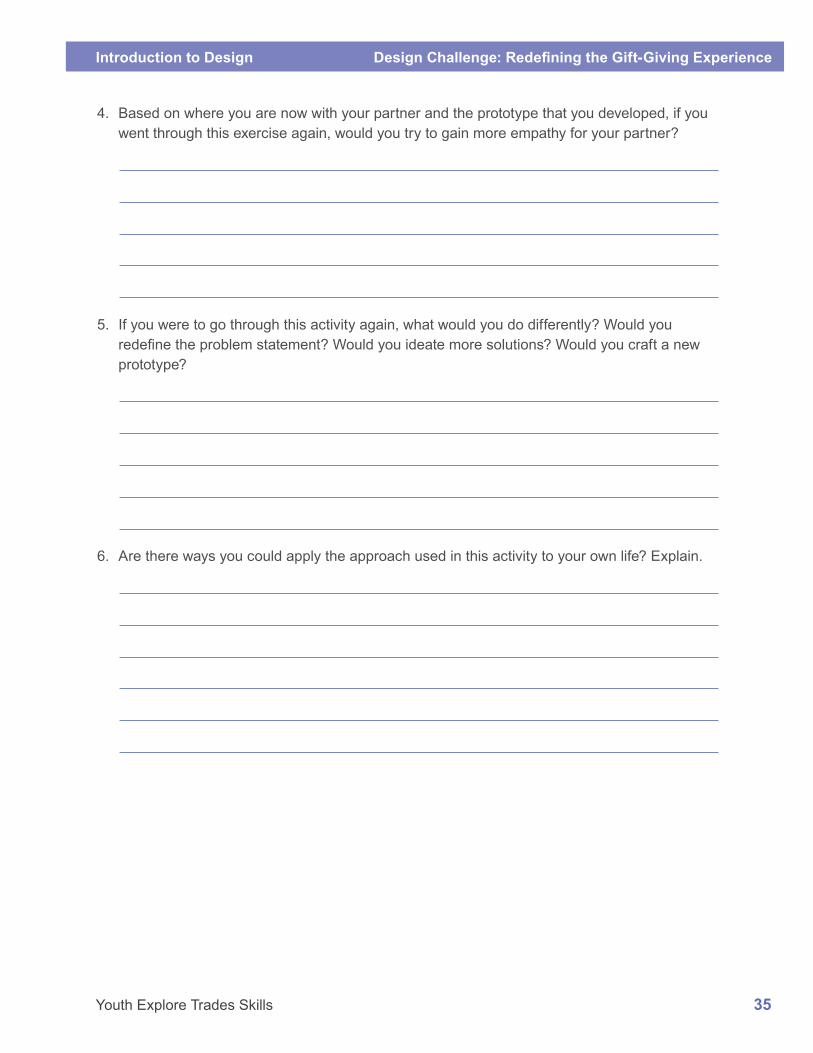
4. Based on where you are now with your partner and the prototype that you developed, if you went through this exercise again, would you try to gain more empathy for your partner?
5. If you were to go through this activity again, what would you do differently? Would you redefine the problem statement? Would you ideate more solutions? Would you craft a new prototype?
6. Are there ways you could apply the approach used in this activity to your own life? Explain.

Design Challenge: Redefining the Gift-Giving Experience Introduction to Design
36 Youth Explore Trades Skills
This work is licensed under a Creative Commons Attribution-NonCommercial-ShareAlike 4.0 International License unless otherwise indicated.
Youth Explore Trades Skills Introduction to Design
37
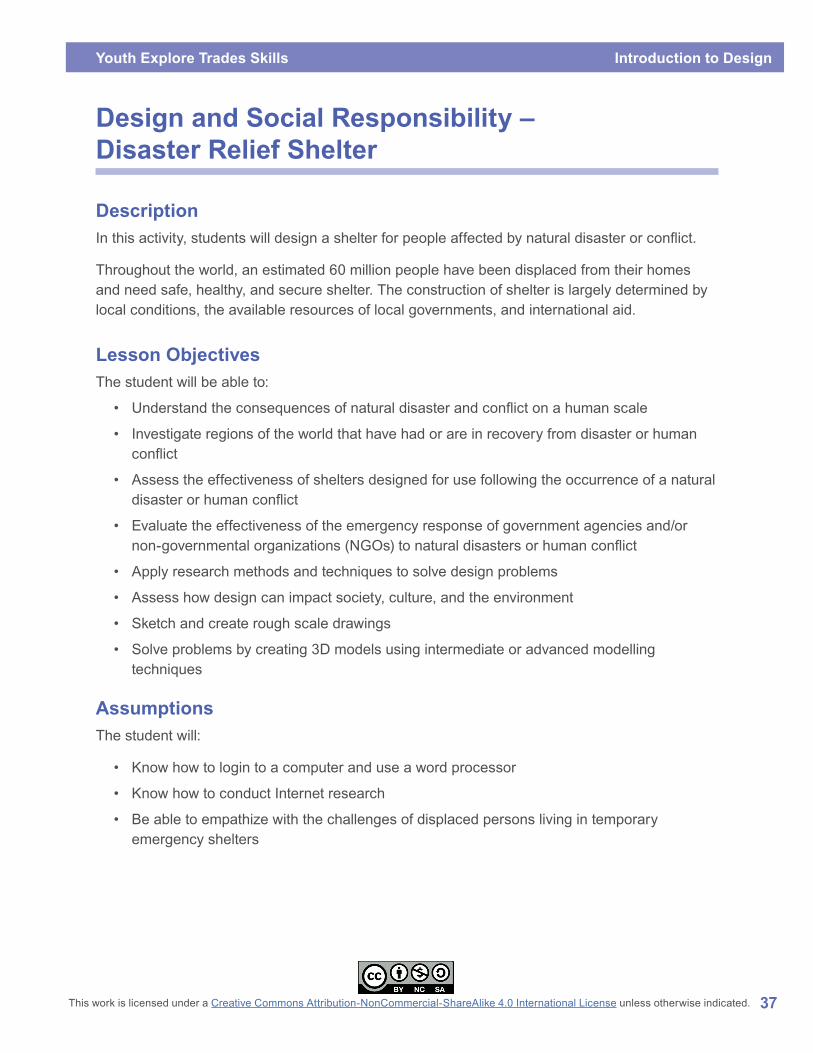
Design and Social Responsibility – Disaster Relief Shelter
DescriptionIn this activity, students will design a shelter for people affected by natural disaster or conflict.
Throughout the world, an estimated 60 million people have been displaced from their homes and need safe, healthy, and secure shelter. The construction of shelter is largely determined by local conditions, the available resources of local governments, and international aid.
Lesson ObjectivesThe student will be able to:
• Understand the consequences of natural disaster and conflict on a human scale
• Investigate regions of the world that have had or are in recovery from disaster or human conflict
• Assess the effectiveness of shelters designed for use following the occurrence of a natural disaster or human conflict
• Evaluate the effectiveness of the emergency response of government agencies and/or non-governmental organizations (NGOs) to natural disasters or human conflict
• Apply research methods and techniques to solve design problems
• Assess how design can impact society, culture, and the environment
• Sketch and create rough scale drawings
• Solve problems by creating 3D models using intermediate or advanced modelling techniques
AssumptionsThe student will:
• Know how to login to a computer and use a word processor
• Know how to conduct Internet research
• Be able to empathize with the challenges of displaced persons living in temporary emergency shelters
Design and Social Responsibility – Disaster Relief Shelter Introduction to Design
38 Youth Explore Trades Skills
TerminologyNatural disaster: a natural event such as a flood, earthquake, tornado, volcanic eruption, or hurricane that causes loss of life and/or extensive physical damage to natural or human-made environments.
Non-Governmental Organization (NGO): any non-profit, voluntary citizens' group organized on a local, national, or international level.
Scale: a ratio of the length of a drawn object relative to its length in “real space.” A proportional representation of an object either reduced or enlarged.
Social responsibility: the moral position that organizations and individuals ought to adopt for the benefit of society at large.
War: a conflict carried out by force of arms, between nations or between parties within a nation. Warfare can occur on land, in the sea, or in the air.
Estimated Time4 hours
Recommended Number of Students20, based on the BC Technology Educators’ Best Practice Guide
FacilitiesComputer lab installed with CAD software (Google SketchUp, AutoCAD, CADopia, Vectorworks, etc.)
Tools• Computer with projector and speakers, installed with CAD software and Internet access
• Printer
Materials• Student activity handout with instructions (see “Student Activity Sheet—Design a
Temporary Emergency Shelter”)
• Minimum 8.5" × 11" paper for sketching
• Modelling materials: cardboard, commercial modelling boards, white glue, glue sticks, balsa wood, popsicle sticks, material of sufficient size to accommodate the model
• Student-sourced materials such as plastic, small replica solar panels for lighting, and other materials to enhance the model for realism
Introduction to Design Design and Social Responsibility – Disaster Relief Shelter
Youth Explore Trades Skills 39
Resources“Design and Social Responsibility by William Mangold” (The People, Place, and Space Reader)There are a number of terms related to design and social responsibility that also address similar interests: design activism, public interest design, human-centred design, social impact design, and social design. This website includes a comprehensive reading list on the subject. http://peopleplacespace.org/frr/design-and-social-responsibility/
How to Build a Perfect Refugee Camp (New York Times)http://www.nytimes.com/2014/02/16/magazine/how-to-build-a-perfect-refugee-camp.html?_r=1
IKEA Flat-Pack Refugee / Emergency Shelterhttp://inhabitat.com/ikeas-solar-powered-flat-pack-refugee-shelters-offer-easily-deployable-emergency-housing/ikea-refugee-shelter2/
United Nations Office for Project Services (UNOPS)This website may help increase understanding of the level of complexity involved in coordinating large-scale humanitarian development projects, particularly regarding project management, procurement, and infrastructure considerations.https://www.unops.org/english/Services/Pages/default.aspx
Stackable Emergency Sheltershttp://inhabitat.com/help-reaction-housing-send-stackable-exo-emergency-shelters-to-refugees-in-syria/
UNHCR Innovative Shelter Solutions through Research and Developmenthttp://www.unhcr.org/protection/basic/5638cc0b9/innovative-shelter-solutions-research-development.html
Teacher-led Activity1. Begin by brainstorming with students the minimum requirements for adequate living
conditions and how these requirements might differ depending on climate, geography, topography, and other environmental considerations.
2. Discuss the causes of displacement, whether natural or produced by humans. You may wish to explore any of the following topics:
• Investigate areas of the world where people are in distress.
• Conduct a Google image search for “refugee shelters” to compare designs.
• Discuss cultural considerations that might impact how shelters are constructed and organized.
• Discuss the ideal number of people per shelter; determine the shelter size accordingly.
• Discuss the range of building materials that can be sourced from both local and foreign aid services and how these materials may differ depending on environmental conditions (i.e., mountainous regions, deserts).
Design and Social Responsibility – Disaster Relief Shelter Introduction to Design
40 Youth Explore Trades Skills
• Demonstrate sketching and the use of scale in the sketch.
• Discuss modelling and ideally have a premade model you can show to the class.
• Explain possible connections between designing disaster relief facilities and the disciplines of landscape architecture and urban design.
Teacher-led Extension Activities• Have local emergency preparedness representatives visit the class to discuss
considerations around providing temporary shelter.
• Conduct a field trip to an emergency services warehouse.
• Have students produce a CAD drawing of their shelter sketch, using appropriate software. Consider using a simulation program (e.g., Autodesk Flow Design, a virtual wind tunnel simulation software application) to test the shelter design under extreme weather conditions.
Student ActivityStudents will follow the “Student Activity Sheet—Design a Temporary Emergency Shelter.” With a partner or in small groups the students will determine an emergency scenario and the reaction by the population to the displacement. They will then research shelter solutions, ideate and draw several proposed shelter solutions, and build one scale model of their best solution.
Extension Activities for Students • Draw the shelter design in a Computer Assisted Drafting (CAD) program.
• Build the actual shelter full size so it could conceivably be disassembled and shipped. This could be either donated for actual emergency preparedness (assessed for utility by emergency services) or sold as a storage shed.
AssessmentThe following scale may be used for the purposes of evaluation, in conjunction with the rubric found below. The rubric may be used to conduct teacher-led assessment, peer assessment, and/or individual assessment.
Beginning Attempted, but criteria not completed to satisfaction
Developing Attempted successfully at the minimum level
Accomplished Completed successfully at a higher than satisfactory level
Exemplary Completed successfully at an exceptional level
Introduction to Design Design and Social Responsibility – Disaster Relief Shelter
Youth Explore Trades Skills 41
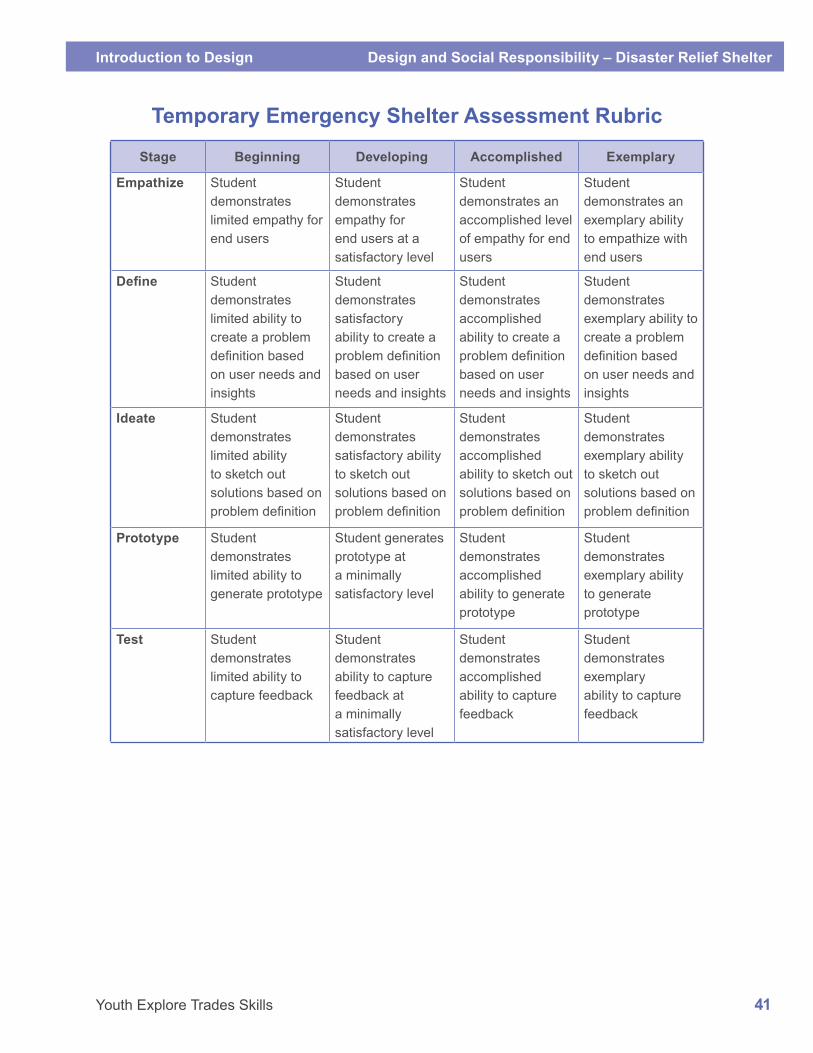
Temporary Emergency Shelter Assessment Rubric
Stage Beginning Developing Accomplished Exemplary
Empathize Student demonstrates limited empathy for end users
Student demonstrates empathy for end users at a satisfactory level
Student demonstrates an accomplished level of empathy for end users
Student demonstrates an exemplary ability to empathize with end users
Define Student demonstrates limited ability to create a problem definition based on user needs and insights
Student demonstrates satisfactory ability to create a problem definition based on user needs and insights
Student demonstrates accomplished ability to create a problem definition based on user needs and insights
Student demonstrates exemplary ability to create a problem definition based on user needs and insights
Ideate Student demonstrates limited ability to sketch out solutions based on problem definition
Student demonstrates satisfactory ability to sketch out solutions based on problem definition
Student demonstrates accomplished ability to sketch out solutions based on problem definition
Student demonstrates exemplary ability to sketch out solutions based on problem definition
Prototype Student demonstrates limited ability to generate prototype
Student generates prototype at a minimally satisfactory level
Student demonstrates accomplished ability to generate prototype
Student demonstrates exemplary ability to generate prototype
Test Student demonstrates limited ability to capture feedback
Student demonstrates ability to capture feedback at a minimally satisfactory level
Student demonstrates accomplished ability to capture feedback
Student demonstrates exemplary ability to capture feedback
Design and Social Responsibility – Disaster Relief Shelter Introduction to Design
42 Youth Explore Trades Skills
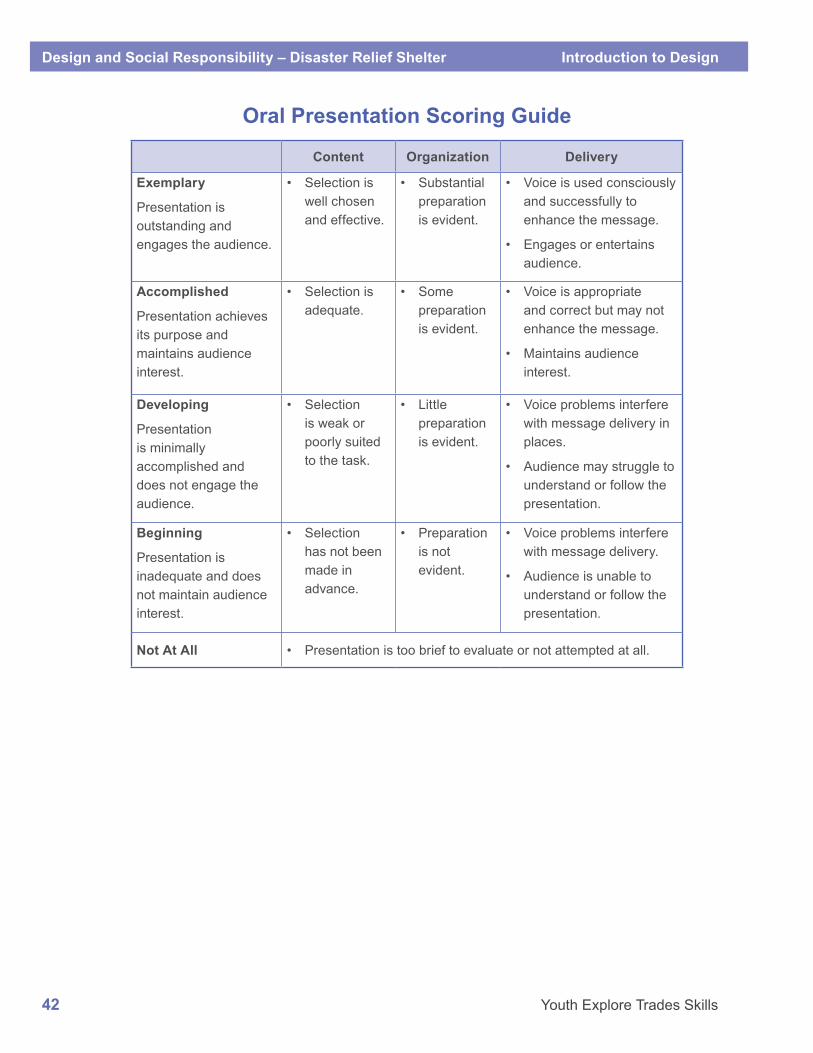
Oral Presentation Scoring Guide
Content Organization Delivery
Exemplary
Presentation is outstanding and engages the audience.
• Selection is well chosen and effective.
• Substantial preparation is evident.
• Voice is used consciously and successfully to enhance the message.
• Engages or entertains audience.
Accomplished
Presentation achieves its purpose and maintains audience interest.
• Selection is adequate.
• Some preparation is evident.
• Voice is appropriate and correct but may not enhance the message.
• Maintains audience interest.
Developing
Presentation is minimally accomplished and does not engage the audience.
• Selection is weak or poorly suited to the task.
• Little preparation is evident.
• Voice problems interfere with message delivery in places.
• Audience may struggle to understand or follow the presentation.
Beginning
Presentation is inadequate and does not maintain audience interest.
• Selection has not been made in advance.
• Preparation is not evident.
• Voice problems interfere with message delivery.
• Audience is unable to understand or follow the presentation.
Not At All • Presentation is too brief to evaluate or not attempted at all.
Introduction to Design Design and Social Responsibility – Disaster Relief Shelter
Youth Explore Trades Skills 43
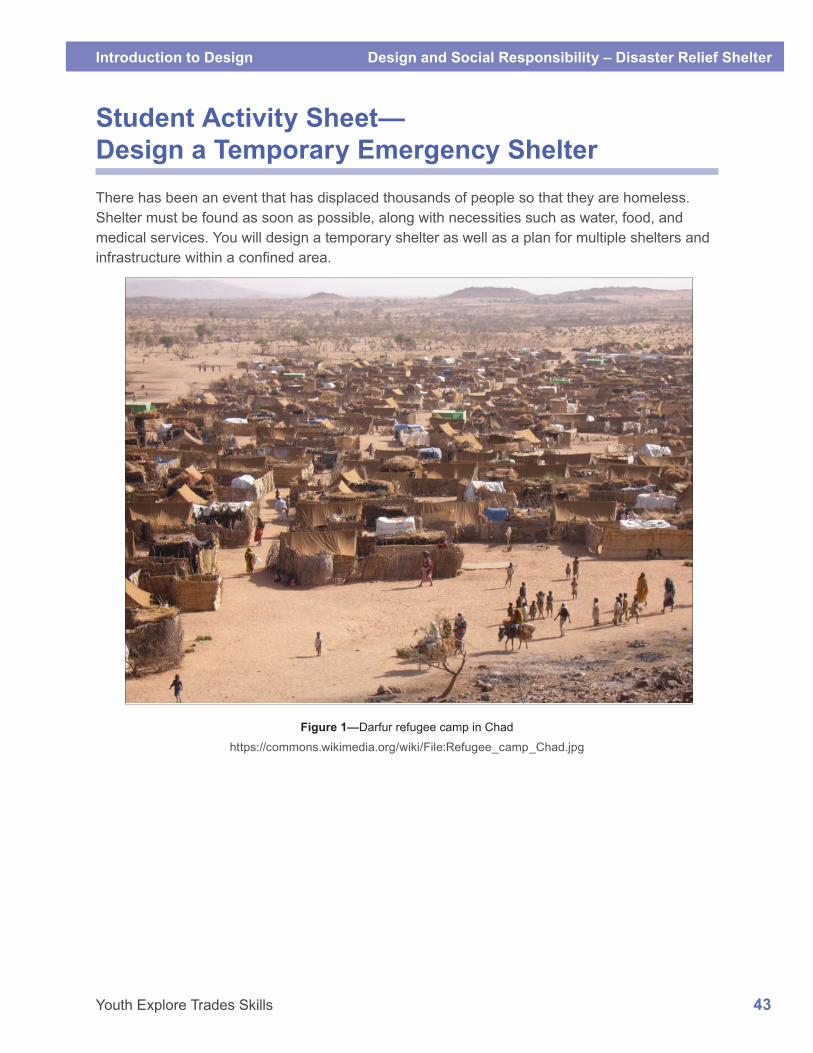
Student Activity Sheet— Design a Temporary Emergency ShelterThere has been an event that has displaced thousands of people so that they are homeless. Shelter must be found as soon as possible, along with necessities such as water, food, and medical services. You will design a temporary shelter as well as a plan for multiple shelters and infrastructure within a confined area.
Figure 1—Darfur refugee camp in Chad
https://commons.wikimedia.org/wiki/File:Refugee_camp_Chad.jpg
Design and Social Responsibility – Disaster Relief Shelter Introduction to Design
44 Youth Explore Trades Skills
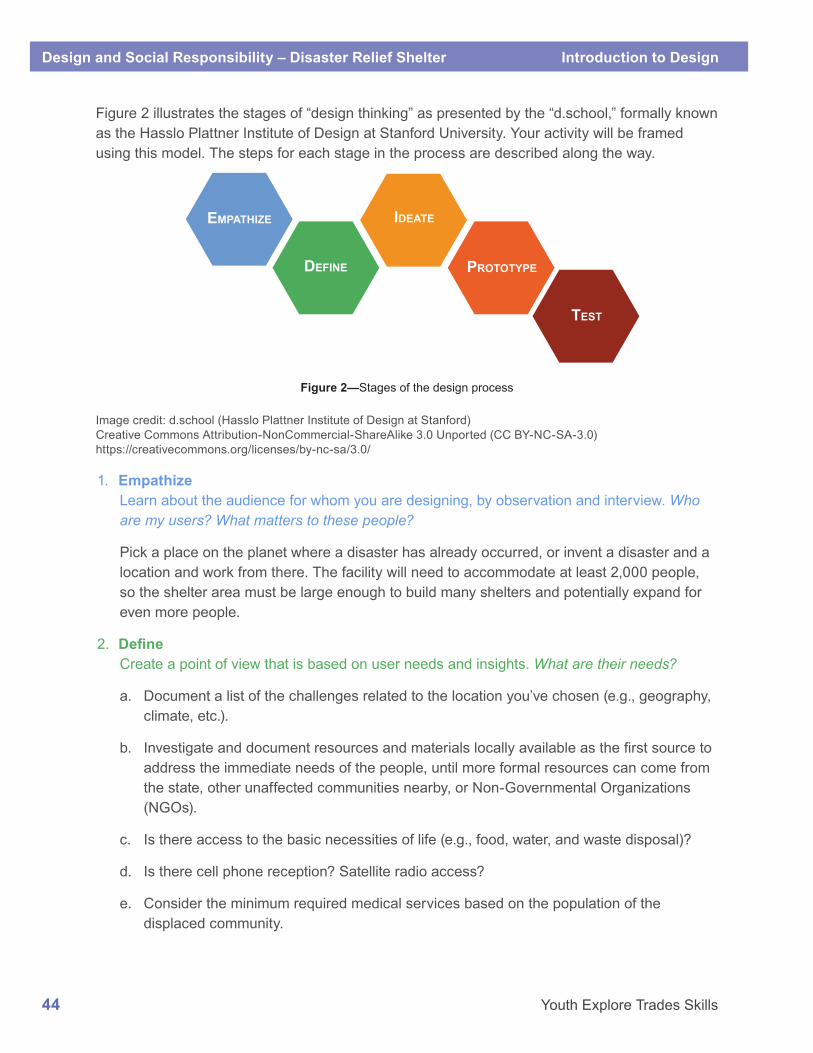
Figure 2 illustrates the stages of “design thinking” as presented by the “d.school,” formally known as the Hasslo Plattner Institute of Design at Stanford University. Your activity will be framed using this model. The steps for each stage in the process are described along the way.
EMPATHIZE IDEATE
DEFINE PROTOTYPE
TEST
Figure 2—Stages of the design process
Image credit: d.school (Hasslo Plattner Institute of Design at Stanford)Creative Commons Attribution-NonCommercial-ShareAlike 3.0 Unported (CC BY-NC-SA-3.0)https://creativecommons.org/licenses/by-nc-sa/3.0/
1. EmpathizeLearn about the audience for whom you are designing, by observation and interview. Who are my users? What matters to these people?
Pick a place on the planet where a disaster has already occurred, or invent a disaster and a location and work from there. The facility will need to accommodate at least 2,000 people, so the shelter area must be large enough to build many shelters and potentially expand for even more people.
2. DefineCreate a point of view that is based on user needs and insights. What are their needs?
a. Document a list of the challenges related to the location you’ve chosen (e.g., geography, climate, etc.).
b. Investigate and document resources and materials locally available as the first source to address the immediate needs of the people, until more formal resources can come from the state, other unaffected communities nearby, or Non-Governmental Organizations (NGOs).
c. Is there access to the basic necessities of life (e.g., food, water, and waste disposal)?
d. Is there cell phone reception? Satellite radio access?
e. Consider the minimum required medical services based on the population of the displaced community.
Introduction to Design Design and Social Responsibility – Disaster Relief Shelter
Youth Explore Trades Skills 45
3. IdeateBrainstorm and come up with as many creative solutions as possible.
Design a shelter that can accommodate at least six people and a few belongings.
a. Sketch out shapes and sizes of shelters, considering rain and/or snow and wind resistance.
b. Consider standard dimensions for cot sizes, toilets, a table and counter surface area (with a sink), etc.
4. Prototype Build a representation of one or more of your ideas to show to others. How can I show my idea? Remember: a prototype is just a rough draft!
a. Build a scale model of one shelter that will fit on a letter-sized piece of cardboard.
b. Build a model to a smaller scale on a larger piece of cardboard that includes an array of shelters organized into a “neighbourhood.” The model should include:
• The shelters
• Water stations
• Latrines
• A common place for social gathering
• Electrical power source(s)
• Government and NGO contact centre
• A medical station
• A food distribution station
• Roadways to connect to other areas, city centres, villages
5. TestShare your prototyped idea with your class to explain your “disaster” and the reasons for your solutions to the various challenges.
Present your model along with your design sketches to your class. Based on feedback from the class, what elements of your design are effective? What elements can be improved?

Design and Social Responsibility – Disaster Relief Shelter Introduction to Design
46 Youth Explore Trades Skills
This work is licensed under a Creative Commons Attribution-NonCommercial-ShareAlike 4.0 International License unless otherwise indicated.
Youth Explore Trades Skills Design–Information Handouts
47
Problem-Solving Models To develop decision-making and problem-solving skills, students need to be challenged to identify problems and develop solutions. The problems students identify or are assigned in technology education involve improving existing products and systems, as well as designing and developing new ones. Models that describe problem-solving processes should be developed with students so they understand the recurring nature of solving real-world problems (as part of a problem is solved, new problems arise and some steps in the processes recur).
The following diagrams present a variety of approaches to describe problem solving in technology education. They are intended to provide teachers with ideas; they are not prescribed models.
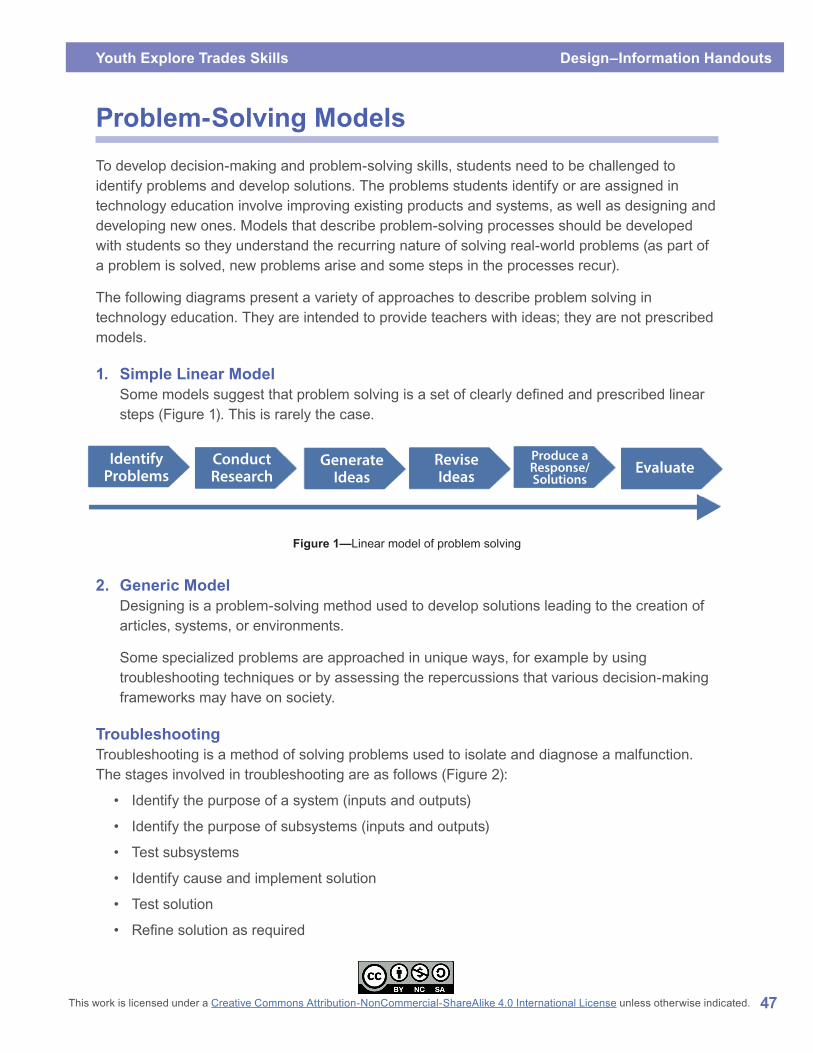
1. Simple Linear ModelSome models suggest that problem solving is a set of clearly defined and prescribed linear steps (Figure 1). This is rarely the case.
IdentifyProblems
ConductResearch
GenerateIdeas
Produce aResponse/Solutions
EvaluateReviseIdeas
Figure 1—Linear model of problem solving
2. Generic ModelDesigning is a problem-solving method used to develop solutions leading to the creation of articles, systems, or environments.
Some specialized problems are approached in unique ways, for example by using troubleshooting techniques or by assessing the repercussions that various decision-making frameworks may have on society.
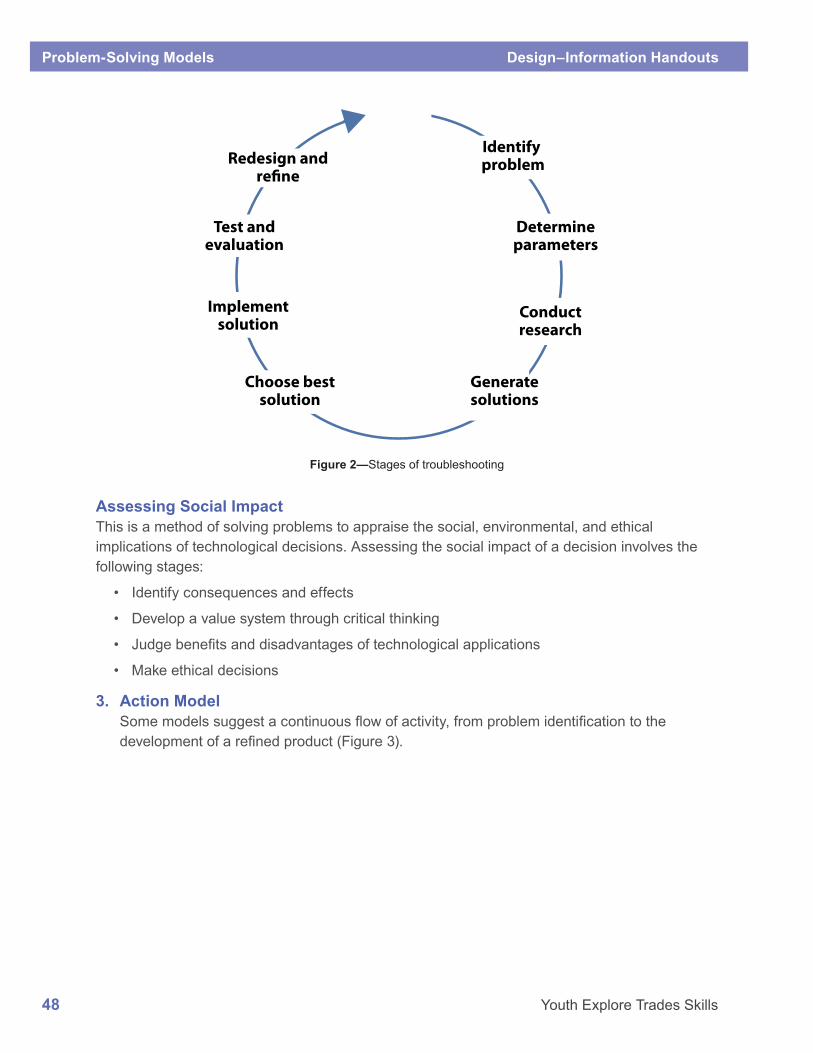
TroubleshootingTroubleshooting is a method of solving problems used to isolate and diagnose a malfunction. The stages involved in troubleshooting are as follows (Figure 2):
• Identify the purpose of a system (inputs and outputs)
• Identify the purpose of subsystems (inputs and outputs)
• Test subsystems
• Identify cause and implement solution
• Test solution
• Refine solution as required
Problem-Solving Models Design–Information Handouts
48 Youth Explore Trades Skills
Determineparameters
Identify problem
Conductresearch
Generatesolutions
Implementsolution
Test andevaluation
Redesign andre�ne
Choose bestsolution
Figure 2—Stages of troubleshooting
Assessing Social ImpactThis is a method of solving problems to appraise the social, environmental, and ethical implications of technological decisions. Assessing the social impact of a decision involves the following stages:
• Identify consequences and effects
• Develop a value system through critical thinking
• Judge benefits and disadvantages of technological applications
• Make ethical decisions
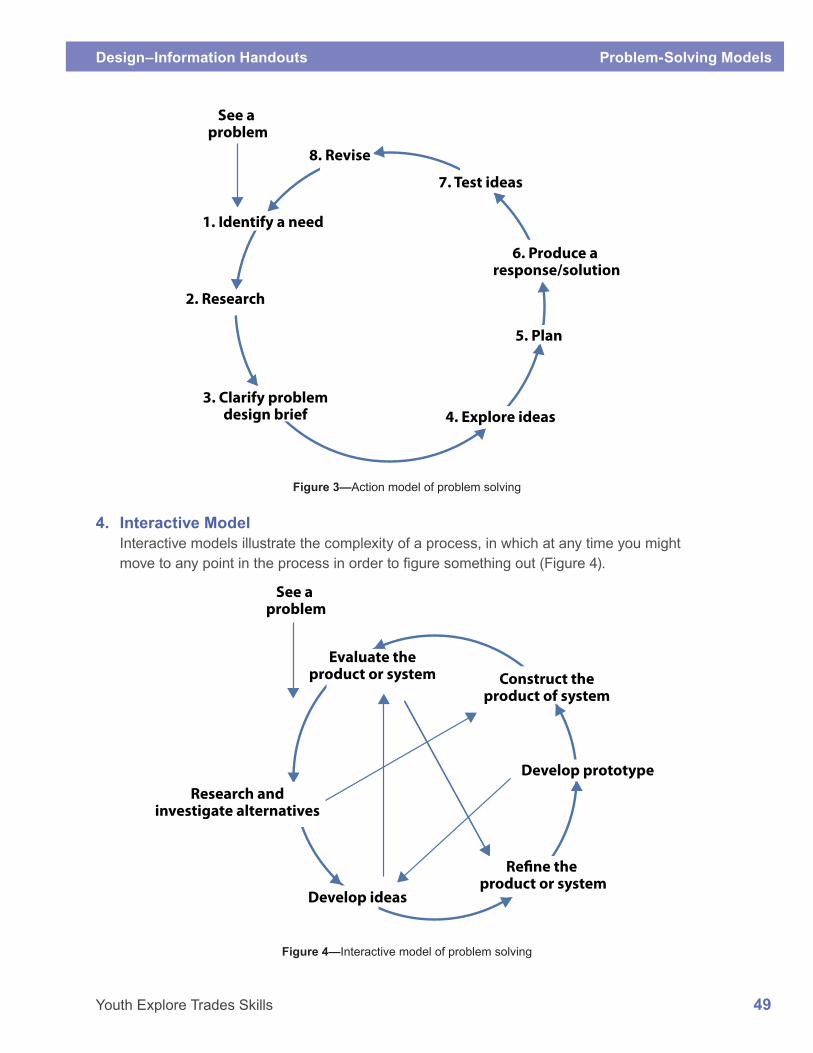
3. Action ModelSome models suggest a continuous flow of activity, from problem identification to the development of a refined product (Figure 3).
Design–Information Handouts Problem-Solving Models
Youth Explore Trades Skills 49
2. Research
1. Identify a need
5. Plan
4. Explore ideas
8. Revise
3. Clarify problemdesign brief
6. Produce a response/solution
7. Test ideas
See a problem
Figure 3—Action model of problem solving
4. Interactive ModelInteractive models illustrate the complexity of a process, in which at any time you might move to any point in the process in order to figure something out (Figure 4).
Research andinvestigate alternatives
Evaluate theproduct or system
Re�ne the product or system
Develop ideas
Construct theproduct of system
Develop prototype
See a problem
Figure 4—Interactive model of problem solving
Problem-Solving Models Design–Information Handouts
50 Youth Explore Trades Skills
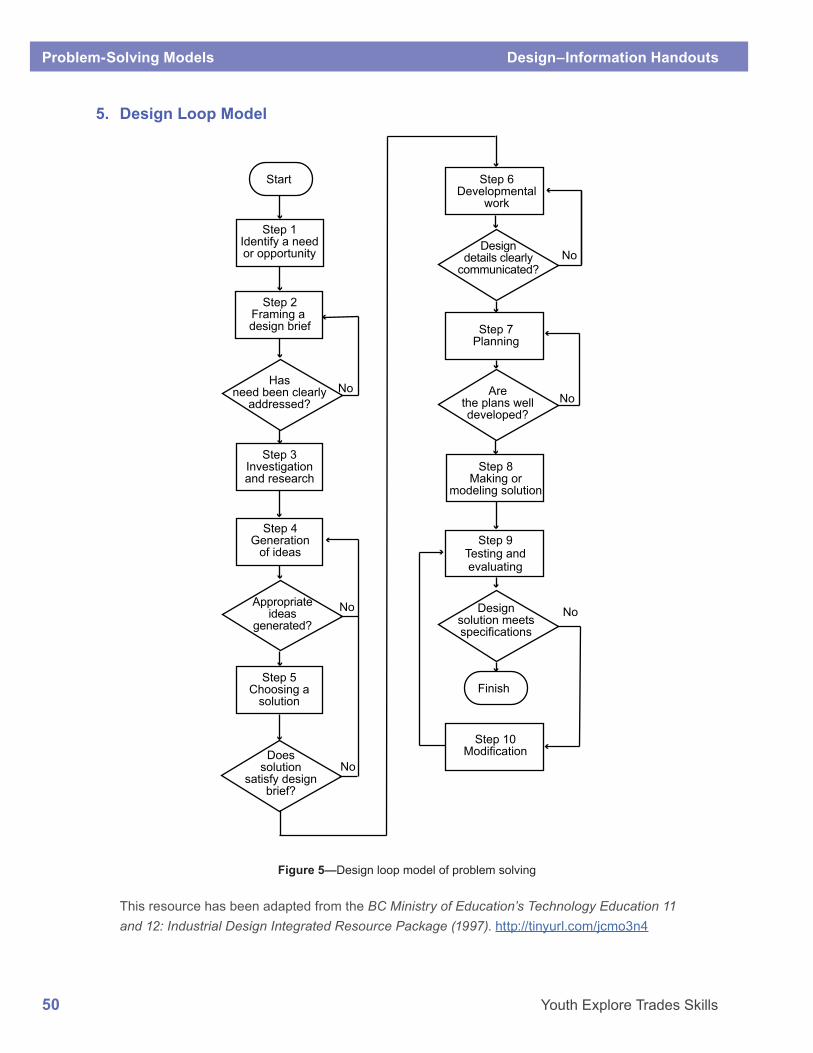
5. Design Loop Model
Start
No
No
No
No No
No
Finish
Step 1Identify a needor opportunity
Step 2Framing a design brief
Hasneed been clearly
addressed?
Step 3Investigationand research
Step 4Generation
of ideas
Appropriateideas
generated?
Step 5Choosing a
solution
Doessolution
satisfy designbrief?
Step 10Modification
Designsolution meetsspecifications
Step 9Testing andevaluating
Step 8Making or
modeling solution
Arethe plans welldeveloped?
Step 7Planning
Designdetails clearly
communicated?
Step 6Developmental
work
Figure 5—Design loop model of problem solving
This resource has been adapted from the BC Ministry of Education’s Technology Education 11 and 12: Industrial Design Integrated Resource Package (1997). http://tinyurl.com/jcmo3n4
This work is licensed under a Creative Commons Attribution-NonCommercial-ShareAlike 4.0 International License unless otherwise indicated.
Youth Explore Trades Skills Design–Information Handouts
51
The Design Process in Manufacturing
ProductDevelopment
ResearchProblems
MaterialsProcessingSketchesDrawings
QualityFunctionPerformanceModi�cation
OrganizeManufacturing
Process
MachinesHand/Power Tools
Material LayoutShaping & Forming
ProcessesFinishing
Safety
Identify NeedsDesigning
Eval
uatin
g
Making Planning
Figure 1—Stages of the design process in product development
Within the manufacturing sector, the design process for product development generally includes the following stages:
Identify needsThis stage involves researching the problems that the design process is intended to solve.
DesignThe design phase includes processing information identified in the preliminary stages of the process, leading to ideation—the identification of materials that may be used to eventually create solutions—and the development of initial sketches and drawings to pave the way for further innovation.
The Design Process in Manufacturing Design–Information Handouts
52 Youth Explore Trades Skills
PlanThe planning stage involves a more formal organization of ideas to reflect the eventual prototyping of materials, in accordance with manufacturing processes and standards.
MakeWith plans in hand, artifact prototypes are then created for testing. Material layout is followed by the use of a variety of processes, machines, and tools (including both hand and power tools) to shape, form, and finish artifacts.
EvaluateThe testing and evaluation of a prototype leads to refinement of its design or an abandonment of the original prototype in favour of an improved model. The iterative quality of design work is an essential feature of the design process.