design project 7-12 - carvewright
TRANSCRIPT
1 | P a g e
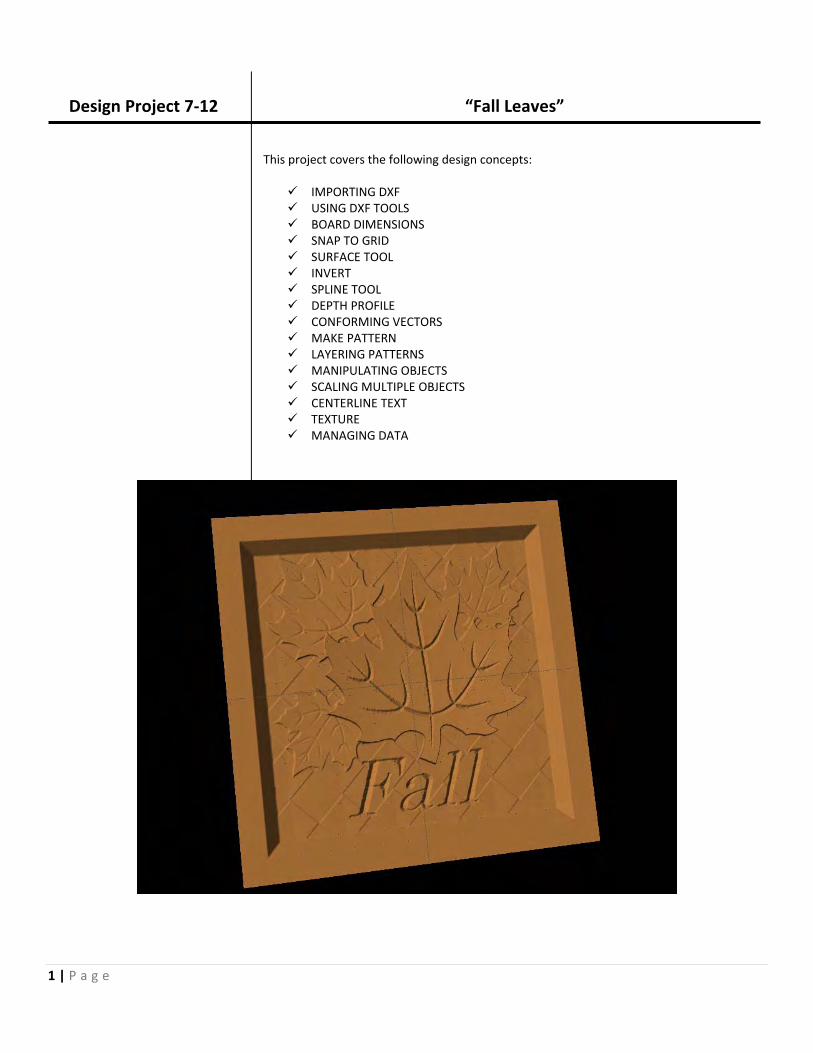
Design Project 7‐12
“Fall Leaves”
This project covers the following design concepts:
IMPORTING DXF USING DXF TOOLS BOARD DIMENSIONS SNAP TO GRID SURFACE TOOL INVERT SPLINE TOOL DEPTH PROFILE CONFORMING VECTORS MAKE PATTERN LAYERING PATTERNS MANIPULATING OBJECTS SCALING MULTIPLE OBJECTS CENTERLINE TEXT TEXTURE MANAGING DATA
2 | P a g e
INSTRUCTIONS:
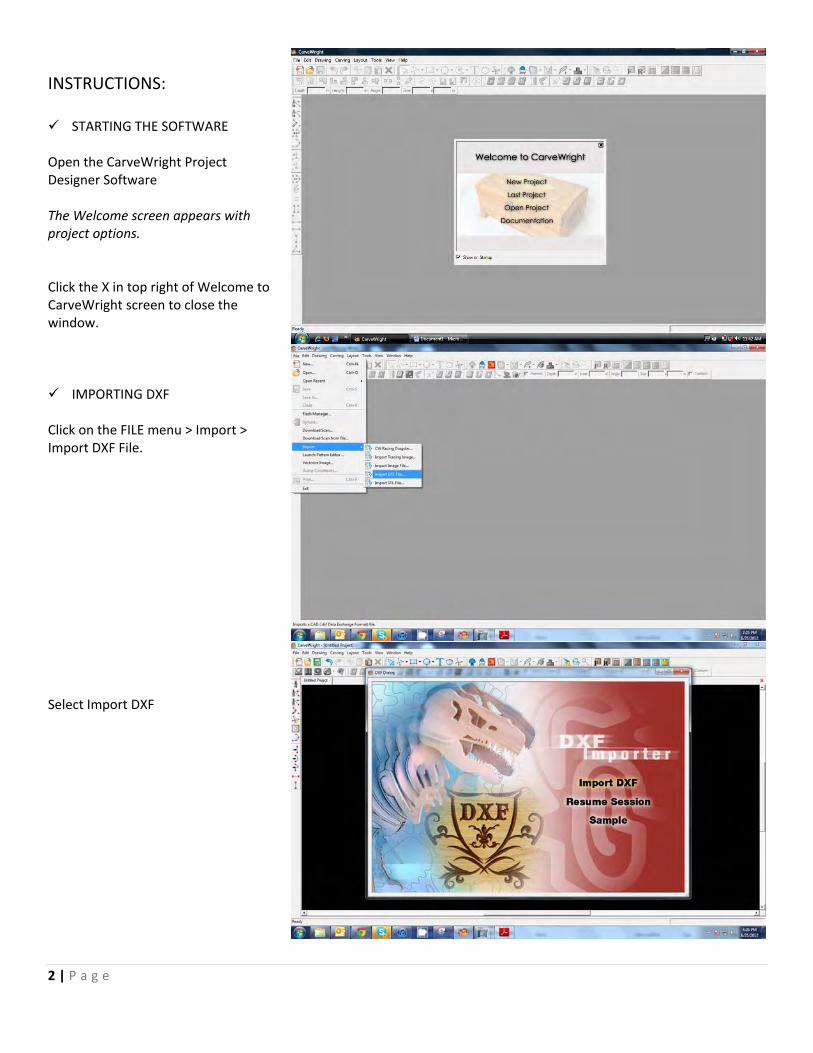
STARTING THE SOFTWARE Open the CarveWright Project Designer Software The Welcome screen appears with project options. Click the X in top right of Welcome to CarveWright screen to close the window.
IMPORTING DXF Click on the FILE menu > Import > Import DXF File.
Select Import DXF

3 | P a g e
Locate the WhiteMapleLeaf.dxf file.
DXF WARNING MESSAGE:
“Not all of the DXF file could be imported”
This is indicates that the file contains elements that are not lines and cannot be imported. Things like groups or layers are examples of these kinds of elements.
Click ok
DXF IMPORTER TOOLS The importer tools have several tabs at the bottom to assist you in manipulating the vector file or files. Click on the tabs at the bottom to see what they include. Scaling effects the overall size of the vector. Auto Connect allows you to connect lines that aren’t. Boards lets you change the size of your work area. Shapes provides a way for you to manipulate and arrange your vectors.
4 | P a g e
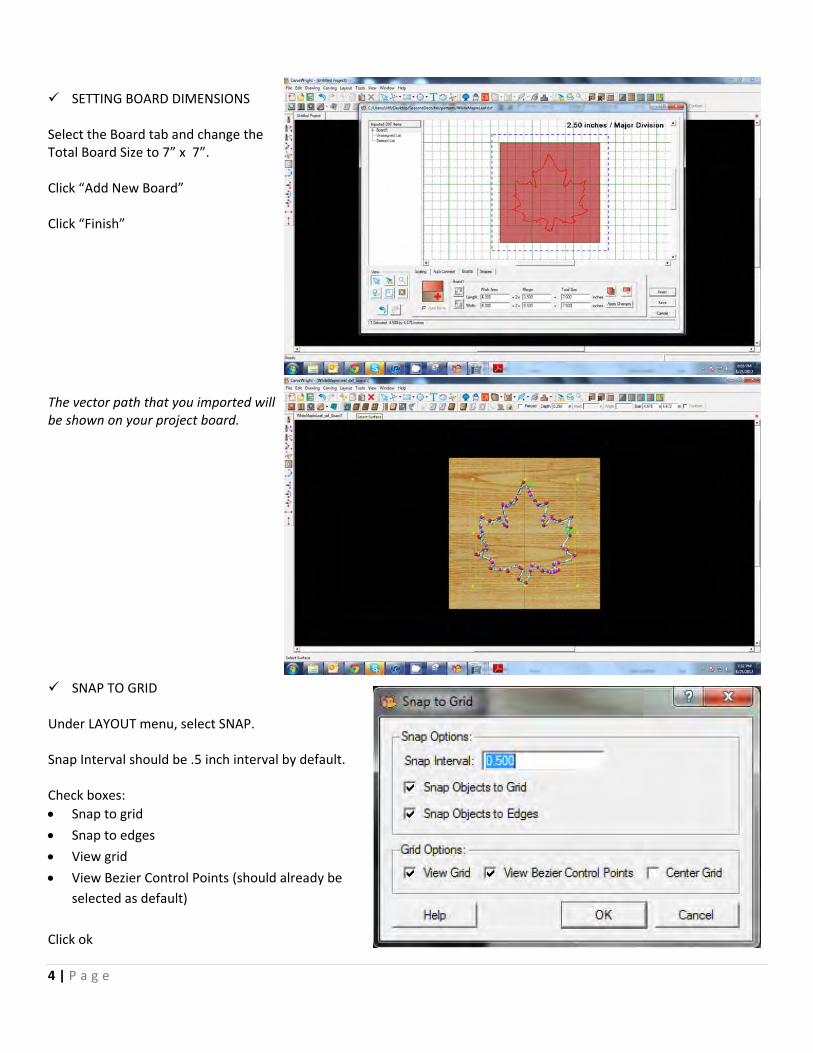
SETTING BOARD DIMENSIONS
Select the Board tab and change the Total Board Size to 7” x 7”. Click “Add New Board” Click “Finish” The vector path that you imported will be shown on your project board.
SNAP TO GRID Under LAYOUT menu, select SNAP. Snap Interval should be .5 inch interval by default. Check boxes: • Snap to grid • Snap to edges • View grid • View Bezier Control Points (should already be
selected as default)
Click ok

5 | P a g e
SURFACE TOOL
With the vector still selected, click on the Surface Tool Icon Select Double Dome Click OK.
INVERT Click the Invert Icon. Change the Height to 999.
DRAWING TOOLS
Select the rectangle or box drawing tool and make a box that is 6” x 6” Notice you can assign this in the size box or you can click on the numbers to Edit Length. If you have selected a rectangle, you will need to edit two sides. If you select a box you will only need to edit one. You must hit enter to make the number apply or escape to get out of the edit box. Right‐click to show all available options for the tool and select Center > Both
6 | P a g e
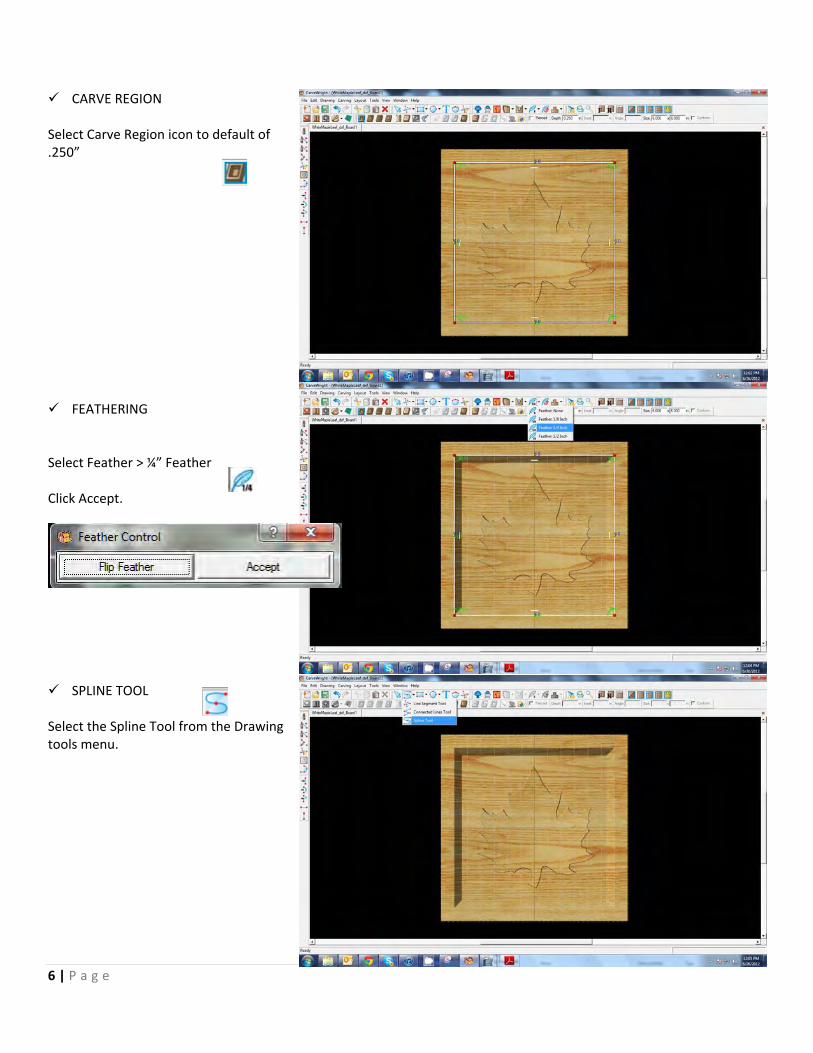
CARVE REGION
Select Carve Region icon to default of .250”
FEATHERING
Select Feather > ¼” Feather Click Accept.
SPLINE TOOL Select the Spline Tool from the Drawing tools menu.
7 | P a g e
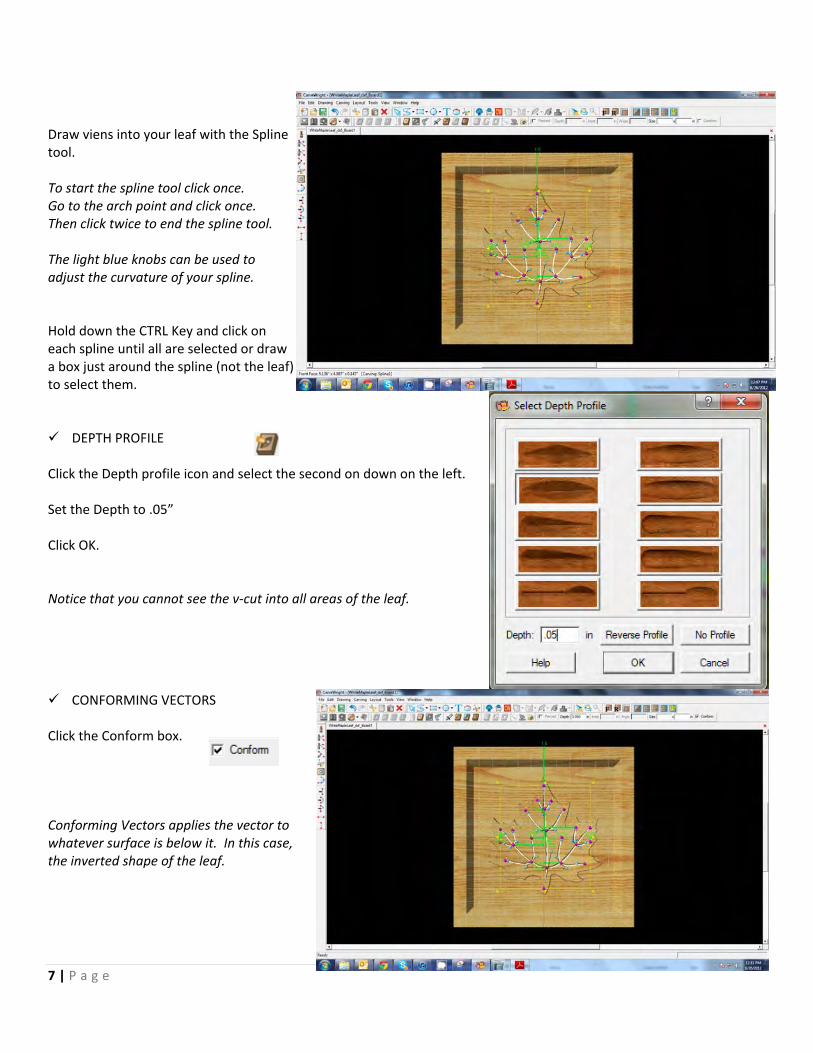
Draw viens into your leaf with the Spline tool. To start the spline tool click once. Go to the arch point and click once. Then click twice to end the spline tool. The light blue knobs can be used to adjust the curvature of your spline. Hold down the CTRL Key and click on each spline until all are selected or draw a box just around the spline (not the leaf) to select them.
DEPTH PROFILE Click the Depth profile icon and select the second on down on the left. Set the Depth to .05” Click OK. Notice that you cannot see the v‐cut into all areas of the leaf.
CONFORMING VECTORS Click the Conform box. Conforming Vectors applies the vector to whatever surface is below it. In this case, the inverted shape of the leaf.
8 | P a g e
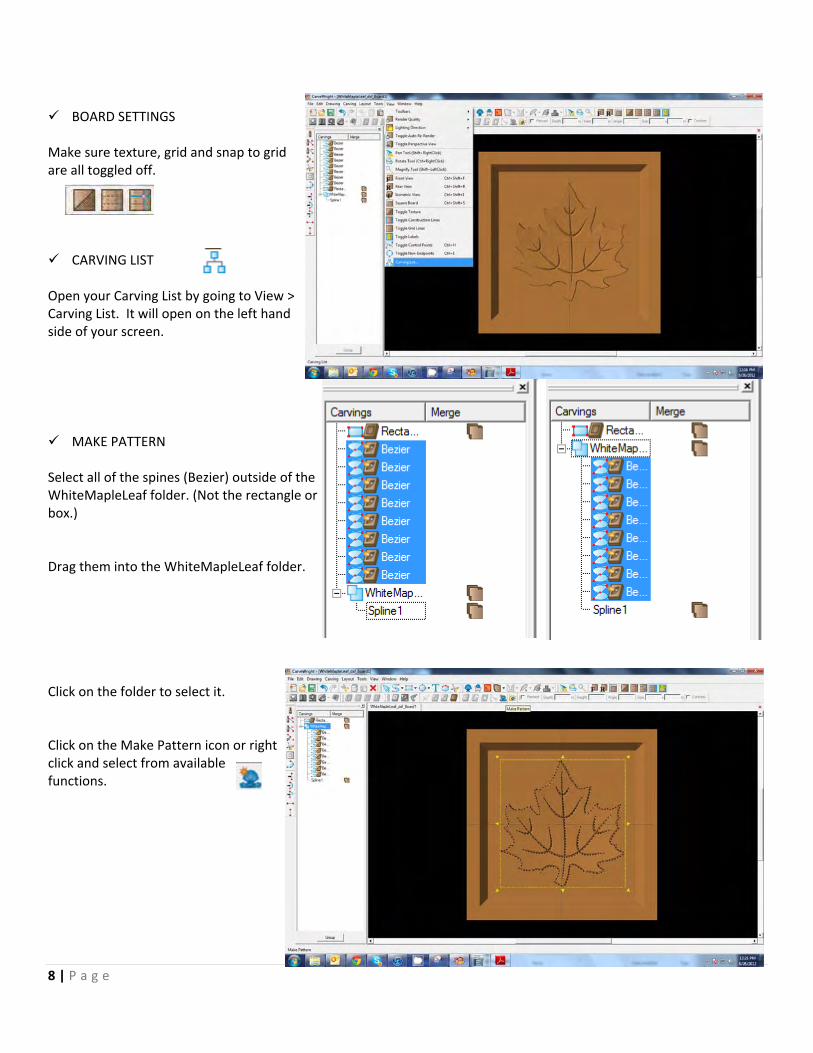
BOARD SETTINGS Make sure texture, grid and snap to grid are all toggled off.
CARVING LIST Open your Carving List by going to View > Carving List. It will open on the left hand side of your screen.
MAKE PATTERN Select all of the spines (Bezier) outside of the WhiteMapleLeaf folder. (Not the rectangle or box.) Drag them into the WhiteMapleLeaf folder. Click on the folder to select it. Click on the Make Pattern icon or right click and select from available functions.
9 | P a g e
SAVE YOUR PATTERN
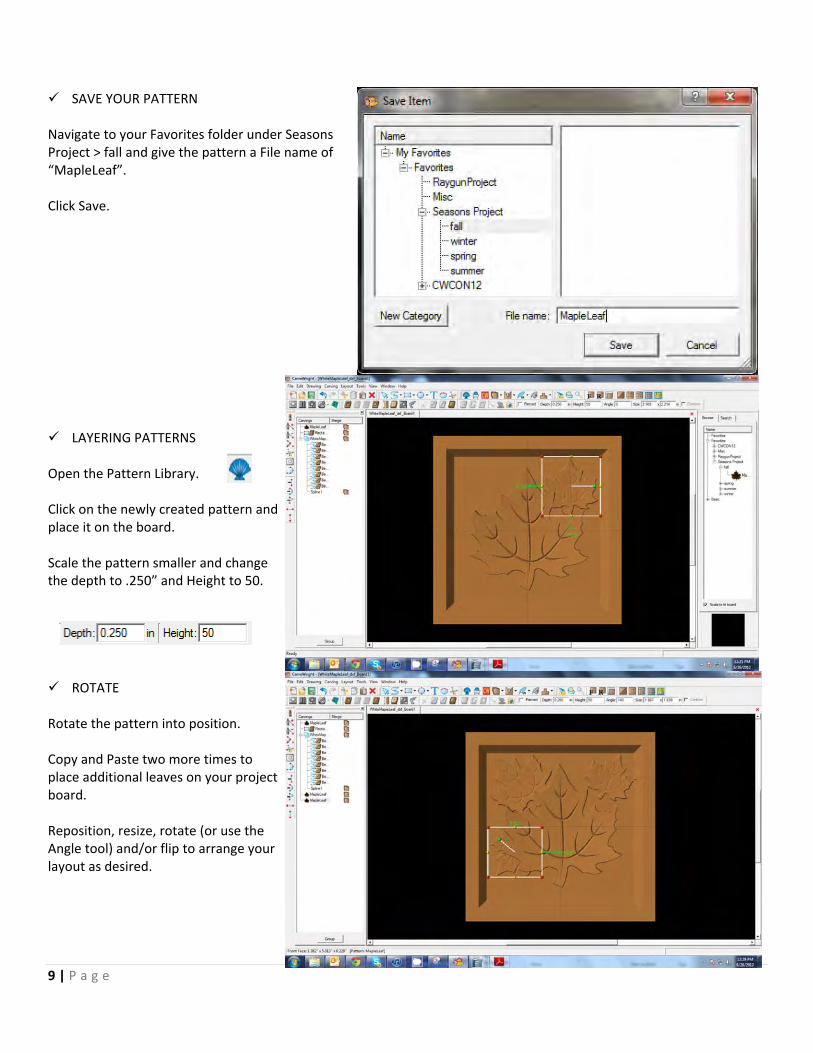
Navigate to your Favorites folder under Seasons Project > fall and give the pattern a File name of “MapleLeaf”. Click Save.
LAYERING PATTERNS Open the Pattern Library. Click on the newly created pattern and place it on the board. Scale the pattern smaller and change the depth to .250” and Height to 50.
ROTATE
Rotate the pattern into position. Copy and Paste two more times to place additional leaves on your project board. Reposition, resize, rotate (or use the Angle tool) and/or flip to arrange your layout as desired.
10 | P a g e
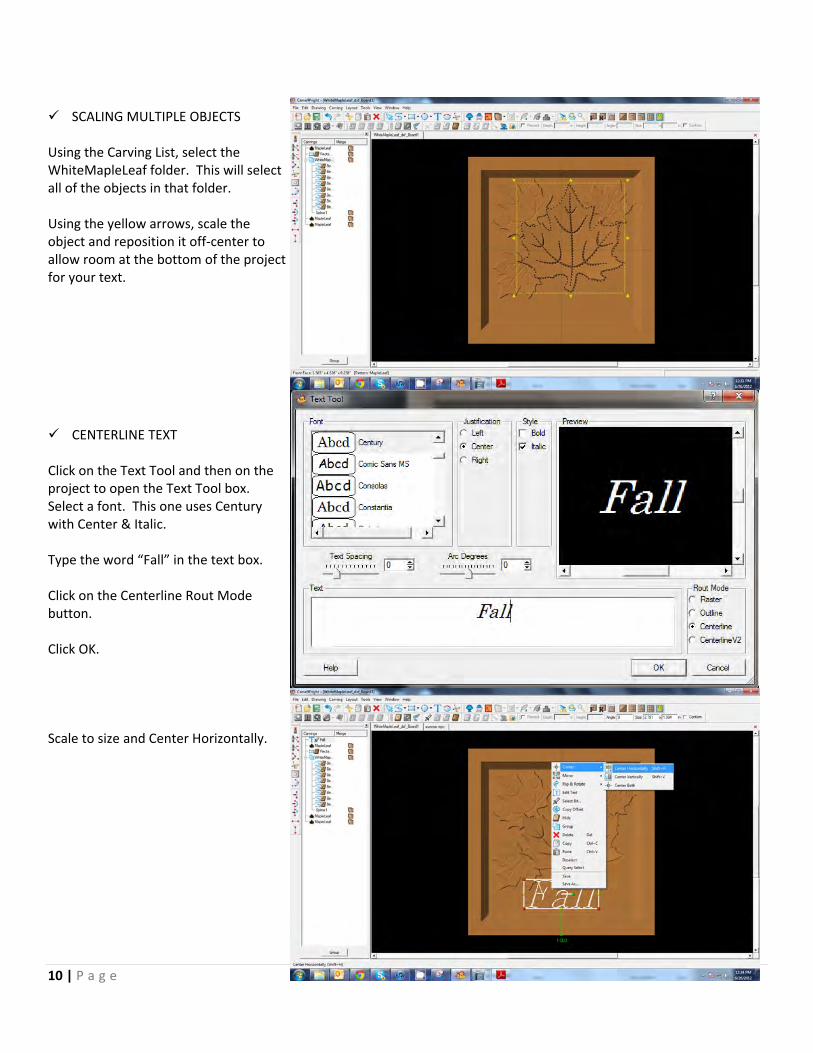
SCALING MULTIPLE OBJECTS Using the Carving List, select the WhiteMapleLeaf folder. This will select all of the objects in that folder. Using the yellow arrows, scale the object and reposition it off‐center to allow room at the bottom of the project for your text.
CENTERLINE TEXT Click on the Text Tool and then on the project to open the Text Tool box. Select a font. This one uses Century with Center & Italic. Type the word “Fall” in the text box. Click on the Centerline Rout Mode button. Click OK. Scale to size and Center Horizontally.
11 | P a g e
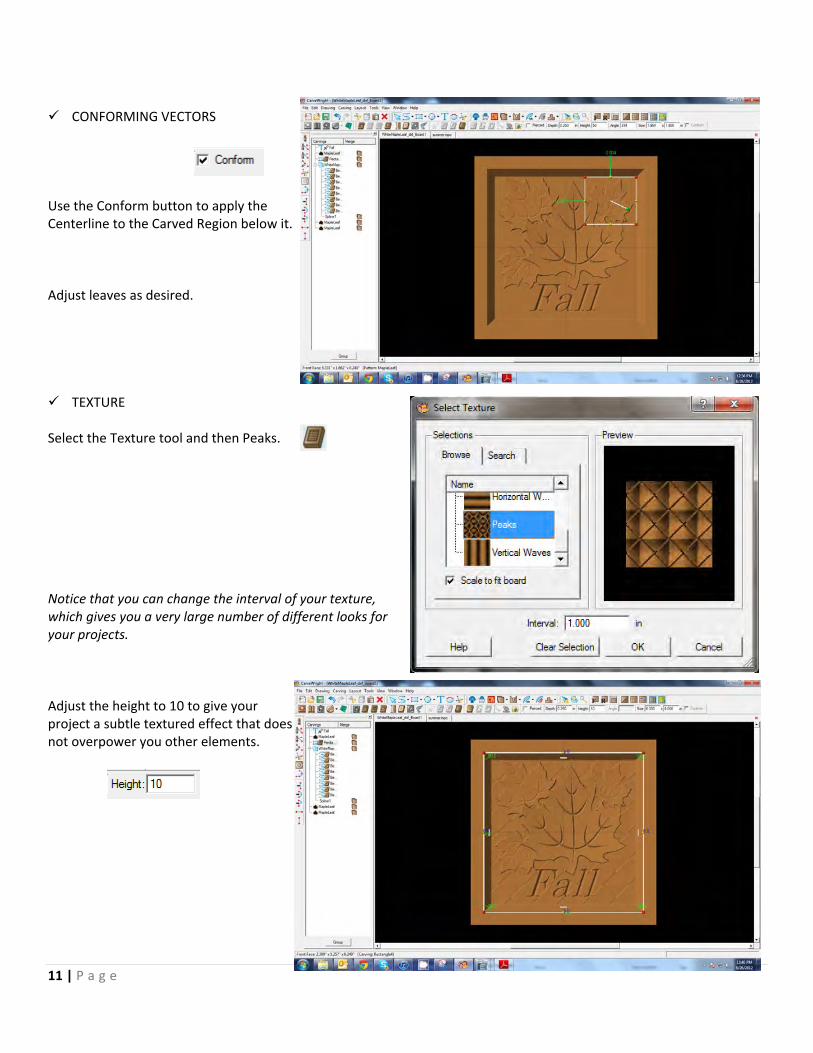
CONFORMING VECTORS Use the Conform button to apply the Centerline to the Carved Region below it. Adjust leaves as desired.
TEXTURE Select the Texture tool and then Peaks. Notice that you can change the interval of your texture, which gives you a very large number of different looks for your projects. Adjust the height to 10 to give your project a subtle textured effect that does not overpower you other elements.
12 | P a g e
REMEMBER THESE FUNCTIONS FROM PREVIOUS STEP‐BY‐STEP PROJECTS
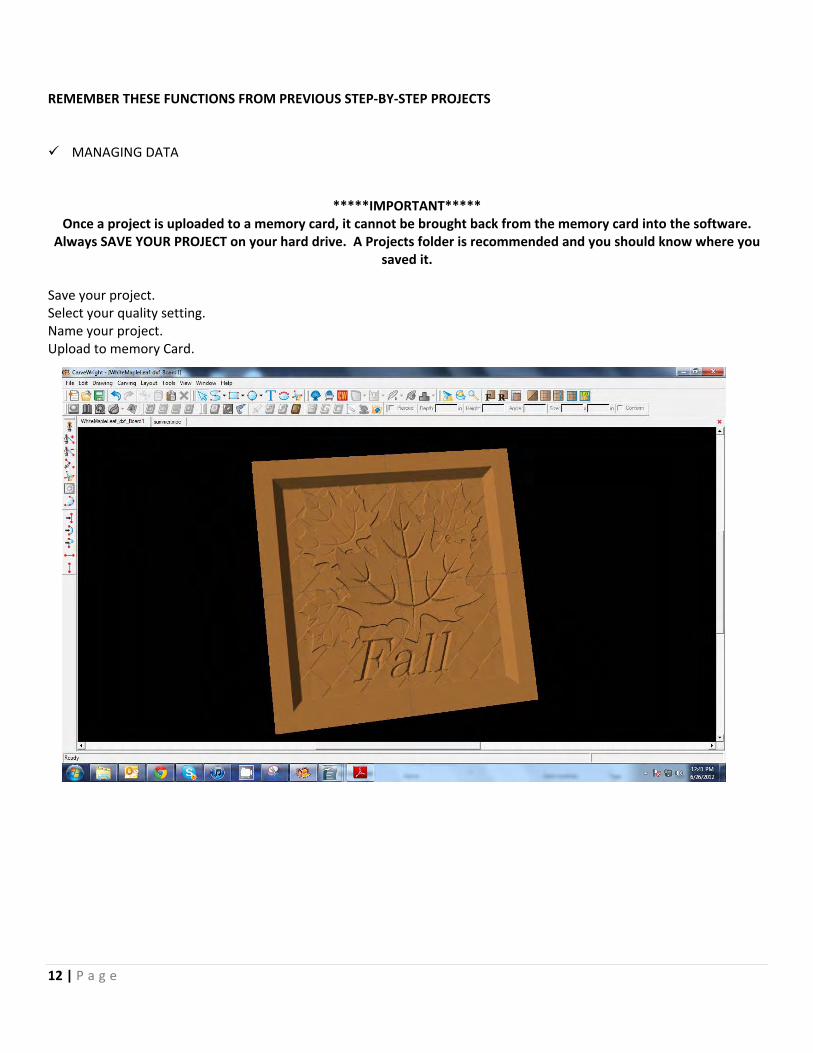
MANAGING DATA
*****IMPORTANT***** Once a project is uploaded to a memory card, it cannot be brought back from the memory card into the software.
Always SAVE YOUR PROJECT on your hard drive. A Projects folder is recommended and you should know where you saved it.
Save your project. Select your quality setting. Name your project. Upload to memory Card.