designer diamond technique step by step #11 – creating
TRANSCRIPT

1 of 4
Designer Diamond Technique Step by Step #11 – Creating Majestic Hoop Embroidery
• The Designer Diamond should be your chosen Embroidery Machine • Be sure your Husqvarna Viking 4D Software is configured with Send 1 direct USB
Connection to the Designer Diamond
1. Open 4D Embroidery Extra .
2. Click Hoop . In Hoop Group select Husqvarna Viking Designer Diamond. In Hoop Size select 360mm x 350mm – Designer Majestic Hoop. Set the Orientation to Vertical and click OK.
3. Click Preferences . Set the Grid Size to 20mm.
4. Leave Remove Overlap When Combining Embroideries checked.
5. Select Intelligent for Split Method and set the Tolerance to 2.
6. Place a checkmark in Alignment Stitches for Turnable Hoop then click OK.
7. Click the drop-down arrow next to Express Design Wizard and choose Fit to Rectangle .
8. Starting at the first grid square in from the top left corner, click and drag a box to the lower right first grid square in from the corner. When you release the button, the Express Design Wizard will open.
9. Click Create Express Trace then click Next.
10. Click View Picture . In the Directory Browser box, use the

2 of 4
Browse to and find C:\\4DEmbroidery\Samples\4DEmb\Pics2\Fashion then click OK.
11. Left click to select the flowers found in the 2nd row, 4th column (1CFa09.png) then click Next.
12. No need to Rotate, just click Next.
13. No need to Find Outline because this clipart has very defined lines. Click Next.
14. On the Monochrome Threshold page, slide the slider bar to the left to about 83 to remove the dark black sections of the flowers, then click Next.
15. On the Crop Picture page, the picture is automatically cropped, just click Next.
16. On the Express Trace Options page, leave Quick Trace Light selected and click Stitch Options.
17. Change the Stitch Length to 2.0 mm then click OK.
18. Click Next and the design is created. Do not be alarmed if some of the lines do not look completely visible. There are stitches connecting the entire design.
19. Click Finish.
The splitting area in the middle of the Designer Majestic Hoop is always 30 mm. It is best to split thru as little of the embroidery design as possible.
20. Click Preferences . Set the Grid Size to 15 mm then click OK. This will allow you to see the splitting area easily. The first dashed grid line to the left and to the right of the vertical solid center line is the edge of the 30mm splitting area.
21. Click Combine to split the design into the two separate embroidery designs that the Designer Majestic Hoop understands.
22. Click the blue color block under the Color Select area and choose a color in the Quick Colors at the bottom of the screen that is completely different than color number 1 (blue) then click OK. This will make it easier to see where the two sides of the design line up when you stitch it out on your Designer Diamond.
23. Click Save As and save the design in your C:\\4DEmbroidery\MyDesigns folder as Majestic flowers.vp3 then click Save.
24. Click Send 1 to send the design directly to your Designer Diamond as configured in 4D Configure.

3 of 4
Embroider the Design: 1. Hoop fabric and stabilizer in the Majestic Hoop and attach the Majestic Hoop to the
Designer Diamond.
2. Touch GO to go to Embroidery Stitch Out. .
3. Touch (with Yes selected) to Embroider all on one side before turning. 4. Insert a size 90 Topstitch Needle. Thread with 30 wt. cotton thread or 40 wt. rayon
thread on top and bobbin thread in the bobbin.
5. Touch and embroider the first side of the design. 6. When the first side of the design is complete, you will be prompted to turn the hoop.
Remove the Designer Majestic Hoop from the embroidery arm, turn it around and slide
the hoop back onto the embroidery arm. Touch on the screen and the embroidery arm will move to adjust for the second side of the design.
7. Because you had Alignment Stitches for Turnable Hoop selected in Preferences in 4D
Embroidery Extra, a cross has been added to the center of the overlap area. You can make sure the needle falls in the center of the cross, then press Start/Stop to begin embroidering again, or you can use Design Positioning to check that the design is lined up perfectly.
8. To position the second side of the design, touch Design Positioning
9. Touch Step 1 10. To set the first locked point, move the red cursor to the visible
upper flower section of the design by touching on the screen where
the two colors come together. Touch zoom , to zoom in on the red cursor.
11. Touch Pan then touch the screen and drag it down until you see the red crosshair in the dark gray section of the screen.
12. Touch and hold Zoom In all the way to the maximum percentage.
13. Touch Position then use the Control arrows to fine tune the placement of the red crosshair to the exact point on the screen where the two sides of the design will meet. Usually you will see long jump stitches in both colors coming to one exact stitch point. That stitch point is exactly where you want your red crosshair.
14. Touch Step 2

4 of 4
15. Watch your fabric and needle as you use the Control arrows to move the needle until it is above the matching locked point of the design on your fabric.
16. Lower the needle into the upper flower section of the design to
check placement. Raise the needle. Adjust again using the Control arrows. Continue to adjust until the needle is exactly above the matching locked point.
17. Touch Zoom to Hoop.
18. Touch Step 3 19. Touch your screen to place the new red cursor on the lowest stem section of the design.
20. Touch and hold Zoom In all the way to the maximum percentage.
21. Touch Pan then touch the screen and drag it up until you see the red crosshair in the dark gray section of the screen as needed.
22. Touch Position then use the Control arrows to fine tune the placement of the red crosshair to the exact point where the two sides of the design will meet. Usually you will see long jump stitches in both colors coming to one exact stitch point. That stitch point is exactly where you want your red crosshair.
23. Touch Step 4 to rotate the design into position on your fabric if necessary. Watch the needle above the fabric as you adjust the control arrows.
24. Lower the needle into the lowest stem section of the design to
check placement. If the needle does not go into the exact selected stitch point on the first half of the design, use the stylus or Control arrows to rotate the design into the exact position. When
satisfied with placement, touch .
25. Touch Zoom to Hoop to see the entire design.
26. Press and embroider out the second side.

1
Majestic Flower Placemat By Marie Duncan, Education Creative Coordinator Create the Majestic Hoop flower design in Designer Diamond Special Technique #11 Majestic Hoop Flowers. Then create a font, and add a monogram. Finish the placemats with Spanish Hemstitching and you will have very special placemats suitable for any occasion. Sewing Supplies:
• Husqvarna Viking Designer Diamond • 40 wt. Rayon Embroidery Thread to Match the
Linen • 30 wt. Sulky Cotton Thread or 40 wt. Rayon Embroidery Thread • Bobbin Thread • One yard Linen for EACH placemat • Clear 1/4” Piecing Foot w/Guide #412927445 • 1/2” wide Steam-A-Seam 2 • Spanish Hemstitch Foot #413 06 48-45 (Includes Distance
Plate) • Inspira Size 90 Topstitch Needle • Sewing Thread to Match Linen
Cut:
• One piece 22” x 20” with embroidery from Designer Diamond Special Technique #11 Majestic Hoop Flowers stitched on it.
• One piece 15” x 18” for lining • Two triangles cut according to diagram • Cut the embroidered piece down to 15” x 18”

2
Create your Initial: You can create virtually unlimited fonts, thanks to 4D QuickFont that came with your Designer Diamond. Any true type font in your PC can quickly be an embroidery font. Be sure that the Majestic Flower design you created is on the Designer Diamond Ultimate Interactive Screen.
1. Open 4D Embroidery , or 4D Embroidery Extra if you have it. If not, open 4D QuickFont directly from your 4D Embroidery System folder.
2. Click Accessories and choose 4D QuickFont. 3. In Font, select Times New Roman. 4. Style Regular 5. Make sure Husqvarna Viking is chosen for the Machine and Designer Diamond is shown in the
list. 6. Character Set Western 1 then click Next.
7. Select Stitch Type Outline. 8. Set the Output Size to 70mm then click Preview. 9. Click Next and the Font will be generated. 10. Leave Send Font File and Save Font File selected.
Make sure your PC is directly connected to your Designer Diamond with the USB cable included with it, to send the font directly to your machine then click Next.
11. On the Print Options page, you can print a catalog of the file or start a new font. Click Finish.
12. Your new font is now available in your Designer Diamond.
13. On your Designer Diamond, click the Start Menu
Button , then choose Font Menu . 14. Scroll down and find the Times New Roman 70 font and
select it. 15. Choose your initial then touch OK.
3
16. With your initial selected, place it as shown in your Majestic Flower.
17. Slide on your Majestic Hoop, Touch 18. Touch the third color to take you directly to the thread color of your initial. Embroider the
initial. Make Twisted Cord:
1. Following the instructions posted on Tips and Hints, at www.husqvarnaviking.com, USA, Education, make about 12” of twisted cord.
2. To create the beaded tassel, slide one bead on to the cord. Bring the ends together and slide
several more on to the double strand. Tie a knot at the end of the cord. Be sure to leave 1” of cord beyond the beads to sew into the seam allowance.
Sew:
1. Thread with sewing thread top and bobbin. Snap on your Clear 1/4” Piecing Foot w/guide.
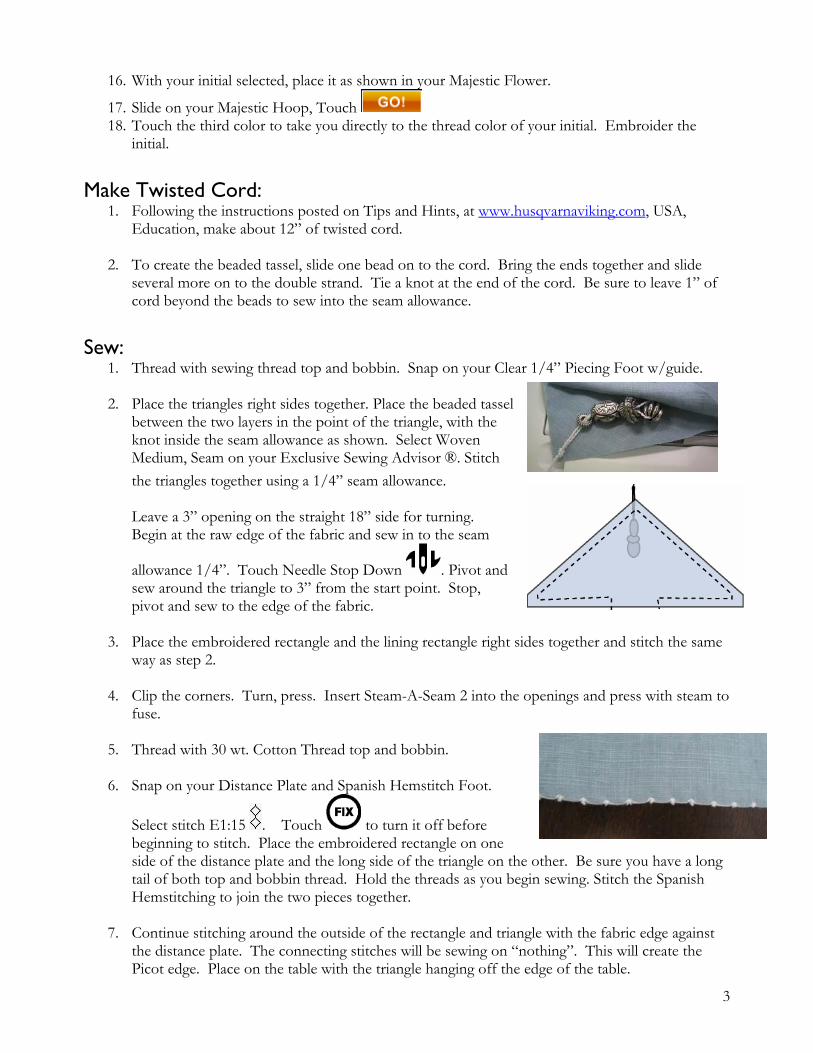
2. Place the triangles right sides together. Place the beaded tassel between the two layers in the point of the triangle, with the knot inside the seam allowance as shown. Select Woven Medium, Seam on your Exclusive Sewing Advisor ®. Stitch the triangles together using a 1/4” seam allowance.
Leave a 3” opening on the straight 18” side for turning. Begin at the raw edge of the fabric and sew in to the seam
allowance 1/4”. Touch Needle Stop Down . Pivot and sew around the triangle to 3” from the start point. Stop, pivot and sew to the edge of the fabric.
3. Place the embroidered rectangle and the lining rectangle right sides together and stitch the same
way as step 2.
4. Clip the corners. Turn, press. Insert Steam-A-Seam 2 into the openings and press with steam to fuse.
5. Thread with 30 wt. Cotton Thread top and bobbin.
6. Snap on your Distance Plate and Spanish Hemstitch Foot.
Select stitch E1:15 . Touch to turn it off before beginning to stitch. Place the embroidered rectangle on one side of the distance plate and the long side of the triangle on the other. Be sure you have a long tail of both top and bobbin thread. Hold the threads as you begin sewing. Stitch the Spanish Hemstitching to join the two pieces together.
7. Continue stitching around the outside of the rectangle and triangle with the fabric edge against
the distance plate. The connecting stitches will be sewing on “nothing”. This will create the Picot edge. Place on the table with the triangle hanging off the edge of the table.

Designer Diamond Technique Step by Step #12 -8 Way Stitch Borders
1. In Sewing Mode, touch
2. Touch Stitch Menu
3. Select L Menu
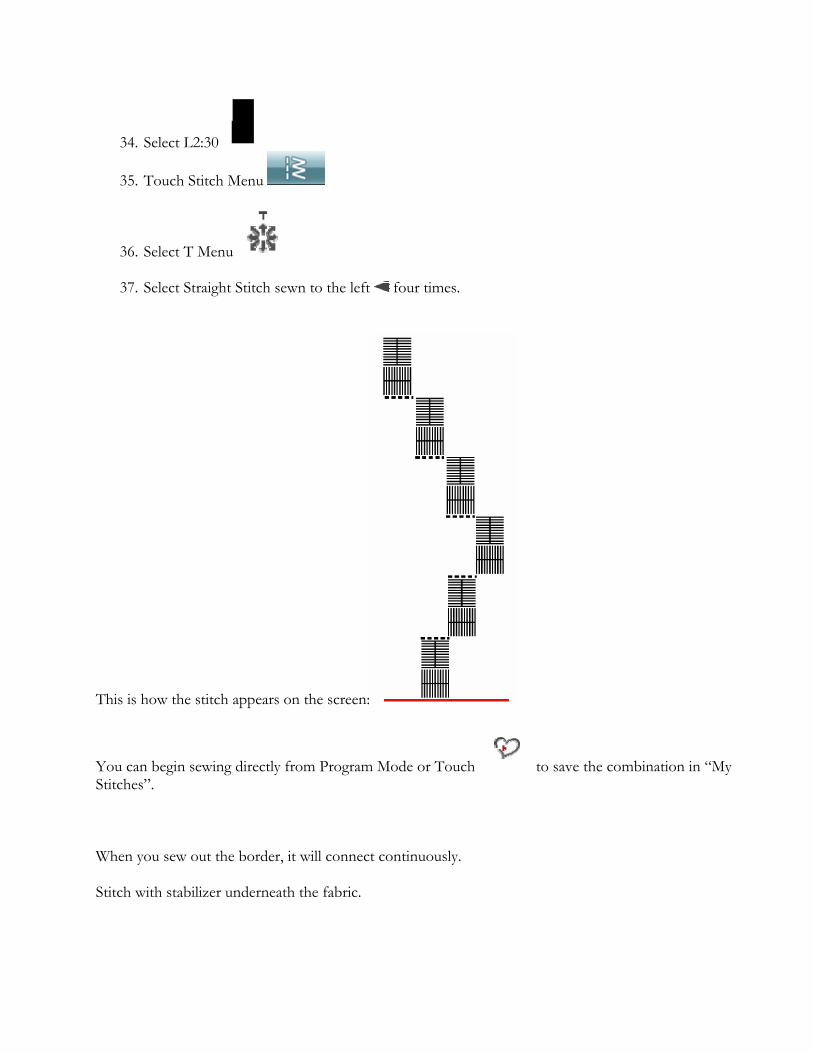
4. Select L2:30
5. Touch Stitch Menu
6. Select T Menu
7. Select Straight Stitch sewn to the right four times.
This is how the stitch appears on the screen:
8. Touch Stitch Menu

9. Select L Menu
10. Select L2:30
11. Touch Stitch Menu
12. Select T Menu
13. Select Straight Stitch sewn to the right four times.
This is how the stitch appears on the screen:
14. Touch Stitch Menu
15. Select L Menu
16. Select L2:30
17. Touch Stitch Menu
18. Select T Menu
19. Select Straight Stitch sewn to the right four times.

This is how the stitch appears on the screen:
20. Touch Stitch Menu
21. Select L Menu
22. Select L2:30
23. Touch Stitch Menu
24. Select T Menu
25. Select Straight Stitch sewn to the left four times.
This is how the stitch appears on the screen:

26. Touch Stitch Menu
27. Select L Menu
28. Select L2:30
29. Touch Stitch Menu
30. Select T Menu
31. Select Straight Stitch sewn to the left four times.
This is how the stitch appears on the screen:
32. Touch Stitch Menu
33. Select L Menu
34. Select L2:30
35. Touch Stitch Menu
36. Select T Menu
37. Select Straight Stitch sewn to the left four times.
This is how the stitch appears on the screen:
You can begin sewing directly from Program Mode or Touch to save the combination in “My Stitches”. When you sew out the border, it will connect continuously. Stitch with stabilizer underneath the fabric.

Designer Diamond Technique Step by Step #13 Advanced Design Shaping Design Shape 1. Select Embroidery Mode
2. Touch Start Menu .
3. Select DD_026
4. Touch and select your 260 x 200 Hoop.
5. Select Design Shaping .
6. Select circle clockwise .
7. Touch scale .Use your control key , make the square 158.0 158.0.
8. Touch the + to increase the number of designs to 6.
9. Touch to close the window.
10. Touch Start Menu .
11. Select DD_034
12. Select Design Shaping .
13. Select circle clockwise .
14. Touch the + to increase to 6.
15. Touch to close the window.
16. Touch Start Menu .
17. Select DD_030
18. Select Design Shaping .
19. Select circle clockwise .

20. Touch scale . Use Control Arrows or drag the squares on the screen until the number reaches 68.7 68.7.
21. Touch the + to increase to 3.
22. Touch to close the window.
23. Touch Save to My Designs .
24. Touch
25. Touch and Hold 26. Name the file DESIGN SHAPE.
27. Touch to exit Character Selection Screen.
28. Touch to save to My Designs.
29. Delete Design
Stitch Shape
1. Touch Start Menu .
2. Touch .
3. Select .
4. Touch and Hold to delete the FIX stitches.
5. Select H1:4 .
6. Touch .
7. Touch .
8. Touch . Change the color to purple.
9. Touch .
10. Touch to close Color Edit.
11. Select Design Shaping .
12. Select circle clockwise .
13. Touch the + to increase to 6.
14. Touch Select Spacing Pop-up
15. Touch .
16. Touch Start Menu .
17. Touch .
18. Select .
19. Touch and hold to delete the FIX stitches.

20. Select K1:10
21. Touch .
22. Touch .
23. Select Color 2:1.
24. Touch . Change the color to blue.
25. Touch .
26. Touch to close Color Edit.
27. Select Design Shaping .
28. Select circle clockwise .
29. Touch Select Spacing Pop-up
30. Touch the + to increase to 6.
31. Touch scale . Use Control Arrows or drag the squares on the screen until the number reaches 113.8 113.8.
32. Touch .
33. Touch Start Menu .
34. Touch .

35. Select .
36. Touch and hold to delete the FIX stitches.
37. Select K3:41 .
38. Touch .
39. Touch .
40. Select Color 3:1.
41. Touch . Change the color to pink.
42. Touch .
43. Touch to close Color Edit.
44. Touch Position
45. Touch Control Center to center the stitch.
46. Touch Save to My Designs .
47. Touch
48. Touch and Hold to delete file name.
49. Name the file STITCH SHAPE.
50. Touch to exit Character Selection Screen.
51. Touch .
52. Touch and hold to delete all designs.
53. Touch .
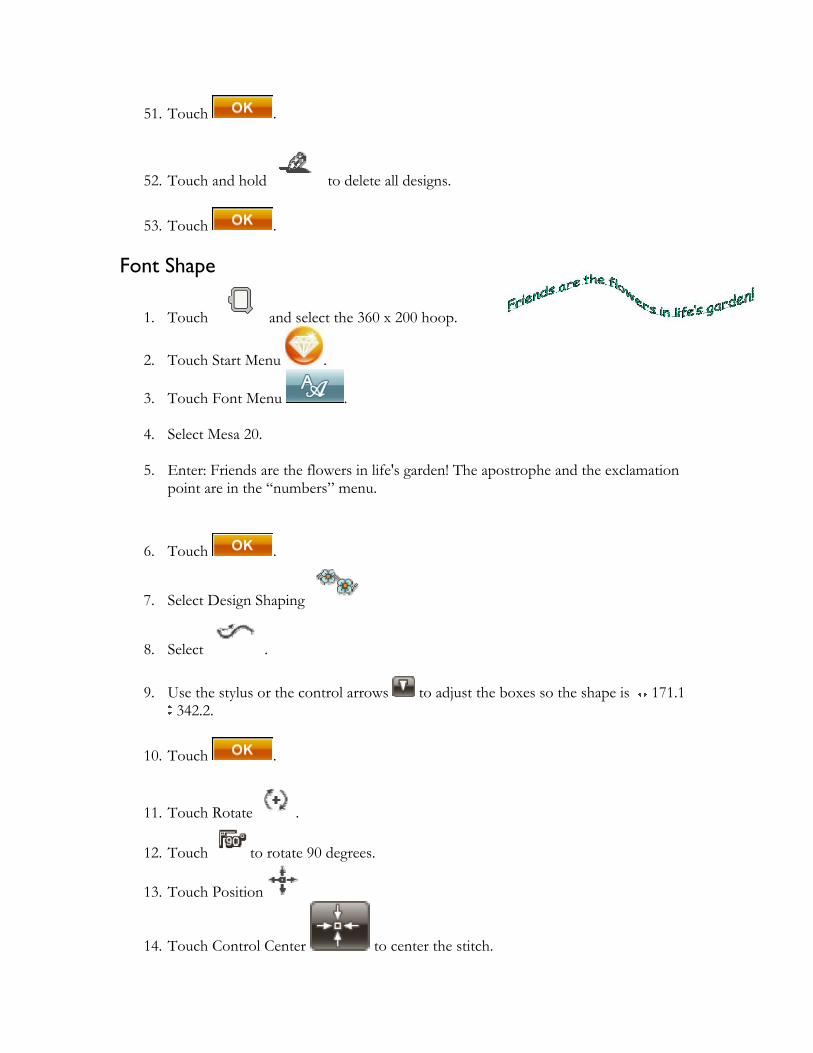
Font Shape
1. Touch and select the 360 x 200 hoop.
2. Touch Start Menu .
3. Touch Font Menu . 4. Select Mesa 20. 5. Enter: Friends are the flowers in life's garden! The apostrophe and the exclamation
point are in the “numbers” menu.
6. Touch .
7. Select Design Shaping
8. Select . 9. Use the stylus or the control arrows to adjust the boxes so the shape is 171.1
342.2.
10. Touch .
11. Touch Rotate .
12. Touch to rotate 90 degrees.
13. Touch Position
14. Touch Control Center to center the stitch.

15. Touch Save to My Designs .
16. Touch
17. Touch and Hold to delete the file name.
18. Name the file FONT SHAPE.
19. Touch to save to My Designs.

1
Flower Shaping By Marie Duncan, Education Creative Coordinator Create the Flower Shaping Wall Hanging designs in Designer Diamond Special Technique #13 Advanced Shaping. Then make this delightful Flower Shaping Wall Hanging. Sewing Supplies:
• Husqvarna Viking Designer Diamond • 5/8 Yard Cotton or Linen • Bobbin Thread • Pictogram Pen • Tear-A-Way Stabilizer • Clear B Edge Stitching Foot #413 05 83-45 • Rick Rack • Sewing Thread • 40 wt. Rayon Embroidery Thread • Eyelet Cutter • 1/2” wide Steam-A-Seam • Eyelet Plate 4mm 412 99 11-45 • Eyelet Plate 6mm 412 99 11-46 • 18” Dowel • 2 1/2 yards of 5/8” wide Ribbon
Cut: 18” wide x 21 1/2” long square of cotton or linen for front 17” wide x 20 1/2” long square of cotton or linen for back

2
Embroider:
1. Using your Pictogram Pen, mark a line vertically and horizontally in the center of the 18” square. Embroider the Design Shape in the center. When embroidery is complete, remove from hoop.
2. From the horizontal center line mark down 2 1/2” and from the vertical center line across 4 1/2” as shown. Repeat on the other side of the embroidery. On the vertical center line, mark an additional dot 6 3/4” down from the center. These are the points of the scallops in the Stitch Shape design.
3. Hoop Tear-A-Way Stabilizer in your 260 x 200 Crown hoop. Slide your hoop on to your
Designer Diamond. Touch .
4. The cursor on your Ultimate Interactive Designer Diamond screen, which represents the needle, is now above the top scallop. Place the top right dot under the needle. Have the center lower dot straight down from the needle as shown.
5. Touch and to baste the fabric to the stabilizer.
6. Touch Design Positioning .
7. Touch Step 1 . Watch the screen, place the Red Cursor over the point of the bottom scallop as shown.
8. Touch Step 2 . Check that the needle is over the marked dot on your fabric.
9. Touch Step 3 . On the screen, move the red cursor to the point of the last, top scallop as shown.
10. Touch Step 4 . Is the needle where it should be on your fabric? Don’t be concerned if you don’t line up exactly on with the top dot. The bottom one, where the scallops meet is the most important.
Step 7
Step 9

3
11.
12. Touch .
13. Touch Color Function
14. Touch Color Block Merge .
15. Stitch the first design. Do not clear the screen when it is done.
16. When the design is complete return to Color Edit .
17. Touch Select All . Touch mirror image side to side . Follow the same Design Positioning steps as before starting on the bottom of the scallop, because that is where the two scallops will meet. Don’t be concerned if you don’t line up exactly on with the top dot. The bottom one, where the scallops meet is the most important.
18. Touch .
19. Touch Color Function
20. Touch Color Block Merge . 21. Stitch the second design.
22. Touch to clear the screen. 23. Bring up FONT SHAPE.VP3 24. Hoop Tear-A-Way Stabilizer in your 360 x 200 Hoop. Slide your hoop onto your machine.
Touch .
25. Touch Color Block Merge . 26. Place the embroidered fabric on the stabilizer so that the top raw edge of the fabric is along the
right side of the inner hoop. The center line on the fabric needs to be lined up with the center mark on your hoop.
27. Touch and to baste the fabric to the stabilizer. Be sure that the words will be centered on the fabric and that the basting stitches just above the flower embroidery.
28. Stitch the words you saved in FONT SHAPE.VP3. Make the Wall Hanging:
1. Cut down the wall hanging to 17” wide x 20 1/2” high with the embroidery centered.
2. Toggle to Sewing Mode . Thread with sewing

4
thread to match your fabric. Snap on your Clear B Edge Stitching Foot. Align the edge of the rick rack with the edge of the fabric. Begin in a corner. Lower the foot so that the fabric and
rick rack edge are aligned with the flange of the foot. Adjust the needle position so that the needle is in the center of the rick rack. Stitch the Rick Rack onto the first side. Cut the rick rack and begin again at the corner. Stitch all four sides the same way.
3. Place the embroidered front piece right sides together with the back. Move the needle position
one click to the left. With the embroidered front side facing up, stitch around the wall hanging, leaving a 6” opening to turn. Stitch just to the left of the previous row of stitching.
4. Turn, press. Insert Steam-A-Seam 2 into the opening and press with steam, to fuse.
5. Across the top of your hanging, mark seven eyelet locations
evenly spaced 2” apart.
6. Touch your Start Menu Button . Select SET
Menu. Select Sewing Settings . Touch to place a
check mark in Free Motion Floating. Place your 6mm Eyelet Plate onto your Designer Diamond. Snap off the foot. Using your eyelet cutter, or a
small scissors, cut a hole for the first eyelet. Choose A1:11 . Place the cut hole over the raised eyelet plate finger. Bring up the bobbin thread to the top and wrap the top and bobbin thread around the finger to anchor them. Stitch the zigzag, turning the fabric as you stitch to zig zag around the eyelet. After stitching around the eyelet once, clip any thread tails.
7. For the bows, mark the location of two sets of
eyelets 3/4” apart, in the curves of the lettering as shown.
8. Attach the 4mm Eyelet Plate and Choose A1:11 . Stitch the four eyelets as before.
9. Cut two pieces of ribbon 18” long. Thread through the 4mm eyelets and tie in bows. Thread
the remainder of the ribbon in the top eyelets so that it is loose enough to insert the dowel through for hanging. Tie knots in the ends of the ribbon. Stitch in the ditch of the eyelet, through the ribbon, at each end, to keep the ribbon secure.
10. Insert 18” dowel into the ribbon loops.

1
Quilted Wall Hanging By Marie Duncan, Education Creative Coordinator Create this Quilted Wall Hanging using the techniques used in Designer Diamond Special Technique #14 Quilting in Sewing Mode. Sewing Supplies:
• Husqvarna Viking Designer Diamond • Assorted Scraps for Crazy Patch • 3/4 yard Multicolor Print for borders and backing • 3/8 yard Cream for Channel Quilt Squares • 3/8 yard Tone on Tone Yellow For Stippling Strip • 1/8 Yard Fabric for Binding • Sewing Thread • Cotton Batting • 40 wt. Rayon Embroidery Thread • 30 wt. Cotton Thread • 12 wt. Cotton Thread • Invisible Thread • Bobbin Thread • Pictogram Pen • INSPIRA® Tear-A-Way Light Stabilizer • Clear 1/4” Piecing Foot w/Guide #412927445 • INSPIRA® size 90 Topstitch Needle • Clear Open Toe Foot #413031945 • Clear B Open Toe Edge/Joining Foot #413058445 • Clearview S Foot #412975145
Cut:

2
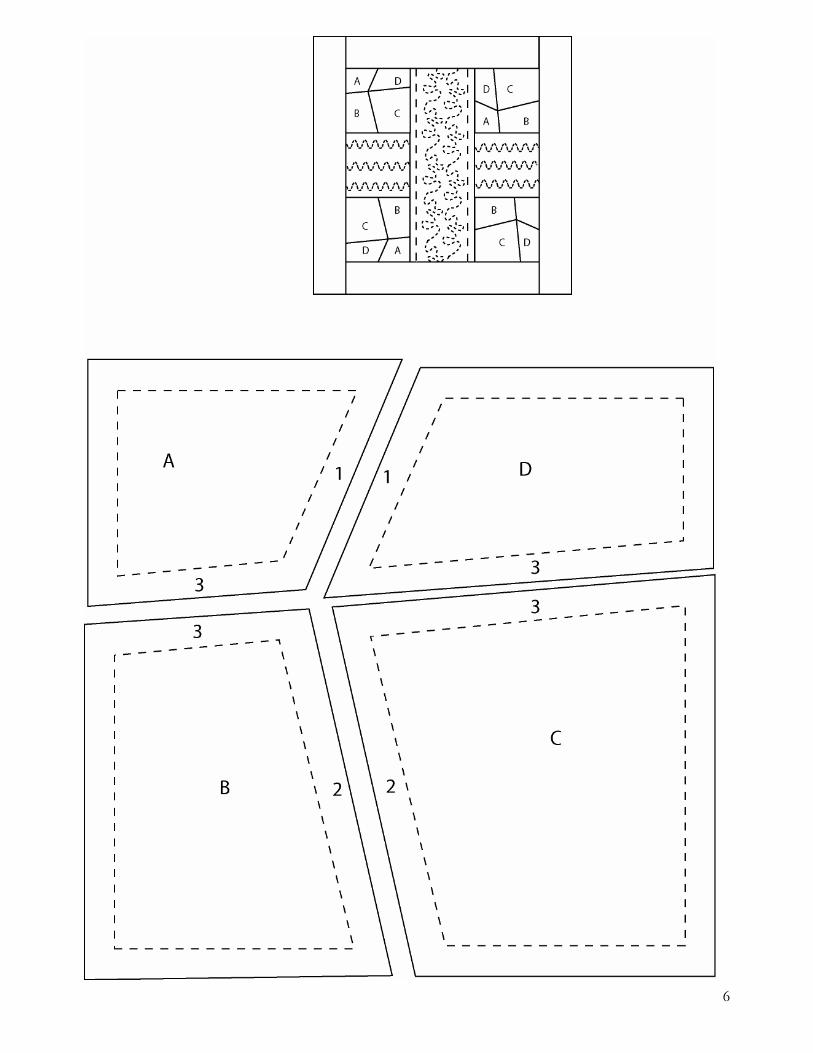
• Using the pattern pieces given, cut four each of the Crazy patch pieces by placing the pattern piece on the right side of the fabric. Mark the right side of the fabric, and the numbers on each piece.
• Cut two 4 1/2” (11.5cm) squares from cream fabric for channel quilting • One 4 1/2” (11.5cm) x 12 1/2” (32cm) rectangle from tone on tone yellow for stippling • Two 2 1/2” (6.5cm) x 12 1/2” (32cm) from multicolor print top and bottom borders • Two pieces 2 1/2” (6.5cm) x 16 1/2” (41.5cm) from multicolor print for side borders
Sew: Crazy Patch Square:
1. Begin by piecing A to D. Match the sides marked 1, right sides together. Offset the ends by 1/4” so the seam line meets as shown.
2. Snap on your 1/4” Piecing Foot w/guide. This is a very popular foot
because of the flange. You can also use your Quilters 1/4” Piecing foot “P”.
3. Thread with sewing thread top and bobbin.
4. Sew the first seam.
5. Repeat for pieces B and C matching the sides marked 2.
6. Press the seams open.
7. Place the two pieces together matching the sides marked 3.
8. Stitch the final seam.
9. Trim your square to measure 4 1/2”.
10. Repeat for the other three crazy patch squares.
11. Press. Place the pieced squares on INSPIRA® Tear-A-Way Light Stabilizer.
12. Insert a size 90 topstitch needle. Thread with 40 wt. rayon embroidery thread, 12 wt. cotton
thread or 30 wt. cotton thread on top and bobbin thread in the bobbin.
13. There are several different feet that work well for this stitching over the seam lines. One is the Clear Open Toe Foot. When using this foot, align the red mark at the back of the foot (behind the needle) with the seam. The other is the Clear B Edge/Joining Foot. Both have the “B” bottom with the tunnel to ride over the bulk of the stitching. The Clear B Edge/Joining Foot is not recommended on stitches wider than 7mm. The flange may get caught on the seam when the machine feeds sideways. Use your Clear Open Toe Foot for those stitches wider than 7mm. Try them both and see which you prefer. If the stitch you choose calls for the “S” foot, use Clear View S Foot. It makes it easier to see your seam line.
14. Select your favorite quilting stitches from the E Quilting Menu . Stitch the decorative stitches over the seams of the crazy quilt squares.

3
15. Tear off the stabilizer.
Piece the Quilt Top:
1. Thread with sewing thread top and bobbin. Snap on your Clear 1/4” Piecing Foot w/Guide.
2. Place one of the crazy patch squares right sides together with the plain channel
quilting square. Stitch a 1/4” seam.
3. Sew another crazy patch square to the opposite side of the plain square.
4. Repeat with the other crazy patch squares and the plain square.
5. Stitch the tone on tone yellow strip for the stippling between the two crazy patch strips.
6. Sew the 2 1/2” (6.5cm) x 12 1/2” (32cm) multicolor print borders to the
top and bottom. 7. Sew the 2 1/2” (6.5cm) x 16 1/2” (41.5cm) multicolor borders to the
sides. 8. Your quilt top is now pieced.
9. Layer with batting and backing to create a “quilt sandwich”.
Stipple Quilting: Thread with 30 wt. cotton thread top and bobbin. Mark your center stippling piece as shown. Your markings will extend up into the border.
Row 1: Select E2:26 . Insert your needle in the first point. Stitch the first row. Stop, when you reach the bottom border.
Row 2: Touch Pattern Restart . Un-thread your needle. Insert your needle on point 2. Stitch slowly until you reach the edge of the border. Stop, re-thread your needle. Stitch the second row. Will insure that the rows match up. Stop when you reach the bottom border. Channel Quilting

4
1. Snap on your Clear “B” Foot. 2. Thread with 12 wt. thread on top and 30 wt. in the bobbin.
3. Select E1:3 .
4. Insert your Edge/Quilting Guide 1” (25mm) from the needle. To insert the Edge/Quilting Guide, loosen the screw on the back of the ankle. Don’t remove it; just loosen it enough that the quilting guide can be inserted, then tighten it.
5. Align the curved guide of the Guide along the seam of the channel quilting square.
6. Stitch the first row. As you reach the seam line, touch while the machine is still running,
then Selective Thread Cutter .
7. Align the Edge/Quilting Guide with the center of the first row of stitching. Stitch the second
row of quilting, and at the end, touch while the machine is still running, then Selective
Thread Cutter . 8. Repeat for row three.
9. Repeat for the other channel quilting square.
Stitch in the Ditch
1. Touch Start Menu .
2. Touch Set Menu .
3. Touch Sewing Settings .
4. Touch Stitch Width Safety .
5. Attach your Interchangeable Dual Feed Foot with the Stitch in the Ditch Foot.
6. Thread with sewing thread on top and in the bobbin.
7. Stitch in the ditch of the borders.
8. In your SET Menu , touch Stitch Width Safety to remove the .
5
9. Attach the “A” Foot to your Interchangeable Dual Feed.
10. Thread with 12 wt. Cotton on top and matching 30 wt. in the bobbin. Select E3:58 .
11. Stitch in the ditch on each side of the center strip. Handlook Quilt Stitch:
1. Attach the Straight Stitch foot to the Interchangeable Dual Feed.
2. Select E1:2 , Handlook Quilt Stitch. 3. Thread with invisible thread on top and colored sewing or 40 wt. rayon thread in the bobbin.
Stand the invisible thread in the upright, vertical position.
4. Test stitch on a scrap with two layers of fabric and batting in between like your wall hanging. Adjust the tension if necessary to bring the bobbin thread to the top.
5. Touch the minus on your to medium speed. If you sew steadily, at medium speed, it helps your stitches to form better.
6. It often takes a couple of stitches to get the bobbin thread start to coming up. Begin stitching
about 1/4” (6mm) on the border before you get to the stippling strip. Those first stitches will be hidden in the multicolor print border. Align the edge of your foot with the edge of the stippling strip and stitch a row of hand look quilting on each side of the stippling.
Binding: To bind your quilted wall hanging, go to www.husqvarnaviking.com, USA, Education, Tips and Hints. Instructions on binding are there.
6

7
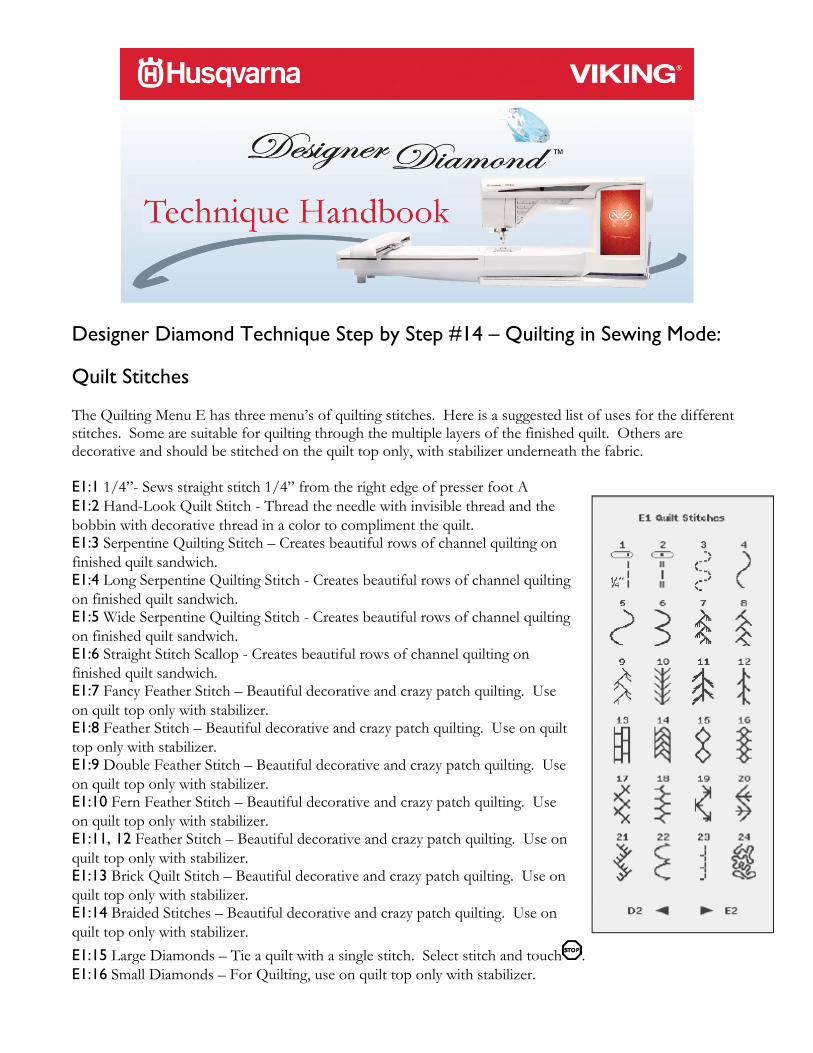
Designer Diamond Technique Step by Step #14 – Quilting in Sewing Mode: Quilt Stitches The Quilting Menu E has three menu’s of quilting stitches. Here is a suggested list of uses for the different stitches. Some are suitable for quilting through the multiple layers of the finished quilt. Others are decorative and should be stitched on the quilt top only, with stabilizer underneath the fabric. E1:1 1/4”- Sews straight stitch 1/4” from the right edge of presser foot A E1:2 Hand-Look Quilt Stitch - Thread the needle with invisible thread and the bobbin with decorative thread in a color to compliment the quilt. E1:3 Serpentine Quilting Stitch – Creates beautiful rows of channel quilting on finished quilt sandwich. E1:4 Long Serpentine Quilting Stitch - Creates beautiful rows of channel quilting on finished quilt sandwich. E1:5 Wide Serpentine Quilting Stitch - Creates beautiful rows of channel quilting on finished quilt sandwich. E1:6 Straight Stitch Scallop - Creates beautiful rows of channel quilting on finished quilt sandwich. E1:7 Fancy Feather Stitch – Beautiful decorative and crazy patch quilting. Use on quilt top only with stabilizer. E1:8 Feather Stitch – Beautiful decorative and crazy patch quilting. Use on quilt top only with stabilizer. E1:9 Double Feather Stitch – Beautiful decorative and crazy patch quilting. Use on quilt top only with stabilizer. E1:10 Fern Feather Stitch – Beautiful decorative and crazy patch quilting. Use on quilt top only with stabilizer. E1:11, 12 Feather Stitch – Beautiful decorative and crazy patch quilting. Use on quilt top only with stabilizer. E1:13 Brick Quilt Stitch – Beautiful decorative and crazy patch quilting. Use on quilt top only with stabilizer. E1:14 Braided Stitches – Beautiful decorative and crazy patch quilting. Use on quilt top only with stabilizer. E1:15 Large Diamonds – Tie a quilt with a single stitch. Select stitch and touch . E1:16 Small Diamonds – For Quilting, use on quilt top only with stabilizer.
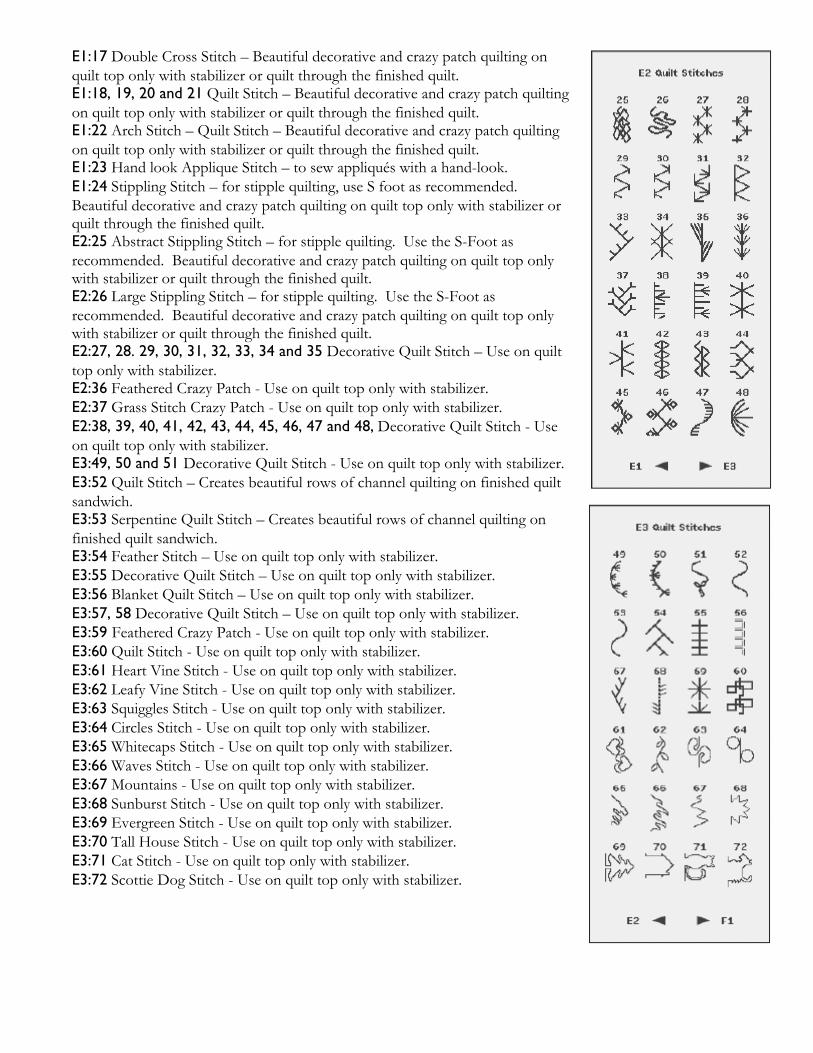
E1:17 Double Cross Stitch – Beautiful decorative and crazy patch quilting on quilt top only with stabilizer or quilt through the finished quilt. E1:18, 19, 20 and 21 Quilt Stitch – Beautiful decorative and crazy patch quilting on quilt top only with stabilizer or quilt through the finished quilt. E1:22 Arch Stitch – Quilt Stitch – Beautiful decorative and crazy patch quilting on quilt top only with stabilizer or quilt through the finished quilt. E1:23 Hand look Applique Stitch – to sew appliqués with a hand-look. E1:24 Stippling Stitch – for stipple quilting, use S foot as recommended. Beautiful decorative and crazy patch quilting on quilt top only with stabilizer or quilt through the finished quilt. E2:25 Abstract Stippling Stitch – for stipple quilting. Use the S-Foot as recommended. Beautiful decorative and crazy patch quilting on quilt top only with stabilizer or quilt through the finished quilt. E2:26 Large Stippling Stitch – for stipple quilting. Use the S-Foot as recommended. Beautiful decorative and crazy patch quilting on quilt top only with stabilizer or quilt through the finished quilt. E2:27, 28. 29, 30, 31, 32, 33, 34 and 35 Decorative Quilt Stitch – Use on quilt top only with stabilizer. E2:36 Feathered Crazy Patch - Use on quilt top only with stabilizer. E2:37 Grass Stitch Crazy Patch - Use on quilt top only with stabilizer. E2:38, 39, 40, 41, 42, 43, 44, 45, 46, 47 and 48, Decorative Quilt Stitch - Use on quilt top only with stabilizer. E3:49, 50 and 51 Decorative Quilt Stitch - Use on quilt top only with stabilizer. E3:52 Quilt Stitch – Creates beautiful rows of channel quilting on finished quilt sandwich. E3:53 Serpentine Quilt Stitch – Creates beautiful rows of channel quilting on finished quilt sandwich. E3:54 Feather Stitch – Use on quilt top only with stabilizer. E3:55 Decorative Quilt Stitch – Use on quilt top only with stabilizer. E3:56 Blanket Quilt Stitch – Use on quilt top only with stabilizer. E3:57, 58 Decorative Quilt Stitch – Use on quilt top only with stabilizer. E3:59 Feathered Crazy Patch - Use on quilt top only with stabilizer. E3:60 Quilt Stitch - Use on quilt top only with stabilizer. E3:61 Heart Vine Stitch - Use on quilt top only with stabilizer. E3:62 Leafy Vine Stitch - Use on quilt top only with stabilizer. E3:63 Squiggles Stitch - Use on quilt top only with stabilizer. E3:64 Circles Stitch - Use on quilt top only with stabilizer. E3:65 Whitecaps Stitch - Use on quilt top only with stabilizer. E3:66 Waves Stitch - Use on quilt top only with stabilizer. E3:67 Mountains - Use on quilt top only with stabilizer. E3:68 Sunburst Stitch - Use on quilt top only with stabilizer. E3:69 Evergreen Stitch - Use on quilt top only with stabilizer. E3:70 Tall House Stitch - Use on quilt top only with stabilizer. E3:71 Cat Stitch - Use on quilt top only with stabilizer. E3:72 Scottie Dog Stitch - Use on quilt top only with stabilizer.

Piecing with a 1/4” (6mm) Seam allowance:
1. Snap on your Quilters 1/4” Piecing foot “P” . The “P” Foot has distance guideline marks 1/4” (6mm) and 1/8” (3mm) from the needle.
2. Select Straight Stitch A1:2 . 3. Place two pieces of cotton quilting fabric right sides together. 4. Align the edge of your presser foot with the edge of the fabric.
5. Stitch a seam with a 1/4” (6mm) seam allowance.
6. On another piece of fabric, place your fabric so that the starting edge of the fabric is aligned with the back red line on the foot and the seam edge with the edge of the foot as shown. This will insure you will start stitching exactly 1/4” (6mm) from the edge of the fabric.
7. Continue stitching and stop when the front red line on the foot is even
with the end of the fabric. This insures that you will stop exactly 1/4” (6mm) from the end of the seam. This is helpful in certain types of piecing such as in a Grandmother Flower Garden or any time you need to stop and start 1/4” (6mm) from the ends of the block.
NOTE: When using the Quilters 1/4” Piecing foot “P” use only center needle position straight stitch.
8. Snap on your “A” Foot. Select E1:1 . 9. Stitch a 1/4” seam by aligning the edge of your “A” Foot with the edge
of the fabric.

Stippling Stitches:
1. Select E2:26 .
2. On a 10” (25cm) square of fabric, use your Pictogram Pen to mark a line lengthwise 2” (5cm) in from the right hand edge of the fabric. Mark starting dots as shown 1” (25mm) and 3/8” (1mm) apart, stair stepping up as shown.
3. Snap on your S Foot.
4. Thread with sewing thread top and bobbin.
5. Align the center red line of the foot with the line
marked on the fabric.
6. Stitch several repeats of the stipple stitch and
touch .
7. When your Designer Diamond stops, check to see that the needle is aligned with the marked line. If not, adjust as necessary. Keep the fabric straight, but let your Designer Diamond do the work.
8. Repeat to the end of your fabric. During the last stitch pattern, touch to end the stippling stitch at the end of the pattern repeat.
9. Align the needle with the next marked starting dot.
10. Stitch the next row.
11. Repeat across the fabric.

Handlook Quilting Stitch:
1. Select E1:2 .
2. Snap on your Quilters 1/4” Piecing foot “P” . 3. Insert a size 90 INSPIRA® Topstitch Needle.
4. Thread with Sulky invisible thread on top. Be sure the thread is in the
vertical position. 5. Insert a bobbin wound with cotton sewing thread or 35 or 40 wt. rayon
thread.
6. On a “quilt sandwich” made with cotton fabric and cotton batting, stitch a row. If you are not seeing enough of the bobbin thread come to the top, increase your upper tension.
7. Insert your Edge/Quilting Guide 1” (25mm) from the needle. To insert the Edge/Quilting Guide, loosen the screw on the back of the ankle. Don’t remove it, just loosen it enough that the quilting guide can be inserted. Align the curved guide of the Guide along the edge of the fabric. Tightren the screw.
8. Stitch the first row of stitching.
9. Stitch rows of channel quilting 1” apart across your “quilt sandwich”.
Handlook Applique:
1. Fold under 1/4” (6mm) of the edge of a 2” (5cm) square of appliqué fabric. Place the appliqué fabric onto a 4”(10cm) square of base fabric.
2. Select E1:23 . Snap on the “A” foot as recommended. 3. Thread with sewing thread or invisible thread on top and sewing
thread in the bobbin.
4. Align the edge of the folded appliqué fabric with the front opening on the “A” foot as shown. Stitch the edge of the square.
5. Fold under the opposite edge. Thread with decorative thread on top and bobbin thread in the
bobbin.
6. Select E3:56 . Stitch the other side of the square.

Tapering Lingerie Pocket By Marie Duncan, Education Creative Coordinator Learn about tapering in Designer Diamond Special Technique #15 Tapering. Then make this delightful Lingerie Pocket featuring tapered appliqué. It’s the perfect gift for a bride, or anyone special on your gift list! Sewing Supplies:
• Husqvarna Viking Designer Diamond • 1/2 yard of 58”-60” Linen • Flower and Leaf Colored Scraps for
Applique • Sewing Thread • 40 wt. Rayon Thread • Bobbin Thread • Open Toe Foot #412 80 09-45 • Clear 1/4” Piecing Foot w/Guide
#412 92 74-45 • Steam-A-Seam 2 Sheets • 1/2” wide Steam-A-Seam 2 • One Button • INSPIRA® Tear-A-Way Stabilizer
1. Remove the paper that removes most easily from the Steam-A-Seam 2.
2. Place the sticky side of the Steam-A-Seam 2 on the reversed images of the pattern given. Trace the shapes and number the leaves.

3. Rough cut the leaves apart from the flower. Place the flower on the flower fabric and the leaves on the green. Press lightly with a dry iron just enough to adhere the Steam-A-Seam 2 to the fabric.
4. Cut out the leaves and flowers. 5. To square your linen, pull threads and
cut to 14” wide x width of fabric. 6. Fold in half and cut into two pieces 14”
x approximately 29”. Set one aside for the lining.
7. Fold the remaining piece in half to
measure 7” x 29”. Fold one end again as shown to create a point. Cut along the fold. This gives you the point of your pocket.
8. Remove the paper from the back of the flower pieces. Using the placement diagram, reassemble the flower on the fabric. Be sure that you have at least 1 1/2” to 2” of fabric between the outside of the leav and the raw edges bag.
9. Press with steam to fuse in place. 10. Place INSPIRA® Tear-A-Way Stabilizer
underneath the flower.
11. Select Z1:1 .
12. Select the Tapering Icon . 13. Select Begin Taper . 14. Select End Taper
15. Touch to close the window. 16. Adjust the width to 3.9. 17. Using your Pictogram Pen, extend the
lines of the flower petal and draw fronds as shown.
18. Thread with 40 wt. rayon thread flower
color on top and bobbin thread in the bobbin.
19. Snap on your Open Toe Foot.
20. Select Needle Stop Down . 21. Begin stitching as shown, at the center
of the flower.

22. Stitch around the flower petal moving
the fabric continuously on the curve, for a smooth stitch. As you approach the
“dip” in the petal, touch . Taper to a point and let the machine stop.
23. Continue stitching until the end. Touch
and allow the machine to stop. 24. Pivot 180 degrees. Stitch around the
next petal as before. 25. Finish stitching around the outside of
the flower and when complete, touch
.
26. Select Z2:30 . 27. Select Begin Taper . 28. Select End Taper .
29. Touch to close the window.
30. Stitch beginning in the center of the flower, out for the detail in the flower petals. Touch
and allow the machine to stop.
31. Select Z1:1 . 32. Select Begin Taper . 33. Select End Taper .
34. Touch to close the window. 35. Adjust the width to 3.9.
36. Touch to save this taper combination in “My Favorite Stitches” menu.
37. Select Z1:1 . 38. Select Begin Taper . 39. Select End Taper .
40. Touch to close the window. 41. Adjust the width to 3.9.
42. Touch to save this taper combination in “My Favorite Stitches” menu.
43. Thread with 40 wt. rayon “leaf” color
on top and bobbin thread in the bobbin.
44. Select Needle Stop Down .
45. Select Start Menu
46. Select and select your first saved combination.
47. Begin at the edge
of the flower as shown.
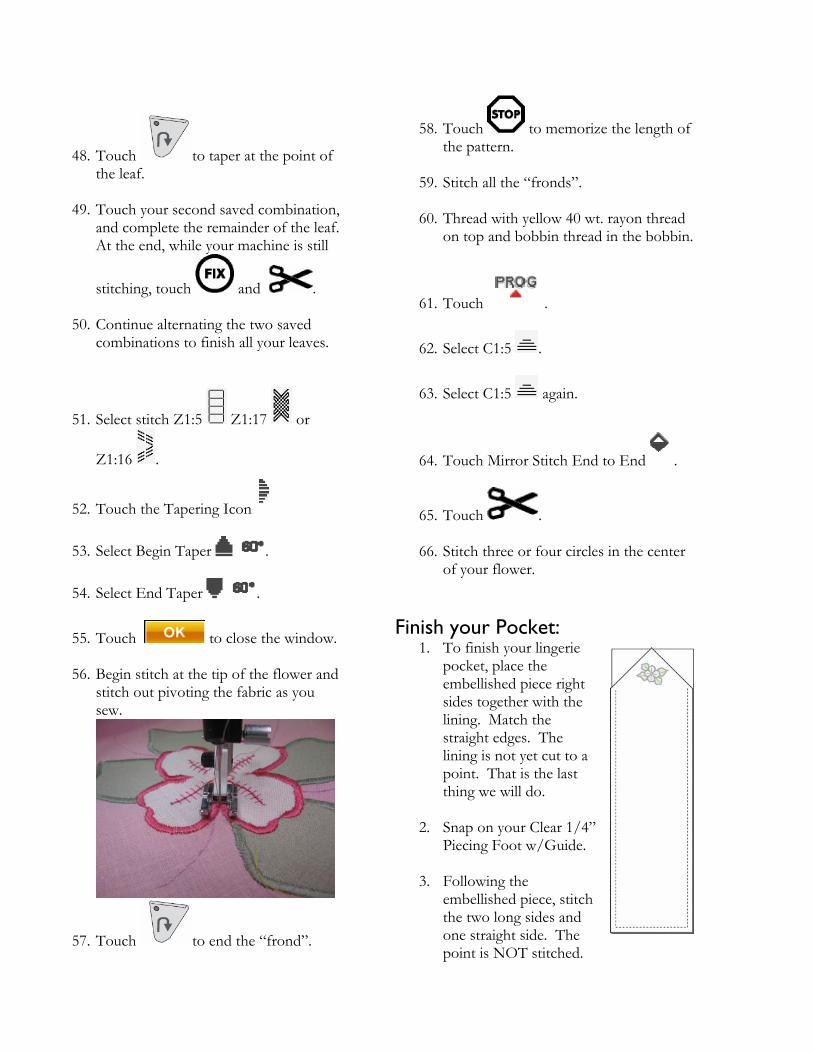
48. Touch to taper at the point of the leaf.
49. Touch your second saved combination,
and complete the remainder of the leaf. At the end, while your machine is still
stitching, touch and .
50. Continue alternating the two saved combinations to finish all your leaves.
51. Select stitch Z1:5 Z1:17 or
Z1:16 .
52. Touch the Tapering Icon
53. Select Begin Taper .
54. Select End Taper .
55. Touch to close the window. 56. Begin stitch at the tip of the flower and
stitch out pivoting the fabric as you sew.
57. Touch to end the “frond”.
58. Touch to memorize the length of the pattern.
59. Stitch all the “fronds”.
60. Thread with yellow 40 wt. rayon thread
on top and bobbin thread in the bobbin.
61. Touch .
62. Select C1:5 .
63. Select C1:5 again.
64. Touch Mirror Stitch End to End .
65. Touch .
66. Stitch three or four circles in the center of your flower.
Finish your Pocket:
1. To finish your lingerie pocket, place the embellished piece right sides together with the lining. Match the straight edges. The lining is not yet cut to a point. That is the last thing we will do.
2. Snap on your Clear 1/4”
Piecing Foot w/Guide.
3. Following the embellished piece, stitch the two long sides and one straight side. The point is NOT stitched.
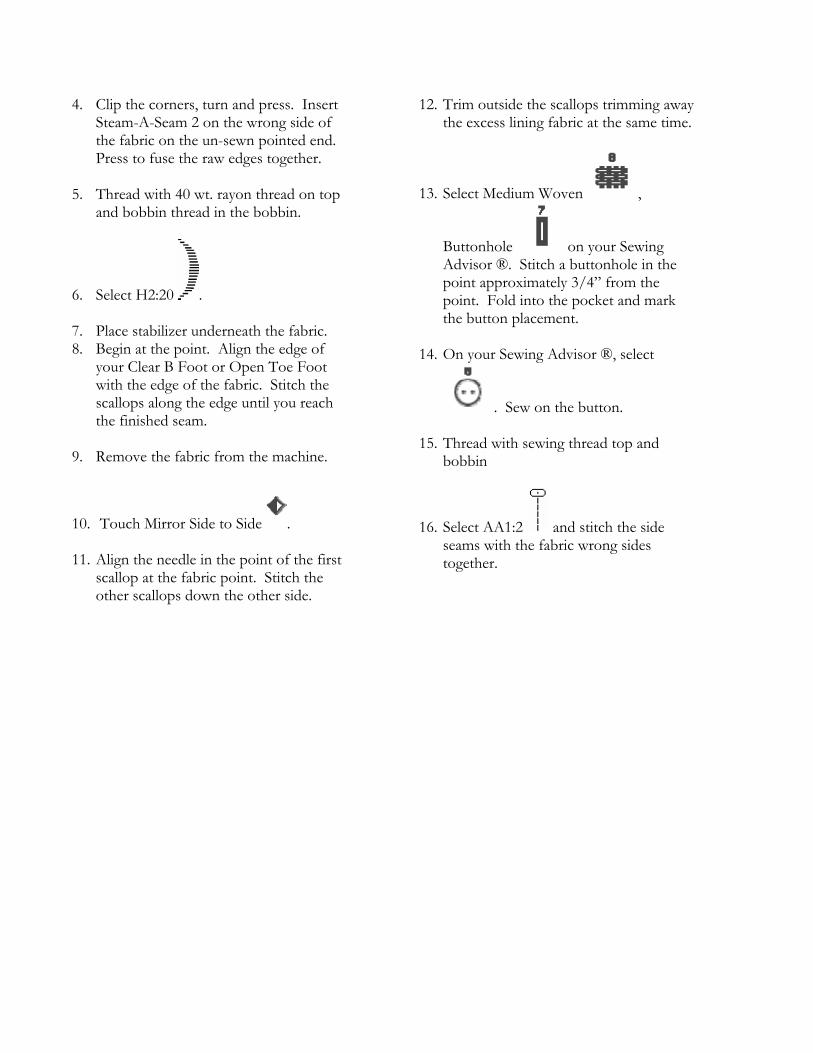
4. Clip the corners, turn and press. Insert Steam-A-Seam 2 on the wrong side of the fabric on the un-sewn pointed end. Press to fuse the raw edges together.
5. Thread with 40 wt. rayon thread on top
and bobbin thread in the bobbin.
6. Select H2:20 . 7. Place stabilizer underneath the fabric. 8. Begin at the point. Align the edge of
your Clear B Foot or Open Toe Foot with the edge of the fabric. Stitch the scallops along the edge until you reach the finished seam.
9. Remove the fabric from the machine.
10. Touch Mirror Side to Side . 11. Align the needle in the point of the first
scallop at the fabric point. Stitch the other scallops down the other side.
12. Trim outside the scallops trimming away the excess lining fabric at the same time.
13. Select Medium Woven ,
Buttonhole on your Sewing Advisor ®. Stitch a buttonhole in the point approximately 3/4” from the point. Fold into the pocket and mark the button placement.
14. On your Sewing Advisor ®, select
. Sew on the button. 15. Thread with sewing thread top and
bobbin
16. Select AA1:2 and stitch the side seams with the fabric wrong sides together.


Designer Diamond Technique Step by Step #15 – Tapering The Designer Diamond has a whole new tapering menu, Menu Z “Decorative Tapering Stitches. There is Menu Z1 and Menu Z2. This menu was introduced in update 5508 so be sure you have updated to this version or higher.
1. Place Tear-A-Way Stabilizer underneath a piece of woven medium fabric. This will be our practice fabric.
2. Select Z1:1 .
3. The Tapering Icon appears on the left hand side.
4. Touch the Tapering Icon and a window opens for selecting angles for beginning and ending tapering.
5. 6. Select begin taper .
7. Select end taper .
8. Touch .
9. Begin stitching. You will see the stitch taper from 0 width, out to the full 6.0 width. After 1”
(25mm) or so, touch the reverse icon or your Reverse Button . The stitch will taper back to a 0 width.
10. Repeat, pivoting the fabric as you go to create a curved line.
11. Select stitch Z1:17.
12. Touch the Tapering Icon
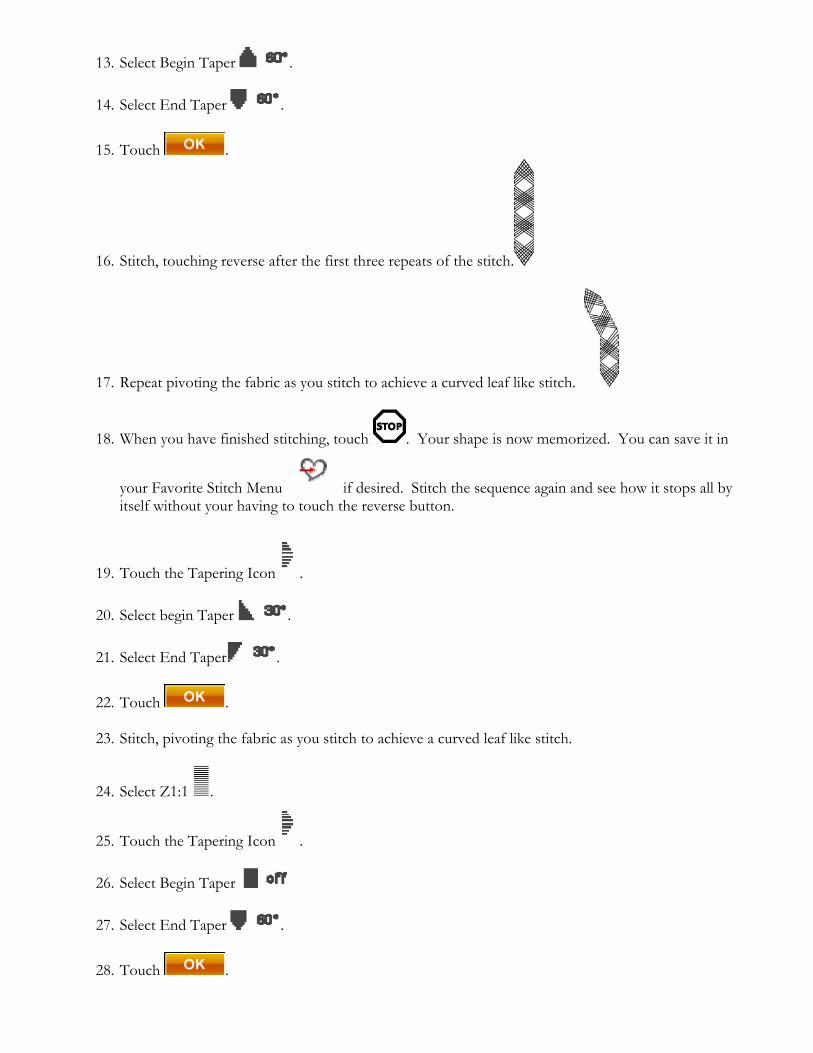
13. Select Begin Taper .
14. Select End Taper .
15. Touch .
16. Stitch, touching reverse after the first three repeats of the stitch.
17. Repeat pivoting the fabric as you stitch to achieve a curved leaf like stitch.
18. When you have finished stitching, touch . Your shape is now memorized. You can save it in
your Favorite Stitch Menu if desired. Stitch the sequence again and see how it stops all by itself without your having to touch the reverse button.
19. Touch the Tapering Icon .
20. Select begin Taper .
21. Select End Taper .
22. Touch .
23. Stitch, pivoting the fabric as you stitch to achieve a curved leaf like stitch.
24. Select Z1:1 .
25. Touch the Tapering Icon .
26. Select Begin Taper
27. Select End Taper .
28. Touch .

29. Stitch. The beginning of your stitch will have a flat, full width end. When you touch reverse, you will taper to 0 width.
30. Adjust the width of your stitch to 3.0. Stitch. You will see that the whole stitch including the ends
is narrower.
31. Select Z1:13 .
32. Touch the Tapering Icon .
33. Select begin Taper .
34. Select End Taper .
35. Touch .
36. Stitch .
37. Touch Mirror Image Side by Side .
38. Notice that the end taper remains the same, only the stitch is mirrored .

Quilting in Embroidery Mode Quilt By Marie Duncan, Education Creative Coordinator Learn about tapering in Designer Diamond Special Technique #16 Quilting in Embroidery Mode. Then make this quilt for your favorite person! It’s simple to make, and you can make it any size you would like to. Ours is a small table topper or wall hanging size that measures 36” x 36”. Sewing Supplies:
• Husqvarna Viking Designer Diamond • Sewing Thread • Sensor Q Foot #412597545 • Clear 1/4” Piecing Foot with Guide #412927445 • 5/8 yard Solid Cotton • 5/8 Yard Tone on Tone Batik • 1 1/2 yard Cotton for Backing Fabric and Binding • 150 x 150mm Do All Quilter’s Hoop #920115096
Cut: Cut one 6 1/2” square for each embroidery. Alternate the colors. For a table topper like ours, cut 18 solid and 18 Tone on Tone Batik. Batting and backing fabric 2” larger all the way around than your quilt top. For the 36” x 36” topper, cut backing and batting 42” x 42”

Piece the Quilt Top:
1. Thread with sewing thread top and bobbin. 2. Snap on your Clear 1/4” Piecing Foot
w/Guide.
3. Following the chart at the right, piece the quilt
top using a 1/4” seam allowance. Begin by sewing the squares into rows, and then sew the rows together.
4. Press the seams open as you go for easy
matching of the points. Assemble the Quilt Sandwich:
1. Place your backing fabric on a flat surface. It needs to be at least 2” larger on each side than your pieced top.
2. Place your batting on top of the backing. It should be the same size as the backing.
3. Place your quilt top centered on top of the batting so that at least 2” of batting and backing extend on
each side of the quilt. This extra 2” is necessary to enable you to hoop the edge squares.
4. Safety pin baste the quilt together. Embroider/Quilt the Quilt:
1. We used Designer Diamond built in designs #85, #86, #87 and #88. Resize the designs as follow.
2. Touch Start Menu .
3. Select your design of choice.
4. Touch Resize . 5. Use the control arrows to resize the designs to the sizes shown.
DD_085 to 136.4 x 130.

DD_086 to 136.4 132.6
DD_087 to 134.9 x 134.9
DD_088 to 118.2 136.3
6. Touch . 7. Thread with cotton sewing thread top and bobbin. 8. Hoop the solid cotton squares in your 150mm x 150mm Do All Quilter’s Hoop using the
inner hoop marked “heavy”. This hoop is designed with two inner hoops, one for light weight fabrics and one for heavier.
9. Remove your ankle and attach your Sensor Q Foot. The bulk of the batting and layers of fabric make the Sensor Q Foot the perfect foot to use.
10. Embroider the quilting designs diagonally on the solid colored squares, following the chart. 11. Each time you start a new design, mark your center on your fabric square and check your
positioning in Design Positioning to be sure you are hooped correctly:
12. Touch .
13. Touch to bring your cursor to the center.
14. Touch and use the control arrows to locate your needle over the marked center of your square.
15. Touch .
16. Embroider your designs in every other square. Leave a long bobbin tail each time you begin a design and bring it to the top of the quilt before you begin to embroider. Stop your Designer Diamond after a few stitches and snip the bobbin thread. This will keep the back of your quilt neat.
Stippling: In the alternating tone on tone batik squares, embroider the stippling design that you created in Designer Diamond Technique Studio.
1. Touch Start Menu .
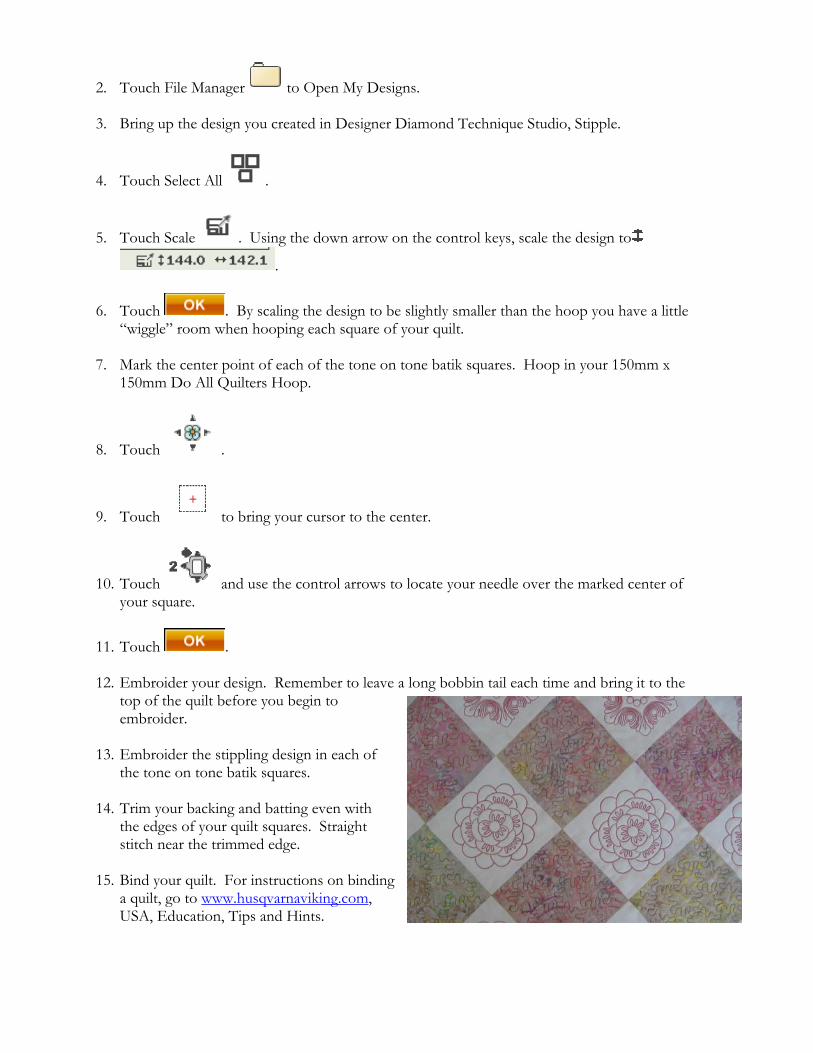
2. Touch File Manager to Open My Designs.
3. Bring up the design you created in Designer Diamond Technique Studio, Stipple.
4. Touch Select All .
5. Touch Scale . Using the down arrow on the control keys, scale the design to
.
6. Touch . By scaling the design to be slightly smaller than the hoop you have a little “wiggle” room when hooping each square of your quilt.
7. Mark the center point of each of the tone on tone batik squares. Hoop in your 150mm x
150mm Do All Quilters Hoop.
8. Touch .
9. Touch to bring your cursor to the center.
10. Touch and use the control arrows to locate your needle over the marked center of your square.
11. Touch .
12. Embroider your design. Remember to leave a long bobbin tail each time and bring it to the top of the quilt before you begin to embroider.
13. Embroider the stippling design in each of
the tone on tone batik squares.
14. Trim your backing and batting even with the edges of your quilt squares. Straight stitch near the trimmed edge.
15. Bind your quilt. For instructions on binding
a quilt, go to www.husqvarnaviking.com, USA, Education, Tips and Hints.
1
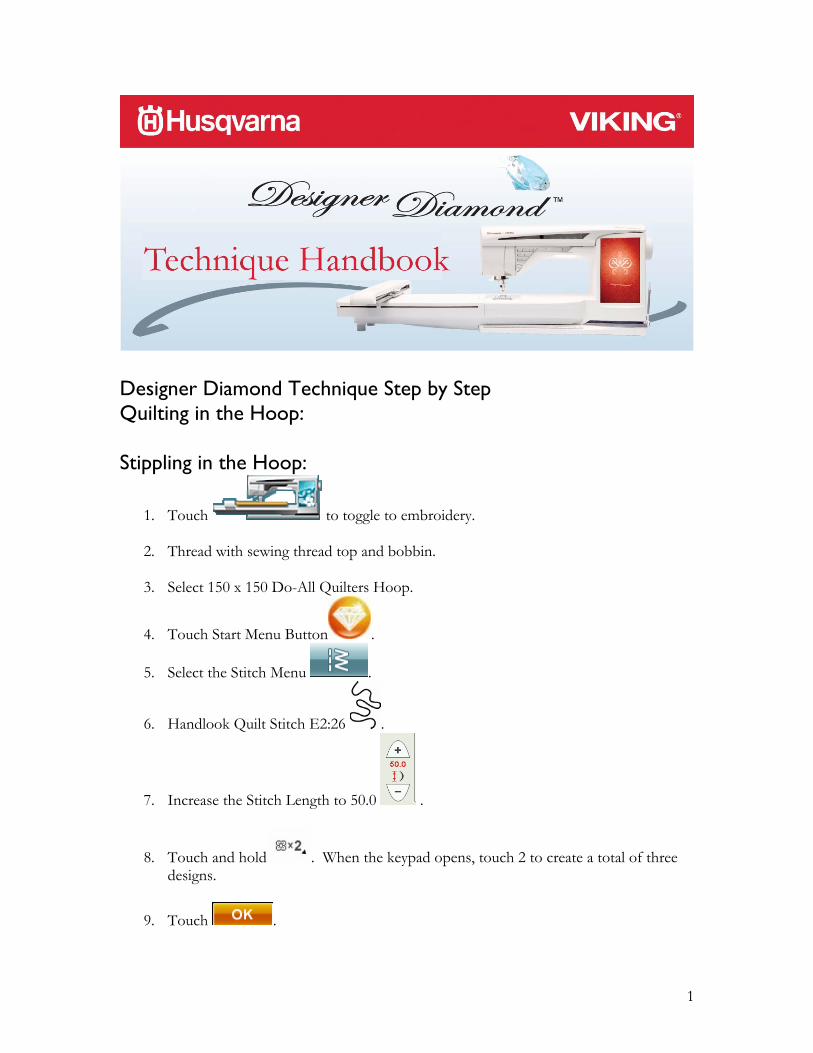
Designer Diamond Technique Step by Step Quilting in the Hoop: Stippling in the Hoop:
1. Touch to toggle to embroidery. 2. Thread with sewing thread top and bobbin. 3. Select 150 x 150 Do-All Quilters Hoop.
4. Touch Start Menu Button .
5. Select the Stitch Menu .
6. Handlook Quilt Stitch E2:26 .
7. Increase the Stitch Length to 50.0 .
8. Touch and hold . When the keypad opens, touch 2 to create a total of three designs.
9. Touch .

2
10. Move to the left edge of the hoop using Control Arrow
to coordinates 0.0 and -59.4 as shown. If you move too far and the design goes outside the hoop,
touch Move to Hoop to bring the design into the hoop and fine tune with the control arrows.
11. Touch .
12. Touch Mirror end to end .
13. Using Control Arrows move to coordinates 0.0 and -29.7.
14. Touch Select All .
15. Touch .
16. Move the two highlighted rows of stippling to 0.0 and 14.6.
17. Touch Add or Remove Selection . The solid red box is now around the third design from the left.
18. Touch .
19. Move the last row of stippling 0.0 and 58.9.
20. Any hoop size can be filled with stippling by simply adjusting the number of repeats of stitches you enter, and by adding additional rows.
21. Touch Save to My Designs .

3
22. Select My Files .
23. Touch .
24. Touch and Hold .
25. Enter STIPPLE, touch .
26. Touch .
27. Thread with cotton sewing/quilting thread top and bobbin. 28. Hoop your quilt sandwich (two layers of fabric with batting in
between them).
29. Attach your Hoop.
30. Touch .
31. Select Color Functions . Select Color Block Sort and Color Block Merge.
32. Touch
33. Because embroidery tension is designed to pull to the back of the hoop, you may need to adjust your tension to a higher number. Increase to 3.6.
Tip: Test by hooping a quilt “sandwich”. Leave a long bobbin thread tail. Manually bring up the bobbin thread. This will keep the back of your quilt neat. Do this each time you begin stitching.
34. Stitch the first row of stippling. Remove from your Designer
Diamond and check to see if the tension is balanced. If not, adjust as needed.
4
35. Before you begin your next row, snip the bobbin thread, which is easy to do, as the hoop has moved towards you, and bring it up manually as before. Stitch all the rows.
36. Using the concepts you have just learned, try building other quilting designs using
the stitches in your Designer Diamond. You need to determine how many stitch repeats will fit in your hoop. As you are selecting the stitch, and touching
duplicate , watch at the bottom of the screen. Our hoop is 150mm and when we reached Program Length 147mm we knew we were at the limit of the hoop.
37. Embroidery Designs 17, 18, 36, 58, 70, 71, 72, 85, 86, 87, 88, 91, 94 and 115 which
are built into your Designer Diamond are excellent designs to use for quilting through a “quilt sandwich”. Follow the same guidelines for tension, and manually bringing up the bobbin thread as you did on the stippling.

Contemporary Heirloom Table Cloth By Marie Duncan, Education Creative Coordinator Make this beautiful, contemporary heirloom table cloth and use the techniques you learned about in the Designer Diamond Technique Studio, Design Positioning Second Generation. Sewing Supplies:
• Linen (3” larger all the way around than your finished tablecloth)
• Clear A Feet Set #920237096
• Clear B Edge Joining Foot #413058445
• Wing Needle • 60 wt. Cotton Thread to match linen • 40 wt. Rayon Embroidery Thread • Bobbin Thread • Quick and Easy Mitred Binding Tool #140002480

1. Your linen has to be cut on grain. Pull threads to be sure
that you are accurately on grain.
2. Measure in 3” from each corner as shown, and make a dot. Beginning at the dot, pull threads to the next dot. Don’t pull the threads beyond the dots. Pull three to four threads total.
3. Thread with 60 wt. cotton thread to match your fabric top and bobbin.
4. Fold up the raw edge 1 1/2” to the wrong side and press.
5. Bring the fold of the edge to just meet the pulled threads. 6. Using your Quick and Easy Mitred Binding Tool miter the corners.
7. Snap on your Clear A Edge Joining Foot. Align
the flange of the foot with the fold of the fabric.
Select Straight Stitch . Adjust the needle position to the right, so that the stitching will be just onto the fold as shown. Stitch the hem in place. Be sure not to cover up the pulled threads.
8. Insert a wing needle.
9. Select D1:6 . Adjust the Stitch Width to 2.5.
10. Touch Mirror Image Side to Side .
11. Touch Alt . Your stitch width is now Stitch Positioning. Touch the right arrow to adjust the position of the stitch to 2.0 to the right.
12. Snap on your Clear B Edge Joining Foot. Align the flange with the edge of the sewn hem
and stitch the hemstitching.

1
Designer Diamond Technique Step by Step Design Positioning Second Generation: Be sure you are updated to New update! Version 5908-5413 (August 17, 2009) or higher:
1. Touch to toggle to embroidery.
2. Touch Start Menu .
3. Touch File Manager .
4. Touch My Designs .
5. Touch List View .
6. Click Ok.
7. Select DD_089.
8. Using your Pictogram Pen, mark lines diagonally from corner to corner. The center is where they intersect.

2
9. Hoop your fabric diagonally, in your 150mm x 150mm Hoop with Tear-A-Way Stabilizer as shown. If preferred, you can hoop the stabilizer and baste your fabric to the stabilizer.
10. Touch and select the 150mm x 150mm hoop.
11. Slide your hoop on to your Designer Diamond.
12. Touch .
13. Touch Design Positioning. .
14. You will notice that the cursor is at the first stitch in the
design. Touch to bring the needle to the center of the design.
15. Touch . We skipped step 1 because by choosing to bring the cursor to the center, we have already done step 1. Use your arrow keys to bring the needle over your center mark.
16. Touch .
17. Touch and embroider the first design.
18. When your design is complete, touch Start Menu .
19. Touch File Manager .
20. Touch List View .
21. Click .
22. Select DD_090.
3
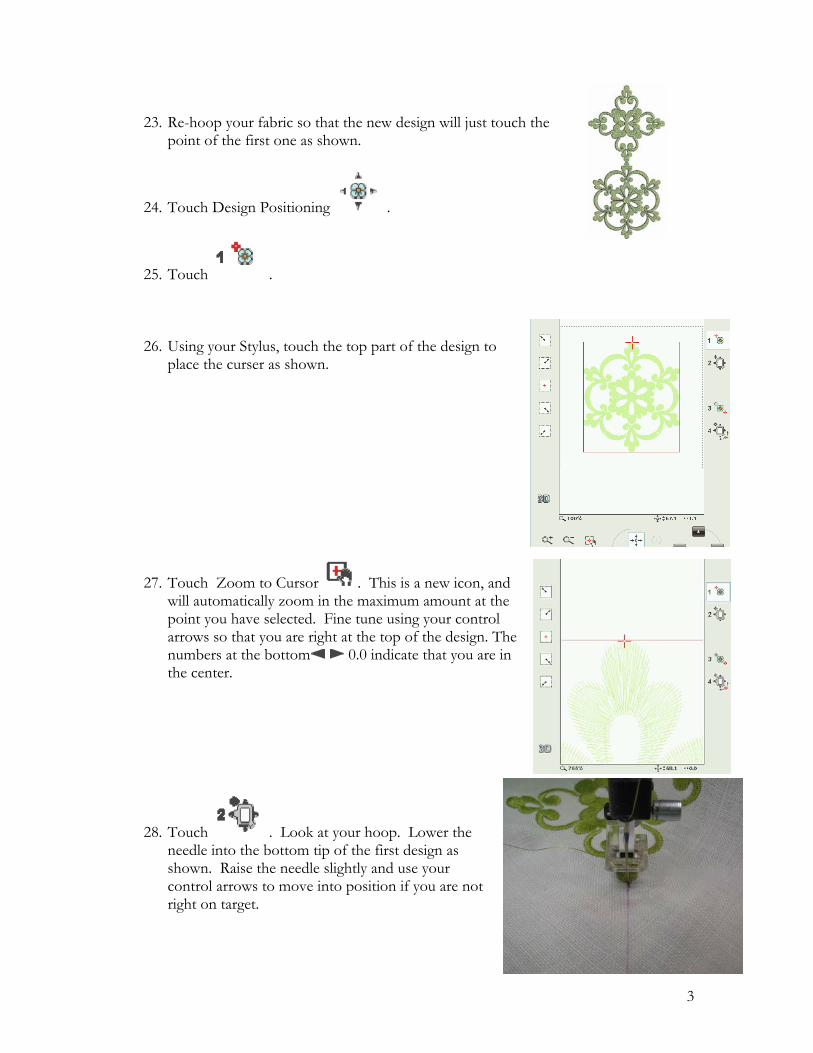
23. Re-hoop your fabric so that the new design will just touch the
point of the first one as shown.
24. Touch Design Positioning .
25. Touch .
26. Using your Stylus, touch the top part of the design to place the curser as shown.
27. Touch Zoom to Cursor . This is a new icon, and will automatically zoom in the maximum amount at the point you have selected. Fine tune using your control arrows so that you are right at the top of the design. The numbers at the bottom 0.0 indicate that you are in the center.
28. Touch . Look at your hoop. Lower the needle into the bottom tip of the first design as shown. Raise the needle slightly and use your control arrows to move into position if you are not right on target.

4
29. You may get a pop-up. Touch to put a checkmark in the box, and you can then continue moving and checking as long as the needle is above the fabric level.
30. Touch Zoom to Hoop .
31. Touch . 32. Using your Stylus, touch at the bottom of the design.
Touch Zoom to Cursor . Use your Control Arrows to bring the curser to the bottom of the design as shown.
33. Touch and check that your needle is aligned over your marked line. If not, use your control arrows to adjust until it is.
34. Touch . Embroider the second design.
35. Continue embroidering three more of design DD_090 using Design Positioning as before, to position each design to create the arrangement shown.

1
Designer Diamond Technique Step by Step Majestic Hoop Quilt Block: We have chosen a quilt design built in to your Designer Diamond. When choosing other designs, remember, that in order to use Design Positioning, to check your position after embroidering the first side, you need to have some room, to move the design. You cannot have a design that completely fills the Majestic Hoop. We recommend at least 20mm of space, around the design on all sides, to enable you to position as needed. Be sure you are updated to the New the update! Version 5908-5413 (August 17, 2009) or higher:
1. Touch to toggle to embroidery.
2. Touch Start Menu .
3. Touch File Manager .
4. Touch My Designs .
5. Touch List View .
6. Select DD_86.vp3

2
7. Touch .
8. Touch .
9. Select 360 x 350.
10. Touch Color Edit .
11. Touch to turn on the grid.
12. Touch .
13. Line up the design in the upper left hand side of the
hoop as shown. Touch and continue touching it until you are zoomed in to 170% or more. Additional grid lines automatically appear. Your Fine Tune Position Numbers on the bottom right hand of the screen should read 82.7 -80.5.
14. Touch Zoom to Hoop . 15. Your design is still highlighted as is indicated by the red square around it. Touch
to duplicate your design. Move the new design to -82.7 -80.5. Use your zoom, and grid lines to help you position the design, then use your Control Arrows to fine tune the position of your design.
16. Repeat step 16 twice to place two more designs at -82.7 80.5 and 82.7 80.5.
17. You now have four perfectly positioned quilt designs.
18. Touch Save Designs .
19. Touch My Files .
20. Touch .

3
21. Touch and Hold .
22. Enter Majestic Hoop Quilt.
23. Touch to close the naming window and again to save the design.
24. Hoop your fabric with two layers of Tear-A-Way Light Stabilizer in your Majestic
Hoop. Be sure to use your clips. If you are quilting through a finished quilt, you can hoop the “quilt sandwich” as long as it uses a fairly thin cotton batting.
NOTE: We are using a quilting design, comprised of straight stitches. If you are using a design that has fill stitches, and dense stitching, you need to use appropriate stabilizer for the design. For a dense design, that would be several layers of regular weight Tear-A-Way or Cut-A-Way.
25. Touch . 26. When prompted “Do you want to stitch out all of one side first?” touch Yes.
27. If you are embroidering through a “quilt sandwich”, thread with bobbin thread to
match your top thread. Bring up the bobbin thread to the top of your fabric. Increase your tension a few clicks for a balanced stitch.
28. Stitch the first side of your design. 29. When the first side is complete, remove your hoop and turn it to attach it on the
opposite side.
30. We are going to use Design Positioning to check the second side of our design, and also to match up the next repeat. We don’t really need to check the second side, because our designs are not dense, so compensation should not be a problem, and our designs don’t actually touch. Learning to do this will help you use it in other designs where the alignment is more crucial. We need to pick the point that we are going to match to. Because we used the grid, and placement numbers, we know our designs are exactly the same distance apart. So, measure two identifiable points in the design. As you can see, we chose where the petals intersect and it measured 1 3/4”. We next measured over 1 3/4” to the right. Make a cross hair there, and repeat for the flower above as shown.

4
31. Touch Design Positioning .
32. Touch Step 1 . 33. Locate the point we are matching on the Screen of your Designer
Diamond. Place your red cursor over that point.
34. Touch Zoom to Cursor and fine tune the placement of the red cursor on the design on the screen.
35. Touch . This is where we will check our position on the fabric in the hoop. If all is well, your needle should be right over your mark. Lower the needle and check if it is over the mark. If it isn’t right on, then use the control arrows to align the needle with the mark on the fabric. You may get a message if your needle is too low. You can choose to allow a lower needle position if you get this message.
36. Touch . Locate the point on the other flower.
37. Touch and check your position on the fabric.
38. Touch to close the Design Positioning window.

5
39. Embroider the second half of the design.
40. When you get the Message: Embroidery is finished, Clear Screen? Touch .
41. To place the second set of designs, we will use Design Positioning again. We know that our designs are 1 3/4” apart. Using a ruler, mark a line down as shown, from the previous designs vertically (the length of the runner).
42. Then measure down 1 3/4” as shown, to create a horizontal mark.
43. Touch Design Positioning .
44. Touch .
45. Place the red cursor on the screen as shown, on the flower. This point corresponds with the mark we made on our fabric.
46. Touch Zoom to Cursor and fine tune the placement of the cursor on the Designer Diamond screen.
47. Touch . Use the control arrows to move the needle so it is over the cross mark you made on the fabric.
48. We can’t check the other mark we made until we stitch the second side. As long as
your center line is lined up with the center line of the hoop, your design will be
correct. Just touch to close and accept the changes you made in Design Positioning. If you get the message that your design is outside the hoop area, touch
Zoom to Hoop . You can see how much outside the hoop you are. If it is

6
only a stitch or two, touch and use your control arrows to move it a couple of clicks back into the hoop. If you are a long way outside the area, you will need to re-hoop and repeat the Design Positioning.
49. When the first side is complete, rotate the hoop and touch .
50. Our marks are now on the bottom of the hoop, towards us.
51. Touch Design Positioning .
52. Touch .
53. Place the red cursor as shown, on the Screen of your Designer Diamond.
54. As before, touch Zoom to Cursor and fine tune the placement of the red cross.
55. Touch and move if necessary so your needle is over the mark you made on your fabric. You should be very close to the mark.
56. Finish stitching the embroidery.
57. Using the techniques you learned here, you can quilt a
full quilt if desired, or quilt a runner as we did.

Majestic Hoop Quilted Runner By Marie Duncan, Education Creative Coordinator This Quilted Runner uses designs from your Designer Diamond, combined in the Majestic Hoop. Follow the instructions in the Majestic Hoop Quilt Block Technique Page to combine and stitch the first set of designs. Sewing Supplies: 1 3/4 yard Brown Silk or other Desired Fabric One Piece 20” x 34” Cotton Batting Robison Anton 40 wt. Rayon Embroidery Thread Sensor Q Foot #4125975-45 Interchangeable Dual Feed #920219096 Changeable Quilters Guide Foot #413155545 Clear A Presser Feet Kit #920237096 Stiletto #140000631
1. Wind a bobbin with 40 wt. Robison Anton thread to match your top thread.
2. Cut two pieces of silk 20” x 54”. Using chalk or a Pictogram
Pen, mark a line down the center of the runner as shown.
3. Make a “quilt sandwich” by putting the batting between the two pieces of silk.
4. Attach your Sensor Q Foot.

5. Touch , touch , touch Sewing Settings . Choose Free Motion Spring Action.
6. Since you will be embroidering through a “quilt sandwich”, thread with bobbin thread to
match your top thread.
7. Using your center mark as a guide, hoop your fabric at one end, as close to the end as you can, matching the center line with the front and back center marks on your hoop.
8. Attach your Majestic Hoop and touch .
9. Bring up the bobbin thread to the top of your fabric.
10. Increase your tension a few clicks for a balanced stitch. We found that 3.8 was perfect.
11. After your Designer Diamond has taken a few stitches, touch . Trim the bobbin thread tail.
12. Continue embroidering the first side of the design. We could have touched to eliminate the color stop, be we left it in, and cut the bobbin thread after the first design. Then we brought it up to the top as before. This insures that the back of our runner will be as beautiful as the front.
13. Follow the instructions in the Designer Diamond Technique Studio Majestic Hoop Quilt
Block to embroider three repeats of the quilt design.
14. Print the template for marking the curves. Trim outside the curves. Place the trimmed template on your runner, matching the embroidery on the runner to the design on the template. Mark the curves with your Pictogram Pen.
15. Switch to Sewing Mode .
16. Thread with sewing thread top and bobbin.
17. Attach your Interchangeable Dual Feed.
18. Snap on your Changeable Quilters Guide Foot.
19. Stitch on the marked curves.
20. Trim just outside the stitching.
21. From the remaining yardage, cut binding strips on the bias 2 3/4” wide. You will need approximately 160 running inches of binding.
22. Stitch the pieces end to end to form one long strip.
23. Press the seams open.
24. Fold the binding in half, lengthwise and press.
25. Remove your Interchangeable Dual Feed. Attach your ankle.
26. Snap on your Clear A Edge Stitching Foot.
27. Select Straight Stitch and adjust the needle position to 1.0 to the right.
28. Place the binding on the right side of the runner, aligning the
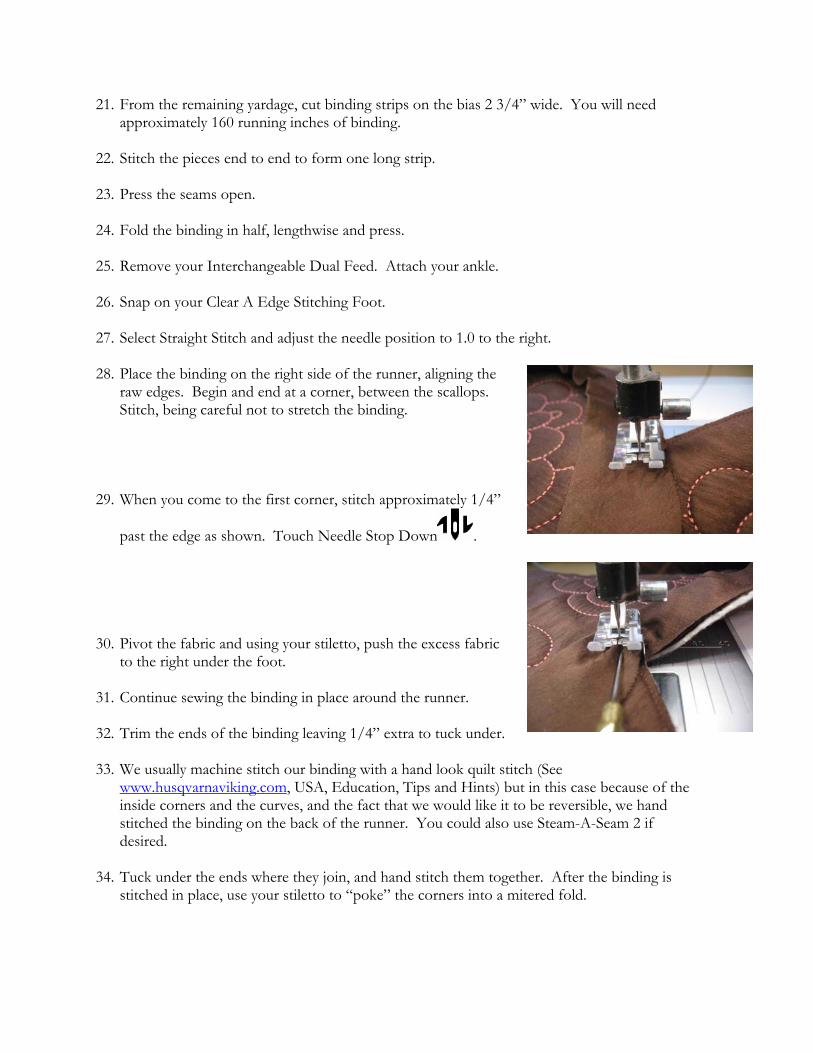
raw edges. Begin and end at a corner, between the scallops. Stitch, being careful not to stretch the binding.
29. When you come to the first corner, stitch approximately 1/4”
past the edge as shown. Touch Needle Stop Down .
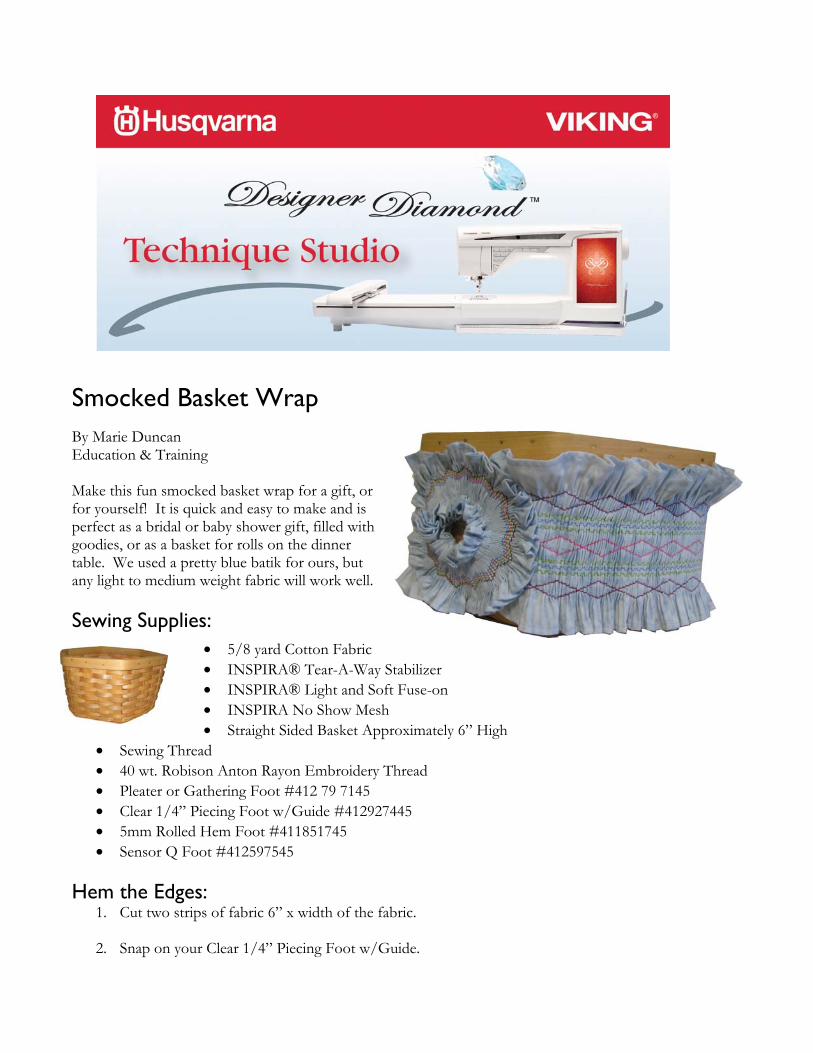
30. Pivot the fabric and using your stiletto, push the excess fabric to the right under the foot.
31. Continue sewing the binding in place around the runner.
32. Trim the ends of the binding leaving 1/4” extra to tuck under.
33. We usually machine stitch our binding with a hand look quilt stitch (See
www.husqvarnaviking.com, USA, Education, Tips and Hints) but in this case because of the inside corners and the curves, and the fact that we would like it to be reversible, we hand stitched the binding on the back of the runner. You could also use Steam-A-Seam 2 if desired.
34. Tuck under the ends where they join, and hand stitch them together. After the binding is
stitched in place, use your stiletto to “poke” the corners into a mitered fold.


1
Designer Diamond Technique Step by Step Designer Smocking: Smocking can be done either in sewing mode or embroidery mode on you Designer Diamond. We will do some of each. Be sure you are updated to the Newest update! Version 6451-5548 or higher: Pleat your Fabric If you are going to make a smocked band to use as a basket wrap, which is the project that accompanies this lesson, finish the edges of the fabric strip as described in the Basket Wrap Project. Your smocked panel can also have raw edges and be set into two other strips of fabric, made into a baby bonnet or even used as a yoke on a baby or child’s dress. Any pattern that calls for hand smocking can be done on the machine. Prepare your fabric by doing one of the following: On a pleater, pleat 6” x 44” (6” x 88” for basket wrap) piece of fabric. A pleater is used by hand and machine smockers to pleat fabric prior to smocking it. There are several different brands of pleaters. Use polyester sewing threads that match your fabric for the pleater because it is stronger. You can also use your gathering foot to pleat the fabric:
1. Snap on your Gathering Foot. 2. Select a basting stitch. 3. Test sew on a scrap and check to be sure it is gathering sufficiently. 4. Mark lines 1” apart across the width of the fabric with your Pictogram Pen and
gather on the lines. Once your fabric is pleated, you need to stabilize it for stitching. There are several options, depending on what your finished project will be with the pleated panel. One would be to use a water soluble sticky stabilizer like INSPIRA® Aqua Magic Plus. This will wash away completely when the garment is washed, and will leave a soft, pliable panel with a bit of give

2
to it. This is a nice option for a baby or child’s garment. The other alternative is to use a soft iron-on stabilizer like INSPIRA® Light and Soft Fuse-on. For our basket wrap project, we chose this method. The fused or sticky stabilizer keeps the pleated fabric stable while the stitches are being formed. Smocking in Sewing Mode:
1. Touch Start Menu .
2. Your Smocking stitches are in menu D:2, stitches D:30 to D:35. They are designed to be programmed together, or used alone.
3. Try a few combinations on a scrap backed with INSPIRA®
Tear-A-Way stabilizer. Because they will be sewn on an uneven, pleated or gathered surface, it is best when smocking in sewing mode to stick with rows of stitches that don’t have to “match”. If you want to do more intricate patterns, that require the “peaks” to match, you are better to do it in embroidery mode.
4. Here are a few combinations we liked:
This is one row of D2:30, one row of D2:35 at a 7.0 Stitch Width and one row of D2:30. This uses twin needles.
Touch .
Touch . Touch Twin Needle Safety and select 3.0. Insert a size 3.0 twin
needle. Touch , then , then . Touch T and look for instructions on threading with a twin needle. It is one row of D2:30, a second of D2:30, the center is D2:32 and then two more rows of D2:30.

3
Smocking in Embroidery Mode: Smocking in Embroidery Mode is preferable when a more intricate pattern is desired. The stitches stay straight, and the rows lined up perfect. Here are several sequences we liked.
1. Toggle to Embroidery Mode .
2. Touch . 3. Select the 360 x 200 hoop.
4. Touch Start Menu .
5. Touch .
6. Select . 7. Touch to go to D2.
8. Touch .
9. Touch twice to remove the two FIX stitches.
10. Touch D2:35 .
11. Touch and hold and enter 11, for a total of 12 repeats of the stitch.
12. Touch .
13. Touch .
14. Touch Color Edit .
15. Touch to bring up the background grid.
16. Touch to close the Color Edit window.
17. Move your design to 0.0 and 3.0.

4
18. Touch to duplicate the design.
19. Touch Mirror Side to Side . 20. Move the design to 0.0 and -3.0.
21. Touch Select All .
22. Touch Group . It is now one grouped design.
23. Touch to duplicate the design. 24. Move to 0.0 and 30.0
25. Touch to duplicate the design. 26. Move to 0.0 and -30.0.
27. Touch Start Menu .
28. Touch .
29. Select . 30. Touch to go to D2.
31. Touch .
32. Touch twice to remove the two FIX stitches
33. Touch D2:30 .
34. Touch and Hold . Enter 71 (360, size of hoop divided by 5.0, size of design plus the one that is already on the screen) for a row to fill the hoop. Look at the bottom of the screen and you will see Program Length 360 which is what we want.

5
35. Touch to close the Stitch Selection window.
36. Touch to close the Program window. 37. Move to 0.0 and 11.0.
38. Touch . 39. Move to 0.0 and 19.0.
40. Touch . 41. Move to 0.0 and 15.0.
42. Touch Step Through Designs four times to go to the first small row.
43. Touch Add/Remove Selection once to highlight it.
44. Touch Step Through Designs to select the next small row.
45. Touch to add the second.
46. Touch Step Through Designs to select the next small row.
47. Touch to add the third.
48. Touch Group to group the three small rows together.
49. Touch . 50. Move to 0.0 and -15.0.
51. Touch Select All .
52. Touch Group . It is now one grouped design.

6
53. Touch Save to My Designs .
54. Touch My Files .
55. Touch .
56. Touch and hold to delete the name that is there.
57. Name the design smocking.
58. Touch to close the naming window and again to save the design.
Embroider:
1. Hoop INSPIRA® Tear-A-Way stabilizer in your 360mm x 200mm hoop.
2. Touch . The needle goes to the back of the hoop, on the right side. This is the far right side of the design. Position the stabilized pleated strip on top of the Tear-A-Way stabilizer, centered side to side with the needle approximately 1/2” to 3/4” from the end of your pleated fabric.
3. Baste the strip in place. Remember, you can baste using your foot control instead of
when you want to control the speed.
4. Colors 1 and 2 stitch the center diamonds.
5. Colors 3 and 4 stitch the right hand row of diamonds.
6. Color 5 stitches the first small row to the right of the center.
7. Color 6 stitches the far right small row.
8. Color 7 stitches out the center right hand row.
9. Color 8 stitches the far left small row to the left center.
10. Color 9 stitches the far right small row.
11. Color 10 stitches out the center right hand row.

7
12. Colors 11 and 12 stitch the left hand row of diamonds.
13. When your Designer Diamond asks you “Embroidery Finished, Clear Screen?”
touch .
14. When the design is complete, DO NOT remove the basting. Remove the fabric from the hoop and trim away the excess stabilizer next to where the next design will begin
15. Design Positioning would not work well in this instance because our design
completely fills our hoop from top to bottom. We would be able to move the design from side to side, but not from top to bottom. Instead we are going to use our basting to match up our next repeat of the design.
16. Hoop INSPIRA® Tear-A-Way
stabilizer and place your hoop in your Designer Diamond.
17. Lower the needle into the corner of the
basting, from the first design as shown.
18. Lower the foot and raise the needle. Baste the fabric in place.
Smocked Basket Wrap By Marie Duncan Education & Training Make this fun smocked basket wrap for a gift, or for yourself! It is quick and easy to make and is perfect as a bridal or baby shower gift, filled with goodies, or as a basket for rolls on the dinner table. We used a pretty blue batik for ours, but any light to medium weight fabric will work well. Sewing Supplies:
• 5/8 yard Cotton Fabric • INSPIRA® Tear-A-Way Stabilizer • INSPIRA® Light and Soft Fuse-on • INSPIRA No Show Mesh • Straight Sided Basket Approximately 6” High
• Sewing Thread • 40 wt. Robison Anton Rayon Embroidery Thread • Pleater or Gathering Foot #412 79 7145 • Clear 1/4” Piecing Foot w/Guide #412927445 • 5mm Rolled Hem Foot #411851745 • Sensor Q Foot #412597545
Hem the Edges:
1. Cut two strips of fabric 6” x width of the fabric.
2. Snap on your Clear 1/4” Piecing Foot w/Guide.

3. Seam them end to end to create one long strip.
4. Snap on your 5mm Rolled Hem Foot.
5. Thread with sewing thread top and bobbin.
6. With the fabric wrong side up, fold up a double 5mm wide hem on the end of the fabric as shown, insert it under the foot and lower the needle into the folded hem.
7. Begin to sew for 1/4” or so, until the fabric is feeding
freely. Touch Needle Stop Down . Your presser foot raises to Pivot position. Pull the fabric up into the roller as shown.
8. Continue sewing, holding the edge of the fabric straight up in front of you as shown. The rolled hem foot takes a bit of practice, but it is well worth the results!
9. Hem both sides of the strip.
10. Press your fabric well; this is the last chance you will have!
Smock: 1. Pleat or gather your fabric following the instructions in the Designer Diamond Technique
Studio Designer Smocking document.
2. Spread out the pleats and measure around your basket. The smocked panel needs to be 1” shorter than the measurement around your basket.
3. Press INSPIRA® Light and Soft Fuse-on to the back of your pleated fabric.
4. Attach your Sensor Q Foot.
5. Hoop INSPIRA® Tear-A-Way Stabilizer in your 360mm x 200mm Designer Royal Hoop.
6. Thread with 40 wt. Robison Anton Rayon thread on top and bobbin thread in the bobbin.
7. Follow the instructions in the Designer Diamond Technique Studio Designer Smocking
document to embroider the first design and place and embroider the second.
Create the Medallion:
1. Touch to toggle to Sewing Mode. 2. Cut one strip of fabric 3” x width of fabric.
3. Hem the two long edges and pleat as you did for the basket wrap. Use threads that match
your fabric for the pleating/basting.
4. Carefully pull the basting threads out of the last 1/2” on each short end.
5. Keeping the basting threads out of the way, select A1:13 . Overcast the raw edges.
6. Select A1:02 . Place the two short ends right sides together and keeping the basting threads out of the way, stitch the seam.
7. Pull up one outer set of basting threads as tight as possible. This will be the center of the medallion. Tie them tight, and cut off the thread ends.
8. Adjust the other three rows of basting until the circle lies flat. The center ruffle will “stick
up” a bit. Press INSPIRA® Light and Soft Fuse-on to the back of the gathered medallion.
9. Touch to toggle to Embroidery Mode.
10. Touch Start Menu .
11. Touch . 12. Select the 120mm x 120mm Designer Splendid Square hoop.
13. Select . 14. Touch to go to D2.
15. Touch and hold to remove the two FIX stitches.

16. Touch D2:33 .
17. Touch .
18. Touch Design Shaping .
19. Touch Circle Clockwise .
20. Be sure that Align Shapes Evenly is chosen.
21. Touch the to create 14 repeats of the stitch.
22. Set the size of the circle to 94.8 and 96.5.
23. Touch .
24. Touch .
25. Touch to move the new design to the center of the hoop, 0.0 and 0.0.
26. Touch Scale .
27. Touch the down arrow to scale to 94.8 and 96.5.
28. Touch .
29. Touch to move the new design to the center of the hoop, 0.0 and 0.0.
30. Touch Scale .
31. Touch the down arrow to scale to 90.6 and 92.5

32. Touch .
33. Touch to move the new design to the center of the hoop, 0.0 and 0.0.
34. Touch Scale .
35. Touch the down arrow to scale to 86.9 and 88.5.
36. Select Color Manager .
37. Select the first color block 1:1.
38. Touch Thread Color Edit .
39. Choose dark red, first column, second from the bottom.
40. Touch .
41. Select second color block 1:2.
42. Touch Thread Color Edit .
43. Choose dark red, first column, second from the bottom.
44. Repeat changing the first 14 colors to dark red.
45. Change the second 14 colors to purple.
46. Change the third 14 colors to orange
47. Change the fourth 14 colors to green.
48. Touch to close Color Edit.
49. Touch Select All .
50. Touch Group . It is now one grouped design.

51. Touch Save to My Designs .
52. Touch My Files .
53. Touch .
54. Touch and hold to delete the name that is there.
55. Name the design medallion.
56. Touch to close the naming window and again to save the design.
57. Hoop INSPIRA® No Show Mesh in your 120mm x 120mm hoop. Pin your gathered medallion so that it is centered.
58. Touch .
59. Touch .
60. Remove the from Automatic Jump Stitch Trim. Even though we removed the Fix stitches from between the stitches, there is still a color change. If you don’t remove the check mark, it will cut between each repeat of the stitch.
61. Touch .
62. Touch and baste the design in place using your foot control instead of the
button. This way you can control the speed and remove the pins if necessary.
63. Embroider the medallion design.
64. Touch to toggle to Sewing Mode. 65. Thread with sewing thread to match your fabric on top and in the bobbin.
66. Trim the No Show Mesh stabilizer away from the embroidery on the outside and inside of
the medallion stitching.

67. Pull the fused stabilizer away from the fabric around the outside only of the embroidery. Pull out any basting threads outside the embroidery. Leave the basting threads inside the embroidery for now.
68. Select straight stitch A1:1, left needle position straight stitch. Align the edge of the foot with
the center ruffle, and stitch as closely as possible around the center, as shown.
69. The center pleats or gathers are now secured. Remove
any basting stitches that show.
70. Pull the fused stabilizer from the center of the medallion and trim away.
71. Place the basket wrap around the basket. Pin the
medallion on top of the two raw ends.
72. Select Stitch A1:02 .
73. Stitch near the edge of the smocking stitches, stitch the medallion in place.
74. Slide your basket wrap onto your basket from the bottom.
75. Fill with goodies, and enjoy!
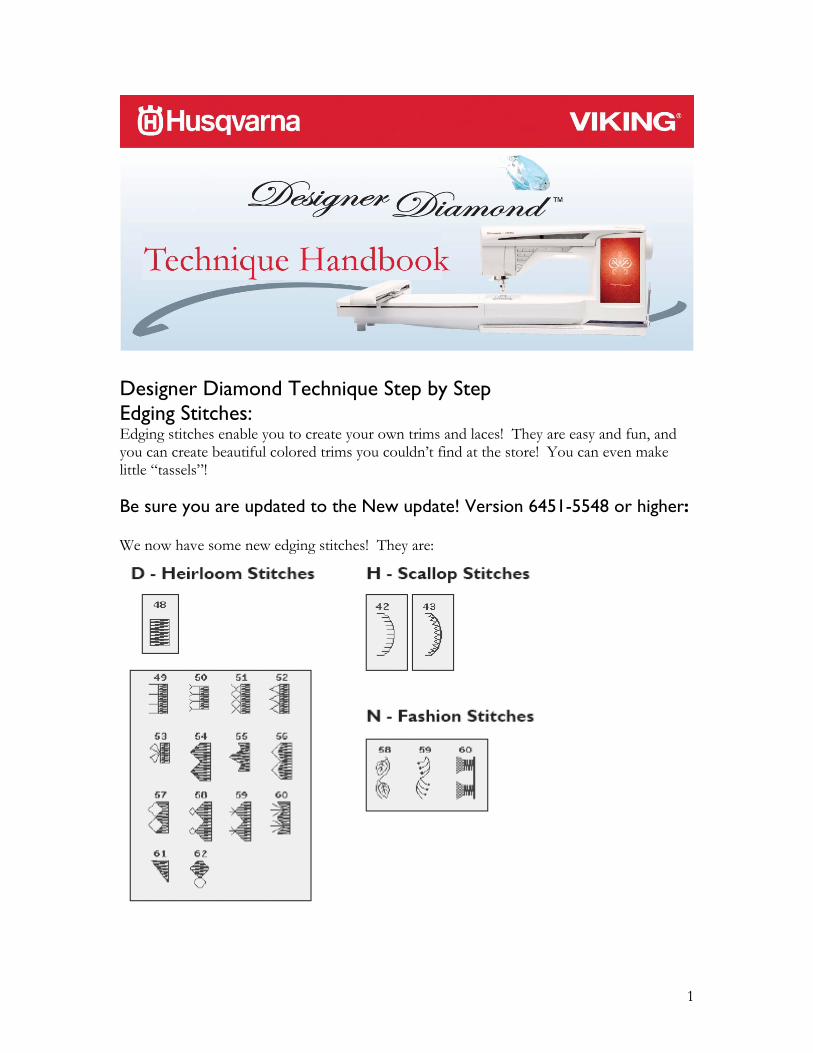
1
Designer Diamond Technique Step by Step Edging Stitches: Edging stitches enable you to create your own trims and laces! They are easy and fun, and you can create beautiful colored trims you couldn’t find at the store! You can even make little “tassels”! Be sure you are updated to the New update! Version 6451-5548 or higher: We now have some new edging stitches! They are:

2
1. Cut a strip of cotton fabric 2” x width of fabric using your rotary cutter and mat. This is important for the new D Menu heirloom stitches. They need a nice clean edge to be stitched on.
2. Thread with 40 wt. Rayon Embroidery thread on top and bobbin thread in the
bobbin.
3. Snap on your B Foot.
4. Place two strips INSPIRA® Tear-A-Way Light stabilizer underneath the strip of fabric. The Tear-A-Way Light is stable enough to support the stitching but will tear away easily without disturbing the stitches.
5. Touch .
6. Touch .
7. Select the D Menu .
8. Select D3:49-62 and try out the different edging stitches. Align the edge of your B Foot with the edge of the fabric as shown.
9. Place two strips of INSPIRA® Aqua Magic Stabilizer
underneath the fabric and stitch a few more. We found our best stitch out was attained with two layers of Aqua Magic Stabilizer.
Note: Because these border stitches D3:49-62 have a forward and backward row of stitching on the edge, when washed, these stitches will be loose and give “picot” edge. If you want a more defined stitch, apply fray blocking liquid along the edge of the stitch and allow to dry before washing.
10. Touch .
11. Touch .
12. Select , Menu 3.
13. Select N3:60 . This needs to be sewn on a finished edge.

3
14. Touch Mirror Side to Side .
15. Fold a piece of fabric in half lengthwise.
16. Place on four layers of Aqua Magic Stabilizer. If you look at the photo, you will see that two layers were not enough. The fabric and stitching was “tunneling”. A water soluble stabilizer is necessary for this stitch to enable the tassels to “fringe”.
17. You can also see that they are not stitching out quite even
on our machine. Because of the way this stitch is formed, it will show up balance irregularity to this specific stitch. If the balance of this stitch needs to be adjusted, here’s how.
18. To adjust the balance on a stitch, touch .
19. Touch .
20. Touch Stitch Settings . We touched the to make the drawing of the stitch on the screen look like the stitch on our fabric.

4
21. Touch . Your stitches should now be even. If they are not, you can adjust accordingly.
H3:42 and H3:43 are decorative stitches. They look nice on borders. Try several rows of H3:42 or H3:43 with N3:58 or N3:59 in between. We used this combination on our apron waistband.

Candlewicking Dresser Scarf Created by Leslie Courtnage Sewing Supplies:
• Designer Diamond and Embroidery Unit • 260mm x 200mm and 120mm x 120mm hoops • 1/2 yard Linen, Linen/Cotton Blend or Osnaburg • INSPIRA® Size 90 or 100 Topstitching needle • Sulky 30 weight cotton thread • Wind at least 2 full bobbins of the same thread • Pictogram pen • INSPIRA® Tear-away Stabilizer • Sulky KK2000 Temporary Spray Adhesive™
Embroider: 1. Straighten both cut edges of fabric. 2. Press out bolt fold and mist the fabric to shrink up slightly. 3. Press a line folding the fabric cut edge to cut edge. Then matching selvage edges press a small crease to
define the center of entire scarf. 4. Hoop center using this marking in the 260mm x 200mm Designer Crown Hoop.
5. Touch the Start Menu Icon and select design #73 floral candlewicking .

6. Touch .
7. Touch Design Positioning .
8. Select center . Adjust design if necessary by using the selection box to align the needle with
the center marking. Select and then embroider design. 9. Mark a line 2” in from each selvage. 10. Mark a line 1 ½” from cut edge. 11. Hoop INSPIRA® Tear-A-Way stabilizer in 120mm x 120mm Designer Splendid Square Hoop. Spray a
small amount of Sulky KK2000 Temporary Spray Adhesive™ on stabilizer. We will be using the or
baste feature to attach fabric to stabilizer.
12. Go to start and select Design #75 corner candlewicking.
13. Select go and then Design Positioning .
14. Select lower left corner . Starting in the left hand corner of one of the narrow ends of the runner,
line up the needle where the lines intersect at the corner. Select fix or baste then touch
start/stop . Embroider design.
15. Once design is finished touch to keep design and not clear screen.
16. Then touch the embroidery edit and select mirror image to flip design for opposite corner.
17. Select go and then Design Positioning .
18. Select lower right hand position of design .
19. Lay another corner on fresh stabilizer lining up right corner markings. Select fix or baste
then touch start/stop . Embroider design. 20. Repeat for the other side of the runner. It is OK to clear screen once you have embroidered the last corner.
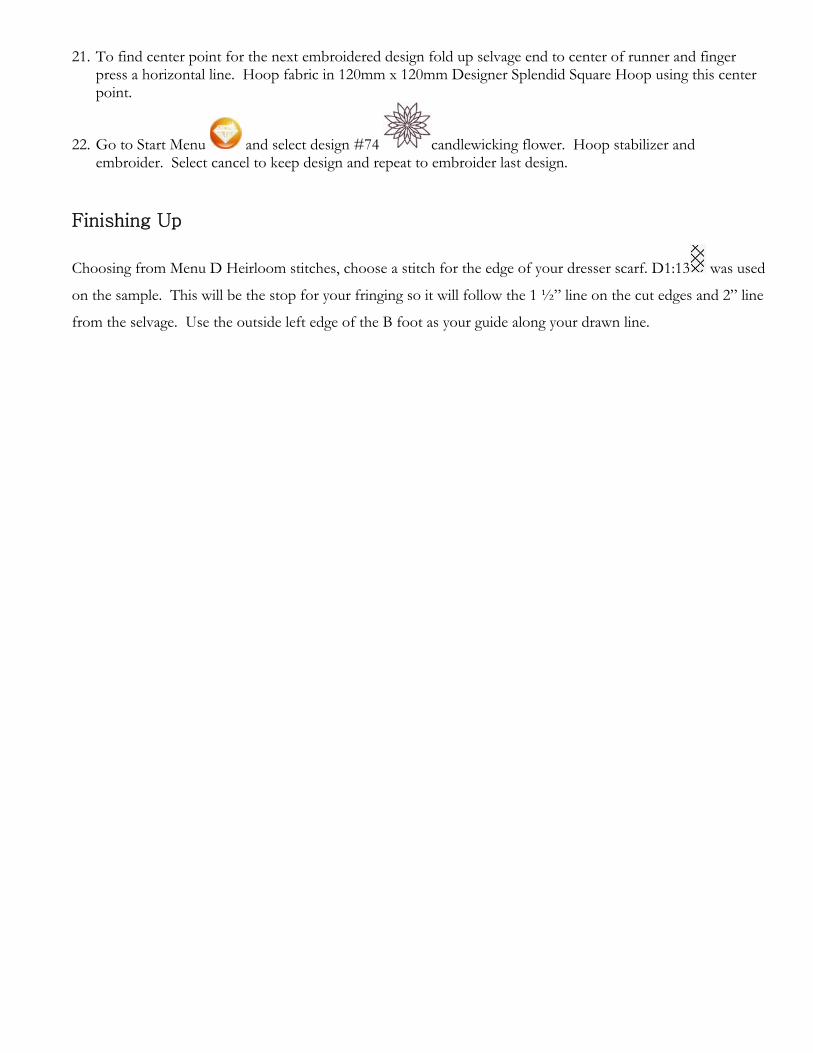
21. To find center point for the next embroidered design fold up selvage end to center of runner and finger press a horizontal line. Hoop fabric in 120mm x 120mm Designer Splendid Square Hoop using this center point.
22. Go to Start Menu and select design #74 candlewicking flower. Hoop stabilizer and embroider. Select cancel to keep design and repeat to embroider last design.
Finishing Up
Choosing from Menu D Heirloom stitches, choose a stitch for the edge of your dresser scarf. D1:13 was used
on the sample. This will be the stop for your fringing so it will follow the 1 ½” line on the cut edges and 2” line
from the selvage. Use the outside left edge of the B foot as your guide along your drawn line.