desktop integration siebel agent guide - oracle · desktop integration siebel agent guide siebel...
TRANSCRIPT

Desktop Integration Siebel Agent GuideSiebel Innovation Pack 2017July 2017

Copyright © 2005, 2017 Oracle and/or its affiliates. All rights reserved.
This software and related documentation are provided under a license agreement containing restrictions on use and disclosure and are protected by intellectual property laws. Except as expressly permitted in your license agreement or allowed by law, you may not use, copy, reproduce, translate, broadcast, modify, license, transmit, distribute, exhibit, perform, publish, or display any part, in any form, or by any means. Reverse engineering, disassembly, or decompilation of this software, unless required by law for interoperability, is prohibited.
The information contained herein is subject to change without notice and is not warranted to be error-free. If you find any errors, please report them to us in writing.
If this is software or related documentation that is delivered to the U.S. Government or anyone licensing it on behalf of the U.S. Government, the following notice is applicable:
U.S. GOVERNMENT END USERS: Oracle programs, including any operating system, integrated software, any programs installed on the hardware, and/or documentation, delivered to U.S. Government end users are “commercial computer software” pursuant to the applicable Federal Acquisition Regulation and agency-specific supplemental regulations. As such, use, duplication, disclosure, modification, and adaptation of the programs, including any operating system, integrated software, any programs installed on the hardware, and/or documentation, shall be subject to license terms and license restrictions applicable to the programs. No other rights are granted to the U.S. Government.
This software or hardware is developed for general use in a variety of information management applications. It is not developed or intended for use in any inherently dangerous applications, including applications that may create a risk of personal injury. If you use this software or hardware in dangerous applications, then you shall be responsible to take all appropriate fail-safe, backup, redundancy, and other measures to ensure its safe use. Oracle Corporation and its affiliates disclaim any liability for any damages caused by use of this software or hardware in dangerous applications.
Oracle and Java are registered trademarks of Oracle and/or its affiliates. Other names may be trademarks of their respective owners.
Intel and Intel Xeon are trademarks or registered trademarks of Intel Corporation. All SPARC trademarks are used under license and are trademarks or registered trademarks of SPARC International, Inc. AMD, Opteron, the AMD logo, and the AMD Opteron logo are trademarks or registered trademarks of Advanced Micro Devices. UNIX is a registered trademark of The Open Group. Android is a trademark of Google Inc. Apple and iPad are registered trademark of Apple Inc.
This software or hardware and documentation may provide access to or information about content, products, and services from third parties. Oracle Corporation and its affiliates are not responsible for and expressly disclaim all warranties of any kind with respect to third-party content, products, and services unless otherwise set forth in an applicable agreement between you and Oracle. Oracle Corporation and its affiliates will not be responsible for any loss, costs, or damages incurred due to your access to or use of third-party content, products, or services, except as set forth in an applicable agreement between you and Oracle.
Documentation Accessibility
For information about Oracle's commitment to accessibility, visit the Oracle Accessibility Program website at http://www.oracle.com/pls/topic/lookup?ctx=acc&id=docacc.
Access to Oracle Support
Oracle customers that have purchased support have access to electronic support through My Oracle Support. For information, visit http://www.oracle.com/pls/topic/lookup?ctx=acc&id=info or visit http://www.oracle.com/pls/topic/lookup?ctx=acc&id=trs if you are hearing impaired.

Desktop Integration Siebel Agent Guide Siebel Innovation Pack 2017 3
Contents
Desktop Integration Siebel Agent Guide 1
Chapter 1: What’s New in This Release
Chapter 2: Desktop Integration Siebel Agent OverviewDesktop Integration Siebel Agent Framework 7
Supported Platforms and Client 7Supported Features 8
Chapter 3: Installing Desktop Integration Siebel AgentDISA Installation Process 9
Downloading the DISA Installer 9
Installing and Configuring DISA 9Installing GUI Based DISA 9Verifying DISA Installation Folder 10Enabling DISA in Mozilla Firefox 11Verifying the DISA Installation 11Re-configuring DISA 12Troubleshooting DISA 12
Deploying DISA to Siebel Desktops 13
Deploying DISA on Multi-User Environments 14Applicable Patches 14DISA Deployment Process on a Multi-User Environment 14
Upgrade DISA 17
Uninstall DISA 17
Chapter 4: Generating and Deploying DISA CertificateSetting Up DISA Environments and Generating DISA Certificates 19
Enabling DISA for Siebel HTTPS Environment 19CA Signed DISA Certificate Generation and Deployment Process 21
Chapter 5: DISA Supported FeaturesInline Attachment Editing 25
How it Works 25

Desktop Integration Siebel Agent Guide Siebel Innovation Pack 2017
Contents ■
4
Applicable Releases 26Inline Attachment Editing Features 27Editing an Inline Attachment 27Viewing files 28
F9/Microsoft Outlook Integration 28How it Works 29Applicable Releases 29
Configuring CTI Hoteling Telesets 31How it Works 31Applicable Releases 32
Web Notifications for Siebel CTI 32How it Works 33Web Notifications Display Configurations 33Applicable Releases 33Web Notifications Functionality 34Browser Add-ons 36
Batch Fulfillment Printing 36Applicable Releases 37
Index
Desktop Integration Siebel Agent Guide Siebel Innovation Pack 2017 5
1 What’s New in This Release
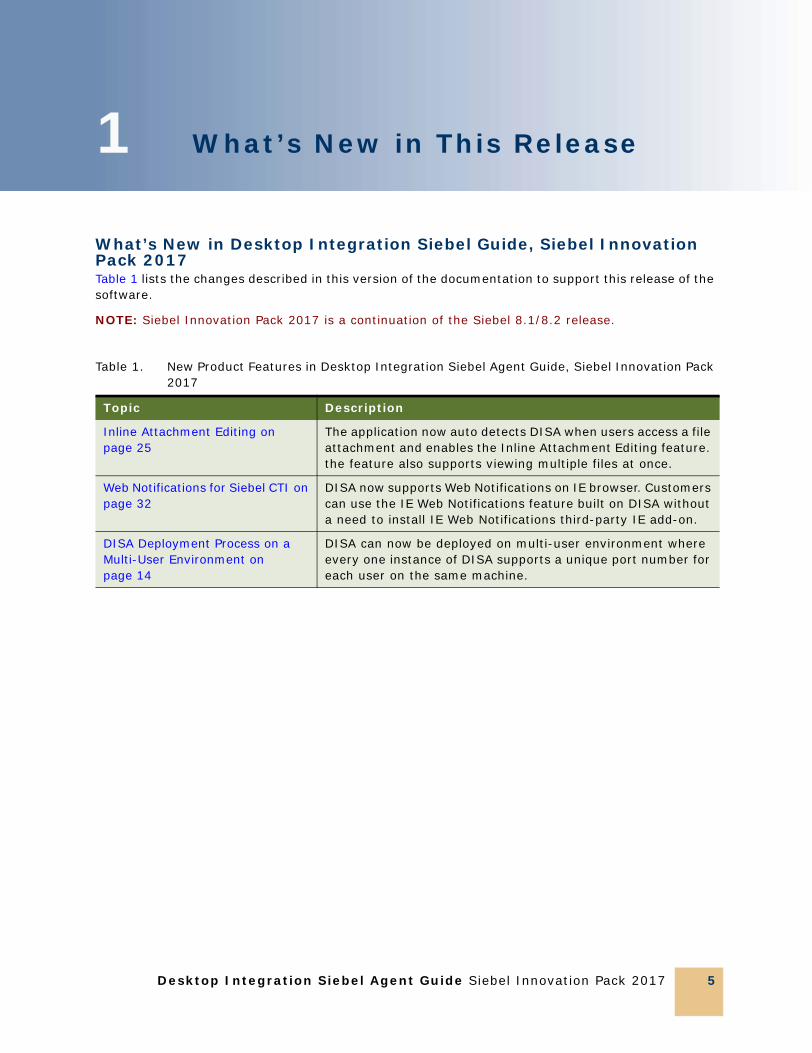
What’s New in Desktop Integration Siebel Guide, Siebel Innovation Pack 2017Table 1 lists the changes described in this version of the documentation to support this release of the software.
NOTE: Siebel Innovation Pack 2017 is a continuation of the Siebel 8.1/8.2 release.
Table 1. New Product Features in Desktop Integration Siebel Agent Guide, Siebel Innovation Pack 2017
Topic Description
Inline Attachment Editing on page 25
The application now auto detects DISA when users access a file attachment and enables the Inline Attachment Editing feature. the feature also supports viewing multiple files at once.
Web Notifications for Siebel CTI on page 32
DISA now supports Web Notifications on IE browser. Customers can use the IE Web Notifications feature built on DISA without a need to install IE Web Notifications third-party IE add-on.
DISA Deployment Process on a Multi-User Environment on page 14
DISA can now be deployed on multi-user environment where every one instance of DISA supports a unique port number for each user on the same machine.

Desktop Integration Siebel Agent Guide Siebel Innovation Pack 2017
What’s New in This Release ■
6
Desktop Integration Siebel Agent Guide Siebel Innovation Pack 2017 7
2 Desktop Integration Siebel Agent Overview
Siebel CRM depends on Java applets to support key desktop integration features. However, browser support for the Netscape PlugIn Application Programming Interface (NPAPI) was discontinued because of performance and security issues. The Desktop Integration Siebel Integration (DISA) replaces NPAPI in Siebel CRM. It includes the following topics:
■ Desktop Integration Siebel Agent Framework on page 7
■ Supported Platforms and Client on page 7
■ Supported Features on page 8
Desktop Integration Siebel Agent FrameworkThe Desktop Integration Siebel Agent (DISA) is a generic framework that is based on the WebSocket protocol. It can be used with the following Siebel Innovation Packs:
■ Siebel Innovation Pack 2014, Patchset 15 or later (version.14.15 or later)
■ Siebel Innovation Pack 2015, Patchset 9 or later (version 15.9 or later)
■ Siebel Innovation Pack 2016
■ Siebel Innovation Pack 2017
The DISA framework consists of two key components:
1 WebSocket Client: Implemented in the OpenUI application in the browser.
2 WebSocket Server: Installed on the agent workstation. It is the interface between OpenUI and workstation native access.
Supported Platforms and ClientDISA can be installed and run on Microsoft Windows and supports the Microsoft Windows version of Siebel Web Client.
DISA also provides backward compatibility through an internal component version scheme. The compatibility check happens when the component is invoked to determine whether a client and a server are compatible.
For additional information on feature support and DISA extensibility, refer to the DISA Development Guide.

Desktop Integration Siebel Agent Guide Siebel Innovation Pack 2017
Desktop Integration Siebel Agent Overview ■ Desktop Integration Siebel Agent Framework
8
Supported FeaturesDISA supports the following features:
■ Inline Attachment Editing on page 25
■ F9/Microsoft Outlook Integration on page 28
■ Configuring CTI Hoteling Telesets on page 31
■ Web Notifications for Siebel CTI on page 32
■ Batch Fulfillment Printing on page 36
NOTE: Siebel for Outlook Drag and Drop feature does not rely on DISA framework. The Microsoft Outlook to Siebel OpenUI Drag and Drop Installer is available on My Oracle Support. Refer to Microsoft Outlook to Siebel Open UI Drag and Drop (Doc ID 2117212.1).
For Open UI F9/MS Outlook Integration please refer to Siebel CRM Open UI F9/Microsoft Outlook Integration (Doc ID 2117013.1).

Desktop Integration Siebel Agent Guide Siebel Innovation Pack 2017 9
3 Installing Desktop Integration Siebel Agent
This chapter includes the following topics:
■ DISA Installation Process on page 9
■ Downloading the DISA Installer on page 9
■ Installing and Configuring DISA on page 9
■ Deploying DISA to Siebel Desktops on page 13
■ Deploying DISA on Multi-User Environments on page 14
■ Upgrade DISA on page 17Uninstall DISA on page 17
DISA Installation ProcessTo install and Deploy DISA, perform the following tasks:
1 Downloading the DISA Installer on page 9
2 Installing and Configuring DISA on page 9
3 Deploying DISA to Siebel Desktops on page 13
Downloading the DISA InstallerThe Desktop Integration Siebel Agent (DISA) Installer is available on My Oracle Support.
Installing and Configuring DISATo install and configure DISA, perform the following tasks:
1 Installing GUI Based DISA on page 9
2 Verifying DISA Installation Folder on page 10
3 Enabling DISA in Mozilla Firefox on page 11
4 Verifying the DISA Installation on page 11
5 Re-configuring DISA on page 12
Installing GUI Based DISADISA is installed in the following two modes:

Desktop Integration Siebel Agent Guide Siebel Innovation Pack 2017
Installing Desktop Integration Siebel Agent ■ Installing and Configuring DISA
10
■ GUI mode: Takes through a step-by-step user interface for installation. GUI mode can be also used to create a response file, which is used while deploying DISA on Agent desktops.
■ Silent mode: Uses the response file to deploy DISA on Agent desktops. For more information, see Deploying DISA to Siebel Desktops on page 13.
To install DISA in the GUI mode:1 After you download the latest DISA version, double-click on the
Desktop_Integration_Siebel_Agent.exe to run the DISA Installer.
2 Select an appropriate location for installation.
3 In the Configure DISA screen, enter the following:
■ Port Number: a valid and unique port number within the specified range. The default port number is 18443.
■ White List: a list of domains names using semicolons (;) as separators.
4 In the DISA Certificate screen, select one of the two options:
■ Option 1: Generate Keystore and Certificate (recommended for the first time setup)
Generates keystore (disa.jks) and certificate (disa.der)
Creates files in "<CURRENT_DISA_HOME>/DesktopIntSiebelAgent"
■ Option 2: Generate Certificate Using Existing Keystore
Creates a new certificate (disa.der) from an existing keystore file (disa.jks)
Copies both keystore (disa.jks) and certificate (disa.der) in "<CURRENT_DISA_HOME>/DesktopIntSiebelAgent"
5 In the Choose Shortcut Folder screen, choose where to add shortcuts for the DISA application (Desktop Integration Siebel Agent) and the uninstaller (Change DISA Installation)
6 In the Pre-Installation Summary screen, click the Installation. The installation begins.
7 In the Install Complete screen, click Done.
Verifying DISA Installation FolderNavigate to the DISA folder and drill down to verify that it contains the the following sub-folders and files
■ Folder Name:
■ DesktopIntSiebelAgent
■ Sub folders names:
■ lib
■ log
■ plugins

Installing Desktop Integration Siebel Agent ■ Installing and Configuring DISA
Desktop Integration Siebel Agent Guide Siebel Innovation Pack 2017 11
■ config.properties
■ File Names:
■ disa.der
■ disa.exe
■ disa.jks
Enabling DISA in Mozilla Firefox1 Make sure DISA is running.
2 Open Mozilla Firefox, and then from the Tools menu, select Options.
3 Navigate to Advanced, and then to the Certificates tab.
4 Click View Certificates.
5 In the pop-up window, select the Servers tab.
6 Select the default localhost 18443 and click Add Exception... .
7 In the Add Security Exception window, in the Location field, enter the following address:
https://localhost:18443.
NOTE: The port 18443 must be changed to the port number which you configured for disa.exe in config.properties file.
8 Click Get Certificate, and then Confirm Security Exception.
You will find a new record is added in the Servers tab.
Verifying the DISA Installation In the Task Tray, verify whether the DISA icon displays as shown:
Desktop Integration Siebel Agent Guide Siebel Innovation Pack 2017
Installing Desktop Integration Siebel Agent ■ Installing and Configuring DISA
12
Re-configuring DISANOTE: After modifying the config.properties file, DISA needs to be restarted for the changes to take effect.
To re-configure DISA after installation1 Navigate to the DISA Install folder and open the config.properties file.
a In the config.properties file, configure the following:
Add the server hostname (without the port number), then the separate server names using semi-colons (;) as separators. For example:
whiteList=example.com;www.example.com;2ndexample.com
For example: whiteList=sla02kfo.us.oracle.com;slc02kfo
port=18443
You can update Whitelist information as needed.
Troubleshooting DISA
To troubleshoot DISA, set the Log Level.NOTE: Setting of the log level is required only for troubleshooting if DISA is not functioning properly.
1 Navigate to the DISA Install folder and open the config.properties file.
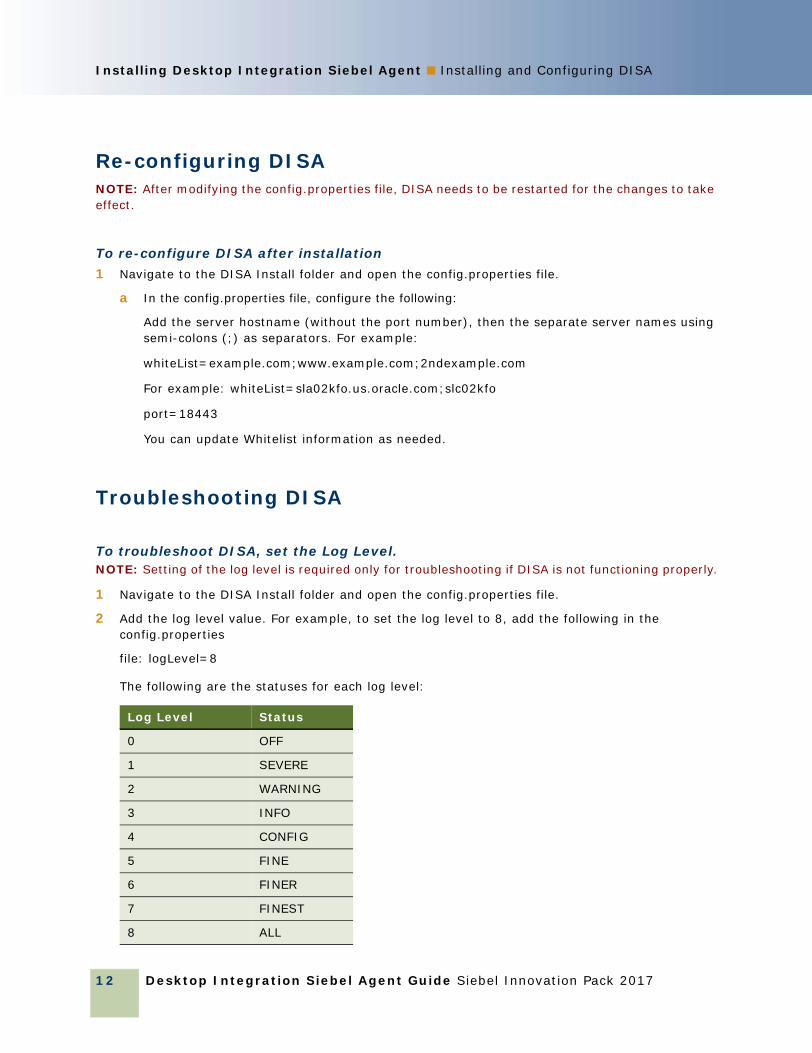
2 Add the log level value. For example, to set the log level to 8, add the following in the config.properties
file: logLevel=8
The following are the statuses for each log level:
Log Level Status
0 OFF
1 SEVERE
2 WARNING
3 INFO
4 CONFIG
5 FINE
6 FINER
7 FINEST
8 ALL
Installing Desktop Integration Siebel Agent ■ Deploying DISA to Siebel Desktops
Desktop Integration Siebel Agent Guide Siebel Innovation Pack 2017 13
3 Check the log file after the log level is reset.
Deploying DISA to Siebel Desktops
Perform the following steps to deploy DISA to agents' desktops1 Generate a response file:
a Run the following command in a command line window:
Desktop_Integration_Siebel_Agent.exe -r d:\resp.txt
b Finish the installation steps as described in Installing GUI Based DISA on page 9. All the user selection and inputs will be recorded in the response file D:\resp.txt.
2 On the agent’s desktop machines, perform DISA Silent Mode Installation. In a command line window, run the following:
Desktop_Integration_Siebel_Agent.exe -i silent -f d:\resp.txt
This command will launch DISA installer in silent mode using the recorded user inputs in the D:\resp.txt file.
NOTE: Depending on the corporate policy, customers can skip certificate import and use other means to import the certificate into the Trusted Root on agents' desktop machines.
To skip certificate import, the recommended install steps for Administrator are:
a Run the DISA Installer once; choose Generate Keystore and Certificate in the DISA Certificate panel.
b Find and copy disa.jks and disa.der files in the DISA install folder \DesktopIntSiebelAgent.
c Record a response file by running the following command:
Desktop_Integration_Siebel_Agent.exe -r d:\resp.txt
❏ Choose Generate Certificate Using Existing Keystore and specify the Keystore Location path to disa.jks, which was copied from the Step b.
❏ Clear the Import Certificate into Trusted Root check box.
❏ Deploy the disa.der certificate, which was copied from step #b to agents' machine by any other means.
❏ To deploy DISA on agents' machines, run the command:
Desktop_Integration_Siebel_Agent.exe -i silent -f d:\resp.txt
The administrator can also modify the variable USER_INPUT_KEY_LOC in the response file and specify the disa.jks location as needed.
NOTE: Companies that have policies that restrict the use of self-signed certificates, refer to CA Signed DISA Certificate Generation and Deployment Process on page 21.

Desktop Integration Siebel Agent Guide Siebel Innovation Pack 2017
Installing Desktop Integration Siebel Agent ■ Deploying DISA on Multi-User Environments
14
Deploying DISA on Multi-User EnvironmentsDesktop Integration Siebel Agent (DISA) provides background service for Siebel application by listening to a local port. However, on multi-user environments, because of system limitation, a DISA instance cannot share the same port for different users. Each instance of DISA requires a unique port number for each user on the same machine.
In a multi-user environment, DISA and Siebel server each can use a file to maintain the user-port map in place of the config.properties file and system preferences.
The deployment of DISA on a multi-user environment involves the following:
1 Deploy DISA on Agent machines.
2 Make configurations on the Siebel server side.
Applicable Patches■ Desktop Integration Siebel Agent 2.17.4 or later
■ Siebel Innovation Pack 2016, Patchset 12 or later (version 2016.12 or later)
■ Siebel Innovation Pack 2017
DISA Deployment Process on a Multi-User EnvironmentPerform the following tasks to deploy DISA on a multi-user environment:
1 Preparing the Port List on page 14
2 Configuring DISA on an Agent Machine on page 16
3 Installing Patch for Siebel Server on page 16
Preparing the Port ListThe administrator assigns each agent a port number. Normally the range of port number is 1 to 65535, of which some numbers may be reserved. Choose valid port number and ensure that it does not conflict with other service on agents' machine. For agents who may have logged in to the same terminal server, each agent must have a unique port number to avoid conflict with that of others.
An agent will have in the following accounts in the two port lists where the agent's port number must be consistent in both the lists.
■ Windows user account
■ Siebel user account
Windows User to Port (For DISA)
Installing Desktop Integration Siebel Agent ■ Deploying DISA on Multi-UserEnvironments
Desktop Integration Siebel Agent Guide Siebel Innovation Pack 2017 15
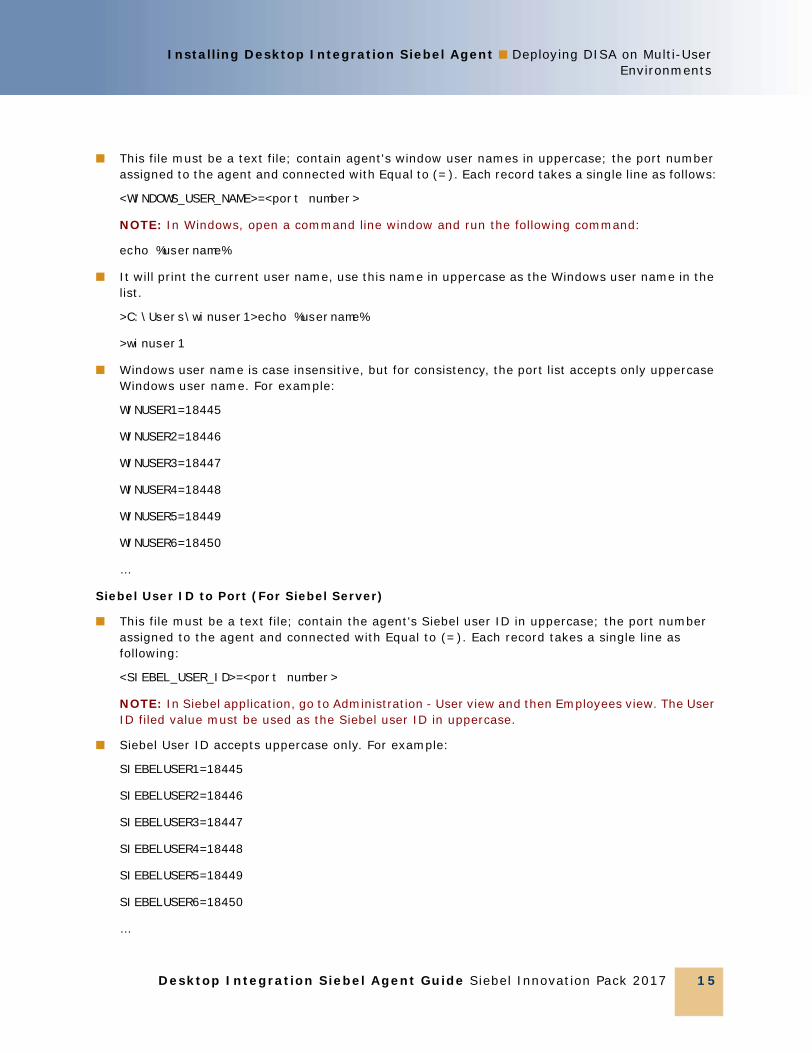
■ This file must be a text file; contain agent's window user names in uppercase; the port number assigned to the agent and connected with Equal to (=). Each record takes a single line as follows:
<WINDOWS_USER_NAME>=<port number>
NOTE: In Windows, open a command line window and run the following command:
echo %username%
■ It will print the current user name, use this name in uppercase as the Windows user name in the list.
>C:\Users\winuser1>echo %username%
>winuser1
■ Windows user name is case insensitive, but for consistency, the port list accepts only uppercase Windows user name. For example:
WINUSER1=18445
WINUSER2=18446
WINUSER3=18447
WINUSER4=18448
WINUSER5=18449
WINUSER6=18450
…
Siebel User ID to Port (For Siebel Server)
■ This file must be a text file; contain the agent's Siebel user ID in uppercase; the port number assigned to the agent and connected with Equal to (=). Each record takes a single line as following:
<SIEBEL_USER_ID>=<port number>
NOTE: In Siebel application, go to Administration - User view and then Employees view. The User ID filed value must be used as the Siebel user ID in uppercase.
■ Siebel User ID accepts uppercase only. For example:
SIEBELUSER1=18445
SIEBELUSER2=18446
SIEBELUSER3=18447
SIEBELUSER4=18448
SIEBELUSER5=18449
SIEBELUSER6=18450
…
Desktop Integration Siebel Agent Guide Siebel Innovation Pack 2017
Installing Desktop Integration Siebel Agent ■ Deploying DISA on Multi-User Environments
16
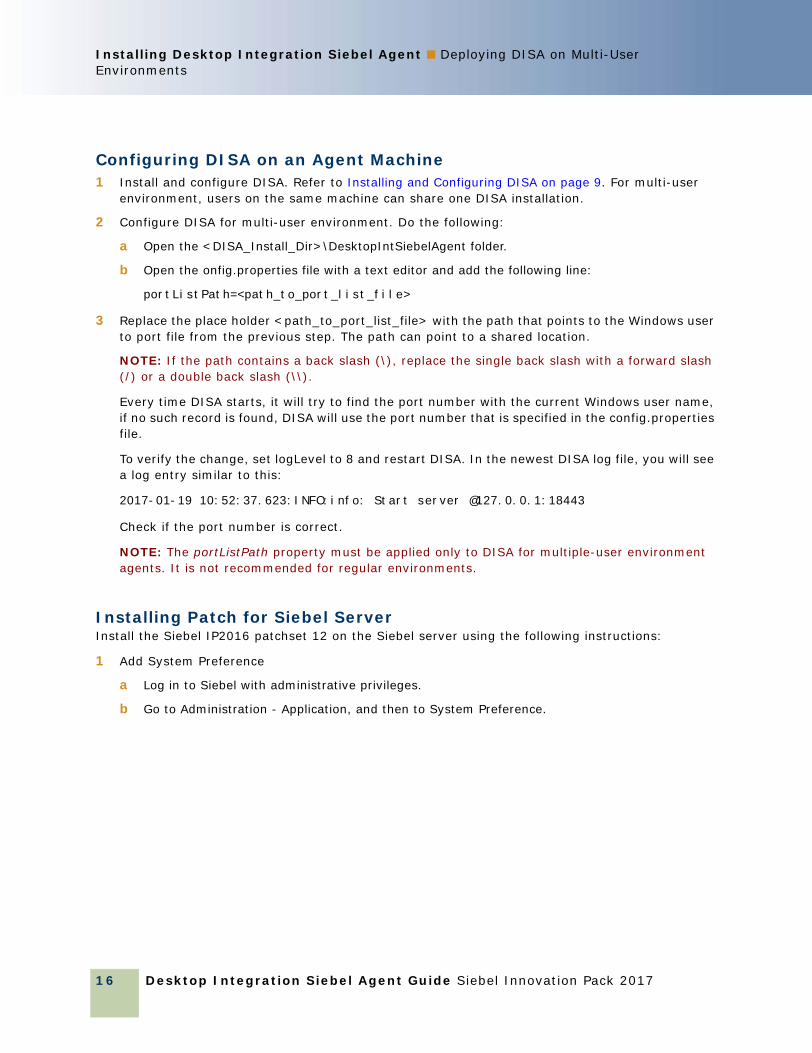
Configuring DISA on an Agent Machine1 Install and configure DISA. Refer to Installing and Configuring DISA on page 9. For multi-user
environment, users on the same machine can share one DISA installation.
2 Configure DISA for multi-user environment. Do the following:
a Open the <DISA_Install_Dir>\DesktopIntSiebelAgent folder.
b Open the onfig.properties file with a text editor and add the following line:
portListPath=<path_to_port_list_file>
3 Replace the place holder <path_to_port_list_file> with the path that points to the Windows user to port file from the previous step. The path can point to a shared location.
NOTE: If the path contains a back slash (\), replace the single back slash with a forward slash (/) or a double back slash (\\).
Every time DISA starts, it will try to find the port number with the current Windows user name, if no such record is found, DISA will use the port number that is specified in the config.properties file.
To verify the change, set logLevel to 8 and restart DISA. In the newest DISA log file, you will see a log entry similar to this:
2017-01-19 10:52:37.623:INFO:info: Start server @127.0.0.1:18443
Check if the port number is correct.
NOTE: The portListPath property must be applied only to DISA for multiple-user environment agents. It is not recommended for regular environments.
Installing Patch for Siebel ServerInstall the Siebel IP2016 patchset 12 on the Siebel server using the following instructions:
1 Add System Preference
a Log in to Siebel with administrative privileges.
b Go to Administration - Application, and then to System Preference.

Installing Desktop Integration Siebel Agent ■ Upgrade DISA
Desktop Integration Siebel Agent Guide Siebel Innovation Pack 2017 17
c Add a new System Preference:
Name: DISAPortListPath
Value: The path to the Siebel user ID to port list file in previous steps.
Make sure the path is accessible to the Siebel server machine. Bounce the server to make the change take effect.
To verify the change, log in to a Siebel application with a Siebel User ID, from the list file. If DISA is running and configured, you will be able to use DISA functionalities. If DISA is not running, you will see the following message in the browser console:
WebSocket connection to ‘wss://localhost:18443/’ failed:Error in connection establishment
Check the wss://localhost:<port>, to see if the port number is correct in this message.
Upgrade DISAThe DISA installer can automatically detect a DISA installation on a machine. If the DISA installer detects an older version, it prompts the user to upgrade to the current installed version of DISA.
In upgrade mode, DISA installer will pick up install settings from the previous DISA installation, user input is not required in upgrade mode.
TIP: Exit DISA before upgrading to avoid restarting the machine during or after the upgrade process.
After the upgrade process is complete, the configuration file, key store file, and custom plugins from the old DISA installation are retained.
Uninstall DISA1 Locate the DISA Uninstaller Change DISA Installation.exe.
2 Double-click on the DISA uninstaller - Change DISA Installation.exe file to begin the process of uninstallation.
NOTE: At any point during the uninstall process, if you choose to cancel the uninstallation and close the wizard, an alert dialog box will appear. Select Quit to exit. To continue with uninstallation, click Resume.

Desktop Integration Siebel Agent Guide Siebel Innovation Pack 2017
Installing Desktop Integration Siebel Agent ■ Uninstall DISA
18
3 In the Configure DISA wizard, the default selection is Uninstall Product. Click Next to continue the uninstallation.
On selecting Repair Product, the wizard repair process checks the DISA installation steps once again and corrects the missing files and key store problems, if any.
4 Click Next in the Uninstall DISA screen. The uninstallation begins.
5 In the Uninstall Complete screen, if DISA files are still in use, there will be a prompt to restart the system and the option Yes, restart my system is selected by default. The system restart is required if DISA is still running during the uninstall process and the uninstaller could not remove some files that are still in use.
Select, No, I will restart myself to continue with your work. The uninstalled files will be removed the next time the system restarts.
Click Done. Based on the option selected, the system either restarts or the Configure DISA wizard closes.
NOTE: It is recommended to exit DISA before the uninstallation process to avoid restarting the computer after uninstall.
Desktop Integration Siebel Agent Guide Siebel Innovation Pack 2017 19
4 Generating and Deploying DISA Certificate
This chapter includes the following topics:
■ Setting Up DISA Environments and Generating DISA Certificates on page 19
■ Enabling DISA for Siebel HTTPS Environment on page 19
■ CA Signed DISA Certificate Generation and Deployment Process on page 21
Setting Up DISA Environments and Generating DISA CertificatesPerform the following configurations to manage DISA certificate related issues, if any:
1 Enabling DISA for Siebel HTTPS Environment on page 19
2 CA Signed DISA Certificate Generation and Deployment Process on page 21
Enabling DISA for Siebel HTTPS EnvironmentThis configuration is applicable only for a Siebel HTTPS environment in which Transport Layer Security (TSL) protocol is enabled using a self-signed certificate. If you are using recognized CA certificates, this configuration is not required because the configurations are already set in the JVM truststore.
1 Identify the JVM DISA used.
DISA uses its bundled JVM in <DISA_INSTALL_DIR>\jre by default. To identify the JVM, refer to Identifying the JVM DISA used on Windows on page 20.
2 Export the X.509 public key certificate file that the Siebel HTTPS environment uses.
NOTE: The Administrator responsible for enabling SSL for Siebel can provide the certificate. You can also export the certificate from browsers such as Chrome and Firefox when visiting the Siebel HTTPS environment. For more information, refer to Exporting the certificate from Google Chrome on page 20.
Validate the certificate content before you import and ensure that the Java keytool can parse the certificate and display its content with cmd keytool -v -printcert -file C:\certname.cer.
3 Import the certificate to the truststore of JVM and do the following:
a Run the following command in cmd.exe with Administrator privileges:
"C:\DISA\jre\bin\keytool.exe" -import -noprompt -trustcacerts -alias testalias -file "C:\certname.cer" -keystore "C:\DISA\jre\lib\security\cacerts" -storepass changeit
Desktop Integration Siebel Agent Guide Siebel Innovation Pack 2017
Generating and Deploying DISA Certificate ■ Setting Up DISA Environments and Generating DISA Certificates
20
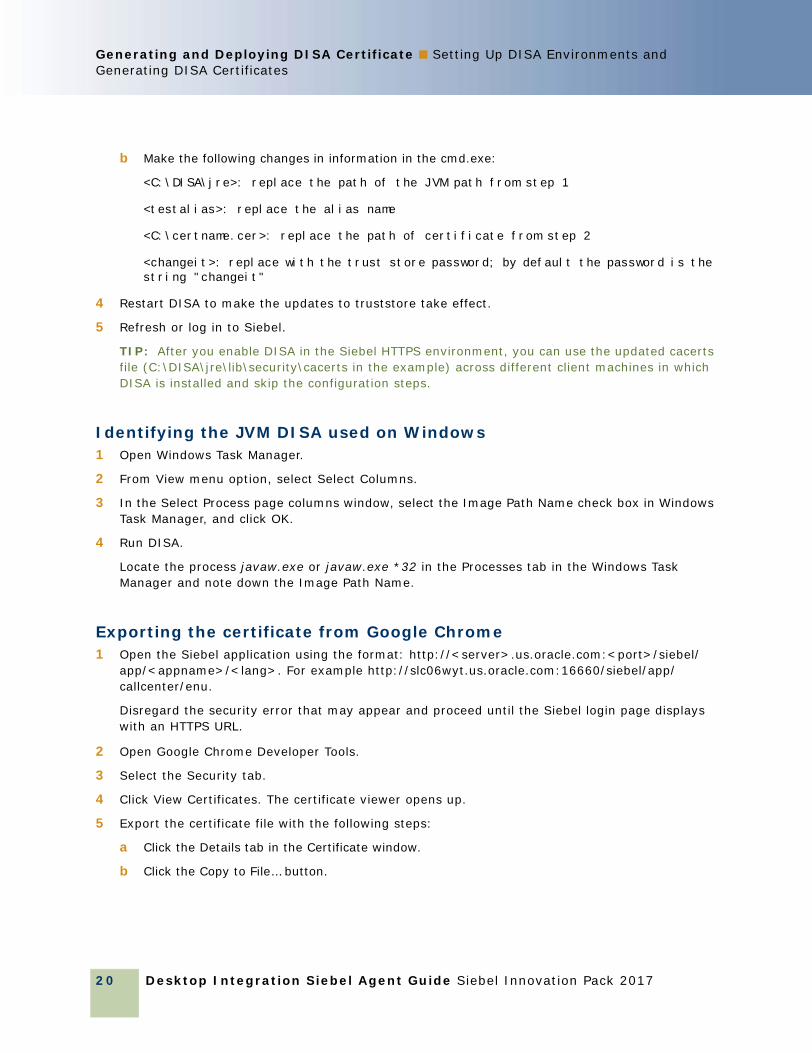
b Make the following changes in information in the cmd.exe:
<C:\DISA\jre>: replace the path of the JVM path from step 1
<testalias>: replace the alias name
<C:\certname.cer>: replace the path of certificate from step 2
<changeit>: replace with the trust store password; by default the password is the string "changeit"
4 Restart DISA to make the updates to truststore take effect.
5 Refresh or log in to Siebel.
TIP: After you enable DISA in the Siebel HTTPS environment, you can use the updated cacerts file (C:\DISA\jre\lib\security\cacerts in the example) across different client machines in which DISA is installed and skip the configuration steps.
Identifying the JVM DISA used on Windows1 Open Windows Task Manager.
2 From View menu option, select Select Columns.
3 In the Select Process page columns window, select the Image Path Name check box in Windows Task Manager, and click OK.
4 Run DISA.
Locate the process javaw.exe or javaw.exe *32 in the Processes tab in the Windows Task Manager and note down the Image Path Name.
Exporting the certificate from Google Chrome 1 Open the Siebel application using the format: http://<server>.us.oracle.com:<port>/siebel/
app/<appname>/<lang>. For example http://slc06wyt.us.oracle.com:16660/siebel/app/callcenter/enu.
Disregard the security error that may appear and proceed until the Siebel login page displays with an HTTPS URL.
2 Open Google Chrome Developer Tools.
3 Select the Security tab.
4 Click View Certificates. The certificate viewer opens up.
5 Export the certificate file with the following steps:
a Click the Details tab in the Certificate window.
b Click the Copy to File… button.

Generating and Deploying DISA Certificate ■ Setting Up DISA Environments andGenerating DISA Certificates
Desktop Integration Siebel Agent Guide Siebel Innovation Pack 2017 21
c The Certificate Export Wizard opens. Follow the instructions in the wizard.
1. Select the export file format and click Next.
2. Click Browse to export the file.
3. Select the certificate file name in the Save As screen and click Save. The certificate name and path displays in the File to Export screen. Note it down for later use.
4. Click Finish.
CA Signed DISA Certificate Generation and Deployment ProcessThe DISA installer gathers necessary information and generates a key store file (disa.jks) required for DISA secured communication. The key store file is a repository where DISA private key and public key certificates are stored.
DISA, by default, generates a self-signed certificate for a secure connection with the browser. The default DISA certificate has a basic constraint for security reason - the DISA certificate is restricted to server and client authentication and cannot be used as a Certificate Authority (CA) certificate. However, DISA can use the signed enterprise certificate authority X.509 certificate.
The default self-signed certificate can be replaced with a valid CA signed certificate to match enterprise security policy.
To generate and deploy a CA signed DISA certificate, perform the following tasks:
1 Generate Certificate Signing Request File on page 21
2 Send the DISA Certificate Signing Request (CSR) to CA on page 22
3 Determine the Certificate Chain on page 22
4 Export Certificate from Certificate Path View on page 22
5 Import Certificates to DISA Key Store on page 23
6 Deploying DISA Using the New Key Store File on page 23
Generate Certificate Signing Request File1 Generate a Certificate Signing Request file from an existing key store file.
2 Run DISA installer to install a copy of the DISA application.
a Select the option Generate Keystore and Certificate in the DISA Certificate install step.
b Provide correct details about the organization and address in accordance with CA policy.
c Clear the option Import Certificate into Trusted Root.
d Retain other configurations in the other install steps. Click Next to reach the Install Complete step. Click Finish.
Desktop Integration Siebel Agent Guide Siebel Innovation Pack 2017
Generating and Deploying DISA Certificate ■ Setting Up DISA Environments and Generating DISA Certificates
22
e Create a backup of the disa.jks file in DISA installed directory to ensure a safe copy in case the following steps fail.
3 Start a command prompt window; navigate to <DISA_HOME>\DesktopIntSiebelAgent folder using the cd command.
4 Make sure no DISA instance is running. In the command window, run command:
disa.exe keymgr -certreq -file <path_to_output_csr_file>
Replace the place holder <path_to_output_csr_file> with the expected .csr file generate location.
For example:
disa.exe keymgr -certreq -file disa_to_be_signed.csr
This command will generate a Certificate Signing Request file named disa_to_be_signed.csr in the current folder.
Send the DISA Certificate Signing Request (CSR) to CA Send the Certificate Signing Request to CA. CA issues a new X.509 certificate based on the CSR.
For example, disa_signed.cer
NOTE: Make sure the machine on which the DISA is deployed, the root CA certificate is trusted and the new DISA certificate is valid.
Determine the Certificate ChainA valid certificate may be trusted through a Certificate Chain.
1 Open a certificate.
2 Navigate to the Certificate Path tab. The certificate chain for the current certificate is displayed.
The certificate chain may include the certificate path:
■ Root Certificate
■ Intermediate Certificate
■ End Entity Certificate
NOTE: For DISA certificates, if there is a root certificate and intermediate certificate in the Certificate Path, they need to be imported to the DISA key store together with the DISA certificate.
Export Certificate from Certificate Path View1 Select the certificate and click View Certificate in the Certificate window.
2 Navigate to the Details tab and then click Copy to File.
3 Follow the Certificate Export Wizard instructions using the default options.
4 Export the root certificate and any intermediate certificate.

Generating and Deploying DISA Certificate ■ Setting Up DISA Environments andGenerating DISA Certificates
Desktop Integration Siebel Agent Guide Siebel Innovation Pack 2017 23
Import Certificates to DISA Key Store1 Import the root and the intermediate certificate to DISA key store so DISA can use them for the
secure connection. The import command is:
disa.exe keymgr -importcert -file <path_to_certificate> [-alias <alias name>]
2 Replace the place holder <path_to_certificate> with the actual certificate file name and path.
To import the DISA certificate, the parameter -alias is optional. However, for root and intermediate certificates, the -alias parameter is required to indicate the alias for the certificate.
■ Use the following command to import Root Certificate:
disa.exe keymgr -importcert -file rootca.cer -alias root
■ Use the following command to import Intermediate Certificate, if any:
disa.exe keymgr -importcert -file intermediate1.cer -alias intermediate1
disa.exe keymgr -importcert -file intermediate2.cer -alias intermediate2
■ Use one of the following command to import new DISA Certificate:
disa.exe keymgr -importcert -file disa_signed.cer
disa.exe keymgr -importcert -file disa_signed.cer -alias disa
NOTE: The DISA certificate must either use the -alias disa or not specify it in the command at all. The other alias for DISA certificate will not be accepted.
Deploying DISA Using the New Key Store FileThe new disa.jks file now contains the new certificate.
1 Deploy DISA on other machines using the disa.jks file.
2 Select the installer option Generate Certificate Using Existing Keystore.
3 Clear the option Import Certificate into Trusted Root option.
Desktop Integration Siebel Agent Guide Siebel Innovation Pack 2017
Generating and Deploying DISA Certificate ■ Setting Up DISA Environments and Generating DISA Certificates
24

Desktop Integration Siebel Agent Guide Siebel Innovation Pack 2017 25
5 DISA Supported Features
This chapter provides information about DISA features. It includes the following topics:
■ Inline Attachment Editing on page 25
■ F9/Microsoft Outlook Integration on page 28
■ Configuring CTI Hoteling Telesets on page 31
■ Web Notifications for Siebel CTI on page 32
■ Batch Fulfillment Printing on page 36
Inline Attachment EditingInline Attachment Editing allows users to edit an attachment without having to download and re-upload. It includes the following topics:
■ How it Works on page 25
■ Applicable Releases on page 26
■ Inline Attachment Editing Features on page 27
■ Editing an Inline Attachment on page 27
■ Viewing files on page 28
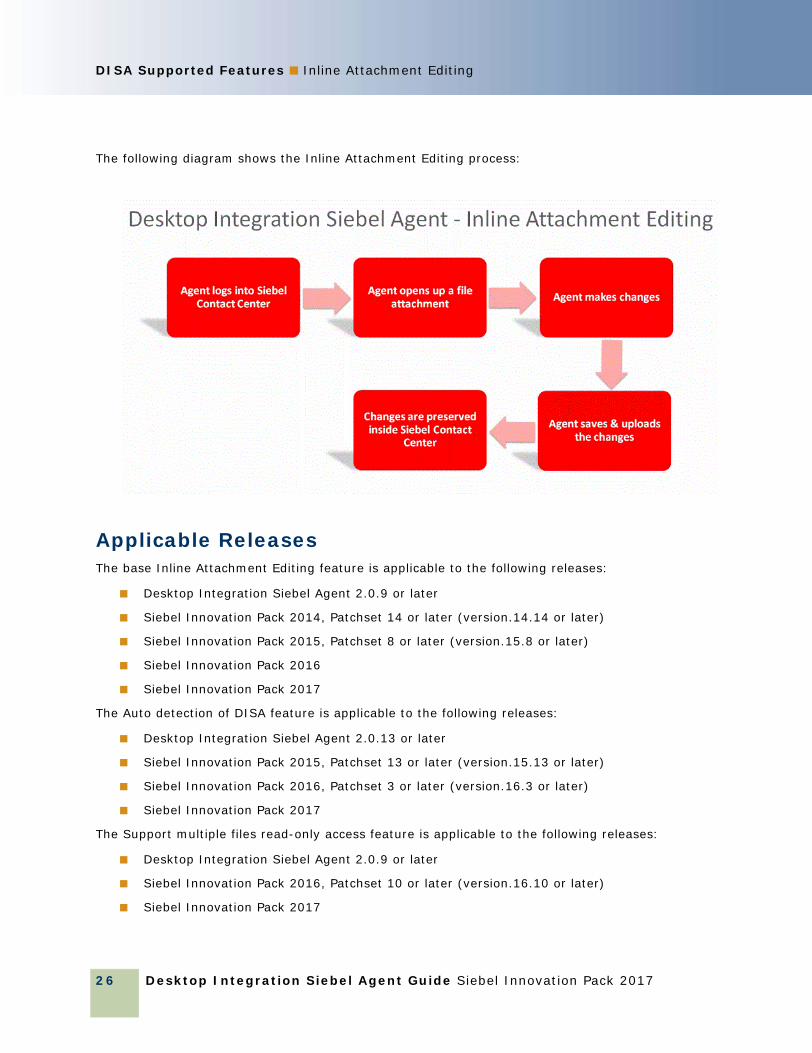
How it Works1 The agent logs into the Siebel Contact Center.
2 The agent opens up a file attachment.
3 The agent makes changes to the file.
4 The agent saves the changes and uploads the changes.
5 The changes made to the file are preserved in the Siebel Contact Center.
Desktop Integration Siebel Agent Guide Siebel Innovation Pack 2017
DISA Supported Features ■ Inline Attachment Editing
26
The following diagram shows the Inline Attachment Editing process:
Applicable ReleasesThe base Inline Attachment Editing feature is applicable to the following releases:
■ Desktop Integration Siebel Agent 2.0.9 or later
■ Siebel Innovation Pack 2014, Patchset 14 or later (version.14.14 or later)
■ Siebel Innovation Pack 2015, Patchset 8 or later (version.15.8 or later)
■ Siebel Innovation Pack 2016
■ Siebel Innovation Pack 2017
The Auto detection of DISA feature is applicable to the following releases:
■ Desktop Integration Siebel Agent 2.0.13 or later
■ Siebel Innovation Pack 2015, Patchset 13 or later (version.15.13 or later)
■ Siebel Innovation Pack 2016, Patchset 3 or later (version.16.3 or later)
■ Siebel Innovation Pack 2017
The Support multiple files read-only access feature is applicable to the following releases:
■ Desktop Integration Siebel Agent 2.0.9 or later
■ Siebel Innovation Pack 2016, Patchset 10 or later (version.16.10 or later)
■ Siebel Innovation Pack 2017

DISA Supported Features ■ Inline Attachment Editing
Desktop Integration Siebel Agent Guide Siebel Innovation Pack 2017 27
Inline Attachment Editing Features
Auto detection of DISAWhen users access a file attachment, the application checks for DISA availability.
■ If DISA is available and running, the application enables the Inline Attachment Editing feature. The Edit button in the pop-up message box is enabled. User can click it to open up a file attachment, make the changes to the document and upload the changes back to Siebel application.
■ If DISA is not available (DISA is either not installed or is not running), the application informs the user that DISA cannot be connected. When DISA is unavailable, the Edit button is disabled. User can only download a file to their local machine and make the changes offline. They need to re-upload the changed file back to Siebel application.
NOTE: The Edit button is disabled when the Siebel CRM application is unable to connect to DISA.
Support multiple files read-only access Users can now view multiple files at once. Users can pre-select multiple files and click the View Files button to open up multiple files one after another. By default, the files will be in read-only mode.
Previously, users could only open and view one file at a time. To view another file, they had to close the current file.
NOTE: The View Files button is disabled when the Siebel CRM application is unable to connect to DISA.
Editing an Inline Attachment
To edit an inline attachment1 Open the Siebel Call Center application and log in.
2 Drill down to the attached document and click on the document name. A file download dialog box appears.
3 Edit the document based on whether DISA is available or not. The application auto-detects DISA availability.

Desktop Integration Siebel Agent Guide Siebel Innovation Pack 2017
DISA Supported Features ■ F9/Microsoft Outlook Integration
28
■ If DISA is available, the Edit button is enabled. Click Edit to open the document. Make the required changes, save and close the document.
Click Finish in the dialog box that appears to upload the edited copy to the application.
TIP: Note the timestamp and file size before and after the upload to know if the file is updated.
If you do not save the edited file and leave it open and click Finish, the system displays an error message, "System has detected an open attachment. Please save and close it." Save and close the file. Click Finish, OK.
NOTE: From DISA 2.16.8 release onwards, the option IAEFileAction=open is available in the DISA configuration file config.properties. When it is configured as open, the attachment will be opened by the default program associated with the file type. If the value is configured as edit, the attachment will be opened by the default program associated to edit the file type. For most file types, they are the same program. This configuration is mainly for photos like PNG, JPEG formats. When it is open, photos will be opened by a photo viewer (like Windows Photo Viewer); when it is edited, photos will be opened by Paint.
■ If DISA is not available, the Edit button is disabled. Click Download to save a copy of the document in your local drive. Edit the document and upload the edited version.
Viewing files
To view a file or multiple files at once:1 Select a file or multiple files in the Attachments applets, such as Contact Attachment applet.
TIP: To select multiple files, when using the mouse to select file record, hold Ctrl or Shift key in the keyboard.
2 Click the View Files button to open one file or multiple files one after another.
NOTE: From DISA 2.17.4 release onward, by default the files will open in read-only mode. This can be changed by modifying IAEViewFileAsReadonly option in DISA configuration file config.properties. By default, IAEViewFileAsReadonly=true. By changing IAEViewFileAsReadonly to false, files will open in normal mode.
F9/Microsoft Outlook IntegrationWhen using Siebel CRM applications to manage customer interactions through emails, application users may choose using third-party email clients to send outbound emails. With the DISA framework, Siebel CRM application users can start to benefit from the full integration between Siebel Email Response (F9) and Microsoft Outlook Client. The solution is supported with Siebel on Open UI. It includes the following topics:
■ How it Works on page 29
■ Applicable Releases on page 29
DISA Supported Features ■ F9/Microsoft Outlook Integration
Desktop Integration Siebel Agent Guide Siebel Innovation Pack 2017 29
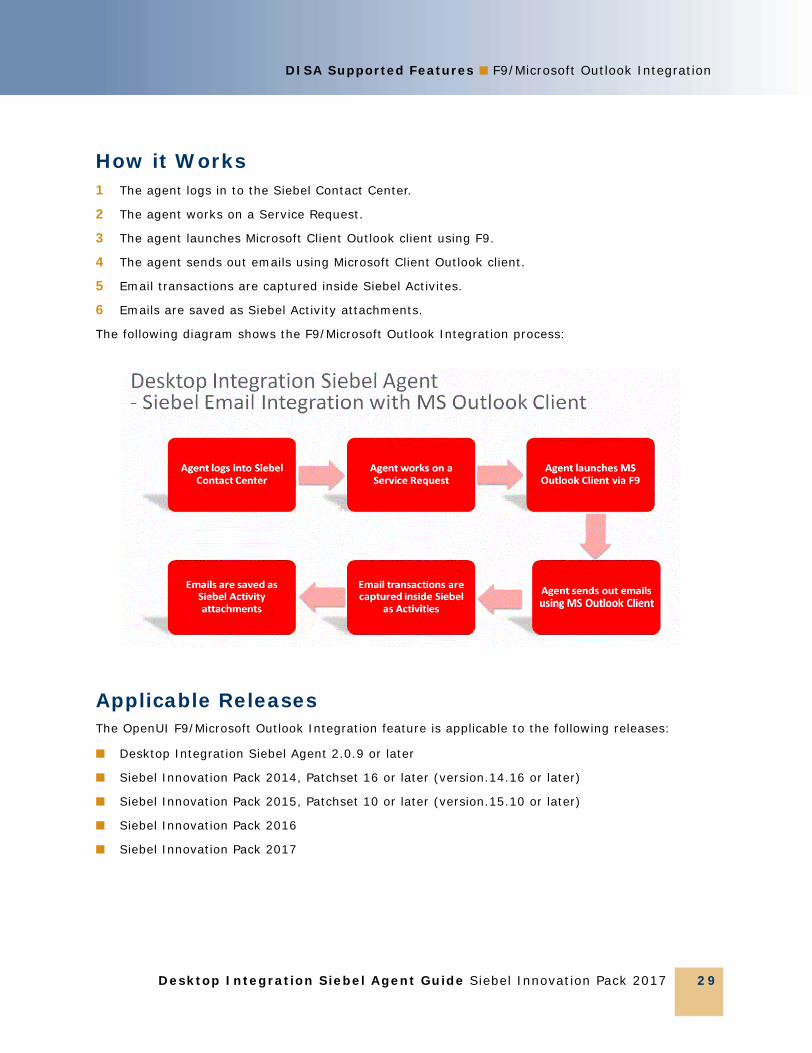
How it Works1 The agent logs in to the Siebel Contact Center.
2 The agent works on a Service Request.
3 The agent launches Microsoft Client Outlook client using F9.
4 The agent sends out emails using Microsoft Client Outlook client.
5 Email transactions are captured inside Siebel Activites.
6 Emails are saved as Siebel Activity attachments.
The following diagram shows the F9/Microsoft Outlook Integration process:
Applicable ReleasesThe OpenUI F9/Microsoft Outlook Integration feature is applicable to the following releases:
■ Desktop Integration Siebel Agent 2.0.9 or later
■ Siebel Innovation Pack 2014, Patchset 16 or later (version.14.16 or later)
■ Siebel Innovation Pack 2015, Patchset 10 or later (version.15.10 or later)
■ Siebel Innovation Pack 2016
■ Siebel Innovation Pack 2017
Desktop Integration Siebel Agent Guide Siebel Innovation Pack 2017
DISA Supported Features ■ F9/Microsoft Outlook Integration
30
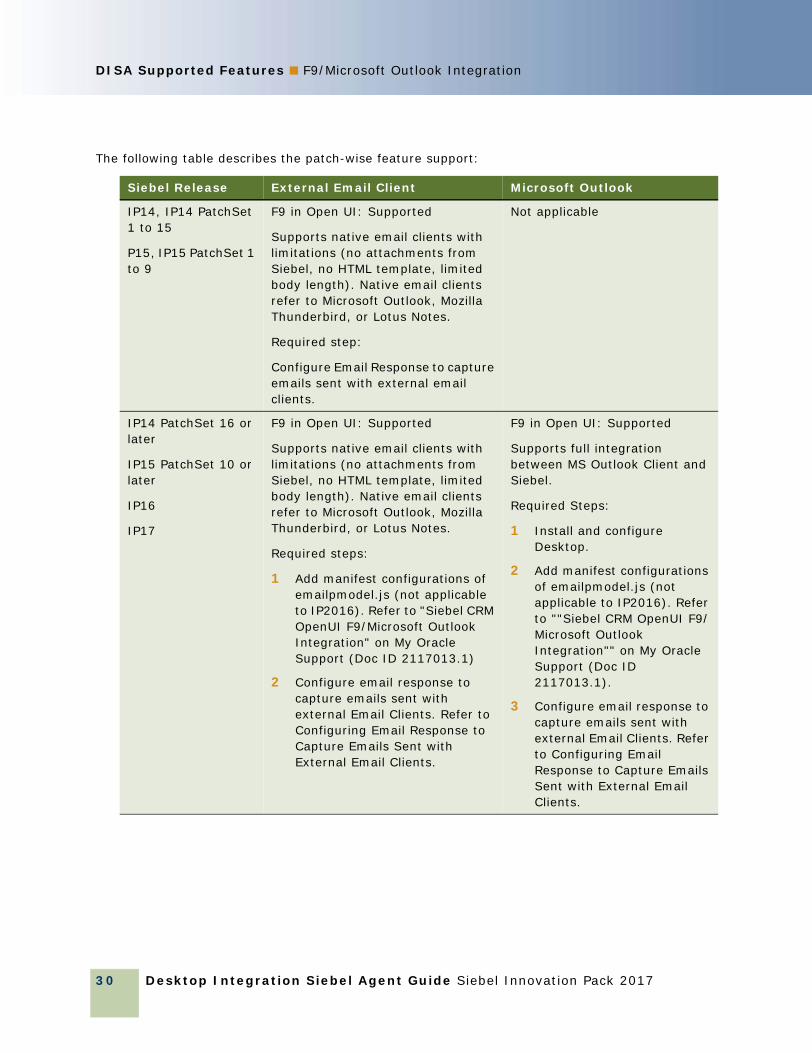
The following table describes the patch-wise feature support:
Siebel Release External Email Client Microsoft Outlook
IP14, IP14 PatchSet 1 to 15
P15, IP15 PatchSet 1 to 9
F9 in Open UI: Supported
Supports native email clients with limitations (no attachments from Siebel, no HTML template, limited body length). Native email clients refer to Microsoft Outlook, Mozilla Thunderbird, or Lotus Notes.
Required step:
Configure Email Response to capture emails sent with external email clients.
Not applicable
IP14 PatchSet 16 or later
IP15 PatchSet 10 or later
IP16
IP17
F9 in Open UI: Supported
Supports native email clients with limitations (no attachments from Siebel, no HTML template, limited body length). Native email clients refer to Microsoft Outlook, Mozilla Thunderbird, or Lotus Notes.
Required steps:
1 Add manifest configurations of emailpmodel.js (not applicable to IP2016). Refer to "Siebel CRM OpenUI F9/Microsoft Outlook Integration" on My Oracle Support (Doc ID 2117013.1)
2 Configure email response to capture emails sent with external Email Clients. Refer to Configuring Email Response to Capture Emails Sent with External Email Clients.
F9 in Open UI: Supported
Supports full integration between MS Outlook Client and Siebel.
Required Steps:
1 Install and configure Desktop.
2 Add manifest configurations of emailpmodel.js (not applicable to IP2016). Refer to ""Siebel CRM OpenUI F9/Microsoft Outlook Integration"" on My Oracle Support (Doc ID 2117013.1).
3 Configure email response to capture emails sent with external Email Clients. Refer to Configuring Email Response to Capture Emails Sent with External Email Clients.

DISA Supported Features ■ Configuring CTI Hoteling Telesets
Desktop Integration Siebel Agent Guide Siebel Innovation Pack 2017 31
Configuring CTI Hoteling Telesets You can configure the telesets in your call center for hoteling, which allows an agent to log in to the Siebel application from any one of a pool of telesets and computers that have been configured for this purpose and allows the agent to use voice communications features.
For more information, refer to Configuring Telesets for Hoteling.
It includes the following topics:
■ How it Works on page 31
■ Applicable Releases on page 32
How it Works1 The administrator configures teleset for hoteling.
2 The agent logs in to Siebel Contact Center.
3 The agent is associated to the teleset.
4 The agent logs in to CTI Toolbar.
5 The agent answers inbound calls with the teleset.
The following diagram shows the Configuring CTI Hoteling telesets feature:
Desktop Integration Siebel Agent Guide Siebel Innovation Pack 2017
DISA Supported Features ■ Web Notifications for Siebel CTI
32
Applicable Releases■ Desktop Integration Siebel Agent 2.0.9 or later
■ Siebel Innovation Pack 2014, Patchset 14 or later (version.14.14 or later)
■ Siebel Innovation Pack 2015, Patchset 8 or later (version.15.8 or later)
■ Siebel Innovation Pack 2016
■ Siebel Innovation Pack 2017
Web Notifications for Siebel CTIWhen Siebel CTI or Chat agents are using Siebel Contact Center to manage their customer communications, sometimes they may need to temporarily look up other applications or browsers for other work. In such cases the Siebel browser may get either minimized or hidden behind other application or browser windows. If there is an incoming call or chat, a visual notification is required at desktop so the agents do not miss customer calls or chats.
Siebel’s solution integrates Web Notifications API with Siebel CTI and Chats. When the Siebel application browser is minimized or hidden behind other application windows, an alert window will display to notify agents about incoming calls or chats. On clicking inside the notification window, the Siebel browser comes to the front.
NOTE: Siebel CTI Web Notifications feature supports Siebel browser to come to front only if a single browser tab is open and not if multiple browser tabs are open.
Siebel CTI Web Notifications feature is based on the standard Web Notifications API (http://www.w3.org/TR/notifications/). The World Wide Web Consortium (W3C) recommends the Web Notifications API. It is designed for end-user notifications and can alert user outside the context of a web page of an occurrence.
The Siebel CTI Web Notifications feature supports the following visual notifications to agents for incoming calls or chats.
■ Displaying pop-up window
■ Flashing browser title bar
■ Bringing Siebel browser to the front when one more browser is running
It includes the following topics:
■ How it Works on page 33
■ Web Notifications Display Configurations on page 33
■ Applicable Releases on page 33
■ Web Notifications Functionality on page 34
■ Browser Add-ons on page 36

DISA Supported Features ■ Web Notifications for Siebel CTI
Desktop Integration Siebel Agent Guide Siebel Innovation Pack 2017 33
How it WorksThe following is a typical flow of the Web Notifications feature:
1 The agent starts the Siebel application.
The first-time user must enable the browser notifications.
NOTE: Follow browser specific instruction to enable browser notifications.
2 The agent logs in to the Siebel CTI toolbar and gets ready to take incoming calls or chats.
3 The agent either minimizes the Siebel browser and starts to do other work or directly switches to other applications.
4 A call or chat comes in. A pop-up window shows up at the right-bottom corner to alert the agent about the incoming call or chat. The Siebel browser title bar starts flashing the title.
5 The agent clicks inside the notification pop-up window. The Siebel Cell Center window comes to the front when one another browser tab is open.
If there are multiple incoming calls or chats, multiple notification pop-up windows will appear. On clicking inside a notification pop-up window, all of the existing pop-up windows will close. Multiple chats at a time can be initiated from the Siebel application.
Web Notifications Display ConfigurationsYou can configure when and how to display the web notifications from the User Preferences > Bring Siebel to Front selection. The following are the options:
■ On all Incoming Work Items: Use this to display the web notifications for both incoming calls and chats.
■ On Matching Events: Use this to display the web notifications pop-up window every time a matched event triggers an event handler.
■ Off: Use this to disable the display of web notifications.
Applicable ReleasesThe Web Notifications for Siebel CTI feature is applicable to the following releases:
■ Desktop Integration Siebel Agent 2.0.13 or later
■ Siebel Innovation Pack 2015, Patchset 13 or later (version.15.13 or later)
■ Siebel Innovation Pack 2016, Patchset 3 or later (version.16.3 or later)
■ Siebel Innovation Pack 2017
Desktop Integration Siebel Agent Guide Siebel Innovation Pack 2017
DISA Supported Features ■ Web Notifications for Siebel CTI
34
Web Notifications FunctionalityLogin in to the Siebel application, bring up the communications panel, and open the CTI session. When Siebel application browser is minimized or hidden behind other application windows, a notification alert window pops up when a new call comes in and the Siebel application comes up to the front.
The web visual notifications display in the following scenarios:
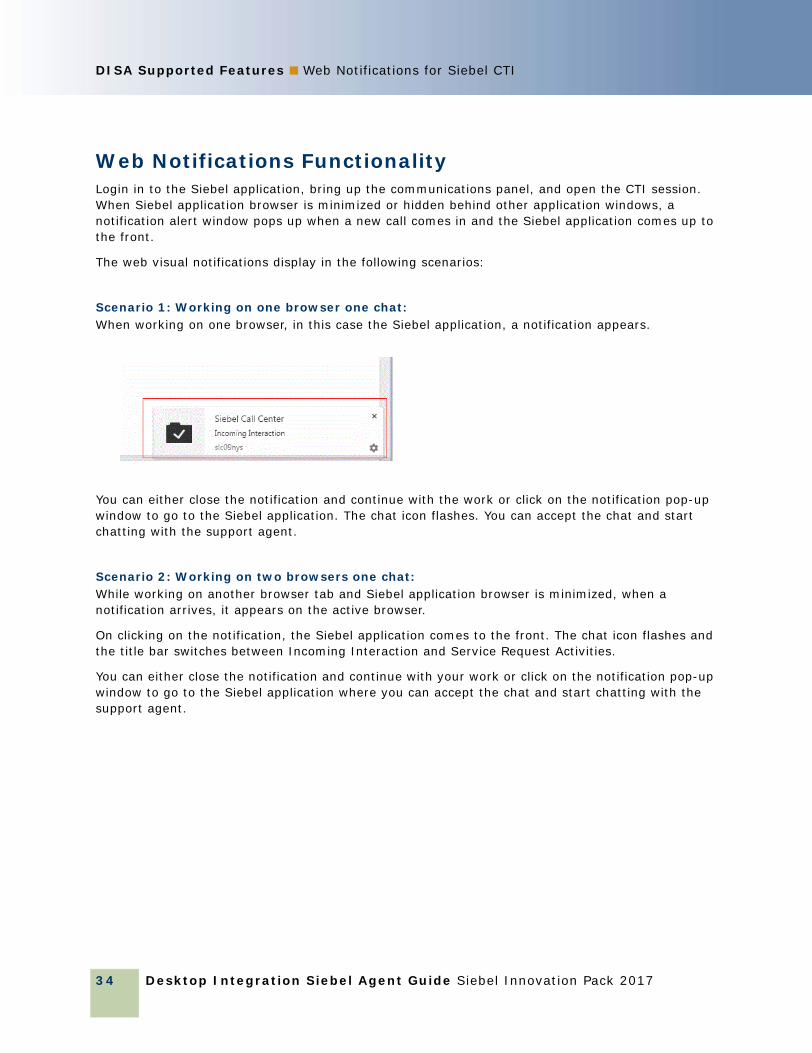
Scenario 1: Working on one browser one chat:When working on one browser, in this case the Siebel application, a notification appears.
You can either close the notification and continue with the work or click on the notification pop-up window to go to the Siebel application. The chat icon flashes. You can accept the chat and start chatting with the support agent.
Scenario 2: Working on two browsers one chat:While working on another browser tab and Siebel application browser is minimized, when a notification arrives, it appears on the active browser.
On clicking on the notification, the Siebel application comes to the front. The chat icon flashes and the title bar switches between Incoming Interaction and Service Request Activities.
You can either close the notification and continue with your work or click on the notification pop-up window to go to the Siebel application where you can accept the chat and start chatting with the support agent.
DISA Supported Features ■ Web Notifications for Siebel CTI
Desktop Integration Siebel Agent Guide Siebel Innovation Pack 2017 35
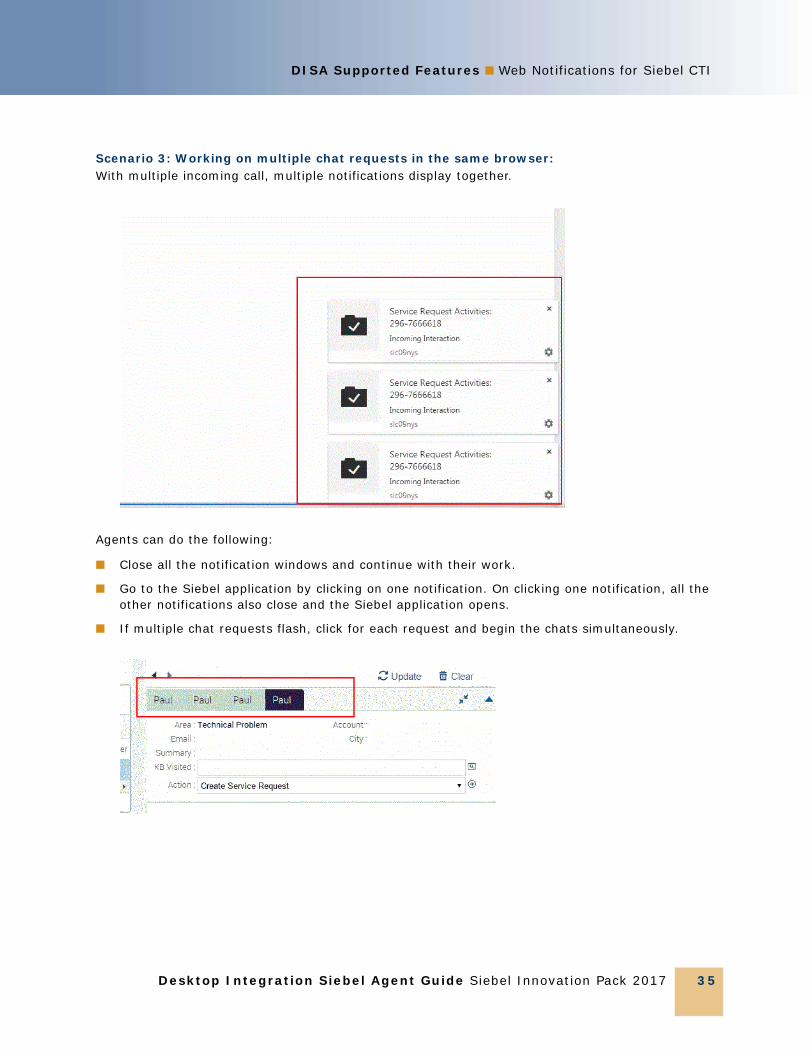
Scenario 3: Working on multiple chat requests in the same browser: With multiple incoming call, multiple notifications display together.
Agents can do the following:
■ Close all the notification windows and continue with their work.
■ Go to the Siebel application by clicking on one notification. On clicking one notification, all the other notifications also close and the Siebel application opens.
■ If multiple chat requests flash, click for each request and begin the chats simultaneously.
Desktop Integration Siebel Agent Guide Siebel Innovation Pack 2017
DISA Supported Features ■ Batch Fulfillment Printing
36
Browser Add-ons
Internet ExplorerDISA supports Web Notifications in Microsoft Internet Explorer so customers can use the IE Web Notifications feature built on DISA, without a need to install the Internet Explorer Web Notifications third-party add-on. Customers who want to use the Web Notifications feature for IE browser have two options:
1 Use third-party IE add-on to support Web Notifications. For example, http://ie-web-notifications.github.io/
2 Use Desktop Integration Siebel Agent (DISA) to support Web Notifications. DISA 2.0.13+ is required to support this feature.
NOTE: When both third-party IE add-on and DISA are available, the third-party add-on is the default add-on for notification pop-up. Disable third-party add-on to use DISA solution delivered through Siebel product.
Starting with DISA 2.0.13, two new settings can be added into config.properties to support flexible configuration for IE users:
■ maxNotificationCount=3 -> the maximum notification count for displaying the pop-up's at the same time
■ notificationLife = 0 -> the life of notification in seconds. 0 is the default value, which requires user interaction to close out a pop-up.
Both settings are applicable to IE browser only.
Google Chrome and Mozilla FirefoxGoogle Chrome and Mozilla Firefox browsers support Web Notifications API natively. If you are using these browsers, you need only to upgrade to the releases that support the feature. There are no extra steps to implement the feature.
Batch Fulfillment PrintingBatch printing simplifies the task of printing multiple correspondence items. The user first selects one or more correspondence items, and then selects the Print option from the menu button. The documents are then printed on the appropriate printer.
Siebel applications support two types of batch printing. These are:
■ Client-based: This is the default configuration. The print menu item appearing in the Correspondence and Fulfillment screens performs the client-based batch printing.
■ Server-based: This printing option can be configured either in addition to, or instead of, client-based batch printing. The administrator can use Siebel Tools to reconfigure these menus to use server-based batch printing.

DISA Supported Features ■ Batch Fulfillment Printing
Desktop Integration Siebel Agent Guide Siebel Innovation Pack 2017 37
Applicable Releases■ Desktop Integration Siebel Agent 2.0.9 or later
■ Siebel Innovation Pack 2016
■ Siebel Innovation Pack 2017

Desktop Integration Siebel Agent Guide Siebel Innovation Pack 2017
DISA Supported Features ■ Batch Fulfillment Printing
38

Desktop Integration Siebel Agent Guide Siebel Innovation Pack 2017 39
Index
Bbatch fulfillment printing 36
CCTI hoteling 31
Ddeploying DISA
agent desktop 13multi-user environment 14
DISA certificateCSR 21deploying 21exporting 21generating 21importing 21
DISA Installer 9configuring and troubleshooting 9enabling DISA on Firefox 9installing 9verifying download 9verifying installation 9
Eediting inline attachment 27enabling DISA on HTTPS 19
FF9, MS Oulook integration 28
Iinline attachment 25
viewing files 28
Nnew features 5
Ssupported features 8supported platforms 7
Uuninstalling DISA 17upgrading DISA 17

Desktop Integration Siebel Agent Guide Siebel Innovation Pack 2017
Index ■ W
40
Wweb notifications 32
browser add-ons 36