developing sensor applications on intel® atomâ„¢ processor-based
TRANSCRIPT

1
Developing Sensor Applications on Intel® Atom™
Processor-Based Android* Phones and Tablets
This guide provides application developers with an introduction to the Android Sensor
framework and discusses how to use some of the sensors that are generally available on
phones and tablets based on the Intel® Atom™ processor. Among those discussed are the
motion, position, and environment sensors. Even though GPS is not strictly categorized as a
sensor in the Android framework, this guide discusses GPS-based location services as well. The
discussion in this guide is based on Android 4.2, Jelly Bean.
Sensors on Intel® Atom™ Processor-Based Android Phones and Tablets
The Android phones and tablets based on Intel Atom processors can support a wide range of
hardware sensors. These sensors are used to detect motion and position changes, and report the
ambient environment parameters. The block diagram in Figure 1 shows a possible sensor
configuration on a typical Intel Atom processor-based Android device.

2
Figure 1: Sensors on an Intel® Atom™–based Android system
Based on the data they report, we can categorize Android sensors into the classes and types shown
in Table 1.
Table 1: Sensor Types Supported by the Android Platform
Motion Sensors Accelerometer
(TYPE_ACCELEROMETER)
Measures a device’s
accelerations in m/s2
Motion detection
Gyroscope
(TYPE_GYROSCOPE)
Measures a device’s
rates of rotation
Rotation
detection
Position
Sensors
Magnetometer
(TYPE_MAGNETIC_FIELD)
Measures the Earth’s
geomagnetic field
strengths in µT
Compass
Proximity
(TYPE_PROXIMITY)
Measures the
proximity of an
object in cm
Nearby object
detection
GPS
(not a type of
android.hardware.Sensor)
Gets accurate geo-
locations of the
device
Accurate geo-
location detection
Intel®
Atom™
Processor
Gyro
GPS
Proximity
ALS
Accelerometer
Magnetometer
Barometer
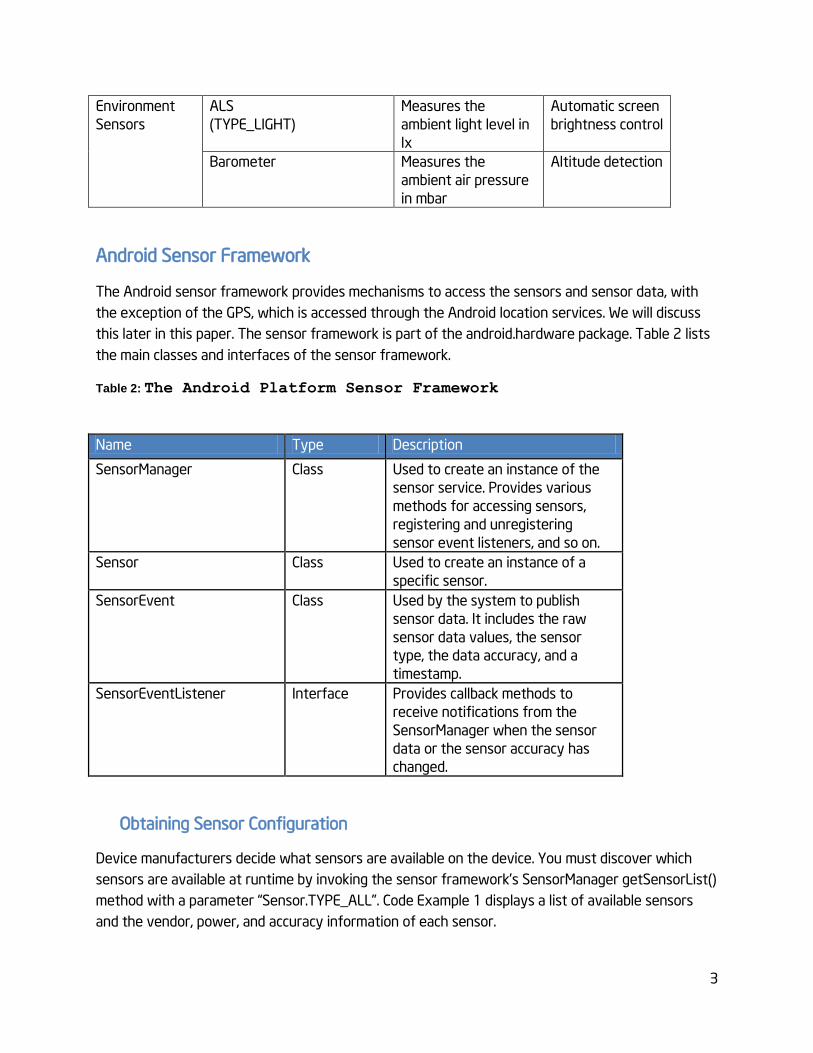
3
Environment
Sensors
ALS
(TYPE_LIGHT)
Measures the
ambient light level in
lx
Automatic screen
brightness control
Barometer Measures the
ambient air pressure
in mbar
Altitude detection
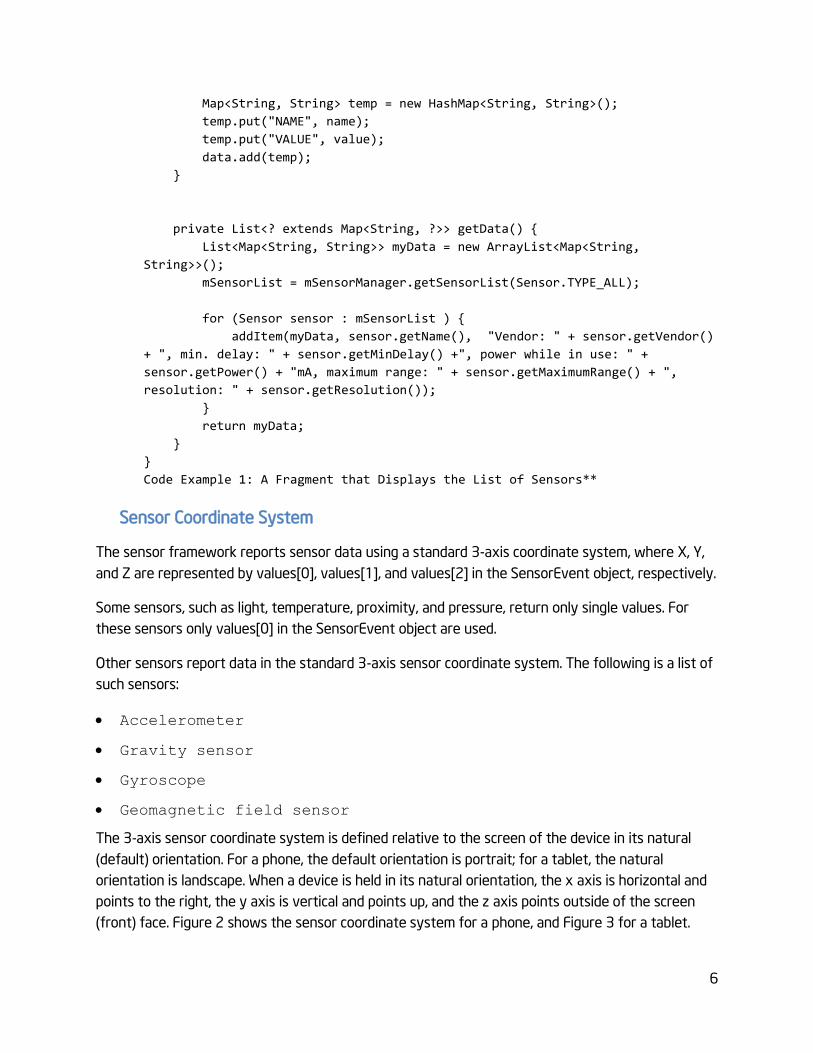
Android Sensor Framework
The Android sensor framework provides mechanisms to access the sensors and sensor data, with
the exception of the GPS, which is accessed through the Android location services. We will discuss
this later in this paper. The sensor framework is part of the android.hardware package. Table 2 lists
the main classes and interfaces of the sensor framework.
Table 2: The Android Platform Sensor Framework
Name Type Description
SensorManager Class Used to create an instance of the
sensor service. Provides various
methods for accessing sensors,
registering and unregistering
sensor event listeners, and so on.
Sensor Class Used to create an instance of a
specific sensor.
SensorEvent Class Used by the system to publish
sensor data. It includes the raw
sensor data values, the sensor
type, the data accuracy, and a
timestamp.
SensorEventListener Interface Provides callback methods to
receive notifications from the
SensorManager when the sensor
data or the sensor accuracy has
changed.
Obtaining Sensor Configuration
Device manufacturers decide what sensors are available on the device. You must discover which
sensors are available at runtime by invoking the sensor framework’s SensorManager getSensorList()
method with a parameter “Sensor.TYPE_ALL”. Code Example 1 displays a list of available sensors
and the vendor, power, and accuracy information of each sensor.

4
package com.intel.deviceinfo;
import java.util.ArrayList;
import java.util.HashMap;
import java.util.List;
import java.util.Map;
import android.app.Fragment;
import android.content.Context;
import android.hardware.Sensor;
import android.hardware.SensorManager;
import android.os.Bundle;
import android.view.LayoutInflater;
import android.view.View;
import android.view.ViewGroup;
import android.widget.AdapterView;
import android.widget.AdapterView.OnItemClickListener;
import android.widget.ListView;
import android.widget.SimpleAdapter;
public class SensorInfoFragment extends Fragment {
private View mContentView;
private ListView mSensorInfoList;
SimpleAdapter mSensorInfoListAdapter;
private List<Sensor> mSensorList;
private SensorManager mSensorManager;
@Override
public void onActivityCreated(Bundle savedInstanceState) {
super.onActivityCreated(savedInstanceState);
}
@Override
public void onPause()
{
super.onPause();
}
@Override
public void onResume()
{
super.onResume();
}

5
@Override
public View onCreateView(LayoutInflater inflater, ViewGroup container,
Bundle savedInstanceState) {
mContentView = inflater.inflate(R.layout.content_sensorinfo_main,
null);
mContentView.setDrawingCacheEnabled(false);
mSensorManager =
(SensorManager)getActivity().getSystemService(Context.SENSOR_SERVICE);
mSensorInfoList =
(ListView)mContentView.findViewById(R.id.listSensorInfo);
mSensorInfoList.setOnItemClickListener( new OnItemClickListener() {
@Override
public void onItemClick(AdapterView<?> arg0, View view, int index,
long arg3) {
// with the index, figure out what sensor was pressed
Sensor sensor = mSensorList.get(index);
// pass the sensor to the dialog.
SensorDialog dialog = new SensorDialog(getActivity(), sensor);
dialog.setContentView(R.layout.sensor_display);
dialog.setTitle("Sensor Data");
dialog.show();
}
});
return mContentView;
}
void updateContent(int category, int position) {
mSensorInfoListAdapter = new SimpleAdapter(getActivity(),
getData() , android.R.layout.simple_list_item_2,
new String[] {
"NAME",
"VALUE"
},
new int[] { android.R.id.text1, android.R.id.text2 });
mSensorInfoList.setAdapter(mSensorInfoListAdapter);
}
protected void addItem(List<Map<String, String>> data, String name, String
value) {
6
Map<String, String> temp = new HashMap<String, String>();
temp.put("NAME", name);
temp.put("VALUE", value);
data.add(temp);
}
private List<? extends Map<String, ?>> getData() {
List<Map<String, String>> myData = new ArrayList<Map<String,
String>>();
mSensorList = mSensorManager.getSensorList(Sensor.TYPE_ALL);
for (Sensor sensor : mSensorList ) {
addItem(myData, sensor.getName(), "Vendor: " + sensor.getVendor()
+ ", min. delay: " + sensor.getMinDelay() +", power while in use: " +
sensor.getPower() + "mA, maximum range: " + sensor.getMaximumRange() + ",
resolution: " + sensor.getResolution());
}
return myData;
}
}
Code Example 1: A Fragment that Displays the List of Sensors**
Sensor Coordinate System
The sensor framework reports sensor data using a standard 3-axis coordinate system, where X, Y,
and Z are represented by values[0], values[1], and values[2] in the SensorEvent object, respectively.
Some sensors, such as light, temperature, proximity, and pressure, return only single values. For
these sensors only values[0] in the SensorEvent object are used.
Other sensors report data in the standard 3-axis sensor coordinate system. The following is a list of
such sensors:
Accelerometer
Gravity sensor
Gyroscope
Geomagnetic field sensor
The 3-axis sensor coordinate system is defined relative to the screen of the device in its natural
(default) orientation. For a phone, the default orientation is portrait; for a tablet, the natural
orientation is landscape. When a device is held in its natural orientation, the x axis is horizontal and
points to the right, the y axis is vertical and points up, and the z axis points outside of the screen
(front) face. Figure 2 shows the sensor coordinate system for a phone, and Figure 3 for a tablet.

7
Figure 2: The sensor coordinate system for a phone
8
Figure 3: The sensor coordinate system for a tablet
The most important point regarding the sensor coordinate system is that the sensor’s coordinate
system never changes when the device moves or changes its orientation.
Monitoring Sensor Events
The sensor framework reports sensor data with the SensorEvent objects. A class can monitor a
specific sensor’s data by implementing the SensorEventListener interface and registering with the
SensorManager for the specific sensor. The sensor framework informs the class about the changes
in the sensor states through the following two SensorEventListener callback methods implemented
by the class:
onAccuracyChanged()
and
onSensorChanged()
Code Example 2 implements the SensorDialog used in the SensorInfoFragment example we
discussed in the section “Obtaining Sensor Configuration.”
9
package com.intel.deviceinfo;
import android.app.Dialog;
import android.content.Context;
import android.hardware.Sensor;
import android.hardware.SensorEvent;
import android.hardware.SensorEventListener;
import android.hardware.SensorManager;
import android.os.Bundle;
import android.widget.TextView;
public class SensorDialog extends Dialog implements SensorEventListener {
Sensor mSensor;
TextView mDataTxt;
private SensorManager mSensorManager;
public SensorDialog(Context ctx, Sensor sensor) {
this(ctx);
mSensor = sensor;
}
@Override
protected void onCreate(Bundle savedInstanceState) {
super.onCreate(savedInstanceState);
mDataTxt = (TextView) findViewById(R.id.sensorDataTxt);
mDataTxt.setText("...");
setTitle(mSensor.getName());
}
@Override
protected void onStart() {
super.onStart();
mSensorManager.registerListener(this, mSensor,
SensorManager.SENSOR_DELAY_FASTEST);
}
@Override
protected void onStop() {
super.onStop();
mSensorManager.unregisterListener(this, mSensor);
}
@Override
public void onAccuracyChanged(Sensor sensor, int accuracy) {
}
@Override
public void onSensorChanged(SensorEvent event) {
10
if (event.sensor.getType() != mSensor.getType()) {
return;
}
StringBuilder dataStrBuilder = new StringBuilder();
if ((event.sensor.getType() == Sensor.TYPE_LIGHT)||
(event.sensor.getType() == Sensor.TYPE_TEMPERATURE)||
(event.sensor.getType() == Sensor.TYPE_PRESSURE)) {
dataStrBuilder.append(String.format("Data: %.3f\n",
event.values[0]));
}
else{
dataStrBuilder.append(
String.format("Data: %.3f, %.3f, %.3f\n",
event.values[0], event.values[1], event.values[2] ));
}
mDataTxt.setText(dataStrBuilder.toString());
}
}
Code Example 2: A Dialog that Shows the Sensor Values**
Motion Sensors
Motion sensors are used to monitor device movement, such as shake, rotate, swing, or tilt. The
accelerometer and gyroscope are two motion sensors available on many tablet and phone devices.
Motion sensors report data using the sensor coordinate system, where the three values in the
SensorEvent object, values[0], values[1], and values[2], represent the x-, y-, and z-axis values,
respectively.
To understand the motion sensors and apply the data in an application, we need to apply some
physics formulas related to force, mass, acceleration, Newton’s laws of motion, and the relationship
between several of these entities in time. To learn more about these formulas and relationships,
refer to your favorite physics textbooks or public domain sources.
Accelerometer
The accelerometer measures the acceleration applied on the device, and its properties are
summarized in Table 3.
Table 3: The Accelerometer
Sensor Type SensorEvent
Data (m/s2)
Description
Accelerometer TYPE_ACCELEROMETE
R
values[0]
values[1]
values[2]
Acceleration along the x
axis
Acceleration along the y
axis

11
Acceleration along the z
axis
The concept for the accelerometer is derived from Newton’s second law of motion:
a = F/m
The acceleration of an object is the result of the net external force applied to the object. The
external forces include one that applies to all objects on Earth, gravity. It is proportional to the net
force F applied to the object and inversely proportional to the object’s mass m.
In our code, instead of directly using the above equation, we are more concerned about the result of
the acceleration during a period of time on the device’s speed and position. The following equation
describes the relationship of an object’s velocity v1, its original velocity v0, the acceleration a, and
the time t:
v1 = v0 + at
To calculate the object’s position displacement s, we use the following equation:
s = v0t + (1/2)at2
In many cases we start with the condition v0 equal to 0 (before the device starts moving), which
simplifies the equation to:
s = at2/2
Because of gravity, the gravitational acceleration, represented with the symbol g, is applied to all
objects on Earth. Regardless of the object’s mass, g only depends on the latitude of the object’s
location with a value in the range of 9.78 to 9.82 (m/s2). We adopt a conventional standard value for
g:
g = 9.80665 (m/s2)
Because the accelerometer returns the values using a multidimensional device coordinate system, in
our code we can calculate the distances along the x, y, and z axes using the following equations:
Sx = AxT2/2
Sy=AyT2/2
Sz=AzT2/2
Where Sx, Sy, and Sz are the displacements on the x axis, y axis, and z axis, respectively, and Ax, Ay,
and Az are the accelerations on the x axis, y axis, and z axis, respectively. T is the time of the
measurement period.

12
Code Example 3 shows how to instantiate an accelerometer.
public class SensorDialog extends Dialog implements SensorEventListener {
…
private Sensor mSensor;
private SensorManager mSensorManager;
public SensorDialog(Context context) {
super(context);
mSensorManager =
(SensorManager)context.getSystemService(Context.SENSOR_SERVICE);
mSensor = mSensorManager.getDefaultSensor(Sensor.TYPE_ACCELEROMETER);
…
}
Code Example 3: Instantiation of an Accelerometer **
Sometimes we don’t use all three dimension data values. Other imes we may also need to take the
device’s orientation into consideration. For example, for a maze application, we only use the x-axis
and y-axis gravitational acceleration to calculate the ball’s moving directions and distances based on
the orientation of the device. The following code fragment (Code Example 4) outlines the logic.

13
@Override
public void onSensorChanged(SensorEvent event) {
if (event.sensor.getType() != Sensor.TYPE_ACCELEROMETER) {
return;
}
float accelX, accelY;
…
//detect the current rotation currentRotation from its “natural orientation”
//using the WindowManager
switch (currentRotation) {
case Surface.ROTATION_0:
accelX = event.values[0];
accelY = event.values[1];
break;
case Surface.ROTATION_90:
accelX = -event.values[0];
accelY = event.values[1];
break;
case Surface.ROTATION_180:
accelX = -event.values[0];
accelY = -event.values[1];
break;
case Surface.ROTATION_270:
accelX = event.values[0];
accelY = -event.values[1];
break;
}
//calculate the ball’s moving distances along x, and y using accelX,
accelY and the time delta
…
}
}
Code Example 4: Considering the Device Orientation When Using the
Accelerometer Data in a Maze Game**
Gyroscope
The gyroscope (or simply gyro) measures the device’s rate of rotation around the x , y, and z axes,
as shown in Table 4. The gyroscope data values can be positive or negative. By looking at the origin
from a position along the positive half of the axis, if the rotation is counterclockwise around the
axis, the value is positive; if the rotation around the axis is clockwise, the value is negative. We can
also determine the direction of a gyroscope value using the “right-hand rule,” illustrated in Figure 4.

14
Figure 4: Using the “right-hand rule” to decide the positive
rotation direction
Table 4: The Gyroscope
Code Example 5 shows how to instantiate a gyroscope.
Sensor Type SensorEvent Data
(rad/s)
Description
Gyroscope TYPE_GYROSCOPE values[0]
values[1]
values[2]
Rotation rate around the
x axis
Rotation rate around the
y axis
Rotation rate around the z
axis
x, y, or z Axis
Positive rotation direction

15
public class SensorDialog extends Dialog implements SensorEventListener {
…
private Sensor mGyro;
private SensorManager mSensorManager;
public SensorDialog(Context context) {
super(context);
mSensorManager =
(SensorManager)context.getSystemService(Context.SENSOR_SERVICE);
mGyro = mSensorManager.getDefaultSensor(Sensor.TYPE_GYROSCOPE);
…
}
Code Example 5: Instantiation of a Gyroscope**
Position Sensors
Many Android tablets support two position sensors: the magnetometer and the proximity sensors.
The magnetometer measures the strengths of the Earth’s magnetic field along the x, y, and z axes,
while the proximity sensor detects the distance of the device from another object.
Magnetometer
The most important usage of the magnetometer (described in Table 5) in Android systems is to
implement the compass.
Table 5: The Magnetometer
Sensor Type SensorEvent
Data (µT)
Description
Magnetometer TYPE_MAGNETIC_FIELD values[0]
values[1]
values[2]
Earth magnetic field
strength along the x axis
Earth magnetic field
strength along the y axis
Earth magnetic field
strength along the z axis
Code Example 6 shows how to instantiate a magnetometer.

16
public class SensorDialog extends Dialog implements SensorEventListener {
…
private Sensor mMagnetometer;
private SensorManager mSensorManager;
public SensorDialog(Context context) {
super(context);
mSensorManager =
(SensorManager)context.getSystemService(Context.SENSOR_SERVICE);
mMagnetometer =
mSensorManager.getDefaultSensor(Sensor.TYPE_MAGNETIC_FIELD);
…
}
Code Example 6: Instantiation of a Magnetometer**
Proximity
The proximity sensor provides the distance between the device and another object. The device can
use it to detect if the device is being held close to the user (see Table 6), thus determining if the
user is on a phone call and turning off the display during the phone call.
Table 6: The Proximity Sensor
Sensor Type SensorEvent
Data
Description
Proximity TYPE_PROXIMITY values[0]
Distance from an object in
cm. Some proximity sensors
only report a Boolean value
to indicate if the object is
close enough.
Code Example 7 shows how to instantiate a proximity sensor.
17
public class SensorDialog extends Dialog implements SensorEventListener {
…
private Sensor mProximity;
private SensorManager mSensorManager;
public SensorDialog(Context context) {
super(context);
mSensorManager =
(SensorManager)context.getSystemService(Context.SENSOR_SERVICE);
mProximity = mSensorManager.getDefaultSensor(Sensor.TYPE_PROXIMITY);
…
}
Code Example 7: Instantiation of a Proximity Sensor**
Environment Sensors
The environment sensors detect and report the device’s ambient environment parameters, such as
light, temperature, pressure, or humidity. The ambient light sensor (ALS) and the pressure sensor
(barometer) are available on many Android tablets.
Ambient Light Sensor (ALS)
The ambient light sensor, described in Table 7, is used by the system to detect the illumination of
the surrounding environment and automatically adjust the screen brightness accordingly.
Table 7: The Ambient Light Sensor
Sensor Type SensorEvent
Data (lx)
Description
ALS TYPE_LIGHT values[0]
The illumination around the
device
Code Example 8 shows how to instantiate the ALS.
18
…
private Sensor mALS;
private SensorManager mSensorManager;
…
mSensorManager =
(SensorManager)context.getSystemService(Context.SENSOR_SERVICE);
mALS = mSensorManager.getDefaultSensor(Sensor.TYPE_LIGHT);
…
Code Example 8: Instantiation of an Ambient Light Sensor**
Barometer
Applications can use the atmospheric pressure sensor (barometer), described in Table 8, to calculate
the altitude of the device’s current location.
Table 8: The Atmosphere Pressure Sensor
Sensor Type SensorEvent
Data (lx)
Description
Barometer TYPE_PRESSURE values[0]
The ambient air pressure in
mbar
Code Example 9 shows how to instantiate the barometer.

19
…
private Sensor mBarometer;
private SensorManager mSensorManager;
…
mSensorManager =
(SensorManager)context.getSystemService(Context.SENSOR_SERVICE);
mBarometer = mSensorManager.getDefaultSensor(Sensor.TYPE_PRESSURE);
…
Code Example 9: Instantiation of a barometer**
Sensor Performance and Optimization Guidelines
To use sensors in your applications, you should follow these best practices:
Always check the specific sensor’s availability before using it
The Android platform does not require the inclusion or exclusion of a specific sensor on the
device. Before using a sensor in your application, always first check to see if it is actually
available.
Always unregister the sensor listeners
If the activity that implements the sensor listener is becoming invisible, or the dialog is
stopping, unregister the sensor listener. It can be done via the activity’s onPause() method,
or in the dialog’s onStop() method. Otherwise, the sensor will continue acquiring data and
as a result drain the battery.
Don’t block the onSensorChanged() method
The onSensorChanged() method is frequently called by the system to report the sensor
data. You should put as little logic inside this method as possible. Complicated calculations
with the sensor data should be moved outside of this method.
Always test your sensor applications on real devices
All sensors described in this section are hardware sensors. The Android Emulator may not
be capable of simulating a particular sensor’s functions and performance.
20
GPS and Location
GPS (Global Positioning System) is a satellite-based system that provides accurate geo-location
information around the world. GPS is available on many Android phones and tablets. In many
perspectives GPS behaves like a position sensor. It can provide accurate location data for
applications running on the device. On the Android platform, GPS is not directly managed by the
sensor framework. Instead, the Android location service accesses and transfers GPS data to an
application through the location listener callbacks.
This section only discusses the GPS and location services from a hardware sensor point of view. The
complete location strategies offered by Android 4.2 and Intel Atom processor-based Android phones
and tablets is a much larger topic and is outside of the scope of this section.
Android Location Services
Using GPS is not the only way to obtain location information on an Android device. The system can
also use Wi-Fi*, cellular networks, or other wireless networks to get the device’s current location.
GPS and wireless networks (including Wi-Fi and cellular networks) act as “location providers” for
Android location services. Table 9 lists the main classes and interfaces used to access Android
location services.
Table 9: The Android Platform Location Service
Name Type Description
LocationManager Class Used to access location services. Provides
various methods for requesting periodic location
updates for an application, or sending proximity
alerts
LocationProvider Abstract class The abstract super class for location providers
Location Class Used by the location providers to encapsulate
geographical data
LocationListener Interface Used to receive location notifications from the
LocationManager
Obtaining GPS Location Updates
Similar to the mechanism of using the sensor framework to access sensor data, the application
implements several callback methods defined in the LocationListener interface to receive GPS
location updates. The LocationManager sends GPS update notifications to the application through
these callbacks (the “Don’t call us, we’ll call you” rule).

21
To access GPS location data in the application, you need to request the fine location access
permission in your Android manifest file (Code Example 10).
<manifest …>
…
<uses-permission android:name="android.permission.ACCESS_FINE_LOCATION" />
…
</manifest>
Code Example 10: Requesting the Fine Location Access Permission in the
Manifest File**
Code Example 11 shows how to get GPS updates and display the latitude and longitude coordinates
on a dialog text view.

22
package com.intel.deviceinfo;
import android.app.Dialog;
import android.content.Context;
import android.location.Location;
import android.location.LocationListener;
import android.location.LocationManager;
import android.os.Bundle;
import android.widget.TextView;
public class GpsDialog extends Dialog implements LocationListener {
TextView mDataTxt;
private LocationManager mLocationManager;
public GpsDialog(Context context) {
super(context);
mLocationManager =
(LocationManager)context.getSystemService(Context.LOCATION_SERVICE);
}
@Override
protected void onCreate(Bundle savedInstanceState) {
super.onCreate(savedInstanceState);
mDataTxt = (TextView) findViewById(R.id.sensorDataTxt);
mDataTxt.setText("...");
setTitle("Gps Data");
}
@Override
protected void onStart() {
super.onStart();
mLocationManager.requestLocationUpdates(
LocationManager.GPS_PROVIDER, 0, 0, this);
}
@Override
protected void onStop() {
super.onStop();
mLocationManager.removeUpdates(this);
}
@Override
public void onStatusChanged(String provider, int status,
Bundle extras) {
}
@Override

23
public void onProviderEnabled(String provider) {
}
@Override
public void onProviderDisabled(String provider) {
}
@Override
public void onLocationChanged(Location location) {
StringBuilder dataStrBuilder = new StringBuilder();
dataStrBuilder.append(String.format("Latitude: %.3f,
Logitude%.3f\n", location.getLatitude(), location.getLongitude()));
mDataTxt.setText(dataStrBuilder.toString());
}
}
Code Example 11: A dialog that Displays the GPS Location Data**
GPS and Location Performance and Optimization Guidelines
GPS provides the most accurate location information on the device. On the other hand, as a
hardware feature, it consumes extra energy. It also takes time for the GPS to get the first location
fix. Here are some guidelines you should follow when developing GPS and location-aware
applications:
Consider all available location providers
In addition to the GPS_PROVIDER, there is NETWORK_PROVIDER. If your applications only
need coarse location data, you may consider using the NETWORK_PROVIDER.
Use the cached locations
It takes time for the GPS to get the first location fix. When your application is waiting for the
GPS to get an accurate location update, you can first use the locations provided by the
LocationManager’s getlastKnownLocation() method to perform part of the work.
Minimize the frequency and duration of location update requests
You should request the location update only when needed and promptly de-register from
the location manager once you no longer need location updates.
Summary
The Android platform provides APIs for developers to access a device’s built-in sensors. These
sensors are capable of providing raw data about the device’s current motion, position, and ambient

24
environment conditions with high precision and accuracy. In developing sensor applications, you
should follow the best practices to improve the performance and power efficiency.
About the Author
Miao Wei is a software engineer in the Intel Software and Services Group. He is
currently working on the Intel® Atom™ processor scale-enabling projects.
Notices
INFORMATION IN THIS DOCUMENT IS PROVIDED IN CONNECTION WITH INTEL PRODUCTS. NO LICENSE,
EXPRESS OR IMPLIED, BY ESTOPPEL OR OTHERWISE, TO ANY INTELLECTUAL PROPERTY RIGHTS IS GRANTED
BY THIS DOCUMENT. EXCEPT AS PROVIDED IN INTEL'S TERMS AND CONDITIONS OF SALE FOR SUCH
PRODUCTS, INTEL ASSUMES NO LIABILITY WHATSOEVER AND INTEL DISCLAIMS ANY EXPRESS OR IMPLIED
WARRANTY, RELATING TO SALE AND/OR USE OF INTEL PRODUCTS INCLUDING LIABILITY OR WARRANTIES
RELATING TO FITNESS FOR A PARTICULAR PURPOSE, MERCHANTABILITY, OR INFRINGEMENT OF ANY
PATENT, COPYRIGHT OR OTHER INTELLECTUAL PROPERTY RIGHT.
UNLESS OTHERWISE AGREED IN WRITING BY INTEL, THE INTEL PRODUCTS ARE NOT DESIGNED NOR
INTENDED FOR ANY APPLICATION IN WHICH THE FAILURE OF THE INTEL PRODUCT COULD CREATE A
SITUATION WHERE PERSONAL INJURY OR DEATH MAY OCCUR.
Intel may make changes to specifications and product descriptions at any time, without notice. Designers must
not rely on the absence or characteristics of any features or instructions marked "reserved" or "undefined."
Intel reserves these for future definition and shall have no responsibility whatsoever for conflicts or
incompatibilities arising from future changes to them. The information here is subject to change without
notice. Do not finalize a design with this information.
The products described in this document may contain design defects or errors known as errata which may
cause the product to deviate from published specifications. Current characterized errata are available on
request.
Contact your local Intel sales office or your distributor to obtain the latest specifications and before placing
your product order.
Copies of documents which have an order number and are referenced in this document, or other Intel
literature, may be obtained by calling 1-800-548-4725, or go to: http://www.intel.com/design/literature.htm
25
Software and workloads used in performance tests may have been optimized for performance only on Intel
microprocessors. Performance tests, such as SYSmark* and MobileMark*, are measured using specific
computer systems, components, software, operations, and functions. Any change to any of those factors may
cause the results to vary. You should consult other information and performance tests to assist you in fully
evaluating your contemplated purchases, including the performance of that product when combined with
other products.
Any software source code reprinted in this document is furnished under a software license and may only be
used or copied in accordance with the terms of that license.
Intel, the Intel logo, and Atom are trademarks of Intel Corporation in the U.S. and/or other countries.
Copyright © 2013 Intel Corporation. All rights reserved.
*Other names and brands may be claimed as the property of others.
Optimization Notice
Intel’s compilers may or may not optimize to the same degree for non-Intel microprocessors for
optimizations that are not unique to Intel microprocessors. These optimizations include SSE2, SSE3,
and SSE3 instruction sets and other optimizations. Intel does not guarantee the availability,
functionality, or effectiveness of any optimization on microprocessors not manufactured by Intel.
Microprocessor-dependent optimizations in this product are intended for use with Intel
microprocessors. Certain optimizations not specific to Intel microarchitecture are reserved for Intel
microprocessors. Please refer to the applicable product User and Reference Guides for more
information regarding the specific instruction sets covered by this notice.
Notice revision #20110804
**This sample source code is released under the Intel Sample Source Code License Agreement